
The BroadWorks Call Center application delivers a comprehensive solution with the sophisticated features and functionality that requiring for a brand range of call centers, alone with the additional benefit of being completely integrated with other BroadWorks Unified Communication (UC)-enabled service. This document serves as an end user guide on how to configure Grandstream GXV33XX Multimedia phones for BroadWorks Call Center features. How to configure BroadWorks Call Center on BroadWorks Application Server is out of the scope of this document.
OVERVIEW OF FUNCTIONS
Grandstream GXV33XX Enterprise Multimedia Phone for Android supports the BroadWorks Call Center feature. The BroadWorks Call Center is a carrier-class, communications management product for Call Center agents and supervisors used with the BroadWorks telephony softswitch platform, on which call centers are hosted. It is designed to support an advanced call center environment where the flexible routing options are needed and the agent’s workflow dictates the need for ACD states, such as Available, Unavailable, Sign-in, Sign-out and Wrap-up. As a BroadWorks Call Center agent phone, GXV33XX device is integrated and support the features, including Call Center Hold Reminder, Hoteling Event, Call Center Status Event, Call Center Disposition Code, Call Center Emergency Escalation and Call Center Customer Originated Trace.
Call Center States and Terminologies
- ACD State – Automatic Call Distribution State. This state is used to determine if the agent can answer the incoming calls to the call center. Both server and agent part can change the state. The ACD state includes Sign-in, Sign-off, Available, Unavailable, and Wrap-up.
- Available State – This is the primary ACD state of an agent during the workday. It indicates that the agent is at their workstation and either ready to take call or on an active call. ACD calls may be delivered to an agent who is in an Available state.
- Unavailable State – In this state, the agent is unavailable to receive ACD calls. This state should be used when the agent is away from their workstation and not available to take calls. Thus, the ACD calls will not deliver to agent. This agent still can receive direct calls.
- Sign-in – The Sign-in state equivalent to a “clock in”, which means the agent is at their work location but not yet ready to accept incoming calls. ACD calls are not delivered to the agent in this state. Sign-in is a transitional state and agents do not remain in this state; rather they transition to their post sign-in state. It is recommended that agents only are in this state between the time they arrive at work and the time they become available to accept calls.
- Sign-out – The Sign-out state is equivalent to a “clock out”, which means the agent’s workdays or shift is completed and they are leaving. ACD calls are not delivered to the agent in this state.
- Wrap-up – The agent is performing post call works. This state is designed to allow the agent to complete paperwork or other post call procedures associated with the last call. ACD calls may delivered to the agent in Wrap-Up state depending on the call center configuration.
- Disposition Codes – Disposition codes are additional attributes that can be applied to the ACD calls to tag calls with comments, results, and so on. More than one disposition code can be assigned to a call.
- Call Trace – The Call Center allows the agent to generate a trace on active, held, released, or missed calls. A call trace contains the following information:
- The phone number of the user who initiated the trace. When the user does not have a phone number, the group phone number and the extension of the user is provided instead.
- The date and time that the call was received.
- The identity (name and number) of the caller.
- Escalate Calls – The method of escalating the calls to the first available agent or the supervisor. Then a three-way conference will be established.
CALL CENTER CONFIGURATION ON GXV PHONES
Configuring the Grandstream GXV33XX Multimedia Phones to work with BroadWorks Call Center feature is straightforward. The first step is to configure the SIP account settings just as you would for a normal SIP account. This SIP user extension is supposed to be joint with a call center. Then enable the BroadWorks Call Center feature for this account. The BroadWorks Call Center settings is under Value-added Service -> BroadSoft Settings -> BroadSoft Call Features of each account of the GXV33XX phones web configuration UI.
Agent Phone
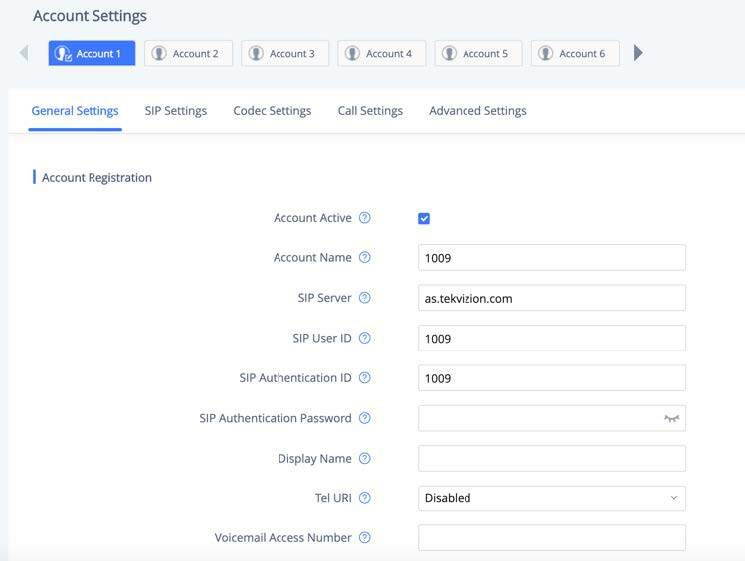
- Configure the SIP Account Settings:
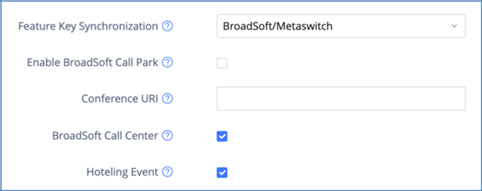
- Enable the BroadSoft Call Center option under Value-added Service -> BroadSoft Settings -> BroadSoft Call Features, as the figure shows below. Make sure that Feature Key Synchronization is set to “BroadSoft/Metaswitch” at the same time. This option is automatically configured when enabling the call center option.

Enter the Call Center Interface
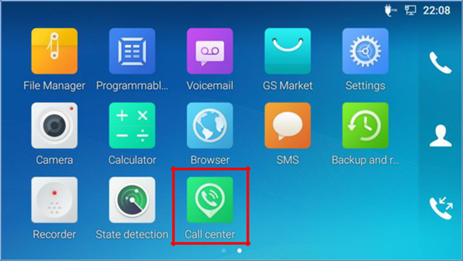
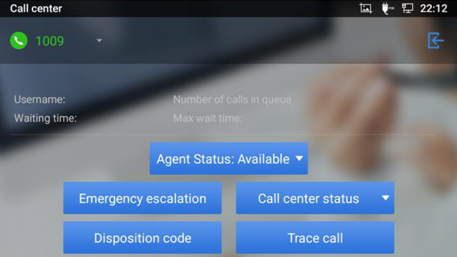
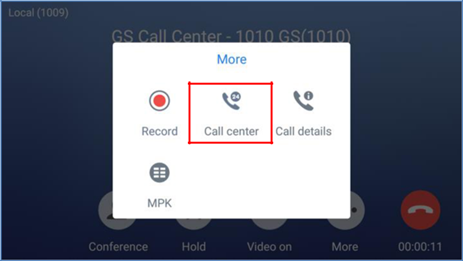
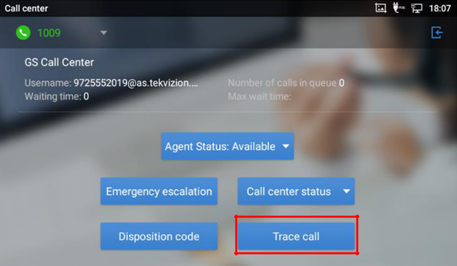
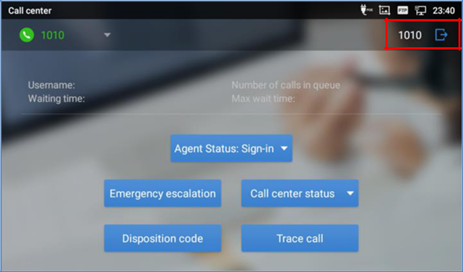
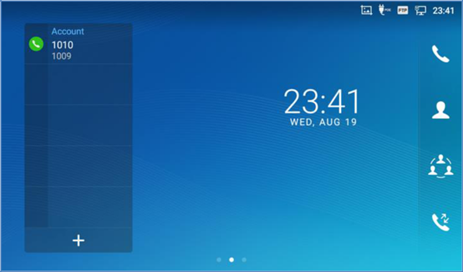
GXV33XX devices provide the same call center feature interfaces. Tap the call center application icon on the application menu to enter the interface. If during a call, tap More on dialer interface and then tap Call Center to enter. The call center interfaces layout the call center feature key icons. Tapping these icons can enable the specified features. The following figures show the GXV33XX’s call center interface.
EXECUTE THE CALL CENTER FEATURES
This chapter will show how to execute the call center features on GXV33XX series products. The following screenshots are based on GXV33XX model.
Change the ACD State
End users can change the call center ACD state via the Agent status icon on the interface. Tapping the icon can enable the state dropdown list. End users can select the ACD state from Sign-in, Available, Unavailable, Wrap-up and Sign-out. Then the phone will synchronize the ACD state with the BroadWorks call center system. On the other hand, if the ACD state is changed from the server side, the GXV phone will also be synchronized to update the state display.

Emergency Escalation
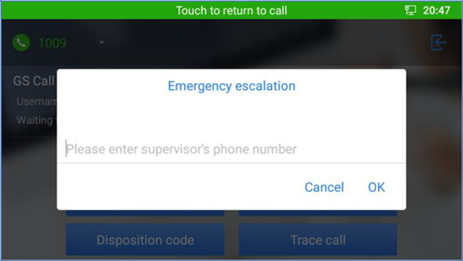
End user can escalate the ACD call to the next available agent or assigned supervisor. The BroadWorks server is supposed to be configured properly. The BroadWorks system allows two kinds of escalation mechanism. One is to specify the supervisor; the other is not to specify the supervisor. GXV33XX phones can implement these two mechanisms in one interface. The following figures show how to implement it.
During an ACD call, end users can enter the call center interface either by tapping More->Call Center in dialing page, or by tapping the Call Center icon on application page.

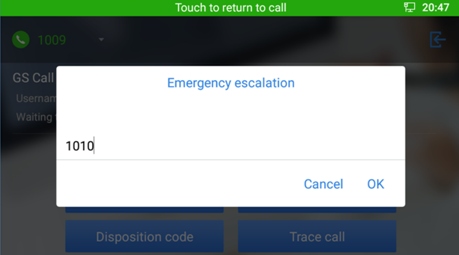
After entering the call center interface, tap the Emergency Escalation icon to trigger the interface below. If the end user fills in the supervisor’s phone number in the box, the phone will include the phone number in the SIP INVITE message to enable the Emergency Escalation, supervisor specified feature. If the end user leaves it black and press OK key directly, the phone will send the SIP INVITE without any specified supervisor information. This will enable the Emergency Escalation, non-supervisor specified feature. Then, the BroadWorks system will select an available supervisor automatically. Whichever kind of emergency escalation is initiated, a supervisor will be immediately conferenced into the call.
Disposition Codes
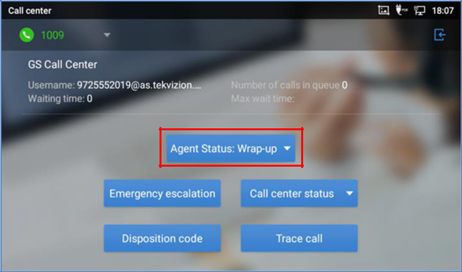
Disposition codes are additional attributes that can be applied to ACD calls to tag calls with comments, results, and so on. More than one disposition code can be assigned to a call. End users can assign disposition codes to the latest released ACD call while in the Wrap-up state.
The following screenshots will show how to tag the disposition codes from GXV33XX.
End users should change the ACD state to the Wrap-Up state first.
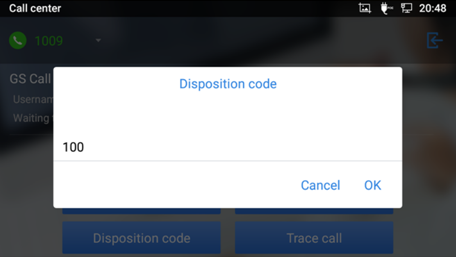
Users could then tap the Disposition Code icon to prompt the disposition code interface and enter the configured disposition code to the phone.
Trace Calls
The BroadWorks provides the capability for the Call Center agent to invoke a customer originated trace during the call or after the call. End users need to tap the Trace Call key to originate the trace. The followings screenshots will show how to originate the call trace on GXV33XX.
No matter which kind of originated trace invoked, during the call or after the call, the end users need to enter the Call Center interface to tap the Trace Call key to trace the call.
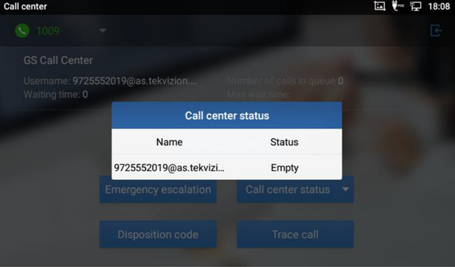
Call Center Information
The BroadWorks provides the capability to support Call Center status information to the phone for Call Centers that the agent has joined. The status information identifies the joint Call Centers and the status for each, such as Empty, Normal, and Threshold Exceeded. This allows the phone to provide a visual indicator to the user for the Call Center status.
The followings screenshots will show how to display the call center status information on GXV33XX.
From the Web GUI, go to the Value-added Service->BroadSoft Settings page to check the Call Center Status box.

From GXV phones, enter the call center interface and tap the Call Center Status key to check the status.
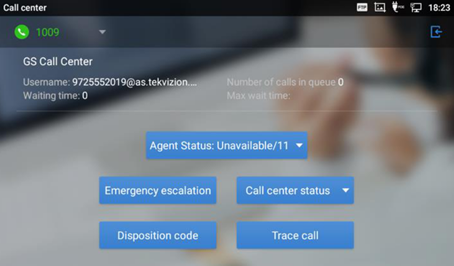
Unavailable Code
The unavailable state should be launched when the agents are away from their workstations and not available to take calls. This state should be used when the agent is at lunch, on a break, in a meeting or engaged in some other activity while they are at work, but unavailable to take calls.
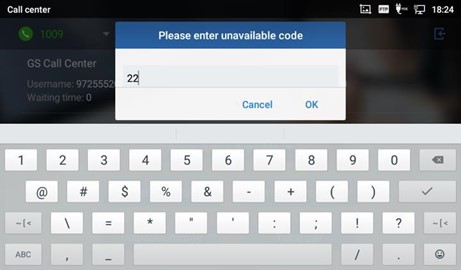
GXV33XX phones can synchronize to display and allow end users to enter BroadWorks configured unavailable codes to notify the call center system. The following figures below will show how to enter and check the unavailable code.
If end users need to check the unavailable code from the phone side, it needs to enter the call center interface. If the code has been entered or synchronized from the system, the phone’s LCD screen should show the following figure. The configured unavailable code 11 is enabled.
If end users need to enter the unavailable code on the phone system, it needs to enter the call center interface and change the agent status to Unavailable. After then, the phone system will pop up a window to enter the unavailable code and tap the OK key to update it to the BroadWorks system. The following figure shows the unavailable code 22 is entered from the phone side.
EXECUTE THE HOTELING FEATURE
An important element of the BroadWorks Call Center solution is the flexibility for an agent to receive calls regardless of their location. This is generally referred to as Hoteling Events.
The hoteling event package provides the capability to synchronize the hoteling guest user address between the phone and BroadWorks. This enables the host phone to display the hoteling guest identity on the phone as well as provides the signaling basis for the phone to allow a hoteling guest login via the phone interface.
This chapter will introduce how to associate and disassociate the host and guest account.
Firstly, the host phone end users need to enter the Phone’s Web UI to check the BroadWorks Call Center Hoteling Event box under the BroadSoft Settings page.
Secondly, the host users can enter the phone’s call center interface to check the association status and execute the accounts’ association or disassociation from the top right corner.
The following screenshots shows where the hoteling feature are located.
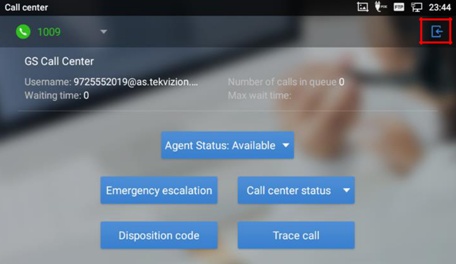
From the interface above, tap the Login key to associate with the guest account, or tap the Logout key to disassociate with the guest account. On the other hand, the phone system can also synchronize the association status with the BroadWorks server.
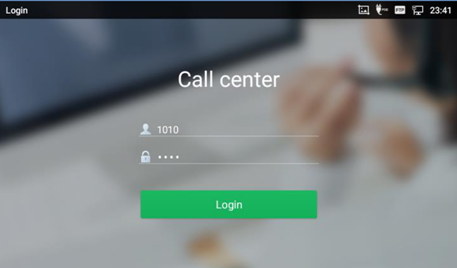
When associating the guest from the phone, there is going to be a prompt page for entering the association credentials. If correct credentials are filled, the phone system will send the association request to the BroadWorks server for association.
After the accounts have been associated, the host phone’s account widget will update to display the guest’s account information immediate.
From now on, all the calls placed from the host phone will display the guest caller ID from the remote side. At the same time, all the incoming calls to the guest phone account will be forwarded to the host phone. It will last until the accounts are disassociated.
*Android is a trademark of Google LLC.