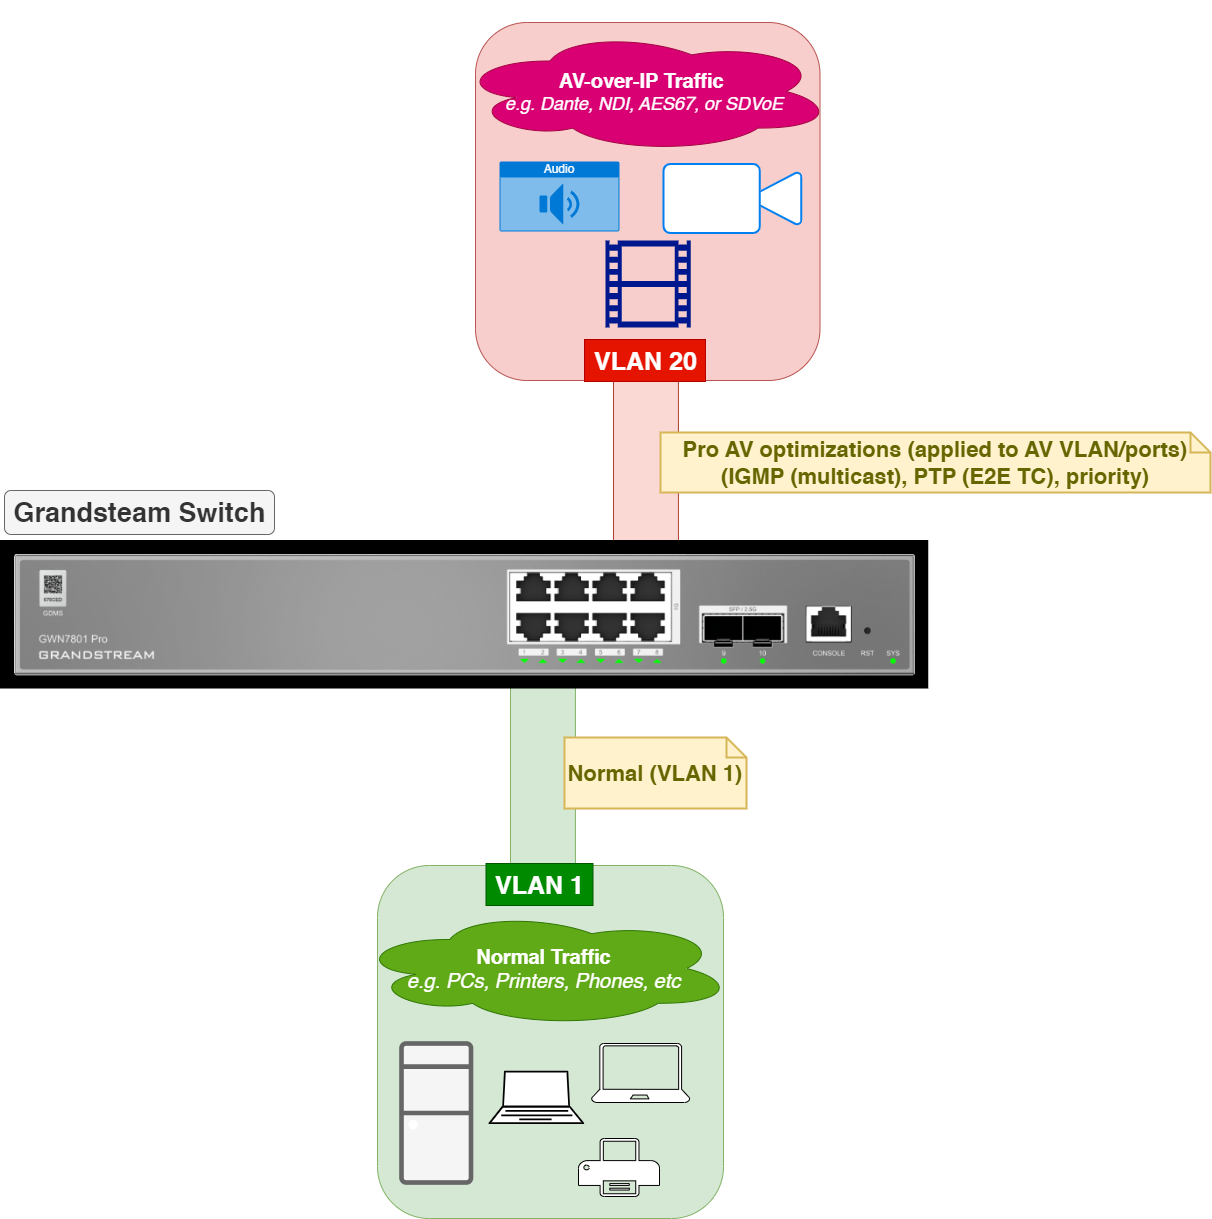
Overview
Pro AV is a feature that simplifies configuring a switch for professional audiovisual (AV-over-IP) deployments. These networks often carry continuous, high-bandwidth streams and commonly use multicast for discovery and distribution. Some deployments may also require PTP timing for synchronization. Without proper segmentation and multicast control, issues such as unstable streams, dropouts, stutter, or multicast flooding can occur.
Pro AV organizes configuration into Templates and Configured Profiles. Templates let you choose a built-in AV scenario (such as Dante, NDI, or AES67) or create a custom one. A configured profile then applies the selected template to a VLAN and assigns the required ports as tagged or untagged members. Depending on the design, the profile can also enable VLAN routing and DHCP for that VLAN.
Benefits
- Faster setup using Templates and Configured Profiles instead of manual repetition
- Cleaner segmentation by deploying a dedicated VLAN for media endpoints
- Easier multicast and timing-focused deployments when required
- More consistent room/site deployments and simpler troubleshooting through clear port assignment
Supported Devices
Pro AV is supported on the following models:
Series | Supported Models |
GWN780x Pro | GWN7801P Pro, GWN7802P Pro, GWN7803 Pro, GWN7803PL Pro, GWN7803PH Pro, GWN7806PL Pro, GWN7806PH Pro |
Supported Devices
Pro AV Configuration
Pro AV configuration consists of two steps: select or create a Template, then create a Configured Profile to apply it to ports.
Templates
Templates define the AV scenario you want to use. You can select a built-in template (AES67, Dante, NDI, etc.) or create a custom template to standardize your own deployment settings.
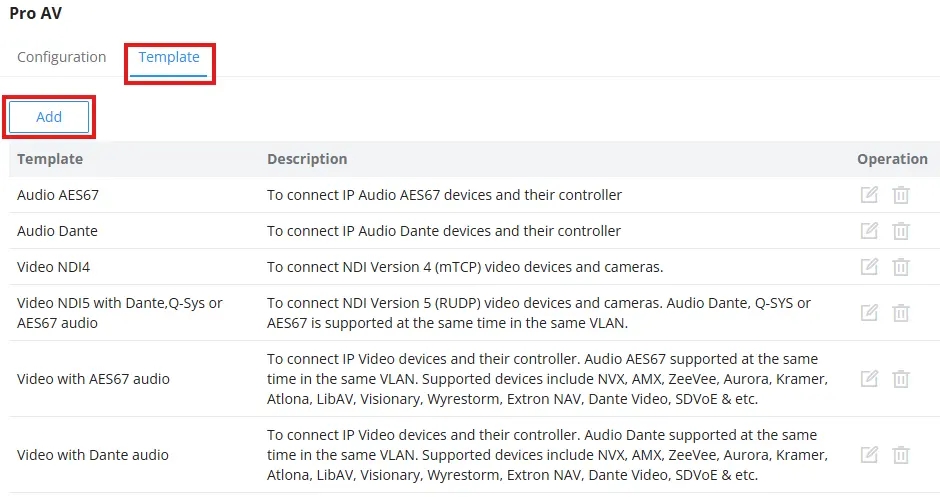
To create a custom template
- Go to Pro AV → Template.
- Click Add.
- Enter a Template name and Description that clearly identify the intended use (for example, Conference Room).
- Configure the options:
- Multicast: Recommended for most AV-over-IP deployments. Enable when your system uses multicast discovery and/or multicast streams. Disabling it in a multicast environment may increase unnecessary traffic and affect performance.
- E2E TC: Enable when the deployment uses PTP (IEEE 1588) for synchronization. This allows the switch to operate as an End-to-End Transparent Clock, helping maintain accurate timing across the AV VLAN so endpoints stay in sync.
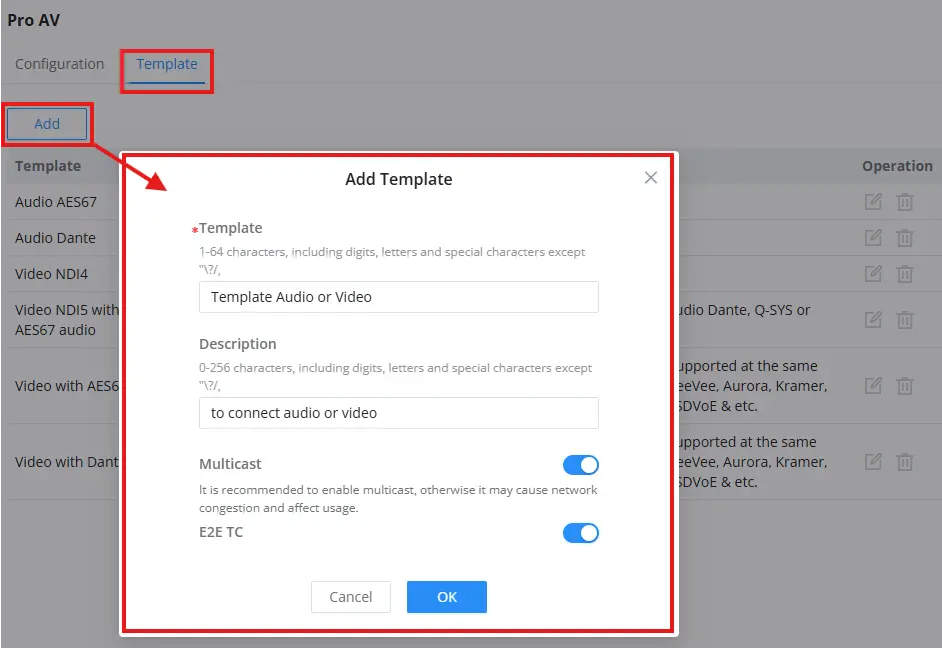
Once created, the template will be available to select when creating a configured profile.
Configured Profiles
A configured profile is the deployment unit in Pro AV. It applies the selected template to a VLAN and assigns the chosen ports and/or LAGs as tagged or untagged members. If enabled, the profile can also configure VLAN routing, the VLAN IP interface, and DHCP settings.
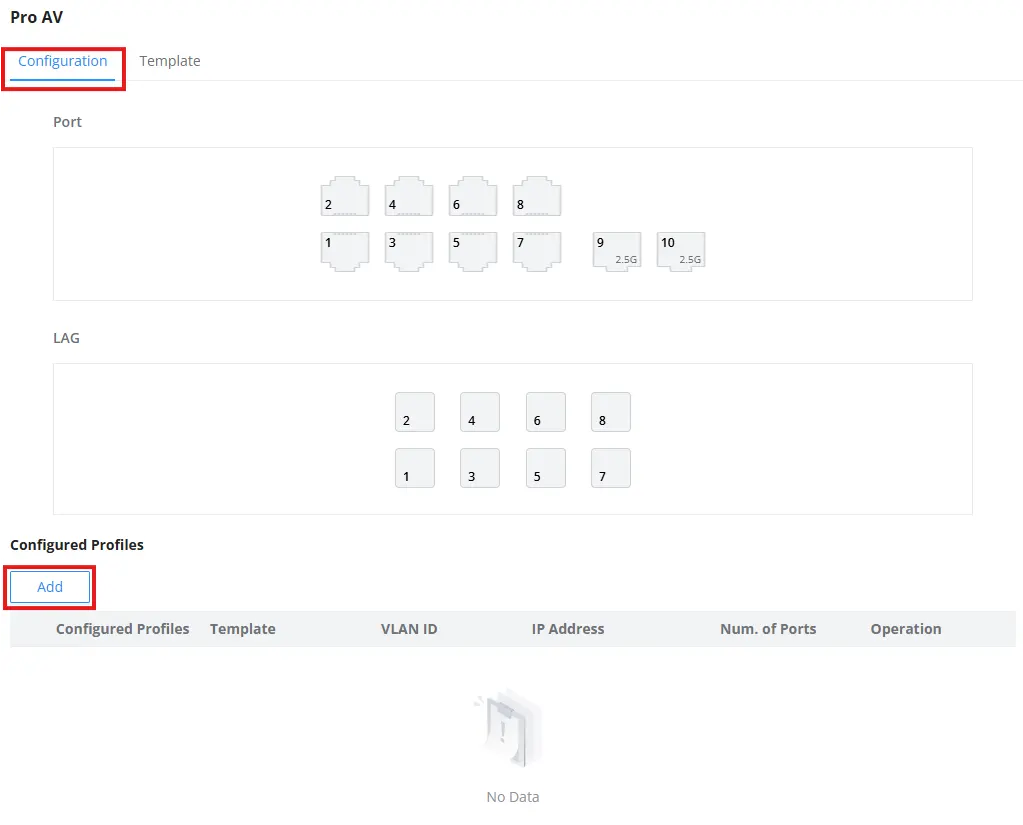
To create a configured profile:
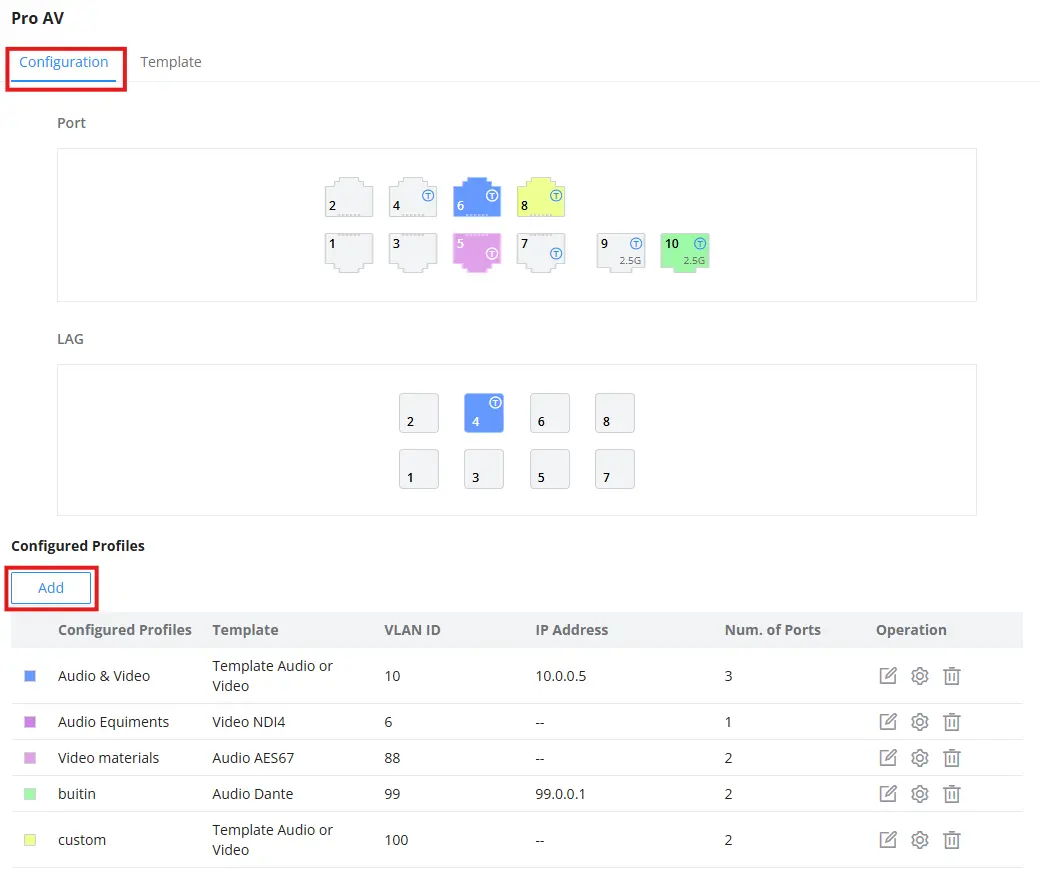
- Go to Pro AV → Configuration.
- In Configured Profiles, click Add.
Select ports membership (Tagged/Untagged)
Use the Member Type control and port/LAG clicks to decide how ports participate in the profile VLAN.
- Untagged is typically used for endpoints that should land in one VLAN without tagging.
- Tagged is typically used for uplinks/trunks or links that must carry multiple VLANs.
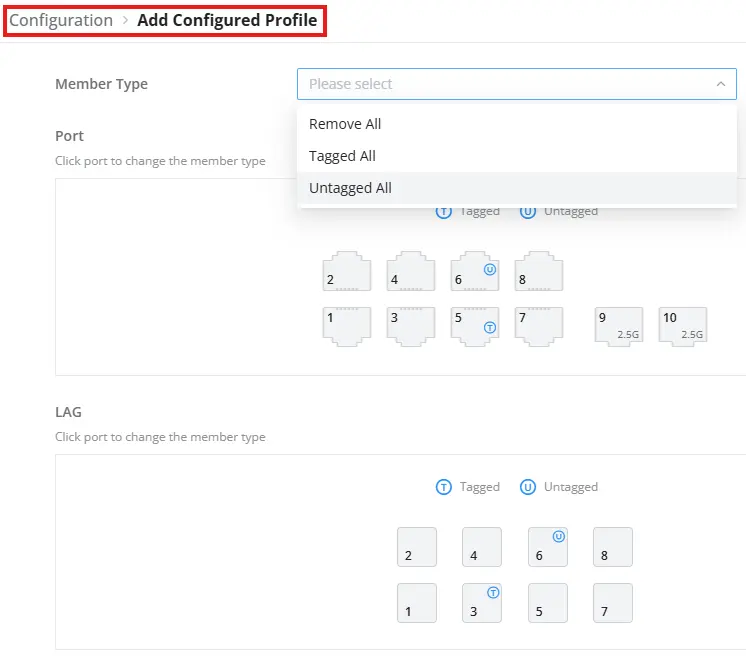
Configure the profile settings
Configure the profile settings in the Add Configured Profile form. Refer to the field descriptions below:
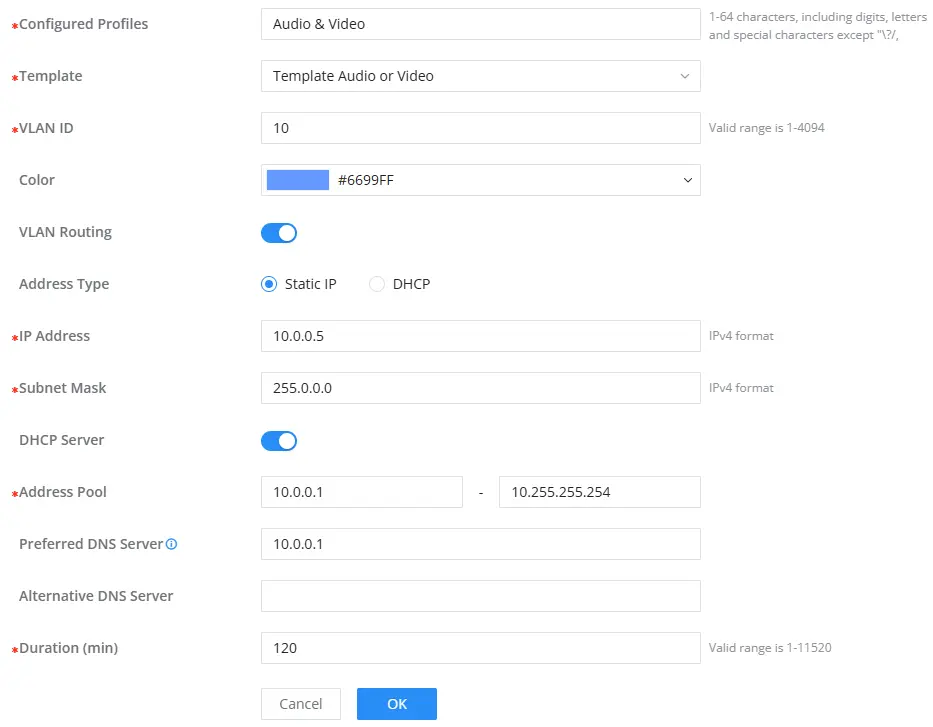
Use the table below while completing the profile form:
Field | Description |
Configured Profiles | Name of this configured profile. Use a clear label that identifies the room/system (e.g., “Conference Room AV”), so it’s easy to find later. |
Template | Select the built-in or custom Pro AV template to apply (defines the intended AV behavior for this profile). |
VLAN ID | VLAN number for this AV segment (1–4094). When you save, the switch creates/updates this VLAN and applies the selected port/LAG membership. |
Color | Shown only on Untagged ports to indicate the port’s PVID for this profile. Use it to tell different PVIDs apart. Tagged ports are marked with “T”. |
VLAN Routing | Enables Layer 3 routing for this VLAN on the switch (the switch acts as the VLAN’s gateway). Enable only if this VLAN must route to other networks. |
Address Type | How the VLAN interface obtains its IPv4 address when VLAN Routing is enabled: Static IP (manual gateway) or DHCP (learned address). |
IP Address | Required for Static IP. IPv4 address assigned to the VLAN interface (gateway address for clients in this VLAN). |
Subnet Mask | Required for Static IP. Subnet mask for the VLAN interface address. |
DHCP Server | Enables the switch’s DHCP server for this VLAN (clients can automatically receive IP settings). |
Address Pool | Required when DHCP Server is enabled. Start and end IP range the switch will lease to clients in this VLAN. |
Preferred DNS Server | Primary DNS server provided to DHCP clients (optional but recommended when DHCP Server is enabled). |
Alternative DNS Server | Secondary DNS server provided to DHCP clients (optional). |
Duration (min) | DHCP lease duration in minutes (how long a client keeps its assigned address before renewal). |
Configure the profile settings
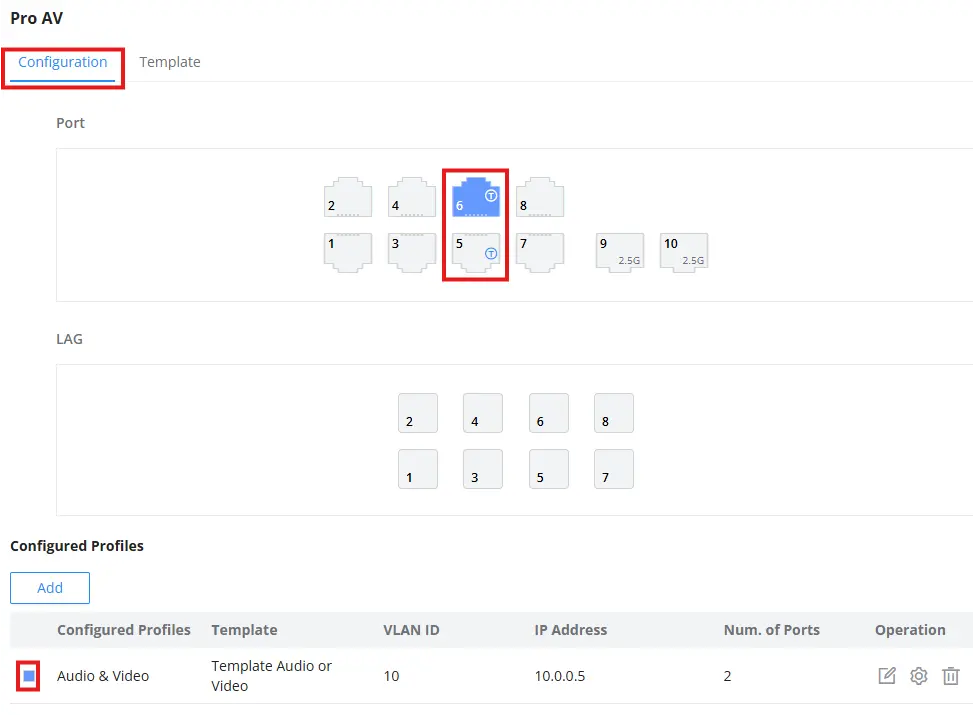
Confirm the profile is applied
After you save the configured profile, it appears in the Configured Profiles table and the selected ports are highlighted using the profile color. If you create additional profiles, the table lists multiple profiles and the port diagram shows multiple colors to indicate which ports belong to each profile.
Optional verification
This section is optional. No additional configuration is required after you save the profile. The examples below show where the applied settings appear in other menus.
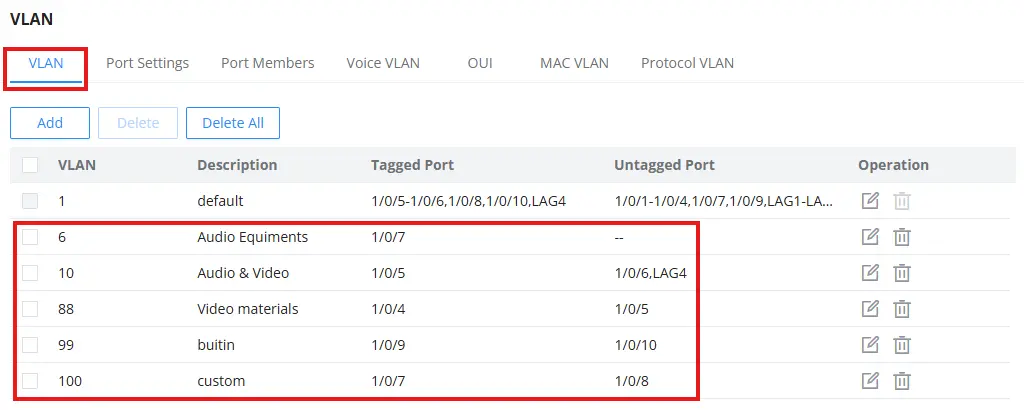
VLAN membership (example)
Verify that the VLAN ID configured in the profile appears in the VLAN list. Confirm that the selected ports and/or LAGs are listed as Tagged or Untagged members, matching what you assigned in Pro AV.
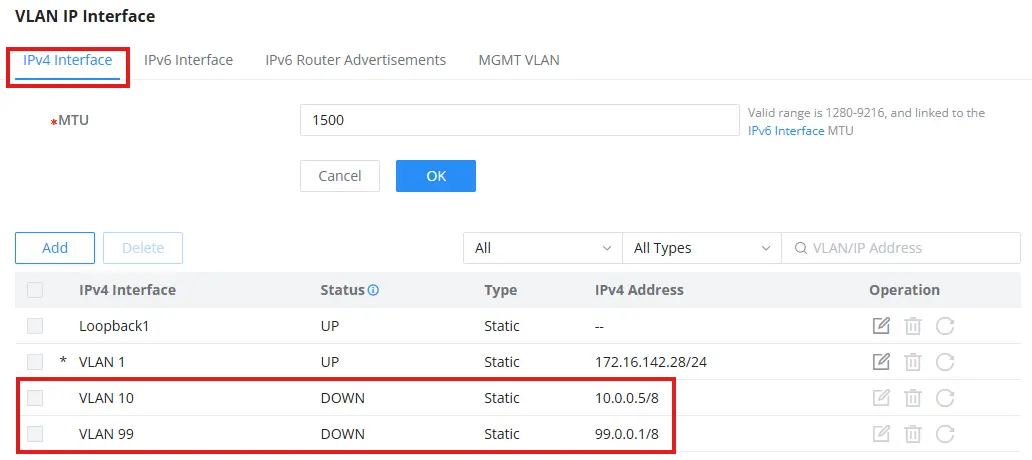
VLAN IP Interface (example)
This entry appears only if VLAN Routing is enabled in the profile. Verify that the VLAN interface exists and that its address settings match what you configured (Static IP or DHCP).
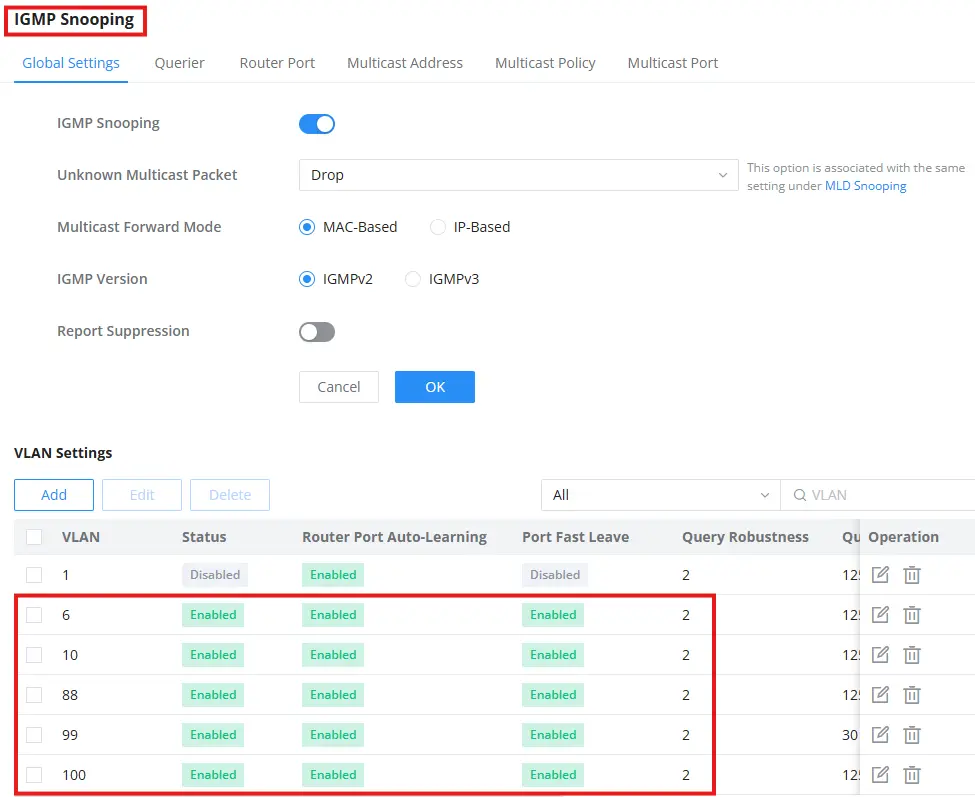
IGMP Snooping (example)
For multicast deployments, the VLAN may appear under IGMP Snooping settings. This reflects how the switch manages multicast forwarding behavior for that VLAN.