
SIP trunks are a VoIP service that can be provided from an ITSP (Internet Telephony Service Provider) to extend telephony features beyond IPPBX local area. SIP trunks can carry voice calls, video calls, instant messages, multimedia conferences, and other SIP-based, real-time communications services.
Using SIP trunks helps to reduce call rates especially when making long distance calls, since VoIP providers can offer better calling rates compared to local ISP using analog lines.
UCM6xxx series support two types of SIP trunks: “Register SIP trunks”, mainly used to connect with provider’s trunk and “Peer trunks”, that can be used to interconnect multiple IP-PBXs. UCM6xxx series support up to 200 SIP trunks.
This guide describes needed configuration to set up register trunk (with provider) and peer trunk (between two UCM6xxx).
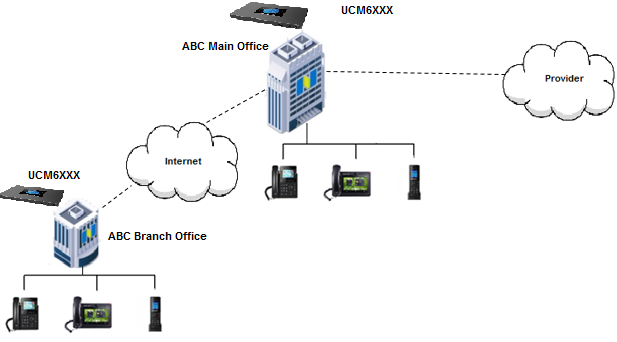
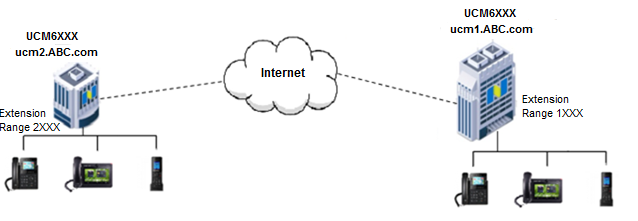
The figure above shows a typical scenario using two UCM6xxx between main and branch offices (connected via peer trunk), and main office UCM6xxx connected to provider via register SIP trunk.
Register SIP Trunks
In this guide, we will take company ABC as example. The company has purchased two SIP trunks, the first one will be used for International calls, while the second will be used of national ones.
The ITSP provider gave following trunk information to the company ABC in order to register their trunks.
SIP Trunk Information | Value |
SIP Trunk 1 | |
Provider address | sip.provider.com |
Username | 0655441000 |
Authenticate ID | 0655441000 |
Password | admin123 |
Main number | 0655441000 |
Provided DIDs | 0655441001 / 0655441002 / 0655441003 / 0655441004 / 0655441005 / 0655441006 / 0655441007 / 0655441008 / 0655441009 / 0655441010 |
SIP Trunk 2 | |
Provider address | sip.provider.com |
Username | 0655441100 |
Authenticate ID | 0655441100 |
Password | admin123 |
Main number | 0655441100 |
Provided DIDs | 0655441101 / 0655441102 / 0655441103 / 0655441104 / 0655441105 / 0655441106 / 0655441107 / 0655441108 / 0655441109 / 0655441110 |
Setup considerations:
- Extensions range on UCM6xxx in main office is 1000 – 1999.
- Dialing to international numbers should be prefixed with 99 with no size limits.
- National numbers start with 06 with 10-digit length.
Configuration
Below steps to configure SIP Trunk 1 on Main office UCM6xxx. Same steps apply to configure Trunk 2.
- Access UCM6xxx web GUI 🡪 Extension / Trunk 🡪 VoIP Trunks.
-
Click on
 , in the following screenshot type in Trunk 1 credentials:
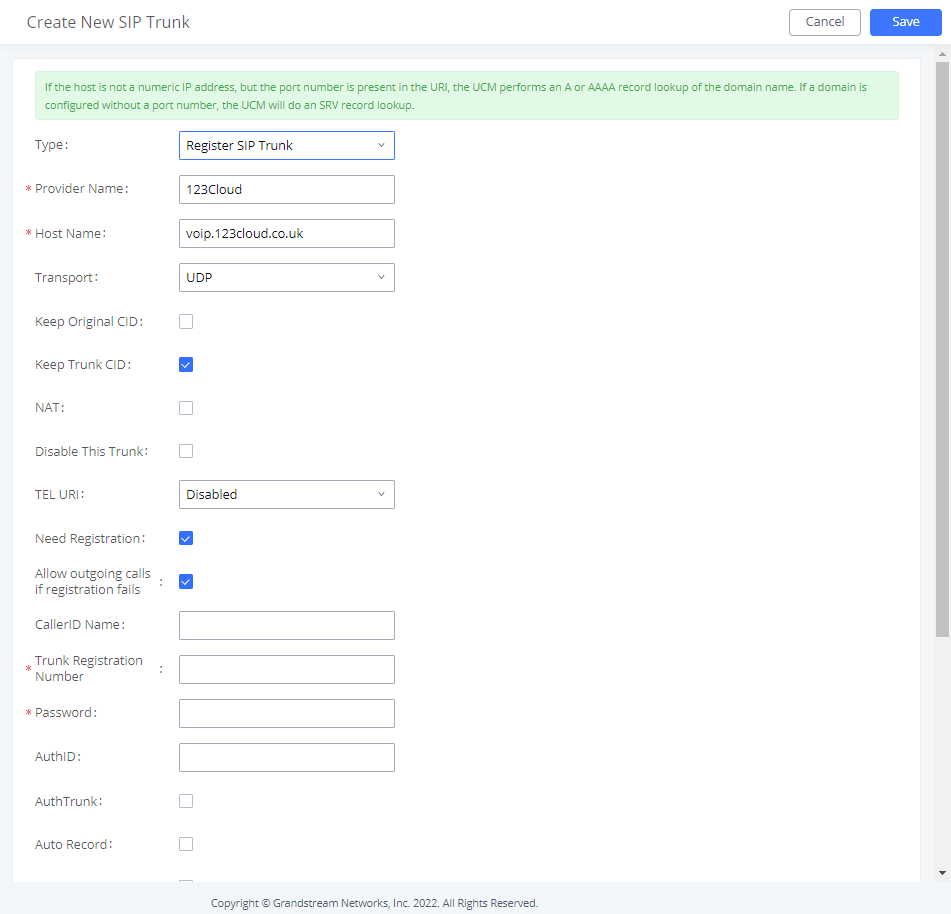
- Select “Register SIP Trunk” as Type.
- Type in a reference name for Provider Name. For example: “Provider_1”.
- Enter provider’s FQDN/IP address in Host Name field. In this example: “sip.provider.com”.
- Enter Username to register to the provider. In this example: “0655441000”.
- Enter Authenticate ID to register to the provider. In this example: “0655441000”.
- Enter Password associated with username. In this example: “admin123”.
-
Click
 and
and
 to store and apply the configuration.
Above steps describe basic configuration needed to register a SIP trunk. Depending on providers, users may need to adjust their settings to successfully register a SIP trunk.
The table below describes main parameters available for Register SIP Trunks:
Basic Settings | |
Provider Name | Configure a unique label to identify this trunk when listed in outbound rules, inbound rules, etc. |
Host Name | Configure the IP address or URL for the VoIP provider’s server of the trunk. |
Transport | Configure the SIP transport protocol to be used in this trunk. The default setting is "UDP".
|
Auto Record | If enabled, calls handled with this extension/trunk will automatically be recorded. Note: |
Keep Original CID | Keep the CID from the inbound call when dialing out. This setting will override the “Keep Trunk CID” option. Please make sure that the peer PBX at the other side supports to match user entry using the “username” field from the authentication line. |
Keep Trunk CID | If enabled, the trunk CID will not be overridden by the extension’s CID when the extension has CID configured. The default setting is “No”. |
NAT | Turn on this option when the PBX is using public IP and communicating with devices behind NAT. If there is a one-way audio issue, usually it is related to NAT configuration or SIP/RTP port configuration on the firewall. |
Disable This Trunk | If selected, the trunk will be disabled. Note: If a current SIP trunk is disabled, UCM will send UNREGISTER message (REGISTER message with expires=0) to the SIP provider. |
TEL URI | If the trunk has an assigned PSTN telephone number, this field should be set to "User=Phone". Then a "User=Phone" parameter will be attached to the Request-Line and TO header in the SIP request to indicate the E.164 number. If set to "Enable", "Tel:" will be used instead of "SIP:" in the SIP request. The default setting is disabled. |
Need Registration | Select whether the trunk needs to register on the external server or not when the "Register SIP Trunk" type is selected. The default setting is No. |
Allow outgoing calls if registration failure | If enabled outgoing calls even if the registration to this trunk fails will still be able to go through. Note that if we uncheck the “Need Registration” option, this option will be ignored. |
CallerID Name | Configure the new name of the caller when the extension has no CallerID Name configured. |
From Domain | Configure the actual domain name where the extension comes from. This can be used to override the “From” Header. For example, "trunk.UCM630X.provider.com" is the From Domain in From Header: sip:1234567@trunk.UCM630X.provider.com. |
From User | Configure the actual username of the extension. This can be used to override the “From” Header. There are cases where there is a single ID for registration (single trunk) with multiple DIDs. For example, "1234567" is the From User in From Header: sip:1234567@trunk.UCM630X.provider.com. |
Username | Enter the username to register to the trunk from the provider when the "Register SIP Trunk" type is selected. |
Password | Enter the password to register to the trunk when "Register SIP Trunk" is selected. |
Auth ID | Enter the Authentication ID for the "Register SIP Trunk" type. |
Auth Trunk | If enabled, the UCM will send a 401 response to the incoming call to authenticate the trunk. |
Auto Record | Enable automatic recording for the calls using this trunk (for SIP trunk only). The default setting is disabled. The recording files can be accessed under Web GUI🡲CDR🡲Recording Files. |
RemoteConnect Mode | If enabled, the RemoteConnect related parameters will be set synchronously. Please make the trunk host is allocated by GDMS or it supports TLS. |
Direct Callback | Allows external numbers the option to get directed to the extension that last called them. For Example, User 2002 has dialed external number |
Enable Concurrent Call Alert | If enabled, the "Trunk Concurrent Calls" system event will monitor the number of concurrent calls in this trunk. When the number of concurrent calls in a certain period exceeds the set threshold, an alarm message will be generated. Note: Please turn on the alert for the "Trunk Concurrent Calls" event first. |
Two-way Concurrent Calls Threshold | Threshold of all incoming and outgoing concurrent calls through this trunk. |
Outgoing Concurrent Calls Threshold | Threshold of all outgoing concurrent calls passing through this trunk. |
Incoming Concurrent Calls Threshold | Threshold of all incoming concurrent calls passing through this trunk. |
Advanced Settings | |
Codec Preference | Select audio and video codec for the VoIP trunk. The available codecs are: PCMU, PCMA, GSM, AAL2-G. |
Send PPI Header | If enabled, the SIP INVITE message sent to the trunk will contain PPI (P-Preferred-Identity) header. The default setting is “No”. Note: “Send PPI Header” and “Send PAI Header” cannot be enabled at the same time. Only one of the two headers can be contained in the SIP INVITE message. |
PPI Mode |
|
Send PAI Header | If enabled, the SIP INVITE message sent to the trunk will contain PAI (P-Asserted-Identity) header including configured PAI Header. The default setting is “No”. Note: “Send PPI Header” and “Send PAI Header” cannot be enabled at the same time. Only one of the two headers can be contained in the SIP INVITE message. |
PAI Header | If “Send PAI Header” is enabled and “PAI Header” is configured as “123456” for instance, the PAI header in the SIP message sent from the UCM will contain “123456”. If “Send PAI Header” is enabled and “PAI Header” is configured as “empty”, the PAI header in the SIP message sent from the UCM will contain the original CID. Note: “Send PAI Header” needs to be enabled to use this feature |
Send Anonymous | If checked, the "From" header in the outgoing INVITE message will be set to anonymous. |
DOD As From Name | If enabled and "From User" is configured, the INVITE's From header will contain the DOD number. Note: |
Passthrough PAI Header | If checked and the option "Send PAI Header" is not checked, the PAI header will be passthrough from one side to the other side. |
Send PANI Header | If checked, the INVITE and REGISTER sent to the trunk will contain the P-Access-Network-Info header. |
Access Network Info | The access network information is in the P-Access-Network-Info header. |
Send Anonymous | If checked, the "From" header in the outgoing INVITE message will be set to anonymous. |
Outbound Proxy Support | Select to enable outbound proxy in this trunk. The default setting is "No". |
Outbound Proxy | When outbound proxy support is enabled, enter the IP address or URL of the outbound proxy. |
Remove OBP from Route | It is used to set if the phone system will remove outbound proxy URI from the route header. If is set to “Yes”, it will remove the route header from SIP requests. The default setting is “No”. |
DID Mode | Configure where to get the destination ID of an incoming SIP call, from SIP Request-line or To-header. The default is set to "Request-line". |
GIN Registration | If enabled, the UCM will send a GIN REGISTER (generate implicit numbers). |
DTMF Mode | Configure the default DTMF mode when sending DTMF on this trunk.
|
Enable Heartbeat Detection | If enabled, the UCM630X will regularly send SIP OPTIONS to the device to check if the device is still online. The default setting is "No". |
Heartbeat Frequency | When the "Enable Heartbeat Detection" option is set to "Yes", configure the interval (in seconds) of the SIP OPTIONS message sent to the device to check if the device is still online. The default setting is 60 seconds. |
The Maximum Number of Call Lines | The maximum number of concurrent calls using the trunk. The default setting is 0, which means no limit. |
Packet Loss Retransmission | Configure to enable Packet Loss Retransmission. |
Audio FEC | Configure to enable Forward Error Correction (FEC) for audio. |
Video FEC | Configure to enable Forward Error Correction (FEC) for video. |
ICE support | Toggles ICE support. For peer trunks, ICE support will need to be enabled on the other end. |
TURN Relay | Enable TURN Relay This option will allow using TURN servers for media NAT traversal. This option will also be prioritized if ICE Support is already enabled. |
FECC | Configure to enable Far-end Camera Control |
SRTP | Enable SRTP for the VoIP trunk. The default setting is "No". |
SRTP Crypto Suite | The following encryption protocols can be used to encrypt an RTP stream.
|
Enable T.38 UDPTL | Enable or disable T.38 UDPTL support. |
STIR/SHAKEN | Configure this feature to prevent call spoofing, robocalls and spam calls.
|
CC Settings | |
Enable CC | If enabled, the system will automatically alert the user when a called party is available, given that a previous call to that party failed for some reason. |
CC Max Agents | Configure the maximum number of CCSS agents which may be allocated for this channel. In other words, this number serves as the maximum number of CC requests this channel is allowed to make. The minimum value is 1. |
CC Max Monitors | Configure the maximum number of monitor structures that may be created for this device. In other words, this number tells how many callers may request CC services for a specific device at one time. The minimum value is 1. |
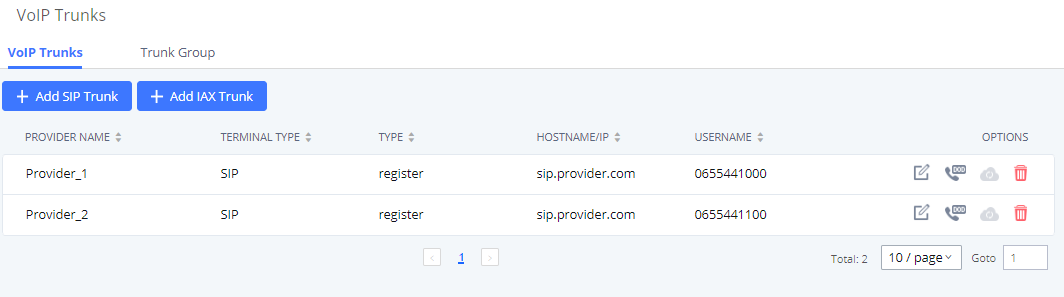
After saving the new VoIP trunk, it will be displayed under Web UI 🡪 Extension / Trunk 🡪 VoIP Trunks as shown below. Press ![]() to edit trunk settings if needed.
to edit trunk settings if needed.
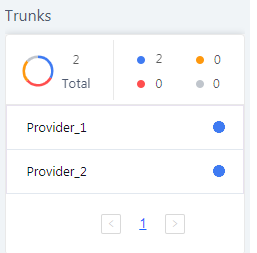
Once the trunk has been created, users can check its registration status under System Status 🡪 Dashboard page.
DID/DOD Configuration
Direct Inward Dialing (DID)
DID (Direct Inward Dialing) is a service provided by the ITSP to subscribers using IP-PBX, adding possibility to route incoming calls to a specific DID to a specific extension. Using DIDs, it will allow extensions to be reachable from outside directly without going through main office number.
In this example, following DIDs have been provided with first trunk “Provider_1”: 0655441000 / 0655441001 / 0655441002 / 0655441003 / 0655441004 / 0655441005 / 0655441006 / 0655441007 / 0655441008 / 0655441009 / 0655441010.
Company wants to redirect incoming calls to specific extensions using provided DIDs.
UCM6xxx in main office is using extensions range: 1000 – 1999.
Following configuration can be done to achieve this:
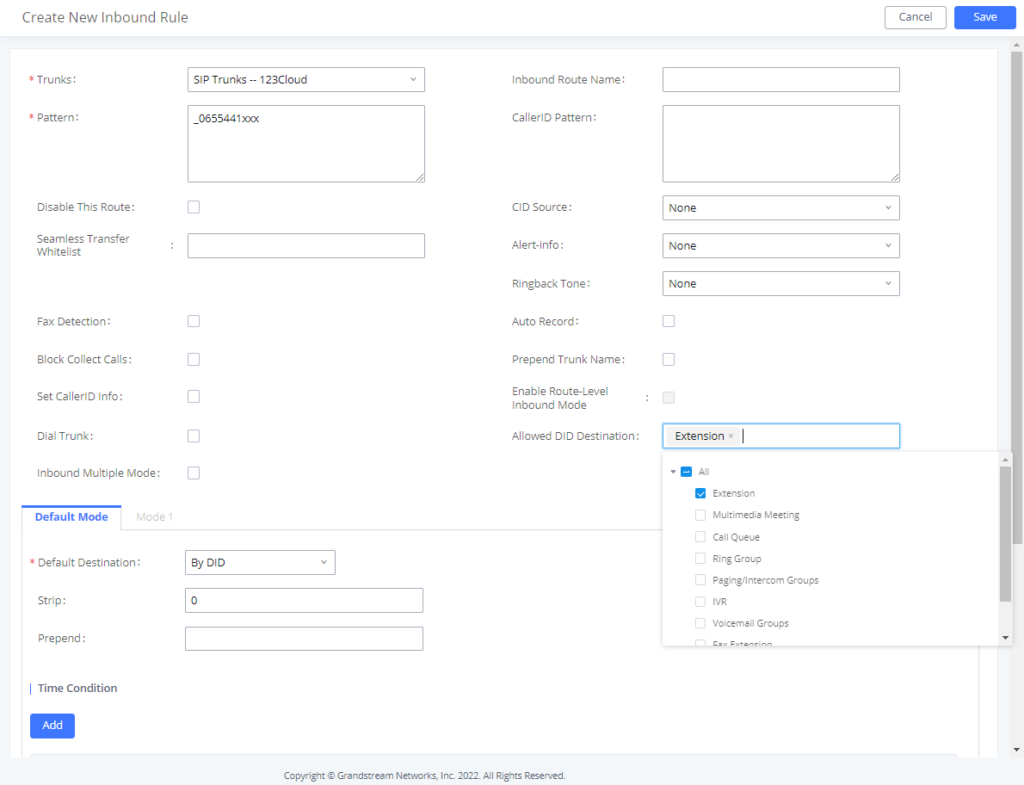
- Access UCM6xxx Web UI 🡪 Extension/Trunk 🡪 Inbound Routes. Select “Trunk 1” and press “Add” button.
- In DID Pattern field, enter “_0655441XXX”.
- Configure ByDID as Default Destination and check “Extension” in “DID Destination” options.
- Configure Strip field. In this example: Strip=6 to remove first 6 digits from incoming number and keep last 4 digits. If call is coming to 0655441007, UCM6xxx will strip 065544 and keep 1007.
-
Click
and
to apply configuration.
Direct Outward Dialing (DOD)
The UCM6xxx provides Direct Outward Dialing (DOD) which is a service of a local phone that allows extensions within a company ABC’s UCM to connect to outside lines directly.
We will use Company’s ABC trunk 0655441000 with 11 DIDs associated to it. At the moment when a user makes an outbound call their caller ID shows up as the main office number which is 0655441000. This create a problem as the CEO would like that his calls to comes from his direct line. This can be accomplished by configuring DOD for the CEO’s extension. Other group member also can benefit from DOD to have their own line showed when making calls.
Steps on how to configure DOD on the UCM6xxx:
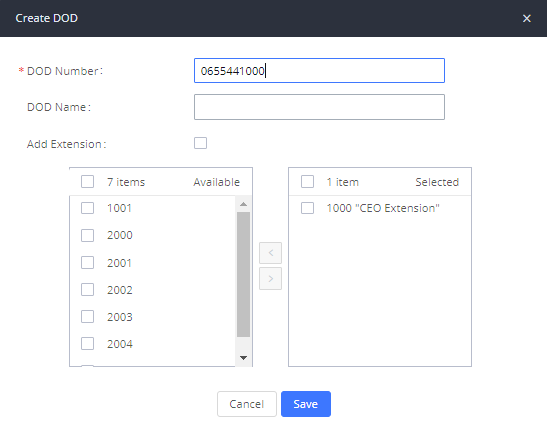
- To setup DOD go to UCM6xxx Web UI 🡪 Extension/Trunk 🡪 VoIP Trunks page.
- Click
 to access the DOD options for the selected SIP Trunk.
 - Click “+ Add DOD” to begin your DOD setup.
- For “DOD Number“, enter one of the numbers (DIDs) from your SIP trunk provider. In this example, we will enter in the number for the CEO’s direct line (0655441000).
- Enter a name for the DOD in the “DOD Name“.
- If extension number need to be appended to the DID number click on “Add Extension”.
- Select an extension from the “Available Extensions” list. Users have the option of selecting more than one extension. In this case, we would select the CEO’s extension. After making the selection, click on the
 button to move the extension(s) to the “Selected Extensions” list.
 - Click and to apply configuration.
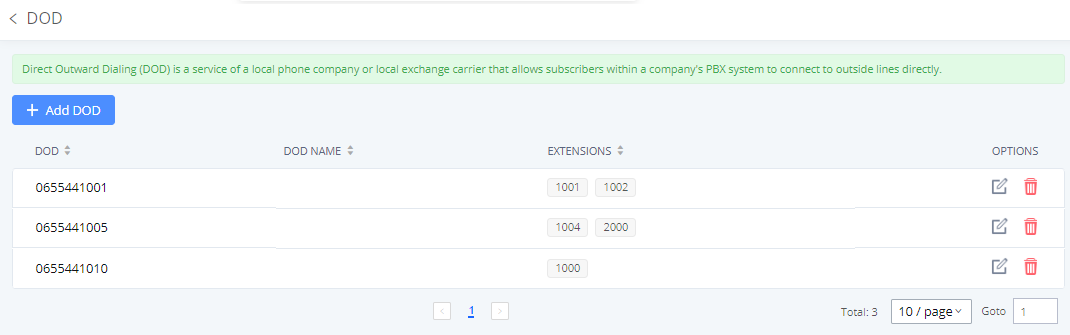
Users can press “Edit DOD” to check/add/delete extensions that are associated to a particular DOD.
Create Outbound/Inbound Routes
In this section we will give an example of creating Outbound and Inbound Rules for trunk 1 “Provider_1” to allow receiving incoming calls and to be redirected to IVR and to allow outgoing calls to be made.
Create Inbound Routes
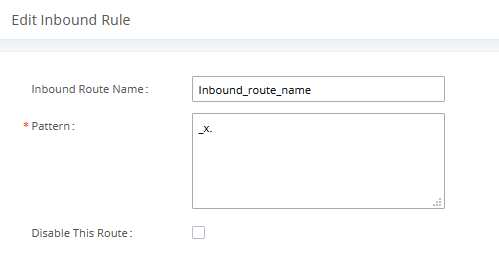
- Access UCM6xxx Web UI 🡪 Extension/Trunk 🡪 Inbound Routes. Select “Trunk 1” and press “+ Add”.
- In DID Pattern field, enter “_X.”. This allows all incoming calls to be received.
- Set IVR as Default Destination. (Assuming IVR is pre-configured).
-
Click
and
to apply configuration.

Create Outbound Routes
- Go to Web UI 🡪 Extension/Trunk 🡪 Outbound Routes.
- Click on “+ Add” button to create a new outbound route.
- Enter the Calling Rule Name, Pattern and choose “Provider_1” in Use Trunk.
In below figure, we set “Pattern” to “_06XXXXXXXX” to allow only dialed numbers with leading 06 and 10-digit length to be accepted. Extensions with privilege “Internal” or higher can use this route/trunk.
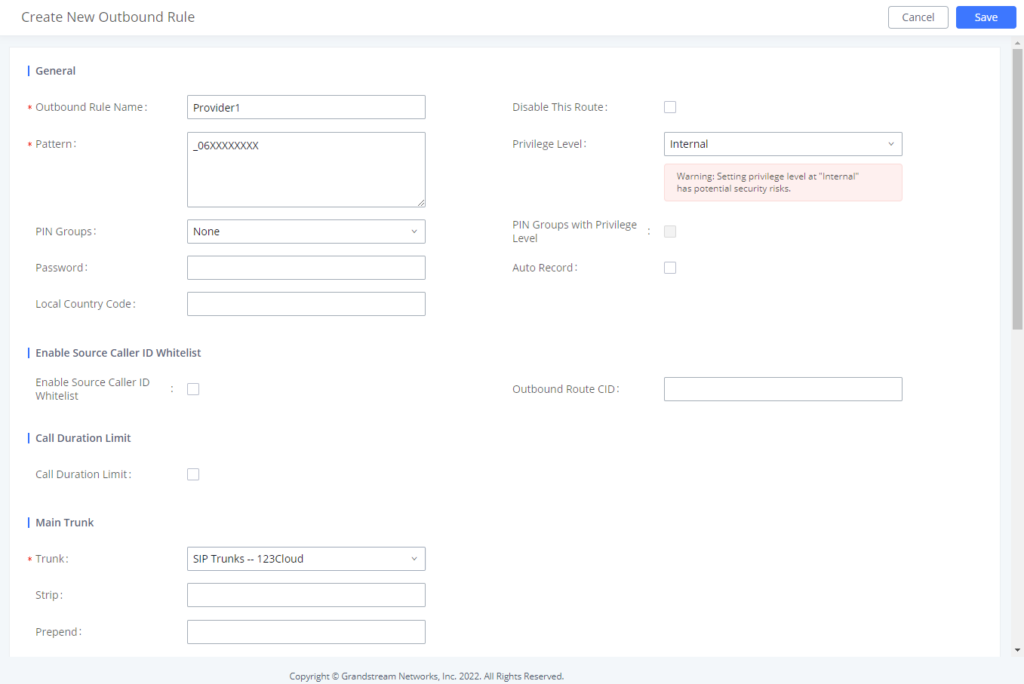
Another outbound route should be set using “Provider_2” with following parameters:
- Pattern: “_99X.” (to allow only dialed numbers with leading 99 to be authorized).
- Privilege: International for instance.
- Strip: “2” (to remove prefix 99 before calling out).
To dial international numbers such as 0016175669300, users need to have privilege “International” in used extension and dial 990016175669300.
Peer Trunk
In this chapter, we will consider that company ABC has a branch office equipped with UCM6xxx, and they want to be able to communicate between the two offices.
Assuming following:
- Both UCM6xxxs have public IP addresses.
- Or both UCM6xxx are on the same LAN/VPN using private or public IP addresses.
- Or both UCM6xxx can be connected through a router using public or private IP addresses (with necessary port forwarding or DMZ).
- UCM6xxx in main office is using extensions range 1XXX, while UCM6xxx in branch office is using extensions range 2XXX.
Configuration
Following steps need to be done on both UCM6xxx in both locations:
- Access UCM6xxx’s web GUI 🡪 Extension / Trunk 🡪 VoIP Trunks.
-
Click on
, and enter following parameters:
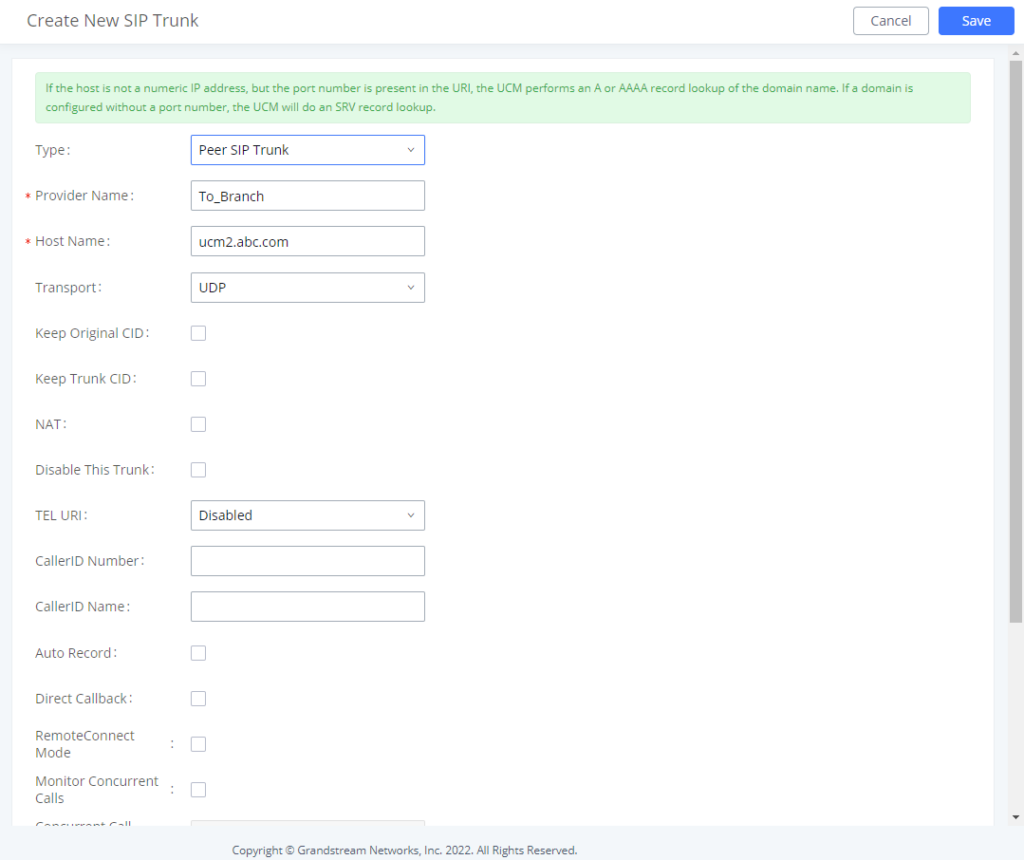
- Select “Peer SIP Trunk” for Type.
- Enter a reference name. In this example: toBranch.
- In Host Name field, enter the IP address/domain of the other UCM6xxx. In this case “ucm2.abd.com” is the domain name of the branch office.
-
Click
and
to apply configuration.
The tables below describe basic and advanced parameters available for PEER trunks:
| Field | Description |
|---|---|
Provider Name | Configure a unique label to identify the trunk when listed in outbound rules and incoming rules. |
Host Name | Enter the IP address or hostname of the VoIP provider’s server. |
Transport | Configure the SIP Transport method. Using TCP requires local TCP support; using TLS requires local TLS support. |
Auto Record | Enable automatic recording for the calls using this trunk (for SIP trunk only). The default setting is disabled. The recording files can be accessed under web GUI->CDR->Recording Files |
Keep Original CID | Keep the CID from the inbound call when dialing out. This setting will override “Keep Trunk CID” option. Please make sure that the peer PBX at the other side supports to match user entry using “username” field from authentication line.
|
If enabled, the trunk CID will not be overridden by extension’s CID when the extension has CID configured. The default setting is “No”.
| |
NAT | Turn on this setting when the PBX is using public IP and communicating with devices behind NAT. If there is one-way audio issue, usually it is related to NAT configuration or SIP/RTP port support on the firewall. |
Disable This Trunk | If checked, the trunk will be disabled. Note: If a current SIP trunk is disabled, UCM will send UNREGISTER message (REGISTER message with expires=0) to the SIP provider. |
TEL URI | If the trunk has an assigned PSTN telephone number, this field should be set to “User=Phone”. Then a “User=Phone” parameter will be attached to the Request-Line and TO header in the SIP request to indicate the E.164 number. If set to “Enable”, “Tel:” will be used instead of “SIP:” in the SIP request. The default setting is disabled.
|
Configure the Caller ID. This is the number that the trunk will try to use when making outbound calls. For some providers, it might not be possible to set the CallerID with this option and this option will be ignored. Important Note: When making outgoing calls, the following priority order rule will be used to determine which CallerID will be set before sending out the call :
| |
Caller ID Name | Configure the name of the caller to be displayed when the extension has no CallerID Name configured. Note: This Option needs Keep Trunk CID Feature enabled
From: “GSTest” <sip:2000@ ucm2.abc.com >;tag=f268 |
From Domain | Configure the actual domain where the extension comes from. |
Jitter Buffer (UCM630x/A only) | Select jitter buffer method for temporary accounts such as meeting participants who joined via link.
|
Direct Callback | Allows external numbers the option to get directed to the extension that last called them. |
RemoteConnect Mode (UCM630x/A only) | If enabled, RemoteConnect-related options will be automatically configured. Please confirm the trunk is a GDMS-assigned address or supports TLS. |
Enable Concurrent Call Alert (UCM630x/A only) | If enabled and when the number of concurrent calls exceeds any trunk’s configured concurrent call thresholds, an alarm notification will be generated. Note: Please make sure the system alert event “Trunk Concurrent Calls” is enabled. |
Concurrent Call Threshold (UCM630x/A only) | Threshold of all incoming and outgoing concurrent calls through this trunk. Please enter a value between 1 and 200. |
Outgoing Concurrent Call Threshold (UCM630x/A only) | Threshold of all outgoing concurrent calls passing through this trunk. Please enter a value between 1 and 200. |
Incoming Concurrent Call Threshold (UCM630x/A only) | Threshold of all incoming concurrent calls passing through this trunk. Please enter a value between 1 and 200. |
| Field | Description |
|---|---|
Codec Preference | Select audio and video codec for the VoIP trunk. The available codecs are: PCMU, PCMA, GSM, AAL2-G.726-32, G.726, G.722, G.729, G.723, iLBC, ADPCM, H.264, H.263, H.263p.
|
Send PPI Header | If enabled, the SIP INVITE message sent to the trunk will contain PPI (P-Preferred-Identity) header. The default setting is “No”. Note: “Send PPI Header” and “Send PAI Header” cannot be enabled at the same time. Only one of the two headers is allowed to be contained in the SIP INVITE message. If enabled the SIP header will contain the following: P-Preferred-Identity: sip:2000@ ucm2.abc.com This feature is needed by the provider “some providers use PPI others use PAI” |
Send PAI Header | If enabled, the SIP INVITE message sent to the trunk will contain PAI (PAsserted-Identity) header. The default setting is “No”. Note: “Send PPI Header” and “Send PAI Header” cannot be enabled at the same time. Only one of the two headers is allowed to be contained in the SIP INVITE message. If enabled the SIP header will contain the following: P-Asserted-Identity: sip:2000@ucm2.abc.com This feature is needed by the provider “some providers use PPI others use PAI” |
Passthrough PAI Header | If enabled and “Send PAI Header” is disabled, PAI headers will be preserved as calls pass through the UCM. |
Send PANI Header (UCM630X/A only) | If checked, the INVITE sent to the trunk will contain P-Access-Network-Info header. |
Send Anonymous (UCM630x/A only) | If checked, the “From” header in outgoing INVITE message will be set to anonymous. |
DID Mode | Configure where to get the destination ID of an incoming SIP call, from SIP Request-line or To-header. The default is set to “Request-line”.
|
DTMF Mode | Configure the default DTMF mode when sending DTMF on this trunk.
|
Enable Heartbeat Detection | If enabled the UCM will send regularly SIP OPTIONS to check if the device is online. |
Heartbeat Frequency | When “Enable Heartbeat Detection” option is set to “Yes”, configure the interval (in seconds) of the SIP OPTIONS message sent to the device to check if the device is still online. The default setting is 60 seconds. |
Maximum Number of Call Lines | The maximum number of concurrent calls using the trunk. The default settings 0, which means no limit. |
Packet Loss Retransmission (UCM630x/A only) | Configure to enable Packet Loss Retransmission. |
Audio FEC (UCM630x/A only) | Configure to enable Forward Error Correction (FEC). |
Video FEC (UCM630x/A only) | Enables Video FEC. |
ICE Support (UCM630x only) | Toggles ICE support. For peer trunks, ICE support will need to be enabled on the other end. |
FECC (UCM630x/A only) | Enable for Remote Camera Management. |
SRTP | Enable SRTP for the VoIP trunk. The default setting is “No”.
|
IPVT Mode | Configures the UCM to be used exclusively for IPVT. Warning: This will lock out certain UCM features. |
Sync LDAP Enable | If enabled, the local UCM6xxx will automatically provide and update the local LDAP contacts to the remote UCM6xxx SIP peer trunk. In order to ensure successful synchronization, the remote UCM6xxx peer also needs to enable this option on the SIP peer trunk. The default setting is “No”.
|
Enable T.38 UDPTL (UCM630x/A only) | Enables or disables T.38 UDPTL support. |
STIR/SHAKEN (UCM630x/A only) | Blocks Spam Calls. |
Enable CC | If enabled, the system will automatically alert the user when a called party is available, given that a previous call to that party failed for some reason.
|
After clicking Save, the new VoIP trunk will be displayed under “Web UI 🡪 Extension / Trunk > VoIP Trunks” as shown below.

Press
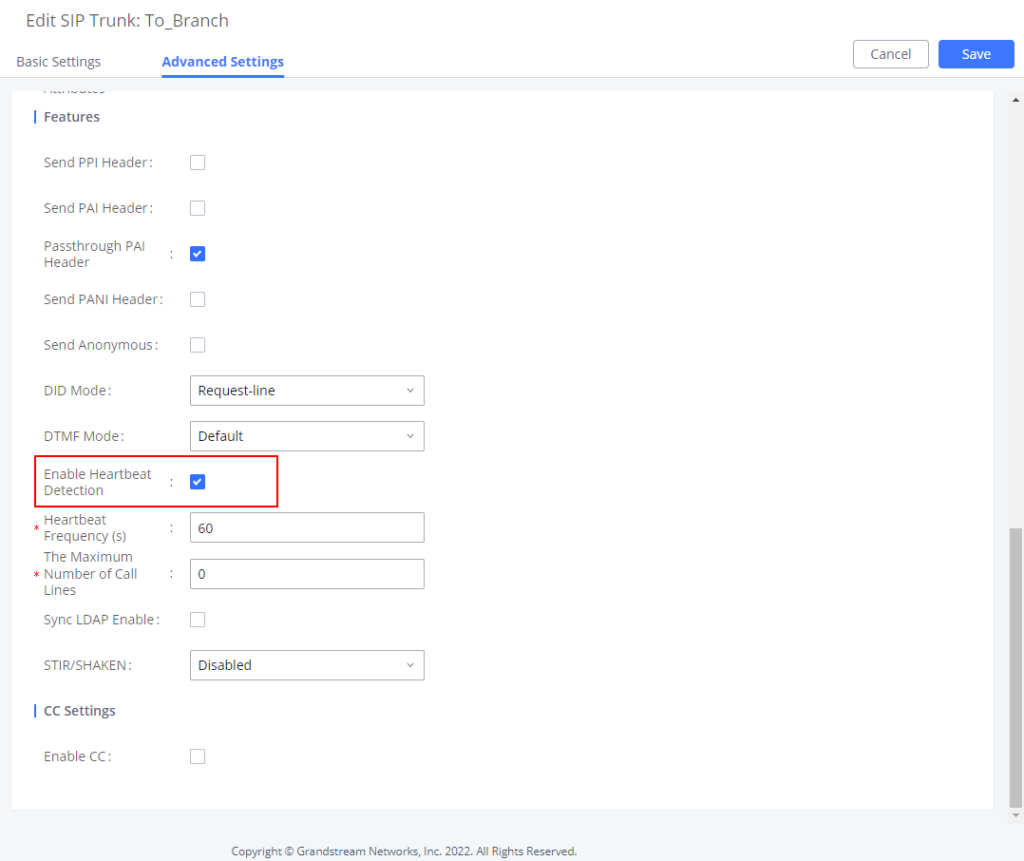
![]() and go to “Advanced Settings”. Check “Enable Heartbeat Detection” option to allow UCM6xxx to monitor the status of each other sending regularly SIP OPTIONS to check if it’s still online.
and go to “Advanced Settings”. Check “Enable Heartbeat Detection” option to allow UCM6xxx to monitor the status of each other sending regularly SIP OPTIONS to check if it’s still online.
Click
![]() and
and
![]() to apply configuration.
to apply configuration.
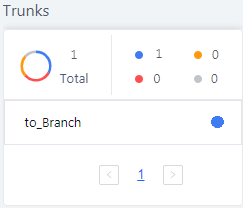
Once the trunk has been created and Enable Heartbeat Detection is set, users can view the status of the peered trunk by navigating to the Status page.
Outbound Routes Configuration
On the main office UCM6xxx web GUI under “Web UI 🡪 Extension/Trunk 🡪 Outbound Routes”, click on
![]() . This would allow the extensions on main office to reach extensions on Branch Office.
. This would allow the extensions on main office to reach extensions on Branch Office.
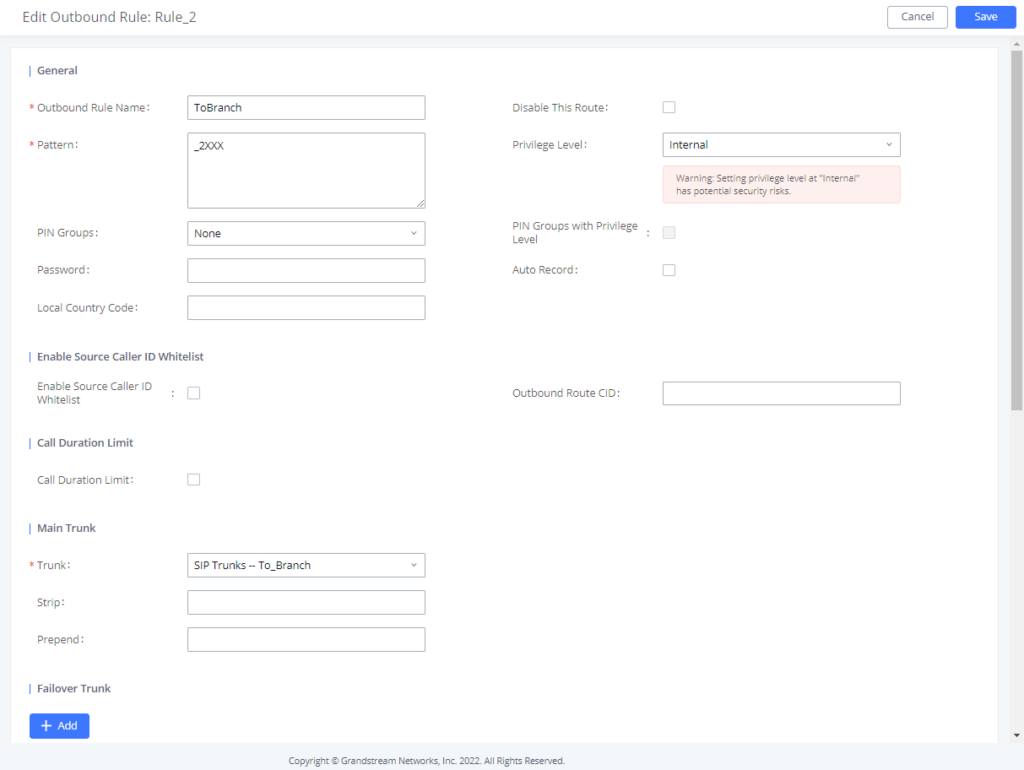
Configure using following parameters:
- Calling Rule Name: This is for reference purposes so we choose to use “toBranch”.
- Pattern: The pattern used in this example is _2XXX since the Branch Office is using extension range 2XXX.
- Privilege Level: Configured as “Internal”. User can change it to another privilege depending on the use case.
- User Trunk: Select the SIP Trunk toBranch.
-
Click on
then
.
In figure 15, the pattern “_2XXX” means that whenever a user on the main office call an extension that starts with 2 and have 4 digits, this trunk will be used for the call.
Inbound Routes Configuration
To create an inbound rule, on the UCM webGUI, under “Web UI 🡪 Extension/trunk 🡪 Inbound Routes” click on
![]() button.
button.
For this example, Main Office UCM6xxx inbound rule needs to be configured so that when an extension on the Branch Office dials, it will be routed to the specified user. Configure using following parameters:
- Trunks: Select the toBranch trunk.
- DID Pattern: Enter in the pattern “_1XXX” | “_2XXX” as shown in below figure.
- DID Destination: By DID.
-
Click on
then
.
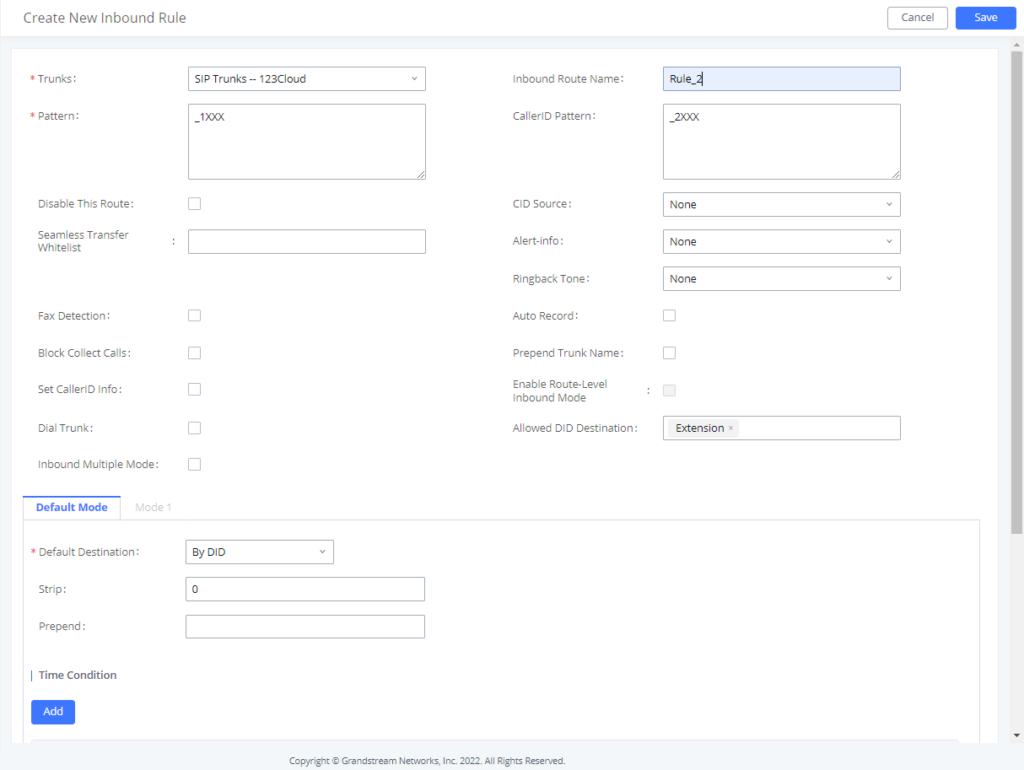
With this inbound rule configured, if the Main Office UCM6xxx receives a call from any extension with a leading 2 and containing 4 digits to any extension with a leading 1 and contains 4 digits it will be redirected by DID to corresponding extension.
Time Condition
Users can set time condition on Inbound/Outbound rules in order to use each route on a specific time.
Supposing that Time Conditions are already set, if more details are needed, please refer to the following guide: https://documentation.grandstream.com/knowledge-base/managing-office-time-holidays/
Users can setup time conditions for trunks by following below steps:
- Access the UCM6xxx Web UI 🡪 Extension / Trunk 🡪 Outbound Routes.
- Navigate to time condition section.
- Select the time condition when to use this trunk. (Office Time in this example)
- Click on “Add” to add the time condition.
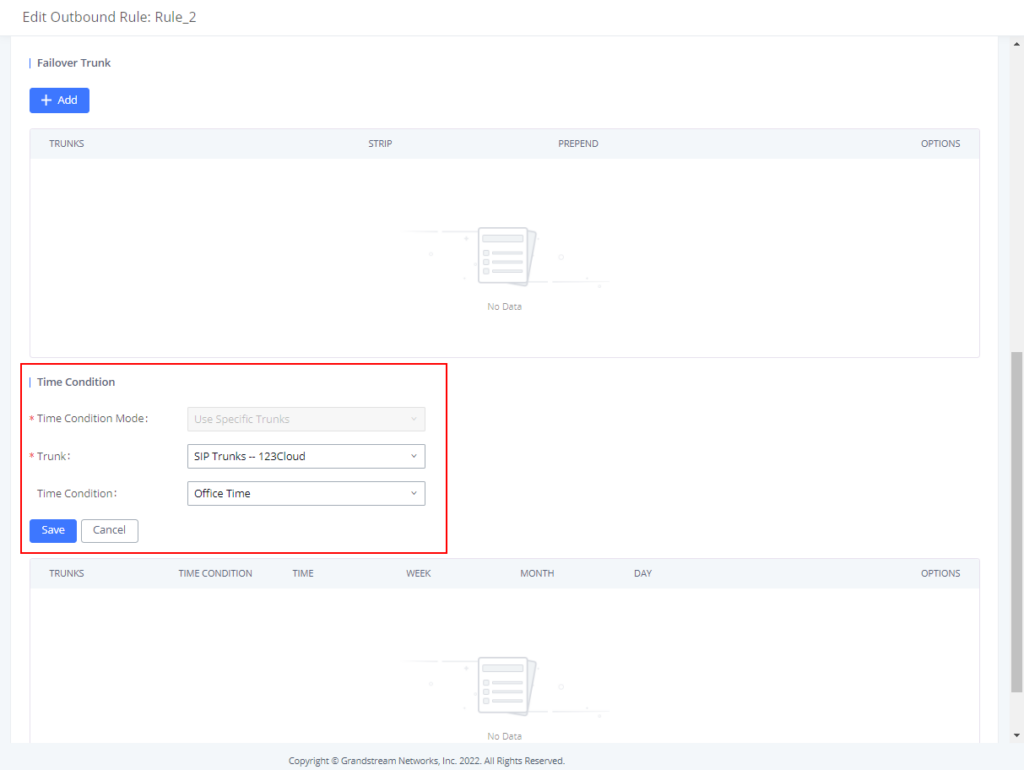
The example above shows that on the Office Time, calls will be made using Provider_1 trunk.

The example above shows that on Out of Office Time, calls will be made using Provider_2 trunk.
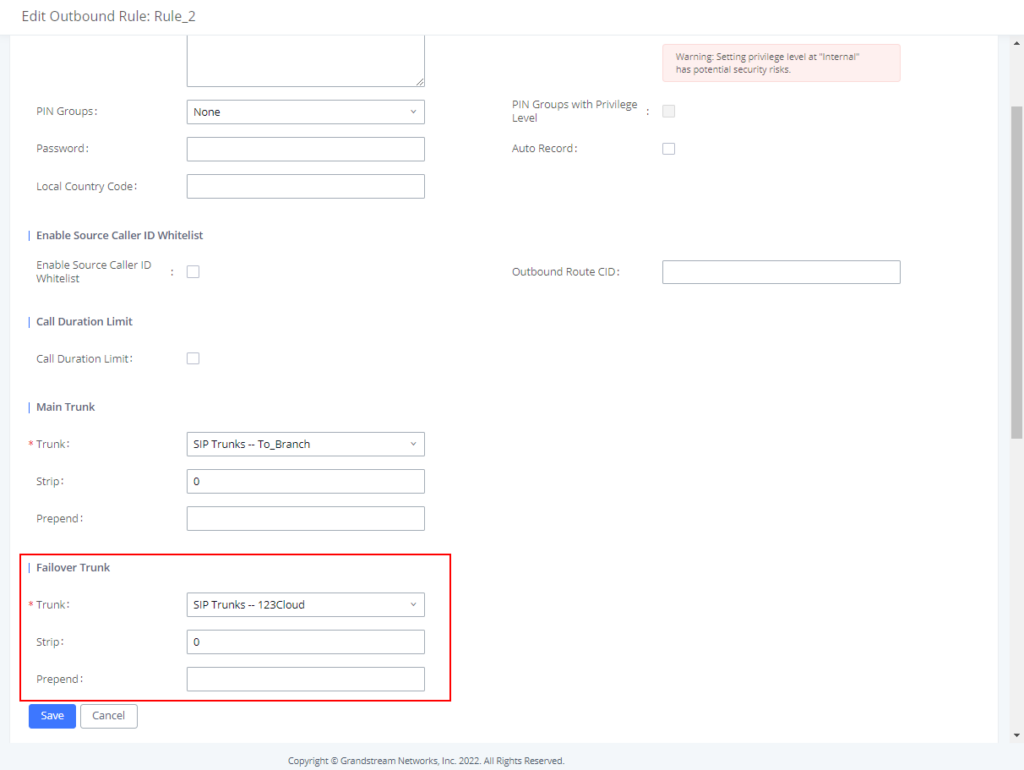
Failover Trunk
Failover trunks can be used to make sure that a call goes through an alternate route, when the primary trunk is busy or down.
UCM6xxx will use Failover trunks in following scenarios:
- No response from first trunk after 32 seconds.
- If UCM6xxx receives 403/407/408/503/603 SIP responses from primary trunk.
- If primary trunk is disabled.
- If primary trunk is an analog trunk and it’s busy or not connected.
Users can setup failover for peer and register trunks by following below steps:
- Go to PBX->Basic/Call Routes->Outbound Routes.
- Click on “Click to add failover trunk”.
- Select then the trunk to be set as failover as shown in the below figure.
- Strip and prepend digits if needed.
Click on
![]() to add another failover trunk.
to add another failover trunk.
Click on
![]()
![]() to arrange the order. If there are multiple trunks set as failovers.
to arrange the order. If there are multiple trunks set as failovers.
Click on
![]() to edit, or
to edit, or
![]() to delete the Trunk from Failover list.
to delete the Trunk from Failover list.