The UCM6xxx support call conferencing which increase employee efficiency and productivity, and also provide more cost-effective way to hold business meetings. A variety of conference call features are offered by UCM6xxx including individual management of conference call activity, multiple conference rooms, conference bridge, and conference schedule.
The UCM6xxx supports conference room allowing multiple rooms used at the same time:
- UCM6202/6204 supports up to 3 conference rooms allowing up to 25 simultaneous PSTN or IP participants.
- UCM6208 supports up to 6 conference rooms allowing up to 32 simultaneous PSTN or IP participants.
- The UCM6510 supports Conference rooms allowing 64 participants with up to 8 bridged rooms at the same time.
This document introduces the conference options, conference configurations including joining, inviting, recording during conference and also including Google Calendar schedule.
Conference Configuration Settings
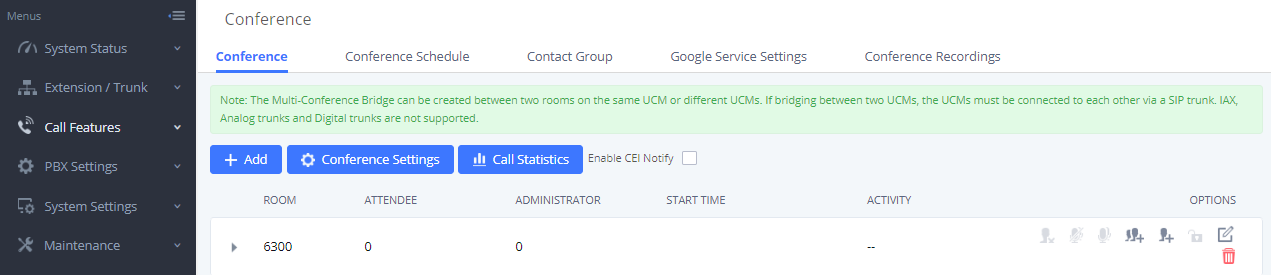
The conference configuration settings are available under Web GUI🡪Call Features🡪Conference or under WEB GUI 🡪 Call Features 🡪 Video Conference to configure video conference room. Allowing users to create, edit, view, invite, manage the participants and delete conference bridges. The conference bridge status and conference call recordings (if recording is enabled) will be displayed under the same web page as well.
Create and Edit audio Conference Rooms
To create, edit or delete the conference rooms please refer to following steps:
- Access the UCM6xxx Web GUI using the administrator username and password.
- Navigate to Call Features🡪Conference.
-
Click on
 to add a new conference bridge as displayed on figure 1 or click on
 to edit the conference bridge.
- Click on
 to delete the conference bridge.

Please refer to following table describing the configuration options available for conference room feature.
Configure Conference settings
Please refer to following steps in order to configure conference settings:
- Access the UCM6xxx Web GUI using the administrator username and password.
- Navigate to Call Features🡪Conference.
- Click on “Conference settings”.
- Configure the DSP Talking/Silence Threshold and enable the talk detection if needed.
The following table describe the conference settings in details:
Configure the conference number for the users to dial into the conference. Note: Up to 64 characters. | |
When configured, the users who would like to join the conference call must enter this password before accessing the conference room. Notes:
| |
Admin Password | Configure the password to join the conference room as administrator. Conference administrator can manage the conference call via IVR (if “Enable Caller Menu” is enabled) as well as invite other parties to join the conference by dialing “0” (permission required from the invited party) or “1” (permission not required from the invited party) during the conference call. Notes:
|
Enable Caller Menu | If enabled, conference participant could press the * key to access the conference room menu. The default setting is “No”. |
Record Conference | If enabled, the calls in this conference room will be recorded automatically in a .wav format file. All the recording files will be displayed and can be downloaded in the conference web page. The default setting is “No”. |
Quiet Mode | If enabled, if there are users joining or leaving the conference, voice prompt or notification tone will not be played. The default setting is “No”. Note: “Quiet Mode” and “Announce Callers” cannot be enabled at the same time. |
If there is only one participant in a conference room, a kick warning prompt will play at the configured interval. If no input from the participant is received after the prompt, he will be automatically kicked out of the conference. The valid range is 1-60 minutes. | |
Wait For Admin | If enabled, the participants will not hear each other until the conference administrator joins the conference. The default setting is “No”. Note: If “Quiet Mode” is enabled, the voice prompt for “Wait For Admin” will not be announced. |
Enable User Invite | If enabled, users could press 0 to invite other users (with the users’ permission) or press 1 to invite other users (without the user’s permission) to join the conference. The default setting is “No”. Note: Conference administrator can always invite other users without enabling this option. |
If enabled, the caller will be announced to all conference participants when there the caller joins the conference. The default setting is “No”. Notes:
| |
Play Hold Music | If enabled, the UCM will play Hold music when there is only one user in the conference. The default setting is “No”. |
Customer Music On Hold | Select the music on hold class to be played in conference call. Music On Hold class can be set up under Web GUI🡪PBX Settings🡪Music On Hold. |
Skip Authentication | If enabled, the invitation from Web GUI for a conference room with password will skip the authentication for the invited users. The default setting is “No”. |
Enable Neteq | If enabled, conference audio quality may improve, but system performance will be lowered. |
Enable Talk Detection | Enables/disables the talk detection, when enabled the AMI will send the corresponding event when a user starts or ends talking. |
DSP Talking Threshold | Configures the time of sound above that the DSP has established as base line silence for a user before is considered to be talking. This value affects several operations and should not be changed unless the impact on call quality is fully understood. The default setting is 128. (Time in milliseconds) |
DSP Silence Threshold | Configures the time of sound above that the DSP has established as base line silence for a user before is considered to be silent. This value affects several operations and should not be changed unless the impact on call quality is fully understood. The default setting is 2500. (Time in milliseconds) |
Join A Conference Call
The UCM6xxx allows users to dial the conference bridge extension to join the conference. If the password is required, users need to enter the password to join the conference as a normal user, or enter the admin password to join the conference as administrator.
Invite Other Parties to Join Conference
When using the UCM6xxx conference bridge, there are two ways to invite other parties to join the conference.
Invite from Web GUI
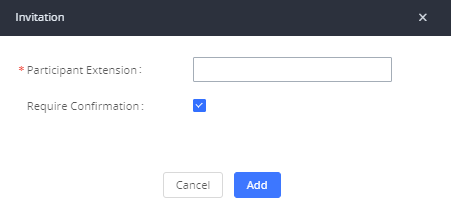
Please refer to following steps in to invite participants to join the conference bridge:
- Access the UCM6xxx Web GUI🡪Call Features🡪Conference.
- Select the conference room to invite participant.
-
Click on the invite icon
 for option “Invite a participant”.
- Enter the number of the party you would like to invite. Then click on “Add“, a call will be sent to this number to join into the conference.
Invite by Dialing 0 or 1 During Conference Call.
A conference participant can invite other parties to the conference by dialing from the phone during the conference call. Please make sure option “Enable User Invite” is turned on for the conference room first. Enter 0 or 1 during the conference call. Follow the voice prompt to input the number of the party you would like to invite. A call will be sent to this number to join it into the conference.
0: If 0 is entered to invite other party, once the invited party picks up the invitation call, a permission will be asked to “accept” or “reject” the invitation before joining the conference.
1: If 1 is entered to invite other party, no permission will be required from the invited party.
Manage the Conference Room
The following steps allow to manage conference rooms using the web GUI or IVR during a conference call.
Manage Conference Call from Web GUI
Access the UCM6xxx web GUI during the conference call, the participants in each conference bridge will be listed.
-
Click on
 to kick a participant from the conference.
-
Click on
 to mute the participant.
-
Click on
 to lock this conference bridge so that other users cannot join it anymore.
-
Click on
to invite other users into the conference bridge.
Manage Conference Call from IVR
If “Enable Caller Menu” is enabled, conference participant can input * to enter the IVR menu for the conference. Please see options listed in the table below.
Conference Administrator IVR Menu | |
1 | Mute/unmute yourself. |
2 | Lock/unlock the conference bridge. |
3 | Kick the last joined user from the conference. |
4 | Decrease the volume of the conference call. |
5 | Decrease your volume. |
6 | Increase the volume of the conference call. |
7 | Increase your volume. |
8 | More options.
|
Conference User IVR Menu | |
1 | Mute/unmute yourself. |
4 | Decrease the volume of the conference call. |
5 | Decrease your volume. |
6 | Increase the volume of the conference call. |
7 | Increase your volume. |
8 | Exit the caller menu and return to the conference. |
Record Conference
The UCM6xxx allows users to record the conference call and retrieve the recording from web GUI🡪Call Features🡪Conference.
To record the conference call, when the conference bridge is in idle, enable “Record Conference” from the conference bridge configuration settings. Save the setting and apply the change.
When the conference call starts, the call will be automatically recorded in .wav format. The recording files will be listed under “Conference Recording” as below once available. Users could click on
![]() to download the recording or click on
to download the recording or click on
![]() to delete the recording. Users could also delete all recording files by clicking on “Delete All Recording Files”, or delete multiple recording files at once by clicking on “Delete Selected Recording Files” after selecting the recording files.
to delete the recording. Users could also delete all recording files by clicking on “Delete All Recording Files”, or delete multiple recording files at once by clicking on “Delete Selected Recording Files” after selecting the recording files.

Conference Schedule
Conference Schedule Configuration
Create New Conference Schedule
Conference schedule Settings can be found under UCM6xxx web GUI🡪Call Features🡪Conference.
Users can create, edit, view and delete a Conference Schedule.
-
Click on
to add a new Conference Schedule and configure schedule settings.
- Or click on the scheduled conference to edit or delete the event.
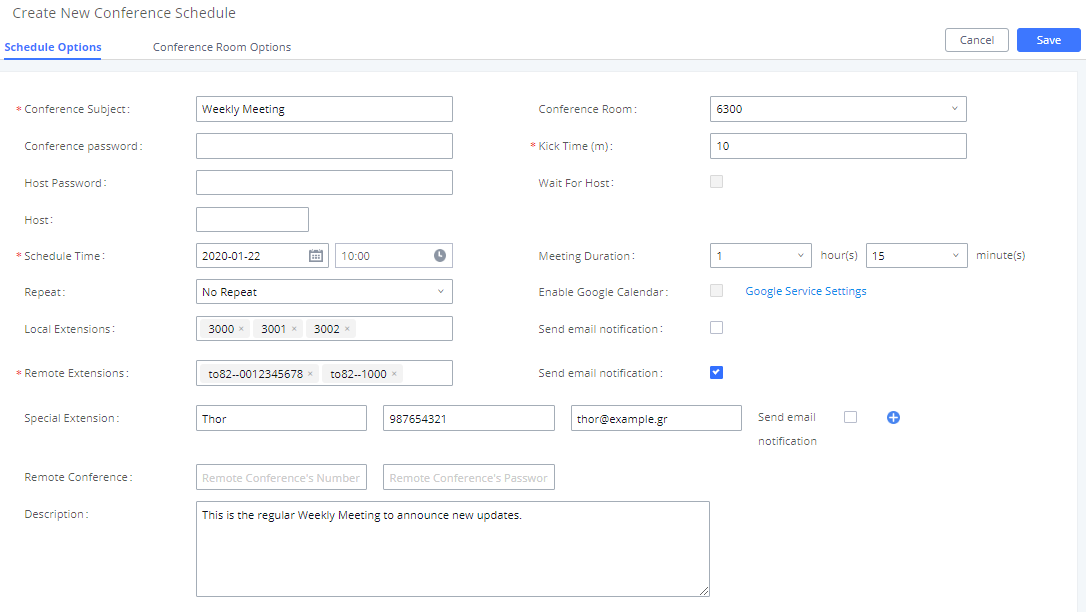
More advanced options such as configuring password, quiet mode, recording conference, announcing callers and others are available under “Conference Room Options” section.
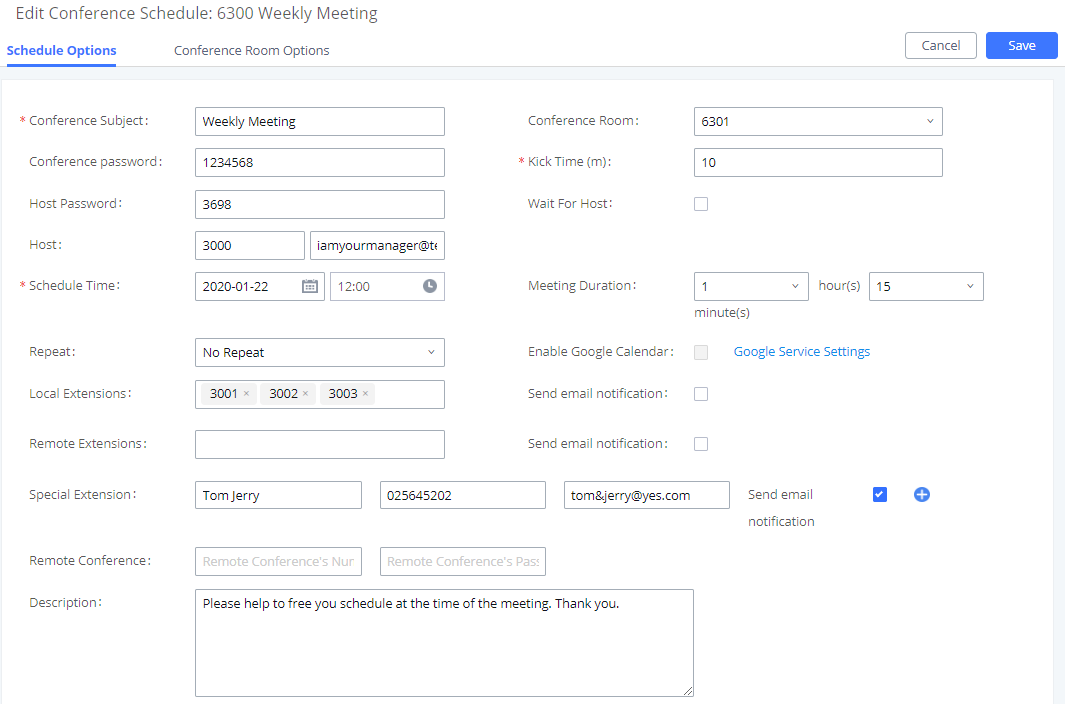
The following table describes the conference schedule settings:
Schedule Options | |
Conference Subject | Configure the name of the scheduled conference. Letters, digits, _ and – are allowed. |
Conference Room | Select a conference room for this scheduled conference. |
Conference Password | Conference login password. |
Host Password | Host Password. |
Kick Time(m) | Set kick time before conference starts. When kick time is reached, a warning prompt will be played for all attendees in the conference room. After 5 minutes, this conference room will be cleared and locked for the scheduled conference to begin. Note: Kick Time cannot be less than 6 minutes in order to clear the conference room. |
Wait for Host |
If enabled, conference participants will not hear each other until the host joins the conference.
|
Host | Select the extension of the conference’s host. |
Description | The description of scheduled conference. |
Repeat | Repeat interval of scheduled conference. By default, set to single event. |
Schedule Time | Configure the beginning date and duration of scheduled conference. Note: Please pay attention to avoid time conflict on schedules in the same conference room. |
Duration of the conference meeting. Note: The maximum allowed meeting duration that can be set is 8 hour(s). | |
Enable Google Calendar | Select this option to synchronize scheduled conference with Google Calendar. Note: Google Service Setting OAuth2.0 must be configured on the UCM6xxx. Please refer to section [Synchronize Conference Schedule with Google Calendar]. |
Send email notification | Sends Email notification to the extension. |
Local Extension | Select available extensions from the list to attend scheduled conference. |
Remote Extension | Select available extensions from the remote peer PBX. Note: “LDAP Sync” must be enabled on the UCM in order to view remote extensions here. |
Special Extension | Add extensions that are not in the list (both local and remote list). If the user wishes to add the special extension, please match the pattern on the outbound route. |
Remote Conference | Invite a remote conference. |
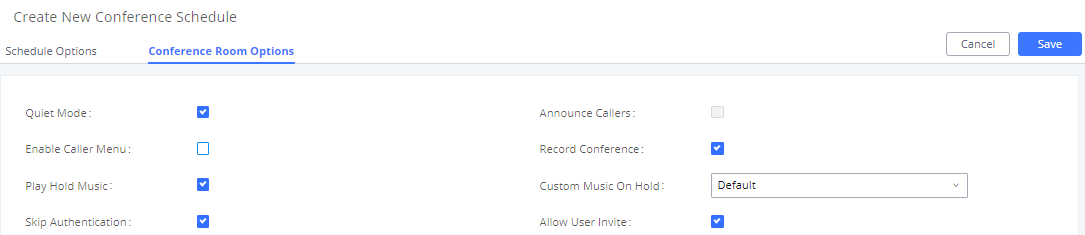
Conference Room Options | |
Enable Caller Menu | If this option is enabled, conference participants will be able to access conference room menu by pressing the * key. |
Record Conference | If this option is enabled, conference call will be recorded in .wav format. The recorded file can be found from Conference page. |
Quiet Mode | If this option is enabled, the notification tone or voice prompt for joining or leaving the conference will not be played. Note: Option “Quiet Mode” and option “Announce Caller” cannot be enabled at the same time. |
Enable User Invite | If this option is enabled, the user can:
Note: Conference Administrator is always allowed to access this menu. |
Announce Callers | If this option is enabled, when a participant joins the conference room, participant’s name will be announced to all members in the conference room. Note: Option “Quiet Mode” and option “Announce Caller” cannot be enabled at the same time. |
Play Hold Music | If this option is enabled, UCM will play Hold Music while there is only one participant in the conference room or the conference is not yet started. |
Skip Authentication | If this option is enabled, the invitation from Web GUI via a trunk with password will not require authentication. Note: Please be aware of the potential security risks when turning on this option. |
Cleaner Options
The cleaner options allow users to automatically clean up configured conference schedule, please refer to following table describing the cleaner parameters.
Cleaner Options | |
Enable Conference Schedules Cleaner | If this option is enabled, conference schedules will be automatically cleaned as configured. |
Conference Schedules Clean Time | Enter the clean time (in hours). The valid range is from 0 to 23. |
Clean Interval | Enter the clean interval (in days). The valid range is from 1 to 30. |
Show/hide Conference Schedule Table
Enable this option will allow Web GUI to display scheduled conference in Conference Schedule Table. Please see figure below.
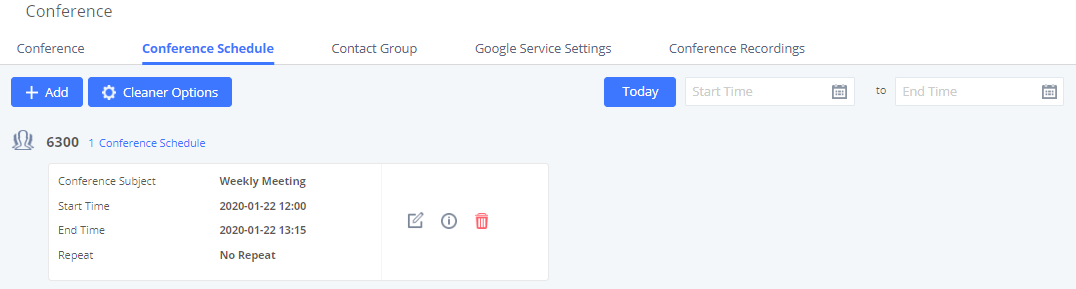
Once the conference room is scheduled, at the kick time, all users will be removed from conference room and no extension is allowed to join the conference room anymore. At the scheduled conference time, UCM will send INVITE to the extensions that have been selected for conference.
Note:
Contact Group
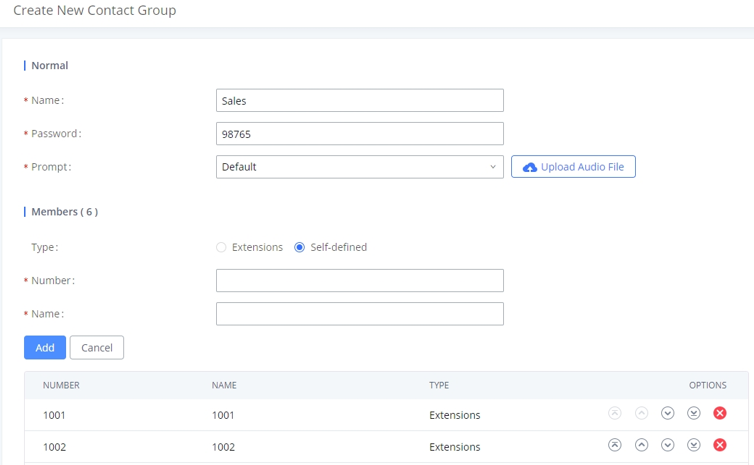
Users can quickly invite multiple participants at once to a conference via conference contact groups. Up to 5 contact groups can be created. The maximum allowed number of contacts per group is based on the UCM model’s conference participant limit: 25 for 6202/6204, 32 for 6208, 64 for 6510.
Each contact group must have a password configured, which will be required when inviting the specified contact group to a conference. Additionally, an audio file can be uploaded to each group to be used to announce the contact group name such as “Sales” or “Marketing”. The default announcement for each group is “Conference Contact Group 1”, “Conference Contact Group 2”, etc.
Contact Group Configurations
- Click on “Create New Contact Group” to add a new Contact Group.
-
Click on
 to edit the Contact Group.
-
Click on
 to delete the Contact Group.
Name | Name associated to the contact group. |
Password | Password required to invite the specified contact group to a conference. |
Prompt | Audio file that can be uploaded to the group to announce the contact group name such as “Sales” or “Marketing”. The default announcement for each group is “Conference Contact Group 1”, “Conference Contact Group 2”, etc. |
Members | Contacts that needs to be added in each group. |
Type | Type of the members to be added, it can be either Extensions or a self-defined number. |
Conference Recordings
The UCM allows users to record the conference call and retrieve the recording from Web GUI🡪Call Features🡪Conference.
To record the conference call, when the conference room is in idle, enable “Record Conference” from the conference room configuration dialog. Save the setting and apply the change. When the conference call starts, the call will be automatically recorded in .wav format.
The recording files will be listed as below once available. Users could click on
![]() to download the recording or click on
to download the recording or click on
![]() to delete the recording.
to delete the recording.

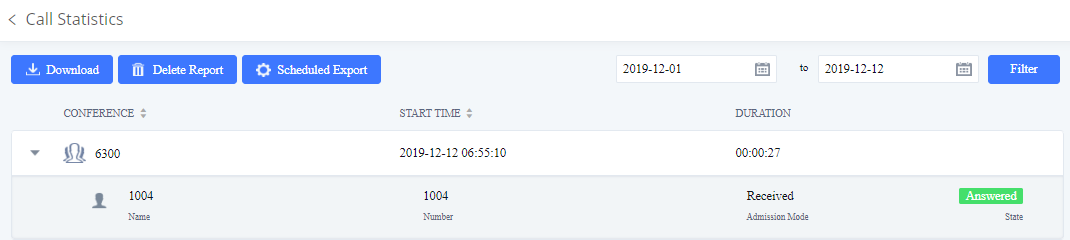
Conference Call Statistics
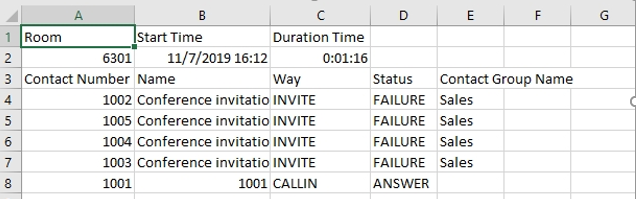
Conference reports will now be generated after every conference. These reports can be exported to a .CSV file for offline viewing. The conference report page can be accessed by clicking on the Call Statistics button on the main Conference page.
Synchronize Conference Schedule with Google Calendar
There are two ways to authorize the synchronization of the conference schedule with the google calendar of your account:
- OAuth2.0 Authentication
- Google Calendar Authorization

OAuth2.0 Authentication
Please refer to following steps:
- Go to the Google Developers Console (https://console.developers.google.com/project).
- Select a project or create a new one.
- In the sidebar on the left, expand APIs & auth. Next, click APIs.
- Select the enabled APIs link in the API section to see all the enabled APIs. Make sure that “calendar API” is on the list of enabled APIs. If you have not enabled it, select API from the list of APIs, then select the enable API button for the API.
- In the sidebar on the left, select “Credentials”. Click “Create New Client ID”.
- Select the installed application type for your project and enter any additional information required. Click create Client ID.
- Copy the “OAuth2.0 Client ID” and “OAuth2.0 Client Secret” to the UCM6xxx’s web GUI under Call Features 🡪 Conference 🡪 Google Service Settings, and click “SAVE”.
Google Calendar Authorization
Please refer to following steps:
- Access the UCM6xxx web GUI 🡪 Call Features 🡪 Conference 🡪 Google Service Settings.
- Click “Get Authorization Code” to obtain authentication code from Google Service.
- Enter the Google account and password (Note: please make sure the account on authorization page is correct, if you have logged in other account, please log out then log in again).
- Click “Accept” on authorization page.
- Copy the strings returned by Google authentication server under “Authorization code” input field, and click the “Authorization” button.
Once the google account is authorized, it will be displayed under “Authorized Account” and it will be connected with Google Service.
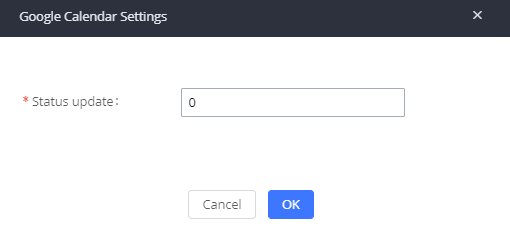
Important: Users can also configure the Status update, which refresh automatically your Google Calendar with the configured time (m). (Note: “Zero” means disable).
Multiple Conference Bridges
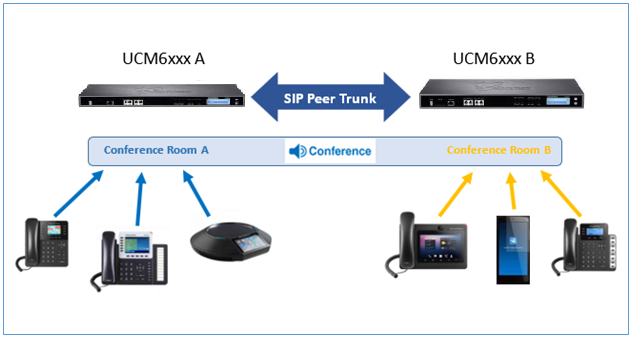
The UCM6xxx support multiple conference bridges between different conference (remote or local) rooms to essentially bridge two conference rooms together reducing bandwidth usage as displayed on the following diagram illustration a conference bridge between two UCMs in a peered scenario.
Please refer to following steps in order to invite a conference room to join the conference call:
- Access the UCM6xxx Web GUI🡪 Call Features🡪Conference.
- Select the conference room to invite participants.
-
Click on the conference room invite icon
 for option “Invite Conference Room”.
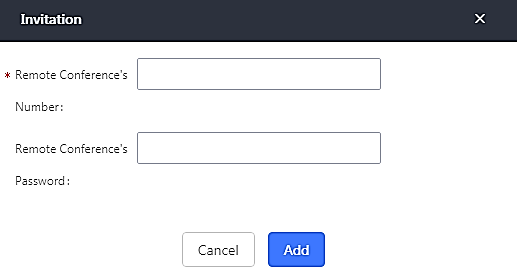
- Enter the remote conference’s number that you would like to invite and its appropriated password.
- Click on “Add“, a call will be sent to this number to join into the conference.
Important notes:
For the peered trunks, users need to do the following on both UCM6xxx peered:
- Enable Sync LDAP feature.
- Configure the Sync LDAP Port and password.
- Set the LDAP outbound rules under VoIP Trunk > Advanced settings.
-
Synchronize the LDAP by click on Sync LDAP
 under VoIP Trunk Settings.
- Configure the inbound routes and set the default destination to “Conference Rooms” and select the conference room number.

Video Conference
With the UCM you can easily create, schedule, manage, and join video conference calls, from your desktop or laptop computer. UCM Video conferencing uses WebRTC technology, so all the participants don’t have to download and install any additional software or plugins. If upgrading from firmware that does not have this functionality, system administrators must first toggle on the Enable WebRTC option for extensions that want to use the UCM’s WebRTC video conferencing feature. The video conference configurations can be accessed under Web GUI🡪Call Features🡪Video Conference. Here, users can create and manage video conference rooms and schedule video conferences.
Video Conference Room Configurations
- Click on “Create New Conference Room” to add a new conference room.
-
Click on
to edit the conference room.
-
Click on
to delete the conference room.
Extension | Configure the conference number for the users to dial into the conference. Note: Up to 64 characters. |
Password | When configured, the users who would like to join the conference call must enter this password before accessing the conference room. Note:
|
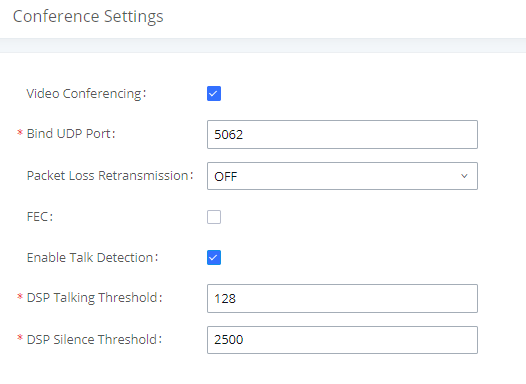
Basic Settings | |
Video Conferencing | This option should be enabled in order to activate the Video Conference feature. |
Bind UDP Port | Configure the UDP port number for MCM. The standard UDP port for MCM is 5062. |
Packet Loss Retransmission | Configure to enable Packet Loss Retransmission. |
FEC | If enabled, the Forward Error Correction (FEC) will be activated. The default setting is “No”. |
Enable Talk Detection | If enabled, the AMI will send the corresponding event when a user starts or stops talking. |
DSP Talking Threshold | The amount of time (ms) that sound exceeds what the DSP has established as the baseline for silence before a user is considered to be talking. This value affects several operations and should not be changed unless the impact on call quality is fully understood. |
DSP Silence Threshold | The amount of time(ms) that sound falls within what the DSP has established as the baseline for silence before a user is considered be silent. This value affects several operations and should not be changed unless the impact on call quality is fully understood. |
Conference Schedule can be found under UCM Web GUI 🡪 Call Features🡪Video Conference 🡪 Conference Schedule. Users can create, edit, view and delete a Conference Schedule.
- Click on “Schedule New Conference” to add a new Conference Schedule.
- Click on the scheduled conference to edit or delete the event.
Schedule Options | |
Conference Subject | Configure the topic of the scheduled conference. Letters, digits, _ and – are allowed. |
Conference Room | Select a conference room for this scheduled conference. |
Conference Password | Configure conference room password. Please note that if “Public Mode” is enabled, this option is automatically disabled. |
Kick Time(m) | Configure the time before the scheduled conference. When this time is reached, a warning prompt will be played, and all attendees currently in the scheduled conference room will be kicked after 5 mins. The conference room will be locked until the scheduled conference begins. Default value is 10 min. |
Schedule Time | Configure the beginning date and duration of scheduled conference. Note: Please be mindful to avoid schedule conflicts for the same conference room. |
Host | Set the admin of this scheduled conference from the following list of members. |
Members | Select available extensions from the list to attend scheduled conference. |
Special Extension | Add extensions that are not in the list (both local and remote list). If the user wishes to add the special extension, please make sure that the UCM’s outbound routes will allow calling that special extension. |
Description | Set a description of scheduled conference. |
Time Zone | Configure the conference Time Zone. |
Local Extension | Select the extensions from the list to attend this scheduled conference. |
Remote Extension | The remote extension in the peer PBX connected to the local PBX via LDAP sync. |
Once created, the Web GUI will display scheduled conference in Conference Schedule. Please see figure below:
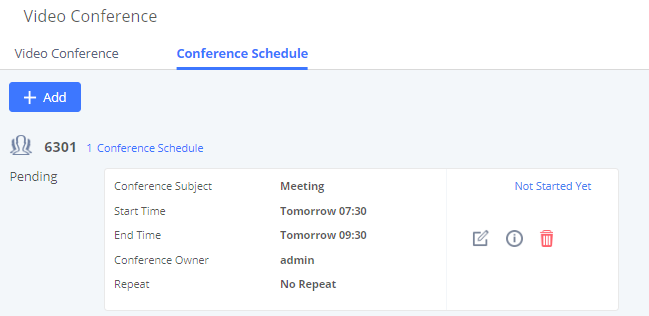
Once the conference room is scheduled, at the kick time, all users will be removed from conference room and no extension is allowed to join the conference room anymore. At the scheduled conference time, UCM will send INVITE to the extensions that have been selected for conference.
Conference Schedule Example Application
This chapter illustrates an example of configuring conference schedule feature.
The sales director of the company “ABC” needs to organize a conference and invite different sales managers to discuss different topics. We will assume the following:
- Sales director needs to have a conference room available on the extension number 6300 which will allow him to invite manually Sales Team members to discuss different topics.
- Every Monday at 9 AM, the sales director will organize with sales team a conference to discuss different topics and assign new tasks, the conference room used to host this weekly meeting is 6301.
- We will assume in this example that the UCM6xxx is already synchronized with Google Calendar services.
- Configuring Conference room 6300
Please refer to following steps in order to configure the conference room 6300:
- Access the Web GUI of the UCM6xxx using the administrator username and password (By default the admin username/password is: admin/admin).
- Navigate to Call Feature 🡪 Conference.
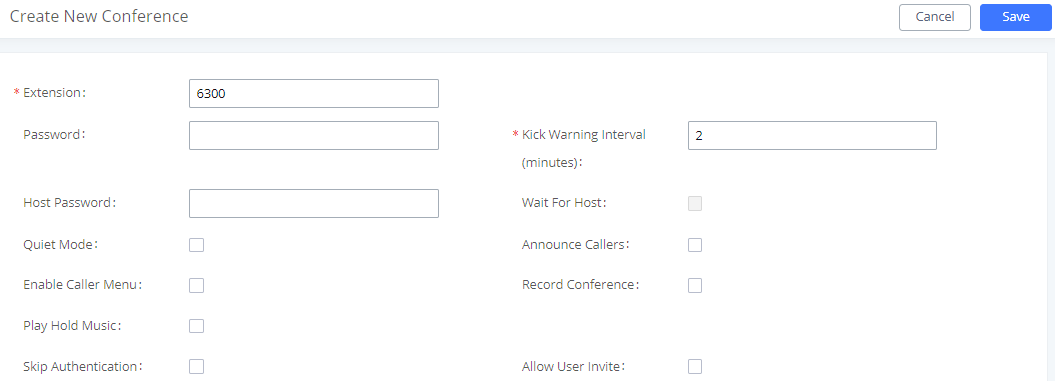
- Click on “Create New Conference Room “.
- Set the extension number to “6300.
- Press Save button to save the new conference room.
Once creating the conference room 6300, the sales director can initiate the conference by dialing 6300 and inviting another participant. Please see steps bellow:
-
Click on the invite icon
for option “Invite a participant”.
- Enter the number of the party you would like to invite. Then click on “Add“, a call will be sent to this number to join into the conference.
The conference room 6301 is programmed to host the weekly meeting planned with Google calendar, on the following steps we will create a new conference schedule and update the Google calendar.
- Access the Web GUI of the UCM6xxx using the administrator username and password. (By default the admin username/password is: admin/admin)
- Navigate to Call Feature 🡪 Conference.
- Click on “Add” to create a new Conference Room.
- Set the extension number to “6301”.
- Press Save button to save the new conference room.
- Access to Call Feature 🡪 Conference schedule.
- Click on “Add” to create a new Conference Schedule.
- Set the “Conference Subject” and select the “Conference room”.
- Configure the “kick time” and set the “Description”.
- Since this meeting is planned for each week, configure “Repeat” to weekly.
- Enable Google Calendar and select the extensions of the participants to join.
- Press Save button and click on “Update Google Calendar “to update the Google calendar.
- Press Apply Changes button to save and apply the new settings on the UCM6xxx.