


INTRODUCTION
Grandstream IP PBXs includes an integrated on-premise Property Management System (Local PMS) that provides core hotel-operations features without requiring third-party PMS integration. Hotels can manage room lifecycles, guest check-in/check-out, billing, wake-up services, reservations, and housekeeping tasks directly from the PBX web interface.
The Local PMS automates several functions that typically require manual work, including clearing guest data at checkout, sending notifications, and backing up guest voicemail recordings. This simplifies hotel operations while keeping all data managed locally on the PBX.
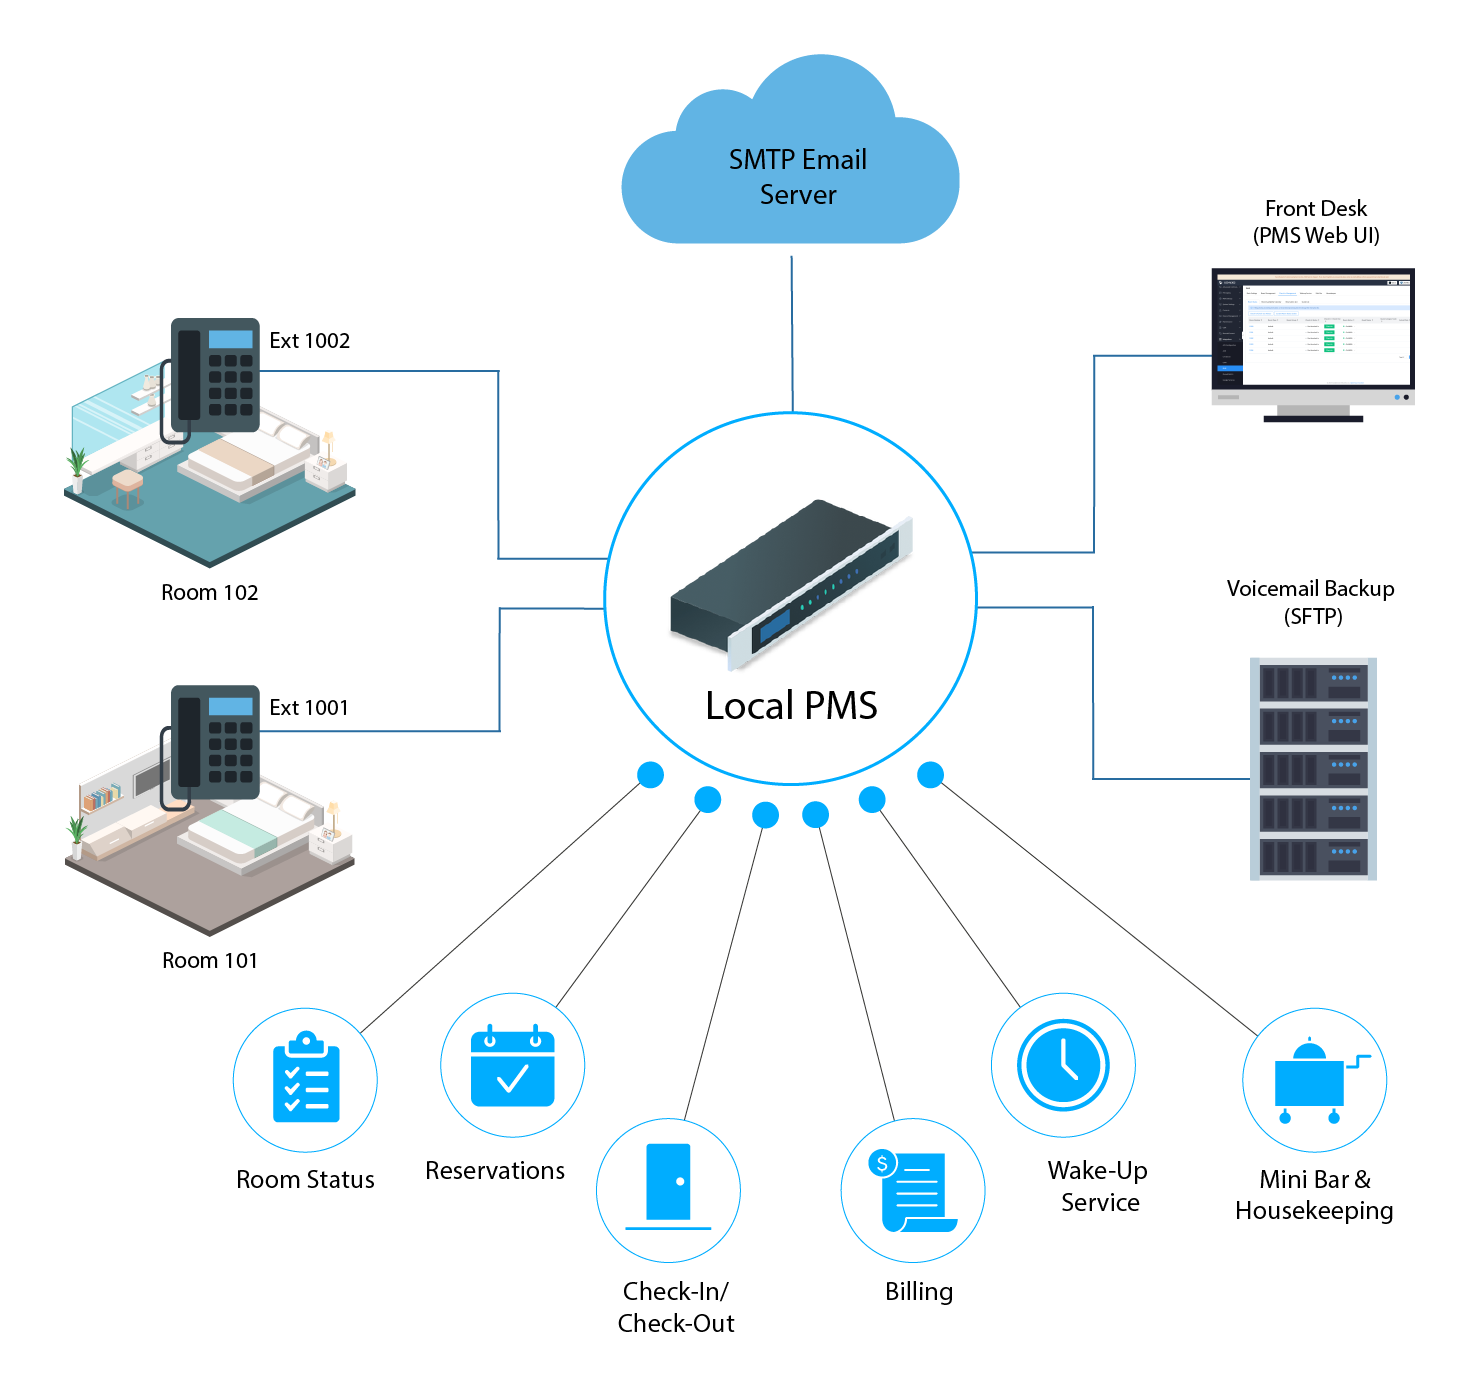
SUPPORTED PMS FEATURES
The Grandstream IP PBX Local PMS provides a range of features for hotel management, including Reservations, Check-In / Check-Out, Billing, Room Status, Wake-Up Service, Mini Bar, Room Types & Pricing, Room Groups, Availability Calendar, Guest Self-Service, Guest List, Check-In / Check-Out History, Voicemail Backup, Housekeeper Management, and PMS Feature Codes.
This section provides detailed descriptions of each feature, its configuration steps, and the available functions.
Basic Settings
When the PMS Module under Integrations → PMS → Basic Settings is set to Local PMS, the Basic Settings page allows administrators to configure the Prompt, Automatically Clear/Reset, Self-Service Settings, and Other Settings.
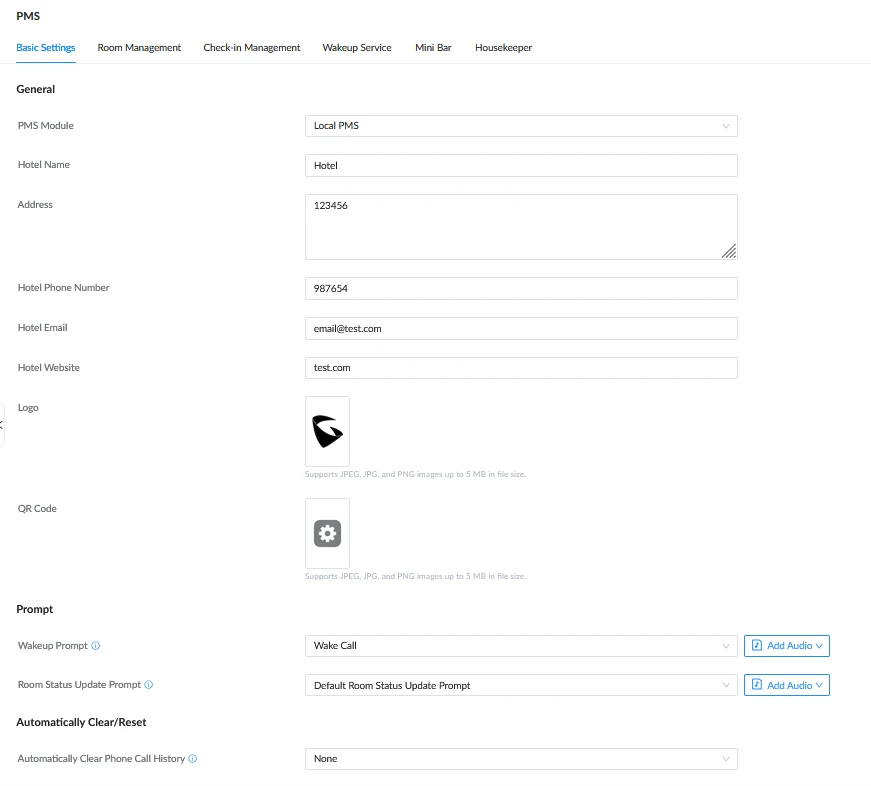
The configuration parameters available on the Basic Settings page are described in the table below:
Parameter | Description |
General | |
PMS Module | Specifies the PMS integration type. This guide focuses on the Local PMS option. |
Hotel Name | Defines the name of the hotel. |
Address | Defines the hotel’s address. |
Hotel Phone Number | Defines the hotel’s phone number. |
Hotel Email | Defines the hotel’s email address. |
Hotel Website | Defines the URL of the hotel’s website. |
Logo | Uploads the hotel’s logo. The uploaded image can be viewed or deleted. Supports JPEG, JPG, and PNG images up to 5 MB in file size. |
QR Code | Uploads the QR code. The uploaded QR code can be viewed or deleted. Supports JPEG, JPG, and PNG images up to 5 MB in file size. |
Prompt | |
Wakeup Prompt | A customized prompts that can be played when the wakeup call is answered. To customize it please navigate to PBX Settings→Voice Prompt→Custom Prompt |
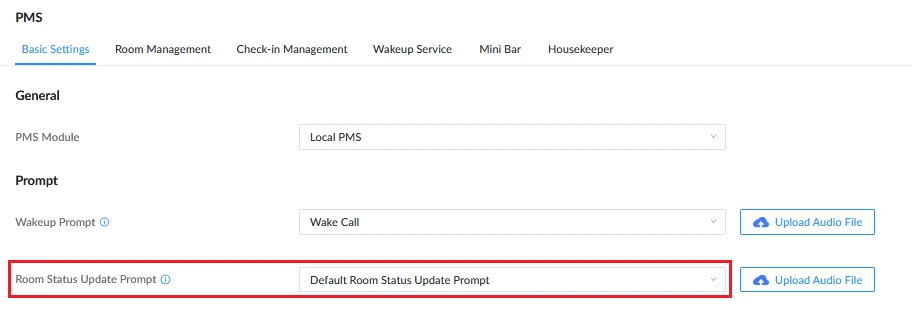
Room Status Update Prompt | Choose a previously uploaded prompt or upload the prompt which will be played when the room status is changed. If the room status codes have been change, please update the Room Status accordingly. |
Automatically Clear/Reset | |
Automatically Clear Phone Call History | Configures whether or not the call history of phones will be automatically cleared upon check-in or check-out. Currently only supported on Grandstream phones.
|
Automatically Clear Wakeup Calls | Scheduled wakeup calls for rooms can be cleared upong checking in or checking out.
|
Automatically Clear Wave Chat History | If enabled, room Wave chat history will be automatically cleared upon check-in or check-out. |
Automatically Reset User/Wave Password | If enabled, the User/Wave password of the room extension will be automatically reset to a random password upon check-out. |
Self-service Settings | |
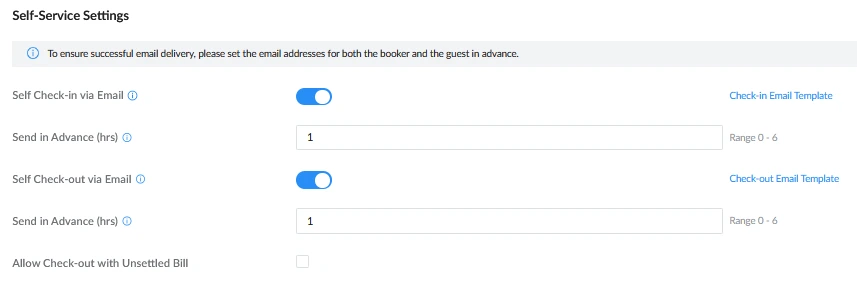
Self-Check-In Via Email | Enables the system to automatically send a self check-in email with a link prior to the guest’s arrival. |
Advance sending time (hrs) | Defines how many hours before the scheduled check-in time the self check-in email will be sent. |
Self-Check-Out Via Email | Allows the system to automatically send a self check-out email with a link prior to departure. |
Advance sending time (hrs) | Defines how many hours before the scheduled check-out time the email will be delivered. |
Allow Check-out with Unsettled Bill | Controls whether guests are allowed to complete self check-out even if their bill is not fully paid.
This option is disabled by default. |
Other | |
Back Up Voicemail Recordings | Configures automatic backup of voicemail recordings to external storage after check-out. When this feature is enabled, users can specify the storage destination. |
Storage Location | Select the storage location for voicemail recordings. The available options are:
Note: To configure storage devices, go to PBX Settings→Storage Device Management. |
Email Address | Enter the destination email address where the system will deliver backup files. |
Sync Guest Name to Phone | Provisions the name of the checked-in guests to endpoints via Zero Config. |
Review Bill at Check-Out | If enabled, a pop-up window with all the charges will appear during guest check-out for reviewing purposes. |
Call Billing | Enables or disables call billing. Click call rate to access the Call Rate page, where carrier call rates and other call rates can be configured. The configured rates are applied to calculate call costs. |
Currency Unit | The currency unit for the call rate. These are the supported options which you can choose from:
|
Periodically Email Recordings | If enabled, new recordings will be automatically sent to the specified email inbox periodically at the specified intervals. |
Type | Configures the type of recordings that should be sent periodically
|
Period | Specifies the automatic download period. The default option is “By Day”. At the specific time of each day, week or month, the last cycle of new records will be sent to the user.
|
Specifies the automatic download period. The default option is “By Day”. At the specific time of each day, week or month, the last cycle of new records will be sent to the user. | |
Email Template | Redirects to the Email Template page, where the email templates used by the system can be modified. |
Guest Email | Enables the system to send automated emails to guests. This includes reservation updates and billing information. Note: Email notifications will not be sent if the customer’s email address is missing. |
Reservation Notification | When enabled, the guest will automatically receive an email whenever a reservation is created, modified, or cancelled. |
Billing Notification | If enabled, billing-related emails will be sent automatically to the guest. |
Email Template | Redirects to the Email Template page, where the email templates used by the system can be modified. |
Room Management
The Room Management page allows administrators manage rooms within the Local PMS. Rooms can be added individually or in batches. Room Types can be configured and assigned to rooms, while Room Groups can be configured to organize rooms for operational management.
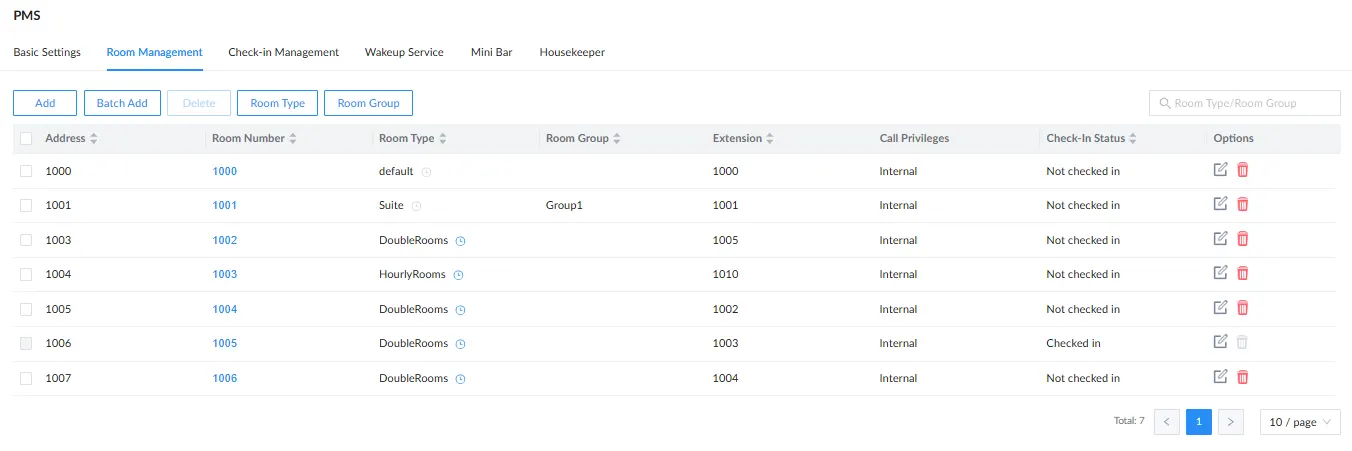
The search bar at the top of the Room Management table allows staff to search rooms by Room Type and Room Group. The table displays the following attributes:
- Address: Displays the address assigned to the room.
- Room Number: Displays the room number assigned to the room.
- Room Type: Displays the assigned room type.
- Room Group: Displays the room group to which the room belongs, if applicable.
- Extension: Displays the extension number assigned to the room.
- Call Privileges: Displays the call privilege level configured for the room.
- Check-In Status: Displays whether the room is currently checked in or not checked in.
- Options: Provides icons for performing operations. The functions of these icons are detailed below.
- The Edit icon
 in Options allows staff to modify a created room by making the required changes and pressing Save.
 - The Delete icon
 in Options allows staff to delete a specific room by pressing the icon and confirming the deletion by pressing OK.
- The Edit icon
 in Options allows staff to modify a created room by making the required changes and pressing Save.
 in Options allows staff to delete a specific room by pressing the icon and confirming the deletion by pressing OK.
Add Room Manually
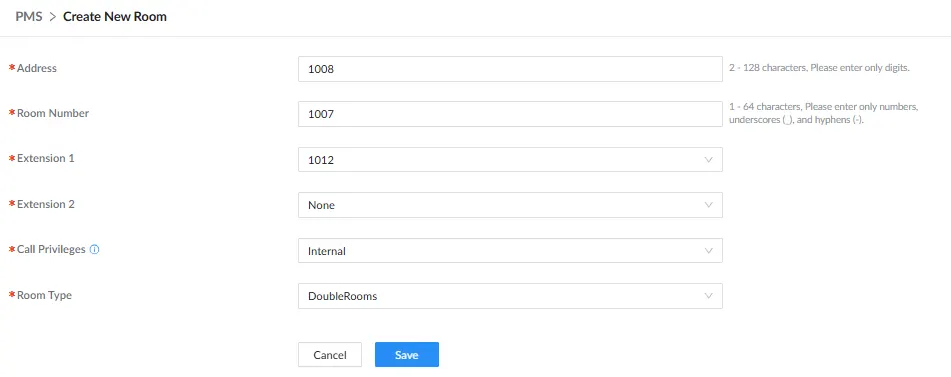
To manually add a room, follow the instructions below:
- Click on the Add button.
- Provide the Address, Room Number, and assign up to two Extension numbers associated with the room (Extension 2 may be set to None if the room requires only a single extension).
- Set the Call Privilege for the room to one of the following: Internal, Local, National, International.
- Select the appropriate Room Type from the list and press Save. Refer to Room Type section for more information.
Batch Add Rooms
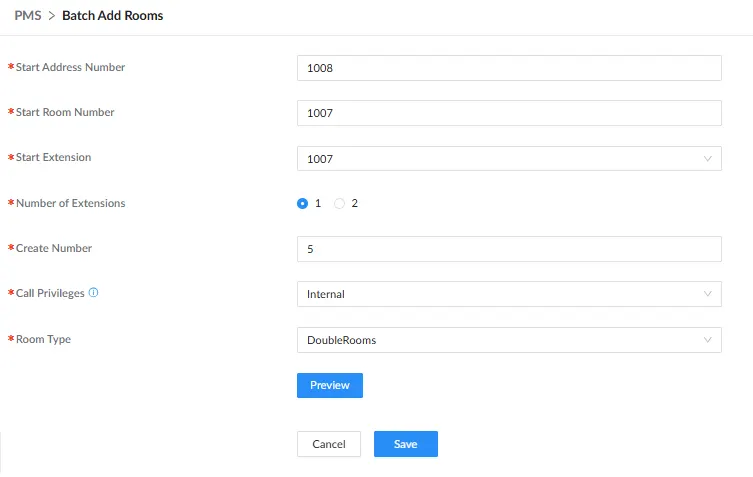
To add a batch of rooms with sequential numbering for addresses, room numbers, and extensions, follow the instructions below:
- Click on the Batch Add button.
- Enter the Start Address, Start Room Number, and Start Extension Number.
- Select Number of Extensions per Room. Selecting 2 will automatically generate two extensions for each room.
- Enter the Create Number, which defines how many rooms will be generated in the batch.
- Choose the Call Privilege and the Room Type that will be applied to all rooms created in this batch.
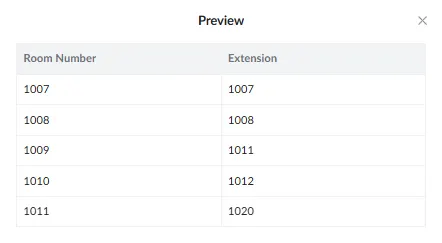
- Press Preview to view the room and extension list before clicking Save.
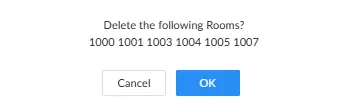
Delete Rooms
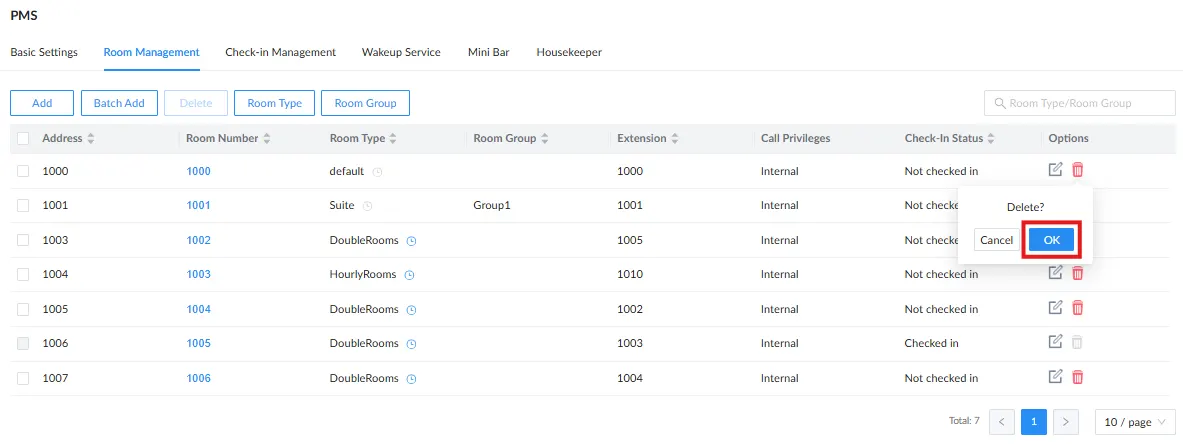
Rooms can be deleted individually. Follow the instructions below:
- Click the Delete icon in Options for a target room, then press OK to confirm the deletion.
Rooms can also be deleted in batches. Follow the instructions below:
- Select the checkboxes for the target rooms or use the global checkbox to select all rooms, then click Delete button.
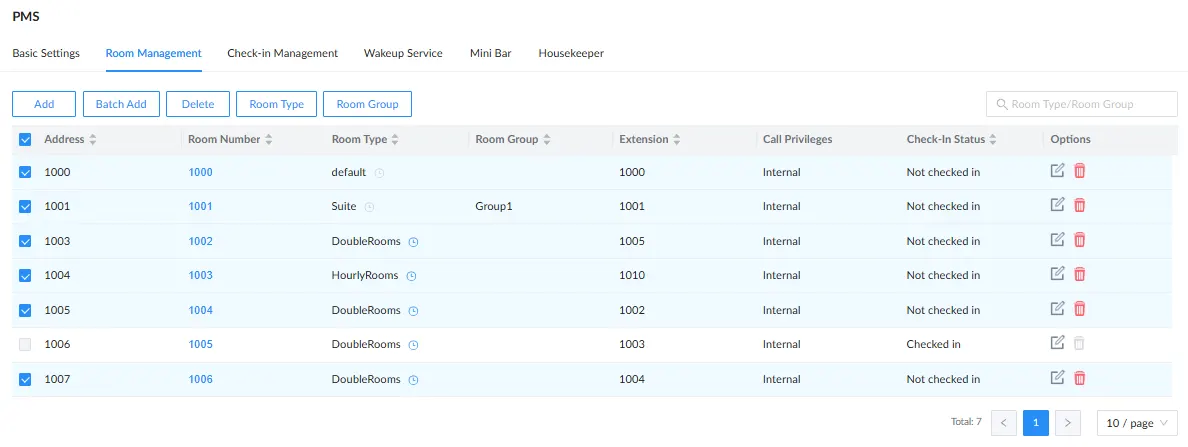
- Confirm the batch deletion by selecting OK.
Room Type
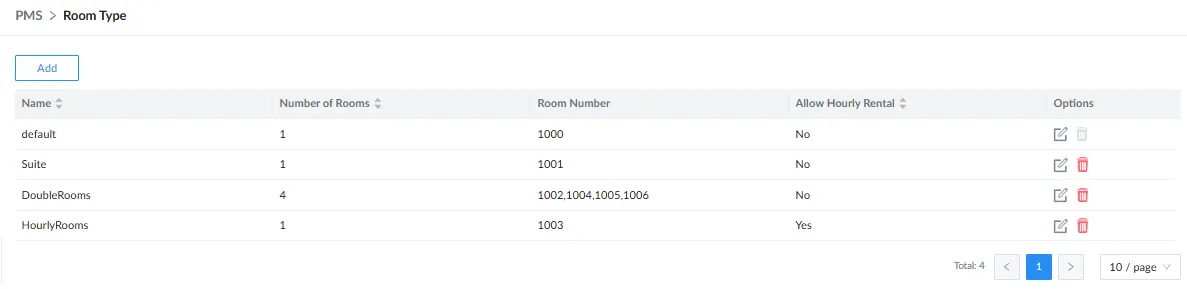
The Room Type page allows administrators to define room categories, including daily pricing, tax, and hourly rental options. To add a Room Type, follow the steps below:
- Press Room Type.
- Click the Add button to access the Create New Room Type page.
- Configure the parameters as described in the table below and press Save.
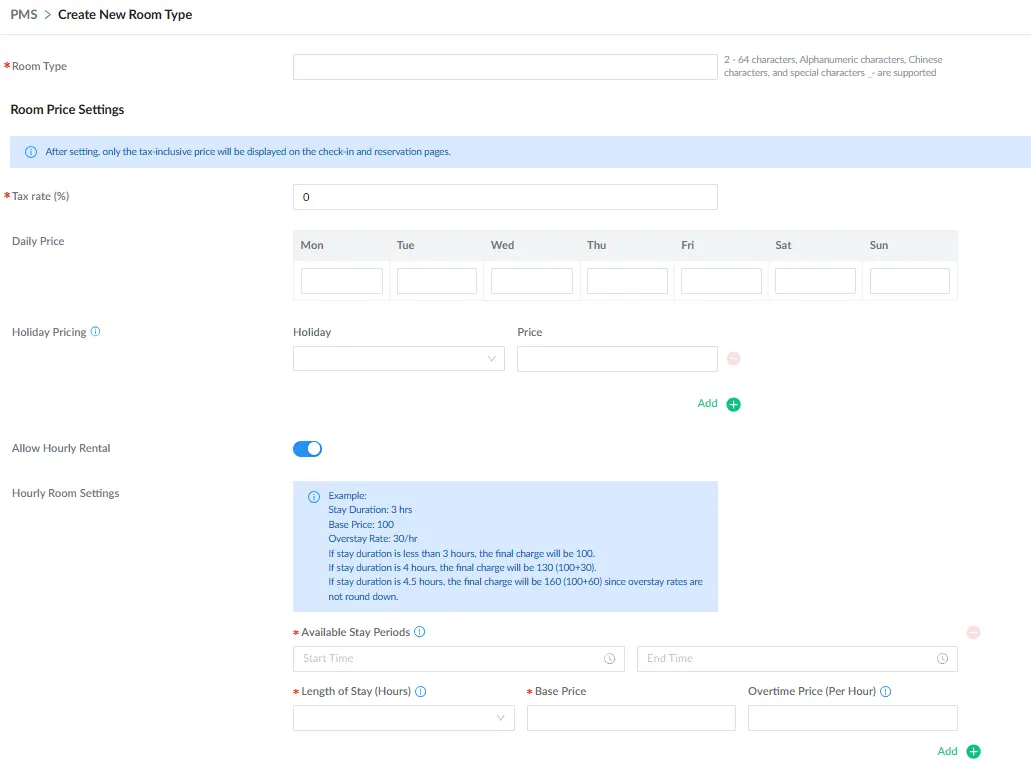
Parameter | Description |
Room Type | Name of the room type. Requirements: 2–64 characters, Alphanumeric characters, Chinese characters, and special characters _ – are supported |
Room Price Settings | |
Tax rate (%) | Tax percentage applied to this room type. Enter a value between 0 and 100 |
Daily Price | Set the daily room price for each day of the week (Mon-Sun). These prices apply by default unless a holiday price overrides them |
Holiday Pricing | Configures holiday prices, with up to 8 holiday settings:
Note: Holiday prices take precedence over daily prices |
Allow Hourly Rental | Enables or disables hourly room rentals. |
Hourly Room Settings | When Allow Hourly Rental is enabled, configures up to 8 hourly rental settings:
Note: Any fraction of an hour is rounded up to the next full hour |
Room Group
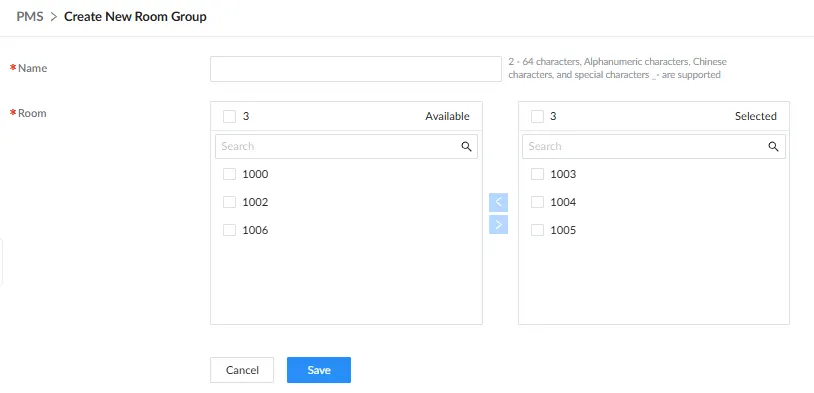
The Room Group page allows grouping multiple rooms together for easier management. This feature can be used to configure Wake-up Service for many rooms at once.
To create a room group:
- Press Room Group.
- Click the Add button to access the Create New Room Group page.

- Set a Name for the group and select the rooms to include in the group and press Save.
Check-in Management
The Check-in Management page provides tools for managing room status, availability, reservations, and guest information. The page includes the Room Status, Room Availability Calendar, Reservation List, and Guest List tabs.
Check-in Procedure
The check-in process updates the room’s occupancy status. The procedure consists of three stages: selecting the check-in type, handling existing reservations, and configuring the check-in parameters. A room can be checked in manually by front-desk staff or automatically through the Self-Check-In via Email feature when enabled.
To check in a guest manually, front-desk staff can follow the steps below under Check-in Management → Room Status:
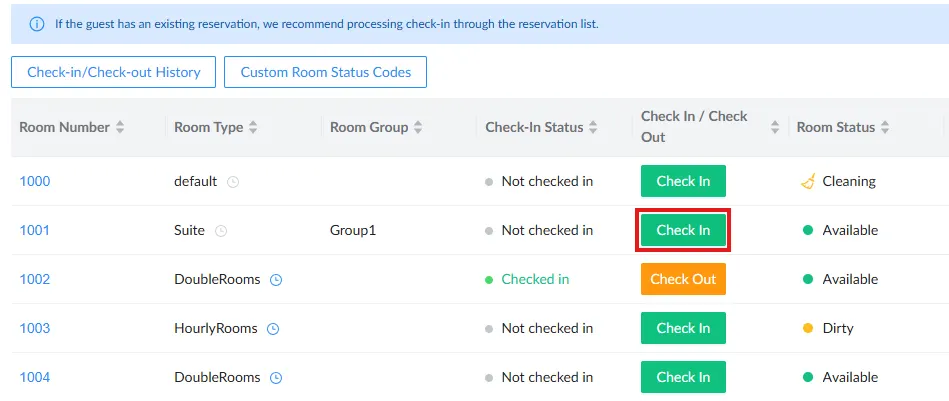
- Click the Check-In button for a checked-in room from the Room Status list.
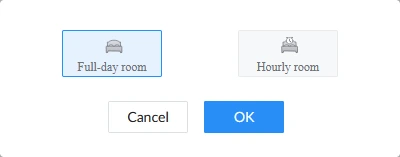
- If the room supports hourly rental, a window prompts the user to select the check-in type. Select the appropriate option, then press OK.
- Full-day room
- Hourly room
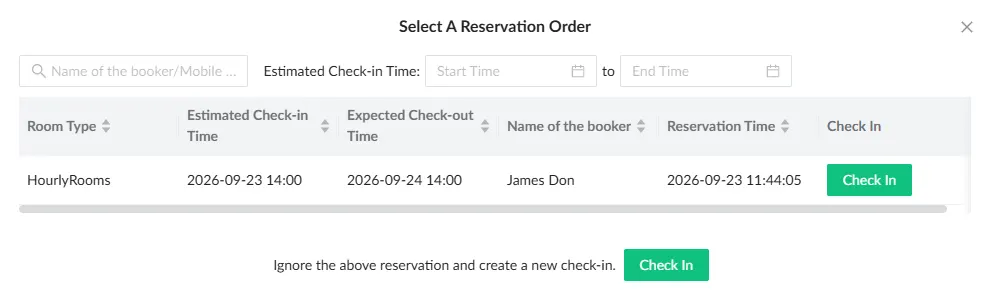
- If the room has an associated reservation, the Select a Reservation Order window opens. It lists the room’s relevant reservation orders, including Room Type, Estimated Check-in Time, Expected Check-out Time, Name of the Booker, and Reservation Time. Use the search and filter options to narrow the reservations by Estimated Check-in Time using a start and end time. Review the reservations and select the one associated with the guest being checked in, ensuring that the check-in does not overlap with an existing reservation.
- To check in using an existing reservation, click Check In for the corresponding reservation.
- To check in a guest without an existing reservation, create a new reservation order by clicking Check In at the bottom of the window.
- After selecting or creating a reservation, the Check In window appears on the side of the page. It contains all configurable parameters required to complete the check-in procedure.
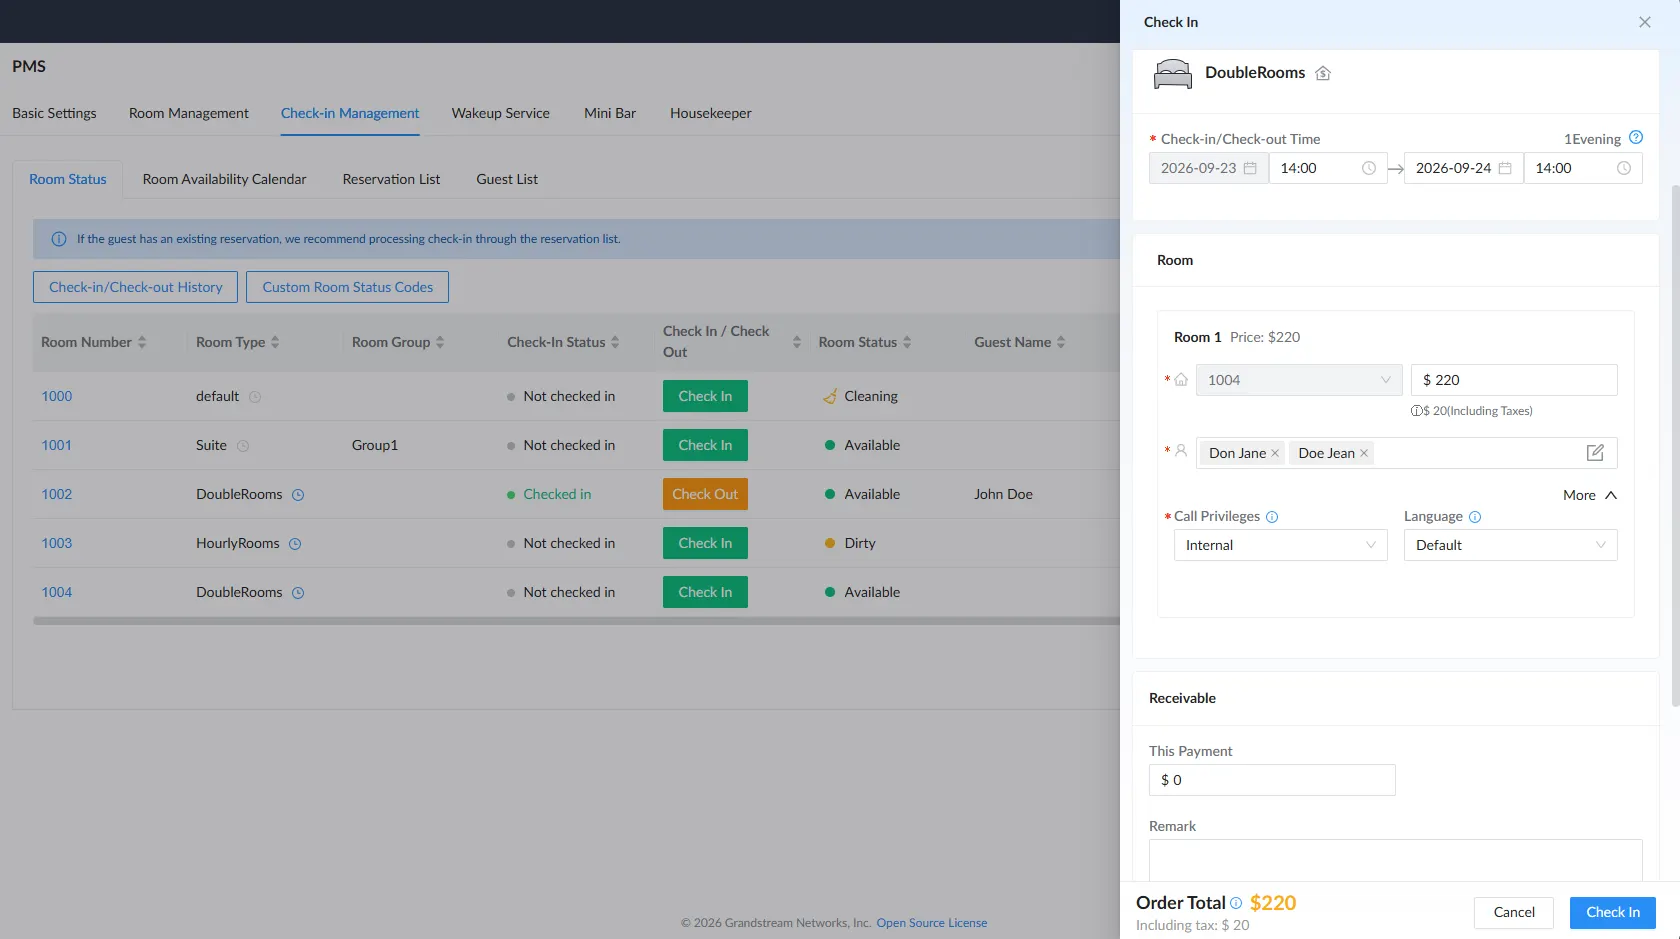
- Hovering over the House Dollar icon displays the room’s price details.
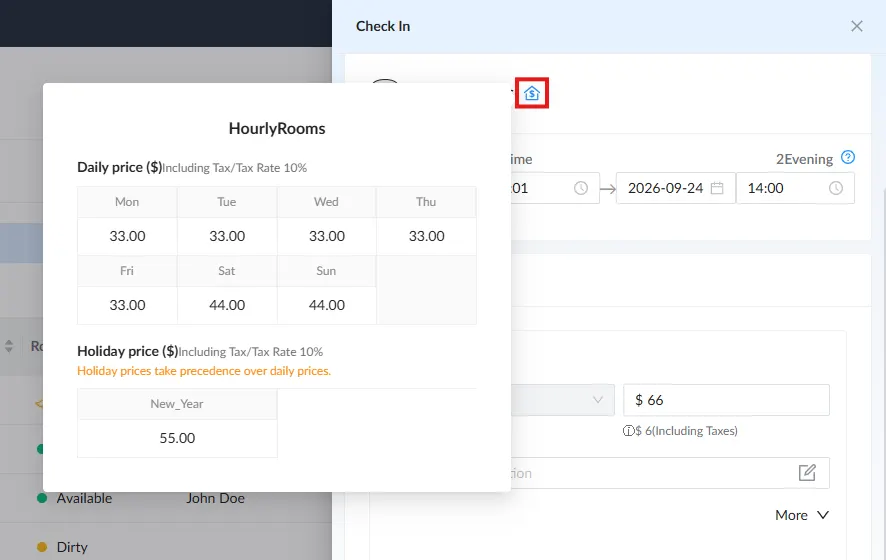
- Configure the parameters as described in the table below and press Check-in.
Parameter | Description |
Check-in/Check-out Time | Sets the check-in and check-out time for the guest(s). The check-in time cannot be earlier than the current system time, and the check-out time cannot be earlier than the check-in time. Note: The allowed range is within 6 months from the check-in date. |
Room | |
Room Number | Displays the room number. |
Total Price (Including Taxes) | Displays the calculated total price, including taxes. The price can be modified. The tax amount is calculated using the following formula: Tax = Actual Price ÷ (1 + Tax Rate) × Tax Rate |
Guest Information | Opens the Edit Guest Information window. Up to 8 guests can be added by clicking the Add icon. The Guest Information Settings are:
|
Call Privileges | Sets the permission level for outgoing calls for the guest(s). The available options are:
The default setting is “Internal”. |
Language | Sets the preferred language for voice prompts. When set to Default, the global PBX voice prompt language setting is used. Supported languages are English and Chinese. Note: The wake-up service prompt is played in the selected language. |
Receivable | |
This Payment | Specifies the amount paid by the guest during check-in. |
Remark | Adds additional information or notes about the guest’s stay, special requests, or other relevant details. |
- Review the information to ensure that the correct pricing and guest details have been applied. Once confirmed, press Check In at the bottom-right of the window to complete the check-in. The room’s status changes to Checked In, and the guest’s name and arrival and expected departure dates appear in the Room Status table.
Check-Out Procedure
The check-out process updates the room’s occupancy status, finalizes billing, and triggers any automated cleanup actions configured under Local PMS settings. A room can be checked out manually by front-desk staff or automatically through the Self-Check-Out via Email feature if enabled.
To check out a guest manually, front-desk staff can follow the steps below under Check-in Management → Room Status:
- Click the Check-Out button for a checked-in room from the Room Status list.
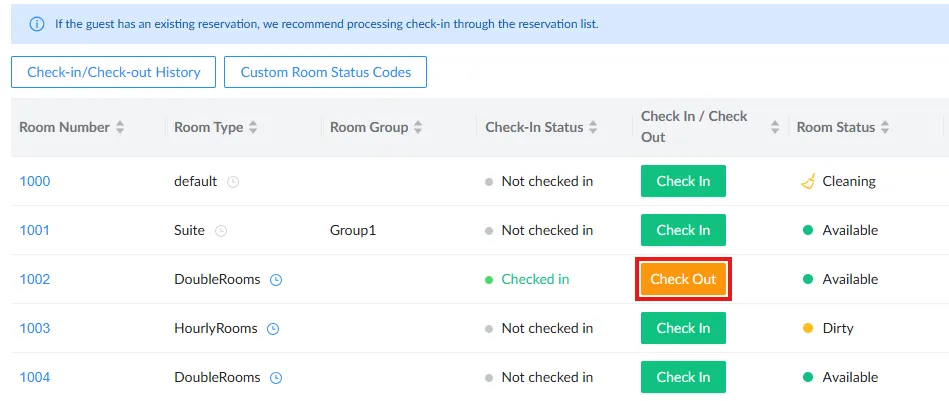
- If Review Bill at Check-Out is enabled under Integrations → PMS → Basic Settings → Other, a billing summary automatically appears before the final confirmation. Staff can print the bill by clicking the Print icon or access the Billing page by clicking the Dollar icon.
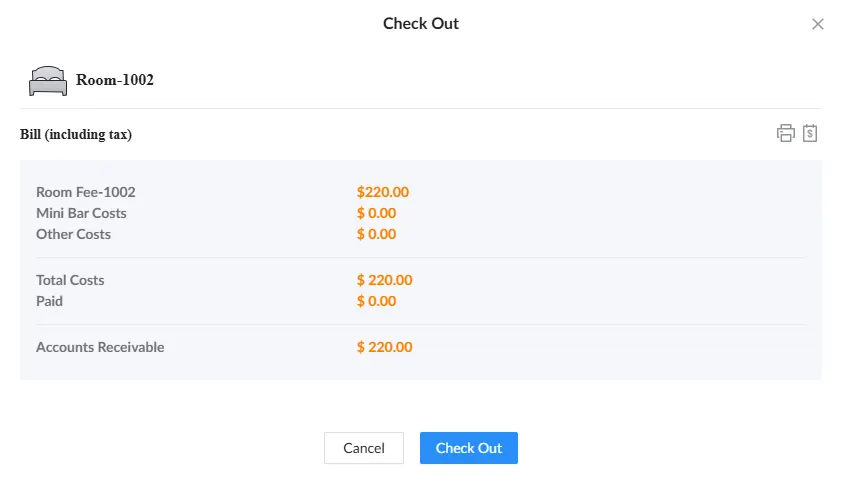
- Press the Check Out button at the bottom of the window to complete the check-out.
After completing the check-out, the room’s status changes to Not Checked In and any post-checkout automation (e.g., clear call history, clear wake-up calls, reset Wave password, clear chat history) is executed based on configuration.
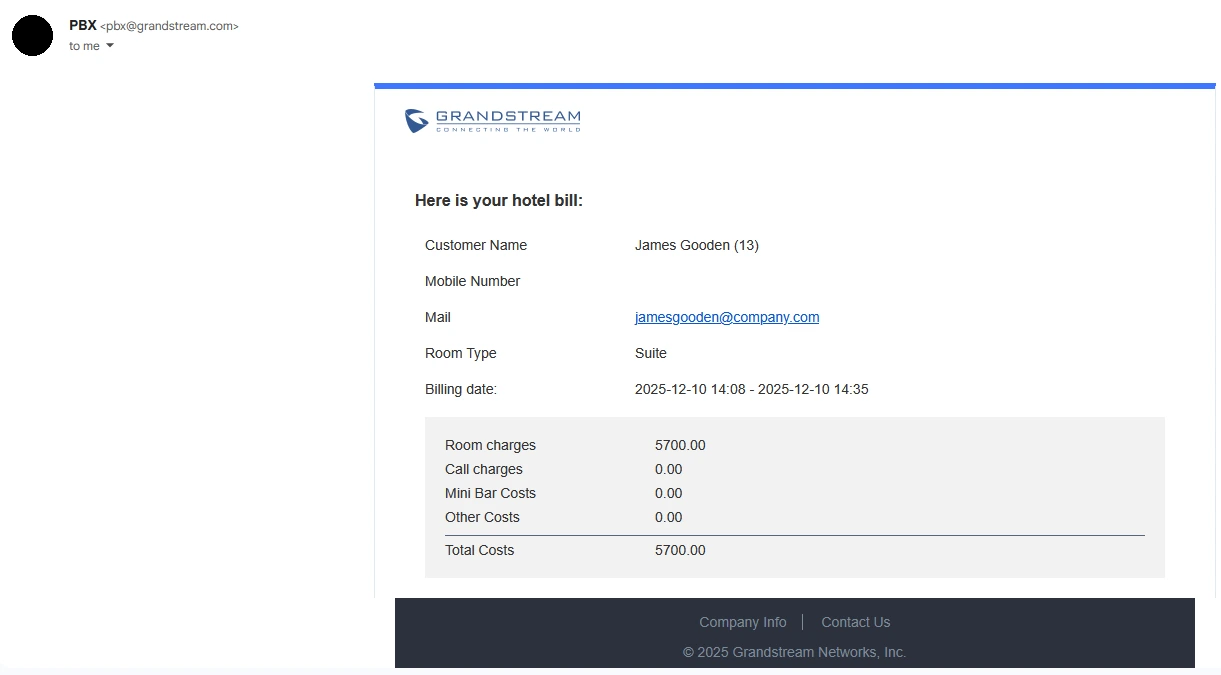
If Billing Notification is enabled under Integrations → PMS → Basic Settings → Other, a second email will be sent after successful checkout which will include a detailed breakdown of charges.
Self-Service Check-In and Check-Out
The Local PMS supports optional self-service workflows that allow guests to complete the check-in or check-out process remotely using secure email links.
Self-service is configured under PMS → Basic Settings → Self-service Settings. When enabled, the PMS automatically sends emails to guests at predefined times before arrival or departure.
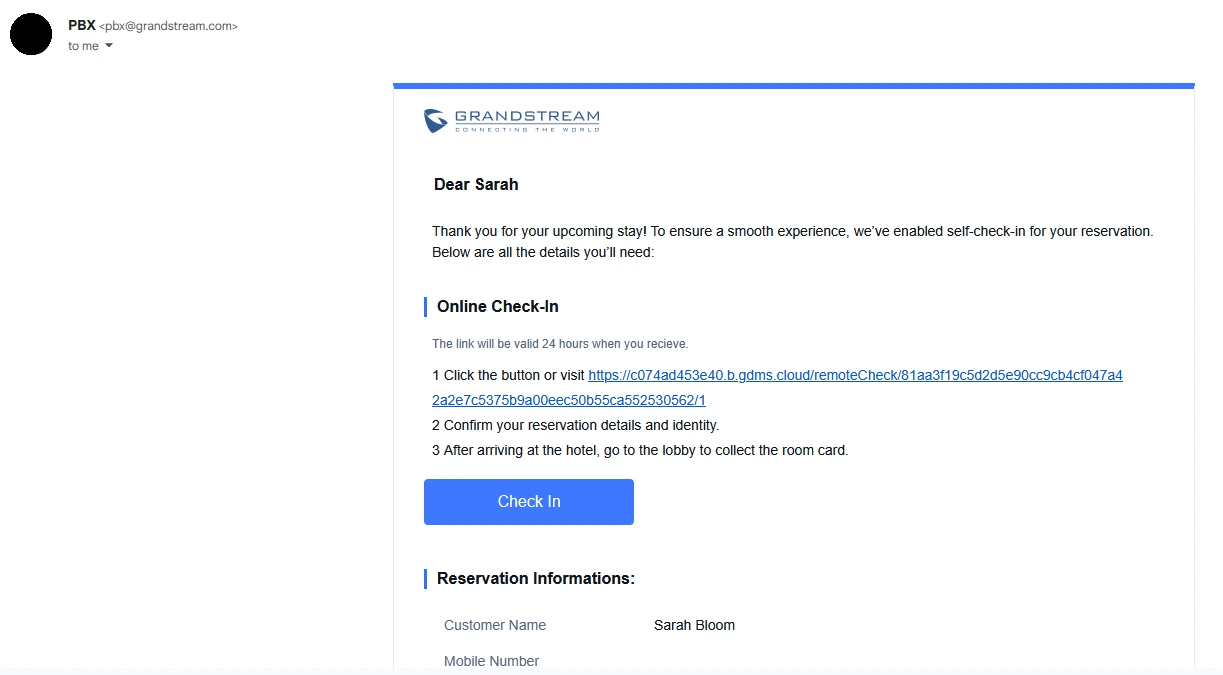
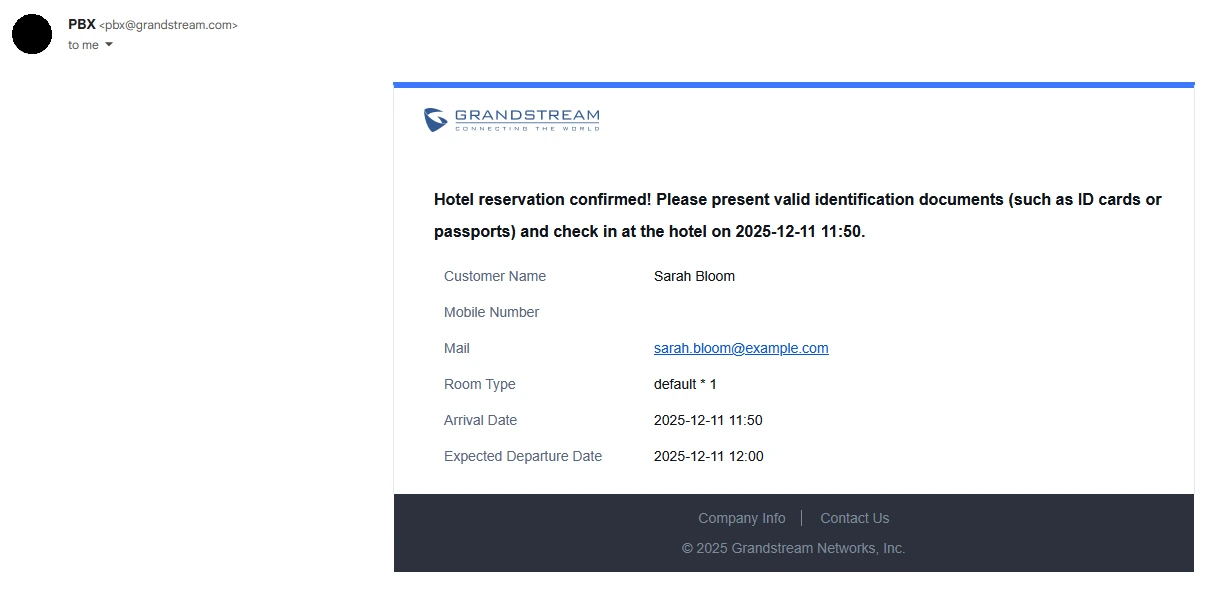
When Self-Check-In via Email is enabled, the PMS sends an automated pre-arrival email to the primary guest based on the configured advance sending time. Below is an example of the received email:
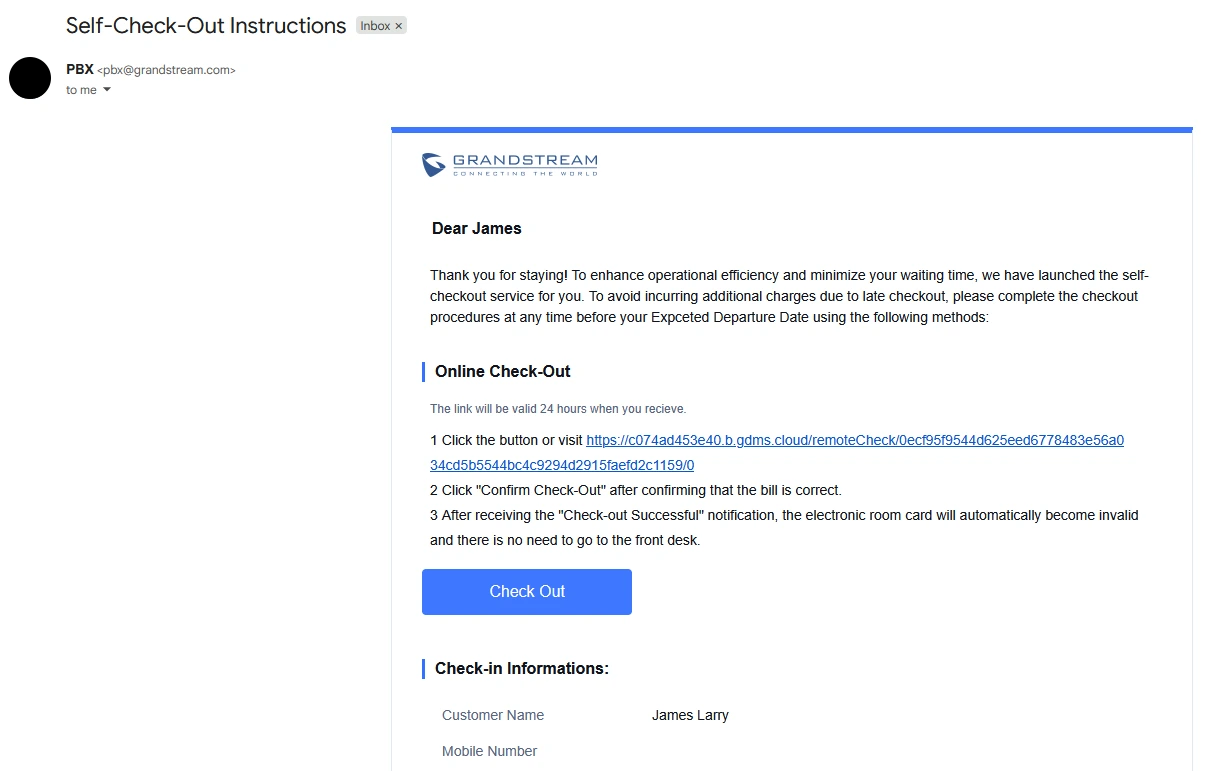
When Self-Check-Out via Email is enabled, the PMS automatically sends a check-out email before the guest’s expected departure time, which includes a link for the guest to use. The email shows up as such:
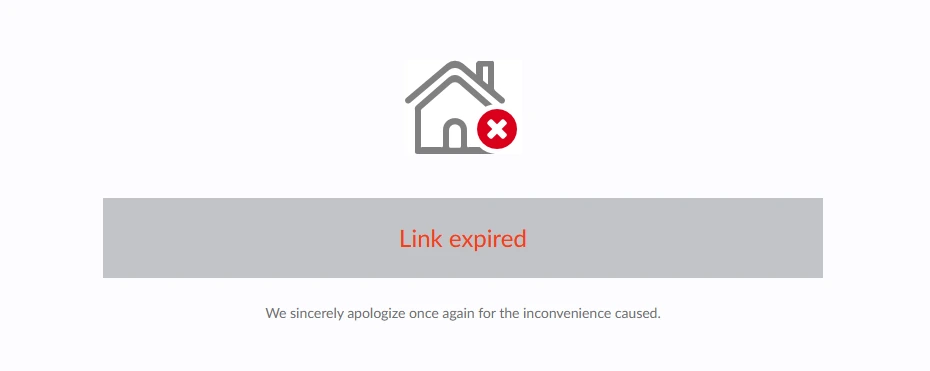
If Check-out is allowed when the bill is not settled is disabled, the system still sends the guest a check-out email, however, the self check-out link will display “Link expired” until all outstanding charges are settled.
Room Status
The Room Status tab provides a centralized overview of the current condition and availability of all rooms in the property. It allows hotel staff to monitor housekeeping progress, maintenance needs, and overall room readiness at a glance.
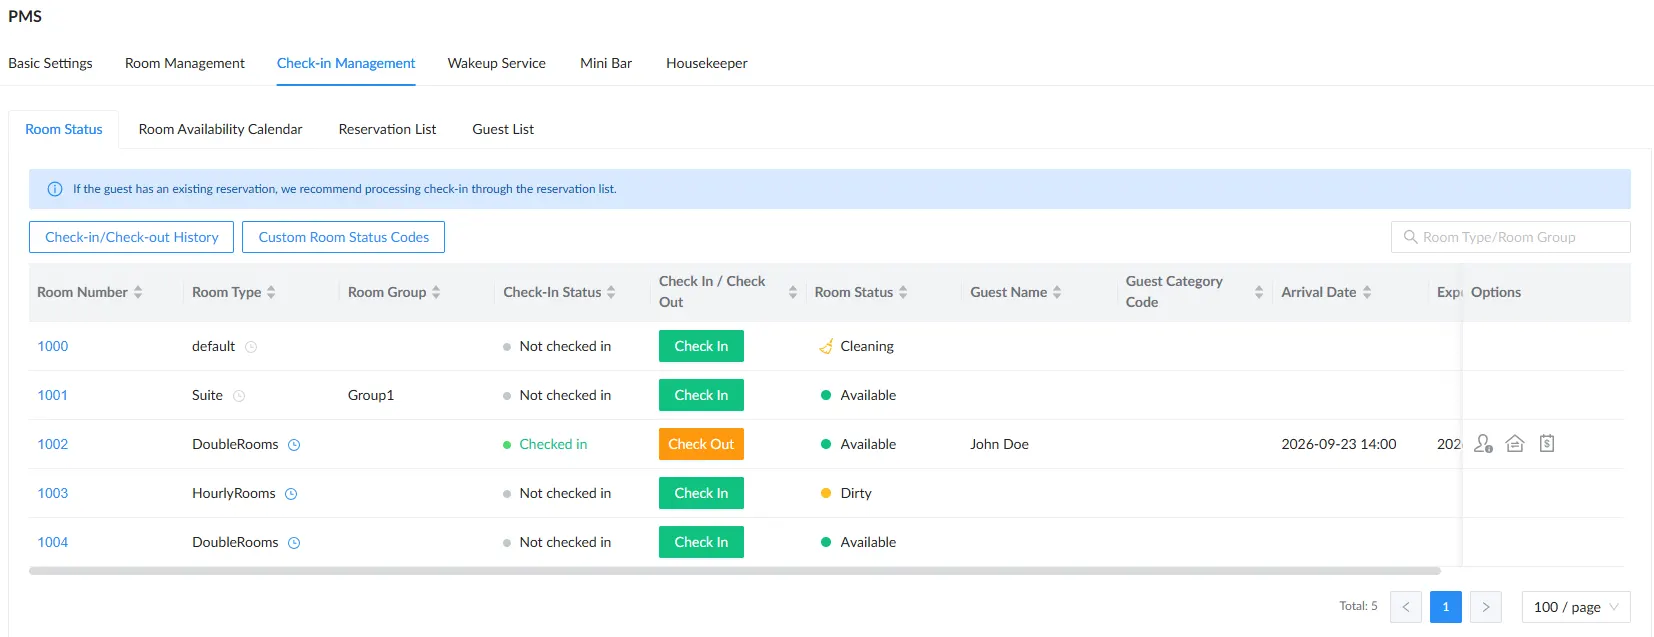
The search bar at the top of the Room Status table allows staff to search rooms by Room Type and Room Group. The table displays the following attributes:
- Room Number: Displays the Room Number.
- Room Type: Displays the assigned Room Type. Rooms that allow hourly rentals are indicated by the hour icon.
- Room Group: Displays the Room Group this room belongs to if applicable.
- Check-In status: Displays Check-in Status, either Checked-in or Not Checked-in.
- Check In / Check Out: Provides a button that changes between Check In and Check Out according to the room’s current status.
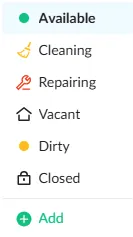
- Room Status: Displays the current Room Status. Click the status to change it to Available, Cleaning, Repairing, Vacant, Dirty, or Closed. This provides hotel staff with an overview of the current status of all rooms in the property. Click Add to access the Custom Room Status Codes page, where up to 10 custom room status codes can be configured. The page can also be accessed by clicking Custom Room Status Codes on the Room Status page.
- Guest Name: Displays the guest’s first and last name when the room is checked in.
- Guest Category Code: Displays the Guest Category code, Guest codes are individualized to residents so they can be issued to their visitors.
- Arrival date: Displays the Customer’s Arrival date.
- Expected departure date: Displays the Customer’s Expected departure date.
- Options: Provides icons for performing operations. The functions of these icons are detailed below.
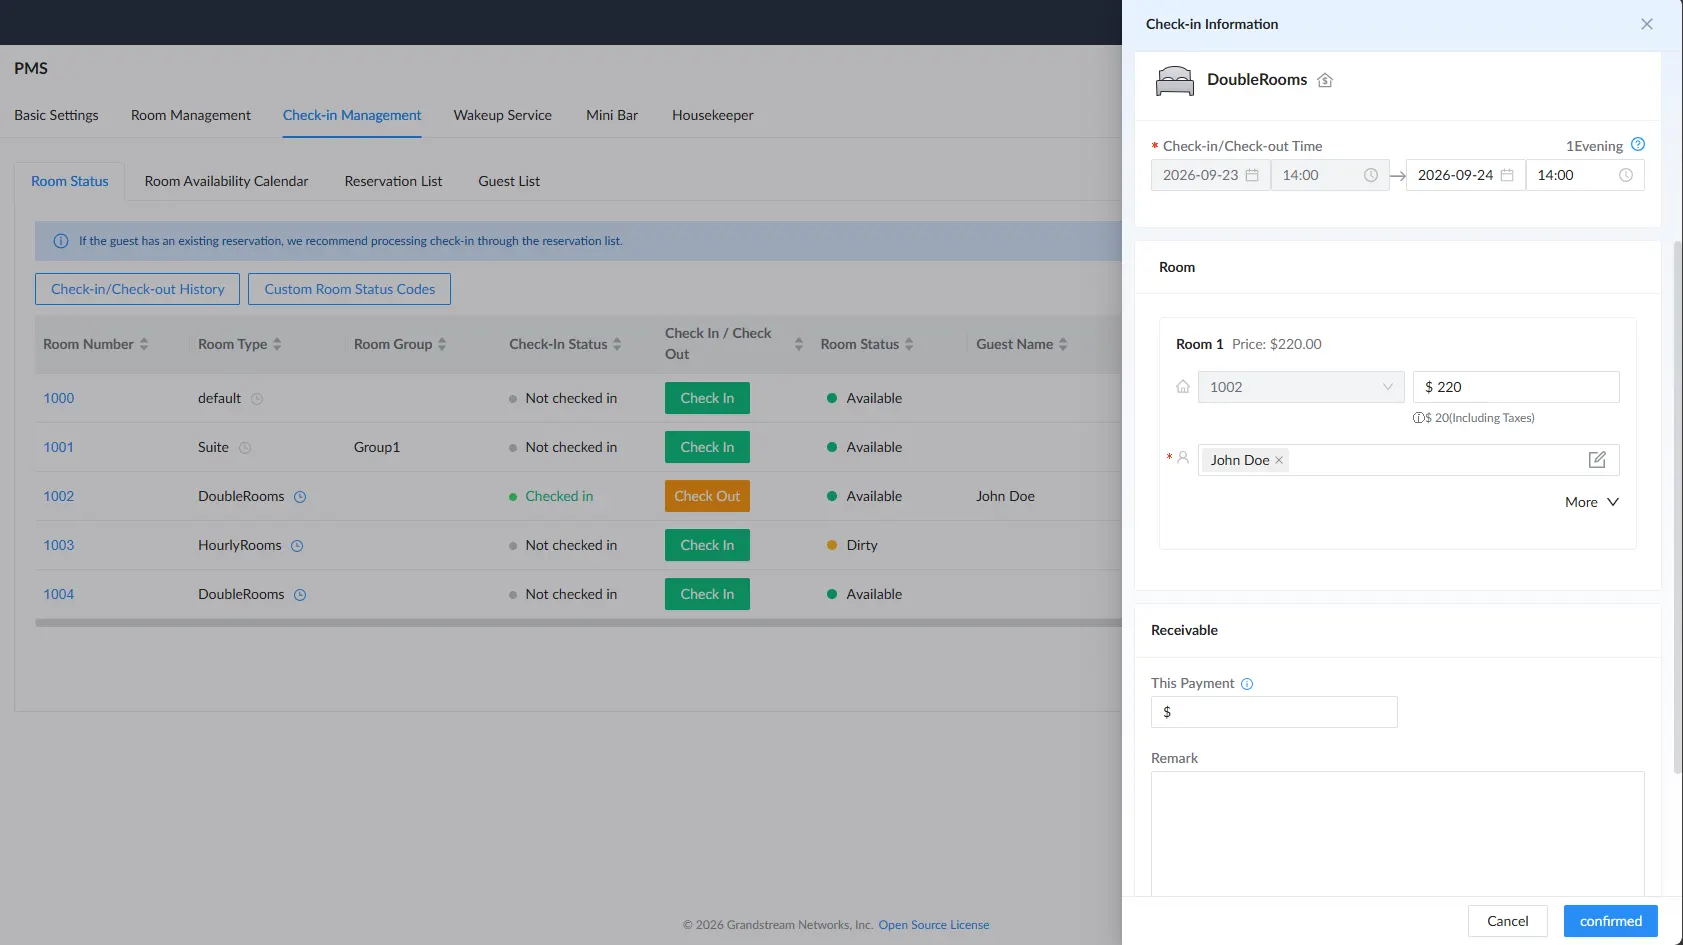
The Info icon  opens the Check-in Information window, where hotel staff can view and modify guest check-in details entered during the Check-in Procedure, room assignments, and billing information.
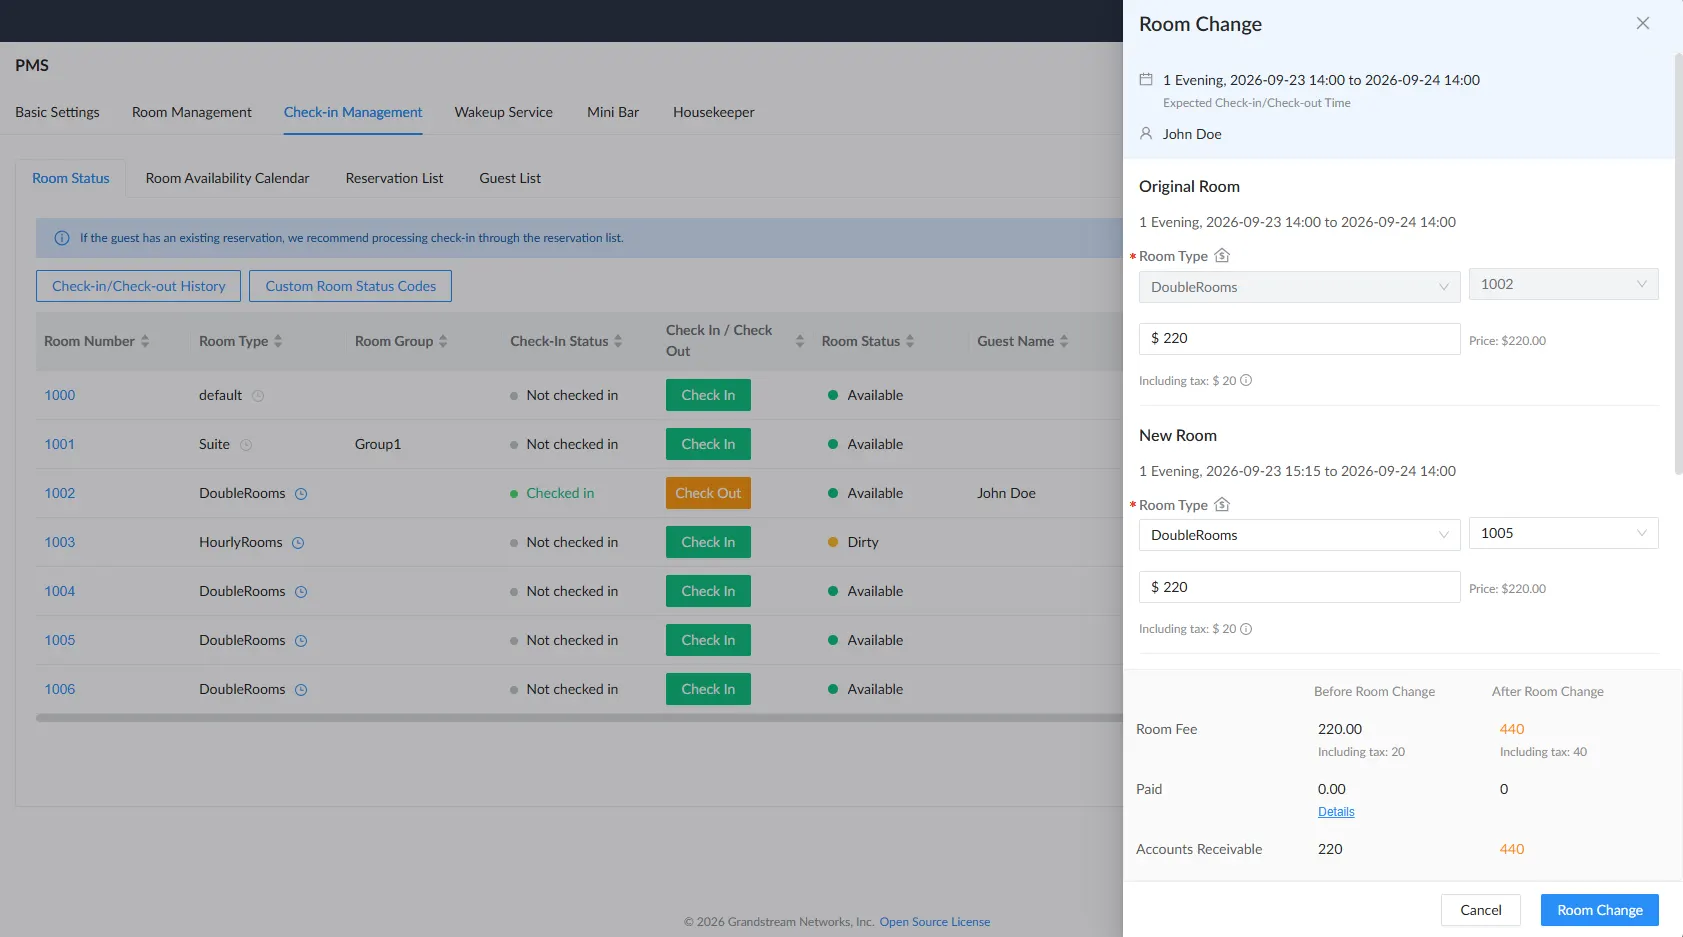
The Switch icon  opens the Change Room window, which displays the guest’s information and Original Room details. Hotel staff can assign a New Room from the available rooms. If the room type changes, the window also displays the applicable room price and fee details for the new room.
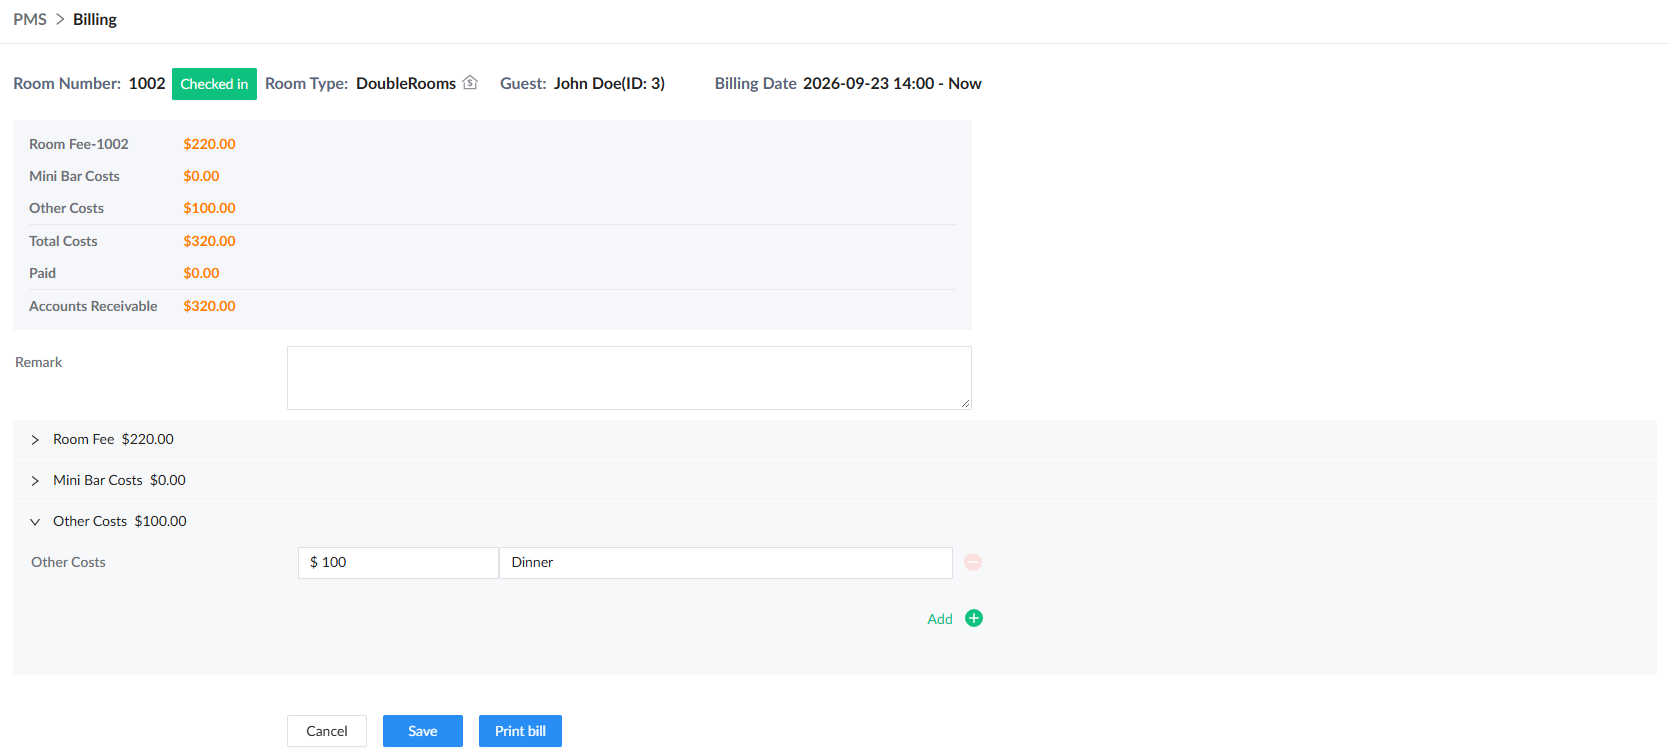
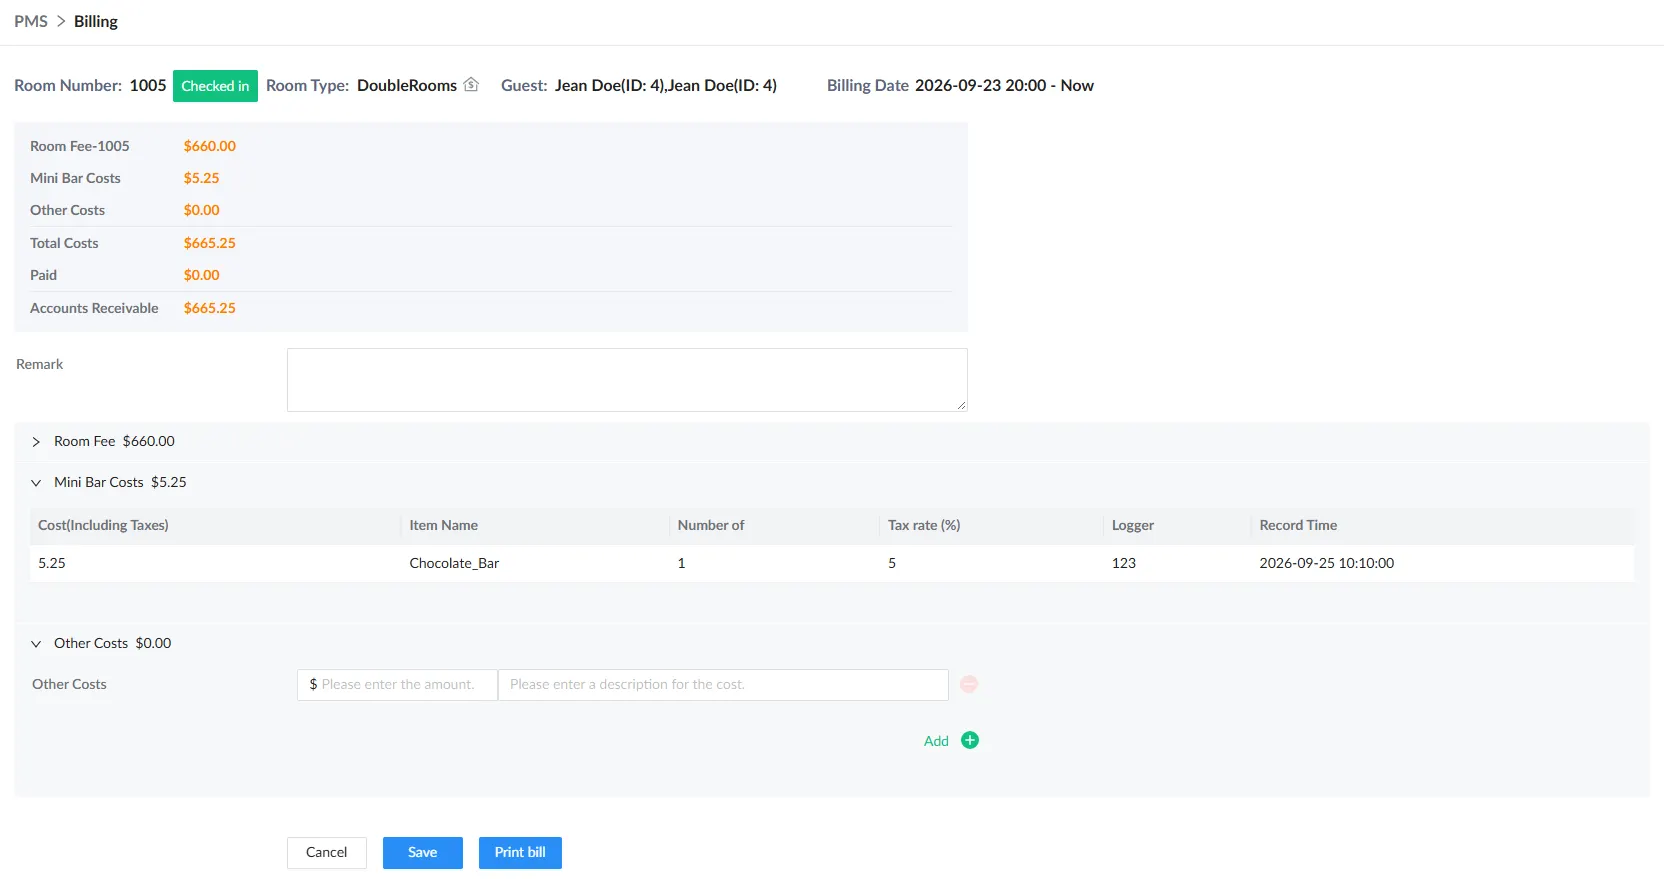
The Bill icon  redirects to the Billing page, which provides a detailed overview of all charges associated with the guest’s stay, including Room Fee, Minibar Costs, and Other Costs. It also displays the Total Cost, Paid amount, Accounts Receivable, and the Remark entered during check-in.
The page provides a breakdown of the Room Fee, Minibar Costs, and Other Costs, with an option to add additional costs under Other Costs.
Check-in/Check-out History
The Check-in/Check-out History page provides a chronological record of guest check-in and check-out activity recorded by the PMS.
The history includes check-ins and check-outs completed manually by front-desk staff, as well as those completed automatically through Self Check-In and Self Check-Out, when enabled.
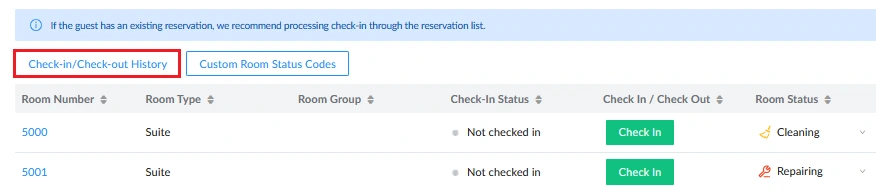
On this page, the staff can perform the following actions:
- View past stay records, including Room Number, Room Group, Check-In Status, Guest Name, Guest Category Code, Check-in/Check-out Format, Arrival Date, Expected Departure Date, Actual Check-out Date and Cost.
- Search and filter entries by Room Number, Guest Name, Arrival Day and Actual Check-out Date.
- Open the Billing page for the selected stay to review charges using the Bill icon
 .
. - Open Call History to review call charges associated with the stay using Call History icon
 .
. - Delete individual history entries using the Delete icon .
- Clear the history records using the Clear button.
 .
.
Custom Room Status Codes
The Custom Room Status Codes page allows administrators to configure the room status indicators used throughout the PMS. These statuses can be used by housekeeping and front-desk staff to report the current condition of each room.
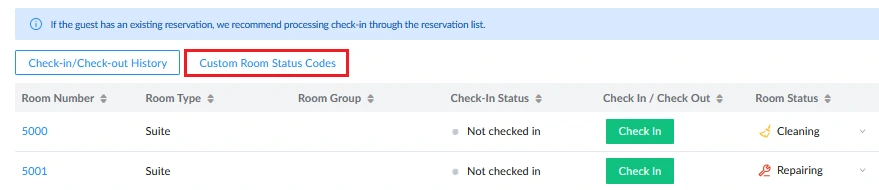
Room status codes can be configured, with each code assigned to a keypad Press number (Press 1–Press 0):
- Status Code: Specifies the numeric code associated with the room status.
- Room Status: Specifies the label shown in the Room Status table.
The page also provides Reset All and Default All options for managing the configured status codes.
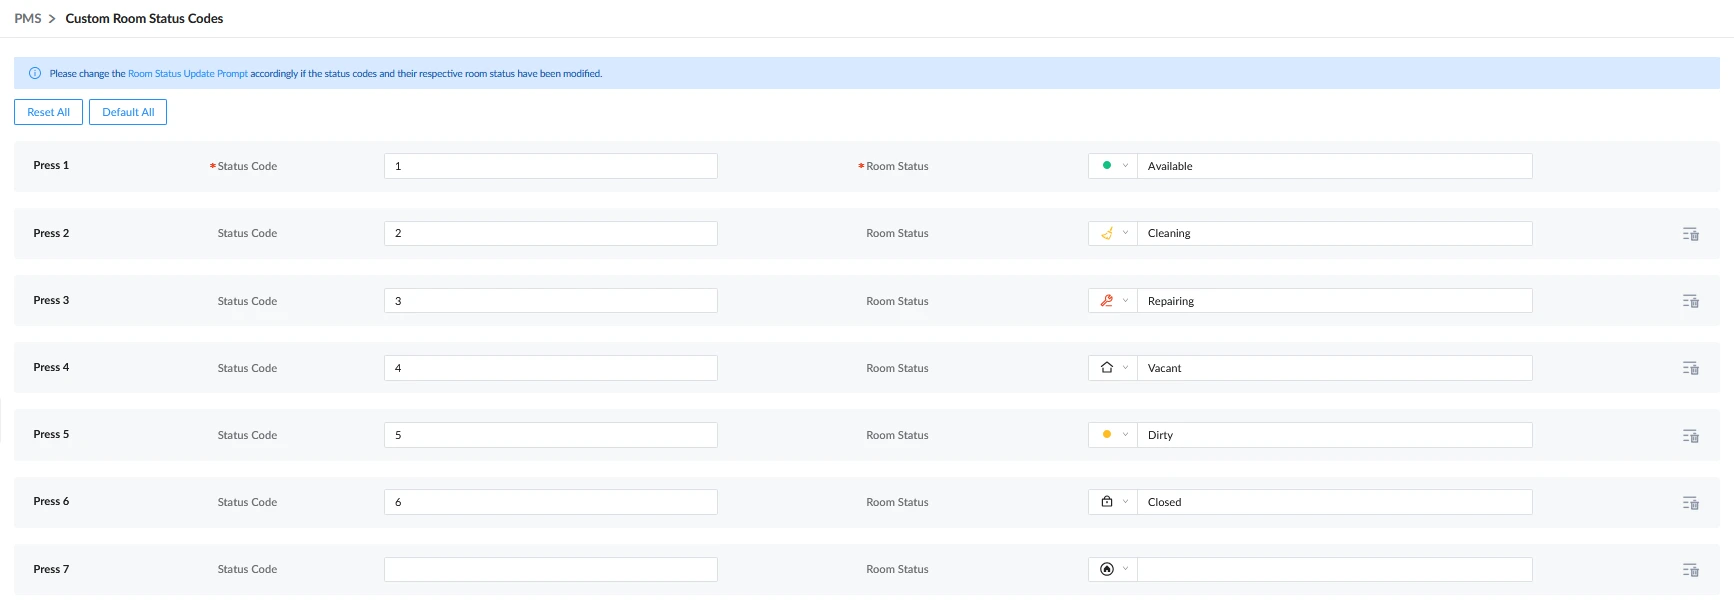
If you change a status code or its mapped room status, you must also update the Room Status Update Prompt under PMS → Basic Settings → Prompt to ensure that voice prompts correspond to the new configuration.
Room Availability Calendar
The Room Availability Calendar tab provides a calendar view of room availability over a two-week period. Staff can filter the calendar by Room Type and Room Status and navigate to previous or subsequent period sand highlights vacant rooms for each day.
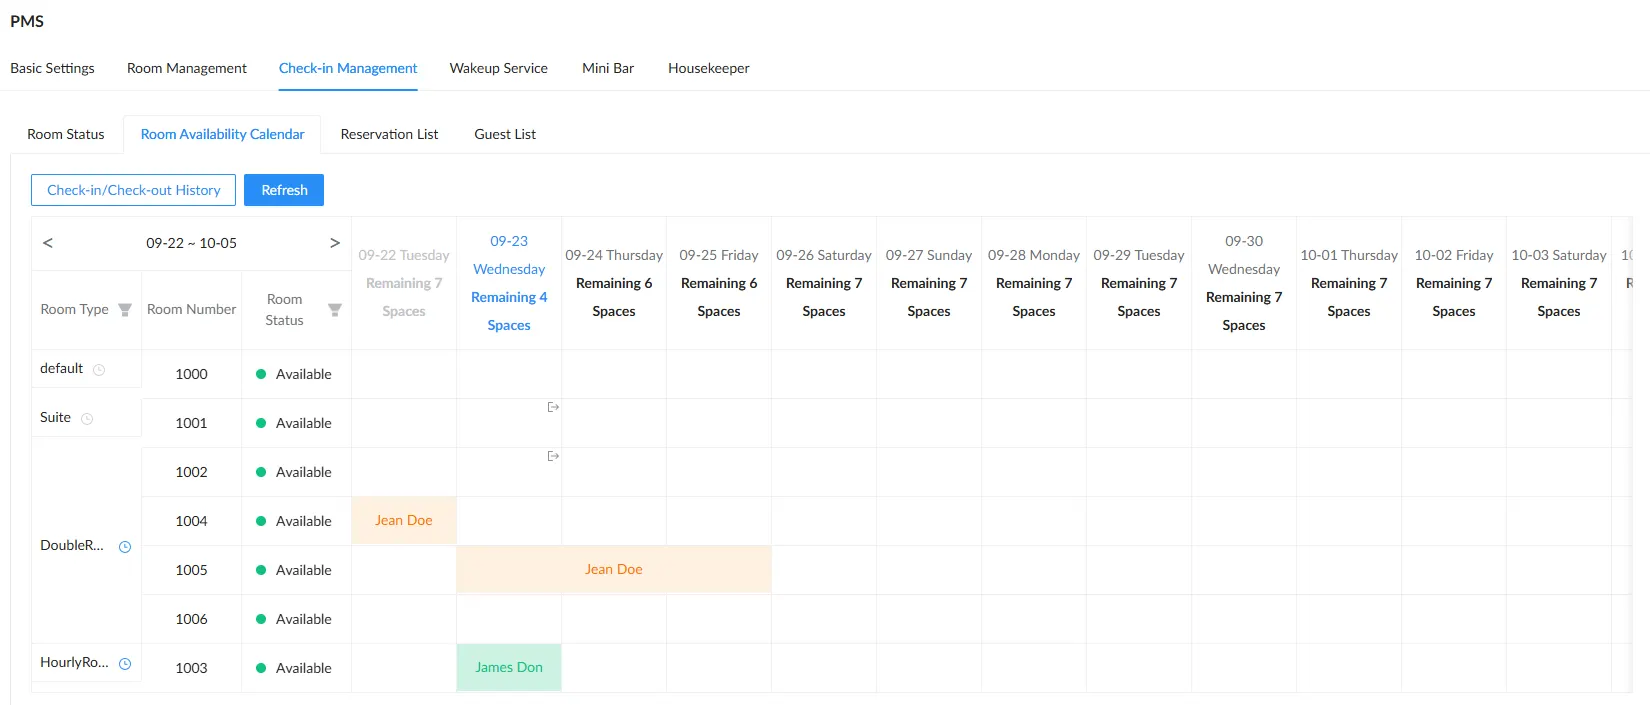
The calendar, by default starts on the current day, allowing staff to view room availability before and after the current date. The information shown on the calendar is described below.
- For available rooms, hovering over a day displays the daily rate for that date. Clicking the available date displays the Reservation button, which opens the Reservation window for the selected room and date.
- Clicking a checked-out entry by pressing the Check Out icon
 displays the details of the completed stay.
 displays the details of the completed stay.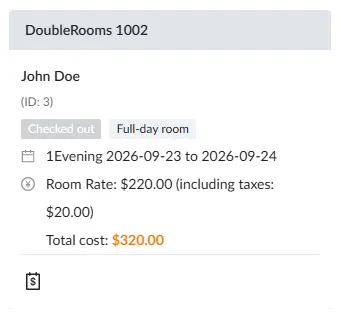
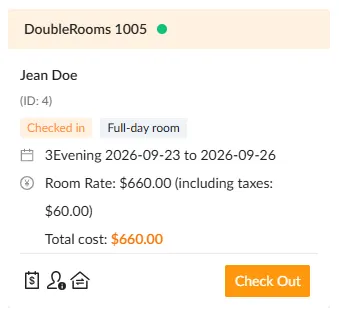
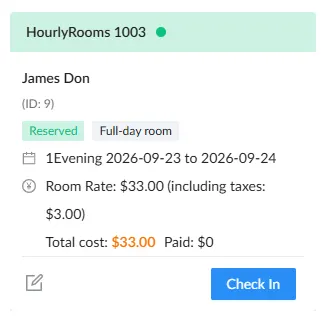
- Clicking a checked-in entry with an orange box displays the check-in information.
- Clicking a reserved entry with a green box displays the reservation information.
Check-in/Check-out History
The Check-in/Check-out History button redirects to the Check-in/Check-out History page, as described in the previously in Room Status section.
Refresh
The Refresh button refreshes the Room Availability Calendar to display the latest room availability and reservation information.
Reservation List
The Reservation List tab displays all active and historical room reservations created in the PMS. It provides a centralized view of upcoming reservations, allowing staff to manage and update them efficiently. The tab provides two modes:
Reservation List: Provides an interactive view for managing reservations.
Historical Reservations: Provides a limited set of operations on past reservations to help prevent accidental changes.
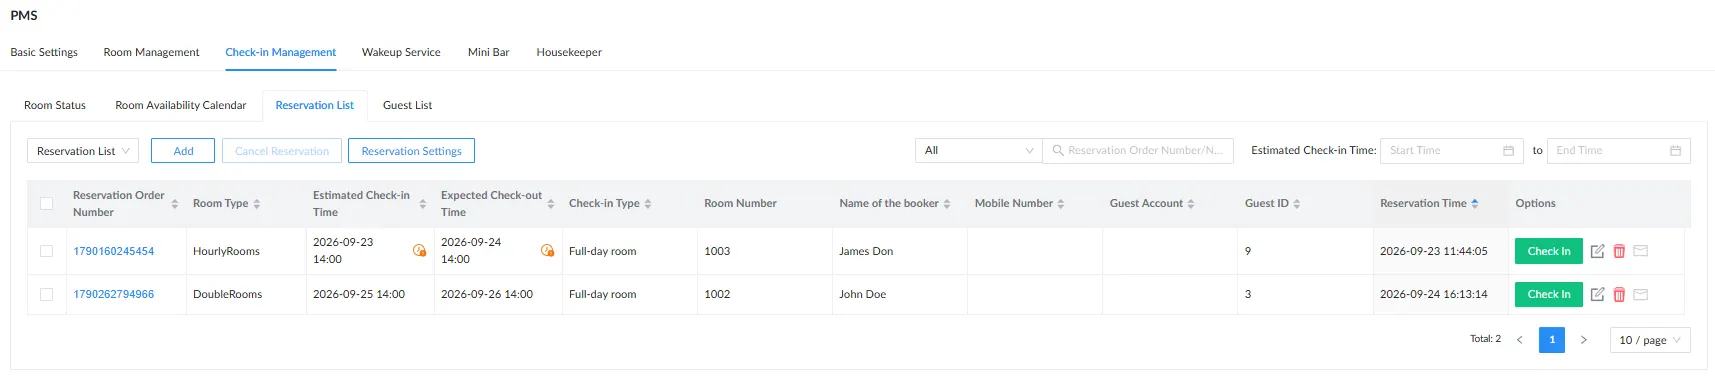
The search bar at the top of the Reservations table allows staff to search by Reservation Order Number, Name of the Booker, or Mobile Number. Staff can also filter reservations by All, Room Assigned, Room Not Assigned, or Check-in Time Exceeded, and specify a Start Time and End Time under Estimated Check-in Time. The table displays the following attributes:
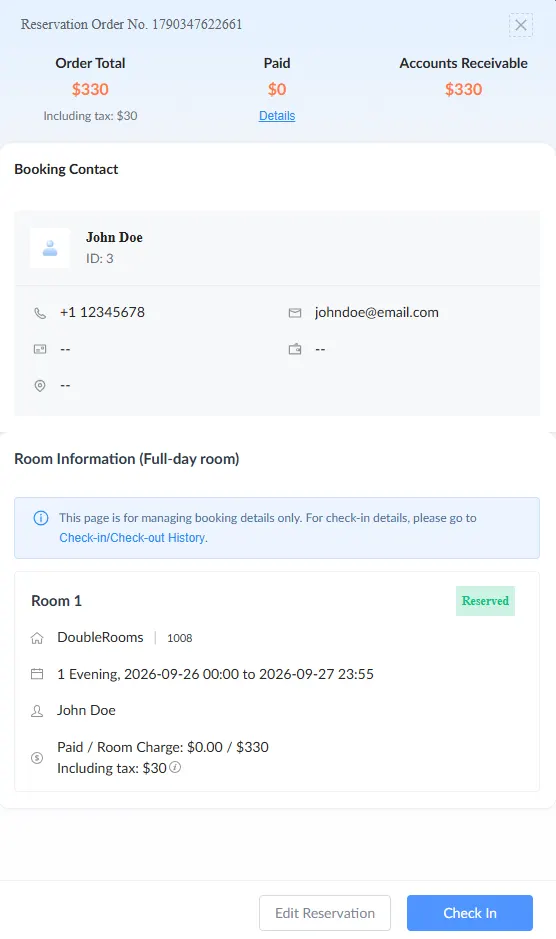
- Reservation Order Number: Displays the unique reservation identifier. Clicking the reservation number opens the Reservation Order, which contains the complete reservation details, with options to Check In or Edit the reservation.
- Room Type: Displays the room type specified for the reservation.
- Estimated Check-in Time: Displays the estimated check-in time for the reservation.
- Expected Check-out Time: Displays the expected check-out time for the reservation.
- Check-in Type: Displays the check-in type specified for the reservation, either Full-day Room or Hourly Room.
- Room Number: Displays the room number assigned to the reservation. If no room has been assigned, click Assign Rooms to assign a room(s) to the reservation.
- Name of the Booker: Displays the first and last name of the Booking Contact who made the reservation.
- Mobile Number: Displays the mobile number of the Booking Contact.
- Guest Account: Displays the guest account of the Booking Contact.
- Guest ID: Displays the unique ID of the Booking Contact.
- Reservation Time: Displays the date and time when the reservation was created.
- Options: Provides icons for performing operations. The functions of these icons are detailed below.
- The Edit icon in Options allows the staff to modify a created reservation by making the required changes and pressing Save.
- The Delete icon in Options allows the staff to delete a specific reservation by pressing the icon and confirming the deletion by pressing OK.
- The Email icon
 in Options allows the staff to manually send the Self Check-In email for a specific reservation.
 - The Check In button
 in Options to open the Check In window, where staff can verify the reservation information and finalize the check-in.
- The Edit icon
 in Options allows the staff to manually send the Self Check-In email for a specific reservation.
 in Options to open the Check In window, where staff can verify the reservation information and finalize the check-in.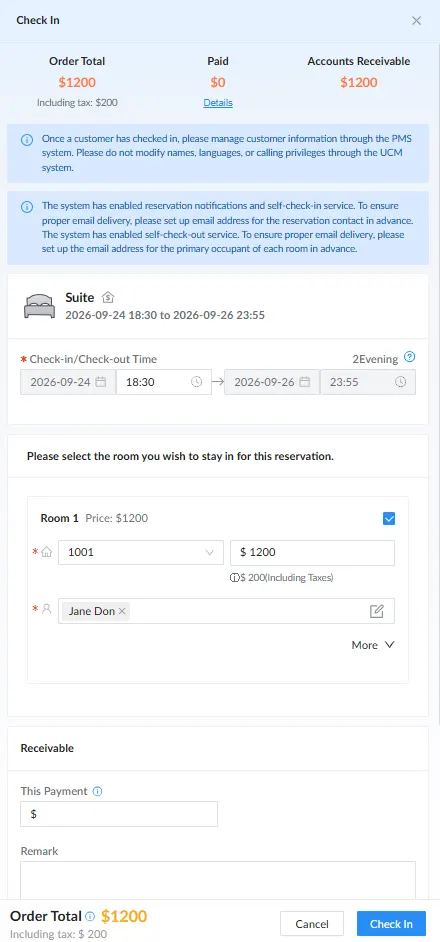
Add a Reservation
To manually add a reservation, follow the instructions below:
- Click Add, select either Full-day Room or Hourly Room, then press OK to open the Reservation window.
- Configure the parameters as described in the table below and press Reservation.
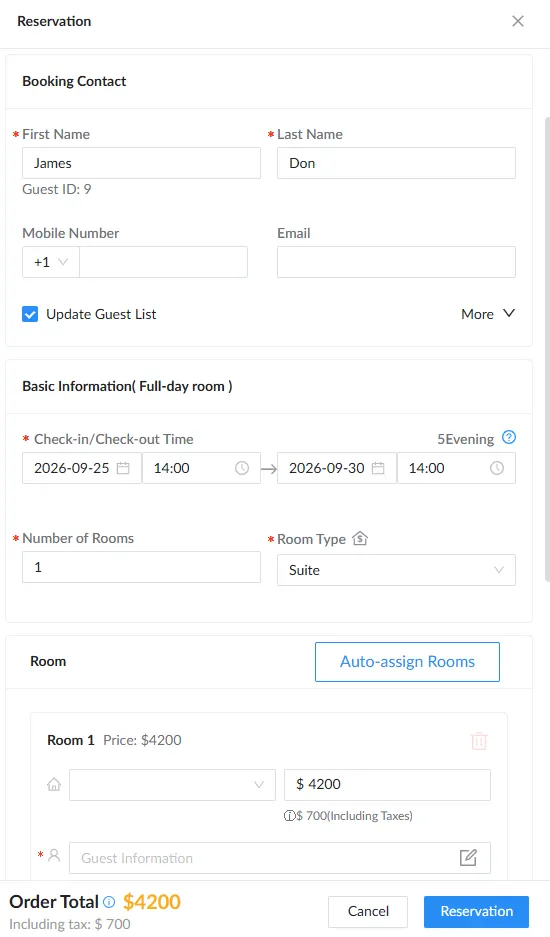
Parameter | Description |
Booking Contact | |
First Name | Specifies the booking contact’s first name. |
Last Name | Specifies the booking contact’s last name. |
Mobile Number | Specifies the booking contact’s mobile number. |
Specifies the booking contact’s email address, which can be used to send automatic check-in and check-out emails. | |
Guest Account | Specifies the unique identifier for the booking contact in the PMS database. |
Guest Credit Money | Displays the available credit for the booking contact. |
Guest Category Code | Specifies the category code assigned to the booking contact. |
Address | Specifies the booking contact’s address. |
Update Guest List | When checked, updates the booking contact’s information in the global customer database. |
Basic Information | |
Check-in/Check-out Time | Sets the check-in and check-out time for the guest(s). The check-in time cannot be earlier than the current system time, and the check-out time cannot be earlier than the check-in time. Note: The allowed range is within 6 months from the check-in date. |
Number of Rooms | Sets the number of rooms to be reserved. |
Room Type | Specifies the type of room to be reserved. |
Room | |
Auto-asssign Rooms | Allows the system to automatically assign rooms that correspond to the requirements configured in Basic Information. Note: This option is disabled if the required fields in Basic Information are not completed or if no eligible rooms are available. |
Room Number | Selects the room(s) to be reserved manually. |
Total Price (Including Taxes) | Displays the calculated total price, including taxes. The price can be modified. The tax amount is calculated using the following formula: Tax = Actual Price ÷ (1 + Tax Rate) × Tax Rate |
Guest Information | Opens the Edit Guest Information window, up to 8 guests can be added per reservation by clicking the Add icon. The following information can be configured for each guest:
|
Call Privileges | Sets the permission level for outgoing calls for the guest(s). The available options are:
The default setting is “Internal”. |
Language | Sets the preferred language for voice prompts. When set to Default, the global PBX voice prompt language setting is used. Supported languages are English and Chinese. Note: The wake-up service prompt is played in the selected language. |
Receivable | |
This Payment | Specifies the amount paid by the booking contact during check-in. |
Remark | Adds additional information or notes about the booking contact’s stay, special requests, or other relevant details. |
Cancel Reservations
Reservations can be canceled individually. Follow the instructions below:
- Click the Delete icon in Options for a target reservation.
- A pop-up appears with a warning if a prepayment exists for the reservation and prompts staff to enter the reason for cancellation. Once completed, press OK to confirm the cancellation.
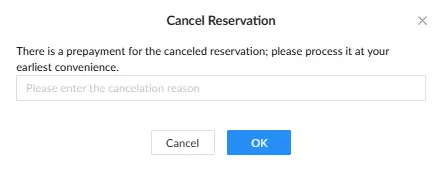
Reservations can also be canceled in batches. Follow the instructions below:
- Select the checkboxes for the target reservations or use the global checkbox to select all reservations, then click Cancel Reservation.
- A pop-up appears with a warning if a prepayment exists for the reservation and prompts staff to enter the reason for cancellation. Once completed, press OK to confirm the cancellation.
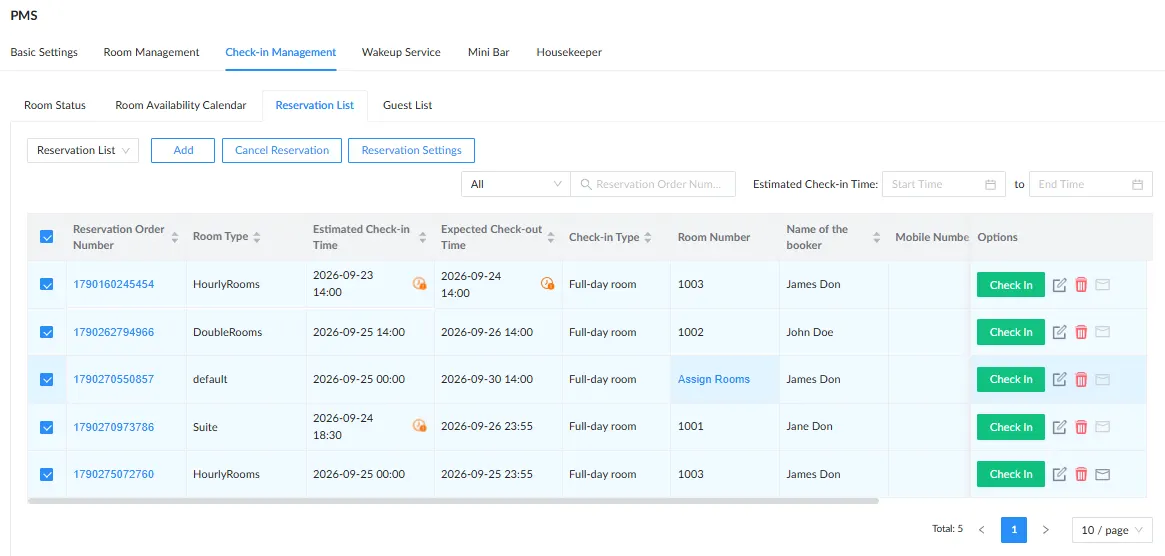
Reservation Settings
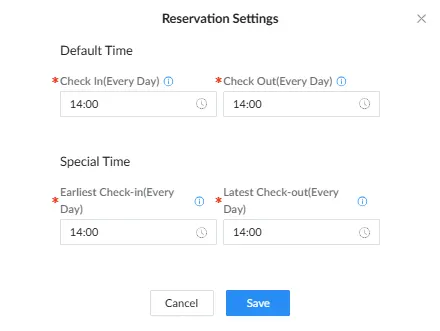
To configure the reservation settings, click the Reservation Settings button at the top of the table. Then configure the Default Time and Special Time settings:
- Check In (Every Day): Sets the default estimated check-in time when creating a reservation.
- Check Out (Every Day): Sets the default estimated check-out time when creating a reservation.
- Earliest Check-in (Every Day): Sets the earliest check-in time that can be configured in a reservation order.
- Latest Check-out (Every Day): Sets the latest check-out time that can be configured in a reservation order. If the guest has not checked out by this time, the overtime fees may be applied based on the circumstances.
The reservation table displays the same attributes in Historical Reservation, with only the Delete and Info icons in Options.

Guest List
The Guest List tab provides a centralized directory of all guests stored in the PMS. It allows staff to manage guest records.

The search bar at the top of the Guest table allows staff to search the table by Guest Name and Mobile Number. The table displays the following attributes:
- Guest ID: Displays the unique ID assigned to the guest.
- Guest Name: Displays the guest’s first and last name.
- Email: Displays the guest’s email address.
- Mobile Number: Displays the guest’s mobile number.
- Guest Category Code: Displays the guest category code assigned to the guest.
- Options: Provides icons for performing operations. The functions of these icons are detailed below.
- The Edit icon in Options allows the staff to modify a guest’s information by making the required changes and pressing Save.
- The Delete iconin Options allows the staff to delete a specific guest by pressing the icon and confirming the deletion by pressing OK.
- The Edit icon
Add Guest
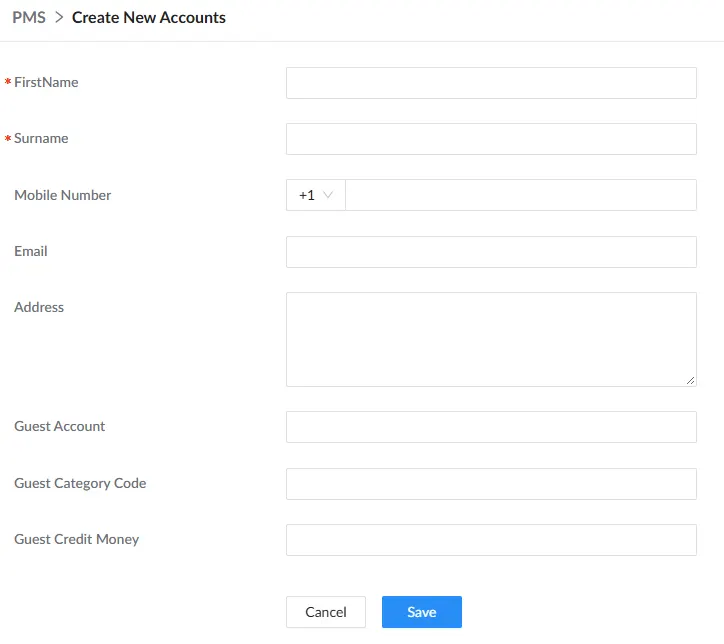
To manually add a guest, follow the instructions below:
- Click on the Add button.
- Enter the guest’s information and press Save.
Delete Guests
Guests can be deleted individually. Follow the instructions below:
- Click the Delete icon in Options for a target guest record.
- Click OK on the confirmation popup to complete the deletion.
Guests can also be deleted in batches. Follow the instructions below:
- Select the checkboxes for the target guests or use the global checkbox to select all guests, then click Delete button.
- Click OK on the confirmation popup to complete the deletion.
Import/Export Guests
Bulk management is also supported through Import and Export, which allow staff to upload guest data and download the guest list in supported formats. These functions can simplify guest data management when migrating from another PMS or maintaining external records.
The supported formats are:
- XLSX
- CSV
Wakeup Service
The Wake-Up Service page allows hotel staff to schedule wake-up calls for guests at a specific time. The wake-up call is associated with the guest’s room, and the IP phone assigned to that room rings at the scheduled time.
Pending Wake-Up
The Pending Wake-Up tab provides options to configure new wake-up services and manage existing ones. The following procedures describe how to add, modify, and delete wake-up services.
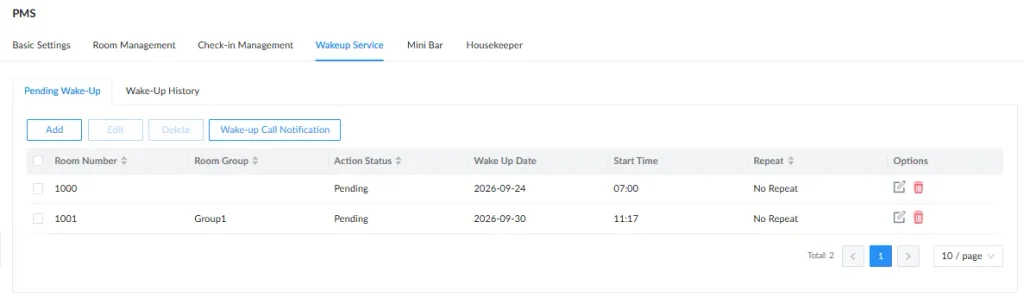
The Pending Wake-Up table displays the following attributes:
- Room Number: Displays the room number associated with the wake-up call.
- Room Group: Displays the room group associated with the room.
- Action Status: Displays the current status of the wake-up call.
- Wake-Up Date: Displays the scheduled date of the wake-up call.
- Start Time: Displays the scheduled start time of the wake-up call.
- Repeat: Displays the configured repeat setting for the wake-up call.
- Options: Provides icons for performing operations. The functions of these icons are detailed below.
- The Edit icon Options allows the staff to modify a pending Wake-Up Service by making the required changes and pressing Save.
- The Delete iconin Options allows the staff to delete a specific pending Wake-Up Service by pressing the icon and confirming the deletion by pressing OK.
- The Edit icon
Add a Wake-Up service
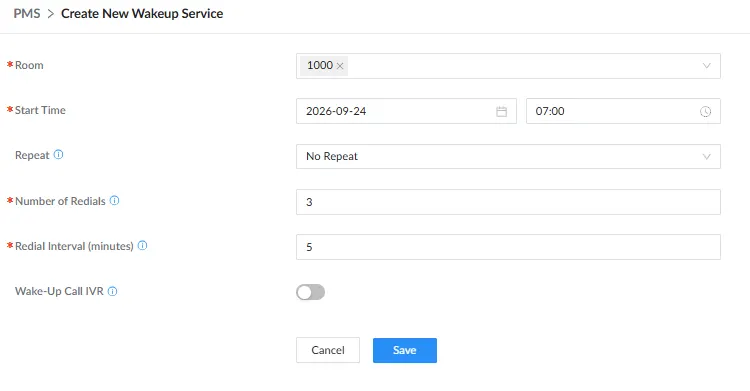
To add a Wake-Up service, follow the instructions below:
- Select the wake-up service tab, click the Add button to create a new wake-up service schedule.
- Configure the parameters as described in the table below and press Save.
Parameter | Description |
Room | Select the rooms or room groups for which to configure the wake-up call service. |
Start Time | Specifies the date and time when the wake-up call starts. |
Repeat | Specifies the recurrence of the wake-up call.
|
Number of Redials | Configures the number of times the system repeats the call attempt if the call is not answered. The default setting is 3. The valid range is 0 to 10. A value of 0 disables redialing. |
Redial Interval (minutes) | Configures the interval between call attempts. The default setting is 5 minutes. |
Wake-Up Call IVR | Enables or disbales IVR processing for wake-up calls. When enabled, the system plays prompts to the guest and sends email or voice notifications to the corresponding IVR destination based on the guest’s key presses. |
Wake-up call IVR Strateg | Specifies the IVR strategy for wake-up calls. Only IVRs with PMS Wake-Up Call Service Mode enabled can be selected. Pressing IVR Setting redirects to the IVR settings page. |
Wake-up Call IVR Notification | Configures notifications for wake-up calls.
|
Edit a Wake-Up Service
Wake-Up Services can be edited individually. Follow the instructions below:
- Click the Edit icon in Options for the target Wake-Up Service.
- Make the required changes and click Save.
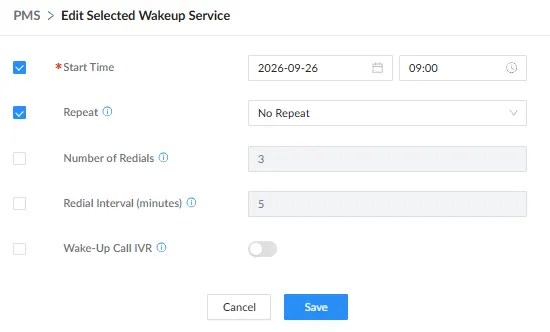
Wake-Up Services can also be edited in batches. Follow the instructions below:
- Select the checkboxes for the target Wake-Up Services or use the global checkbox to select all, then click the Edit button at the top of the table.
- Enable the setting that will be modified for the batch and make the changes and click Save.
Delete Wake-Up Services
Wake-Up Services can be deleted individually. Follow the steps below:
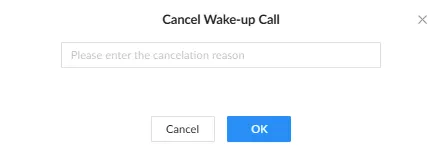
- Click the Delete icon in Options for the target Wake-Up Service.
- Enter the reason for deletion and click OK.
Wake-Up Services can also be deleted in batches. Follow the steps below:
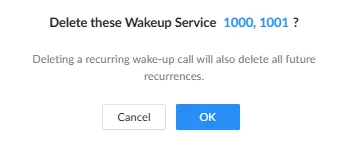
- Select the checkboxes for the target Wake-Up Services or use the global checkbox to select all Wake-Up Services, then click Delete at the top of the table.
- A warning for recurring Wake-Up Services is displayed. Click OK to confirm the deletion.
Wake-up Call Notification
The administrator can configure to send a Voicemail or an Email Notification in case the Wake-up call is not answered. The configuration parameters are described in the table below.
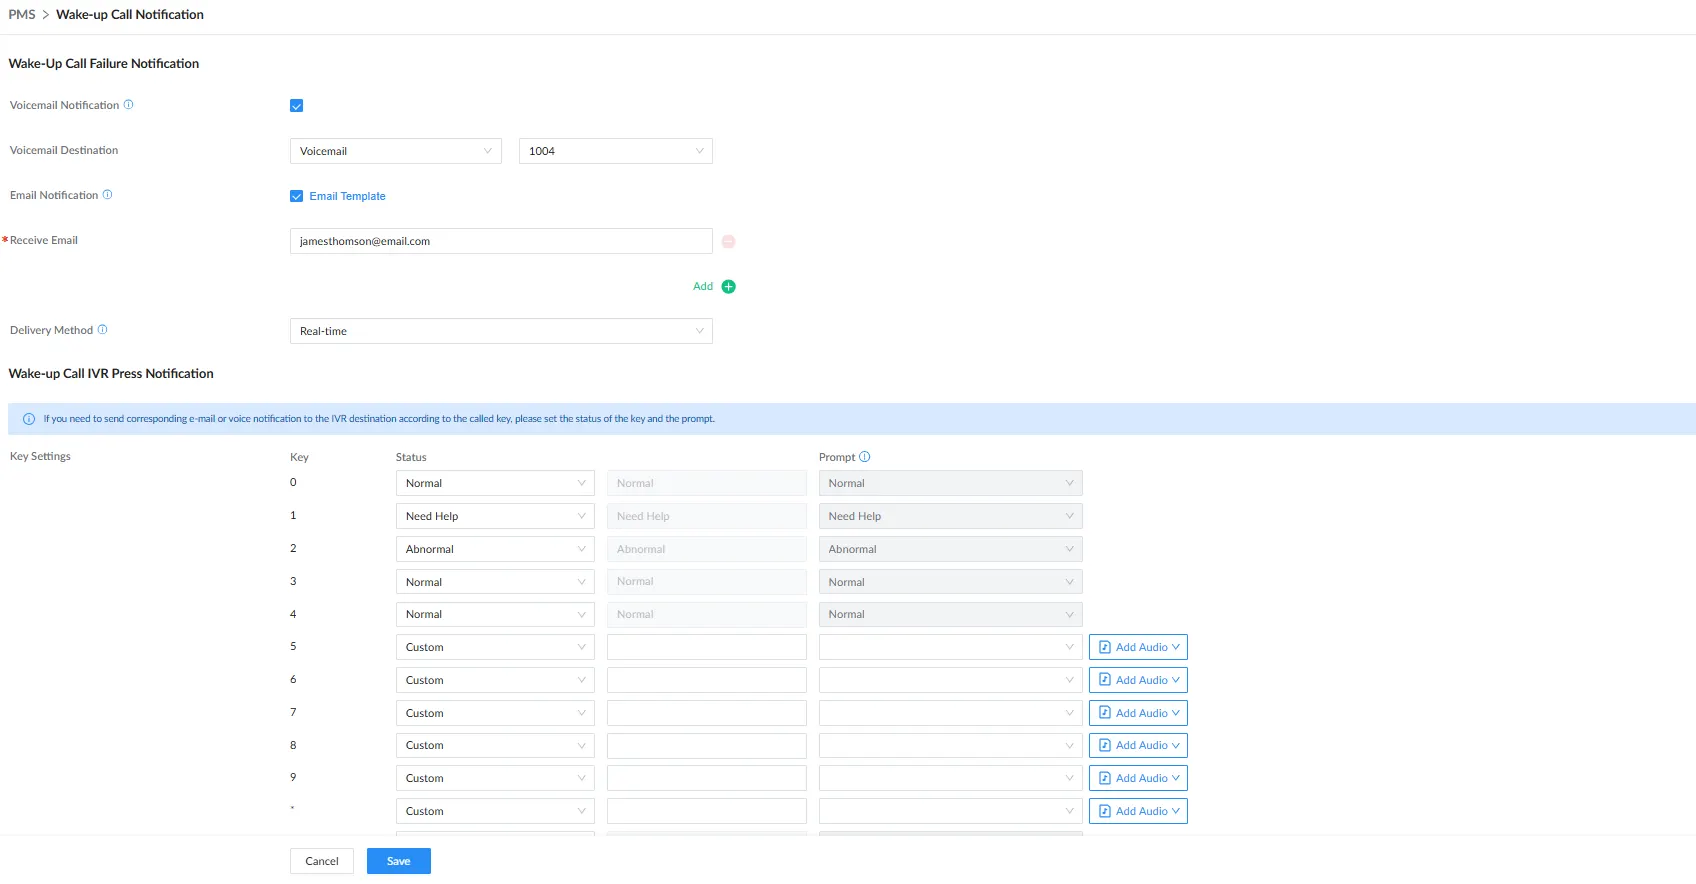
Voicemail Notification | Enable to send a notification to the configured voicemail extension/group when a wake-up call has failed, meaning it has non-answered status. Default settings is “disabled”. Note: No notification will be sent if no failed wake-up call has occurred. |
Voicemail Destination | Choose the voicemail/group to receive the failed wake-up call notifications. |
Email Notification | Enable to send notifications of failed wake-up calls to the email addresses configured, based on the interval chosen. Any wake-up call that is not marked as “Answered” will be included in these notifications. If there are no failed wake-up calls, no alerts will be sent. Default settings is “disabled”. |
Receive Email | Configure the e-mail address to receive failed wake-up call notifications. Maximum number of allowed email addresses is 5. |
Delivery Method | Choose the delivery method of the email notifications.
Default setting is “Periodic”. |
Alert Sending Interval | The frequency of notification emails for all failed wakeup calls that happen during that cycle in minutes, hours or days. |
Key Settings | Set the settings for the key. You can select predefined statuses for a specific key, and you can also enter a custom status which will be sent on the notificatiom email. The user can set a preloaded voice prompt or upload a custom one. |
Wake-Up History
The Wake-Up History tab allows staff to view and manage past wake-up call records.
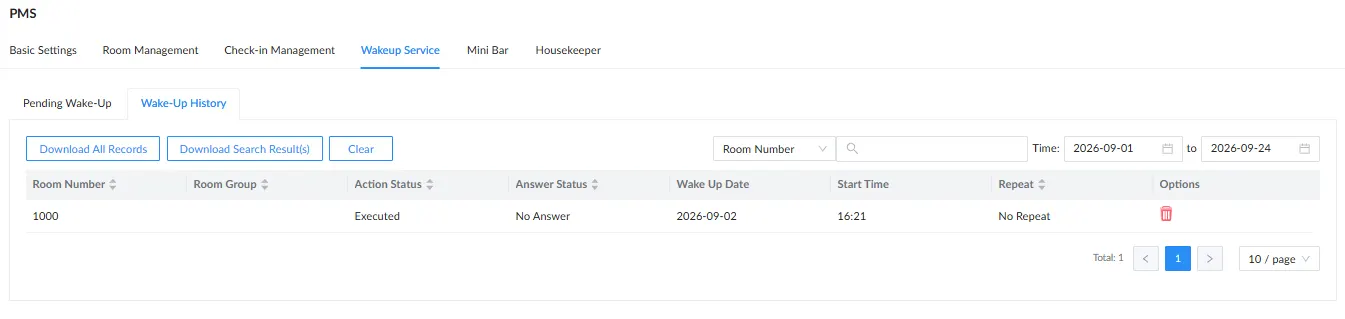
The search bar at the top of the Wake-Up History table allows staff to search by Room Number and Room Group. Staff can also filter records by Room Number, Room Group, and Answer Status, and specify a Start Date and End Date. The table displays the following attributes:
- Room Number: Displays the room number associated with the wake-up call.
- Room Group: Displays the room group associated with the room.
- Action Status: Displays the current status of the wake-up call action.
- Answer Status: Displays whether the wake-up call was answered.
- Wake-Up Date: Displays the date of the wake-up call.
- Start Time: Displays the scheduled start time of the wake-up call.
- Repeat: Displays the configured repeat setting for the wake-up call.
- Options: Provides icons for performing operations. The functions of these icons are detailed below.
- The Delete iconin Options allows staff to delete a specific Wake-Up History record by pressing the icon and confirming the deletion by pressing OK.
- The Delete icon
Download Records
The staff can download a CSV file containing all wake-up call history data by pressing Download All Records or download the results of a specific search by pressing Download Search Result(s).
Clear
Wake-Up History records can be deleted individually. Follow the steps below:
- Click the Delete icon in Options for the target Wake-Up History record and press OK.
Wake-Up History records can also be cleared completely by clicking Clear at the top of the table.
Mini Bar
The Minibar page allows hotel staff to bill guests for goods consumed during their stay or remove items from the guest’s minibar record. The configuration parameters are described in the table below.
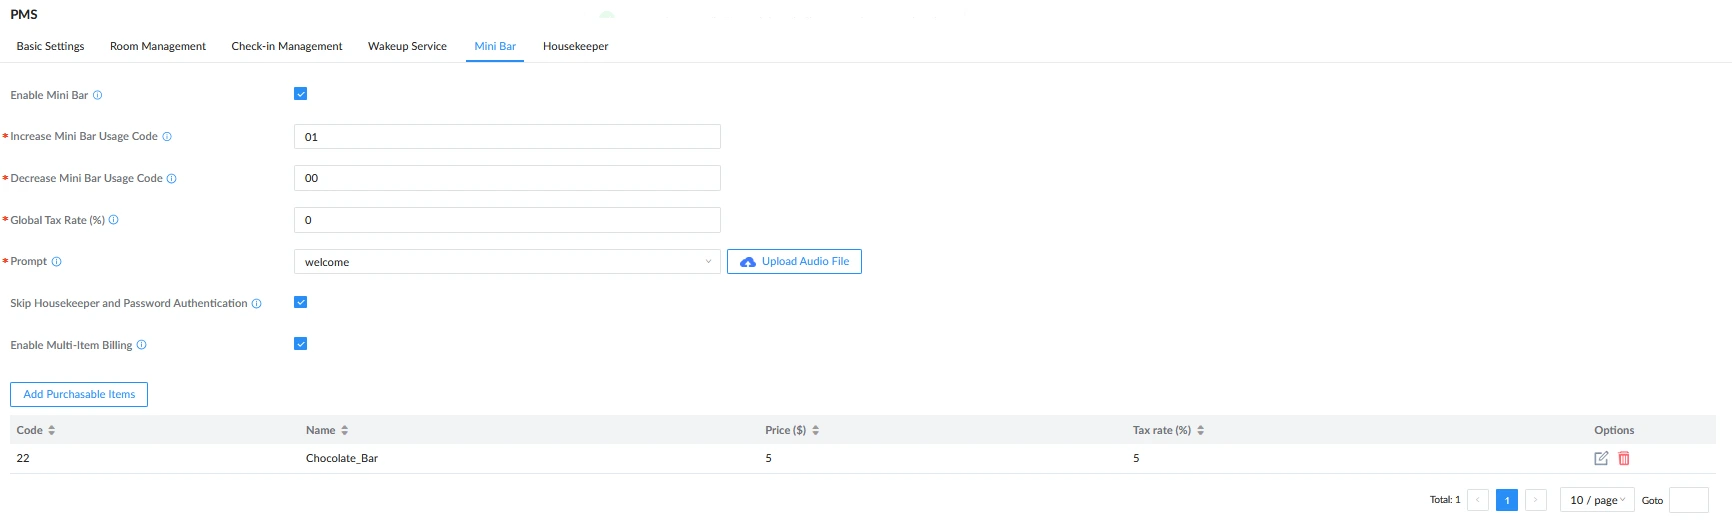
Enable Mini Bar | Enables or disables the Mini Bar feature. When enabled, feature codes can be dialed to increase or decrease the usage of Mini Bar items. |
Increase Mini Bar Usage Code | Specifies the feature code used to access Mini Bar billing. The housekeeper dials this code followed by the housekeeper code, password, and item code to add the item to the guest’s bill. |
Decrease Mini Bar Usage Code | Specifies the feature code used to access Mini Bar billing. The housekeeper dials this code followed by the housekeeper code, password, and item code to remove the item from the guest’s bill. |
Global Tax Rate (%) | Specifies the global tax rate applied to Mini Bar items. If no individual tax rate is configured for an item, the global Mini Bar tax rate is applied. |
Prompt | Specifies the tone played when a housekeeper dials the Mini Bar feature code. The tone indicates the corresponding item code. Press Add Audio and Upload Audio File to upload an audio file, or create an AI Generated Speech prompt by configuring the following settings and pressing AI Generate:
|
Skip Housekeeper and Password Authentication | Disables housekeeper and password authentication when enabled. The housekeeper code is 0000 by default when this option is enabled. |
Enable Multi-Item Billing | Enables or disables multiple Mini Bar items to be entered during a single call. Separate each item code with an asterisk (*). |
The Mini Bar table displays the following attributes:
- Code: Displays the unique code number dialed to purchase or remove the item.
- Name: Displays the unique name assigned to the item.
- Price ($): Displays the price of the item.
- Tax Rate (%): Displays the tax rate configured for the item. Supports percentage values from 0 to 100, with “.” as the decimal separator. If left blank, the Global Tax Rate (%) value is applied.
- Options: Provides icons for performing operations. The functions of these icons are detailed below.
- The Edit iconin Options allows staff to modify a created Purchasable Item by making the required changes and pressing Save.
- The Delete iconin Options allows staff to delete a specific Purchasable Item by pressing the icon and confirming the deletion by pressing OK.
- The Edit icon
Add Purchasable Items
To add a new item, follow the steps below:
- Click the Add Purchasable Items button.
- Enter the item information and click Save.
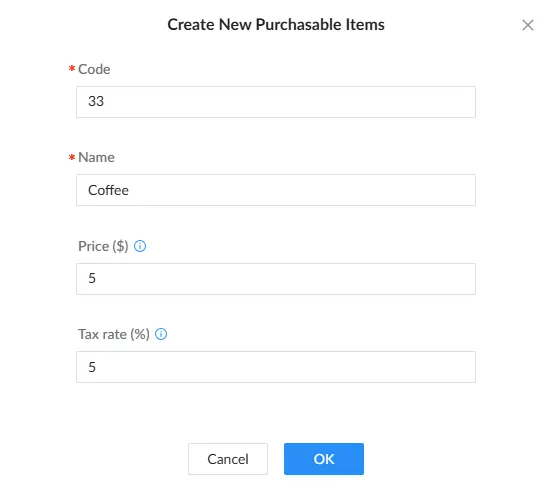
Code | Specifies the item code. Supports 2–18 digits only. |
Name | Specifies the item name. Supports up to 64 characters. |
Price ($) | Specifies the item price. Supports up to 12 characters. |
Tax rate (%) | Specifies the tax rate for the item. Supports percentage values from 0 to 100 with “.” as the decimal separator. If left blank, the Global Tax Rate (%) value is applied. |
The Mini Bar table displays the same attributes as the table and provides the following Options icons:
- The Edit iconin Options allows staff to modify a created Purchasable Item by making the required changes and pressing Save.
- The Delete iconin Options allows staff to delete a specific Purchasable Item by pressing the icon and confirming the deletion by pressing OK.
In the configuration example above, the housekeeper dials 01 to add an item to the guest’s bill or 00 to remove an item.
The system prompts the housekeeper to enter the Housekeeper Code followed by the Password, with each value separated by an asterisk (*), then press the pound key (#). After successful authentication, the housekeeper can enter the item code. The system announces the result of the operation. Refer to the Housekeeper section for more information about housekeeper credentials.
When Enable Multi-Item Billing is enabled, the housekeeper can enter multiple item codes during a single call by separating each item code with an asterisk (*).
After an item is added to a guest’s bill by a housekeeper, it can be viewed by navigating to Room Status and pressing the Bill icon for the corresponding room. Refer to the Room Status section for more information about Billing.
Housekeeper
The Housekeeper page allows administrators to manage hotel cleaning services by configuring a unique code and password for each housekeeper. Housekeepers can use these credentials on the IP phone assigned to a room to update the room status or manage Mini Bar usage by dialing the corresponding PMS feature code followed by their credentials.

The Housekeeper table displays the following attributes:
- Housekeeper Code: Displays the code assigned to the housekeeper.
- Password: Displays the password configured for the housekeeper.
- Options: Provides icons for performing operations. The functions of these icons are detailed below.
- The Edit icon in Options allows staff to modify a created Housekeeper’s credentials by making the required changes and pressing Save.
- The Delete icon in Options allows staff to delete a specific Housekeeper’s credentials by pressing the icon and confirming the deletion by pressing OK.
- The Edit icon
Add a Housekeeper
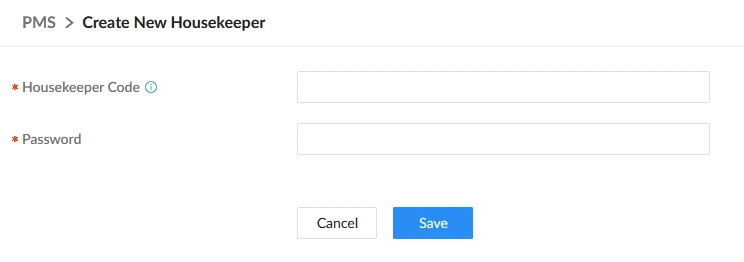
To configure a new housekeeper’s credentials, follow the steps below:
- Click Add.
- Enter the Housekeeper Code and Password.
- Once confirmed, click Save.
PMS FEATURE CODES
The Local PMS service includes a set of pre-defined feature codes specific to PMS functions. These feature codes can be accessed under Basic Call Features → Feature Codes → Feature Codes:
- PMS Wakeup service
- Update PMS Room Status
- PMS Remote Wake-up Service
These feature codes can be dialed from the endpoint in a hotel room or from the reception to trigger specific PMS actions. An IVR guides staff through the available options and prompts them to select the action to perform.

PMS Wakeup Service
The PMS Wake-Up Service can be accessed by dialing the default feature code *35. The IVR provides options to add, update, activate, or deactivate a wake-up service. Each action is assigned to a specific IVR menu option.
For example, the IVR may prompt the staff to press 1 to add a wake-up service, 2 to update it, 3 to activate it, or 4 to deactivate it
Update PMS Room Status
The Update PMS Room Status can be accessed by dialing the default feature code *23. The feature code can be used in two ways:
- Using the IVR prompts: Dial the room status feature code followed by the housekeeper code. After the system prompt, enter the key corresponding to the desired room status. The IVR will then request selection of either Room Cleaning service (press 1) or Room Repair service (press 2).
- Example: A housekeeper with code 0001 dials *230001, listens to the available status options, and presses 1 to set the room status to Available.
- Example: A housekeeper with code 0001 dials *230001, listens to the available status options, and presses 1 to set the room status to Available.
- Direct status update (no prompts): Dial the room-status feature code, followed by * (star), the housekeeper code, another * (star), and the room-status option key. This bypasses the IVR prompts and directly updates the room status.
- Example: A housekeeper with code 0001 dials 230001*1 to set the room status to Available, assuming the housekeeper already knows the status option codes.
PMS Remote Wakeup Service
The PMS Remote Wake-Up Service can be accessed by dialing the default feature code *37. It allows staff to add, update, activate, or deactivate wake-up services for other room extensions. This feature is intended for reception staff to manage wake-up services for multiple hotel rooms without accessing each room’s endpoint.
SUPPORTED MODELS
The following table describes the supported local PMS features for each Grandstream PBX.
PMS Feature | UCM6300/A | CloudUCM | SoftwareUCM | GCC PBX |
Reservations | Yes | Yes | Yes | No |
Check-In / Check-Out | Yes | Yes | Yes | Yes |
Billing | Yes | Yes | Yes | No |
Room Status | Yes | Yes | Yes | Yes |
Wake-Up Service | Yes | Yes | Yes | Yes |
Mini Bar | Yes | Yes | Yes | Yes |
Room Types & Pricing | Yes | Yes | Yes | No |
Room Groups | Yes | Yes | Yes | No |
Availability Calendar | Yes | Yes | Yes | No |
Guest Self-Service | Yes | Yes | Yes | No |
Guest List | Yes | Yes | Yes | No |
Check-In / Check-Out History | Yes | Yes | Yes | Yes |
Voicemail Backup | Yes | No | Yes | Yes |
PMS Feature Codes | Yes | Yes | Yes | Yes |