


OVERVIEW
This guide explains how to connect a WhatsApp Business phone number to a UCM using a WhatsApp Trunk, allowing the UCM to receive incoming WhatsApp voice calls.
With a WhatsApp Trunk configured on the UCM:
- Customers can call the business through WhatsApp.
- Incoming WhatsApp calls are received by the UCM through the WhatsApp Trunk.
- Incoming calls can be routed to the configured UCM destination through an Inbound Route.
To complete the configuration:
- Configure the WhatsApp application and phone number on Meta, and obtain the required Phone Number, Phone Number ID, and Access Token.
- Configure the WhatsApp Trunk on the UCM using the information obtained from Meta.
- Configure an Inbound Route for the WhatsApp Trunk and select the required destination.
Once the Inbound Route is configured, the WhatsApp Trunk is ready to receive and route incoming WhatsApp calls.
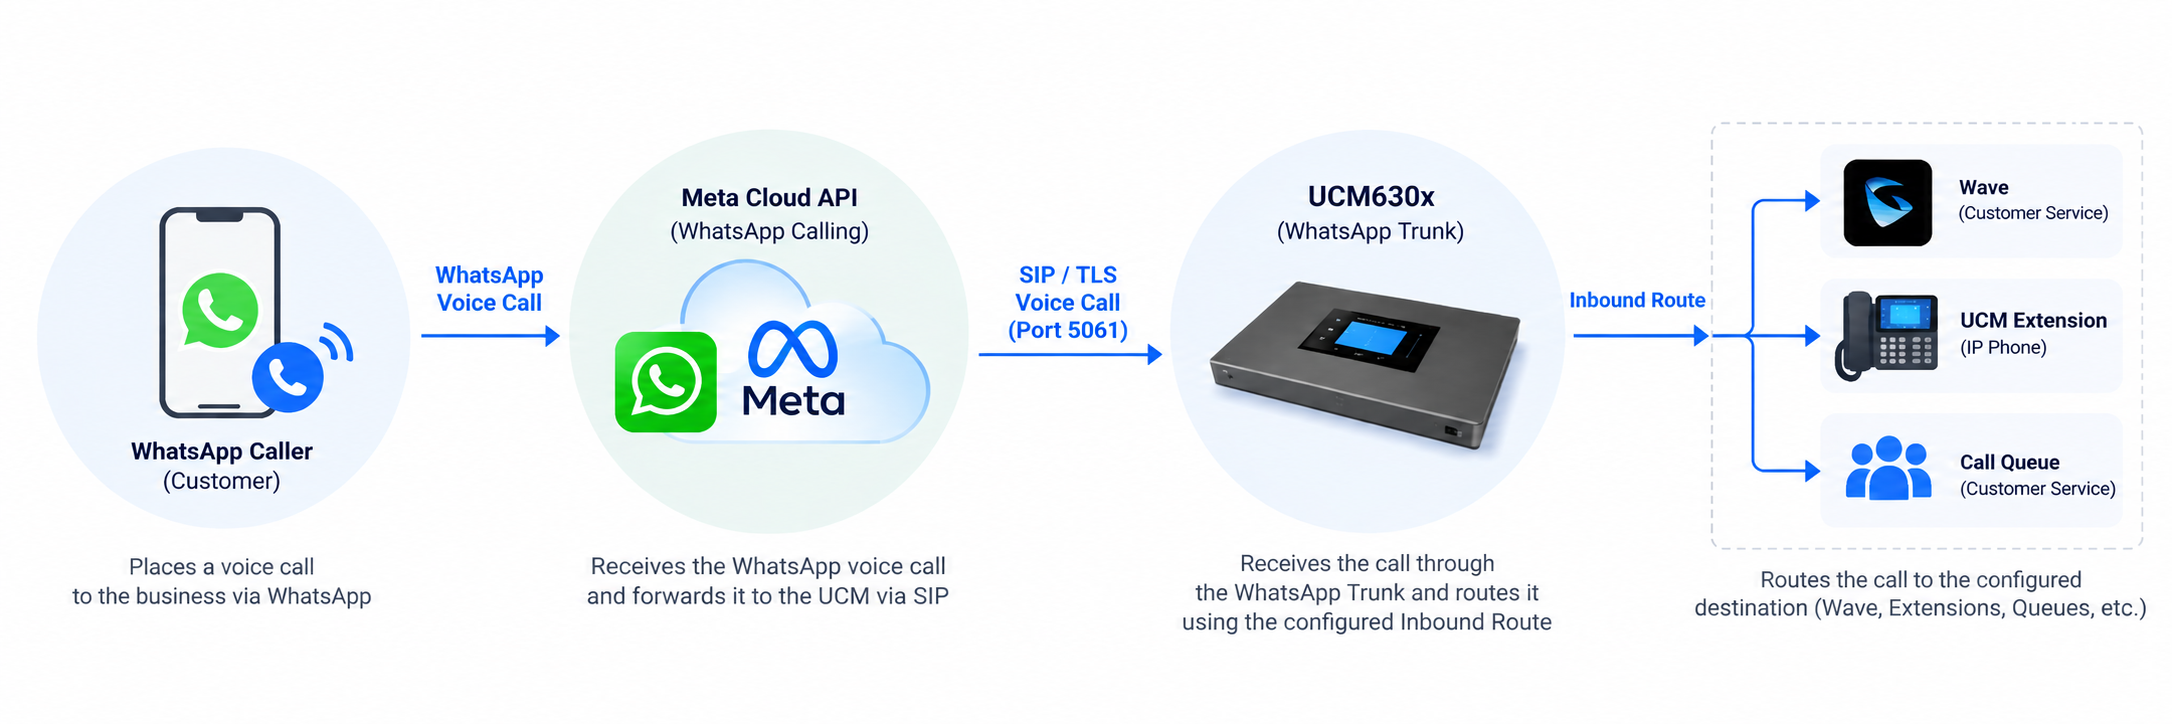
By completing the steps in this guide, you will have a WhatsApp Business number connected to the UCM and configured for WhatsApp voice calling, with incoming calls routed to the desired UCM destination.
PREREQUESITES
WhatsApp Business & Meta Requirements
- A phone number to be used with the WhatsApp Business API.
- The number must not be registered to any existing WhatsApp account (personal or business app).
- Ability to receive SMS/voice OTP for number verification.
- A Meta Business Portfolio with administrative access.
- A Meta Developer account registered at https://developers.facebook.com
UCM & Network Requirements
- A UCM6300/A Series or CloudUCM running a compatible firmware version (see SUPPORTED DEVICES section).
- The UCM must be publicly reachable via HTTPS with a valid CA-signed TLS/SSL certificate.
QUICK CONFIGURATION REFERENCE
| Step | Action | Key Requirement |
|---|---|---|
| 1 | Prepare Meta information | Meta application, WhatsApp phone number, Phone Number ID, and Access Token |
| 2 | Go to Extensions / Trunks → WhatsApp Trunk | Create a new WhatsApp Trunk |
| 3 | Enter the trunk parameters | Trunk Name, Phone Number, Phone Number ID, and Token |
| 4 | Save the WhatsApp Trunk | Graph API validation must succeed |
| 5 | Go to Extensions / Trunks → Inbound Routes | Select the corresponding WhatsApp Trunk |
| 6 | Click Add | Create the inbound rule |
| 7 | Configure the rule | Enter the Inbound Rule Name |
| 8 | Select Default Destination | Select the required call destination |
| 9 | Save the inbound rule | WhatsApp Trunk configuration is complete |
WHATSAPP CLOUD API SETUP (META SIDE)
This section covers all the Meta-side configuration required before the UCM can be set up. Complete all steps in this section first. By the end, you will have your Phone Number ID and a permanent access token ready to paste into the UCM portal.
Create Meta App and Configure WhatsApp
- Open Meta for Developers and sign in (If you don’t have a Meta developer account, complete the registration process).
- Click Create App.
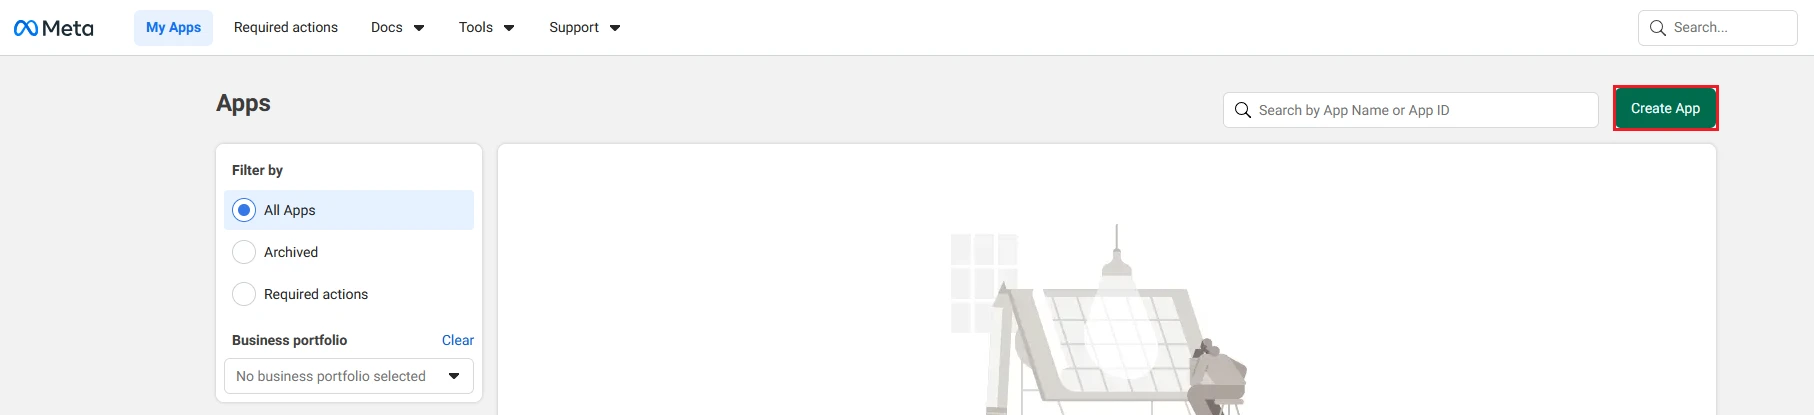
- Choose a name for your app.
- Under the Business messaging app category, choose the Connect with customers through WhatsApp use case.
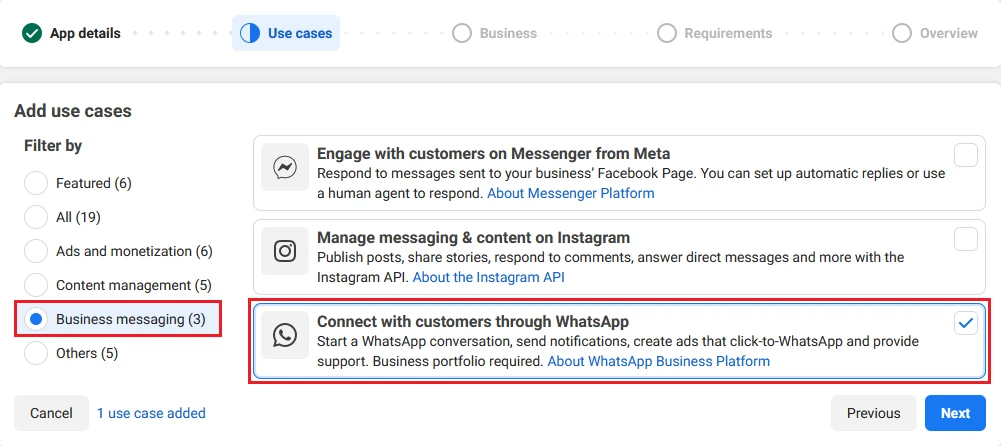
- Select an existing Meta Business Portfolio or follow the prompts to create a new one, then complete app creation.
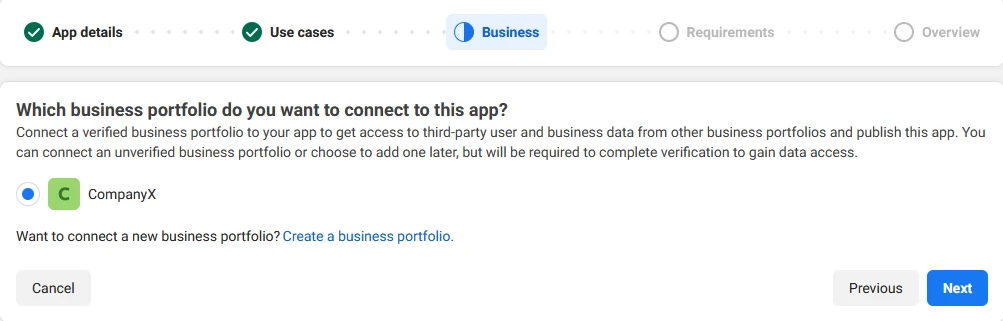
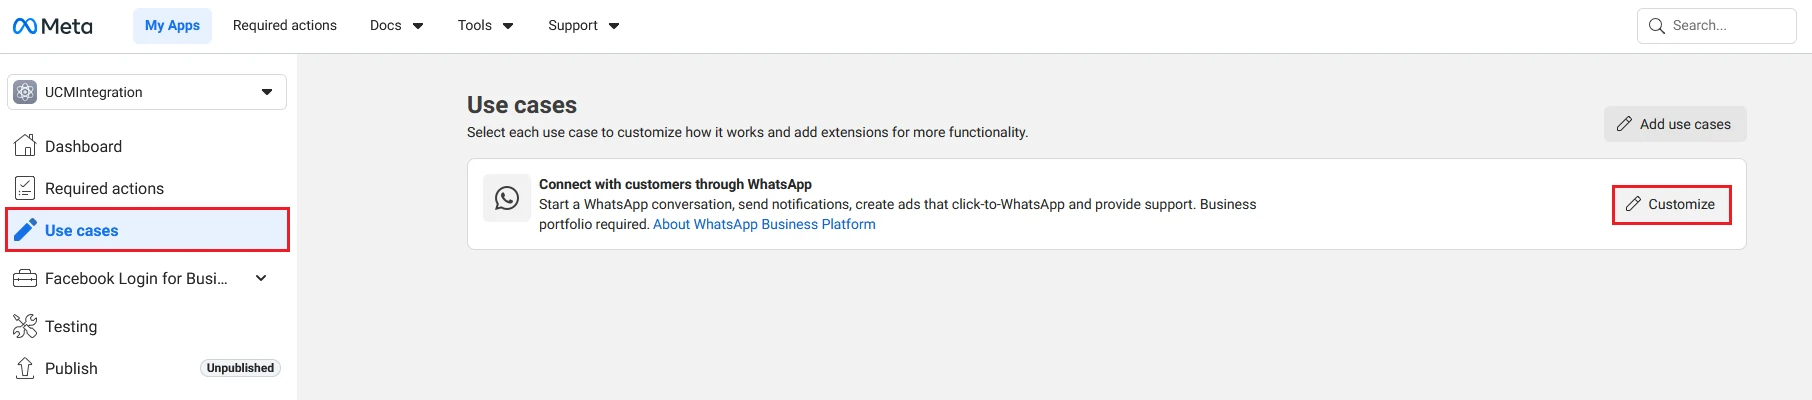
- In the left sidebar, click Use Cases (pencil icon), then click Customize under the Connect with customers through WhatsApp use case.
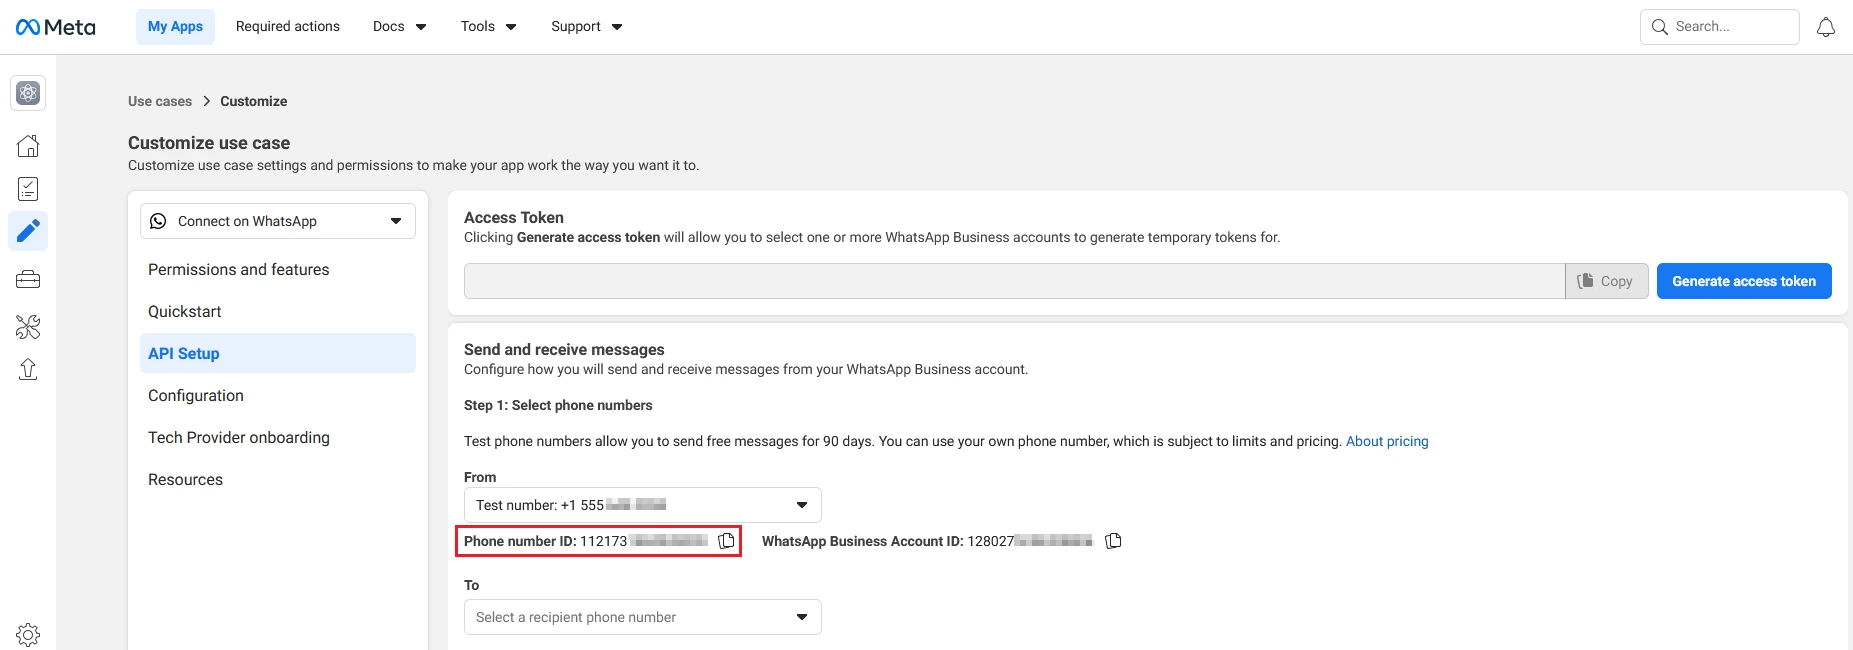
- In the Quickstart/API Setup section, locate and copy the Phone Number ID displayed for the test number (or your own number if already added). Save this value as it will be required during UCM configuration.
Send a Test Message (Optional)
Before proceeding to production configuration, it is recommended to verify that your Meta app is correctly connected to the WhatsApp Cloud API by sending a test message.
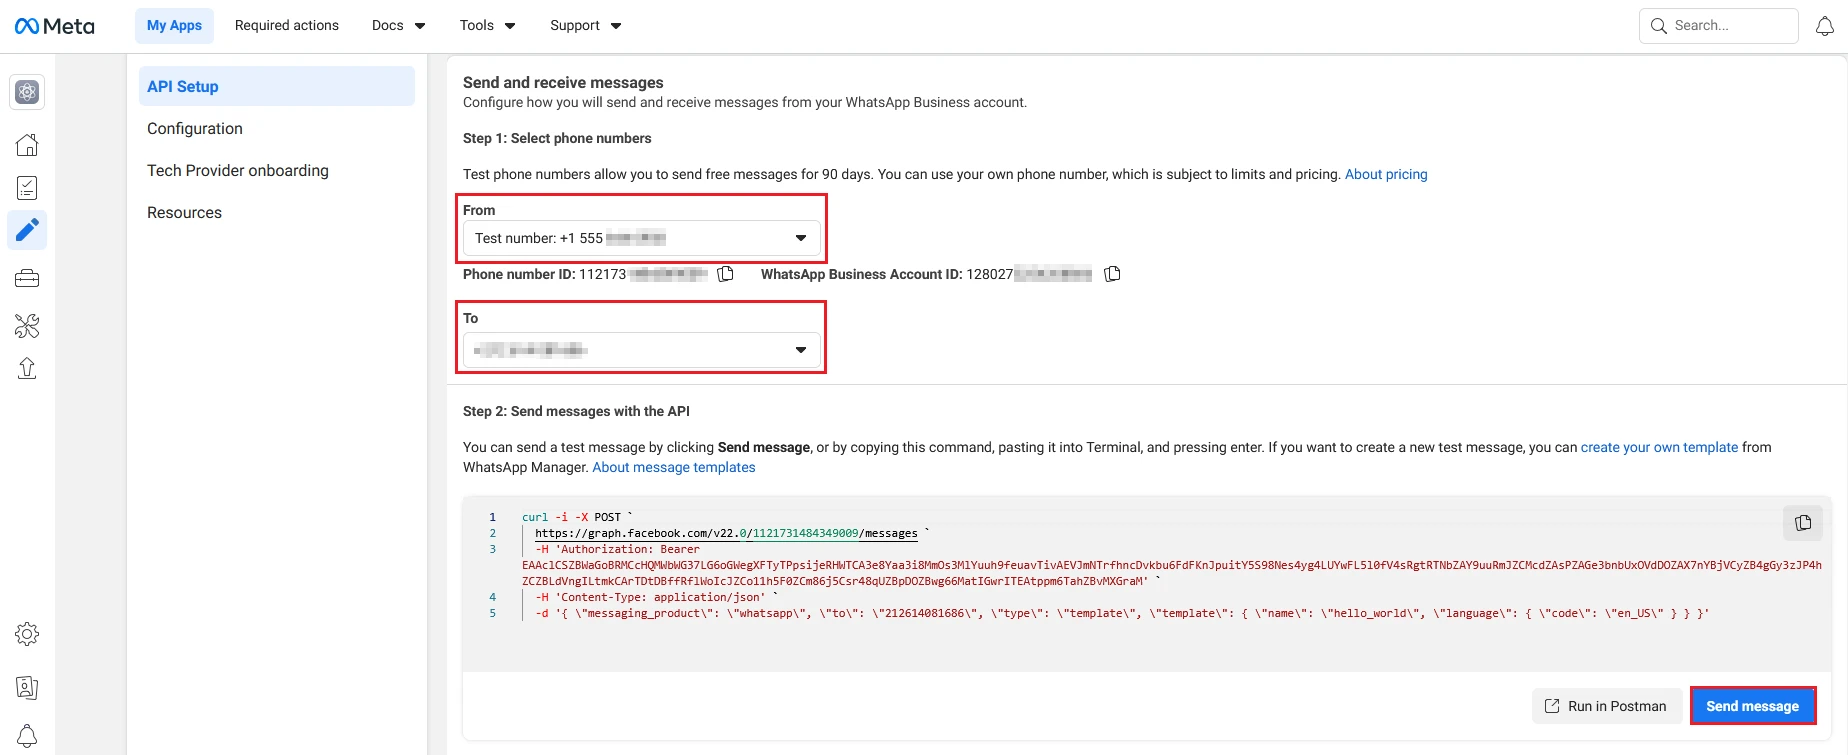
- On the API Setup page, generate a temporary access token.

- Ensure the test phone number is selected in the From field.
- In the To field, click Manage phone number list and add a personal WhatsApp number to receive the test message. Up to 5 recipient numbers can be added during testing.
- Click Send message. Meta will send a preconfigured hello_world template message to the selected number.
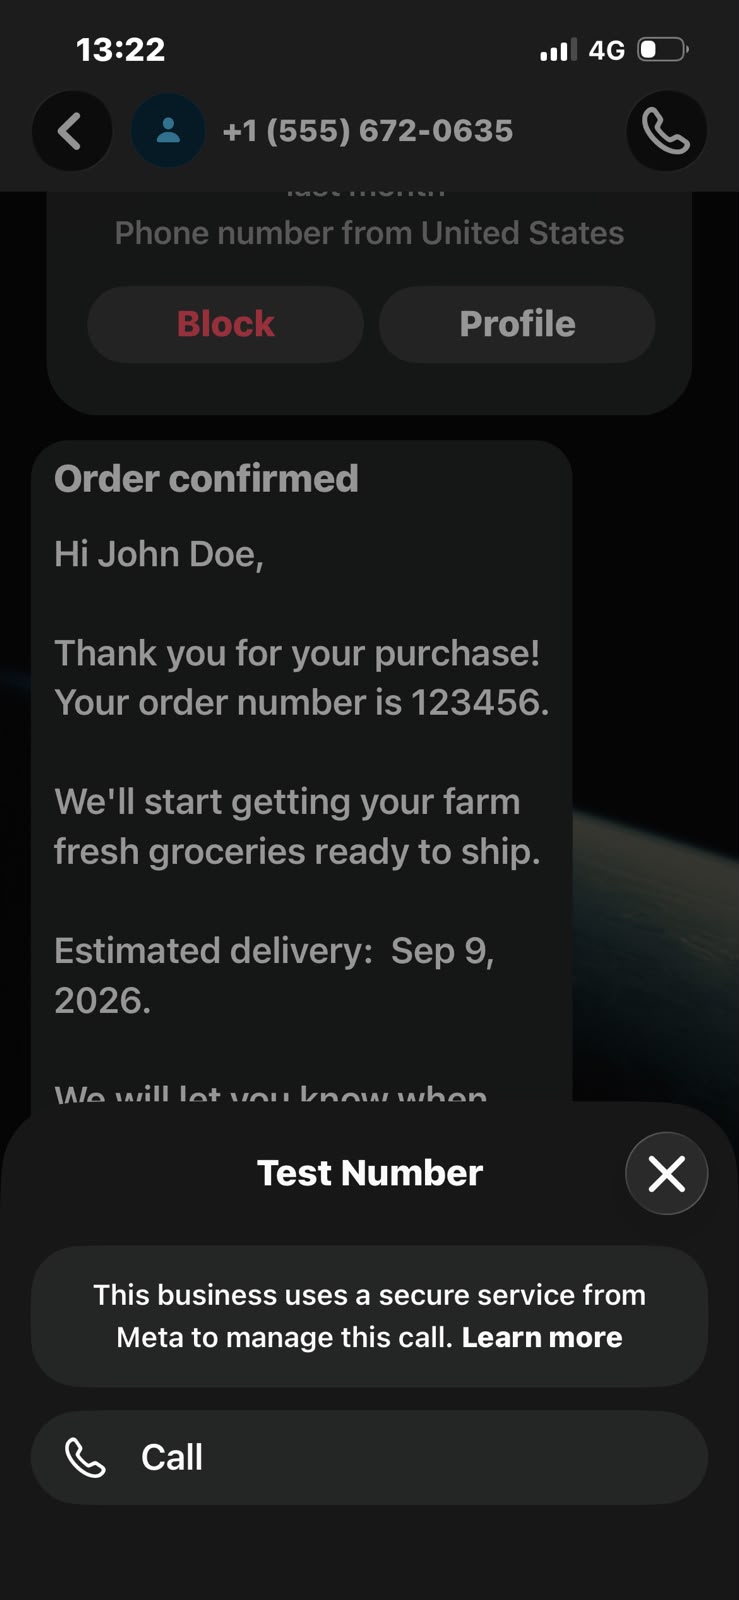
- Confirm the message is received on the target device.
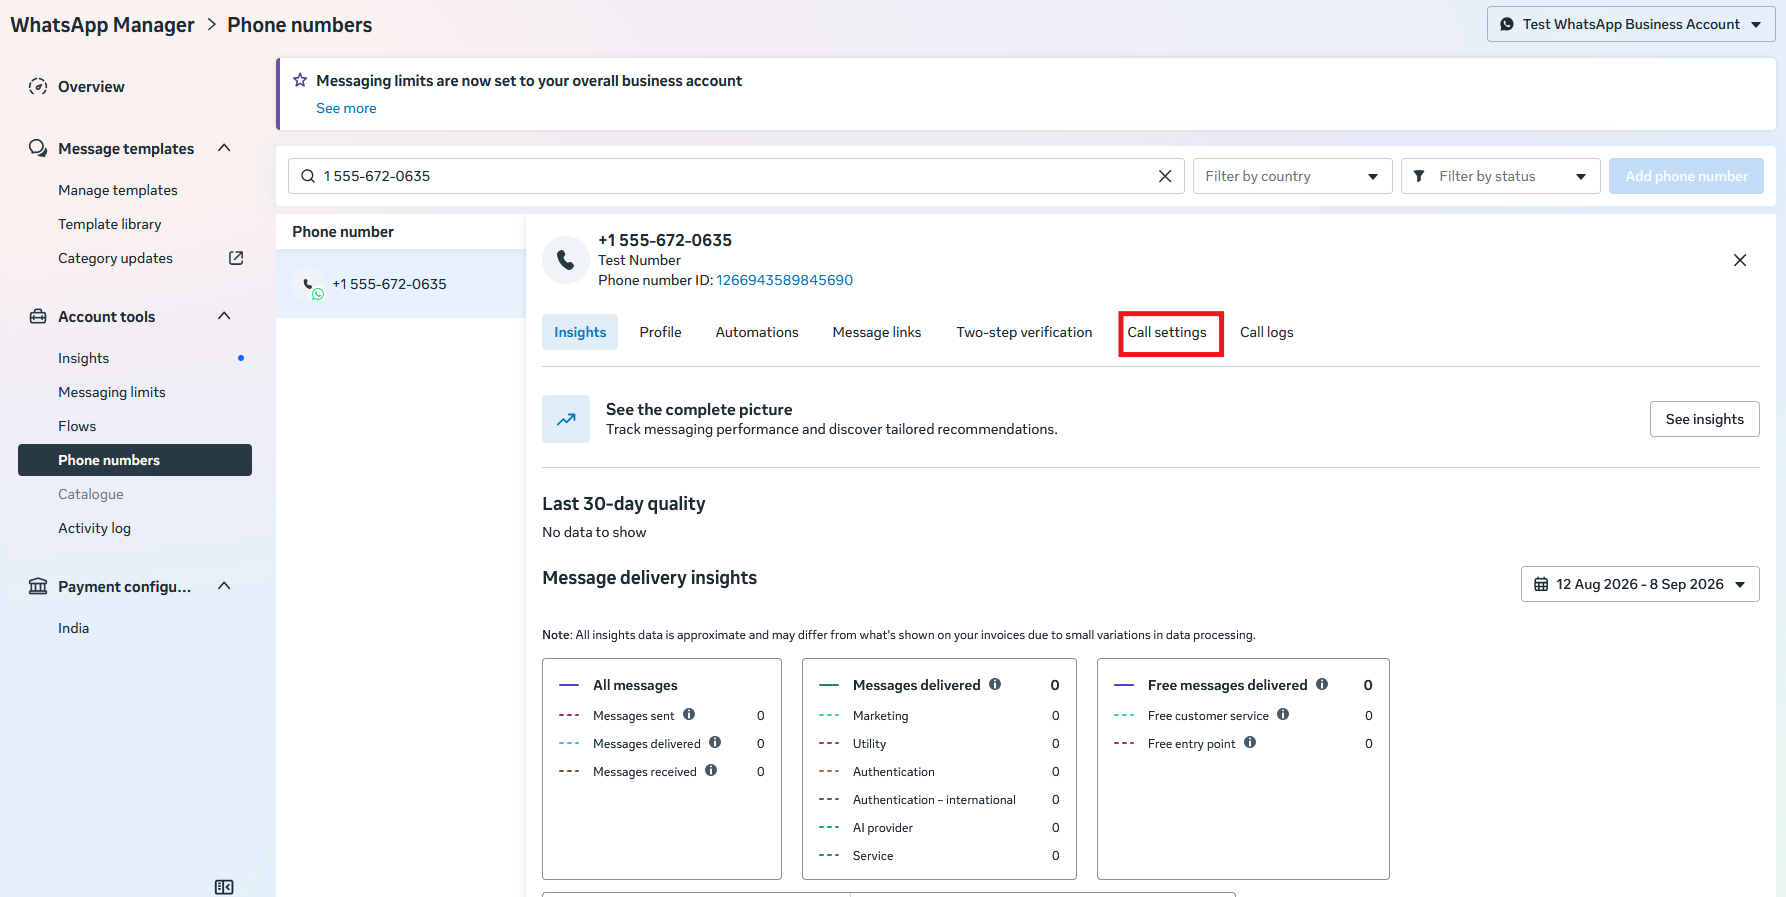
6. To enable WhatsApp voice calling through the UCM WhatsApp Trunk, enable calling for the configured WhatsApp Business phone number in Meta. Go to WhatsApp Manager → Phone Numbers, select the WhatsApp Business number, and open Call settings.
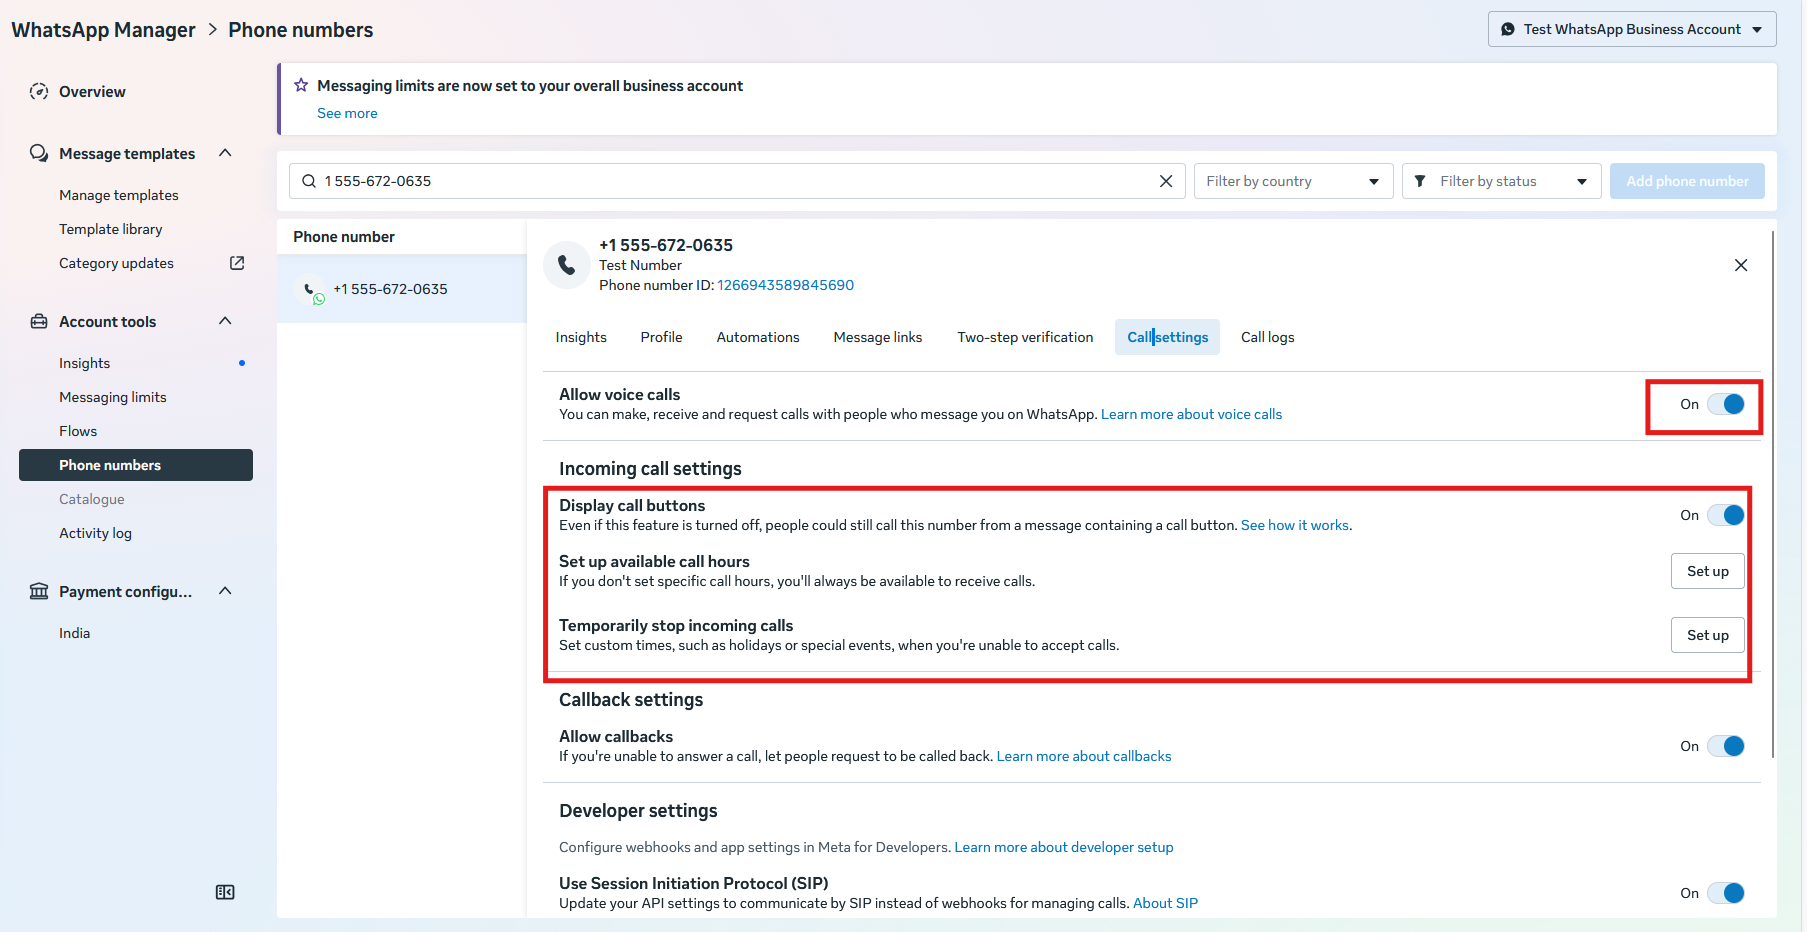
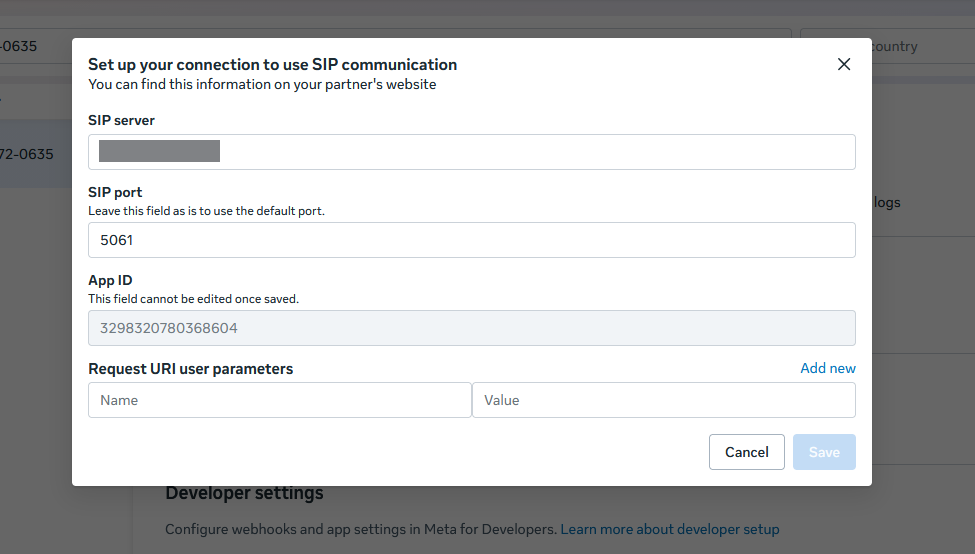
7. Enable Allow voice calls, then enable Use Session Initiation Protocol (SIP) under Developer settings to configure the SIP trunk.
Add a Production Phone Number (Optional)
Skip this step if you wish to use the Meta-provided test number for this integration, or if your production number is already added and visible in the Form drop-down on the API Setup page.
If you need to register a new production phone number:
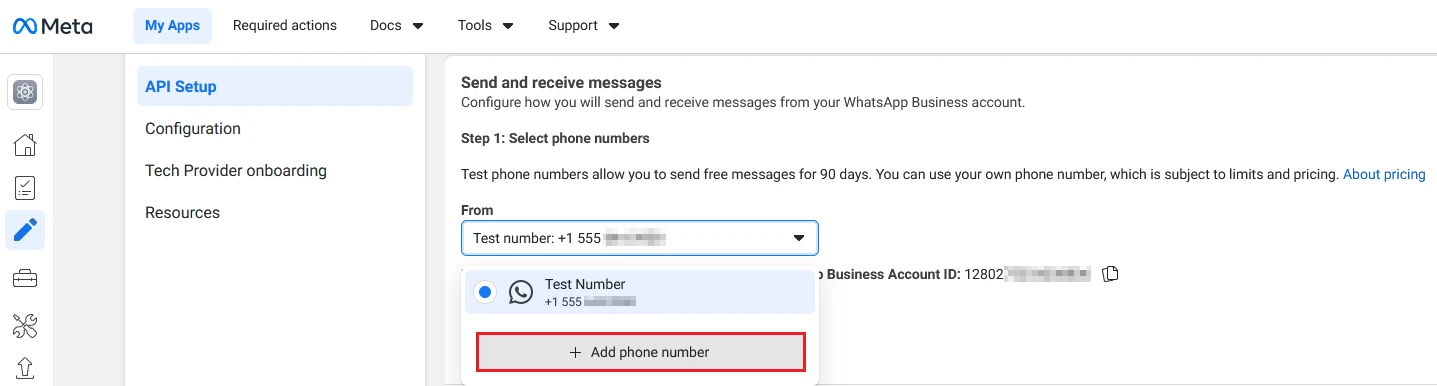
- On the API Setup page, click Add phone number under the From field.
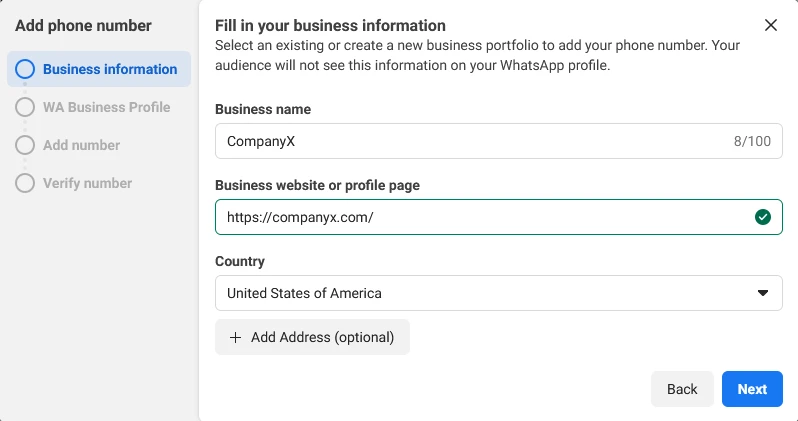
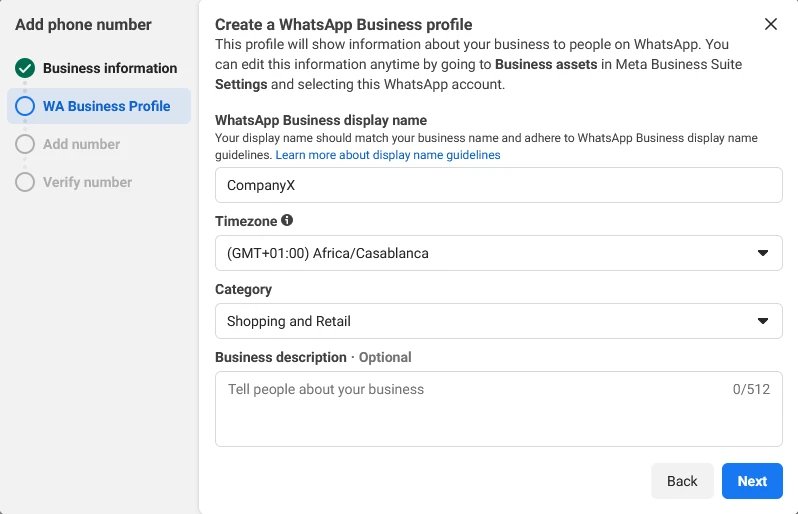
- Enter your business display name and business category, then click Next.
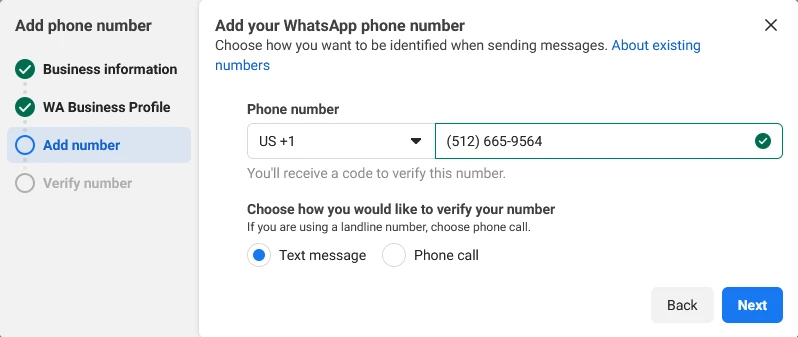
- Enter the phone number, select a verification method (SMS or Voice Call), and click Next.
- Enter the verification code received and complete the process.
- Once added, the number will appear in the From drop-down. Select it and copy the associated Phone Number ID.
Generate a Permanent Access Token
This step creates a non-expiring System User token that will be used for all ongoing UCM to WhatsApp communication.
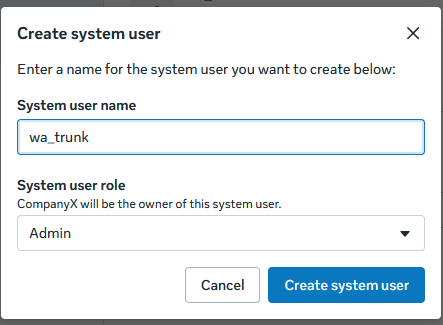
Create a System User
- Open Meta Business Settings.
- In the left sidebar, navigate to Users→System Users and click Add.
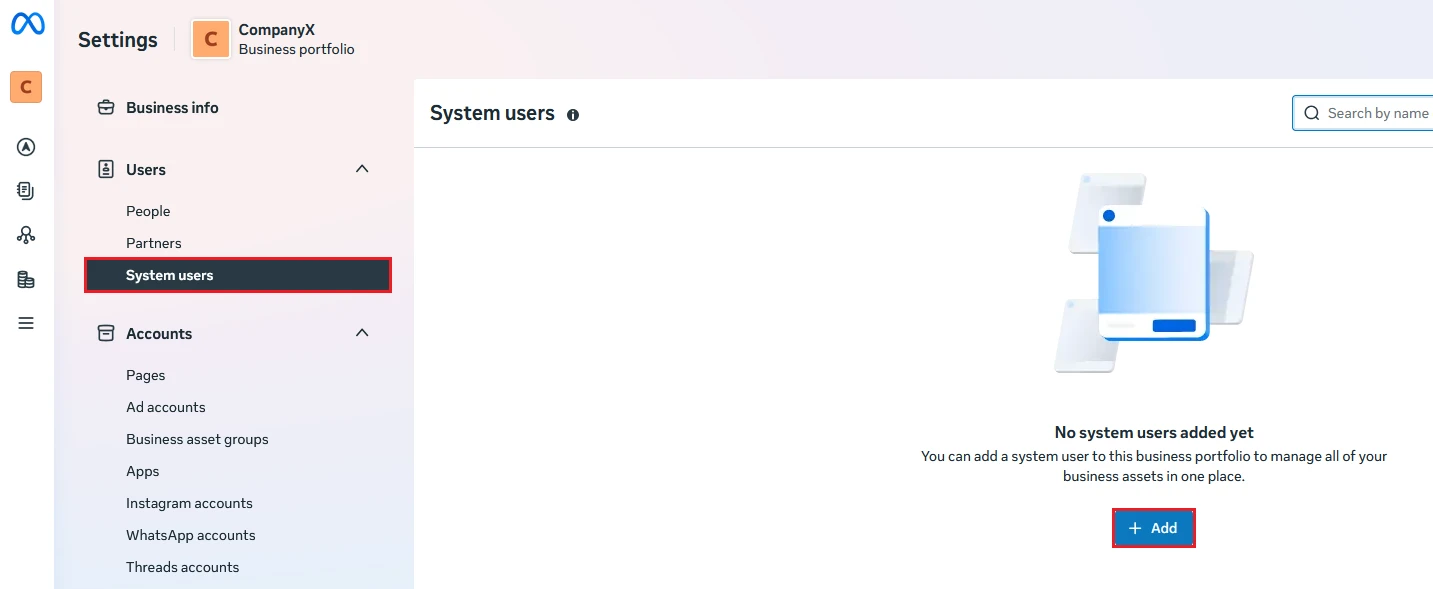
- Enter a name for the system user (e.g., UCM-WhatsApp), set the role to Admin, and click Create System User.
Assign Assets to the System User
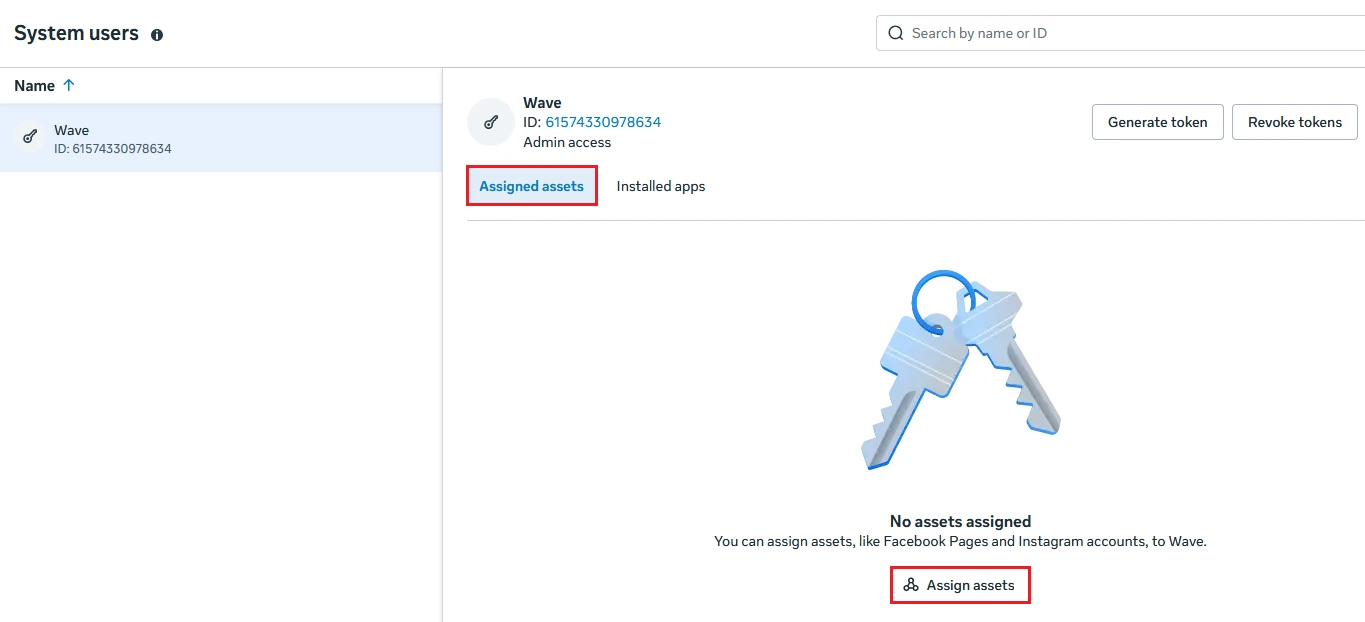
- With the new system user selected, click Assign Assets.
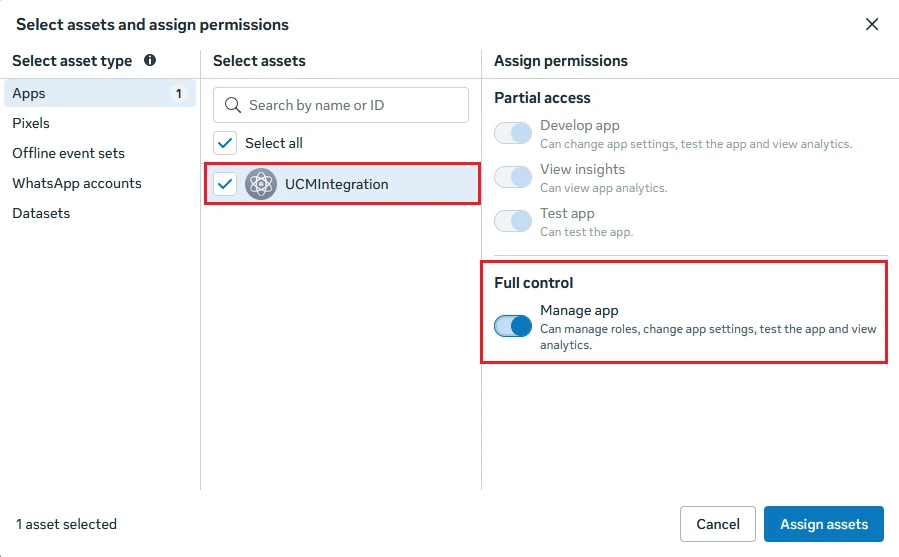
- Under the Apps tab, select your Meta app and enable Full Control→Manage app. Click Save Changes.
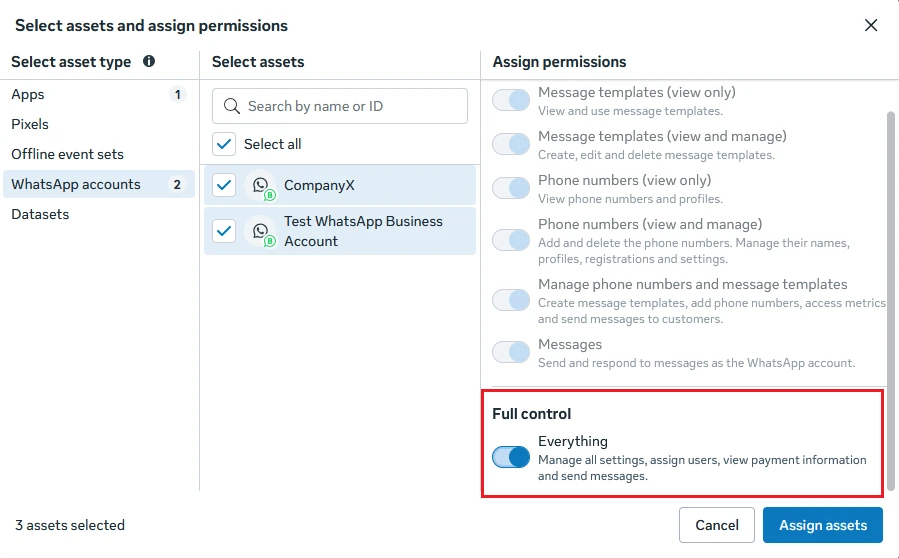
- Under the WhatsApp Accounts tab, select your WhatsApp Business Account(s) and enable Full Control→Manage WhatsApp Business Accounts. Click Save Changes.
Generate the Token
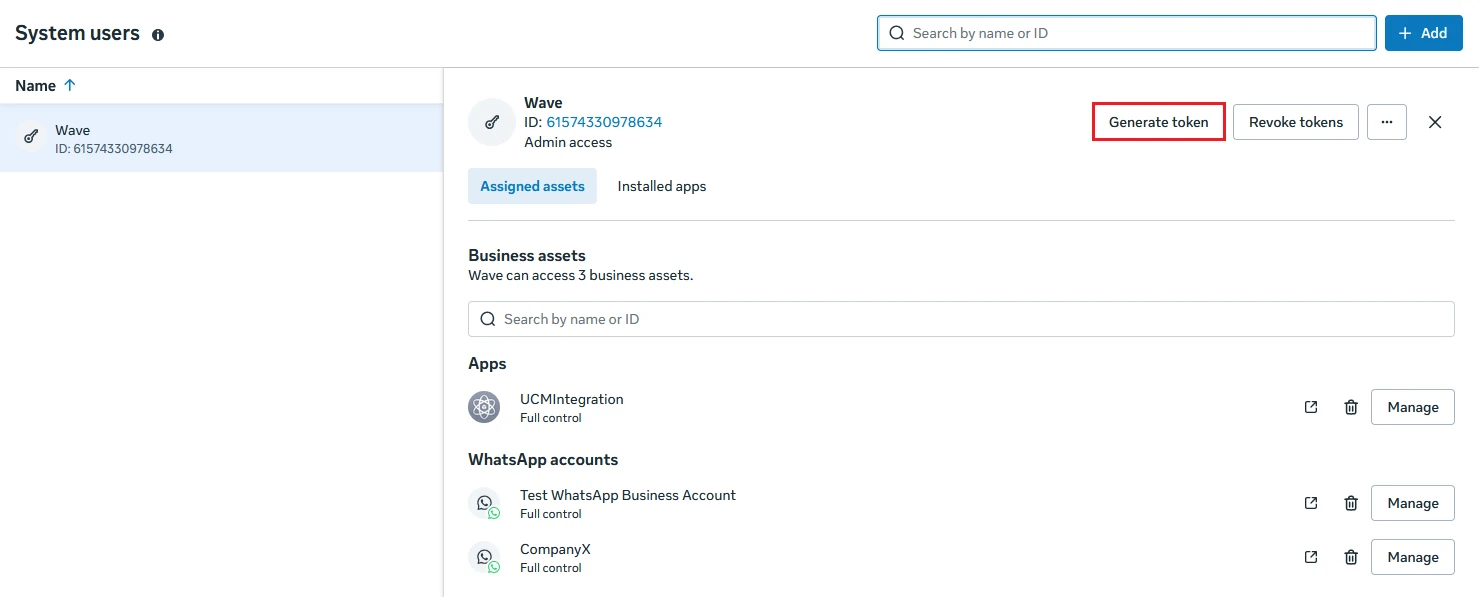
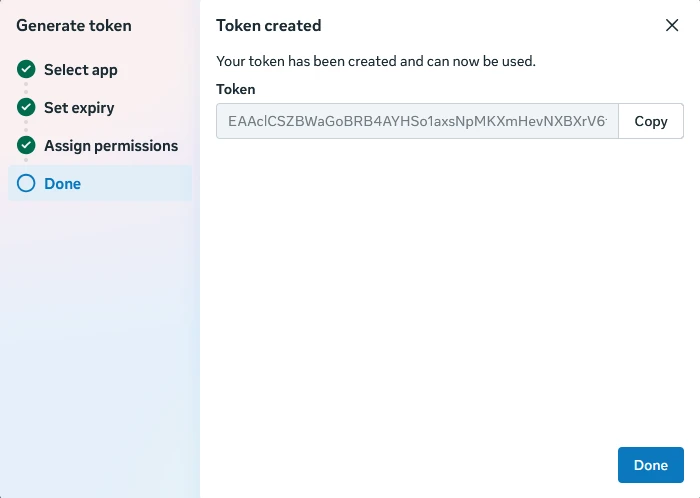
- On the System Users page, select the system user you created and click Generate token.
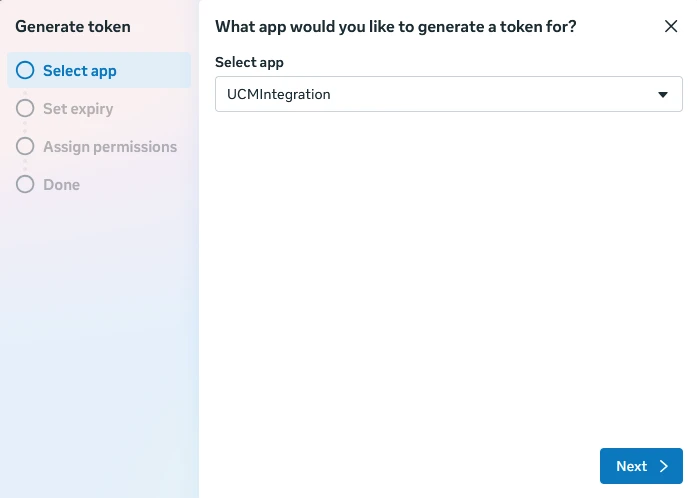
- In the pop-up, select your app from the drop-down list.
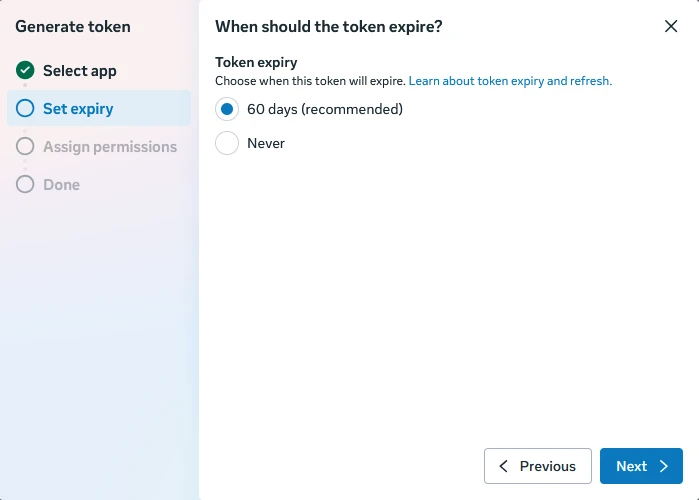
- Select a token expiration; we recommend 60 days.
- Enable the following permissions:
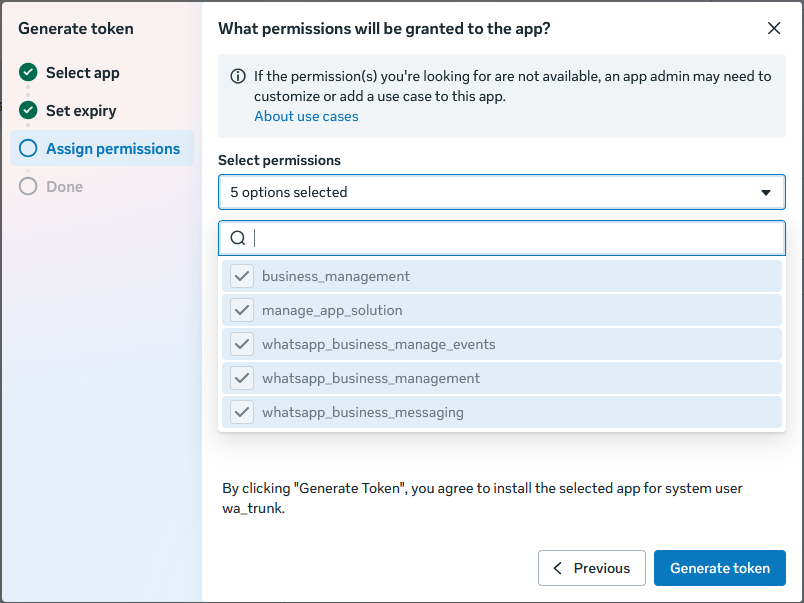
- Click Generate Token.
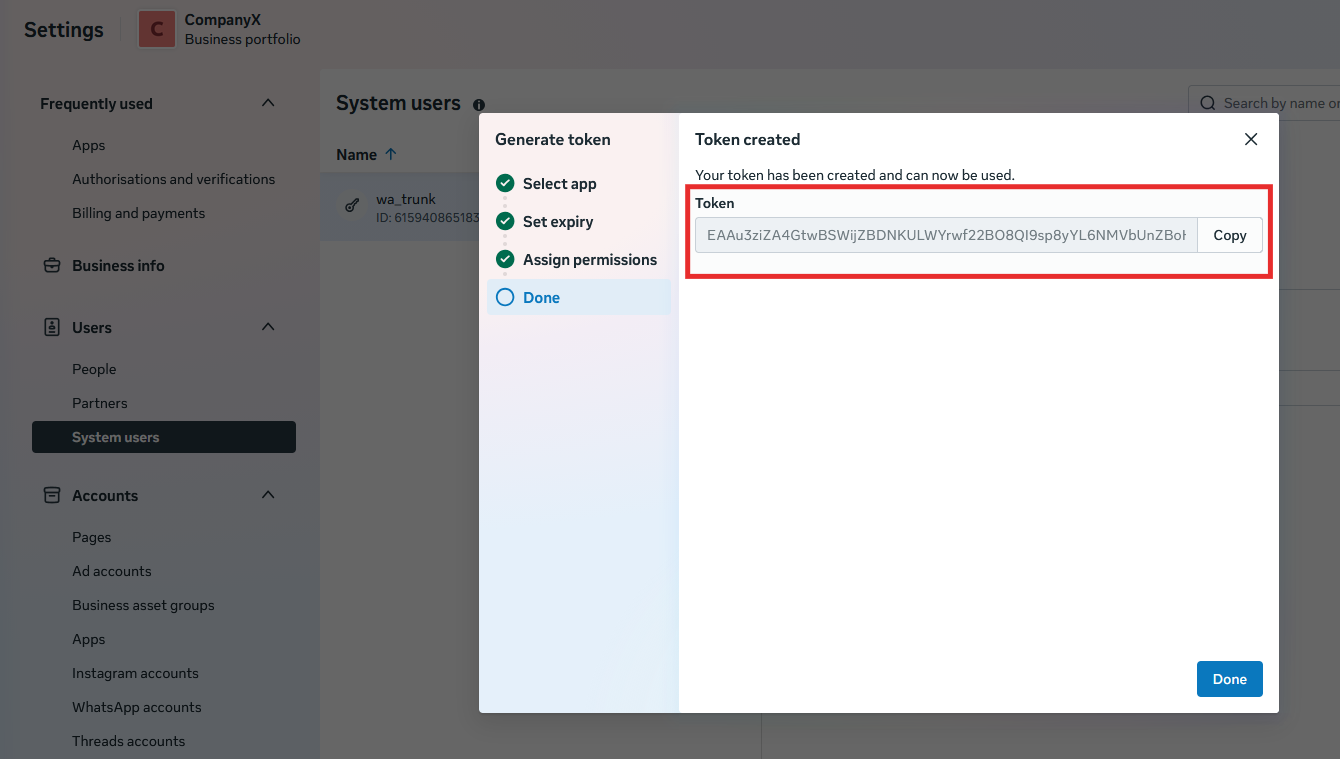
- Copy the token displayed and store it in a secure location. This token will not be shown again and remains valid indefinitely until explicitly revoked.
UCM CONFIGURATION
Configuration Overview
The WhatsApp Trunk configuration follows this sequence:
- Obtain the required WhatsApp information from Meta.
- Create a WhatsApp Trunk on the UCM.
- Enter the WhatsApp information and configure the trunk.
- Save the WhatsApp Trunk and allow the UCM to validate the configuration.
- Configure an Inbound Route for the WhatsApp Trunk.
- Select the required Default Destination.
- Save the Inbound Route.
Configure the WhatsApp Trunk
Access the WhatsApp Trunk Configuration Page
Log in to the UCM Web UI and navigate to:
Extensions / Trunks → WhatsApp Trunk
Click Add to create a new WhatsApp Trunk.
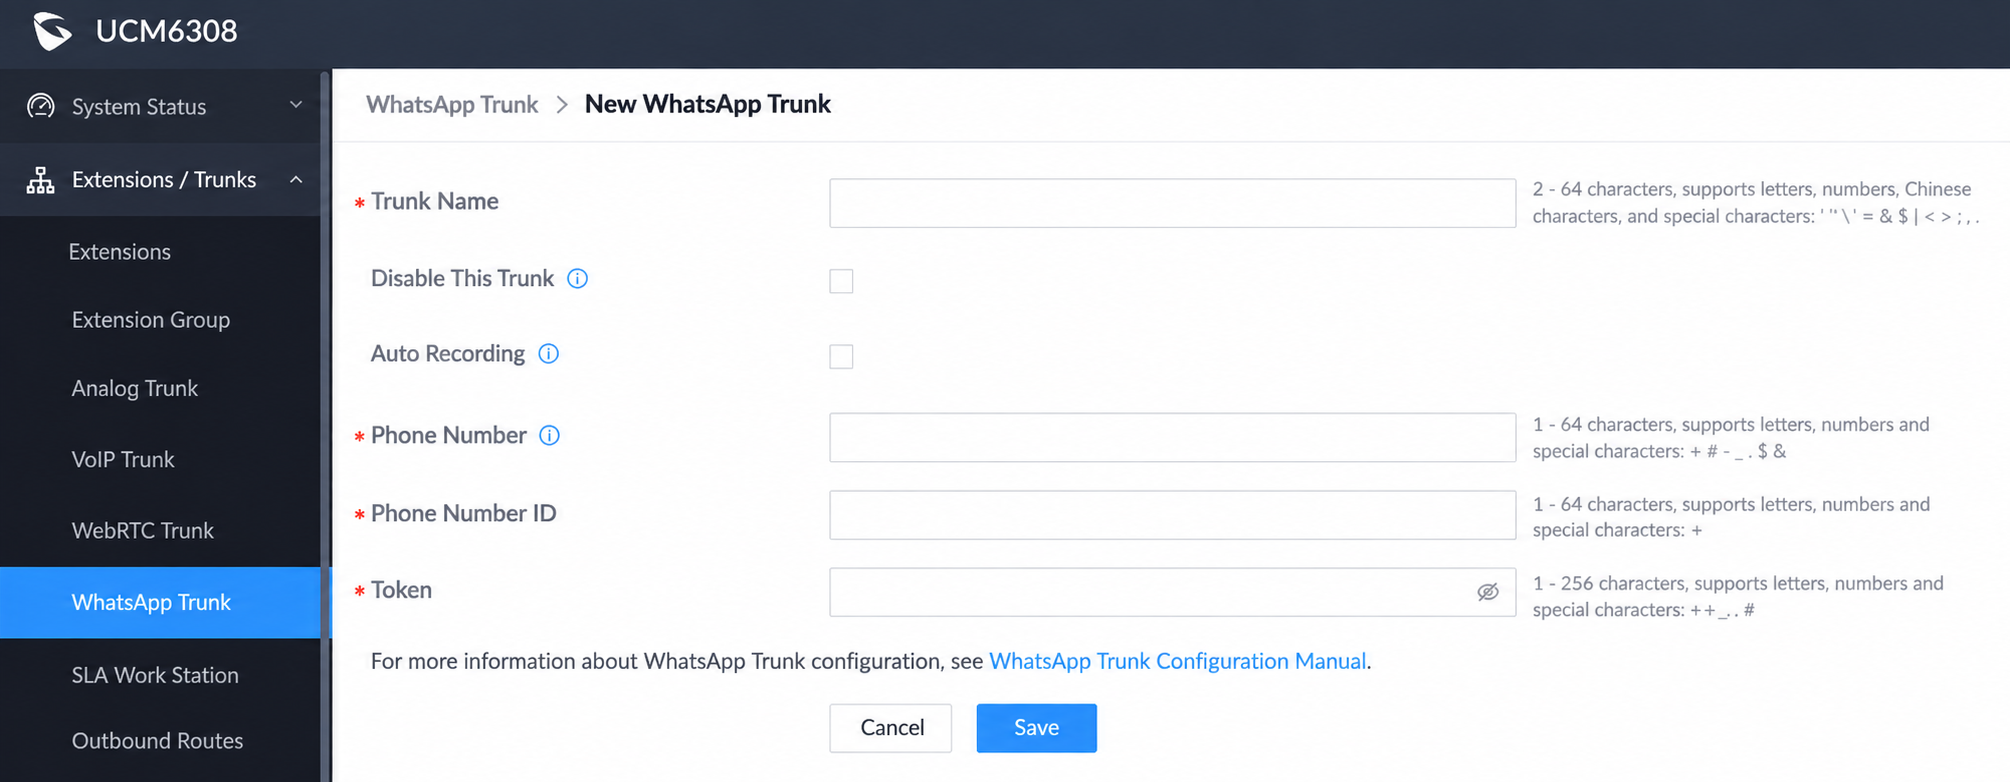
The New WhatsApp Trunk configuration page will be displayed.
Configure the WhatsApp Trunk Parameters
Configure the parameters according to the following table.
| Parameter | Requirement | Description |
|---|---|---|
| Trunk Name | Required | Enter a name for the WhatsApp Trunk. The trunk name is mandatory and must not be the same as an existing VoIP Trunk name. |
| Disable This Trunk | Optional | Enable this option to disable the WhatsApp Trunk while retaining its configuration. Calls cannot be made through a disabled trunk. |
| Auto Record | Optional | Enable this option to automatically record calls made through the WhatsApp Trunk. |
| Phone Number | Required | Enter the WhatsApp phone number obtained from the Meta application. |
| Phone Number ID | Required | Enter the Phone Number ID obtained from the Meta application. |
| Token | Required | Enter the Access Token obtained from the Meta application. |
The Phone Number, Phone Number ID, and Token are information obtained from the Meta application.
Phone Number
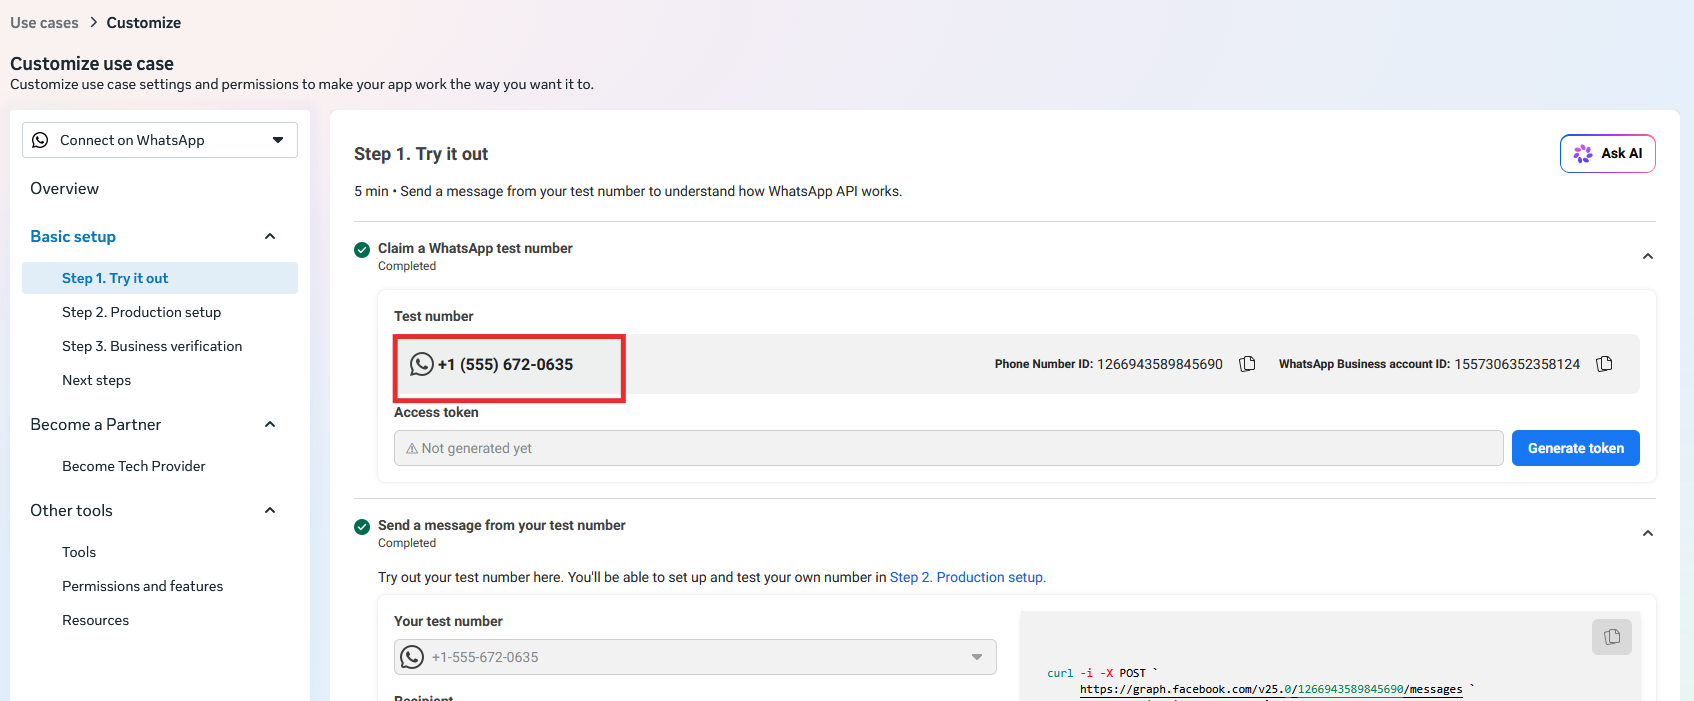
The Phone Number field corresponds to the WhatsApp phone number obtained from the Meta application.
Enter the WhatsApp phone number associated with the WhatsApp Business account that will be used with the trunk.
Important: The phone number must correspond to the WhatsApp phone number configured in the Meta application.
Phone Number ID
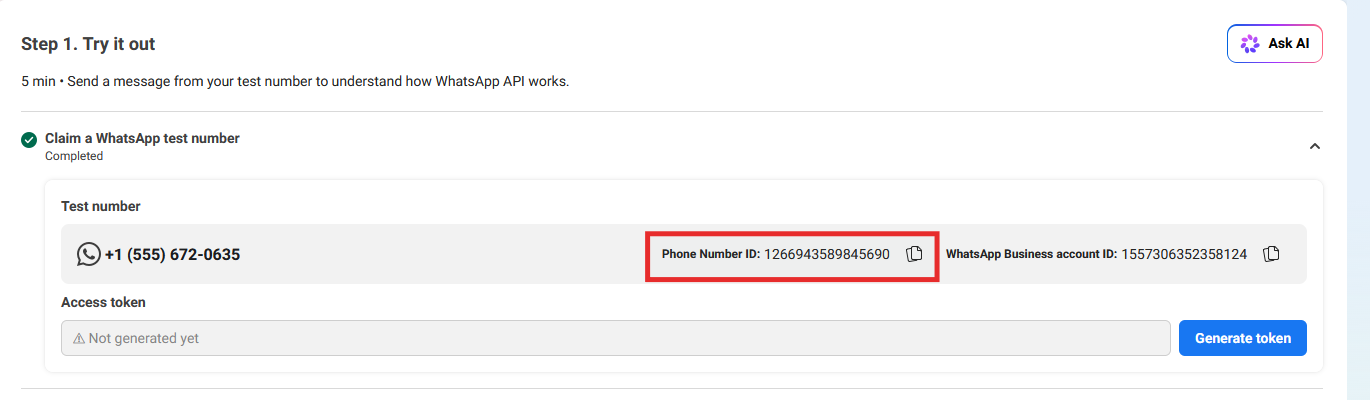
The Phone Number ID field corresponds to the Phone Number ID obtained from the Meta application.
Enter the Phone Number ID associated with the WhatsApp phone number.
Token
The Token field corresponds to the Permanent Access Token obtained from the Meta application.
Enter the permanent Access Token generated from Meta Business Settings → Users → System Users for the WhatsApp Business account.
Saving and Validating the WhatsApp Trunk
After entering the required information, save the WhatsApp Trunk configuration.
During the save operation, the UCM communicates with the Graph API to query the required information and bind the SIP service.
The save operation therefore also performs validation of the configured information.
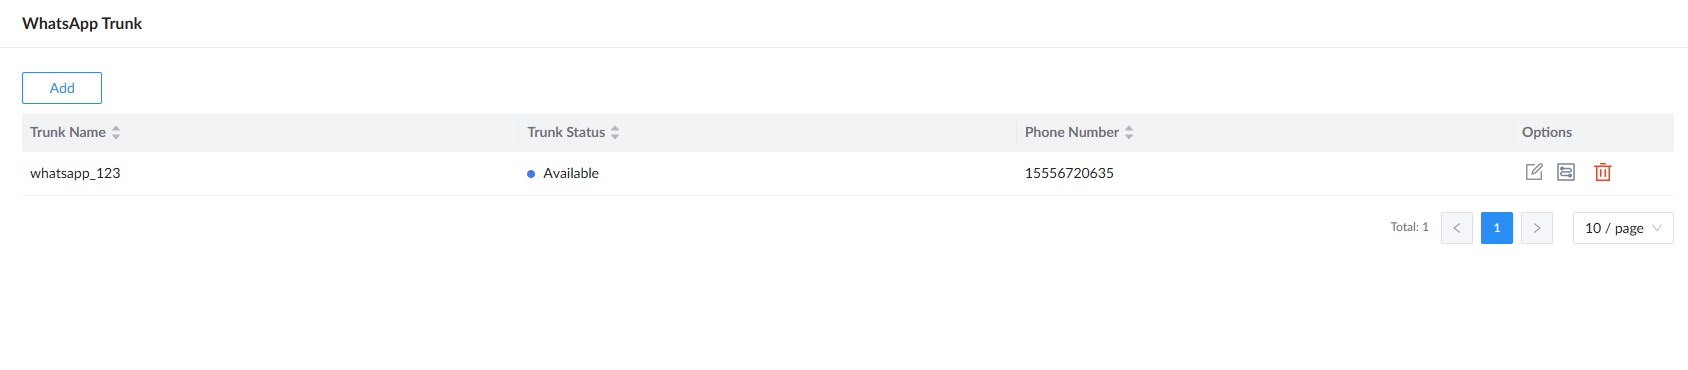
- If the information is correct:
If the information provided to the UCM is correct and the Graph API operation succeeds, the WhatsApp Trunk configuration can be saved successfully.
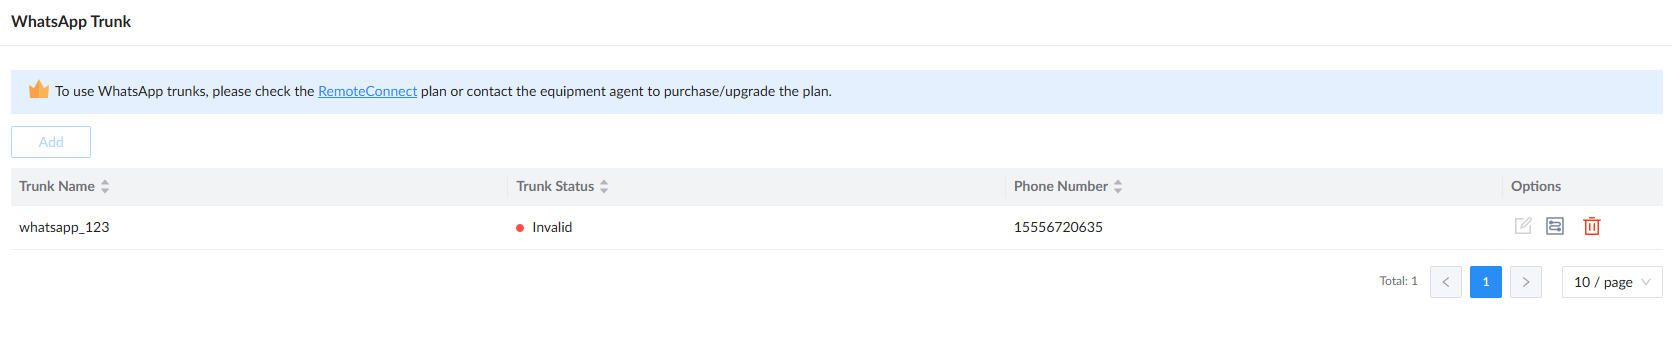
- If the information is incorrect
If the configured information is incorrect, the Graph API interface returns a failure.
In this situation:
- The WhatsApp Trunk configuration cannot be saved.
- The UCM returns an error message.
Therefore, if the configuration cannot be saved, verify the WhatsApp information entered in the trunk configuration, particularly the following:
- Phone Number
- Phone Number ID
- Access Token
Configure the WhatsApp Trunk Inbound Route
After configuring the WhatsApp Trunk, configure its Inbound Route.
The inbound route determines where incoming WhatsApp calls should be delivered.
Inbound Route Limitation
Because inbound call matching is closely associated with the WhatsApp Trunk’s phone number:
Each WhatsApp Trunk can have only one Inbound Route.
This is an important configuration limitation when deploying multiple WhatsApp Trunks on the same UCM.
Access the Inbound Route Configuration Page
Navigate to:
Extensions / Trunks → Inbound Routes
In the upper-right corner of the page, select the corresponding WhatsApp Trunk.
Then click Add.
The New Inbound Rule page will be displayed.
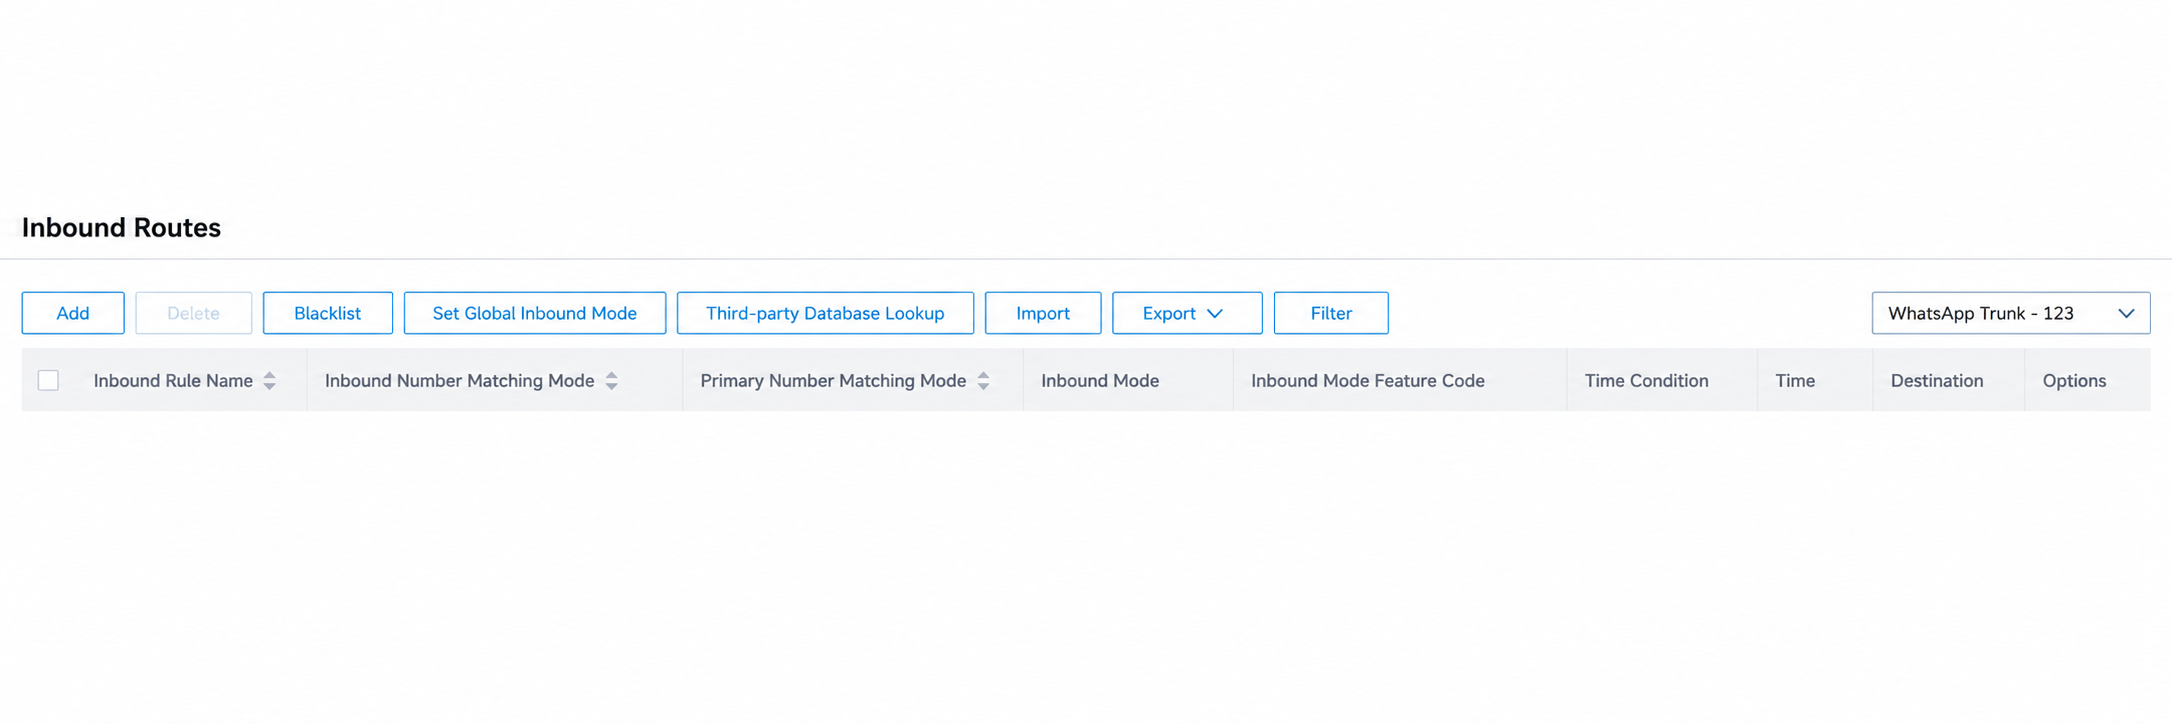
Or click the highlighted icon below, and it will automatically redirect you to the inbound route page for the specific selected WhatsApp trunk :

Configure the Inbound Rule
On the New Inbound Rule page:
Step 1 — Enter the Inbound Rule Name
Enter a name for the inbound rule.
The rule name should identify the purpose of the inbound rule and distinguish it from other inbound rules where applicable.
Step 2 — Select the Default Destination
Select the required Default Destination.
The available destination types provide different ways to handle incoming calls. Select the destination according to the customer’s requirements.
Step 3 — Save the Rule
After configuring the inbound rule name and Default Destination, save the configuration.
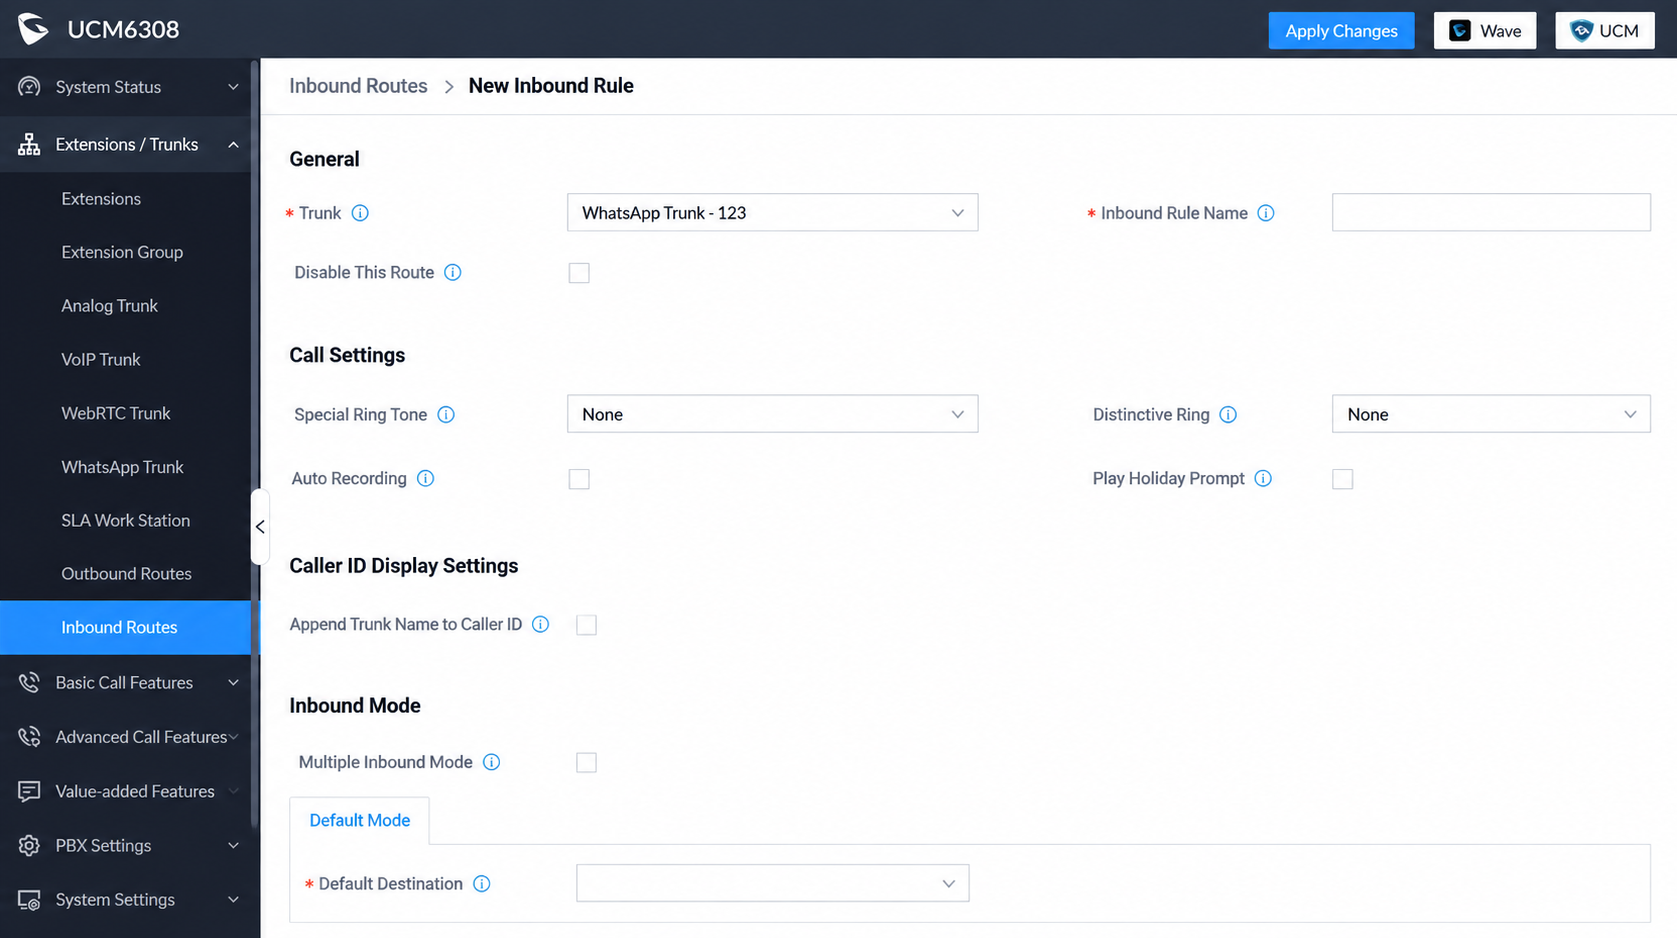
The Default Destination provides multiple destination choices and that the available choices are generally consistent with those used for VoIP Trunk inbound-route configuration.
The exact destination should be selected according to the customer’s call-handling requirements.
The source screenshot illustrates the following destination options:
- Extension
- Conference
- Language Prompt
- Language Mailbox
- IVR
- Ring Group
- Queue
- Fax/Extension
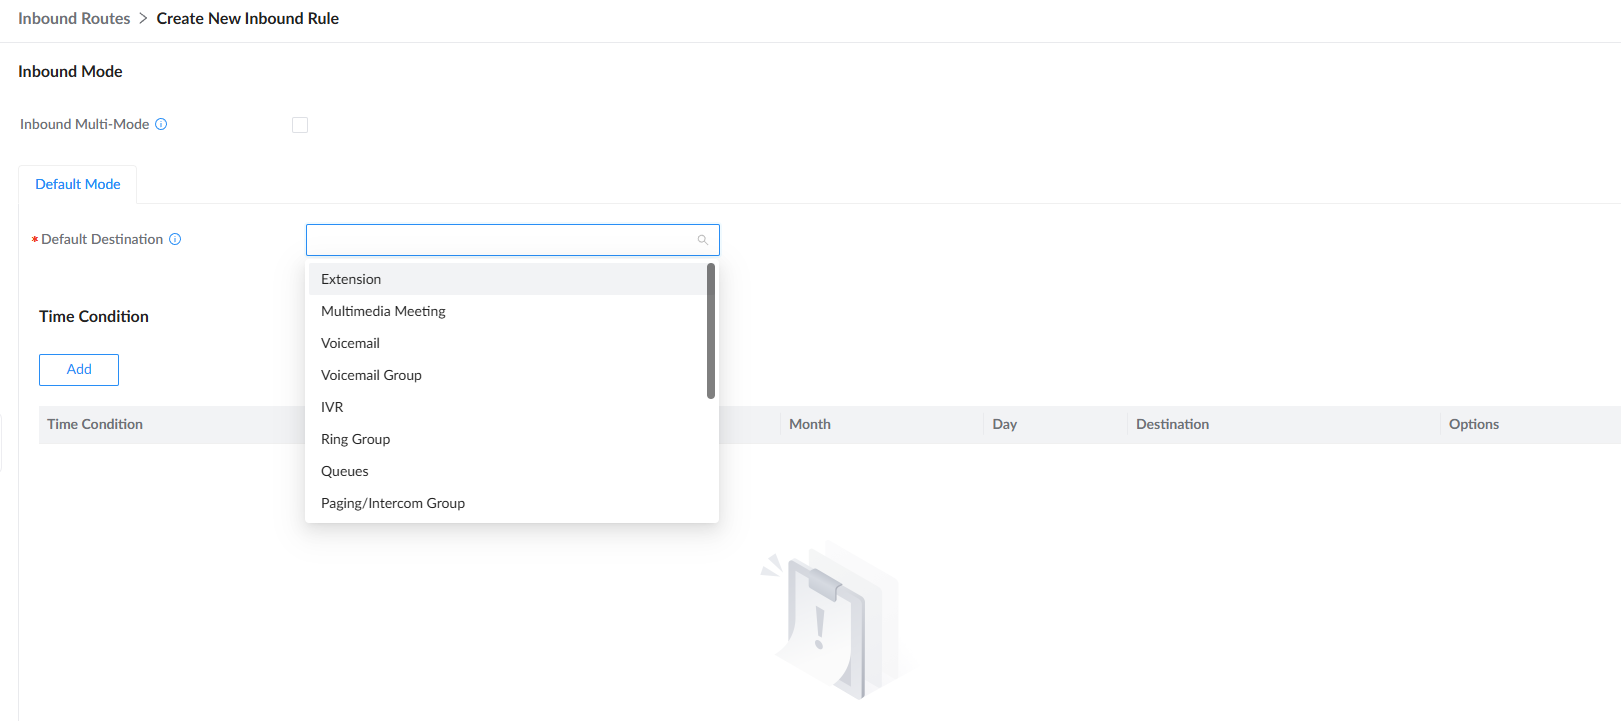
When configuring the inbound route, select the Default Destination according to how the customer wants incoming WhatsApp calls to be handled.
For example, the destination can be configured to send the call toward an appropriate UCM call-handling destination such as an extension, IVR, ring group, or queue.
After configuring the inbound route, the entire WhatsApp Trunk configuration process is completed.
SUPPORTED DEVICES
The WhatsApp Trunk configuration described in this guide is supported on the following Grandstream devices:
Models | Firmware Required |
UCM630x Series | 1.0.35.8+ |
UCM630xA Series | 1.0.35.8+ |