


INTRODUCTION
Grandstream IP phones support an XML-based downloadable phonebook that allows users to share, synchronize, and manage contacts remotely in a centralized and flexible manner.
For efficient deployment and management, the XML phonebook file can be stored on a web server for phones to download automatically or on demand. This is especially useful in environments that require centralized directory access, such as enterprises, hospitality systems, or call centers, where all phones can periodically synchronize with a single server.
This document describes the Grandstream XML-based downloadable phonebook configuration, structure, and provisioning options. An example XML file is provided at the end of this guide to help administrators build, modify, or export compatible phonebooks.
What is XML?
XML (eXtensible Markup Language) is a markup language* for documents and applications containing structured information. This information contains both content (text, pictures, input box, etc.) and an indication of what role that content plays (e.g. contents in a section header are different from contents in a footnote). Almost all documents are structured.
*A markup language is a mechanism to identify structures in a document. The XML specification defines a standard way to add markup to documents.
Why XML?
XML provides a flexible and platform-independent method for communication between SIP endpoints and external systems. It allows Grandstream phones to act as intelligent clients that can retrieve, interpret, and display data.
For phonebook applications, XML enables administrators to manage and update contacts centrally, ensuring all devices display synchronized and up-to-date contact information without manual editing on each phone.
XML API architecture
The XML-based phonebook download mechanism uses standard transport protocols such as HTTP, HTTPS, or TFTP, depending on device support.
The Grandstream phone initiates an HTTP GET request to the server hosting the XML file and waits for a response. Once received, the phone parses and displays the XML content as a structured contact directory.
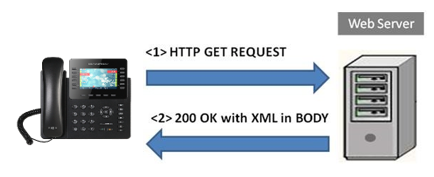
Two typical deployment models are supported:
- Local Network (LAN): Phones request XML phonebook data from the web server via HTTP or TFTP. The web server processes the request, retrieves the necessary information from the application server, and returns the XML content.
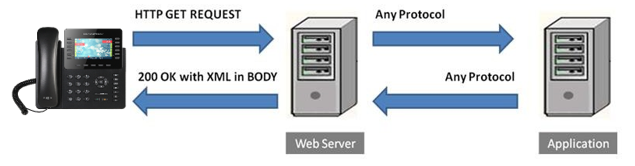
- Internet-based or Cloud Deployment: Phones retrieve the XML file from a public or cloud-hosted web server. This approach allows for real-time updates from remote management systems.
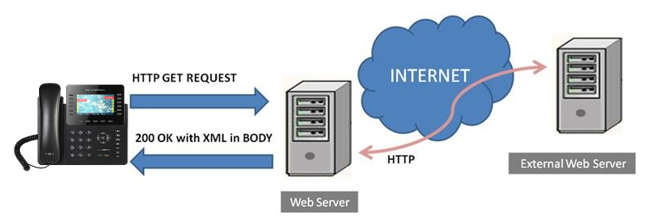
In both cases, the phone acts as a client that requests and displays the XML document, while all logic and data management occur on the server side. The XML file structure, defined later in this guide, determines how the phonebook entries are displayed and organized on the device.
XML PHONEBOOK CONFIGURATION
Firmware
Before using the XML phonebook feature, please make sure the firmware on the phone is upgraded to the latest version. Please refer to the following link for firmware upgrading information: https://www.grandstream.com/support/firmware
Web Configuration
Users can configure XML phonebook settings through the supported device’s web interface. Although all Grandstream models support the same basic functionality, the menu paths and setting names vary slightly between series.
The following sections summarize where to find these options and how the labels differ across devices.
Accessing the XML Phonebook Settings
To configure the XML phonebook, first log into the device’s web interface using its IP address. The exact menu location for XML phonebook options varies by model series. Use the paths in the table below to locate the setting appropriate for your device.
Model Series | Web UI Path |
GXP Series | Phonebook → Phonebook Management |
GRP Series, GHP63x/W Series, WP8x6 Series | Application → Contacts → Phonebook Management |
GXV Series, WP856, WP20 | Application → Contacts → Download Contacts |
WP810, WP822, WP825 | Directory → Phonebook Management |
DP7xx Series | Phonebook → Global Phonebook XML Settings |
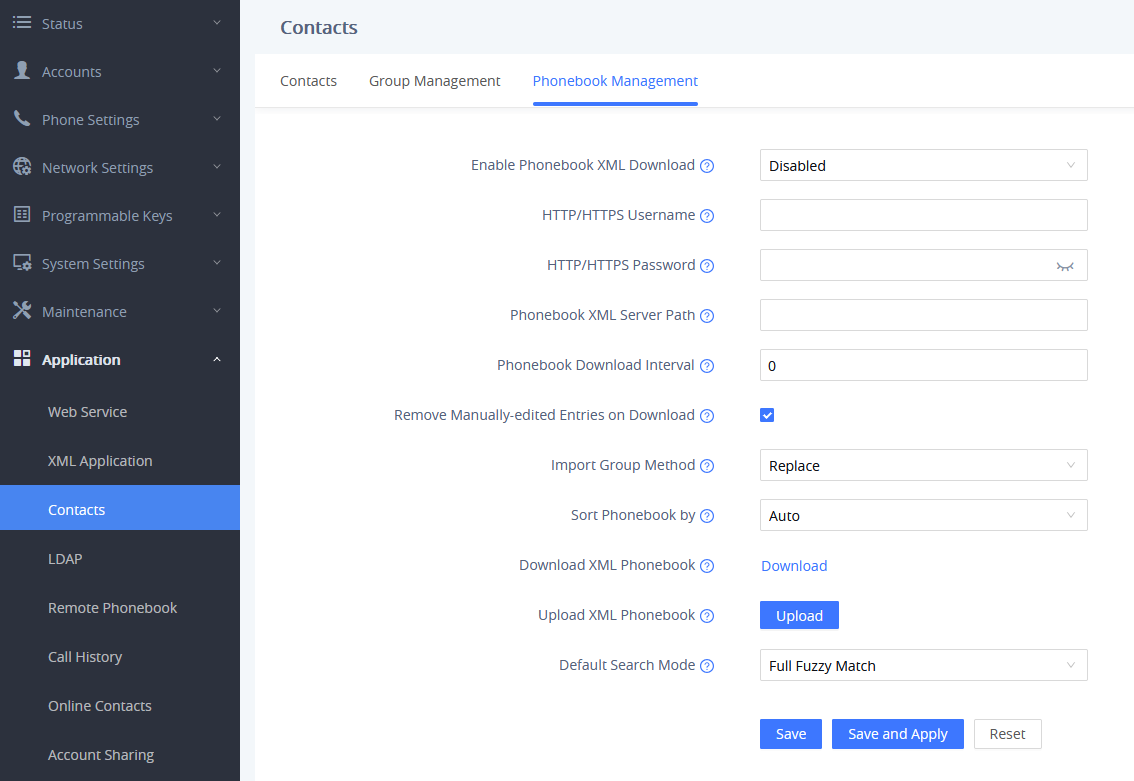
This screenshots below illustrate how the XML phonebook configuration page appears on several Grandstream phone series.
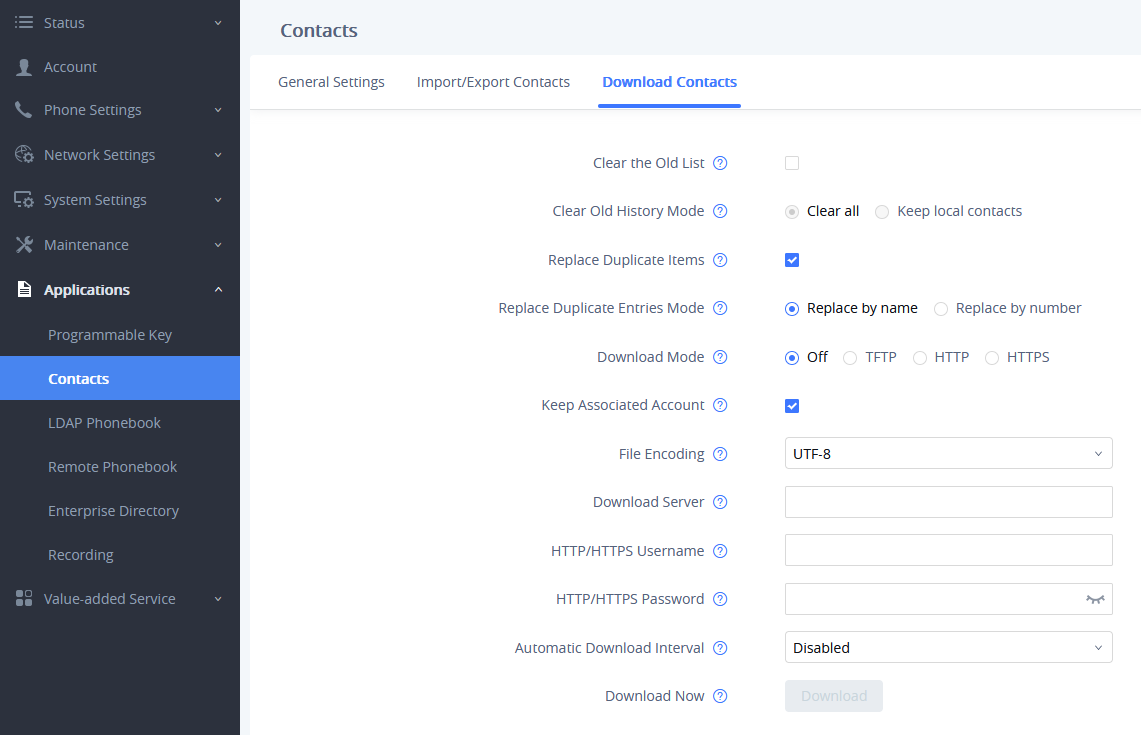
Web UI Configuration Parameters
The XML phonebook settings allow administrators to define how the phone retrieves and manages contact data from a remote server.
All supported Grandstream models include equivalent parameters, though their exact field names and menu positions may vary. In general, the web interface provides options to:
- Enable or disable XML phonebook synchronization over supported protocols (HTTP, HTTPS, or TFTP).
- Specify the server address or URL where the XML phonebook file is hosted.
- Define how often the device should check for and download updates from the server.
- Choose whether downloaded entries should replace or merge with existing contacts.
- Control how the device handles manually edited or locally stored contacts during synchronization.
- Optionally provide authentication credentials for secured servers.
- Set the display or sorting order of contacts in the phone’s directory.
The following example illustrates how XML phonebook settings can be configured on a GXP series phone through the web interface. This serves as a reference for administrators when setting up XML phonebook synchronization.
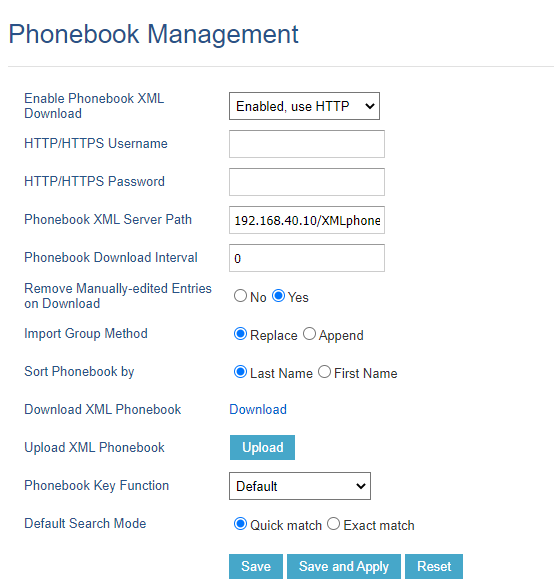
- Enable Phonebook XML Download: Set this option to Enabled, use HTTP. This allows the phone to automatically download the XML phonebook from a configured HTTP server.
- HTTP/HTTPS Username and Password: Leave these fields blank if the server does not require authentication. If your server requires credentials, enter the appropriate username and password.
- XML Server Path: Enter the full path to the XML phonebook file (for example: http://192.168.1.10/XML/phonebook.xml)
- Phonebook Download Interval: Set to 0 to disable automatic downloads, or choose a value between 5 and 720 minutes for recurring updates.
- Remove Manually-edited Entries on Download: Set to Yes to delete any manually edited contacts whenever a new XML phonebook is downloaded.
- Import Group Method: Set to Replace to completely overwrite existing groups, or Append to add new entries without removing current contacts.
- Sort Phonebook By: Set to Last Name or First Name to control the default sorting order of contacts in the phonebook.
- Download XML Phonebook: Click the Download button to retrieve the XML file to a local PC. If the phonebook is empty, the downloaded XML will contain a minimal structure:
<?xml version="1.0" encoding="UTF-8"?>
<AddressBook>
<version>1</version>
</AddressBook>- Upload XML Phonebook: Click the Upload button to send a local XML file to the phone.
- Phonebook Key Function: Set to Default. This controls the behavior of the Phonebook key on the device, which can be configured to access LDAP search, Local Phonebook, Local Group, or Broadsoft Phonebook.
- Default Search Mode: Set to Quick Match. The alternative option is Exact Match, which restricts searches to exact entries.
LCD configuration
Certain Grandstream phones provide the ability to trigger XML phonebook downloads directly from the device LCD. On most devices, such as GXP, GRP, and WP, the phone retrieves the XML file from a server that has already been configured via the Web UI or provisioning. Users can only trigger the download or refresh manually, and cannot change the server path or credentials from the LCD.
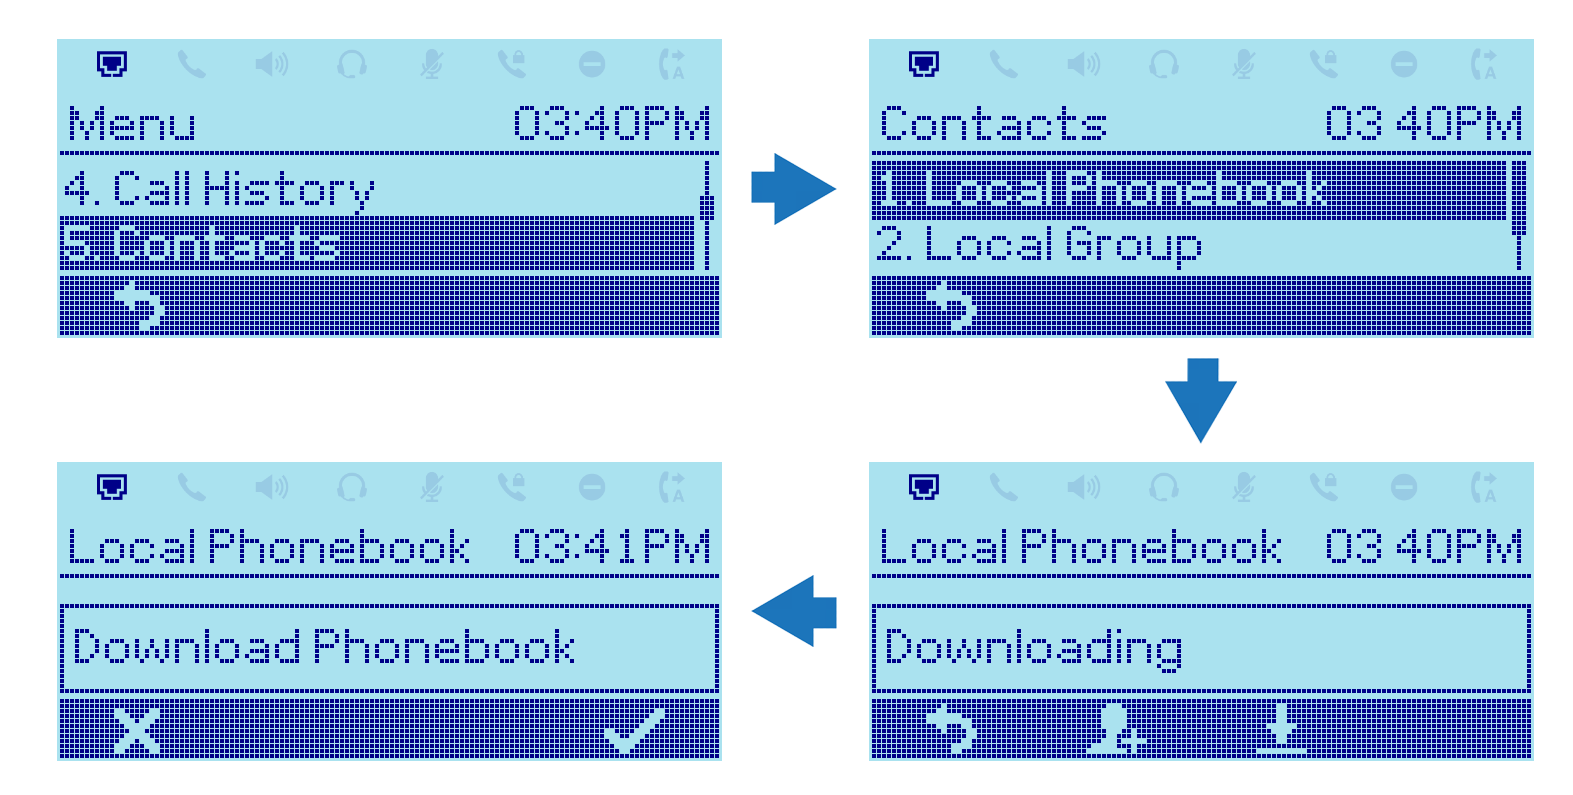
The example below illustrates how to download the latest phonebook XML file using the GRP260x IP phone series:
- Navigate to Menu → Contacts → Local Phonebook.
- Press the Download soft key. The phone fetches the XML file from the pre-configured server.
- Confirm the download if prompted. The phone merges or replaces contacts according to the import method defined in the Web UI.
Provisioning
Grandstream IP phones support XML phonebook configuration via provisioning files, Web UI, or remote management tools, allowing administrators to centrally define the server path, download interval, import method, and authentication credentials.
- The XML phonebook is always downloaded from a server defined in the configuration file, Web UI, or pushed via GDMS/Zero Config.
- Different series (GXP, GRP, GXV, WP, DP, GHP63x) may use different parameter names or P-values, which can change between firmware releases.
- Some models, such as GRP series, support direct uploading of configuration files via the Web UI. This is a simpler alternative, but it must be done individually per device.
Grandstream provides a single ZIP file containing templates for all supported models, which ensures administrators always have the latest parameter values. To find the configuration template for each model, please refer to the instructions below:
- Visit the Grandstream tools page: https://www.grandstream.com/support/tools
- Download the Configuration Template file, which includes configuration files for all models.
- Use the template corresponding to your device to define XML phonebook parameters.
- Deploy the configuration:
- Web UI upload: device-by-device.
- GDMS / Zero Config: push settings to multiple devices simultaneously.
XML PHONEBOOK SYNTAX
Header
The XML document should begin with a standard XML declaration. This defines the XML version and encoding. All supported Grandstream models use UTF-8 encoding (some legacy models also support GBK).
<?xml version="1.0" encoding="UTF-8"?>
Phonebook XML structure
The main structure of the XML phonebook is consistent across all supported Grandstream devices. It contains a root <AddressBook> element, optional groups (<pbgroup>), and individual contact entries (<Contact>).
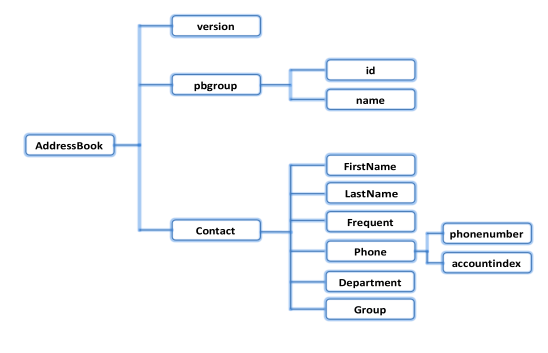
<AddressBook>
<version>Enter version number here. Usually 1</version>
<pbgroup>
<id>Enter group id here</id>
<name>Enter group name here</name>
</pbgroup>
<pbgroup>
<!-- Enter another group information here, same format as above -->
</pbgroup>
<Contact>
<FirstName>Enter first name here</FirstName>
<LastName>Enter last name here</LastName>
<Frequent>Favorite contact or not</Frequent>
<Phone type="Specify phone type here">
<phonenumber>Enter phone number here</phonenumber>
<accountindex>Enter account index here</accountindex>
</Phone>
<Department>Enter department name here</Department>
<Group>Enter group ID here</Group>
</Contact>
<Contact>
<!-- Enter another contact information here, same format as above -->
</Contact>
</AddressBook
Phonebook XML element
This section describes details of the XML elements used in an XML phonebook file. Please note that the element name is case-sensitive when being used in an XML document.
Root element <AddressBook>
The <AddressBook> element is the root of the XML phonebook and contains all groups and contacts. It is mandatory in every XML phonebook file.
<AddressBook>
<!-- Enter phonebook information here -->
</AddressBook>
Object | Position | Type | Values | Comments |
AddressBook | Root element | Mandatory | – | Root element of the XML document |
version | Child element | Optional | Number | XML format version number. Usually 1. |
pbgroup | Child element | Optional | – | Define groups. |
Contact | Child element | Mandatory | – | Each contact is a phonebook entry. |
Element <pbgroup>
Each <pbgroup> defines a contact group. Groups can be used to categorize contacts, such as Work, Friend, or Blacklist.
<pbgroup>
<id>Enter group id here</id>
<name>Enter group name here</name>
</pbgroup>
Object | Position | Type | Values | Comments |
pbgroup | Element | Optional | – | Each pbgroup is a group. More than 1 group can be defined |
id | Child element | Optional | Number | To specify group ID. |
name | Child element | Mandatory | String | Group name. |
Element <Contact>
Each <Contact> element represents an individual phonebook entry. Contacts include names, phone numbers, departments, and optional fields like job title or company.
<Contact>
<id>Enter-contact-Id-here</id>
<FirstName>Enter first name here</FirstName>
<LastName>Enter last name here</LastName>
<Frequent>Favorite contact or not</Frequent>
<Phone type="Specify phone type here">
<phonenumber>Enter phone number here</phonenumber>
<accountindex>Enter account index here</accountindex>
</Phone>
<Primary>Enter-value-here</Primary>
<Department>Enter department name here</ Department >
<Group>Enter group ID here</Group>
<Job>Enter-job-here</Job>
<Company>Enter-company-here</Company>
</Contact>
Object | Position | Type | Values | Comments |
Contact | Element | Mandatory | – | Each contact is an entry |
Id | Child element | Optional | Number | Specify the contact id |
FirstName | Child element | Optional | String | Specify first name and last name. At least one of them has to be specified. |
LastName | Child element | Optional | String | |
Job Title | Child element | Optional | String | Specify the job title of the contact |
Frequent | Child element | Optional | Number | 0: Default 1: Mark this contact as frequent/favorite |
Phone | Child element | Optional | – | Phone number information |
Primary | Child element | Optional | Number | Specify If the number is primary |
Department | Child element | Optional | String | Specify Department name. |
Group | Child element | Optional | number | Specify group ID for this contact. |
Job | Child element | Optional | String | Specify the job of the contact |
Company | Child element | Optional | String | Specify the company of the contact |
Element <Phone>
The <Phone> element contains a phone number and its type (Work, Home, Mobile, Fax, or Other) for a given contact. Each phone number must also specify which account it belongs to.
<Phone type="Specify phone type here">
<phonenumber>Enter phone number here</phonenumber>
<accountindex>Enter account index here</accountindex>
</Phone>
Object | Position | Type | Values | Comments |
Phone | Element | Mandatory | – | It has attribute “type”. type: Work/Home/Mobile/Fax/Other |
phonenumber | Child element | Mandatory | Number | Phone number |
accountindex | Child element | Mandatory | Number | From 0 to 5 for account 1 to account 6 |
XML PHONEBOOK EXAMPLE
Below is an example of an XML phonebook file:
<?xml version="1.0" encoding="UTF-8"?>
<AddressBook>
<version>1</version>
<pbgroup>
<id>1</id>
<name>Blacklist</name>
</pbgroup>
<pbgroup>
<id>2</id>
<name>Work</name>
</pbgroup>
<pbgroup>
<id>3</id>
<name>Friend</name>
</pbgroup>
<Contact>
<FirstName>John</FirstName>
<LastName>Doe</LastName>
<Frequent>0</Frequent>
<Phone type="Work">
<phonenumber>8001</phonenumber>
<accountindex>1</accountindex>
</Phone>
<Phone type="Home">
<phonenumber>3000001</phonenumber>
<accountindex>0</accountindex>
</Phone>
<Phone type="Mobile">
<phonenumber>1234567890</phonenumber>
<accountindex>0</accountindex>
</Phone>
<Department>Marketing</Department>
<Group>1</Group>
</Contact>
<Contact>
<FirstName>Michael</FirstName>
<LastName>Tsai</LastName>
<Frequent>0</Frequent>
<Phone type="Work">
<phonenumber>8002</phonenumber>
<accountindex>1</accountindex>
</Phone>
<Phone type="Home">
<phonenumber>3000002</phonenumber>
<accountindex>0</accountindex>
</Phone>
<Phone type="Mobile">
<phonenumber>1234567889</phonenumber>
<accountindex>0</accountindex>
</Phone>
<Department>Sales</Department>
<Group>2</Group>
</Contact>
<Contact>
<FirstName>Alex</FirstName>
<LastName>Smith</LastName>
<Frequent>1</Frequent>
<Phone type="Work">
<phonenumber>8003</phonenumber>
<accountindex>0</accountindex>
</Phone>
<Phone type="Home">
<phonenumber>3000002</phonenumber>
<accountindex>0</accountindex>
</Phone>
<Phone type="Mobile">
<phonenumber>2345678888</phonenumber>
<accountindex>0</accountindex>
</Phone>
<Department/>
<Group>3</Group>
</Contact>
</AddressBook>
SUPPORTED DEVICES
The table below lists Grandstream devices that support XML phonebook functionality and the maximum number of contacts each model can store.
Device Model | Maximum Contacts |
GRP260x Series | up to 2000 |
GRP2610(P), GRP2611G, GRP2612(P/W/G), GRP2613(W) | up to 1000 |
GRP2614, GRP2615, GRP2616, GRP2624, GRP2634, GRP2636, GRP2650, GRP2670 | up to 2000 |
up to 1000 | |
GXP2130 v2, GXP2135, GXP2140, GXP2160, GXP2170 | up to 2000 |
GHP630(W), GHP631(W) | up to 1000 |
DP75x Series | up to 3000 |
WP810, WP822, WP825 | up to 500 |
WP816, WP820, WP826, WP836, WP856 | up to 1000 |
GXV3350, GXV3370, GXV3450, GXV3470 | up to 1000 |
GXV3380, GXV3480 | up to 2000 |