

Introduction
IPSec (Internet Protocol Security) is a protocol suite that secures IP communications by authenticating and encrypting each IP packet in a communication session. When configuring IPSec VPN on a router, the goal is to establish a secure tunnel between two networks over an untrusted network, such as the Internet.
In this guide we will be configuring a site-to-site connection between two Grandstream routers located in different branches, our goal is to establish a secure VPN tunnel between the two locations, that will be exchanging different network subnets, Please refer to the illustration below for better understanding.
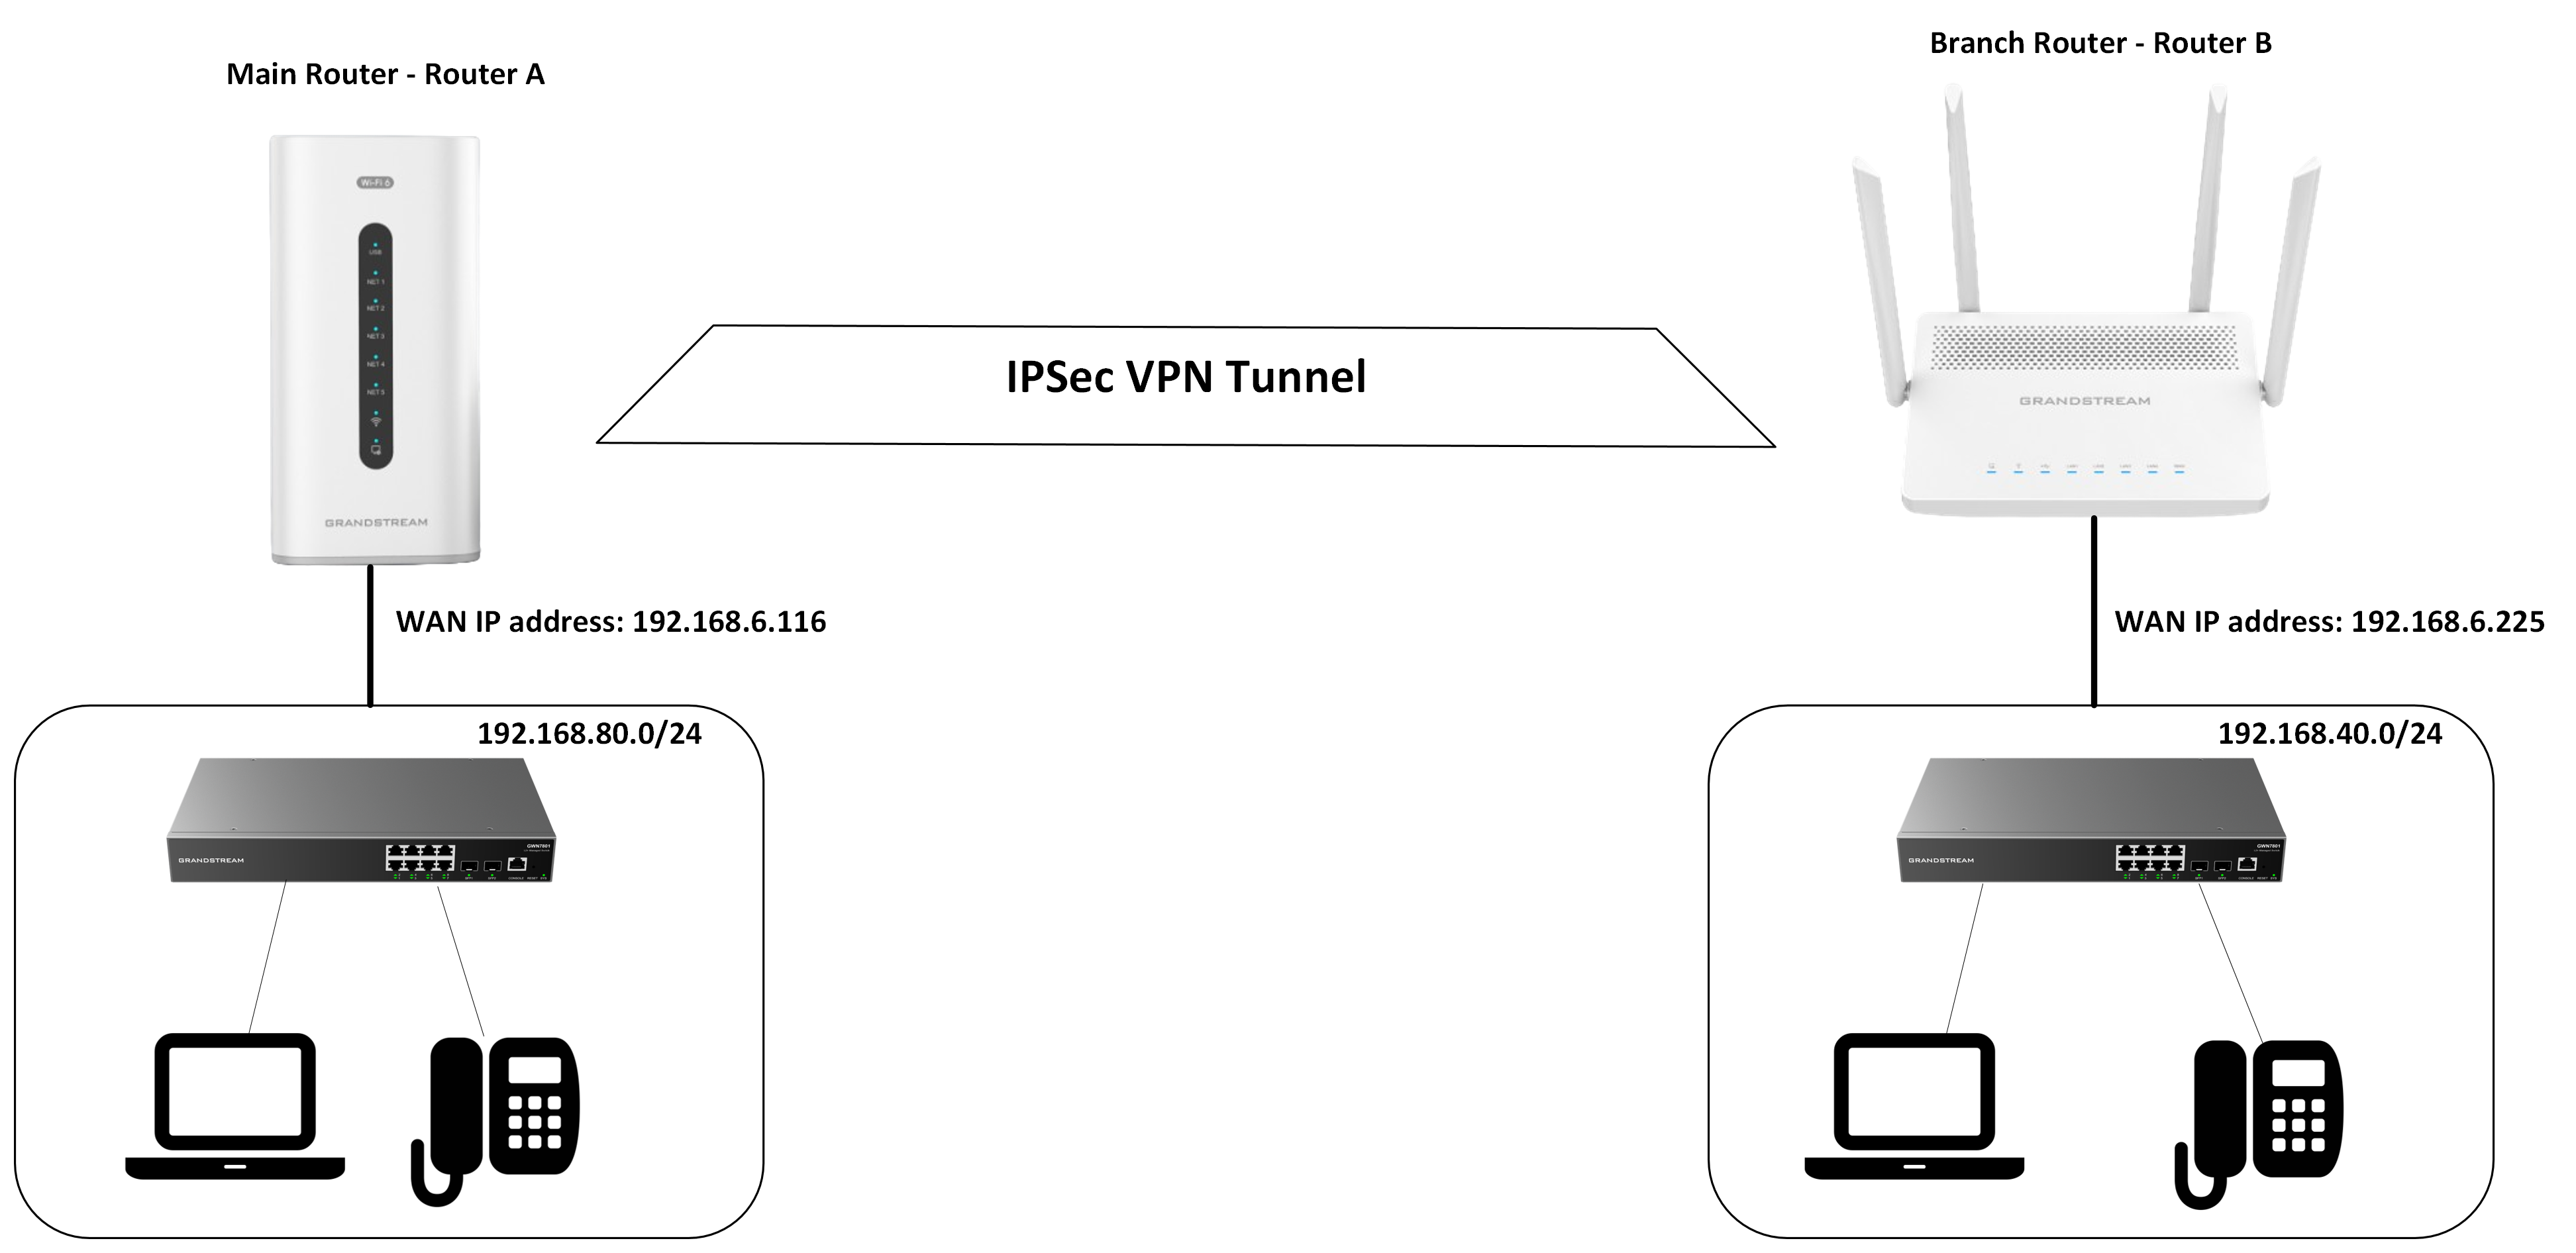
The configuration steps for an IPSec site-to-site VPN tunnel will consist of different sections, we will explain the goal to be achieved at each stage:
- General Configuration: This configuration will define the remote router’s Public IP address and the Internet key exchange protocol version.
- Phase 1 Configuration: Defines parameters that can authenticate both routers and negotiate the protocols to use for encryption and hashing of the VPN tunnel
- Phase 2 Configuration: the secured tunnel created in Phase 1 will be used by Phase 2 to negotiate the security associations and define local and remote subnets that will be used to protect data traffic.
Main Router Configuration
On the Main Router (Router A), we will carry on the following configuration:
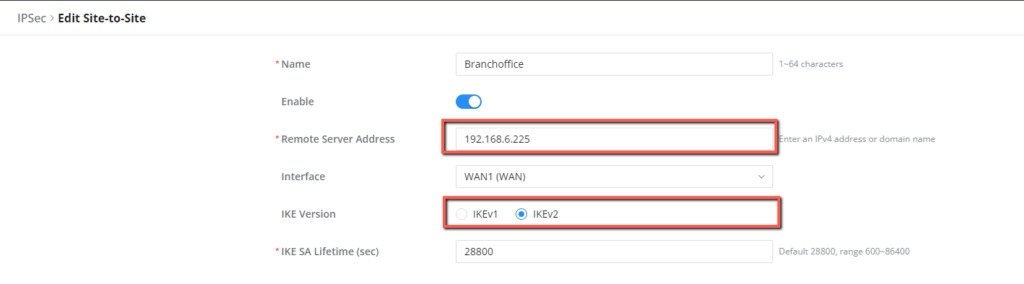
- Access the web UI of Router A and go under VPN → IP Sec → Site-to-Site
- Click Add to create a new VPN tunnel
- Set the name to “BranchOffice” for example,
- Set the Remote Server Address to the WAN IP address of The branch Office Router (Router B)
- For the Internet Key exchange version (IKE), you have the option to select IKEv1 or IKEv2, the IKEv1 is the legacy version of the protocol, and is advised to use it only when the other router does not support IKEv2, for better security, it is recommended to select the IKEv2.
- Set the IKE SA lifetime to a value of 28800 seconds, and make sure the same value is selected on the other router
Phase 1 Configuration – Main Router
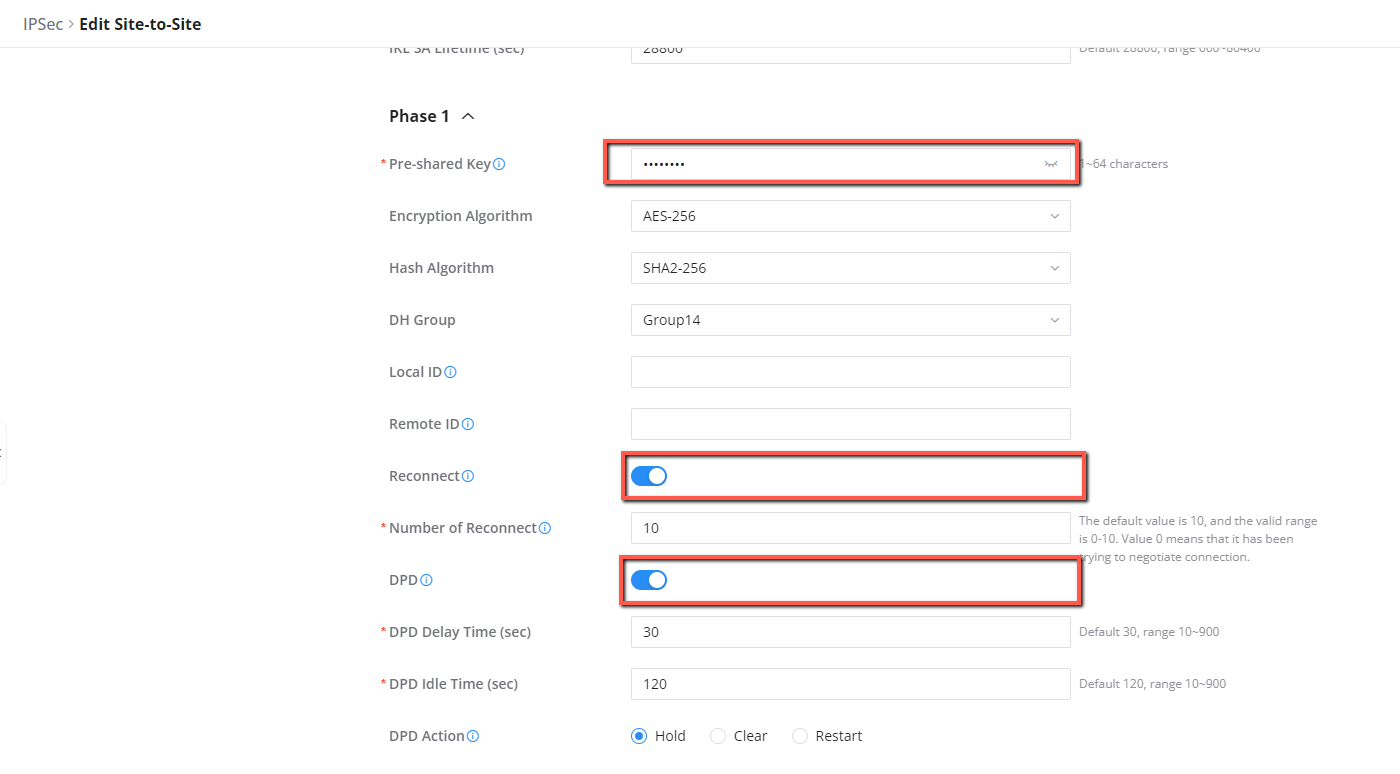
Considering that the IKE version chosen is IKEv2, then the configuration will be carried as shown below:
- Set the pre-shared key to a complex password, this key will be used to authenticate the branch office router.
- The encryption algorithm and hashing algorithm should be selected based on the deployment scenario, and based on the resources, all the algorithms will perform the same goal of encrypting exchanged data, what needs to be confirmed is that the same encryption and hashing algorithms are used on both routers, we will set the encryption algorithm to AES-256, and Hash Algorithm to SHA2-256
- Set the DH group to Group14, the Diffie-Hellman Group defines how secure the algorithm will be, the higher the value, the longer the encryption key will be.
- Enable the Reconnect option, to allow the connection to be renegotiated before it expires, and set the number of tries to 10.
- Enable the Dead Peer Detection (DPD), and define its Delay time and Idle time in seconds, the delay time will allow the device to delay the re-connection attempt, and the Idle time will define how long the device should wait before trying to reconnect.
- Define the DPD action, we will set it to Hold.
- Hold: Keeps the tunnel down but does not remove the connection, waiting for the peer to come back online.
- Clear: Deletes the current connection, this requires a manual restart to re-establish the tunnel.
- Restart: Attempts to immediately re-establish the tunnel after the peer is detected as down.
Phase 2 Configuration – Main Router
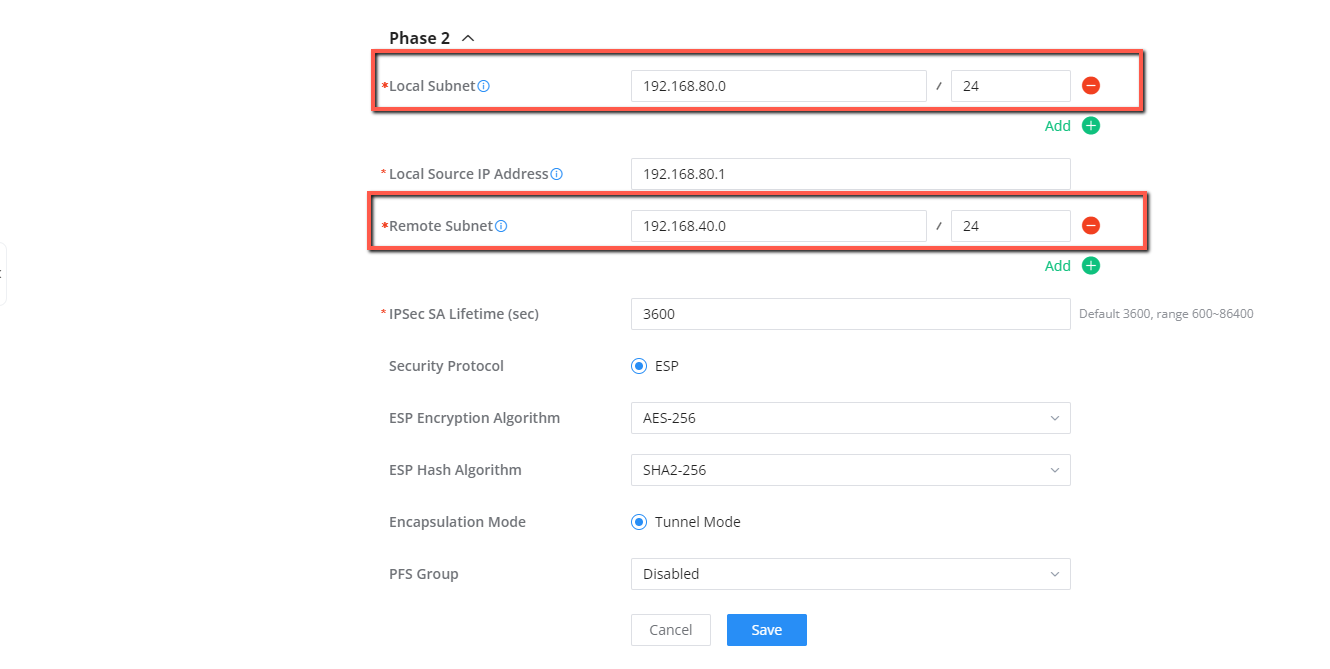
In this phase, the administrator needs to define the network for the local subnet and the remote subnet, For the above example, we can configure it as shown below:
- Set the local Subnet to be the default VLAN of the Main router, this will be the 192.168.80.0/24 subnet
- Set the local Source IP address to 192.168.80.1, this is the IP address of the gateway, if you are routing traffic through a device that has a specific IP, use that address.
- The remote subnet will be the network of the branch office: 192.168.40.0/24
- In Phase 2, we will define the IPSEC SA Lifetime (sec) to be 3600 seconds
- Set the security Protocol to ESP, and define its Encryption and hashing algorithms
- Set the Encapsulation Mode to Tunnel Mode
- We will keep the PFD group disabled, but you have the option to enable it and choose the security group desired this will be used to encrypt packets going through phase 2 of the VPN tunnel.
Branch Router Configuration
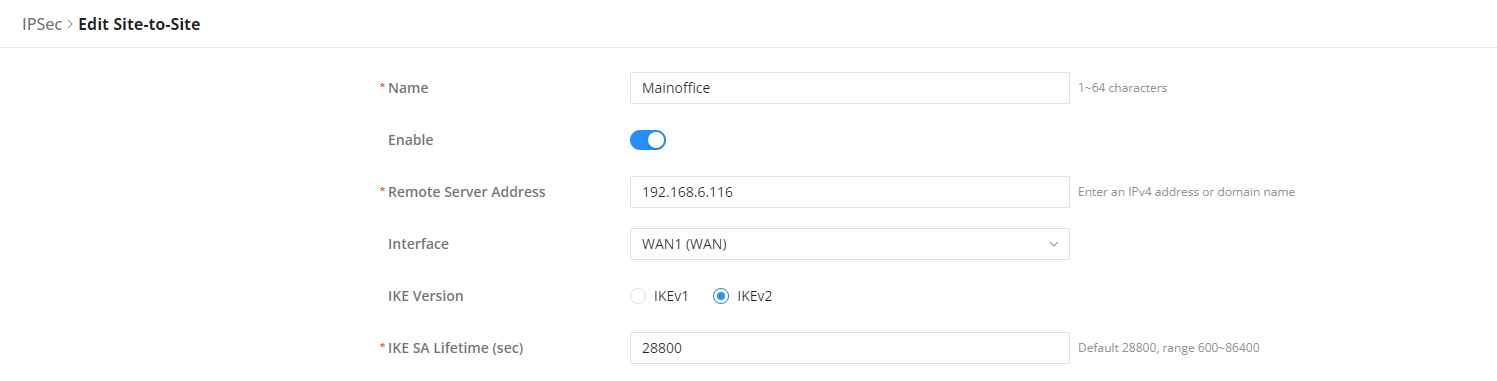
On the Branch Router (Router B), the configuration is going to be almost similar, since we will need to provide the same values to authenticate the VPN connection, please follow the below steps for the configuration:
- Go to VPN → IP Sec → Site-to-site.
- Create a new IPSec tunnel, and name it “Main office”.
- Set the remote server address to the public IP address of the main office router
- Set the internet key exchange version to IKEv2, similar to the one defined on the main router
- Set the internet IKE SA Lifetime to 28800 seconds, the same value as the one defined on the main router configuration.
Phase 1 Configuration – Branch Router
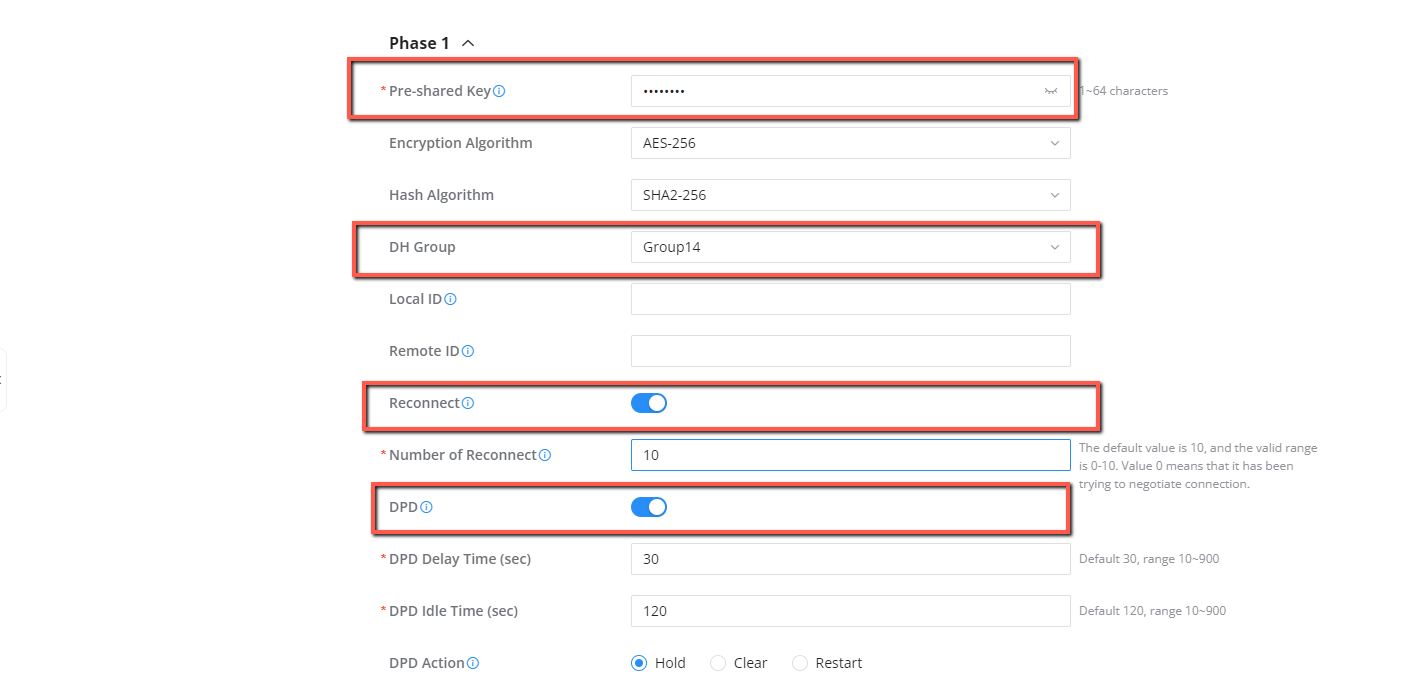
The values defined on phase 1 configuration on the branch router will be the same as the ones defined on the main router to authenticate the secure connection:
- Provide the same Preshared Key defined on the main router
- Set the Encryption and hashing Algorithm to AES-256 and SHA2-256 respectively.
- Set the Diffie-Hellman Group (DH Group) to Group 14, the same as the one defined on the main Router, this group will use a 2048-bit encryption key
- Enable the Reconnect option and the Dead Peer Detection option, this will check if the remote VPN peer is still active. If the peer becomes unresponsive, DPD helps to automatically disconnect or reconnect the VPN tunnel.
- We set the DPD Action to “Hold“, this keeps the tunnel down but does not remove the connection, waiting for the peer to come back online.
Phase 2 Configuration – Branch Router
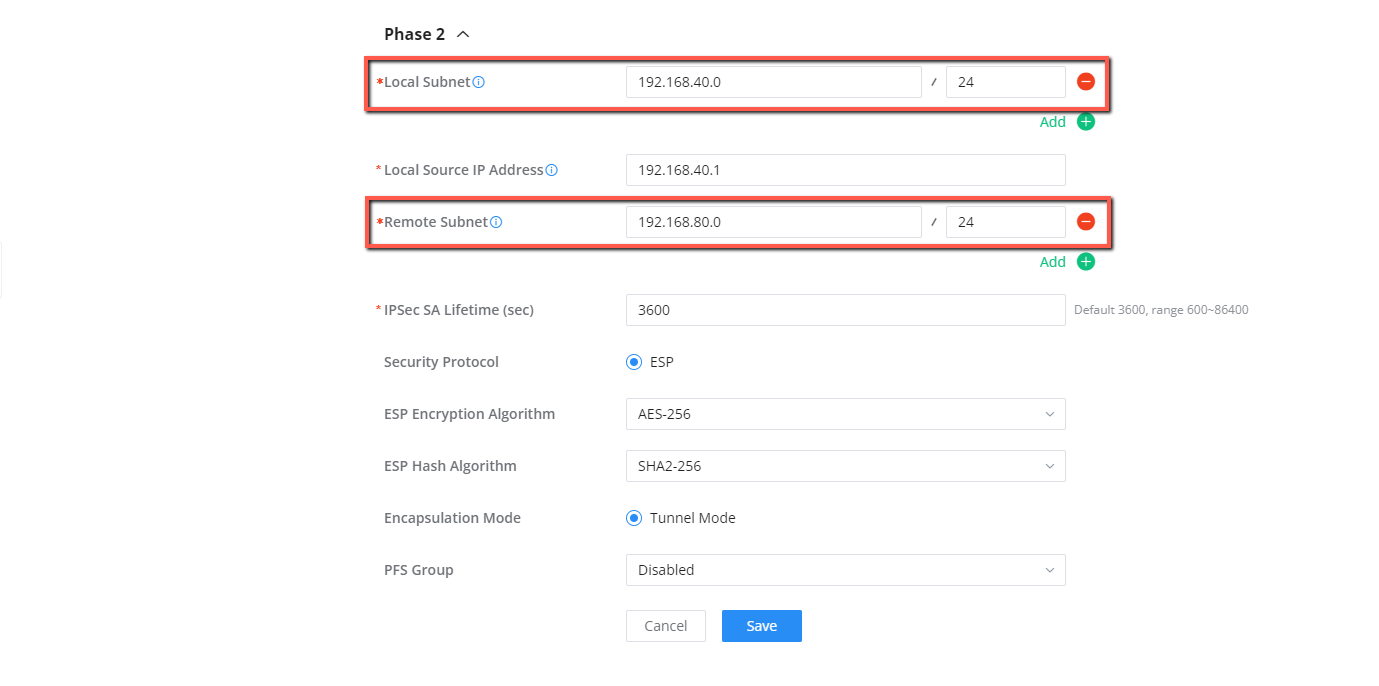
The Phase 2 configuration will define the Local and remote subnets of the Branch Router, Please Follow the below steps:
- Set the local Subnet to 192.168.40.0/24
- Set the local Source IP address to the IP address of the gateway: 192.168.40.1
- Set the Remote Subnet to: 192.168.80.0/24
- The IPSec SA Lifetime will stay the same as the one defined on the Main Router: 3600 Seconds
- The rest of the security protocols should have the same value as the ones defined on the main router:
Testing the connection
Once the communication is established, it should show the status “connected” on both routers.


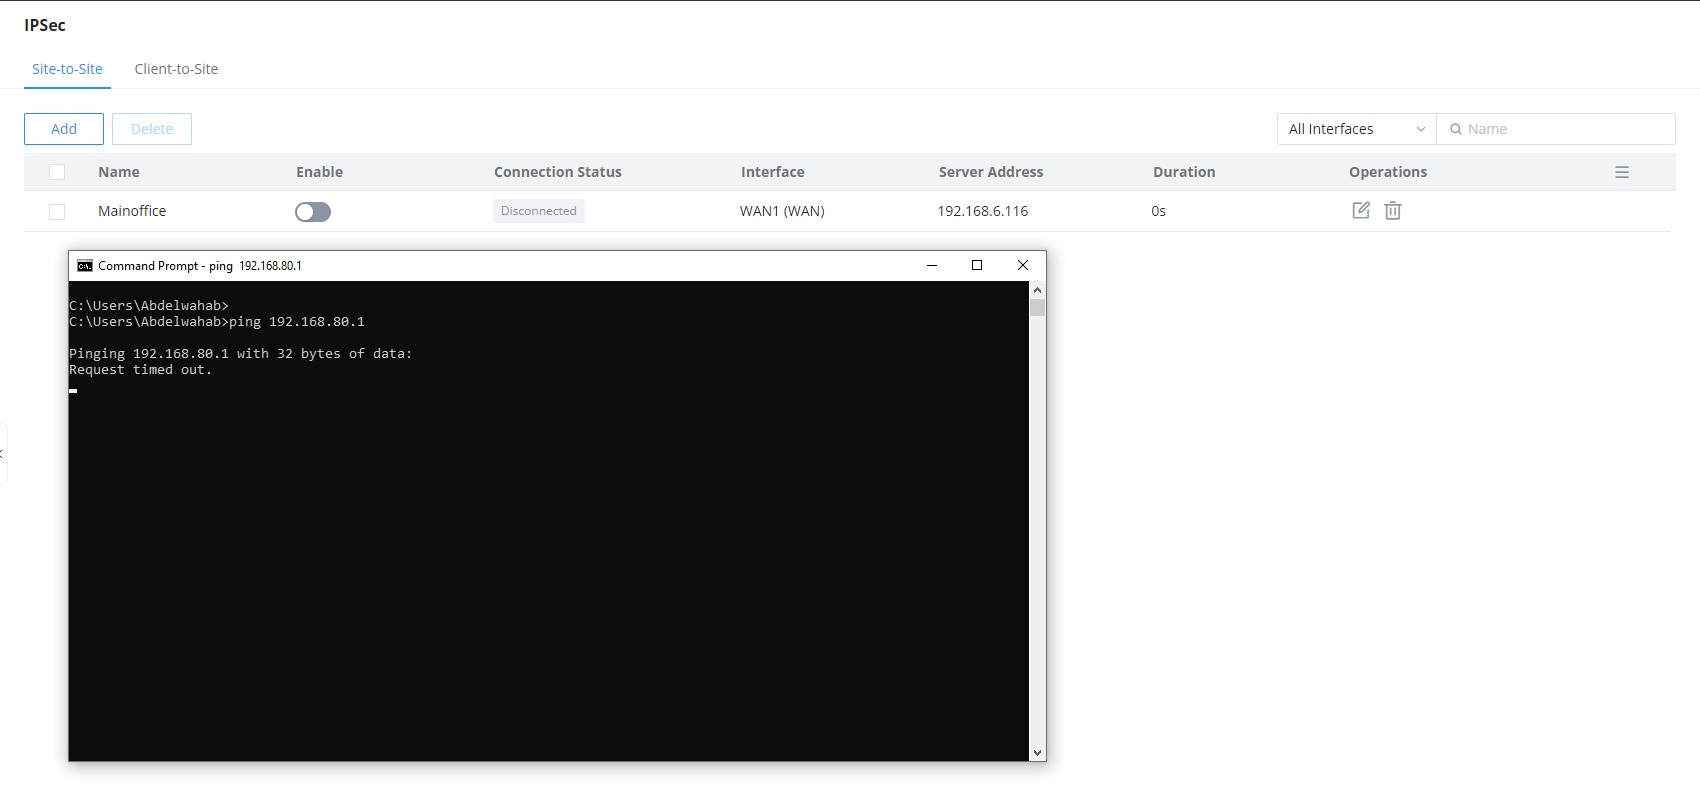
To confirm that the connection has been established, we will perform a ping from one device on the branch office to a server on the main office, for example when connected on the branch office network, we will ping the gateway of the main office network.
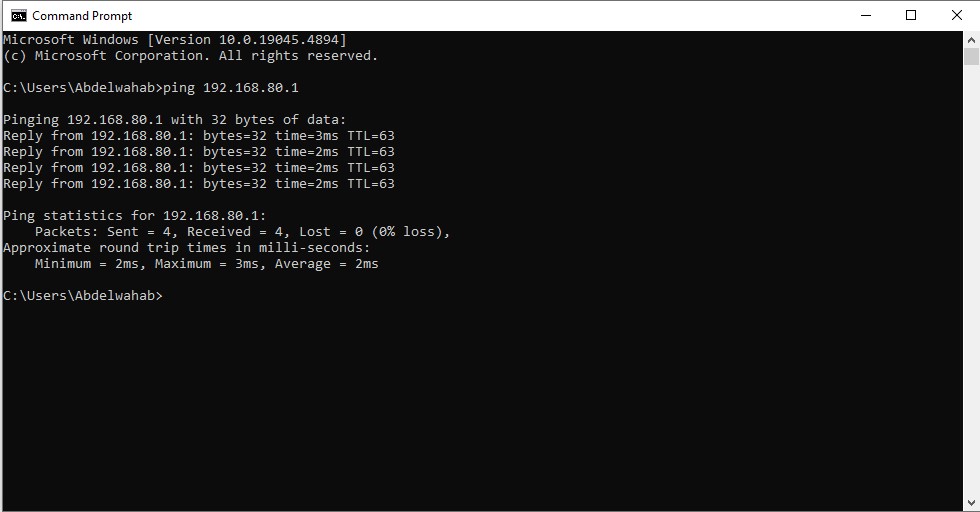
When the VPN connection is not established or has been manually disconnected, the ping will not be successful
Supported Devices
Device Model | Firmware Required |
GWN7052 | 1.0.5.5+ |
GWN7052F | 1.0.7.1+ |
GWN7062 | 1.0.5.6+ |
GWN7001 | 1.0.1.6+ |
GWN7002 | 1.0.1.6+ |
GWN7003 | 1.0.1.6+ |
GCC6010 | 1.0.1.8+ |
GCC6010W | 1.0.1.34+ |
GCC6011 | 1.0.1.34+ |
GCC6020 | 1.0.7.32+ |
GCC6021 | 1.0.7.32+ |
Supported Devices