


Overview
This guide explains how to secure OpenVPN® remote access using RADIUS authentication with Duo multi-factor authentication (MFA). Users will continue to log in with their existing VPN username and password, and Duo will add a second verification step (for example, Duo Push) before the VPN connection is allowed.
The router acts as the OpenVPN® server and sends authentication requests to the Duo Authentication Proxy using RADIUS. The Duo Authentication Proxy validates the user against your RADIUS server, then triggers Duo MFA and returns an “accept” or “reject” back to the router. This keeps the router configuration simple, because from the router’s perspective, it is “just RADIUS”.
This setup is useful when you want to:
- Add MFA to OpenVPN® without changing the user login experience
- Reduce risk from compromised credentials and password reuse
- Centralize authentication through RADIUS while enforcing Duo approval
In this guide, you will:
- Confirm you have a working RADIUS server (local or existing)
- Create a Duo application and enroll at least one user/device
- Install and configure the Duo Authentication Proxy (Windows® or Linux®)
- Configure the router to use a RADIUS profile that points to the Duo proxy
The End Result: OpenVPN® connections require both valid credentials and Duo MFA approval before the VPN session is established.
Supported Devices and Prerequisites
Supported Devices
This guide applies to Grandstream routers that support running an OpenVPN® server and authenticating users via RADIUS. The router does not integrate with Duo directly. It only sends RADIUS authentication requests to a RADIUS endpoint (in this guide, that endpoint is the Duo Authentication Proxy).
The supported devices are the following Grandstream models:
| Series / Devices | Models |
|---|---|
| Grandstream GWN700x Routers | GWN7001, GWN7002, GWN7003 |
| Grandstream GCC601x Series | GCC6010W, GCC6010, GCC6011 |
| Grandstream GCC602x Series | GCC6020, GCC6021 |
Supported Devices
Prerequisites
Before you start, make sure you have:
- A working RADIUS server (for example, FreeRADIUS) with at least one test user.
- A Cisco Duo tenant with admin access.
- At least one Duo user enrolled with a second factor (for example, Duo Mobile).
- A Windows® or Linux® machine/VM to run the Duo Authentication Proxy.
Topology and Authentication Flow
This deployment uses four main components:
- VPN client (user device running an OpenVPN® client: e.g., OpenVPN® App)
- Grandstream router (OpenVPN® server + RADIUS client)
- Duo Authentication Proxy (runs on Windows® or Linux®)
- RADIUS server (your primary username/password authentication source)
The router does not talk to Duo directly. It only talks RADIUS. Duo MFA is enforced by the Duo Authentication Proxy, which sits between the router and your RADIUS server.
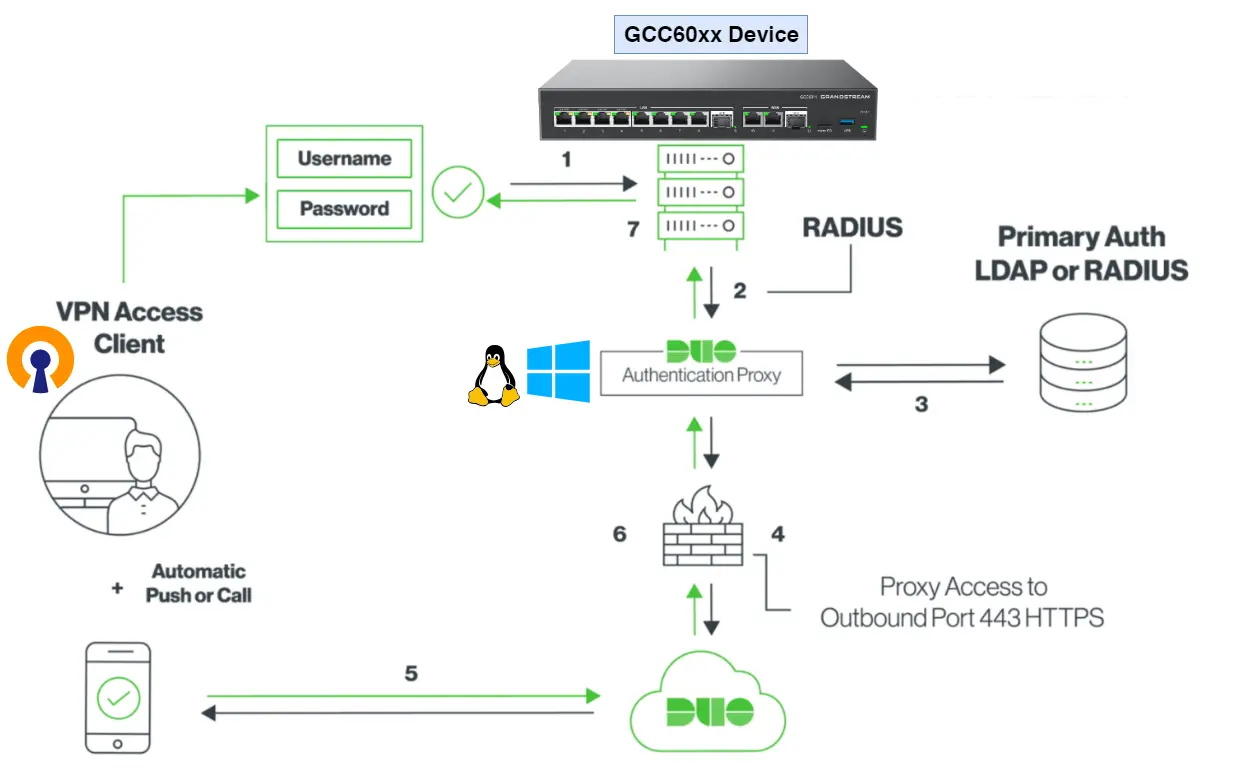
High-level flow (what happens when a user connects):
- User starts VPN login: The user enters their VPN username and password in the OpenVPN® client.
- Router forwards the login via RADIUS: The router (OpenVPN® server) sends the credentials as a RADIUS Access-Request to the Duo Authentication Proxy.
- Proxy validates the username/password (Primary Auth): The Duo Authentication Proxy forwards the authentication request to the RADIUS server to confirm the credentials are correct.
- Proxy triggers Duo MFA: If primary authentication succeeds, the proxy contacts Duo Cloud over HTTPS (TCP 443 outbound) to request MFA approval.
- User approves MFA: Duo sends the MFA request to the user (typically Duo Push, or passcode/phone call depending on policy).
- Duo returns the MFA result to the proxy: Duo Cloud sends “approved” or “denied” back to the Duo Authentication Proxy.
- Proxy returns the final result to the router: The proxy sends a RADIUS Accept (approved) or RADIUS Reject (denied) to the router.
Key points to remember:
- The router only needs a RADIUS profile pointing to the Duo Authentication Proxy.
- Duo MFA is enforced by the proxy, not by the router.
- The proxy must be reachable by the router (RADIUS) and must have outbound HTTPS (443) access to Duo Cloud.
- The RADIUS server is still required, because it is the primary authentication source for username/password.
Ports used (typical defaults):
- Router → Duo Authentication Proxy: RADIUS (UDP 1812)
- Duo Authentication Proxy → Duo Cloud: HTTPS (TCP 443 outbound)
- Duo Authentication Proxy → RADIUS server: RADIUS (UDP 1812)
Step 1: RADIUS Server Configuration
Duo MFA does not replace the username and password check. The Duo Authentication Proxy still needs a RADIUS server to validate the user’s credentials first, then Duo adds the second-factor approval.
If you already have a working RADIUS server, skip this step. Before continuing, make sure you have the RADIUS server IP/hostname, the RADIUS port (typically UDP 1812), the shared secret, and a test username/password that can authenticate successfully.
- Install FreeRADIUS and the test tool (Ubuntu):
sudo apt update
sudo apt install -y freeradius freeradius-utils- Edit the RADIUS client configuration:
sudo vim /etc/freeradius/3.0/clients.confAdd the following block to the file, then save and exit (i → paste → Esc → :wq → Enter).
The secret value must match the secret you configure later in the Duo Authentication Proxy.
client all {
    ipaddr = 0.0.0.0/0
    secret = password
}
Note: Setting ipaddr = 0.0.0.0/0 allows RADIUS requests from any IP address. Use this only for isolated lab testing. In production, do not use 0.0.0.0/0; restrict ipaddr to the Duo Authentication Proxy IP address (or the specific authorized RADIUS client IPs) to prevent unauthorized access.
- Create a test user:
sudo vim /etc/freeradius/3.0/usersAdd the following lines to the file, then save and exit. This creates a temporary test account (username gcc_duo, password admin123) used to verify RADIUS is working; remove it after the full Duo flow is confirmed.
gcc_duo Cleartext-Password := "admin123"
    Reply-Message := "Hello, %{User-Name}"
Reply-Message is an optional success message returned by FreeRADIUS. %{User-Name} is replaced by the authenticating username, so the reply becomes Hello, gcc_duo. This helps confirm the test is working.
- Start FreeRADIUS (leave it running while testing):
sudo freeradius- Test authentication:
radtest gcc_duo admin123 <RADIUS_SERVER_IP>:1812 0 password<RADIUS_SERVER_IP> is the RADIUS server IP address. If the test succeeds, you should see Access-Accept and a reply message similar to Hello, gcc_duo.
If the connection fails, confirm the server IP is correct and reachable. If authentication fails, verify the username/password and the shared secret match what you configured in users and clients.conf.
Step 2: Duo Application and User Enrollment
In this step, you set up Cisco Duo so it can enforce MFA for OpenVPN® logins later (Step 3). You will access or create a Duo tenant, create a Duo application to obtain the integration values, and add a Duo user and enroll their phone with Duo Mobile so they can approve MFA requests.
By the end of Step 2, you should have the following ready for Step 3: Client ID, Client secret, and API hostname, plus at least one enrolled Duo user.
2.1 Register or sign in to your Duo Admin Panel
Duo configuration is done in the Duo Admin Panel (web). If you already have a Duo tenant, sign in and continue to the next section. If you do not have one yet, create one or use the free trial.
Open the Duo Admin sign-in page: https://admin.duosecurity.com/login
2.2 Install Duo Mobile on the user phone
Duo Mobile is the second factor in this setup. When a VPN user logs in successfully with their username and password (validated by RADIUS), Duo sends an approval request to the user’s phone (Duo Push) or expects a passcode, depending on policy. No phone enrollment means no MFA approval, which means no VPN access.
Install Duo Mobile from the official store: iOS® (App Store) or Android® (Google Play)
2.3 Create the Duo application (integration)
You need a Duo application so that Duo generates the integration values used by the Duo Authentication Proxy in Step 3.
In the Duo Admin Panel, open Applications and click Add application.
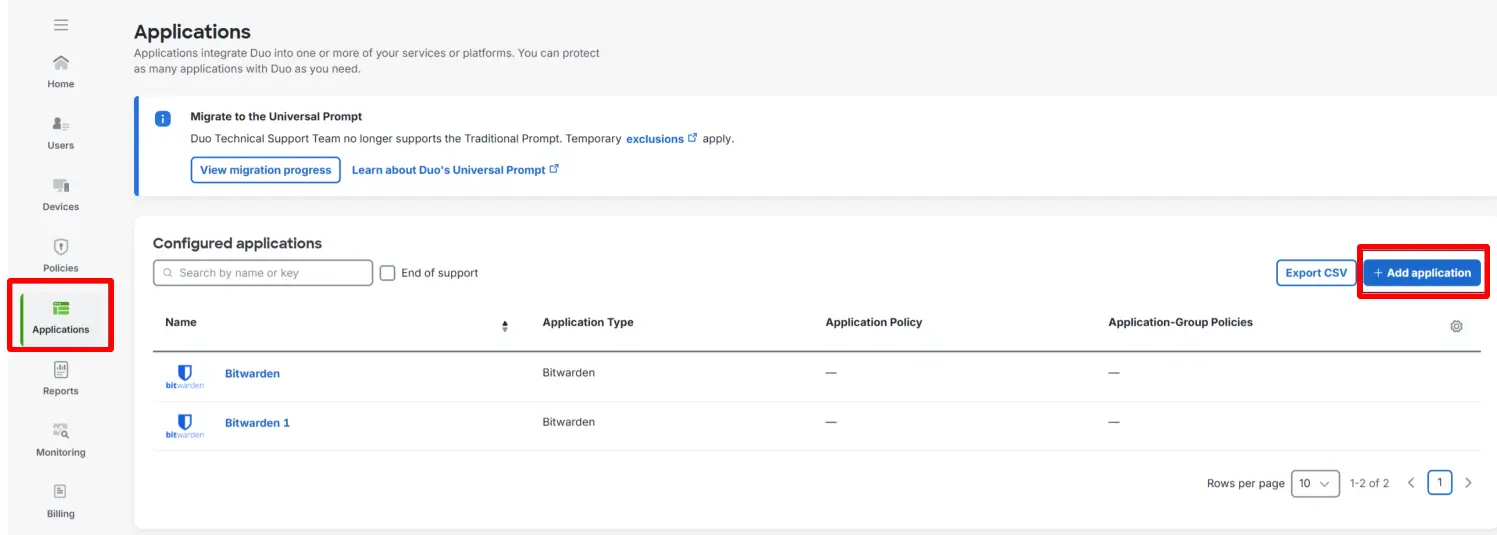
Search for the application template you want to use (your example uses “Bitwarden”), then select the entry with the 2FA label and add it. After adding it, open the application from the Applications list.
On the application page, scroll to Details and locate: Client ID, Client secret, and API hostname.
These values are required in Step 3.
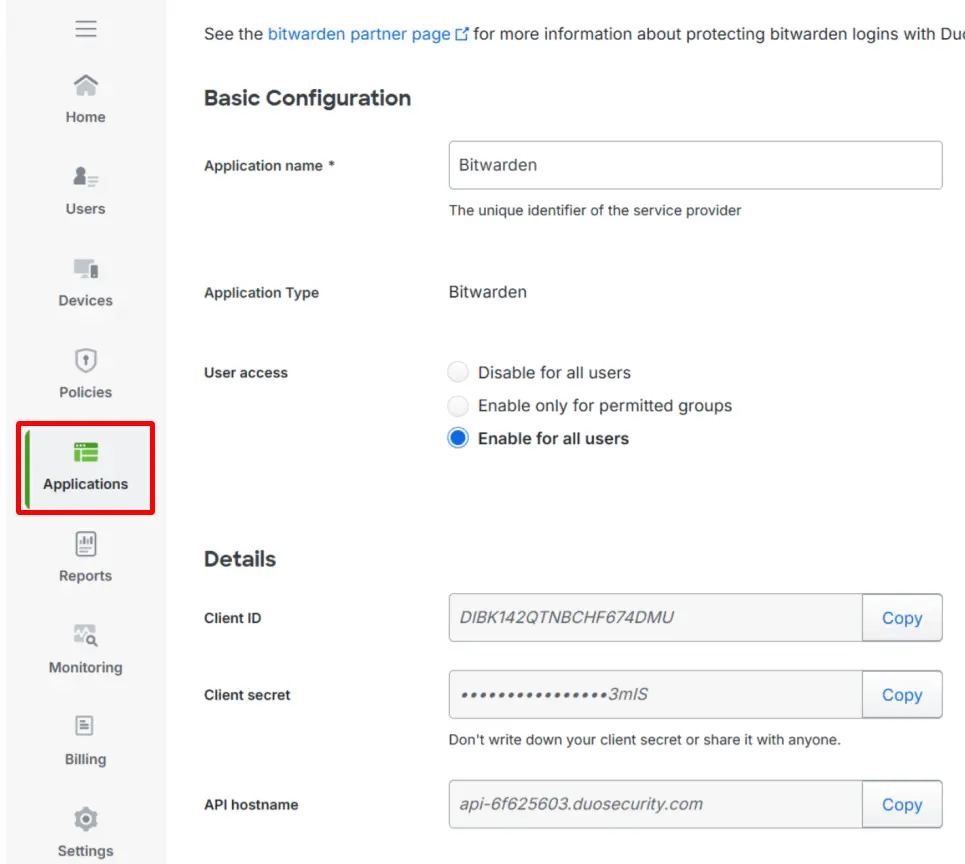
Important: Client ID becomes ikey, Client secret becomes skey, and the API hostname becomes api_host in the Duo Authentication Proxy configuration.
2.4 Add a Duo user
Now, create a Duo user who will receive the MFA prompt during VPN login.
Open Users and click Add User.
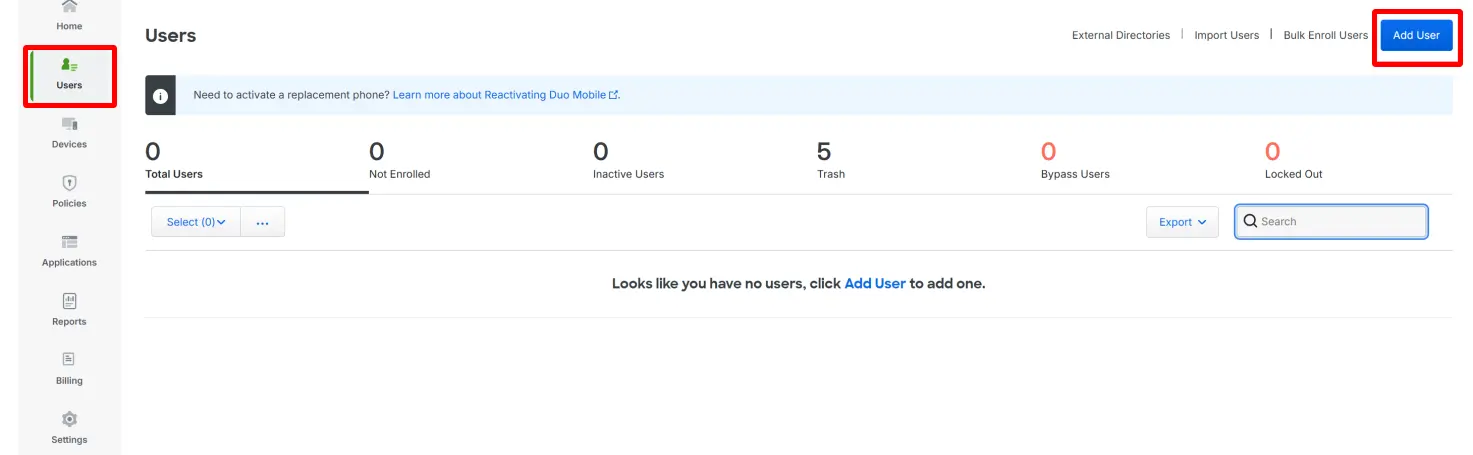
Enter the username and save.
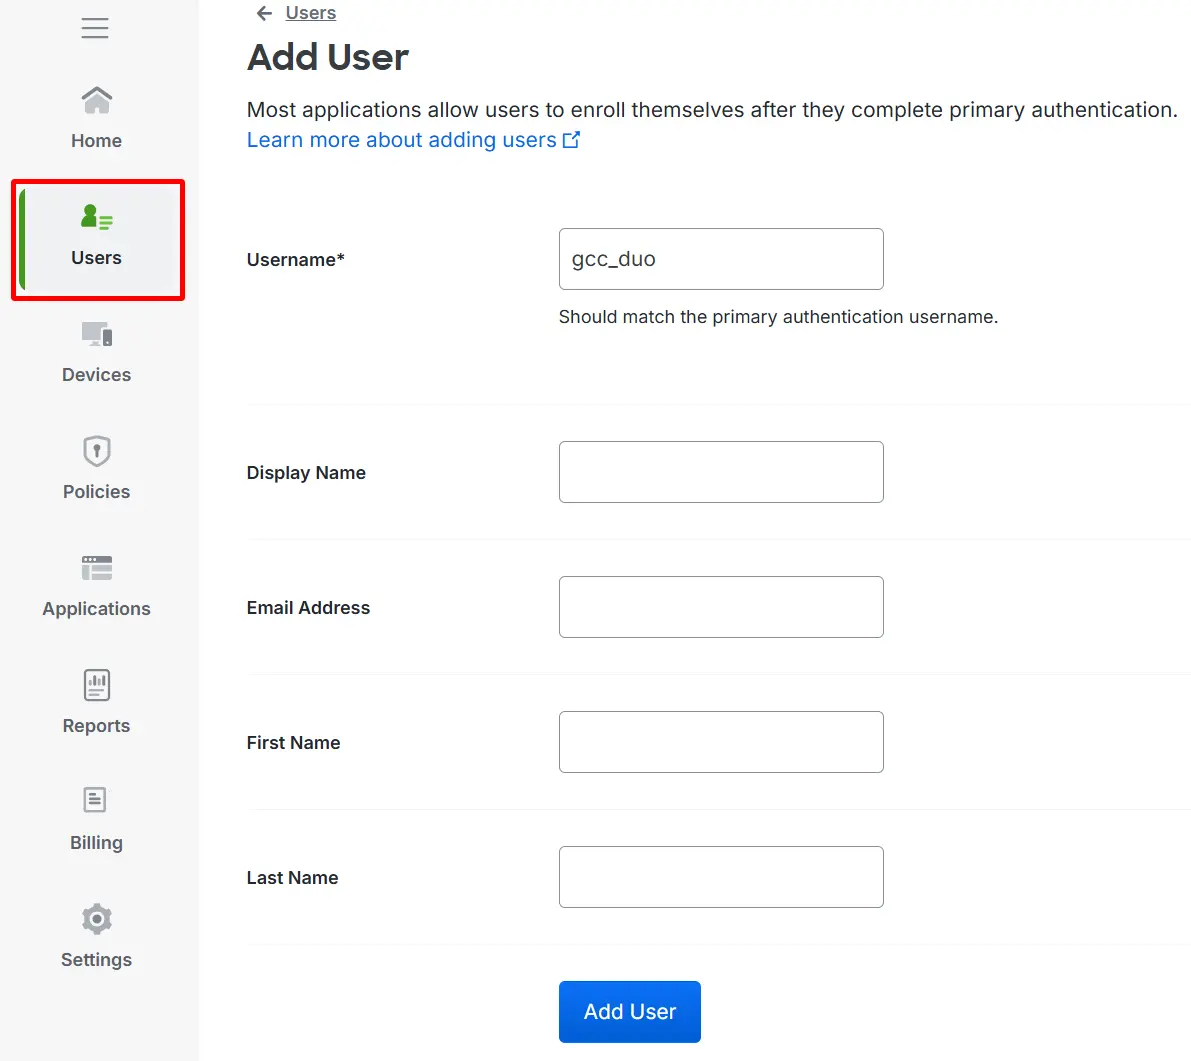
Important: The username must match the username in your RADIUS server (Step 1).
2.5 Enroll the phone and activate Duo Mobile
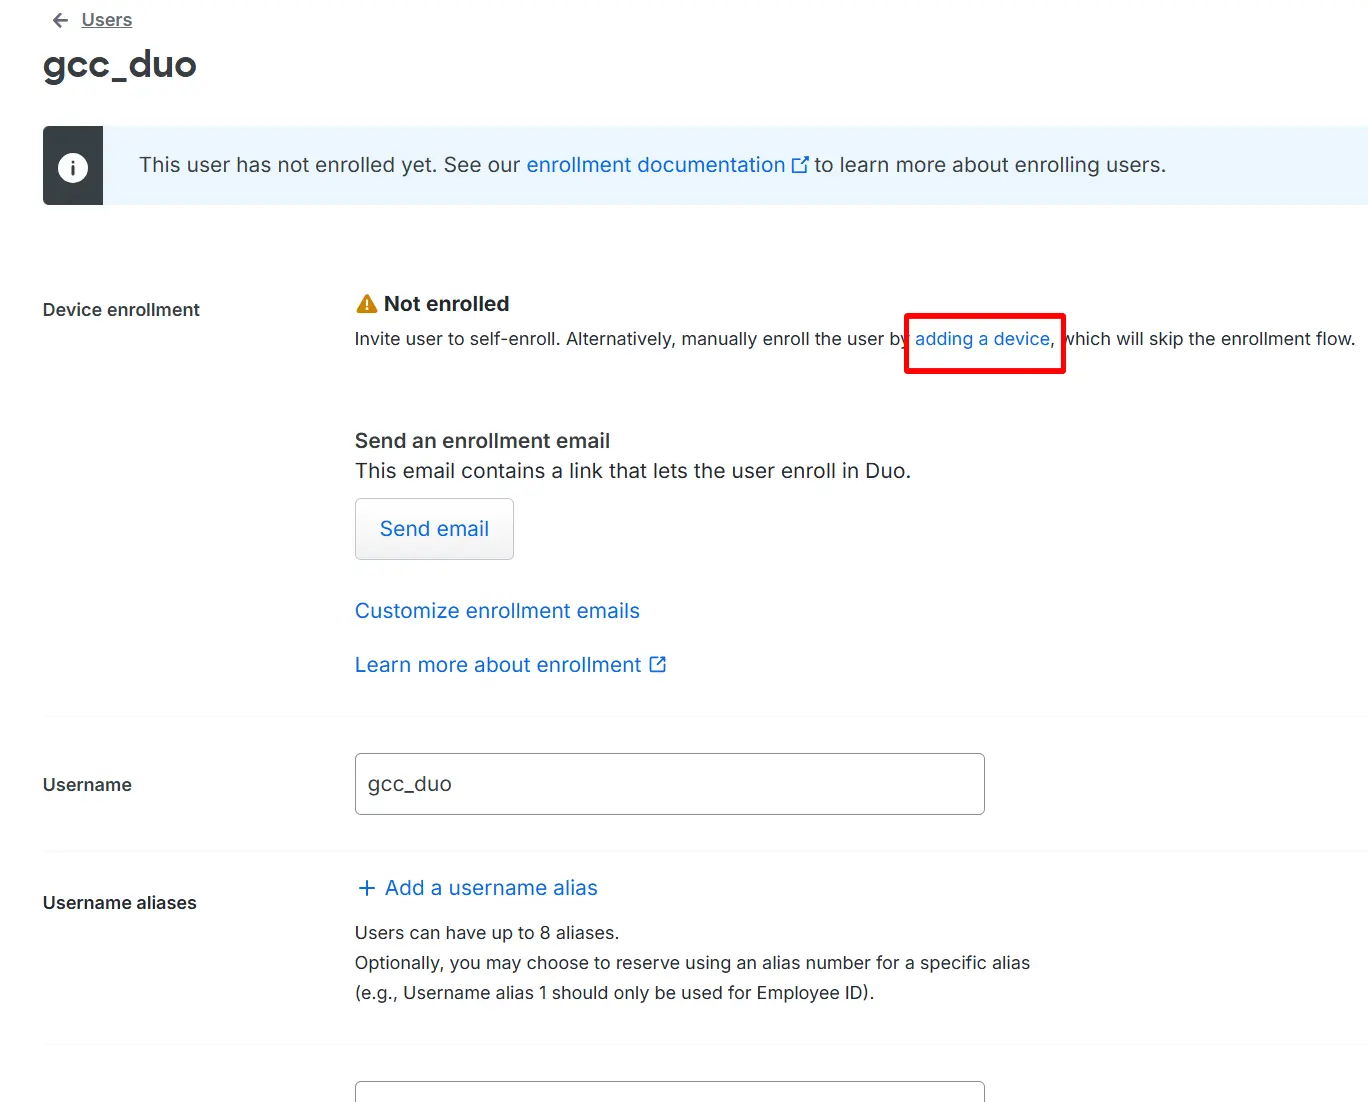
Open the user you created. If the user shows Not enrolled, click adding a device to start enrollment.
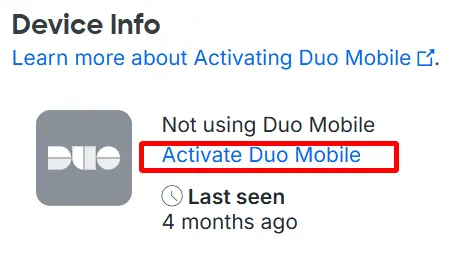
On the device section, choose Activate Duo Mobile.
Choose how you want to deliver activation (e.g. Email or SMS), then enter the user’s email address.
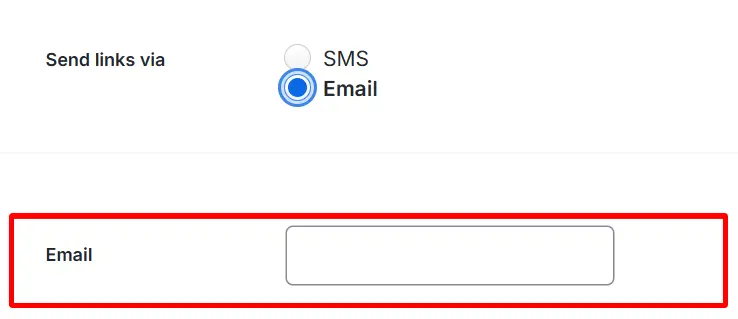
Generate the activation code/link.
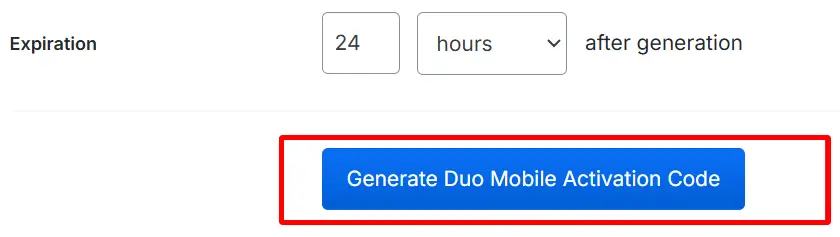
On the phone, open Duo Mobile and complete activation (this is typically done by scanning a QR code or opening an activation link, depending on what Duo presents). Once completed, the user becomes enrolled and can approve MFA prompts.
Step 3: Duo Authentication Proxy Configuration
In this step, you install and configure the Duo Authentication Proxy. The router (OpenVPN® server) will send RADIUS authentication requests to the proxy. The proxy validates the username and password against your RADIUS server (Step 1), then triggers Duo MFA using the Duo application you created (Step 2).
For more details, check the Duo Authentication Proxy reference: https://duo.com/docs/authproxy_reference
3.1 Install Duo Authentication Proxy
Install the Duo Authentication Proxy on a Windows® or Linux® machine/VM that is reachable from the router and can reach both the RADIUS server and Duo Cloud.
Windows® download: https://dl.duosecurity.com/duoauthproxy-latest.exe
Note: Linux® is also supported. The configuration concepts and file sections are the same; only the installation method and file path differ.
3.2 Open the proxy configuration file
The proxy is configured using authproxy.cfg. After making changes, the Duo Authentication Proxy must be restarted for the changes to take effect.
The configuration is organized into sections:
- CLIENTS: where the proxy sends primary authentication (RADIUS in this guide)
- SERVERS: how the proxy accepts requests from the router and enforces Duo MFA
3.3 Configure primary authentication (RADIUS server)
Add a radius_client section that points to the RADIUS server you configured in Step 1.
Example:
[radius_client]
host=192.168.70.249
secret=password
pass_through_all=true
Note: Replace host and secret with the same RADIUS server IP/hostname and shared secret you used in Step 1.
3.4 Configure Duo MFA enforcement for the router
Add a radius_server_auto section. This section allows the proxy to accept RADIUS requests from the router (OpenVPN® server), then perform Duo MFA.
Example:
[radius_server_auto]
ikey=AAAA1111BBBBBBB111CCC
skey=0000000AAAAAA0000000AAAAAA00000AAAAA11111
api_host=api-xxx.duosecurity.com
radius_ip_1=192.168.70.23
radius_secret_1=password
failmode=safe
client=radius_client
port=1812 (Note: defaults to 1812 if not specified)
Note: Replace ikey, skey, and api_host with the Client ID, Client secret, and API hostname from the Duo application you created in Step 2. Replace radius_ip_1 with the IP address of the router/OpenVPN server that will send RADIUS requests to this proxy, and set radius_secret_1 to the shared secret you will also configure on the router in Step 4. Keep client=radius_client as-is because it must match the [radius_client] section name you configured in section 3.3, so the proxy knows which RADIUS server to use for primary authentication.
Note: failmode controls what happens if the Duo service is unreachable. failmode=safe allows authentication to continue (fail open) when Duo cannot be contacted, which improves availability but reduces security during an outage. Use failmode=secure to deny authentication when Duo is unavailable (fail closed) for stricter enforcement.
3.5 Restart the Duo Authentication Proxy
After saving authproxy.cfg, restart the Duo Authentication Proxy service so the new configuration takes effect. Once the proxy is running with the updated configuration, continue to Step 4 to configure the router to send RADIUS authentication requests to the Duo Authentication Proxy.
Step 4: Configure OpenVPN® on the Router
This step connects the OpenVPN® deployment to the Duo MFA flow. The router authenticates OpenVPN® users using RADIUS, and the RADIUS requests are sent to the Duo Authentication Proxy. The proxy validates the username and password against your primary authentication source (RADIUS) and then triggers Duo MFA approval.
To make this work end-to-end, three items must align: the router RADIUS profile, the OpenVPN® server authentication mode, and the OpenVPN® client configuration.
4.1 Create a RADIUS profile (Duo Authentication Proxy)
In the router web interface, open the RADIUS configuration page and add a new authentication profile.
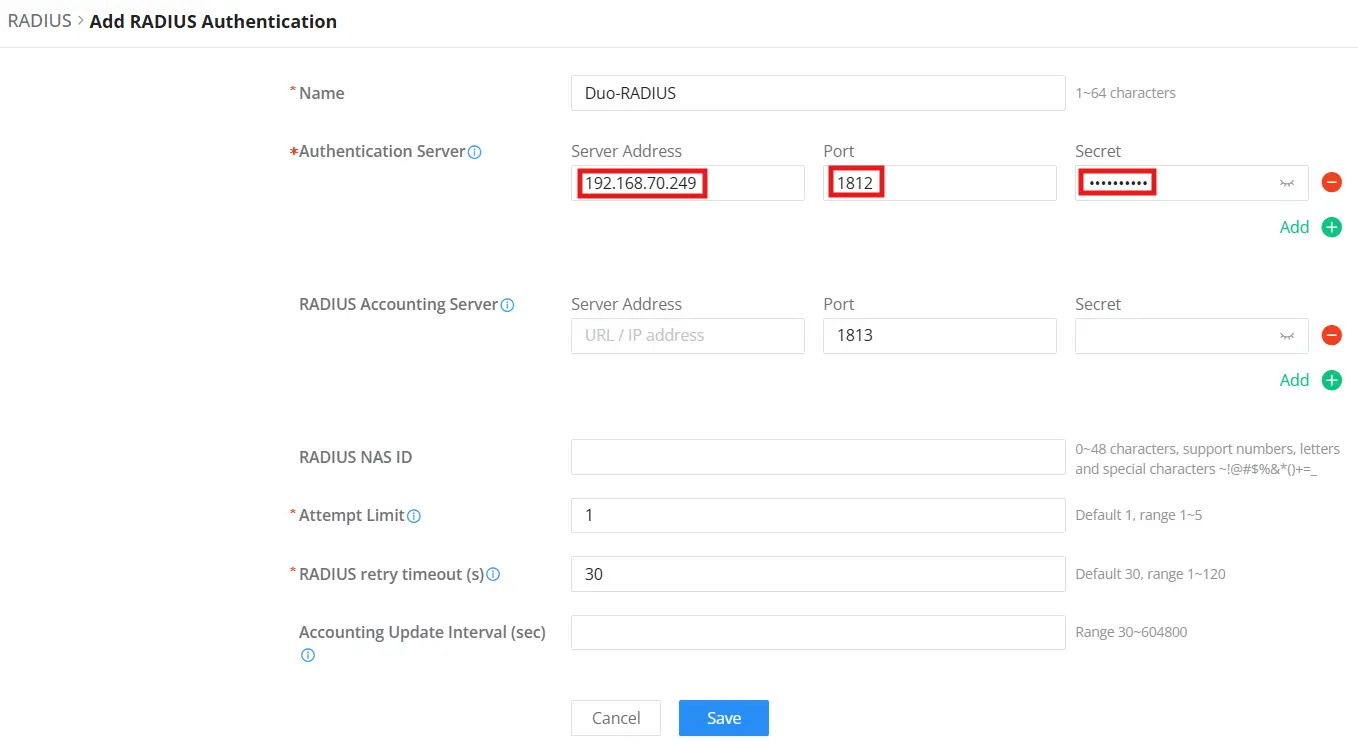
In the Authentication Server fields, enter the details of the machine running Duo Authentication Proxy:
Server Address: Duo Authentication Proxy IP/hostname
Port: 1812 (unless changed on the proxy)
Secret: the shared secret configured on the Duo Authentication Proxy for this router
4.2 Configure the OpenVPN server to use the RADIUS profile
Open the OpenVPN server settings on the router and create a new server (or edit the one you will use).
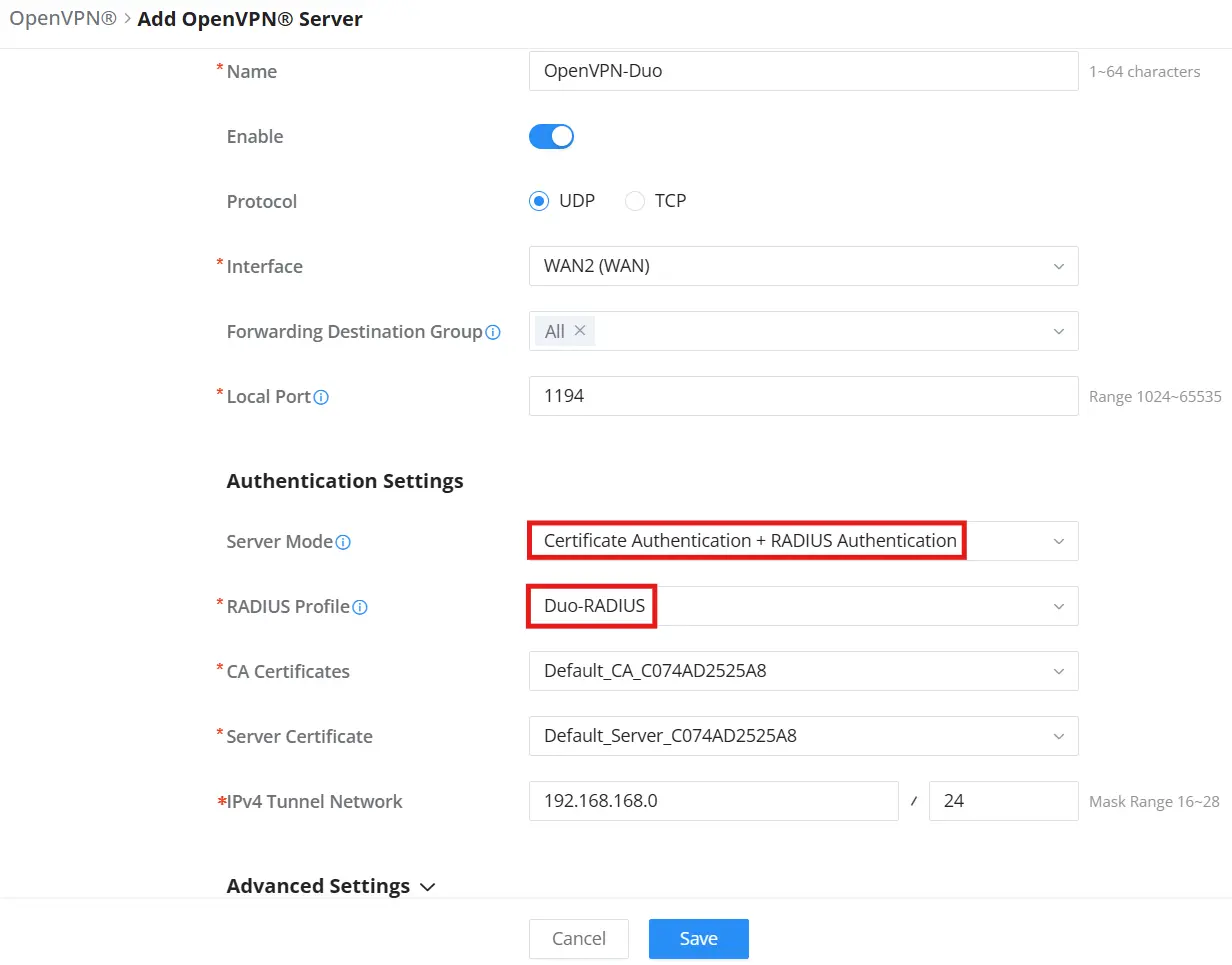
In the authentication settings, configure the Duo-related options:
Set Server Mode to Certificate Authentication + RADIUS Authentication.
Select RADIUS Profile and choose Duo-RADIUS.
Select the required CA certificate and server certificate.
This server mode enforces both certificate validation and a successful RADIUS login. Duo MFA is triggered during the RADIUS login step because the router sends the authentication request to the Duo Authentication Proxy.
4.3 Client requirements (to ensure Duo MFA is triggered)
Duo MFA is triggered only when the OpenVPN® connection includes a username and password that can be verified through RADIUS. The client must be configured to send credentials during connection.
Client authentication method
Select the client authentication method based on how the OpenVPN® server is configured:
If the server uses username/password authentication only, configure the client for User Authentication.
If the server uses certificates in addition to username/password authentication, configure the client for Certificate + User Authentication.
.ovpn profile requirement (PC/phone clients)
If clients connect using an exported .ovpn profile, ensure the profile includes the following directive:
auth-user-pass
This directive forces the OpenVPN® client to prompt for a username and password when connecting. Without it, the client may not send credentials, RADIUS authentication will not occur, and Duo MFA will not be triggered.
Router-to-router clients
If the OpenVPN® client is another router, select User Authentication or Certificate + User Authentication to match the server mode. The client must provide a username and password during connection so the server can perform RADIUS authentication and trigger Duo MFA.
Expected user experience:
When connecting, the user enters their RADIUS username and password. After credentials are submitted, Duo prompts the user to approve the login in Duo Mobile. The VPN connection is established only after both the password verification and Duo approval succeed.
References
Standard OpenVPN® configuration and client setup: VPN Guide
Duo RADIUS documentation (Authentication Proxy + RADIUS behavior): https://duo.com/docs/radius
Trademarks and Legal Notice
OpenVPN is a trademark of OpenVPN Inc.
Cisco and the Cisco logo are trademarks or registered trademarks of Cisco and/or its affiliates. Duo and Cisco Duo are trademarks of Cisco and/or its affiliates.
iOS is a trademark or registered trademark of Cisco in the U.S. and other countries and is used under license.
Android and Google Play are trademarks of Google LLC.
App Store is a service mark of Apple Inc.
Microsoft and Windows are trademarks of the Microsoft group of companies.
Linux is a registered trademark of Linus Torvalds in the U.S. and other countries.
All other trademarks are the property of their respective owners.