


Property Management System is a software application used in the hospitality industry to automate some hotel functions such as guest booking, guest details, etc…
The system can be divided into three parts:
- PMS (Property Management System)
- PMSI (Property Management System Interface)
- PBX
Grandstream IPPBXs have integrated charpms which support a large variety of PMS software, providing the following hospitality features: Check-in, Check-out, set Room Status, Wake-up call, and more.
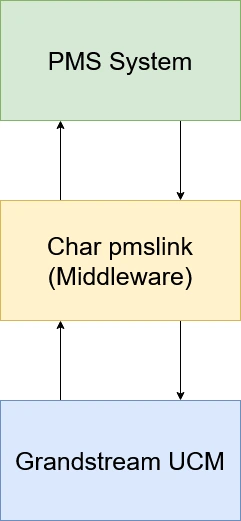
The following figure illustrates the communication flow between the PBX and PMS software, which is done through a middleware system, charpms, acting as the interface between both parties.
The following list includes all PMS systems that are compatible with Char Pmslink:
http://www.chardesarrollodesistemas.com/download/general/documentation/char_pms_integrated_en.pdf
For more information about Char Pmslink, you can visit their website below:
Supported PMS Features
Grandstream IPPBXs support the following features using charpms.
Features |
Check-In |
Check-out |
Wake-up Call |
Update |
Room Status |
Room Move |
Do Not Disturb |
Mini Bar |
MSG |
Check-in
The Check-in feature is used to store information such as Room Number, Extension, Username, Guest Account, Guest Credit Money, Maid Code, Arrival/Departure Date upon guest arrival.
Guest language can also be received from PMS to customize phone system prompts (if possible).

Check-out
The Check-out feature is used upon guest departure to clear stored data at check-in and restore the extension’s default settings, including language, privileges, and delete all voicemails on that extension.
The “Room Status” will be set to “checkout”.

Update Entry
When an update is needed for an entry, in case of an error, for instance, PMS sends an Update command to the IPPBX containing Name, Surname, and Language to update according to modifications made on the PMS side.
Update Room Status
The Room Status feature is used to update the status of the room.
Three statuses are available:
- Cleaning
- Repairing
- Cleaning Repair finished.
*23XXXX is the feature code to update the Room Status, where XXXX is the Maid Code.
When dialing *23XXXX, the room status (Cleaning, Repairing, or Cleaning Repair finished) should be selected by the maid using the corresponding status code.



Room Move
When a guest changes or moves to another room, the Room Move command is sent by the PMS through pmschar to notify a guest room change, and all stored information will be moved to the new room.
In the figure below, all data in room 4000 is moved to room 2000.

Wake-up Call
The wake-up feature is used to make the extension ring upon the PMS signal.
The UCM sends a notification message to the PMS, including the time and date of the answered call, in order for the system to repeat (or not) the wake-up call.
Wake-up Call Action Status
When setting up a Wake-up call on the PMS, IPPBX initially sets “Action Status” to Programmed.
Once the call is made, IPPBX sets “Action Status” to Executed.
Programmed Wake-up calls can be cancelled from the PMS. The UCM will update the Action Status to Cancelled as shown on the following figure.

Wake-up Call Types
Two types of wake-up calls are available:
Single
The call will be made once at the programmed time.

Daily
The call will be repeated each day at the programmed time.

Wake-up Answer Status
Three Answer Statuses are available in response to the Wake-up call:
Answered
If the guest answers the wake-up call, UCM6XXX will set “Answer Status” to Answered.

Rejected
If the guest rejects the wake-up call, the IPPBX will set “Answer Status” to Busy.

No Answer
If the guest doesn’t answer the wake-up call after the timeout, IPPBX will set “Answer Status” to No Answer.

Error
If an error occurs during the wake-up call, UCM6XXX will set “Answer Status” to Error.

MSG Notification
Sent by PMS through charpms to notify the existence of a new message
for the guest (in Reception, voicemail, etc.)
Do Not Disturb
When Do Not Disturb is activated on an extension, all calls to that extension will get busy treatment.
This command is sent by PMS through charpms to enable/disable DND status.
Mini Bar
The mini-bar feature is used by the maid to monitor the consumer’s goods.
Users need to first create the minibar and the maid code to consult the goods. Please refer to the Mini-Bar for more details.
IPPBX Configuration
The following configuration is based on charpms with firmware. The configuration may vary using higher firmware versions.
Create Extensions
To configure the IPPBX with a PMS Server, users need first to create some extensions on the IPPBX that will be associated with guests’ rooms.
To create or modify existing extensions, log in to the IPPBX by typing its address on a browser, then go to Extension/Trunk > Extensions.
Configure IPPBX with PMS Server
To use all PMS features, make sure that the following feature codes are configured from IPPBX Web GUI Basic Call Features > Feature Codes:
- Update PMS Room Status
- PMS Wake Up Service

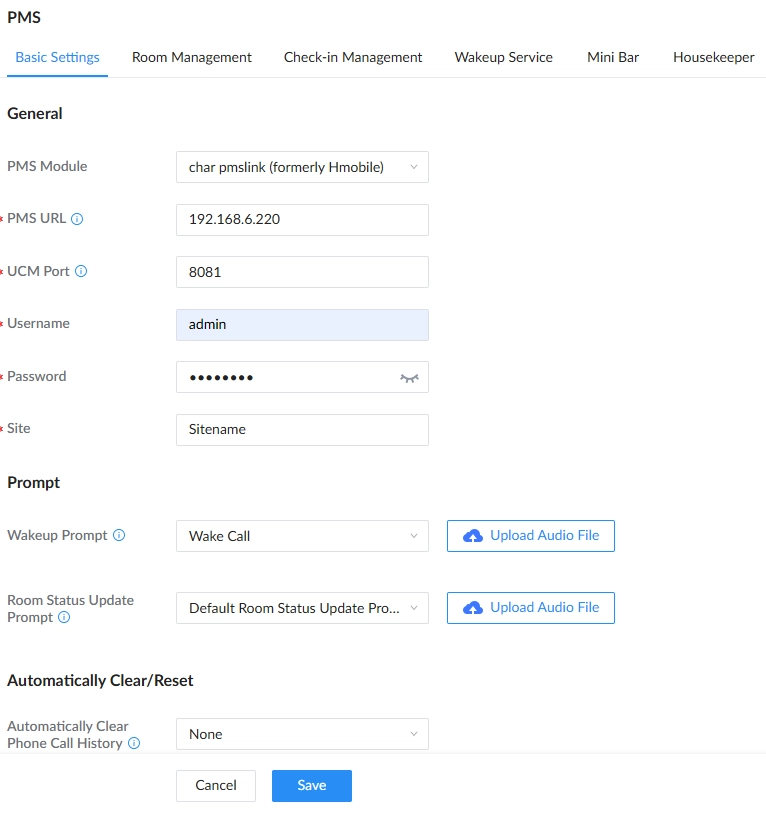
Navigate to Integrations > PMS > Basic settings. The following table explains the fields needed to be configured to set the connection for the PMS system.
| Field | Description |
|---|---|
PMS Module | Select char pmslink. |
Wake Up Prompt | Enter the IPPBX’s port to use when communicating with the char pmslink Server. |
PMS URL | Enter the server’s URL address (i.e 192.168.6.185:8081/soap). |
UCM Port | Enter the Password for the PMS system authentication. |
Username | Enter the Username for PMS system authentication. |
Password | Enter the Password for PMS system authentication. |
Site | Enter the Site ID to identify the hotel on the PMS server. |
Back-Up Voicemail Recordings | Used for backing up voicemail recordings to external storage after check-out. |
Room Management
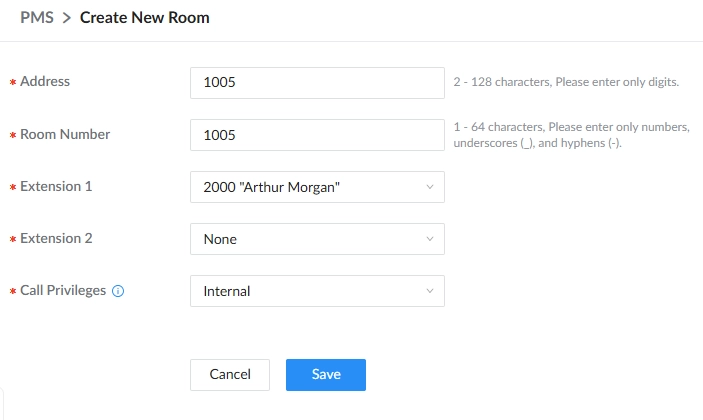
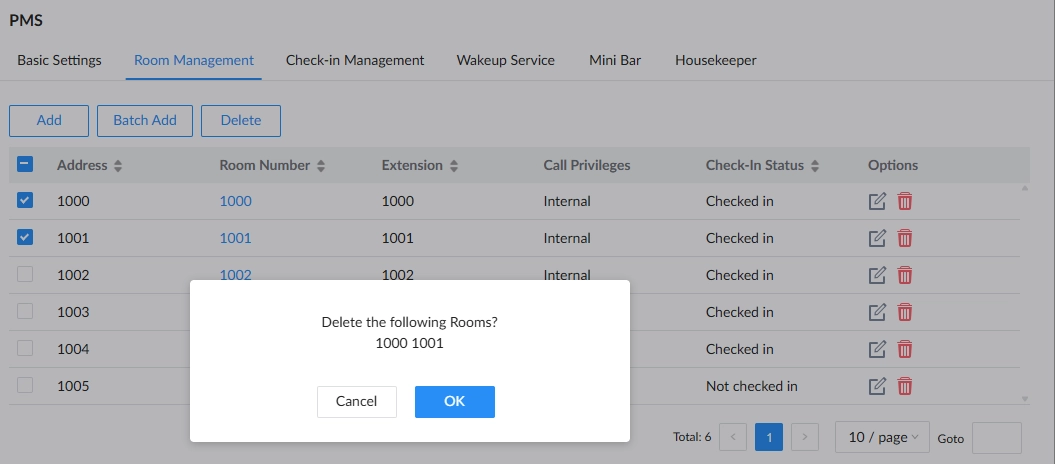
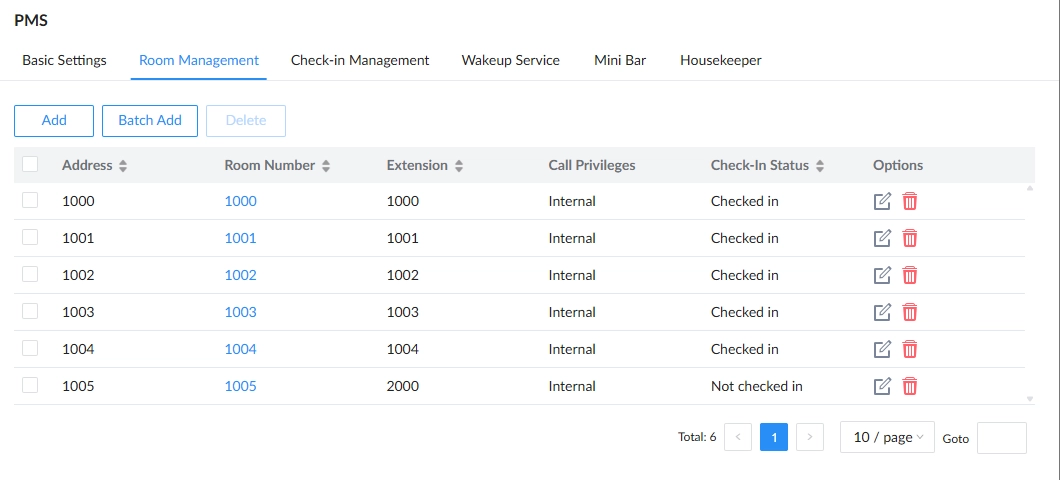
Users can then create and manage Rooms from Integrations > PSM > Room Status:
- Click Create Add Room to create a new room for a guest.
- Click on Delete Selected Rooms to delete any selected rooms.
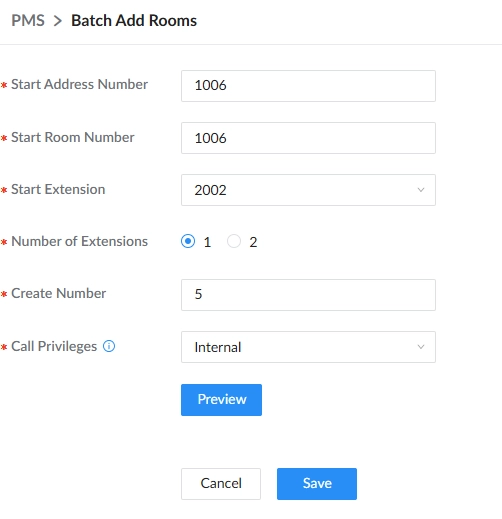
- Click on Batch Add Rooms to create multiple rooms at the same time.
The user can also click  next to a room to delete it, or click
  to edit the room’s options.
Wake Up Service
Users can create a New Wake Up service for Rooms from Integration > PMS > Wake Up Service.
Click on Create New Wake Up Service. The following window will pop up:
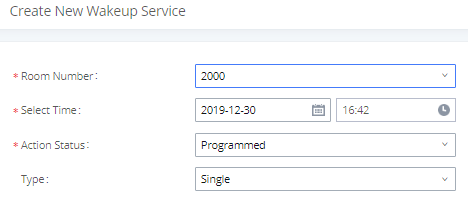
Please refer to the following table for the fields of Wake-Up Service:
| Field | Description |
|---|---|
Room Number | Select the room number where to call. |
Time | Set the time of the wake-up call. |
Action Status | Show the status of the call:
|
Type |
|
The following figure shows the status of the wakeup call once the call is made at the specified time.

Mini Bar
Create New Mini Bar
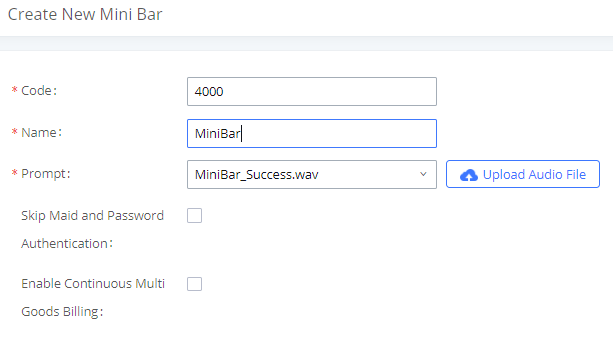
To create a new minibar, click on “Add Mini Bar” under UCM WebGUI > Integrations > PMS > Mini Bar. The following window will pop up:
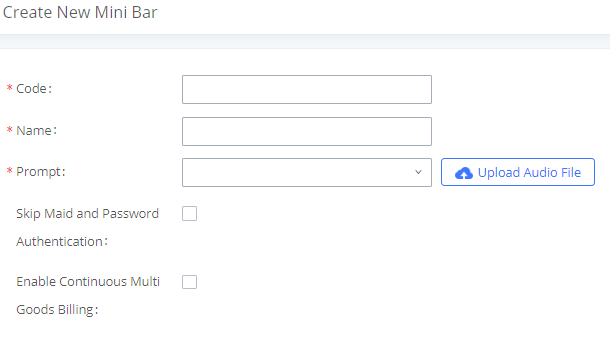
Code | Enter a non-existing extension number to be dialed when using the minibar feature. |
Name | Enter a name for the minibar. |
Prompt | Select the Prompt to play once connected to the minibar. |
Skip Maid and Password Authentication | If enabled, the default maid code will be 0000; no authentication is required. Enter 0000 followed by # to access the consumer goods |
Enable Continuous Multi Goods Billing | If enabled, please separate the goods’ codes by * (star). |
To create a new prompt, please refer to CREATE CUSTOM PROMPT
Create New Maid
Once the Mini Bar is created, a new maid needs to be created to consult the consumer goods.
To create a new maid, click on Add under UCM WebGUI > Integrations > PMS > Maid Code. The following window will pop up:
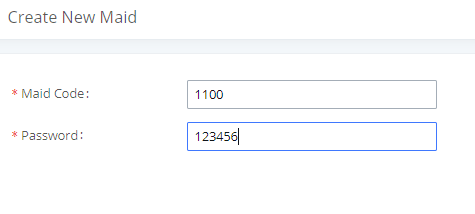
Maid Code | Enter a code to identify the new maid. Only digits accepted. This code is required to identify the maid when checking consumer’s goods. |
Password | Enter a password associated with the maid. Only digits accepted. |
The user could either edit the “Maid” secret by clicking  , or delete a maid by clicking
  to remove the selected maid.
Create Consumer Goods
Create then the consumer goods and set associated prompts to them.
- To create a new consumer good, click
 under UCM webGUI > Integrations > PMS > Mini Bar, the following window will pop up:
 under UCM webGUI > Integrations > PMS > Mini Bar, the following window will pop up: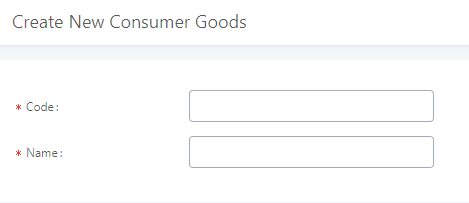
Code | Enter the Goods Code. |
Name | Enter the Name of the Goods |
- Users could edit the created consumer goods by clicking
 . The name can be changed, while the consumer goods “Code” cannot:
 . The name can be changed, while the consumer goods “Code” cannot: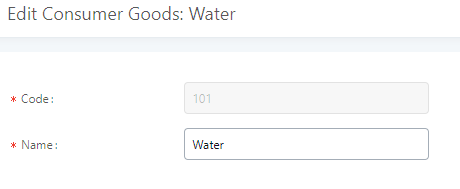
To delete a consumer goods user could click  to remove the item.
The Minibar page shows as follows:
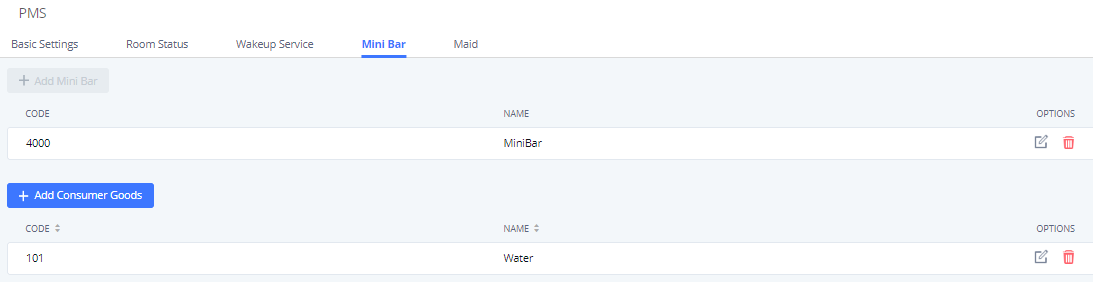
Using Mini Bar
To use the Mini Bar feature, follow the steps below:
- Make a call to the Mini Bar extension (4000 in this example), and a voice prompt will be played.
- Enter the Maid Code followed by a star and the password followed by a pound (example: 1100*123456#).
- Type the consumer’s code that the Maid wants to check, followed by a pound (example: 101#).
Create Custom Prompt
Prompts on PMS can be customized/personalized at the customer’s convenience by either recording or uploading new prompts. Click on the “Prompt” option as shown on the following figure to be redirected to the “Custom Prompt” page, or go to PBX Settings > Voice Prompt > Custom Prompt page directly.
Once the PMS prompt file (created/uploaded) is successfully added to the UCM6xxx, it will be shown in the prompt list options to select in different PMS scenarios.
Record New Custom Prompt
In the UCM6xxx web UI PBX Settings > Voice Prompt > Custom Prompt page, click on  and follow the steps below to record a new prompt.
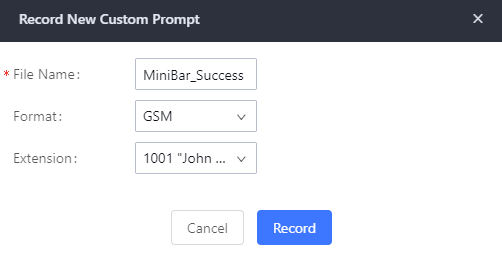
- Specify the custom prompt file name.
- Select the format (GSM or WAV) for the prompt file to be recorded.
- Select the “Extension” to receive the call from the UCM6xxx to record the prompt.
- Click the “Record” button. A call will be initiated to the selected extension.
- Pick up the call and start the recording following the voice prompts.
- The recorded file will be listed in the Custom Prompts page (see figure 30). Users could select to rerecord, play, or delete the recording.
- Select the format (GSM or WAV) for the prompt file to be recorded.
- Select the “Extension” to receive the call from the UCM6xxx to record the prompt.
- Click the “Record” button. A call will be initiated to the selected extension.
- Pick up the call and start the recording following the voice prompts.
- The recorded file will be listed in the Custom Prompts page (see figure 30). Users could select to rerecord, play, or delete the recording.

Upload Custom Prompt
If the user has a pre-recorded prompt file, click  on the Web GUI under PBX Settings > Voice Prompt > Custom Prompt page to upload the file to the UCM6xxx.
The following are PMS prompt requirements to be accepted by the UCM6xxx series:
- PCM encoded.
- 16 bits.
- 8000Hz mono.
- In .mp3 or .wav format; or raw/ulaw/alaw/gsm file with “.ulaw” or “.alaw” suffix.
- File size under 5M.
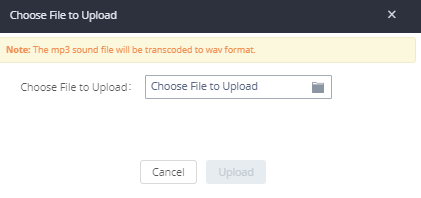
Click on the button to select an audio file from the local PC, and click on it to start uploading it. Once uploaded, the file will appear in the “Custom Prompt” web page.