UCM6XXX series offer DISA (Direct Inward System Access) and Callback features allowing users to get access to the system resources, including analog and VoIP trunks, and initiate calls using them, with no need for Internet connection. Therefore, the user will not be charged on phone services for long-distance or international calls.
In situations where the user is not connected to the system, locally or remotely over the Internet, but still needs to use the system resources; the UCM6XXX DISA/Callback features can be used to allow him to reach the system by calling into it, from his own cellphone or landline, and initiate calls to system extensions or using analog/VoIP trunks enjoying the benefits of using VoIP systems.
This guide will offer step-by-step instructions to configure DISA or Callback on the UCM6XXX to help users to be able to call from the outside, using a cell phone, payphone, regular PSTN, etc., and use the UCM6XXX resources such as Analog or SIP Trunks.
DISA
DISA is commonly known as Direct Inward System Access. It’s a feature offered by the UCM6XXX that gives the user the ability to call from the outside using his cell phone, landline… and dial out via the SIP trunk or PSTN trunk connected to the UCM6XXX as it is an internal extension.
In many scenarios where the user needs to access UCM6XXX resources to perform calls for instance to other extensions or external calls via Trunks but doesn’t have access to his extension. In such cases, if DISA is configured on the UCM6XXX, he can call the UCM6XXX from any PSTN number, Mobile, or payphone, and act as an internal extension in a secured way using a password.
After successful DISA configuration, when users call into UCM6XXX and reach DISA, they will be required to enter a password. After entering the correct password, a second dial tone will be heard for the users to dial out.
Create a New DISA
Please follow the below steps to configure DISA on the UCM6XXX:
Login to the UCM6XXX web GUI and navigate to Call Features🡪DISA.
-
 Click on “add” to create a new DISA.
-
 Click on to edit the DISA configuration.
- Click on to delete the DISA.
DISA Settings
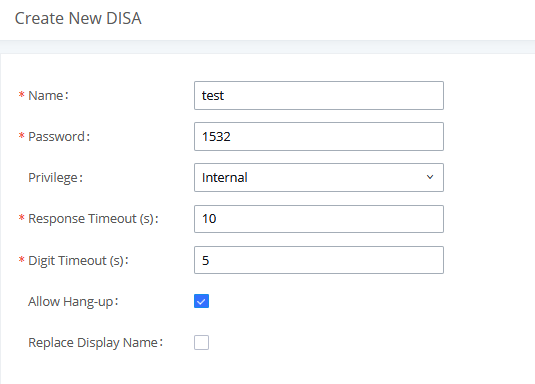
The following table describes the necessary options to configure a new DISA.
Name | Configure the DISA name to identify the DISA. |
Password | Configure the password (digit only) required for the user to enter before using DISA to dial out. Note: The password has to be at least 4 digits. |
Permission | Configure the permission level for DISA. The available permissions are “Internal”, “Local”, “National” and “International” from the lowest level to the highest level. The default setting is “Internal”. If the user tries to dial outbound calls after dialing into the DISA, the UCM6XXX will compare the DISA’s permission level with the outbound route’s privilege level. If the DISA’s permission level is higher than (or equal to) the outbound route’s privilege level, the call will be allowed to go through. |
Response Timeout | Configure the maximum amount of time the UCM6XXX will wait before hanging up if the user dials an incomplete or invalid number. The default setting is 10 seconds. |
Digit Timeout | Configure the maximum amount of time permitted between digits when the user is typing the extension. The default setting is 5 seconds. |
Allow Hang-up | If enabled, during an active call, users can enter the UCM6XXX hang-up feature code (by default it’s *0) to disconnect the call or hang up directly. A new dial tone will be heard shortly for the user to make a new call. |
Replace Caller ID | If enabled, the UCM will replace the caller display name with the DISA name. |
Table 1: DISA Settings
Using DISA in Inbound Route
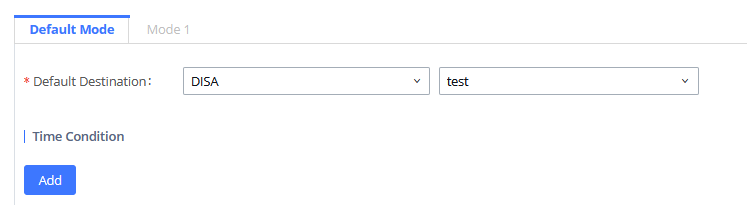
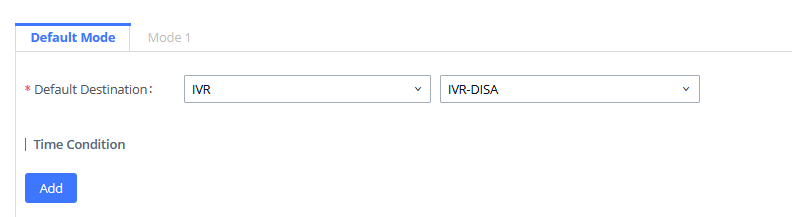
Once successfully created, users can configure the inbound route destination as “DISA” or “IVR” (DISA can be set as IVR key event). Users can set the destination under the inbound routes of a trunk to DISA directly, by navigating under web GUI🡪Extension/trunk🡪Inbound Routes.
Using DISA as IVR Key Pressing Event
Users could also set the inbound route to IVR if a pressing key event is configured as DISA.
To configure DISA as IVR Key Pressing Event, follow below instructions:
- Navigate to UCM6XXX Web GUI🡪Call Features🡪IVR.
- Edit an existing IVR or create a new one to use in inbound routes.
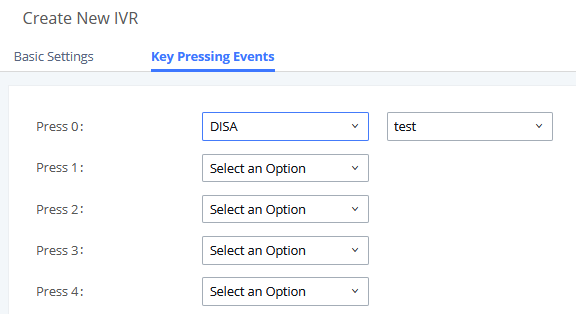
- Under Key Pressing Events tab, choose DISA from drop-down list next to the desired key.
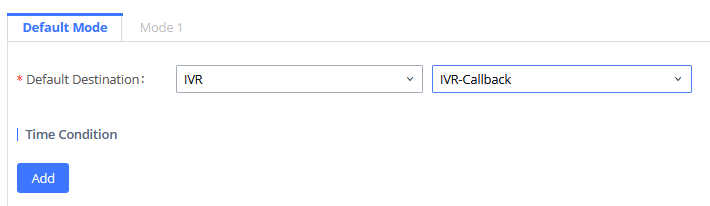
Once set, navigate to Web GUI🡪Extension/trunk🡪Inbound Routes and set IVR as the default destination as shown in the following figure.
CALLBACK
The callback is mainly designed for users who often use their mobile phones to make long-distance or international calls which may have high service charges. The callback feature provides an economic solution for reducing call costs.

In this way, the calls are placed and connected through trunks on the UCM6XXX instead of to the mobile phone or landline directly. Therefore, the user will not be charged on phone services for long-distance or international calls.
Configure Callback
To configure callback on the UCM6XXX go to web GUI🡪Call Features🡪Callback.
-
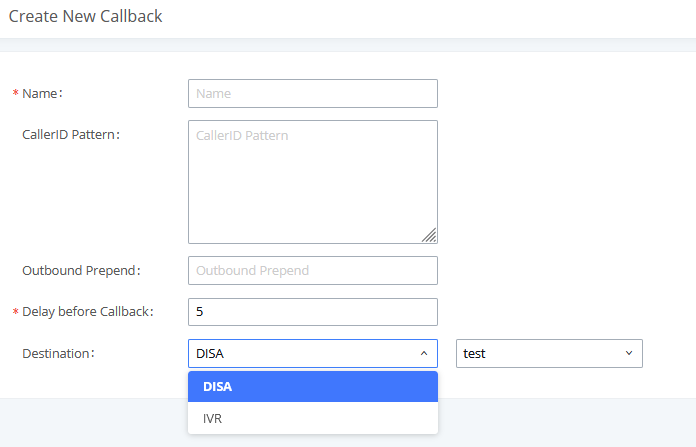
Click on “Create New Callback” to add a new Callback.
-
Click on to edit the Callback configuration.
- Click on to delete the Callback.
Callback Settings
The following table describes the necessary options for configuring a Callback.
Name | Configure a name to identify the Callback. |
CallerID Pattern | Configure the pattern of the callers allowed to use this callback. The caller who places the inbound call needs to have the callerID match this pattern so that the caller can get a callback after hanging up the call. Note: If leaving as blank, all numbers are allowed to use this callback. |
Outbound Prepend | Configure the prepend digits to be added before dialing the outside number. The number with prepended digits will be used to match the outbound route. ‘-’ is the connection character that will be ignored. |
Delay Before Callback | Configure the number of seconds to be delayed before calling back the user. |
Destination | Configure the destination to which the callback will direct the caller. Two destinations are available:
The caller can then enter the desired number to dial out via UCM6XXX trunk. |
Table 2: Callback Settings
Using Callback in Inbound Route
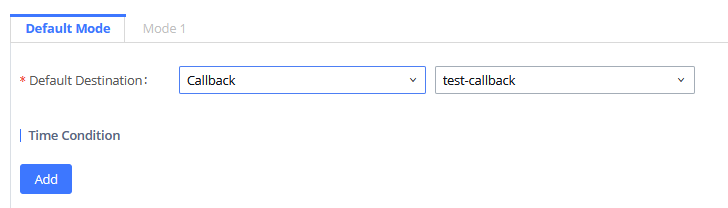
Once successfully created, users can configure the inbound route destination as “Callback” or “IVR” if a key event is configured as “Callback” on the IVR.
Users can set the destination under the inbound routes of a trunk to Callback directly, by navigating under web GUI🡪Extension/trunk🡪Inbound Routes.
Using Callback as IVR Key Pressing Event
Users could also set the Inbound route to IVR if a pressing key event is configured as Call Back.
To configure Callback as IVR Key Pressing Event.
- Navigate to UCM6XXX Web GUI🡪Call Features🡪IVR.
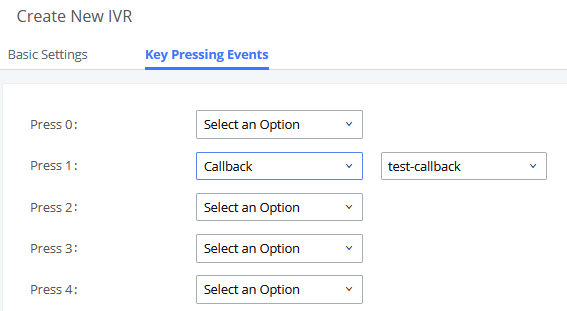
- Edit an existing IVR or Create a new one to use in inbound routes.
- Under Key Pressing Events tab, choose Callback from drop-down list next to the desired key
Once set, navigate to web GUI🡪Extension/trunk🡪Inbound Routes and set IVR as default destination as shown in the following figure.