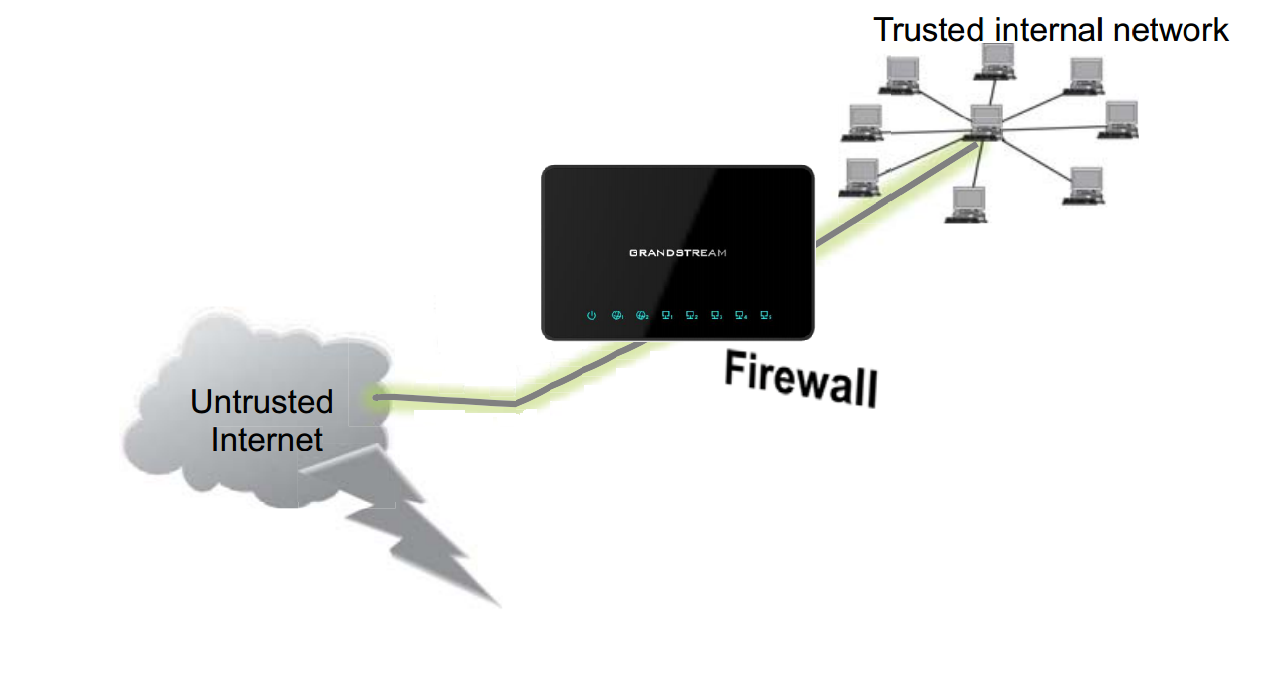
A firewall is a set of security measures designed to prevent unauthorized access to a networked computer system. It is like walls in a building construction, because in both cases their purpose is to isolate one “network” or “compartment” from another.
To protect private networks and individual machines from the dangers of Internet, a firewall can be employed to filter incoming or outgoing traffic based on a predefined set of rules called firewall policies.
Firewall Basic Settings on the GWN7000 is used to enable SYN Flood, setup port forwarding, DMZ, inter-group traffic forwarding and UPnP.
This guide will help you to understand and configure Basic features related to firewall on the GWN7000.
The “Basic” configuration menu is available under “Firewall → Basic”. It allows to configure features such as SYN flood protection, port forwarding, DMZ, and more.
GENERAL SETTINGS
Overview
General Settings allows users to prevent their environment from SYN flood attacks.
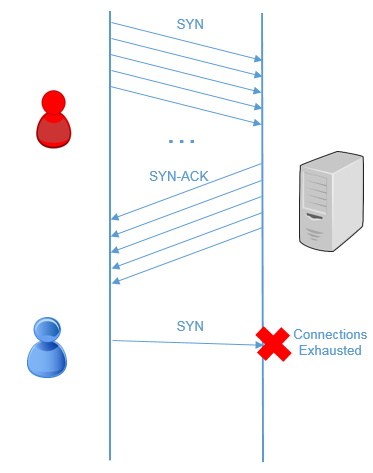
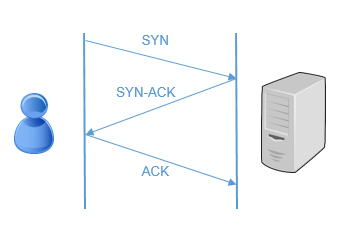
SYN flooding is an attack vector to conduct a Denial-of-Service (DoS) attack on a computer server. The attack involves having a client repeatedly send SYN (synchronization) packets to every port on a server, using fake IP addresses. When an attack begins, the server sees the equivalent of multiple attempts to establish communications. The server responds to each attempt with a SYN/ACK (synchronization acknowledged) packet from each open port, and with a RST (reset) packet from each closed port.
GWN7000 offers a set of options/settings to deal with this kind of attack.
Configuration
The settings can be configured from GWN7000 Web GUI under “Firewall → Basic → General Settings”.
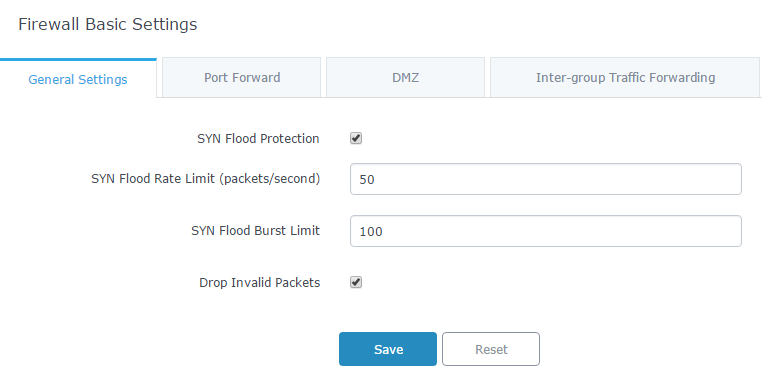
The above example set a limit of 50 SYN packets per second meaning that if the GWN7000 receives more than this number of SYN packets, new coming SYN packets will be dropped. If a burst of SYN packets exceeding 100 is received, it is considered as a flood and the GWN7000 will reject packets exceeding this limit.
Below table provide and explanation about SYN Flood fields on the GWN7000.
Field | Description |
SYN Flood Protection | Choose whether to enable protection against SYN Flood attack. |
SYN Flood Rate Limit (packet/second) | Set a limit of accepted packets per second, once this limit exceeded, the traffic is considered as flood. |
SYN Flood Burst Limit | Set a limit for SYN packets, once this limit exceeded, the traffic is considered as flood. |
Drop Invalid Packets | Drop invalid packets, not matching any active connection. |
PORT FORWARDING
Overview
Port forwarding is an application that redirects a communication request from one address and port number combination to another while the packets are traversing a network gateway or a router. It is used to make services on a host residing on a protected (internal) network available to hosts on a public network (internet), by remapping the destination IP address and port number of the communication to an internal host.
Configuration
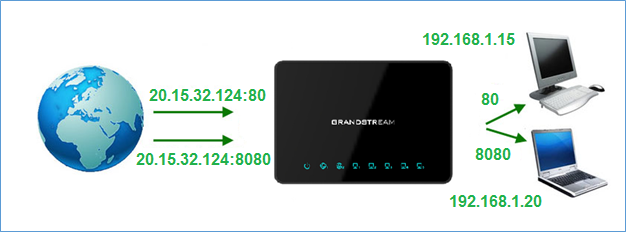
Using port forwarding, we want to do the following:
- Redirect each incoming request to that public IP on port 80 to a PC with the IP of 192.168.1.15
- Redirect each incoming request to the public IP on port 8080 to the PC with IP of 192.168.1.20.
To achieve this, access GWN7000 webGUI → Firewall → Basic → Port Forward and following below steps:
-
Click
 and the following window popup to add a new rule.
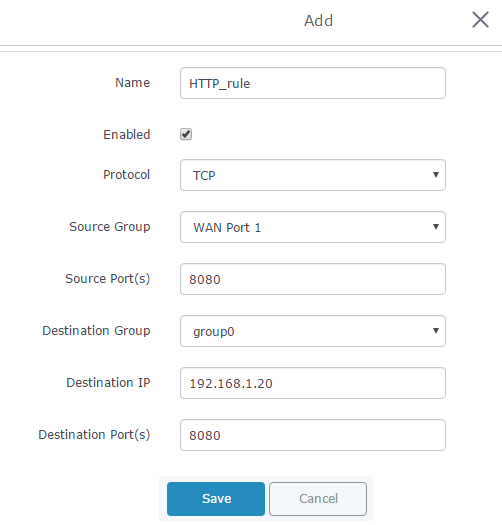
- Set a name to identify the rule in the “Name” field.
- Click on “Enabled” checkbox to activate this rule.
- Select the protocol used for incoming requests from the “Protocol” dropdown list.
In this example: TCP.
- Choose whether the request is incoming from WAN port 1 or WAN port 2 from the “Source Group” dropdown list.
- Enter the incoming port number on the “Source Port” field.
In this example: 80 and 8080 for rule 1 and rule 2 respectively.
- Select the group to where the destination device belongs using the “Destination Group” field.
- Enter the IP address of the device to which the incoming traffic should be redirected on the “Destination IP” filed.
In this example: 192.168.1.15 and 192.168.1.20 for rule 1 and rule 2 respectively.
- Choose the port to which the incoming traffic will be redirected for the selected IP address within the selected network group using the “Destination Port” field.
In this example: 80 and 8080 for rule 1 and rule 2 respectively.
-
After filling the fields, click on
 ,then
,then
 to save and apply the settings.
DMZ
Overview
DMZ or dematerialized zone is a physical or logical sub-network that separates an internal local area network (LAN) from other untrusted networks (usually Internet). Servers placed into a DMZ network will be accessible from Internet (untrusted networks) but separated from local private network (trusted network).
Using DMZ prevents malicious parties from gaining access to private networks if public servers are hacked. Hackers will be isolated in DMZ network with no access to private hosts placed in trusted network (LAN).
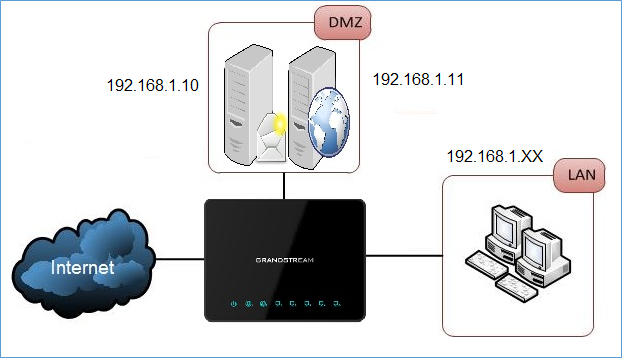
In the above example, Mail and Web servers are in DMZ zone.
Configuration
To configure the DMZ on the GWN7000, navigate to “Firewall → Basic → DMZ” and set the following:
-
Click
and the following window popup to add a new server on the DMZ.
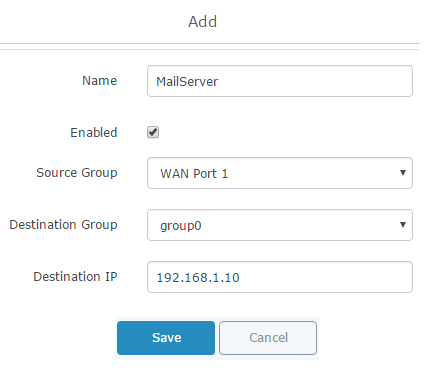
- Set a name to identify the rule on the “Name” field.
- Click on “Enabled” checkbox to activate this rule.
- Choose whether the request is incoming from WAN port 1 or WAN port 2 from the “Source Group” dropdown list.
- Select the group to where the destination device belongs using the “Destination Group” field.
- Enter the IP address of the device to which the incoming traffic should be redirected on the “Destination IP” filed.
In this example: 192.168.1.10 and 192.168.1.11 in rule 1 and rule 2 respectively.
-
After filling the fields, click on
,then
to save and apply the settings.
Inter-group traffic Forwarding
Overview
GWN7000 offers the possibility to allow traffic between different groups and interfaces.
Users can select to edit a source group and add to it other network groups and WAN interfaces to allow inter-group traffic between selected members.
Configuration
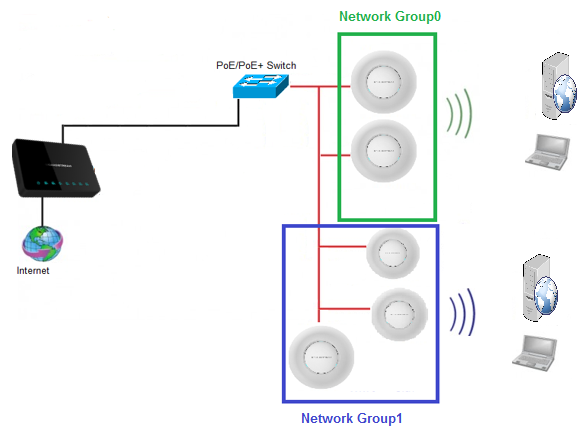
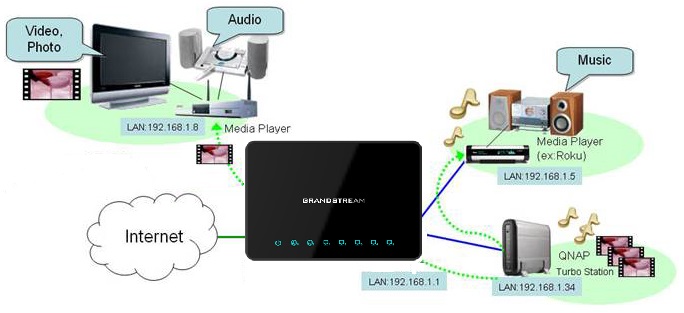
Assuming we have the following architecture:
- Two network groups: group0 which belongs to VLAN1 and group1 which belongs to VLAN2
- Server/Client: clients and HTTP server connected to group0, and clients and HTTP server connected to group1 as shown in the figure below.
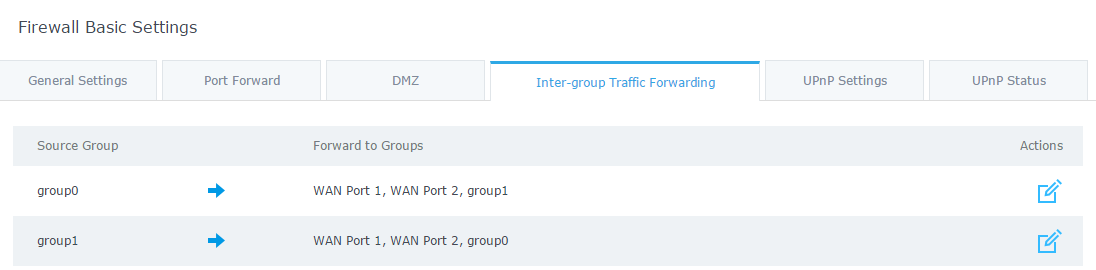
Traffic forwarding between network groups can be configured from “Firewall → Basic → Inter-group Traffic Forwarding” as shown below:
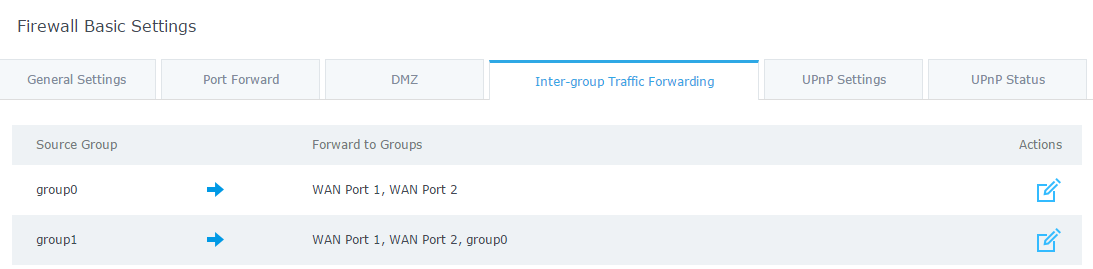
In the above example, group1 has access to group0 but not the opposite, this allows clients in group1 to communicate with clients or HTTP server on group0.
Clients in group0 can’t communicate with group1 unless they are allowed on the “inter-group traffic forwarding” list.
To do this, follow below steps:
-
Click on the
 button.
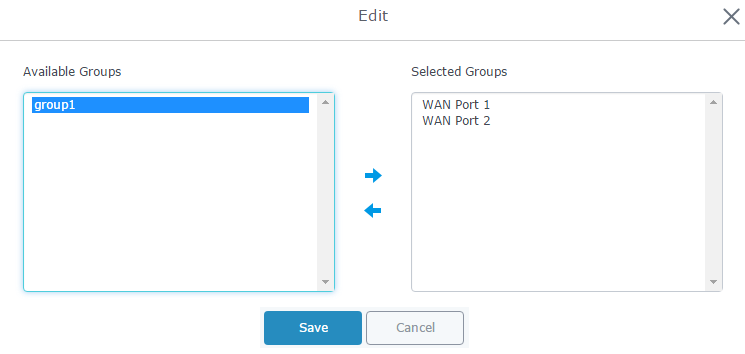
-
Select “group1” from “Available Groups” and click on
 arrow to set it on the “Selected Groups” as shown below.
-
Click on
,then
to save and apply the changes.
- With this configuration both clients on group1 and group0 can access servers on the other group as shown in figure below.
UPNP SETTINGS
Overview
Universal Plug and Play (UPnP) is a standard that uses Internet and Web protocols to enable devices such as PCs, mobiles, tablets and intelligent appliances to be plugged into a network and automatically know about each other. With UPnP, when a user plugs a device into the network, the device will configure itself, acquire a TCP/IP address, and use a discovery protocol based on HTTP to announce its presence on the network to other devices. For instance, if you had a camera and a printer connected to the network and needed to print out a photograph, you could press a button on the camera and have the camera send a “discover” request asking if there were any printers on the network. The printer would identify itself and send its location in the form of a universal resource locator (URL).
GWN7000 supports UPnP that enables programs running on a host to configure automatically port forwarding. UPnP allows a program to make the GWN7000 to open necessary ports, without any intervention from the user, without making any check.
Configuration
UPnP settings can be accessed from GWN7000 WebGUI → Firewall → Basic → UPnP Settings. Refer to below Table for UPnP settings.
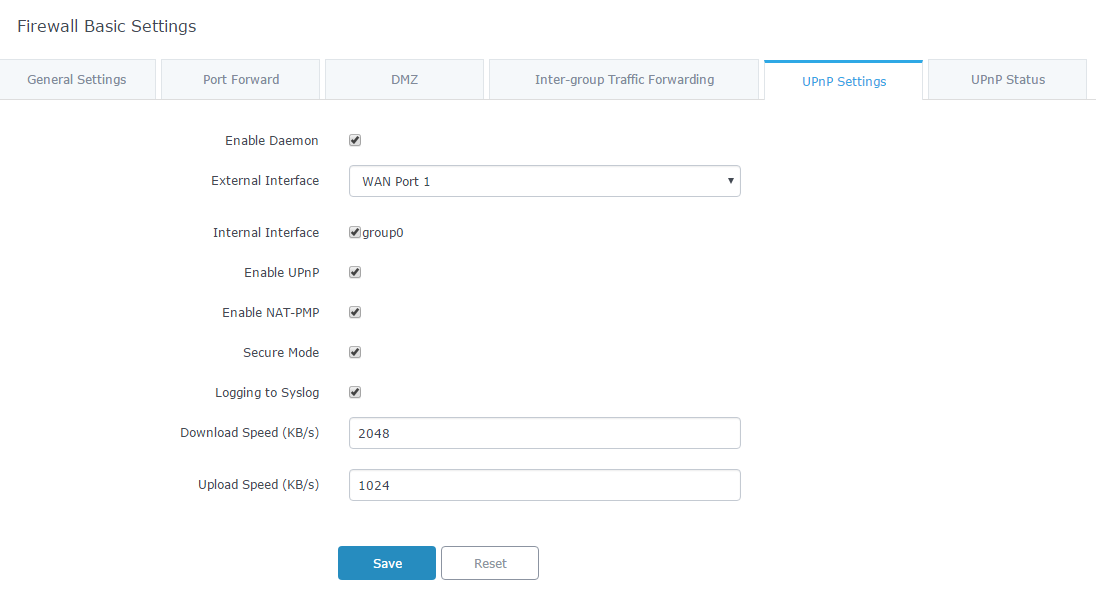
- Click on “Enable Daemon” to activate UPnP service so that the GWN7000 can listen for UPnP traffic.
- Select WAN interface to allow external connection to resources that enables UPnP using “External Interface” field.
- Check “Internal Interface” checkbox the LAN network group on which to activate UPnP.
- Check “Enable UPnP” checkbox to Enable UPnP for the LAN clients on selected network group.
- Check “Enable NAT-PMP” checkbox to enable automatic NAT Port Mapping (NAT-PMP).
- Check “Secure Mode” to activate secure mode for devices that activate UPnP.
- Choose whether to log activities for UPnP into Syslog using “Logging to Syslog”. (It’s recommended to use this option for troubleshooting purpose only).
- Set the Download speed value in KB/s using the textbox “Download Speed”. Default is 2048
- Set the Upload speed value in KB/s using the textbox “Upload Speed”. Default is 1024.
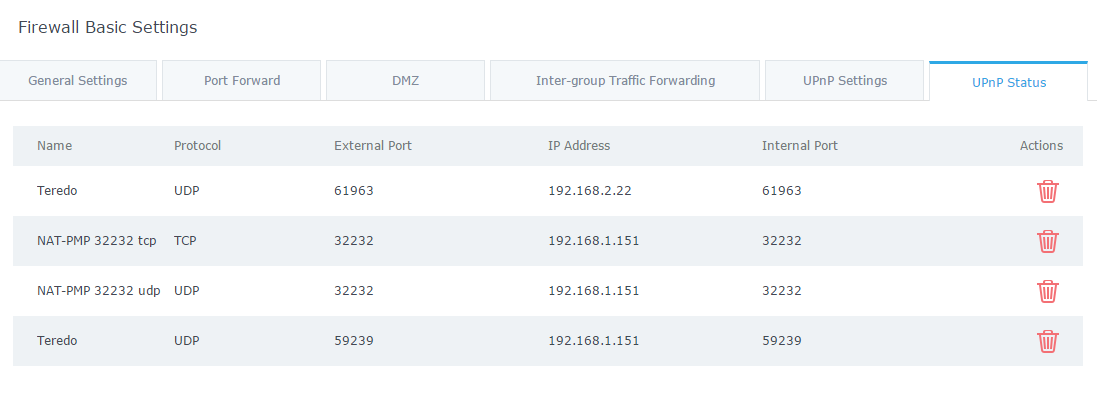
In the below example, we activate the UPnP daemon and install a torrent client on a machine connected to the GWN7000, the machine has 192.168.1.151 as IP address, on the “UPnP Status” page, the GWN7000 opens necessary ports for that PC to communicate with another peer connected to that torrent client.