


Introduction
Fast Provisioning is a feature available on the GCC6000 convergence devices, its main purpose is to facilitate the process of registering VoIP devices to the PBX module of the GCC6000 device, making it easier for administrators and system integrator to deploy SIP accounts to the desired installed endpoints, the process of pushing the account configuration from the GCC6000 device to the endpoints is straightforward. The below illustration describes the process.

Prerequisites
Before starting the configuration, make sure the following conditions are met:
- The Grandstream VoIP devices and the GCC6000 unit are deployed under the same LAN, or the same VLAN.
- The GCC6000’s PBX module is enabled.
Configuration Scenario
Let’s consider the following example:
The GCC6000 administrator wants to deploy 10 extensions to his network, two of these extensions will be used by a WP8x6 Wi-Fi phone, a WP856 mobile computing device, and a GXV34xx video phone, the rest will be used by other Grandstream VoIP devices such as the GRP26xx IP phones.
This can be done easily by following the below steps, we will split the configuration into three sections:
- GCC6000 configuration
- WP816/WP826/WP836 configuration
- WP856 configuration
- GXV34xx configuration
- Initial Dial up Deployment
Here is an illustration of the setup:

GCC6000 Configuration
On the GCC6000, please perform the below steps:
- Open the UC Endpoint Module of the GCC6000 device

2. Access to Fast Provisioning Tab

3. Depending on your preference:
Either add manually each extension and define its ID code.

Use a predefined Excel file to batch-create extensions and batch-generate their profile codes. Once created you can import the Excel file.
The template can be downloaded by clicking “Download Import Template” as shown below.


4. Once the extensions are added, they will be generated with a specific Profile code, each 6-digit code is mapped to an extension, this code will be used on the UC endpoints to automatically retrieve the SIP information and register the extension to the GCC6000’s PBX module.

Additional Fast Provisioning Parameters
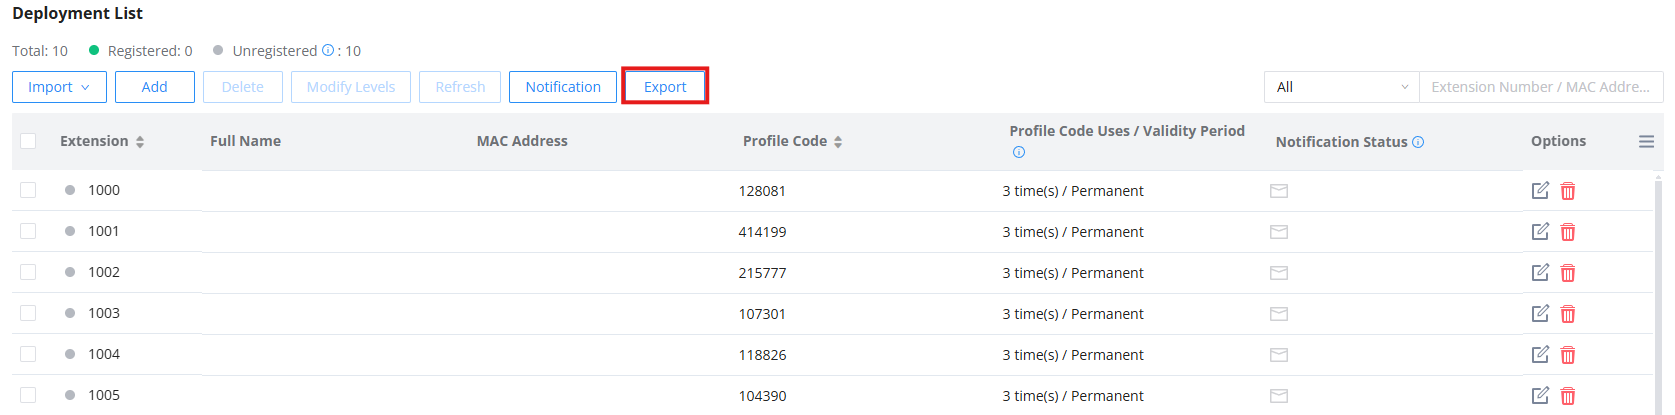
Some additional parameters can be defined when manually adding an extension on the Fast provisioning app, or directly on the Excel file example, on the fast provisioning app, we can define the following:
- Device information: In this section, we define the custom extension we would like to add, we can manually add the device’s MAC address, and we can define Network Priority, Call Security level, and Call Voice Quality, for each parameter, three levels are available: Normal, Intermediate, and Advanced, and additionally, we can define the Profile code for the specific extension, The profile code defined can be set to be permanently active or expires after a certain period (1 day, 2 days, 7 days, 30 days, or Custom amount of days)

- Identity Information: In this section, you can define the user-specific information including Employee ID, First and Last name, Email, Mobile Number, Job Title.

Additional Fast Provisioning Operations
- Delete: This option is used to select and delete a specific extension, or extensions.

- Refresh: This option allows the users to automatically change the 6-digit profile code for a specific extension into a newly generated code.

- Modify Levels: This option allows the user to change the extension’s network priority, call security level, and voice call quality, these settings correlate directly with the QoS configuration on the router module.

- Notification: Using this option, the administrator can send the ID profile code for a specific extension related to a specific user, he can be notified through SMS by using an SMS carrier service such as Twilo or Amazon, or through email by defining the corresponding email settings.


- Export: The administrator can export all extension information into one Excel file by clicking the Export option.
DHCP Option Configuration
- First Scenario: Sync DHCP Option Configuration enabled
Sync DHCP option is a crucial parameter that will define how the SIP extension will be pushed to the endpoint devices. If the option is enabled, then option 66, responsible for defining the Config server path, and option 121, responsible for defining the SIP server address, will be automatically pushed to the router’s DHCP options, with the crucial condition that there are no DHCP options 66 and 121 already defined; otherwise, it will not work.


- Second Scenario: Sync DHCP Option Configuration disabled
The second option to push the SIP extension is when the sync DHCP option is disabled. In this case, the SIP extension will be pushed using a SIP subscribe message sent from the endpoint to the SIP server, by providing the ID code defined. It will bypass defining parameters such as the SIP user ID, SIP Auth ID, and SIP password, and will only require a unique 6-digit ID code to register the extension. Once the ID code is provided, the SIP server will provide back a SIP notify message with the configuration server path, and a message confirming that the account has been provisioned.


Endpoint Configuration
WP816/WP826/WP836 configuration
On the WP8x6 Wi-Fi phone, you can deploy the extension by simply providing the profile code in the phone’s internal settings, please follow the below steps to complete the configuration:
- On your WP8x6, Access Settings → Zero Config.
- Open the Profile Code option, and select the user account you want to add the extension to.
- Provide the 6-digit code received, and click connect. After this, the extension will be automatically deployed to the device, in addition, the device’s MAC address will be automatically retrieved and added to the GCC6000 device.

WP856 configuration
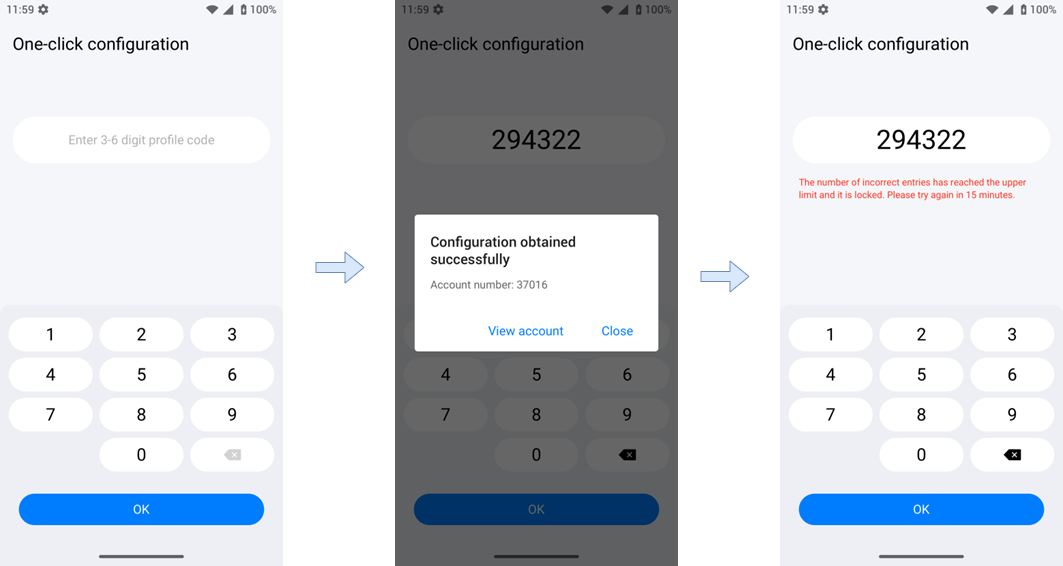
The WP856 is a mobile computing device, that supports SIP account registration, this allows the device to be integrated in a VoIP telephony system, by registering a SIP account to the device, this can be done easily using the “One-Click Configuration” App:
- On your WP856 deice, Open “One-Click configuration”, as shown in the screenshot below
- Provide the 6-digit ID code for your corresponding extension
- Once the 6-digit code is provided , the extension will be automatically linked with the device, and the SIP account will be registered
GXV34xx configuration
The GXV34xx device uses an application called “One-Click Configuration” to push the extension settings to a specified account, Please follow the below steps to achieve that goal:
- On your GXV34xx, Open the One-Click Configuration App
- Provide the 6-digit Profile code for your corresponding extension.

3. The extension will automatically be registered to the device, after showing the success message below, in addition, the device’s MAC address will be automatically retrieved and added to the GCC6000 device.

Initial Dial up Deployment
For other VoIP devices that do not support the one-click configuration application, or the zero config configuration, the process of provisioning the SIP account is done through the initial dial up deployment, the way to set this up is as follows:
- Enable Initial Dial-up Deployment feature under UC Endpoints Module→ Fast Provision.

2. Under UC Endpoints Module→ Device Management → VoiP Devices, select the devices that you wish to register with the SIP accounts created
3. Click the  icon to push the a SIP Notify message with the account information.

4. On the endpoint, dial the profile code corresponding to the extension you wish to register, the account registration will be completed after that, (e.g: on the dial pad of the IP phone, dial the profile code 359814 to register extension 1000), the MAC address of the unit will be added accordingly.

Supported Devices
Device | Firmware required |
GCC6010W | 1.0.1.7+ |
GCC6010 | 1.0.1.7+ |
GCC6011 | 1.0.1.7+ |
Supported Devices