

Thank you for purchasing Grandstream GRP260X Lite Series IP Phones.
The GRP Carrier-Grade IP Phone series is designed with zero-touch provisioning for mass deployment and centralized cloud management via GDMS. Engineered for on-site or remote desktop workers, this series offers a sleek design with next-generation communication features, including 5-way audio conferencing, full HD audio on both speaker and handset, AI Noise Reduction, GS-FEC packet loss resistance, and native WireGuard VPN support.
PRODUCT OVERVIEW
Feature Highlights
The following table compares the major features of the GRP260X Lite phones:
Feature | 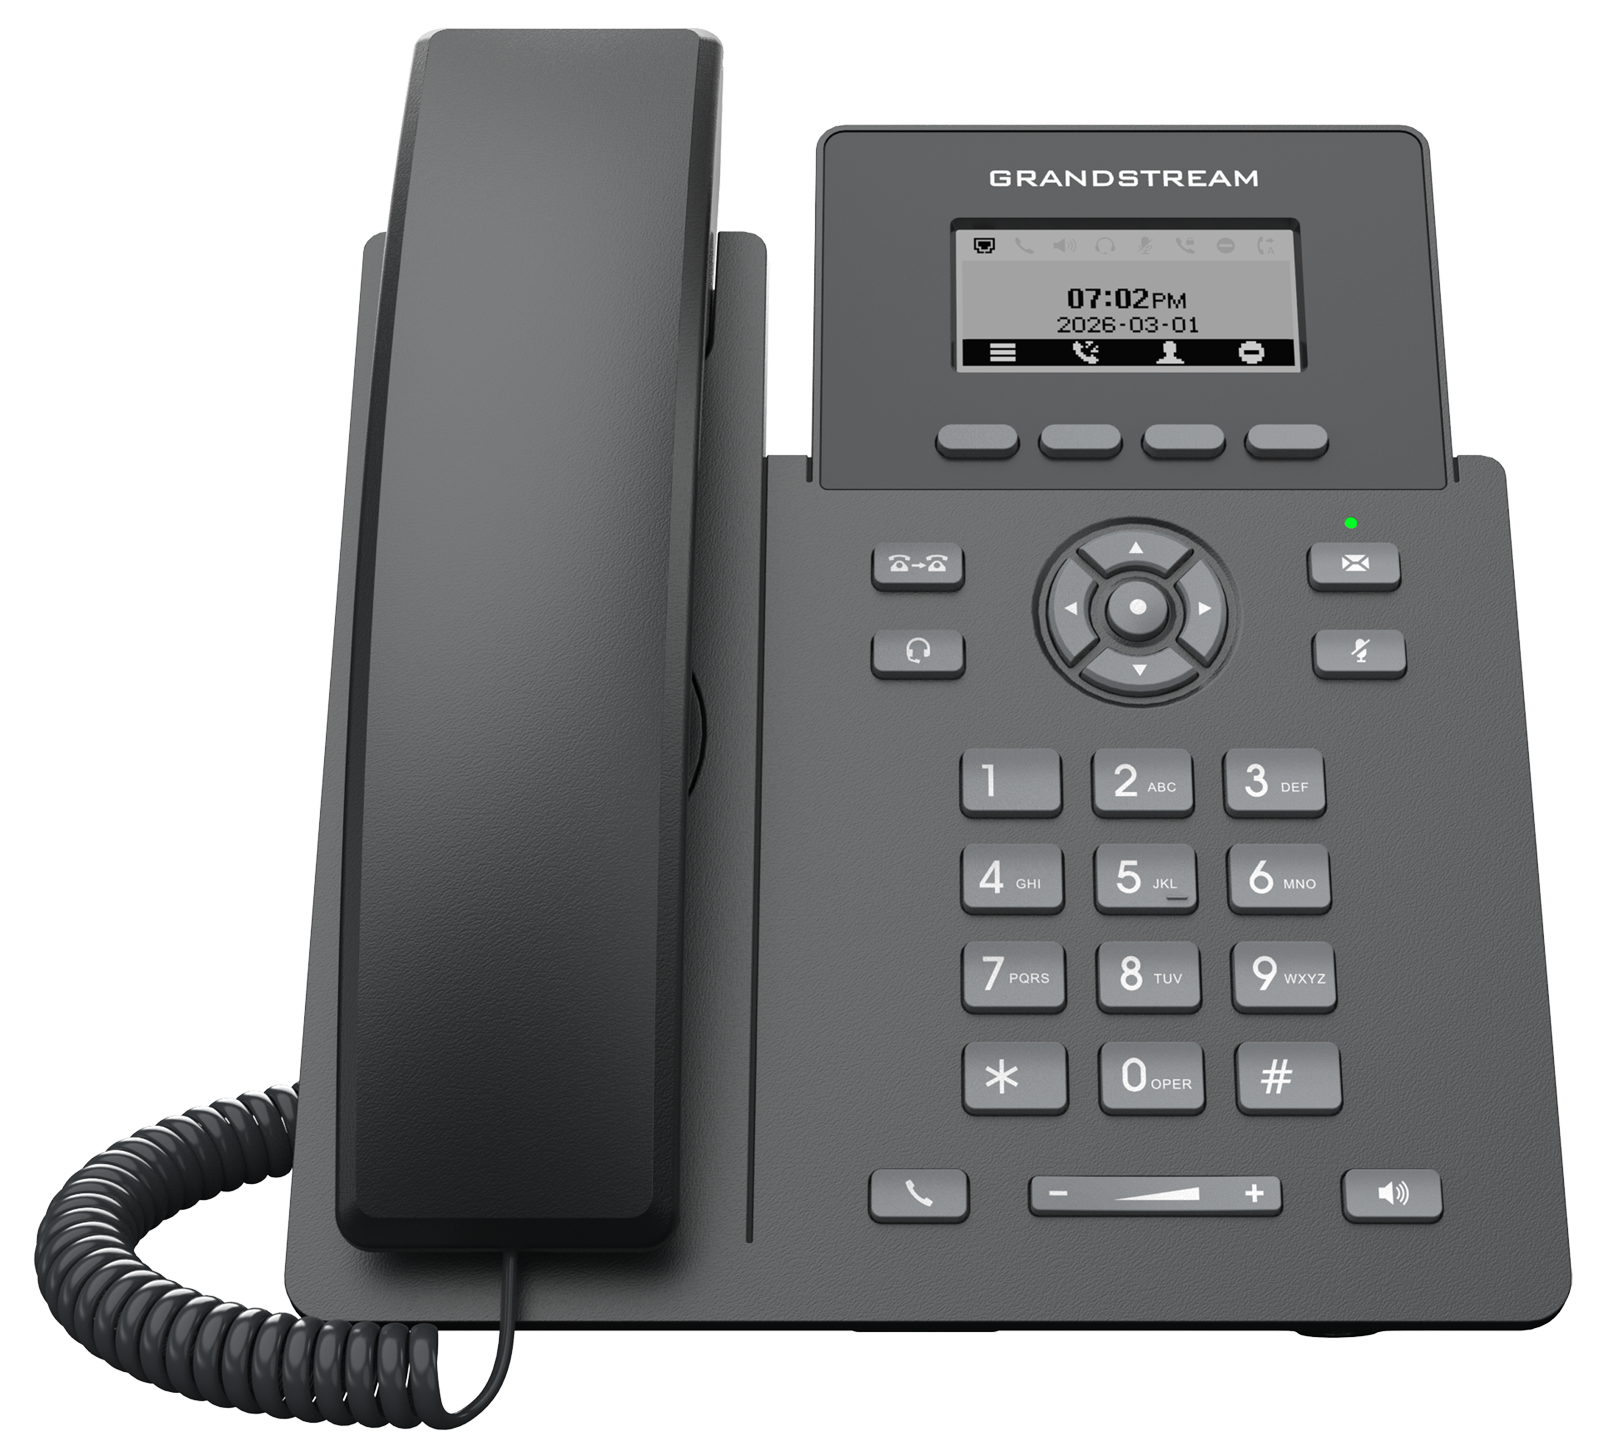 GRP2601L | GRP2601LP | GRP2601LW | 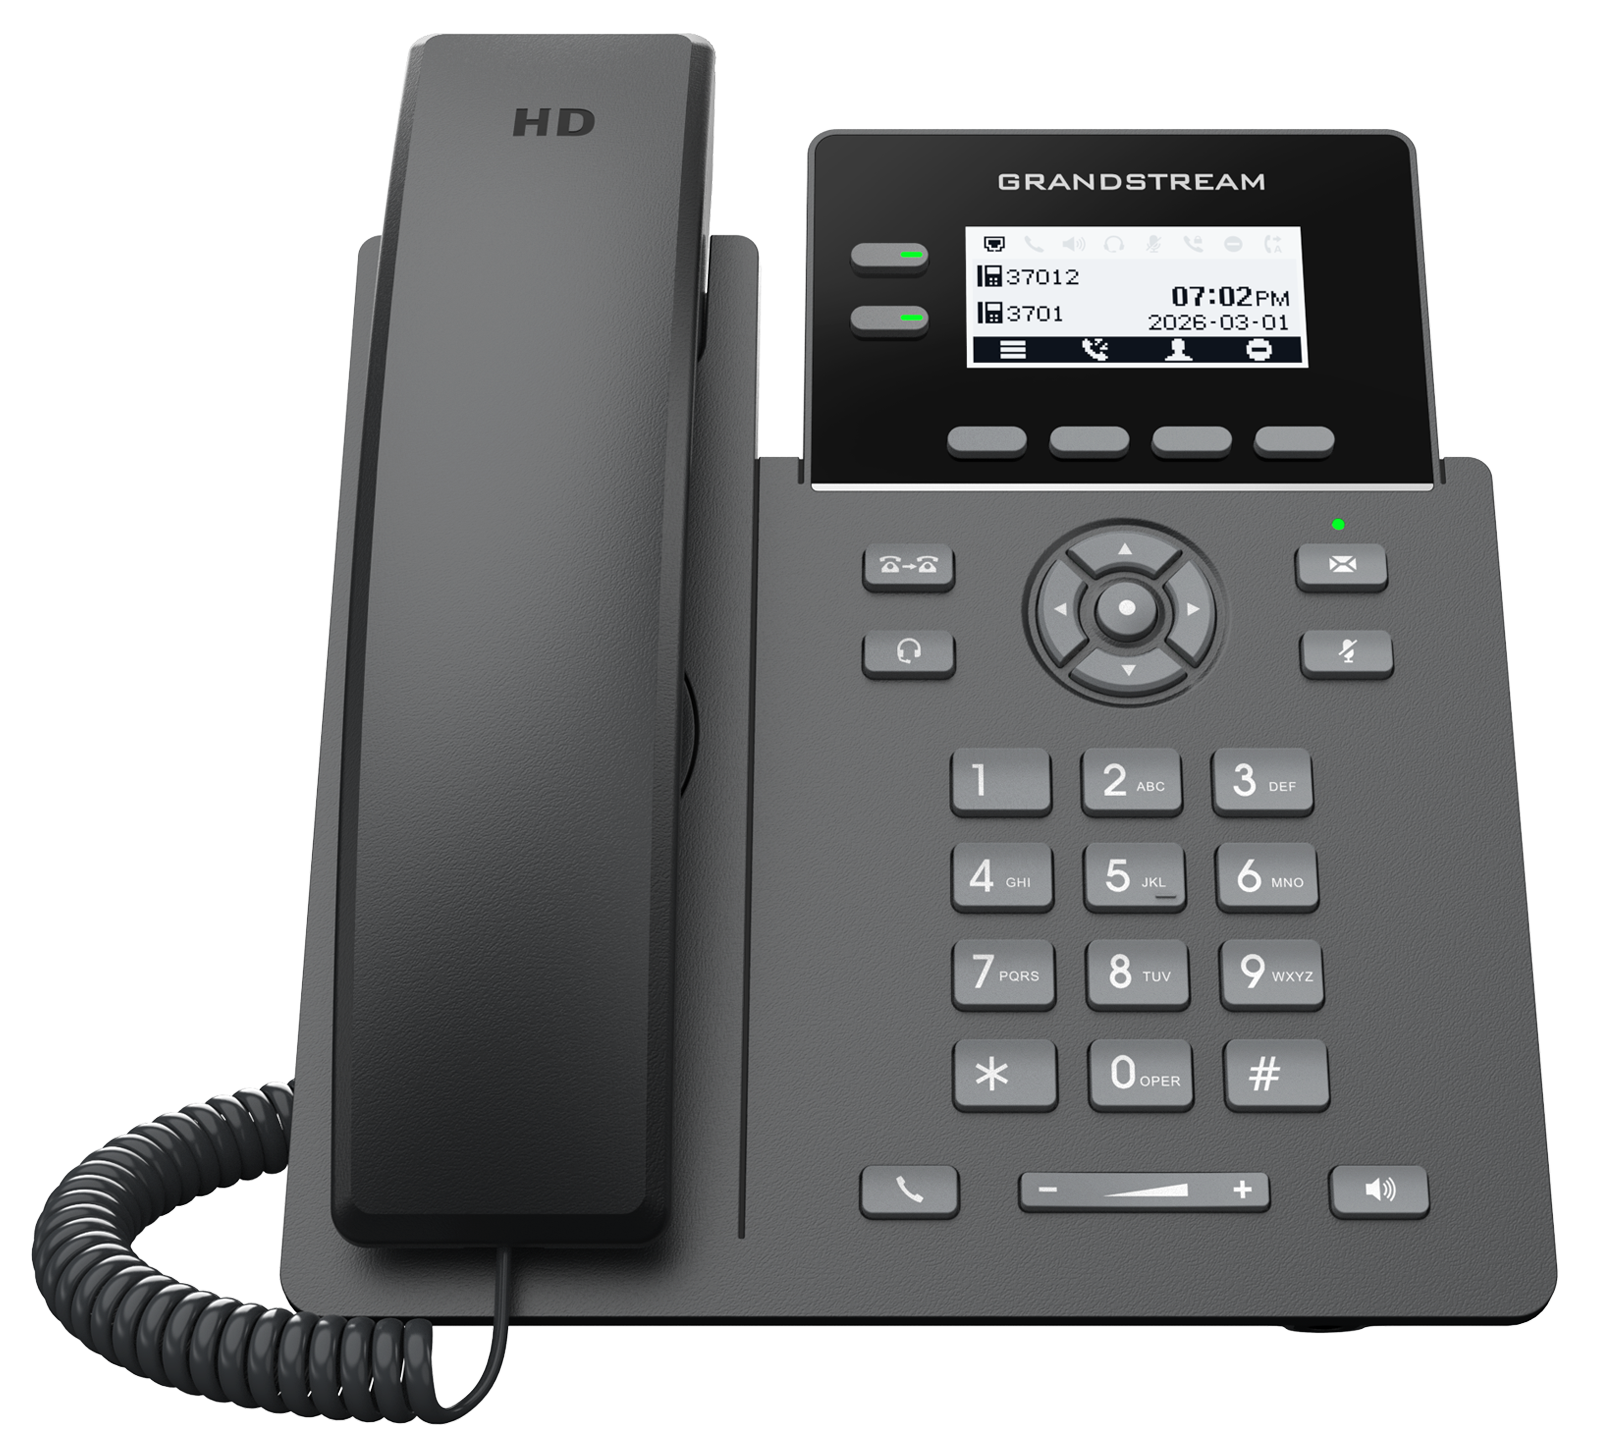 GRP2602LP | GRP2602LG |
SIP Accounts / Lines | 2 / 2 | 4 / 2 | |||
Line Keys | None | 2 (Dual-color LED) | |||
Display | 2.41″ LCD (132×48) | 2.41″ Backlit LCD (132×48) | |||
Network Speeds | Dual 10/100 Mbps | Dual 10/100/1000 Mbps (Gigabit) | |||
PoE Support | No | Integrated PoE (Class 1) | No | Integrated PoE (Class 1) | |
Wi-Fi | Not supported | Wi-Fi 6 (2.4 GHz 802.11ax) | Not supported | ||
Audio & Codecs | HD Audio, Opus, GS-FEC, AI Noise Reduction | Full HD Audio, Opus, GS-FEC, AI Noise Reduction | |||
Conferencing | 5-way audio | ||||
VPN Support | WireGuard VPN | ||||
Headset Port | RJ9 with EHS | ||||
GRP260x Lite Features at a glance
Technical Specifications
The following table resumes all the technical specifications including the protocols/standards supported, voice codecs, telephony features, languages, and upgrade/provisioning settings for the GRP260X Lite series.
- GRP2601L/GRP2601LP/GRP2601LW Technical Specifications
GRP2601L | GRP2601LP | GRP2601LW | ||
Basic | Unit Dimension | 202 mm × 180 mm × 63.4 mm (7.95″ × 7.09″ × 2.50″)(L × W × H)(With Handset) | ||
Package Dimension | 253 mm × 206.5 mm × 69 mm (9.96″ × 8.13″ × 2.72″)(L × W × H) | 242 mm × 206.5 mm × 59 mm (9.53″ × 8.13″ × 2.32″)(L × W × H) | 253 mm × 206.5 mm × 69 mm (9.96″ × 8.13″ × 2.72″)(L × W × H) | |
Unit Weight | 650 g (1.43 lb) | 650 g (1.43 lb) | 651 g (1.44 lb) | |
Package Weight | 860 g (1.90 lb) | TBD | 900 g (2.0 lb) | |
Installation Methods | Desktop, Wall Mount (Wall mount bracket sold separately) | |||
Physical Features | Graphic Display | 2.41 inch (132 × 48) LCD | ||
Feature Keys |
| |||
Base Stand | Yes, 1 angle position available (45°) | |||
Ports | Network Ports |
|
|
|
Auxiliary Ports |
| |||
Power and Energy | Universal Power Adapter | Input: 100–240 V AC, 50–60 Hz; Output: 5 V DC, 600 mA | ||
PoE | N/A | IEEE 802.3af Class 1, 3.84 W; IEEE 802.3az (EEE) | N/A | |
Connectivity | Wi-Fi | N/A | N/A | Single-band 2.4 GHz (802.11b/g/n/ax) |
Environmental Endurance | Operating Temperature | 0 °C to 40 °C (32 °F to 104 °F) | ||
Storage Temperature | -10 °C to 60 °C (14 °F to 140 °F) | |||
Humidity | 10%–90%, non-condensing | |||
Certification | Compliance | CE, FCC, IC, RCM | ||
Protocols and Standards | Network Protocols | IPv4, IPv6, HTTP/HTTPS, ARP, ICMP, DNS (A record, SRV, NAPTR), DHCP, SSH, TFTP, NTP, STUN, TURN, ICE, SIMPLE, LLDP-MED, LDAP, TR-069, SNMP, 802.1X | ||
VoIP Protocols | SIP RFC3261 (over UDP/TCP/TLS), RTP/RTCP, RTCP-XR, RTCP-MUX, SDES-SRTP, DTLS-SRTP | |||
QoS | Layer 2 QoS (802.1Q, 802.1p) and Layer 3 (ToS, DiffServ, MPLS) QoS | |||
Wi-Fi Encryption | N/A | N/A | WEP, WPA/WPA2 (Personal/Enterprise), WPA3 (Personal/Enterprise) | |
Security |
| |||
Provisioning and Interoperability | Deployment | Mass provisioning using GDMS/TR-069 or AES encrypted XML configuration file | ||
Maintenance | Firmware upgrade via FTP, TFTP, TFTPS, HTTP and HTTPS | |||
Interoperability | Fully interoperable with major UC platforms including BroadSoft, Metaswitch, Kandy, 3CX, Zoom, NetSapiens, RingCentral, Asterisk, Freeswitch and openSIPS | |||
Audio Features | Voice Codecs | G.729A/B, G.711µ/a-law, G.726, G.722 (wide-band), G.723.1, iLBC, Opus (with in-band FEC) | ||
Audio Capabilities |
| |||
Features | Directory | Downloadable phonebook (XML, LDAP, up to 500 items), call log (up to 200 records) | ||
Call Management | Hold, transfer, forward, call park, call pickup, call waiting, auto answer, off-hook auto dial, click-to-dial | |||
Collaboration | 5-way conferencing, shared-call-appearance (SCA), bridged-line-appearance (BLA) | |||
Customization | Personalized music ringtones and music on hold | |||
System and Administration | Hot-desking, flexible dial plan, server redundancy, failover | |||
Advanced Features |
| |||
Localization | Multi-Language | Arabic, Catalan, Chinese (Simplified), Chinese (Traditional), Croatian, Czech, Dutch, English, French, German, Greek, Hebrew, Hungarian, Italian, Japanese, Korean, Latvian, Polish, Portuguese, Russian, Slovak, Slovenian, Spanish, Swedish, Turkish, Ukrainian | ||
Standard Items | Primary Unit |
| ||
Power and Cable |
| 1 × Network Cable |
| |
Manual and License |
| |||
GRP2601L/GRP2601LP/GRP2601LW Technical Specifications
- GRP2602LP/GRP2602LG Technical Specifications
GRP2602LP | GRP2602LG | ||
Basic | Unit Dimension | 202 mm × 180 mm × 63.4 mm (7.95″ × 7.09″ × 2.50″)(L × W × H)(with handset) | |
Package Dimension | 242 mm × 206.5 mm × 59 mm (9.53″ × 8.13″ × 2.32″)(L × W × H) | 253 mm × 206.5 mm × 69 mm (9.96″ × 8.13″ × 2.72″)(L × W × H) | |
Unit Weight | 670 g (1.48 lb) | ||
Package Weight | 830 g (1.83 lb) | 880 g (1.94 lb) | |
Installation Methods | Desktop, Wall Mount (Wall mount bracket sold separately) | ||
Physical Features | Graphic Display | 2.41 inch (132 × 48) LCD with backlight | |
Feature Keys |
| ||
Base Stand | Yes, 1 angle position available (45°) | ||
Ports | Network Ports |
|
|
Auxiliary Ports |
| ||
Power and Energy | Universal Power Adapter | Input: 100–240 V AC, 50–60 Hz; Output: 5 V DC, 600 mA | |
PoE | IEEE802.3af Class 1, 3.84 W; IEEE802.3az (EEE) | ||
Environmental Endurance | Operating Temperature | 0 °C to 40 °C (32 °F to 104 °F) | |
Storage Temperature | -10 °C to 60 °C (14 °F to 140 °F) | ||
Humidity | 10%–90%, non-condensing | ||
Certification | Compliance | CE, FCC, IC, RCM | |
Protocols and Standards | Network Protocols | IPv4, IPv6, HTTP/HTTPS, ARP, ICMP, DNS (A record, SRV, NAPTR), DHCP, SSH, TFTP, NTP, STUN, TURN, ICE, SIMPLE, LLDP-MED, LDAP, TR-069, SNMP, 802.1X | |
VoIP Protocols | SIP RFC3261 (over UDP/TCP/TLS), RTP/RTCP, RTCP-XR, RTCP-MUX, SDES-SRTP, DTLS-SRTP | ||
QoS | Layer 2 QoS (802.1Q, 802.1p) and Layer 3 (ToS, DiffServ, MPLS) QoS | ||
Security |
| ||
Provisioning and Interoperability | Deployment | Mass provisioning using GDMS/TR-069 or AES encrypted XML configuration file | |
Maintenance | Firmware upgrade via FTP, TFTP, TFTPS, HTTP and HTTPS | ||
Interoperability | Fully interoperable with major UC platforms including BroadSoft, Metaswitch, Kandy, 3CX, Zoom, NetSapiens, RingCentral, Asterisk, Freeswitch, and openSIPS | ||
Audio Features | Voice Codecs | G.729A/B, G.711μ/a-law, G.726, G.722 (wide-band), G.723.1, iLBC, Opus (with in-band FEC) | |
Audio Capabilities |
| ||
Features | Directory | Downloadable phonebook (XML, LDAP, up to 500 items), call log (up to 200 records) | |
Call Management | Hold, transfer, forward, call park, call pickup, call waiting, auto answer, off-hook auto dial, click-to-dial | ||
Collaboration | 5-way conferencing, shared-call-appearance (SCA), bridged-line-appearance (BLA) | ||
Customization | Personalized music ringtones and music on hold | ||
System and Administration | Hot-desking, flexible dial plan, server redundancy, failover | ||
Advanced Features |
| ||
Localization | Multi-Language | Arabic, Catalan, Chinese (Simplified), Chinese (Traditional), Croatian, Czech, Dutch, English, French, German, Greek, Hebrew, Hungarian, Italian, Japanese, Korean, Latvian, Polish, Portuguese, Russian, Slovak, Slovenian, Spanish, Swedish, Turkish, Ukrainian | |
Standard Items | Primary Unit |
| |
Power and Cable | 1 × Network Cable |
| |
Manual and License |
| ||
GRP2602LP/GRP2602LG Technical Specifications
GETTING STARTED
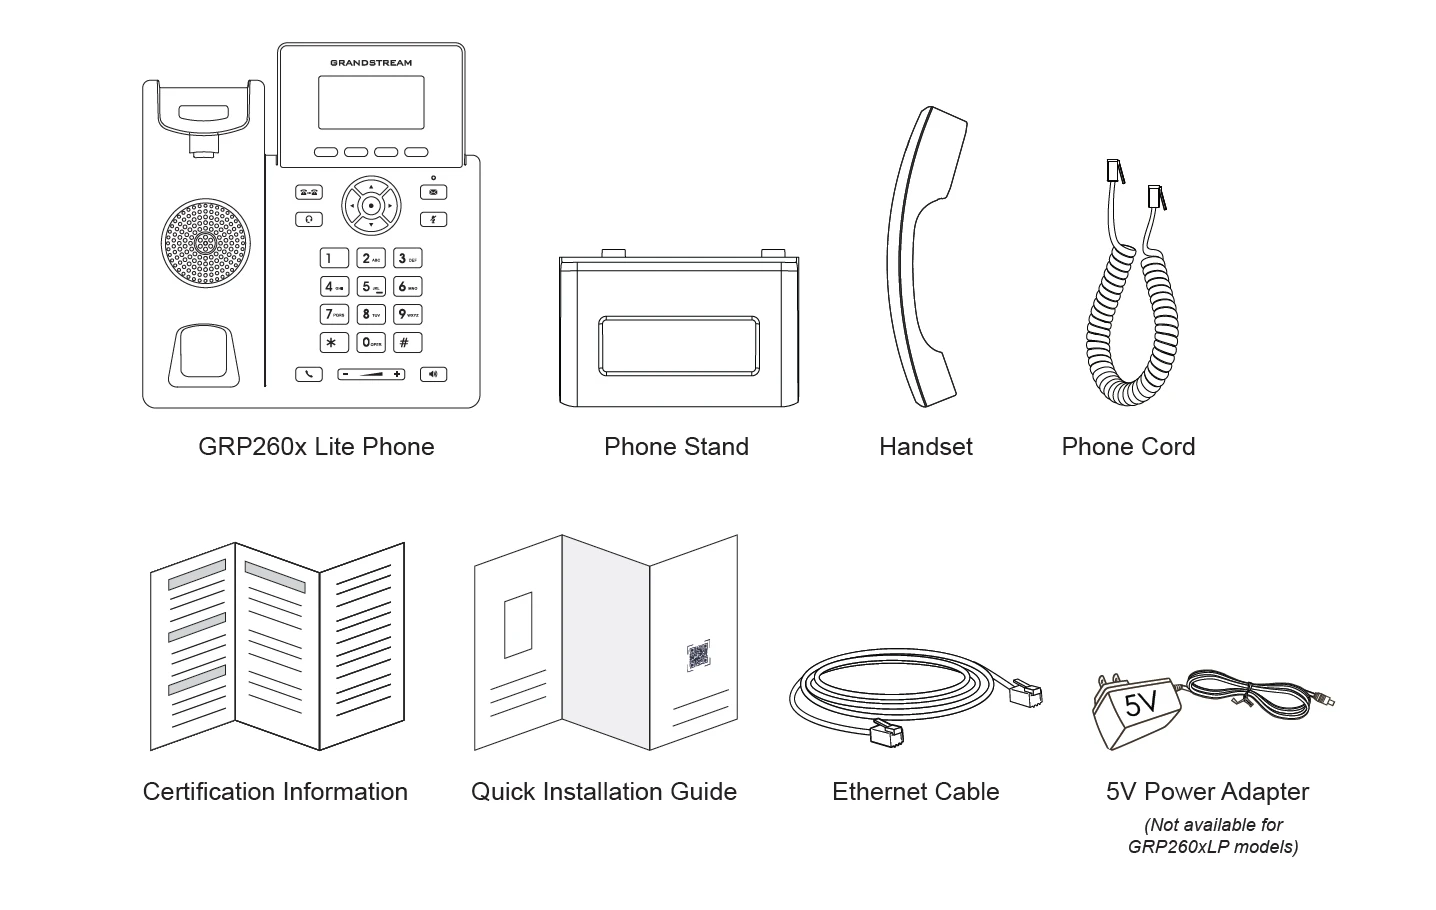
This chapter provides basic installation instructions including the list of the packaging contents and information for obtaining the best performance with the GRP260X Lite IP phones.
Equipment Packaging
GRP260X Lite Phone Package Content |
|
Keys and Ports Description
The figures and tables below show a description of the back and front views of the GRP260x Lite models:
- GRP2601L/LP/LW
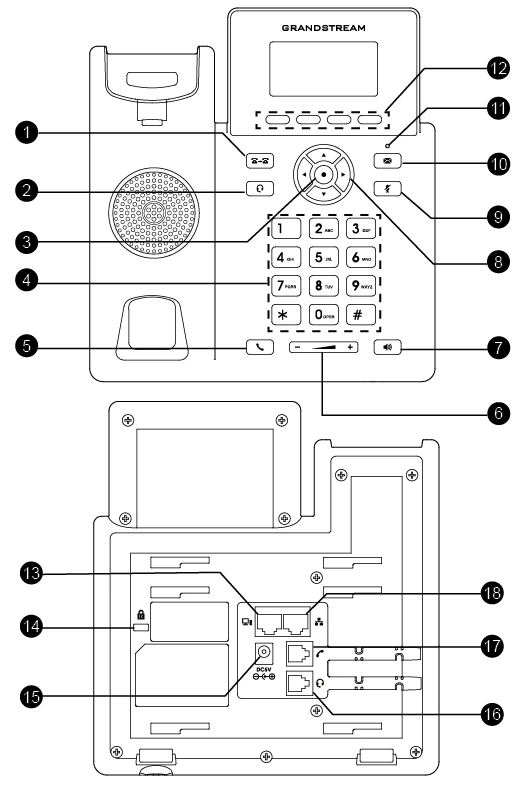
GRP2601L/LP/LW Keys and Ports
Port | Description | |
1 | Transfer | Transfers an ongoing call to another extension or number. |
2 | Headset | Switches audio to a connected headset when in use. |
3 | MENU/OK Key | Opens the main menu or confirms selections and settings. |
4 | Standard keypad | Traditional dial pad used to enter phone numbers and navigate menus. |
5 | Send | Dials the entered number or redials the last called number. when in idle mode, pressing the send key opens the dialing screen. |
6 | Volume | Adjusts the volume for the ringer, call audio, speaker, or headset. |
7 | Speaker | Activates speakerphone mode for hands-free calling. |
8 | Navigation keys | Allow you to scroll through menus, lists, and call records. |
9 | Mute | Mutes the active call; when pressed in idle mode, it enables Do Not Disturb (DND). |
10 | Message | Accesses voicemail and stored messages. |
11 | Message Waiting Indicator | LED indicator lights up when you have a new unread message/voicemail. |
12 | Soft keys | Dynamic buttons that change function based on what’s displayed on screen. |
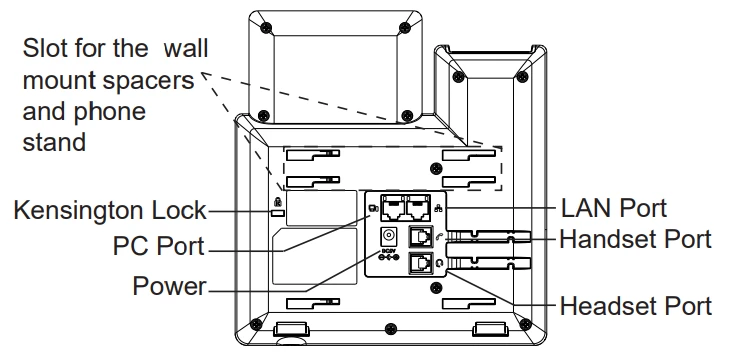
13 | PC Port | Ethernet pass-through port to connect a PC using the same network cable. |
14 | Keingston lock | Anti-theft port for hardware electronics |
15 | Power | Connects a 5V DC power adapter when PoE is not used. A power adapter is included with the GRP2601L and GRP2601LW only. |
16 | Headset Port | Connects a wired headset for hands-free operation. |
17 | Handset Port | Connects the physical handset to the phone. |
18 | LAN Port | Connects the phone to the network via Ethernet. Supports 10/100 Mbps auto-negotiation. PoE is supported on the GRP2601LP only. |
GRP2601L/LP/LW Keys and Ports Description
- GRP2602LP/LG
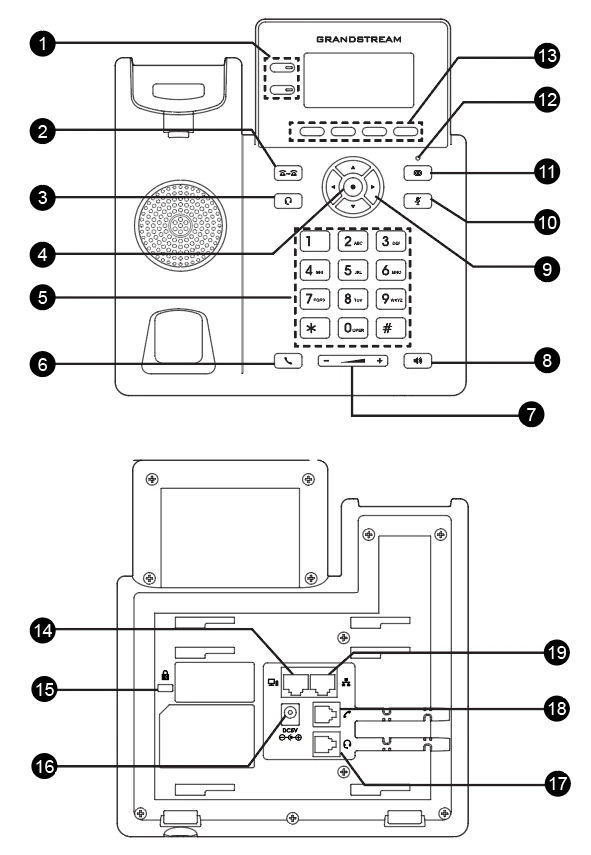
GRP2602LP/LG Keys and Ports
Port | Description | |
1 | Line Keys | Used to manage multiple vpks buttons, the VPKs can be configured to perform a certain action, like speed dial, BLF key… |
2 | Transfer | Transfers an ongoing call to another extension or number. |
3 | Headset | Switches audio to a connected headset when in use. |
4 | MENU/OK Key | Opens the main menu or confirms selections and settings. |
5 | Standard keypad | Traditional dial pad used to enter phone numbers and navigate menus. |
6 | Send | Dials the entered number or redials the last called number. when in idle mode, pressing the send key opens the dialing screen. |
7 | Volume | Adjusts the volume for the ringer, call audio, speaker, or headset. |
8 | Speaker | Activates speakerphone mode for hands-free calling. |
9 | Navigation keys | Allow you to scroll through menus, lists, and call records. |
10 | Mute | Mutes the active call; when pressed in idle mode, it enables Do Not Disturb (DND). |
11 | Message | Accesses voicemail and stored messages. |
12 | Message Waiting Indicator | LED indicator lights up when you have a new unread message/voicemail. |
13 | Soft keys | Dynamic buttons that change function based on what’s displayed on screen. |
14 | PC Port | Ethernet pass-through port to connect a PC using the same network cable. |
15 | Keingston lock | Anti-theft port for hardware electronics |
16 | Power | Connects a 5V DC power adapter when PoE is not used. A power adapter is included with the GRP2602LG only. |
17 | Headset Port | Connects a wired headset for hands-free operation. |
18 | Handset Port | Connects the physical handset to the phone. |
19 | LAN Port | Connects the phone to the network via Ethernet. The GRP2602LP supports 10/100 Mbps auto-negotiation and PoE, while the GRP2602LG supports 10/100/1000 Mbps auto-negotiation. |
GRP2602LP/LG Keys and Ports Description
GRP260X Lite Phone Setup
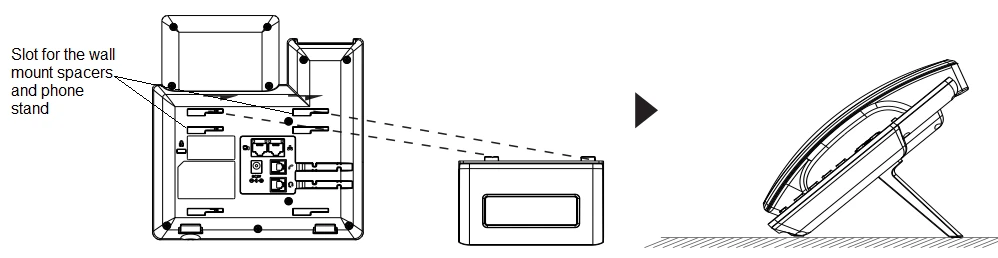
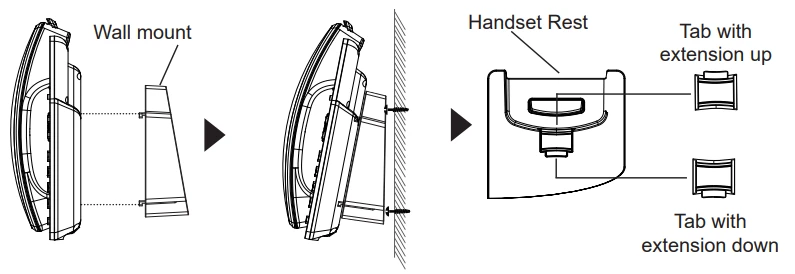
The GRP260X Lite phones can be installed on the desktop using the phone stand or attached to the wall using the slots for wall mounting.
Using the Phone Stand
For installing the phone on the table with the phone stand, attach the phone stand to the bottom of the phone where there is a slot for the phone stand. (Upper half, bottom part).
Using the Slots for Wall Mounting
- Attach the wall mount spacers to the slot for wall mount spacers on the back of the phone.
- Attach the phone to the wall via the wall mount hole.
- Pull out the tab from the handset cradle (See figure below).
- Rotate the tab and plug it back into the slot with the extension up to hold the handset while the phone is mounted on the wall (see figure below).
Connecting the GRP260X Lite
To set up the GRP260X Lite, follow the steps below:
- Connect the handset and main phone case with the phone cord.
- Connect the LAN port of the phone to the RJ-45 socket of a hub/switch or a router (LAN side of the router) using the Ethernet cable.
- Connect the 5V DC output plug to the power jack on the phone. Plug the power adapter into an electrical outlet. If a PoE switch is used in step 3, this step could be skipped (For GRP2601LP, GRP2602LP, and GRP2602LG).
- The LCD will display the Grandstream logo. Before continuing, please wait for the date/time display to show up.
- Using the phone-embedded web server or keypad configuration menu, you can further configure the phone using either a static IP or DHCP.
Using Wi-Fi (GRP2601LW only):
- On the LCD menu, navigate to Settings → Wi-Fi settings and enable Wi-Fi.
- Select Wi-Fi Network and the phone will automatically start scanning within the range.
- A list of Wi-Fi networks will be displayed. Select the desired network, and if required, enter the correct password to connect.
- Users can add and connect to a hidden network by accessing Wi-Fi Network and then pressing on Add softkey. Then enter the Network’s information.
ACCESS AND CONFIGURATION
Configuration via Keypad
To configure the LCD menu using the phone’s keypad, follow the instructions below:
- Enter MENU options: When the phone is idle, press the round MENU button or Menu Softkey to enter the configuration menu.
- Navigate to the menu options: Press the arrow keys UP/DOWN keys to navigate in the menu options.
- Enter/Confirm selection: Press the round MENU to enter the selected option.
- Exit: Press Return Softkey to exit to the previous menu.
- Return to the Home page.
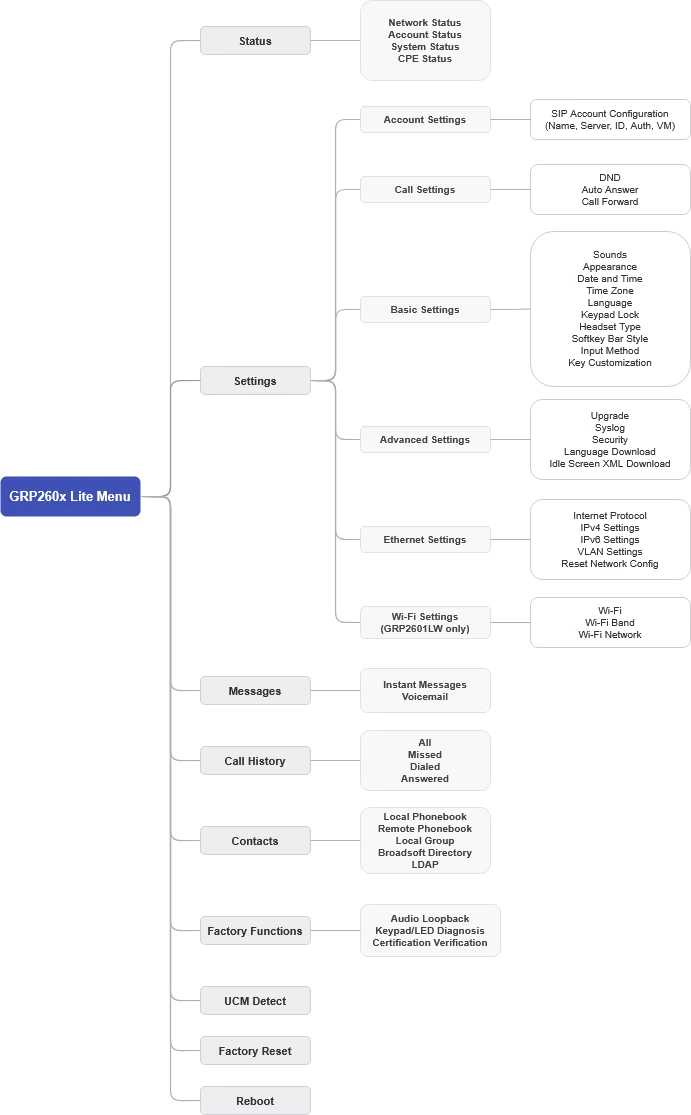
The MENU options are listed in the following table.
Status | Displays account status, network status, software version number, and Hardware:
|
Settings | Settings sub menu contains the following options:
|
Messages | The messages menu contains the following:
|
Call History | Displays the following Local Call Logs:
|
Contacts | Contacts sub menu includes the following options:
|
Factory Functions | Factory Functions sub menu includes the following options:
|
UCM Detect | Configures the IP address and port of the UCM on which the IP phone can be registered. |
Factory reset | Performs a Factory reset on the phone. |
Reboot | Reboots the phone. |
Configuration Menu
The following picture shows the keypad MENU configuration flow:
Configuration via Web Browser
The GRP260x Lite IP phone can be configured through the embedded web interface using a computer’s web browser, such as Google Chrome, Mozilla Firefox, or Microsoft Edge. To access the Web GUI:
- Connect the computer to the same network and subnet as the phone. This can be done by connecting the computer to the same hub or switch as the phone, or by connecting it directly to the phone’s PC port.
- Ensure the phone is properly booted and connected to the network. Obtain the phone’s IP address by short pressing the Up arrow key.
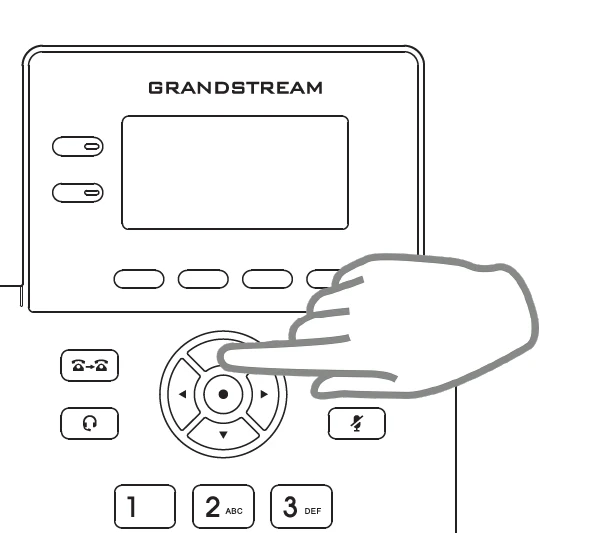
- Open a web browser on the computer and enter the phone’s IP address in the address bar. For example, if the phone’s IP address is 192.168.40.154, enter
https://192.168.40.154in the browser’s address bar. - Enter the administrator username and password to access the Web UI.
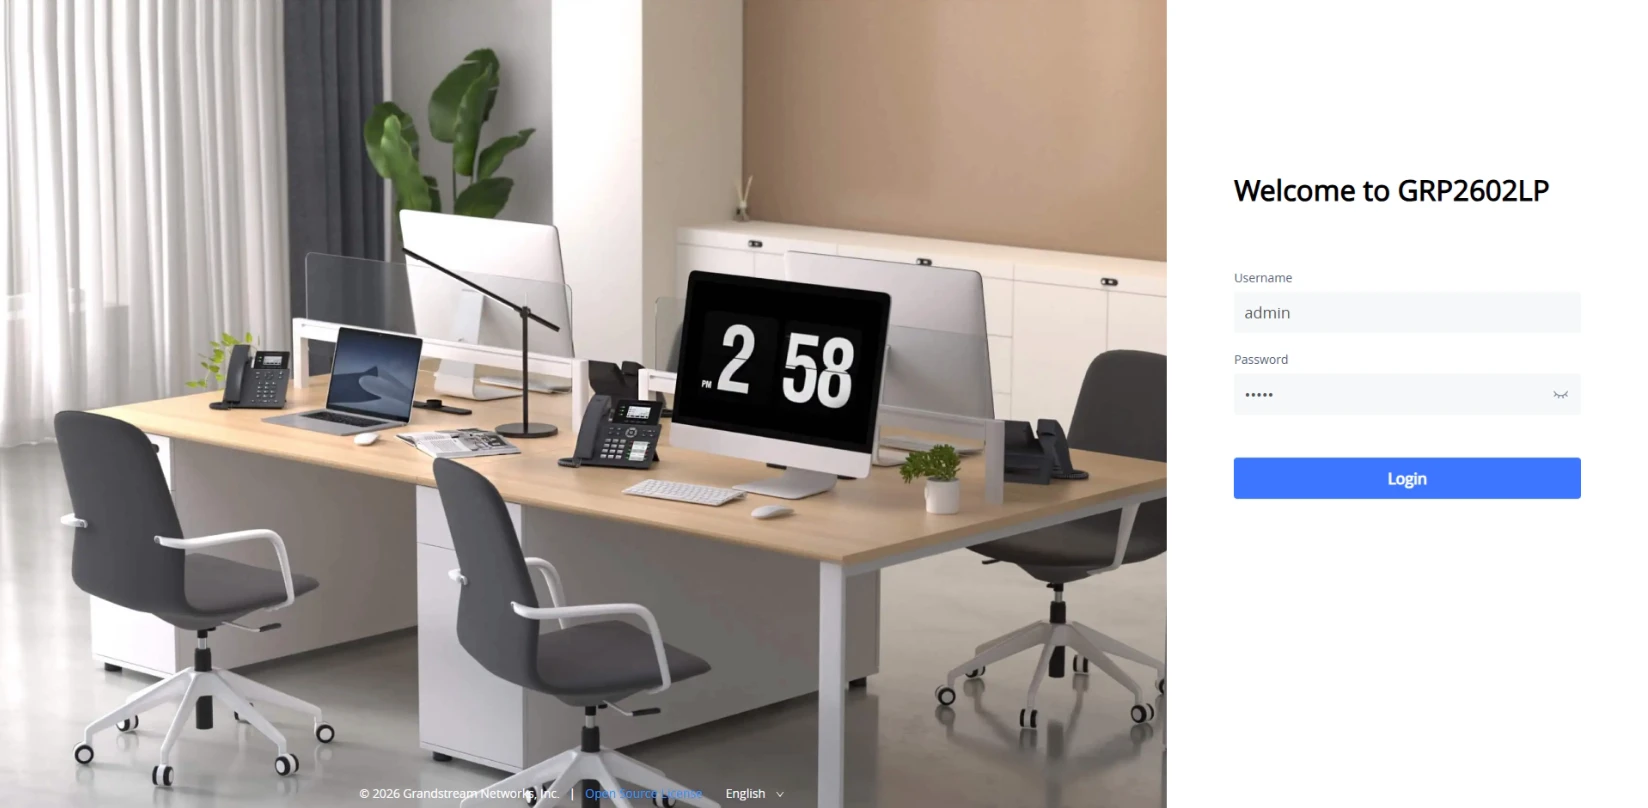
There are two user levels with default passwords as shown below:
User Level | User | Password | Web Pages Allowed |
End User Level | user | 123 or unit label password | Only Status and Basic Settings |
Administrator Level | admin | admin or unit label password | Browse all pages |
GRP260x Lite Default Passwords
Saving Configuration Changes on the Web UI
After modifying the phone’s configuration, click Save to save the changes. Saved changes do not take effect until Apply is clicked. Alternatively, click Save and Apply to save and apply the changes immediately. After all changes have been applied, it is recommended to reboot or power cycle the phone.
LEARNING THE INTERFACE
Idle Screen
When the phone is idle, the LCD shows the current line/account, date and time, and a row of context-sensitive softkeys. The appearance can change based on which softkeys are active, and what each VPK displays and is not fixed by the hardware.
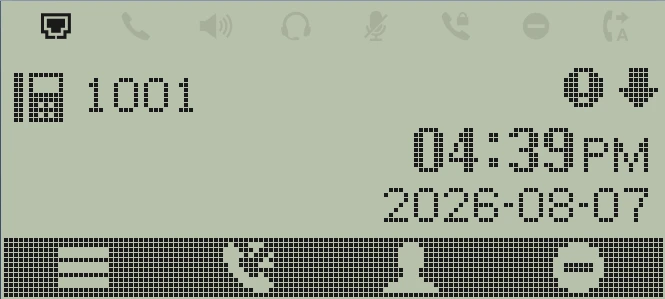
The GRP260x Lite idle screen is made up of the core elements described in the table below:
Date and Time | Displays the current date and time. It can be synchronized with time servers. The date and time format can be changed depending on the admin configuration. |
Network icon | Shows the status of the network. It will indicate whether the network is down or starting. |
Status icons | Shows the status of the phone during dialing, enabled call features, etc., using icons as described in the table below. |
Line status indicator | The line keys are context-sensitive and will change depending on the configuration of the phone. By default, they display the registered accounts. |
Softkeys in idle screen | The softkeys are context-sensitive and will change depending on the status of the phone. Default functions assigned to softkeys are:
|
Idle Screen Definitions
Top Banner Icon | Description |
 | Ethernet Port Connected |
 | Off-Hook Dialing/Ongoing Call |
 | Speaker Dialing/Ongoing Call |
 | Headset Port Connected |
 | Ongoing Call Mute |
 | Ongoing SRTP Call |
 | DND Enabled |
 | Call Forward Enabled Note: This icon shows up when call forward is enabled locally or by using the UCM feature codes. |
GRP260X Lite Top Banner Status Icons
Call Screen
The LCD switches from the idle layout to the call screen as soon as a number is being dialed, and stays on the call screen through ringing, connection, hold, and until the call ends. The specific information shown such as dialed digits, contact name if matched in the phonebook, call duration once connected, and current state updates in real time as the call progresses.
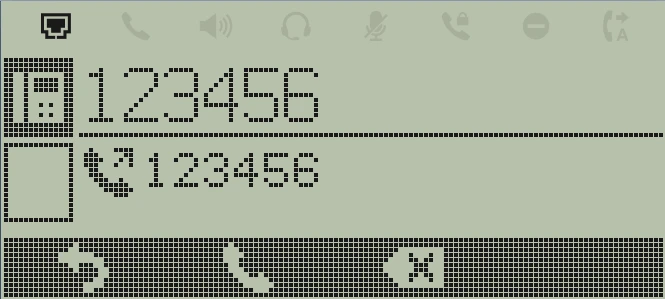
The call screen displays a set of elements described in the table below:
Network icon | Shows the status of network. It will indicate whether the network is down or starting. |
Status icons | Shows the status of the phone during dialing, enabled call features etc., using icons as described in the table above. |
Line keys icons | The line keys are context sensitive and will change depending on the configuration of the phone. By default, they display the registered accounts. Users can use the line keys to dial from a different account. |
Softkeys in call screen | The softkeys are context sensitive and will change depending on the status of the call and admin configuration. Default functions assigned based on call state are:
|
Call Screen Definitions
VPKs (GRP2602LP/GRP2602LG)
Each phone in the GRP2602LP/GRP2602LG models have a set of two line keys built into the hardware, which default to Line mode and register a SIP account. Beyond these, the models also support Dynamic VPKs, which are additional virtual keys you can add that appear on extra screens paged through from the idle or call screen.
Both Fixed and Dynamic VPKs can be set to modes like Speed Dial, BLF (extension monitoring), Call Park, Transfer, and more. This transforms a single key into a one-touch shortcut instead of just a line selector.
The configured fixed VPKs are displayed next to the corresponding line. If dynamic VPKs are configured, the users can see a page number shown on the bottom left corner of the LCD.
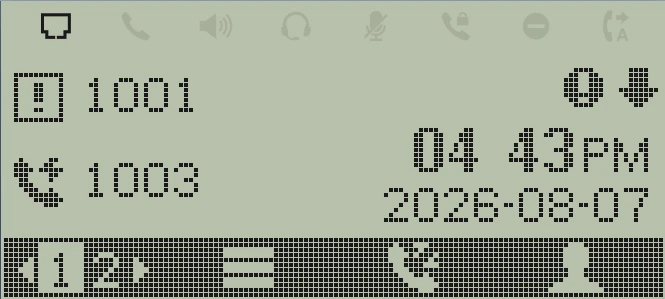
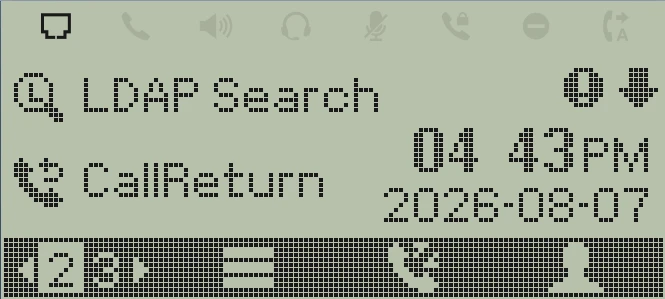
Users can edit existing VPKs or add new ones directly from the phone, without accessing the Web UI, by pressing and holding the line key for about 4 seconds to open its configuration
The configurable VPK modes and icon indications are described in the table below:
VPK Mode | Description | State | Icon | LED Status |
Line | Regular line key to open up a line and switch lines. The Label and Value fields can be left blank. Note: Line mode is supported on Fixed VPK only. | Unregistered |  | OFF |
Registered + Idle |  | OFF | ||
Voicemail | | OFF | ||
Dialing / Outgoing Call |  | GREEN | ||
Ongoing Call |  | GREEN | ||
Ringing / Incoming Call |  | Flashing RED | ||
On Hold |  | Flashing GREEN | ||
Call Failed |  | OFF | ||
Shared | Share line for Shared Line Appearance feature. Select the Account registered as Shared line for the line key. The Description and Value fields can be left blank. | Unregistered |  | OFF |
Registered + Idle |  | OFF | ||
Speed Dial | Speed Dial mode allows you to set a key for one-touch dialing; the configured number will be dialed once VPK is pressed. Select the Account to dial from and enter the Speed Dial number to be dialed in the Value field, or enter the IP address to set the Direct IP call as Speed Dial. | Account Registered/Unregistered |  | OFF |
Busy Lamp Field (BLF) | Busy Lamp Field (BLF) mode allows to monitor status (available, ringing, busy) of an extension. Select the Account to monitor the BLF status. Enter the extension number in the Value field to be monitored. | Offline/Unknown |  | OFF |
Terminated |  | GREEN | ||
Ringing (Early) |  | Flashing RED | ||
Trying |  | RED | ||
Confirmed | ||||
Presence Watcher | Presence watcher allows you to monitor the presence/registration status of an extension. This feature needs to be supported by the SIP server to use it. | Unavailable, Unknown | | OFF |
Available |  | GREEN | ||
Away |  | GREEN | ||
Chat |  | RED | ||
Custom Status |  | GREEN | ||
DND |  | RED | ||
Eventlist BLF | Eventlist BLF allows monitoring a list of extensions similar to BLF. The administrator needs to configure Eventlist BLF on the server side and provide the Eventlist BLF URI on the phone. Select the Account to monitor the Eventlist BLF status. Enter the extension number in the Value field to be monitored and make sure to specify “Eventlist BLF URI” (Account X > SIP Settings > Advanced Features). | Offline/Unknown | | OFF |
Terminated | | GREEN | ||
Ringing (Early) | | Flashing RED | ||
Trying | | RED | ||
Confirmed | ||||
Speed Dial Via Active Account | Speed Dial via active account mode allows you to set a key for one-touch dialing; the configured number will be dialed once VPK is pressed using the specified account if available; otherwise, the first available account will be used to dial out. Select the Account to dial from and enter the Speed Dial number to be dialed in the Value field, or enter the IP address to set the Direct IP call as Speed Dial. | No state changes | | OFF |
Dial DTMF | Dial DTMF allows customers to send digits while in communication; for instance, when dialing to an IVR, users can set Dial DTMF Key to send digits to the IVR. | No state changes |  | OFF |
Voicemail | Allows access to the user’s voicemail by pressing the configured VPK. | Account not registered |  | OFF |
Account Registered (No new voice mail) | ||||
Account Registered (voice mail available) |  | Flashing RED | ||
Call Return | Allows users to dial the last answered call by pressing the configured VPK. | No state changes |  | OFF |
Transfer | Allows to set a destination number to transfer calls to it (blind transfer) by pressing configured VPK. | Account Registered/Unregistered |  | OFF |
Call Park | This feature allows you to park/pick up the call and can also be used to monitor parking lots via the VPK button’s LED.
| Call Park Extension |  | OFF |
Parking Lot (No available call) | GREEN | |||
Parking Lot (Available call) | RED | |||
Intercom | Allows you to set a VPK as an intercom button to a specific destination with an auto-answer instruction. | Account Registered/Unregistered |  | OFF |
LDAP Search | This option is to narrow the LDAP search scope.
For example: If users set VPK as “LDAP Search” for “Account 1”, and set filters:
| No State |  | OFF |
Conference | Enables users to initiate a conference by pressing the assigned button. | No state |  | OFF |
Multicast Paging | Multicast paging is a feature that allows the user to make calls to a group of phones listening to the same Paging IP address. | No State |  | OFF |
Call History | This Key is a shortcut to Call History. | No state |  | OFF |
Monitored Call Park | This VPK is used to monitor parking lot extensions. | No parked call | | GREEN |
Available parked call | RED | |||
Menu | This Key is a shortcut to the Menu. | No state |  | OFF |
XML Application | This Key is a shortcut to the XML Application. | No state |  | OFF |
INFO | Select this feature in order to display the Information popup to show the firmware version, MAC address, IP address, and IP Settings from the MPK buttons. | No state |  | OFF |
Messages | This Key is a shortcut to Messages. | No state |  | OFF |
Forward | This Key can be used to forward an ongoing call to the extension entered in the Value Field. | No state |  | OFF |
DND | Allows users to enable/disable Do Not Disturb mode. | No state |  | OFF |
Redial | The phone will redial using the same SIP account as was used for the last call. | No state |  | OFF |
Multicast Listen Address | This feature sets up a multicast listening address for the IP Phone. | No state | | OFF |
OpenDoor | Triggers an open-door action in conjunction with a GDS37xx. | No state |  | OFF |
Presence Eventlist | Similarly to the Presence Watcher, this option allows you to monitor the SIP presence status of extensions, but in this case the PBX collects the information from the phones and sends it out in a single notify message.
| Unavailable | | OFF |
Available | | GREEN | ||
Away | | GREEN | ||
Chat | | RED | ||
Custom Status | | GREEN | ||
DND | | RED | ||
Provision | Enables the phone to initiate an instant provisioning. | No state |  | OFF |
Multicast Paging Address | This Feature sets up a Multicast paging address for paging purposes. | No state | | OFF |
HTTP Command | Enables users to set up a call through an HTTP command. | No state |  | OFF |
Call Flip | This feature allows the user to switch devices seamlessly while a call is ongoing. The flip happens without having to hang up the call. | No state |  | OFF |
Visual Park | Used with PortSIP servers, this feature allows the phone to act as a visual call parking location. |  | ||
Silent Call | This feature allows users to initiate calls from a GRP260x phone to an extension without any audible or visual indication on the LCD screen, providing discreet calling where the call’s status remains hidden, which is intended for emergency or panic scenarios. Note: In silent call mode, the device behaves as follows:
| No state |  | OFF |
GRP260x Lite VPK Modes Icon Indications
Softkeys
Unlike VPKs which users can configure directly from the LCD, softkeys cannot be reassigned from the phone itself. Their function are set exclusively by an administrator through the Web UI, under Settings → Programmable Keys → Idle Screen Softkeys and Call Screen Softkeys. A user without Web UI access cannot add, remove, or reorder softkeys locally.
Virtual Extension Keys
The Virtual Extension feature transforms a mobile device (iOS/Android) into a virtual expansion module for the GRP260x Lite series using the dedicated GS-EXT app. This allows users to add extra programmable soft keys, such as Speed Dial, Transfer, Call Park, and Intercom, without purchasing physical expansion boards.
Characters Input
The GRP260x Lite keypad can be used by tapping on an input field. The keypad has 4 modes “123”, “ABC”, “abc” and “Ab2”. The default mode is “Ab2”.
- “123” Mode: This mode allows to enter digits and the characters described in the following table.
Key | Description | Key | Description | Key | Description |
1 | 1 | 2 | 2 | 3 | 3 |
4 | 4 | 5 | 5 | 6 | 6 |
7 | 7 | 8 | 8 | 9 | 9 |
* | . | 0 | 0 | # | : |
Characters Input: 123 Mode
- “ABC” Mode: This mode allows to enter capital letters, digits, and symbolic characters. The following table describes the allowed characters for each key.
Key | Description | Key | Description | Key | Description |
1 | 1 . : @ + , ‘ ” – ? ! ( ) / _ ; % = < > $ [ ] { } ~ ^ | ` & | 2 | A B C 2 | 3 | D E F 3 |
4 | G H I 4 | 5 | J K L 5 | 6 | M N O 6 |
7 | P Q R S 7 | 8 | T U V 8 | 9 | W X Y Z 9 |
* | * | 0 | 0 | # | # |
Characters Input: ABC Mode
- “abc” Mode: This mode allows to enter small letters, digits, and symbolic characters. The allowed characters for each key are shown in the table below.
Key | Description | Key | Description | Key | Description |
1 | 1 . : @ + , ‘ ” – ? ! ( ) / _ ; % = < > $ [ ] { } ~ ^ | ` & | 2 | a b c 2 | 3 | e d f 3 |
4 | g h i 4 | 5 | j k l 5 | 6 | m n o 6 |
7 | p q r s 7 | 8 | t u v 8 | 9 | w x y z 9 |
* | * | 0 | 0 | # | # |
Characters Input: abc Mode
- “Ab2” Mode: This mode allows to enter capital letters, small letters, digits, and symbolic characters. The following table describes the allowed characters for each key.
Key | Description | Key | Description | Key | Description |
1 | 1 . : @ + , ‘ ” – ? ! ( ) / _ ; % = < > $ [ ] { } ~ ^ | ` & | 2 | A B C a b c 2 | 3 | D E F e d f 3 |
4 | G H I g h i 4 | 5 | J K L j k l 5 | 6 | M N O m n o 6 |
7 | P Q R S p q r s 7 | 8 | T U V t u v 8 | 9 | W X Y Z w x y z 9 |
* | * | 0 | 0 | # | # |
Characters Input: Ab2 Mode
TELEPHONY FEATURES
Making Calls
Placing a call starts with picking which line to dial from, then choosing how to reach the number, whether it’s typed directly, pulled from history or the phonebook, or dialed as a direct IP address or SIP URI when no SIP server is involved. The sections below cover each of these operations.
Line Selection
Each line key maps to a registered SIP account on the IP phone. The number of SIP accounts and line keys available depends on the model, described in the table below:
Model | SIP Accounts | Line Keys |
GRP2601L GRP2601LP GRP2601LW | 2 | – |
GRP2602LP GRP2602LG | 4 | 2 |
To make a call, select the line you wish to use. The corresponding line LED will light up in green. The user can switch accounts before dialing any number by pressing the other line buttons.
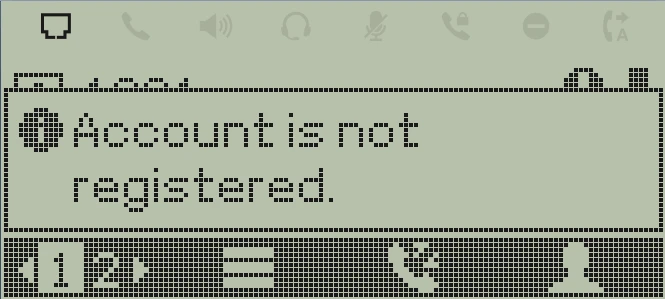
When no SIP accounts are configured on the phone and Direct IP calls are disabled, a congestion tone will be played on the dial screen to indicate that outgoing calls cannot be completed under the current configuration.
Dialing Methods
There are several ways to place a call, described below.
- On-hook dialing: enter the number while the phone is idle, then go off-hook to send it:
- When the phone is idle, enter the number to be dialed.
- Take the handset off-hook, or press the Speaker button, or press the Headset button with the headset plugged in, or select an available LINE key.
- The call will be dialed out.
- Off-hook dialing: go off-hook first, then enter the number:
- Take the handset off-hook, press Speaker, press Headset, or select an available line key to activate the speaker.
- Once you hear a dial tone, enter the desired number.
- Press SEND or click on the Dial Softkey to dial out.
- Predictive dialing: as digits are entered, the phone suggests matching numbers from the local phonebook and call history, even if the digits appear in the middle or end of a saved number (partial match). Select a suggestion with the Up/Down keys and dial. Entering (*) as the first digit lists all available feature codes.
- Redial: dials the last number called by going off-hook (handset, Speaker, Headset, or a line key), or from an idle screen, then pressing SEND or the Redial softkey.
- Via Call History: press MENU → Call History, or the History softkey from idle, select an entry, then press SEND.
- Via Phonebook: press MENU → Contacts, or the Contacts button, select Local Phonebook or Broadsoft Phonebook, select a contact, then press SEND.
- Via Speed Dial: configure a line key in Speed Dial mode (see Virtual Multi-Purpose Keys), then go off-hook or press the key directly to dial out.
- Call Return: users can configure a VPK in Call Return mode (no value required), then press the key to redial the last answered call.
Predictive Dialing
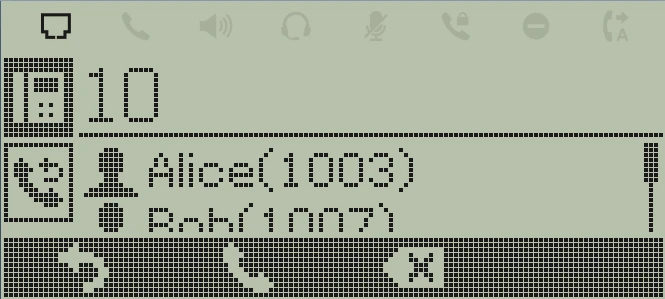
As digits are entered on the dial screen, the phone predicts and lists likely matches with their associated names, so a number can often be selected instead of typed in full. Suggestions can be pulled from several sources:
- Call History
- Local Phonebook
- Remote Phonebook
- LDAP
To select a suggested number, use the Up/Down arrow keys to highlight it, then dial as usual.
Direct IP Calls
Direct IP Call allows two phones to talk to each other in an ad-hoc fashion without a SIP proxy. VoIP calls can be made between two phones if:
- Both phones have public IP addresses; or
- Both phones are on the same LAN/VPN using private or public IP addresses; or
- Both phones can be connected through a router using public or private IP addresses (with necessary port forwarding or DMZ).
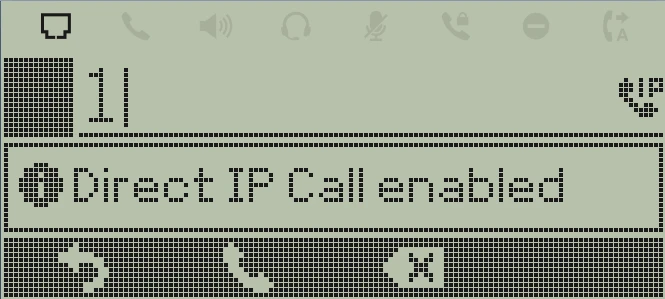
When Direct IP feature is enabled, users can perform an IP call by following the steps below:
- Press any number key on standby to open On-hook Dialing. A prompt will confirm Direct IP calling.
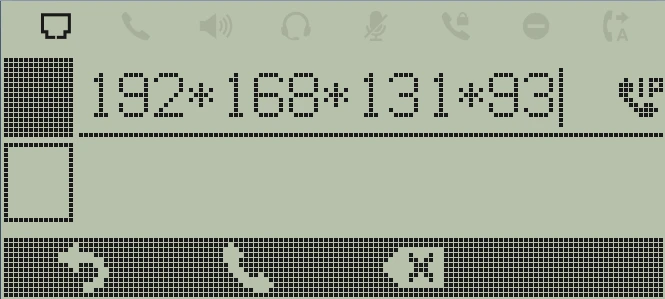
- Enter the IP address, using * instead of dots (e.g., 192*168*1*100).
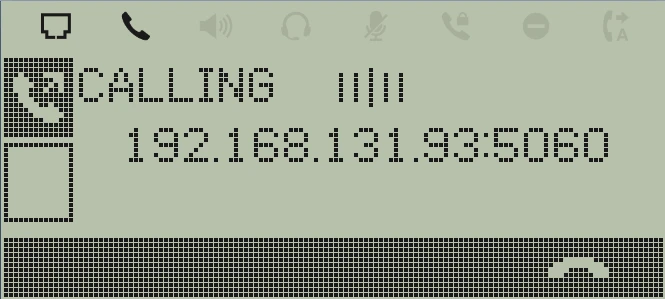
- The call will automatically use default port 5060. To specify a different port, append # followed by the port number (e.g., 192*168*1*100#5062)
- The receiving device will display the incoming direct IP call.
SIP URI/Hostname Calls
This feature allows GRP260x Lite IP phones to place and receive direct SIP calls to other devices using SIP URIs (e.g., sip:user@domain.com) or hostnames (e.g., server.example.net) directly from the contact book. It integrates DNS resolution and IP-based call setup, enabling seamless VoIP communication without requiring a SIP server or registration.
Users can input SIP URIs or hostnames as primary contact numbers via:
- LCD Menu: Manual entry under Contacts → Local Phonebook.
- Web GUI: Bulk upload via XML (field: <phonenumber>sip:user@domain.com</phonenumber>).
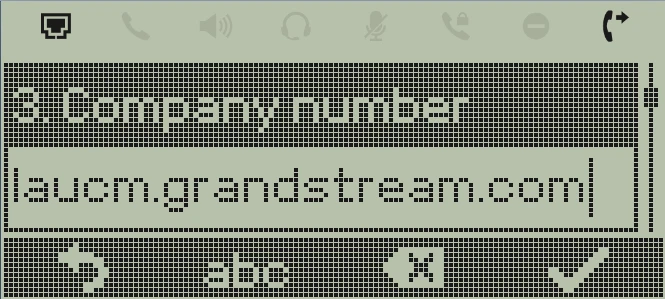
After the contact is added, users can select the contact in phonebook and press dial softkey.
After pressing the dial key, an IP call will be established to the IPv4 address resolved using the hostname.
Receiving Calls
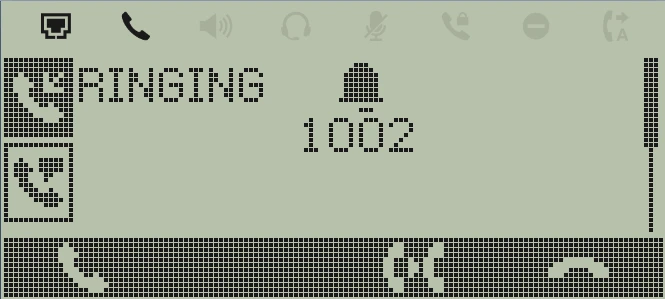
Once a call arrives, the phone rings and the corresponding line key flashes red. How the call is handled next depends on whether another call is already active, whether the phone belongs to a Ring Group, and whether Do Not Disturb is enabled.
Single Incoming Call
When the phone rings with the selected ringtone and the mapped line key flashes red (GRP2602L(P/G) only), users can answer by taking the handset off-hook, pressing Speaker or Headset, or pressing the flashing line key.
Multiple Incoming Calls
If another call comes in while one is already active, behavior depends on whether Call Waiting is enabled for the account:
- Call Waiting enabled: the phone plays a Call Waiting tone (stutter tone) and the second line flashes red (GRP2602L(P/G) only). Pressing the flashing line key or clicking on the Answer softkey picks up the new call and automatically places the first call on hold.
- Call Waiting disabled: the second call is not offered to the phone and is instead sent to voicemail since the phone is treated as busy.
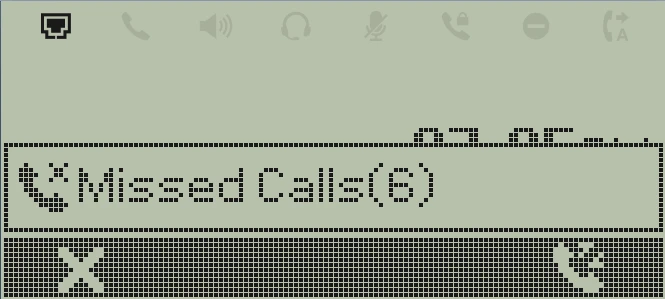
Missed Calls Indication
When you miss a call, the phone shows a notification on the LCD screen. From there, you can call back immediately by pressing the Call History soft key and choosing the dial option for the selected entry.
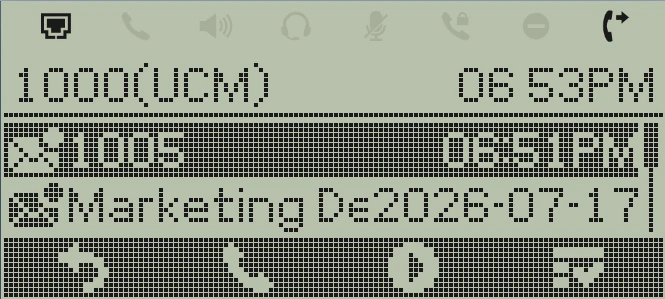
If a voicemail hasn’t been cleared yet, the LCD will also display a voicemail notification alongside your missed calls.
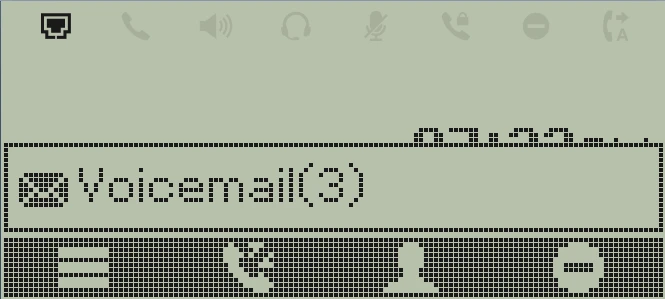
By default, the LCD backlight stays on for missed call notifications. If you’d prefer it stay off, ask your administrator to disable it under the phone’s Web UI (System Settings → Preferences → Display Control → Enable Missed Call Backlight). The missed call LED will still flash even with the backlight off.
Ring Group Calls
If the phone is a member of a Ring Group, all phones in the group ring simultaneously when the group extension is called. Once any phone answers, the others stop ringing and, depending on server configuration, may avoid logging it as a missed call. For details on this behavior, see the Administration Guide.
Do Not Disturb
Do Not Disturb (DND) silences incoming calls without affecting the ability to place outgoing calls. To enable/disable from the LCD:
- Press MENU → Settings → Call Settings.
- Highlight Do Not Disturb and press Left/Right to toggle it.
- Press Save.
DND can also be toggled quickly by pressing the Mute button. This shortcut can be changed to Idle Mute or disabled entirely by admins under Web UI Phone Settings → Call Features → General → Mute Key Functions While Idle.
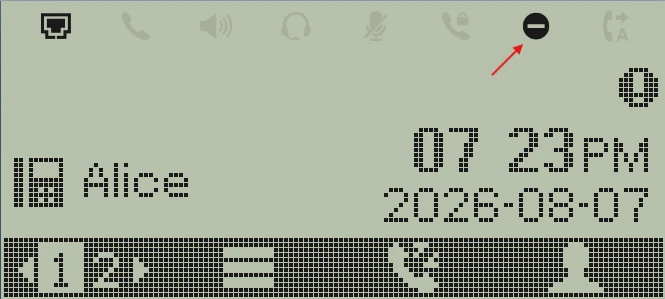
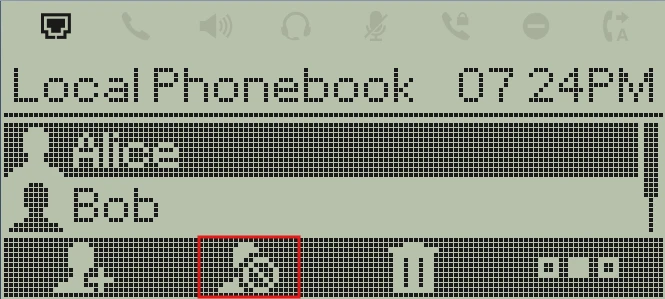
If the contact number belongs to the Blocklist group, the call from that number will always be blocked regardless of DND mode. Users can add numbers to the Blocklist from the phone’s LCD under Menu → Contacts using the blocklist softkey as shown below:
Call Forwarding
Incoming calls can be automatically redirected instead of ringing the phone, using one of three forwarding rules:
- Forward All: Every incoming call is redirected immediately, regardless of the phone’s state.
- Forward Busy: Calls are redirected only when the phone is already on a call.
- Forward No Answer: Calls are redirected if not answered within a configurable timeout.
Each rule is set independently and can be enabled or disabled on its own. For example, Forward Busy and Forward No Answer can point to different destinations, or only one rule can be active at a time.
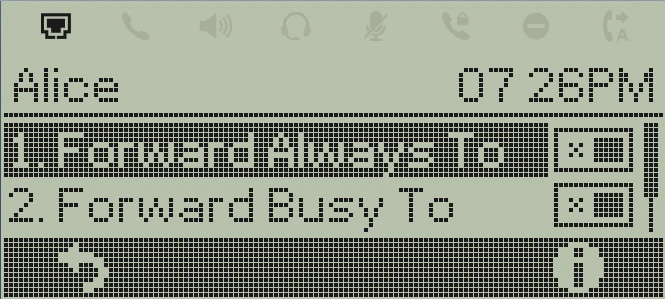
To configure from the LCD:
- Go to Menu → Settings → Call Settings → Account X → Call Forward.
- Use the arrows to enable the desired call forwarding rules, and enter a destination number for each.
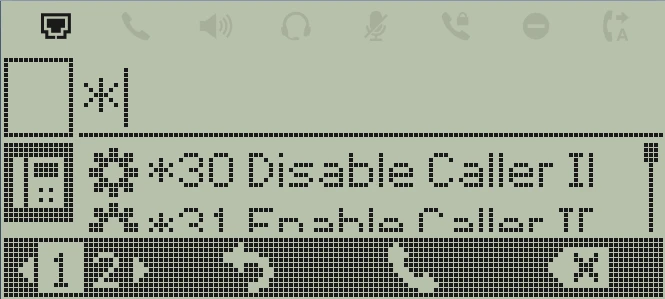
- Forwarding can also be set using feature codes (see Call Feature Codes section for code references).
- When a forwarded call arrives at its destination, the recipient’s LCD indicates the original number the call was intended for.
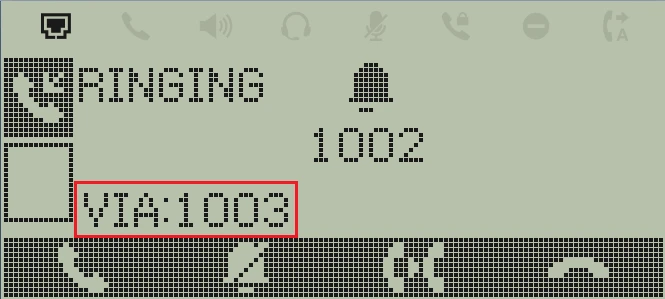
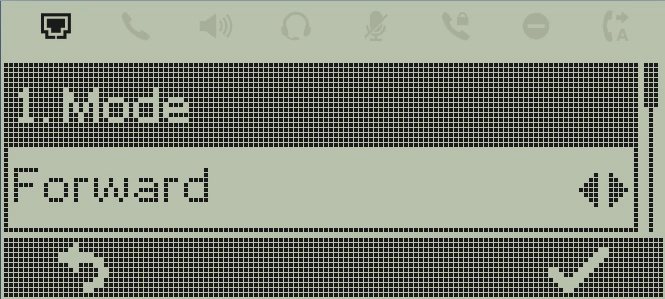
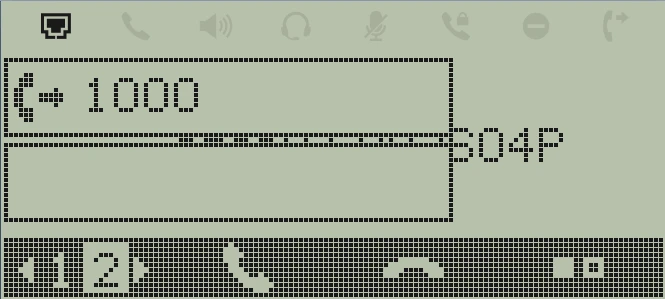
Another way to set a call to be forwarded is by using a VPK or Softkey. Users can configure a a destination, then press the Forward key manually when receiving a call instead of defining rules in advance.
Voice Mail
A blinking green Message Waiting Indicator (MWI) in the top-right corner of the phone signals a new voicemail. Retrieve messages by:
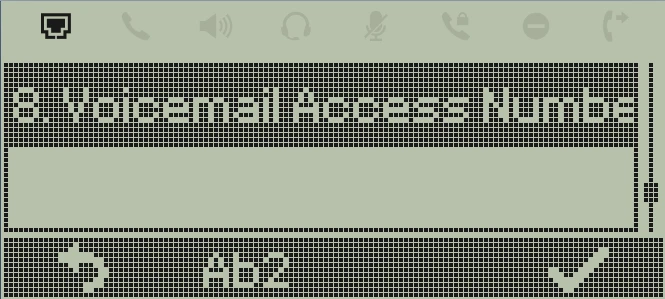
- Dialing the voicemail access number directly, which can be configured under the phone’s LCD Settings → Account Settings → Account X.
- Configuring a voicemail VPK for the desired account.
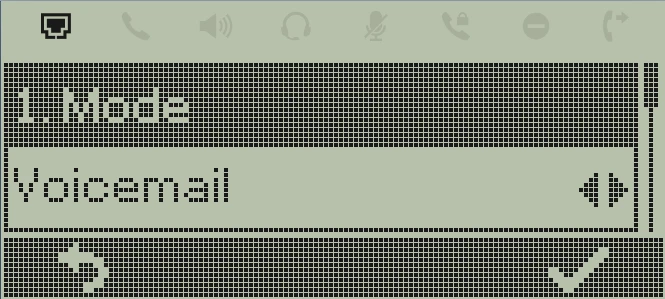
- Pressing the Voicemail fixed button on the phone, or navigating to Menu → Messages → Voicemail.
During Calls
Once a call is connected, several actions are available such as muting, placing the call on hold, transferring it elsewhere, parking it for pickup later, or moving it to a different device mid-call. The sections below cover each.
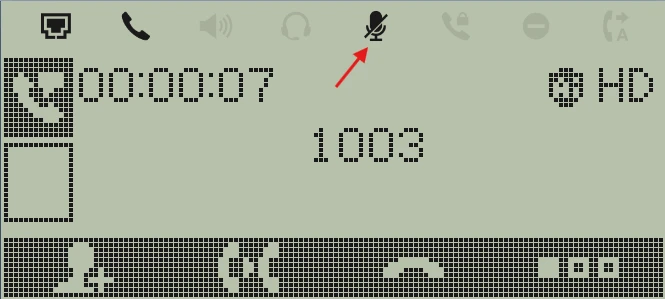
Mute
Press the MUTE button to mute or unmute the microphone during an active call. The LCD shows a mute icon at the top of the screen while muted.
Users can also mute a call before it’s answered by simply placing the call, then pressing Mute before the other party picks up.
Call Hold
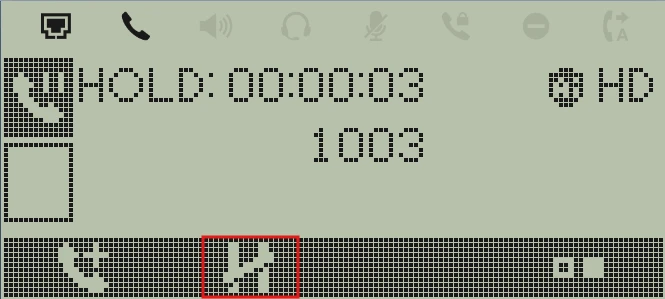
During a call, press the Hold softkey to place the active call on hold. The line key for that call will start blinking in green and the phone will show the call hold duration.
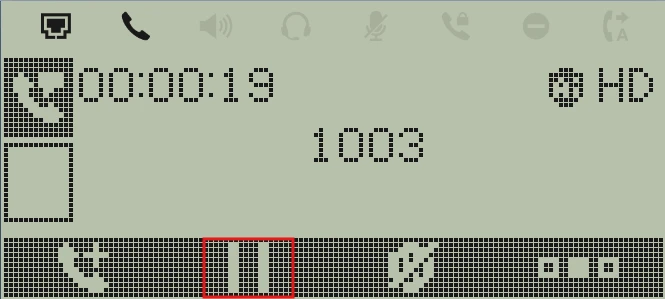
To resume the call, simply click on the Resume softkey, or click on the blinking line key.
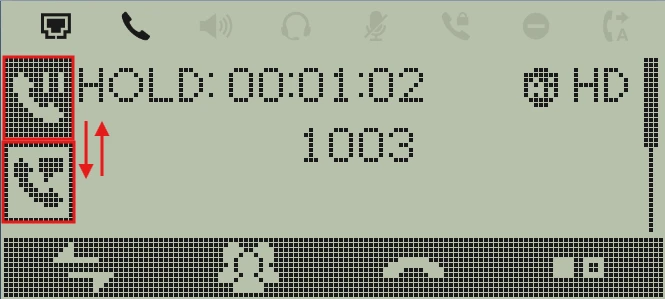
When attempting a new call, the active call will be automatically placed on hold. The user can then switch between calls by pressing the LINE key or using the keypad arrows.
Call Recording
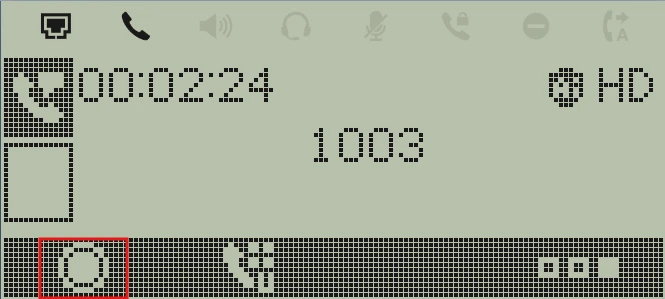
Recording is started and stopped from the call screen by pressing Record softkey to start recording, and press it again to stop.
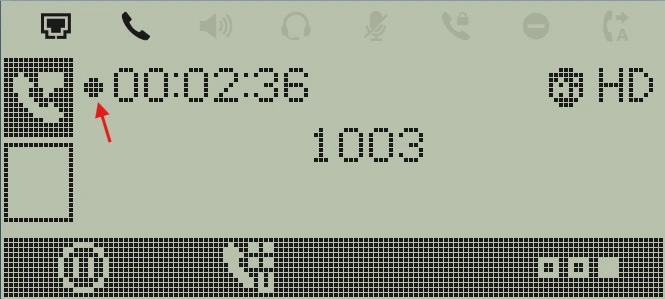
A recording indicator on the LCD shows when a call is being recorded, for both local and remote recordings. This can be turned off by an administrator if not needed.
Call Transfer
The GRP260x Lite series supports Blind Transfer and Attended Transfer. A transfer can be started three ways:
- Pressing the phone’s dedicated TRANSFER button.
- Pressing a VPK configured in Transfer mode.
- Pressing the Transfer softkey during an active call.
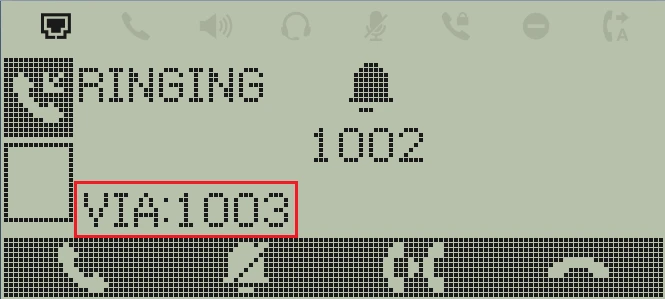
Once users receive a transferred call, the LCD shows who transferred it (e.g., “Via 1003”).
Blind Transfer
This method sends the call to a new destination without speaking to them first:
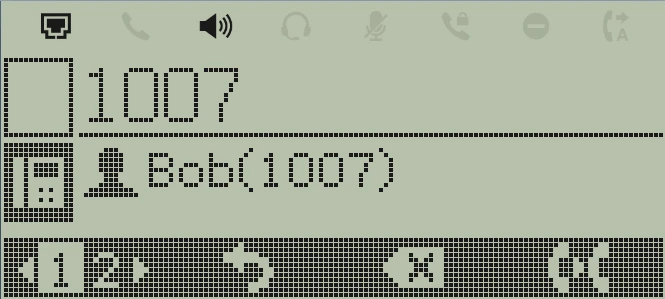
- During the active call, press the Transfer softkey (button, VPK, or softkey) and dial the destination number.
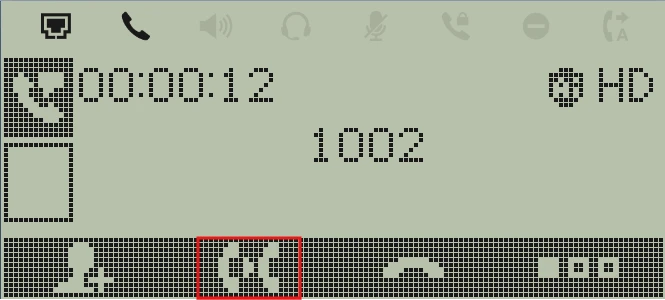
- Press the Transfer softkey again to complete it.
Attended Transfer
Attended Transfer allows you speak to the destination before completing the transfer, and behaves differently depending on how it’s configured:
Static Attended Transfer
- During the first active call, open a new LINE. The first call will be automatically put on hold
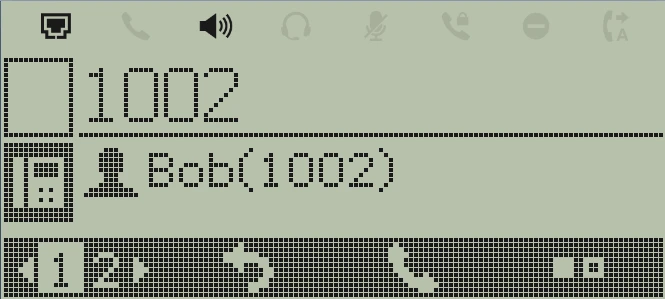
- Enter the number for the second call in the new line and establish the call.
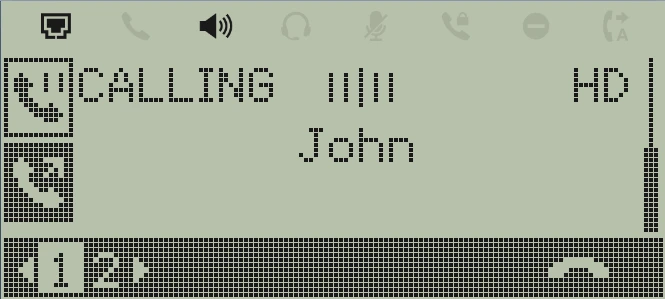
- Press TRANSFER.
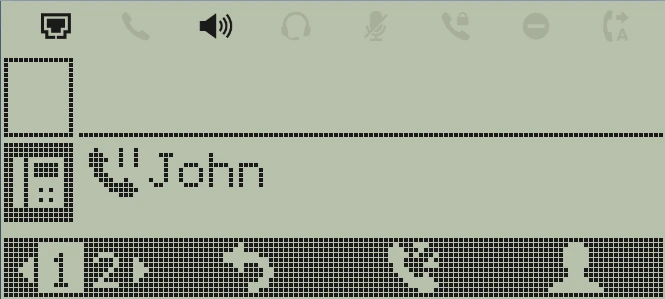
- Select the initial call, which is on hold, to transfer the call.
Dynamic Attended Transfer
- During the first active call, press TRANSFER.
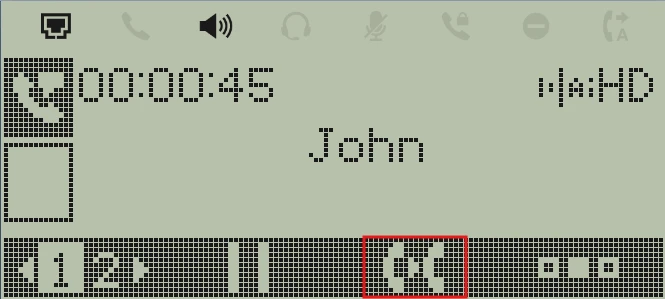
- A new line will be brought up, and the first call will be automatically placed on hold.
- Dial the number and to establish the second call and enter attended transfer mode.
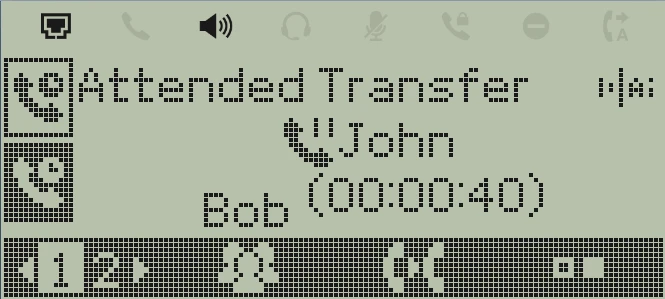
- Once the second call is established, press TRANSFER again to complete the transfer.
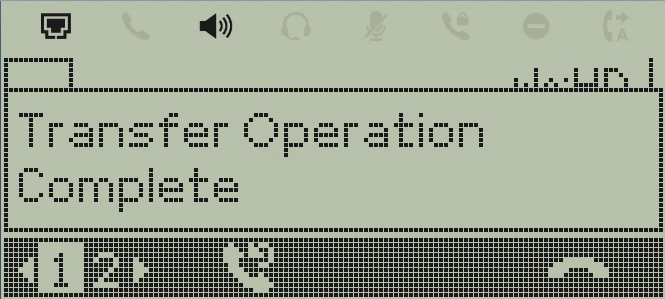
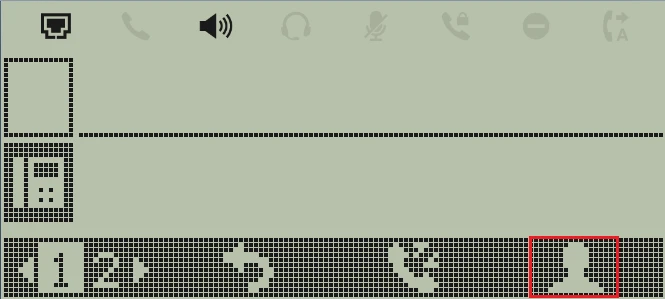
Target Selection
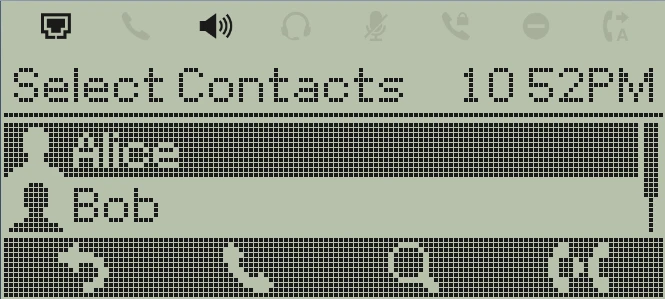
While transferring, pressing the Target softkey opens a source picker (Local Phonebook, LDAP Directory, Local Call Log) instead of manually dialing a number.
Selecting an entry and pressing Select or Dial completes the transfer to that target directly.
Call Park
Call Park is a feature that allows users to put an ongoing call on hold and retrieve it from any other extension. The GRP260x Lite series supports Call Park via VPKs/MPKs as well as Enhanced Call Park using Softkeys.
Call Park using Virtual Multi-Purpose Keys
For this example, we’re using the UCM’s default Parking Lot, extension 700, found under Call Features → Parking Lot in the UCM Web UI.

- To configure the call park VPK, go to the corresponding long press the desired line key, choose “CallPark” in Mode and enter the Parking Lot under Value.
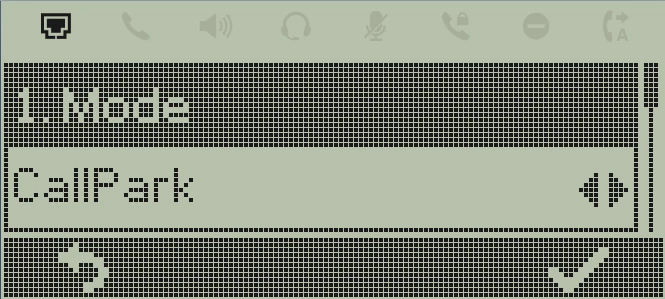
- During an ongoing call, press the configured VPK to park the call.
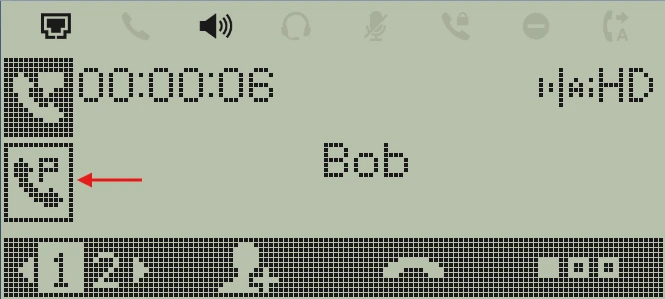
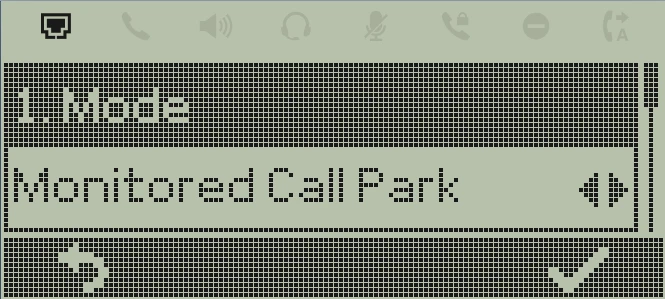
- Once the call is successfully parked, users can either retrieve the call by dialing the correct Parking Slot or by configuring a VPK to monitor specific parking slots. This can be done by setting the “Monitored Call Park” in VPK Mode and entering the Parking Slot number under Value.
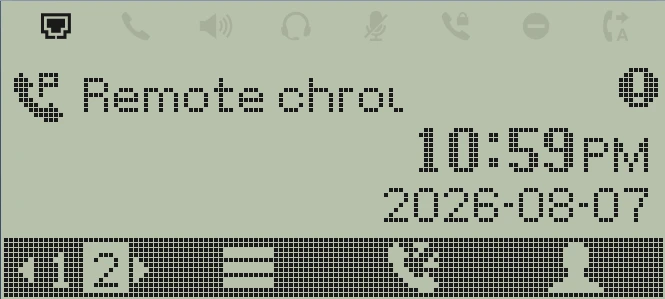
- After the call is parked, the Monitored Call Park VPK LED indicator turns solid red, and the remote extension appears on the LCD screen. Users can press the configured key to pick up the parked call.
Enhanced Call Park
The Enhanced Call Park feature transforms how users temporarily suspend and retrieve calls, replacing manual feature codes (FACs) with intuitive softkeys and notifications. This section explains how to use the PortSIP PBX’s enhanced call park feature with GRP260x Lite Series IP phones.
To activate the Enhanced Call Park Softkey, administrators need to access the phone’s Web UI and go to Phone Settings → Call Settings → Others.
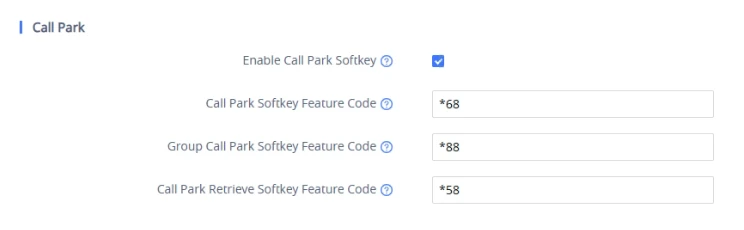
For this example, we configured all the phones with the Feature Codes shown in the screenshot above.
Call Park Softkeys on the call-connected screen
- During an ongoing call, click on the Call Park softkey that appears.
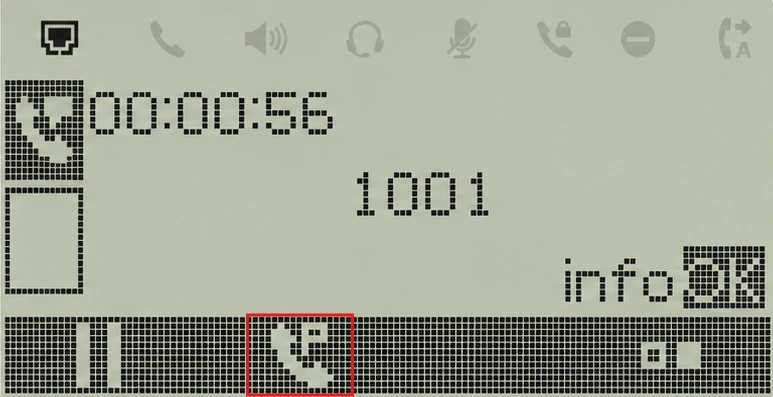
- A new prompt screen will appear with the following options:
- Park softkey.
- Group Park softkey.
- Number pad for manual entry.
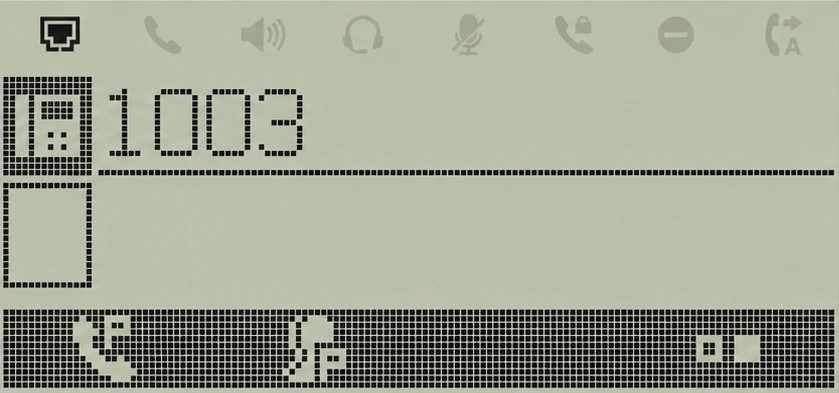
- The user can press Park to park the current call to their own extension or enter a target extension before pressing the softkey. Alternatively, pressing the Group Park softkey will park the call to the assigned call park group.
- Pressing Park dials *{Call Park Softkey Feature Code} + [Extension Number], parking the call on the specified extension or the current account.
- Pressing Group Park dials *{Group Call Park Softkey Feature Code}, parking the call within the user’s assigned call park group.
Retrieving a Parked Call
Once a call is parked to a remote extension, a window will show up to notify the user of the parked call (only for phones that support the Enhanced Call Park feature).
- When the receiving phone has a parked call, a window will show up to notify the user of the parked call (only for phones that support the Enhanced Call Park feature).
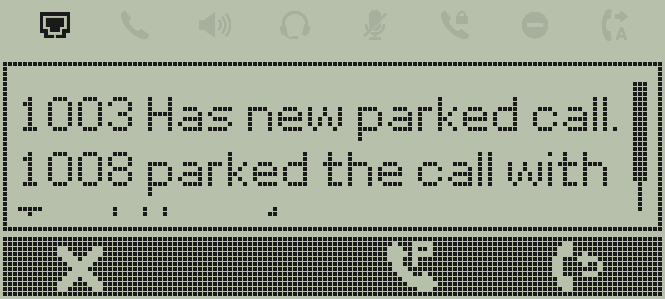
- The user can access the list of parked calls by pressing the softkey.
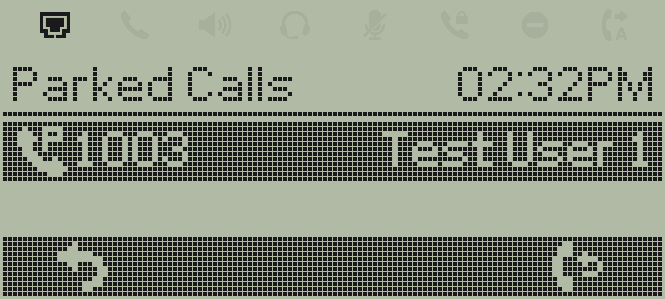
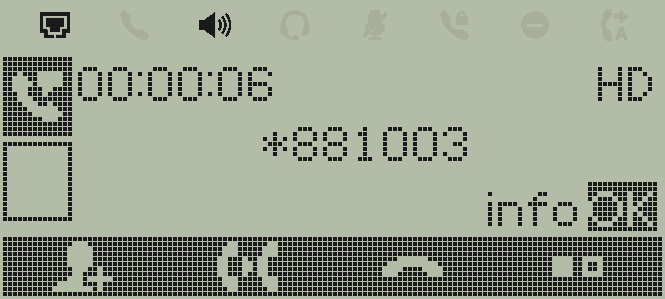
- To retrieve the parked call, the user needs to dial the Retrieve Feature Code followed by their extension. In this scenario the Feature Code is *88 in this example and the extension number is 1003.
Conferencing
The GRP260x Lite series can host up to 5-way conference call with other parties. The section below describes the possible actions during a conference call.
To establish a conference call:
- While a call is active, press on conference Invite softkey, and dial the second conference number.
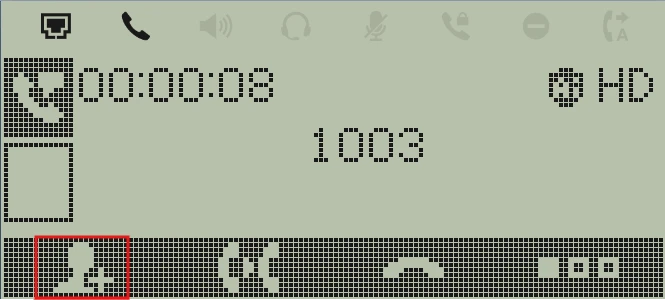
- The conference will be established as soon as the dialed number answers the call.
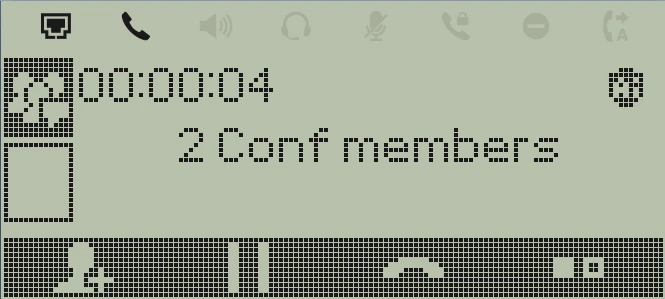
- Users can view conference members by pressing on the conference info softkey as shown below.
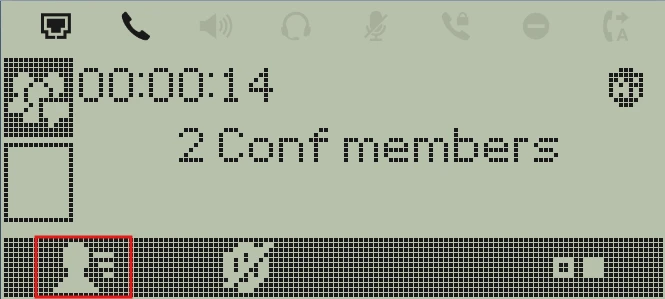
- On the info page, use the UP/DOWN arrows to select a member and press on the highlighted softkey to kick the selected number from the conference.
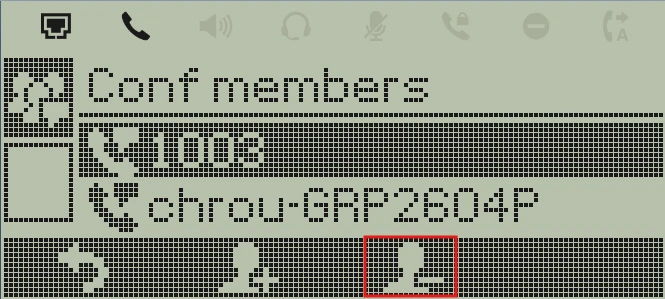
- To end the conference, press the End Call soft key or simply hang up the call using the handset.
CALL FEATURES CODES
The GRP260x Lite series supports traditional and advanced telephony features using the local feature codes describes below:
*30 | Block Caller ID (for all subsequent calls)
|
*31 | Send Caller ID (for all subsequent calls)
|
*50 | Disable Call Waiting
|
*51 | Enable Call Waiting
|
*67 | Call with Caller ID Blocked (per call)
|
*82 | Call with Caller ID Enabled (per call)
|
*70 | Call with Call Waiting Disable (per call)
|
*71 | Call with Call Waiting Enabled (per call)
|
*72 | Unconditional Call Forward.
|
*73 | Cancel Unconditional Call Forward. To cancel the unconditional call forward:
|
*90 | Busy Call Forward. To set up busy call forward:
|
*91 | Cancel Busy Call Forward. To cancel the busy call forward:
|
*92 | Delayed Call Forward. To set up delayed call forward:
|
*93 | Cancel Delayed Call Forward. To cancel the delayed call forward:
|
Call Features
CONTACTS
The GRP260x Lite Series supports several types of phonebooks, so you can reach contacts stored directly on the device, contacts pulled from a company directory, or contacts synced from a remote server.
The following sections describe each type of phonebook available on your phone.
Local Phonebook
The Local Phonebook holds contacts stored directly on your device that you’ve added manually, imported, or downloaded. Each contact can have multiple numbers, categorized as Work, Home, Mobile, or Conference.
To add a contact, go to Contacts, select Local Phonebook, and press the New softkey. Fill in the contact’s details (name, numbers, job title, company, etc.) and press “Save.”
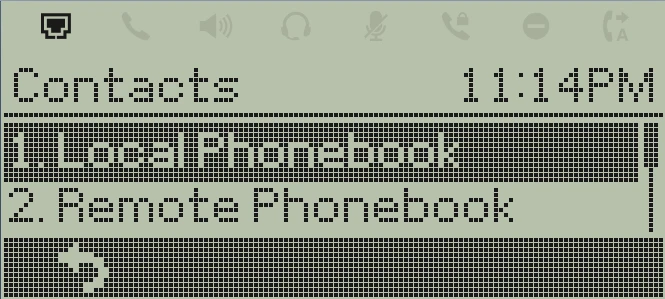
LDAP Phonebook
The LDAP Phonebook allows you to search your company’s directory directly from your phone, without needing to save each contact locally. To access it, go to Contacts, then LDAP Directory.
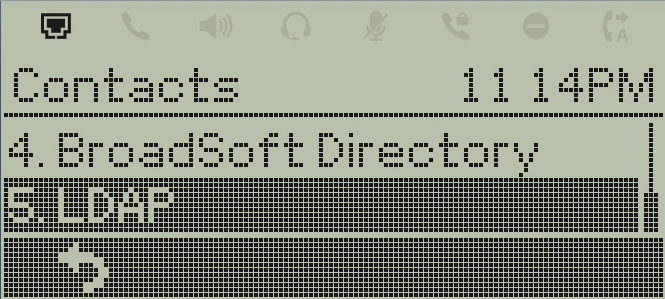
Your administrator sets up the connection to your organization’s LDAP server under the phone settings. For setup details, see the Admin Guide.
Remote Phonebook (XML)
A Remote Phonebook is an XML contact list hosted on a server (HTTP/HTTPS/TFTP/FTP/FTPS) rather than stored on the phone itself.
The phone downloads it automatically so your contact list always reflects the latest version maintained by your organization. The GRP260x Lite Series supports up to 5 remote phonebooks at once.
To access and download your remote phonebooks, go to Contacts → Remote Phonebook. From this page, you can choose to download all the phonebooks at once, or select and download just the one you need.
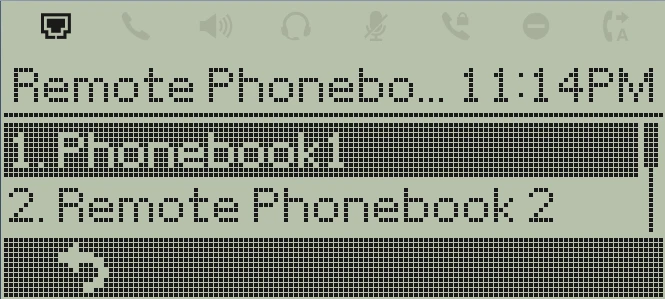
Broadsoft Directory
If your organization uses Broadsoft/BroadWorks, you can search its directories (such as the enterprise or group directory) directly from your phone under Contacts → Broadsoft.
Contact Search Mode
The GRP260x Lite phones allow you to search through your phonebooks using three distinct methods:
Quick Match
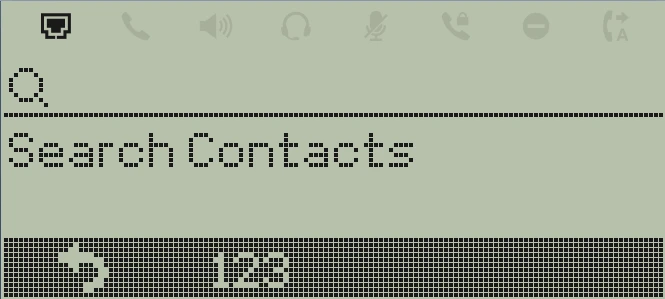
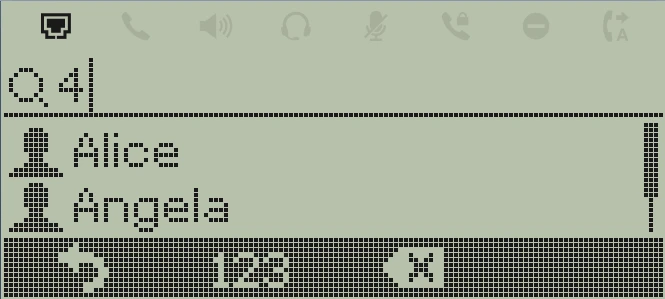
The quick match feature allows users to search any part of a name or number. For instance, if users only remember the first name, last name, or a portion of the phone number, they can use the string in the search bar as displayed in the following screenshots:
Exact Match
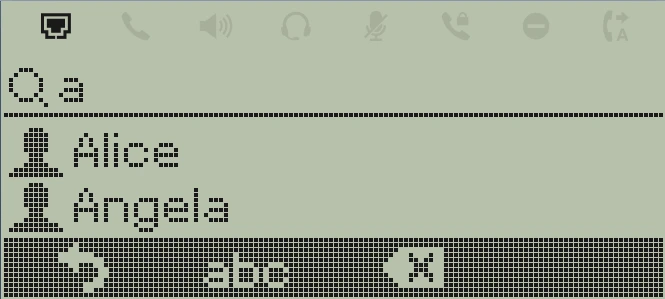
Exact Match search helps users find a contact by their name. When the search type is set to “Exact Match,” users need to type the contact’s full name exactly as it’s saved.
The search only returns a result when the name matches precisely, misspelled entries won’t bring up the correct contact.
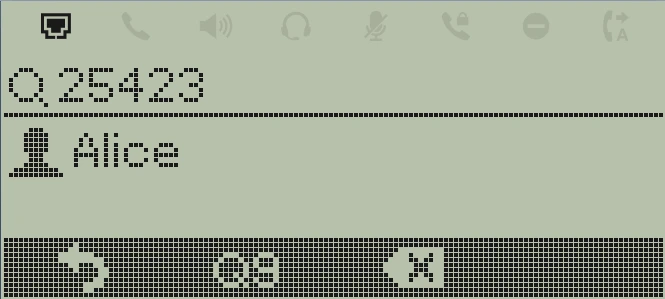
Q9 Search (Predictive Search)
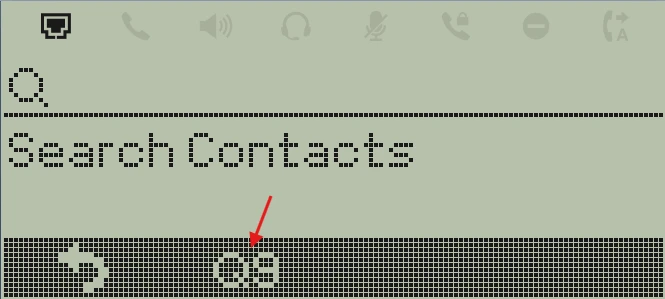
The Q9 search enables quick searching by entering a contact’s name using single keypad presses without multi-tapping.
By pressing the input softkey until Q9 is displayed, users press each corresponding letter’s key and the phone evaluates all possible letter combinations for the entered sequence of digits against saved phonebook entries.
For example, when searching for “Alice”:
- Digit Sequence: Pressing 2-5-4-2-3 maps to the letter groups [ABC]-[JKL]-[GHI]-[ABC]-[DEF].
- Combination Generation: The system calculates every possible word created by these key groups (such as AIGAD, BLEBE, ALICE, etc.).
- Directory Matching: The phone checks these generated combinations against your existing contacts and instantly displays any matching name (e.g., Alice).
CALL HISTORY
The Call History menu keeps a record of your recent calls so you can quickly review, return, or clean up your call log.
Call history is organized into five categories, which you can browse using the navigation keys:
- All
- Missed
- Dialed
- Answered
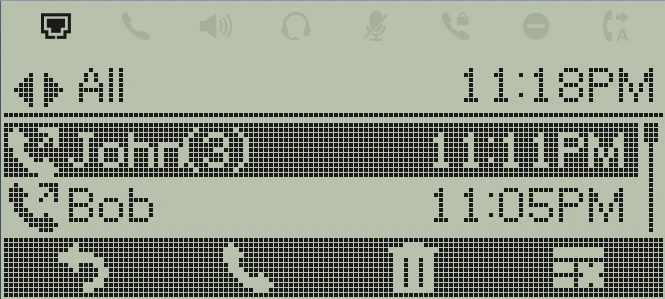
From the Call History screen, you can:
- Dial: tap on one of the entries to dial the number directly. The phone will dial out using the same account used for that original call.
- Clear: select an entry and press the trash icon softkey to remove it.
- Clear All: clear the entire call history.
CONNECTING TO DEVICES
EHS Headset
The GRP260x Lite Series supports a standard RJ9 jack which is compatible with Plantronics, Jabra, Sennheiser and more.
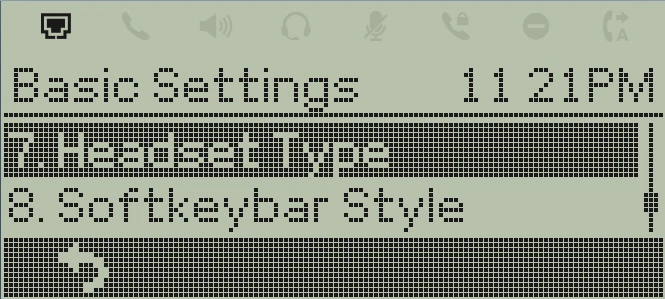
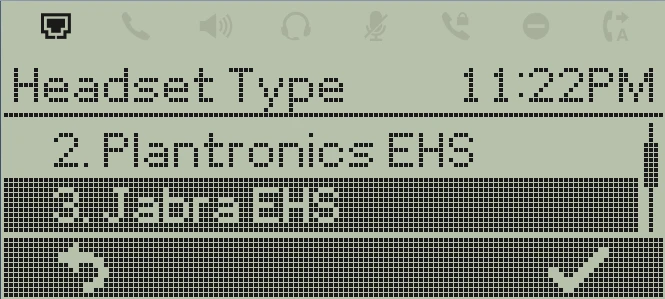
To configure a specific headset:
- Go to the phone’s LCD, under Settings → Basic Settings → Headset Type, select the desired type, then reboot the phone.
- Connect the EHS headset to the phone by inserting the headset connector into the RJ9 headset port on the back of the device.
- To switch to headset mode, press the headset button. A headset icon will appear on the LCD to confirm it’s active.
REBOOT
Restarting the GRP260x Lite device clears active system memory, reapplies newly configured network and SIP settings, and forces the phone to re-establish connections with registration and provisioning servers.
The device can be restarted using any of the following methods:
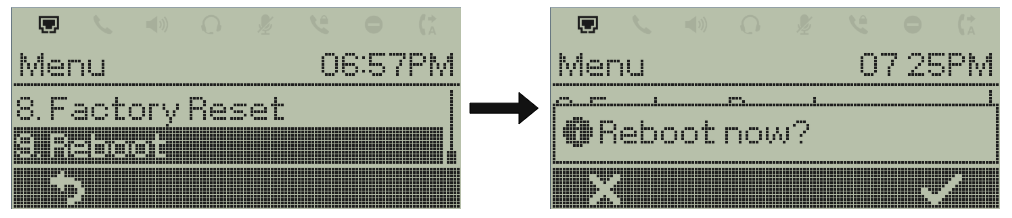
Reboot via LCD Menu
Users can initiate a manual reboot directly using the physical navigation keys on the phone interface.
- On the idle screen, press the MENU button on the handset keypad.
- Navigate using the directional keys to the Reboot option.
- onfirm the reboot prompt to execute the system restart.
Reboot from the Web UI
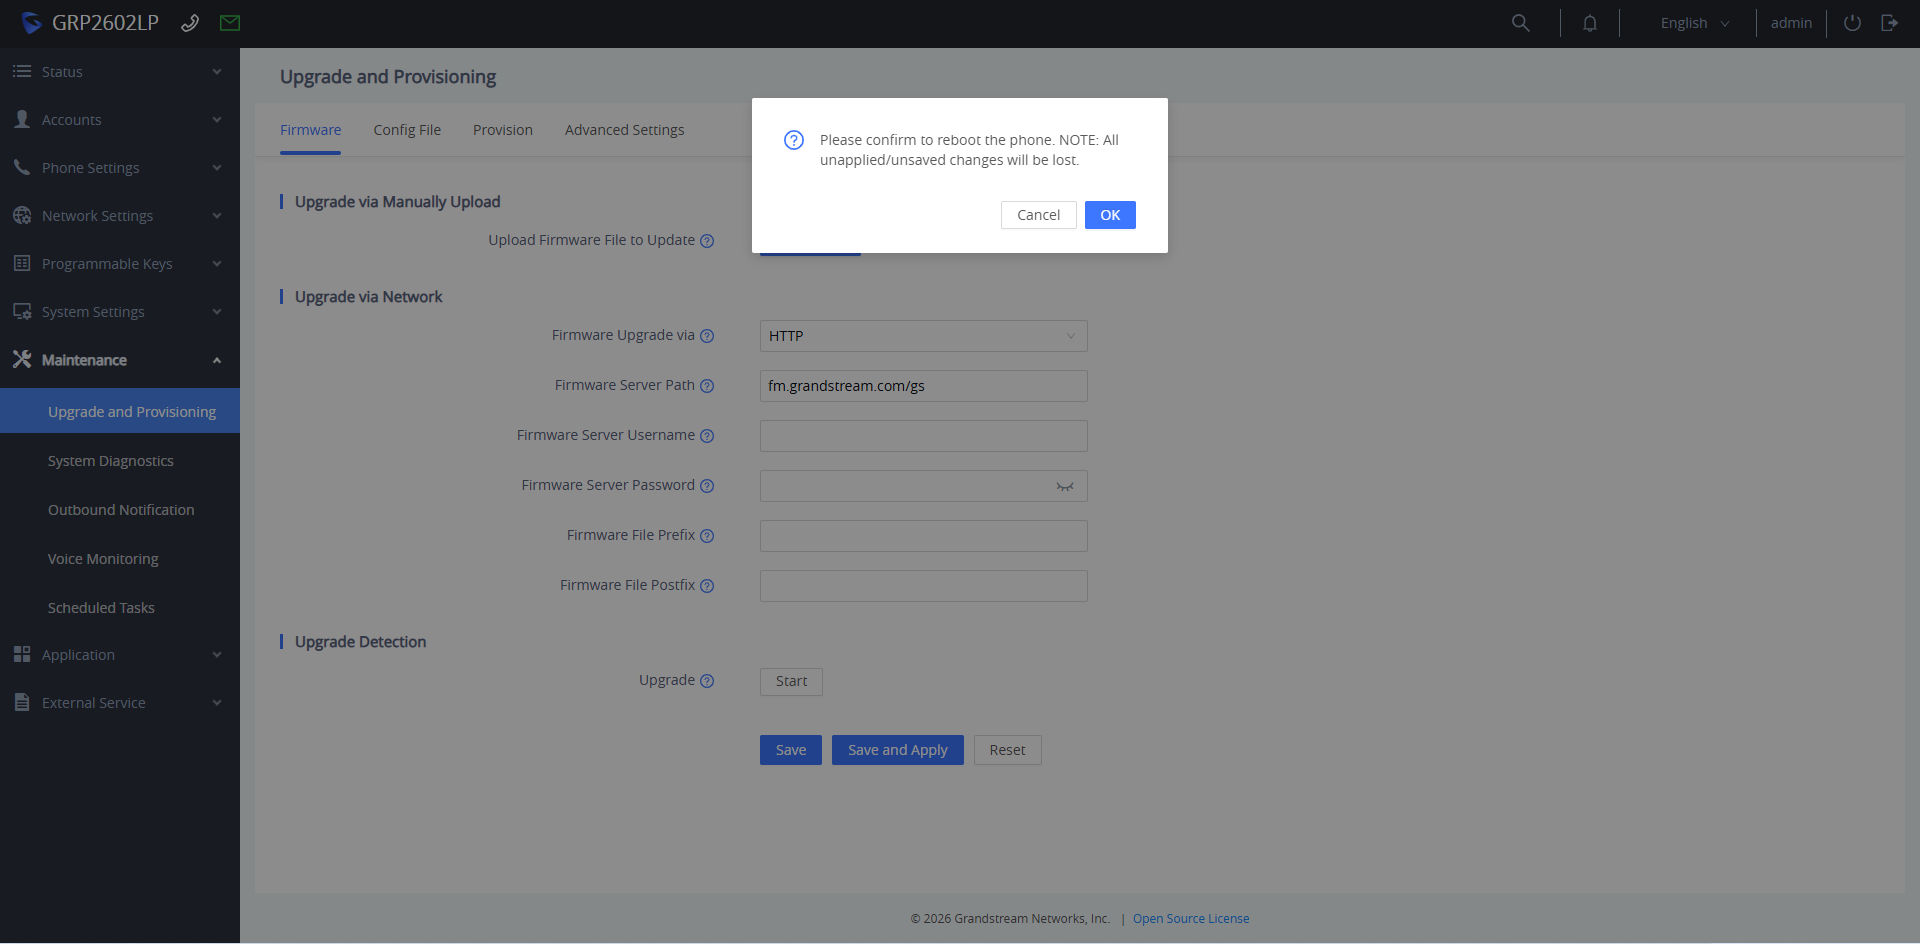
Administrators can restart the phone remotely through the browser interface.
- Open a web browser, log in to the phone Web UI using administrator/user credentials.
- Click the dedicated Reboot button located at the top-right corner of the web header.

- Confirm the action when prompted. The phone will perform a system restart immediately.
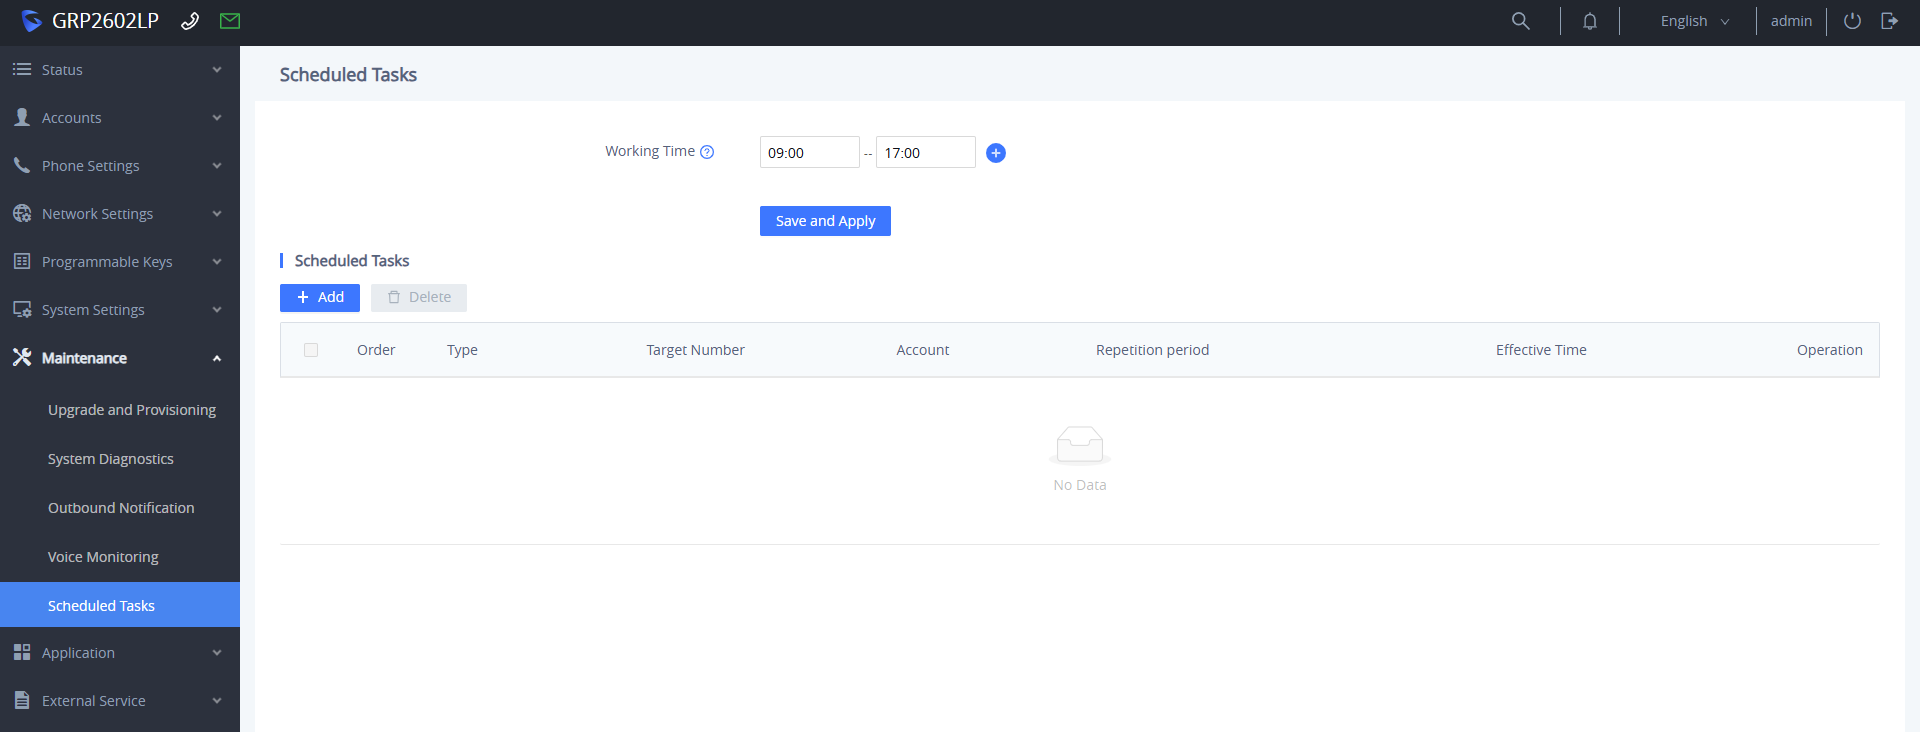
To configure automated periodic restarts for system maintenance during off-peak hours:
- Navigate to Maintenance → Scheduled Tasks, and click Add to configure a new task.
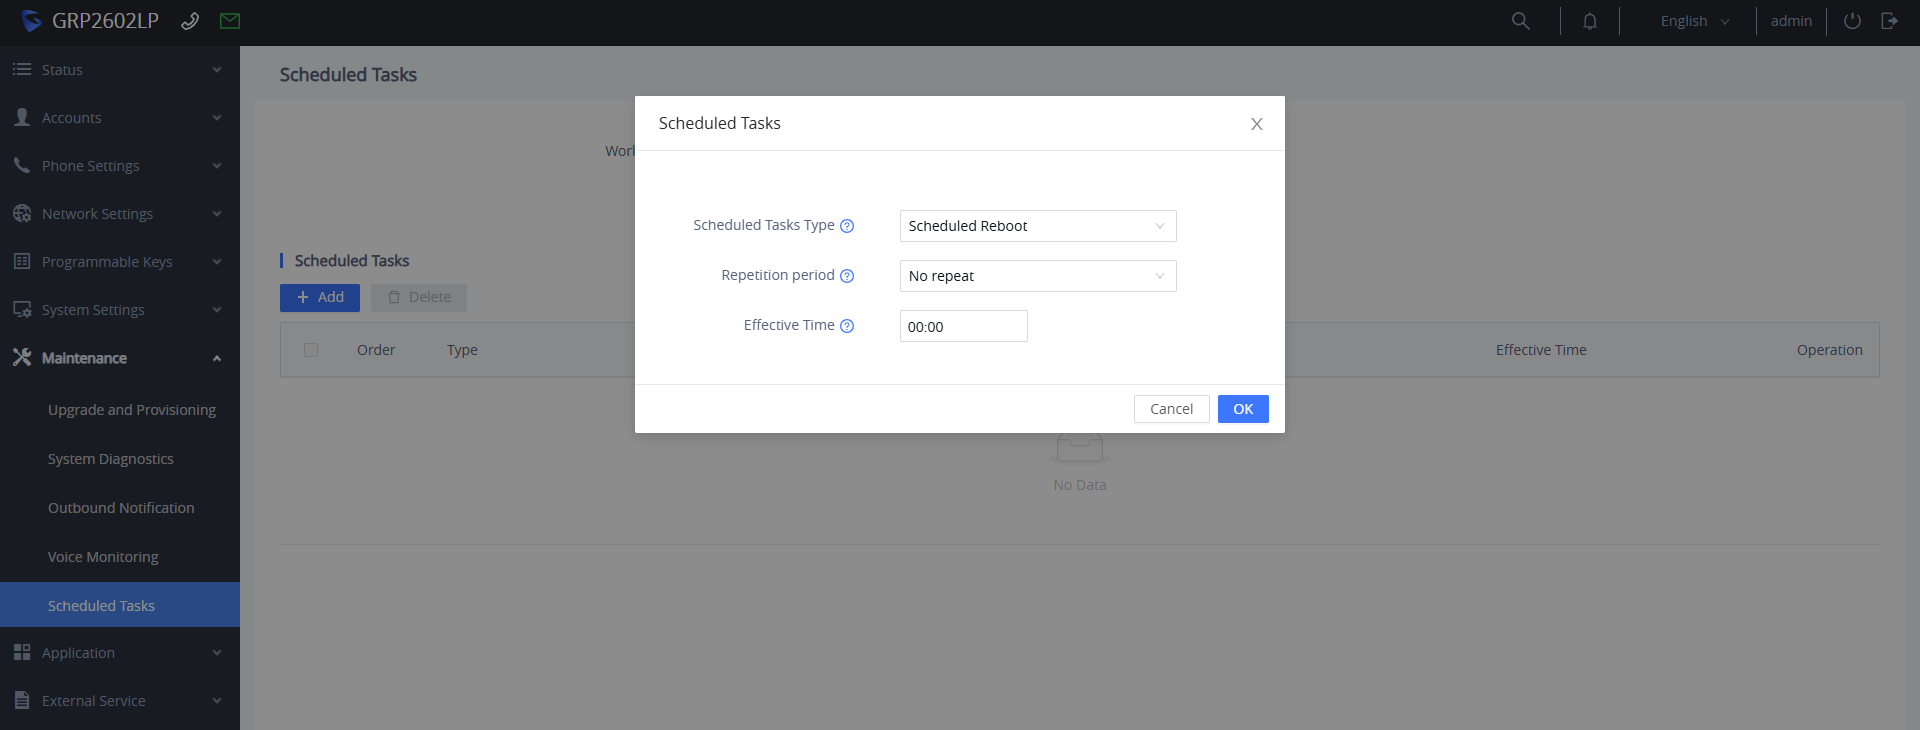
- Set Scheduled Tasks Type to Scheduled Reboot.
- Configure the Repetition period dropdown to define how often the task repeats (e.g., No repeat, Daily, or specific interval settings).
- Enter the exact execution time in the Effective Time field, and click OK to save and apply the scheduled reboot rule.
Reboot through SSH
Users can also execute a system remote system reboot over SSH terminal access by following these steps:
- Ensure SSH is enabled under System Settings → Security Settings → SSH Access.
- Open an SSH client (such as PuTTY) on your PC and log in using the phone’s IP address and SSH port.
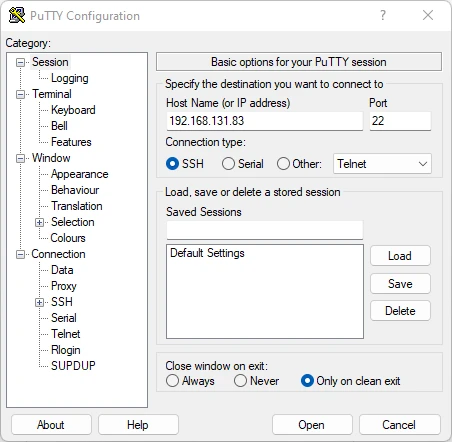
- Use your admin credentials to login.
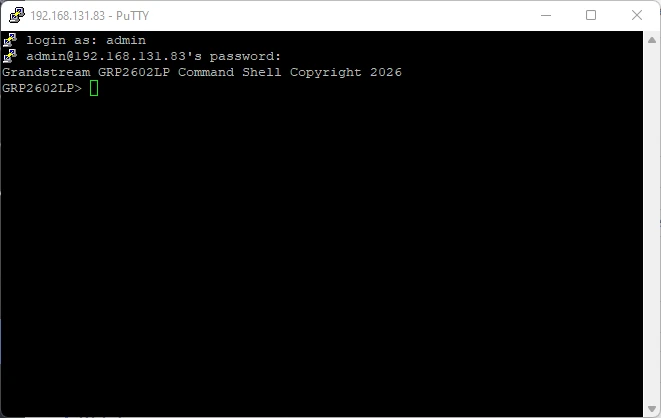
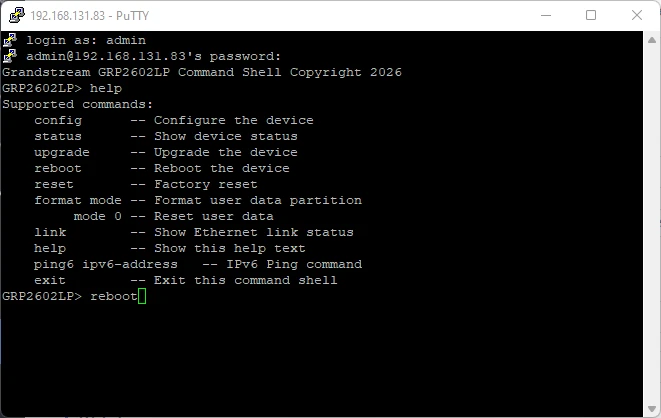
- Type the command reboot and press Enter.
Reboot through GDMS
The GRP260x Lite series allows administrators to issue remote cloud reboots without requiring local network access or port forwarding:
- Log in to your GDMS account and navigate to VoIP Device.
- Select the check box next to the target device entry (or select multiple devices for batch reboots).
- Click the More dropdown menu and select Reboot Device.
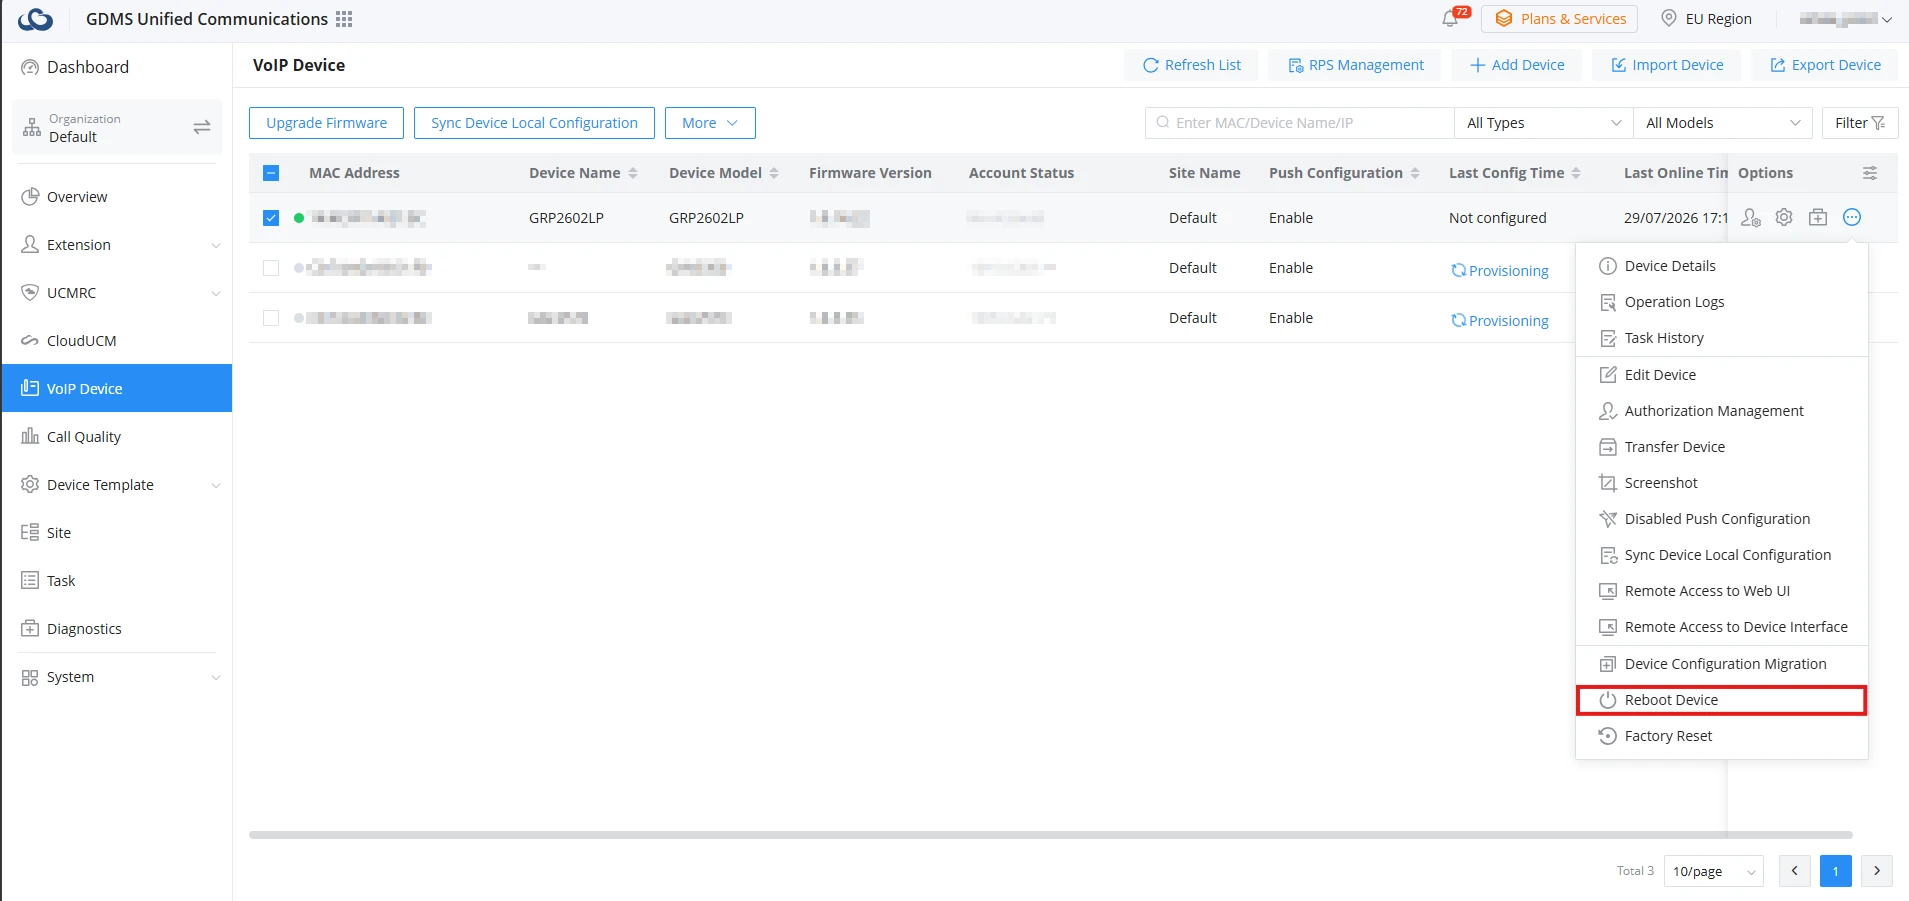
- In the pop-up window, select the preferred execution timing:
- Immediate: Sends a real-time restart command directly to the selected devices.
- Scheduled: Sets a designated date, start time, and end time to automatically execute the reboot task during non-business hours.
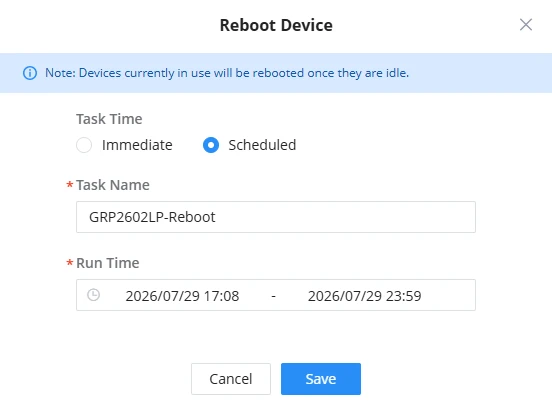
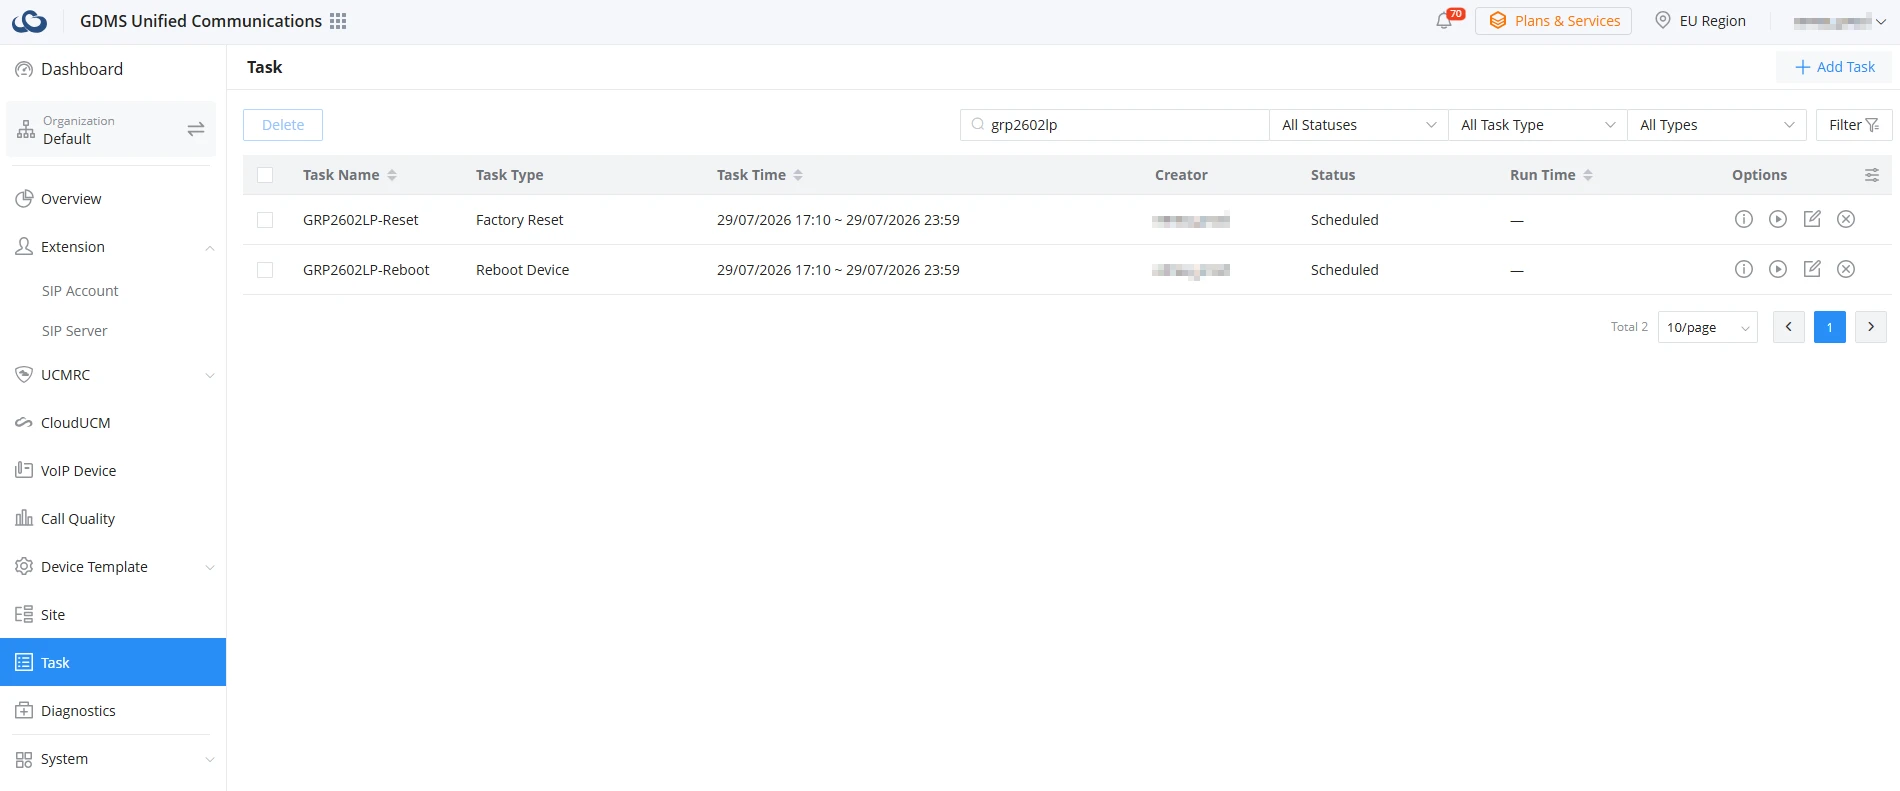
- Click Save to create the reboot task. You can monitor the progress and status of active or queued restart tasks under the Task management menu on GDMS.
FACTORY RESET
Restoring the device to its factory default settings permanently deletes all custom configuration settings, registered SIP accounts, network rules, local call logs, and personal phonebook entries. Once executed, the phone reverts to its out-of-the-box factory configuration.
The device can be restored to factory defaults using any of the following methods:
Factory Reset via LCD Menu
Users can restore the GRP260x Lite to default settings directly on the phone screen:
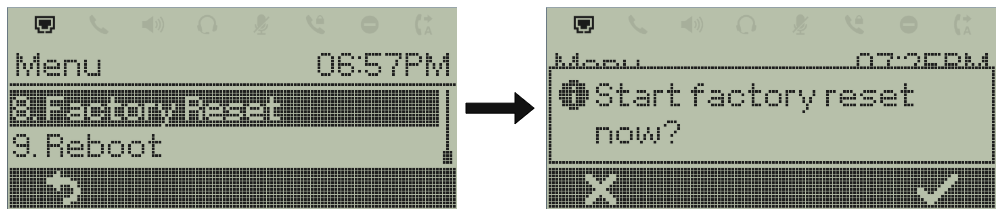
- On the phone idle screen, press the MENU button to access the main menu.
- Navigate directly to the Factory Reset option using the directional keys and click on it.
- If prompted, enter the administrative password (the password is required if the keypad menu constraint mode is enabled).
- Confirm the reset by pressing the softkey. The device will erase its flash memory and automatically restart with default factory settings.
Factory Reset from the Web UI
Administrators can execute a remote factory reset through the phone’s web management interface.
- Open a web browser, log in to the phone Web UI using administrator credentials, and navigate to Upgrade and Provisioning → Advanced Settings.
- Locate the Factory Reset section and click the Start button.
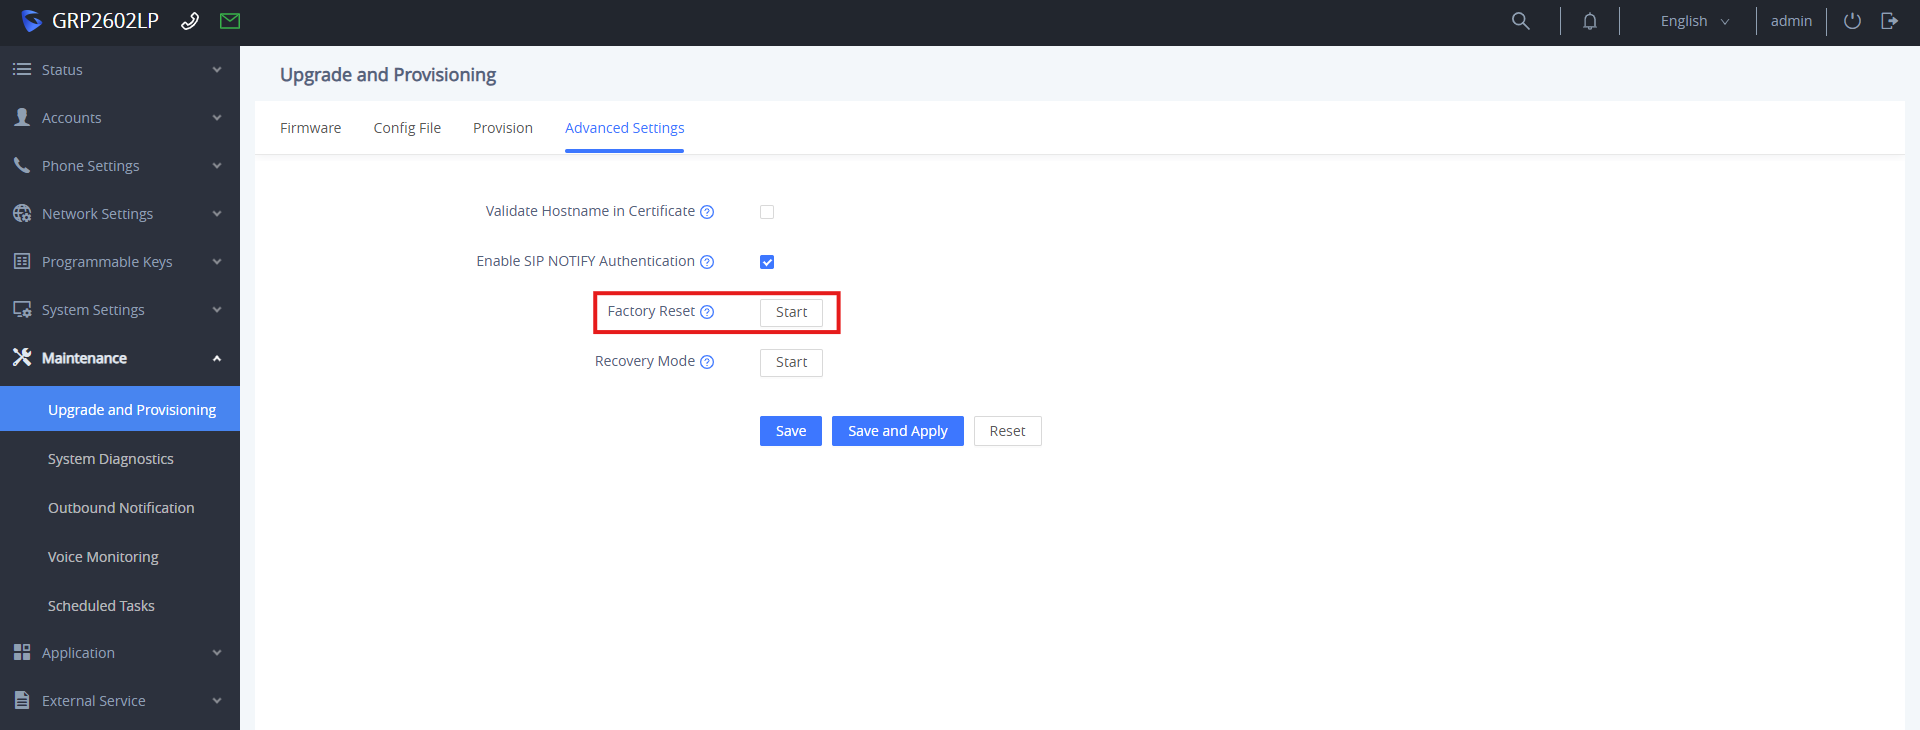
- A confirmation dialog box will pop up on the screen. Click OK to proceed.
The phone will clear its stored configuration and perform an automatic reboot.
Factory Reset via SSH
Command-line administration allows administrators to execute an immediate factory wipe over an encrypted SSH terminal connection.
- Ensure SSH is enabled under System Settings → Security Settings → SSH Access.
- Open an SSH client (such as PuTTY) on your PC and log in using the phone’s IP address, SSH port, and admin credentials.
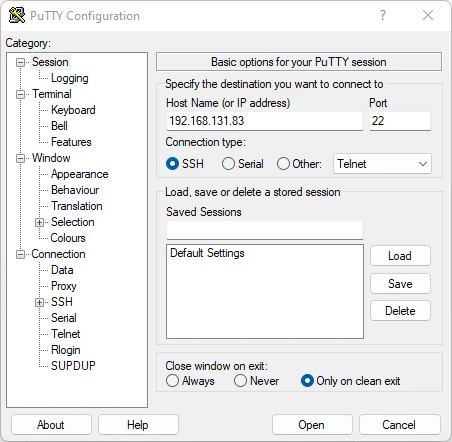
- Type the command rest and press Enter.
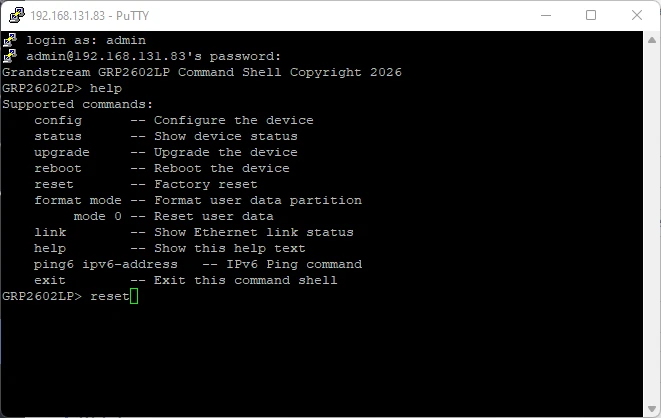
The device will receive the command, clear all configuration data from its internal memory, and reboot into its factory default state.
Factory Reset from GDMS
GDMS allows users to perform a remote factory wipe command to endpoints managed under their organization without requiring local network connectivity.
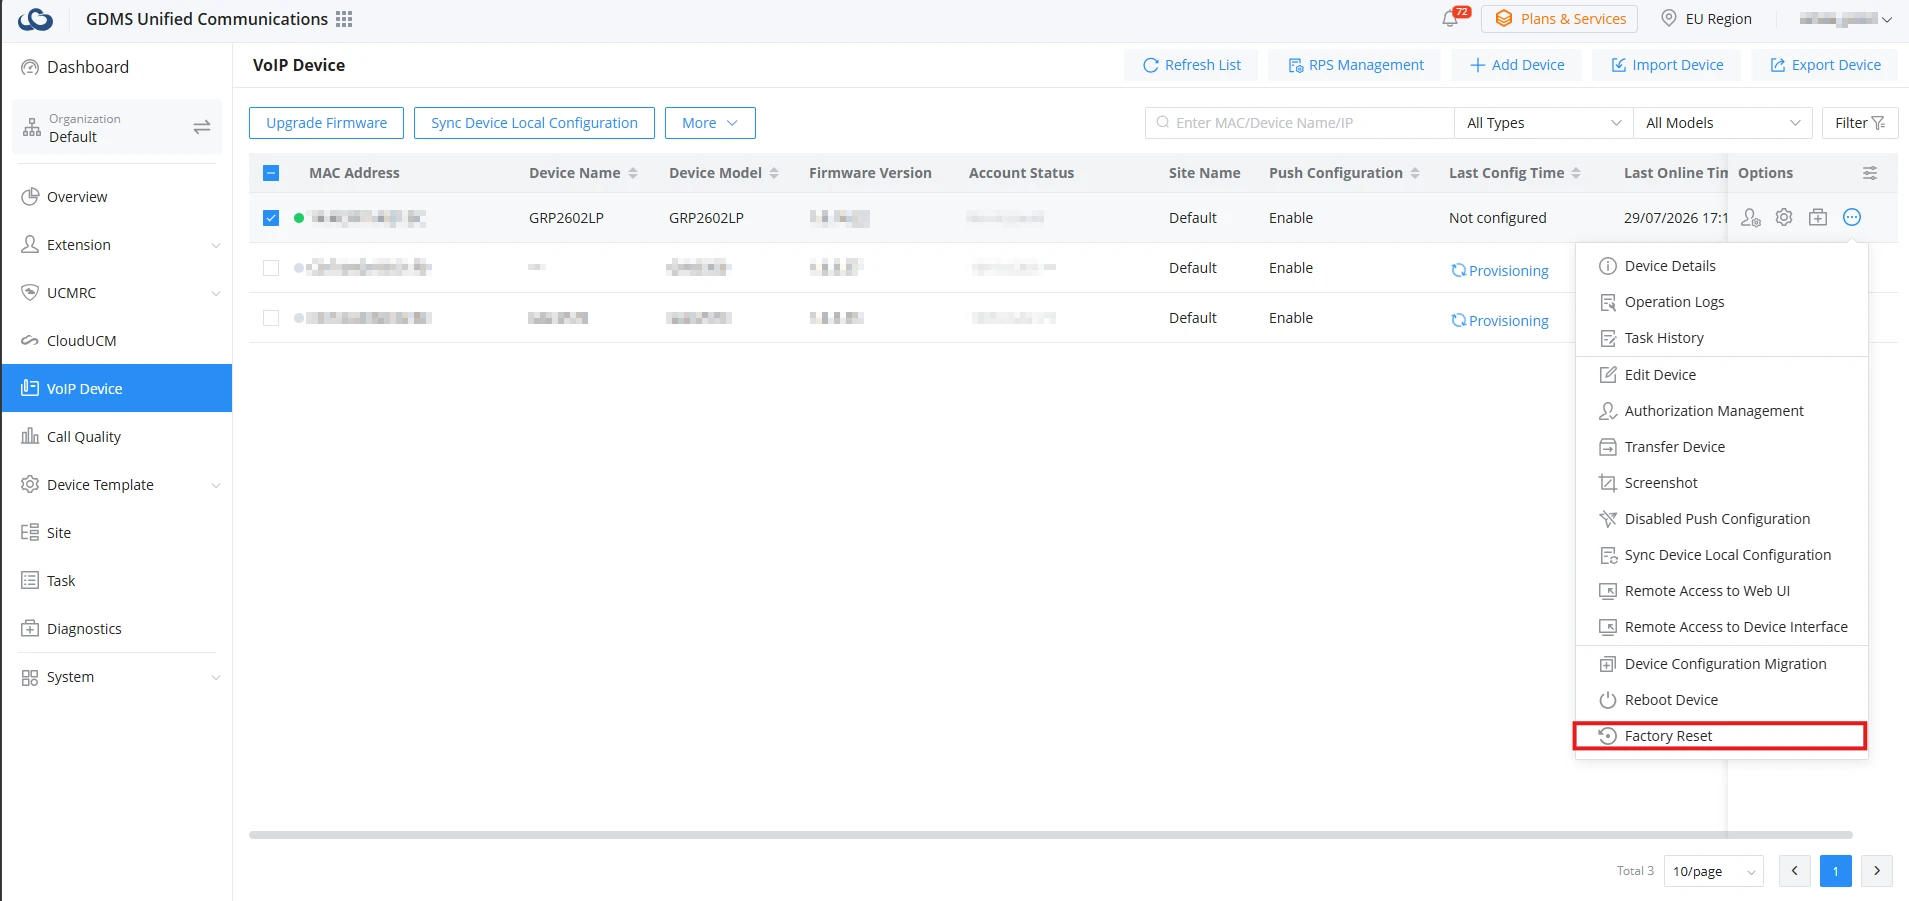
- Log in to your GDMS account and navigate to VoIP Device.
- Locate the target device entry in the table and click the check box next to it.
- Click the More dropdown menu on the top action bar and select Factory Reset.
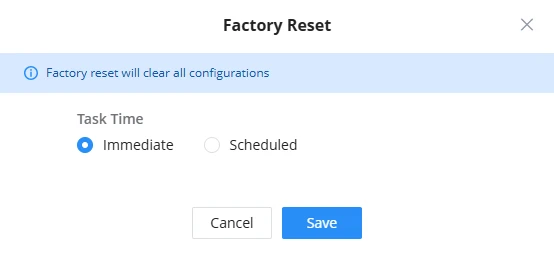
- In the pop-up window, select the preferred execution timing:
- Immediate: Sends a real-time factory reset command directly to the selected devices.
- Scheduled: Sets a designated date, start time, and end time to automatically perform the factory reset task.
CHANGELOG
This section documents significant changes from previous versions of user manuals for GRP260X Lite. Only major new features or major document updates are listed here. Minor updates for corrections or editing are not documented here.
Firmware Version 1.0.1.29
- This is the initial version.