Introduction
The GSC356X-PM Pole-Mount Kit provides a secure mounting solution for installing the GSC3560 and GSC3565 Facility Control Stations on vertical or horizontal poles. Designed for outdoor and industrial deployments, the kit allows the device to be mounted on utility poles, access control posts, parking structures, and other cylindrical surfaces without requiring wall installation. The bracket system uses stainless steel mounting bands to ensure a stable and reliable installation while maintaining easy access for cable routing and maintenance.
Package Content

| Letter | Component | Quantity | Description |
|---|---|---|---|
| a | Pole-Mount Bracket | 1 | Main mounting bracket used to attach the GSC356X enclosure to a vertical or horizontal pole. It serves as the structural base of the pole-mount installation. |
| b | Stainless Steel Mounting Bands | 2 | Adjustable metal bands used to secure the pole-mount bracket to the pole. They provide a strong and reliable attachment without requiring drilling. |
| c | PM4 × 12 mm Screws | 5 | Mounting screws used to fasten the enclosure and bracket components together during installation. |
| d | Grounding Cable | 1 | Grounding wire used to connect the mounting assembly to earth ground, helping protect the device from electrical surges and improving safety in outdoor installations. |
| e | PM3 × 6 mm Screw | 1 | Grounding screw used to secure the grounding cable to the designated grounding point on the mounting assembly. This connection is mandatory for proper grounding. |
| f | Quick Installation Guide (QIG) | 1 | Installation guide containing mounting instructions, hardware identification, and deployment procedures. |
| g | Regulatory and Safety Information | 1 | Documentation containing regulatory compliance statements, safety notices, warranty information, and disposal guidelines. |
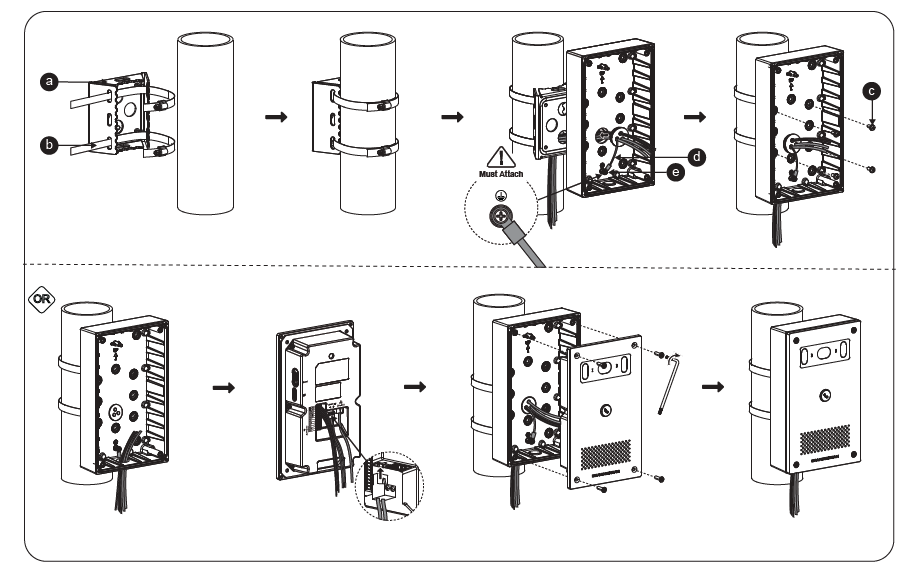
Vertical Pole Installation
- Position the pole-mount bracket (a) against the pole.
- Route the two mounting bands (b) through the bracket slots and around the pole.
- Tighten the bands securely until the bracket is firmly attached to the pole.
- Install the cable tie (d) and secure it using the PM3 × 6 mm screw (e).
- This step is mandatory for proper cable retention.Attach the mounting enclosure to the bracket and secure it using the PM4 × 12 mm screws (c).
- Route and connect the required cables to the GSC356X device.
- Place the device into the mounting enclosure.
- Secure the front panel using the supplied screws and tighten it with the provided installation tool.
- Verify that the device is securely mounted and operating correctly.
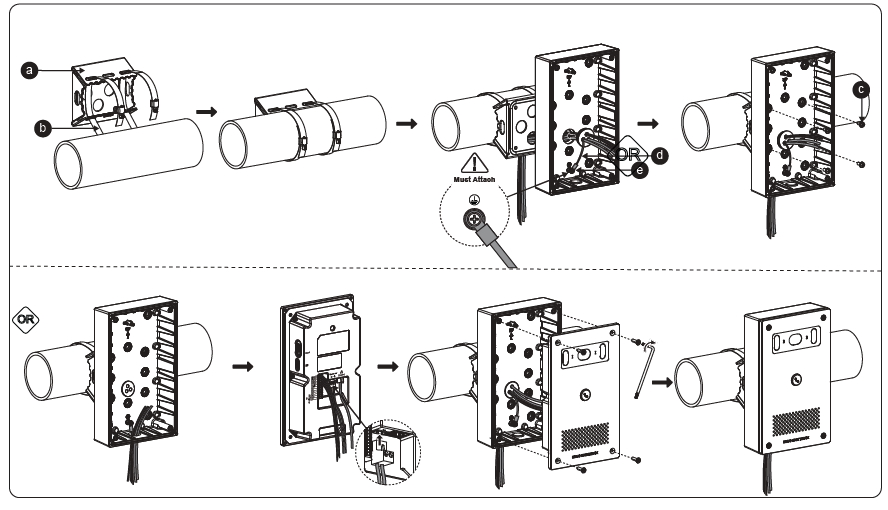
Horizontal Pole Mount
- Position the pole-mount bracket (a) against the horizontal pole.
- Route the two stainless steel mounting bands (b) through the bracket slots and wrap them around the pole.
- Tighten the bands securely until the bracket is firmly attached to the pole.
- Connect the grounding cable (d) to the designated grounding point and secure it using the PM3 × 6 mm grounding screw (e). This step is mandatory for proper grounding.
- Attach the mounting enclosure to the bracket and secure it using the PM4 × 12 mm screws (c).
- Route the network and power cables through the enclosure and connect them to the GSC356X device.
- Carefully place the GSC356X into the mounting enclosure.
- Attach the front panel and secure it using the supplied mounting screws.
- Tighten all screws and verify that the device is securely mounted and properly grounded.