
OVERVIEW
GWN.Cloud Multi-Factor Authentication (MFA) is the simple and best security practice method that adds an extra protection to account username and password. When MFA is enabled, the user will be required to enter the login username and password (the first security method) and an authentication code (the second security method) from the MFA device when they log on to the GWN.Cloud platform. These multiple methods will improve the security for the settings and resources of your GWN.Cloud account.
Users can purchase supported physical devices or virtual MFA devices to enable MFA for GWN.Cloud accounts.
Virtual MFA Device
Virtual MFA Device is an application that runs and simulates physical device on mobile phones or other devices. Virtual MFA device will generate a six-digit code based on a one-time time-synchronized cryptographic algorithm.
When logging into GWN.Cloud platform, the user must type in a valid code from the specific device. Each virtual MFA device assigned to the user must be unique. The user cannot type in the code with another user’s virtual MFA device code for authentication. Since the virtual MFA device may be executed on unsafe mobile device, it may not provide the same level of security as physical MFA device.
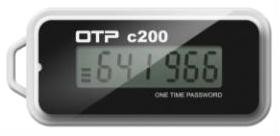
Physical MFA Device
Physical MFA Device is a device which can generate a six-digit code based on a one-time time- synchronized cryptographic algorithm.
When logging into GWN.Cloud platform, the user must type in a valid code from the specific device. Each physical MFA device assigned to the user must be unique. The user cannot type in the code with another user’s physical MFA device code for authentication.
MFA DEVICE STANDARDS
|
Virtual MFA Device |
Physical MFA Device | |
|
MFA Device |
Refer to table 2 |
Purchase physical MFA device |
|
Cost |
Free |
Price by supplier |
|
Physical Device Standard |
Use your smartphone/tablet/PC which can execute applications that support open TOTP standards to install virtual MFA device |
The physical device which supports open TOTP standards. It is recommended to use the devices from Microcosm manufacturer. |
|
Function |
Support multiple tokens on single device | The financial service institutions and IT enterprises use the same model of device. |
DOWNLOAD VIRTUAL MFA APPLICATION
Install virtual MFA application for your smartphone/tablet/PC from your device’s app store. The following table lists some applications that are suitable for multiple kinds of smartphones.
|
Android | |
|
iPhone | |
|
Windows |
ENABLE MFA DEVICE
To enhance security, it is recommended that users can configure Multi-Factor Authentication (MFA) to help protect GWN.Cloud resources. Users can enable MFA for GWN.Cloud accounts.
Enable Virtual MFA Device
Prerequisites:
- Log in to the GWN.Cloud platform with your account number, click on the name at the upper right corner, and access the personal information page:
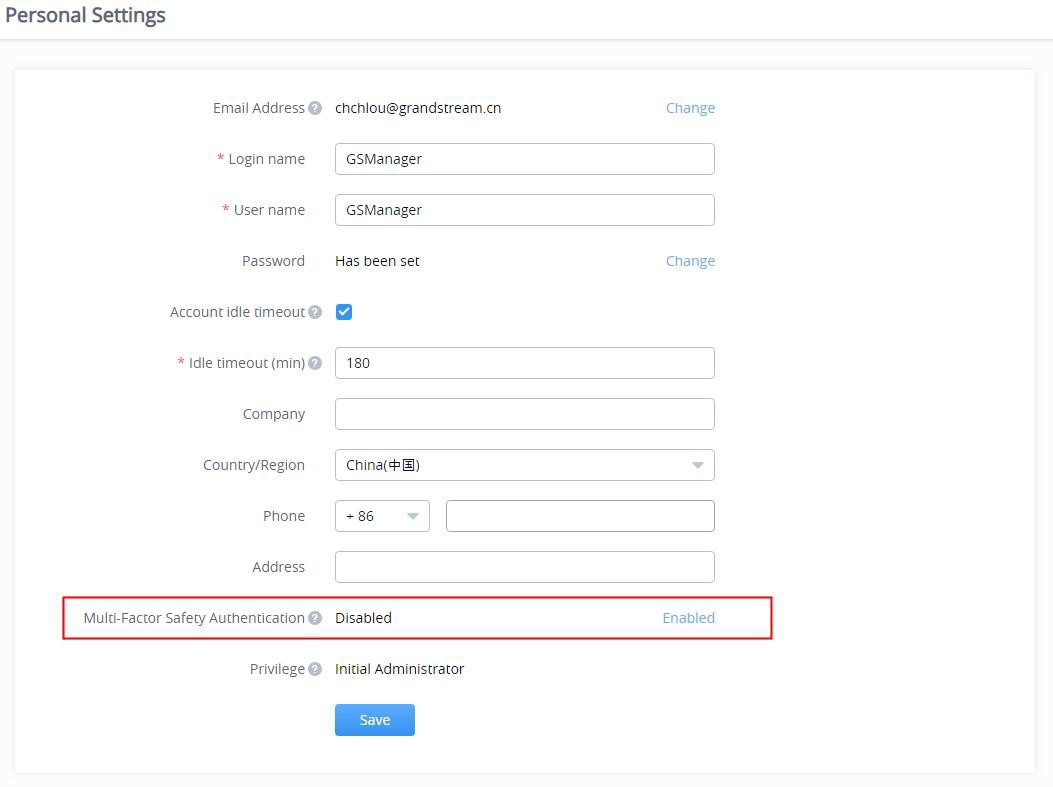
- Click to enable “Multi-Factor Safety Authentication” option and select to use “Virtual MFA Device” on the pop-up window, then click “Next” option to continue.
- Then, it will generate and display the configuration information of the virtual MFA device, including QR code graphics. This figure represents the configuration of the virtual MFA device as a secret key, users can scan the QR code to finish setting virtual MFA device. Users can also input the secret key manually into the smartphone/tablet/PC in order to finish setting virtual MFA device if your smartphone/tablet/PC does not support to scan QR code.
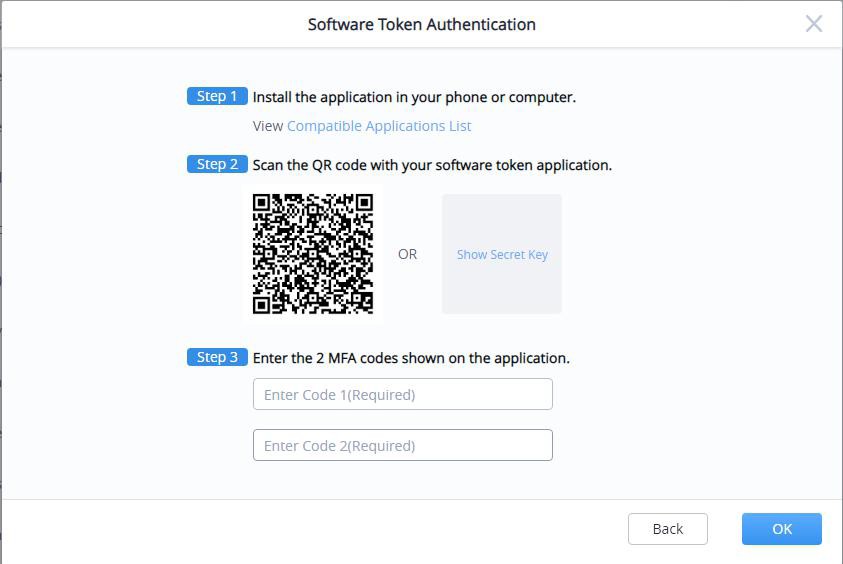
- Open virtual MFA application in your smartphone/tablet/PC, ensure that whether if the application in your smartphone/tablet/PC supports to scan QR code, and then perform one of the following actions below:
- If the MFA application in the smartphone/tablet/PC supports to scan QR code, the user can use the application to scan QR code to finish setting virtual MFA device. For example, the user can select the camera icon or scanning QR code option to use the device’s camera to scan the QR code.
- If the smartphone/tablet/PC does not support to scan QR code, the user can click on “show secret key” option and input the private secret key manually in the MFA application.
Note:
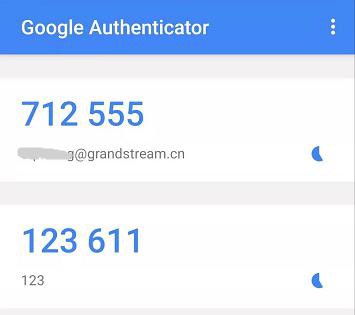
- When the operations above are completed, users can use the virtual MFA device to generate one- time passwords. In the MFA secret code box Code 1, the user enters the one-time password which is displayed in the virtual MFA device currently. Then, wait for 30 seconds so that the virtual MFA device will generate a new one-time password, the user enters the second one-time password in the MFA secret code box Code 2.
- Click on “Start Verification” option to start to verify the password. When the verification is pass, the GWN.Cloud account and the virtual MFA device has been bound successfully. When the user tries to log in the GWN.Cloud platform, the user must input the MFA device code.
Note:
Enable Physical MFA Device
Prerequisites:
- Log in to the GWN.Cloud platform with your account number, click on the name at the upper right corner, and access the personal information page.
- Click to enable “Multi-Factor Safety Authentication” option and select to use “Physical MFA Device” on the pop-up window, then click “Next” option to continue.
- Enter the interface below to bind the physical MFA device with the GWN.Cloud account:
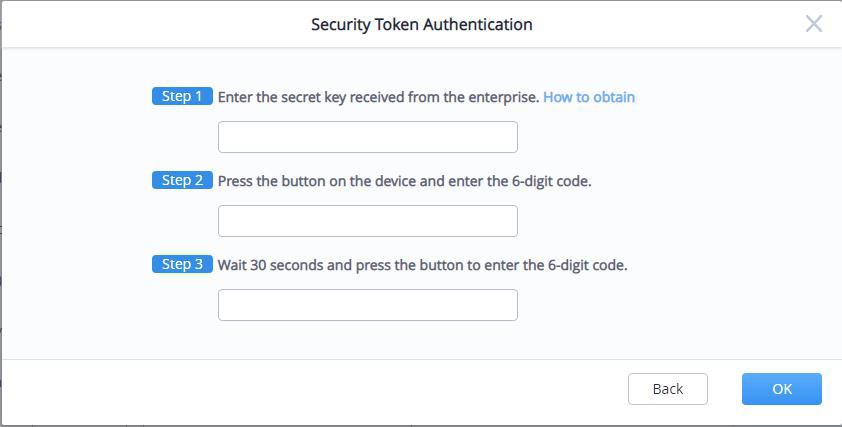
- Input the secret key of the device. Please contact with the manufacturer for the secret key.
Note:
Examples:
- In the MFA secret code box Code1, the user enters the six-digit one-time password which is displayed in the physical MFA device currently. The user needs to press the button on the front of the physical MFA device to display the secret code. Then, wait for 30 seconds and press the display button on the front of the physical MFA device again, so that the MFA device will generate the second six-digit one- time password. The user needs to enter the second one-time password in the MFA secret code box Code 2.
- Click on “Start Verification” option to start to verify the password. When the verification is pass, the GWN.Cloud account and the physical MFA device has been bound successfully. When the user tries to log in the GWN.Cloud platform, the user must input the MFA device code.
Note:
REMOVE MFA DEVICE
If the user does not need to proceed MFA verification, the user can remove the MFA device and restore normal login authentication method.
- Log in to the GWN.Cloud platform with your account number, click on the name at the upper right corner, and access the personal information page.
- Click “Remove” button to remove the MFA Authentication function for the current GWN.Cloud account.
GENERAL QUESTIONS
Lost MFA Device/Invalid MFA Device
If your MFA device is lost or does not work properly, you can remove the MFA device first and then re- enable the new MFA device.
Method 1: If your GWN.Cloud account is a sub-account, you can contact the main GWN.Cloud account to remove your multi-factor authentication from the User management page. After removal, you can log in to the GWN.Cloud platform with the password, and then re-enable the new MFA device.
Method 2: If your GWN.Cloud account is a main GWN.Cloud account and you cannot log in to the GWN.Cloud platform, you can contact our Technical Support, provide your relevant information to our Technical Support, and they will help you remove the multi-factor authentication (Our Technical Support will send the removal email to the user and the user needs to input account password and check removal).