


Overview
This guide provides step-by-step instructions for integrating GDMS Networking with external messaging platforms: Telegram®, WhatsApp® Cloud API, and Grandstream Wave to receive real-time system alerts outside the web interface.
By connecting GDMS to messaging apps and clients your team already uses, you can:
- Get instant notifications for critical events (e.g., device offline, network disruptions).
- Centralize alerts in group chats, mobile apps, or the Wave client for faster response.
- Extend alert visibility beyond email or dashboard-only notifications.
The guide walks you through:
- Prerequisites: What accounts, tokens, and IDs you need in advance.
- Telegram Setup: How to create and activate a bot, and link it to GDMS.
- WhatsApp Setup: How to use Meta’s Cloud API with a business number and approved message template.
- Wave Setup: How to use a Wave interface link and UCM extension to receive alerts in the Wave client.
- Alert Configuration: How to select which alerts should be sent to each platform.
Whether you’re managing one site or multiple networks, this integration ensures the right people are notified at the right time wherever they are.
Prerequisites
Before configuring alerts in GDMS Networking, make sure you have the following:
- GDMS Networking account: Admin access to your instance (for example, gdms.cloud or an on-prem GWN Manager deployment).
- Telegram account: Required to create a bot via BotFather.
- More information: https://telegram.org
- WhatsApp-capable phone number:
- A number you can use as a sender through the WhatsApp Cloud API.
- It must support WhatsApp and follow E.164 format (e.g.,
+14155550123).
- Meta developer setup for WhatsApp, including:
- A Meta Developer account and a Meta App with the WhatsApp product added
- WhatsApp Cloud API access
- Full instructions: https://developers.facebook.com/docs/whatsapp/cloud-api/get-started
- Business verification (if required): Some features of the WhatsApp® Business Platform, such as sending alerts via Cloud API, may require your Meta business account to complete verification. Refer to the Meta Help Center for up-to-date requirements.
- Grandstream UCM / Wave environment, including:
- A UCM system with Wave support enabled
- A Wave user/extension that can sign in to the Wave desktop client
- Permission to access the Management Portal → Integration page in Wave in order to create an Interface Link URL, Token, and assign a Wave extension number for alerts.
Telegram Setup
To receive alert notifications in Telegram, you’ll need to create a Telegram bot using BotFather, activate it by sending a message, and then connect it to your GDMS Networking account using the bot’s API token. Once configured, GDMS will be able to send alert messages directly into your Telegram chat.
Note: For more information on Telegram bots, you can refer to the official guide from Telegram here:
https://core.telegram.org/bots/tutorial
Search for BotFather in Telegram
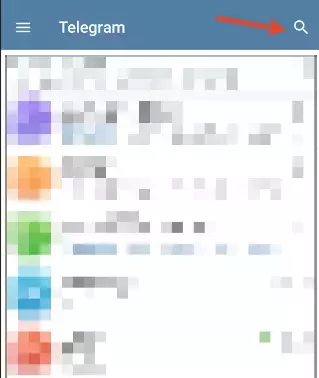
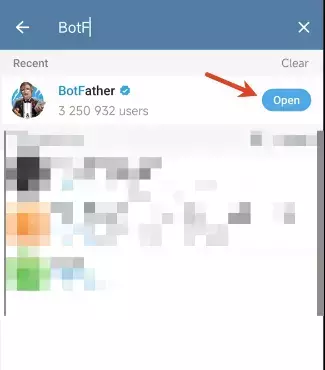
Open the Telegram app and tap the search icon (top right corner). Type BotFather into the search bar. You’ll see the verified BotFather account appear in the results.
Create a New Bot
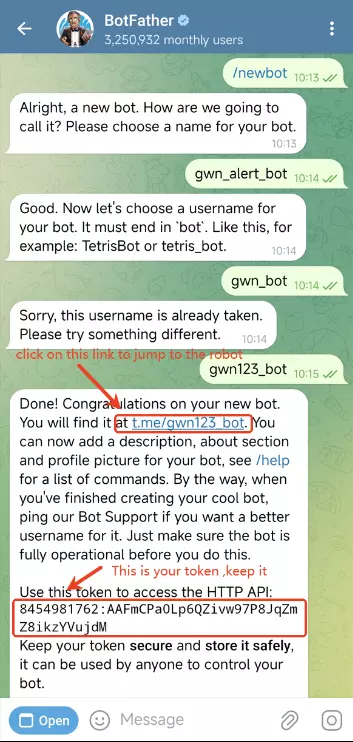
Once inside the BotFather chat, tap Start (if needed), then type /newbot and follow the prompts:
- Choose a bot name: This can be anything, e.g.
GWN Alert Bot - Choose a username: Must be unique and must end in
bot, e.g.gwn_alert_bot
If the username is taken, BotFather will prompt you to try another. Once successful, BotFather will respond with a link to your bot (e.g. t.me/gwn123_bot) and a bot token.
Start the Bot
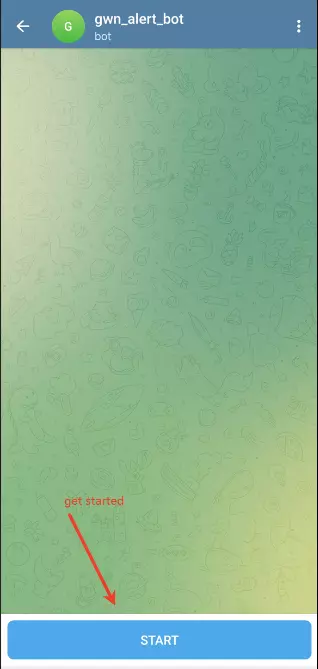
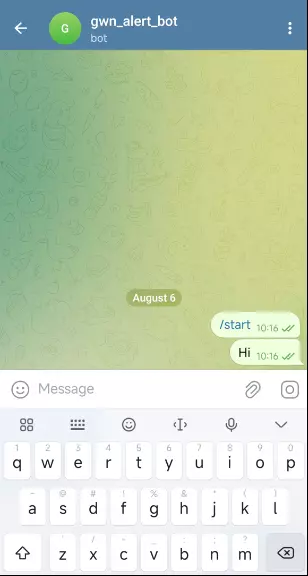
Click the link provided by BotFather (e.g. t.me/gwn123_bot) to open your bot’s chat window. Press Start to initiate the bot.
Link the Bot to GDMS
- Log in to your GDMS Networking or GWN Manager instance
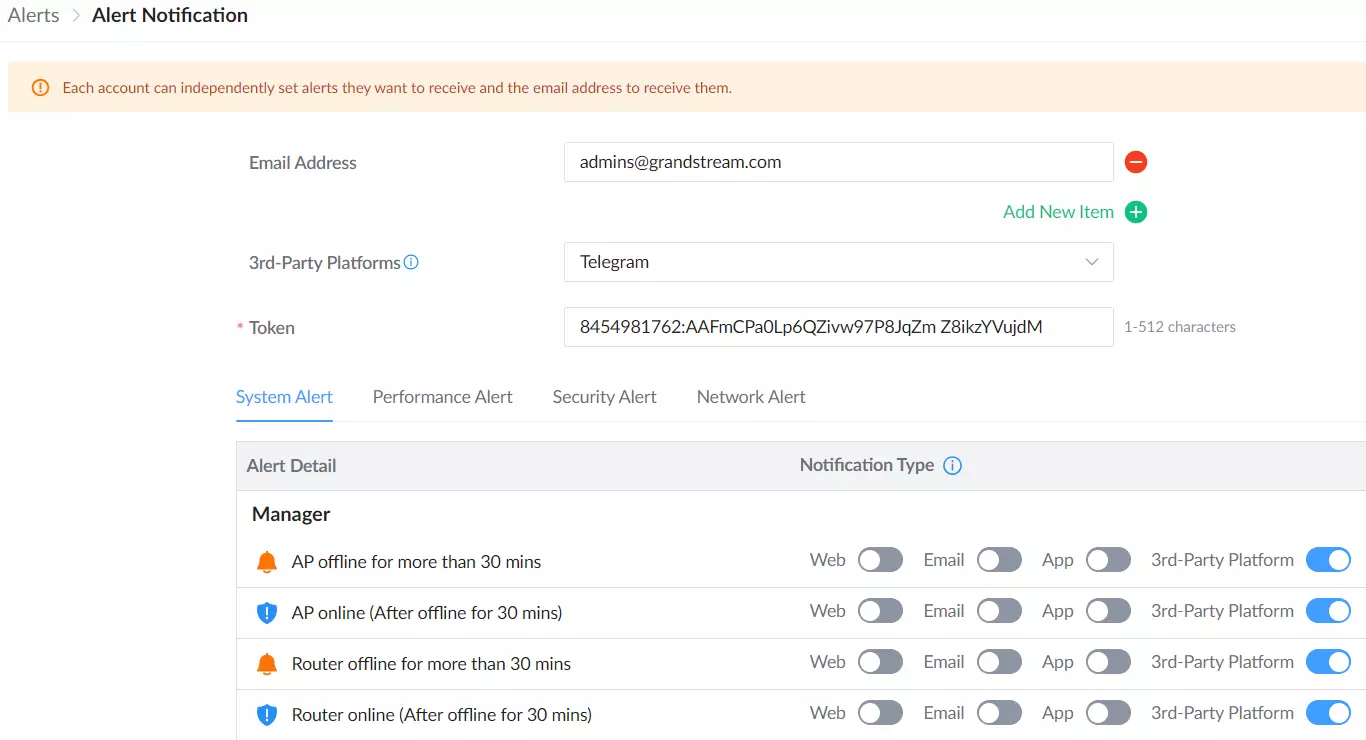
- Navigate to: Alerts → Alert Notification.
- From the 3rd-Party Platforms dropdown, select Telegram
- Paste the bot token you copied earlier into the Token field
- Under the alert categories (System Alert, Performance Alert, etc.), toggle 3rd-Party Platform for the alerts you want to forward to Telegram.
WhatsApp Setup
GDMS Networking supports WhatsApp Cloud API integration for delivering alert notifications to a specified mobile number using a pre-approved message template. This setup relies on Meta’s developer platform, where you’ll create a template, obtain a long-lived access token, and retrieve your phone number ID. Once these credentials are entered in GDMS, the system can deliver real-time alerts directly to your WhatsApp chat, using dynamic message content defined by your alert preferences.
Access the WhatsApp API Setup in Meta Developer Console
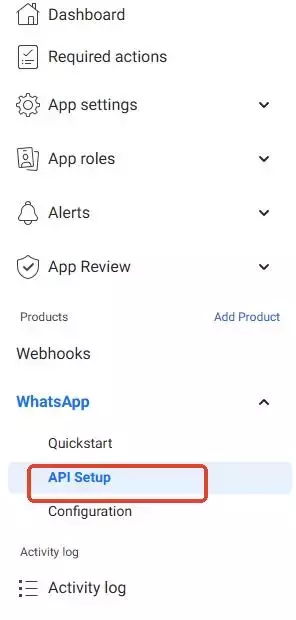
Log in to your Meta for Developers account and open the app you created for WhatsApp integration. In the left-hand navigation menu, locate the WhatsApp product section.
Click on API Setup under the “Quickstart” section. This will take you to the WhatsApp Cloud API configuration area, where you’ll generate the credentials and test messages used for alert delivery.
Generate Access Token and Collect Required Credentials
On the API Setup page, scroll to the Access Token section and click Generate access token. This token is used to authenticate API requests sent from GDMS to the WhatsApp Cloud API.
Once generated, copy and store the token securely, as it will be required when configuring WhatsApp alerts in GDMS.
Next, scroll to the Send and receive messages section:
- In the From dropdown, select your WhatsApp Business sender number (provisioned through Meta).
- In the To dropdown, select a recipient number. This should be an active WhatsApp number used for message testing.
Just below, locate the Phone number ID (also called Telephone ID). This is a unique identifier for the sender number and will be needed in the GDMS alert configuration later.
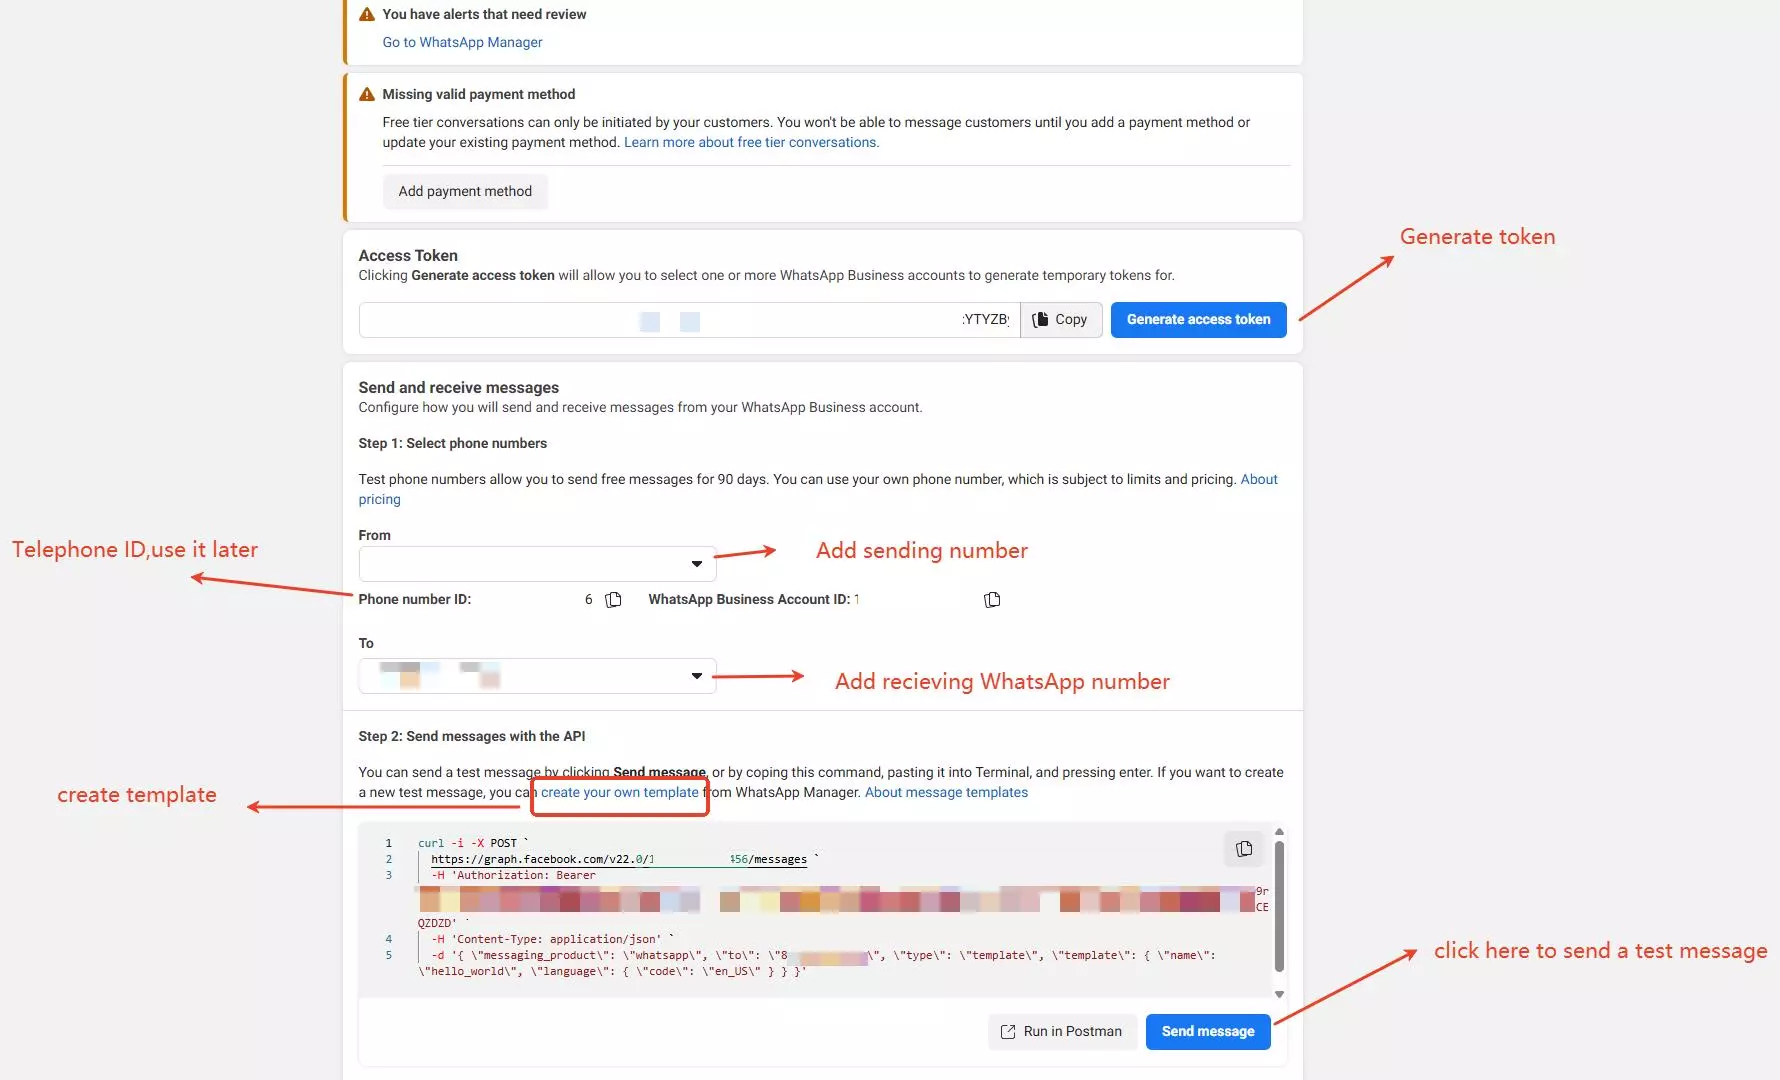
You will also find a sample curl command under Step 2 that can be used to send a test message through the WhatsApp Cloud API. This example demonstrates how to structure an API request using a message template and your access credentials.
Add or Manage Recipient Test Numbers
To send test messages during the WhatsApp Cloud API setup, Meta allows you to define up to five recipient phone numbers. These numbers are temporary and intended for development and testing only.
In the Send and receive messages section, under the To dropdown, click on Manage phone number list.
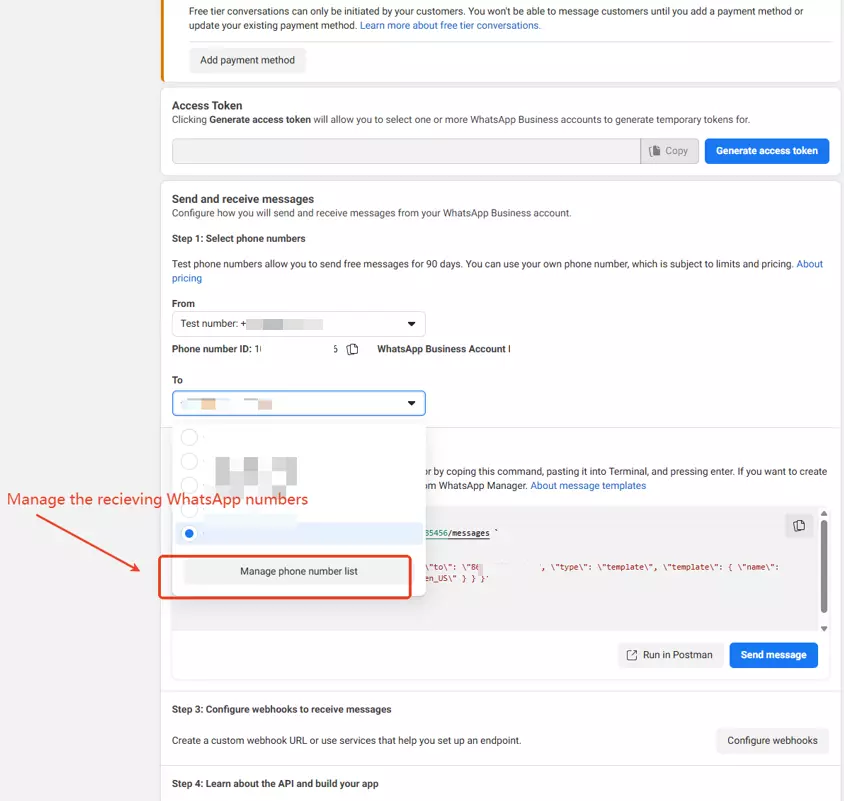
This will open the interface where you can add, remove, or update test recipient numbers. These numbers must be WhatsApp-enabled and will receive test messages using your approved templates. You’ll configure these in the next step.
Note: You must use a valid personal or testing phone number here. These numbers are not visible to end users and are only used during the development and validation phase of your integration.
Add a New Test Recipient Number
After clicking Manage phone number list, a pop-up window will appear allowing you to manage test recipients.
To add a new number:
- Click the input field labeled Add phone number.
- Enter a valid mobile number in E.164 format (e.g.,
+14155550123). - Press Enter or confirm to add the number to the list.
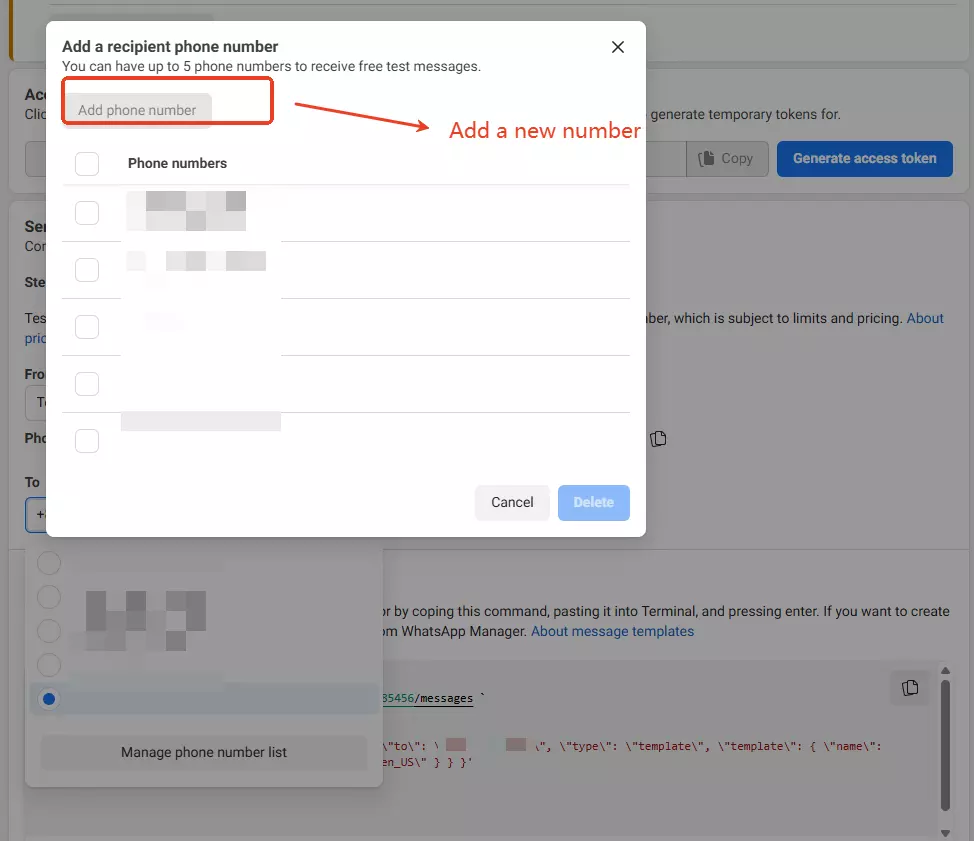
You can define up to five test recipients. These numbers will be eligible to receive development messages via the WhatsApp Cloud API during the testing phase. This step is essential before sending any template-based messages from Meta’s test interface.
Extend Access Token (Recommended)
By default, the access token generated for your WhatsApp Cloud API session is short-lived and expires within an hour. To ensure consistent operation especially when used with services like GDMS you should generate a long-lived access token.
To do this:
- Navigate to the Access Token Debugger in the Meta Developer portal.
- Paste your short-lived token into the tool and click Debug.
- After the information is displayed, click Extend Access Token (at the bottom of the page).
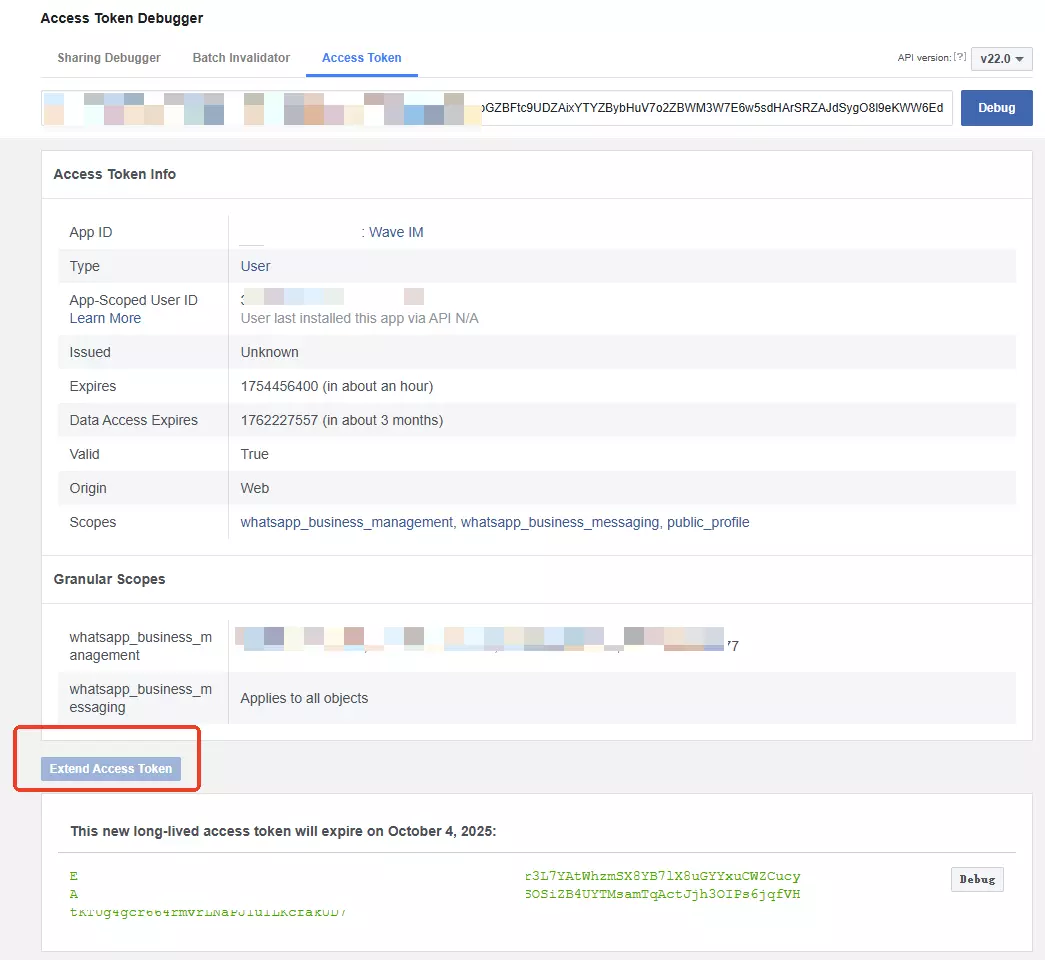
Once extended, a new long-lived token will be generated. Copy and store this token securely it will be used in the GDMS integration to authenticate WhatsApp messages.
Note: Long-lived tokens can last up to 60 days or more, depending on your app configuration. Always handle this token securely, and avoid exposing it publicly.
Open the Message Templates Section
To send messages through the WhatsApp Cloud API, you must use pre-approved message templates. This is a Meta requirement for initiating messages to users via the Cloud API. Templates define the content and format of outbound messages (such as alerts or notifications), and they must be reviewed and approved by Meta before use.
Follow these steps to begin:
- Navigate to WhatsApp Manager in your Meta Developer account.
- From the left sidebar, go to Message Templates > Manage Templates.
- On the top right, click the Create template button.
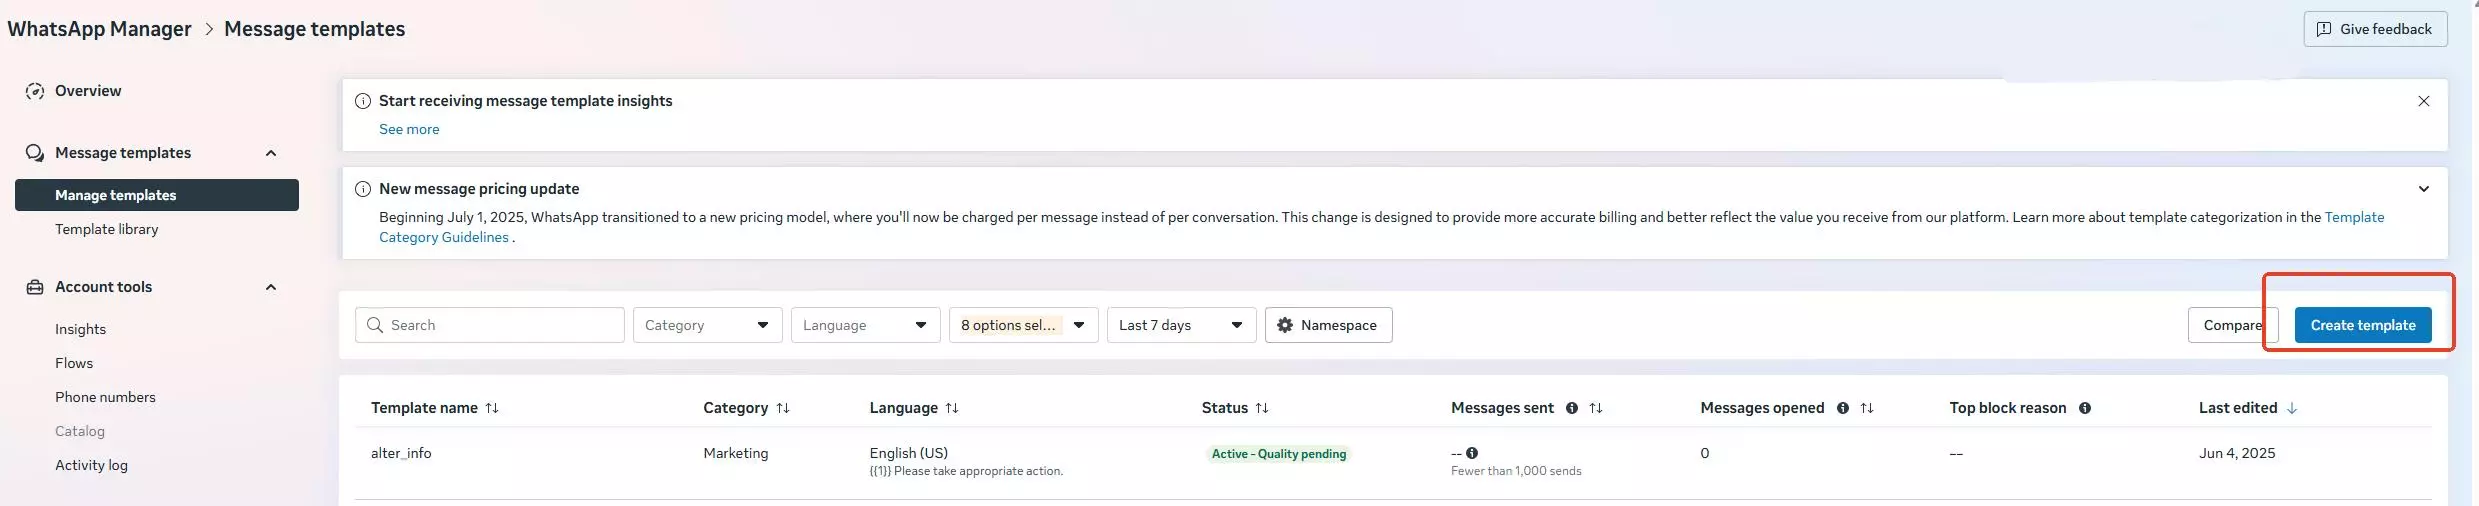
You will now proceed to define a new message template, which will include:
- The category of your message,
- The language,
- And the content (such as header, body, and optional footer or buttons).
In the next steps, we’ll walk through configuring the template content itself.
Choose Template Category and Type
In this step, you’ll define the purpose and structure of your WhatsApp message template.
- Under Set up template, choose a category that best reflects the nature of your message. For alert notifications, you can safely use the “Marketing” category, then select the Custom template type.
- Custom templates are flexible and suitable for general announcements or system alerts.
- Avoid using Catalog or Call permissions request types, as they are not relevant for GDMS alerting.
- Once selected, click Next to proceed to the content configuration stage.
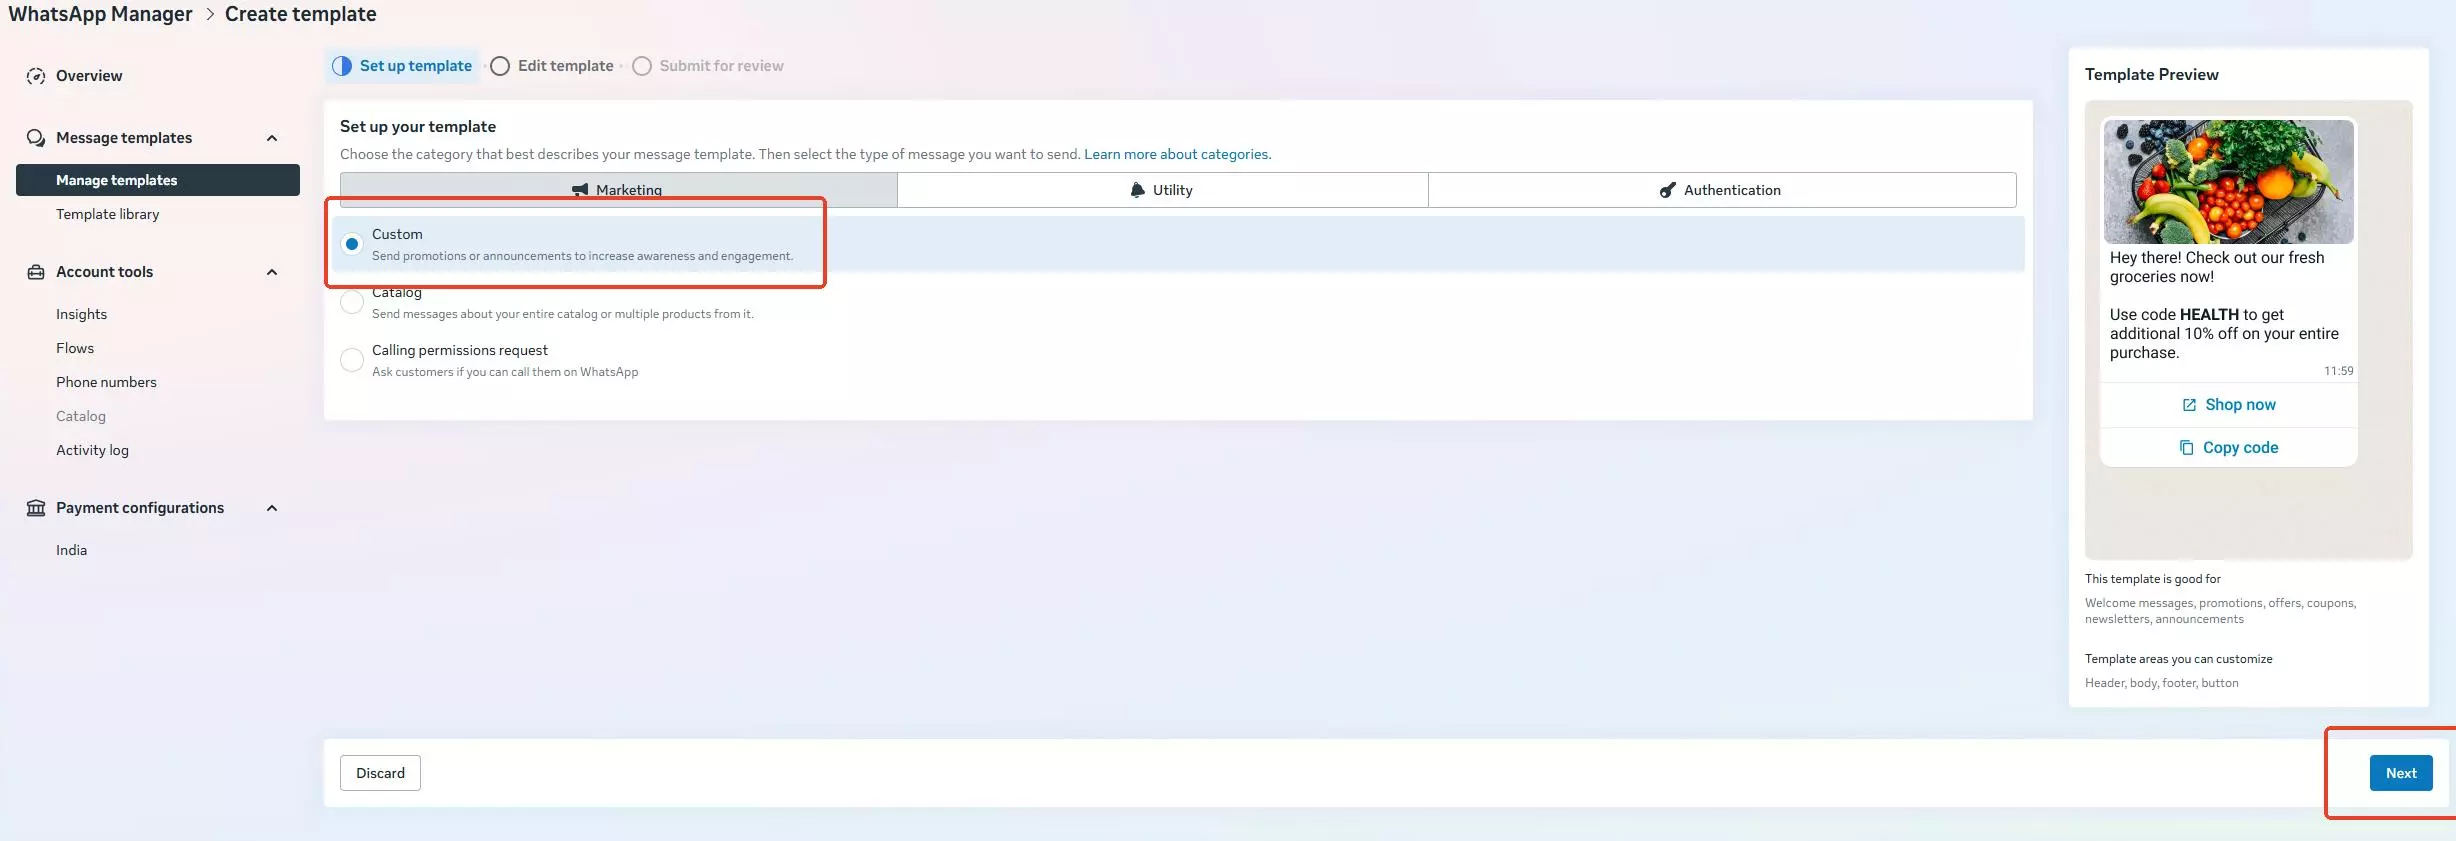
Note: Choosing the wrong category or type may lead to rejections during Meta’s template approval. Use “Marketing + Custom” for the best chance of approval for alert messages.
Configure Template Content
Now define the structure and content of the WhatsApp message template. This is the message users will receive when an alert is triggered by GDMS Networking.
- Template Name:
- The template name must be exactly
gdms_networking_alert. - This specific name is required to match the alert system logic in GDMS Networking. If the name is different, the alert messages will not be delivered.
- The template name must be exactly
- Language:
- Choose the appropriate language for the message (e.g., English US).
- Content Sections:
- Header (Optional): You can include a short title such as Alerting (text type).
- Body (Required): This is the main content of your alert. You must include a variable placeholder like
{{1}}so GDMS can insert the dynamic alert message.- Example Body:
{{1}} Please take appropriate action. - Example Variable Sample:
The configuration of device (C0:74:AD:E0:D7:8F) has been modified by a local user
- Example Body:
- Buttons (Optional):
- You may add action buttons (up to 10) such as “Acknowledge” or “View Dashboard,” though they are not required for GDMS alerts.
- Once done, click Submit for review to send the template for Meta approval.
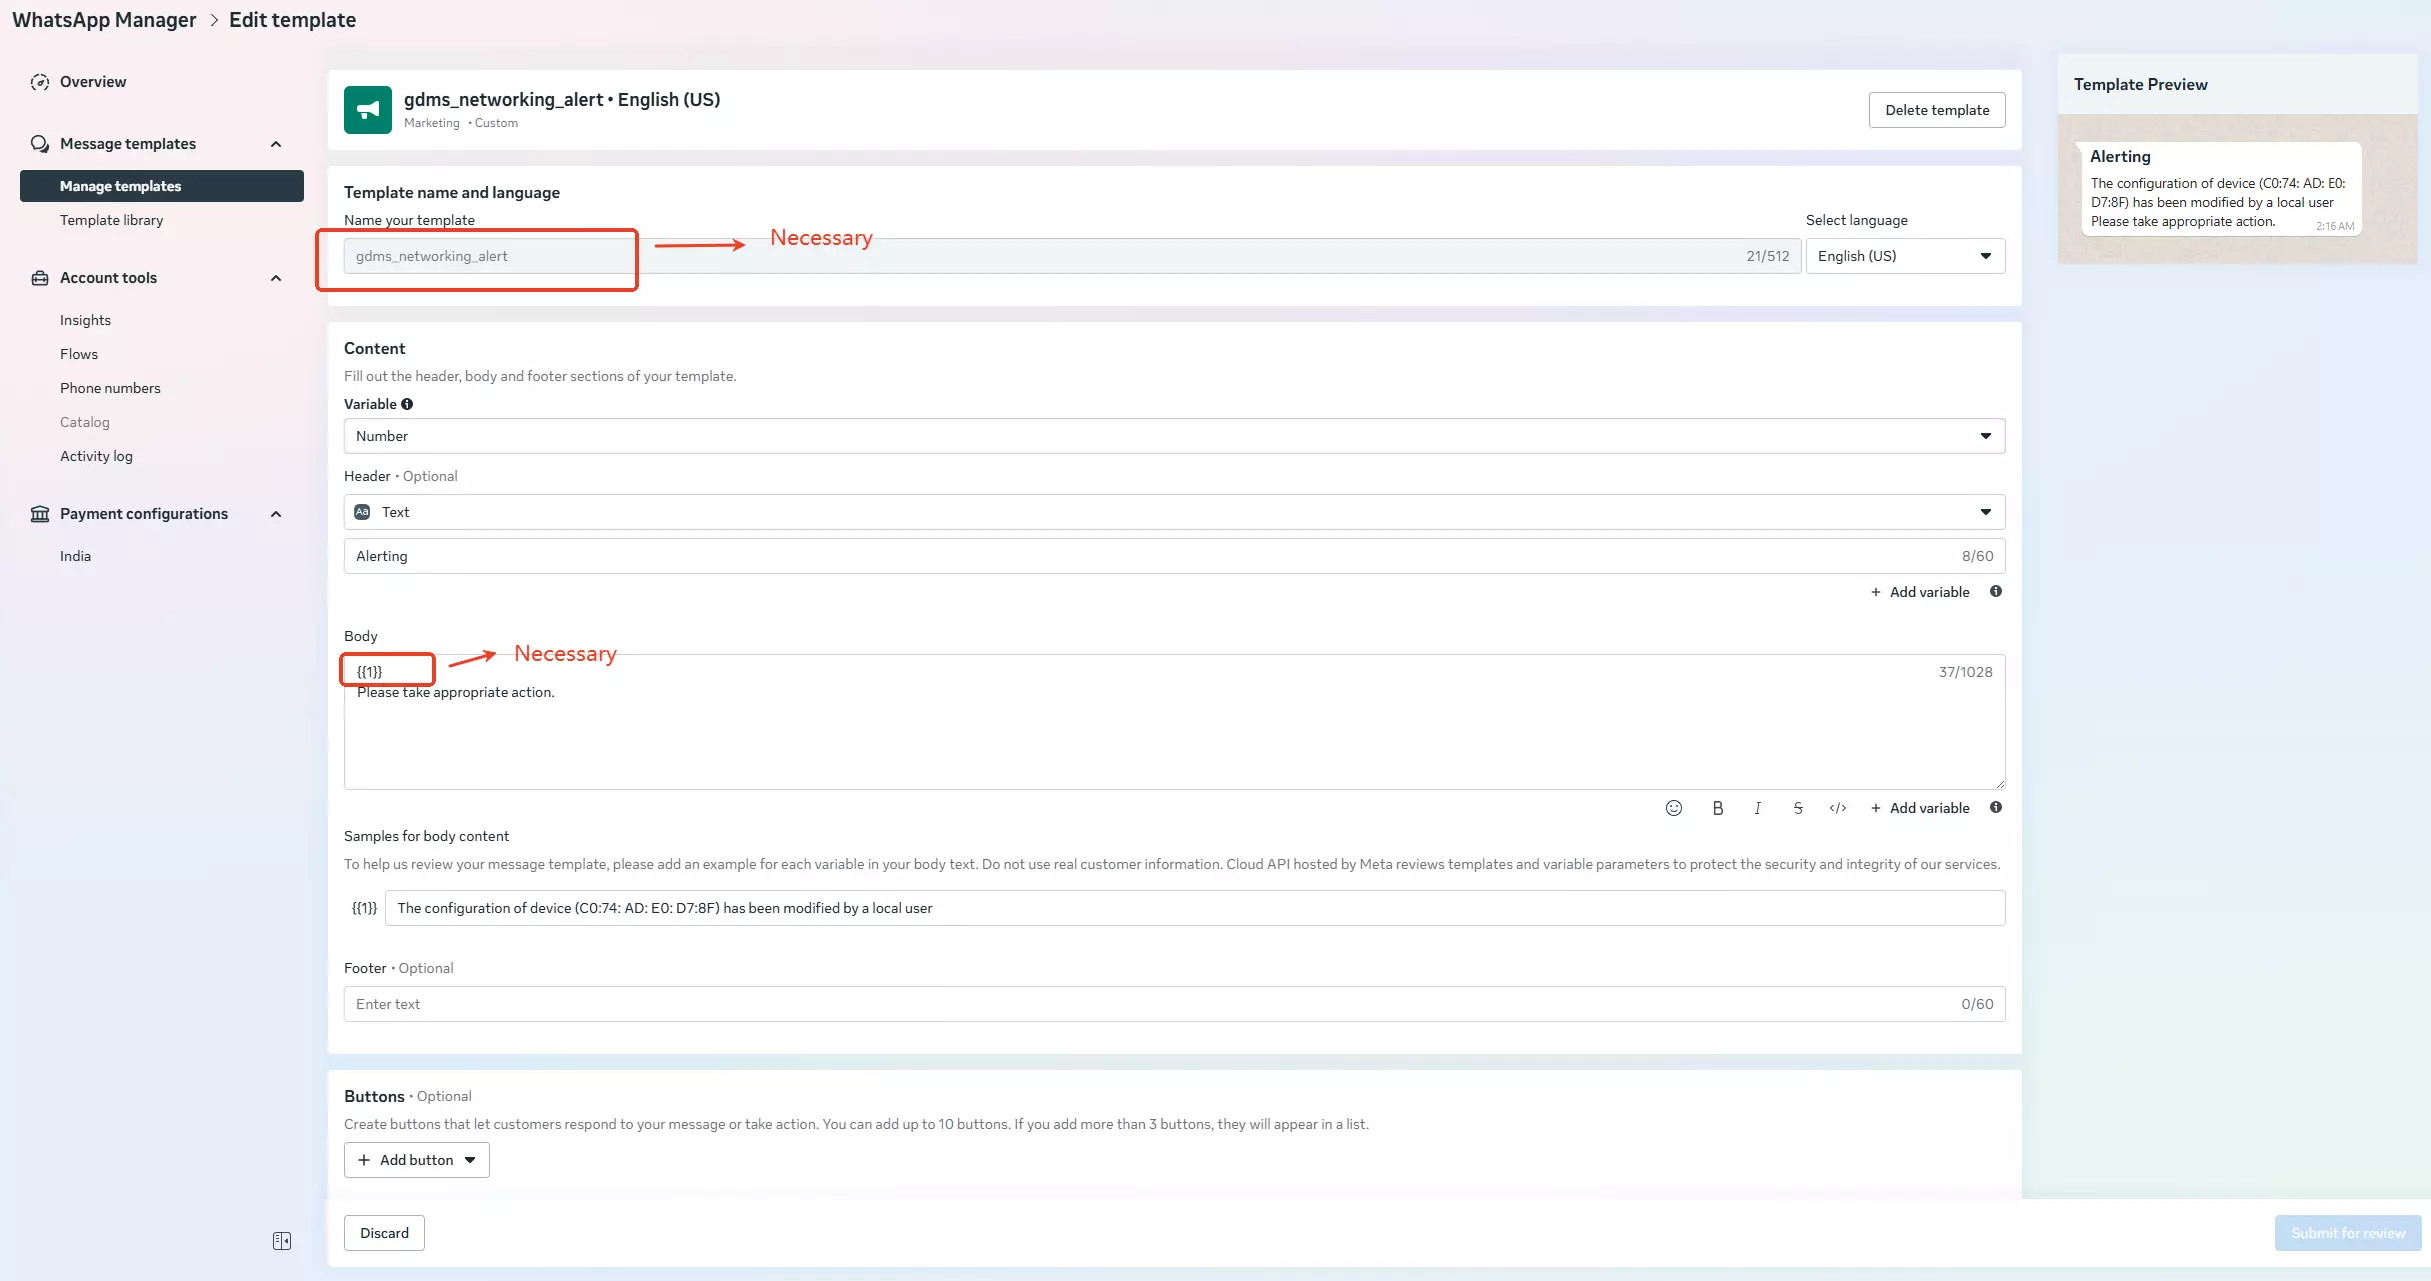
Note: Your template will not be usable until it’s approved and marked “Active.” Avoid using real user data or formatting that violates Meta’s template policies.
Monitor Template Approval Status
After submitting your template, it needs to go through Meta’s review process. You can track its status from the Manage templates section within the WhatsApp Manager.
- Navigate to the Message templates section > Manage templates.
- Locate your submitted template by its name you must use
gdms_networking_alert.
- Check the Status column:
- A status of Active – Quality pending means the template is already approved and usable, but still undergoing additional monitoring.
- You must wait for the template to reach at least “Active” status before sending live messages through GDMS.

Note: You can start using a template as soon as it reaches the “Active” phase, even if quality assessment is still in progress.
Configure WhatsApp Alerts in GDMS Networking / GWN Manager
Once your WhatsApp access token, phone number, and approved message template are ready, you can enable alert delivery via WhatsApp directly from the GDMS or GWN Manager interface.
To do this:
- Go to Alerts > Alert Notification in your GDMS or GWN Manager account.
- Under the Third-Party Platforms section:
- Select WhatsApp from the dropdown menu.
- In the Telephone ID field, paste the phone number ID you obtained earlier from the WhatsApp API Setup screen.
- In the Token field, paste your long-lived Access Token.
- In the Telephone Number field, enter the actual WhatsApp number you linked earlier — make sure to enter it in international format without spaces (e.g.,
8618376391234).
- Scroll down to the Notification Type section and select which alerts you want to send through WhatsApp:
- Enable the Third-Party Platform toggle for any alert type you wish to push to WhatsApp.
For example, you might enable:- ✅ AP offline for more than 30 mins
- ✅ Router offline for more than 30 mins
- ✅ Switch offline for more than 30 mins
- …and others, depending on what’s important for your environment.
- Enable the Third-Party Platform toggle for any alert type you wish to push to WhatsApp.
- Click Save once you’ve finished configuring.
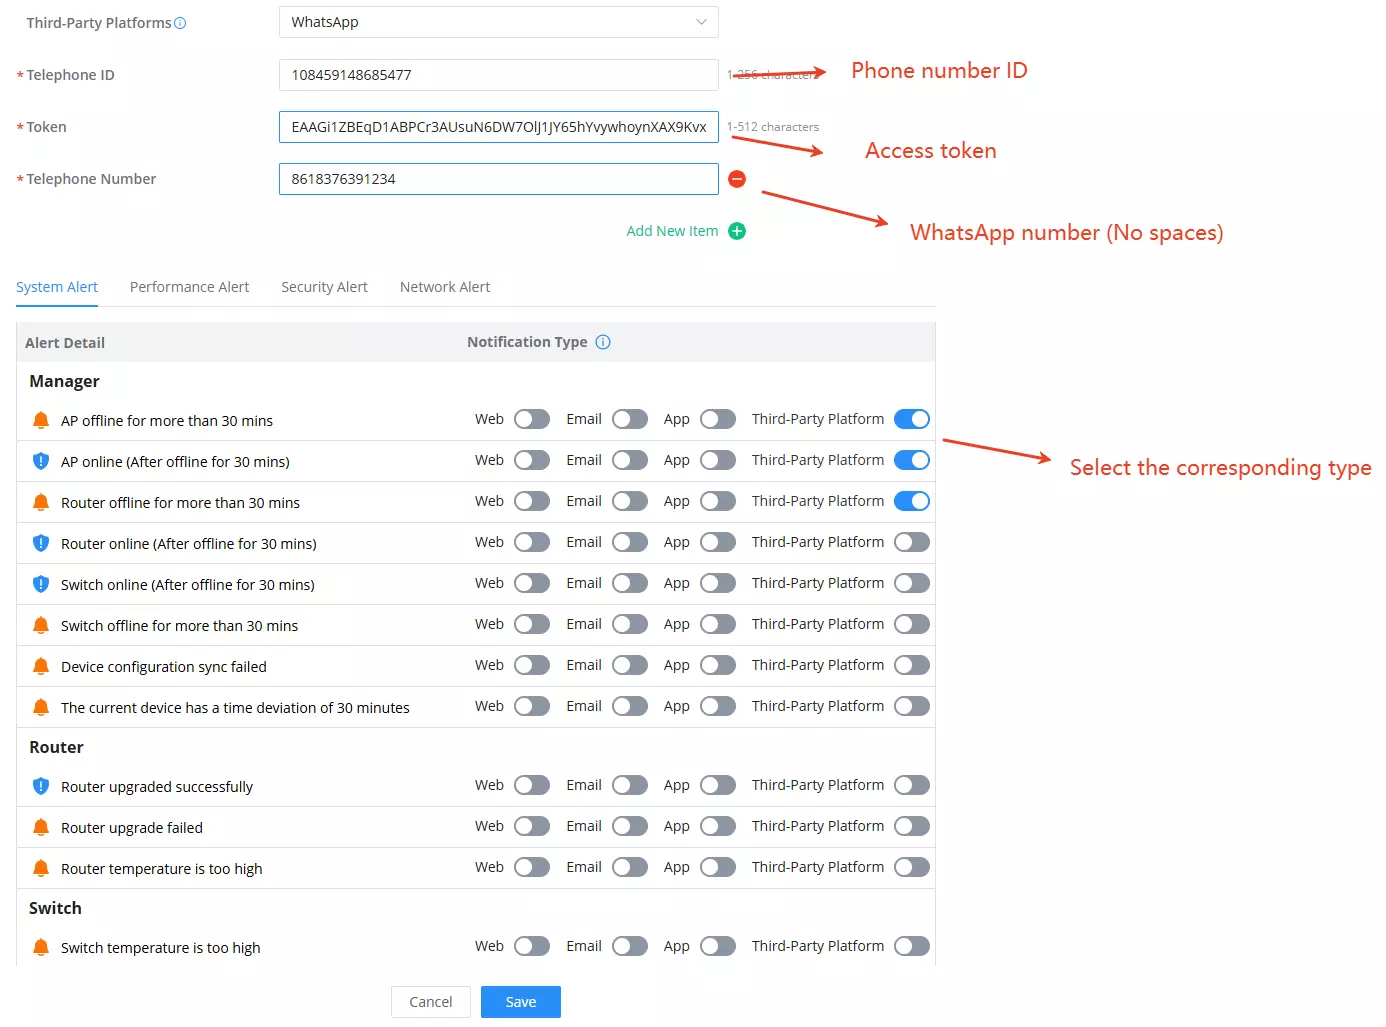
Tip: You can use different alert types for email, app, or WhatsApp independently. Each notification method works in parallel.
Wave Setup
Wave integration allows GDMS Networking and GWN Manager to forward alert notifications directly to Grandstream Wave, so that events such as device status changes or network issues appear as messages inside the Wave client for a specific UCM extension. Using an interface link created in the Wave Management Portal, GDMS Networking / GWN Manager sends alert details to Wave, which then delivers them through the Notification Assistant. Once the interface link, token, and target extension are configured on both sides, supported alerts are pushed in real time to the selected Wave user alongside their regular calls and chats.
Open the Wave Management Portal
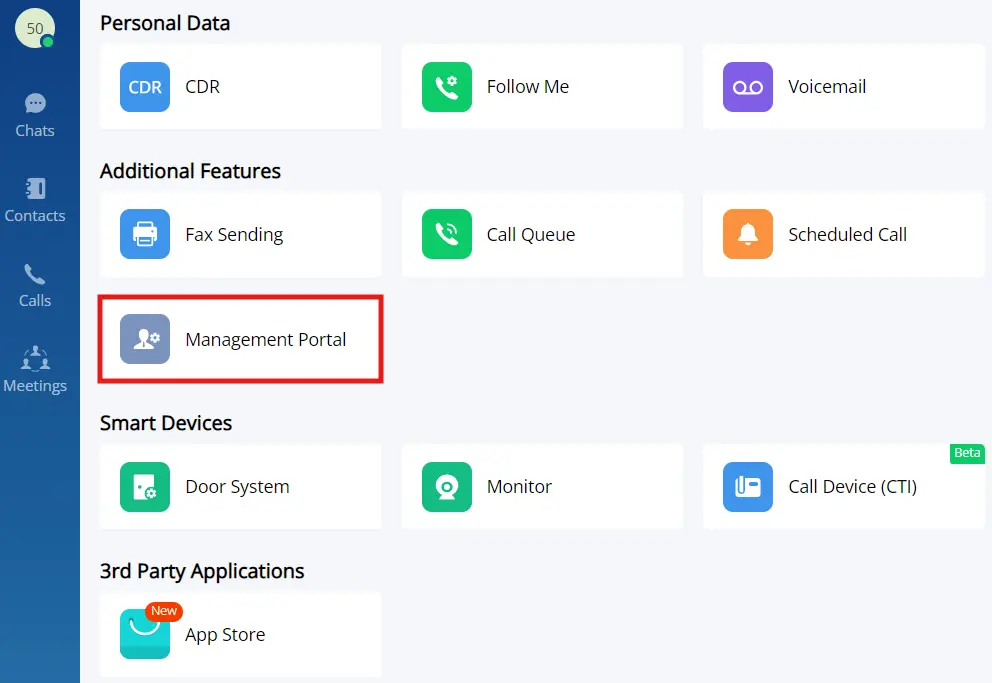
- Sign in to the Grandstream Wave desktop client using the UCM extension that will receive GDMS Networking alerts.
- Under Application, locate the Management Portal tile under Additional Features and click it.
- This opens the management interface for the logged-in Wave user and exposes integration options that can receive notifications from external systems.
- The extension must have the appropriate Wave / user-portal privileges assigned on the UCM side.
For detailed information about Wave roles and permissions, refer to the Grandstream Wave Administrator Guide: https://documentation.grandstream.com/knowledge-base/wave-administrator-guide/
Enable the Integration Interface
- In the Management Portal, use the left navigation menu and select Integration.
- At the top of the page, turn on the Interface Link switch.
- This enables the HTTP interface that allows external systems to send notification messages to Wave users.
- Confirm that the Interface Link section is visible and that existing integration entries (if any) are listed.
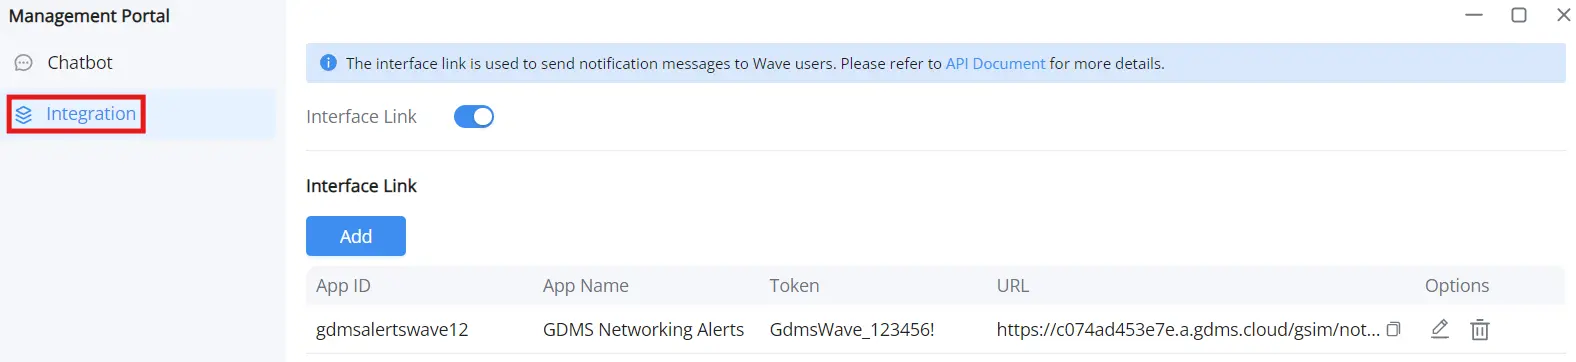
Create an Interface Link for GDMS Networking Alerts
- On the Integration page, in the Interface Link section, click Add to create a new integration entry.
- In the Add Interface Link dialog, configure the following fields:
- App ID
- Enter a unique identifier for this integration, such as
gdmsalertswave12. - This value is used internally to identify the application.
- Enter a unique identifier for this integration, such as
- App Name
- Enter a descriptive name that will appear in Wave, for example GDMS Networking Alerts.
- This label will be shown in the Notification Assistant when alerts are received.
- Token
- Enter a secure string that will be used by GDMS Networking / GWN Manager to authenticate requests to Wave.
- Example:
GdmsWave_123456!
- App ID
- After filling in the fields, confirm the dialog (for example, by clicking OK or Generate Interface Link, depending on the client version).
- The system automatically generates an Interface Link URL for this app. This URL is displayed in the URL / Interface Link field of the integration entry.
- Copy both of the following values and store them temporarily:
- The full Interface Link URL
- The Token value
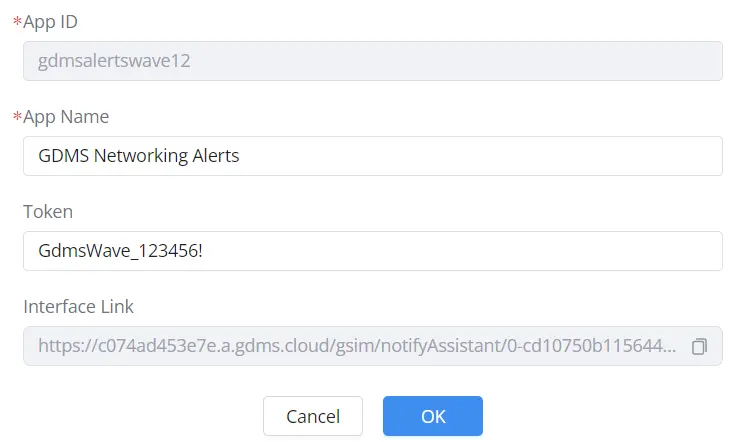
These values will be used when configuring Wave as a third-party platform in GDMS Networking / GWN Manager.
Select Which Alerts Will Be Sent to Wave
- Log in to GDMS Networking / GWN Manager with an account that has permission to manage alerts for the target organization or network.
- In the left navigation menu, go to Alerts → Alert Settings.
- For each device category (for example Router, Switch, AP), review the list of available alert types.
- Enable the checkbox next to each alert you want GDMS Networking to generate and potentially send to Wave.
- Examples include:
- Router temperature is too high
- Switch temperature is too high
- Failure detected
- AP upgraded successfully
- Examples include:
- Save the alert settings when finished.
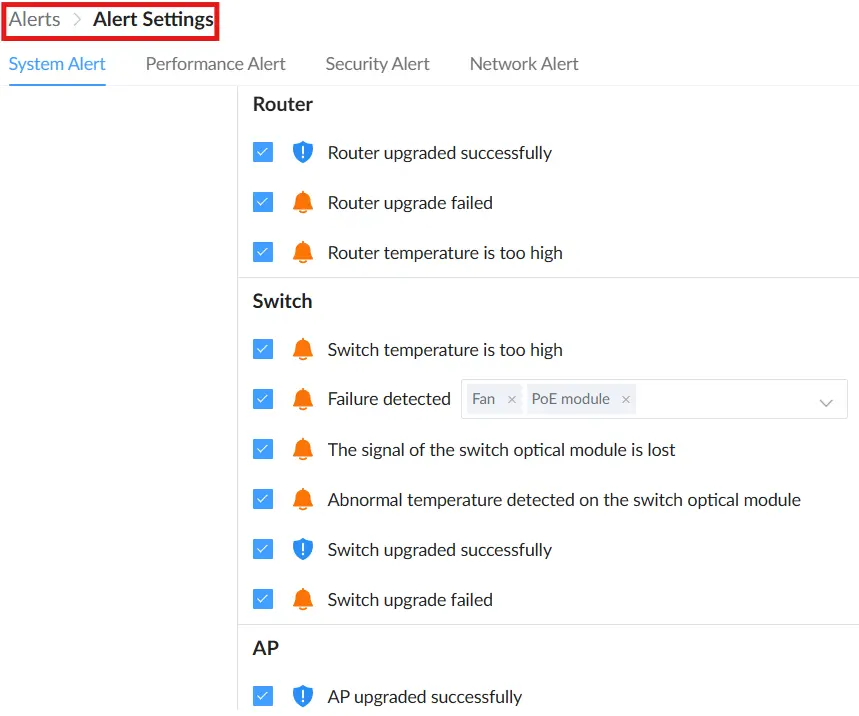
Enabling an alert here ensures that GDMS Networking can generate the event; the delivery method (including Wave) is configured in the next step.
Configure Wave as a Third-Party Platform in Alert Notification
- In GDMS Networking / GWN Manager, remain under Alerts and open Alert Notification.
- In the 3rd-Party Platforms section, click Add New Item if needed, then set 3rd-Party Platforms to Wave.
- Fill in the Wave integration fields as follows:
- Request Address
- Paste the Interface Link URL that was generated in the Wave Management Portal for the GDMS Networking Alerts app.
- Use the URL exactly as displayed in Wave; do not modify the path or parameters.
- Token
- Enter the same Token value that was configured for the app in the Wave Integration page.
- This allows Wave to validate that alert requests originate from an authorized source.
- Extension
- Enter the UCM extension number of the Wave user who should receive these alerts (for example,
5050). - The specified extension must be registered on the UCM and logged in to Wave.
- Enter the UCM extension number of the Wave user who should receive these alerts (for example,
- Request Address
- Under the Notification Type section, for each alert you want to deliver to Wave, enable the 3rd-Party Platform toggle.
- You can independently enable/disable Web, App, and 3rd-Party Platform delivery for each alert.
- To send alerts only to Wave, it is sufficient to enable 3rd-Party Platform for the relevant entries.
- Click Save to apply the changes.
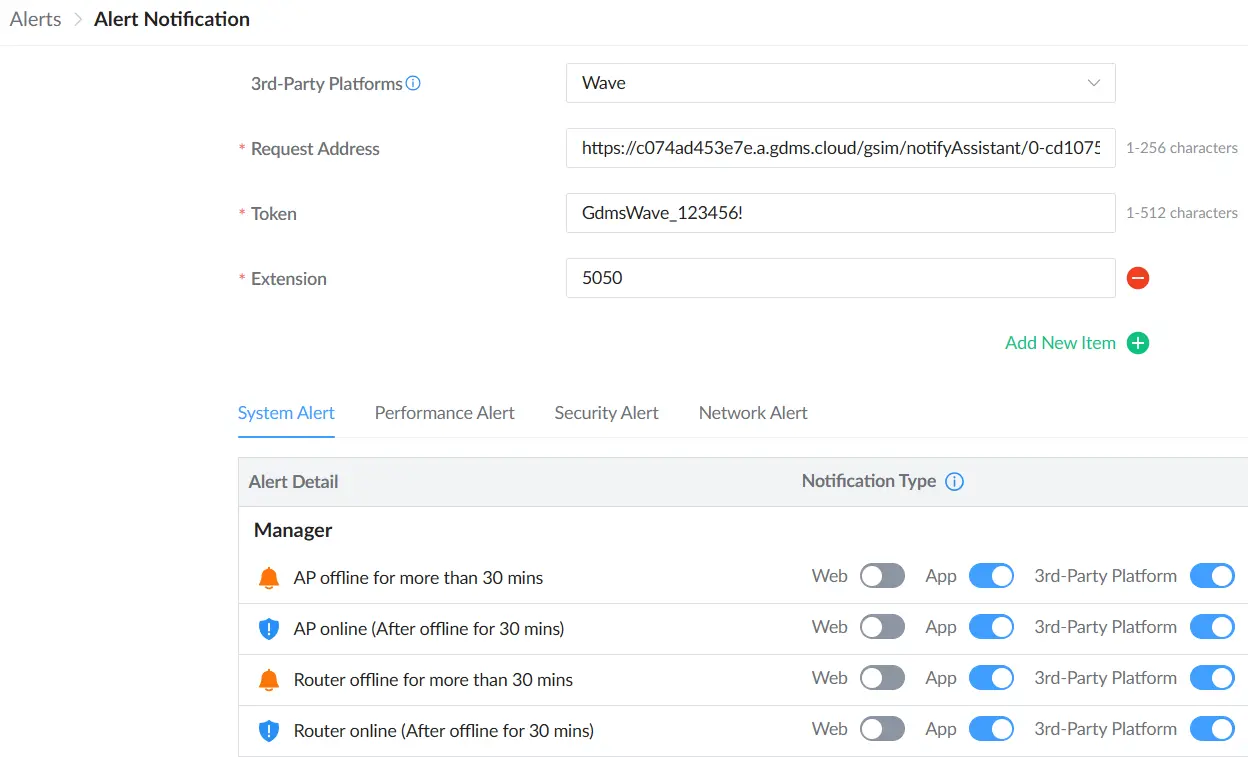
Verify Alerts in GDMS Networking / GWN Manager
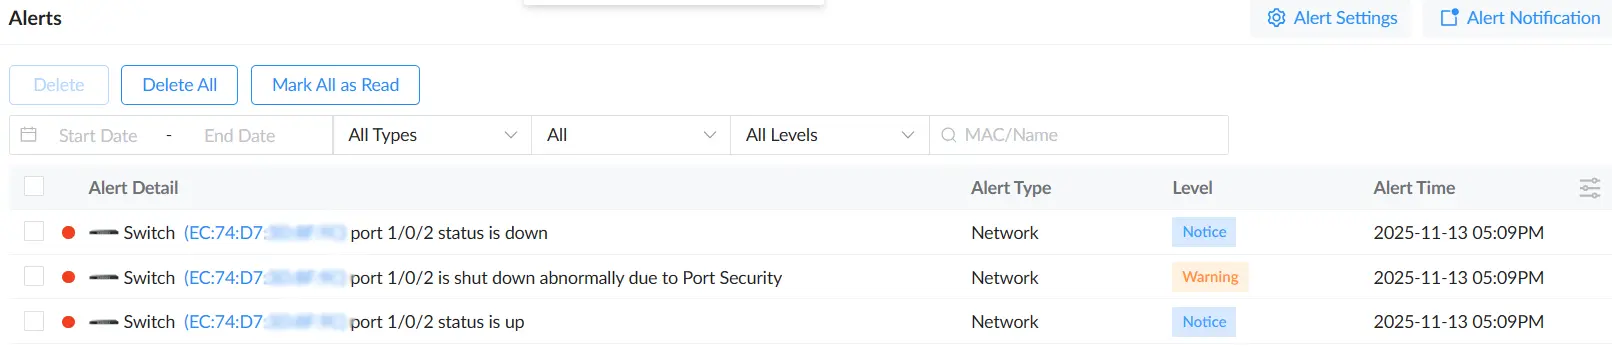
- Generate a test condition that will trigger one of the enabled alerts (for example, disconnecting a network port or simulating a device status change in a lab environment).
- In Alerts, open the Alerts list view.
- Confirm that the expected alert entries appear, including the device identifier, alert detail, type, level, and time.
- This confirms that GDMS Networking / GWN Manager is detecting the event and creating an alert record that can be forwarded to third-party platforms such as Wave.
Confirm Alert Delivery in Grandstream Wave
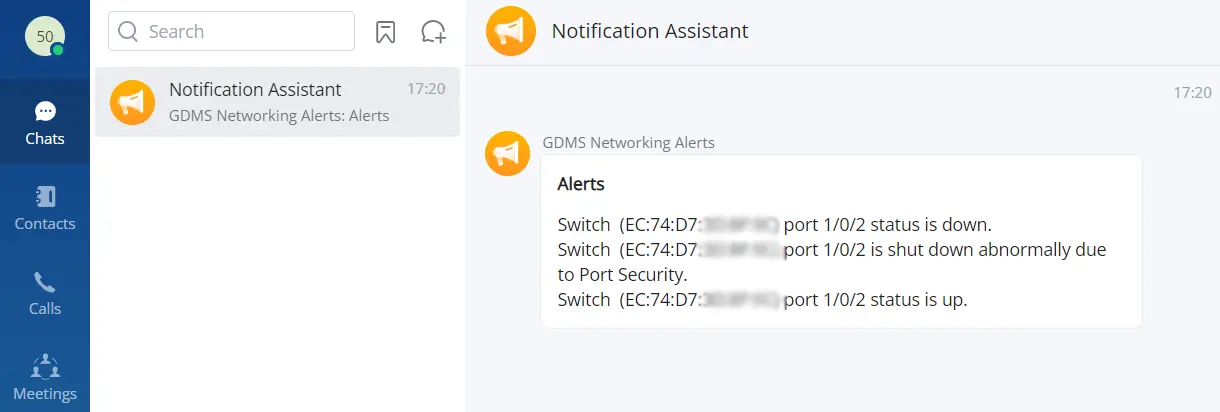
- Return to the Wave desktop client that is logged in with the extension configured in the Extension field (for example,
5050). - In the left navigation menu, go to Chats.
- Open the Notification Assistant conversation.
- Confirm that a new message from GDMS Networking Alerts (or the App Name you configured) appears, containing the alert details sent from GDMS Networking / GWN Manager.
- The message should include information such as device identifier, port information, and alert description (for example, port status is down or port is shut down abnormally due to port security).
- Use this notification flow to validate that subsequent network events will be delivered to Wave users in real time.
Trademarks Notice
WhatsApp® is a registered trademark of Meta Platforms, Inc. Telegram® is a registered trademark of Telegram Messenger LLP. All product names, logos, and brands are property of their respective owners. Use of these names does not imply any affiliation with or endorsement by them.