Wave Desktop supports the functions of Wave administrator.
Wave administrator can configure Wave related functions as an enterprise administrator (UCM administrator). Currently, you can configure LiveChat’s Chatbot, view and message records, and enable the third-party integration interface for sending messages.
PREREQUISITES
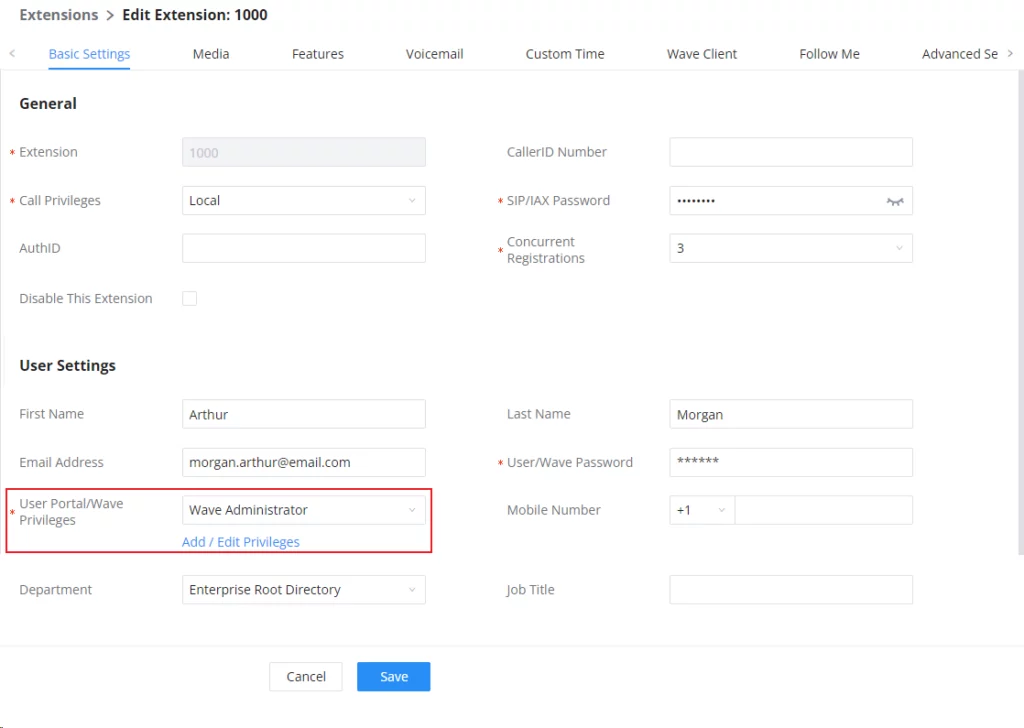
The UCM administrator should enable the Wave Administrator privileges for the specific extension by accessing the administrator web UI of the UCM, then navigate to Extension/Trunk > Extensions, then on “User Portal/Wave Privileges”, select “Wave Administrator” as shown in the figure below.
Extension Basic Settings
Important
In order to use this feature, please respect the software versions mentioned below:
Software version for Wave Desktop must be 1.27.X or higher.
Software version for the UCM6300 Series device must be 1.0.27.X or higher.
Third-party systems can send notification messages to Wave users through the following interfaces.
For example, the third-party system “Helpdesk” sends notifications to Wave users when there is a new ticket or the ticket status changes, and then the “Helpdesk” system uses the interface to send notification messages to the specified extension or email address.
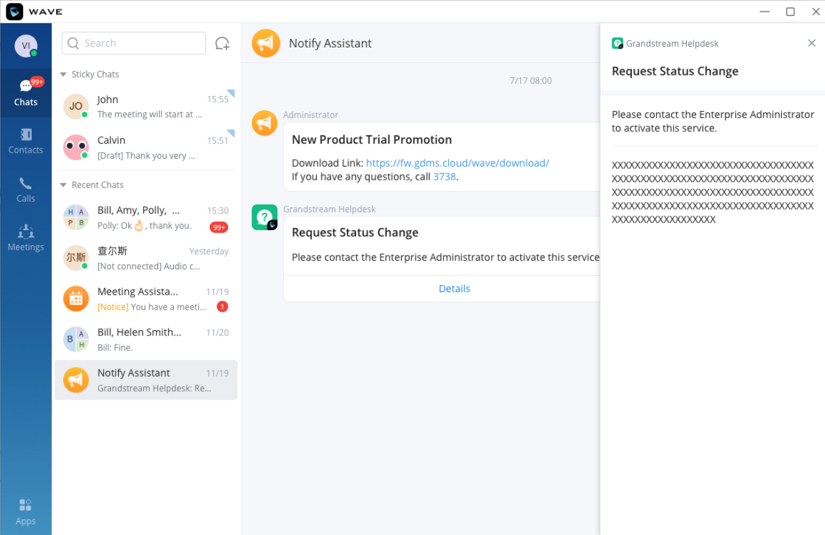
These extension users can receive notification messages when they log in to the Wave desktop or mobile client, as follows:
Notify Assistant
Enable Interface Link
To set an Interface Link please follow the steps below:
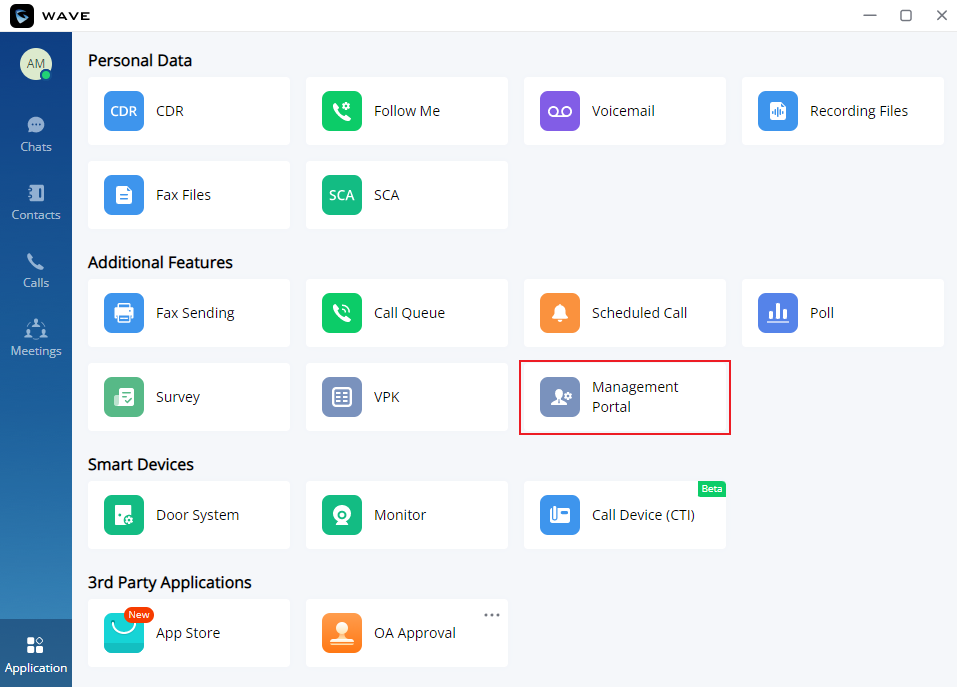
Log in to the Wave client, and the Wave administrator opens the management page in Application > Management Portal > Integration.
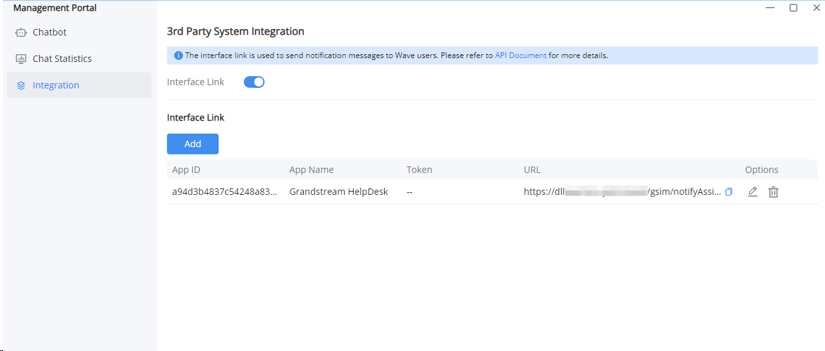
Click to enable interface link. After enabling, all the following interface links will be valid. Otherwise, all interface links will be invalid.
Interface Link Enabled
Notes
If your UCMRC/CloudUCM plan expires, all the links will also expire.
If the UCMRC/CloudUCM domain name changes, the interface link address will automatically change to the new domain name. Your third-party system needs to use the new link address.
Add Interface Link
Users can create different interface links for different third-party systems to facilitate the management of the use of third-party systems.
Log in to the Wave client, and the Wave administrator opens the management page in Application > Management Portal > Integration > Wave Notification Messages.
Click “Add” to add a new interface link.
Add Integration
APP ID
Enter your APP ID for unique identification. It can be a random string or your custom Wave add-in app ID.
If you want to send a notification message to a Wave user, who can start the Wave add-in to parse the detailed data, you can enter your custom add-in APP ID in the Wave app store.
Enter a name, which will be displayed when the Wave client receives notification messages.
Token
Optional, you can enter a random string for authentication when using the interface.
Parameters for calling the interface: secret=”my_token”;
Interface Link
An interface link corresponding to this APP ID will be generated for use by third-party systems. Parameters for calling the interface: curl -X POST -d “$body” -k “https://c074ad2abcd.a.gdms.cloud/gsim/notifyAssistant/0-aae3e891849641069cfc37ea3d677d98-c074ad2a4b5c” -H “X-Hub-Signature-256: sha256=$signature”;
How to Call the Interface
Third-party systems can call the interface link through the following method to send notification messages to Wave users.
Notes
If your UCMRC/CloudUCM plan expires, all the links will also expire.
If the UCMRC/CloudUCM domain name changes, the interface link address will automatically change to the new domain name. Your third-party system needs to use the new link address.
Post:
/gsim/notifyingAssistant/:urlToken
Request example:
curl -i /gsim/notifyingAssistant/:urlToken
Header:
Field Name
Type
Description
X-Hub-Signature-256
string
Optional. This parameter is required only when “token” is set when adding a new interface link. Use Token to calculate the header field X-Hub-Signature-256 (please refer to the Github interface for usage).
Parameter:
Note
The total length of this message body cannot exceed 5000 characters.
Field
Type
Required
Length
Description
to
array<string>
yes
1~500
The extension or email address that receives the notification message
title
string
yes
1~128
The title of the notification message, which will be displayed in the Wave notification assistant
description
string
yes
1~500
The message content will be directly displayed as a message in the Wave notification assistant
target
string
no
0~36
Optional. If you want the new notification message of the same object (such as the same ticket) to overwrite the old notification message, you can fill in the ID of this object (such as the ticket ID).
For example, if you fill in the ticket ID here, when you send a new notification message with the same ticket ID again, the Wave client will overwrite the original notification message of the ticket ID with the new notification content.
messageType
string
yes
1~128
The message content format can be: "json", "text", “url”, “sso_url”, the default is "text".
data
string
no
0~4000
The details of the notification will not be directly displayed in the notification assistant. If you click the "Details" button, it will be parsed.
If the messageType is "json" format, the Wave plug-in of this APP ID will be started to parse the data after clicking the details.
If the messageType is "text" format, the text of the data will be displayed in a pop-up window after clicking the details.
If the messageType is “url” format, this URL will be opened in a browser.
If the messageType is “sso_url” format, this URL must include the App ID of the SSO Authentication API. Once clicked by the user, the re-assembled URL will be opened in a browser.
Stream read failed, failed to read webhook request body
426
User permission denied, the current user does not have permission
420
User not found
411
Error data type
402
Unknown action, it may be because the current UCM firmware version does not support this function
400
Illegal request parse json fail, the json format is incorrect and json parsing failed
Edit/Delete Interface Link
Log into Wave Desktop client and open the management page in Application > Management Portal Integration
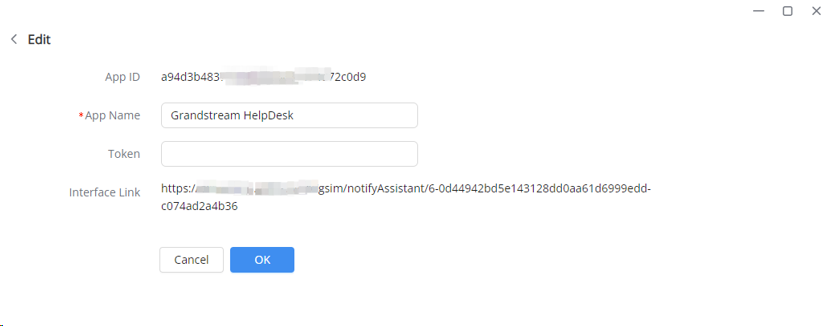
Click the button to edit the interface link.Only the APP Name and Token can be edited, and the others cannot be edited.
Note
After changing the Token, you also need to modify the Token synchronously when calling the interface.
Click on the button to delete the interface. After deletion, the link to this interface will be invalid.
App Configuration Entry
WAVE SSO AUTHENTICATION
Third-party systems can integrate this SSO API (which recognizes Wave accounts) to enable users to sign in to third-party systems using their Wave account simply by clicking a link inside Wave notification messages (“Sign in with Wave” links).
Example:
When a user receives a notification message from a third-party system on Wave and clicks the “Details“ button, the URL will open in a browser (e.g., an OA system).The URL carries the Wave account metadata, allowing the third-party system to decrypt the Wave account information using a secret key, achieving a seamless Single Sign-On (SSO) experience.
Wave Notification Message
Go to Management Portal -> SSO Authentication and create a new SSO Authentication API. During creation, configure the input parameters as follows:
Parameter Name
Description
Name
Required. A descriptive/remark name for this SSO authentication, such as its intended purpose.
URL Whitelist
Optional. Specifies which URLs are eligible for this SSO authentication parsing. If left blank, any URL using this App ID will automatically be re-assembled to carry Wave account authentication metadata.
Once created successfully, the generated parameters are as follows:
Parameter Name
Description
App ID
Can be used as a URL parameter for the notification message SSO interface link (see steps below).
Secret Key
Used to authenticate the Wave account information within the newly re-assembled URL. The data is stored in JWT format (see steps below).
SSO Authentication
Inject the SSO interface link through the [Add Interface Link]. The link assembly rules are defined below, requiring the inclusion of the SSO appid: