


INTRODUCTION
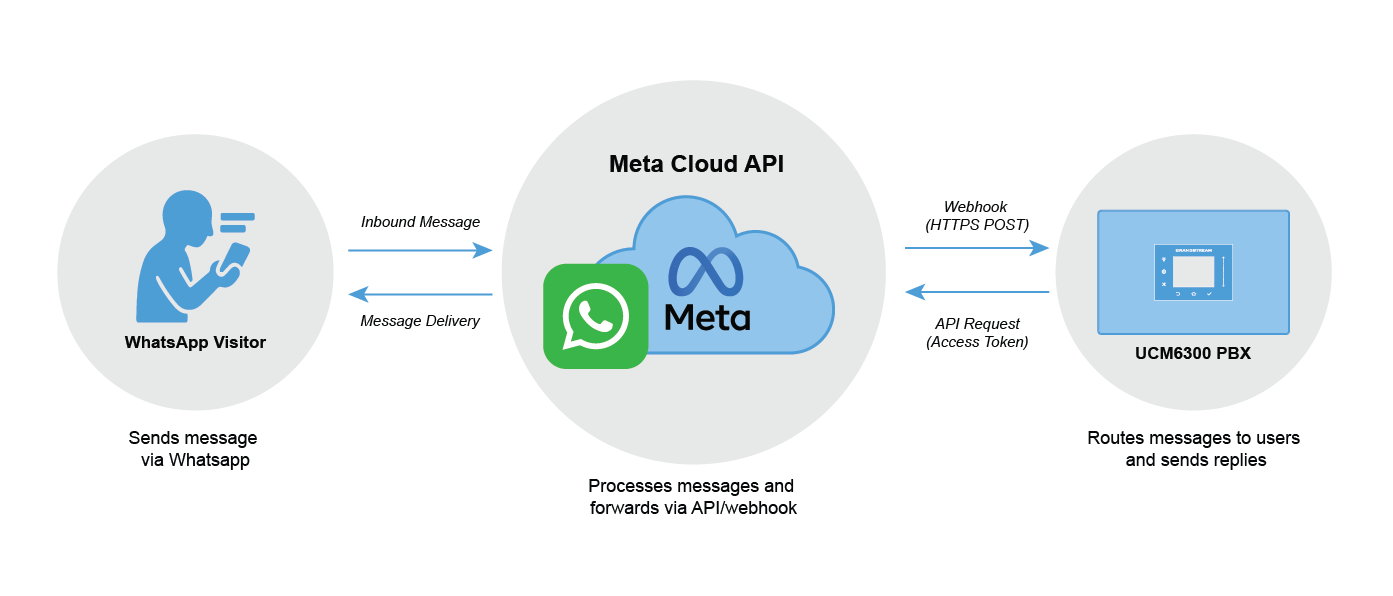
The UCM WhatsApp Integration allows UCM administrators to centrally configure WhatsApp Business accounts for all Wave Desktop users. Once configured on the UCM, extension users can receive and respond to WhatsApp messages directly from the Wave Desktop application without performing any individual client-side setup. Additionally, the integration can incorporate chatbot flows, enabling automated message handling, predefined interaction scenarios, and improved response efficiency for common user inquiries.
This guide provides a step-by-step configuration workflow covering the Meta (WhatsApp Business) side, the UCM configuration, and the Wave Desktop client setup.
PREREQUISITES
Before attempting this integration, ensure the following requirements are met:
WhatsApp Business & Meta Requirements
- A phone number to be used with the WhatsApp Business API.
- The number must not be registered to any existing WhatsApp account (personal or business app).
- Ability to receive SMS/voice OTP for number verification.
- A Meta Business Portfolio with administrative access.
- A Meta Developer account registered at https://developers.facebook.com
UCM & Network Requirements
- A UCM6300/A Series or CloudUCM running a compatible firmware version (see SUPPORTED DEVICES section).
- The UCM must be publicly reachable via HTTPS with a valid CA-signed TLS/SSL certificate.
WHATSAPP CLOUD API SETUP (META SIDE)
This section covers all the Meta-side configuration required before the UCM can be set up. Complete all steps in this section first. By the end, you will have your Phone Number ID and a permanent access token ready to paste into the UCM portal.
Create Meta App and Configure WhatsApp
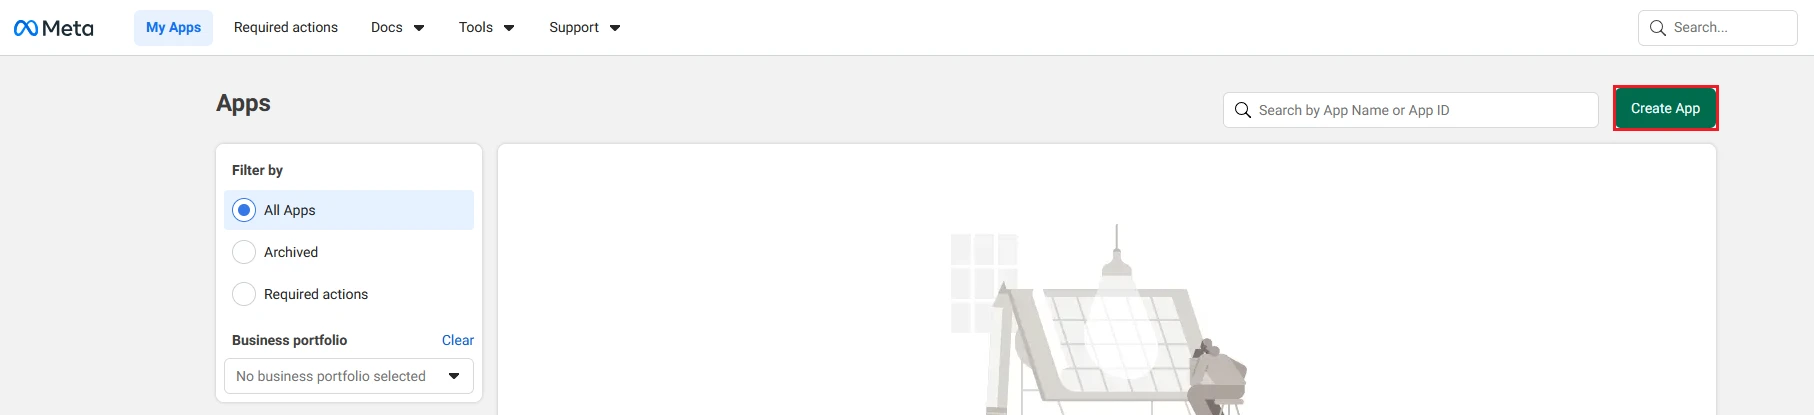
- Open Meta for Developers and sign in (If you don’t have a Meta developer account, complete the registration process).
- Click Create App.
- Choose a name for your app.
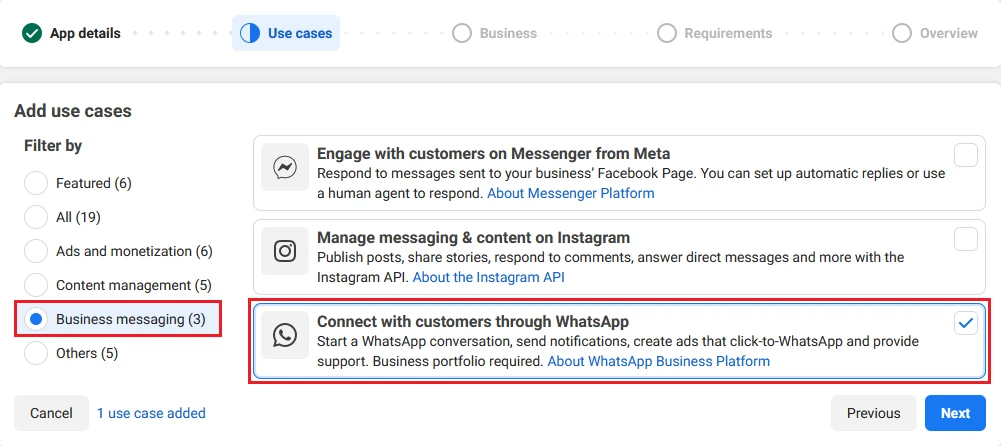
- Under the Business messaging app category, choose the Connect with customers through WhatsApp use case.
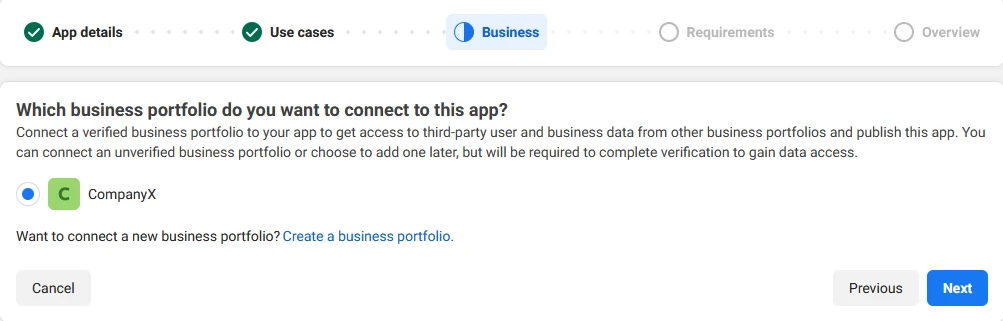
- Select an existing Meta Business Portfolio or follow the prompts to create a new one, then complete app creation.
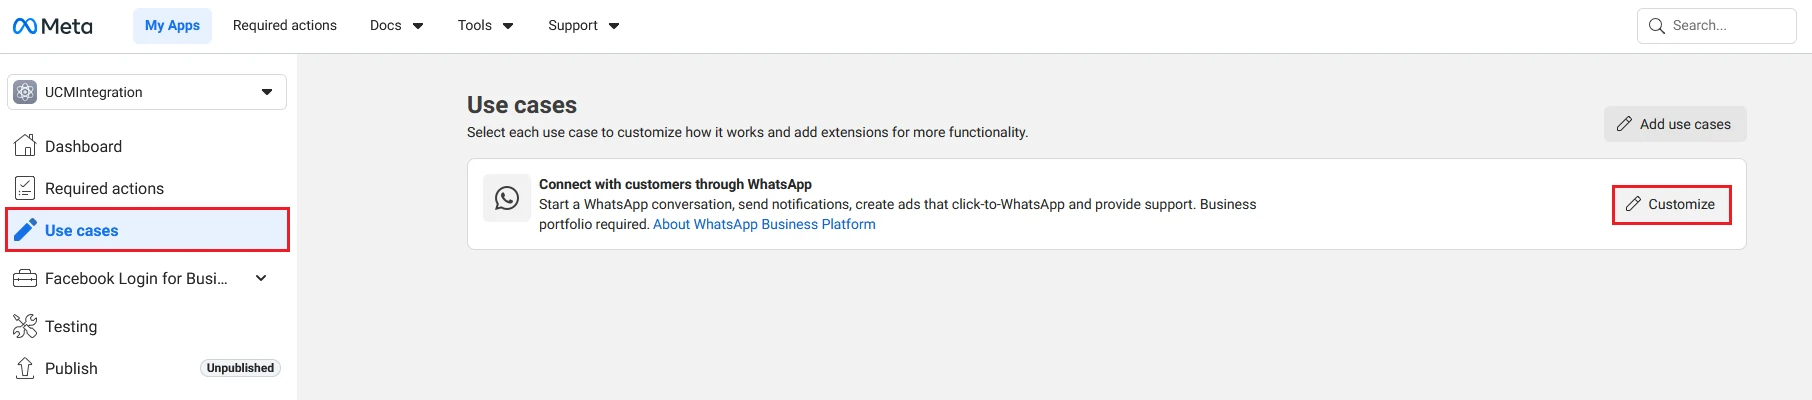
- In the left sidebar, click Use Cases (pencil icon), then click Customize under the Connect with customers through WhatsApp use case.
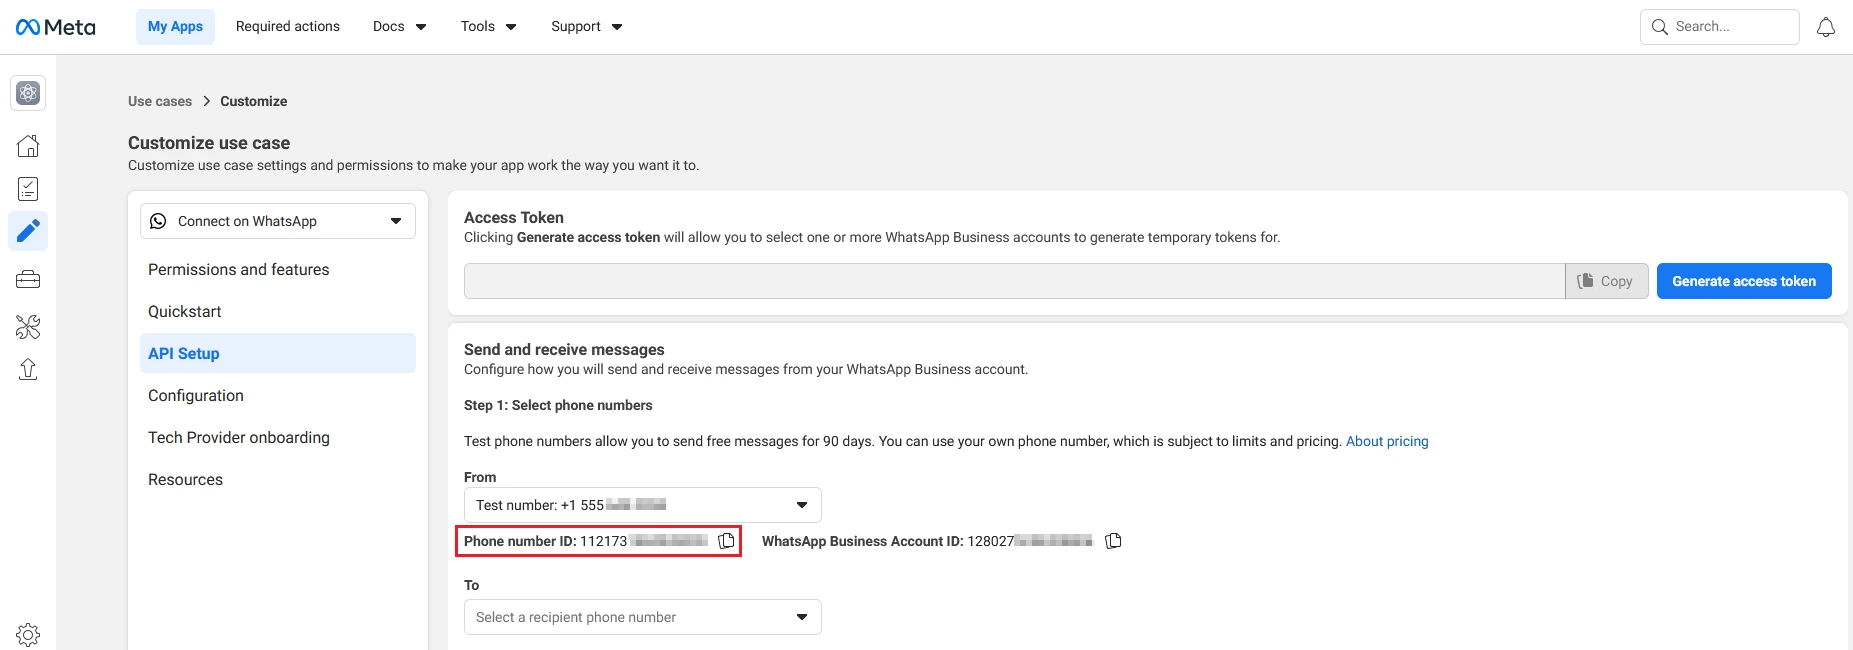
- In the Quickstart/API Setup section, locate and copy the Phone Number ID displayed for the test number (or your own number if already added). Save this value as it will be required during UCM configuration.
Send a Test Message (Optional)
Before proceeding to production configuration, it is recommended to verify that your Meta app is correctly connected to the WhatsApp Cloud API by sending a test message.
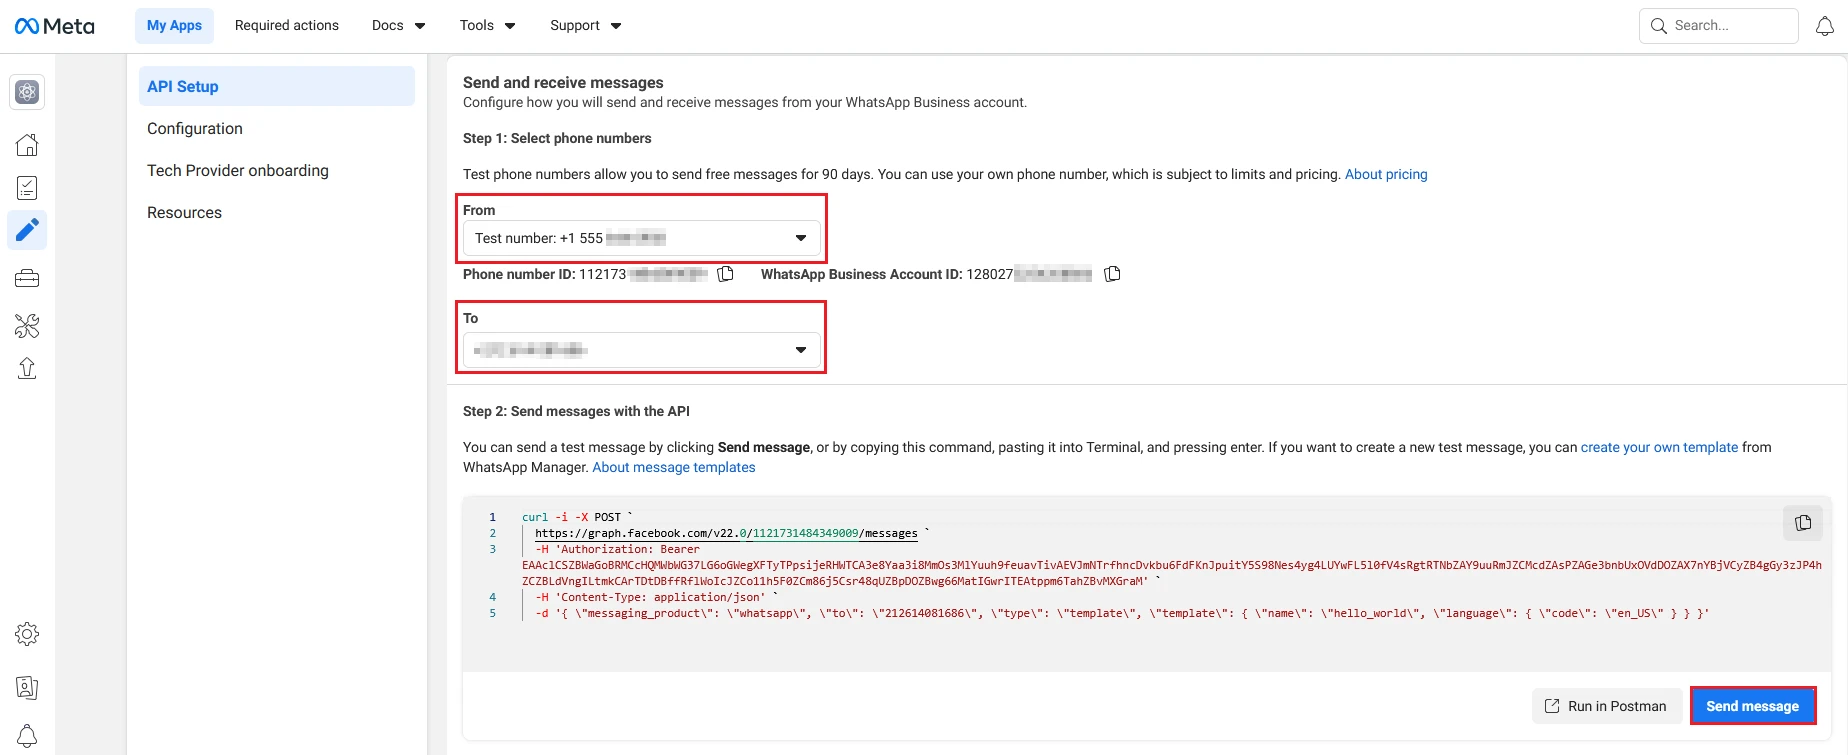
- On the API Setup page, generate a temporary access token.

- Ensure the test phone number is selected in the From field.
- In the To field, click Manage phone number list and add a personal WhatsApp number to receive the test message. Up to 5 recipient numbers can be added during testing.
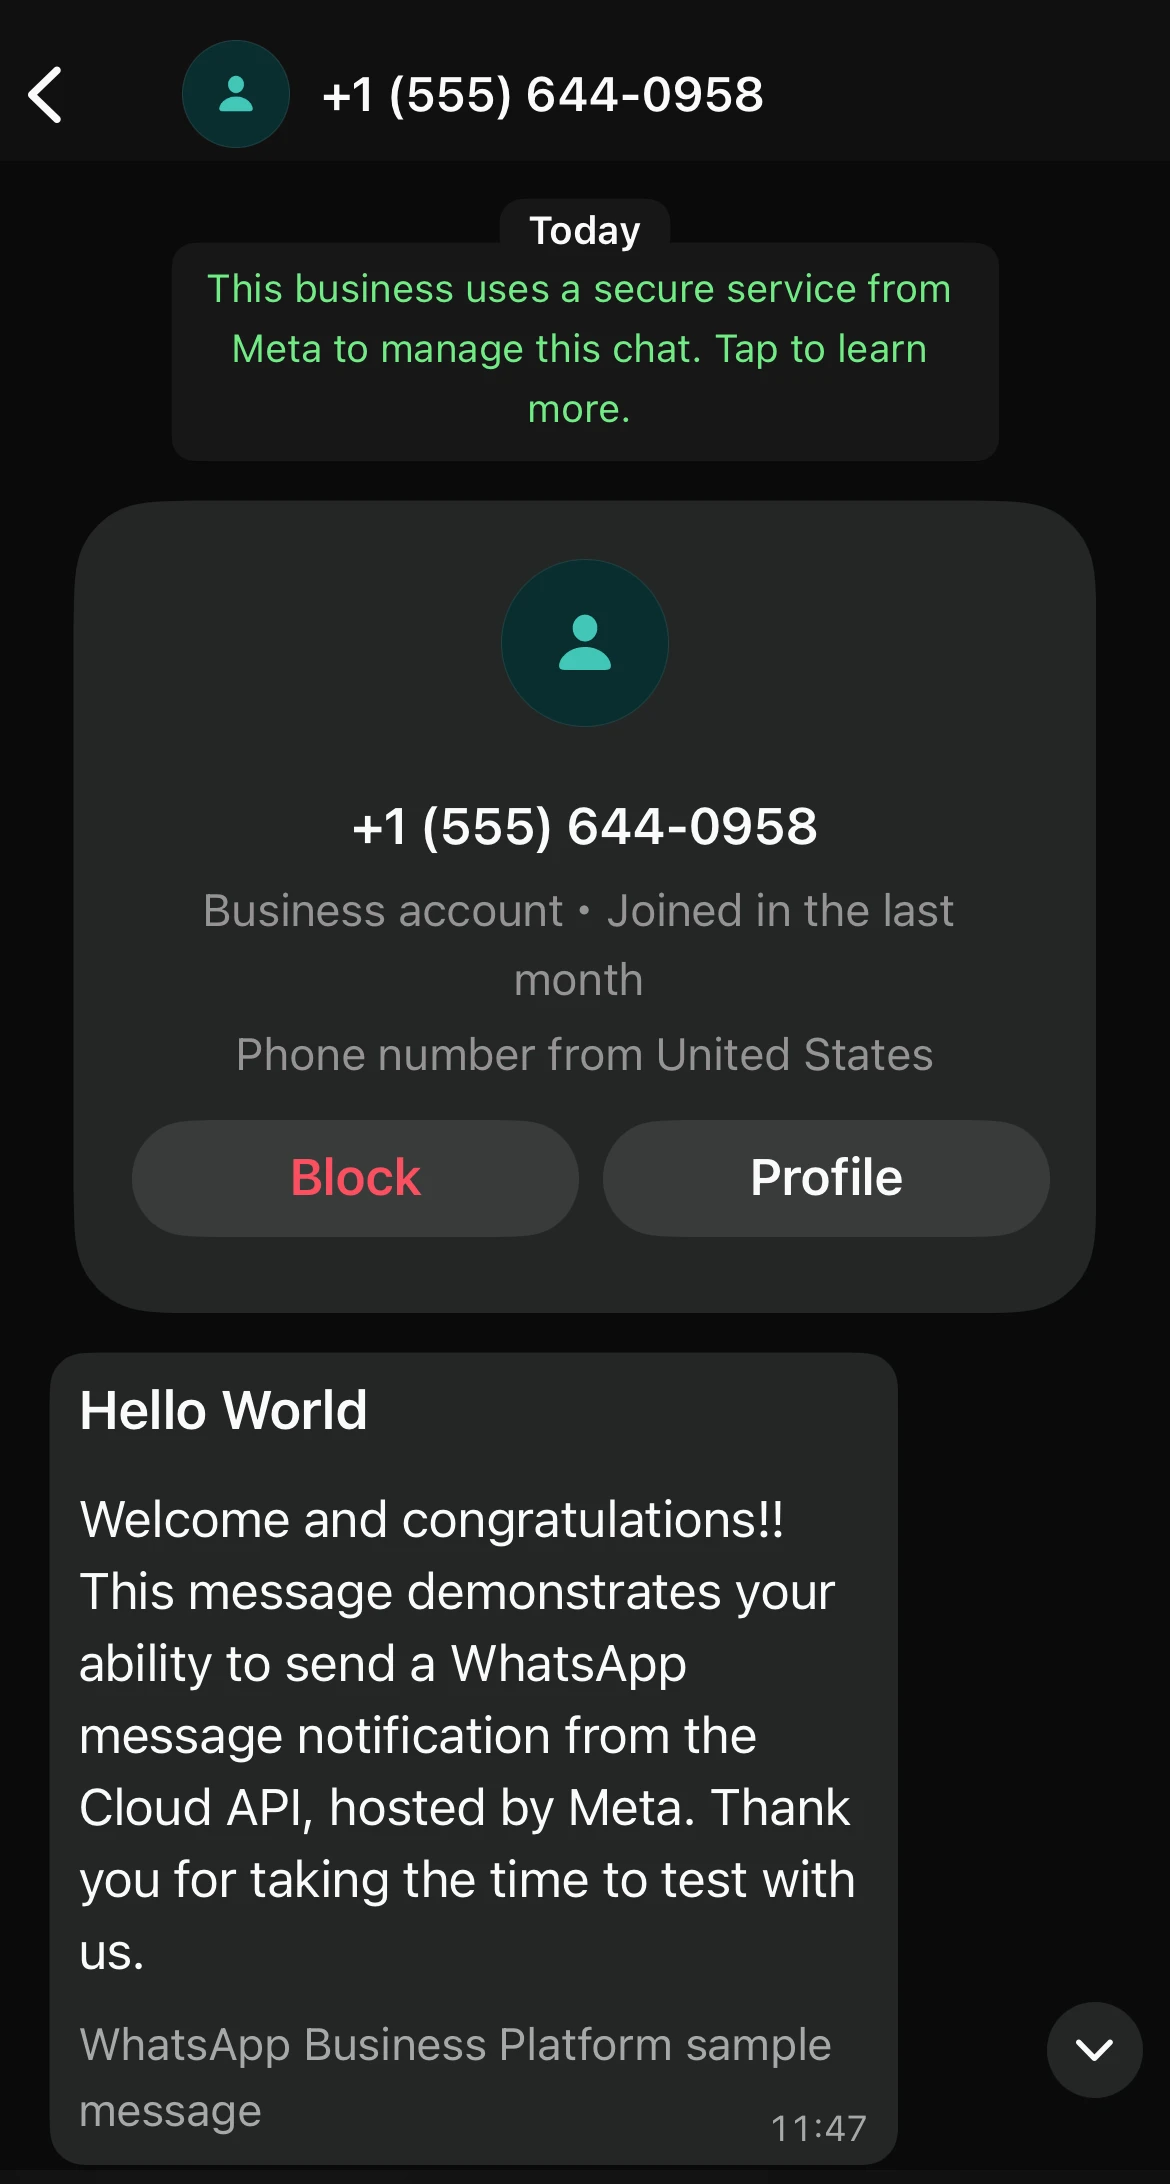
- Click Send message. Meta will send a preconfigured hello_world template message to the selected number.
- Confirm the message is received on the target device.
Add a Production Phone Number (Optional)
Skip this step if you wish to use the Meta-provided test number for this integration, or if your production number is already added and visible in the Form drop-down on the API Setup page.
If you need to register a new production phone number:
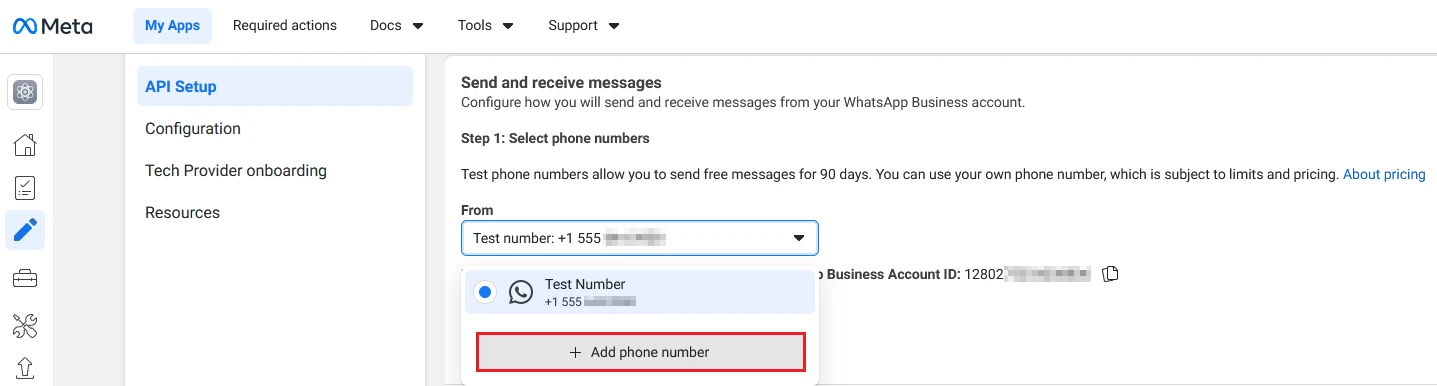
- On the API Setup page, click Add phone number under the From field.
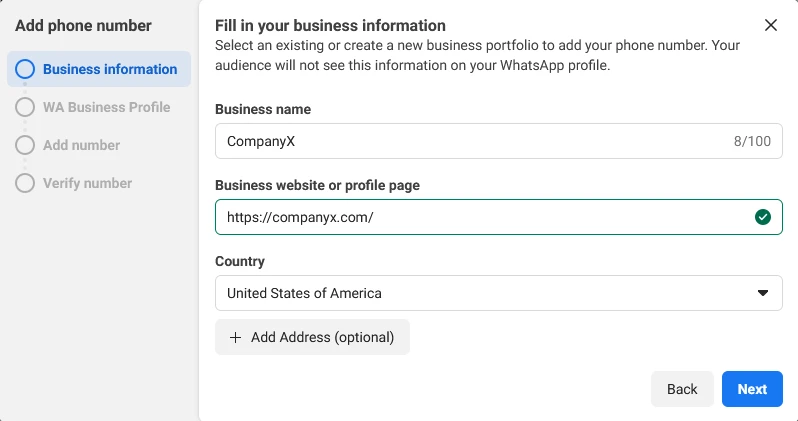
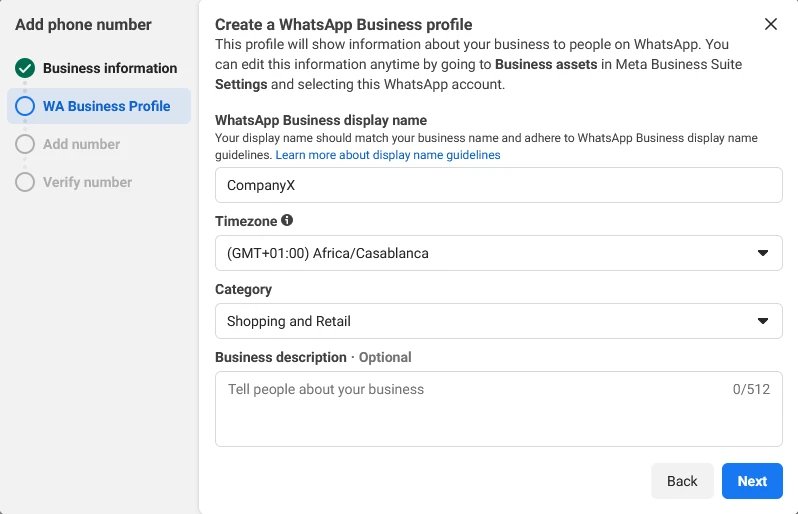
- Enter your business display name and business category, then click Next.
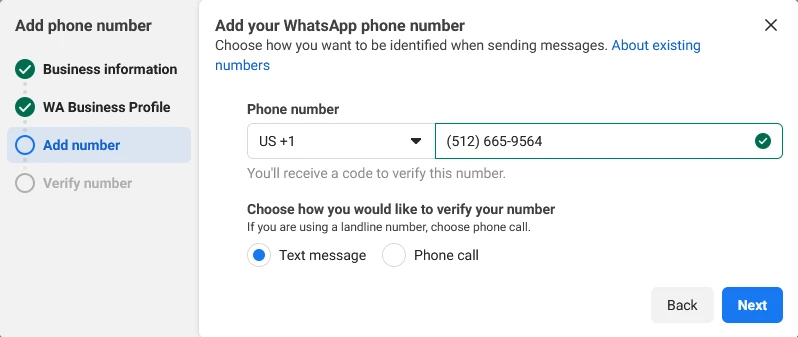
- Enter the phone number, select a verification method (SMS or Voice Call), and click Next.
- Enter the verification code received and complete the process.
- Once added, the number will appear in the From drop-down. Select it and copy the associated Phone Number ID.
Generate a Permanent Access Token
This step creates a non-expiring System User token that will be used for all ongoing UCM to WhatsApp communication.
Create a System User
- Open Meta Business Settings.
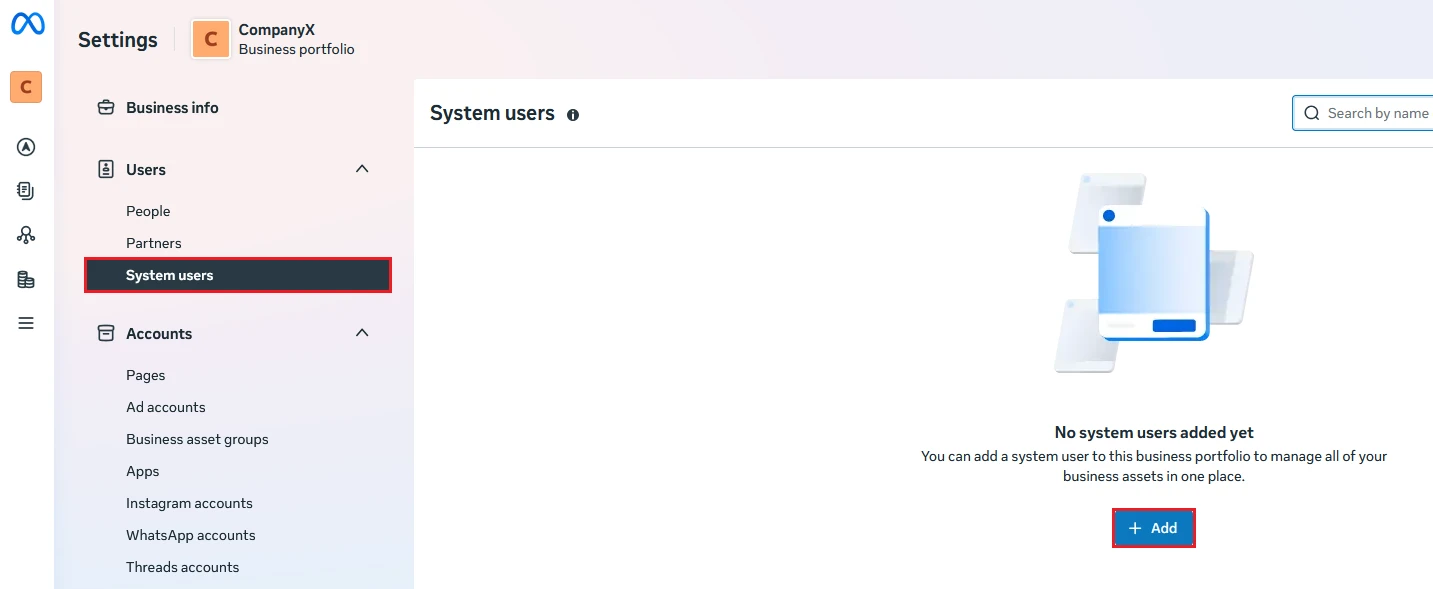
- In the left sidebar, navigate to Users→System Users and click Add.
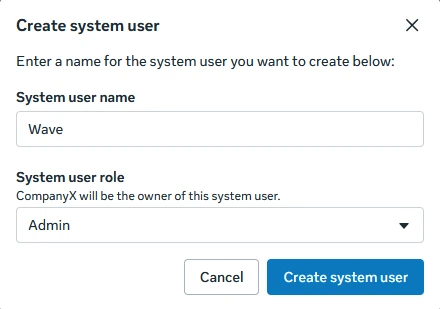
- Enter a name for the system user (e.g., UCM-WhatsApp), set the role to Admin, and click Create System User.
Assign Assets to the System User
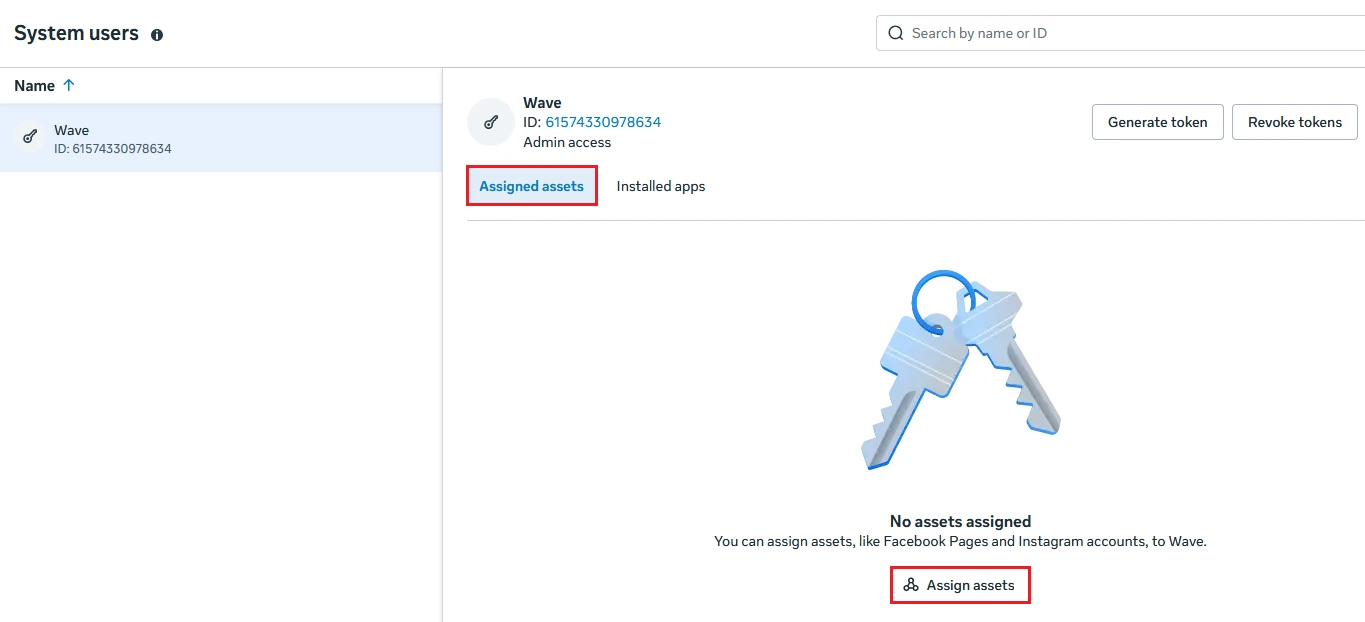
- With the new system user selected, click Assign Assets.
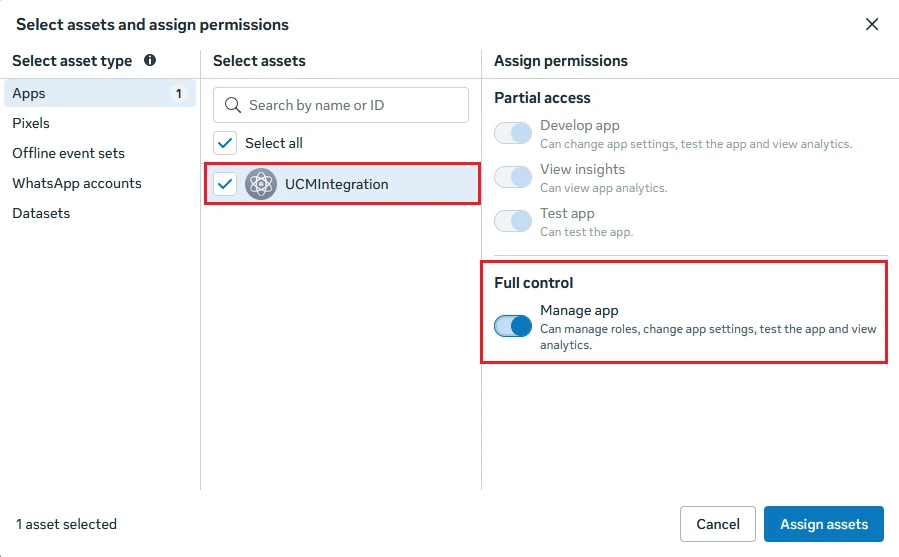
- Under the Apps tab, select your Meta app and enable Full Control→Manage app. Click Save Changes.
- Under the WhatsApp Accounts tab, select your WhatsApp Business Account(s) and enable Full Control→Manage WhatsApp Business Accounts. Click Save Changes.
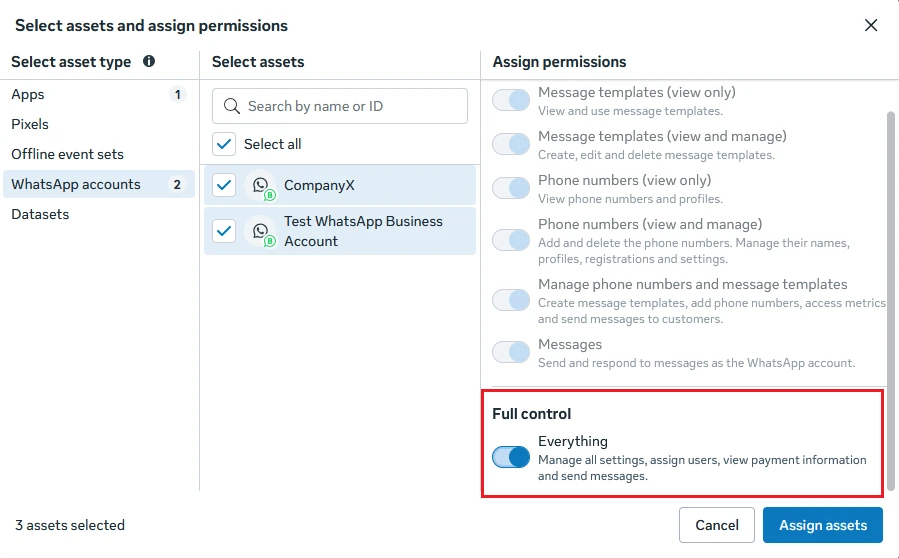
Generate the Token
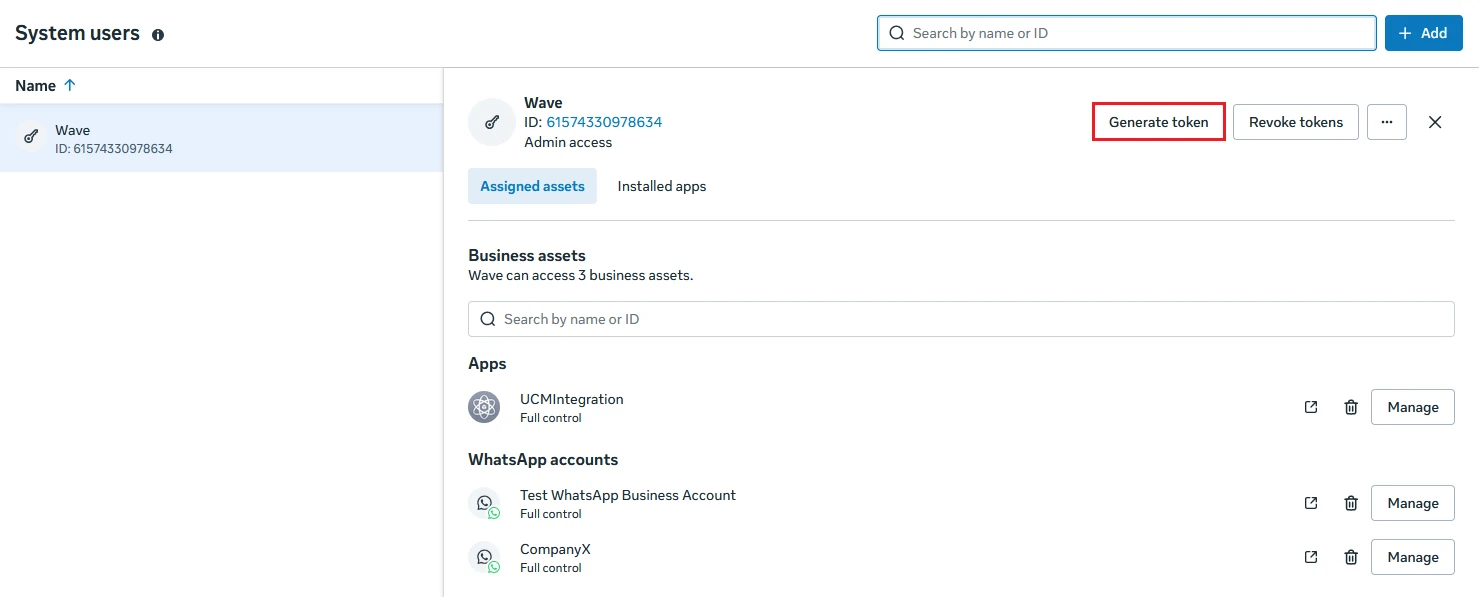
- On the System Users page, select the system user you created and click Generate token.
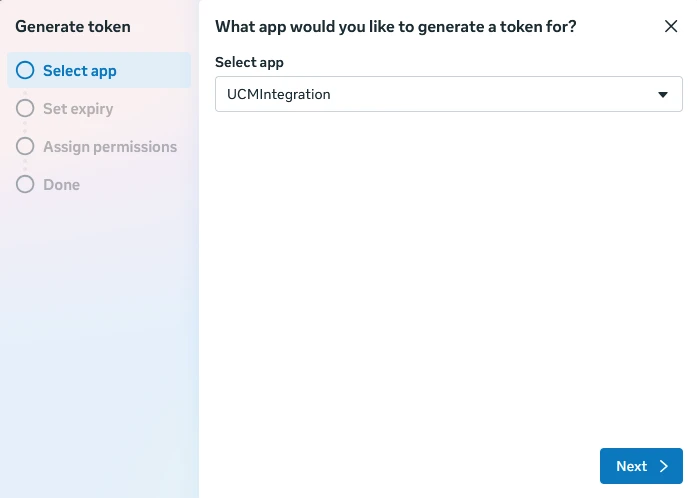
- In the pop-up, select your app from the drop-down list.
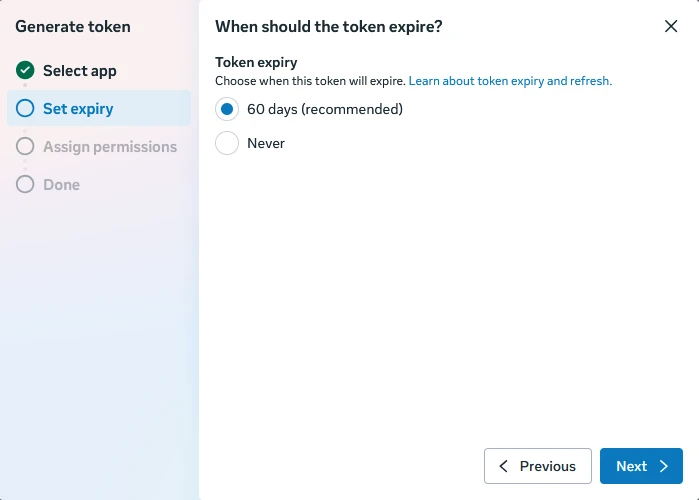
- Select an expiration for the token; it is recommended to set it to 60 days.
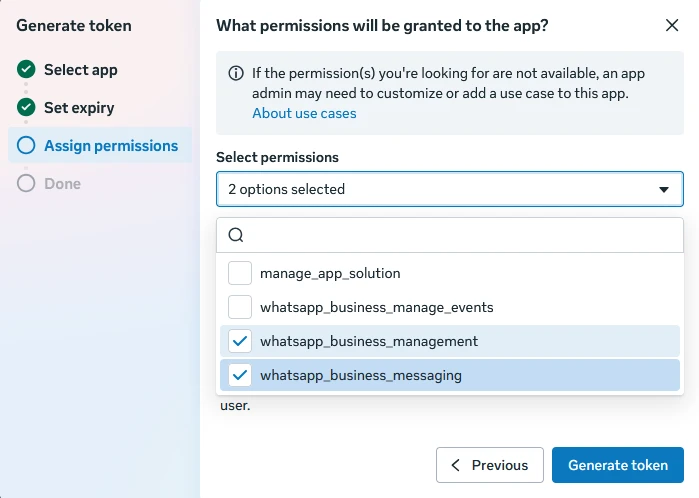
- Enable the following permissions:
whatsapp_business_messagingwhatsapp_business_management
- Click Generate Token.
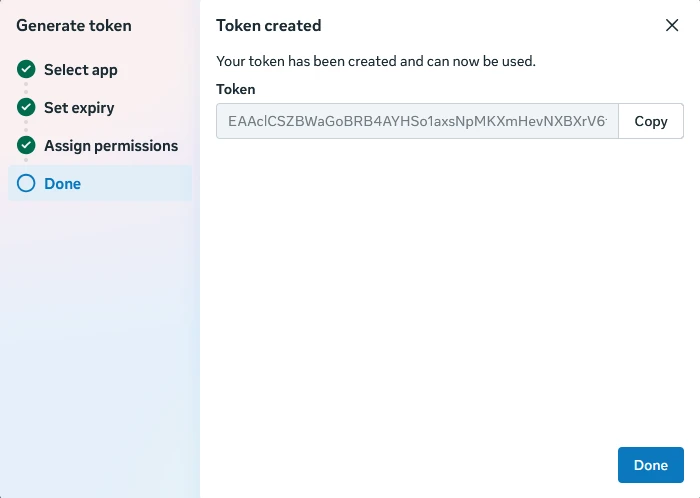
- Copy the token displayed and store it in a secure location. This token will not be shown again and remains valid indefinitely until explicitly revoked.
Retrieve the App Secret (Optional)
The App Secret is used by the UCM to cryptographically verify that incoming webhook events originate from Meta. Configuring it is optional but recommended for production deployments.
- In the App Dashboard, go to App Settings→Basic.
- Locate the App Secret field and click the Show icon.
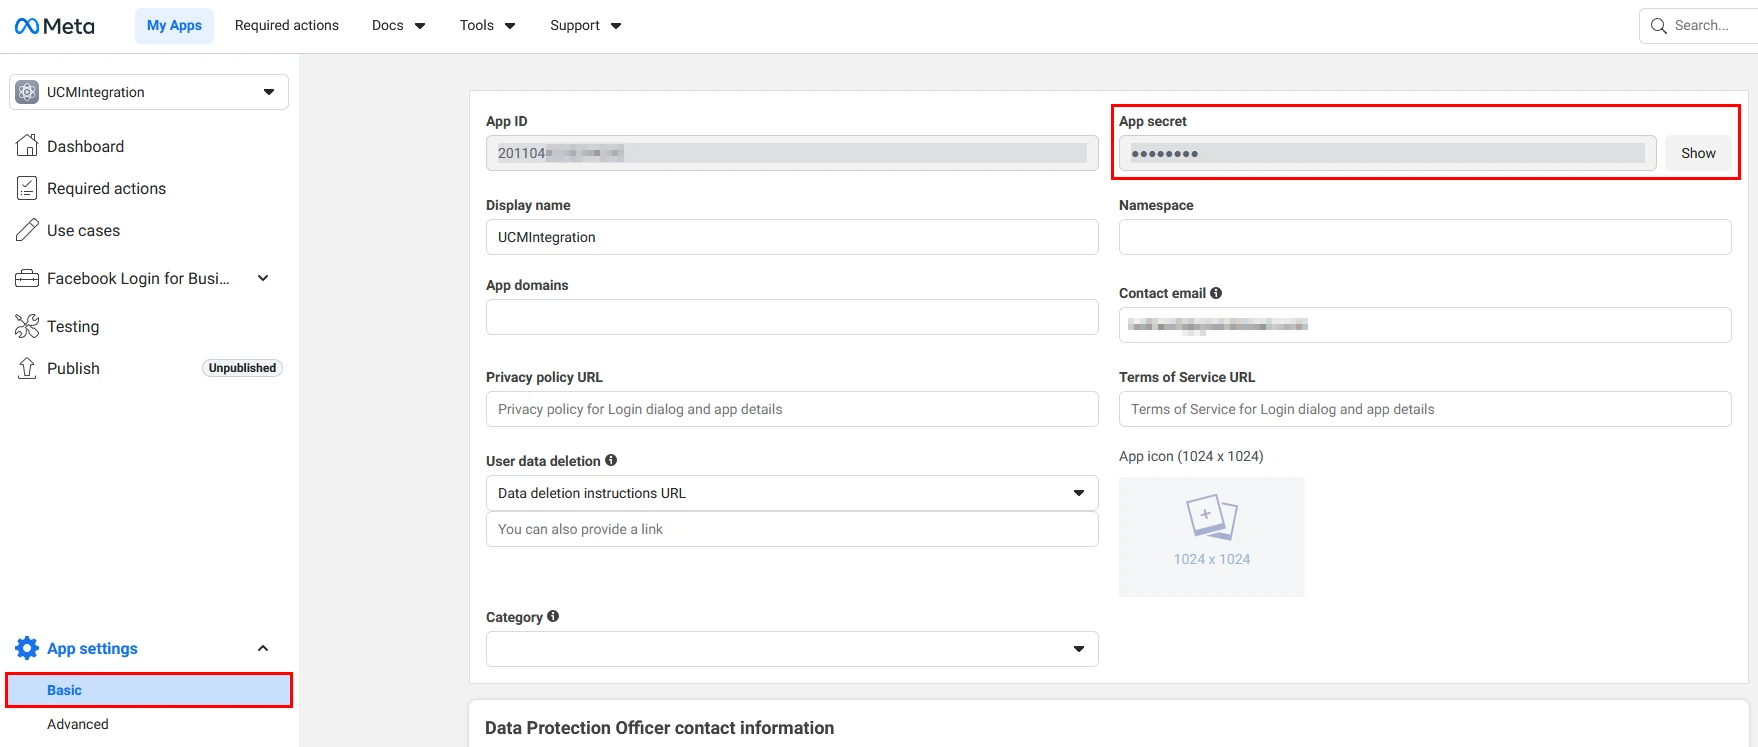
- Copy the value and store it securely alongside your access token.
UCM CONFIGURATION
This section covers the configuration steps performed on the UCM via the Wave Management Portal. Before proceeding, ensure you have the following values from the Meta side configuration:
Value | Meta Page | Configuration Step |
Phone Number ID | API Setup | Based on the number used for this integration:
|
Permanent Access Token | System Users | Step 5 in Generate the Token |
App Secret (optional) | App Settings | Step 3 in Retrieve the App Secret (Optional) |
Configure the WhatsApp Account
To access the UCM WhatsApp integration page:
- Log in to the UCM Wave Management Portal.
- Navigate to Advanced Messaging→Chatbot→WhatsApp.
- Click Add WhatsApp.
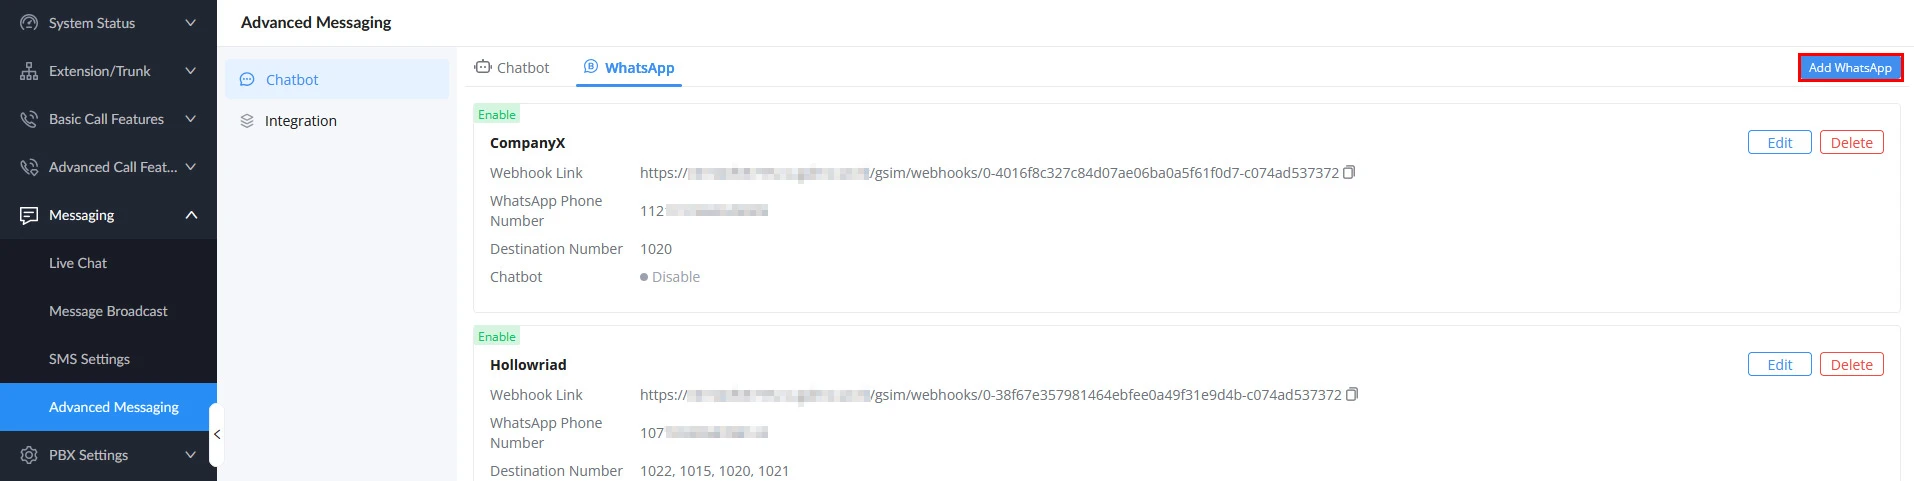
The Add WhatsApp dialog contains the following settings:
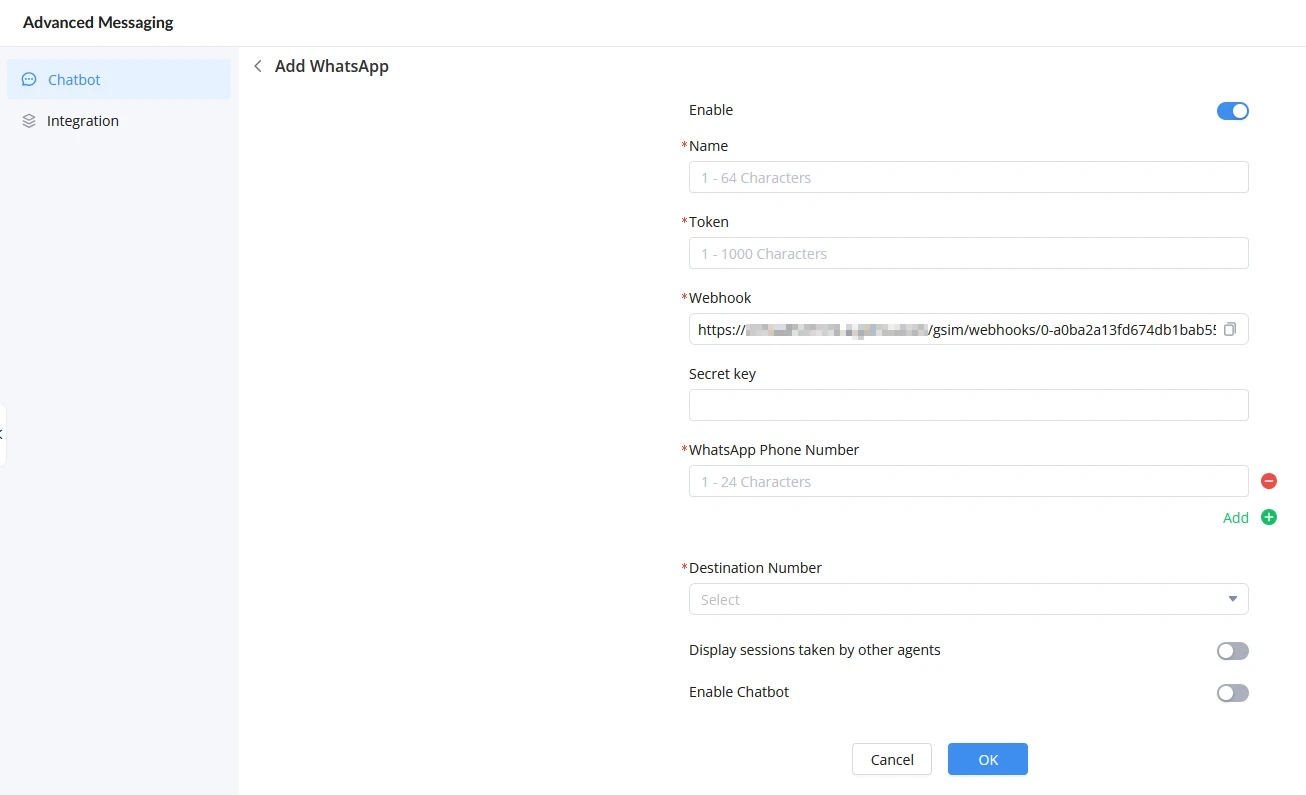
Parameter | Definition |
Enable | Toggle to activate this WhatsApp account. When enabled, incoming messages to this account will be delivered to the assigned extension users. |
Name | A display name for this WhatsApp Business account configuration. |
Access Token | Paste the permanent access token generated in the Meta side configuration. |
Webhook URL | Auto-generated by the UCM. Do not edit this field. Copy this URL using the copy button as it will be required in the next section to complete webhook registration on the Meta developer portal. |
Client Secret | (Optional) Enter the App Secret retrieved in the Meta side configuration. |
WhatsApp Phone Number | Enter the Phone Number ID saved from the Meta side configuration. Click the + button to add additional Phone Number IDs if needed. Messages received on any configured number will be delivered to the assigned Wave Desktop users. |
Destination Number | Select the UCM extension(s) that will receive incoming WhatsApp messages. Multiple extensions can be assigned. |
Display Sessions Taken by Other Agents | When enabled, this option allows agents to see sessions assigned to them, pending assignment, or assigned to another agent. |
Enable Chatbot | Activates the automated reply function for this WhatsApp account. When enabled, a Chatbot selection field appears. |
Chatbot | Select an existing configured Chatbot to handle incoming sessions automatically. For information on building Chatbot reply flows, refer to the Live Chat Chatbot Admin Guide. |
Chatbot Mode | Defines how the Chatbot interacts with incoming sessions. See the Chatbot Mode table below. |
Transfer to Agent | If the Chatbot cannot respond to a query, it sends a configured fallback message. When the visitor selects Transfer to Agent, a notification is sent to the assigned extension user. |
After Hours Prompt | Configures automatic replies for defined time windows (start time and end time). Behavior differs depending on whether the Chatbot:
|
Two chatbot modes can be configured for the WhatsApp channel:
Mode | Behavior |
Automatic Reception | All incoming WhatsApp sessions are handled entirely by the Chatbot. Assigned extension users receive no message notifications unless the visitor clicks Transfer to Agent or the Chatbot cannot answer the query. |
Chat Assistance | The Chatbot automatically replies to the visitor while simultaneously notifying assigned extension users in real time, allowing agents to take over the conversation at any point. |
Once this configuration is saved, assigned extension users will see the WhatsApp account listed in their Wave Desktop WhatsApp Business add-in. Extension users can view the configuration but cannot edit or modify it.
Configure the Webhook URL
This section completes the connection between Meta and the UCM by registering the Webhook URL copied from the UCM portal. Until this step is complete, the UCM will not receive incoming WhatsApp messages.
Register the Webhook URL
To register the Webhook URL retrieved from the WhatsApp configuration in the UCM page, please refer to the steps below:
- Return to https://developers.facebook.com and open your app.
- Use cases, customize
- In the Configuration section, click Edit.
- Paste the Webhook URL copied from the UCM portal into the Callback URL field.
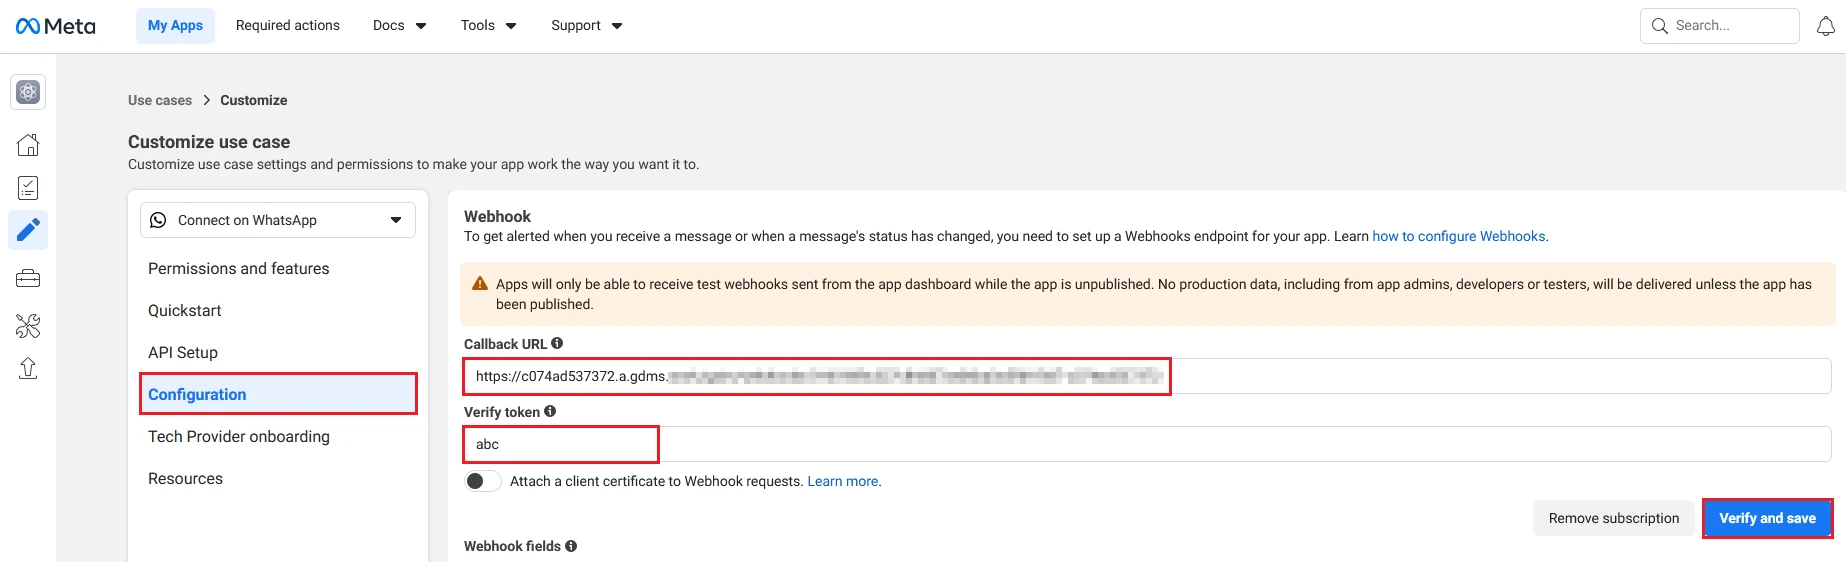
- In the Verify Token field, enter any alphanumeric string of your choice. This value is used by Meta to confirm that the callback URL is reachable and responsive and does not need to match any value configured on the UCM.
- Click Verify and Save. Meta will send a one-time verification request to the UCM. If the UCM is reachable and the URL is valid, the webhook will be confirmed.
Subscribe to Webhook Fields
After the Callback URL is verified, webhook field subscriptions must be configured to ensure the UCM receives the correct event types.
- In the Webhook section, click Manage (located below the Edit button).
- In the Webhook fields list, locate the messages field.
- Click Subscribe next to it, then click Done.
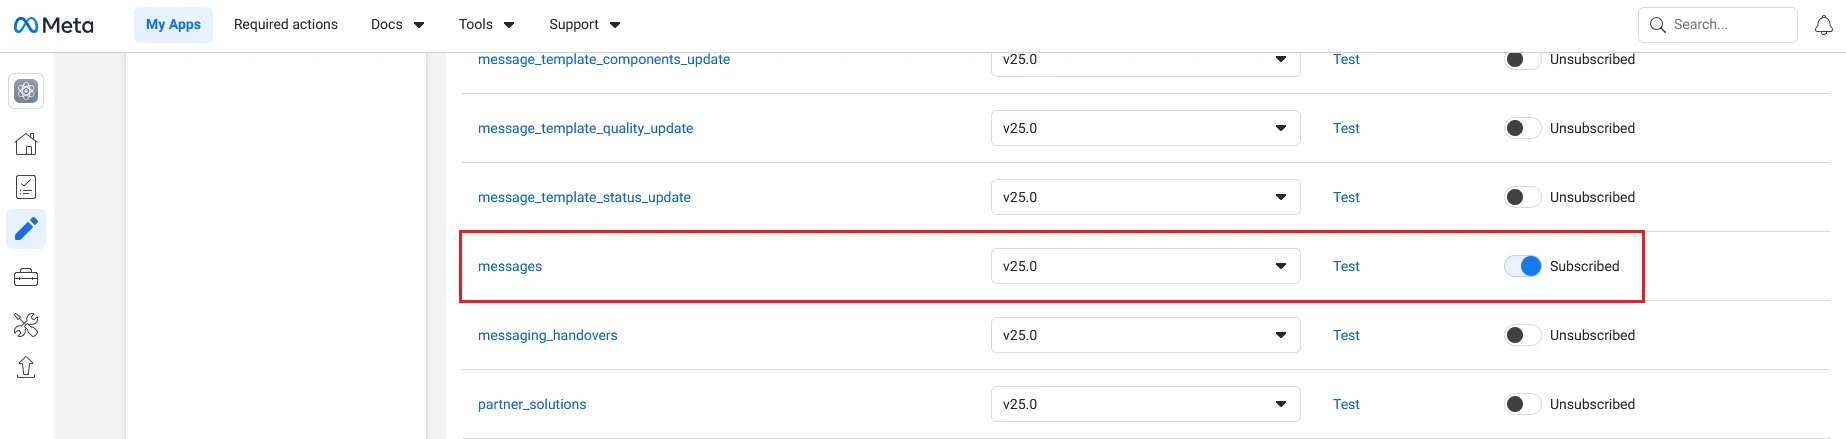
Once the webhook is registered and the messages field is subscribed, perform a quick end-to-end test to confirm the full integration is working:
- From a personal device, send a WhatsApp message to the configured phone number.
- Confirm the message appears in the Chat module of Wave Desktop on the assigned extension user’s client.
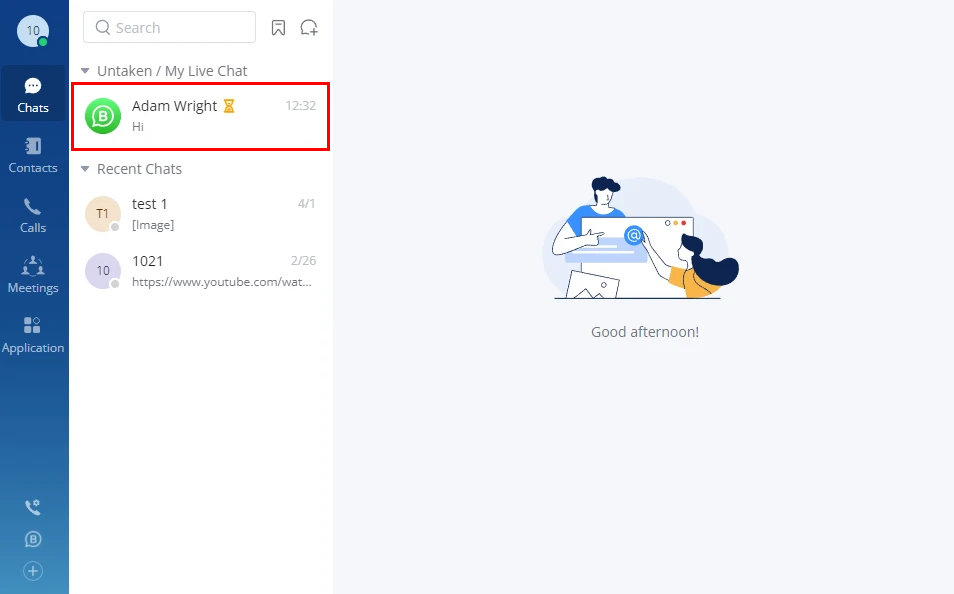
- Reply to the message from Wave Desktop and confirm that the reply is received on the personal device.
WAVE DESKTOP CLIENT
Once the UCM configuration and webhook registration are complete, assigned extension users can access the WhatsApp Business integration directly from the Wave Desktop application. No additional setup is required on the client side.
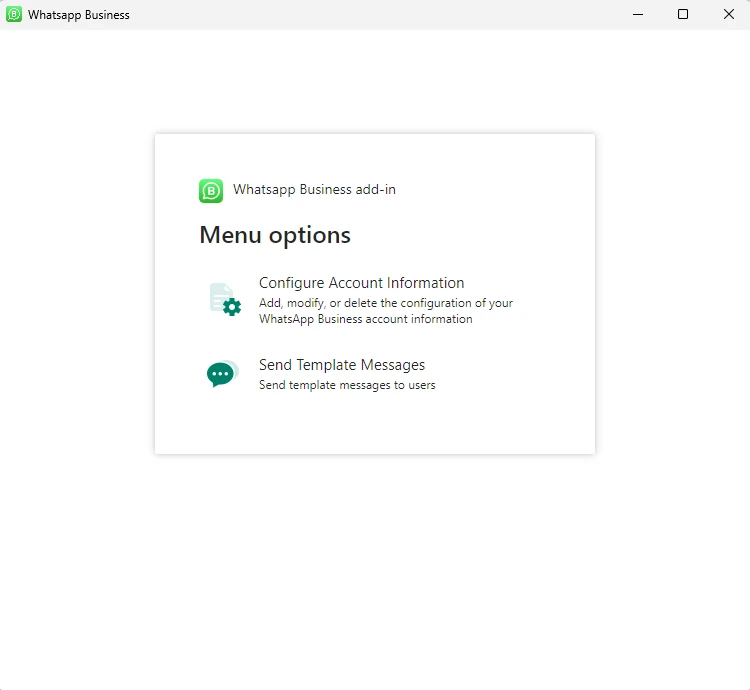
To access the integration, download and open the WhatsApp Business add-in from Wave Desktop. The add-in presents two menu options:
- Configure Account Information: View the WhatsApp Business account configuration pushed from the UCM.
- Send Template Messages: Send pre-approved template messages to WhatsApp users.
Configure Account Information
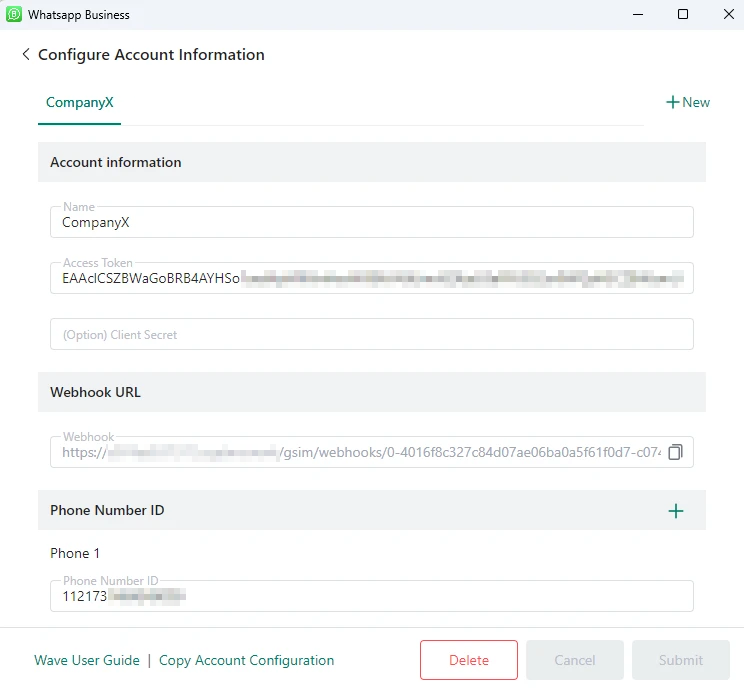
This module displays the WhatsApp Business account configuration set by the UCM administrator. Extension users can view the configured account details, including the account name, associated Phone Number IDs, and webhook URL, but cannot edit or modify any settings.
Send Template Messages
Template messages allow Wave Desktop users to send pre-approved, structured messages to one or more WhatsApp recipients on demand.
They are the only message type that can be sent outside of the 24-hour customer service window, making them suitable for outbound notifications, follow-ups, and marketing communications.
To send a template message from Wave:
- Open the WhatsApp Business add-in from Wave Desktop and click Send Template Messages.
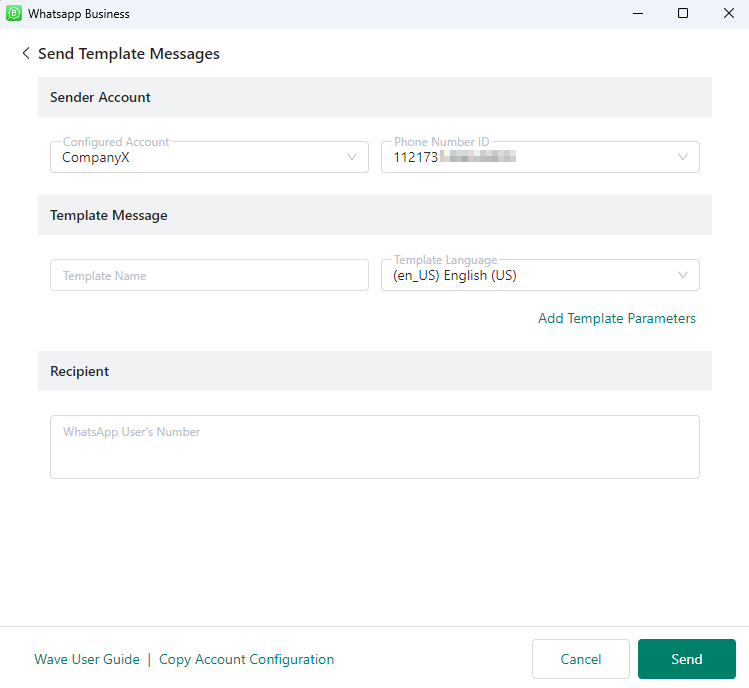
- Configure the following fields:
Parameter | Definition |
Sender Account | |
Configured Account | Select the WhatsApp Business account to send from. |
Phone Number ID | Select the Phone Number ID associated with the chosen account. |
Template Message | |
Template Name | Enter the exact name of the approved message template. |
Template Language | Select the language of the template. Must match one of the languages configured in the Meta approved template. |
Add Template Parameters | Required only when the template contains variable placeholders. Parameters must be added in the correct type and sequence. |
Header Type | Supports image, video, and document uploads for templates with a media header. |
Body Type | Supports text, date, time, and currency parameters. If the body contains multiple parameters, add them in the order they appear in the template. |
Button Type | Only URL-type button parameters are supported. |
Recipient | |
WhatsApp User’s Number | Enter the recipient phone number(s). Multiple numbers can be entered or pasted simultaneously, separated by spaces, line breaks, commas, or semicolons. |
To retrieve the template name and language values needed in Wave Desktop, locate your approved templates on the WhatsApp Business Platform:
- Go to https://business.facebook.com and sign in.
- In the left sidebar, navigate to WhatsApp Manager.
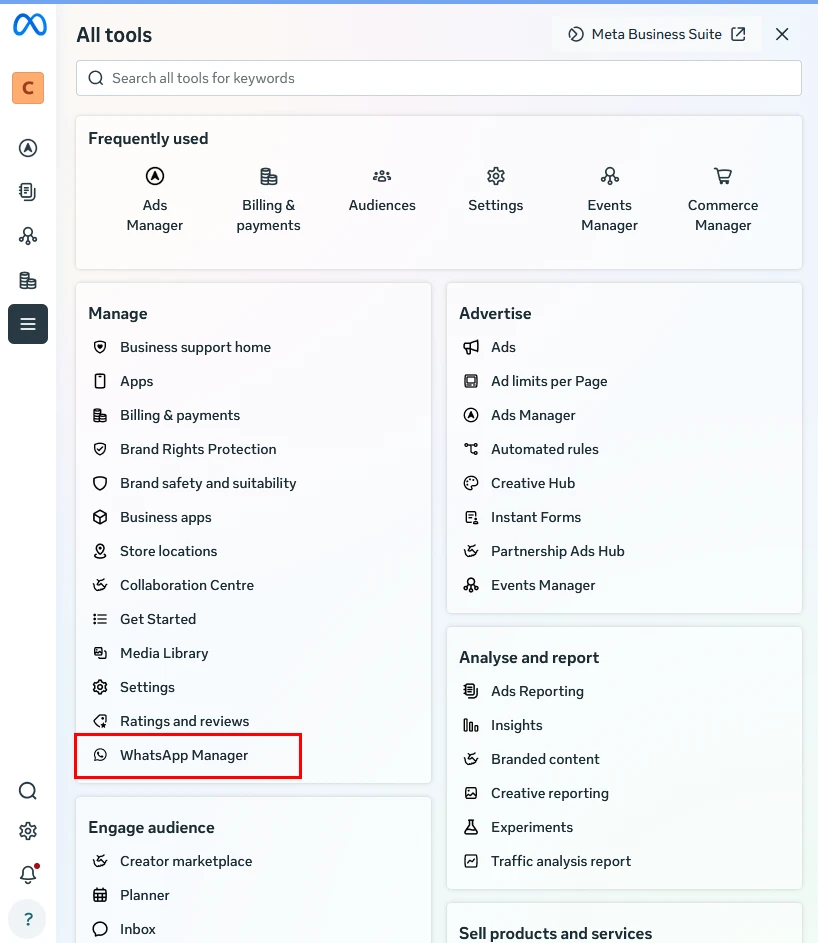
- Select your WhatsApp Business Account from the account list.
- Click Message Templates in the left sidebar.
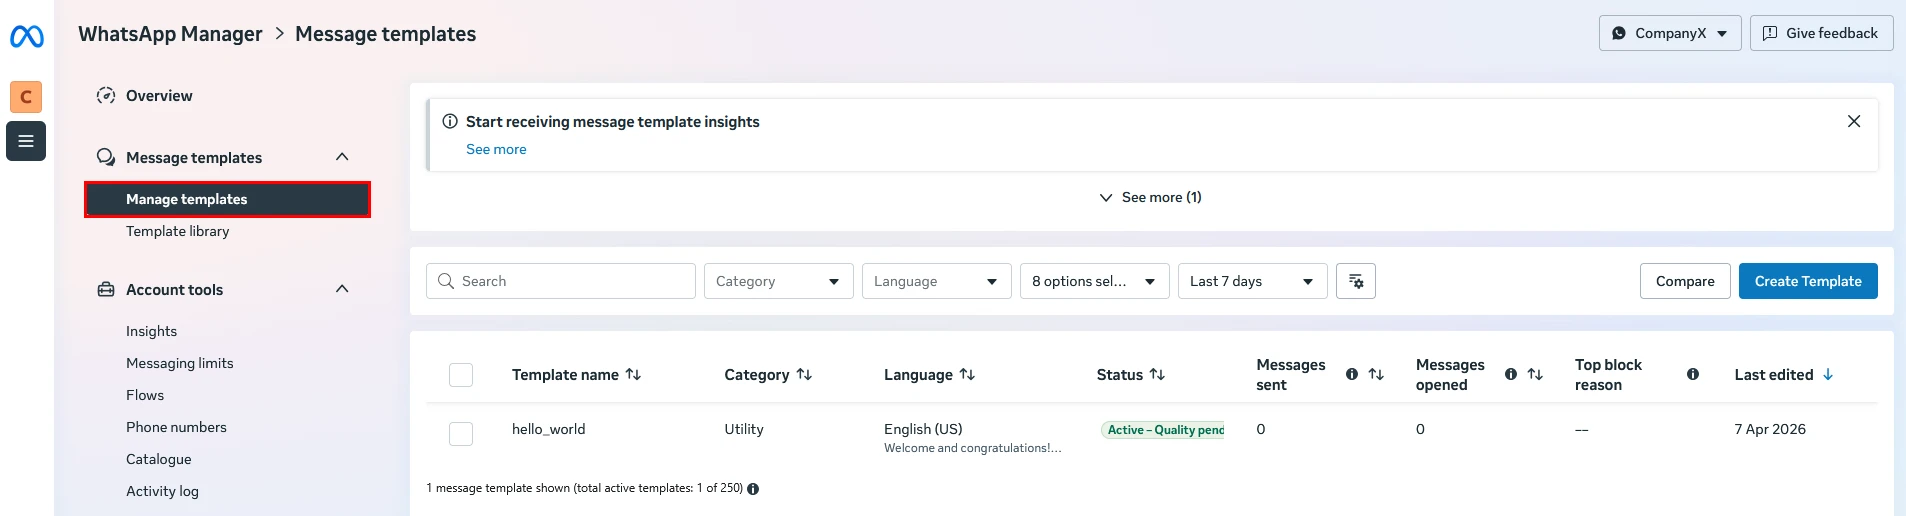
- The template list displays all submitted templates and their current approval status. Only templates with an Active status can be sent.
- Click on a template to view its full details, including:
- Template name: enter this exactly as shown into the Template Name field in Wave Desktop.
- Language: select the language matching option in the Template Language field in Wave Desktop.
- Parameters: review the header, body, and button components to determine what parameter values need to be supplied when sending.
Receiving Messages
Incoming WhatsApp messages are routed to the assigned extension user(s) and appear in the Chat module of Wave Desktop.
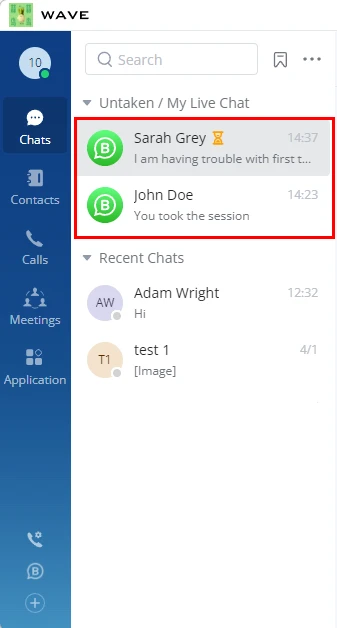
Each WhatsApp conversation is listed as a separate session, identified by the visitor’s display name. Agents can send text messages and file attachments in reply.
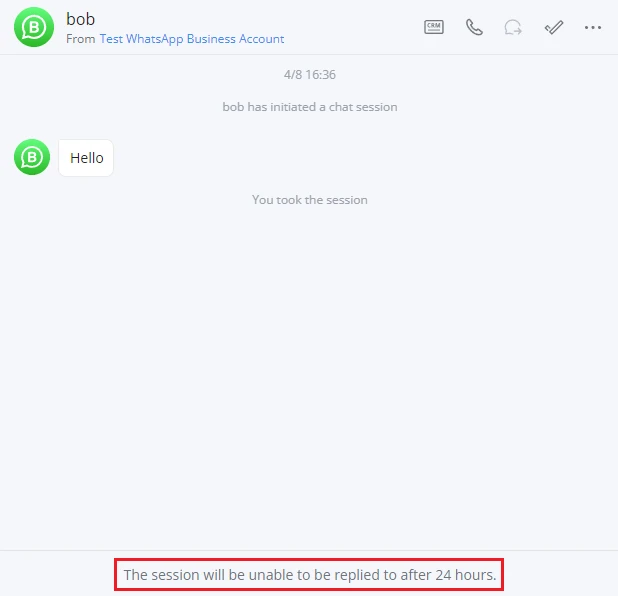
WhatsApp enforces a 24-hour customer service window. Once a visitor sends a message, the assigned agent has 24 hours to reply within the open session. After this window closes, the chat input field will be disabled for that session.
Chatbot Interaction
From the visitor’s perspective, the Chatbot responds automatically to incoming messages according to the configured reply flow. Depending on the flow design, the visitor may be presented with options, prompted for input, or guided through a predefined interaction sequence.
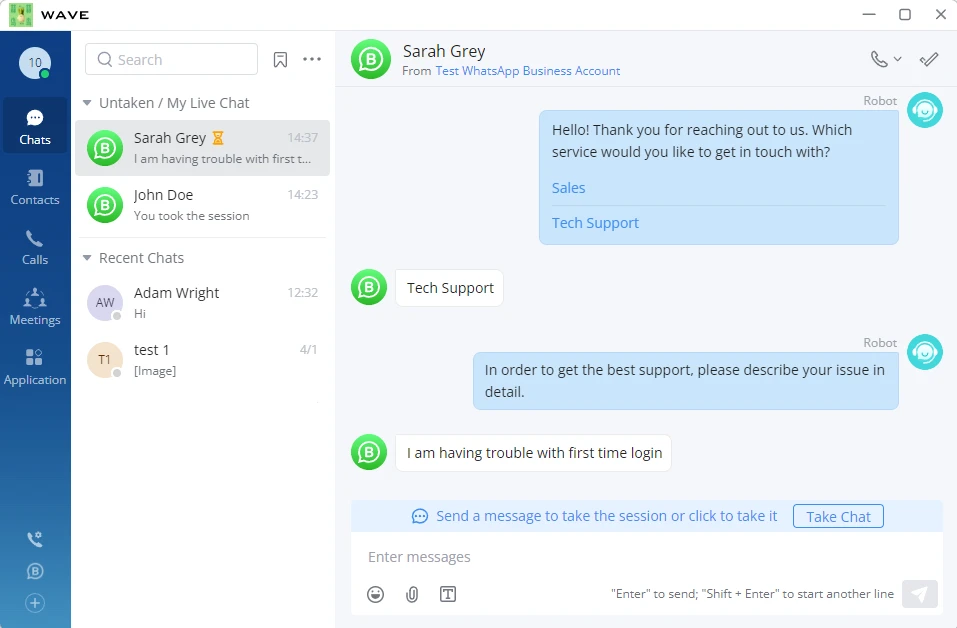
If the Chatbot cannot answer a query or the visitor requires human assistance, a Transfer to Agent option is presented, which can be customized in the UCM WhatsApp settings.
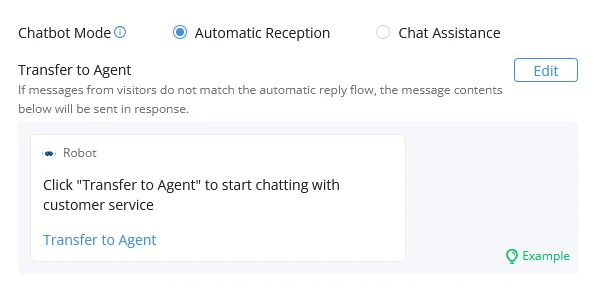
When a visitor selects Transfer to Agent, the session is pushed to the assigned extension user(s) in the Wave Desktop Chat module. The agent receives a session notification and can open the conversation to take over.
Chat Window Actions
The following actions are available from the upper-right corner of an active WhatsApp chat window:
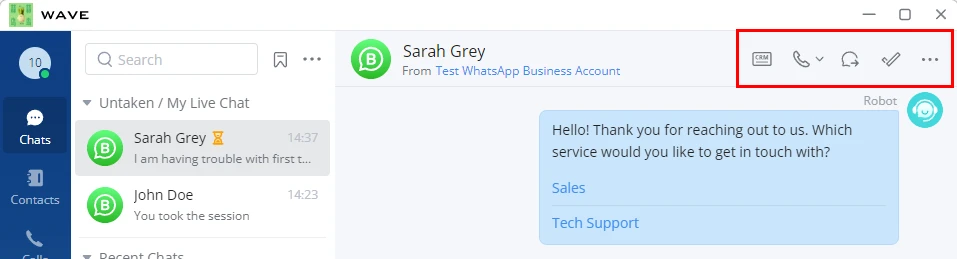
View CRM Contact
Clicking this option opens the CRM record associated with the WhatsApp session directly from the chat window. This action is only visible when a CRM add-in is installed, and the user is logged in.
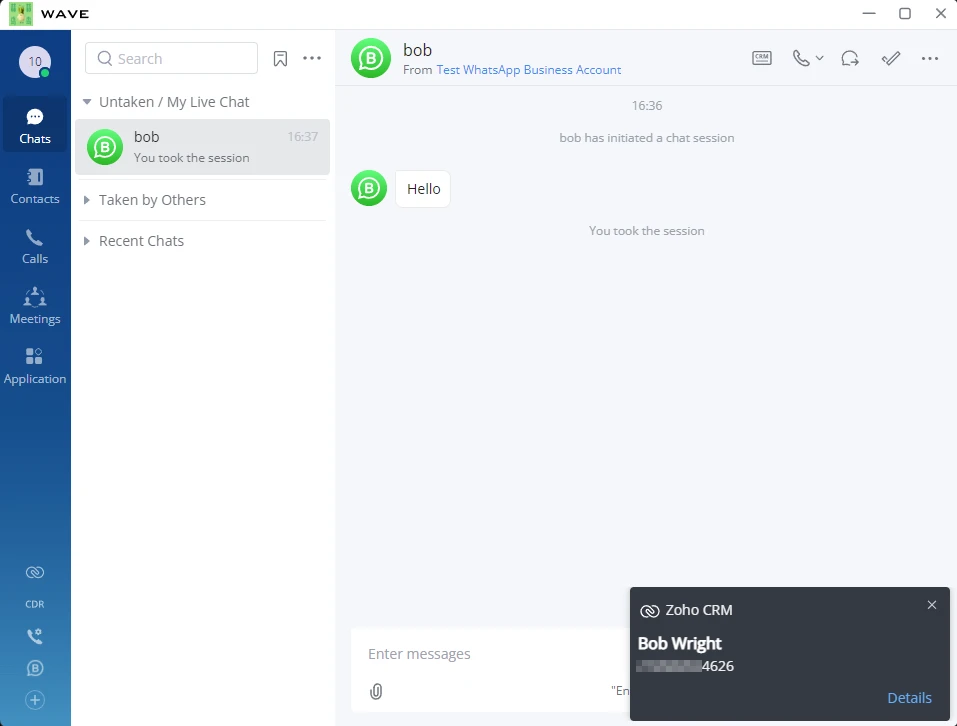
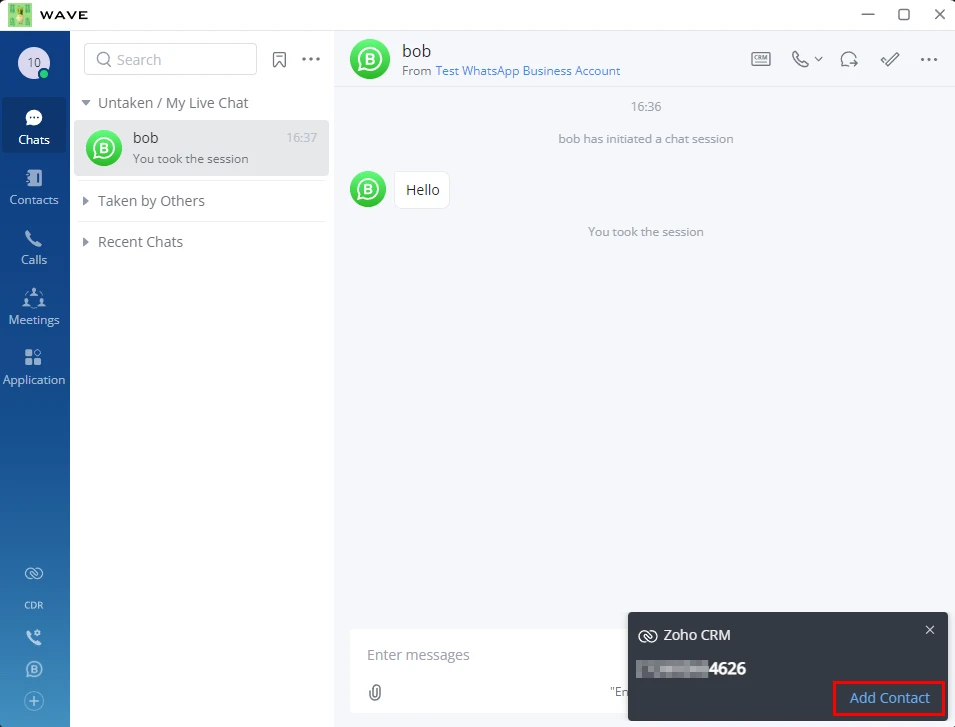
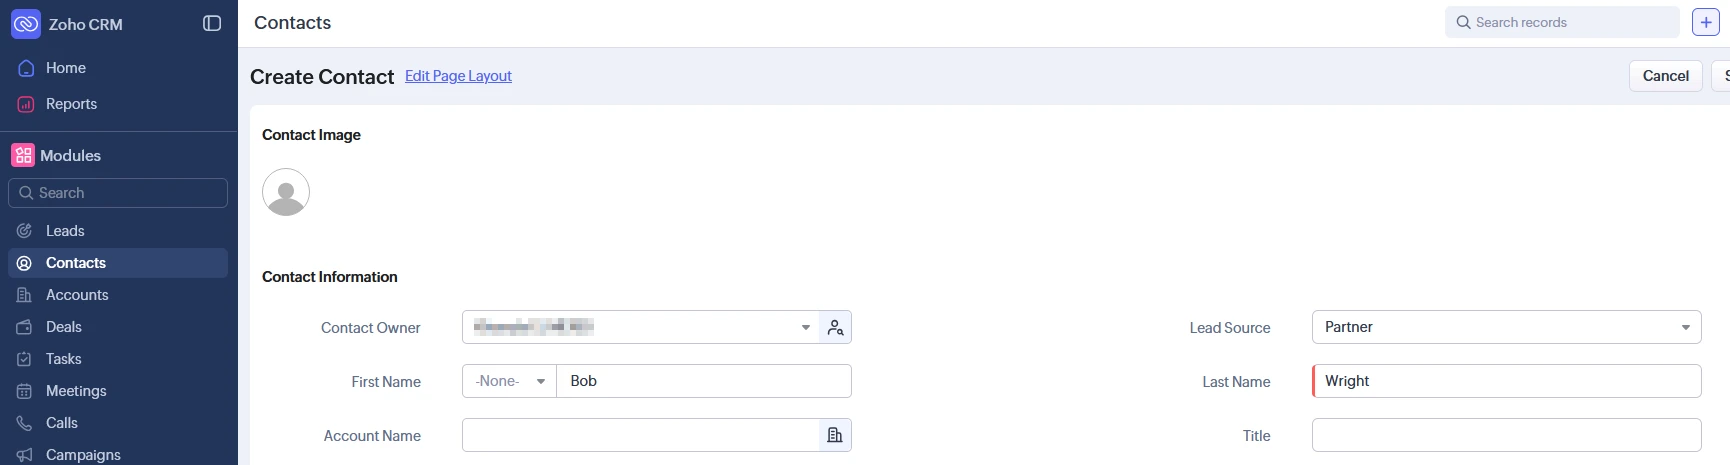
If no matching contact record exists for the visitor, the CRM prompts the agent to create a new one. For example, when using the Zoho CRM integration, clicking View CRM Contact on a session with no existing record opens a Zoho contact creation pop-up.
Dial Actions
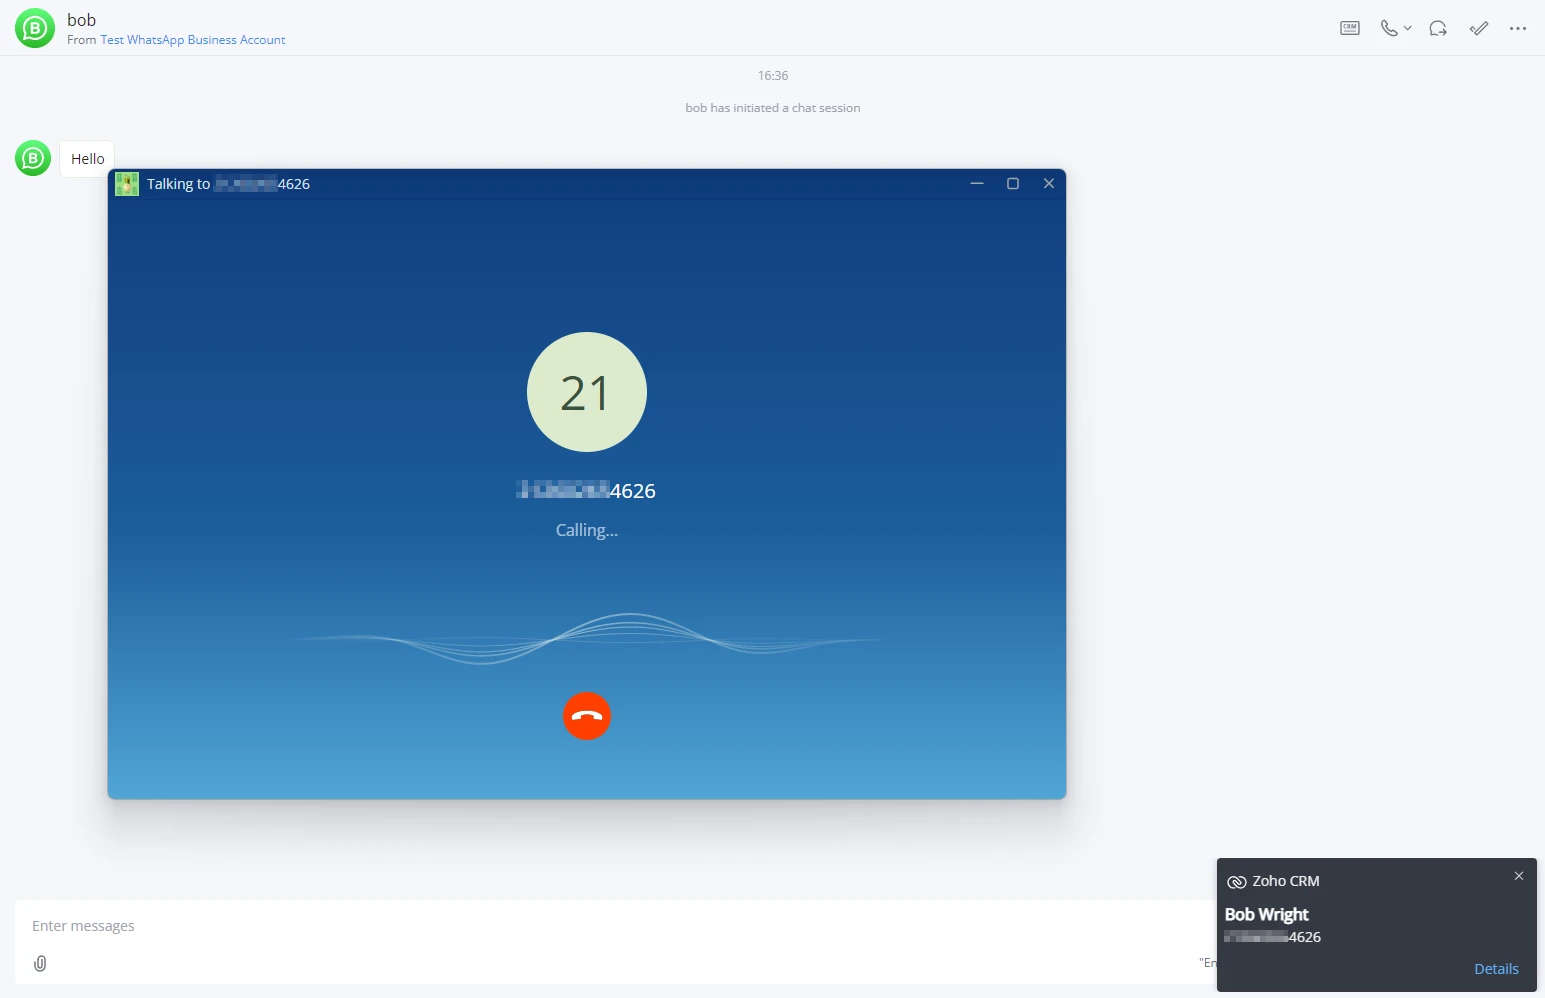
This option initiates an outbound voice call to the phone number associated with the active WhatsApp session. The call is processed by the UCM telephony engine and routed via the configured SIP trunks according to the outbound routing rules.
Users can either:
- Call Number: Initiates a standard outbound call to the number associated with the current WhatsApp conversation.
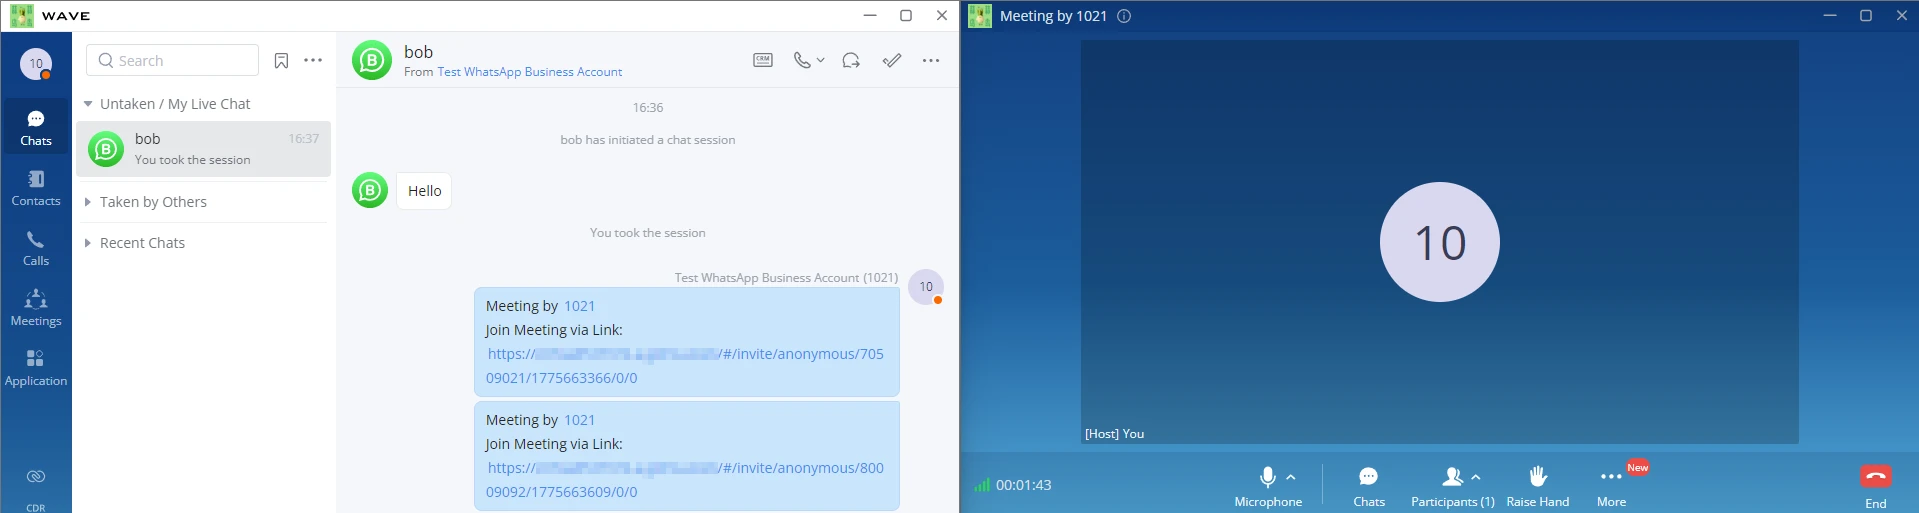
- Start Meeting: Creates a meeting session and generates an invitation link, allowing the agent to invite the contact and additional participants.
Forward Session
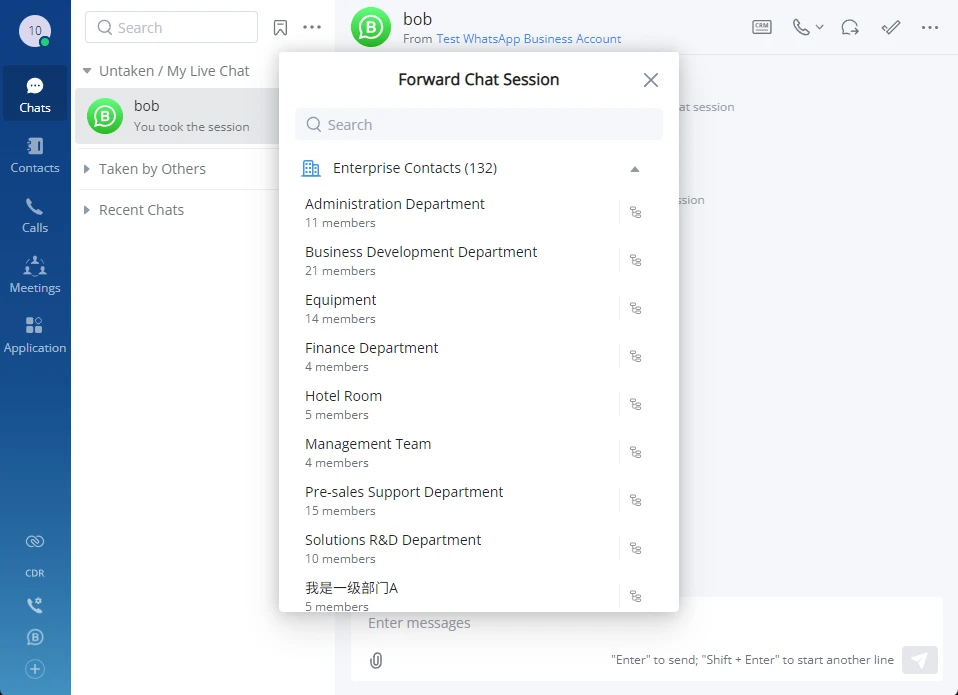
The Forward Session action allows agents to hand off an active WhatsApp conversation to another Wave Desktop user without interrupting the visitor experience.
Once a session is forwarded, the receiving agent inherits the full conversation history and can continue the exchange seamlessly.
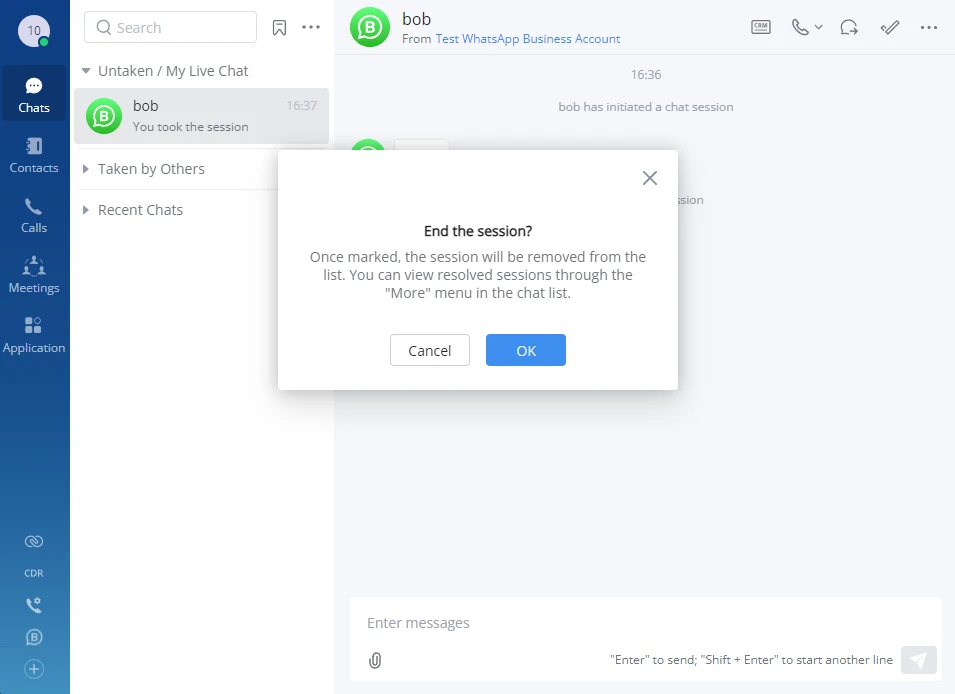
Mark as Processed
Clicking this option marks the session as resolved and removes it from the active chat list. Use this once the visitor’s query has been fully addressed.
Marking a session as processed does not block the visitor from sending future messages. If the visitor sends a new message after a session is closed, a new session will be created and routed to the assigned extension user(s).
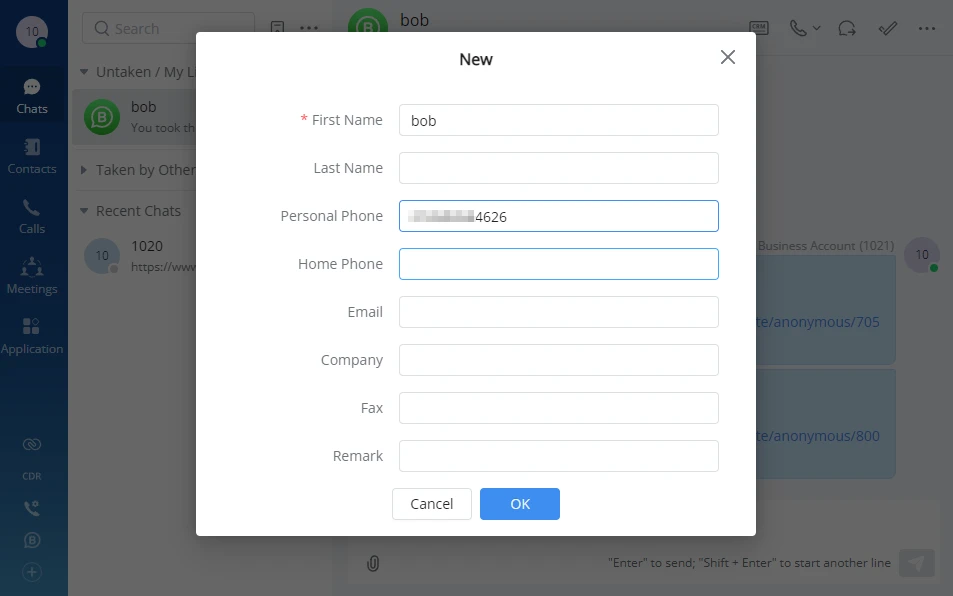
Add to Personal Contacts
This option allows the agent to save the phone number associated with the active WhatsApp session to their personal contact list on the UCM.
When selected, the system prompts the user to define contact details (e.g., last name, company, fax) before saving.
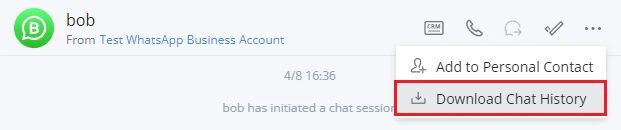
Download Chat History
Agents can download a local copy of the conversation history for any WhatsApp session. Clicking this option exports the chat log, including message content and timestamps.
Downloaded chat history is saved locally on the agent’s machine. Retention and storage of exported chat logs are subject to your organization’s data handling policies.
SUPPORTED DEVICES
Models | Firmware Required |
UCM630x Series | 1.0.29.19+ |
UCM630xA Series | 1.0.29.19+ |
CloudUCM | 1.0.29.7+ |