


OVERVIEW
Grandstream IPPBX supports integration with Microsoft Outlook, allowing users to receive important email notifications directly from the PBX.
This guide describes setting up and configuring the authentication between Grandstream IPPBX and Microsoft 365, ensuring efficient and secure email communication using modern OAuth2 authentication.
This guide is divided into three parts, each performed in a different administrative portal:
- Microsoft 365 Admin Center
- Azure Portal / Microsoft Entra ID
- Grandstream PBX Web UI
PREREQUISITES
Before starting, confirm the following:
- A Microsoft account with global administrator permissions is available.
- The global administrator account has been assigned a Microsoft Entra ID P1 or P2 license.
- The email sending account that will be used by the PBX has an Exchange Online license.
MICROSOFT 365 ADMIN CENTER SETUP
This part covers three tasks that must be completed before touching the Azure Portal:
- Enabling Modern Authentication
- Verifying licenses
- Enabling Authenticated SMTP on the sending account
Step 1: Enable Modern Authentication
Modern authentication is the foundation of the OAuth2 flow used in this guide. Without it, the authorization process will not work.
- Log in to the Microsoft 365 Admin Center using your global administrator account.
- In the left navigation menu, go to Settings → Org Settings.
- Under the Services tab, locate and click Modern Authentication.
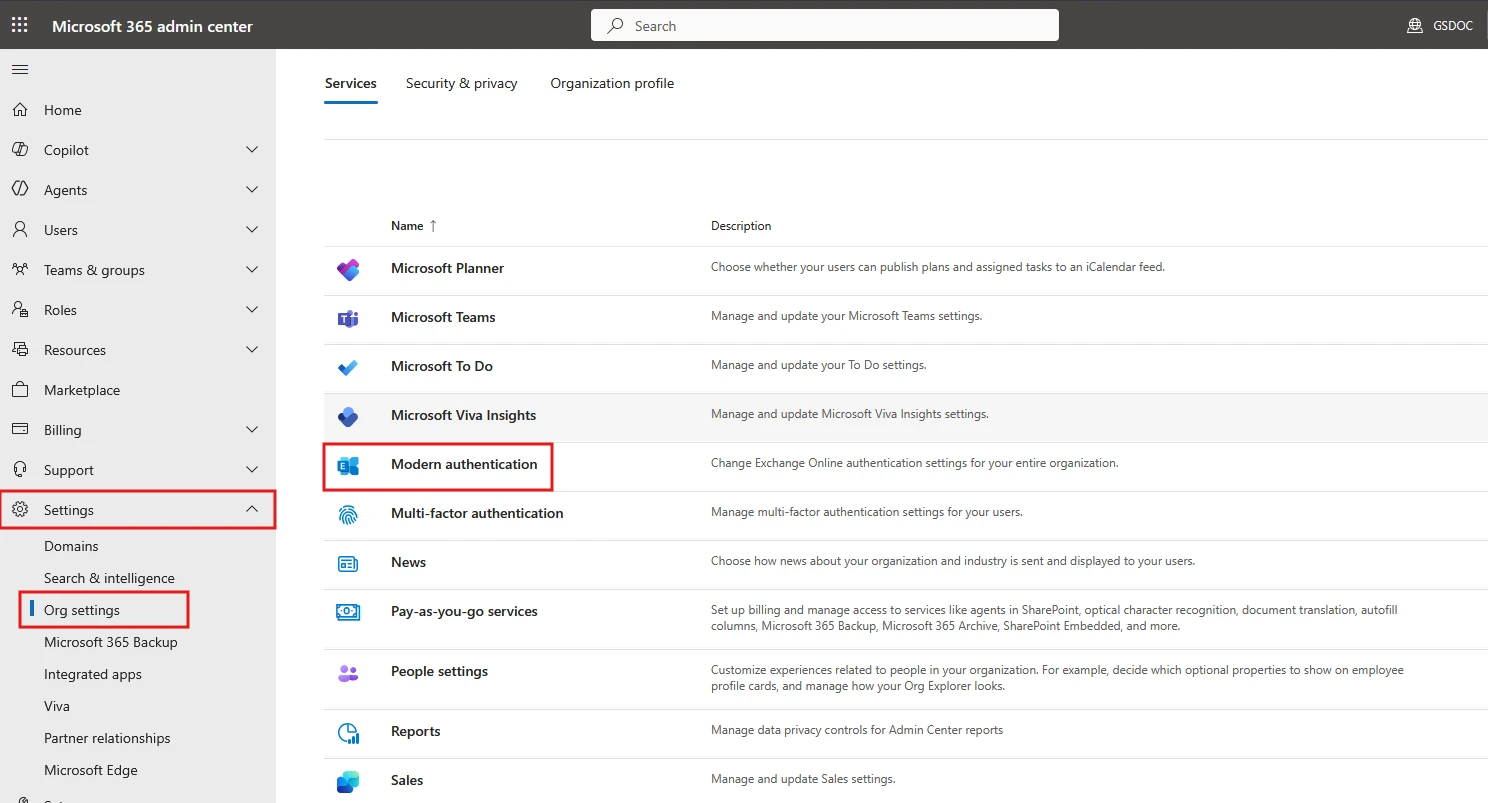
- In the Modern Authentication panel that appears, check the box for Turn on modern authentication for Outlook 2013 for Windows and later (recommended).
- Click Save.

Step 2: Verify License Assignment
Before enabling Authenticated SMTP, confirm that the email sending account has the correct Exchange Online license assigned.
- In the left navigation menu, go to Users → Active Users.
- Locate and click on the account that will be used to send emails from the PBX.
- In the user details panel, click the Licenses and apps tab.
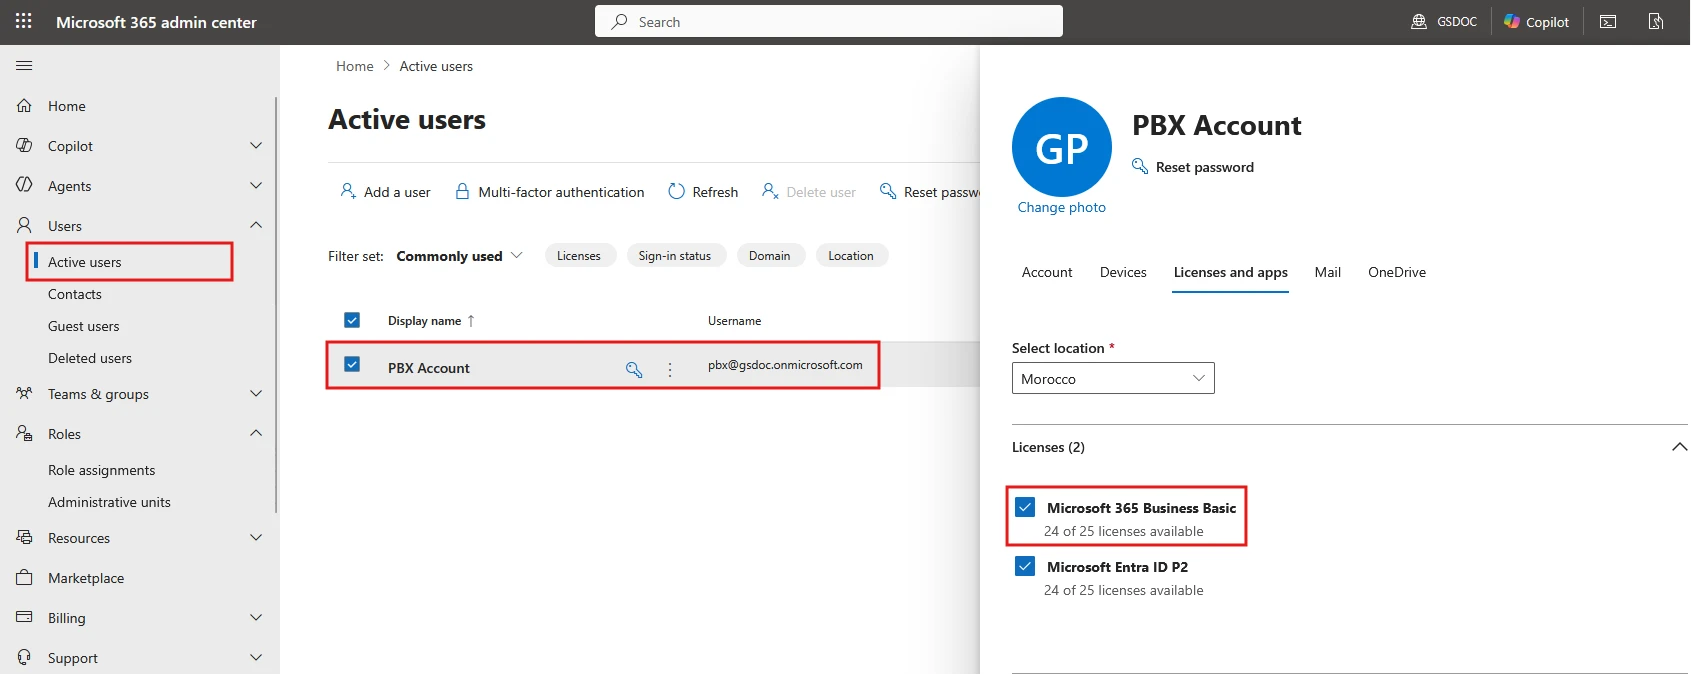
- Confirm that an Exchange Online license is listed and enabled. Acceptable licenses include:
- Exchange Online Plan 1
- Exchange Online Plan 2
- Microsoft 365 Business Basic
- Microsoft 365 Business Standard
- Microsoft 365 Business Premium
Step 3: Enable Authenticated SMTP
This step grants the account permission to connect to Microsoft’s SMTP server and send emails on behalf of the PBX.
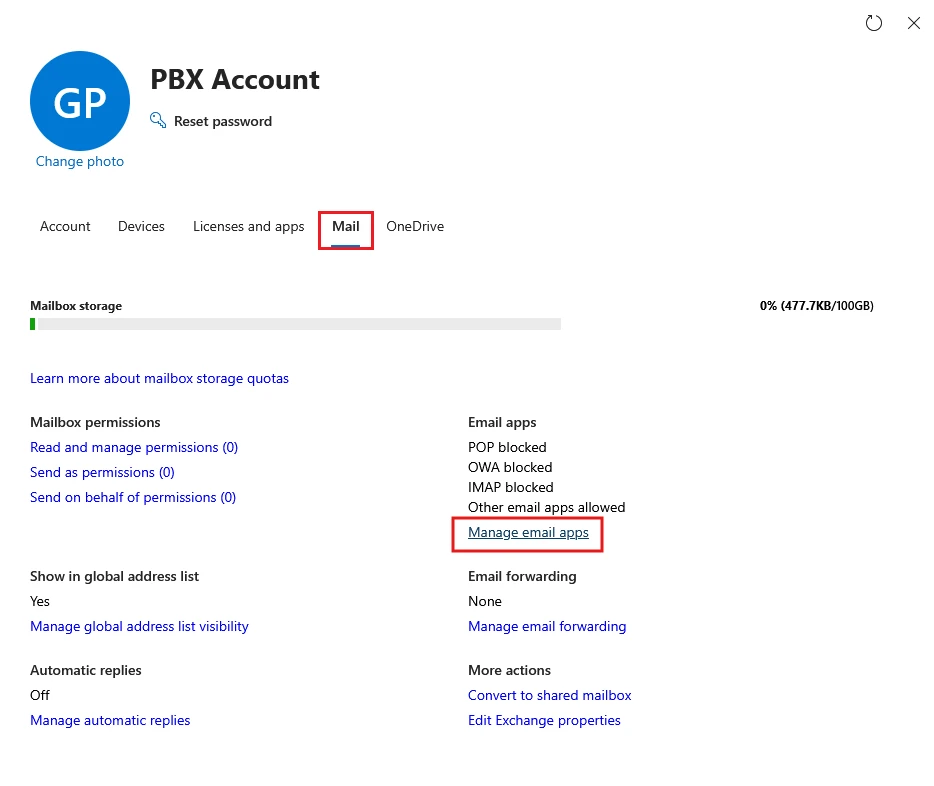
- On the same user account, click the Mail tab.
- Click Manage email apps.
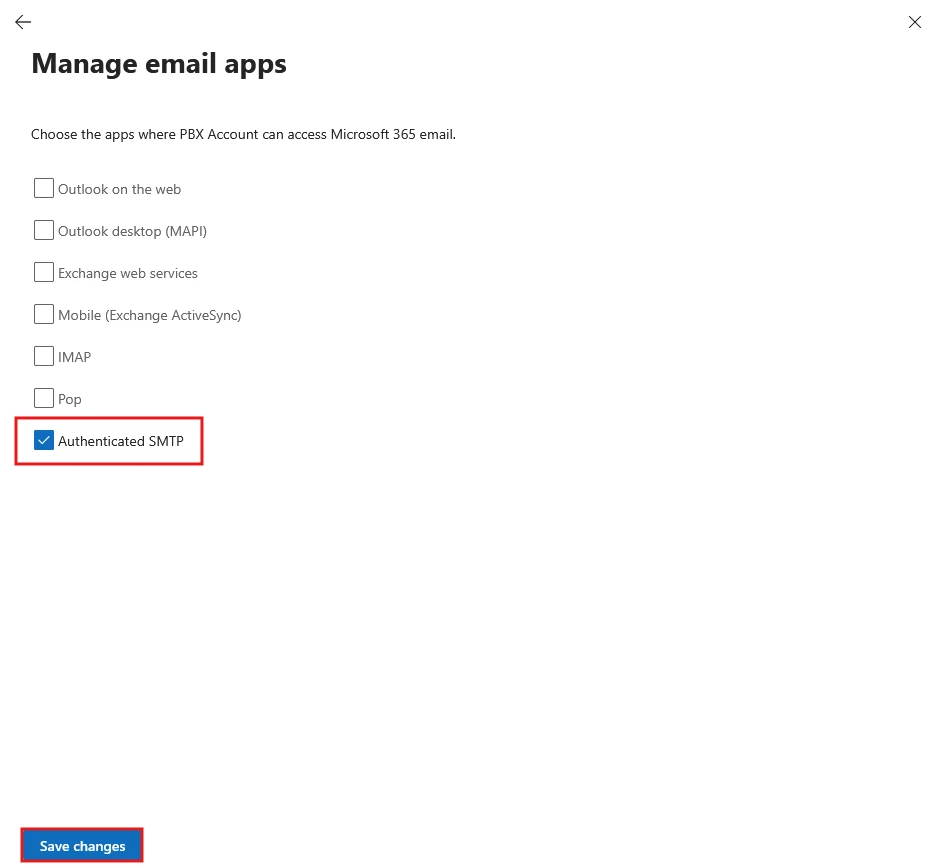
- In the Manage email apps panel, check the box for Authenticated SMTP.
- Click Save changes.
MICROSOFT ENTRA ID SETUP
This part registers the Grandstream PBX as an application in Microsoft Entra ID, grants it the necessary permissions to send email, and generates the credentials the PBX will use to authenticate.
Step 1: Register the Application in Microsoft Entra ID
- Log in to the Azure Portal using your global administrator account.
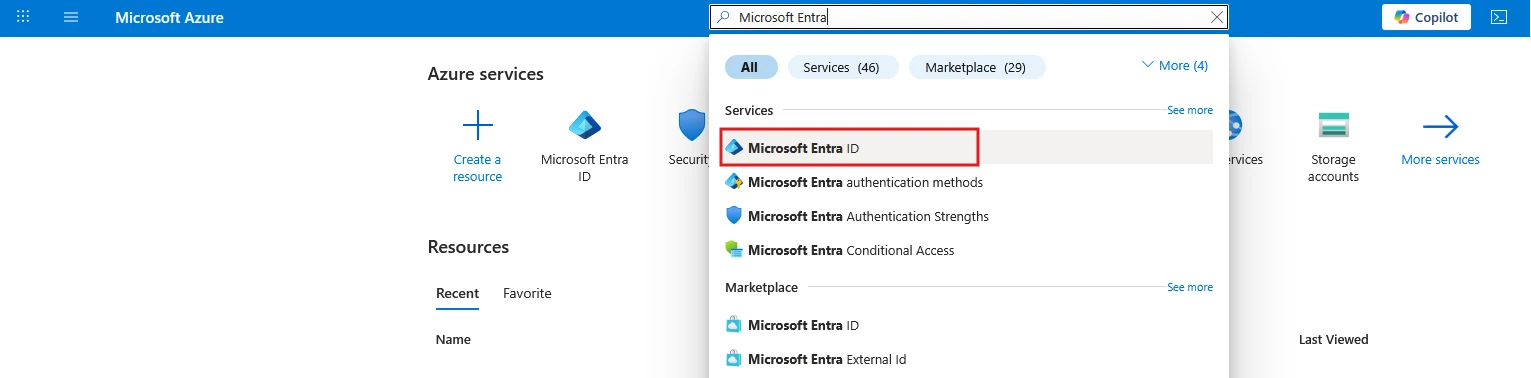
- In the top search bar, search for and select Microsoft Entra ID.
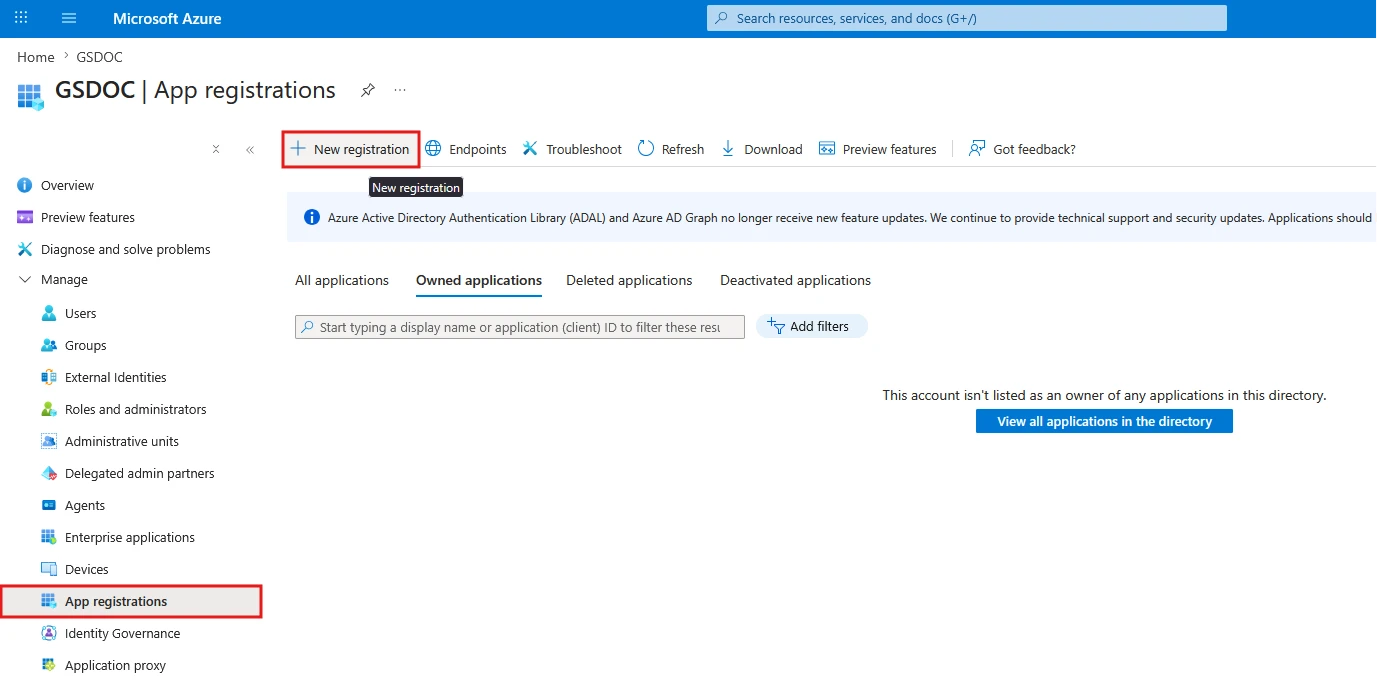
- In the left navigation of the Microsoft Entra ID page, click App registrations, then click New registration.
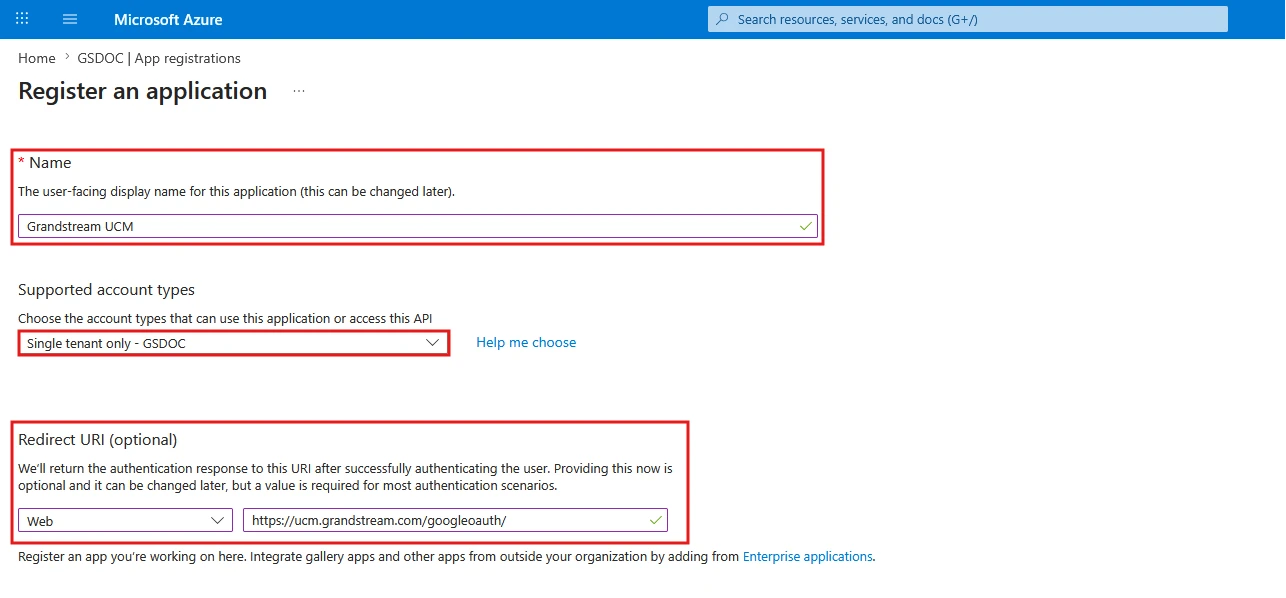
- On the Register an application page, fill in the following fields:
Field | Value |
Name | Enter a display name for the application (e.g. “Grandstream UCM”) |
Supported account types | Select Accounts in this organization’s directory only. |
Redirect URI | Select Web from the platform dropdown and enter the Redirect URI (see note below). |
- Click Register.
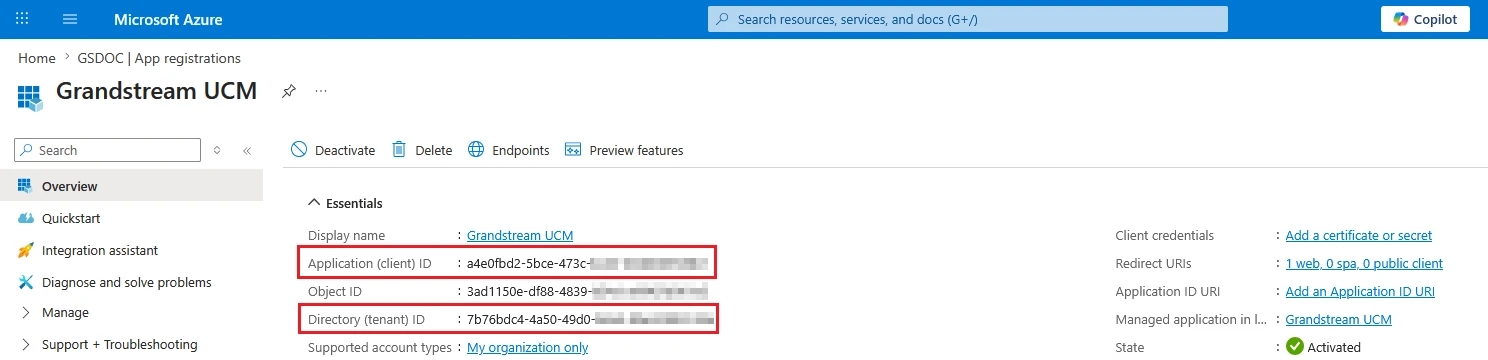
- After registration is complete, you will be taken to the application overview page. Note down the following values as you will need them in Part 3:
- Application (Client) ID
- Directory (Tenant) ID
Step 2: Assign API Permissions
- In the left navigation of the application page, click API permissions, then click Add a permission.
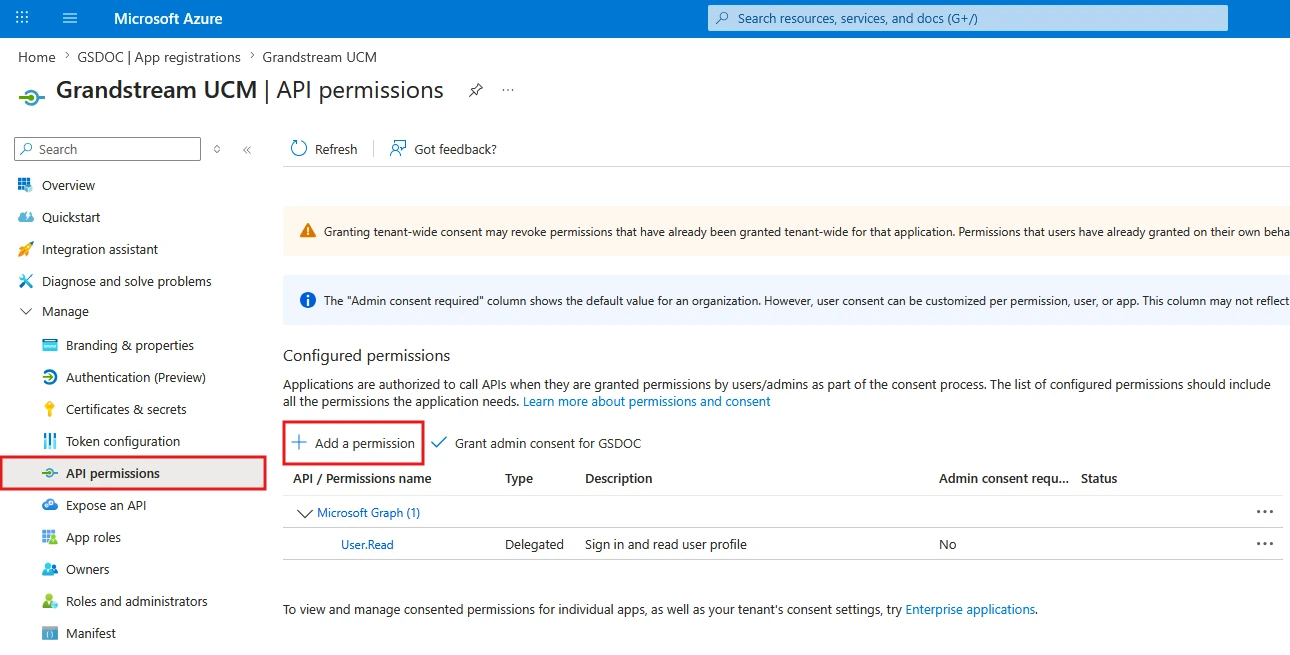
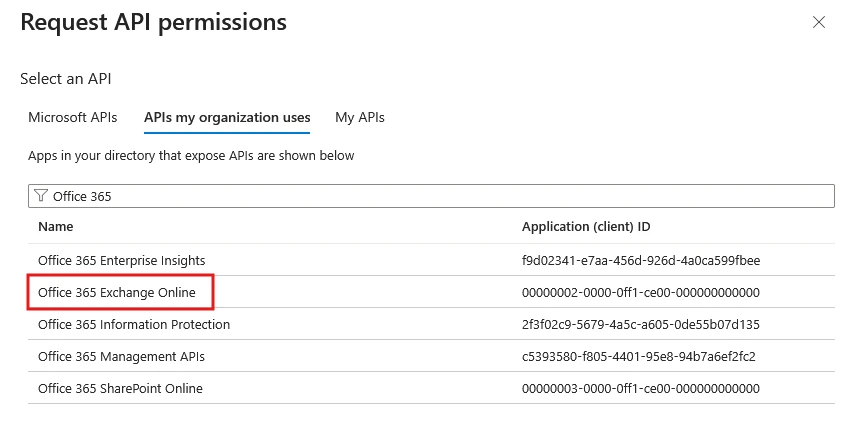
- In the Request API permissions panel, click APIs my organization uses, then search for and select Office 365 Exchange Online.
- Select Application permissions.
- In the permissions list, search for SMTP and expand the SMTP section. Check SMTP.SendAsApp.
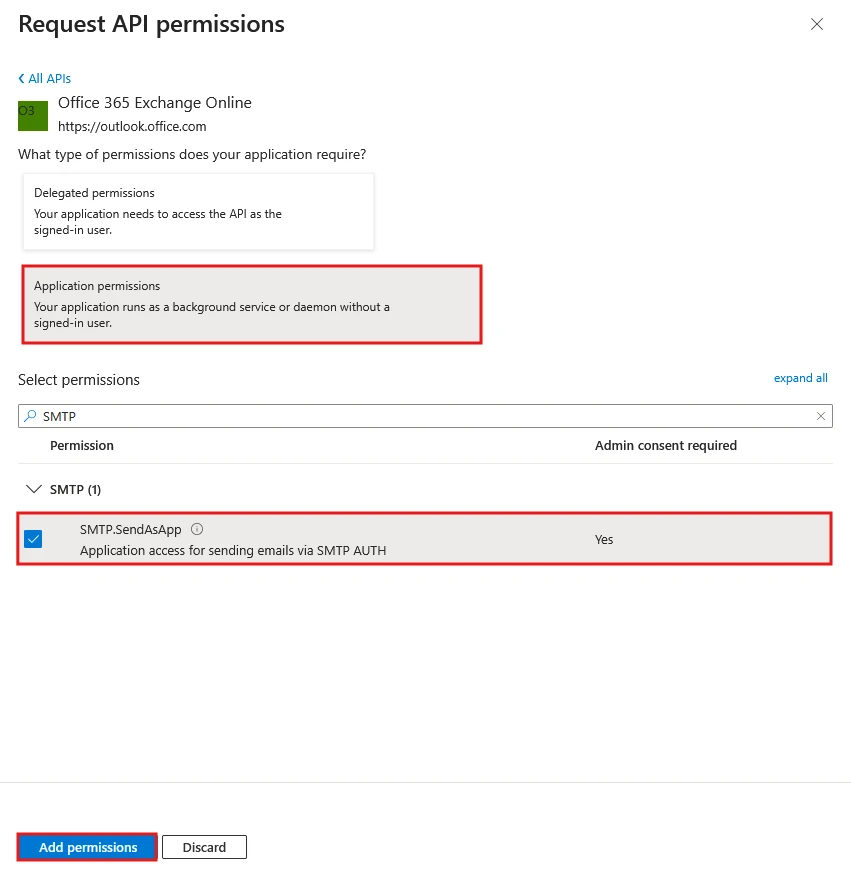
- Click Add permissions.
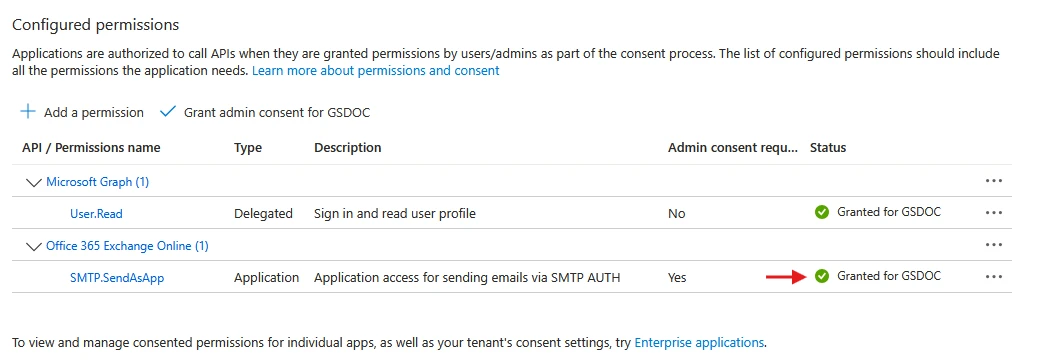
Step 3: Grant Admin Consent
- Back on the API permissions page, click Grant admin consent for [your organization name].
- Click Yes to confirm.
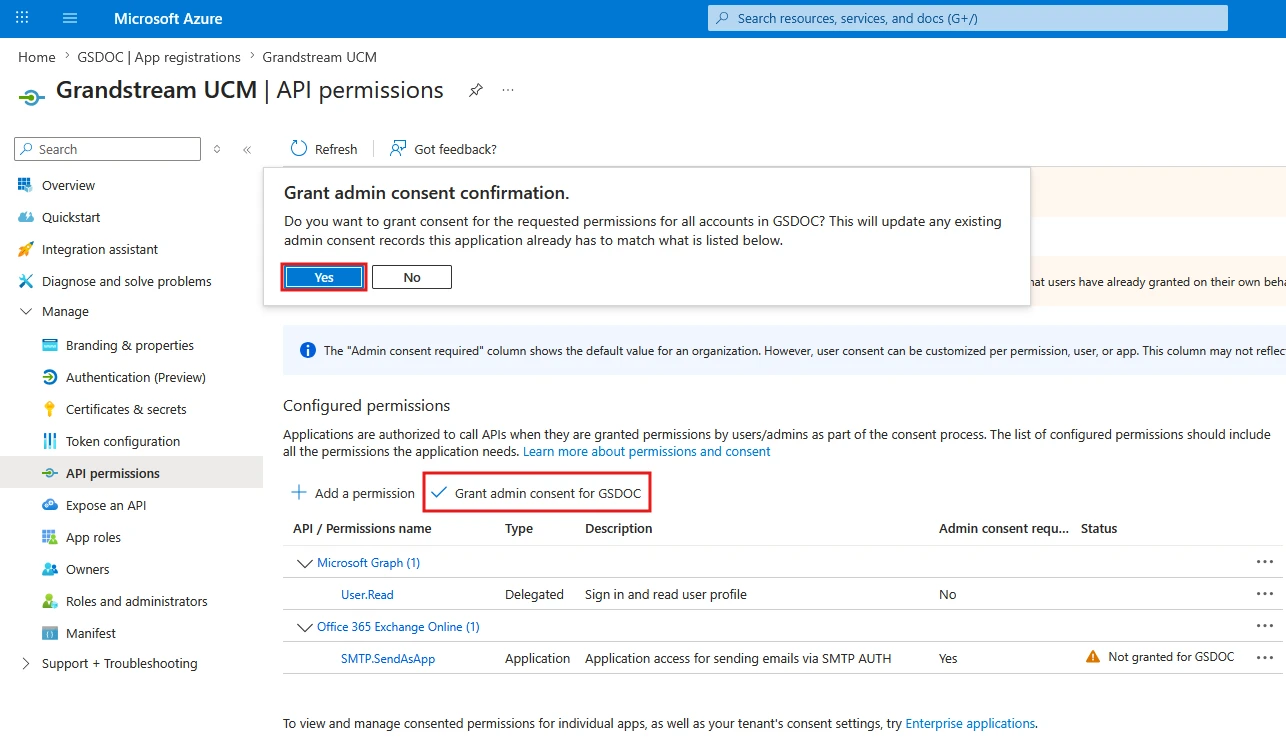
- After granting consent, the status column for SMTP.SendAsApp should show a green checkmark indicating “Granted for [organization]”.
Step 4: Create a Client Secret
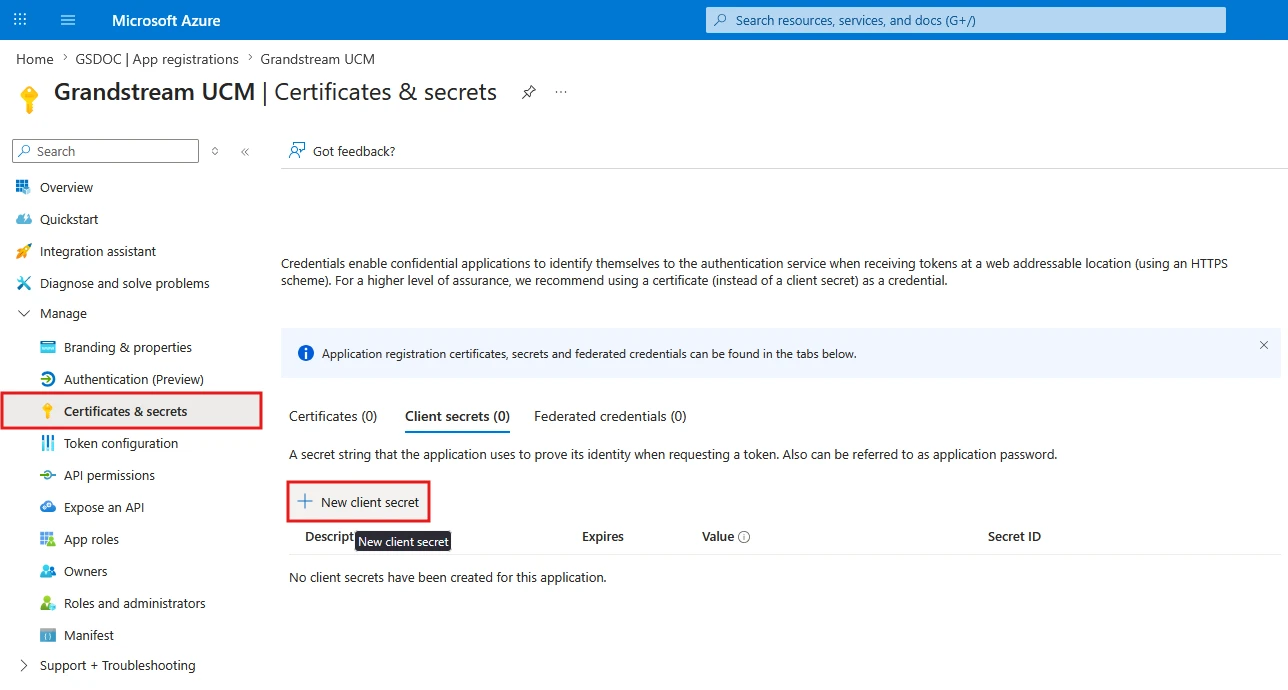
- In the left navigation of the application page, click Certificates & secrets, then click New client secret.
- In the Add a client secret panel, fill in the following:
Field | Value |
Description | Enter a description label (e.g. “Grandstream UCM Outlook”) |
Expires | Select an expiration period (recommended: 180 days/6 months) |
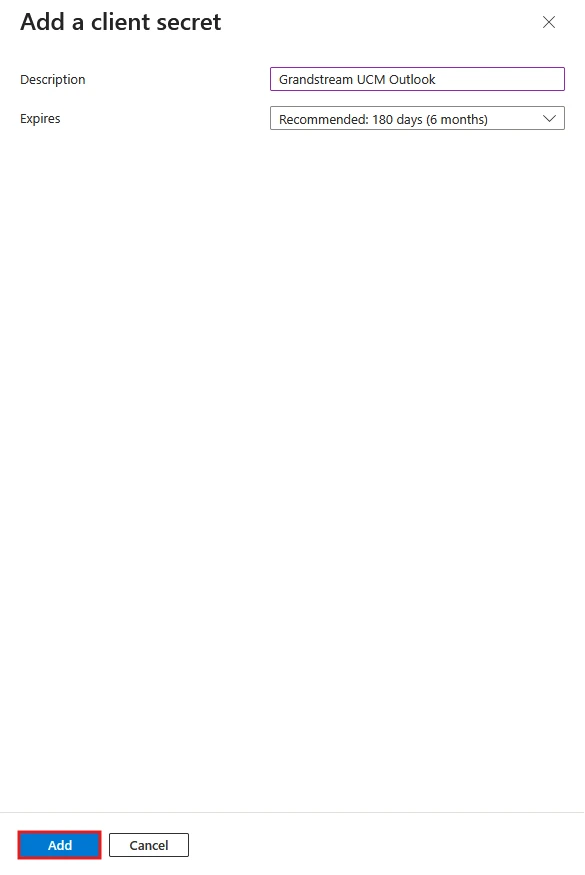
- Click Add.
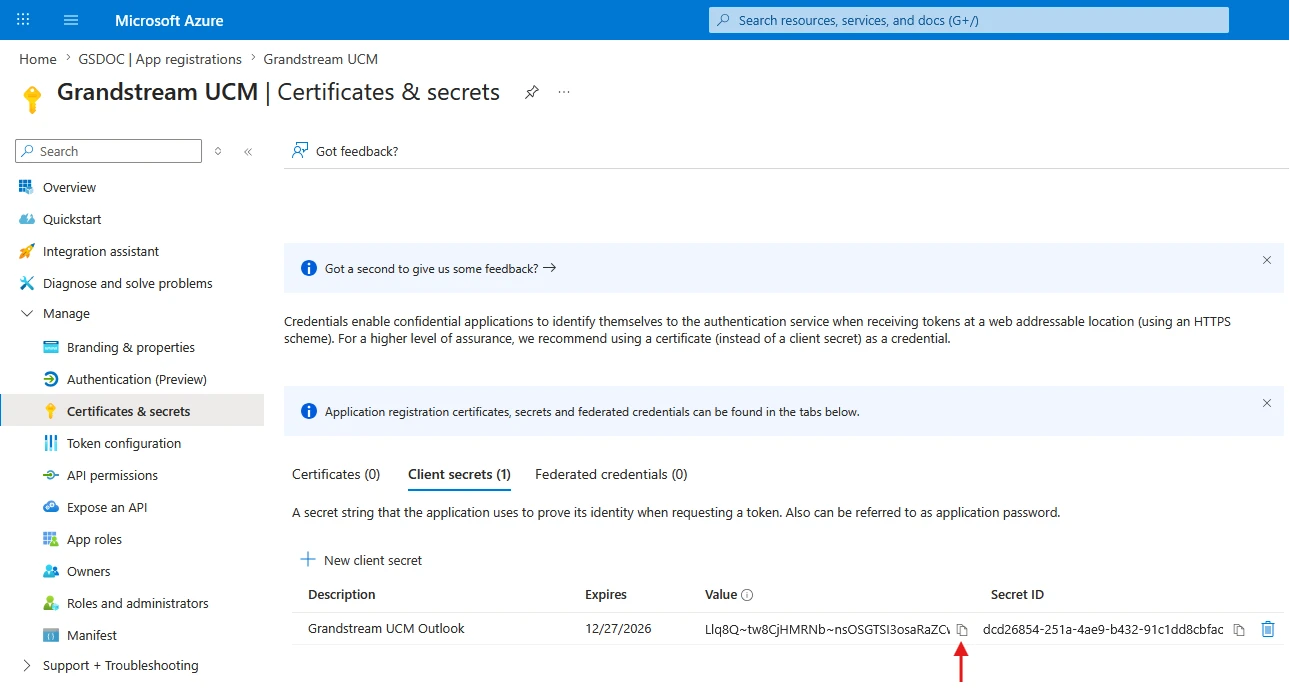
- The new client secret will appear in the list. Copy the value shown in the “Value” column and store it securely.
GRANDSTREAM PBX CONFIGURATION
This part enters all the credentials gathered into the PBX, completes the OAuth authorization flow, and verifies the configuration with a test email.
Step 1: Configure Email Settings
- Log in to the PBX Web UI.
- Navigate to System Settings → Email Settings.
- In the Mail Server Providers drop-down, select Microsoft.
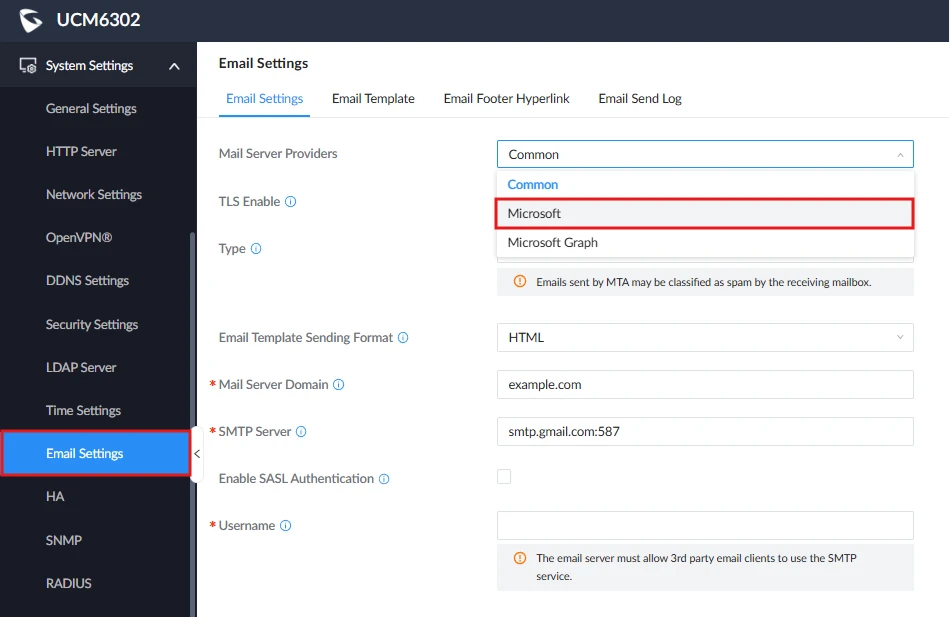
- The Server Authorization section will appear showing that authentication is incomplete. Click De-authorization to open the Microsoft Server Licensing configuration dialog.
Step 2: Enter Authorization Information
In the Microsoft Server Licensing dialog, fill in the following fields:
Field | Value |
Redirect URIs | The exact same URI registered in Microsoft Entra ID Setup, Step 1 (e.g. https://ucm.grandstream.com/googleoauth/) |
Tenant ID | The Directory (Tenant) ID from the Azure application overview page |
Username | The Microsoft 365 email address of the sending account that was configured in Microsoft 365 Admin Center Setup |
The Application (Client) ID | The Application (Client) ID from the Azure application overview page |
The client password | The client secret Value copied in Step 4 (Create a Client Secret) |
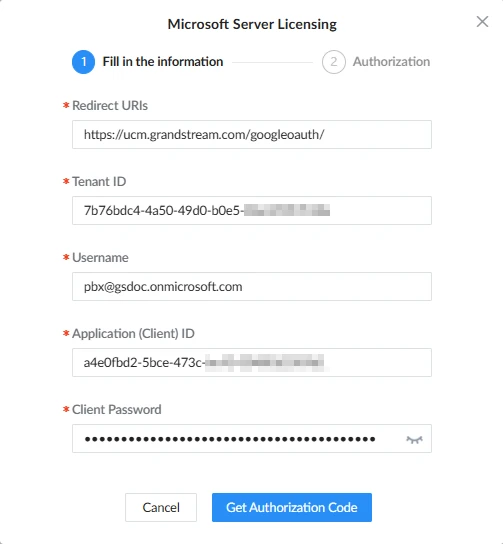
Step 3: Get the Authorization Code
Once the information is correctly entered, please follow the steps below to complete the authorization flow:
- Click Get Authorization Code.
- A new browser window or tab will open and redirect you to Microsoft’s login page.
- Sign in using the email sending account (the Microsoft 365 account configured).
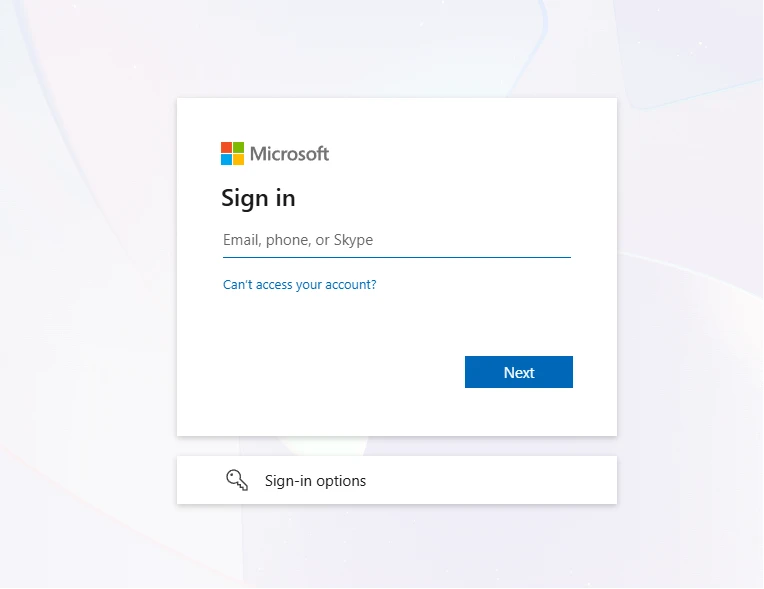
- After successfully signing in, Microsoft will redirect your browser to the Redirect URI you configured. What you see next depends on which Redirect URI you used:
If you used the Grandstream redirect URI (https://ucm.grandstream.com/googleoauth/): The page will display the authorization code directly on screen in a text box, ready to copy.

If you used any other HTTPS URI (e.g. https://your.example.com): Your browser will land on that page. Copy the link from the browser’s address bar the full URL will look like this:
https://your.example.com/?code=1.AXoAxL12e1BK0Emw...LONGCODE...&state=GrandStream&session_state=xxxxxCopy only the value that starts after code= and ends before &state=. This is your authorization code. Do not include &state= or anything after it.
If the page shows an error or “Server Not Found”: This is expected if your Redirect URI points to a non-existent page. The authorization code is still present in the browser address bar. Copy the value as described above.
Step 4: Complete Authorization
- Paste the copied authorization code into the Authorization Code field in the PBX dialog.
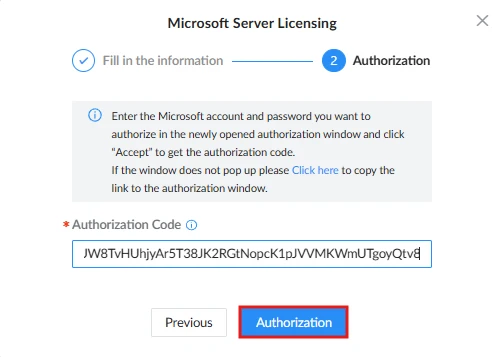
- Click Authorization.
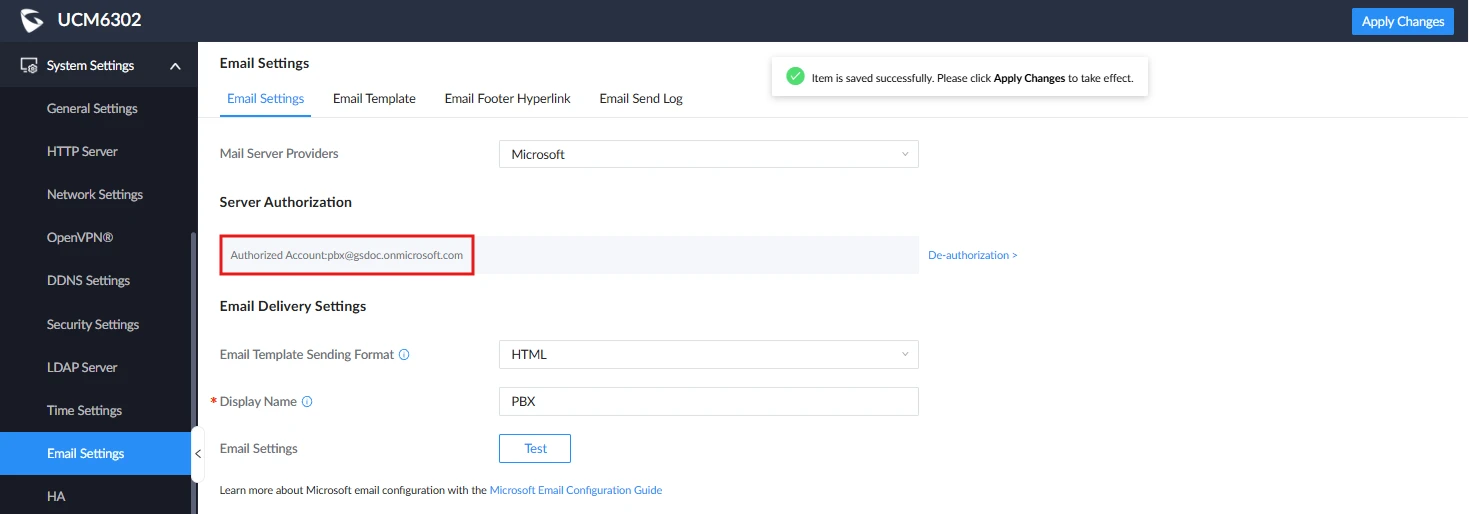
- Click Save, then click Apply Changes for the configuration to take effect.
After completing authorization, the Email Settings page will show the authorized Microsoft account under Server Authorization.
Step 5: Send a Test Email
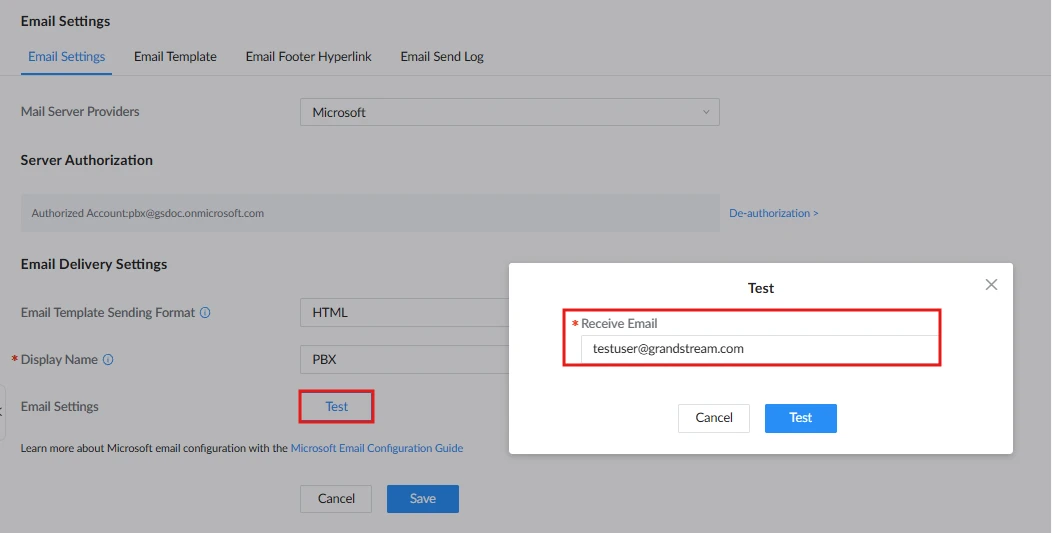
- On the Email Settings page, click Test.
- In the Test dialog, enter a recipient email address in the Receive Email field.
- Click Test.
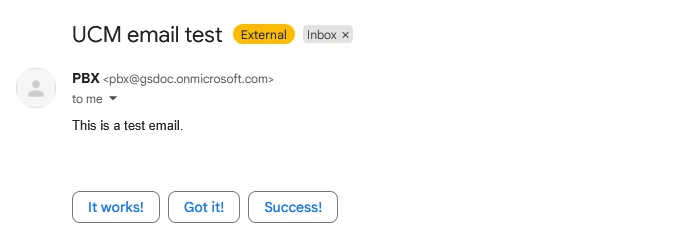
- Check the recipient inbox to confirm the email was received. The sender will appear as your Microsoft sending account.
SUPPORTED MODELS
Supported Devices | Firmware version |
SoftwareUCM | 1.0.27.18+ |
UCM6300/A Series | 1.0.27.20+ |
CloudUCM | 1.0.29.7+ |