


INTRODUCTION
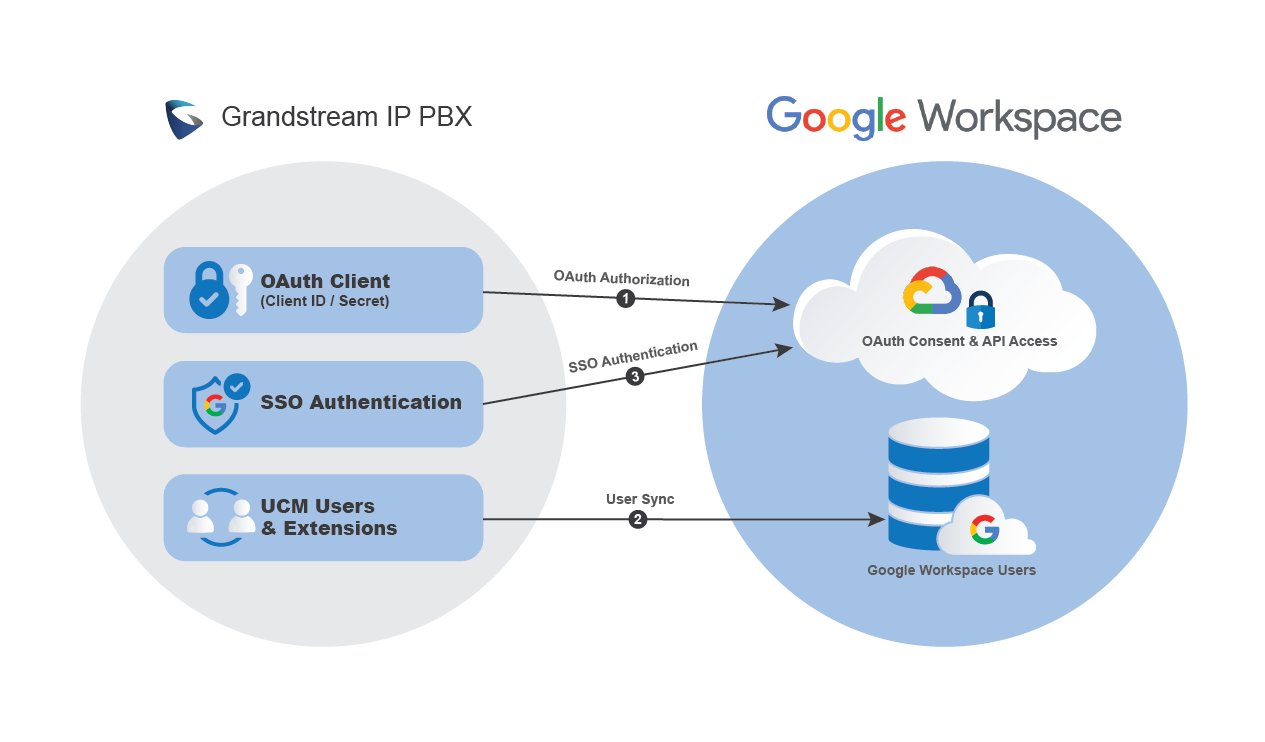
This guide provides step-by-step instructions for configuring Google Workspace integration with the Grandstream IP PBX, which includes both the Google Workspace application setup and the configuration on the PBX. The goal is to enable secure Google user synchronization and optional Single Sign-On for web access. This guide is intended for administrators performing the initial deployment or validation of the integration.
PREREQUISITES
Before proceeding, ensure that all the following prerequisites are met:
- Google Workspace domain with Super Admin access
- PBX running supported firmware (Please refer to the Supported Models table)
- A public FQDN resolving to the PBX (directly or via reverse proxy)
- HTTPS access to the PBX using the same FQDN
GOOGLE WORKSPACE CONFIGURATION
This section describes how to create and configure the Google OAuth application used by the PBX to communicate with Google Workspace. This application establishes the trust relationship required for user synchronization and SSO. All settings in this section must be completed before proceeding with the PBX-side configuration.
Create a Google Cloud Project
A dedicated Google Cloud project is required to host the OAuth application and manage API access for Google Workspace integration.
- Log in to the Google Cloud Console with a super admin account.
- Navigate to IAM & Admin→Manage resources.
- Click Create Project.

- Enter a project name and select the appropriate organization.
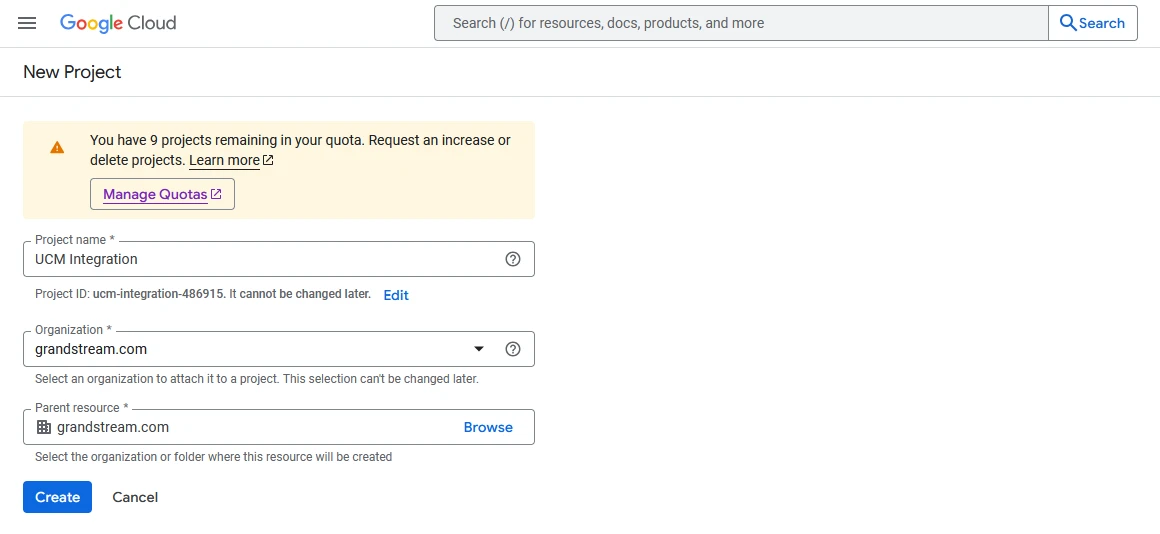
- Click Create and wait for the project to be provisioned.

Enable Google Admin SDK
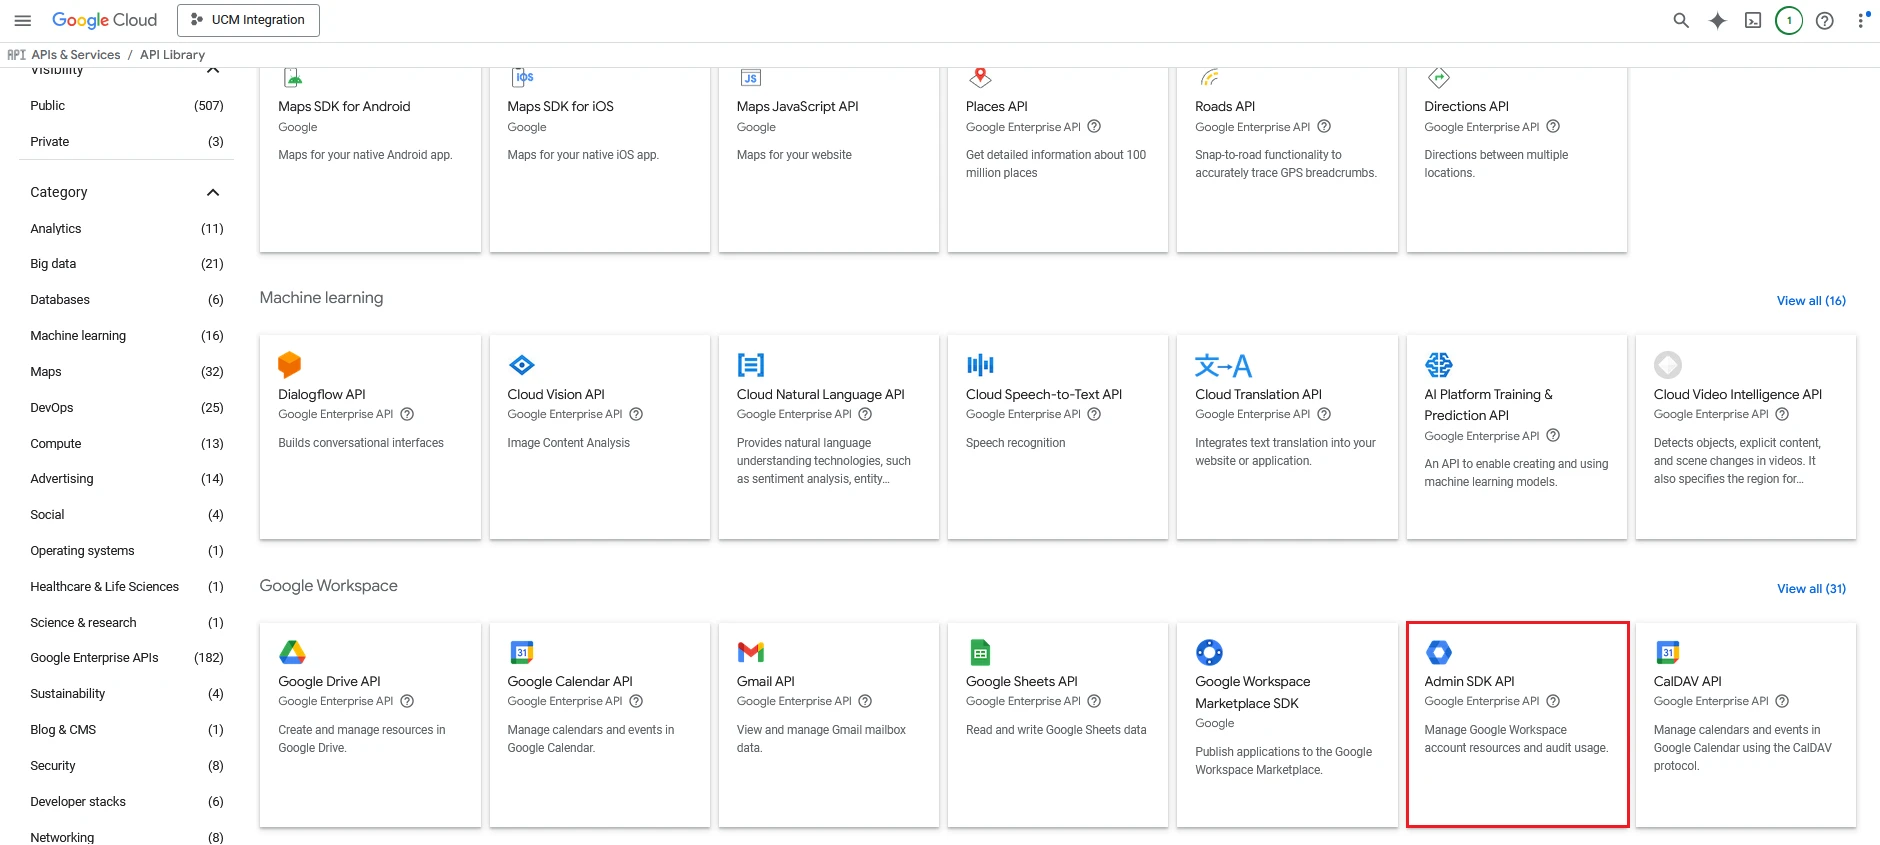
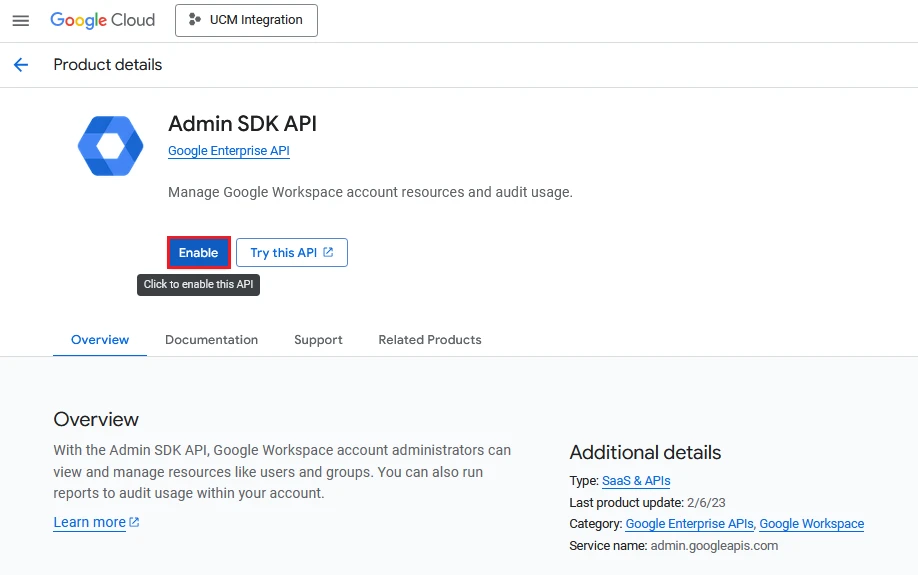
The Google Admin SDK is required for the PBX to retrieve user information from the Google Workspace domain. Without this API enabled, user synchronization and SSO-related user queries will fail even if OAuth authorization succeeds.
- In Google Cloud Console, select the project created for the PBX integration.
- Navigate to APIs & Services→Library.
- Search for Admin SDK API.
- Click Enable.
Configure OAuth Consent Screen
The OAuth consent screen defines how the PBX application is presented to Google Workspace users during authorization. This configuration is mandatory even if the application is used internally only.
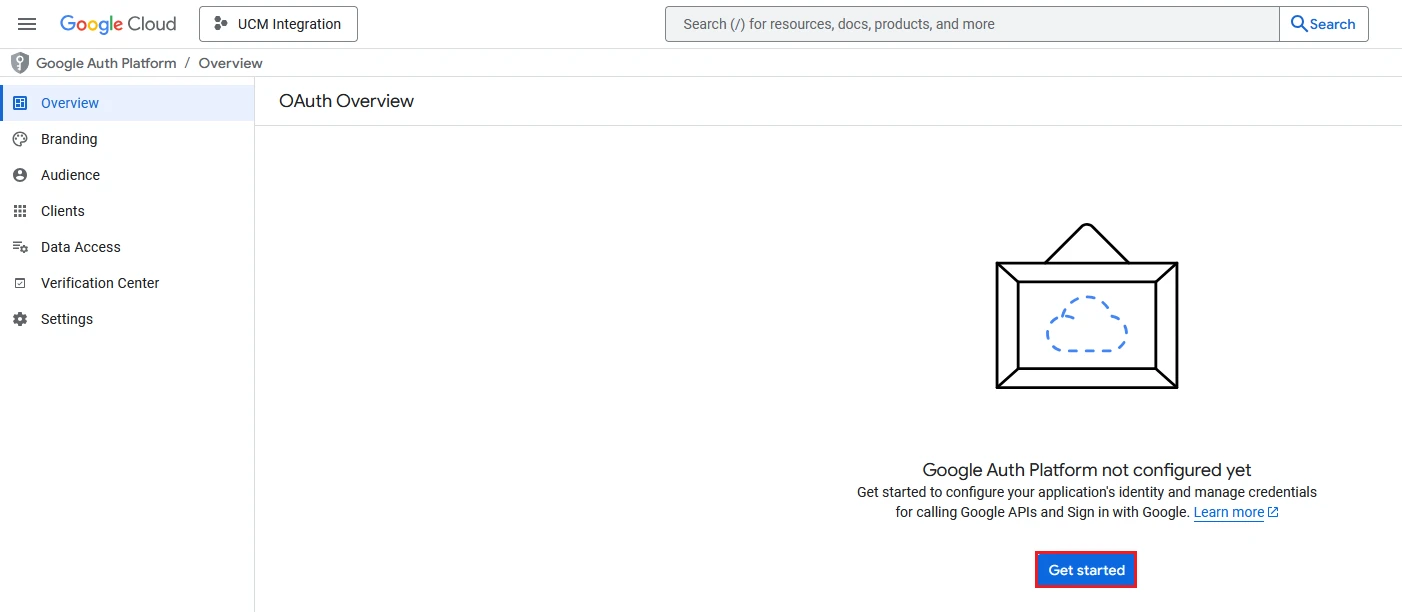
- Navigate to APIs & Services → OAuth consent screen.
- Make sure the correct new project is selected and click “Get Started“.
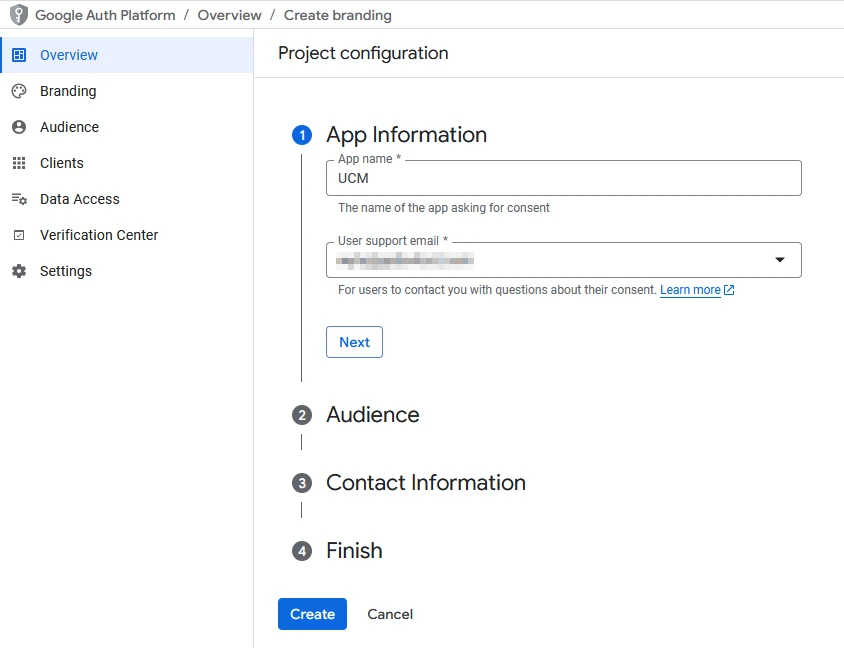
- Configure the required application information (Application name, support email).
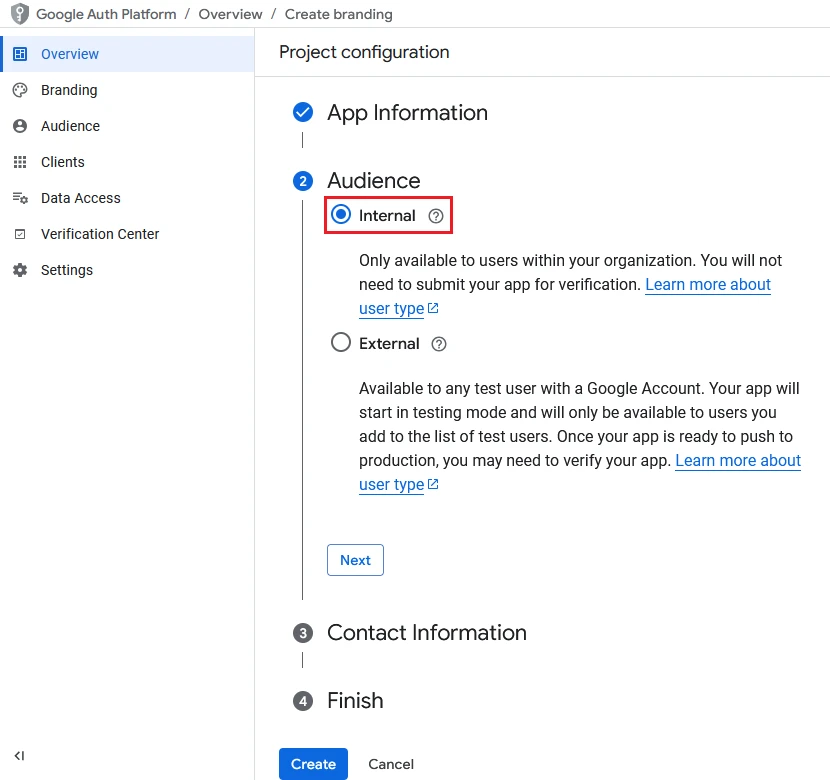
- Select Internal as the user type.
- Enter a valid email address to receive project-related change notifications, agree to the Google API Services: User Data Policy, then click Create.
Create OAuth Client Credentials
OAuth client credentials allow the PBX to authenticate securely against Google Workspace. These credentials will later be entered on the PBX.
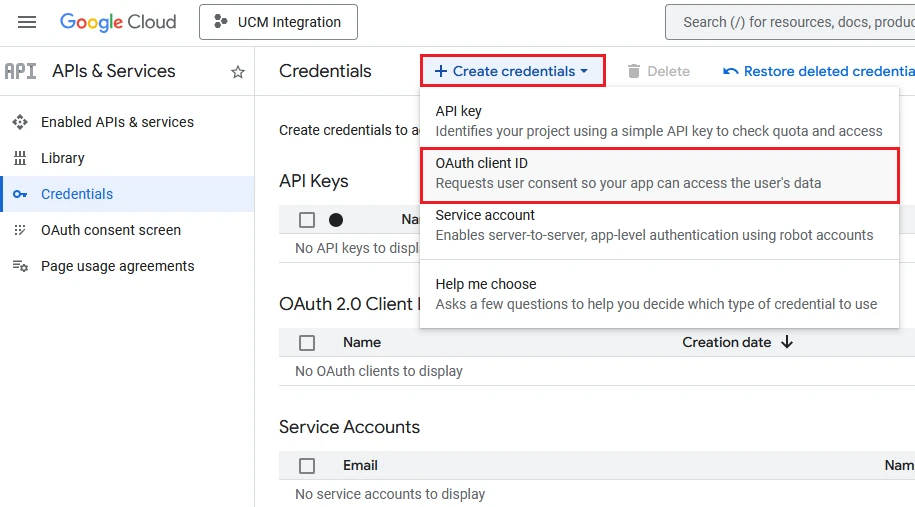
- Navigate to APIs & Services → Credentials.
- Click Create Credentials → OAuth client ID.
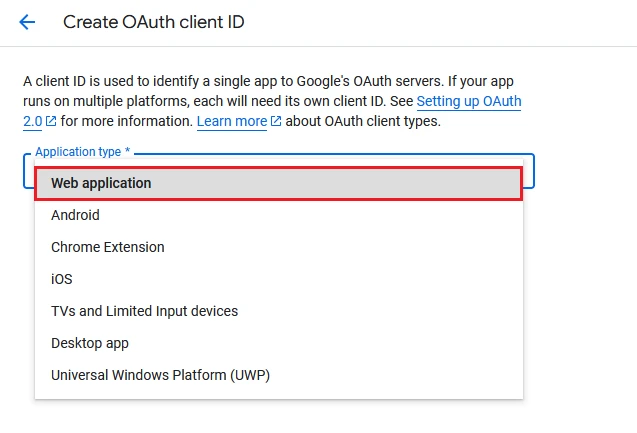
- Select Web application as the application type.
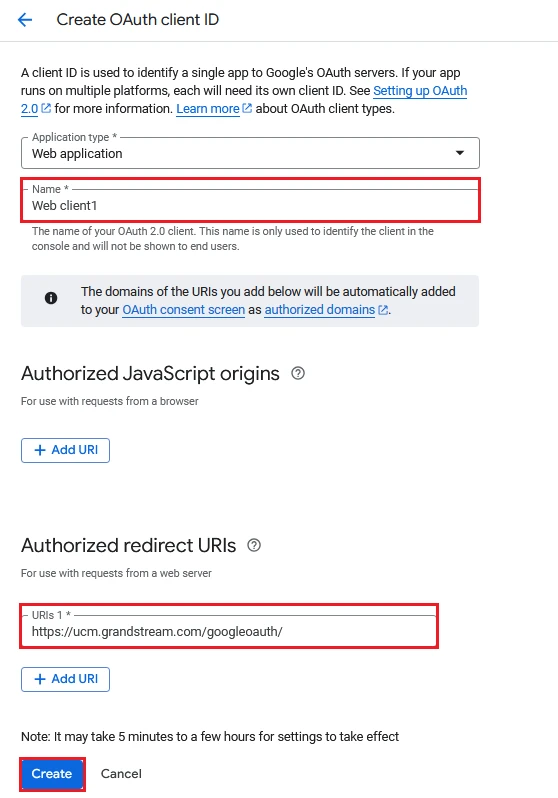
- Enter a name for the client.
- Under Authorized redirect URIs, add the redirect URI provided by the PBX (HTTPS only).
- Click Create.
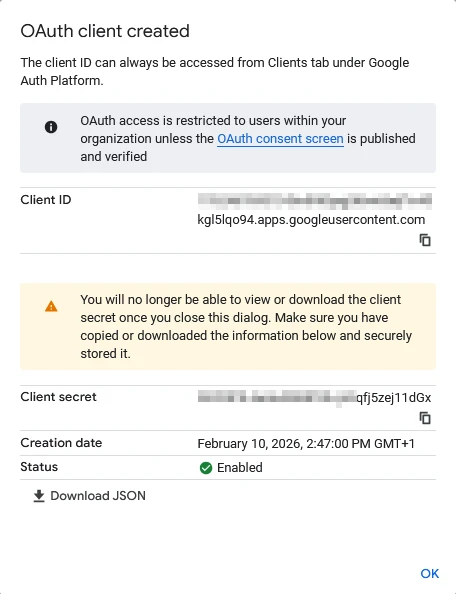
- Record the Client ID and Client Secret for later use.
PBX CONFIGURATION
This section describes how to configure the Google Workspace integration on the PBX after the Google Workspace application has been created. OAuth authorization must be completed successfully before Google users can be retrieved, synchronized, or used for SSO.
Configure Google Workspace Authorization
This step establishes the OAuth trust between the PBX and Google Workspace using the Client ID and Client Secret created earlier.
- Log in to the PBX web interface as an administrator.
- Navigate to Integrations → Integration of Collaborative Office Platforms → Google Workspace → Basic Settings.
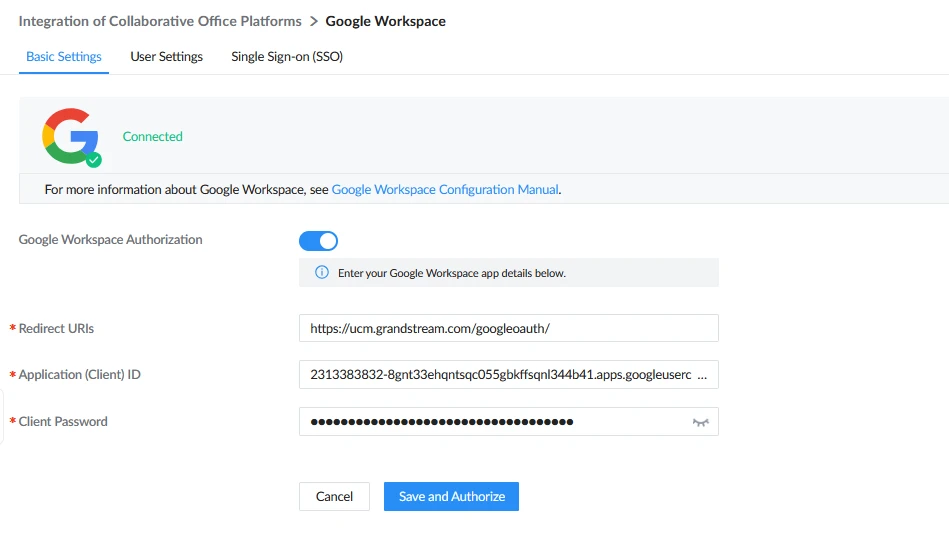
- Enable Google Workspace Authorization.
- Enter the Redirect URI configured in Google Workspace.
- Enter the Application (Client) ID and Client Password (Client Secret) obtained from Google Cloud Console.
- Click Save and Authorize.
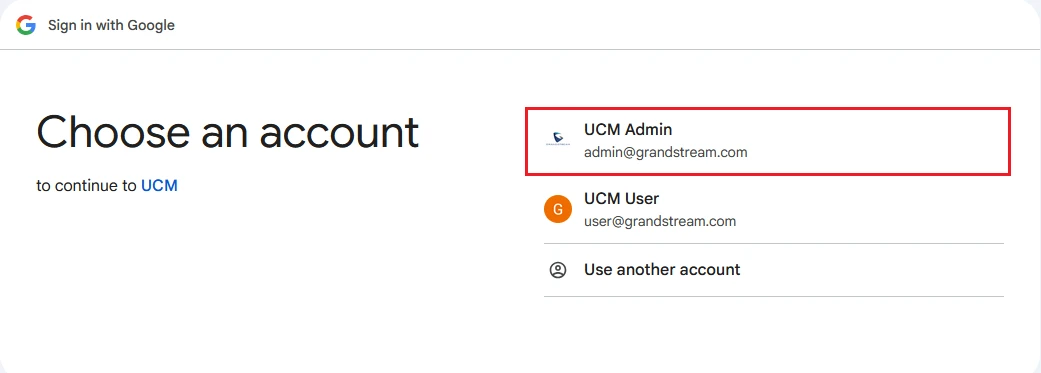
- When redirected, sign in using a Google Workspace administrator account.
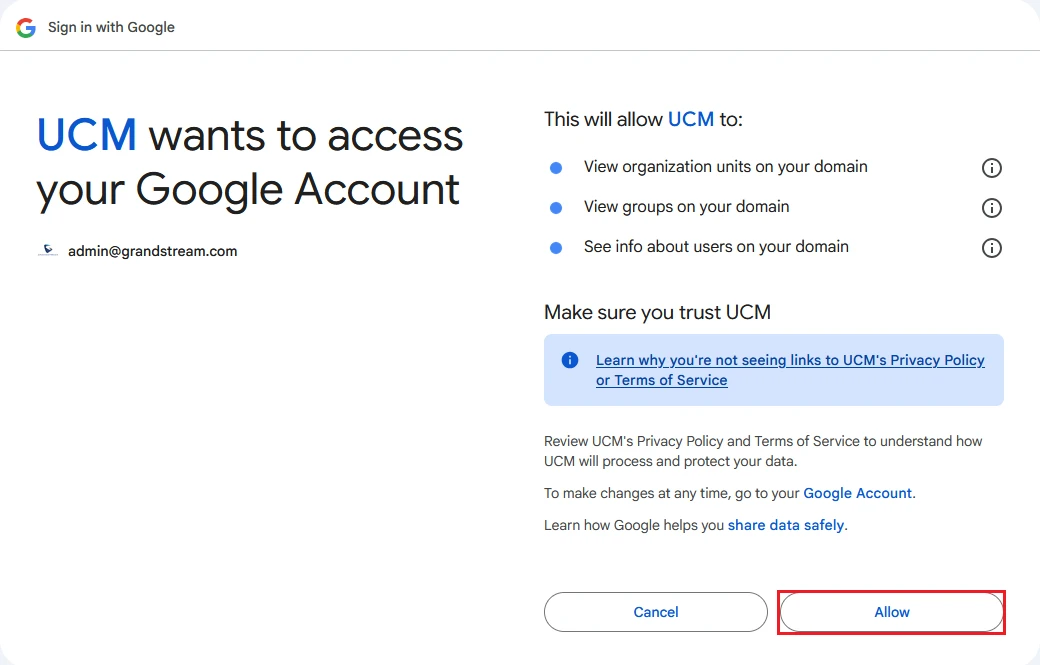
- Review the requested permissions and click Allow to grant consent.
- After consent is granted, Google redirects to a page displaying an Authorization Code.

- Return to the PBX authorization page and paste the copied Authorization Code into the required field.
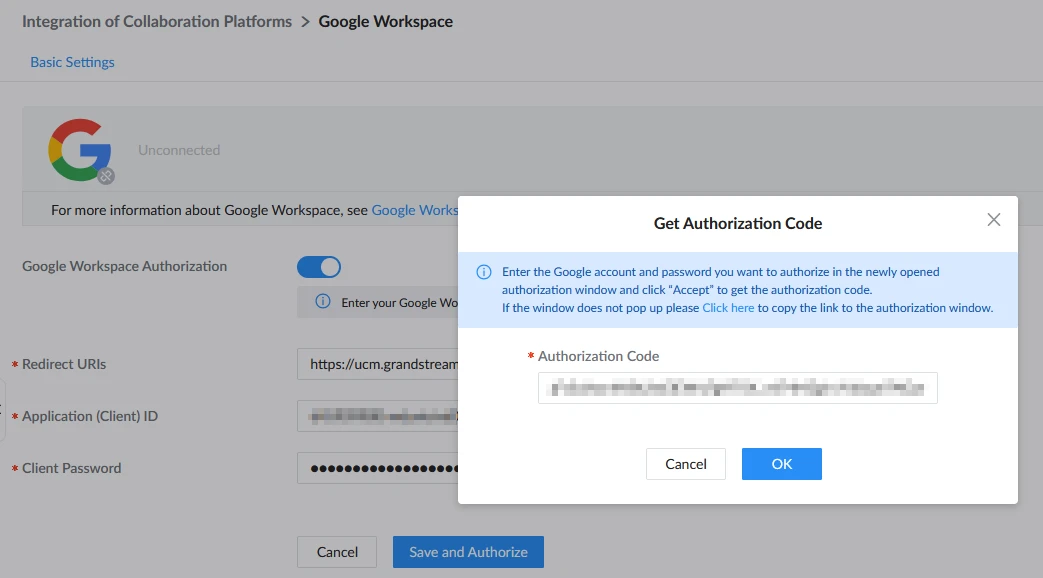
- Click Confirm to complete authorization.
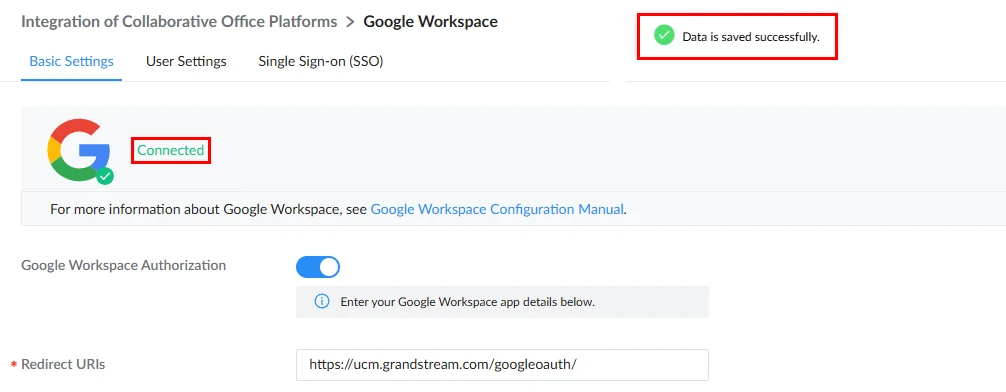
A confirmation prompt is displayed on the PBX indicating that the Google Workspace authorization was successful. Google Workspace-related configuration tabs become available.
Configure Google User Synchronization
After Google Workspace authorization is completed, the PBX can retrieve users from the connected Google Workspace domain. This section explains how to define the user scope and enable synchronization.
Enable Google Workspace User Retrieval
This step determines which Google Workspace users are retrieved and whether they are synchronized into the PBX system.
- Navigate to User Settings → Google User.
- Enable Get Google User.
- Select the User Range:
- All Users: retrieves all users from the Google Workspace domain.
- Users within the designated organizational unit: retrieves users from a specified Organizational Unit.
- Users within the designated group: retrieves users belonging to one or more specified Google Workspace groups.
- If applicable, specify the Organizational Unit or Groups.
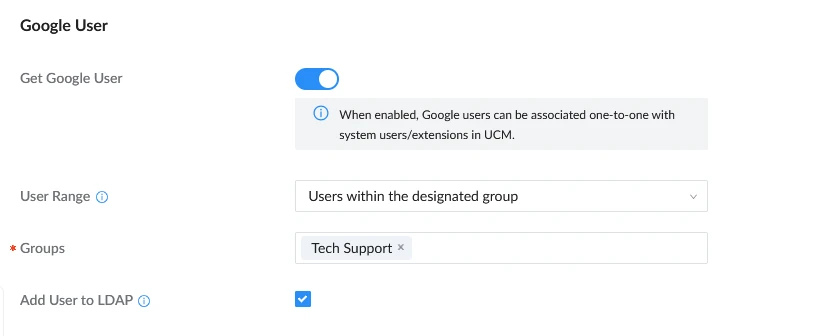
- (Optional) Enable Add User to LDAP to synchronize retrieved Google users into the PBX LDAP directory.
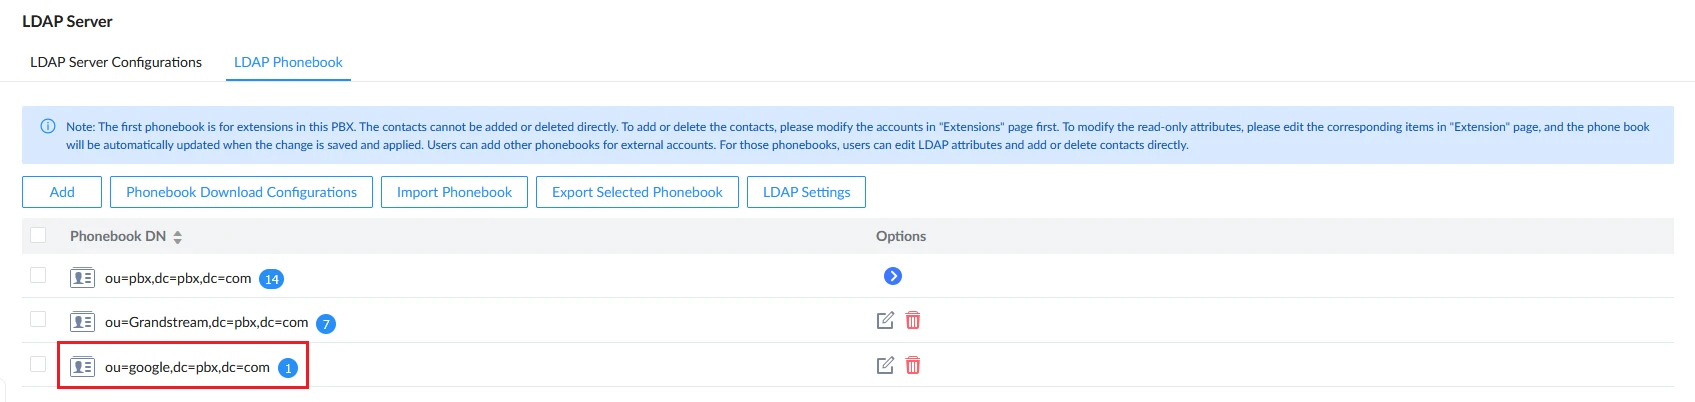
Link Google Workspace Users
Linking associates Google Workspace users with PBX system users or extensions. This association is required for Single Sign-On and optional for user synchronization.
Configure Linking Method
This step defines whether users are linked automatically or manually.
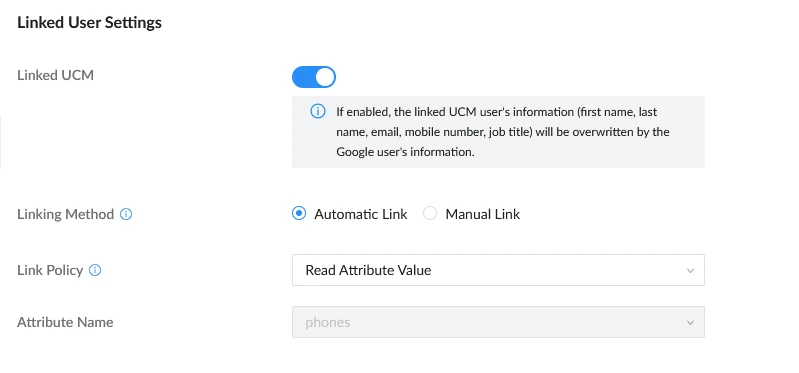
- Navigate to User Settings→Linked User Settings.
- Enable Linked PBX* (*The PBX field in this parameter varies based on the model).
- Select a Linking Method:
- Automatic Link: the PBX automatically links Google users to PBX users or extensions.
- Manual Link: administrators manually link users from the Google User List.
- When Automatic Link is selected, the PBX determines how Google users are matched to PBX users or extensions. Under Link Policy, select one of the following:
- Automatic Allocation: the PBX creates or assigns an extension starting from a specified initial extension number.
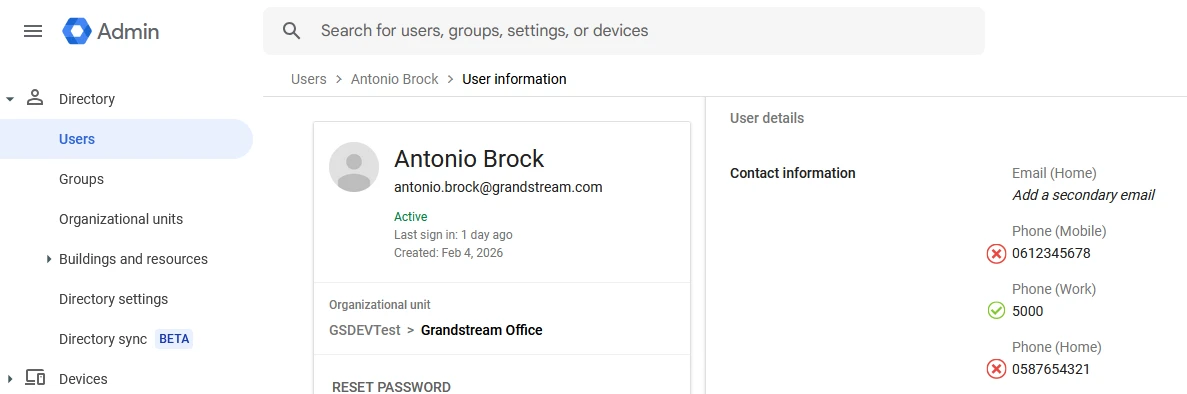
- Read Attribute Value: the PBX reads the Google user phone attribute to create/match a PBX extension.
Google User List And Manual Operations
After users are retrieved, they are displayed in the Google User List. This section explains how to manually synchronize and link users.
This list allows administrators to retrieve the latest user information immediately.
- Navigate to the Google User List section.
- Click Sync Now.
- Wait for the synchronization process to complete.

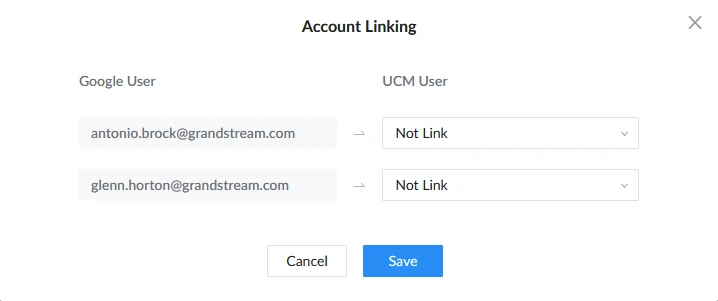
When Manual Link is selected, administrators can explicitly associate Google users with PBX users or extensions.
- In the Google User List, select one or more Google users.
- Click Batch Link or use the Options column for individual users.

- Select the target PBX user or extension.
- Confirm the association.
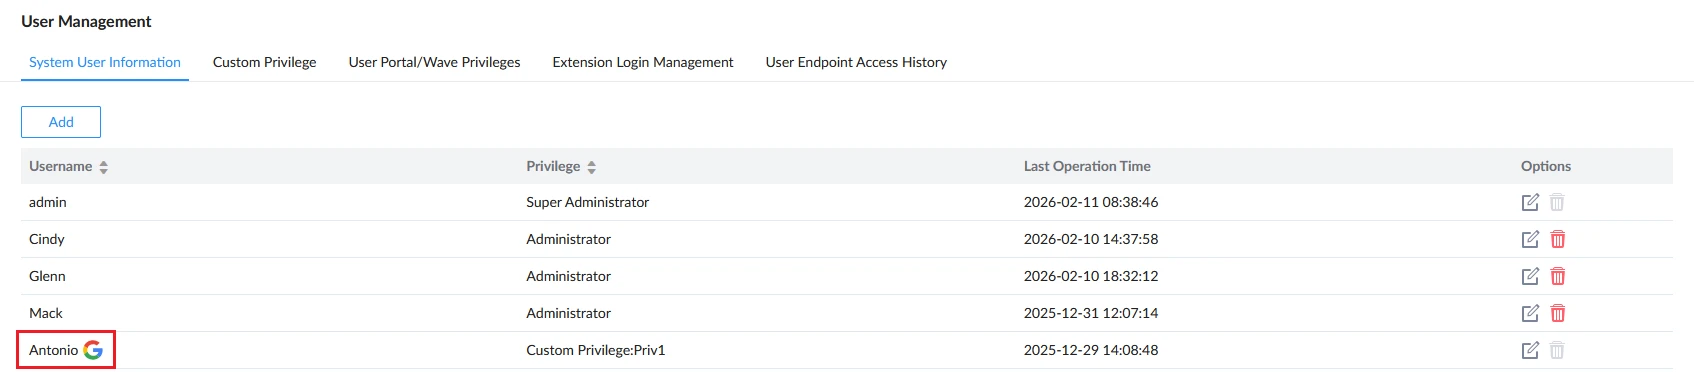
The linked PBX system users and extensions are identified by a Google icon as shown below:

Configure Sync Settings
The Sync Settings page defines how Google Workspace user lifecycle events are handled on the PBX and whether synchronization runs automatically. This section ensures user data consistency between Google Workspace and the PBX.
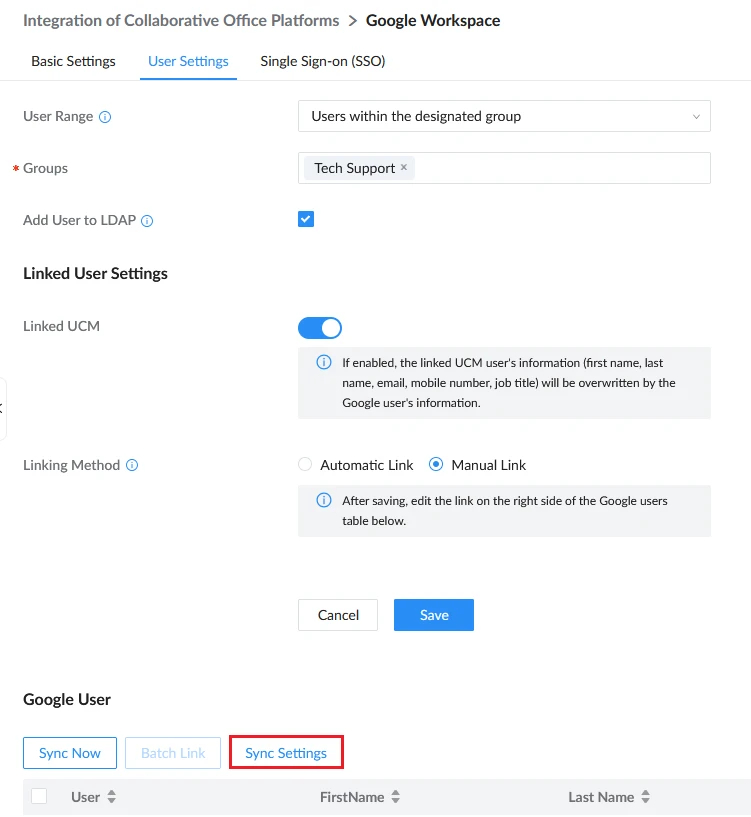
This Sync Settings page can be accessed from the Google User List as such:
Configure Extension Cleanup Behavior
This configuration determines how linked PBX extensions are handled when a Google Workspace user is deleted, suspended, or unlinked.
- Navigate to Google User List → Sync Settings.
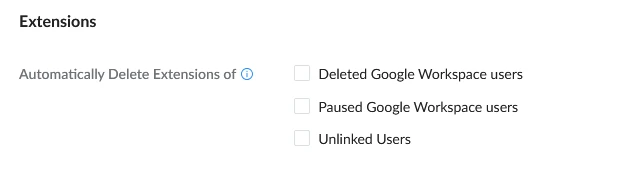
- Under the Extensions section, configure the following options as required:
- Deleted Google Workspace users: Automatically deletes the linked PBX extension when the corresponding Google Workspace user is deleted.
- Paused Google Workspace users: Automatically deletes the linked PBX extension when the corresponding Google Workspace user is suspended or paused.
- Unlinked Users: Automatically deletes PBX extensions that are no longer linked to any Google Workspace user.
- Click Save.
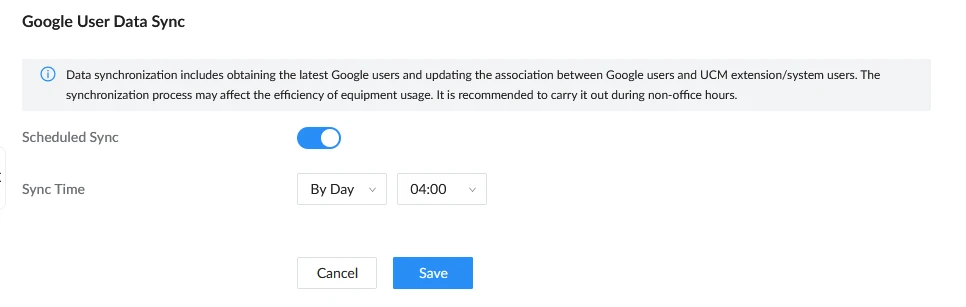
Configure Scheduled Synchronization
Scheduled synchronization allows the PBX to periodically retrieve updated Google Workspace user information and maintain link associations automatically.
- In the Sync Settings page, enable Scheduled Sync.
- Configure the desired synchronization schedule.
- Click Save.
Review Sync History
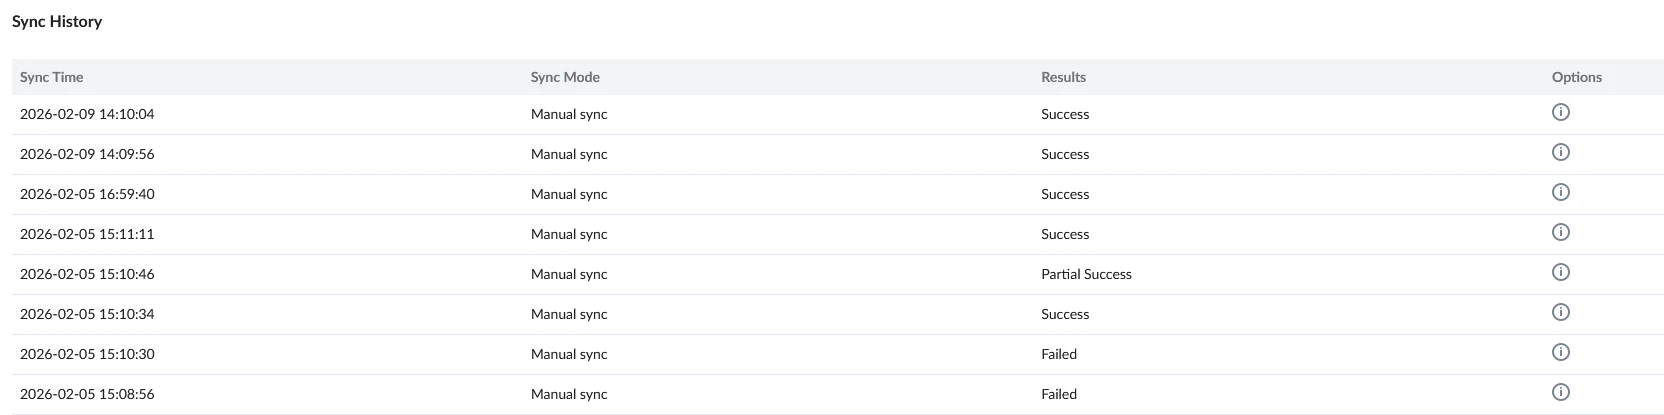
The Sync History section under Sync Settings provides visibility into previous synchronization attempts and their results. This is useful for validation and troubleshooting.
The following information is displayed:
- Sync Time: Date and time when the synchronization was executed.
- Sync Mode: Indicates whether the sync was triggered manually or by schedule.
- Results: Displays the synchronization result (Success, Partial Success, or Failed).
- Options: Provides access to detailed synchronization logs for troubleshooting purposes.
Configure Single Sign-On (SSO)
Single Sign-On enables Google account-based authentication for the PBX web interface. When enabled, users can log in using their Google credentials instead of local PBX credentials.
The following conditions must be met for SSO to function correctly:
- At least one Google Workspace account must be linked to a PBX user or extension.
- The PBX must be accessed using a public FQDN over HTTPS.
Configure Authorized Domain and Redirect URI
Google requires the domain used to access the PBX to be registered in the OAuth consent screen and the exact login URL to be configured as an authorized redirect URI.
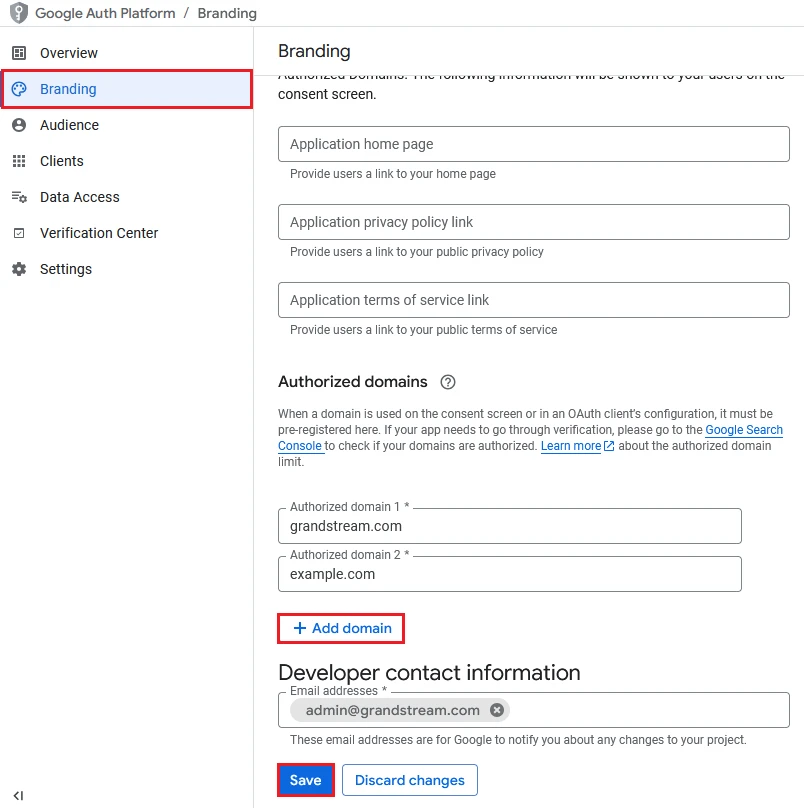
Add Authorized Domain
The domain used to access the PBX must belong to your Google Workspace organization.
- Log in to Google Cloud Console.
- Select the project created for the PBX integration.
- Navigate to APIs & Services→OAuth consent screen, and access the Branding tab.
- Under Authorized domains, click Add Domain.
- Enter the root domain of the PBX FQDN (not the full subdomain).
- Click Save.
Configure Authorized Redirect URI
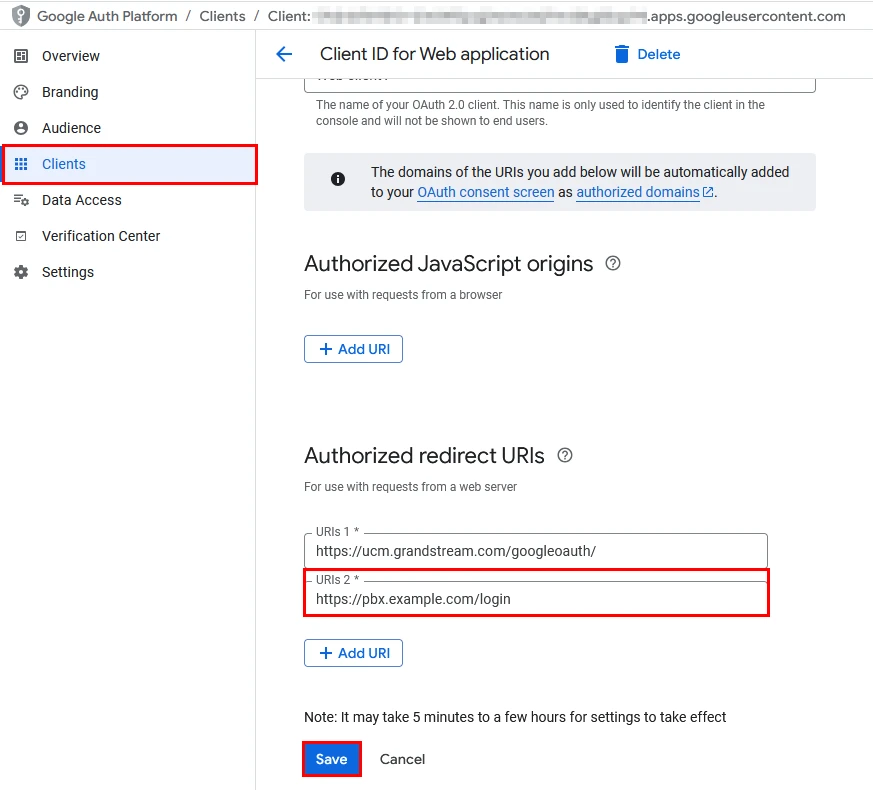
After adding the authorized domain, configure the exact redirect URI used by the PBX during OAuth authentication.
- Navigate to APIs & Services → Credentials.
- Locate the previously created OAuth 2.0 Client ID.
- Click Edit.
- Under Authorized redirect URIs, click Add URI.
- Enter the exact HTTPS login URL used to access the PBX.
- Click Save.
Configure SSO on the PBX
After the Google side configuration is complete and OAuth authorization has already been successfully established under Basic Settings, enable SSO on the PBX.
- Log in to the PBX web interface as an administrator.
- Navigate to Integrations→Integration of Collaborative Office Platforms→Google Workspace→Single Sign-On (SSO).
- Enable Google Workspace SSO.
- Save the configuration.
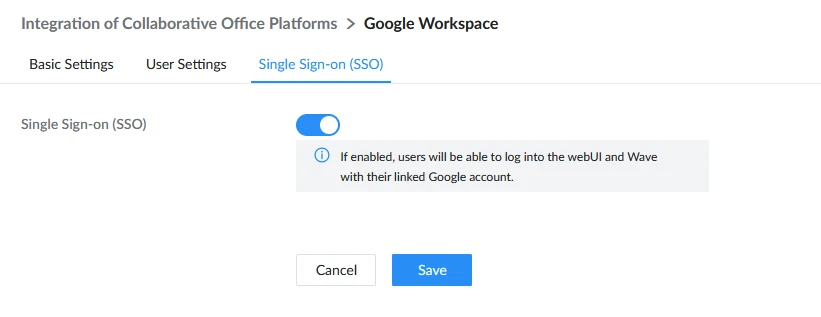
Once enabled, the PBX will use Google authentication for linked users, and the Sign in with Google option will appear on the PBX login page.
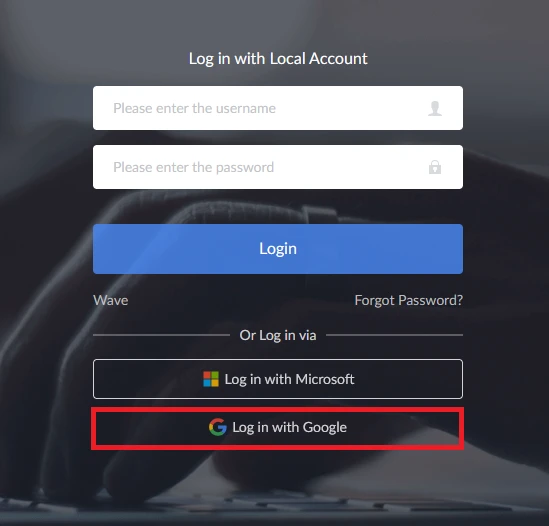
Verify SSO Login
To validate SSO functionality, please refer to the steps below:
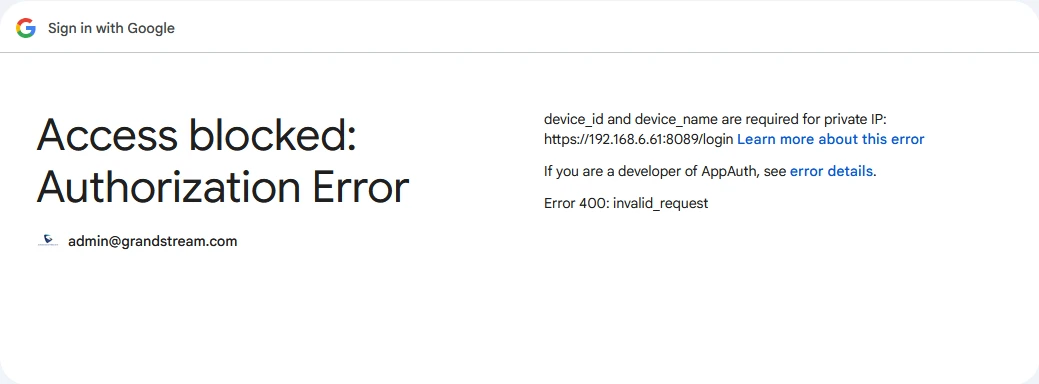
- Open the PBX login page using the configured public FQDN (https://pbx.example.com). If a private IP is used, Google will block the OAuth request and display the following error.
- Click Sign in with Google.
- Sign in using a Google Workspace account that:
- Exists in the Workspace domain.
- Has been retrieved under User Settings.
- Is linked to a PBX user or extension.
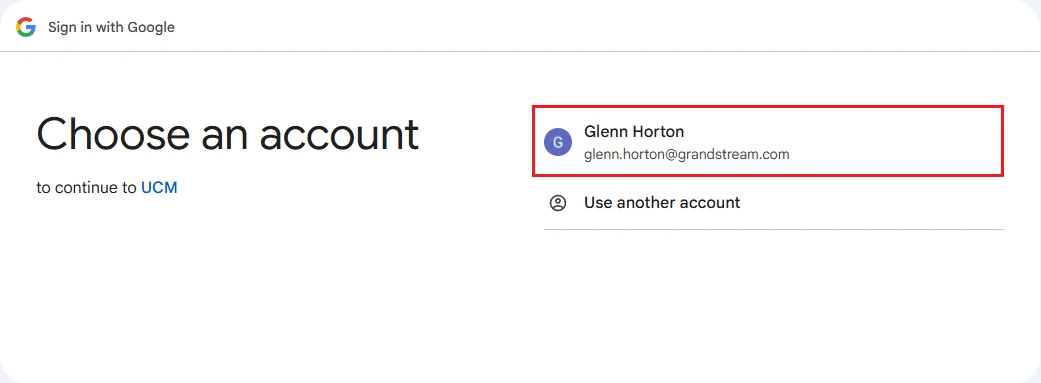
- Grant consent if prompted.
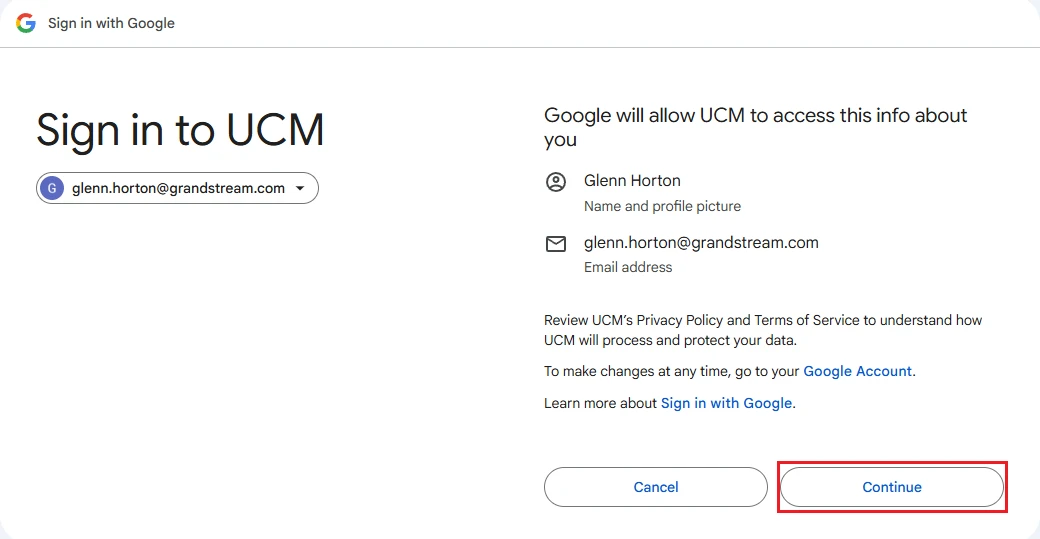
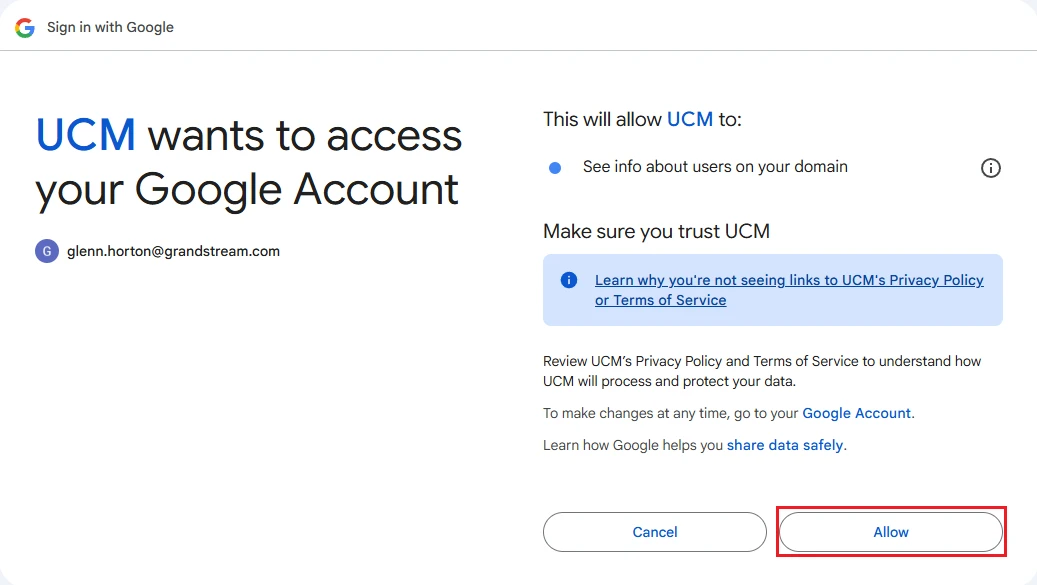
If the configuration is correct, the user is redirected back to the PBX and logged in under the mapped user account.
SUPPORTED MODELS
The table below lists the supported models and firmware support for the Google Workspace integration.
Models | Firmware Required |
UCM630x Series | 1.0.33.7+ |
UCM630xA Series | 1.0.33.7+ |
SoftwareUCM | 1.0.33.7+ |
CloudUCM | 1.0.33.10+ |