


This guide provides a comprehensive, step-by-step walkthrough for integrating Microsoft Entra ID (formerly Azure Active Directory) with Grandstream’s IP PBXs. By enabling this integration, administrators can synchronize Microsoft 365 contacts, configure Single Sign-On (SSO), and streamline user account binding.
This setup is ideal for organizations using Microsoft 365 that want to centralize identity and access control across their communication infrastructure.
PREREQUISITES
- Microsoft account with global administrator permissions.
- Modern authentication has been enabled in the Microsoft 365 admin center.
- Grandstream PBX running a compatible firmware version (Refer to the [Supported Models]).
ENTRA ID CONFIGURATION
Registering the application with Microsoft Entra ID
- Access the Azure Portal using the account with global administrator privileges.
- In the search bar, search for and select the Microsoft Entra ID service to enter the organization’s directory.
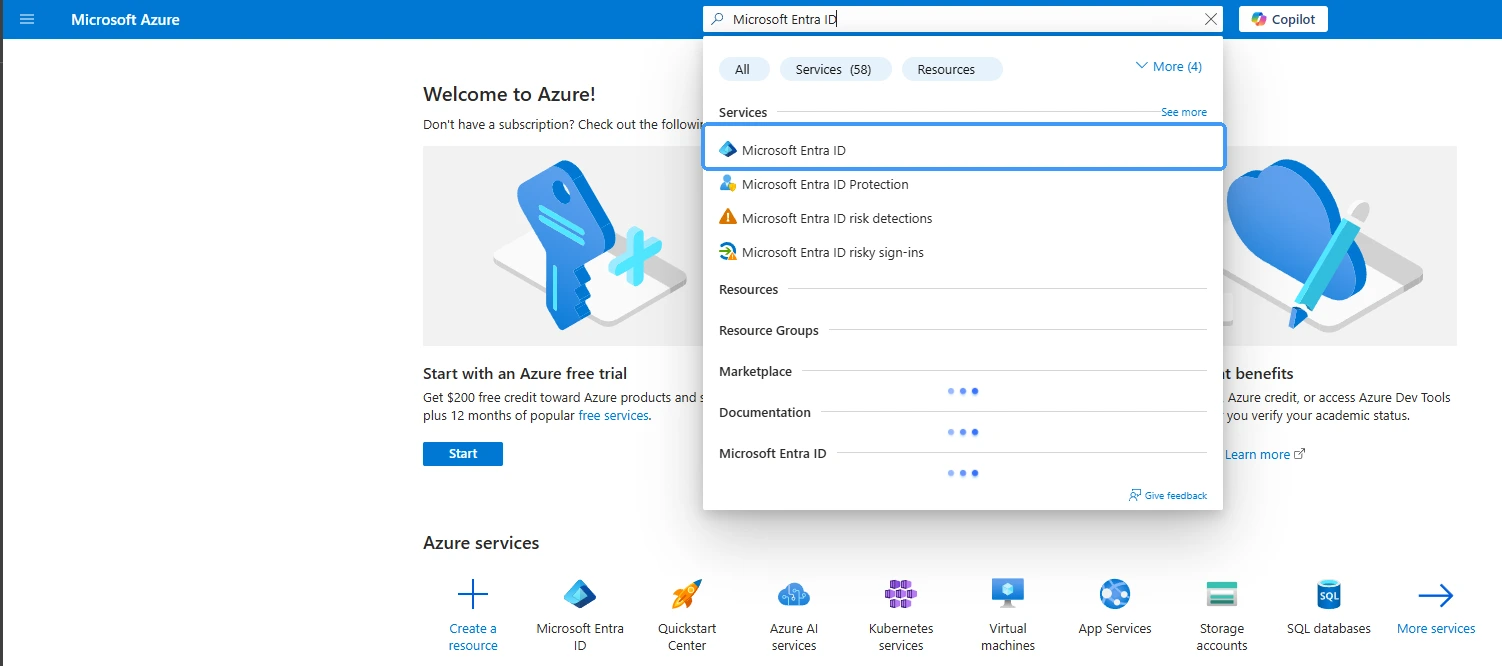
- In the left navigation of the organization directory, go to App Registrations and click New Registration.

- On the App Registration page, configure the application’s registration information based on the table below, and then click Register.

Name | Set the name that the application needs to display. |
Supported account types | Select Accounts in this organization’s directory only. |
Redirect URI | In the Select Platform drop-down list, select Web , and then fill in the URI that needs to receive the token . Make sure this URI is secure and can be accessed normally. |
- After completing the registration, the page will jump to the application’s overview page. The application (client) ID and directory (tenant) ID of this application will be required to complete the relevant information on the PBX later.

Assigning API Permissions
To enable Microsoft Entra ID user and contact synchronization, the application must be granted both Application permissions and Delegated permissions in Microsoft Graph.
Microsoft Graph uses two permission models:
- Delegated permissions (scopes): used when the PBX accesses Microsoft Graph on behalf of a signed-in administrator during authorization.
- Application permissions (app-only / app roles): used when the PBX accesses Microsoft Graph as a background service, without a signed-in user.
Both permission types are required for this integration because the PBX performs operations that occur during user-authorized access and operations that occur as the service itself during synchronization.
To configure the required permissions, please refer to the steps below:
- In the app’s menu, go to API permissions → Click Add a permission.
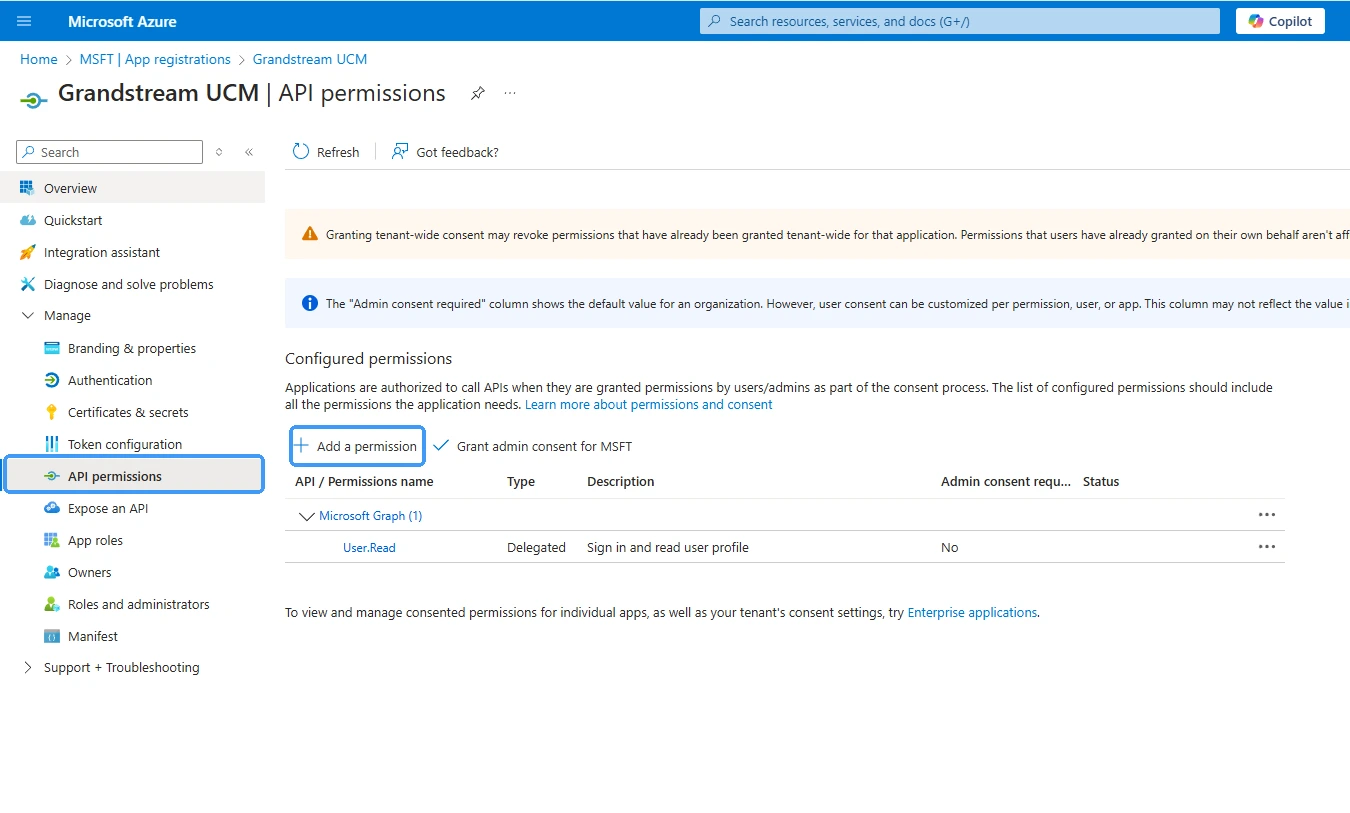
- Select Microsoft Graph → Choose Application permissions.
- Under the application permissions, search for and add: User.ReadWrite.All.
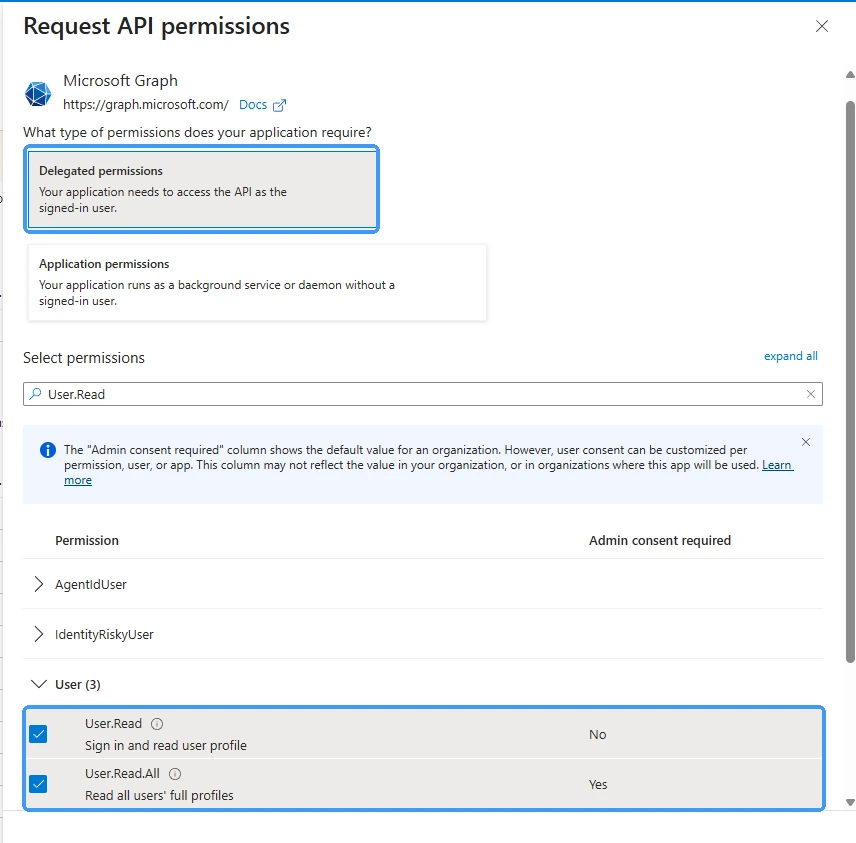
- Choose Delegated permissions, and select “User.Read” and “User.Read.All” under User.
- After adding the permissions, click Grant admin consent for the organization (if you’re not the Global Admin, request approval from one).
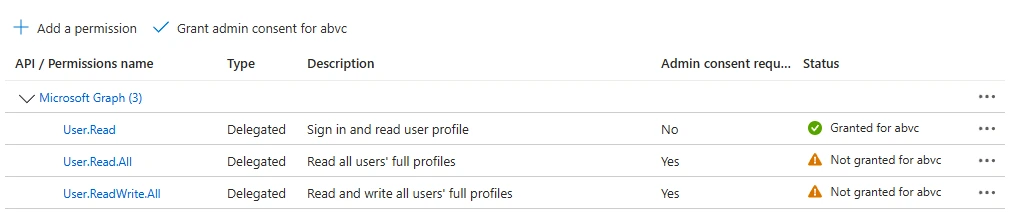
- Confirm that the permission has been granted for your organization. The status should be “Granted for [Org]“.

Creating a Client Secret
- Go to Certificates & secrets → Under Client secrets, click New client secret.
- Add a description and choose the desired expiration time.
- Click Add and copy the generated client secret value.
IP PBX CONFIGURATION
After creating and configuring your app in Azure, log in to your PBX system to input the required data.
- Log into the Web UI and navigate to Integrations → Microsoft Entra ID (Azure AD).
- Fill in the following fields:
Redirect URI | This should be the same redirect URI as the one used in Azure registration |
Tenant ID | Paste your Directory (Tenant) ID |
Application (Client) ID | Paste your Client ID |
Client Password | Paste the saved Client Secret. |
- Click “Save and Authorize“. A new browser window will open, prompting you to sign in with your Microsoft Global Administrator account. Upon successful authentication, an authorization token will be sent to the configured redirect URI.
- Copy the token received, paste it into the window prompt, and click Authorization.
- Once authorized, click Save to apply changes.
INTEGRATION FEATURES
This section describes the key features available after successful integration of Microsoft Entra ID with the Grandstream PBX systems.
Synchronizing Microsoft Users/Extensions
Enables the PBX to retrieve and display Entra ID user information in the local contact list.
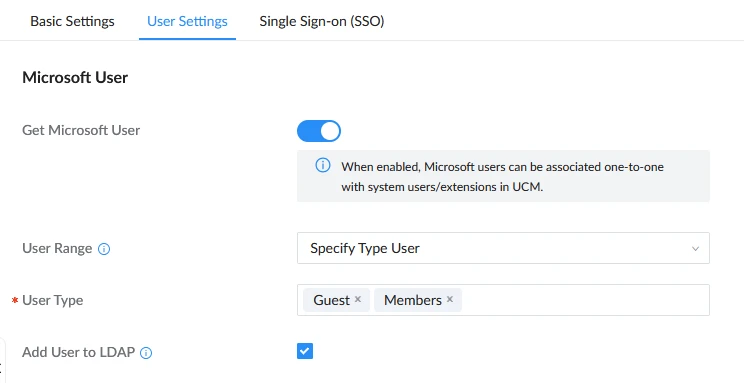
- Get Microsoft Users: Enables the PBX to retrieve contacts from Microsoft Entra ID, store them locally, and display them in the list.
- User Range: Controls whether to retrieve all Microsoft users or specify a user type.
- User Type: Defines which Entra user types (e.g., Members, Guest) will be retrieved. Only selected types are synchronized.
- Add Users to LDAP: Adds the synchronized Entra ID users to the PBX LDAP phonebooks, making them available to LDAP-enabled devices.
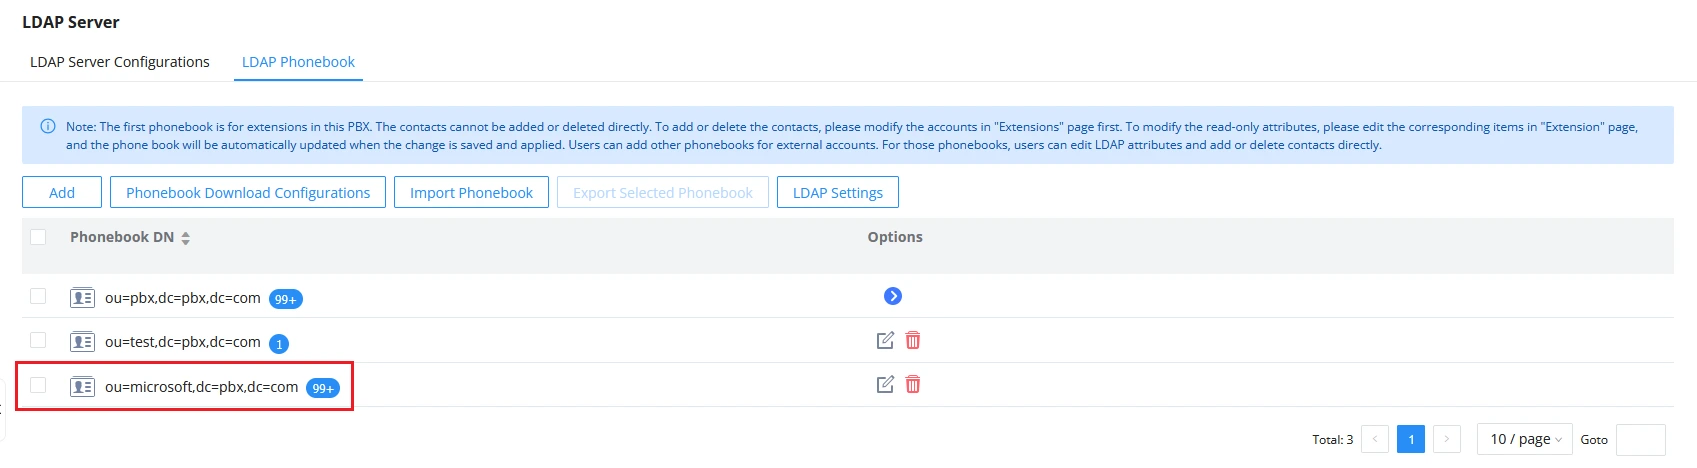
Once LDAP synchronization is enabled, the synchronized Microsoft Entra ID contacts will be accessible via the PBX LDAP directory path: ou=microsoft,dc=pbx,dc=com.
Associated User Settings
- Associated UCM (Field may vary by PBX model): After checking this option, you can bind Microsoft users to PBX extensions/users to form an alternative management method.
- Association Mode: allows choosing automatic association or manual association.
- Manual association requires users to bind users/extensions themselves by clicking Bind in the user list.
- Automatic association involves many configuration items:
- Associated user range: refers to the scope of binding, specifying which Microsoft Entra ID users are eligible for binding. This can include all users, guests, or members.
- Association Policy: Defines how the PBX assigns extensions to Microsoft Entra ID users during automatic association.
- Auto Allocation assigns extensions sequentially, starting from a specified base number.
- Read the Specified Property Value uses a chosen Entra ID attribute (e.g., mobilePhone or businessPhone) to determine the extension or match it to an existing PBX user, enabling precise user binding based on existing directory data.
Extensions and users that are successfully bound to Microsoft Entra ID accounts will be marked with a Microsoft logo icon in the PBX interface, making them easily identifiable.

Microsoft User List
Displays the list of synchronized Entra ID users and allows manual or automatic association management.
- The Sync Now button means that a synchronization will be performed immediately. If binding information is set, rebinding will also be performed.
- Sync Settings: allows the configuration of the following synchronization settings:
- Automatically delete extensions: When the selected scenarios occur during synchronization, the bound extensions will be automatically deleted.
- Automatic Sync: Allows administrators to set a schedule for recurring user synchronization.
- Synchronous Record: Keeps a log of all synchronization activities for auditing and troubleshooting purposes.
Single Sign-On (SSO)
Allows users to log in to the PBX system using their Microsoft Entra ID credentials.
After enabling SSO (Single Sign-On), users must add the PBX SSO redirect URI to the list of redirect URIs in the Microsoft Entra ID application settings to complete the configuration.
Once SSO is successfully configured, a Microsoft login option will appear on the PBX login page, allowing users to authenticate using their Microsoft Entra ID credentials.
SUPPORTED MODELS
Supported Devices | Firmware Version |
UCM6300/A Series | 1.0.29.6+ |
CloudUCM | 1.0.29.7+ |
SoftwareUCM | 1.0.33.7+ |