


OVERVIEW
The Chatbot intelligently interacts with visitors by automatically responding with pre-configured messages, enhancing agent efficiency and improving the overall customer experience.
For example, when a visitor initiates a chat session, they enter the default reply flow and receive a greeting such as “Hi, how may I help you?” or a customized message with interactive buttons set by the administrator. When the visitor clicks a button, the Chatbot automatically replies with the corresponding preset response. Administrators can also create separate sub-flows or button options tailored to address specific inquiries, such as product information or pricing details.

PREREQUISITES
- The UCMRC/CloudUCM plan of your device has LiveChat permission.
- Install Wave Desktop client and log into your extension.
- The current extension user has Wave administrator privileges. on the UCM management web UI, set an extension user as “Wave Administrator”, as shown below.

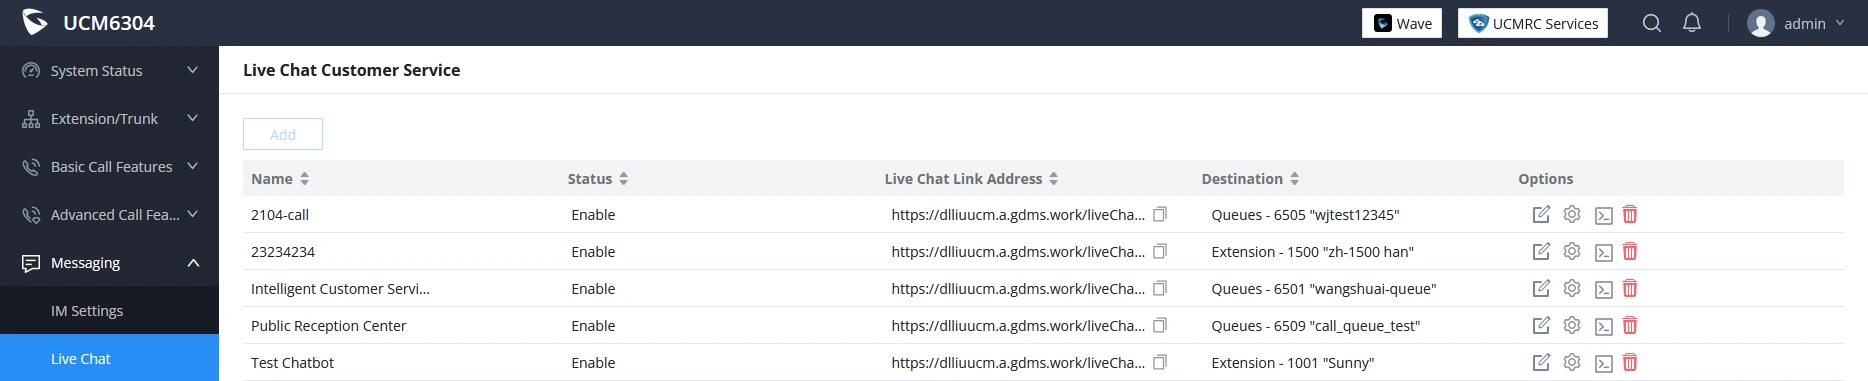
- It requires creating a Live Chat, please access the UCM6300 Series device web UI then navigate to Messaging → Live Chat then add a Live Chat if it has not been added.
CHATBOT CONFIGURATION
The management platform includes a Chatbot function that allows users to configure an automatic reply flow for customer interactions. A single Chatbot can be assigned to multiple channels (e.g., a specific Live Chat or WhatsApp), enabling multiple channels to share the same automated reply flow.
Add a Chatbot
- Log into Wave Desktop client, then navigate to Application tab and click on “Management Portal”

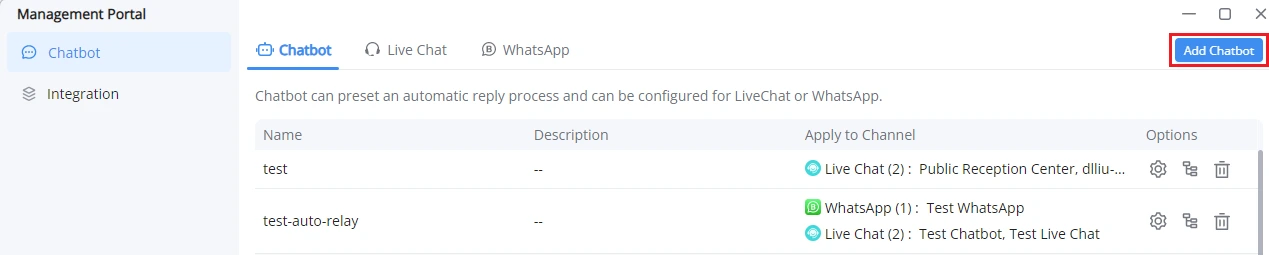
- On the Chatbot tab, click on “Add Chatbot“.
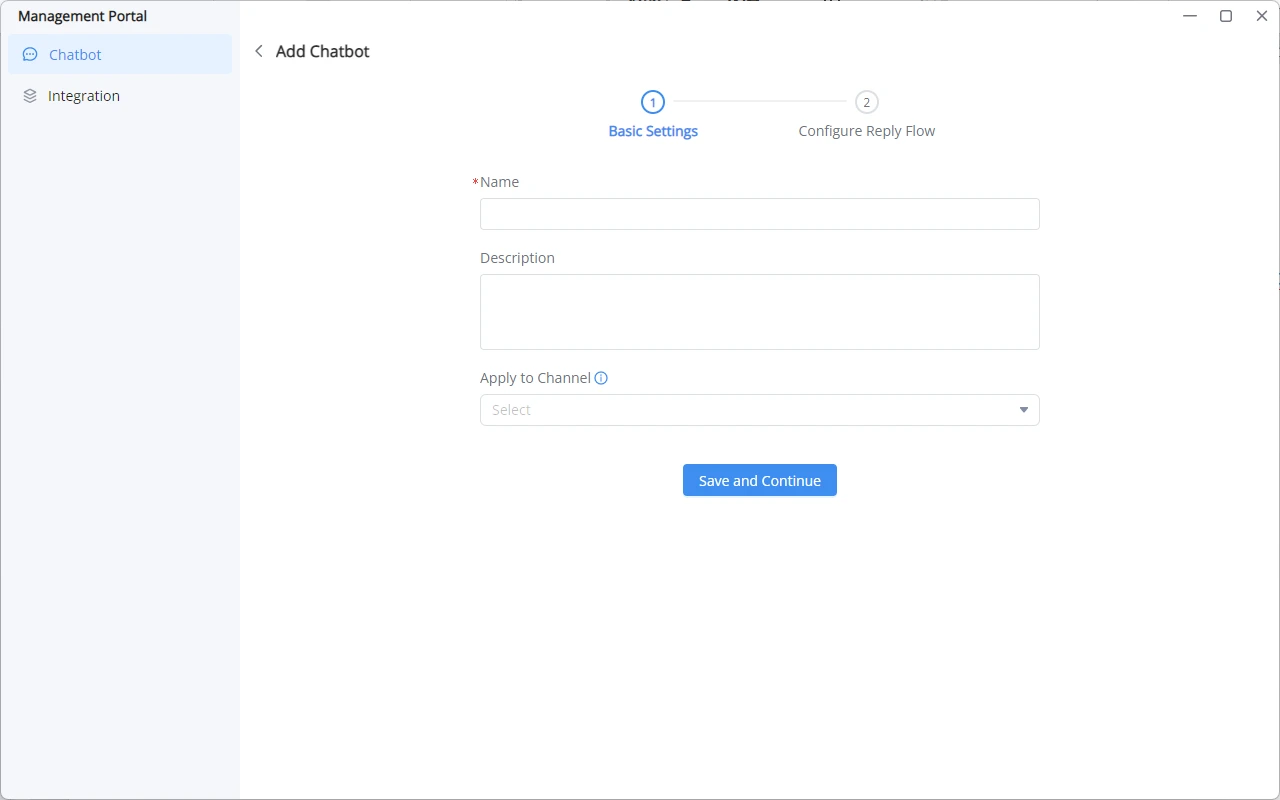
- Provide the Chatbot name, description, and select the channel (Live Chat or WhatsApp) created on the UCM.
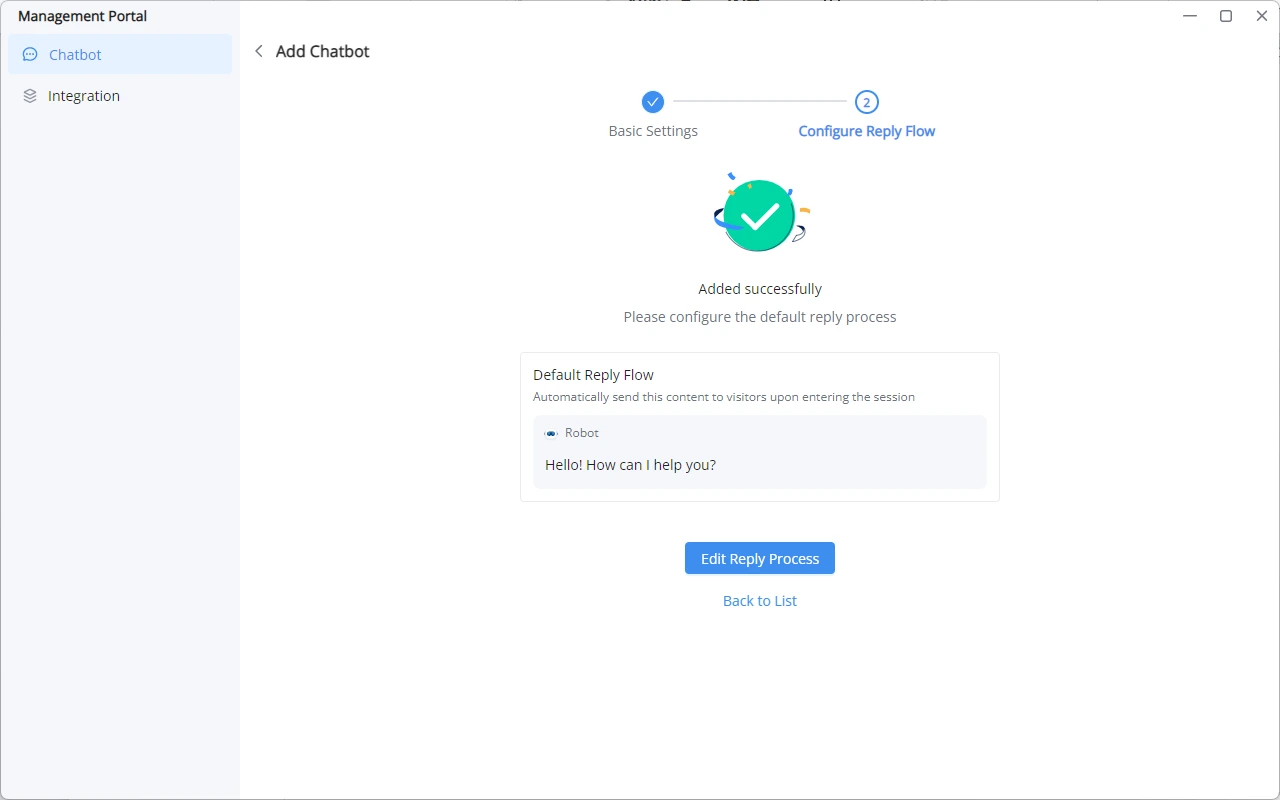
- Configure the Chatbot reply flow as described in the Manage Chatbot Reply Flow section of this guide.
Edit a Chatbot
- Locate the chatbot you want to update from the list on the Chatbot tab.
- Click the edit icon
 next to that chatbot’s name. This will open the chatbot’s configuration page.

- Update the settings as required:
- Name: Change the assigned name of the chatbot.
- Description: Modify the description to clarify the chatbot’s purpose or provide updated details.
- Apply to Channel: Select the channels where this chatbot will be active (e.g., Live Chat channel or WhatsApp channel).
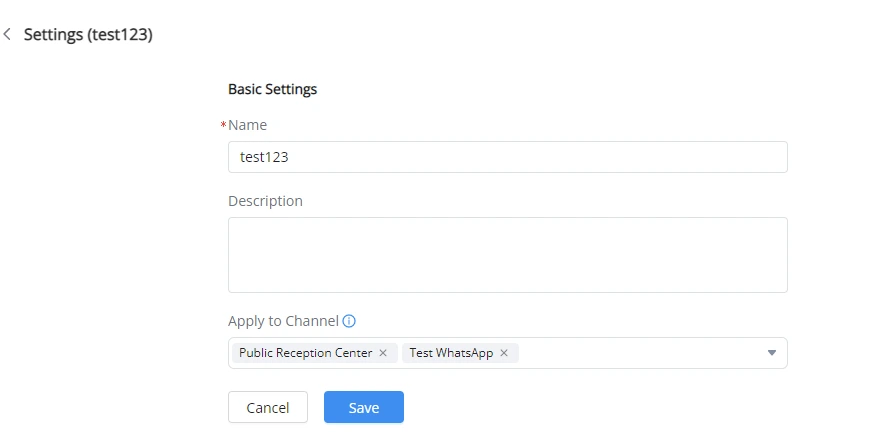
- Click Save to apply your changes.
Manage Chatbot Reply Flow
The chatbot reply flow defines how the Chatbot interacts with visitors by guiding conversations and automating responses. It consists of a main default flow that initiates the interaction and additional sub-flows for handling specific topics or scenarios.
The chatbot reply flow consists of two main components:
- Default Reply Flow: After enabling Chatbot, there will always be a default reply flow that cannot be deleted or hidden. This is the beginning of the chat bot conversation. It is mainly used to greet visitors, collect information from visitors, and display questions that visitors may need to ask, so that visitors can solve problems according to guidance.
- Sub-flow: Sub-flows set for specific situations or complex problems, such as product prices, etc. It can be referenced in different scenarios of the default response flow or reused in other Live Chats.
Users can edit the Chatbot reply flow by clicking the  to access the reply flow list.


Configure Default Reply Flow
If you want to automatically reply to visitors’ messages, you must configure a default reply flow.
- Open the Chatbot management in Application → Management Portal.
- Select the Chatbot you need to configure, click
 .
. - Click the edit button of “Default Reply Flow” to enter the flow editor page.

Flow Editor
Edit the main message: Click the message box to edit the content and buttons in the message.

Enable | Whether to enable this flow. If not enabled, users cannot enter this flow and cannot automatically reply to messages in this flow. |
Description | The description of this flow. This content will not be seen by visitors. |
Message Content | Enter the message content for automatic reply to visitors. |
Add Button- “Reply” Type | When a visitors clicks this button, the system will reply to this text message.
|
Add Button- “Flow” Type | Visitors click this button to enter the selected sub-flow.
|
Add Button- “Link” Type | Visitors click this button and use the browser to open this URL. |
Note: Click “Delete” icon to delete the button and its reply content. | |
Edit/delete message: Hover over the message box to edit and delete

Click the message or the icon  to edit the message content and corresponding buttons.

If it is a “Flow” type, click Edit to directly enter the sub-process editor.

Publish the flow: After editing, you need to click the “Publish” button in the upper right corner to save and take effect this flow.
Add Sub-flow
You can create multiple sub-flows so that you can reference this sub-flow in different scenarios in the default flow, or visitors can send keywords to enter this sub-flow.
- Open the Chatbot management page in Application → Management Portal.
- Select the Chatbot you need to configure, click

- Click “Add Flow” to enter the following sub-flow editor page:


Enable | Whether to enable this flow. If not enabled, users cannot enter this flow and cannot automatically reply to messages in this flow. |
Name | The name of this flow, which will not be visible to visitors. |
Keyword | The keyword of this sub-flow. Other flows use this keyword to enter this sub-flow. It is unique in all flows of this LiveChat and cannot be repeated. |
Description | The description of this flow. This content will not be seen by visitors. |
Reply Content | Enter the message content that will be displayed on the visitor interface after entering this flow. |
Add Button- “Reply” Type | When a visitors clicks this button, the system will reply to this text message.
|
Add Button- “Flow” Type | Visitors click this button to enter the selected sub-flow.
|
Add Button- “Link” Type | Visitors click this button and use the browser to open this URL.
|
- After editing, you need to click the “Publish” button in the upper right corner to save and take effect this flow.
Test and Publish Your Chatbot
You can test the auto-reply flow of the Chatbot you set up and publish it.
- Open the Chatbot management page in Application → Management Portal.
- Select the Chatbot you need to configure, click
- Click the “Test” button to enter the test page. Click the message button on the test page to try out the flow to ensure that it meets your expectations:

- You can also go to the flow editor page and click the “Test” button to test the chatbot:

- After editing, you need to click the “Publish” button in the upper right corner to save and make this flow effective.

Copy Reply Flow
You can copy the reply flow to other Live Chats.
- Open the chatbot management page in Application → Management Portal.
- Select the Chatbot you need to configure, click
- Select the flow to be copied then click the icon
 to copy it.
 to copy it.
Copy flow to | Select the target Live Chat to which you want to copy the flow. |
Copy the included sub-flow | Whether to copy all the sub-flows contained in the currently selected flow. For example, if you select “Default Reply Flow” to copy, all sub-flows used in “Default Reply Flow” will be copied to the target Live Chat. |
Edit/Delete Reply Flow
- Open the chatbot management page in Application → Management Portal.
- Select the Chatbot you need to configure, click
- Select the flow to be edited and click the icon
 to enter the flow editor. After editing, click the “Publish” button to publish the new flow.
 - Select the flow to be deleted and click the icon
 to delete the selected flow. Only the current flow will be deleted, and the sub-flows contained in this flow will not be deleted.
 to delete the selected flow. Only the current flow will be deleted, and the sub-flows contained in this flow will not be deleted.
LIVE CHAT SETTINGS
To configure Live Chat features such as user info collection and message transfer, please follow the steps below:
- Open the Live Chat tab page by navigating to Application → Management Portal in the Wave application.
- Click
 to configure the Live Chat parameters.
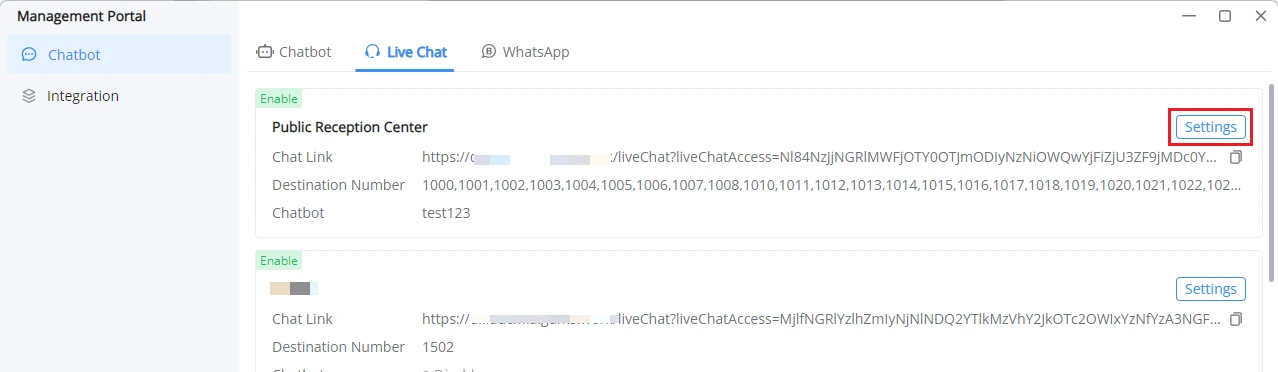
Each section below describes specific settings or features that can be configured after following the above steps.
Collect User Information
The Collect User Info setting allows users to gather essential details from visitors before they begin a Live Chat session. This ensures that the team has the necessary information to provide personalized and efficient support.
Once enabled, visitors will be prompted to complete an information form when they initiate a chat.
- In the Live Chat settings, toggle Collect User Info to “On”.
- Click the “Edit” button next to the User Info section.
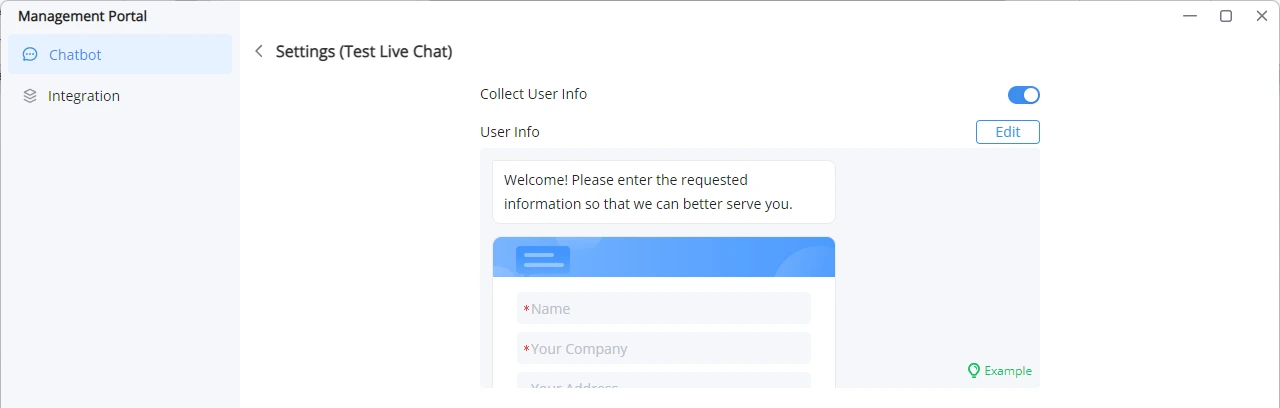
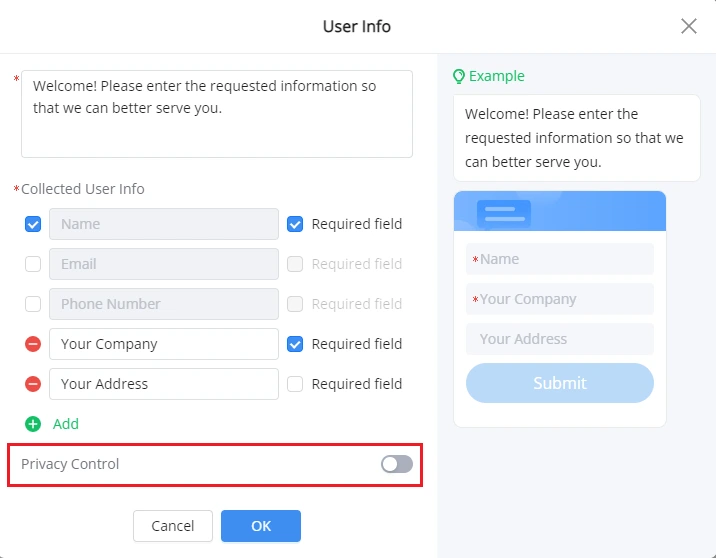
- Customize the message shown to visitors requesting their information. (Example: “Please provide your details so we can assist you better.”)
- Configure the requested fields by specifying the information to be collected and selecting whether each field is required or optional.
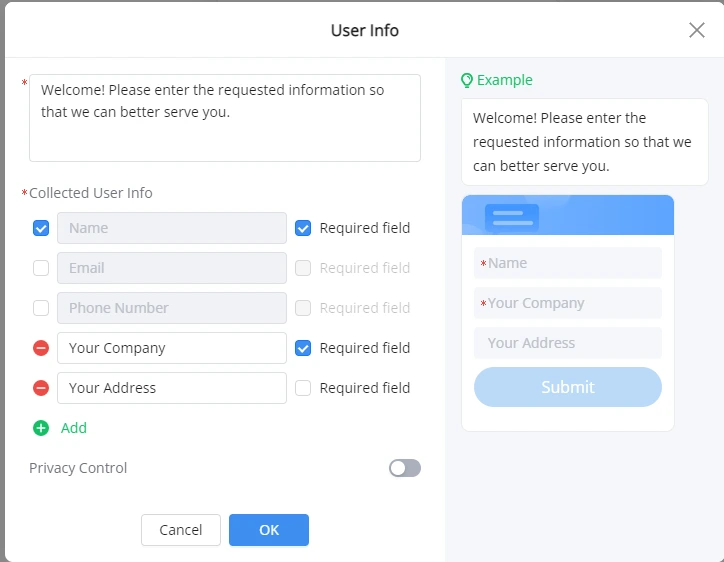
- Toggle the “Privacy Control” option to require visitors to agree to a privacy policy before proceeding, and customize the privacy policy text to align with your organization’s compliance requirements.
Enable Chatbot
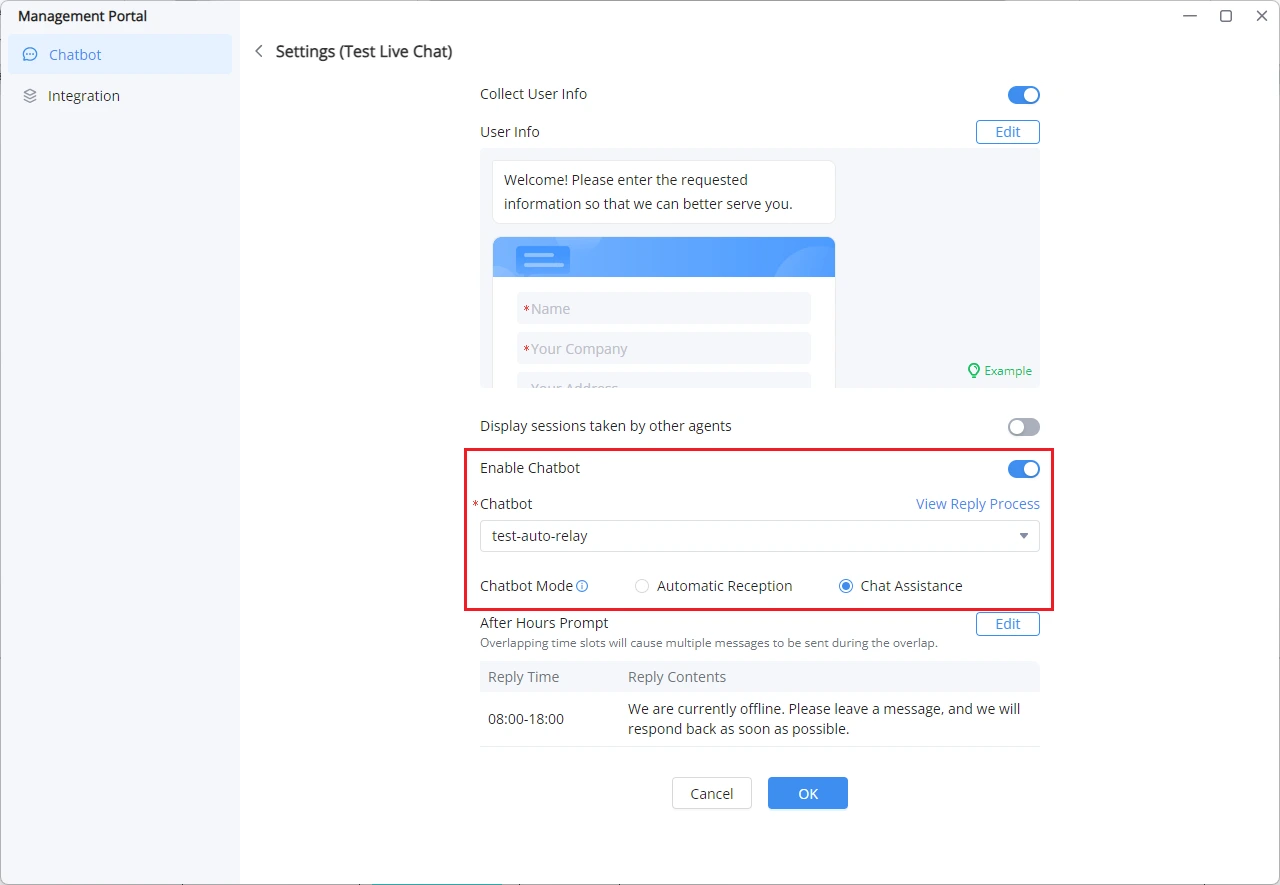
The Enable Chatbot function allows users to activate automatic replies for Live Chat sessions. Once enabled, you can select a previously created Chatbot to manage incoming messages.
- In the Live Chat settings, toggle Enable Chatbot to “On”.
- Select the existing Chatbot to be used for the Live Chat session.
- Configure the following modes after enabling the Chatbot:
- Automatic Reception: Live Chat sessions are fully handled by the Chatbot by default. No message notifications are sent to Wave extension users (Agents). Agents will be notified only when the visitor clicks “Transfer to Agent.”
- Chat Assistance: Live Chat sessions are automatically replied to by the Chatbot, and messages are simultaneously notified to Wave extension users (Agents). Agents can receive message reminders promptly and take over the conversation.
Transfer to Agent
If the Chatbot fails to automatically reply to a visitor’s message, it will send a configured fallback message prompting the visitor. When the visitor clicks “Transfer to Agent”, a notification will be sent to the assigned Wave extension user (Agent), allowing them to take over the chat session.

After Hours Prompt
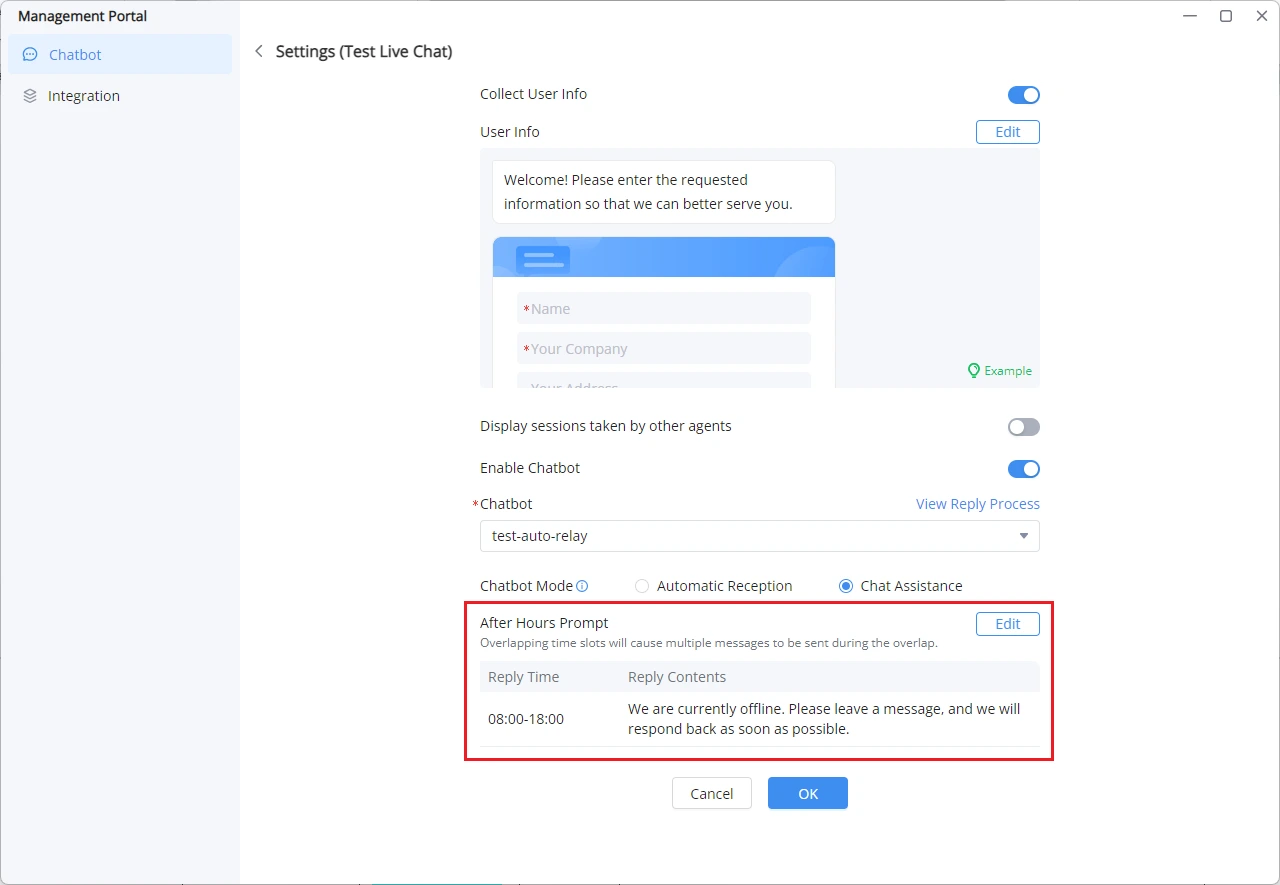
If your live agents have off-duty hours and are not available 24/7, you can configure an After Hours Prompt. This allows you to set a custom reminder message that will be automatically displayed to visitors who try to contact you outside of your working hours.
This feature supports setting different automatic reply messages for multiple time periods by configuring specific time ranges (start time, end time).
- When Enable Chatbot is turned on, this message will only be automatically sent if a visitor clicks “Transfer to Agent” or sends a message that the Chatbot cannot automatically reply to.
- When the Chatbot is disabled, this message will be automatically sent in response to the visitor’s first message.

Welcome Message and Reply to First Message
When the Chatbot is disabled, Wave provides options to set automated responses that improve visitor engagement and provide timely communication.
- Welcome Message: This message appears to visitors immediately when they open the Live Chat window. It can be used to greet visitors, or provide basic instructions.
- Reply to First Message: This option automatically sends a reply to the visitor’s first message in the chat, ensuring prompt acknowledgment even without an active agent or chatbot response.