OVERVIEW
Wave Desktop offers third party integrations with productivity add-ins in order to have these tools accessible directly on Wave Desktop, without having to switch constantly between tools. Integrating add-ins into Wave Desktop brings convenience which improves the unified collaboration experience.
ADD-IN INSTALLATION AND UPDATE
Install Add-in
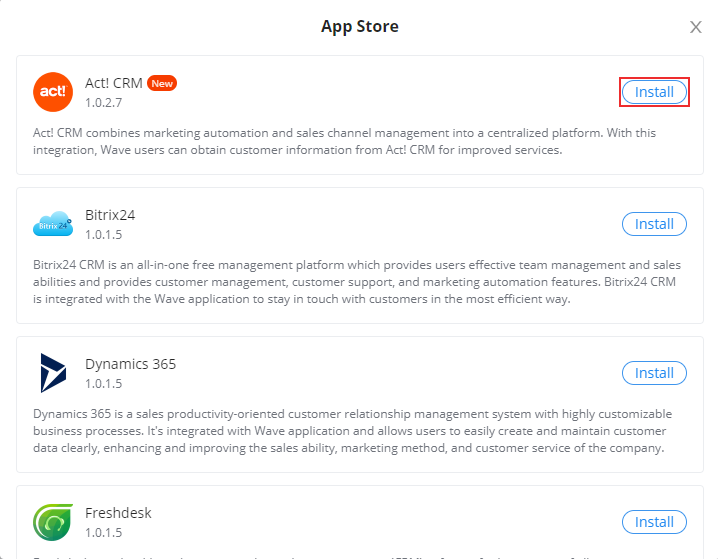
To install an add-in in Wave Desktop client, please navigate to Applications tab on Wave, then click on  , then click on “Install” on the add-in, then the add-in will be downloaded and installed. Please see the screenshot below.
Update Add-in
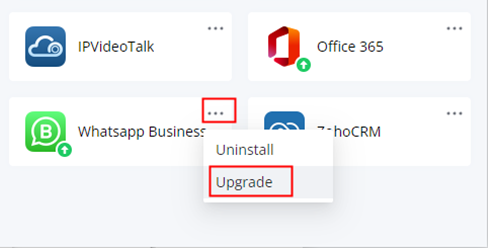
When an update is release for an add-in, a small green arrow will appear next to the icon of the add-in as the following image shows![]() .
.
The user can click on the three dots to open the menu of the actions related to the add-in then select “Upgrade” to update the add-in.
Uninstall Add-in
To uninstall an add-in, please navigate to Applications on Wave Desktop client, then click on the three dots on the add-in you wish to uninstall then click on “Uninstall”.

ADD-IN CONFIGURATION
WhatsApp Add-in
WhatsApp add-in allows the user to integrate WhatsApp messaging services into Wave. The user will be able to receive WhatsApp messages on Wave and respond directly from Wave without having to switch to WhatsApp client.
Prerequisites:
- The user must have a WhatsApp business account with a phone number. The phone number cannot be used for other WhatsApp accounts. If the user wants to use the phone number that is already bound to another WhatsApp account, the user needs to remove the binding first.
Please refer to the link below:
https://faq.whatsapp.com/ - Your UCM server must have an external network address and the address contains a valid TLS/SSL certificate (users can use the UCM RemoteConnect address), so that the WhatsApp server can push WhatsApp messages to the UCM server.
- Phase 1: Create Application on WhatsApp
- Visit https://developers.facebook.com to log in the Facebook account. The user needs to register as a Meta Developer first.
- Go to Multi-factor Authentication. Please refer to the link below for more details: https://www.facebook.com/help/148233965247823
- Go to developers.facebook.com -> My Apps -> Create App, select the “Business” type and follow the prompts on your screen.
- Enter the display name of the application and other settings, then create an application.
- After the application is created successfully, the user can process to “Add products to your app”, then the user can find the “WhatsApp” application, and click the “Set up” option.
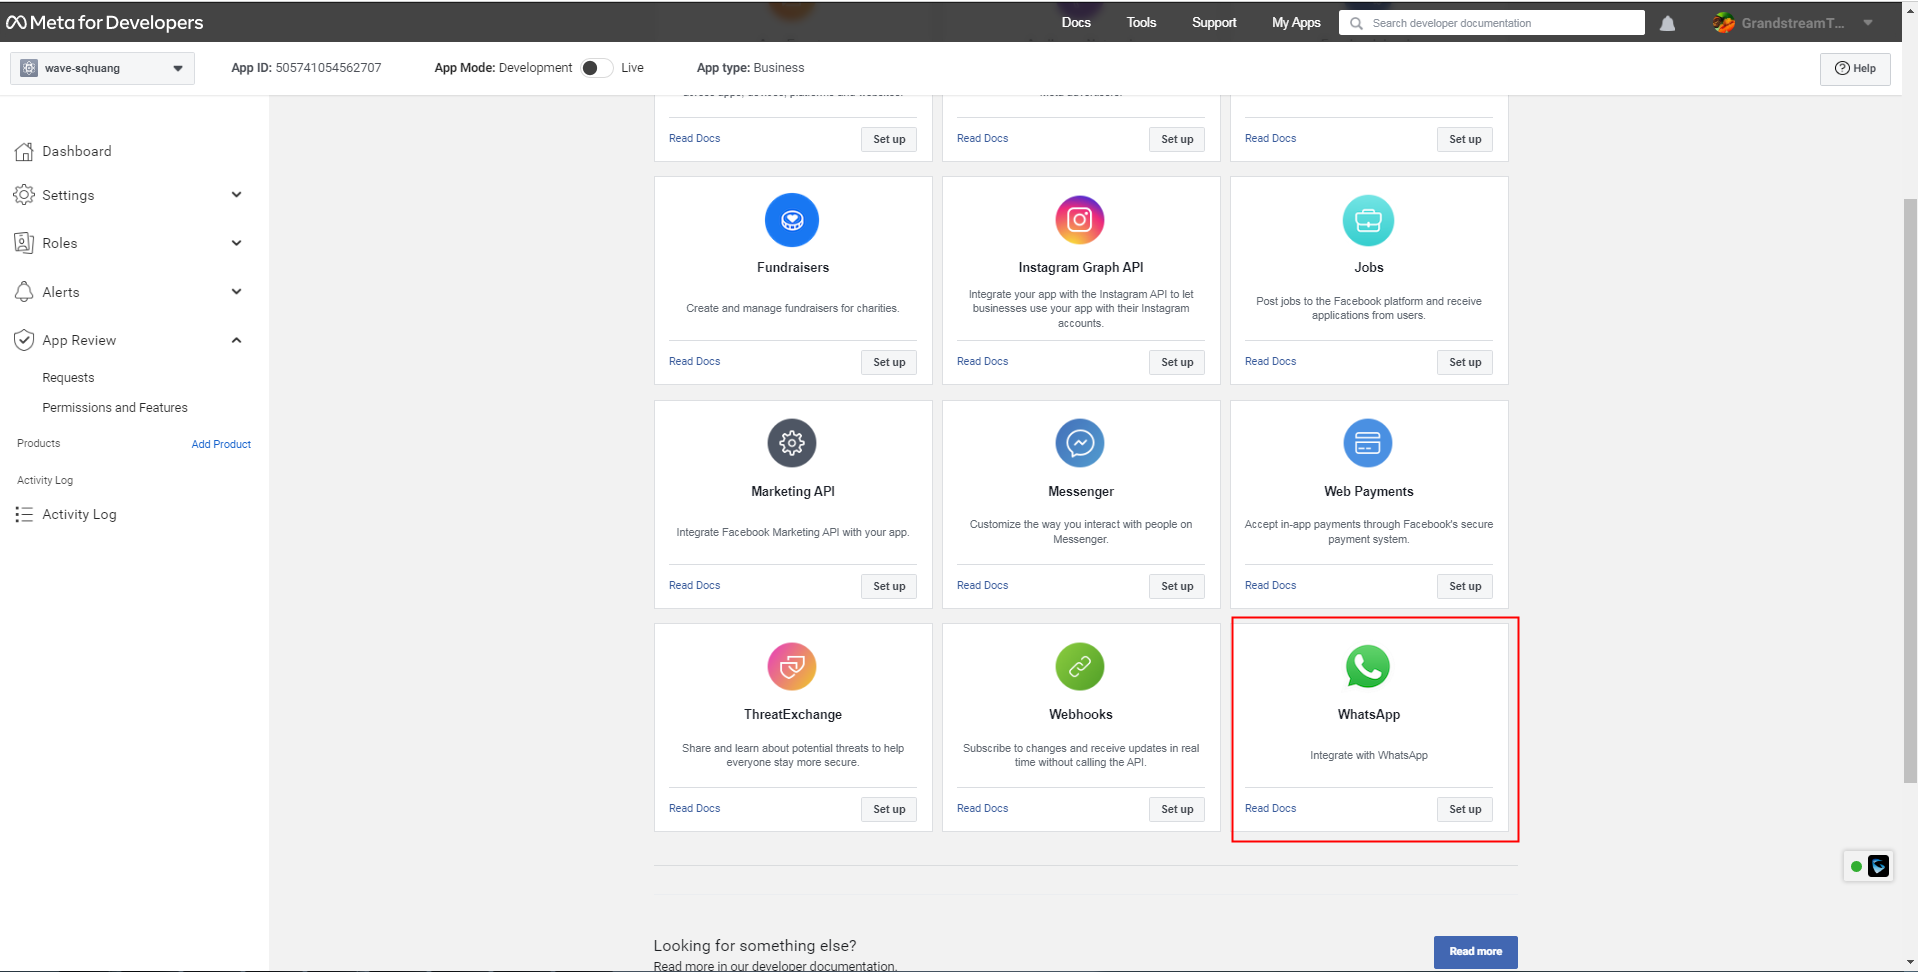
6. The user can click the “Continue” option to access “WhatsApp” -> “Getting Started (or Setup) Panel”. Please refer to the screenshot below:
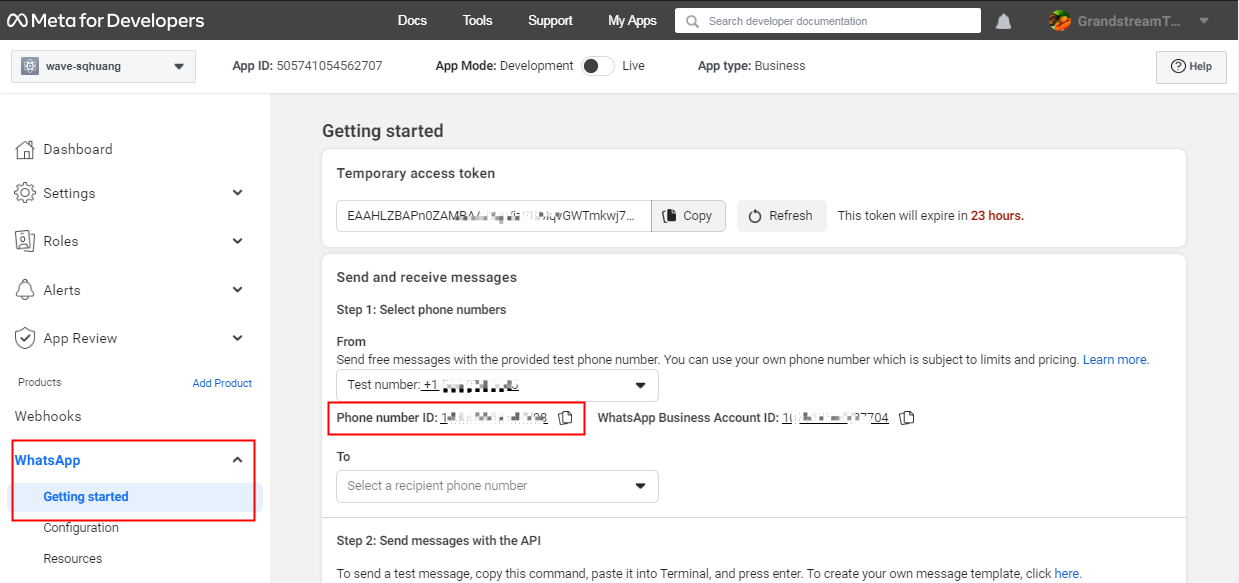
7. Select the phone number which the user prefers to use to send/receive WhatsApp messages. The user can copy the “Phone number ID” and save it for configuration on the Wave client.
8. (Optional) On the “Setting” -> “Basic” page, find the item “App secret”, the user can copy the “App secret” to the bottom of the drop-down menu and save it for future usage. The user can use this parameter to verify the callback URL to ensure the UCM server is securely accessed.

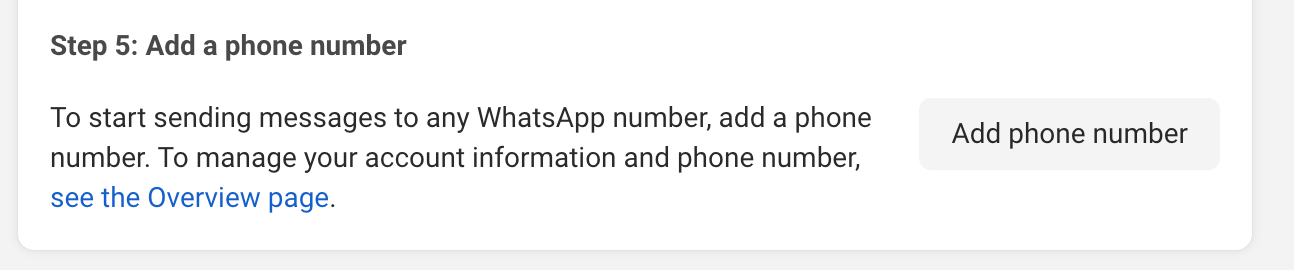
9. If the user does not have a number attached to the WhatsApp account, then follow the steps below:
- Phase 2: (Optional) Add Phone Number
- Under “WhatsApp” -> “Getting started” -> “Step 5: Add a phone number”, click the option “Add Phone Number”. Please refer to the screenshot below:
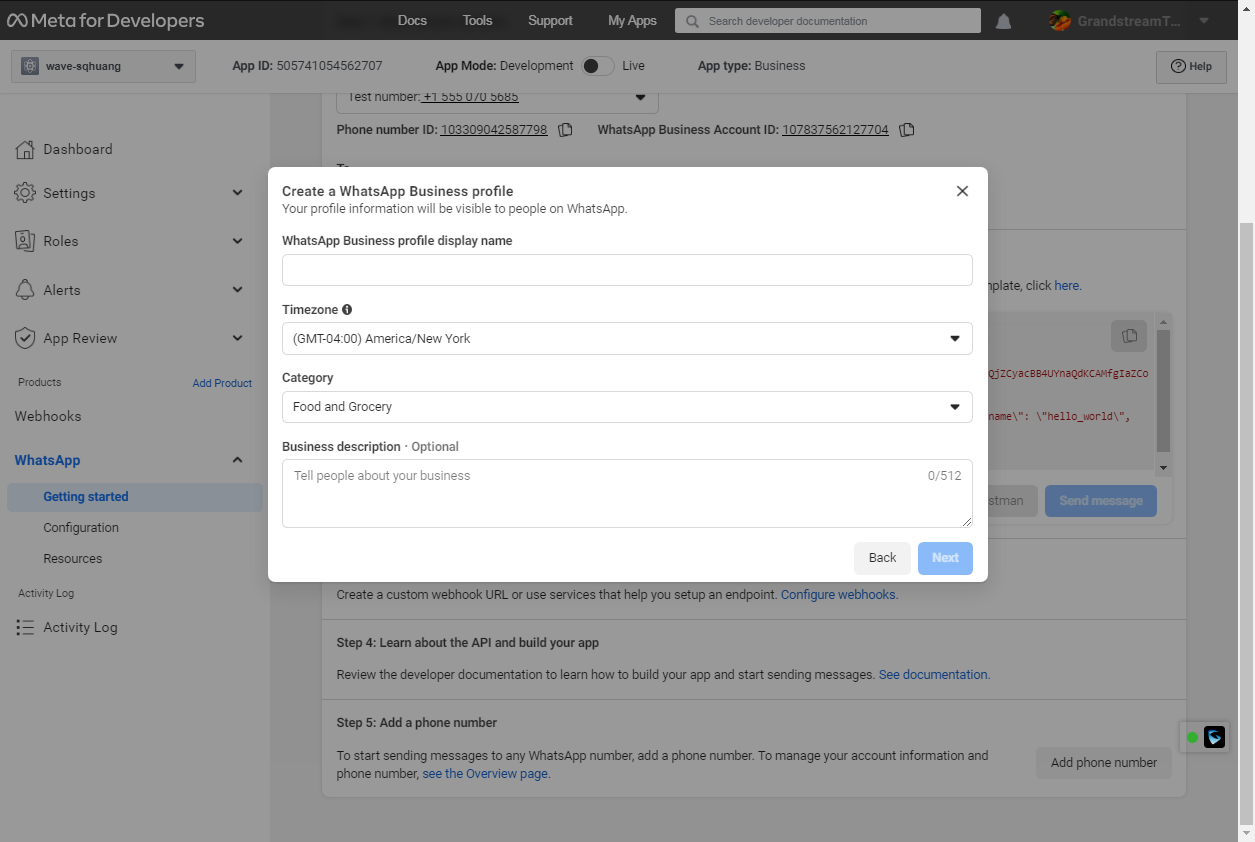
2. Fill in the information as prompted and click the “Next” button.
3. Enter the phone number and select the verification method (Text or Phone Call), and click the “Next” button.
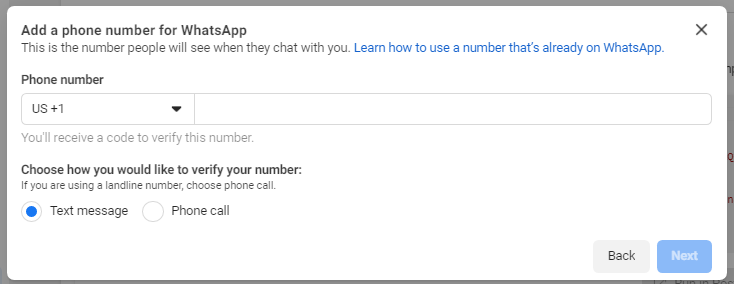
4. Once verified, the phone number will be visible in the drop-down menu of “Send and receive messages” field on the “WhatsApp” -> “Getting Started” page. The user can select the phone number and copy the “Phone number ID” to save it.
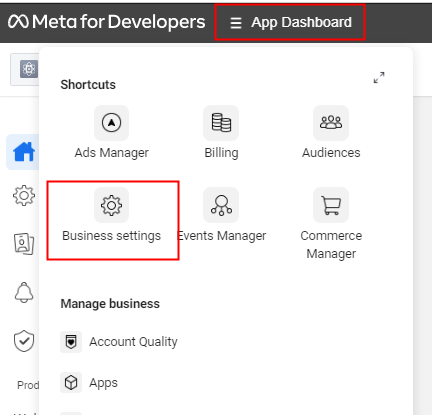
- Phase 3: Set Administrator Role
- The user can go to the “Dashboard” page of the app, click on the menu icon
 and select “Business settings”. Please refer to the screenshot below:
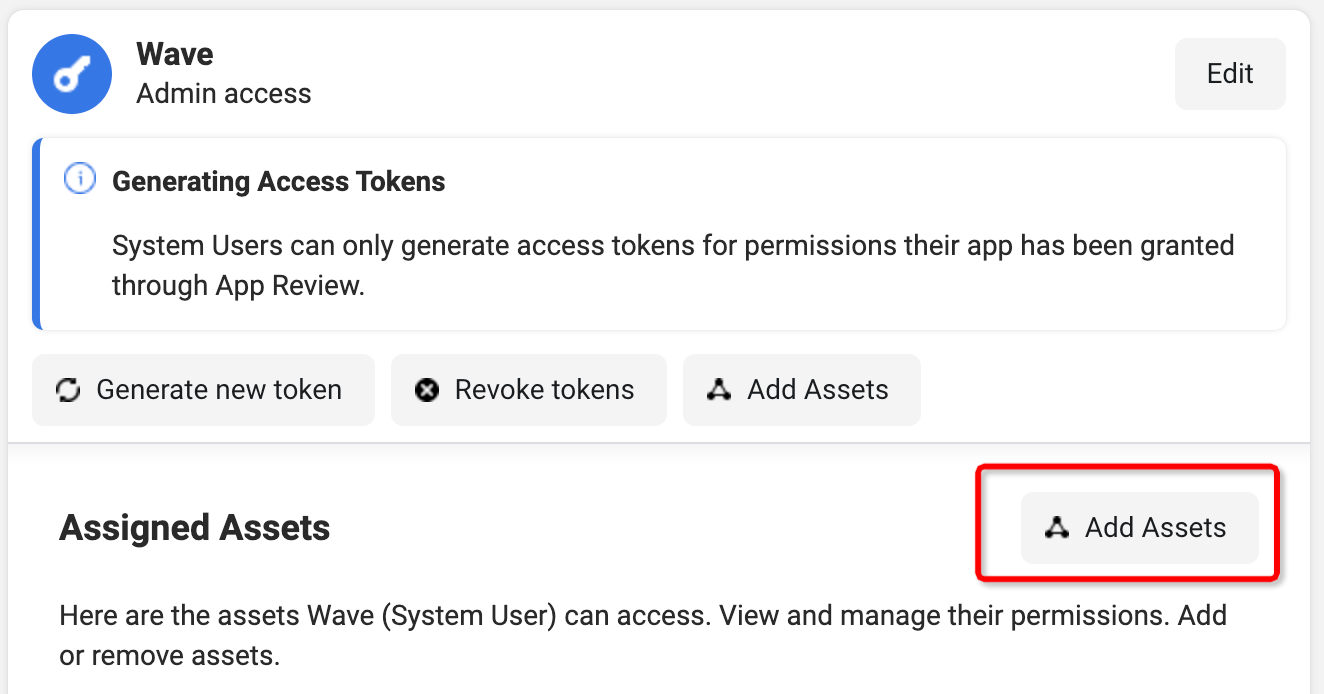
2. The user needs to go to the “Users” -> “System Users” page, click “Add” option, accept the non-discrimination policy, and click the “Done” button.
3. Enter a system username, something like “Wave”, and set the user role to “Admin”.
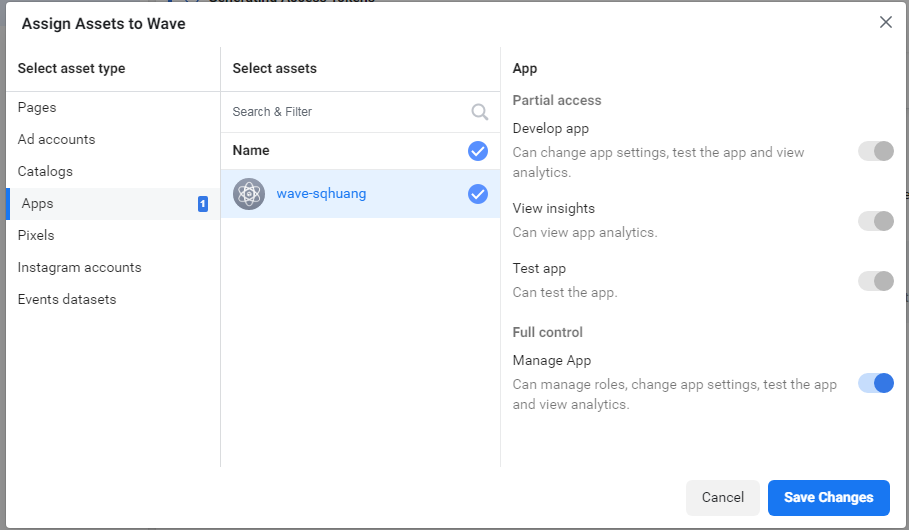
4. Click the “Add Assets” option -> on the pop-up box, select “Apps” -> [Your App] -> enable the option “Manage app” -> click the “Save Changes” button. Please refer to the screenshots below:
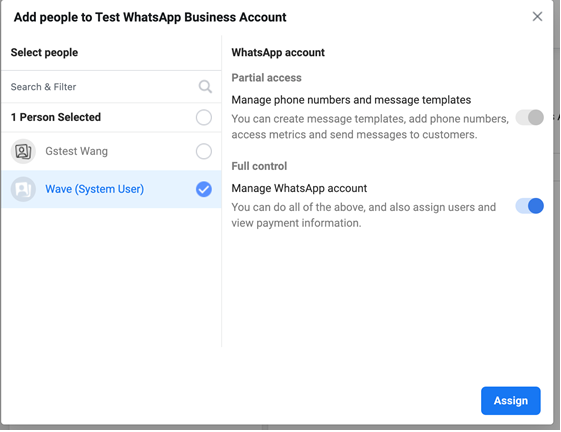
5. Go to “Accounts” -> “WhatsApp accounts” page, the user can select the app and click “Add people” to add administrator candidates.
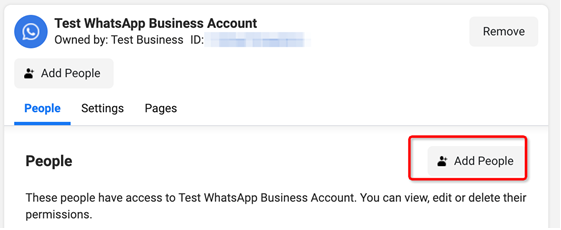
6. Select the system user the user has created and enable the “Manage WhatsApp account” option, then click the “Assign” button to finish setting the administrator role.
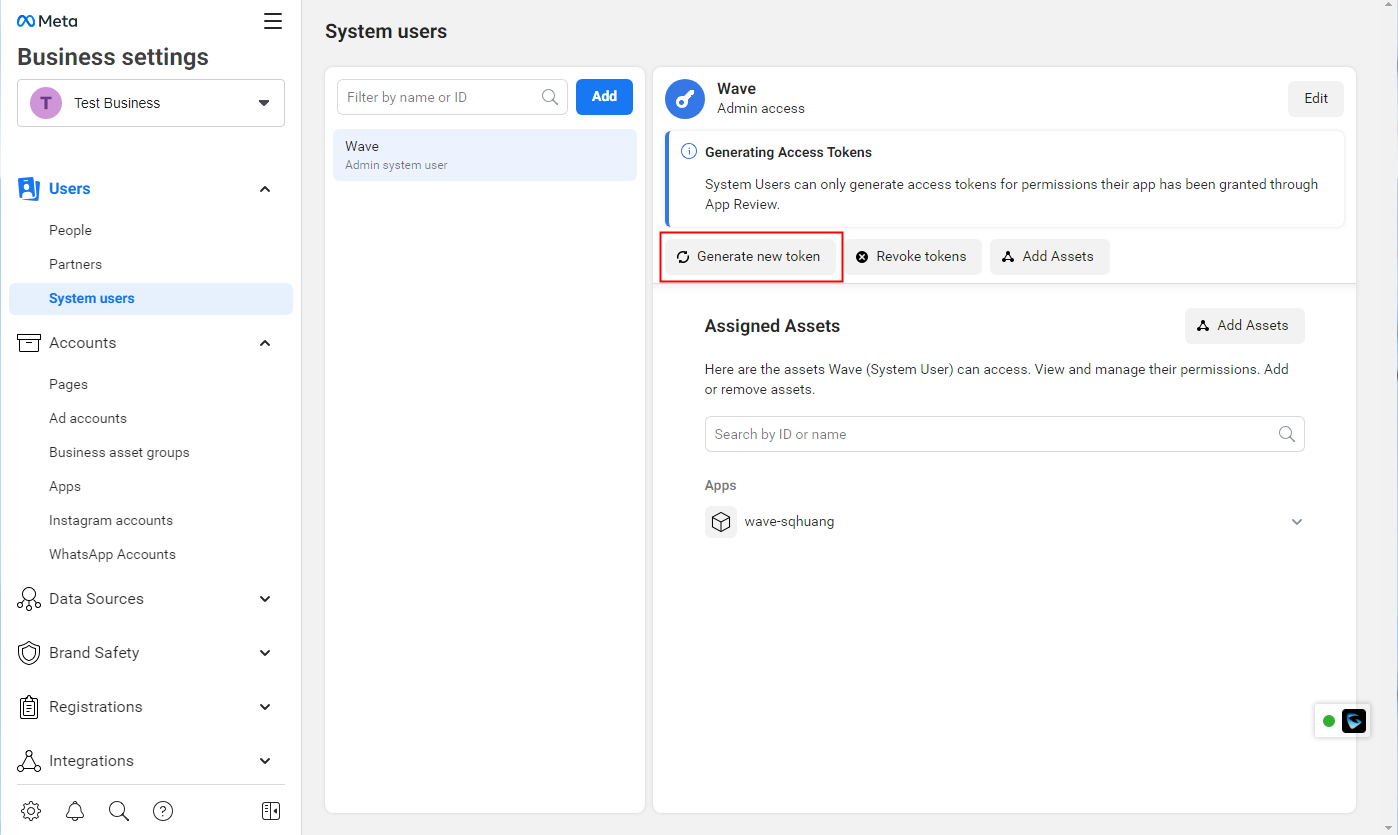
- Phase 4: Generate New Token
- Go to the “Business settings” page, then go to “Users” -> “System users”, and click the option “Generate new token”.
2. On the pop-up menu, select the app from the drop-down list.
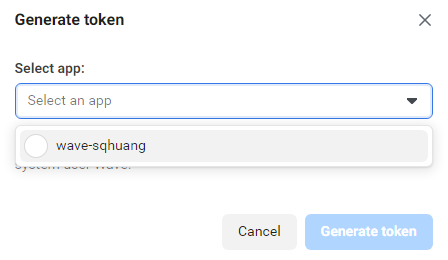
3. Check the option “whatsapp_business_messaging” and “whatsapp_business_management”, then the user can click the “Generate Token” button to generate the token. Please refer to the screenshot below:
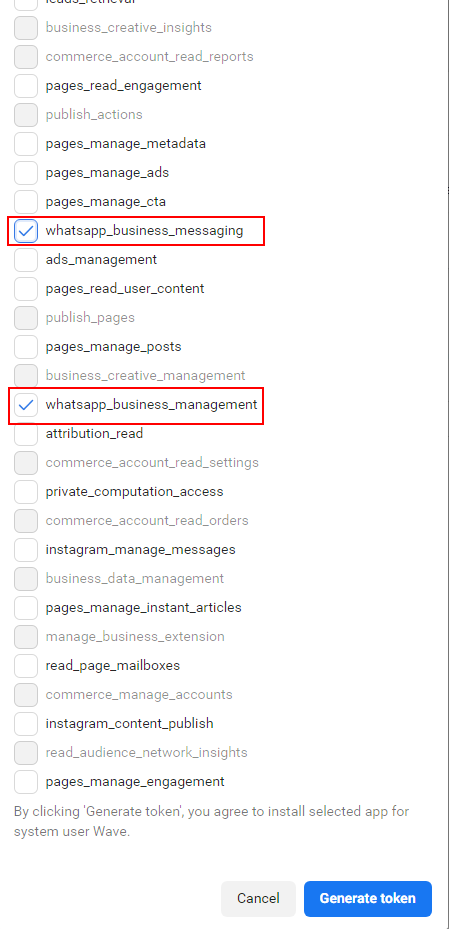
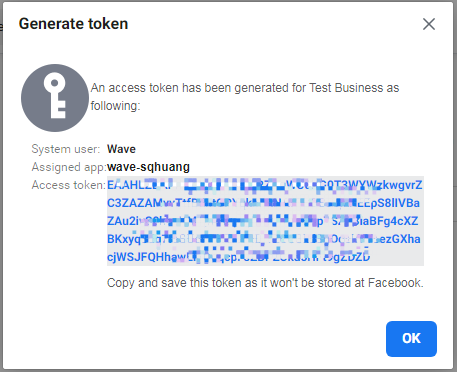
4. The access token will be displayed in the popup window, the user needs to copy and save it. This is a permanent token and will not be revoked until the user clicks the “Revoke token” button.
- Phase 5: Configure WhatsApp On Wave Desktop
The user can install the WhatsApp add-in on the Wave Desktop application, and the user can click the add-in to configure the account info of the WhatsApp. Please refer to the screenshot below:
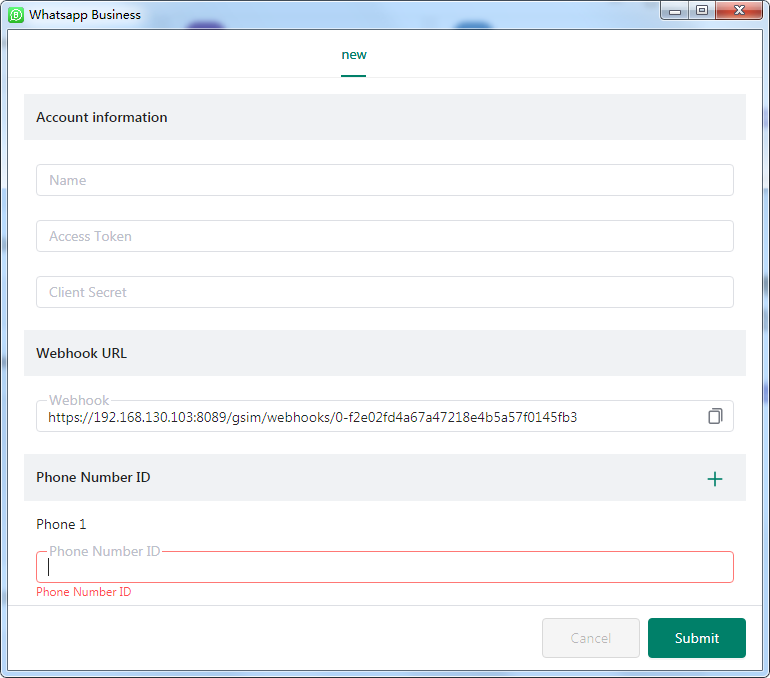
- Name: The name of the WhatsApp business account.
- Access Token: Enter the access token which the user obtains in Step NO.4.
- Client Secret (Optional): Enter the “App secret” the user obtains in Step NO.1.
- Webhook URL: This URL needs to be configured to the WhatsApp administration page, please click the button
 to copy it.
 - Phone Number ID: Enter the “Phone number ID” which the user obtains in Step NO.1. The user can click the button
 to add the phone number ID. If the user configures multiple phone numbers, when those numbers receive WhatsApp messages, they will notify the Wave client.
- Phase 6: Configure Webhook URL
- In Step NO.5, the user needs to copy the Web URL on the Wave client as the screenshot shows below:

2. Access the link again https://developers.facebook.com and access the user’s App page. Go to “WhatsApp” -> “Configuration”, and click on the button “Edit”:
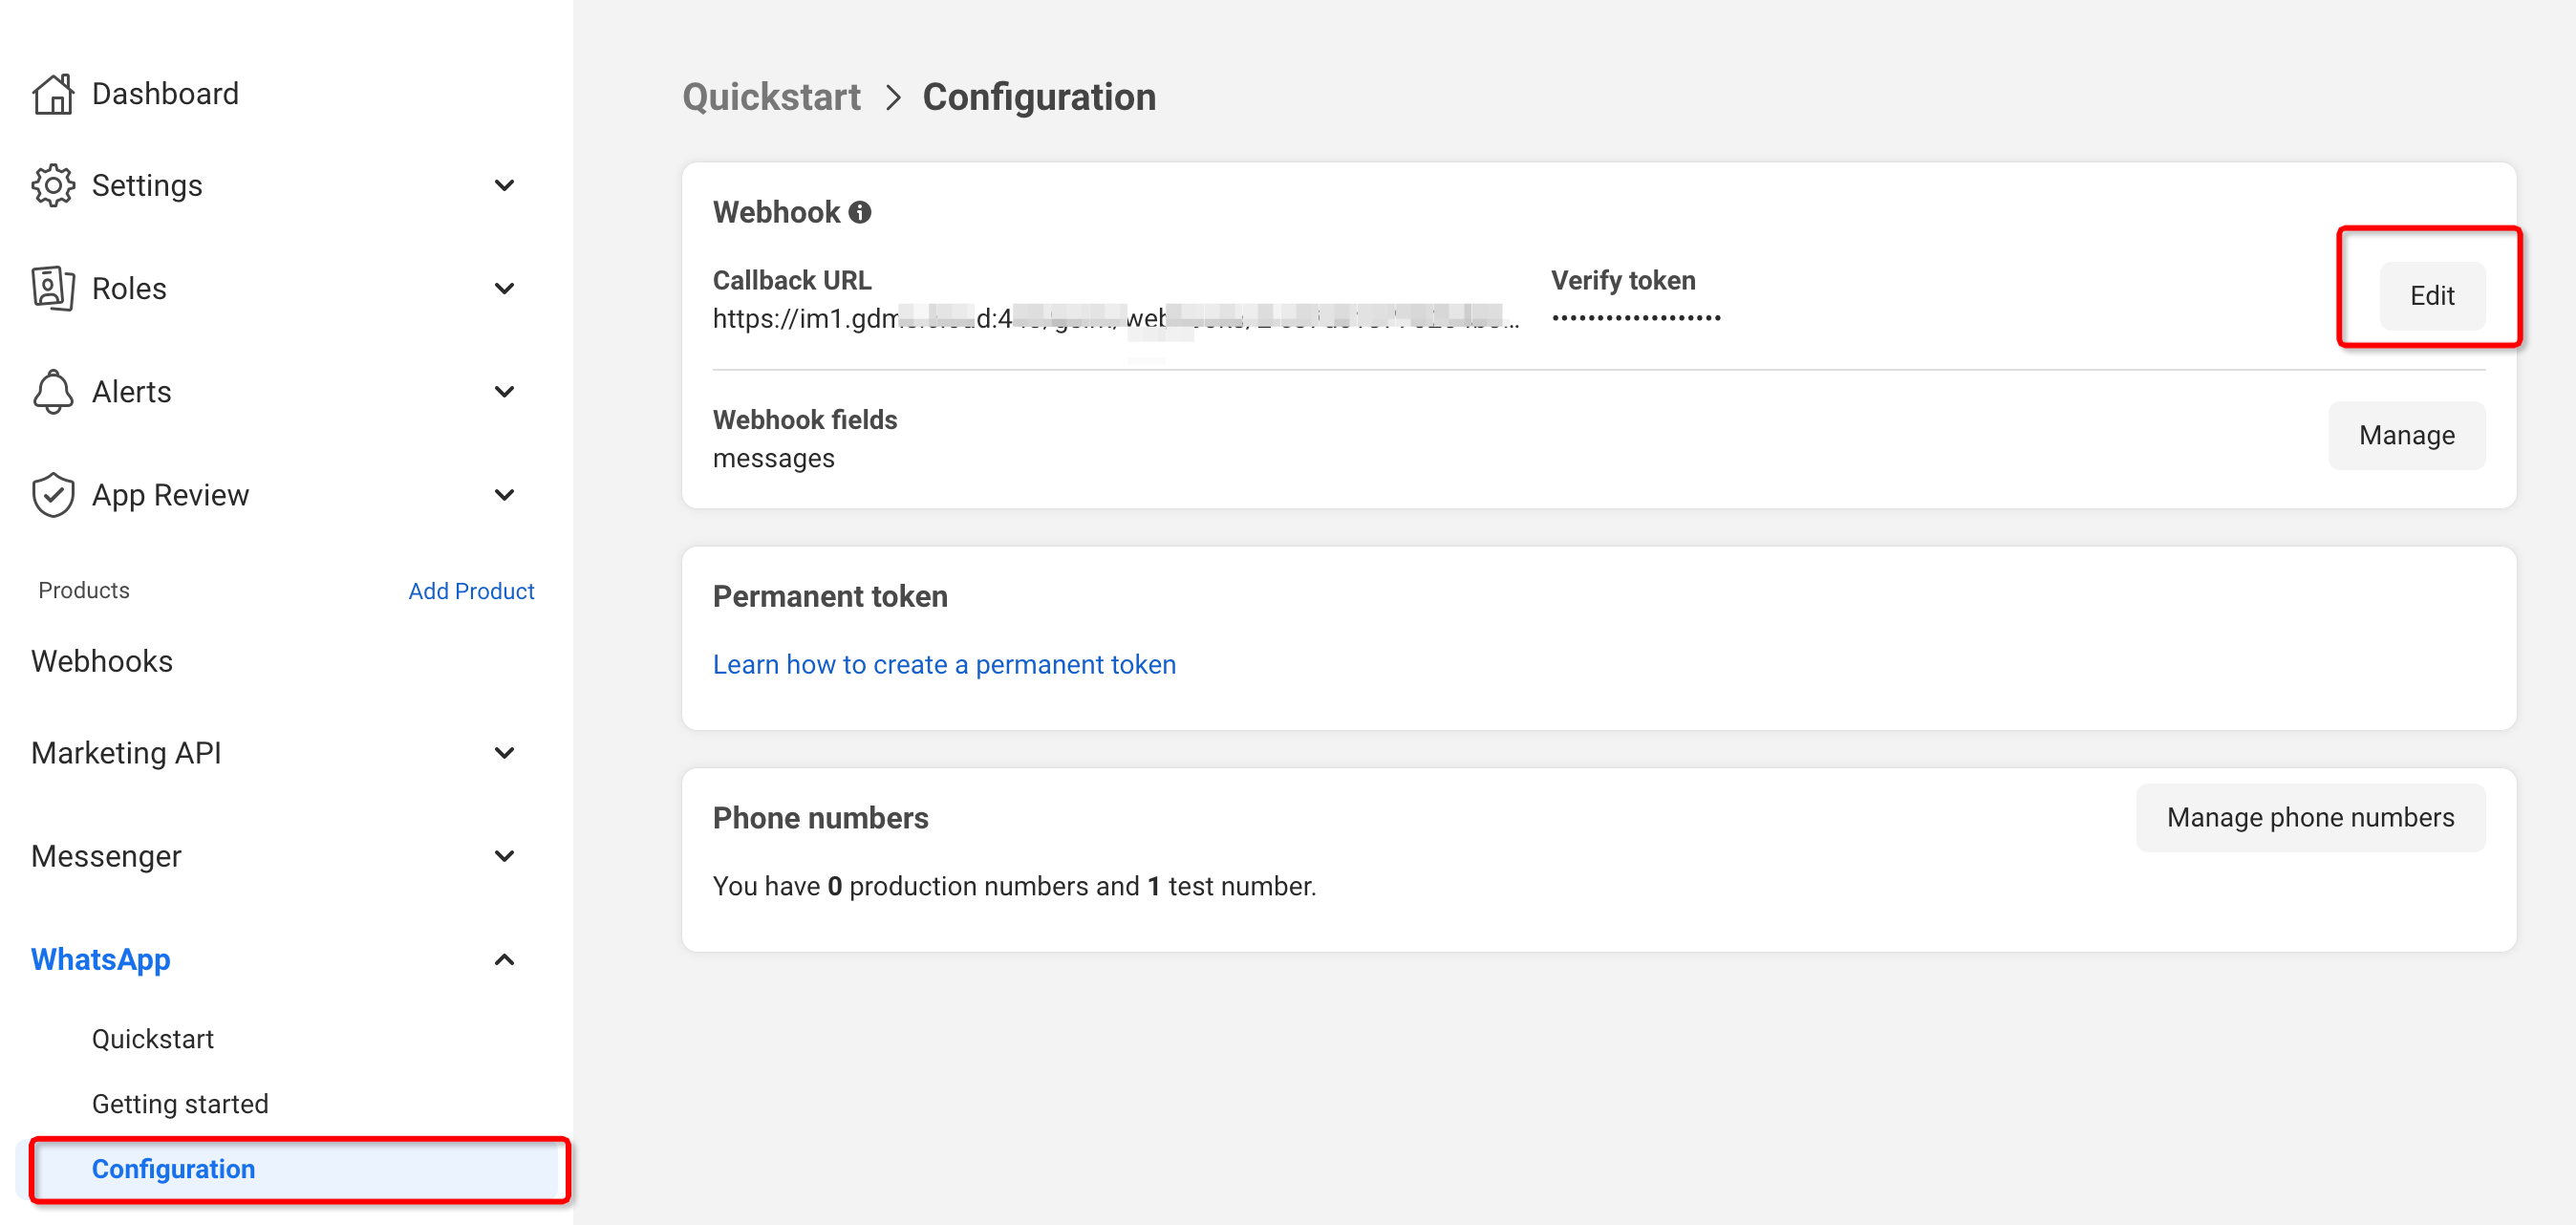
3. Paste the copied Webhook URL taken from Wave into the “Callback URL” field.
4. To verify the token, the user can enter a random letter or number, and then click the “Verify and save” button:
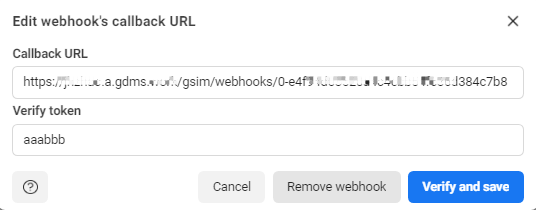
5. Click on the “Manage” button in the “Webhook fields” below the “Edit” button. Please see the screenshot above.
6. Click the “Subscribe” button next to the “messages” field and click “Done” button. Please see the screenshot below:

7. After the configurations are complete, the user can test the configuration by sending a WhatsApp message to the configured phone number to ensure that the user can receive the WhatsApp message on the Wave client, and make sure that the user can reply to it properly.
Send/Receive WhatsApp Message on Wave Desktop
After the configurations are complete, the user can receive WhatsApp messages on the Wave client and reply to messages directly.
- The user can see the WhatsApp messages in the Chat module of Wave Desktop, and the user can also see the unread message notifications. Please the screenshot below:

The user can send text and attachments in the chat window.
Options on the right upper corner of the chat window.
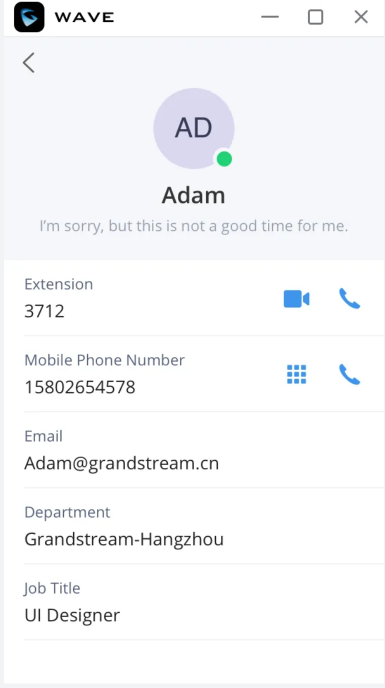
![]() : the user can click this option to view the CRM contact corresponding to this phone number. This entrance can be seen only if the user has installed and logged into the CRM.
: the user can click this option to view the CRM contact corresponding to this phone number. This entrance can be seen only if the user has installed and logged into the CRM.![]() : The user can click this option to dial the corresponding WhatsApp account.
: The user can click this option to dial the corresponding WhatsApp account.![]() : The user can click this option to forward the session to another Wave client user. After forwarding the session, the user will exit this session, and the other Wave client user will continue chatting with this WhatsApp account user.
: The user can click this option to forward the session to another Wave client user. After forwarding the session, the user will exit this session, and the other Wave client user will continue chatting with this WhatsApp account user.![]() : The user can click this option to mark this session as processed, which means the WhatsApp account user’s problem has been resolved, and the session will be deleted from the Wave client.
: The user can click this option to mark this session as processed, which means the WhatsApp account user’s problem has been resolved, and the session will be deleted from the Wave client.![]() : The user can click the avatar image of the WhatsApp account user to view the phone number, and the user can dial to this number or add it to the Personal Contacts.
: The user can click the avatar image of the WhatsApp account user to view the phone number, and the user can dial to this number or add it to the Personal Contacts.

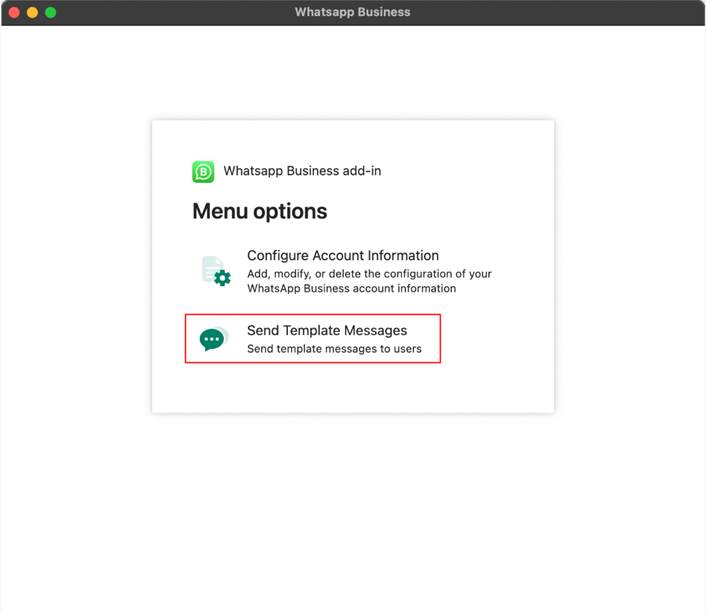
Send Template Messages
Users can pre-configure template messages which can be sent on-demand to specific recipients. Template messages are useful when the user wishes to send the same message to many recipients, e.g., marketing material. The messages can be created on Whatsapp Business platform first, then they can sent through Whatsapp Business Add-in.
Prerequisites: Users need to create a message template on the WhatsApp platform first. Please refer to the link below to learn more about creating message templates in WhatsApp:
(https://www.facebook.com/business/help/2055875911147364?id=2129163877102343)
Steps:
- Users can go to Wave’s WhatsApp add-in and click the option “Send Template Messages” as the screenshot shows below:
2. Users will see the “Send Template Messages” page:
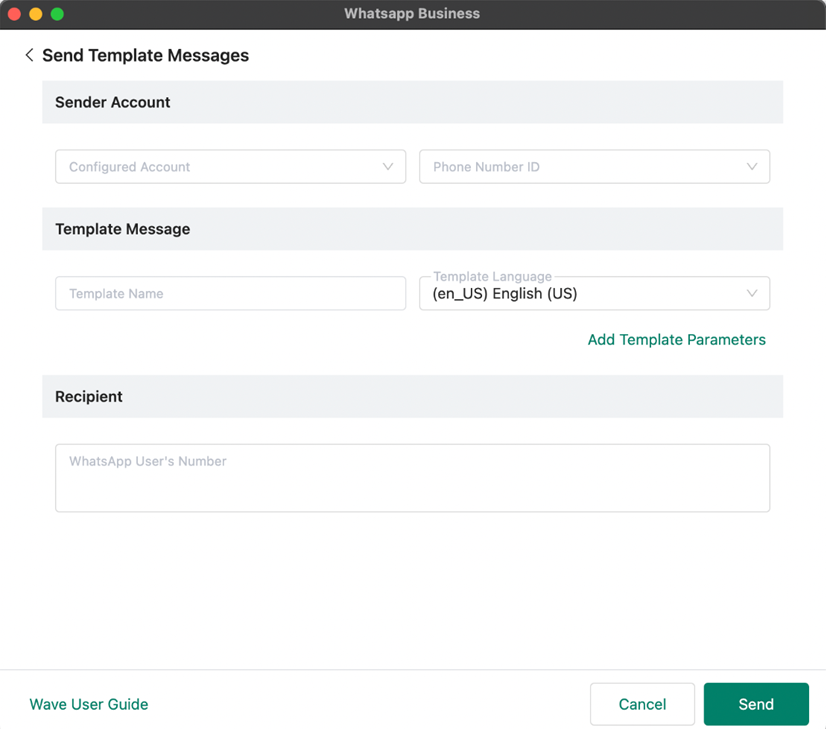
Sender Account | |
Configured Account | Select your configured WhatsApp account. |
Phone Number ID | Select the phone number ID under this WhatsApp account |
Template Message | |
Template Name | Enter the name of your message template. |
Template Language | Select the language of your message which you will send. It must be the language contained in the message template you selected, otherwise sending will fail. |
Add Template Parameters | Only if the message template contains parameters, you need to add parameters of the corresponding type and enter values. Note: Please make sure to add according to the parameters in the message template, otherwise sending will fail. |
Header Type | Support uploading pictures, videos, and files. |
Body Type | Parameters in the message body:
|
Button Type | Only the URL of the "Visit Website" button is supported. |
Recipient | |
WhatsApp User’s Number | Enter the phone number of Whatsapp user. It supports to enter and paste multiple numbers, and the multiple numbers are separated by space, enter, comma, or a semicolon. |
Telegram Add-in
Prerequisites
- The UCM63xx device must have the UCMRC plan and use the UCMRC domain address to log in to the Wave Desktop client.
- You must have a Telegram account.
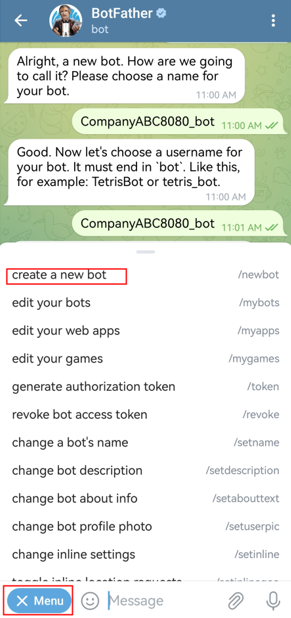
Obtain Telegram Bot Token
- Search for BotFather in Telegram and enter /newbot command on the chat interface, and enter your Bot Username according to the guidance. Please refer to the screenshot below:
2. After creating successfully, you can obtain your Bot Token. Please refer to the screenshot below:
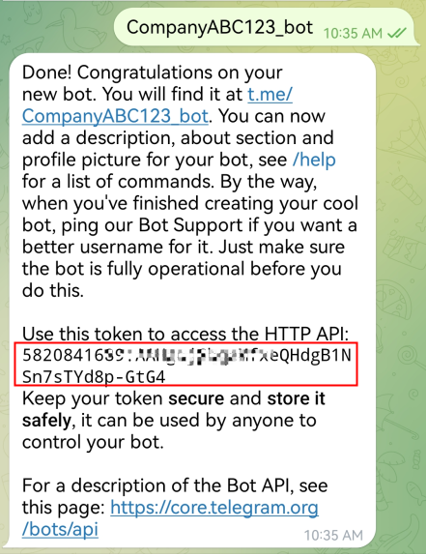
For more information, please refer to the link below:
https://telegram.org/faq#q-how-do-i-create-a-bot
Configure Telegram on Wave
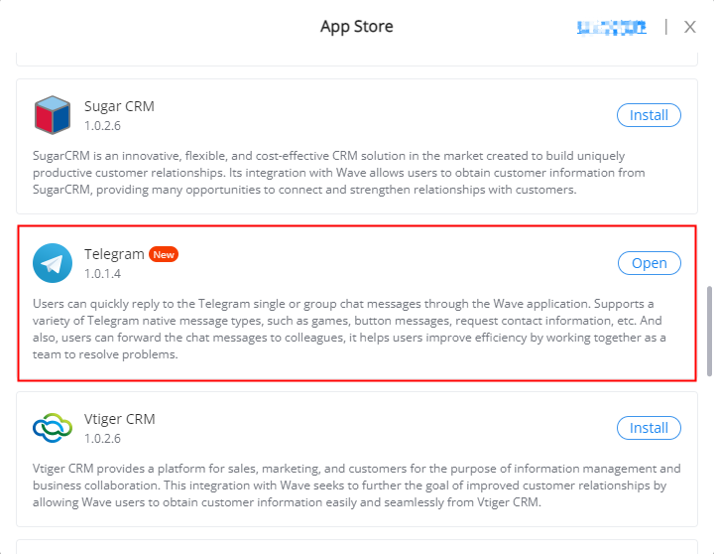
- Install “Telegram” add-in “Application” module of Wave app:
2. After installation, you can access the configuration page below.
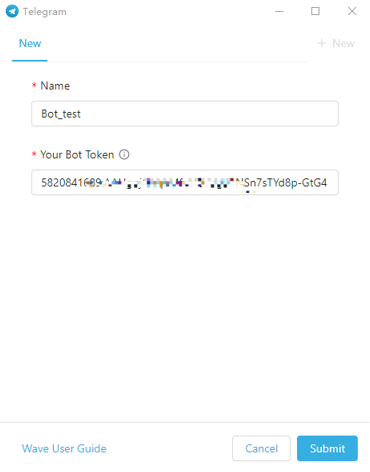
- Name: You need to fill in your remark name. It will be displayed on the Telegram message interface.
- Your Bot Token: You need to fill in your Bot Token which you have obtained in previous steps.
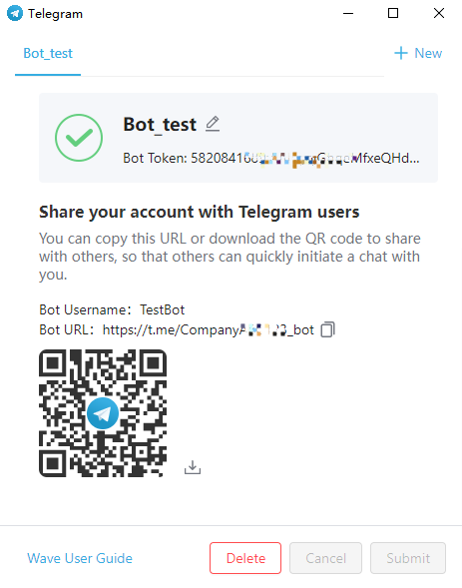
3. After creating successfully, you can copy the Bot link or download the QR code and send it to Telegram contacts, so that they can click the link or scan the QR code to send messages to your Bot through the Telegram App:
Reply to Telegram Messages on Wave
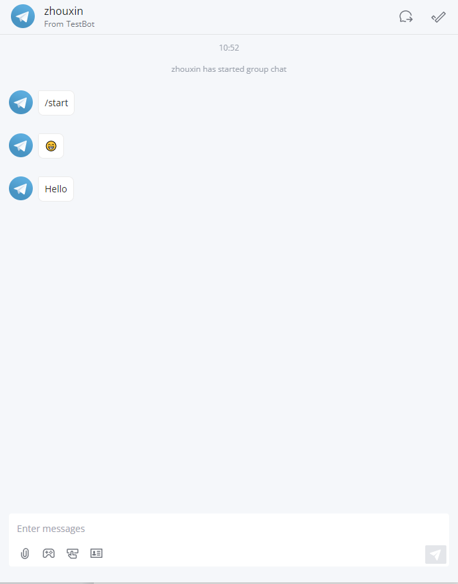
When your Bot receives a single or group chat message, it can be viewed, and you can reply to it in the Wave Desktop client.
- Receive Telegram messages on Wave:
Options on the right upper corner of the chat window.
![]() : The user can click this option to forward the session to another Wave client user. After forwarding the session, the user will exit this session, and the other Wave client user will continue chatting with this WhatsApp account user.
: The user can click this option to forward the session to another Wave client user. After forwarding the session, the user will exit this session, and the other Wave client user will continue chatting with this WhatsApp account user.
![]() : The user can click this option to mark this session as processed, which means the WhatsApp account user’s problem has been resolved, and the session will be deleted from the Wave client.
: The user can click this option to mark this session as processed, which means the WhatsApp account user’s problem has been resolved, and the session will be deleted from the Wave client.
![]() : You can send local files, pictures, and videos.
: You can send local files, pictures, and videos.![]() : You can send games which have been created under your Bot.
: You can send games which have been created under your Bot.![]() : You can send specific messages with buttons.
: You can send specific messages with buttons.![]() : You can request the user information or geographic location of the other party (Group chat does not support this feature).
: You can request the user information or geographic location of the other party (Group chat does not support this feature).
2. Send games:
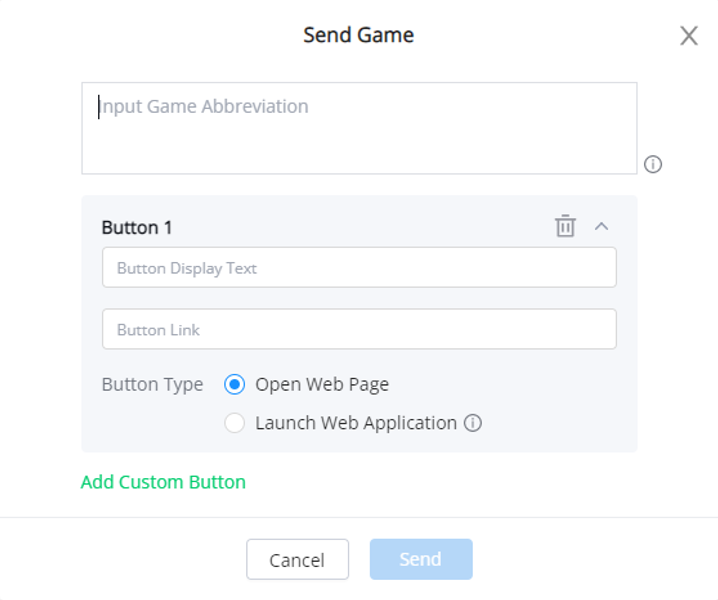
- Game Abbreviation: You need to enter the game abbreviation in your Bot. You can go to your BotFather and enter the command /mygames to search for it. You can refer to the following manual to create games: https://core.telegram.org/bots/games
- Add Custom Buttons: You can add multiple buttons.
Button Display Text | The other party receives this message and at the same time sees the button display text. |
Button Link | Click this button to open the link address. |
Button Type | There are 2 types:
|
The message received by the other party is similar to the message in the following screenshot:

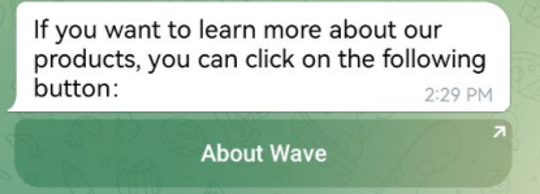
3. Send specific messages with buttons:
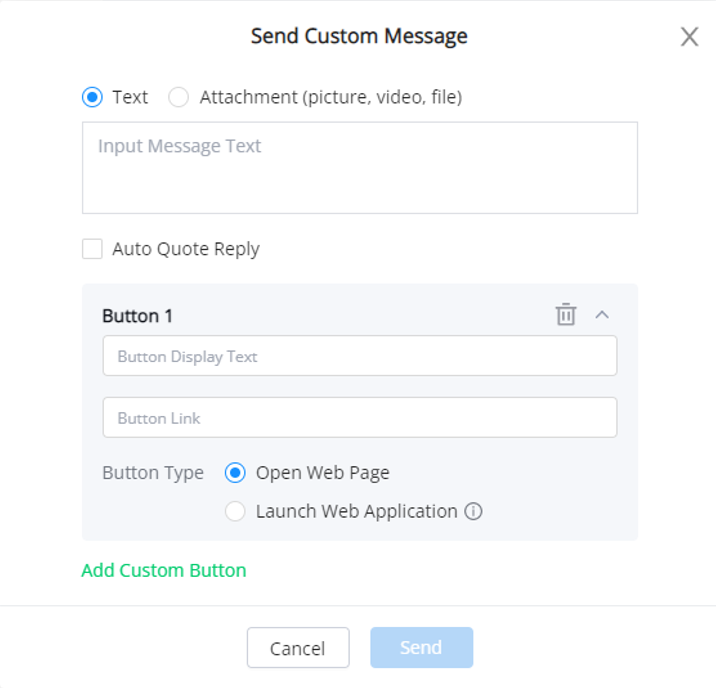
- Text or Attachment: You can enter text messages or upload pictures, videos, or files. Attachments cannot exceed the maximum file size supported by Telegram.
- Auto Quote Reply: After this option is selected, the other party will automatically quote and reply to the message in the input box when the chat interface is opened.
- Add Custom Buttons: You can add multiple buttons. If you have selected the option “Auto Quote Reply”, you cannot add custom buttons.
Button Display Text | The other party receives this message and at the same time sees the button display text. |
Button Link | Click this button to open the link address. |
Button Type | There are 2 types:
|
The message received by the other party is similar to the message in the following screenshot:
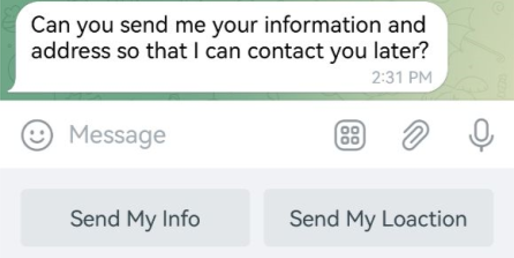
4. Request user information:
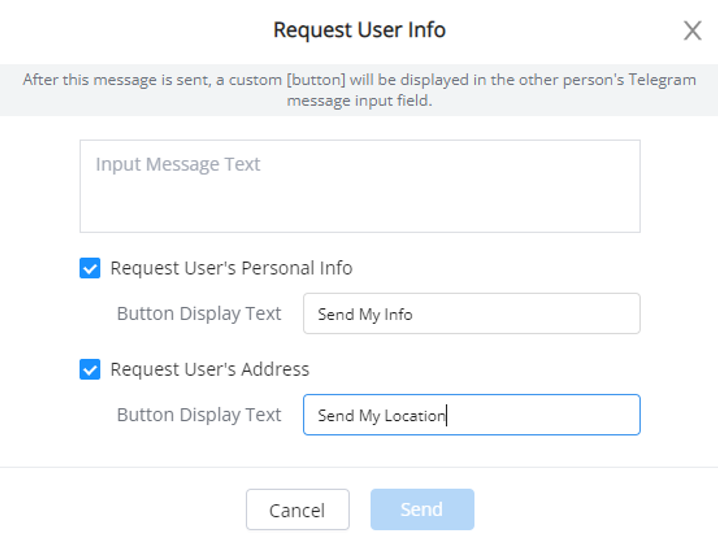
- Text: You can enter the text message contents.
- Request User Information: After the option is selected, you can fill in the button display text such as “Send My Info”, and the button “Send My Info” will appear below the input box of the other party. If the other party clicks this button, it will send Telegram user information to the chat box.
- Request User Location: After the option is selected, you can fill in the button display text such as “Send My Location”, and the button “Send My Location” will appear below the input box of the other party. If the other party clicks this button, it will send the current location information to the chat box.
The message received by the other party is similar to the message in the following screenshot:
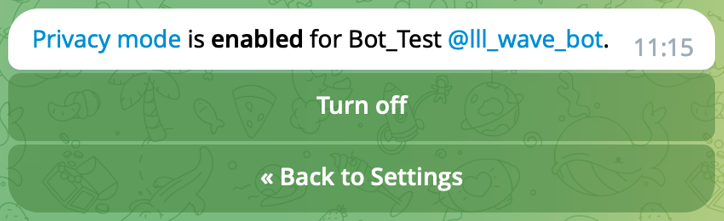
Turn Off Privacy Mode of Telegram Bot
By default, all bots added to groups run in Privacy Mode and only see relevant messages and commands (Please refer to the Privacy Mode Instructions).
Steps:
- In the BotFather private chat, select /mybots from the menu, and select the Bot you want to set up:

2. Click Bot Settings -> Group Privacy, and click the “Turn off” button to turn off the privacy mode of Telegram Bot.
Office 365 Add-in
Users can install Office 365 add-in on the Wave Desktop application, users can send the documents in Office 365 on the Wave chat window, and users can edit the documents with other chat members together online. Users can also manage the documents in Office 365 through the Wave Desktop application.
How to Use Office 365 Add-in on Wave Desktop App
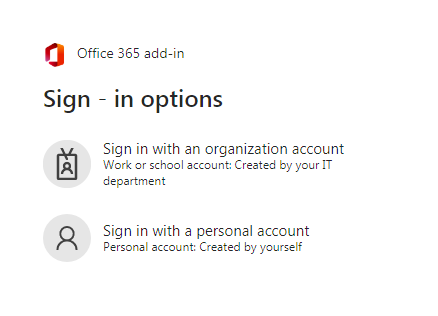
- The user needs to install the Office 365 add-in in the “Application” module on the Wave Desktop app, and logs in the Office 365 account before using the service. The user can log in the Office 365 add-in with the personal account or enterprise account.
Note: If the user wants to log in the Office 365 add-in with the enterprise account, the user needs to obtain the “Application (client) ID” and enable the related permissions before using it.
3. Click on “Send” button to send Whatsapp template message to the recipient immediately.
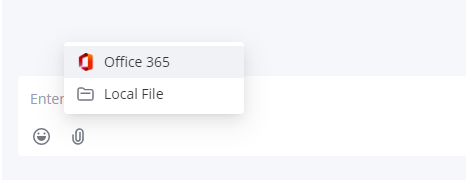
2. After installation, the user can see the Office 365 add-in on the chat window and select files by click the option in the screenshot below:

After sending the file, the user will see the file name and file URL as the screenshot shows below:
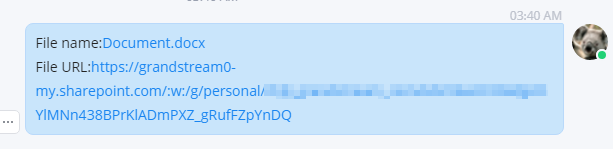
After sharing the file, it allows members to read-only or edit. If the file owner selects to allow editing the file, other members can click the file URL to access the file and edit the file.
On the Office 365 add-in page, the user can also upload files as the screenshot shows below:
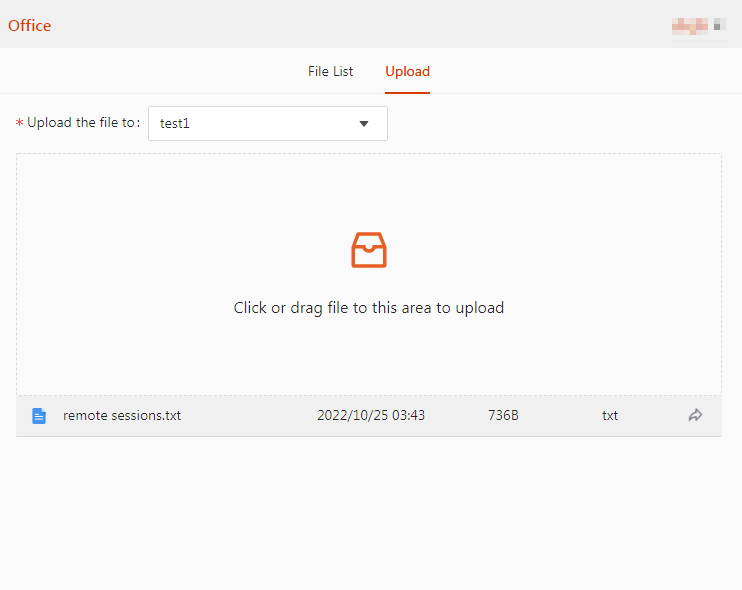
After uploading a file, the file will be displayed under the uploading area, and the user can click the button ![]() to share it immediately.
to share it immediately.
Assign Account Permissions in Office 365
The steps below are required only if the user logs in the Office 365 add-in with the enterprise account:
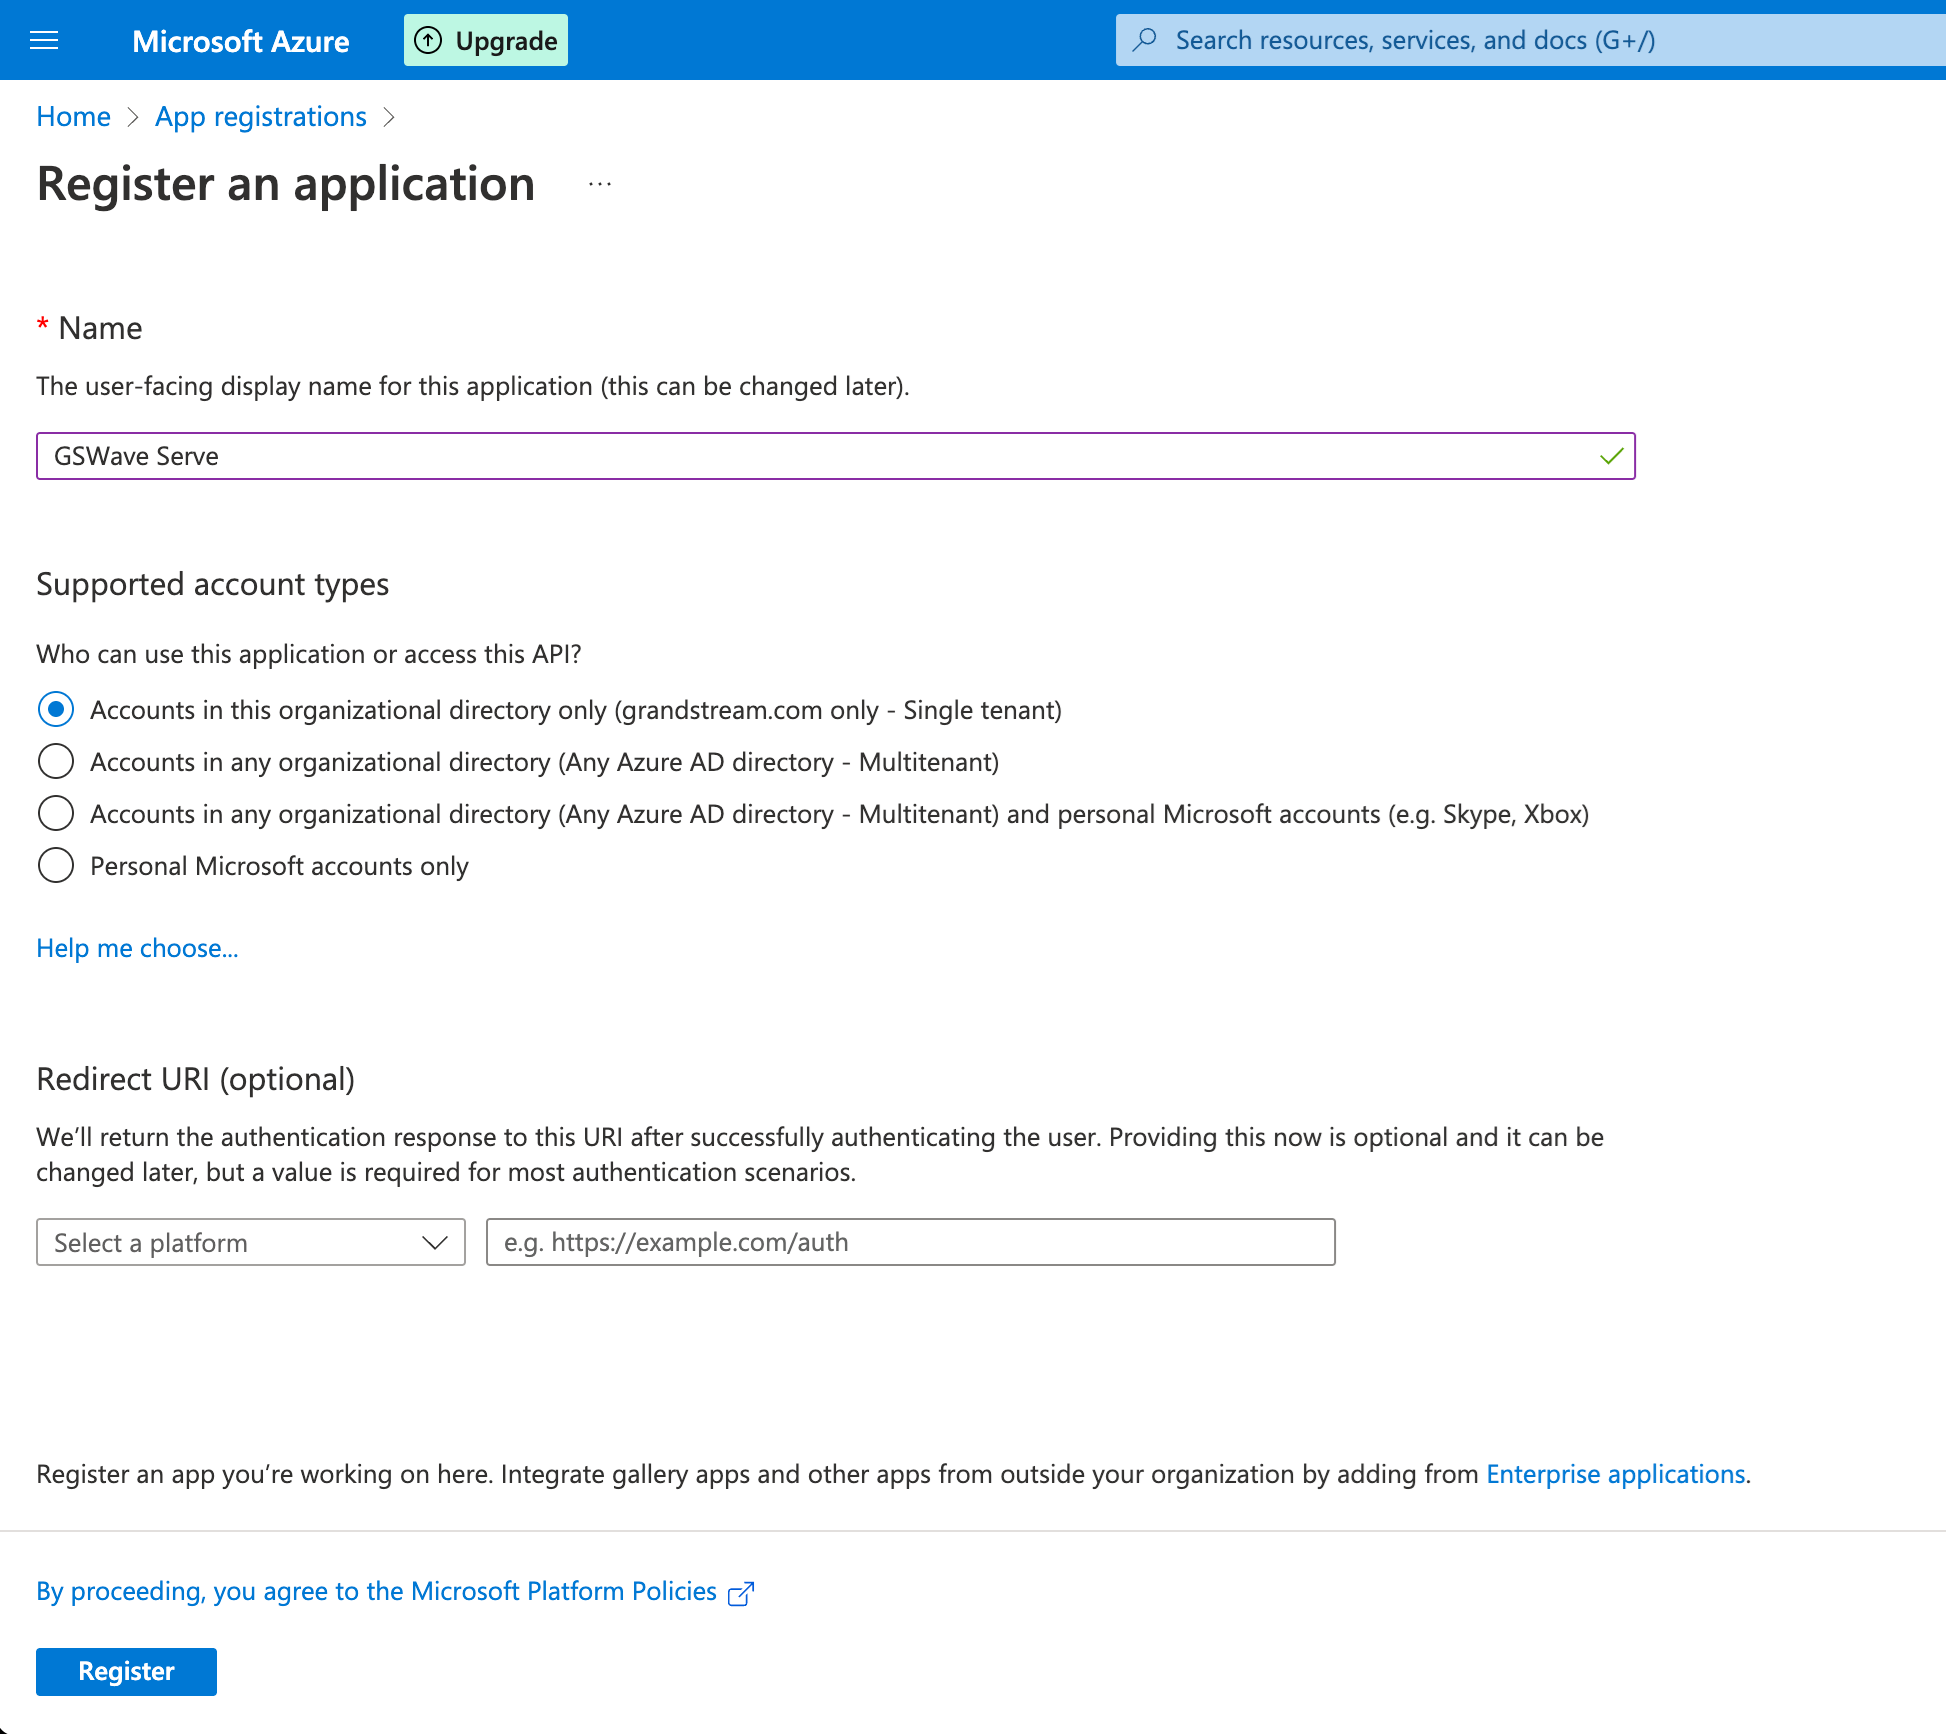
1. Go to the Microsoft Azure App Registrations page using your Microsoft Office 365 Online account, i.e. “Azure services” -> “App registrations”.
2. Click on “New registration” and complete the app information. Please refer to the screenshot below:
- “Name” – enter the app’s name, e.g. “Wave for Office 365”.
- “Supported account types” – leave default or update based on your needs.
- “Redirect URI (optional)” – select “Single-page application”. For the redirect URI enter http://localhost:3000”. For the Redirect URI enter http://localhost:8000.
- Click “Register” to proceed with the app registration.
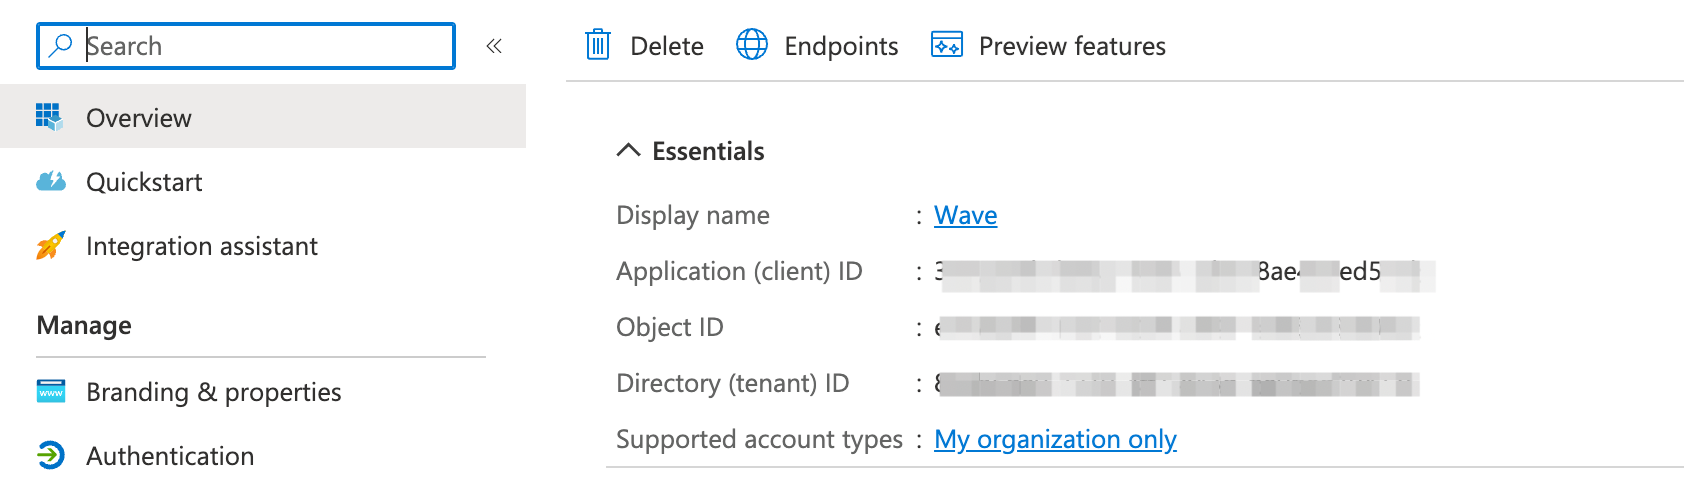
3. In the app “Overview” page, note the values of these fields for configuring Wave Office 365 add-in later:
- “Application (client) ID”.
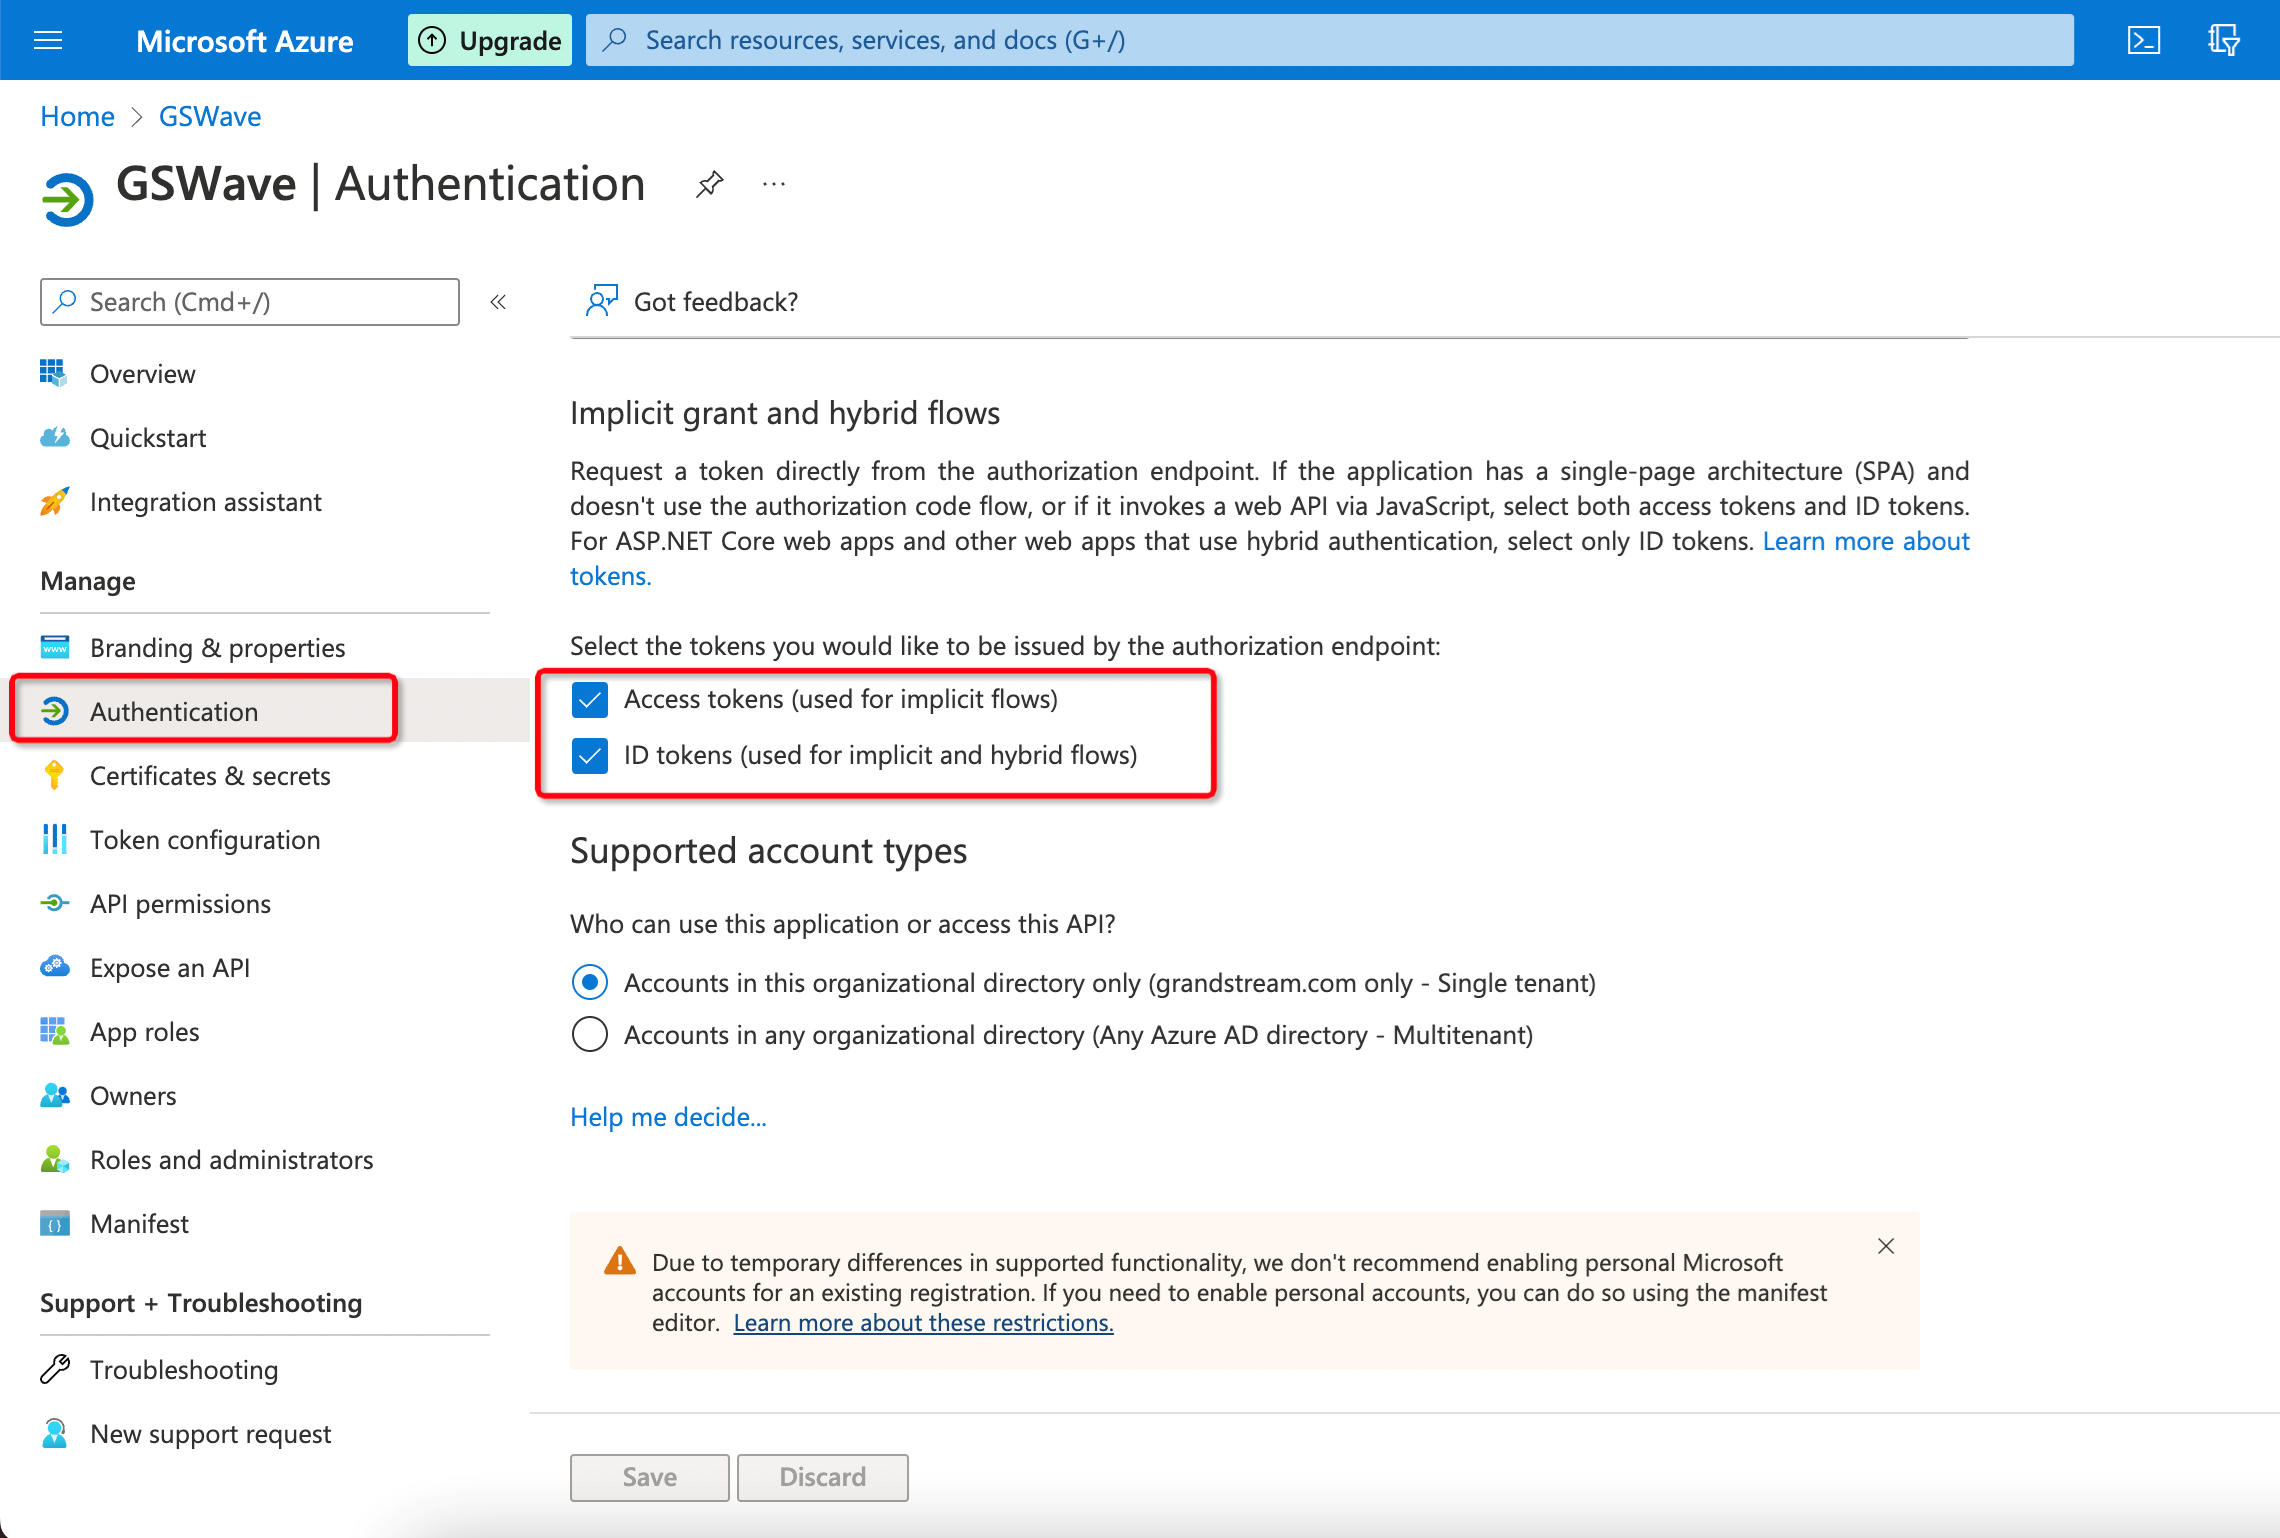
4. On “Authentication” -> “Implicit grant and hybrid flows” page, the user needs to enable the options “Access tokens (used for implicit flows)” and “ID tokens (used for implicit and hybrid flows)”. Please refer to the screenshot below:
5. To add the required permissions to access the Microsoft Office 365 Online information, click on “API permissions” -> “Add a permission” -> “Microsoft Graph”.
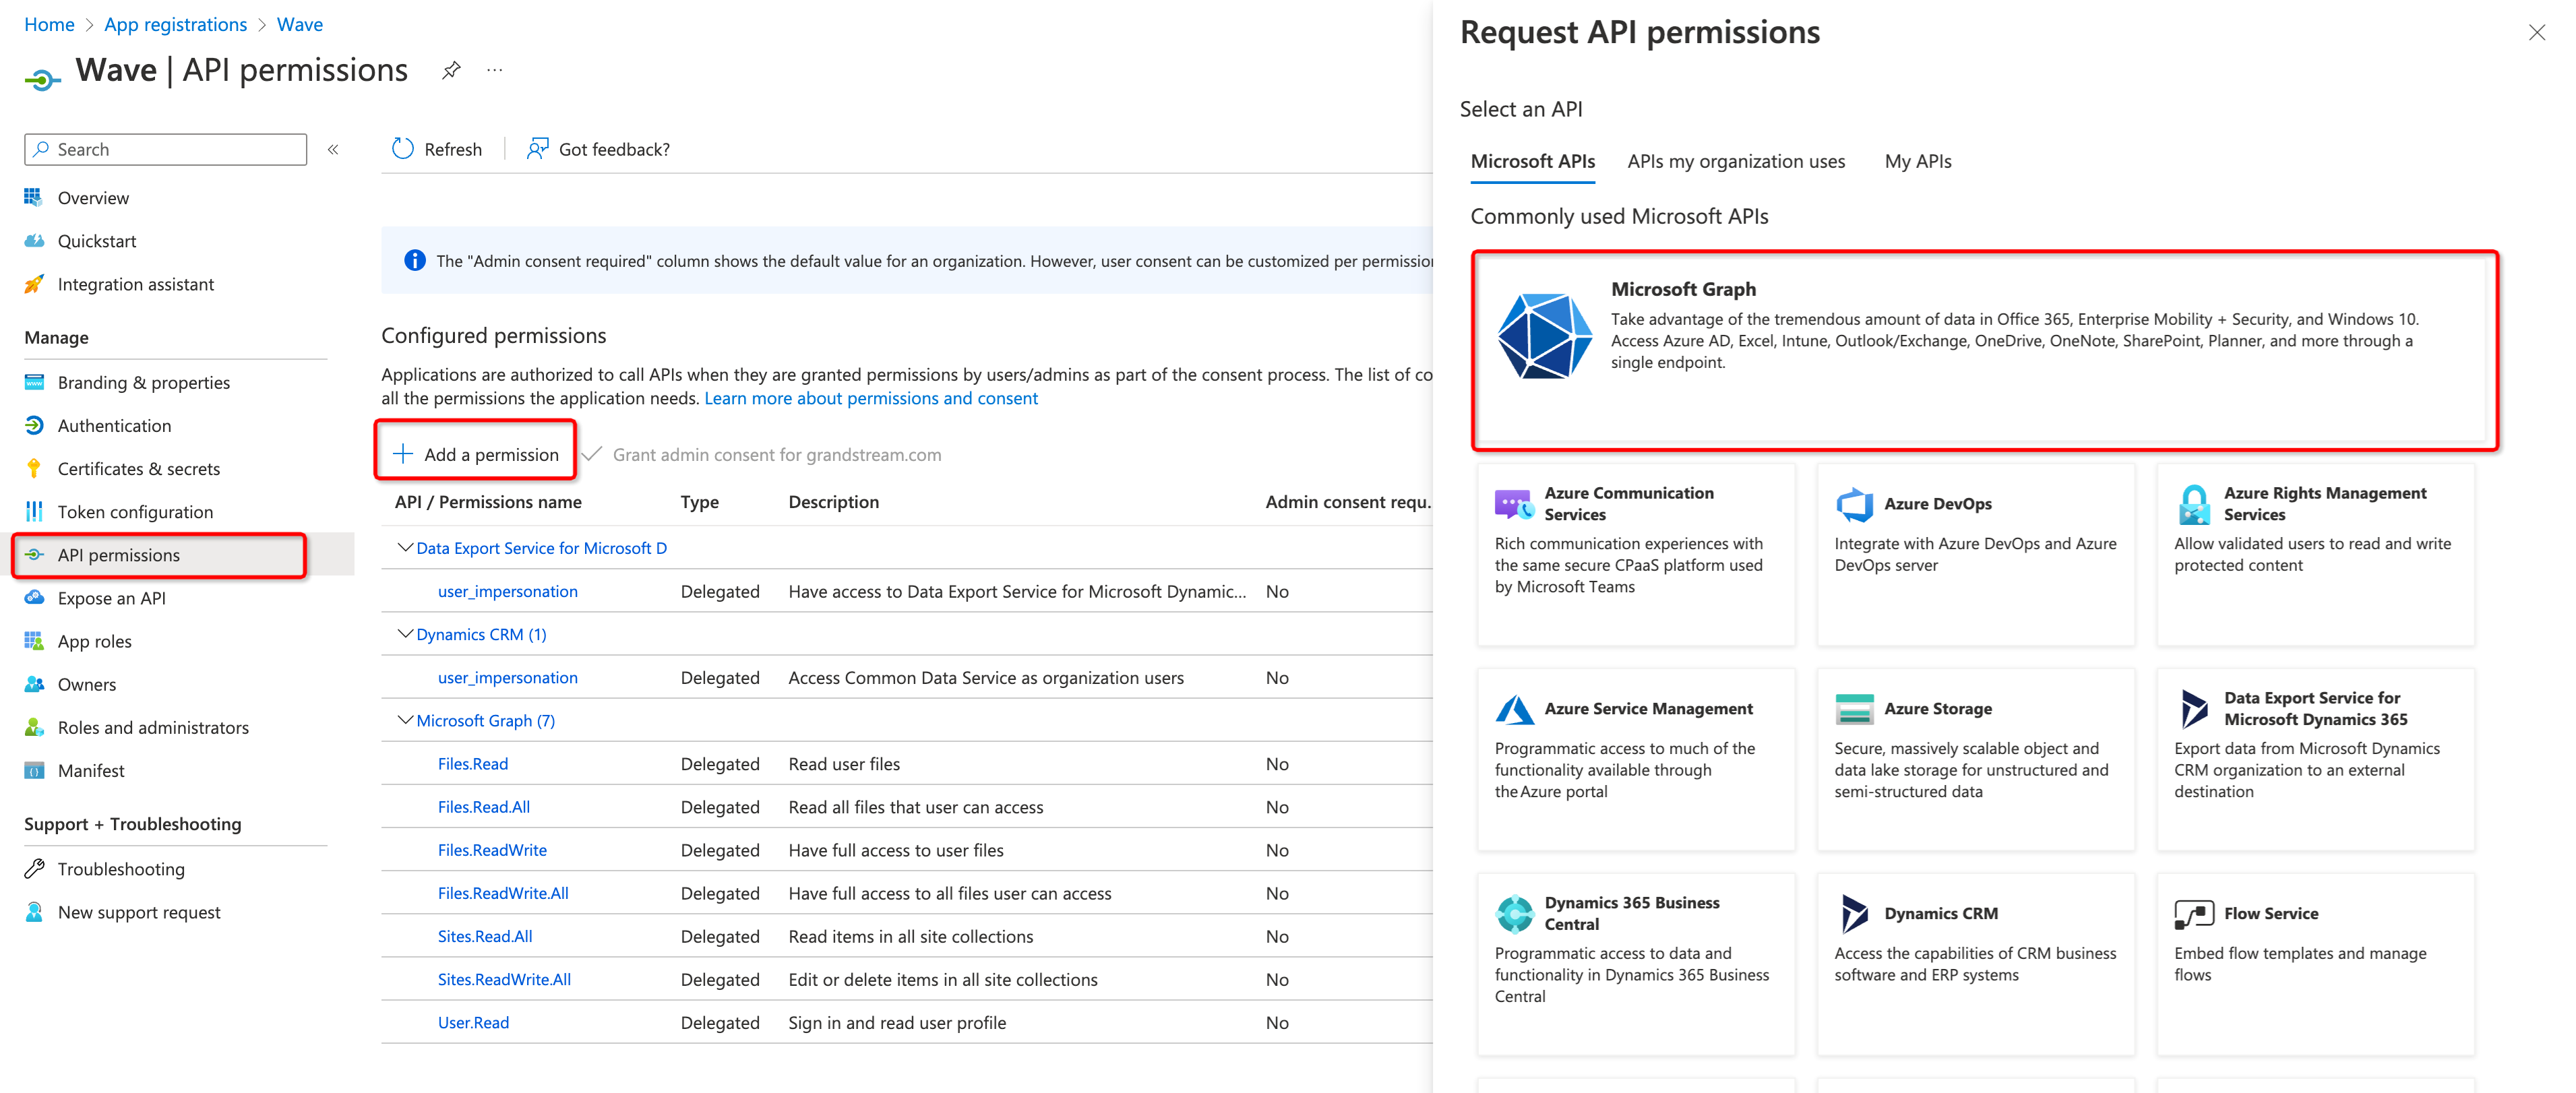
6. Enable the “Files.Read Files.Read.All Files.ReadWrite Files.ReadWrite.All Sites.Read.All Sites.ReadWrite.All” permissions and click on “Add permissions”.
7. Wait for about 10 minutes for the app changes to become available.
IPVideoTalk Add-in
IPVideoTalk service supports online meetings of up to thousands of participants, and supports online webinar meetings. The user can click the link http://www.ipvideotalk.com/ to lean more details.
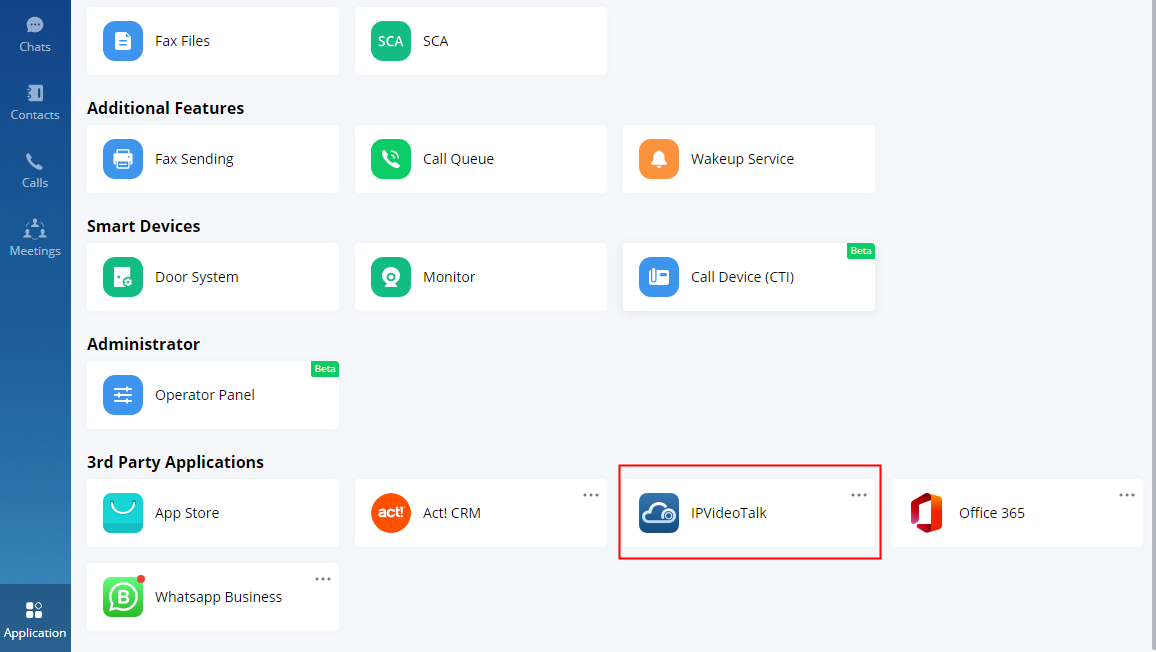
If the user already has the IPVideoTalk account, the user can install the IPVideoTalk add-in on the Wave Desktop application, and quickly access the IPVideoTalk meeting management platform to schedule meetings or start instant meetings.
1. After installation, the user needs to log in the IPVideoTalk add-in with the IPVideoTalk account username and password.
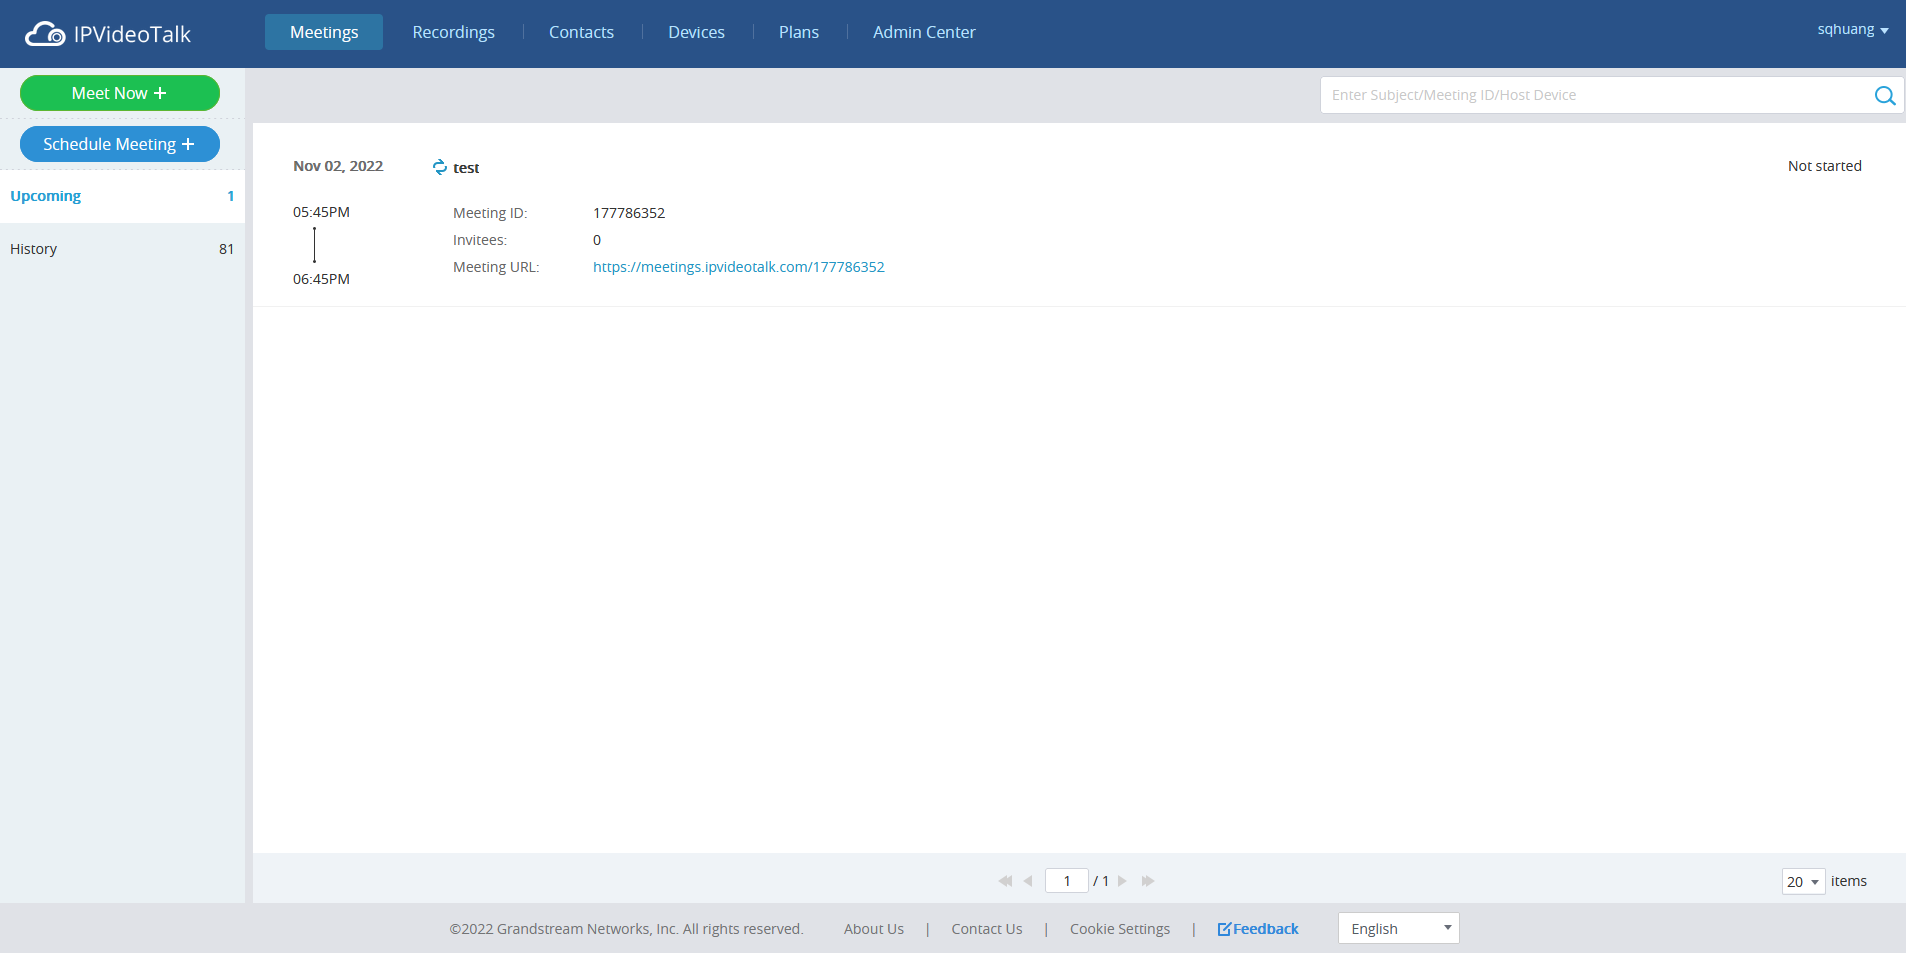
2. After login, the user can click the “IPVideoTalk” icon in the “Application” module to access the IPVideoTalk meeting management platform directly. Please refer to the screenshot below:
Wave Add-in on Outlook
Users can install the Wave add-in on Outlook so that users can quickly start meetings or schedule meetings.
Prerequisites: Users must install Wave Desktop application 1.19.x or later version for login.
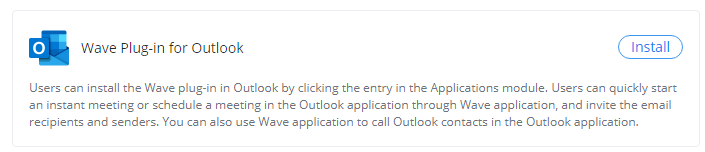
1. Users can download the “Wave Plug-in for Outlook” add-in in the “Application” module on the Wave Desktop application. After clicking the “Install” button, the user will be redirected to download the add-in through the browser, and the add-in can be regarded as an installation file, the user can click the installation file to install the add-in to the Outlook.
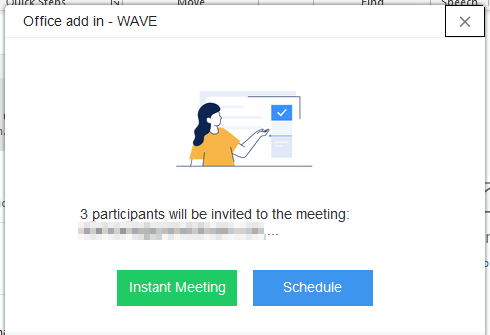
2. After installing the add-in to the Outlook, the user can see the “Meeting” button and “Call” button for Wave Desktop application inside the Outlook.

The user can click the button , select the meeting type between “Instant Meeting” and “Schedule”, and access the meeting creation interface of Wave Desktop application. The email contacts will be carried as the meeting invitees automatically.
The user can click the “Call” button to dial to the number of the Outlook contact. If there is no number for the Outlook contact, the Wave Desktop application will use the email of the contact to query the number in the Wave Contacts for dialing.
Wave H5 Add-in on Google Chrome
For the Wave H5 add-in on Google Chrome, it is a soft terminal of Wave application and users can use Wave application through the add-in on any pages.
Steps:
1. Users can find and install the Wave H5 add-in in the “Chrome web store”.
2. Log in the Wave account.
Note: The user cannot log in the Wave H5 add-in and Wave Web/Desktop client at the same time. If the user logs in the Wave H5 add-in, the same Wave account in the Wave Desktop client or Web client will be logged out automatically.
3. After logging in, the user will see the Wave interface as shown below:

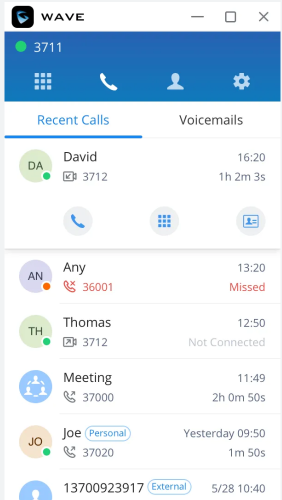
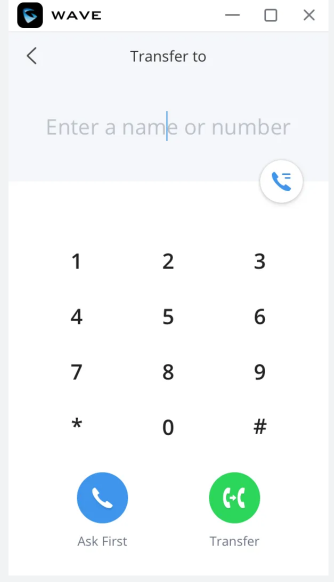
Dial Panel: Users can quickly dial to any numbers. Users can enter the number to search the contact, or enter the name to search the contact.
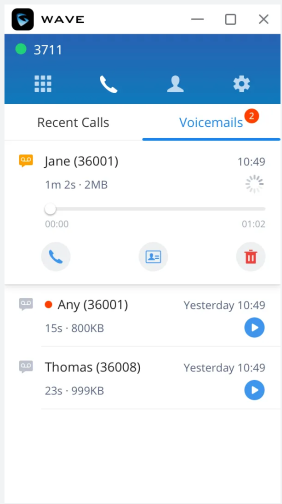
Recent Calls & Voicemails: Users can callback or view the contact details on the “Recent Calls” page.
It supports the “Call Flip” feature. Users can enter the call flip feature code to switch the call on another client to the local Wave H5 add-in client, or click the call flip button to switch it immediately.
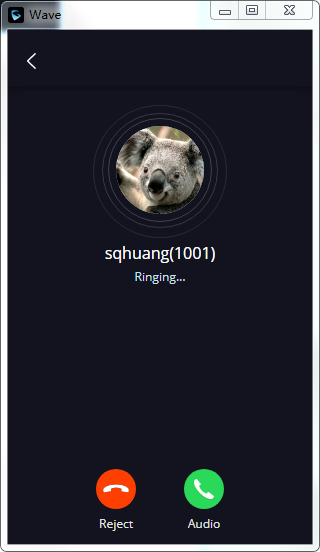
Please refer to the following screenshot for the incoming call window.
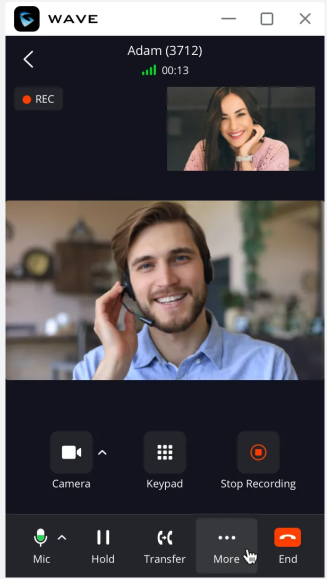
Calling Interface: The calling interface includes the following features: Multiple lines, audio/video calls, blind/attended transfer, call hold, which are the same as the features on Wave Desktop client.
If the user minimizes the calling interface, the user will see: 
Contacts: All contacts in the Contacts module will be displayed (displayed in tiled mode). Users can view the contact details.
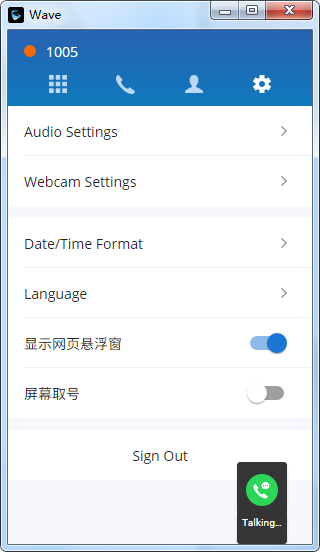
Settings:
Users can set the audio and video devices, set date/time format, set languages (the default setting is using the current language of the browser), set the floating window of the Wave client (There is a quick access entrance on the browser. Users can click the button to display the Wave client window), set click-2-dial feature (If this option is enabled, the numbers on the Chrome browser can be dialed through the Wave client. The user can move the cursor to the number and the user can see the Wave calling entrance for clicking), and set to log out of the account.
Please refer to the screenshots below:
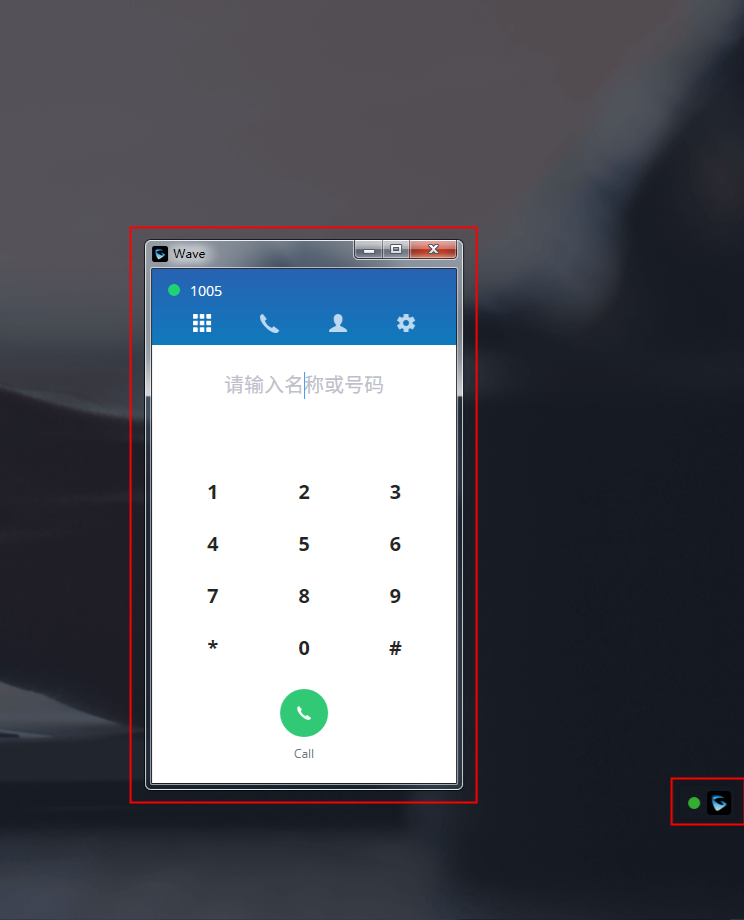
If the floating window of the Wave client is enabled, the user can see the Wave client as the screenshot shows below:
If the user enables the click-2-dial feature:
The user can see the Wave call entrance on the Chrome browser if the user moves the cursor to the number. Please see the screenshot below: