
INTRODUCTION
Overview
Wave desktop is a client application for the UCM63xx series IP PBX users to use a desktop application to participate in video/audio conferences and make calls via WebRTC. With Wave desktop client, users can easily create, schedule, manage, and join video conference calls, share presentation, chat during conference calls, register UCM extension and make point-to-point calls. Wave desktop helps enterprise users to join meetings and communicate efficiently. It is an ideal product for enterprises looking for tools for users to communicate and work productively.
Feature Highlights
- Supported on Windows 10 or higher / macOS High Sierra 10.13 or higher.
- Native integration with UCM including contacts and ability to display SIP users’ online status
- Supports LDAP to access contacts in the UCM LDAP server.
- Supports call display, voicemail, and call encryption.
- Supports call history.
- High quality point-to-point audio and video calling.
- Full integration with Grandstream UCM6300 IP PBX, including creation of QR code for automatic login, call transfer, call recording from server etc.
- Supports Opus and G.722 for HD audio. Jitter resilience up to 50% audio packet loss and 20% video packet loss.
- Supports H.264.
- Supports joining meeting via link without logging in.
- Supports schedule meeting and meeting now at anywhere anytime
- Built-in NAT traversal including automatic NAT discovery and TURN/ICE.
- Support basic chat functions, including single chat and group chat, sending files and emoticons, starting audio conferences in a group chat, simultaneous group chats and meeting chats.
- Integrated UCM user portal entry to access personal data, follow me settings, SCA, wakeup calls etc.
Specifications
Specifications and limitations of WebRTC change from one model to another, please find below a table showing the specifications for the features on each model.
| UCM630x series | Video feeds | Screen Share Feed | Concurrent user registration | Participant limit (Audio Conference) | Participant limit (Video Conference) |
|---|---|---|---|---|---|
|
UCM6301 |
4 or 9 |
1 |
500 |
75 |
20 |
|
UCM6302 |
4 or 9 |
1 |
1000 |
150 |
30 |
|
UCM6304 |
4 or 9 |
1 |
2000 |
200 |
60 |
|
UCM6308 |
4 or 9 |
1 |
3000 |
300 |
80 |
Below are the rest of technical specifications for all the models:
Protocols/Standards | SIP RFC3261, TCP/IP/UDP, RTP/RTCP, HTTP/HTTPS, DNS (A record, SRV, NAPTR), STUN/TURN/ICE, SIMPLE, LDAP, TLS, SRTP, IPv6 |
Voice Codecs and Capabilities | Opus, G.711 A-law/U-law, G.722, G722.1 G722.1C, G.723.1 5.3K/6.3K, G.726-32, G.729A/B, iLBC, GSM, NetEQ FEC 2.0, NACK Full-duplex speaker, AEC, AGC, Noise Reduction, PLC, Adaptive JIB |
DTMF | In-audio, RFC2833, SIP INFO |
Video Codecs and Capabilities | H.264, H.263, H.263+, VP8 1080P HD video supports displaying multiple videos, screen sharing, camera on/off, GS-Fec |
Telephony Features | Call hold/unhold, mute/unmute, call transfer, audio meeting room, call history, scheduling meeting, voicemail, call recording, etc. User portal entries allow access to personal data, wakeup call settings, SCA, follow me settings, call queue, CDR, CRM user settings, etc. |
UCM Applications | Supports UCM feature codes (transfer, call park, recording, meeting control options, etc.) |
QoS | Layer 3 QoS (ToS, DiffServ, MPLS) |
Security | SIP over TLS, SRTP (128-bit and 256-bit), HTTPS |
Multi-language Support | English, Simplified Chinese, French, Spanish (Latin America), Spanish (Spain), Italian, Greek, Arabic, Russian, German, Polish, Portuguese, Vietnamese, Thai, Czech, Turkish, Hebrew, Dutch, and Slovenian. |
Login | Supports login with SIP extension and password. Supports joining meetings via link without logging in. |
Upgrade | Wave Web client is built-in with UCM and upgrades via UCM. |
Table 2: Wave Desktop Specifications
Please visit our website for more Wave desktop information and product documentations: https://www.grandstream.com
GETTING STARTED
System Requirements
- Operating system: Windows 10 or higher / macOS High Sierra 10.13 or higher.
- Web environment: stand by Network connection above 3 Mbps (recommended), UCM needs to be connected to the network.
- Audio and video equipment: to make a call, you need a speaker and microphone, webcam, or high-definition webcam.
Download and Install the Client
The Wave client can be downloaded on the Grandstream official website:
https://fw.gdms.cloud/wave/download/
After the download is complete, you can install it according to the instructions on the interface.
Upgraded Version
On the main page before or after login, click the upper right corner, and then click the menu item “About”. If there is a newer firmware version, you can click the “Upgrade Firmware” button to upgrade.

LOGGING IN TO WAVE DESKTOP
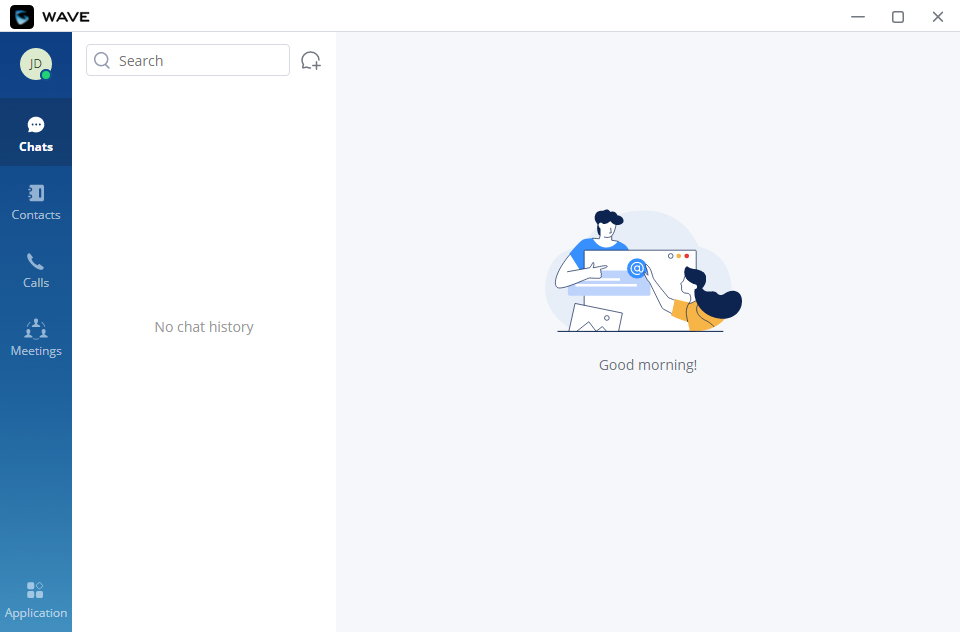
With UCM SIP extension number and user portal password, users could log in the Wave desktop portal. After logging in successfully, users can host meeting, schedule meeting, manage contacts, make calls, transfer calls, chat during meeting etc.
To start using Wave Desktop Application:
Login Using Credentials
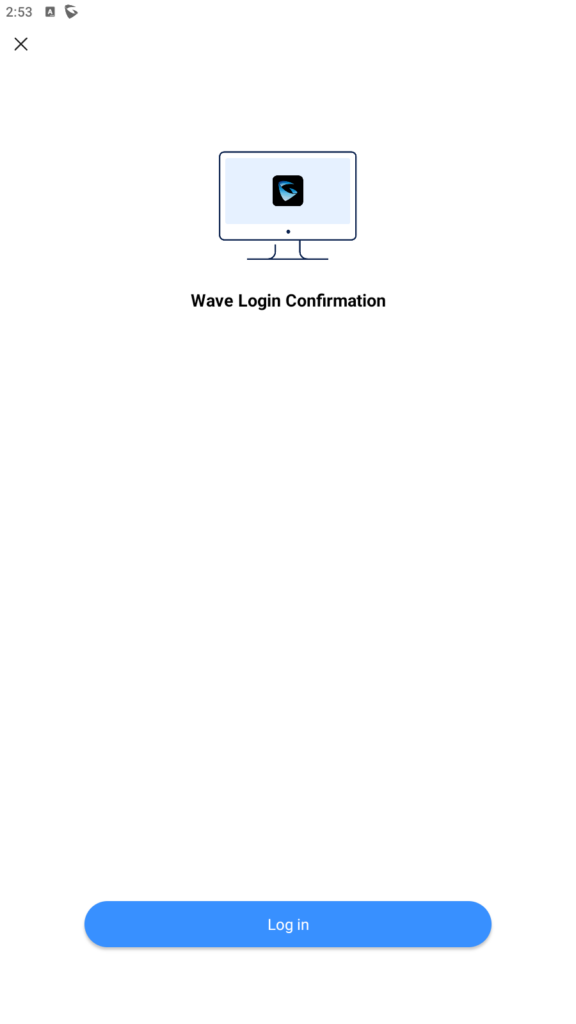
- Click on to
 open Wave Desktop application. The following login page will be displayed.
 open Wave Desktop application. The following login page will be displayed.
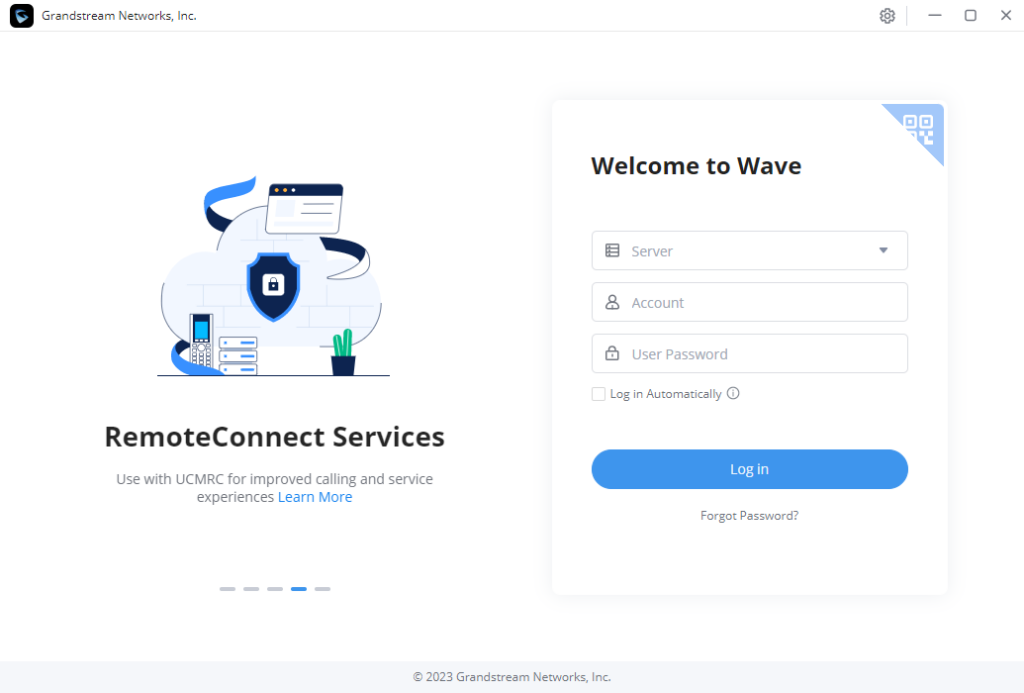
2. Enter an extension number and its user portal password in the Wave desktop login page. Make sure to set the correct server address.
3. Click on the “Log In Automatically” option and the application will store the username and password. The user can auto-log in the Wave application when clicking the application icon.
Log In by Scanning QR Code
This feature allows you to login quickly to Wave Desktop client if you are already logged into Wave on your smartphone. To login using this method, please follow the steps below:
- On Wave Desktop, click on the top right corner highlighted in blue to change the login method.
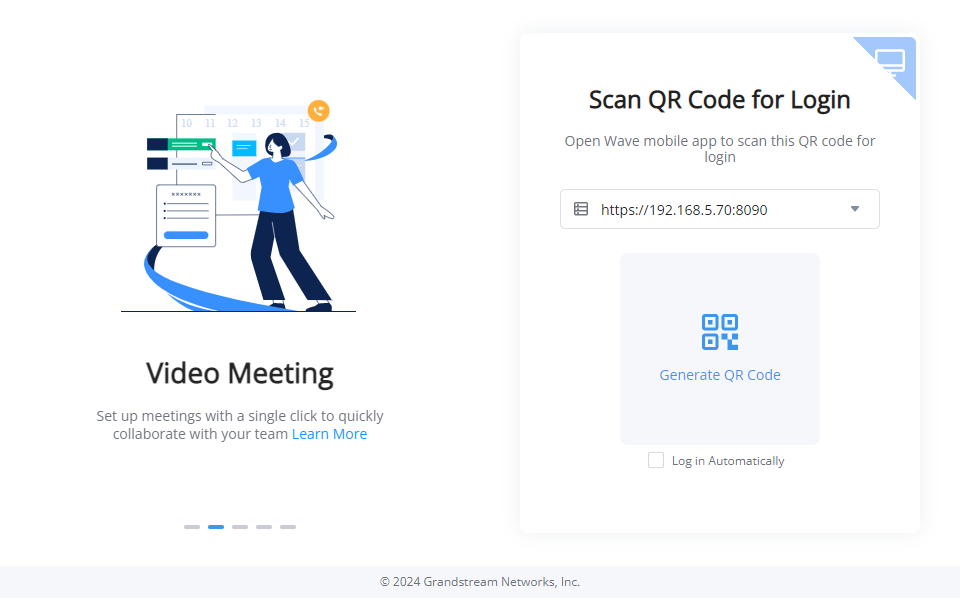
- Enter the address of the UCM on which your extension will be registered.
- On Wave mobile application, click on the plus icon on the top right corner, and select “Scan”.
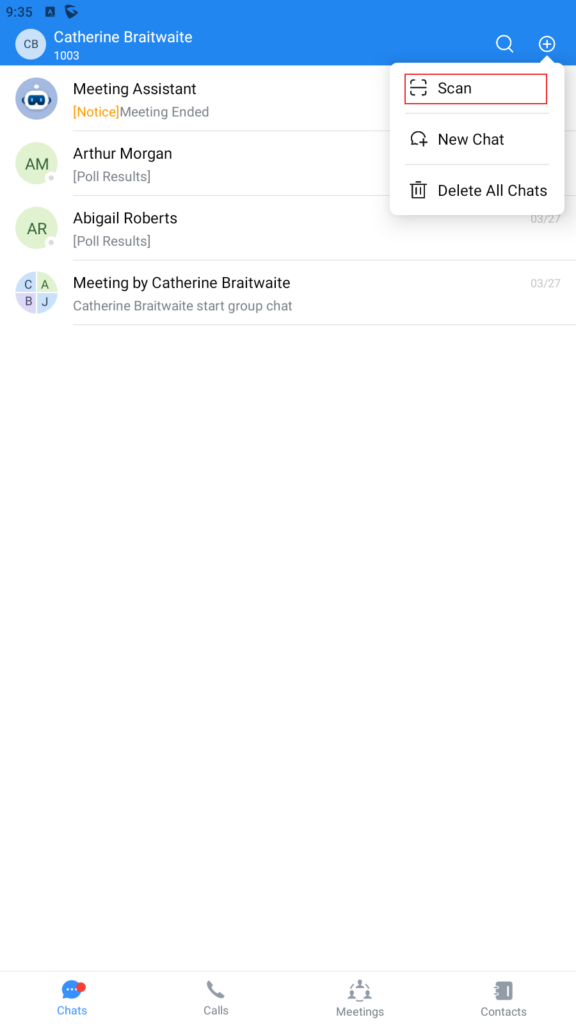
- Once the QR is scanned, press “Login”
Wave Password Recovery
Users can reset wave login password by following the below steps:
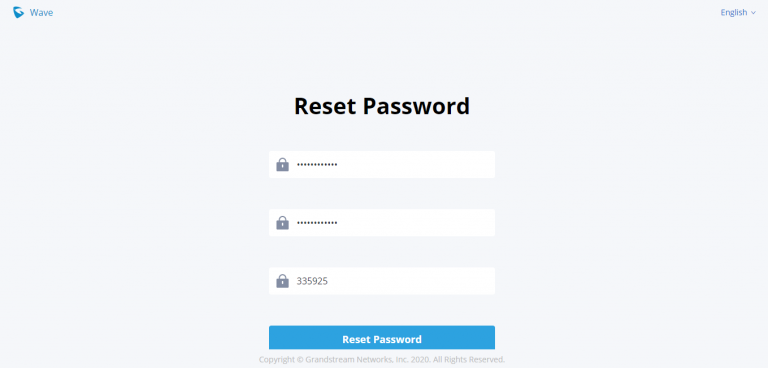
- Click on Forgot Password and the below window will be displayed, then enter the username
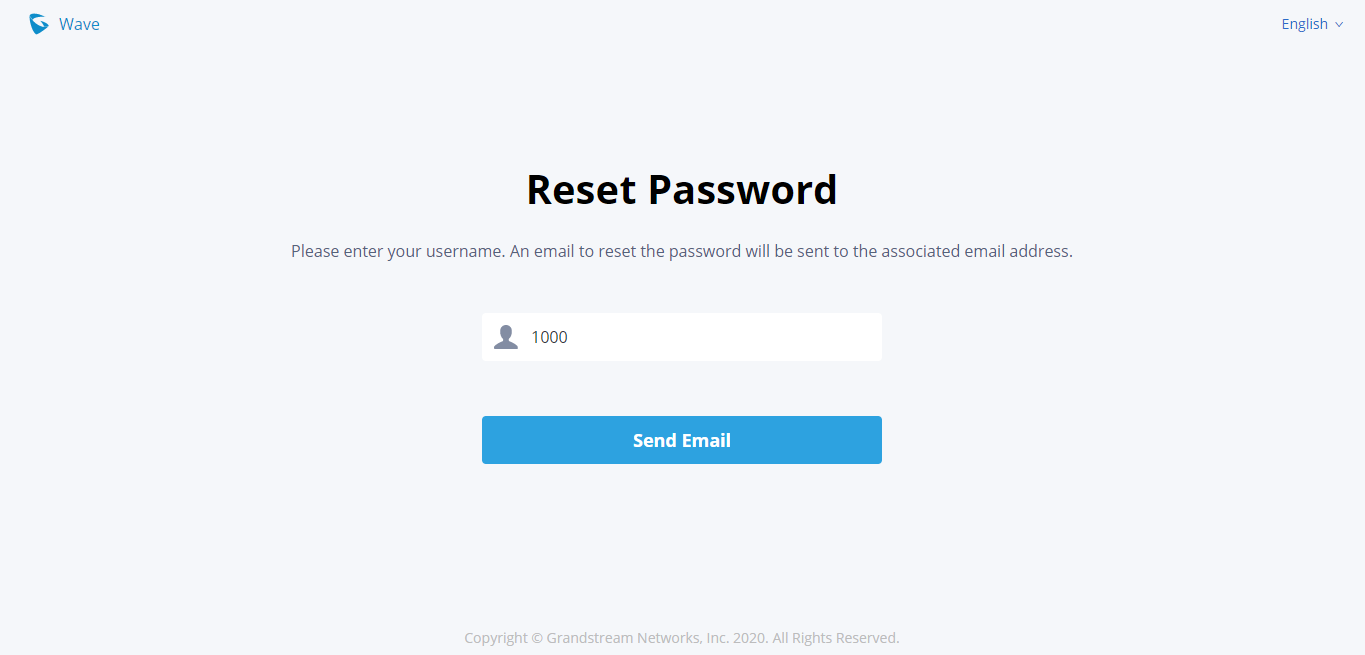
2. After clicking on Send Email a verification code will be given
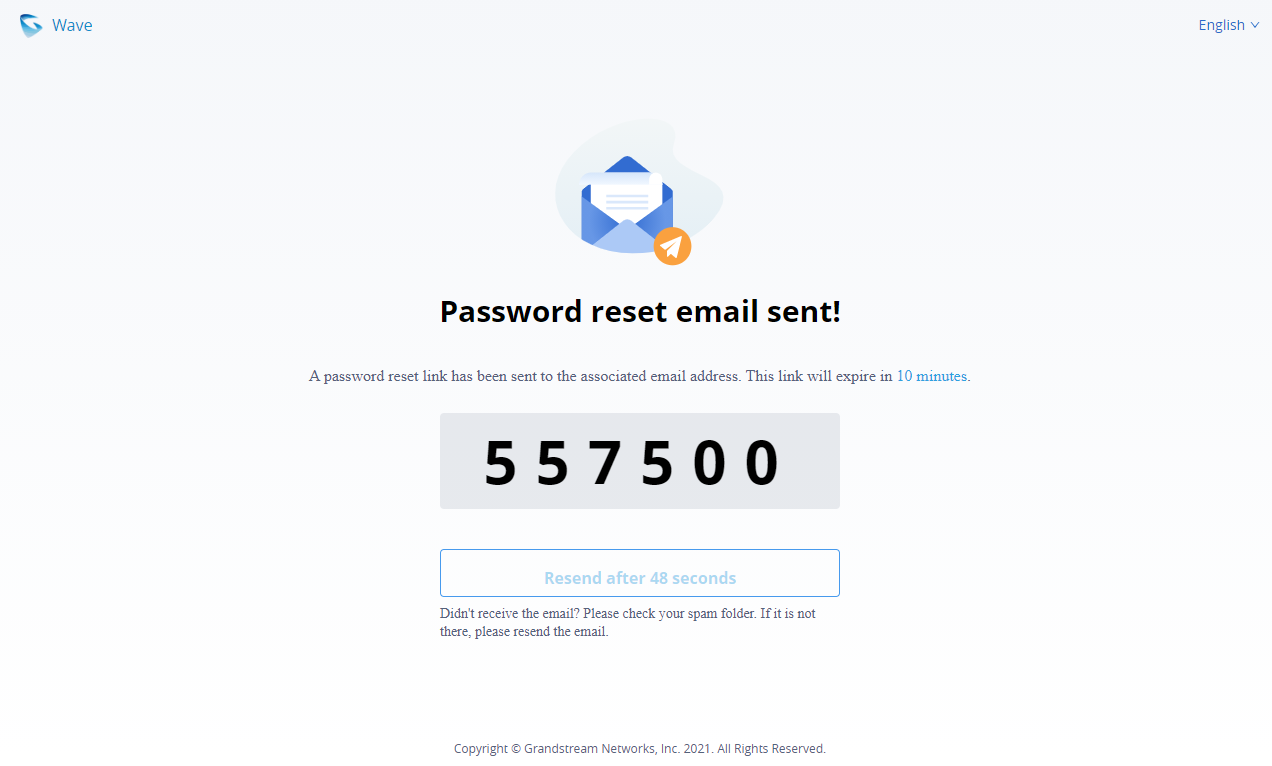
3. And an email will be sent to the email address configured under the extension
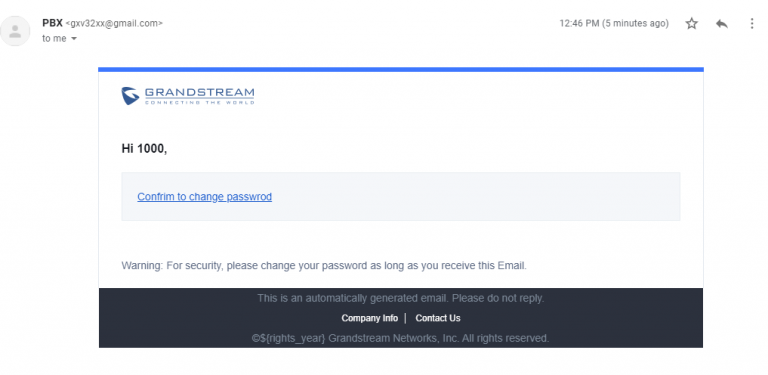
4. On the received email, click on the link to confirm to change password and you will be redirected to the below page, where you will need to enter a new password, re-enter it and the provided verification code, as shown below:
5. And you will be jumped to the login page after the password is reset correctly.
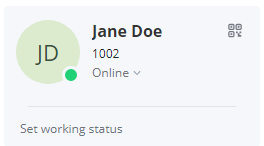
Custom Status
Wave users can customize the status in the application. It is divided into account status and working status, and it is displayed in the contacts book and chat module.
- Account Status:
The user can click the user icon to enter the configuration interface, then click the status below the account at the top to customize the status of the account, as the screenshot shows below:
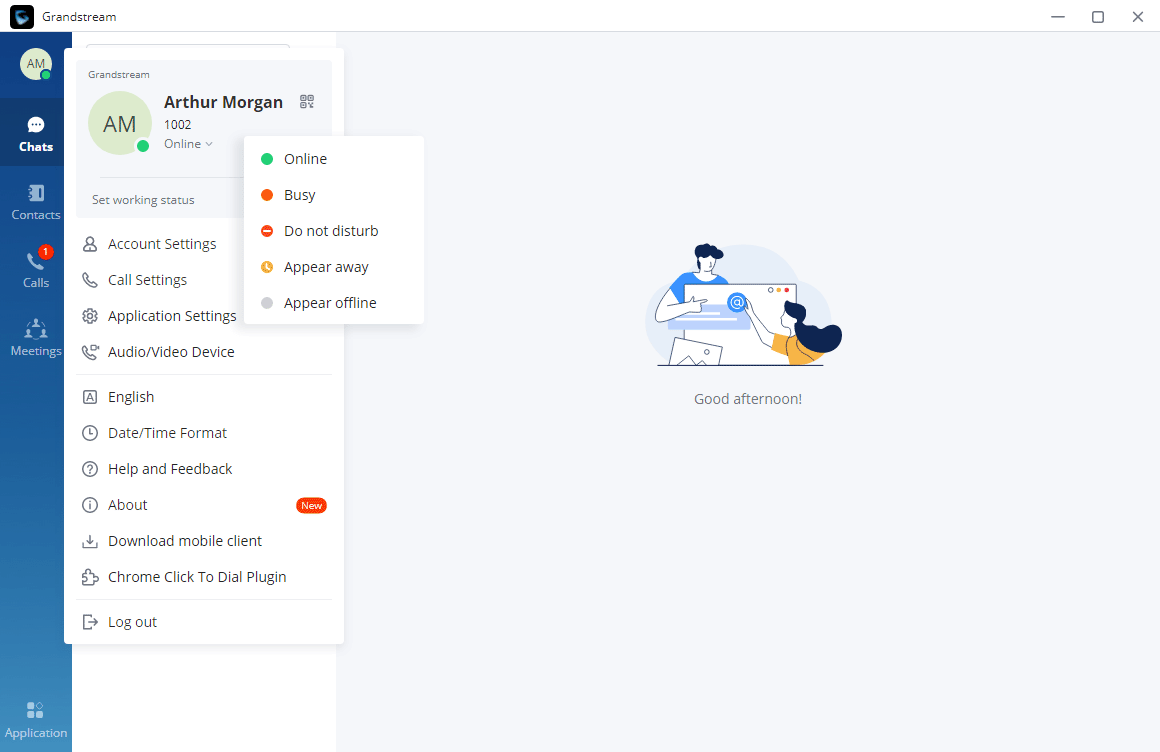
 Online: This is the default account status. The new calls and messages will prompt users.
 Busy: The user is busy now, and the user can send/receive new calls and messages normally.
 Do not disturb: The new incoming calls and messages will be prompted without any sounds, and there is no pushing notification. The new incoming calls will be ignored, and the new missed call history will be generated.
 Offline: The account status will be displayed as offline, but the user still can send/receive calls and messages normally.
 Away: The account status will be displayed as away, but the user still can send/receive calls and messages normally.
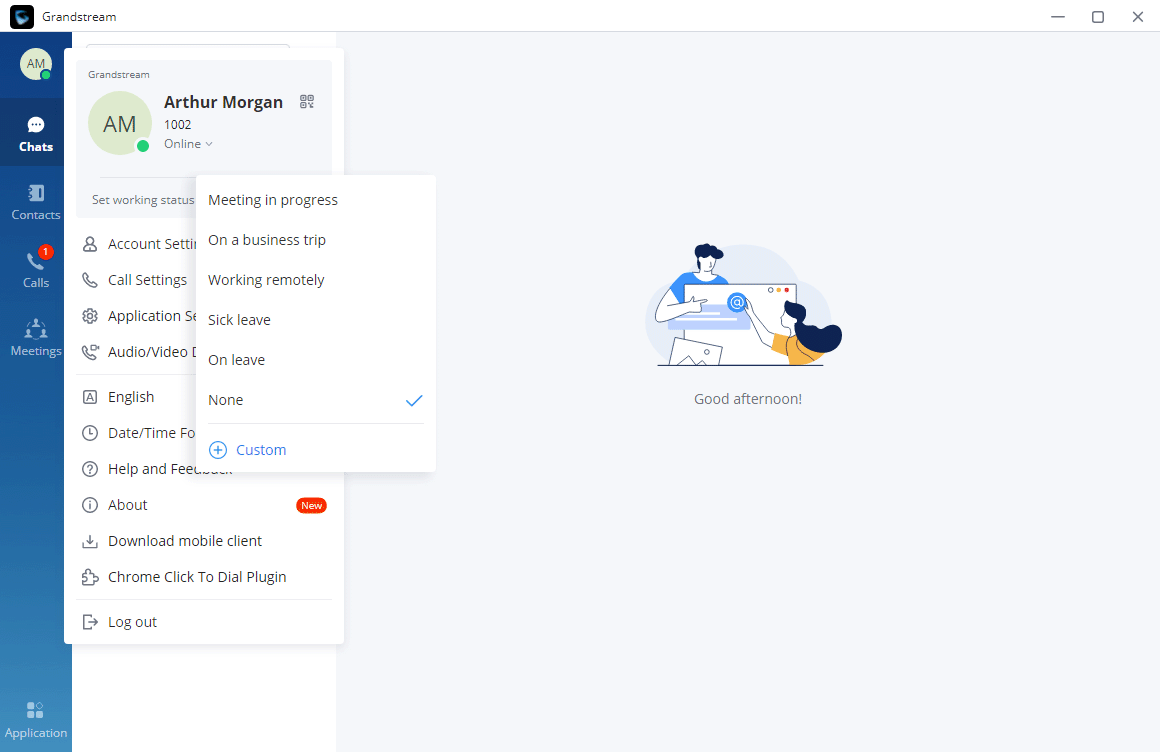
- Working Status
The user can click the status bar below the user icon and click “Set Working Status” to select the following working status: Meeting in progress, On a business trip, Working remotely, Sick leave, On leave, None and Custom.
After setting the working status, it will be displayed in the contacts book and chat module.
Custom Avatar
Users can customize the profile avatar and the custom avatar will be displayed in the contacts book, chat interface and meeting interface.
- Step 1: Click on the account icon on the left upper corner, and click “Change profile picture”, users can modify the avatar as the screenshot shows below.
- Step 2: Click on “Select images” to open the local file selection window, users can select the images from local files.
- Step 3: Select an image and click “OK” to upload the custom avatar to the application.
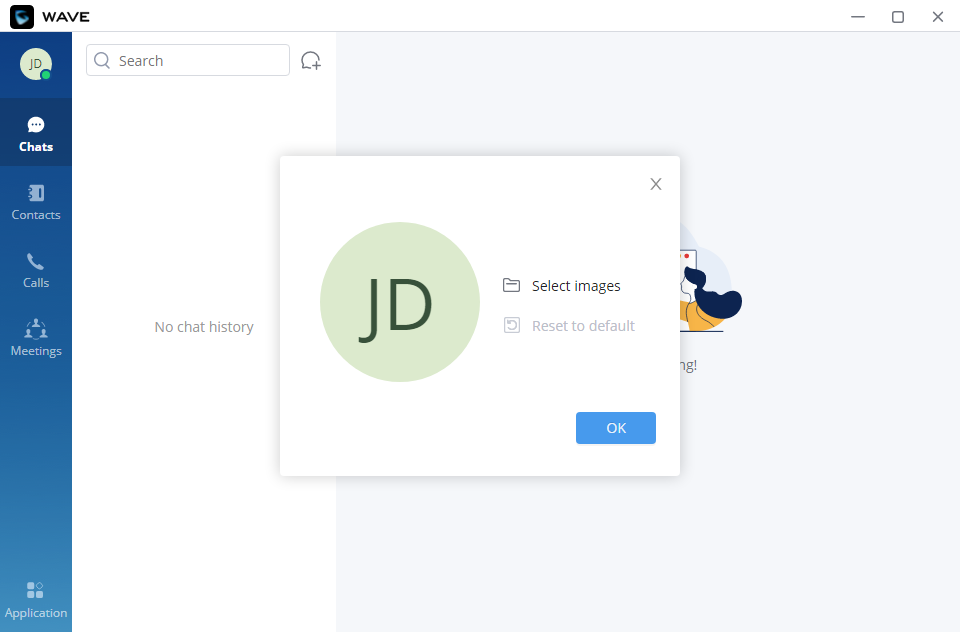
Users can click “Reset to default” option to restore the avatar to the original avatar.
CALLS
Making Calls
Users can use Wave desktop for point-to-point audio and video calls.
Initiating a Call from Keypad
- After logging in Wave desktop, click on the “Calls” tab
 on the bottom left of the page to bring up keypad.
 on the bottom left of the page to bring up keypad.
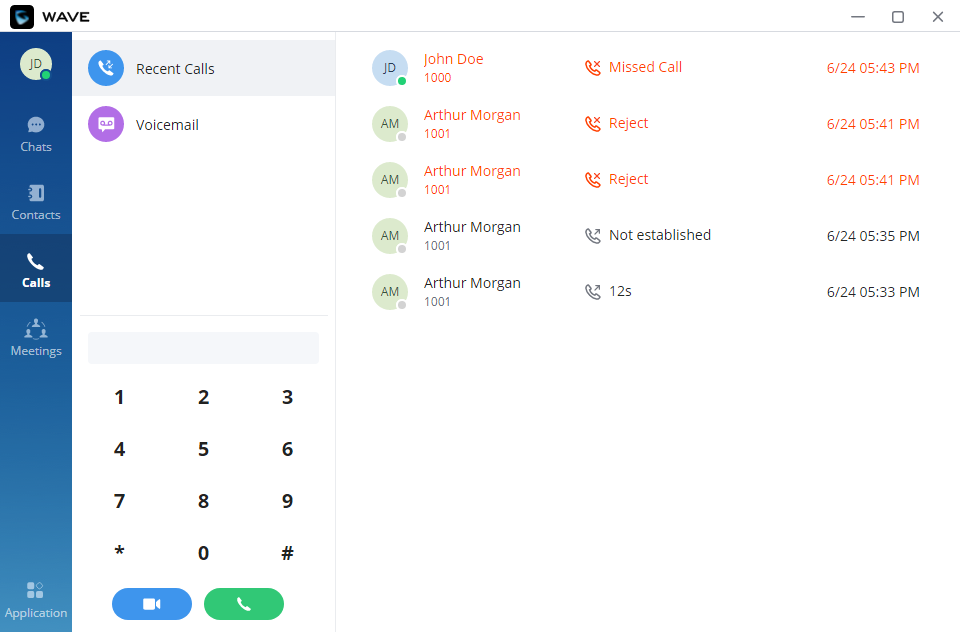
2. Enter the number to dial.
3. Click on ![]() for video call or click on
for video call or click on ![]() for audio call. Or press enter to start an audio call.
for audio call. Or press enter to start an audio call.
Call a Contact

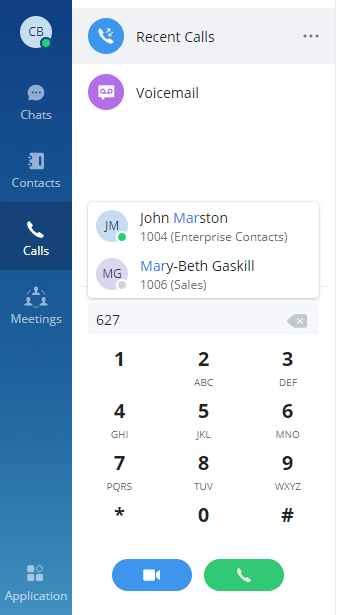
There are two repertoires in Wave, Enterprise Contacts and Personal Contacts. This helps the user to keep his/her contacts organized and he/she can easily find the information of a certain contact.
Users can search for a specific contact or a specific number to dial under Contact Tab.

The user can also use T9 contact search by entering the numbers which map to the dial pad letters existing in the contact name as the example below shows.
- In the search bar, enter the number or username to search.
- Click on the search result. The details of this contact will show on the right.
- For the search result, clicking on
 to make video call and clicking on
  to make audio call.
 - Also, by hovering the cursor on the contact, you can add it to your favorite contact tab as shown below

Personal Contacts allow the user to add their own contacts to Wave to initiate calls to those specific contacts.
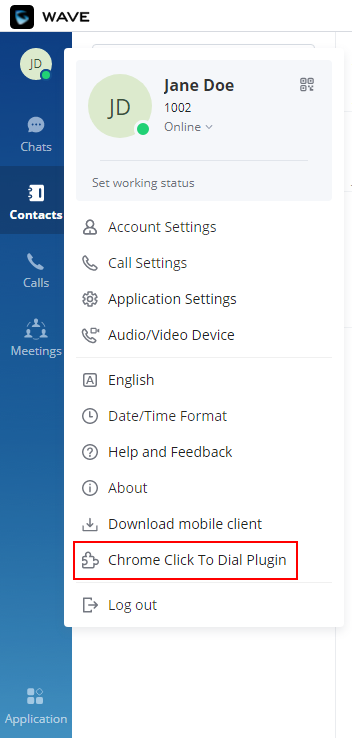
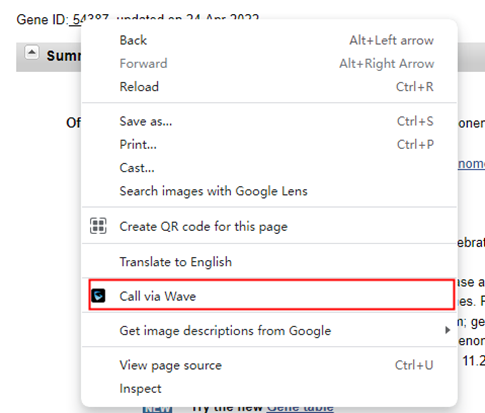
Click-to-Dial Chrome Plug-in
Click-to-Dial Chrome plug-in is another way to quickly initiate calls from your Chromium-based web browser (Google Chrome, Microsoft Edge, and Opera). To install this plug-in in your browser, please follow the steps below
Step 1: Click on your profile picture in Wave Desktop then select “Chrome Click to Dial Plug-in”.
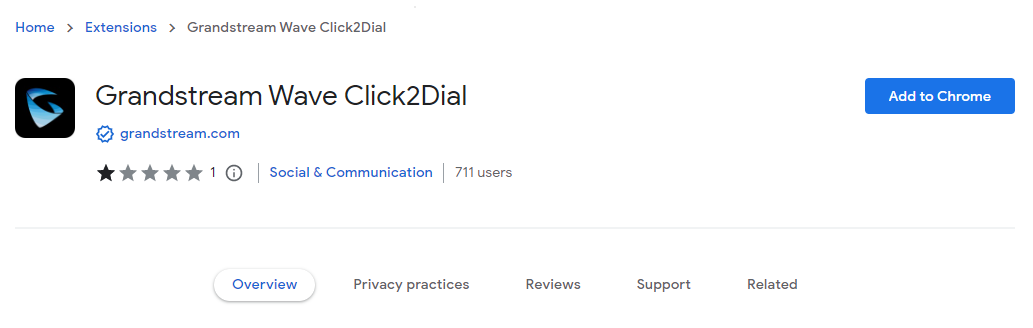
Step 2: A window will pop up showing the plug-in, if you are using Microsoft Edge or Opera, you might have a prompt that will ask if you want to allow installing plug-ins from Chrome Web Store. Please go ahead and click allow. Then click ![]()
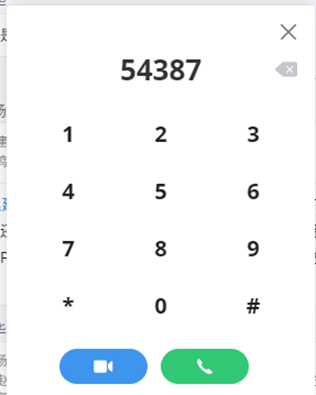
Now that the plug-in has been installed, it will be detecting the numbers on the web page and by right-clicking on the number you can quickly have it dialed in Wave, please see the figures below.
Answering Calls
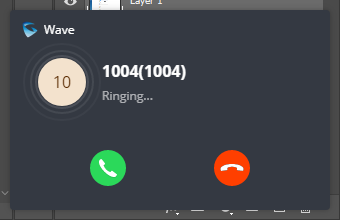
If the user has logged in Wave desktop, when there is an incoming call, the desktop will prompt an incoming call notification on the right bottom corner. Clicking on the notification will bring up Wave desktop page.
- If it is an audio call, the user can select
 to answer the call, or select to hang up.
 - If it is a video call, the user can select
 to answer with video, select to answer with audio only, or select to hang up.
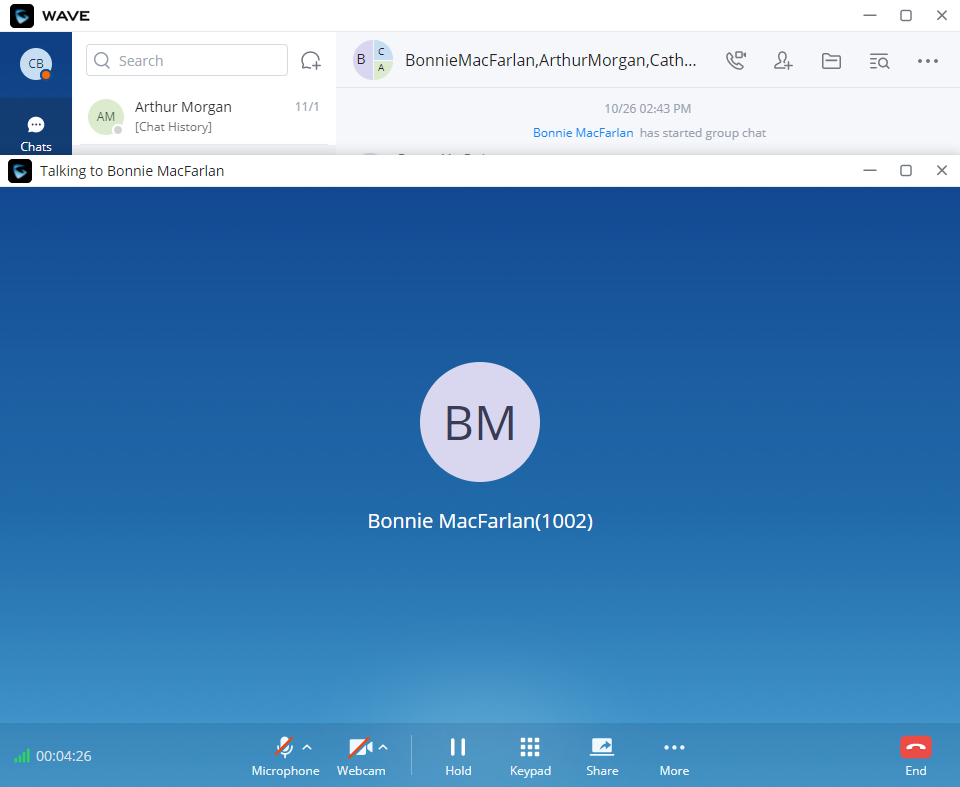
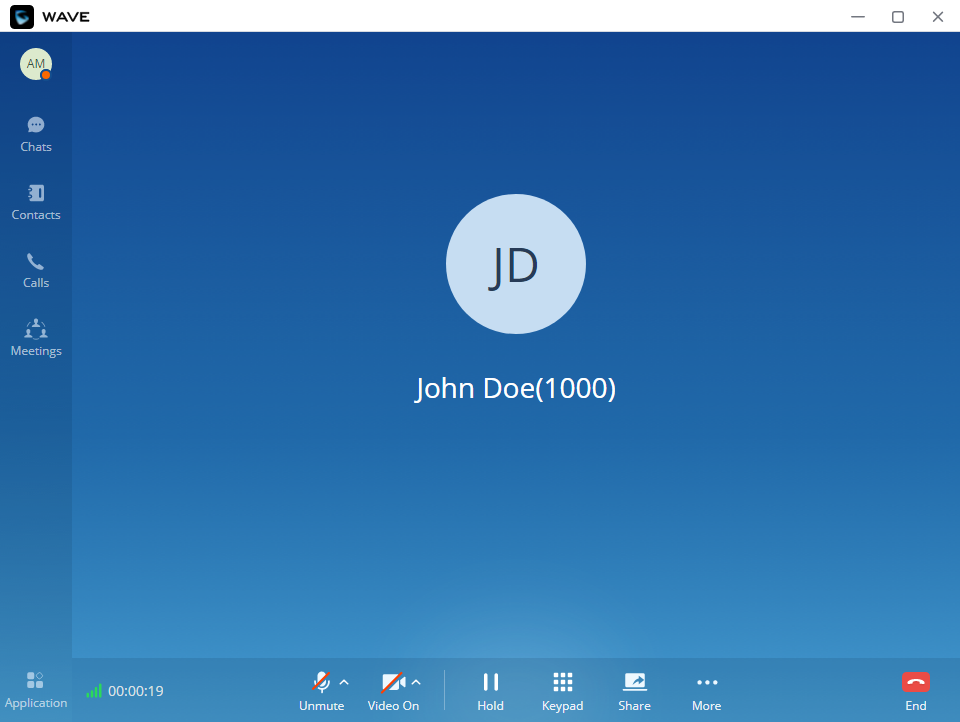
During a Call
Once the call is established, a new windows will on which you will have the call controls, as well as the video feed if it’s a video call. The users can use the call controls to mute/unmute themselves, enable and disable their video feed, screen share (video calls only), hold/unhold the call, and transfer the current call.
 :View current network connection status including audio and video packet loss.
 :End call.
 :Mute/unmute. Users can click “More” button to enter the alternative ringing speaker settings interface.
 :Video on/off. Users can click “More” button to enter the virtual background settings interface.
 :Share screen, whiteboard or pdf file
 :Click to open more functions such as transfer.
 :After clicking on for more functions, click on this icon to hold the call.
 :After clicking on for more functions, click on this icon to transfer the call.
 Click on this icon to enter DTMF.
 After clicking on for more functions, click the button to transfer both parties’ calls to the conference room for the call, so that more people can be added to the conference.
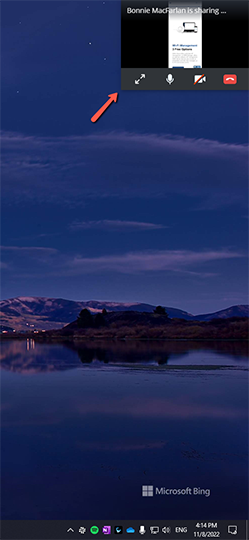
During a video call or screen-sharing, when the user minimizes the call screen, a small window with the toolbar will appear on the top right corner of the screen showing a small video of the camera feed or the screen-sharing.
Hold/unhold
- During call, click on Hold
 to put the current call on hold.
 - To resume the call, click on
 .
.
Mute/unmute
- During call, click on
 to mute the call. The user will not be heard by other parties anymore.
 - To unmute the call, click on
 . The user can now be heard by the other parties.
DTMF
- During the call, press the more button to open the menu page, and click the DTMF
 button and a soft keyboard will be opened, as shown in the figure below.
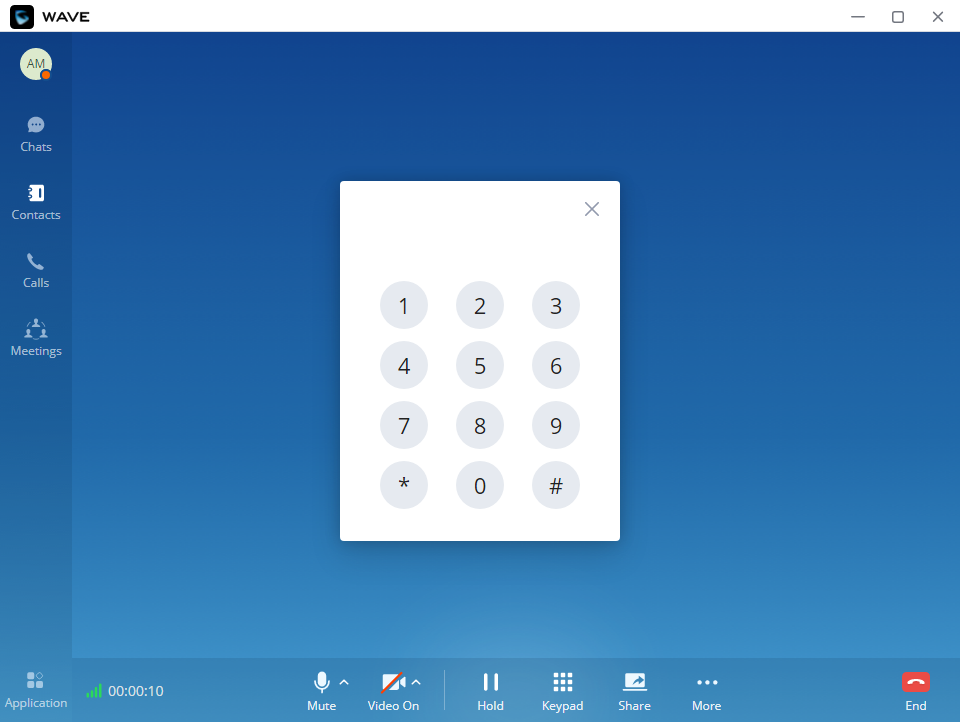
2. Click on the numbers that needs to be entered.
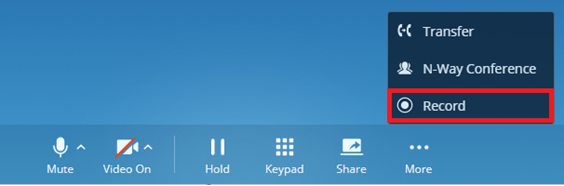
Record one-to-one Call
Users can start the audio recording function during the one-to-one call. Users can click the More button🡲Recording ![]() button to record the current call. Please see the screenshot below:
button to record the current call. Please see the screenshot below:
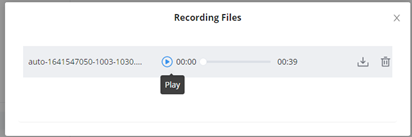
When the call is ended, users can click ![]() button on the call history interface following the specific call log to listen to the call recording, and download/delete the recording files. Please see the screenshot below:
button on the call history interface following the specific call log to listen to the call recording, and download/delete the recording files. Please see the screenshot below:
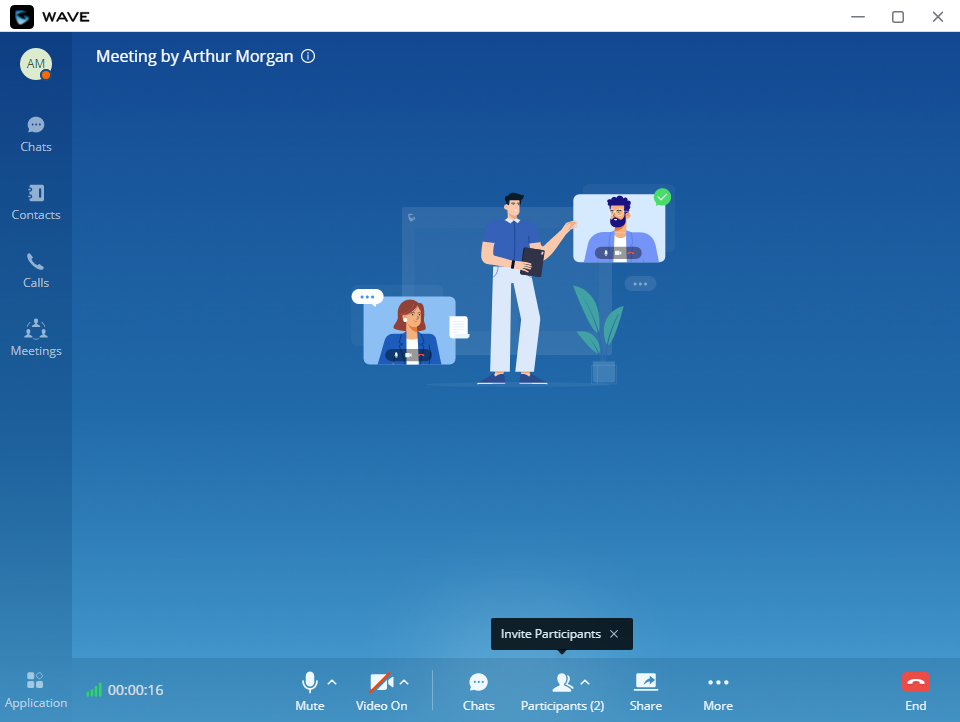
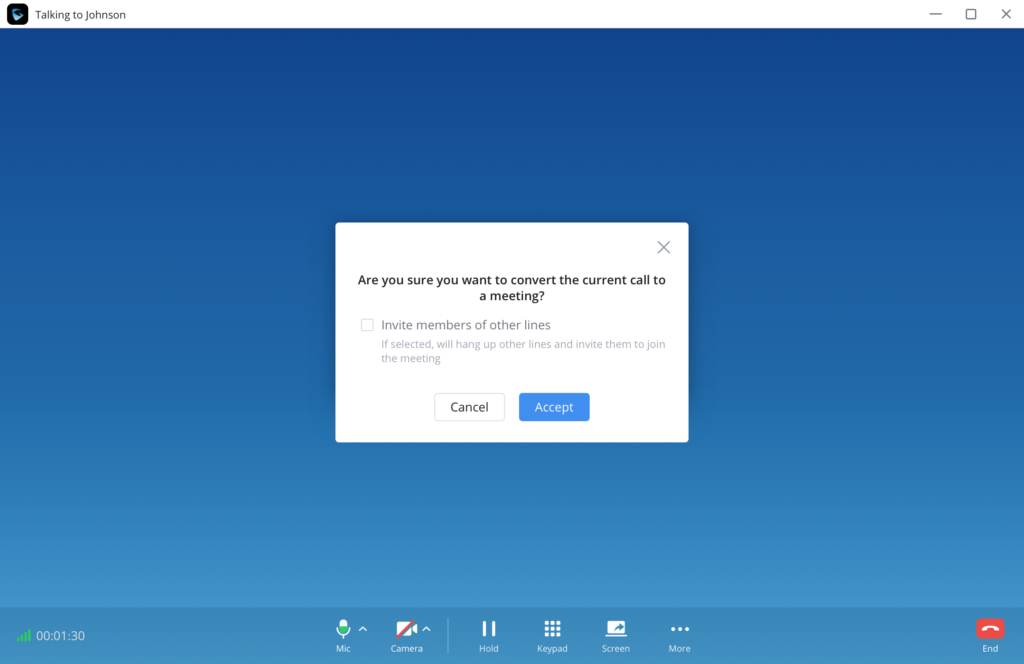
Transfer to Meeting Room
1. During the call, the user can click “…” button to open the menu and click the “N-way Conference” ![]() to transfer the current call to the random video meeting room. As the figure shows below:
to transfer the current call to the random video meeting room. As the figure shows below:
2. When the call has been transferred to the video meeting room, the operator will become the meeting host.
Call Flip Function
Let’s say you initiated a call on your GS Wave softphone app, but when you arrived to your office, you wanted to continue the call on your Grandstream desk phone or on Wave Web client. Call flip function allows to do that seamlessly. Without any interruption, you can switch between calls from device to another without having to hang up the call. Also, the callee won’t notice that you have switched devices. In order to be able to use the call flip function, make sure that both devices have the same account configured on them.
On the device you want to switch to, a green bar will appear notifying you that there is already a call ongoing on a different device. In our example, if you open Wave Web App you’ll see the green bar on top side of the screen and if you wish to continue that call on the Wave Web app, click on ![]()

After you click on “Switch” this prompt will appear:

Confirm your choice by clicking on ![]()
The call will be switched to the Wave Web App without any interruption.
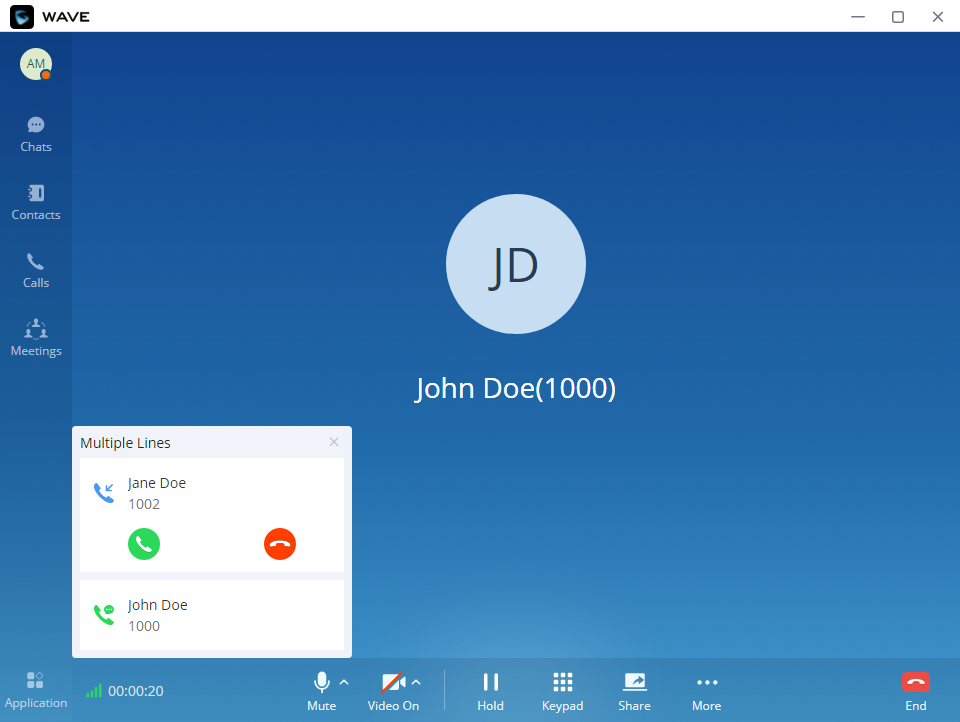
Multiple Lines
It supports two-line calls at the same time. The user can quickly switch between lines in the lower left corner. The user can click button ![]() to answer the call and click button
to answer the call and click button ![]() to hang up the call.
to hang up the call.
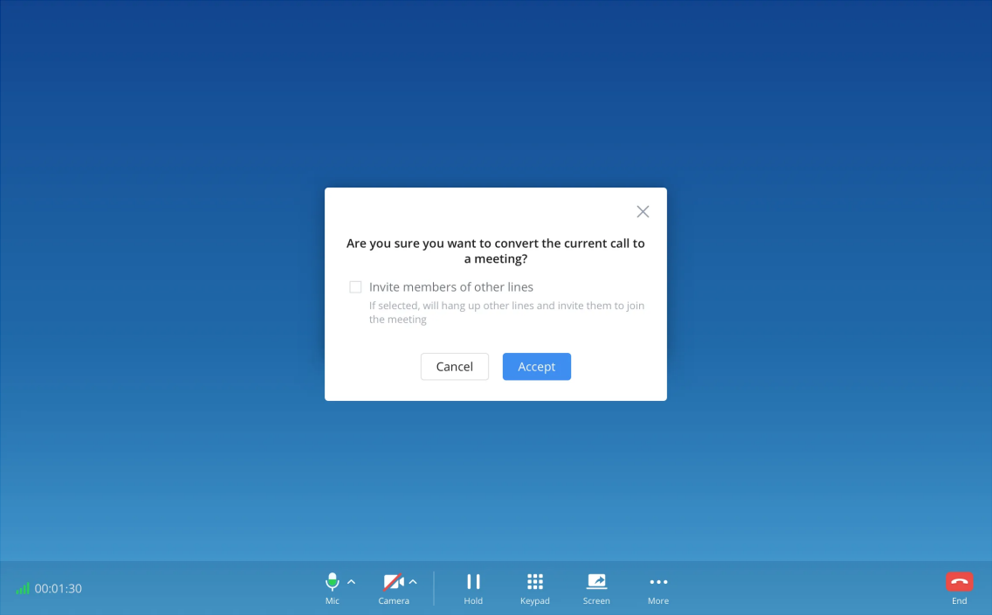
If the user wants to convert all the calls received on the lines into a meeting, he/she can click on “More” and then choose “N-way conference” then check “Invite members of other lines”, then click “Accept”.
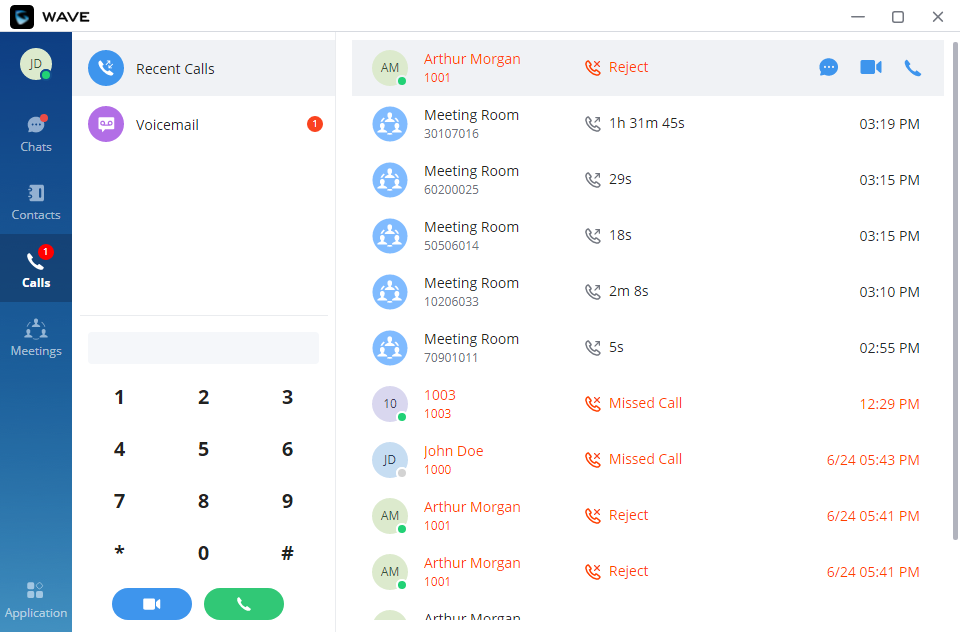
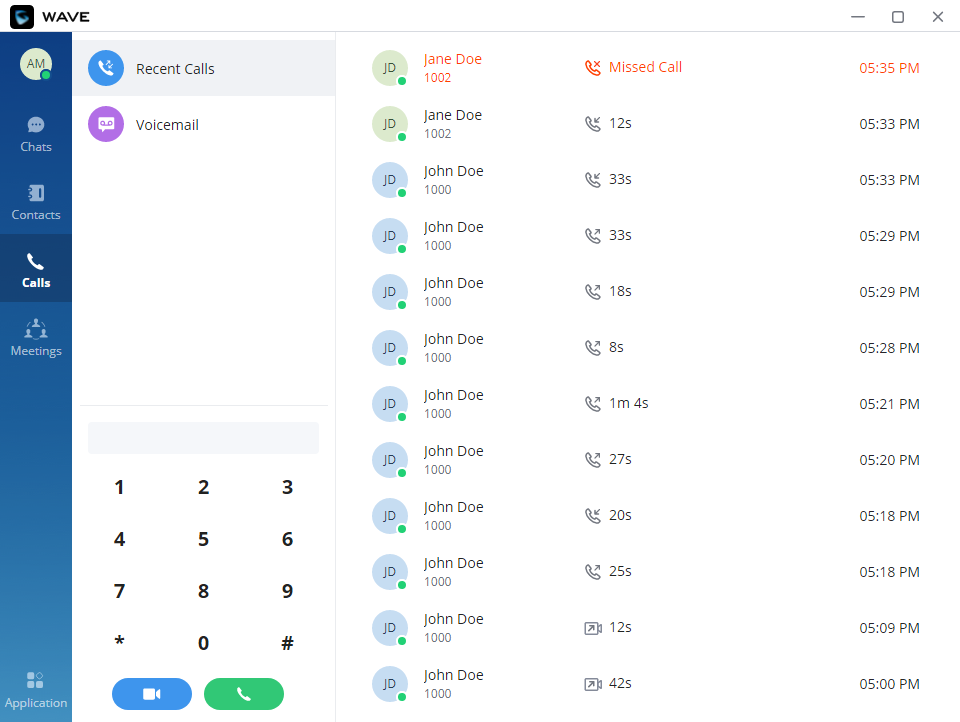
Call History
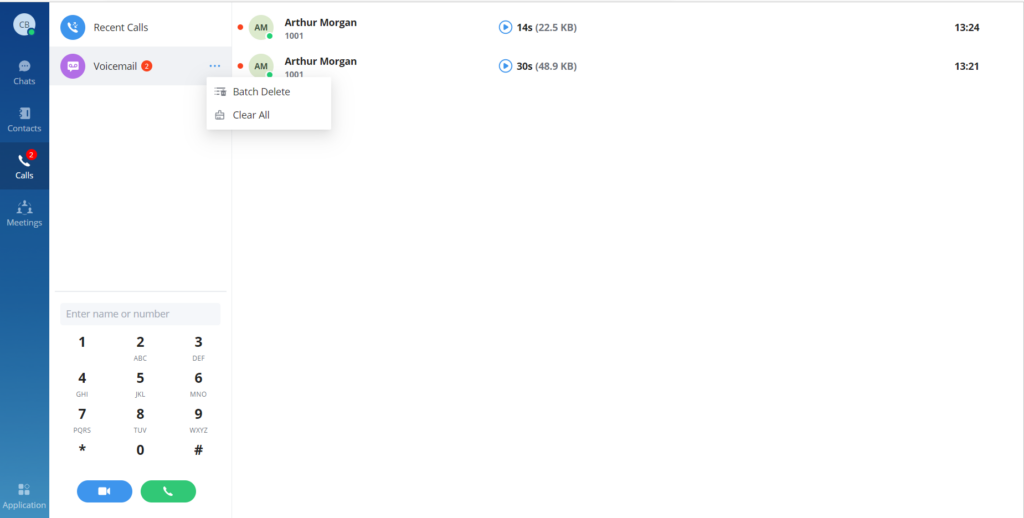
Users can click on “Calls” menu on the left side of the application UI and click “Calls” menu to view all call history of the current Wave account. Users can view call history, search in call history, view details or initiate calls from there.
- The user can enter the number or username to search in call history.
- Scroll up and down to view more call history if existed.
- For the call history entry, click on to make a video call and click on to make an audio call or
 for a chat.
 - When a call history entry is selected, the details of this entry are displayed on the right side.
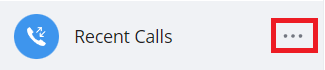
- Click on
 for more options:
- “Batch Delete“: To select multiple entries and delete them.
- “Clear All“: To delete all the call history entries at once.
 for more options:
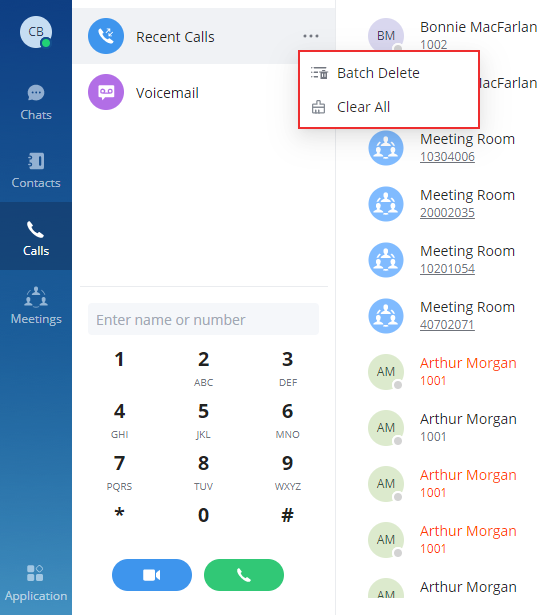
Call history can have the following type of calls:
![]() : Incoming audio calls
: Incoming audio calls ![]() : Outgoing audio calls
: Outgoing audio calls ![]() : Missed audio/video calls and rejected calls
: Missed audio/video calls and rejected calls ![]() : Incoming video calls
: Incoming video calls ![]() : Outgoing video calls
: Outgoing video calls
MISSED CALLS
If there is a missed call, there is a notification on the lower right corner of the desktop, as the screenshot shows below:
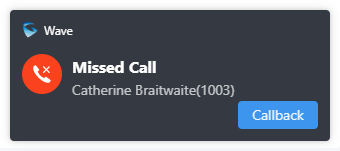
The user can quickly call the extension back by clicking on ![]()
Users can check missed calls under Calls Tab.
CALL TRANSFER
Wave desktop users can transfer current call to another party via blind transfer or attended transfer.
Blind Transfer
- User A is using Wave desktop. Establish call between User A and User B.
- On User A Wave desktop call screen, click on
 icon and select transfer
- Enter User C’s number as the number to transfer the call to. The number will be listed in the search result.
- Click on “Blind” to perform blind transfer.
- User C rings. User A hangs up automatically. When User C answers, the call between User B and User C will be established.
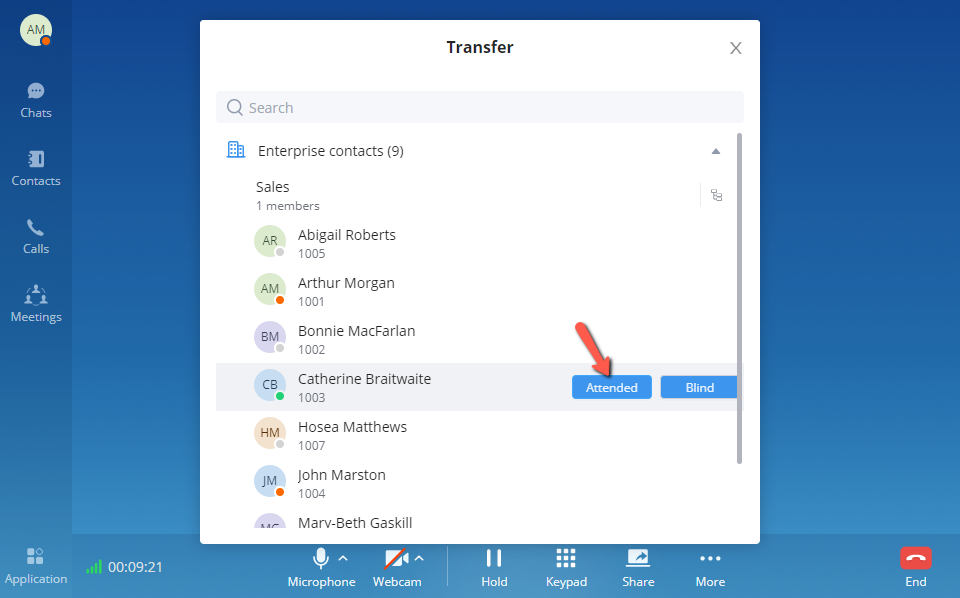
Attended Transfer
Step 1: There is a call which is in progress between extension John and Arthur.
Step 2: Arthur clicks on ![]() button then select the contact to which he wants to initiate the transfer to.
button then select the contact to which he wants to initiate the transfer to.

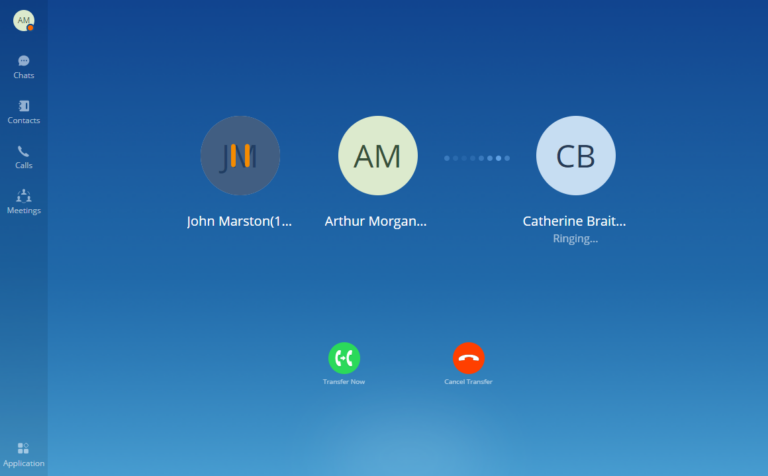
Step 3: Arthur selects to start an attended transfer to Catherine.
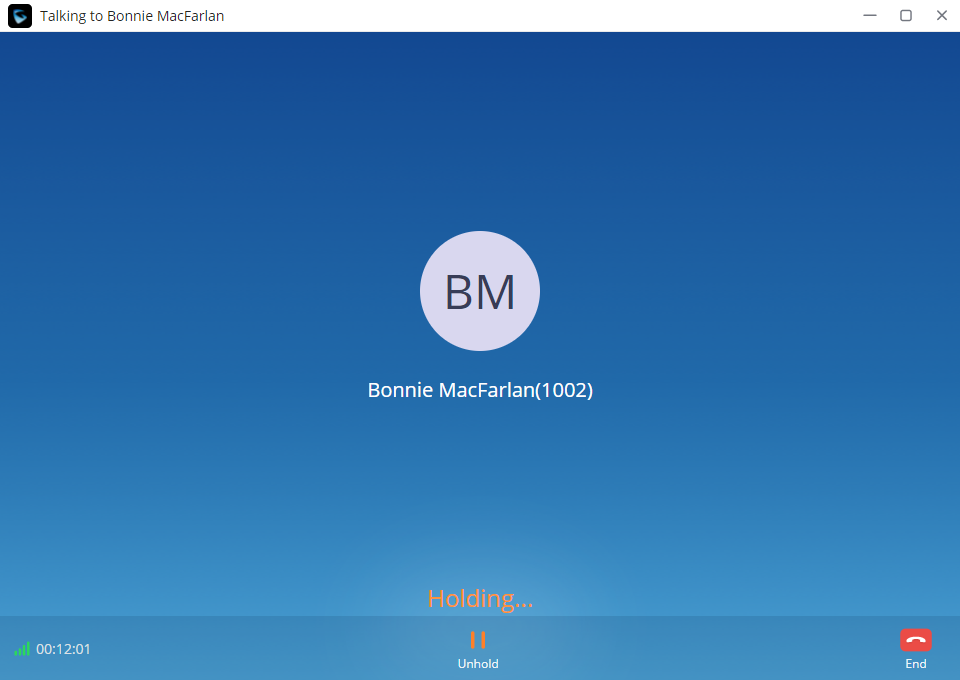
Step 4: Once the attended transfer has been initiated, the call between John and Arthur will be put on hold, and Catherine’s extension will start ringing. John will be hearing the On-Hold music.
- Transfer Now: The call between Arthur and John will hang up and the transfer will be performed, regardless if Catherine answered or not.
- Cancel Transfer: The call between Arthur and Catherine will hang up, and the call between Arthur and John will be resumed.
CHATS
Wave desktop allows users to conduct a peer-to-peer chat or a group chat. After logging in Wave desktop, click on “Chat” on the left panel to open the chat page.
If you want to use the cloud IM system, go to the Grandstream official website to learn about the CloudIM package.
Start a single chat
Method 1: After clicking on the “Chat”, user need to click on ![]() button, then select the other party he/she wants to chat with and click OK to enter the single chat interface.
button, then select the other party he/she wants to chat with and click OK to enter the single chat interface.
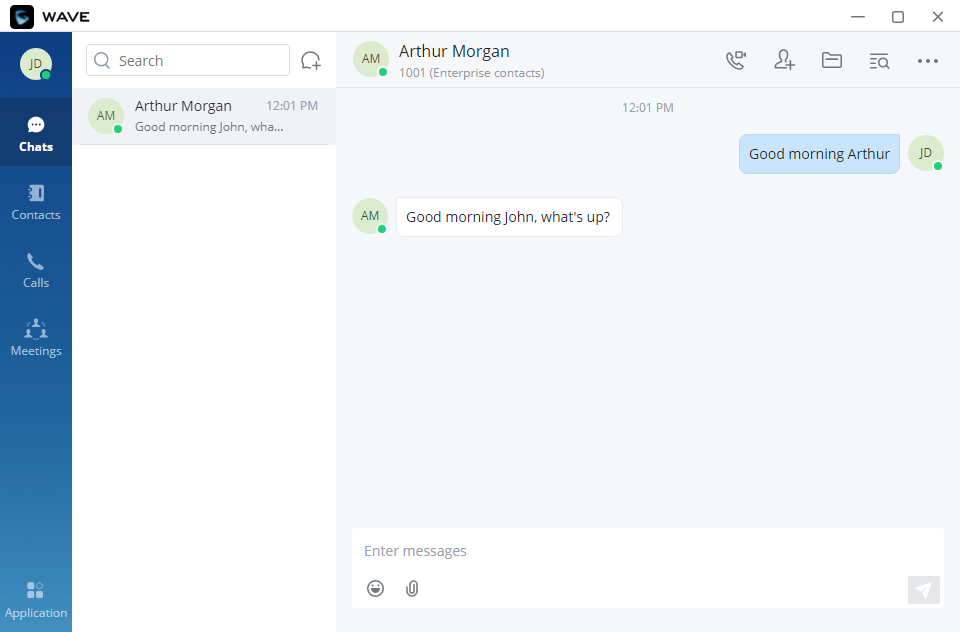
Method 2: User can click on “Contact” tab, find the contact he/she wants to chat with, and click ![]() button, the user will be redirected to the chat section.
button, the user will be redirected to the chat section.
Method 3: User can click on “Calls” tab, find the contact he/she wants to chat with, and click ![]() button to initiate the chat.
button to initiate the chat.
Method 4: User can click on “Keypad” tab, find the contact he/she wants to chat with among the calls log, and click ![]() button to initiate the chat.
button to initiate the chat.
End to End Encrypted Chat
Wave supports end to end encryption which encrypts the messages from the terminal which is sending the message and decrypt the message once it reaches the recipient’s terminal. This protects the confidentiality of the messages exchanged; this includes all the types of messages, text messages, images, documents, and files. Waves uses advanced asymmetric encryption technology to ensure that nobody, other than the two parties, can read the messages.
Wave point to point chat is by default not encrypted, but if the user wants to start an end to end encrypted chat, then please follow the steps below.
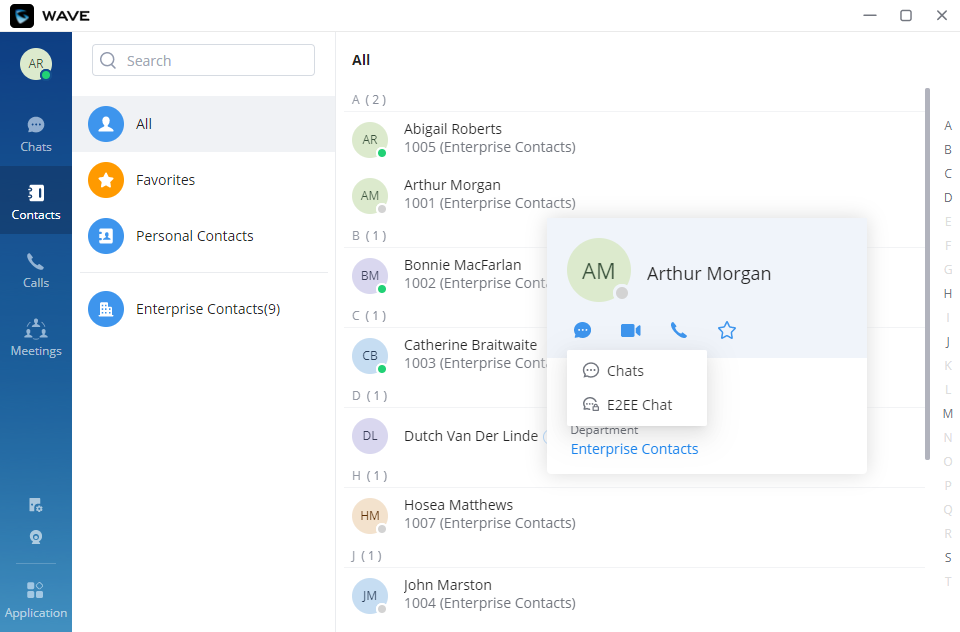
Navigate to Contacts, then select the hover the mouse cursor over the profile picture of the contact, after than click on ![]() and on the menu, click on E2EE Chat.
and on the menu, click on E2EE Chat.
Start a Group Chat
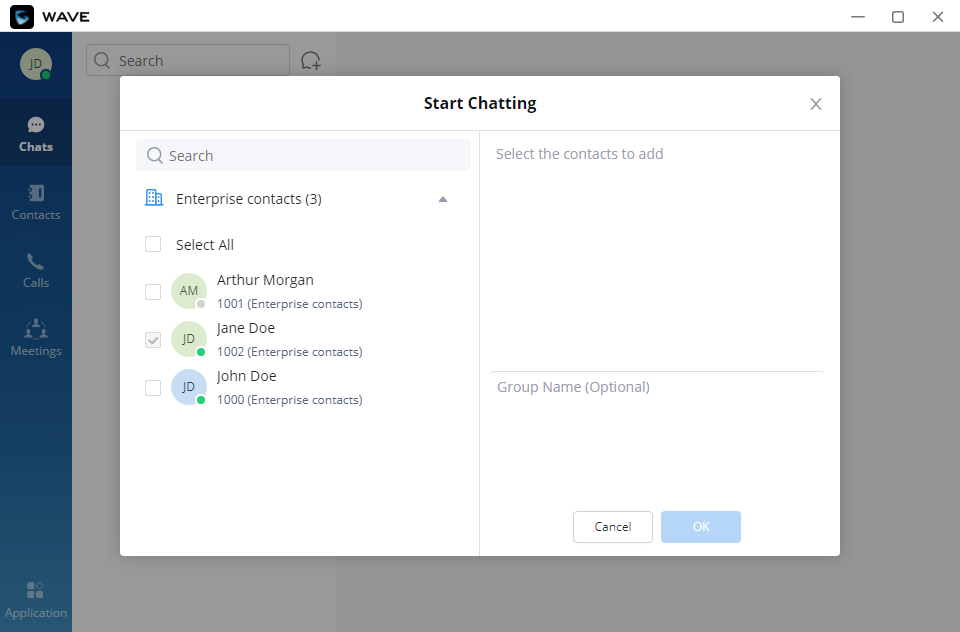
Method 1: After clicking on the “Chat”, user need to click on ![]() Button, then select multiple contacts he/she wants to chat with, enter the group name, and click OK to enter the group chat interface.
Button, then select multiple contacts he/she wants to chat with, enter the group name, and click OK to enter the group chat interface.
Method 2: In the single chat window, user need to click on ![]() , then on
, then on ![]() to invite more contacts to form a group chat.
to invite more contacts to form a group chat.
Send Messages
In the chat interface, sending text, emoticons, files/pictures are supported.
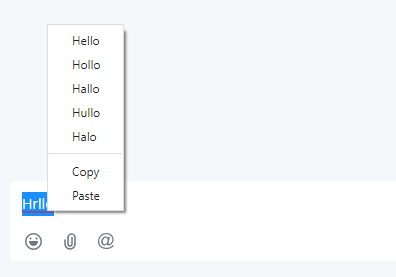
While typing a message in the chat box, Wave will underline any misspelled words

By right-clicking on the misspelled words, a list of similar words will pop up to help the user choose which word they wanted to type.
When a message fails to send, a red exclamation mark will appear right next to it as shown in the screenshot below:

You can click on the exclamation mark to try to send it. Or, you can delete it by right-clicking on it and choose “Delete”.
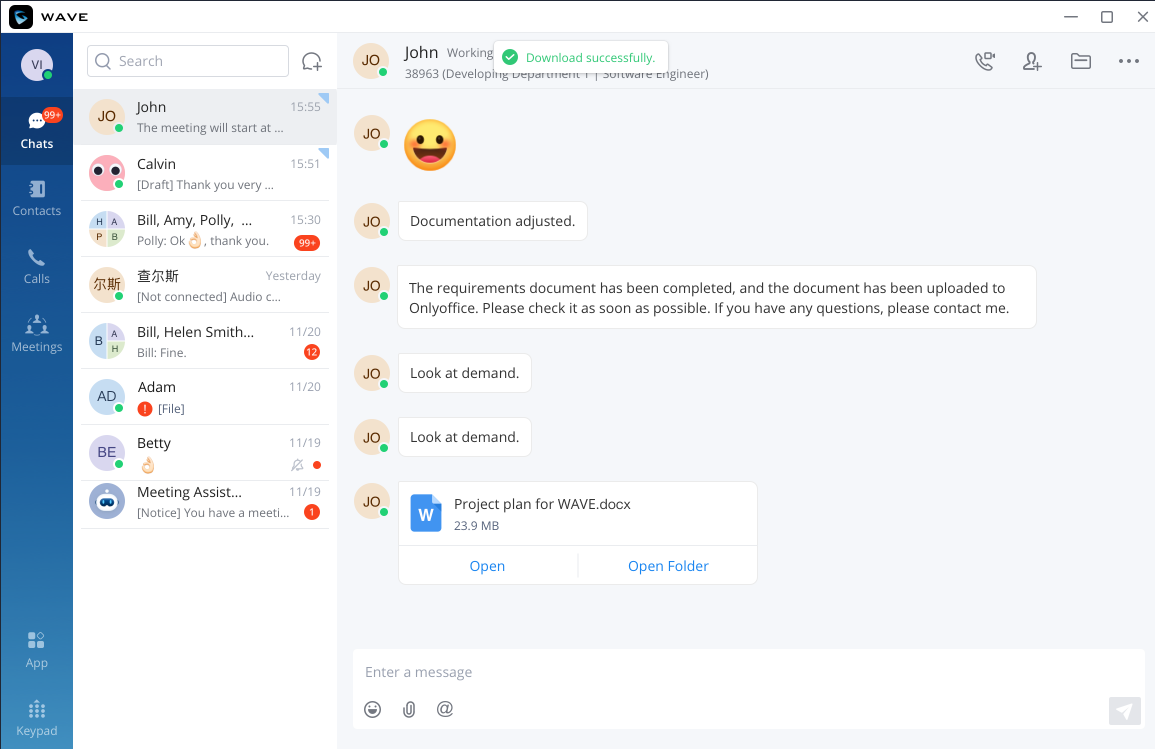
Send Files
With Wave Desktop app you can send a file to a contact or a group of contacts. To do that, click on under the chat box, then select the file you want to send.
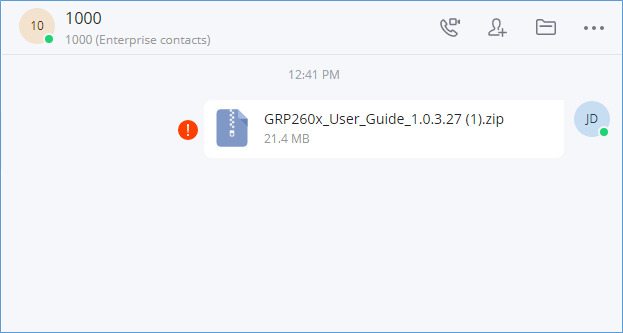
In case a file fails to upload, you will get an exclamation mark that indicates that the file has not been sent.
The user can also send the link to a file stored on Google Drive. To do that, the user must install Google Drive integration module from the App Store menu in Wave Desktop. After the integration has been installed, the user needs to login to her/his account. After that the user will be able to send Google Drive files in form of links, please refer to the screenshot below.

In case the user sent an image in point-to-point chat or in a group chat, the users can directly see the images and will be also able to rotate, share or download the image.
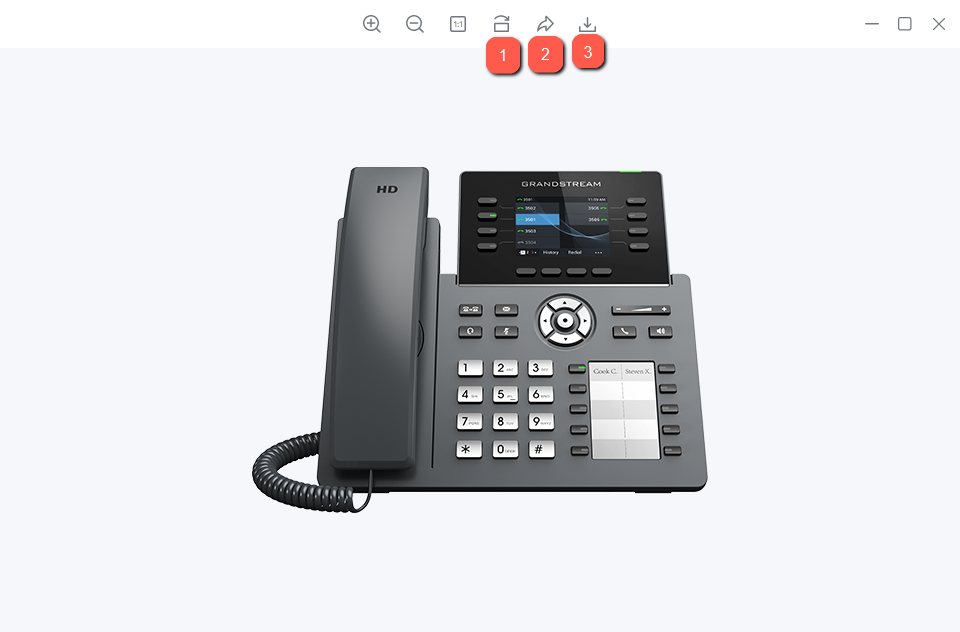
- 1: Rotate the image clockwise.
- 2: Share the image to another chat.
- 3: Download the image.
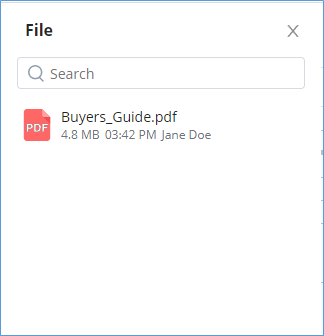
File List
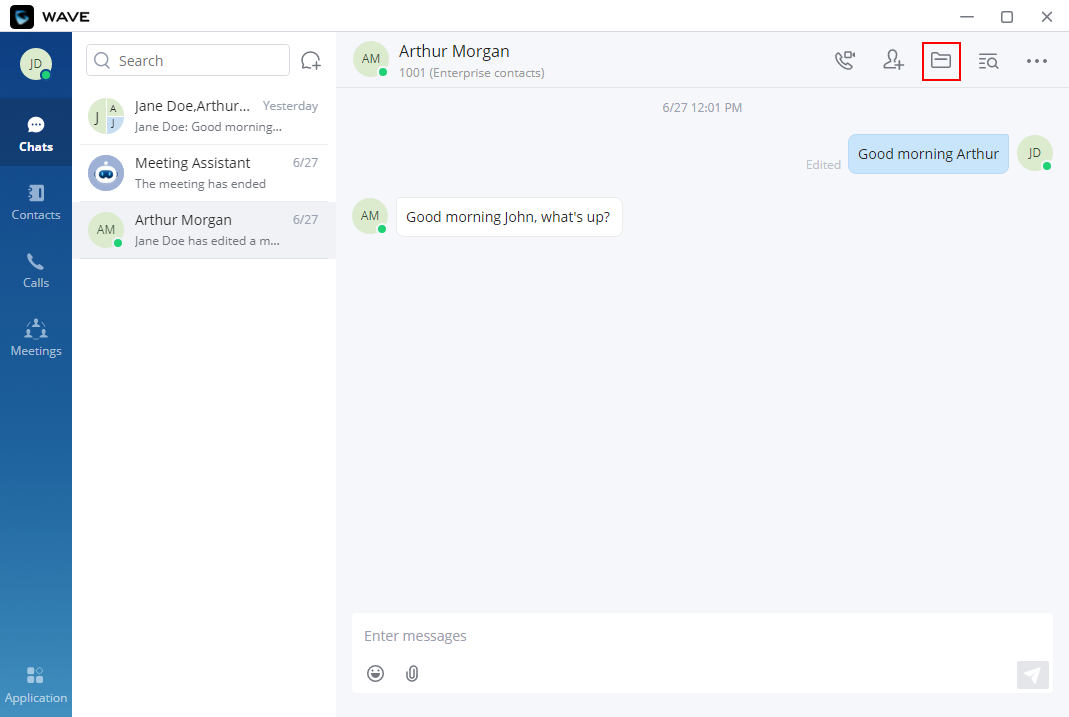
All the files that have been exchanged in a point-to-point chat or a group chat can be viewed in one list.
To access this list, the user needs to click on the folder icon ![]() in the top right-hand corner of the screen of the chat, then the list will appear as shown in the image below:
in the top right-hand corner of the screen of the chat, then the list will appear as shown in the image below:
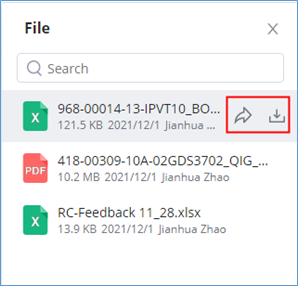
The files list will be displayed, and “Search” bar is available to quickly find the needed file.
Users can forward/download or open the files as shown in the screenshot below:
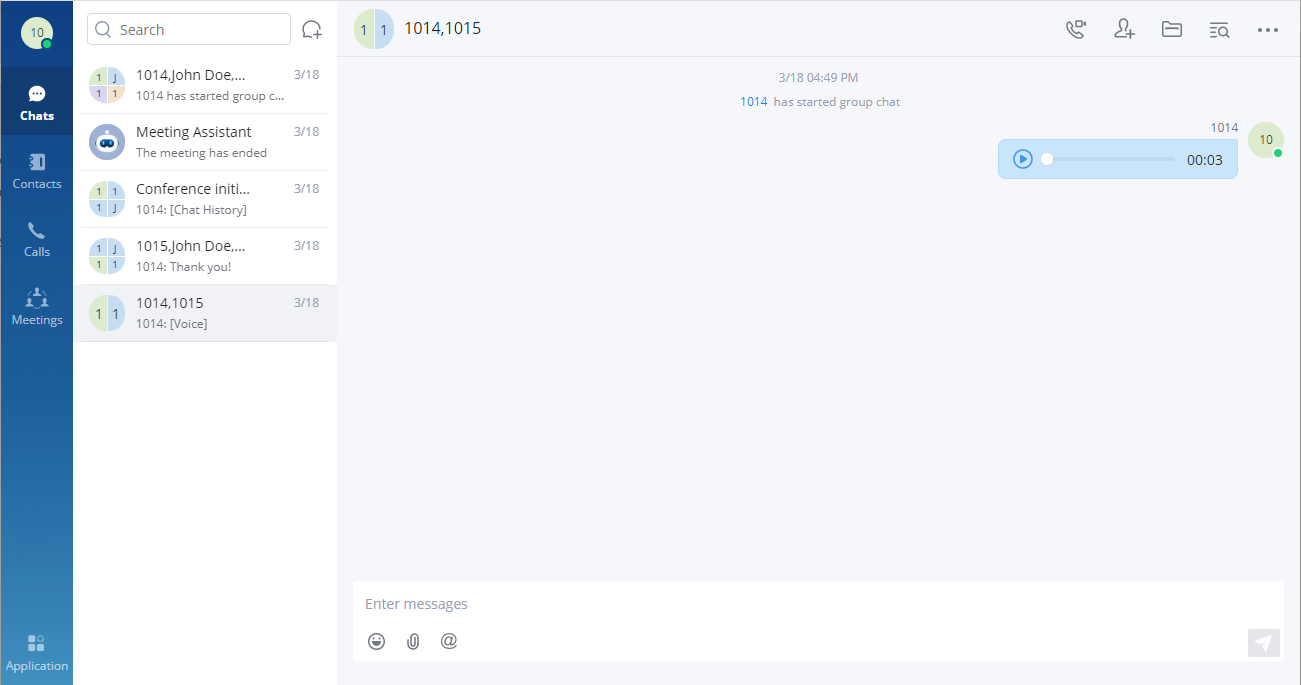
Audio Message
The users can receive voice messages from other users. Upon receiving a voice message, it will be shown on the chat window and can played by clicking on the play button. Please see the screenshot below:
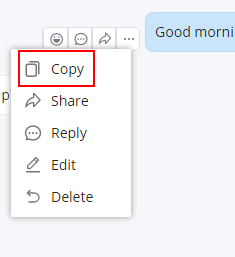
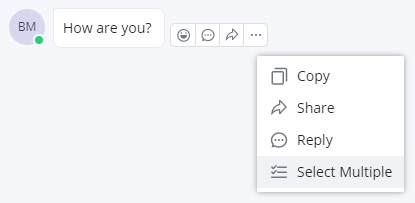
Copy Message
In the chat interface, select a message, with right-click select “Copy” to copy the content of the message. Currently files and pictures do not support copying.
Forward Message
Wave users can forward one or multiple messages using Share option to one or multiple recipients. These recipients can either be a single chat or a group chat.
Step 1: In the chat interface, select a message, with right-click select “Share”.
Step 2: The user can select the contacts/groups and forward the message to the contacts/groups. It supports to forward the message to multiple contacts/groups.
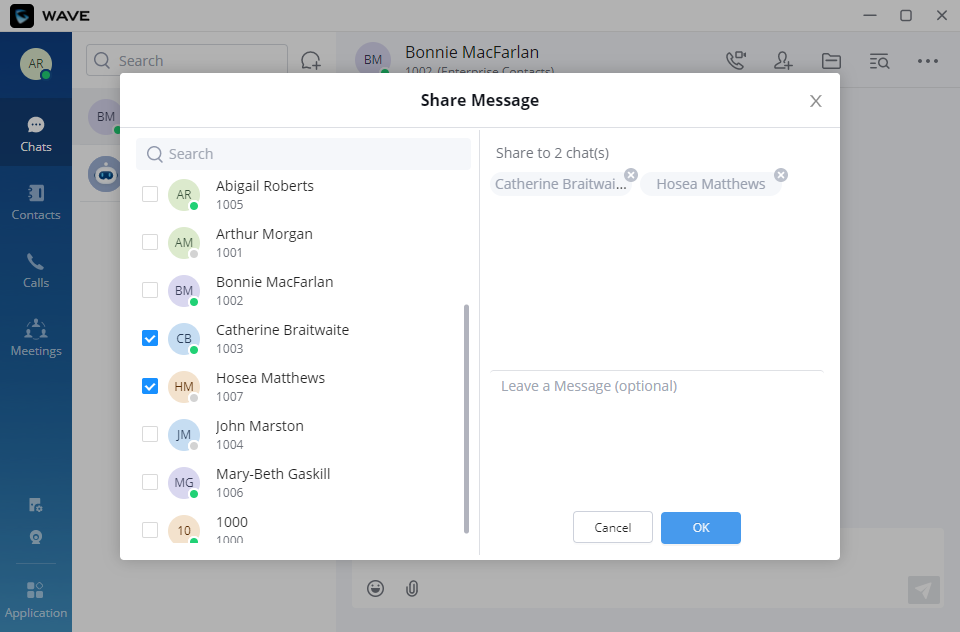
Step 3: (Optional) Write a message and click the “OK” button to forward the content of this message to the selected person or group.
To send multiple messages, please click on More then click select the messages that you want to forward.
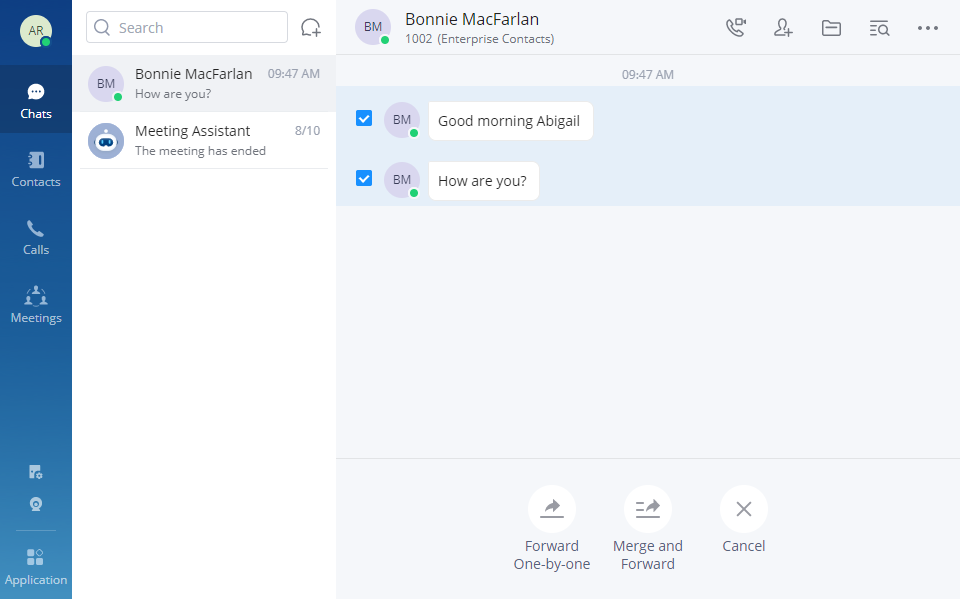
Use Forward One-by-One if you want the messages to be forwarded separately.
Use Merge and Forward to have the messages forwarded in one message.
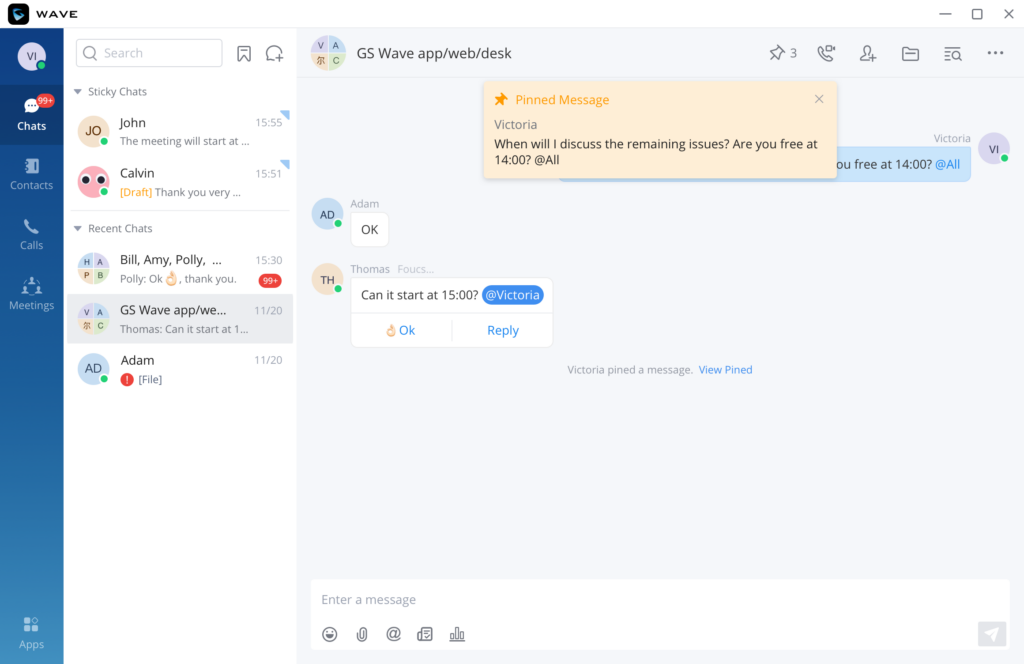
Pin Messages
The user can pin important messages in group chats, the pinned messages will be displayed separately on the top of the chat box so all the users can see the message or announcement when they open the chat window of the group. The user can select a message that has been resent to pin on the top of the conversation. If many messages have been pinned in the conversation, the user can click on the pin symbol to see all the messages which are pinned.
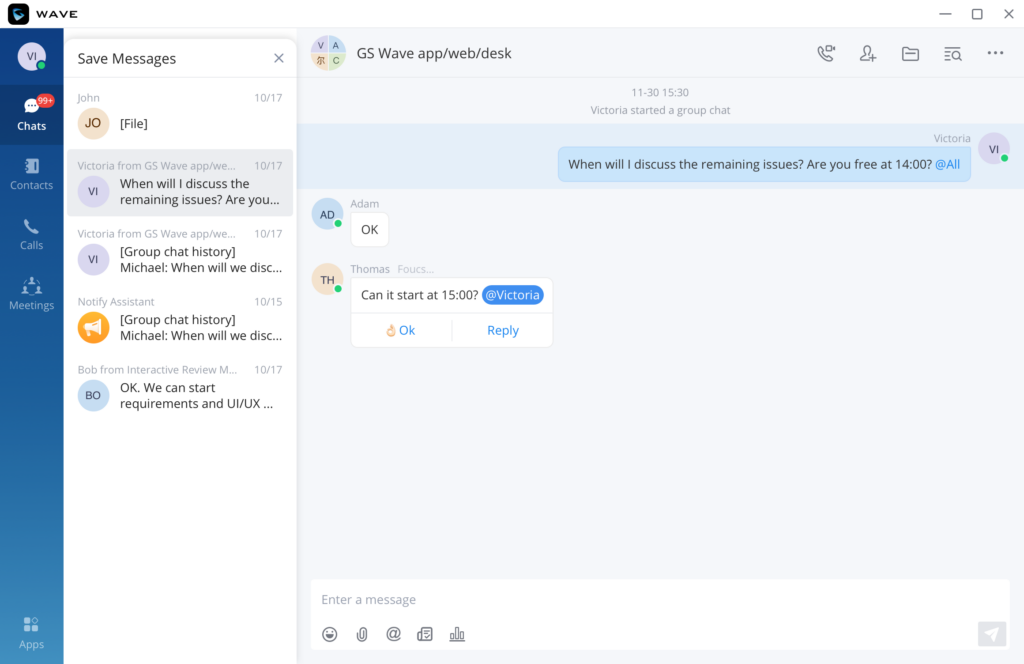
Save Messages
The user can save any messages in one-to-one conversations or group conversations. This allows the user to save important messages, to-do items, important files etc. which can be easily accessed to later.
View Unread Messages
In the “Chat” tab, users can view the latest unread messages. Tap to enter the chat interface to view new messages.
In addition, by clicking on the chat box of a person or a group, users can view the history of chatting.
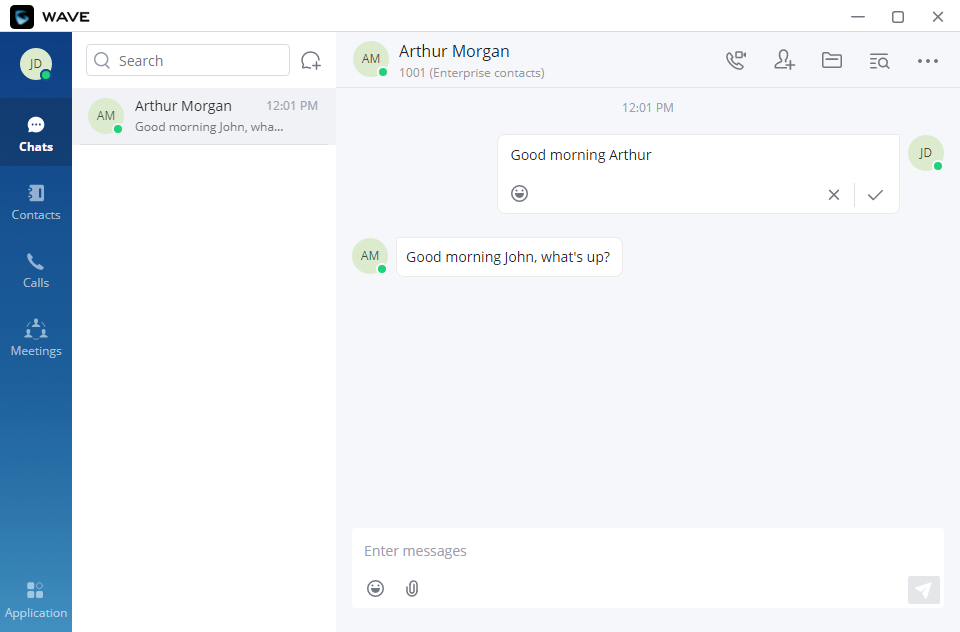
When a message is sent, Wave will indicate to the sender that the message has been successfully delivered to the contact. This is indicated by a small check mark right next to the latest message sent
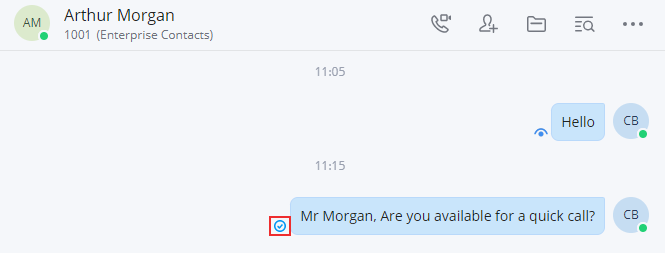
Once a user has opened an unread message, Wave will indicate to the sender that the message has been read by showing a small eye icon next to the latest message seen.

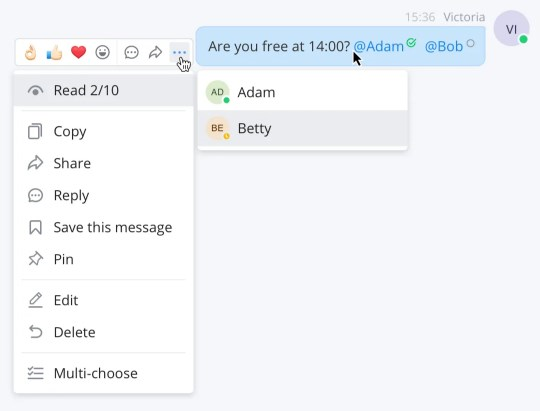
In a group chat, the user can check the parties who have seen the message by hovering the mouse cursor on the message, then click on the three dots to open the menu, then you can see the read count. If you hover the mouse cursor on the read count number, you can see who has read the message as displayed in the screenshot below.
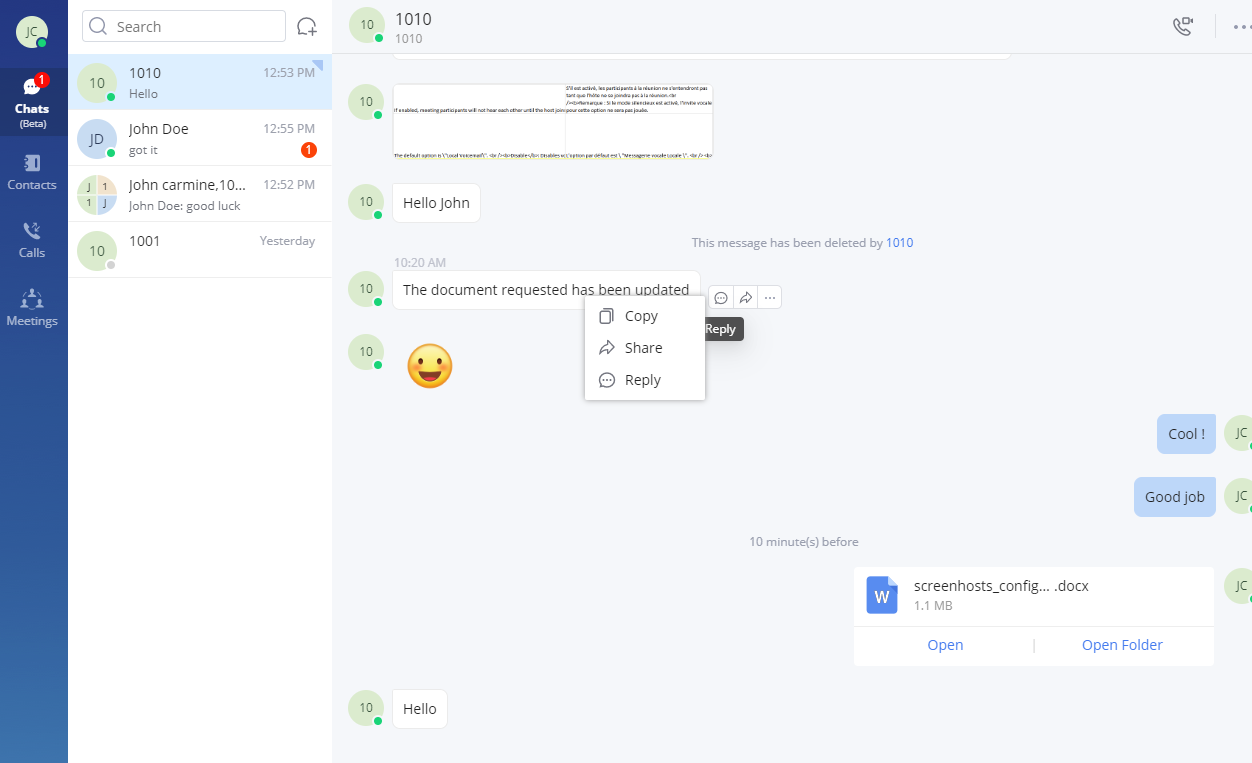
Quote to Reply Message
Step 1: In the chat interface, the user can select a message, right-click it and click “Reply” option or click the button ![]() next to the message.
next to the message.
Step 2: The user can reply to the message in the message box.
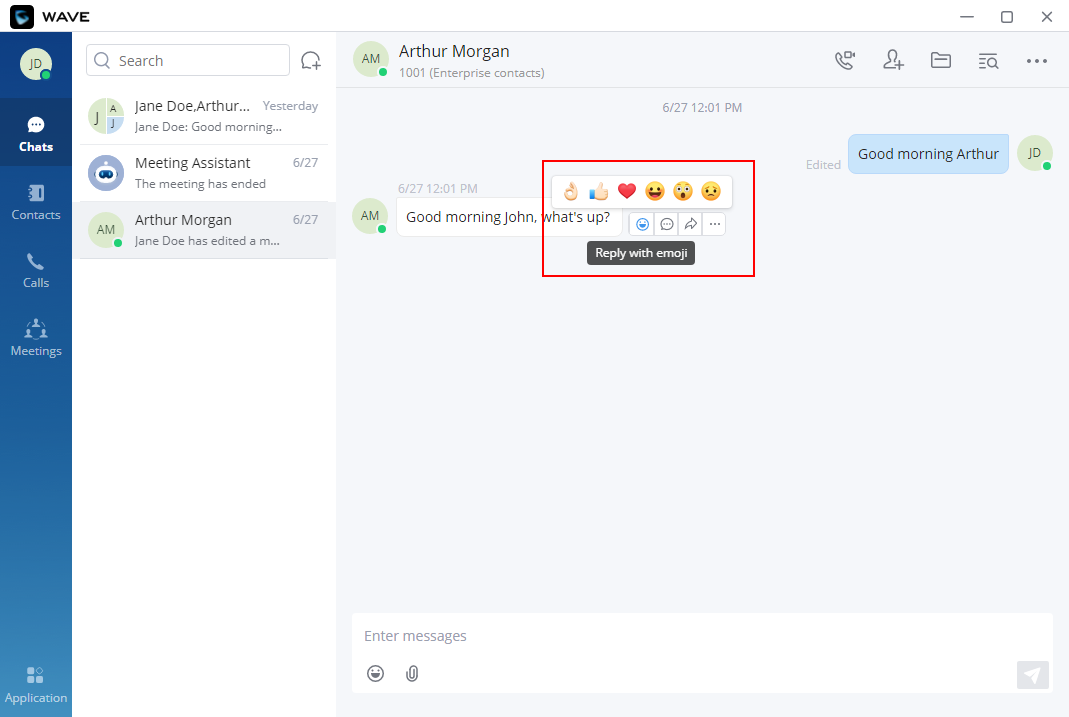
Reply with Emoji
- In the chat interface, users can reply to the sent/received messages in the single/group chat, files, and images with emojis.
- Click on
 option and select a specific emoji. The replied emoji and the emoji amount will be displayed under the corresponding message, as the screenshot shows below.
 - For the same message, each member can only reply with 1 single emoji. If the member replies to the message with another emoji again, the previous replied emoji will be replaced.
- If the member clicks the same emoji as the replied emoji again, the replied emoji will be canceled.
- If the user moves the mouse over the emoji, the user can view the member who replies to the message with the emoji.

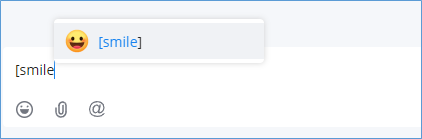
Reply Quickly With an Emoji Shortcut
Emojis will be displayed in the chat box for preview after you type their respective shortcuts, e.g: if you type [Smile] in the chat box, the emoji ![]() will be shown.
will be shown.
Edit the Sent Text
In the chat interface, users can edit the sent text and resend the edited message.
- In the chat interface, hover the cursor on the message to edit, a menu appear on which the user can click on the three dots button to open a drop down menu.
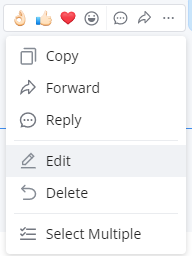
- Re-edit the contents in the input box.
Delete Message
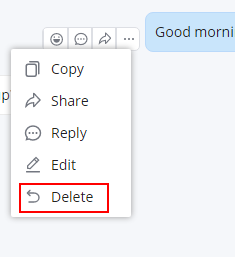
Step 1: In the chat interface, the user can select a message and right click it then click “Delete” button to delete the message.
Step 2: After deleting the message, the remote party will delete the message synchronously.
Step 3: The deleted text can be re-edited by the user.
Note: After deleting the message, it will be deleted permanently, and the message cannot be recovered.
When a message is sent, Wave will indicate to the sender that the message has been successfully delivered to the contact. This is indicated by a small check mark right next to the latest message sent
Once a user has opened an unread message, Wave will indicate to the sender that the message has been read by showing a small eye icon next to the latest message seen.
Create Poll/Survey
In the chat window in Wave, the users can create polls, in which they ask the recipient(s) to pick one option. Polls and surveys can be created in individual chats as well as group chats.
To create a poll, please follow the steps below:
- Navigate to the chat window in which you want to start a poll, then click on poll icon
 .
.

2. Enter the information regarding the poll, as shown in the figure below.
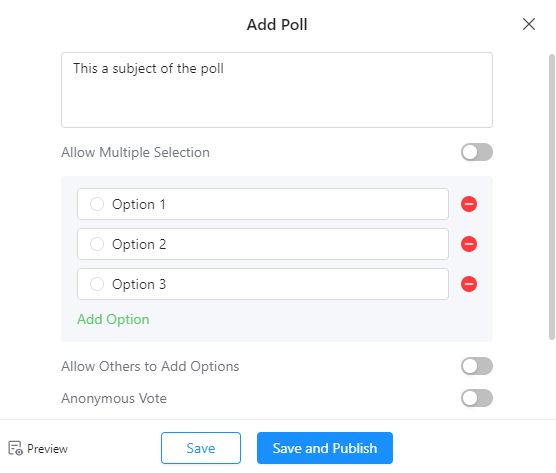
3. Click “Save” to save the poll as a draft. The recipient will not be able to see the poll.
If the poll is ready to be sent, then click “Save and Publish”. Then the poll will be displayed just like the figure below illustrates.
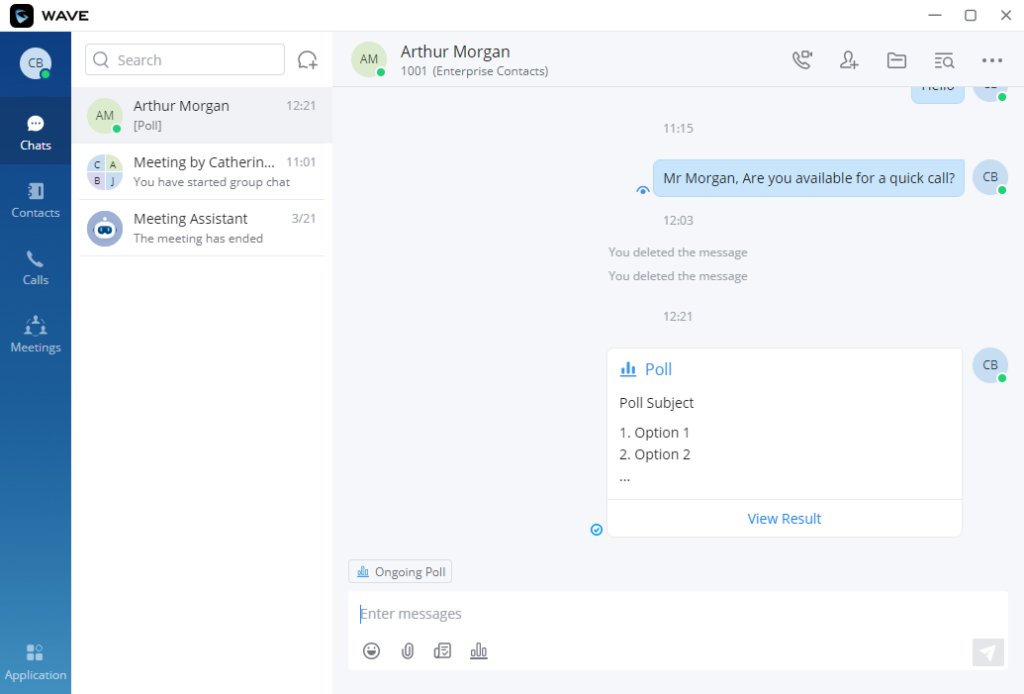
Please note that while the poll is ongoing, you can send it to multiple Wave users to cast their votes on the poll. To do that, please navigate to the chat window in which you want to send the poll, then click on the poll icon ![]() . From the list of the polls, select the poll you want to send.
. From the list of the polls, select the poll you want to send.
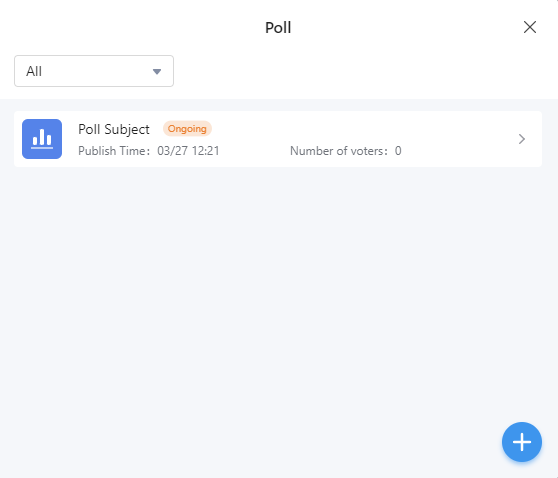
Click on the three dots to show more options, then click on “Send”.
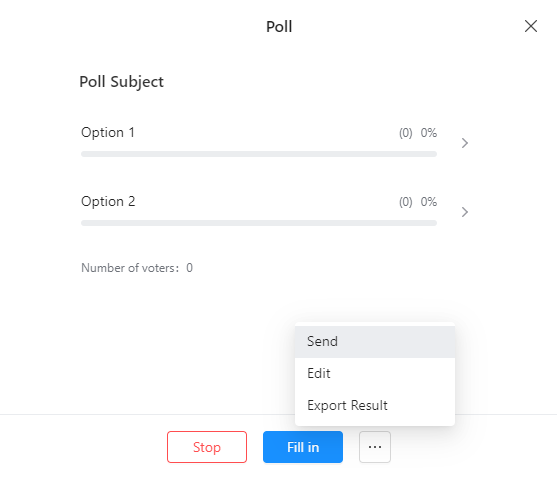
Once a poll has ended, the user can choose to publish it again, delete it, share the results with other chat parties, or export the results to a .xlsx file.
Wave supports creating surveys which allow the user to make a list of questions and send them to other users either in individual chats or in group chats.
To create a survey, please follow the steps below:
- On the chat window, click on survey icon .
- Then fill in the survey’s information accordingly.
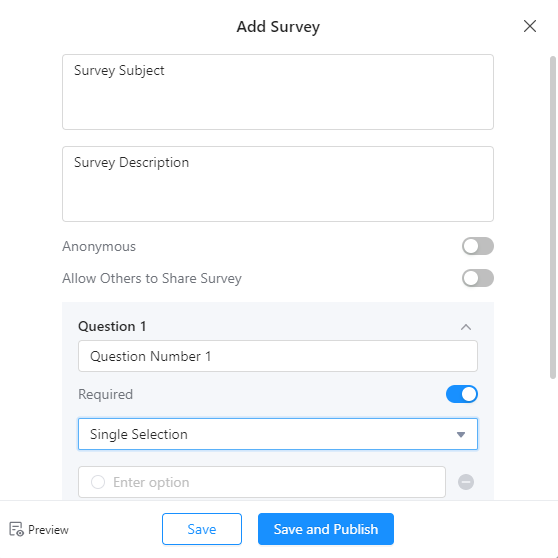
3. Specify the type of the answer that the user will provide.
– Single Selection: Enter the choices that users can choose from. The users will be able to pick only one option.
– Multiple Selection: Enter the choices that users can choose from. The users will be able able to pick multiple answers to the question.
– Text: The user will be able to provide the answer in the form of a text.
– Yes/No: The users will get the option to answer either Yes or No to the question.
Once the survey is ready to be published, the user can click on “Save and Publish” to send the survey. Just like polls, the surveys can be sent to other user to fill in.
Survey management includes: Add Survey, Publish Survey, Edit Survey, Delete Survey, View Survey Results, Share Survey Results, and Export Survey Results.
For a survey which is in progress, the user can end the survey or send the survey to others or other chat groups. For the ended survey, the user can re-publish the survey (the previous votes will be reserved, and the survey will be reopened for voting) or re-create the survey (the original survey options will be reserved, but the previous votes will not be reserved).
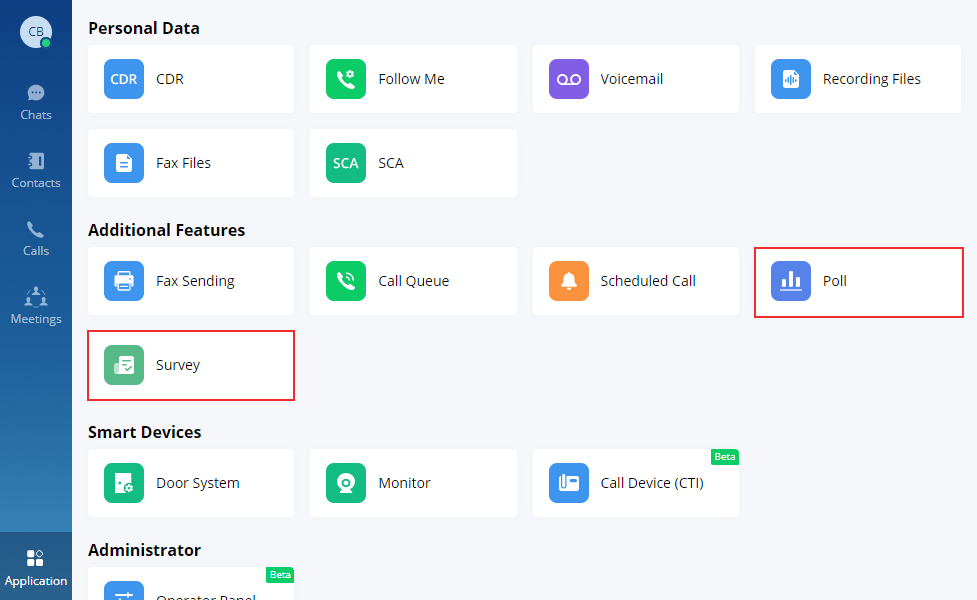
The user can view all the polls and surveys shared by navigating to “Application” tab, then clicking on Poll/Survey as the screenshot below indicates.
Keyword Search
Grandstream Wave allows searching for a specific keyword within a conversation so you can exactly recall the context and the information relayed by your team members. This can be used in group chat as well as point-to-point conversations. To search for a specific word, navigate to the discussion you wish to search. Then on the top right corner of the window, click the search button ![]() . After that type the keyword you wish to search, then press enter. If there are any results, they will be displayed similarly to this example below.
. After that type the keyword you wish to search, then press enter. If there are any results, they will be displayed similarly to this example below.
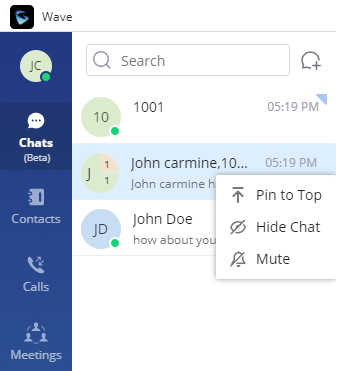
Pin Chat to the Top
In the chat list, the user can select a point-to-point chat or group chat and set the chat box to the top of the chat list. When the chat box has been set to the top of the chat list, the user can quickly find the chat box and reply to the message.
The user can also click the chat box and unpin the chat box.

Hide Chat Box
In the chat list, the user can select a point-to-point chat or group chat and click on Hide Chat. Then, the chat box will be hidden in the chat list.
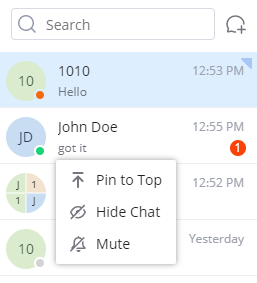
Mute Chat
If the user needs to mute the new message notification of a chat, they can select a point-to-point chat or group chat in the chat list and set it to “Mute”.
If the user wants to resume notification of new messages for the chat, the user can select the current chat box and cancel the DND setting by clicking on “Enable Message Reminder”.
Group Management
Change Group Name
Both the group owner and group members can change the group name. To do so, kindly follow below steps.
Step 1: On the chat page, open the group chat page and click on the upper right corner to view group information.

Step 2: By clicking on ![]() , users can modify the group name. The group name supports a maximum of 80 characters.
, users can modify the group name. The group name supports a maximum of 80 characters.
Step 3: After the modification is completed, click anywhere to save successfully.
Or You can directly click on the chat group name to edit it quickly, as shown in the screenshot down below:

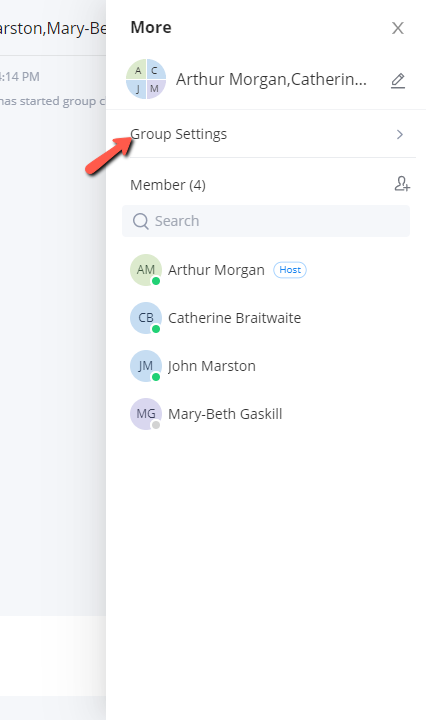
View Group Members
Both the group owner and group members can view the group members.
Step 1: On the chat page, open the group chat page and click on the three dots ![]() in the upper right corner to view group members.
in the upper right corner to view group members.
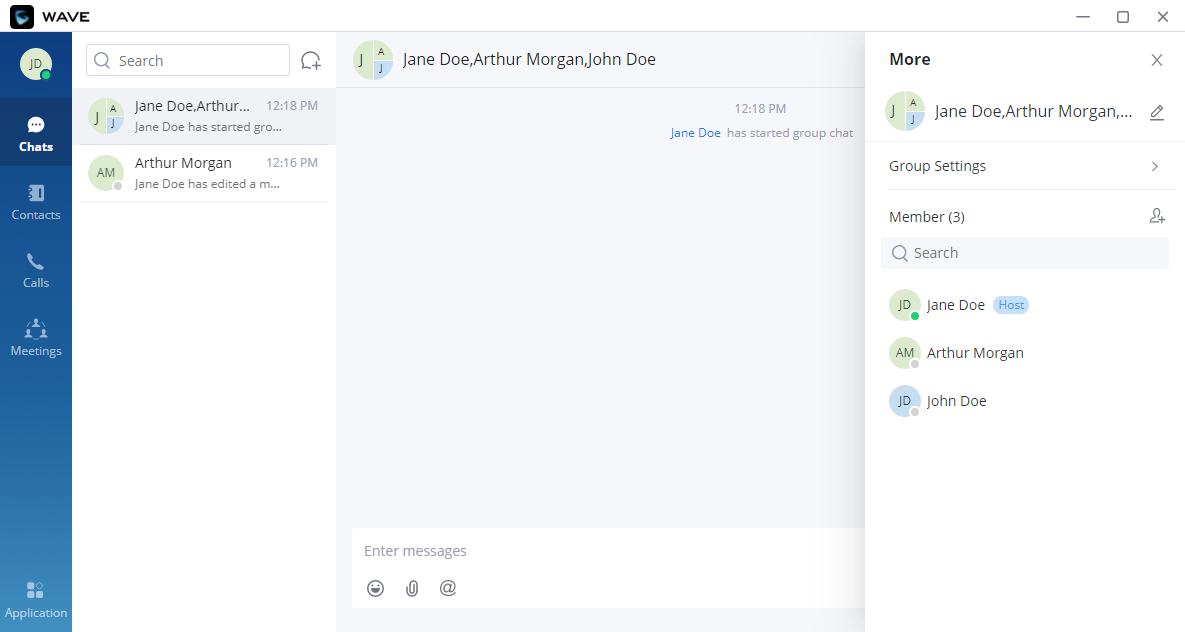
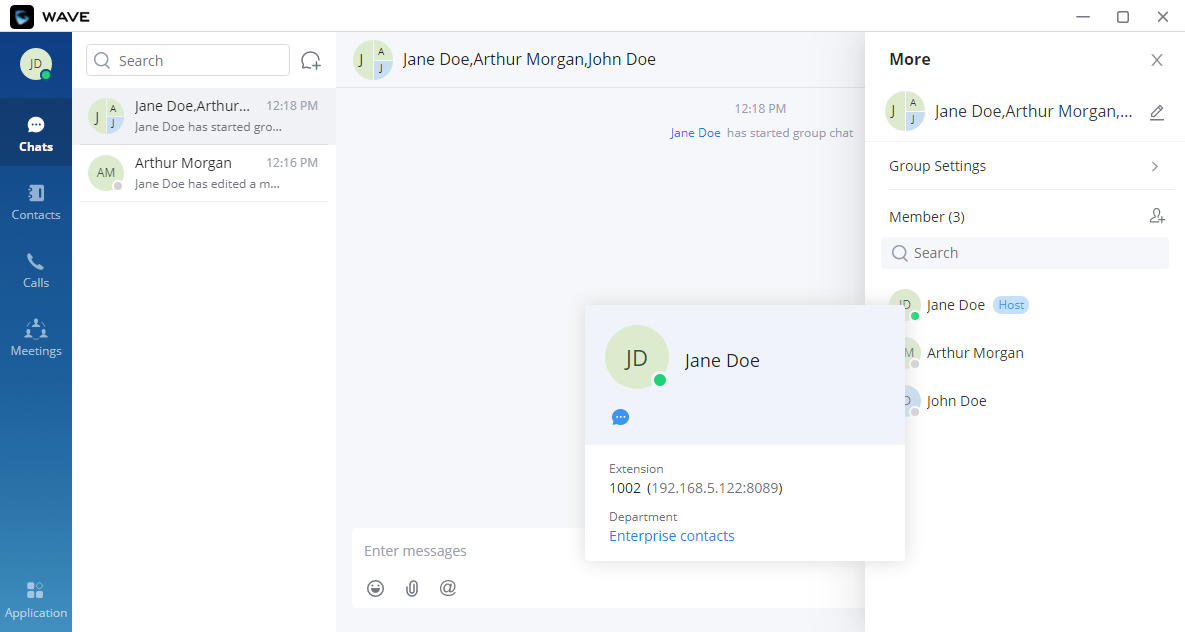
Step 2: Click on the avatar of the group member to view the detailed information of the member, send messages, and make calls.
Add Group Members
Both group owners and group members can add group members.
Step 1: On the chat page, open the group chat page and click on the upper right corner, then click on ![]() to enter the contact selection page.
to enter the contact selection page.
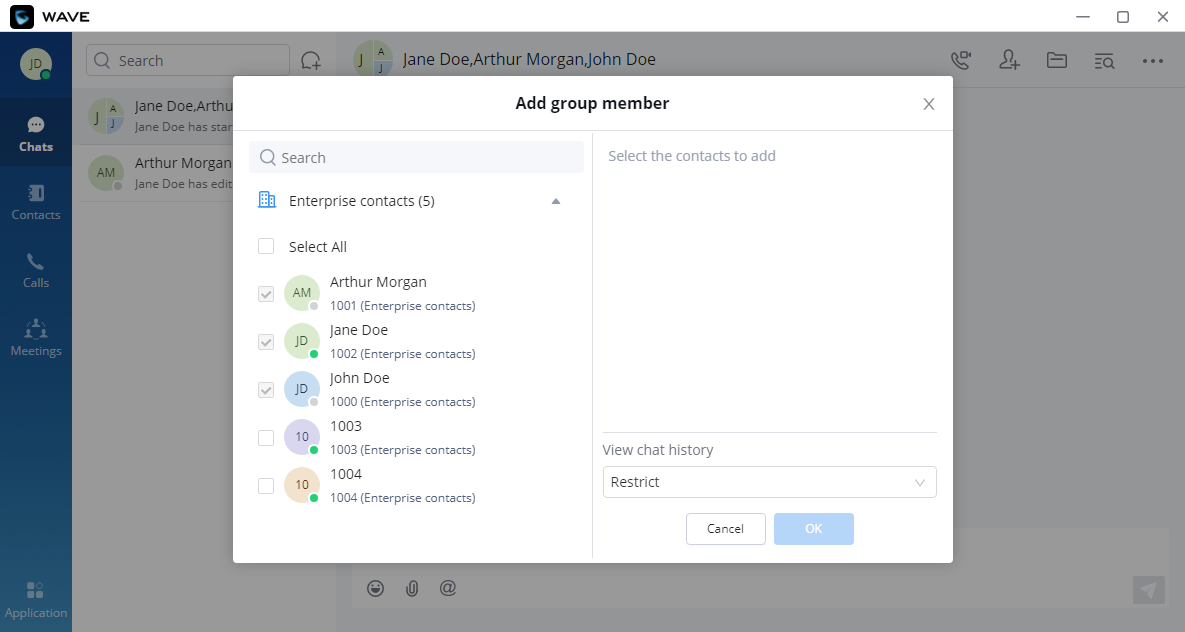
Step 2: Select the contact you want to add or search for a contact by name and select it.
Step 3: Click the “OK” button to immediately add the selected contact to the group chat.
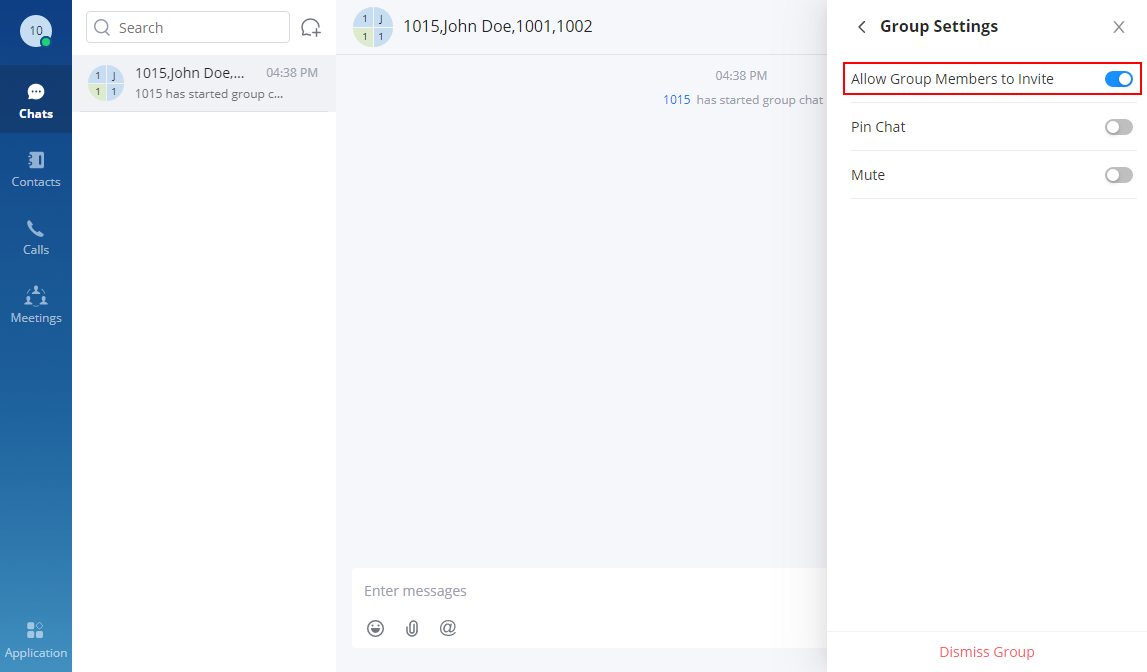
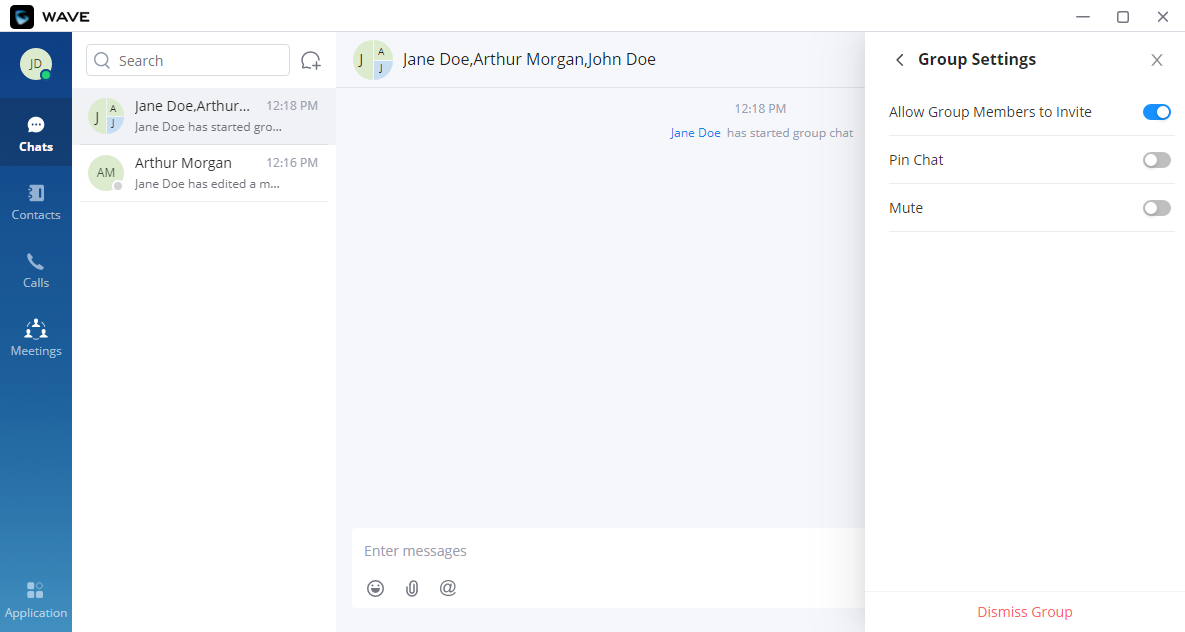
- Prevent or allow participants to invite other users:
The chat group creator can allow or prohibit the participants from adding other members. To do that, please navigate to “Group Settings” icon![]() then choose to toggle on or off the option ” Allow Group Members to Invite”.
then choose to toggle on or off the option ” Allow Group Members to Invite”.
Delete Group Members
Only the owner can delete group members.
Step 1: On the chat page, open the group chat page and click on the upper right corner, and hover over the profile picture of the member you want to delete.
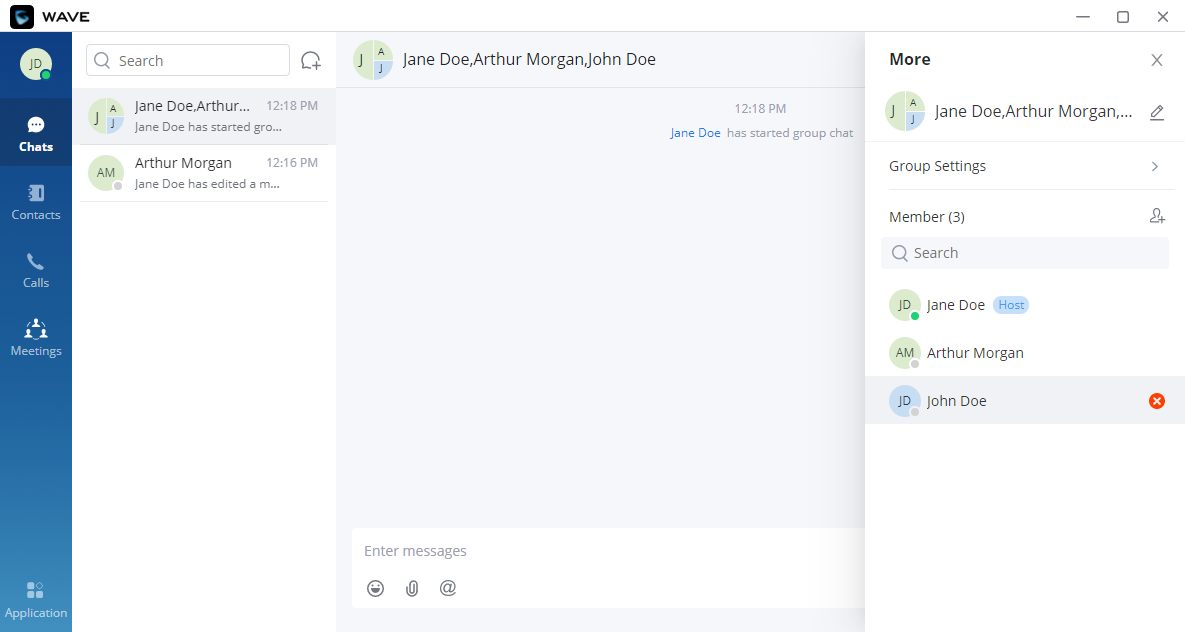
Step 2: Click on button ![]() next to the member to delete them from the group.
next to the member to delete them from the group.
Step 3: After confirming the deletion, this group member exits the group chat and can no longer view the group chat messages.
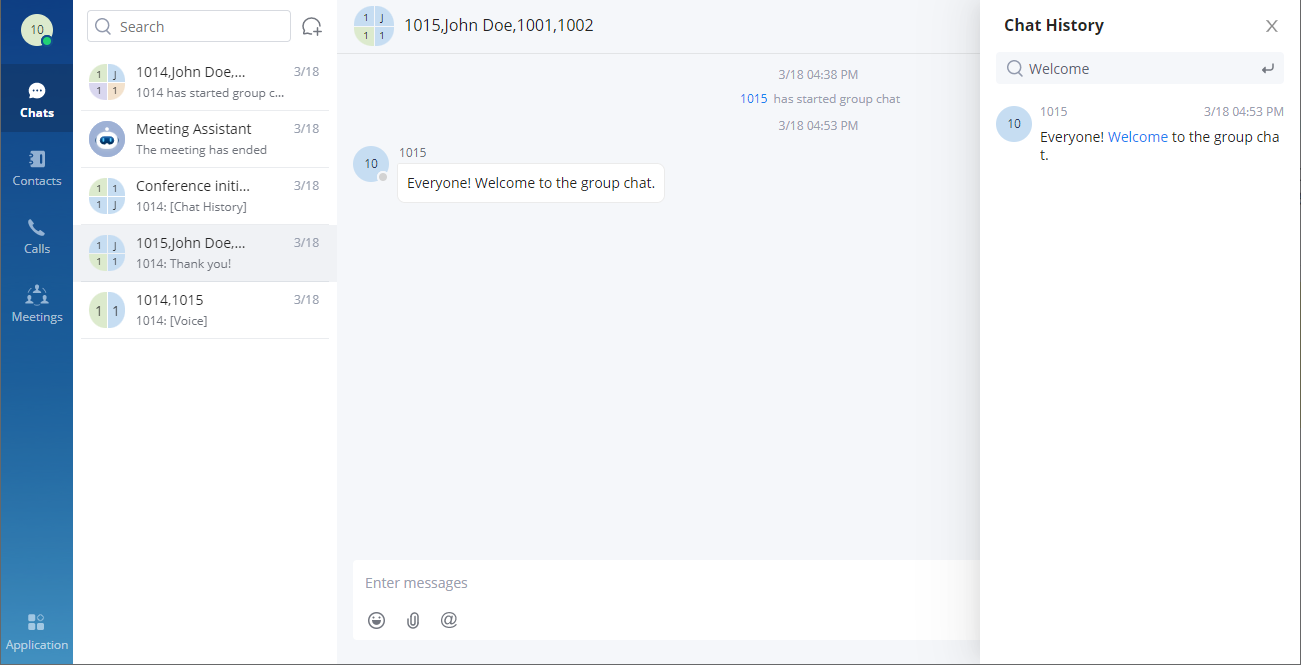
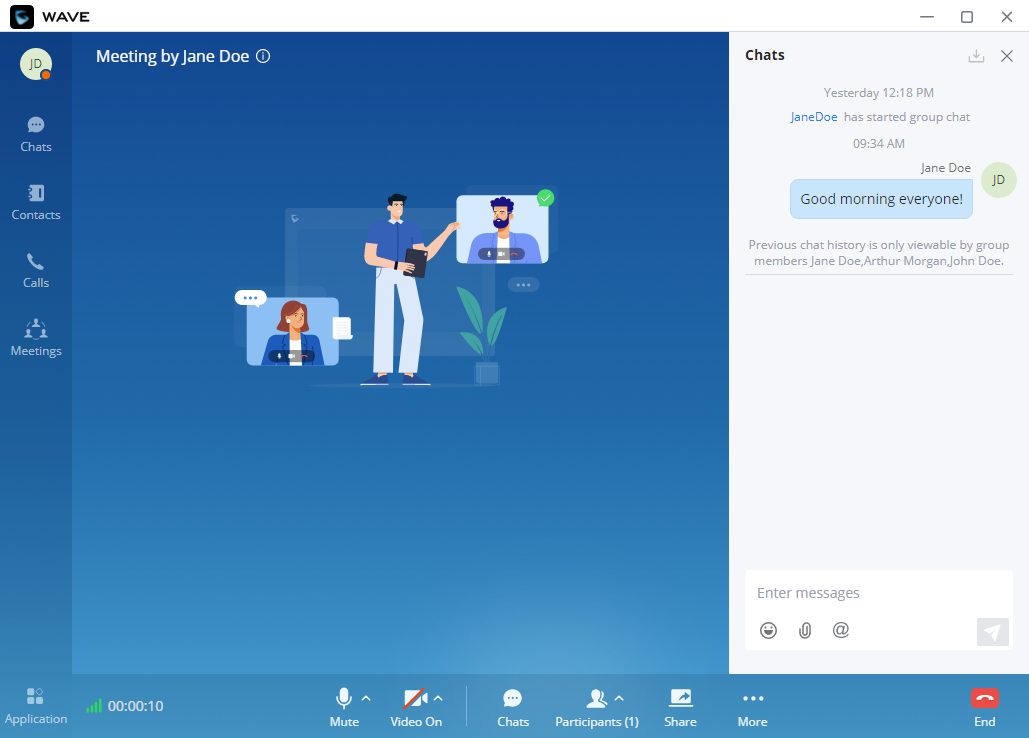
Start a Group Meeting
The user can quickly start a meeting with all the members of an existing chat group, please see the figure below.
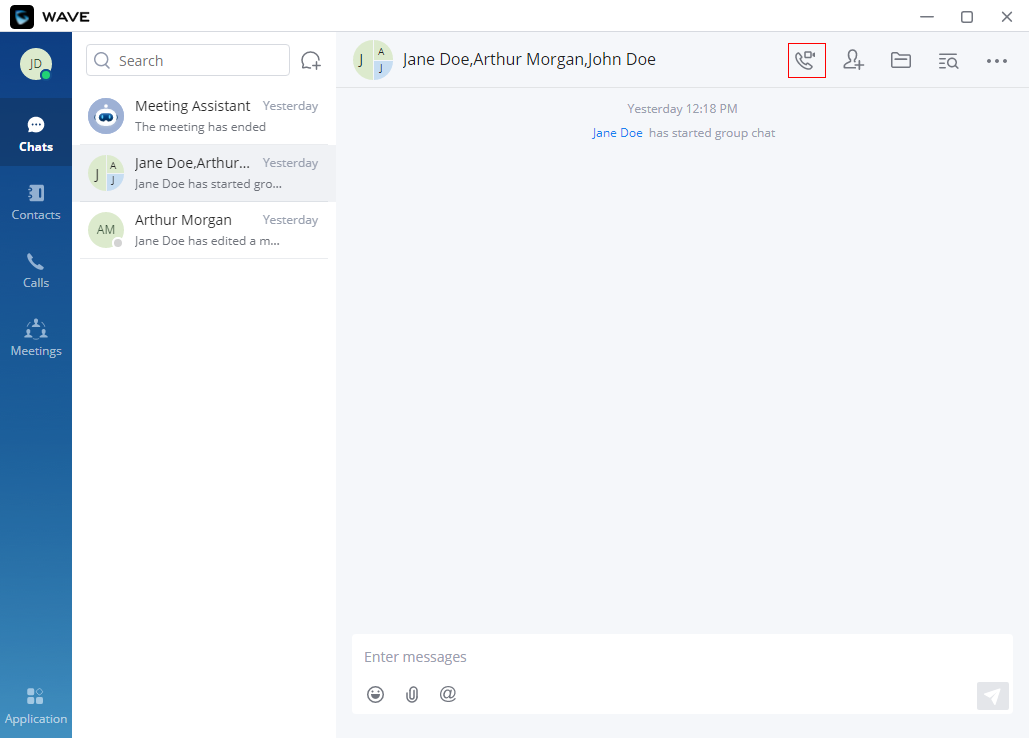
The chat history will be carried over to the meeting’s chat, as the figure below shows. But any chat that has been exchanged during the meeting won’t be synchronized to the chat group.
Exit Group
Only group members can leave the group.
Step 1: On the chat page, open the group chat page and click on the upper right corner, then click “Leave Group Chat” at the bottom.
Step 2: After confirming to log out, you will no longer accept new messages from this group and cannot view the group history messages.
Dismiss Group
Only the group owner can dismiss the group.
Step 1: In the chat interface, the user can open group chat interface and click the button on the right upper corner ![]() , then click “Group Settings” option at the bottom of the interface to dismiss the group.
, then click “Group Settings” option at the bottom of the interface to dismiss the group.
Step 2: After dismissing the group, all members of the group will be removed, and the group chat history cannot be viewed.
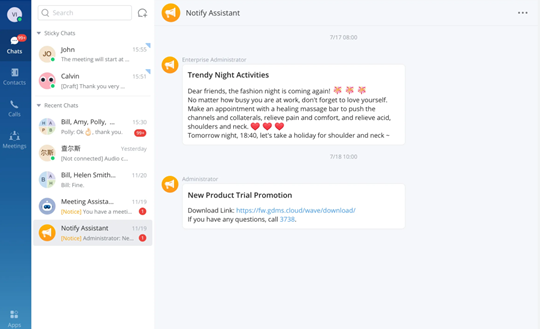
Notification Assistant
The administrator of your UCM can log in the Web UI of the UCM -> Messaging -> Message Broadcast to publish a broadcast message to all extension users, and Wave users can receive this message and display through the Notification Assistant. You can set the desktop notification and sound notification in Settings.
Contact Local Time
When opening the chat box of a specific contact, Wave will show the contacts local time. This helps with knowing what time it is for a contact when the contact is located in a different time zone. This saves the user time of converting between time zones.

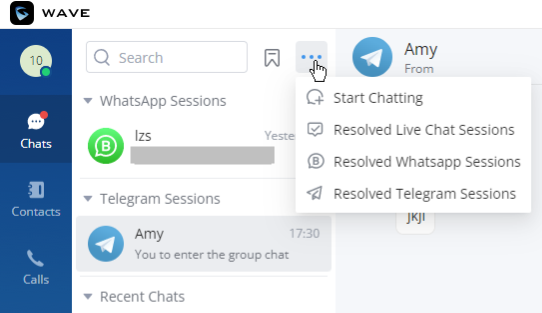
Whatsapp and Telegram Sessions
When Whatsapp Business/Telegram add-ins are configured, the user can directly respond to the messages initiated on the aforementioned platforms directly from Wave. When a session is marked as resolved, the user can view them by clicking on the three dots menu on Wave desktop client and choose the corresponding sessions as shown in the screenshot below.
MEETINGS
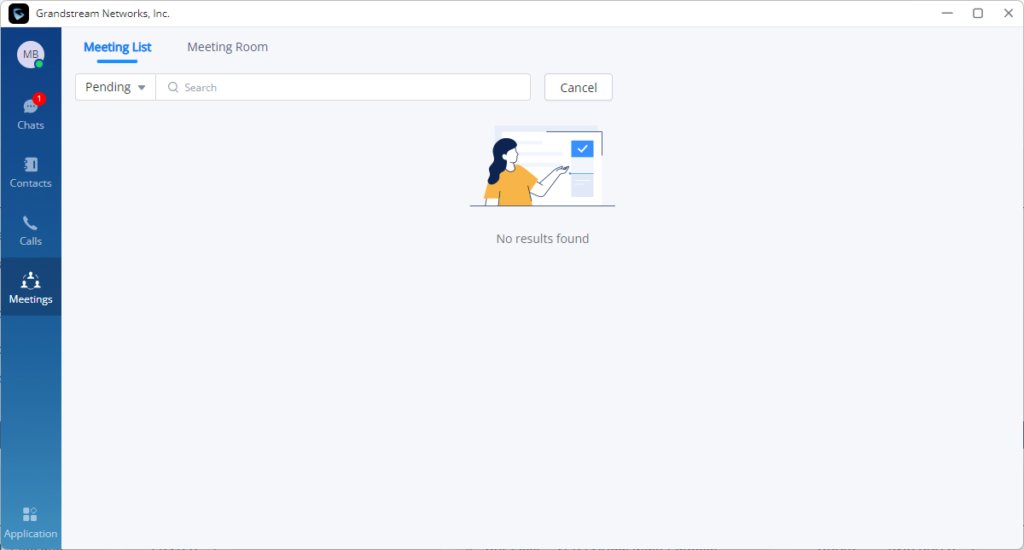
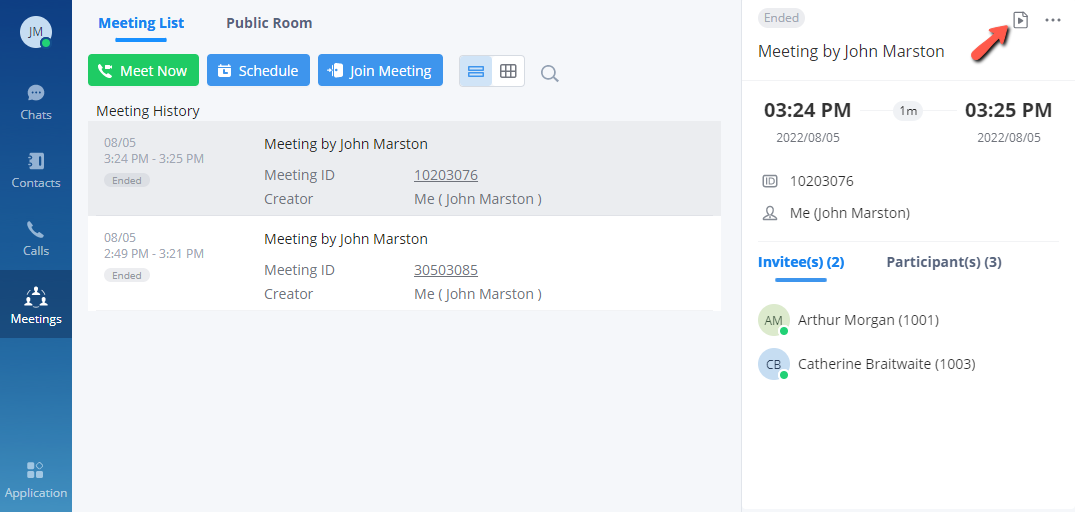
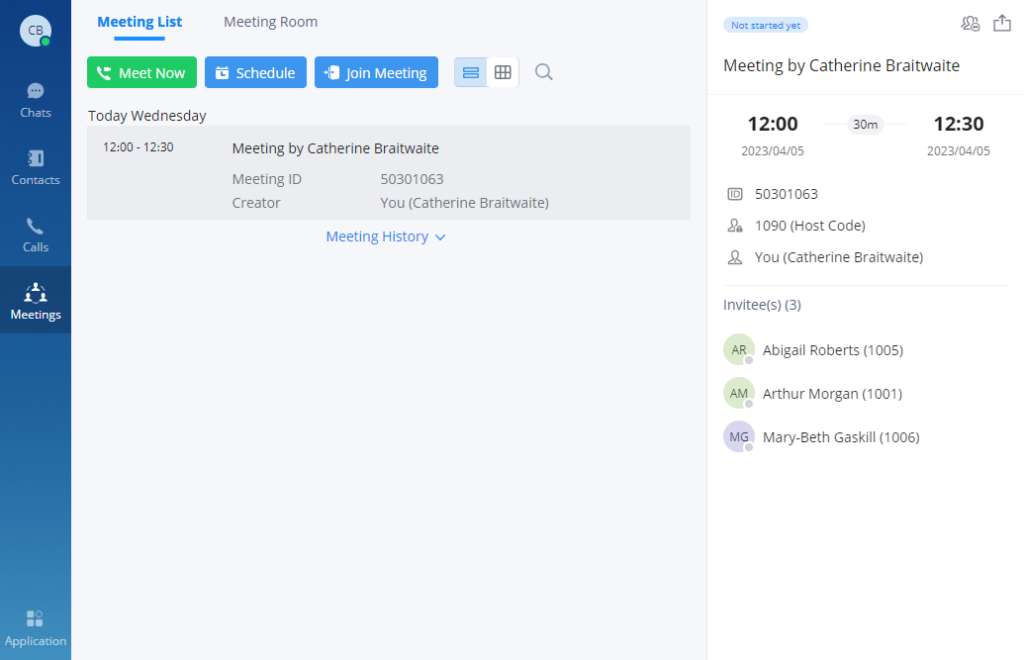
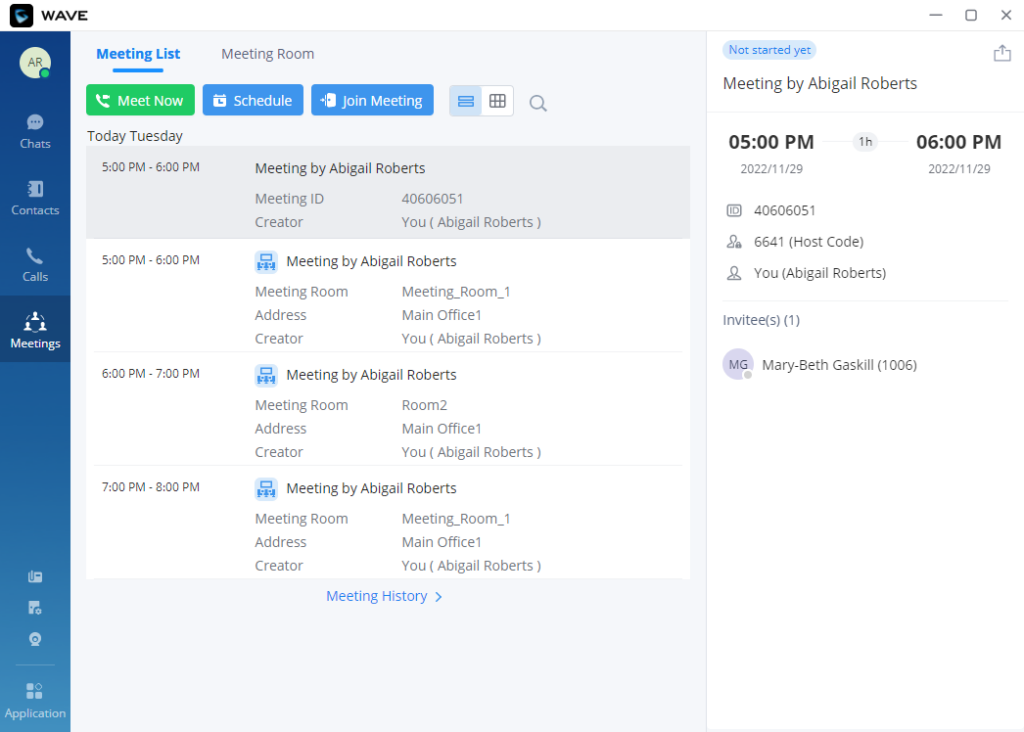
Meeting List
Users can join an audio or video meeting on UCM by dialing the room number. After logging in Wave desktop, click on “Meetings” on the left panel to open meeting page.
Users can view all meeting history in Wave application, and it will show the actual duration of the previous meetings, as well as the participants list of the previous meetings.
Users can search for the recent 6 months meeting history. The period will be counted by natural month.
Users can create meeting to start now by selecting ![]() , or schedule meeting by clicking on
, or schedule meeting by clicking on ![]() on the top of this page.
on the top of this page.

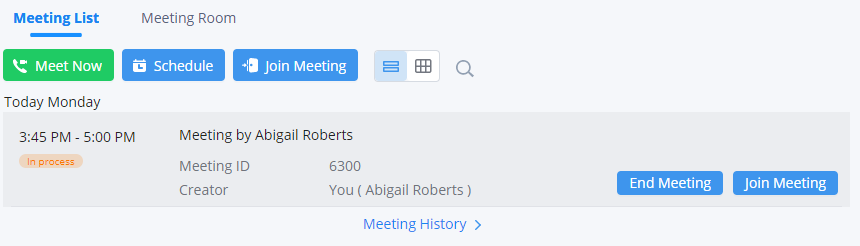
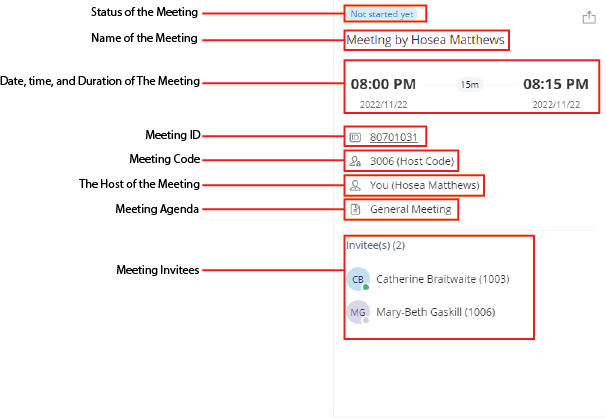
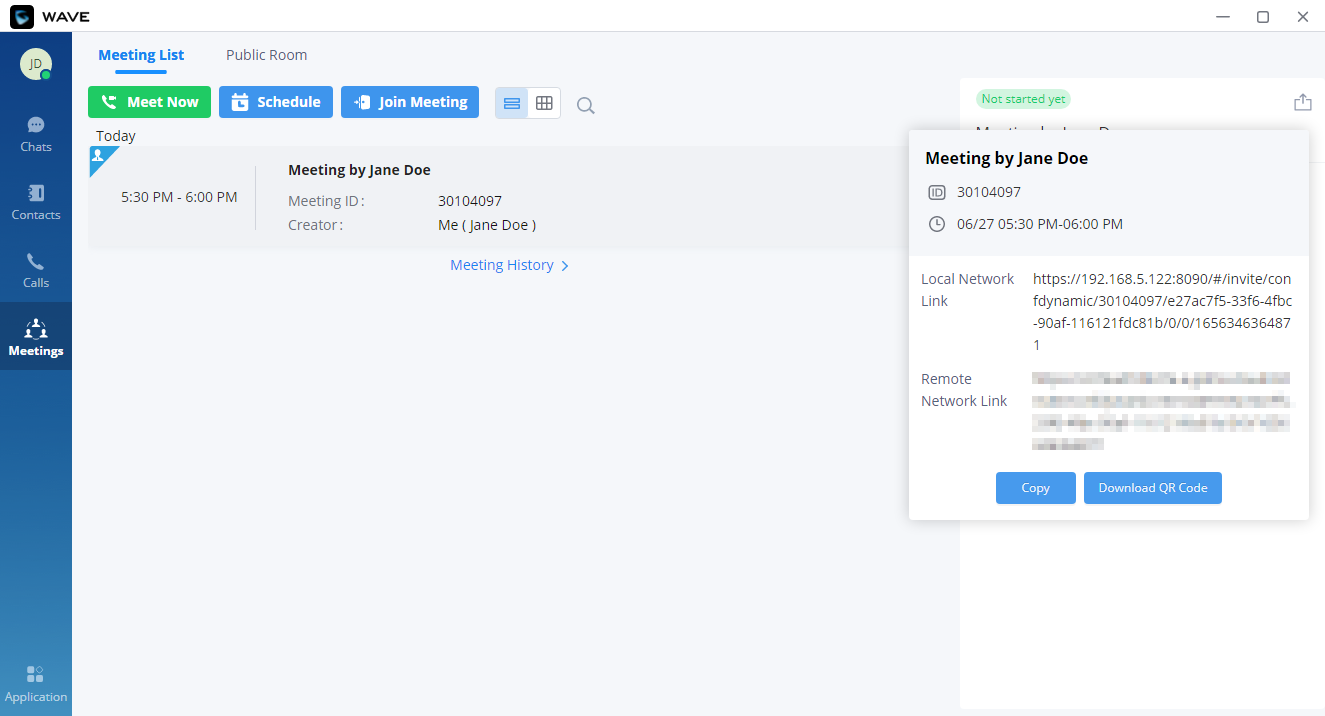
Once the meeting has been scheduled, the user can view the details related to the meeting in the side bar. The details which are displayed are:
- The status of the meeting: This shows if the meeting has started or not yet.
Users can view scheduled Meetings by selecting “Daily”, “Weekly”, “Monthly” and defining the date range. Click on ![]() to search meeting by meeting subject, creator, meeting room number.
to search meeting by meeting subject, creator, meeting room number.
Meet Now
On the top of meeting page, click on ![]() .
.
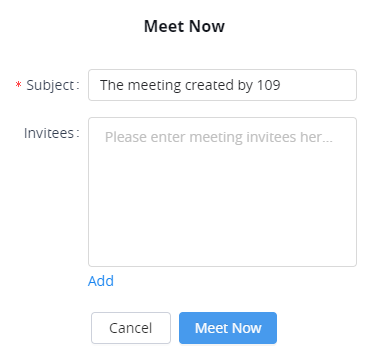
Step 1: The user needs to enter a meeting subject.
Step 2: The user needs to enter the invitee’s number or email address or click the “Add” button to invite the participants from the contacts or group.
Step 3: The user can click “Meet Now” button to start an instant video meeting immediately and invite participants to join the meeting.
- Merge separate calls into one meeting
The user can start a meeting when he/she has received calls from multiple parties. The user can quickly merge all the active lines into one meeting.
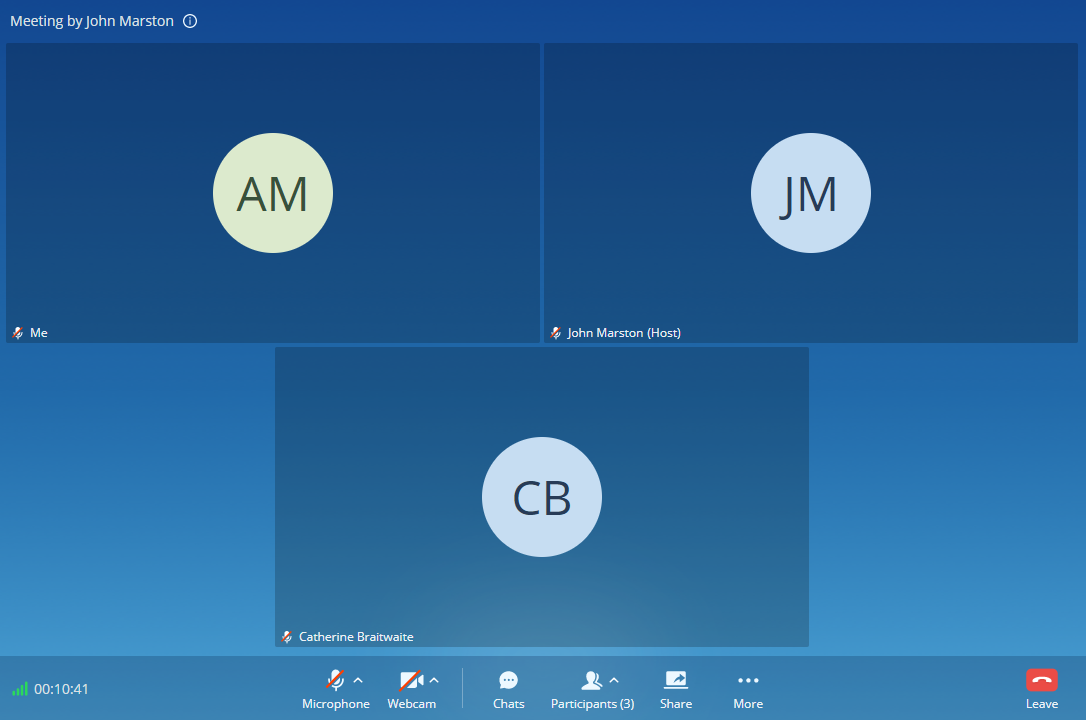
Multimedia Meeting
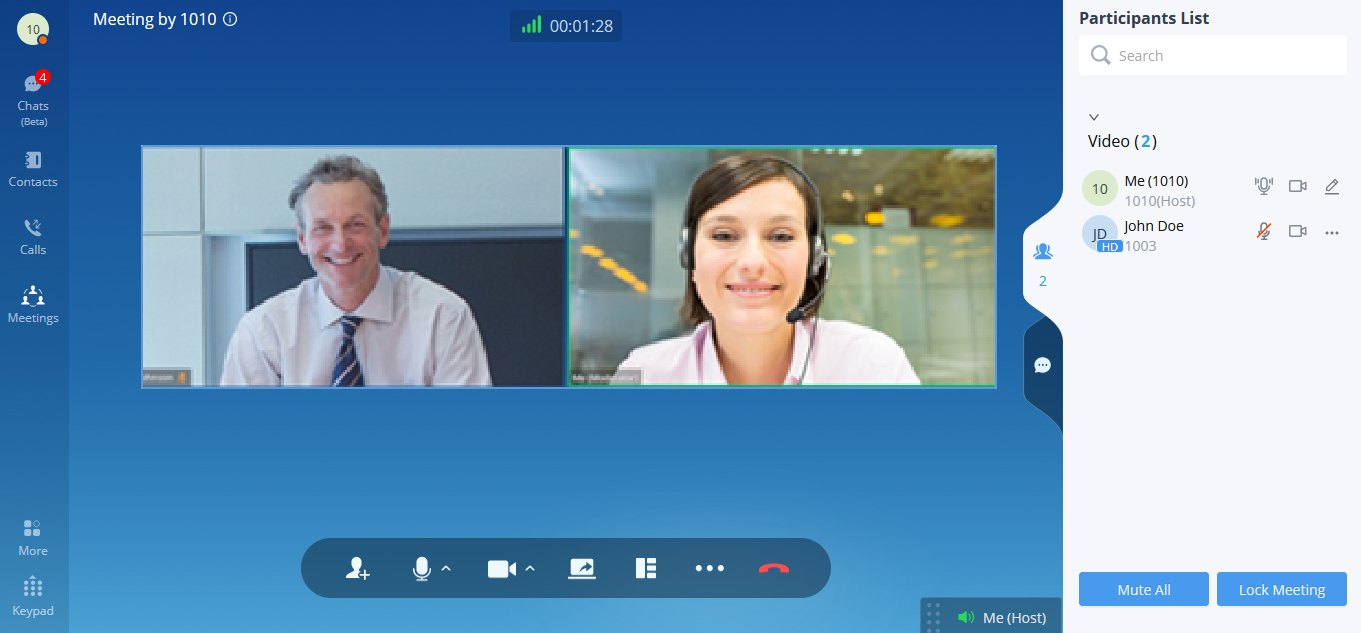
Users can click “Video on” or “Video off” option during the conference to switch between video/audio conference. Below is the picture showing the call interface after joining video conference room.

Below are the available meeting control options:
 : View network condition status such as packet loss for video and audio.
 : Invite participants. If the UCM admin has enabled “Allow User Invite” for the meeting room, any participant in the meeting can invite other participants. Otherwise, only the moderator can invite other participants.
- : Mute/unmute. Users can click the “More” button to enter the alternative ringing speaker settings interface. When a participant is muted, either by his/her own self or by the host. The participant can activate the microphone by pressing and holding the space bar. The microphone will be activated in as long as the participant is holding the space bar and the will be disabled once the participant let go of the space bar.
 : Video on/off. Click to enable/disable the local video feed. Users can click the “More” button to enter the virtual background settings interface.
- : Screen sharing. Click to start screen sharing. Only one participant can share screen at a time. If a participant already shares the screen, this icon will be grey and other participants cannot click on this icon to share.
- : More options. The user can click this button to open the DTMF soft keyboard and display the chat bubble function.
- : End call.
 : View participant list. Click to open the participant list. The user can view participants’ mute/unmute status, search for a participant, modify display name, chat with participants, etc.
 : Chat. Click to open the chat window and enter chat text.
- : Raise hand to request to talk.
To become meeting host:
- Host Meeting: If there is no meeting host in the meeting, the user can click “More” button and select “Host Meeting” option to become the meeting host.
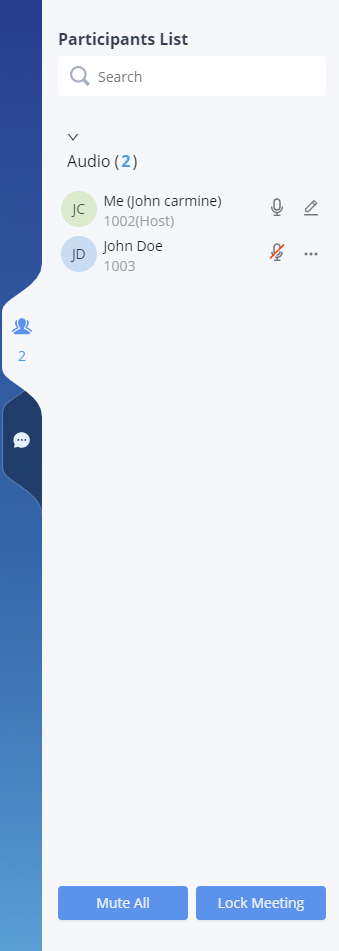
- Manage participants:
Click on icon ![]() on the right-side menu to open participant list. The moderator can mute/unmute participants, turn on / off video for participants, transfer moderator to another participant, remove participant from meeting and etc. The moderator can also mute all participants and lock the meeting room (no one can join the meeting room).
on the right-side menu to open participant list. The moderator can mute/unmute participants, turn on / off video for participants, transfer moderator to another participant, remove participant from meeting and etc. The moderator can also mute all participants and lock the meeting room (no one can join the meeting room).
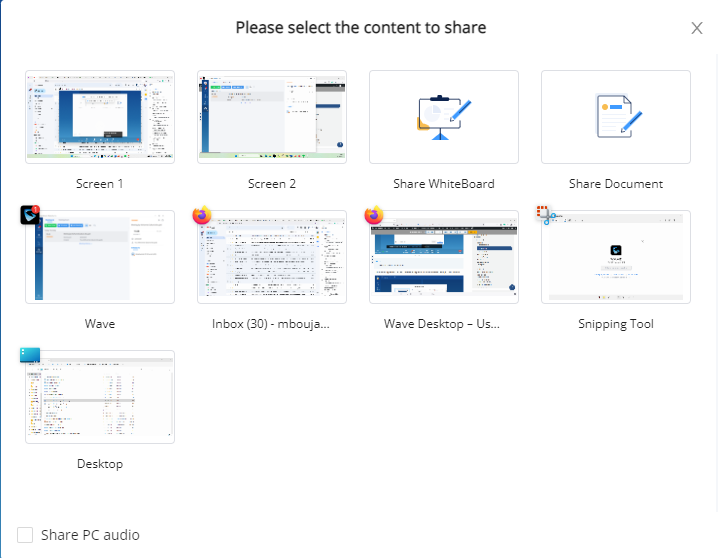
Content Sharing
During point-to-point video calls or video meetings, users can share screen to present to all the other participants.
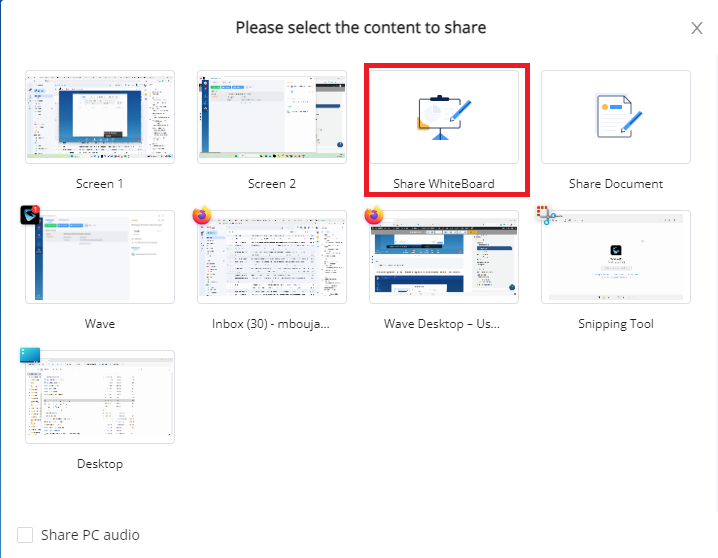
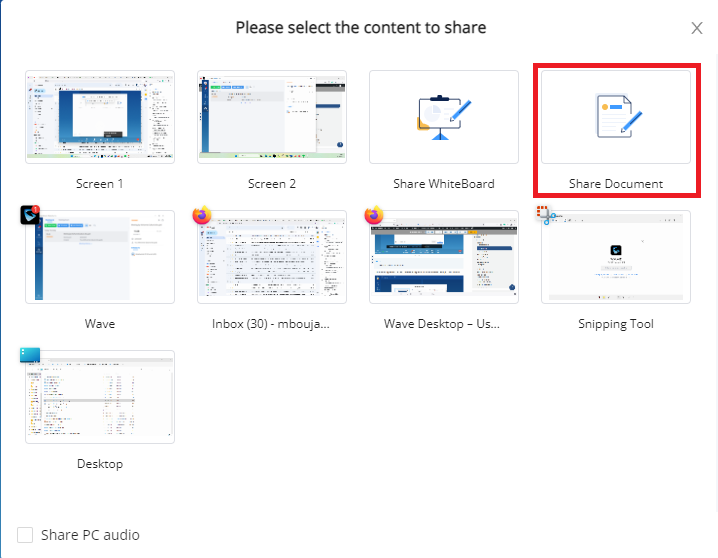
After the users click on the icon ![]() , a prompt will appear with the sharing options:
, a prompt will appear with the sharing options:
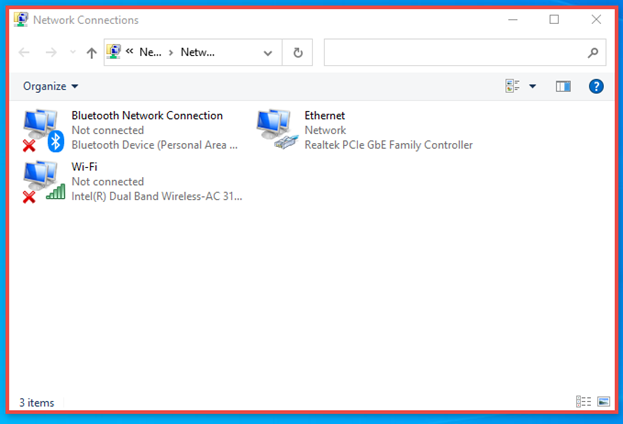
- “Screen #”: To share the entire screen
- “Web Browser”: To share the web browser content only
- “Application”: To share a specific application content only.
- “Share WhiteBoard”: To share the WhiteBoard (Supported in meetings only)
- “Share Document”: To share a PDF file (Supported in meetings only)
Share Screen
Select “Share Screen”.
During screen sharing, the users can double click on the sharing screen or video screen to enlarge the display area to full screen.
During screen sharing, the shared screen/window will have a red frame to distinguish the shared content.
The user can use the sketching tools to draw annotations on the screen.
Share WhiteBoard
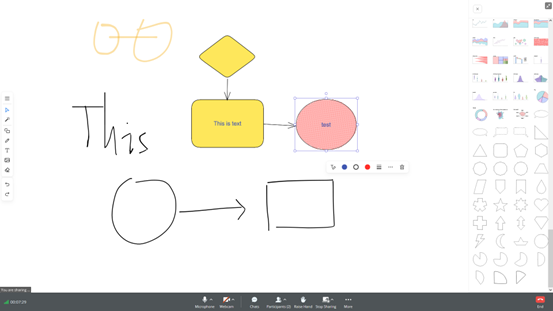
The user can click on the icon ![]() , and select “Share WhiteBoard”.
, and select “Share WhiteBoard”.
The shared whiteboard contains complete features including laser pointer, highlighter, input texts, graphics, flow charts, charts and other more graphics and styles. You can drag graphics, and edit graphics for multiple times. The real-time drawing feature is very simple and fast for users.
![]() : Click to view more options (only the sharer has the permission) including: Enable/Disable Collaboration function (After enabling this function, other participants can draw at the same time), change the Canvas Color, Empty Canvas, Open File (the whiteboard data picture which was previously saved), Save as Picture, etc.
: Click to view more options (only the sharer has the permission) including: Enable/Disable Collaboration function (After enabling this function, other participants can draw at the same time), change the Canvas Color, Empty Canvas, Open File (the whiteboard data picture which was previously saved), Save as Picture, etc.
![]() : This is the mouse option. After you select this option, the whiteboard brush becomes the mouse. You can select any figure on the whiteboard, drag the figure or change the style of the figure. You can press and hold the blank space to move the whiteboard.
: This is the mouse option. After you select this option, the whiteboard brush becomes the mouse. You can select any figure on the whiteboard, drag the figure or change the style of the figure. You can press and hold the blank space to move the whiteboard.
![]() : This is the laser pointer option and only the sharer has this option. It displays the drawn track and will disappear in 3 seconds.
: This is the laser pointer option and only the sharer has this option. It displays the drawn track and will disappear in 3 seconds.
![]() : This is the graphics option. It only displays the basic graphics by default. You can click “All Graphics” option to expand the menu and see more graphics, including more basic graphics, flow charts, charts, UCM charts, Google charts, etc. You can also double click the graphic to add text.
: This is the graphics option. It only displays the basic graphics by default. You can click “All Graphics” option to expand the menu and see more graphics, including more basic graphics, flow charts, charts, UCM charts, Google charts, etc. You can also double click the graphic to add text.
![]() : This is the brush option. There are two types brush “Common Brush” and “Highlighter”.
: This is the brush option. There are two types brush “Common Brush” and “Highlighter”.
![]() : This is the text box option. You can click it to enter texts.
: This is the text box option. You can click it to enter texts.
![]() : Pictures can be inserted. After inserting a picture, you can drag the edge to change the size of the picture.
: Pictures can be inserted. After inserting a picture, you can drag the edge to change the size of the picture.
![]() : This is the eraser option.
: This is the eraser option.
![]() : This is the undo option.
: This is the undo option.
![]() : This is the recovery option.
: This is the recovery option.
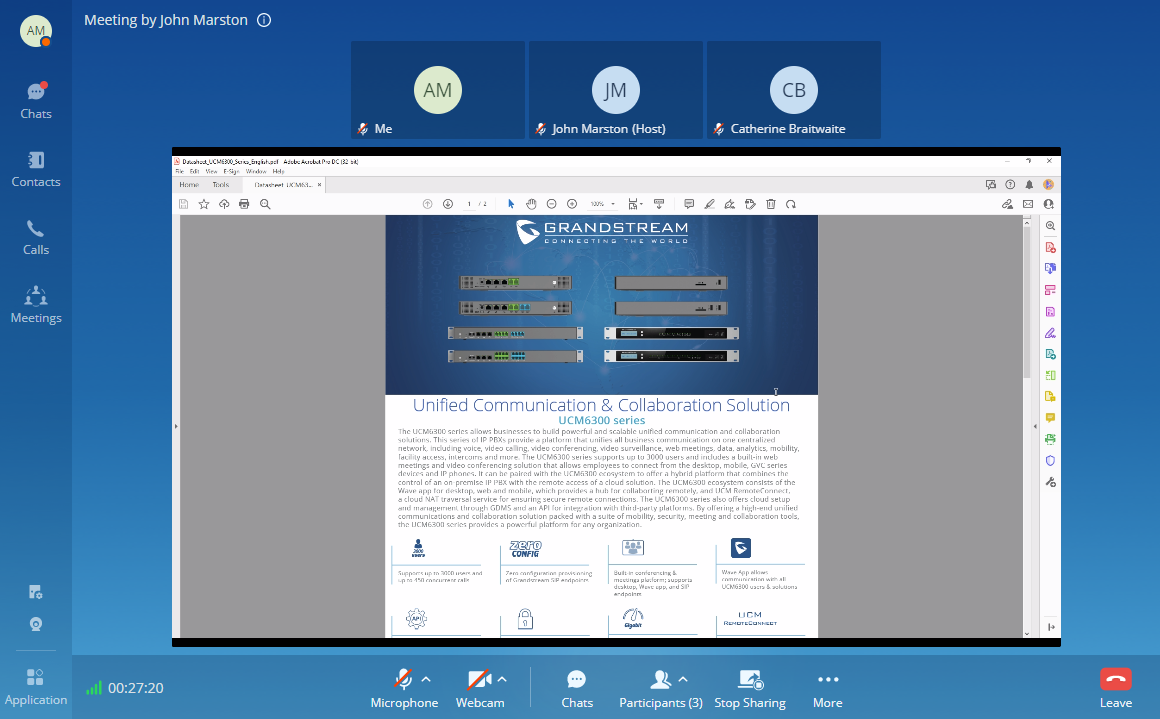
Share Document
The user can click on the icon

, and select “Share Document”.
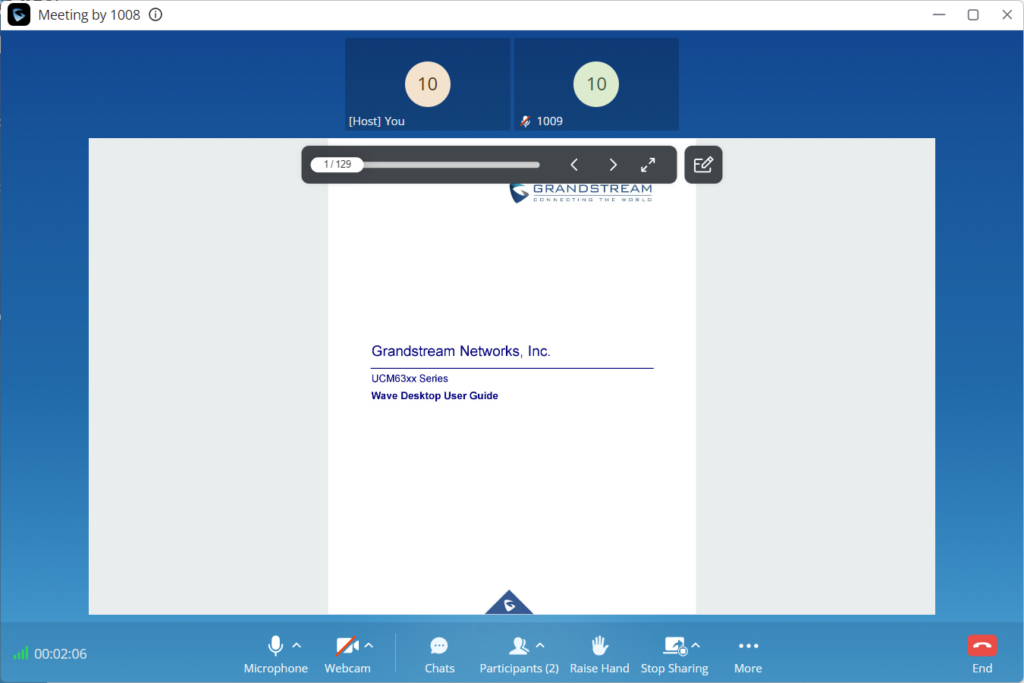
The users can click ![]() button to use annotations on the shared document.
button to use annotations on the shared document.

![]() : This option to change the brush thickness and color.
: This option to change the brush thickness and color.
![]() : This is the paint brush option. It supports different modes: Free, Line, Rectangle/square, Circle and Arrow.
: This is the paint brush option. It supports different modes: Free, Line, Rectangle/square, Circle and Arrow.
![]() : This option to enter text.
: This option to enter text.
![]() : This is the eraser option.
: This is the eraser option.
![]() : This is the undo option.
: This is the undo option.
![]() : This is the recovery option.
: This is the recovery option.
![]() : This is the empty option to clear all the annotations.
: This is the empty option to clear all the annotations.
![]() : This option to other the other participants to draw annotations at the same time.
: This option to other the other participants to draw annotations at the same time.
![]() : This is the download option. It will download the current page with its annotations as jpeg file.
: This is the download option. It will download the current page with its annotations as jpeg file.
Switch Sharing Source
Using Wave point-to-point call or meeting allows switching seamlessly between the source of the screen-sharing. This can be performed without ending the screen-sharing. Please refer to the screenshot below to know exactly how it can be performed.
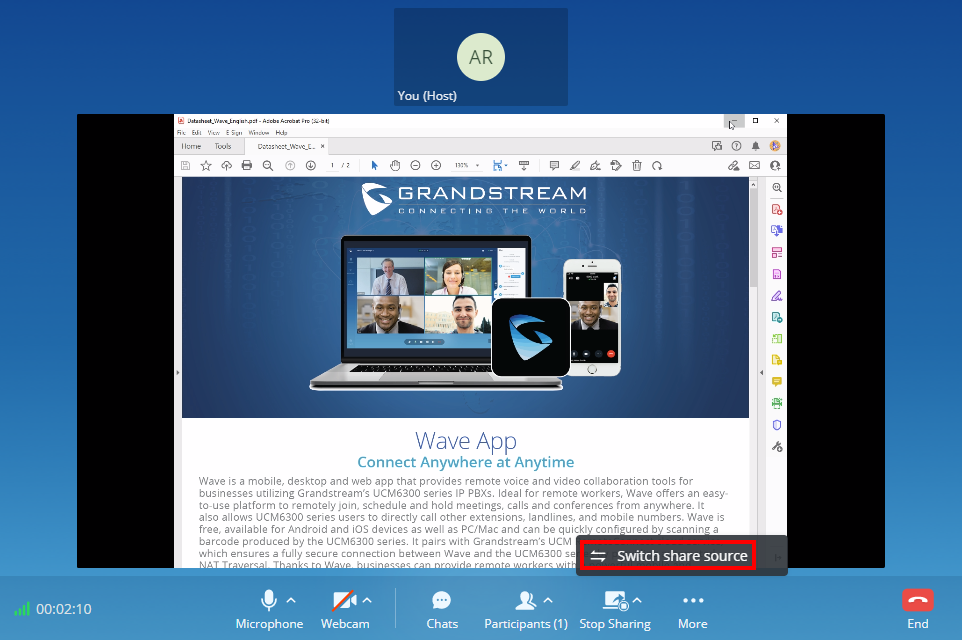
Then choose the new source that you want to share with the other users.
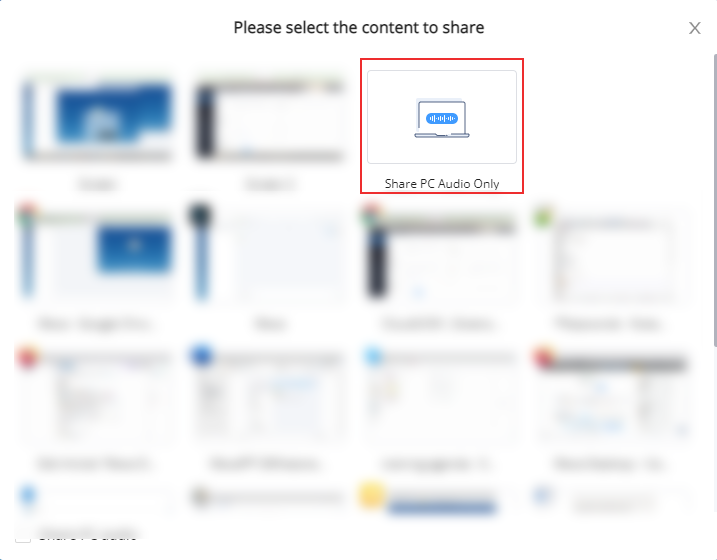
Share Desktop Audio
While in a one-to-one call or a meeting, the user can share the desktop audio with the other user(s). To share the desktop audio, please click on “Share” button on the call menu ![]() then, select “Share PC Audio Only” as shown in the figure below.
then, select “Share PC Audio Only” as shown in the figure below.
Raise Your Hand
During the meeting, the participants can request to speak by raising the hand. All the other participants will be able to see who has risen their hand. This makes meetings with many participants a lot easier to manage for the host.
To raise your hand, please click on ![]() . The participants who have risen their hands will be displayed as the screenshot below shows.
. The participants who have risen their hands will be displayed as the screenshot below shows.
Invite Participants
If the UCM admin has enabled “Allow User Invite” for the meeting room, any participant in the meeting can invite other participants. Otherwise, only moderator can invite other participants.
Users can invite other participants by generating meeting link or dialing other participants.
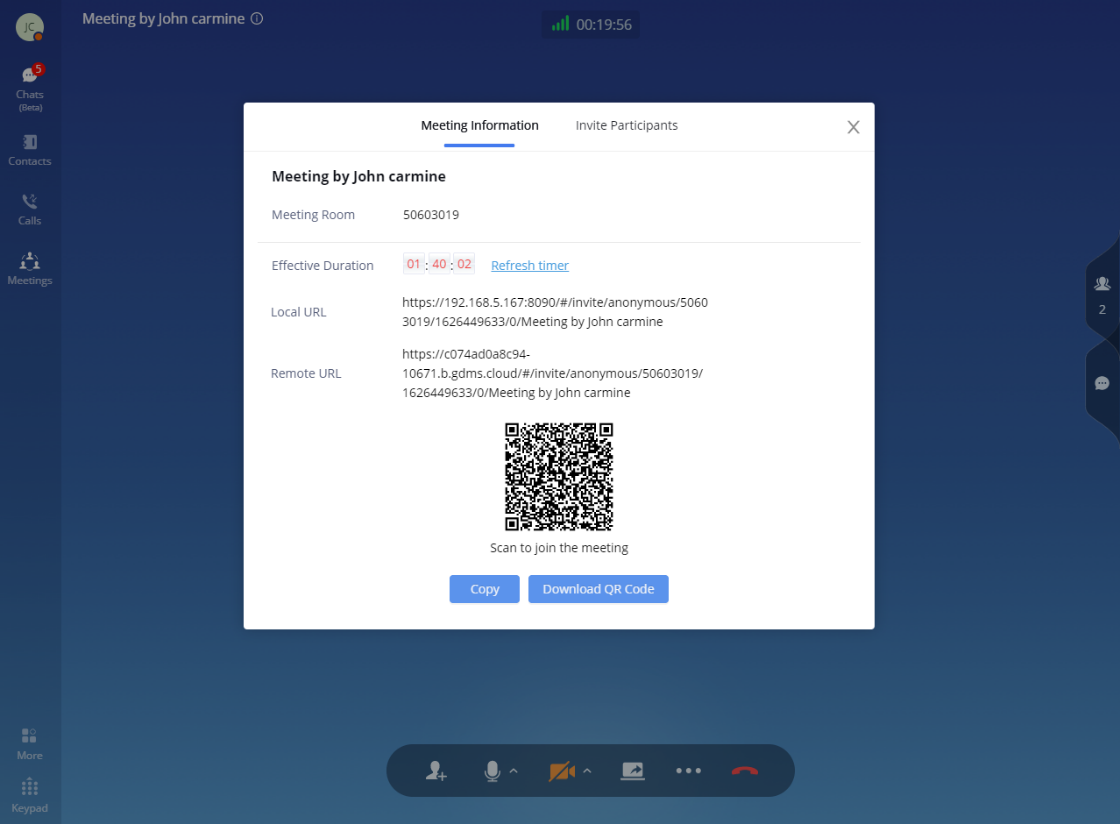
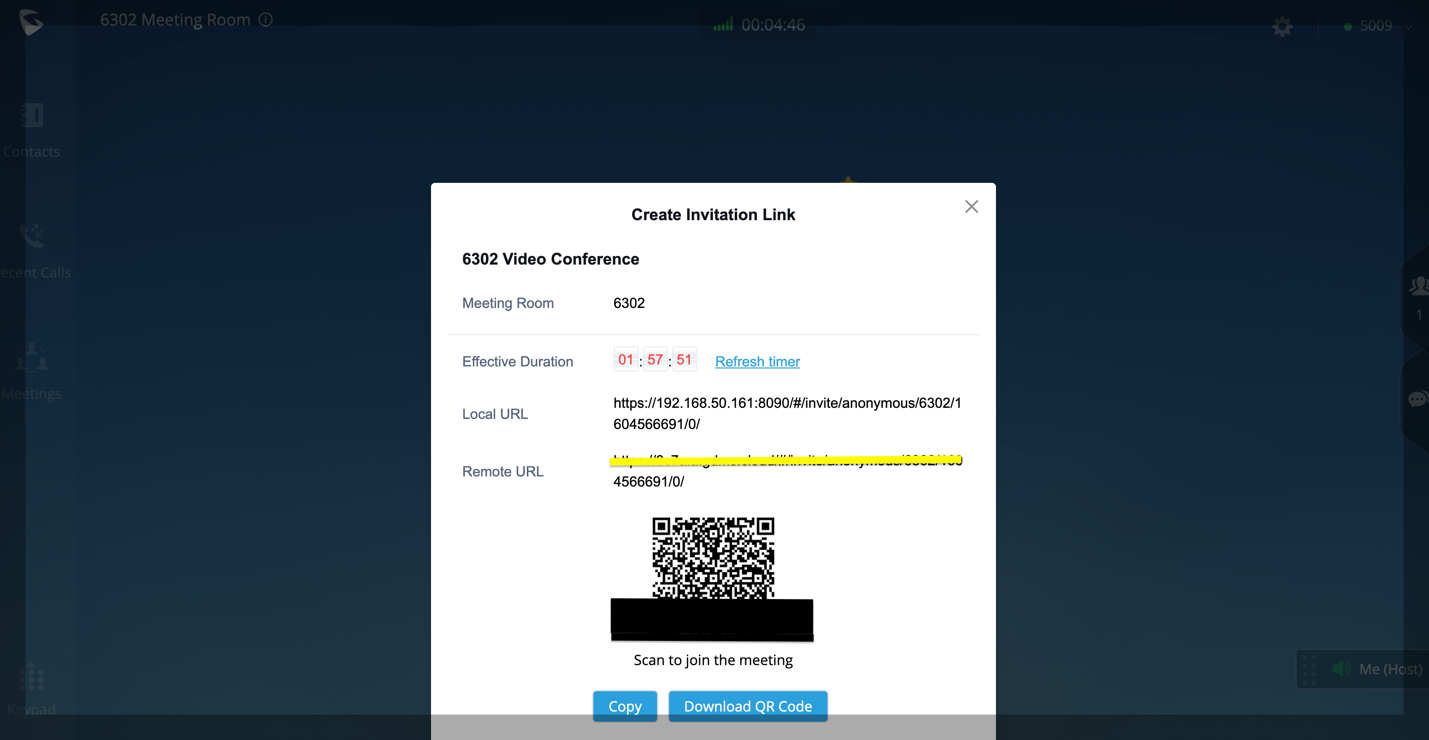
- Create invitation link:
After selecting “Create Invitation Link”, users will be prompt with link information as below. The users can send the link or QR code to other parties for them to join the meeting.
- Invite participants:
After selecting “Invite Participants”, users can select a contact to invite or enter the number to invite.
The meeting’s host can also invite the participants quickly. . To do this, the user needs to click on button ![]() in the menu bar at the bottom of the screen to bring the participants menu up:
in the menu bar at the bottom of the screen to bring the participants menu up:

On the invitees tab, the user needs to click on ![]() to quickly invite the participant.
to quickly invite the participant.
Managing Participants
During meeting, click on icon ![]() to open participant list.
to open participant list.
Participants can view the list only, while moderator has more options to manage the participants.
 :Modify display name.
 :This indicates the participant has video on. If moderator clicks on it, it will turn off the participant’s video.
 :This indicates the participant has video off. If moderator clicks on it, it will invite the participant to turn on video.
 :Mute. This indicates the participant has mic on. If moderator clicks on it, it will mute the participant’s mic.
 : This indicates the participant is talking. If moderator clicks on it, it will mute the participant’s mic.
 :This indicates the participant is muted. If moderator clicks on it, it will turn the mic back on for this participant.
 :More options to operate for this participant, such as “Transfer Moderator”, “Remove” and “Chat”.
 :Chat. Click to open chat window.
- Lock Meeting:Click to lock meeting so that no one can join the meeting room anymore.
- Mute all: Click to mute all participants in one click.
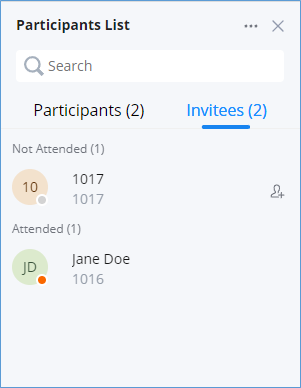
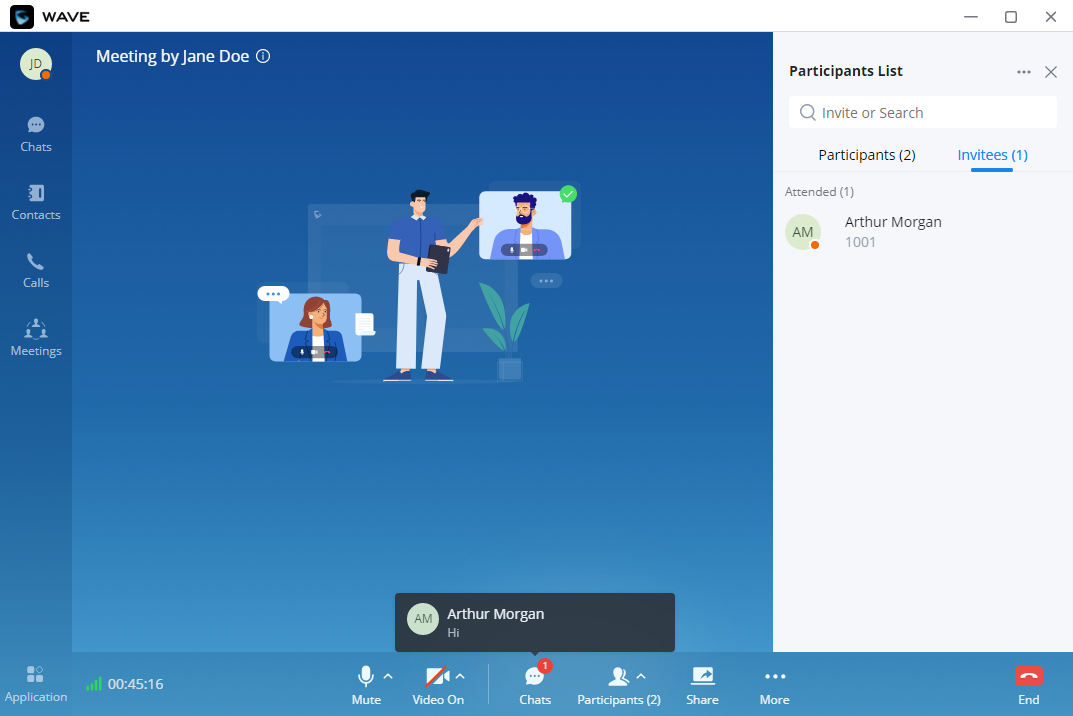
Invitees List
If the current user is the meeting host, the user can view the list of participants who are not attending the meeting. The participants can only view the list of current attended participants. The meeting’s host can send an invitation to the people who have not attended the meeting or those who left. Please see the screenshot below.
Chat During Meeting
During meeting, users can click on ![]() to open chat window. The chat messages can either be sent to a specific participant or to all the participants.
to open chat window. The chat messages can either be sent to a specific participant or to all the participants.
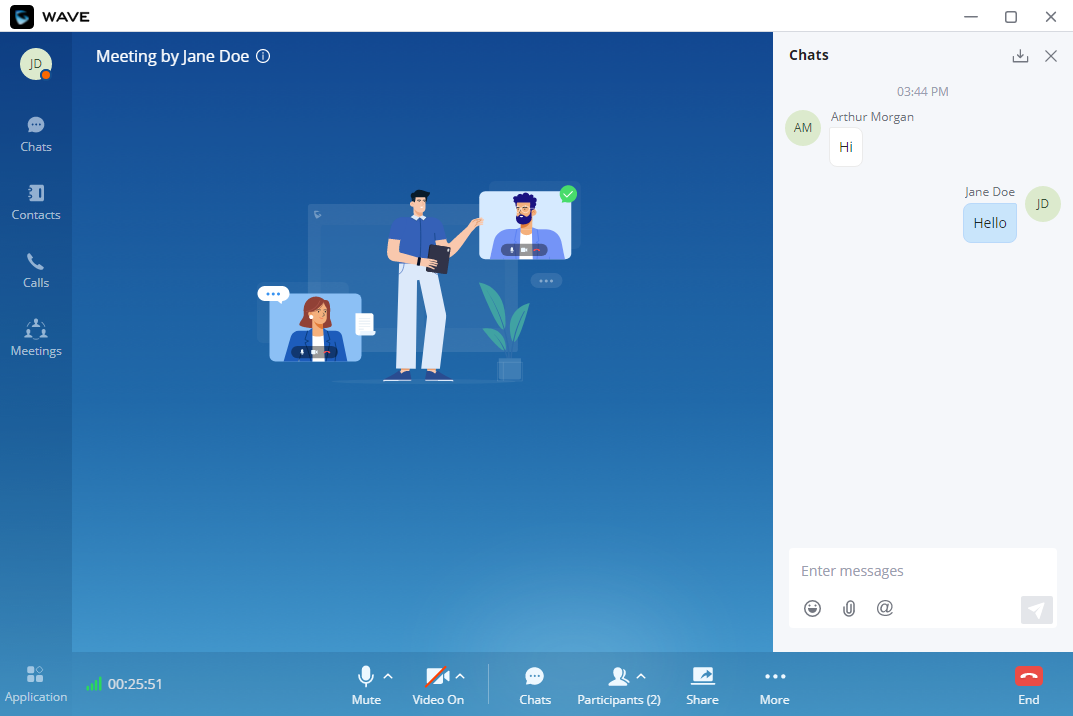
- Chat window not only displays all chat messages, but it also shows real-time notification when a participant joins meeting or leaves meeting.
- Wave supports chat with members who join the conference via browser, PC client, and mobile APP.
- The user can choose to send a message to all members or select a specific member to send the message.
- Click the icon
 under the participant list for a specific user chat privately with him/her. Only supported for wave users.
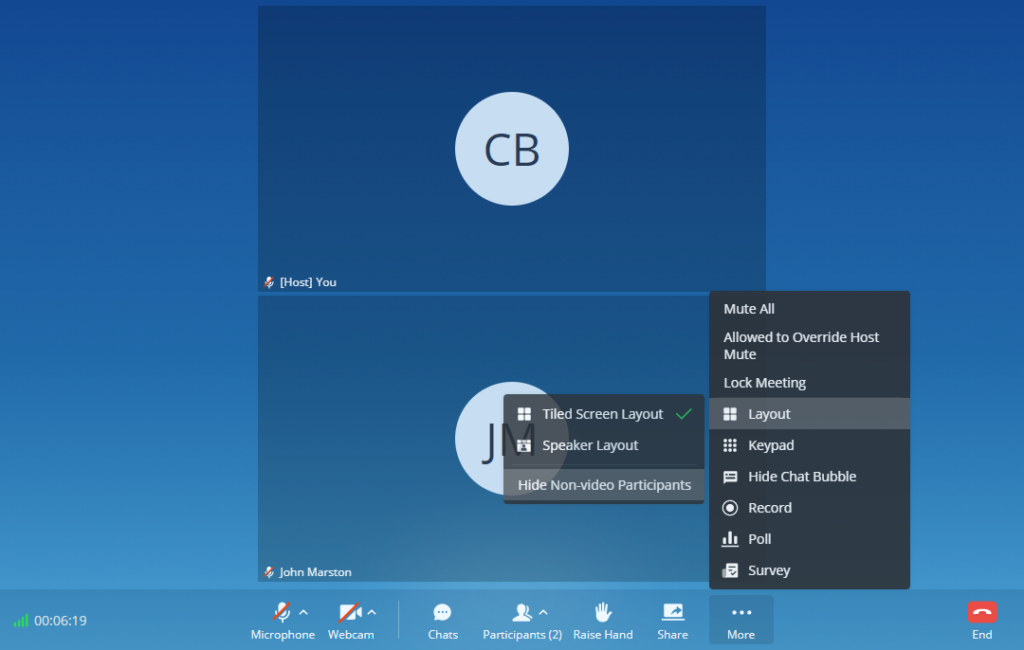
Meeting Layout
You can arrange the layout of the tiles of the participants in a specific meeting in two arrangements, to do that please click on “More” button ![]() , then select either
, then select either ![]() Or
Or ![]()
- Tiled Screen Layout: The tiles will be arranged in the same size without putting the focus on the speaker.
- Speaker Layout: Whenever someone is speaking his tile will be enlarged and showed under the tiles of the listeners. This puts the focus on the speaker and his/her video feed if he/she has the webcam on.
The meeting host can also control to have one participant’s tile pinned. To do that, the meeting host can click on the three dots on the top right corner of the user’s tile, then click on “Focus For All” as the screenshot below shows.
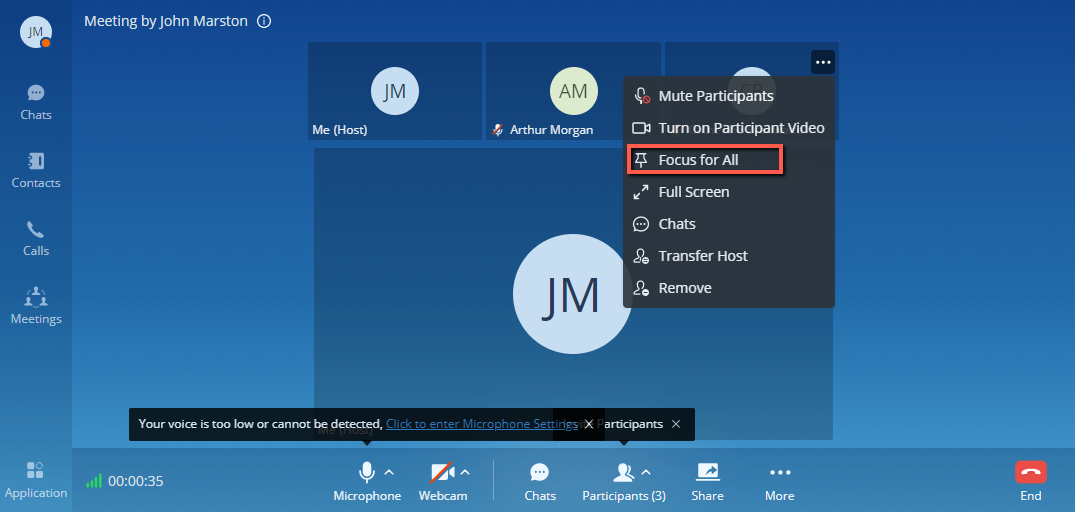
The host can perform various action depends on the user, please see the screenshot below.

- Mute Participant: The host can mute a specific participant. The participant can activate the microphone by pressing and holding the space bar. The microphone will be activated in as long as the participant is holding the space bar and the will be disabled once the participant let go of the space bar.
- Turn on Participant Video: The host can turn on the sound of a certain participant.
- Focus For All: The host can enable focus on one speaker tile/webcam feed.
- Full Screen: The host can toggle one speaker tile/webcam feed to full screen.
- Chats: The host can directly mention the speaker in the chat using this button.
- Transfer Host: The host can relegate its role as a meeting host to a different participants.
- Remove: The host can use this feature to remove a participant from the meeting.
The host can hide the participants whom have not turned on their webcams by clicking on ![]() , then hover the mouse cursor on “Layout” then click on “Hide Non-video Participants”.
, then hover the mouse cursor on “Layout” then click on “Hide Non-video Participants”.
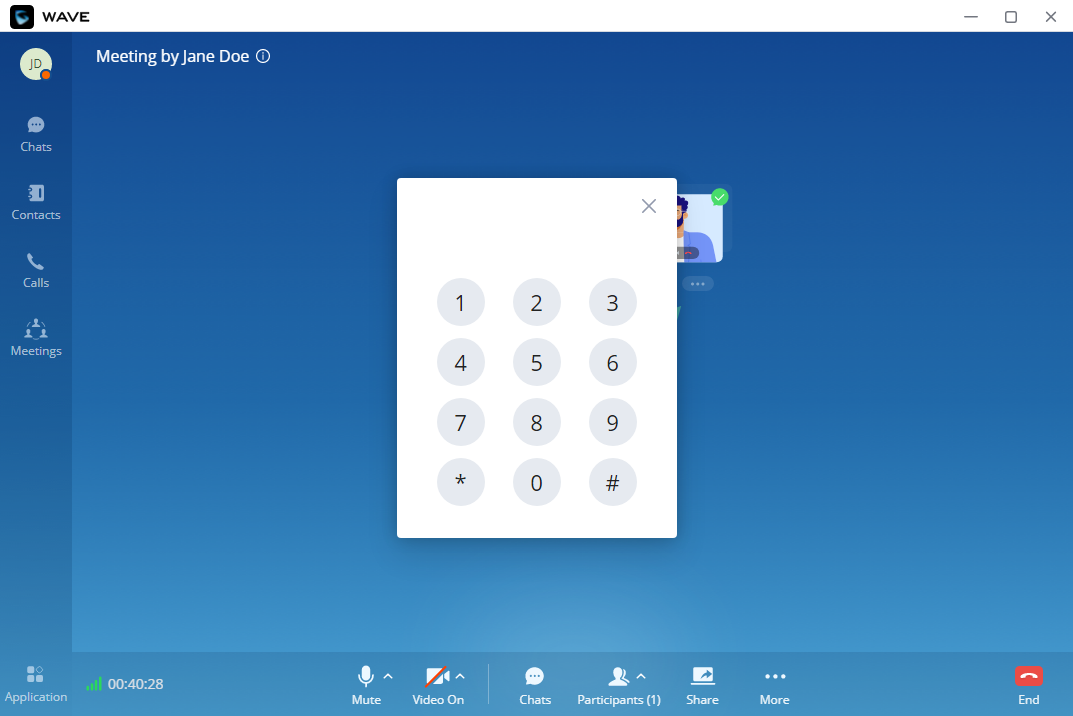
DTMF
- Step 1: During the meeting, the user can click the “More” button on the menu and click DTMF button
 to open the DTMF soft keyboard, as the screenshot shows below.
 - Step 2: The user can click the digit button on the keyboard to enter the digits.
Chat Bubble
During the meeting, the user can click ![]() button to enable the chat bubble function. If there is a new message during the meeting, the chat content will be displayed in the form of bubbles on the right side of the interface, as the screenshot shows below:
button to enable the chat bubble function. If there is a new message during the meeting, the chat content will be displayed in the form of bubbles on the right side of the interface, as the screenshot shows below:
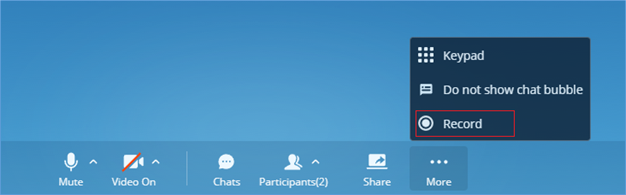
Record an Ongoing Meeting
During a meeting, the host can start recording it. To do that, you need to click on “More” on the menu at the bottom of the screen, then click “Record”.
When the meeting is ended, the meeting organizer can view the recording files in Meeting Details.
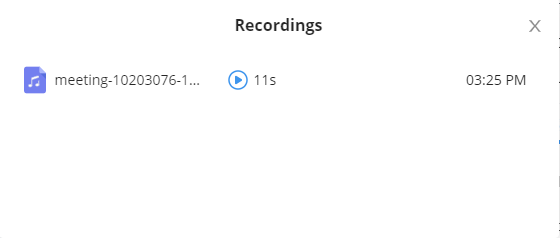
After the meeting is finished, the host can check the recording by navigating to the meeting tab, then select the meeting and after that click on the recording’s icon on the top right-hand corner. Please see the screenshot below.
The recording files will appear with possibility to play them, download, or delete them.
Manage Meeting
- End meeting
When a meeting participant clicks on ![]() to end meeting, the participant will leave the meeting immediately.
to end meeting, the participant will leave the meeting immediately.
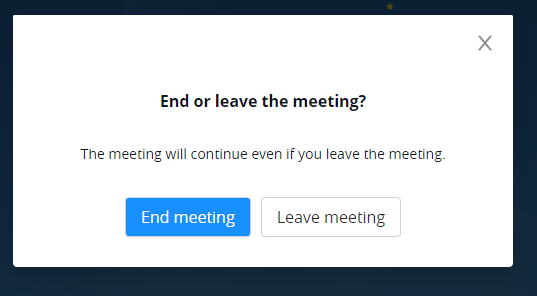
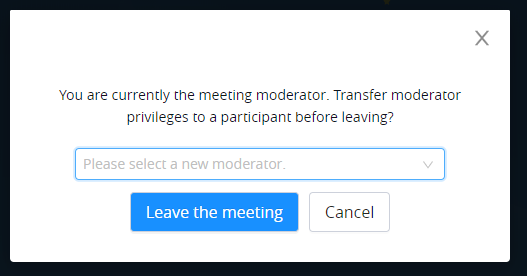
When a moderator clicks on ![]() to end meeting, a prompt will be displayed asking the moderator to confirm whether to leave meeting only or end the meeting. If the moderator selects leaving meeting only, Wave desktop will request the moderator to select another participant to be the moderator. After that, the user will leave the meeting while the meeting is still ongoing for the other participants. If the moderator selects ending the meeting, all participants will be disconnected from the meeting.
to end meeting, a prompt will be displayed asking the moderator to confirm whether to leave meeting only or end the meeting. If the moderator selects leaving meeting only, Wave desktop will request the moderator to select another participant to be the moderator. After that, the user will leave the meeting while the meeting is still ongoing for the other participants. If the moderator selects ending the meeting, all participants will be disconnected from the meeting.

You can also end an ongoing meeting by going to Meetings then hover the mouse cursor over the meeting you would like to end then click on end meeting.
- Edit a scheduled meeting
The user can edit a meeting after it has been scheduled, to change its name, meeting room type, time, recurrence, password, and invitees. To edit a meeting, the user should navigate to Meetings tab on Wave, then hover the mouse cursor over the meeting that they want to edit, then select Edit Meeting.
- Cancel meeting
The user can cancel a meeting after it has been scheduled. To do that, the user should navigate to Meetings tab and then hover the mouse cursor over a specific meeting then click on Cancel Meeting.
Meeting Group Chat
Only the meeting organizer can create a group that consists of the same members that were previously in a meeting, in case they wish to continue the discussion through text chat. The user needs to navigate to the “Meetings” tab, then on the top right-hand corner, click on the three dots and select “Create and Forward Chat History”.
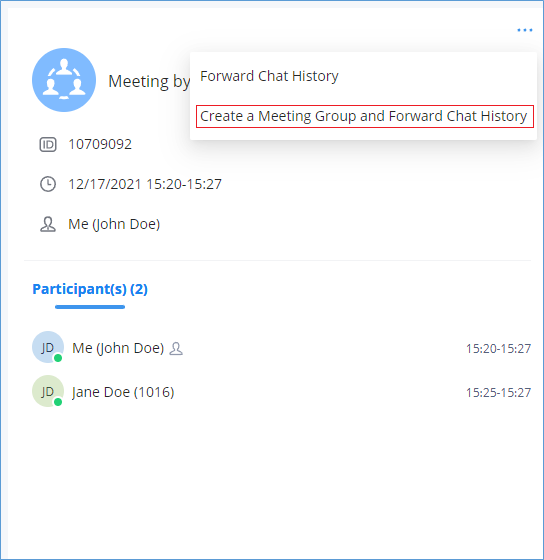
Once that’s clicked, a window will appear with the members of the meeting selected, with the possibility to add any users that were not in the meeting:
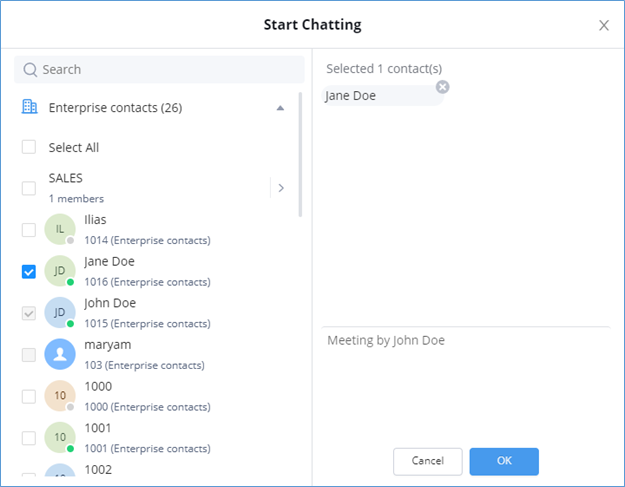
Press “OK” to create the group and forward the chat history of the meeting.
The group will be created, and the chat history will be displayed similar to the image below.

At any point the host of the group can relegate his/her role to another member by going to “Group Settings” as the figure below shows:
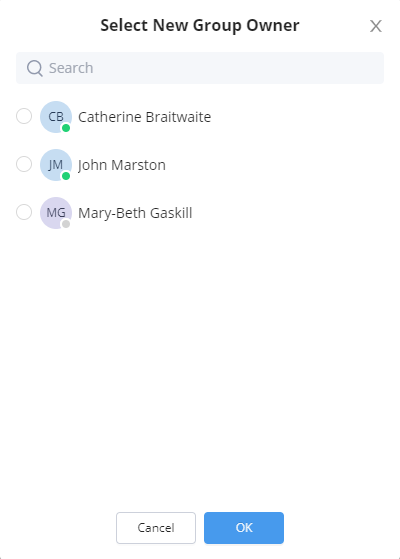
Then select “Change Group Owner”:
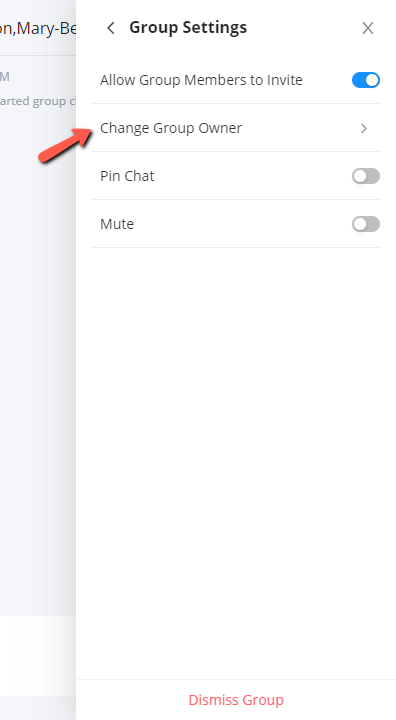
Then choose the new group owner among the existing members of the group.
Download The Chat History
During a meeting, the host can download the chat history at any point of time. To do that, the host needs to open the chat sidebar in the meeting screen and then click on the download button on the top right corner of the screen, as the screenshot below shows.

The chat history will be downloaded as a .txt file.
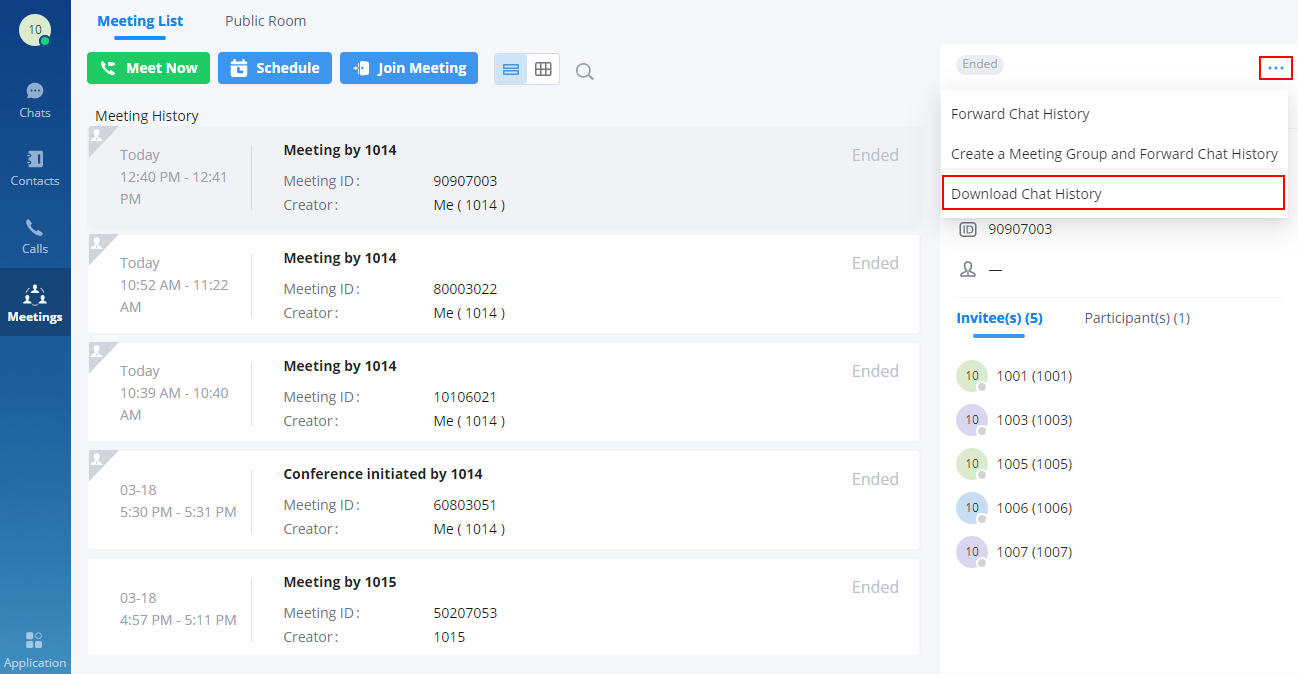
If the host wishes to download the chat history after the meeting has ended, then he/she need to navigate to “Meetings” tab, then click on three dots on the top right corner of the window, and select “Download chat history”
Meeting Management
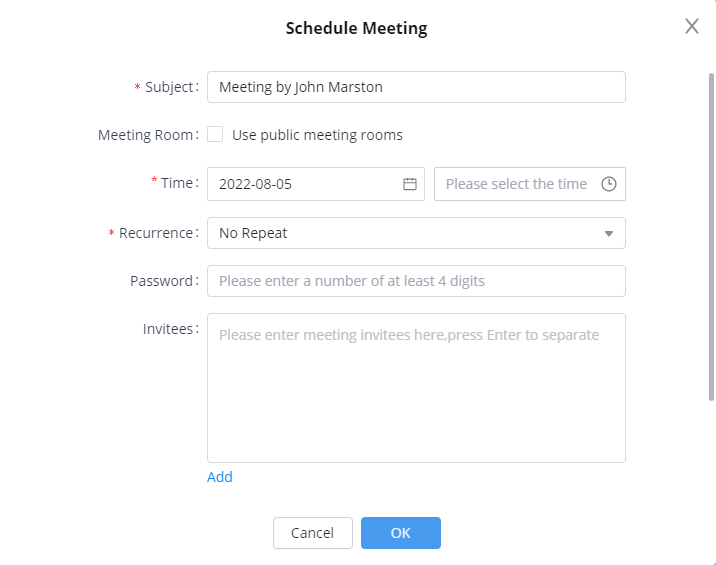
Schedule Virtual Meeting
Wave desktop users can schedule meeting after logging in with SIP extension number and SIP registration password. Click on Meetings on the left panel and select “Schedule Meeting” on the top. A new window to edit schedule meeting will be prompted.
Schedule Meeting Options | |
Subject | Configure meeting subject. |
Conference Type | Select video or audio conference. |
Meeting Room | The user can select to use a public meeting room.
|
Time | Select the date and time for the meeting. Note: Please avoid time conflict on schedules in the same meeting room. |
Recurrence | Choose when to repeat a scheduled meeting:
|
Password | Configure the password for participants to join a meeting. The password must be at least 4 digits. |
Invitees | Defines the extensions or emails of the members to attend a scheduled conference. After adding one invitee, click on ENTER to confirm. Note: -If the invitee’s extension does not have email configured on the UCM extension setting, the user can click on “(Add Email)” to add email for this invitee. -To remove an invitee, click on “x” for the invitee. The user can click the “Add” button to add the participants from contacts or groups. |
Meeting Agenda | Set the agend of the scheduled meeting. (Up to 500 characters) |
Host Settings | |
Host | This is used to select a meeting host. |
This is the host email address. | |
Host Code | This is used to configure the host code. The password must be at least 4 digits. |
Advanced Settings | |
Time Zone | Defines the time zone of the scheduled meeting. The default setting is the time zone of the current client. |
Email Reminder (minutes) | If configured, email reminders will be sent out x minutes before the start of the conference. |
Allow participants to invite | If enabled, any participant in the meeting can invite other parties. |
Allowed to override Host Mute | If enabled, the participants will be able to unmute themselves after the host has muted them. |
Auto-call Participants | If enabled, invited participants will be called when the meeting starts. |
Create Meeting Group | Create a group chat after successfully scheduling the meeting. Messages created during the meeting will be automatically synced to the group after the meeting. |
Schedule Meeting Specifications
After the meeting is scheduled, it will be listed in the meetings page. Meeting participants will receive email notification for the scheduled meeting. At the same time, the system will send the meeting assistant message to the invitees automatically.
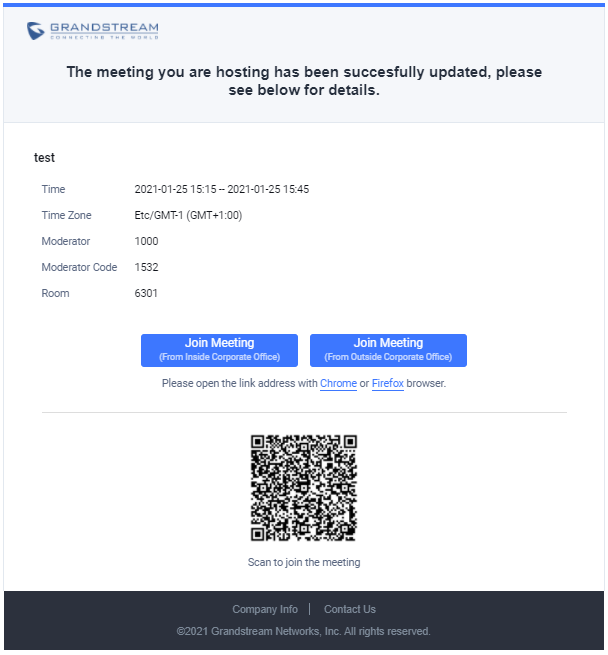
If meeting schedule information is modified, participants will receive email update. An email reminder will also be sent to the participants at the configured email reminder time, If the meeting has been modified, or the meeting reminder will be sent to the participants through the meeting assistant.
To join meeting, the Wave user can click on the link in the email notification to join meeting directly, or Wave mobile app user can scan the QR code in the email notification to join meeting as well. The user can click the meeting assistant message to enter the meeting.
Schedule Onsite Meeting
The users can schedule onsite meetings by going to Meetings and clicking on Schedule.
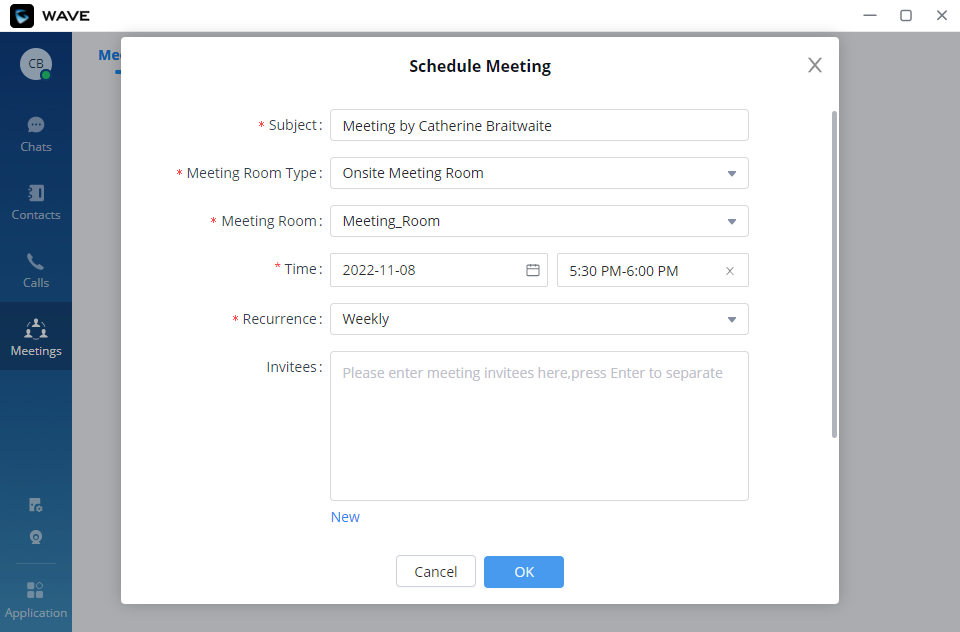
Subject | Enter the subject of the meeting. |
Meeting Room Type | Select Onsite Meeting room. |
Meeting Room | Select the meeting room on which the meeting will take place. |
Time | Select the duration of the onsite meeting. |
Recurrence | Select the recurrence of this meeting. The options are Daily, Weekly, and Monthly |
Invitees | Select the invitees of this meeting. |
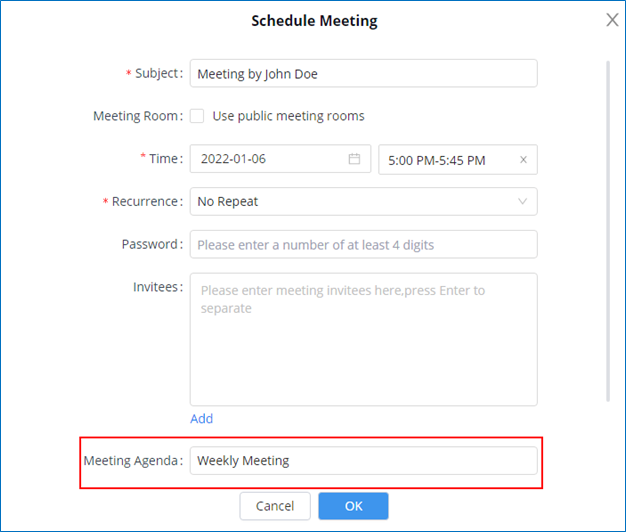
Meeting Agenda
When scheduling a meeting, the host can configure an agenda name to the meeting to be reminded of that purpose of that meeting.
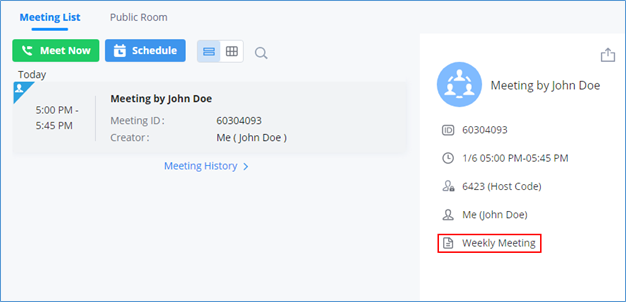
After creating the meeting, you can check the agenda in the meeting details tab. Please see the screenshot below:
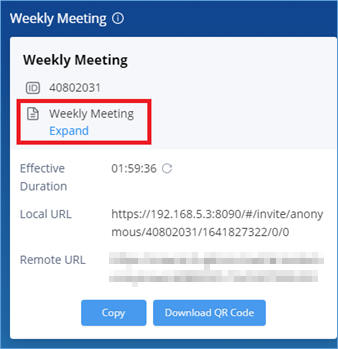
When the meeting starts, the user can click to view the meeting details to check the meeting agenda. Please see the screenshot below:
Meeting List
To view all the scheduled and ongoing meeting, click on Meetings tab, then click on Meeting List. The following window will be displayed.
- Virtual Meeting:
- Onsite Meeting

Meeting Room
To view all the rooms that have been created for meetings (this includes virtual and onsite meeting rooms), navigate to Meetings tab then click on Meeting Room.
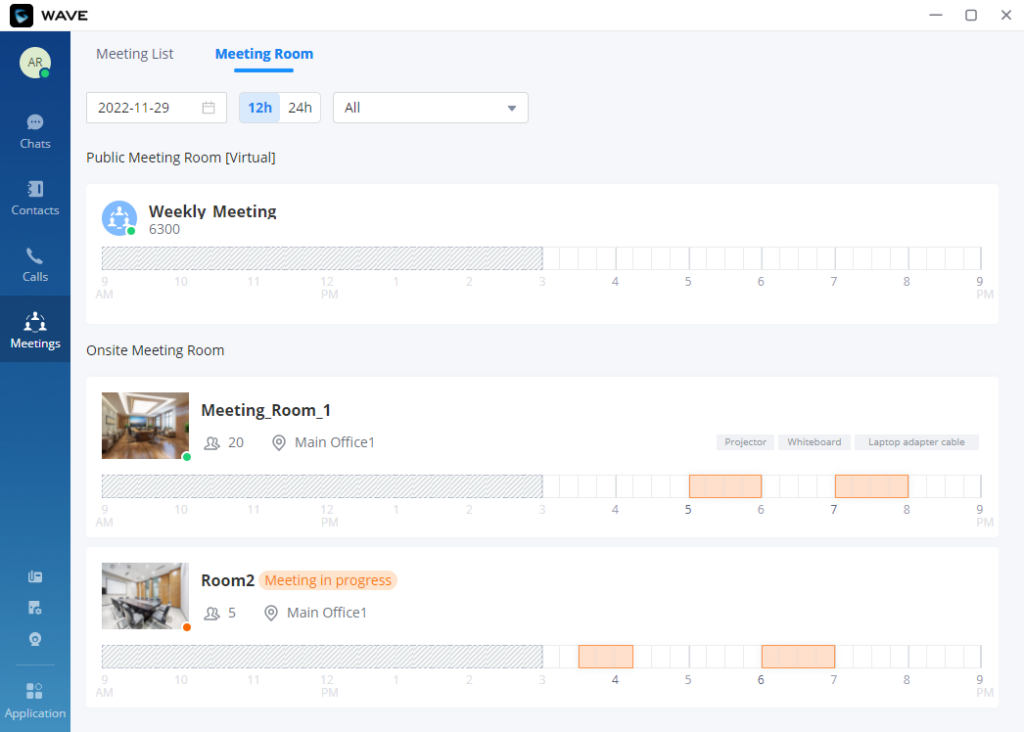
From this window, you can directly schedule meetings. Select a time interval to start scheduling the meeting.
Public Room
The user can click the “Meeting” menu on the left side of the Wave application main interface to open the meeting interface. The user can click “Public Room” tab on the top of the meeting interface to access to the list of the public meeting rooms in the current UCM. Please see the figure below:
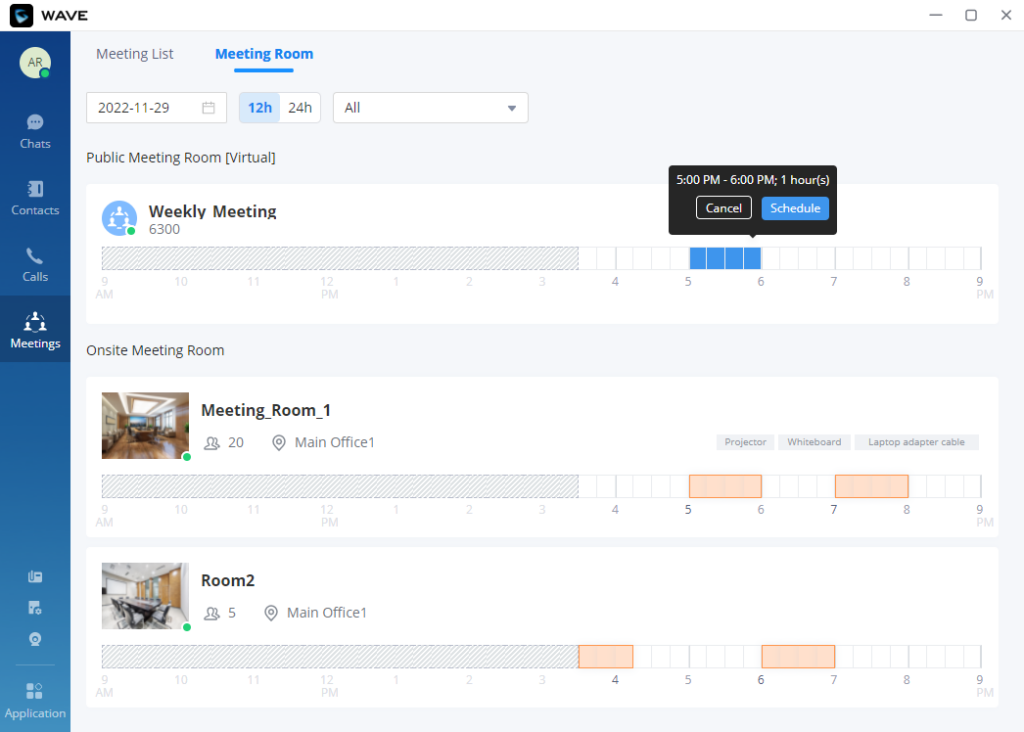
The timeline is displayed under each public meeting room. The blank field represents the vacant period, and the blue field represents the period that has been scheduled. It supports to click to switch the date ![]() , and the user can also switch the time range displayed in the timeline by clicking “12h/24h”.
, and the user can also switch the time range displayed in the timeline by clicking “12h/24h”.
The user can select a specific meeting room and click button ![]() to access to the public meeting room. If there is a meeting in the current public meeting room, the user will be directed to the current meeting. If there is no meeting in the current meeting room, the user will join the meeting as a participant.
to access to the public meeting room. If there is a meeting in the current public meeting room, the user will be directed to the current meeting. If there is no meeting in the current meeting room, the user will join the meeting as a participant.
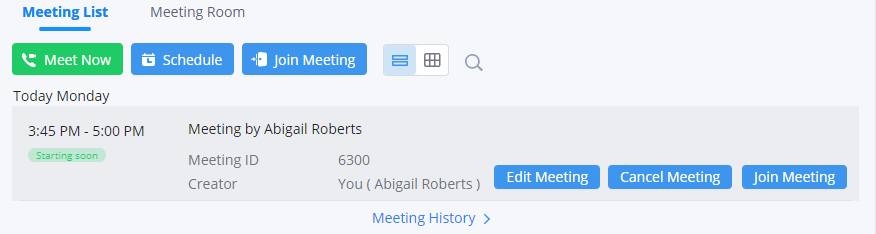
Edit/Cancel Meeting
Only the meeting creator can edit/cancel the meeting.
Step 1: The user can click the “Meeting” button on the left side of the main interface to access to the meeting list interface.
Step 2: Move the cursor to the wanted meeting and click “Edit Meeting” or “Cancel Meeting”.

Step 3: After editing/canceling the meeting, the user can click “OK” button to apply the changes, and the meeting modification notification will be sent to the invitees immediately.
Reschedule Meeting
For the “Ended” meetings, the user can reschedule the meetings from Wave application.
Step 1: The user can click the “Meeting” button on the left side of the main interface to access to the meeting list interface.
Step 2: Find the “Ended” meeting in the calendar.
Step 3: Move the cursor to the meeting and click “Reschedule” button or click the “Reschedule” button on the meeting details interface.

Step 4: The user will be directed to the meeting rescheduling interface, and the current meeting subject, invitees, meeting property information will be filled in the corresponding fields automatically.
Step 5: The user can click “Schedule Meeting” button to reschedule the meeting as a new meeting.
Share Meeting
In the meeting details interface, the user can click the share button ![]() on the right upper corner to copy the meeting information, or the user can download the meeting QR code, and send the meeting information to the contacts through chat, email, etc.
on the right upper corner to copy the meeting information, or the user can download the meeting QR code, and send the meeting information to the contacts through chat, email, etc.
Join Meeting
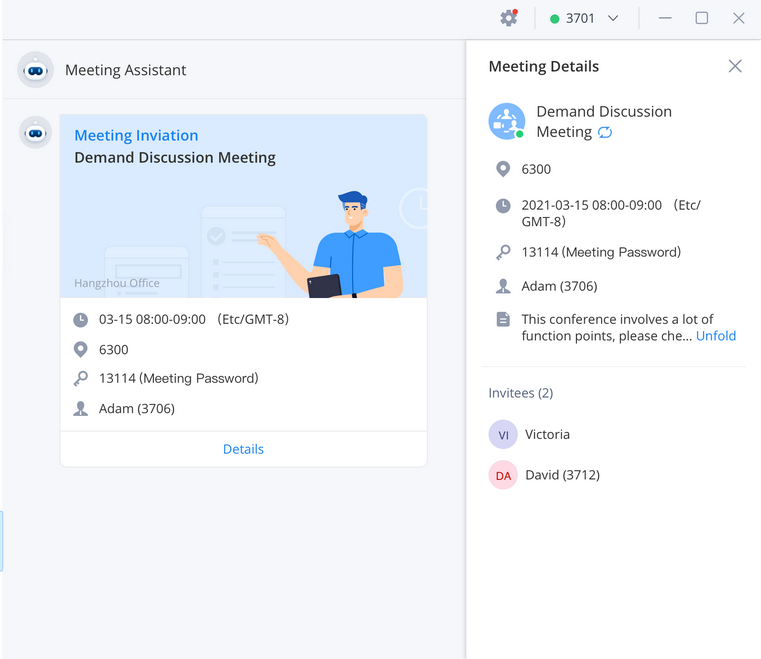
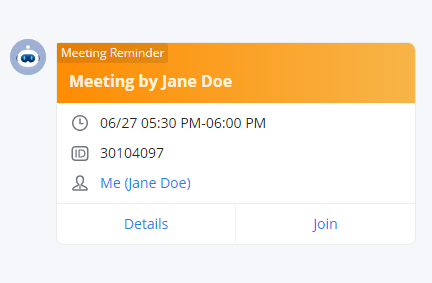
Method 1: In the chat interface in Wave application, the user can click “Meeting Assistant” to find the meeting notification which will be sent to the invitees 10 minutes before the meeting starting time and click “Join” button to join the meeting.
Method 2: In the meeting list in Wave application, the user can find the meeting which has invited the user and click “Join” to join the meeting.
Method 3: In the “Meeting Room” list of the meeting interface in Wave application, the user can click to join the public meeting room directly.
Method 4: The user can enter the meeting number to join the meeting directly through dial panel.
Method 5: The user can join the meeting by click “Join” button in the meeting invitation email.
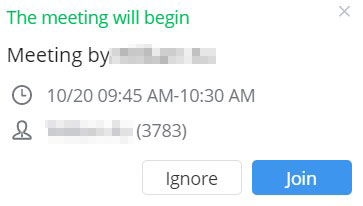
Method 6: The user can click “Join” button in the meeting invitation in the lower right corner of the Desktop to join the meeting.
Join Meeting via Link
If users do not have UCM extension to log in Wave desktop, the users can join meeting via link. The link can be obtained from the meeting invitation email or from the meeting organizer/participant who shares the link directly.
After the users join meeting via link, the users can change the display name after opening participant list and selecting the current name.
Complete Meeting
On the meeting list, the meeting creator can click ![]() button to end the meeting which is currently in progress. Then, the meeting will be ended directly.
button to end the meeting which is currently in progress. Then, the meeting will be ended directly.

VOICEMAIL
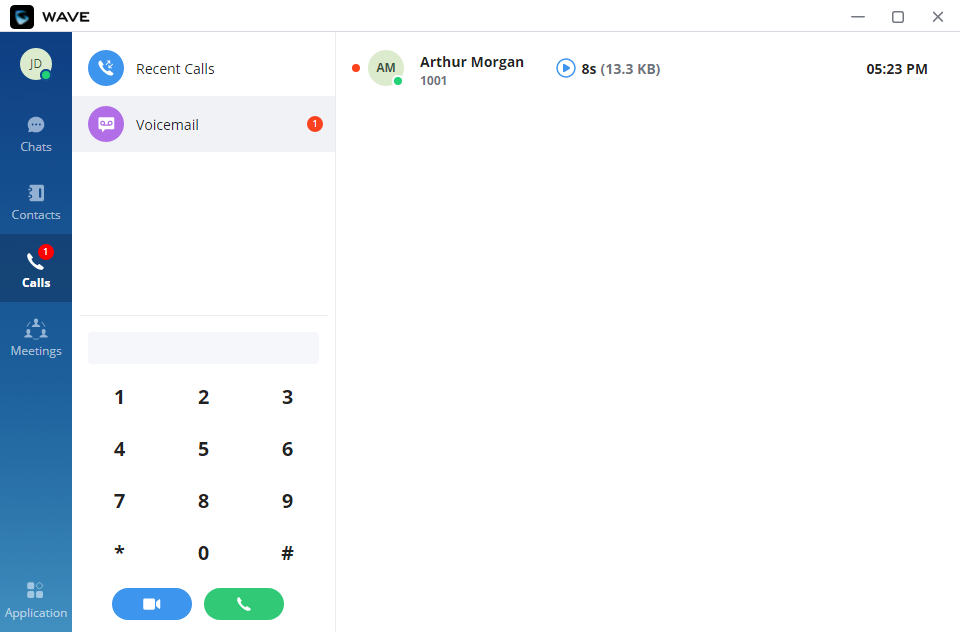
Users can click on the “Calls” menu on the left side of the Wave application UI and click “Voicemail” menu to view all voicemail of the current Wave account.
In “Voicemail” module, users can check all voicemail received by the account, including the common voicemail and urgent voicemail.
Users can play the voicemail, set the voicemail to read, and download/delete the voicemail.
Users can also dial to the contacts and send messages to the contacts from this interface. Please refer to the screenshot below for the voicemail interface:
The users can delete all the voicemails or select the ones to be deleted in batches. Please refer to the screenshot below.
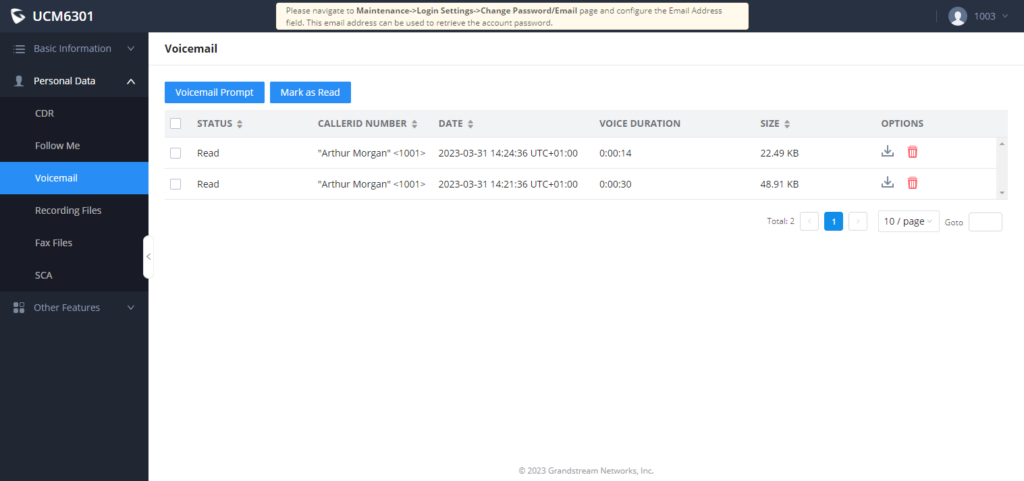
Users can click “Application” tab on the left side of the application UI and click on “Voicemail” module to access to the user portal interface on the UCM Web UI.

Then the UCM user portal page will open on which the user can download or delete the voicemails received.
- Open keypad on Wave desktop, enter the voicemail access code. For example, *98 is the default feature code on UCM for users to access voicemail box.
- Follow the IVR from UCM to enter the voicemail box and password.
- If the password is correct, users will be able to hear voicemail options and listen to the voicemail.
Note: The voicemail access code and voicemail password are pre-configured in UCM. Please contact UCM admin to obtain the voicemail access code and password.
CONTACTS
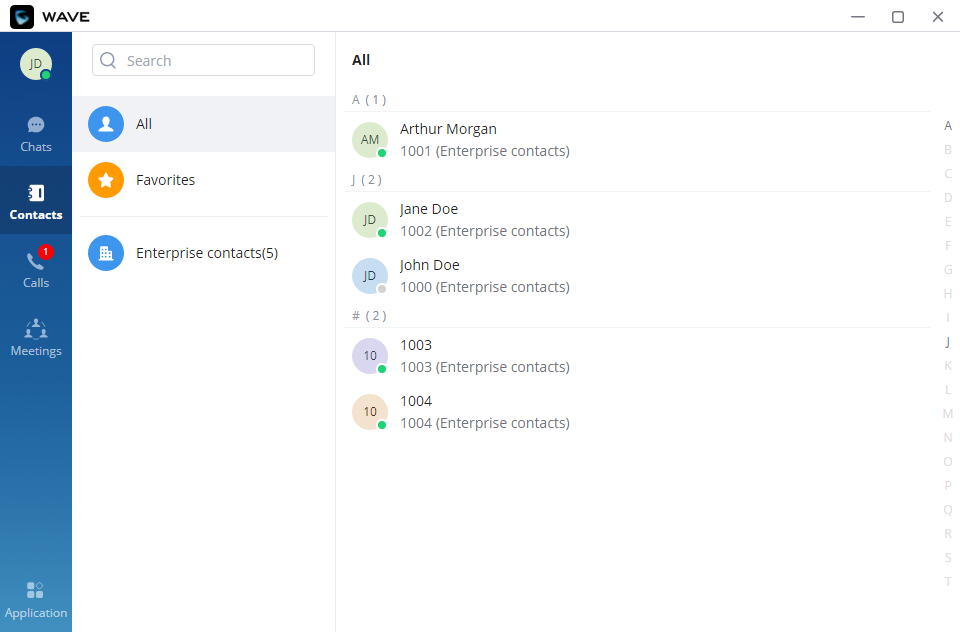
In Wave desktop, users can click “Contacts” menu on the left side to view all contacts, favorites, LDAP contacts, local UCM contacts, CloudIM contacts, view their presence, and call status. Users can also select the contact to view details and call the contact.
Search Contacts
Users can enter username or number to search contacts. On the search result, users can click to view contact details, click on ![]() to initiate video call or click on
to initiate video call or click on ![]() to initiate audio call.
to initiate audio call.
Import/Export Personal Contacts
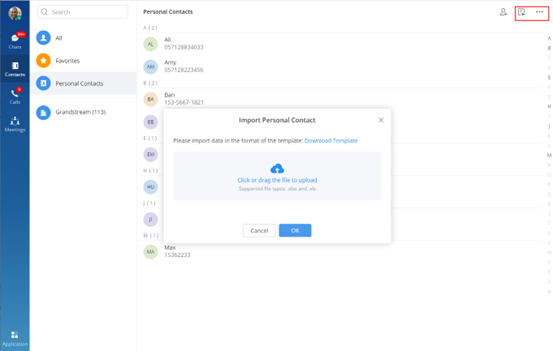
You can click the button ![]() on the right upper corner to import contacts to Personal Contacts in batches. You can also click the button
on the right upper corner to import contacts to Personal Contacts in batches. You can also click the button ![]() to select the exported contacts or delete contacts in batches.
to select the exported contacts or delete contacts in batches.
Note: It is recommended to import contacts in the template format to prevent import errors.
SETTINGS MENU
The Settings menu is on the left side of the Wave application’s main UI. Users can click the user icon to open the Settings menu, the menu includes Account Information, Account Settings, Call Settings, Audio/Video Device, Language, Launch on system startup option, Help and Feedback, Export logs option, About, Download mobile client, Integrate Wave, UCM Remote Connection and Log out options.
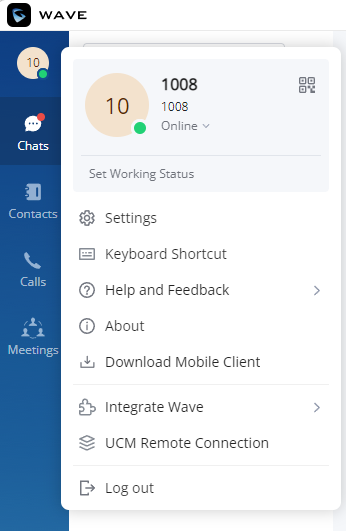
Account Information
Account information screenshot is shown as follows:
- The Account Information interface displays the username, QR code, SIP number and personal status.
- Users can scan the SIP account QR code with the Wave mobile version to quickly log in the account.
- Users can set the personal status, which can be divided into account status and working status, and the status will be displayed in the contacts book and chat module.
Settings
General
Account Settings
The account settings allow you to change the “Account Info” or the “Account Password”.
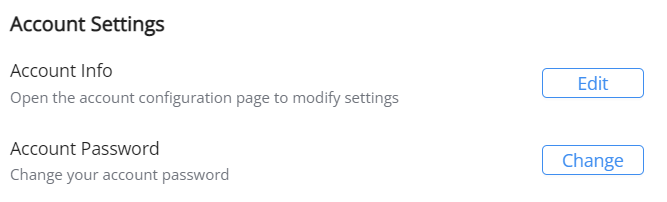
- Account Info
Press “Edit” button to be redirected to the account settings interface in the UCM management platform, and you can go to “Personal Configuration” tab to fill in the personal basic information. Then, the updated information will be saved and applied to Wave application.

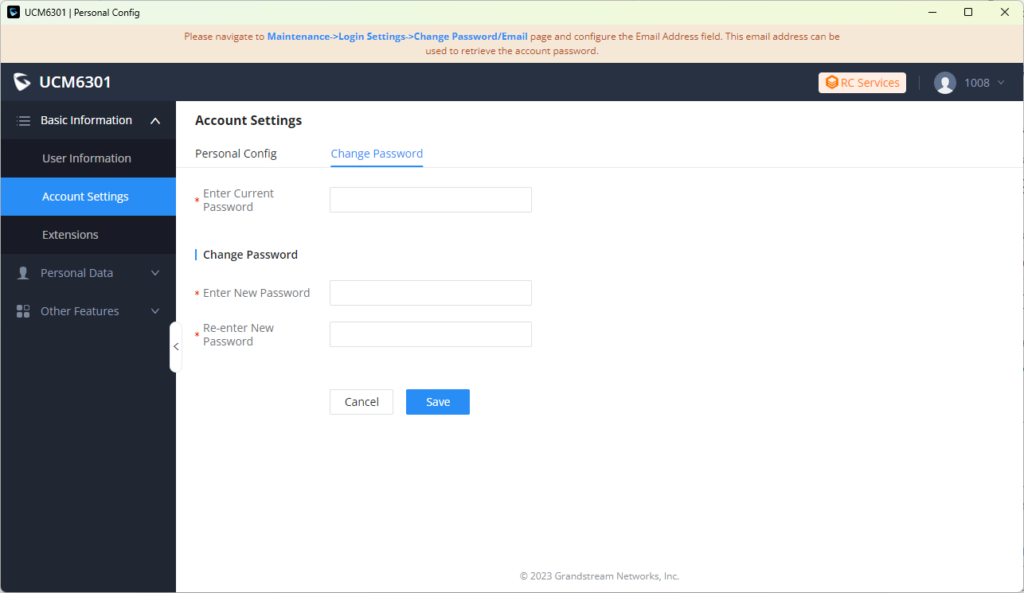
- Account Password
Press “Change” button to be redirected to the account settings interface in the UCM management platform, and you can go to “Change Password” tab to update your Wave account password.
General Settings
The General Settings control the Wave Application behavior on startup and close.

When enabled, closing the application will keep the application running in the background allowing you to receive calls and chat messages… without having the application open.
- Launch on System Startup
Enable this option to have Wave launch automatically when the operating system boots up.
- Startup Mode
Select the startup mode when launching the Wave Application. Two options are available: “Start in Foreground” and “Start in Background”.
Language
The Wave application supports English, Chinese, French, Spanish (Latin America), Spanish (Spain), Italian, Greek, Arabic, Russian, German, Polish, Portuguese, Vietnamese, Thai, Czech, Turkish, Hebrew, Dutch, and Slovenian.

Date/Time Format
The Wave application allows you to change the date and time format.
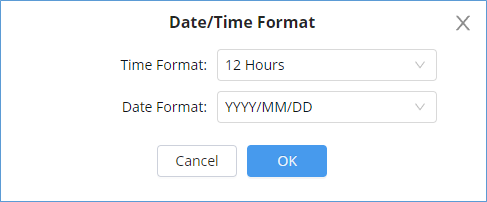
Time Format options are:
- 12 Hours
- 24 Hours
Date Format options are:
- YYYY/MM/DD
- DD/MM/YYYY
- MM/DD/YYYY
Contacts Sort Order
This option configures the sorting order of the Wave Contacts. Two options are available:
- First Name, Last Name
- Last name, First Name
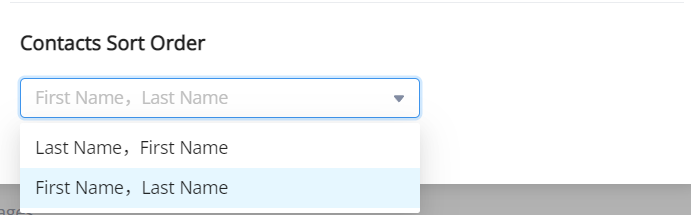
Notification Settings
Wave can be configured to notify the user based on the preferences set. The user can set the preference to be notified for all the messages exchanged in the groups he/she is part of, direct messages, mentions or none at all.
The user can also configure Wave to play a notification sound when they receive a message, when they received an incoming call, or when they receive a reminder of a meeting.
General Message Notification Settings
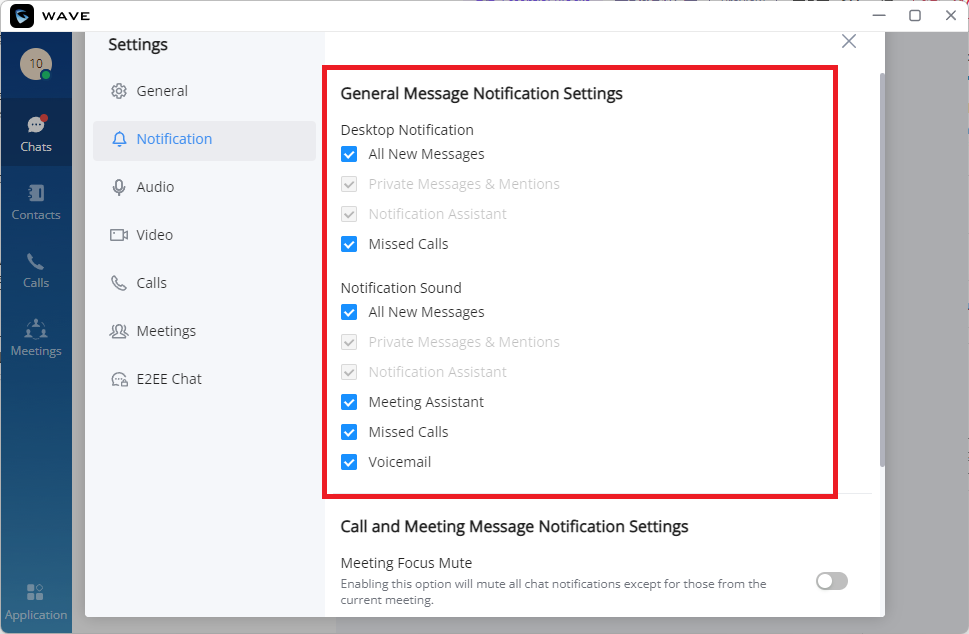
- Desktop Notification
Check/uncheck Desktop Notification for “All New Messages”, “Private Messages & Mentions”, “Notification Assistant” and/or “Missed Calls”
- Notification Sound
Check/uncheck Notification Sound for “All New Messages”, “Private Messages & Mentions”, “Notication Assistant”, “Meeting Assistant”, “Missed Calls” and/or “Voicemail”
Call and Meeting Message Notification Settings
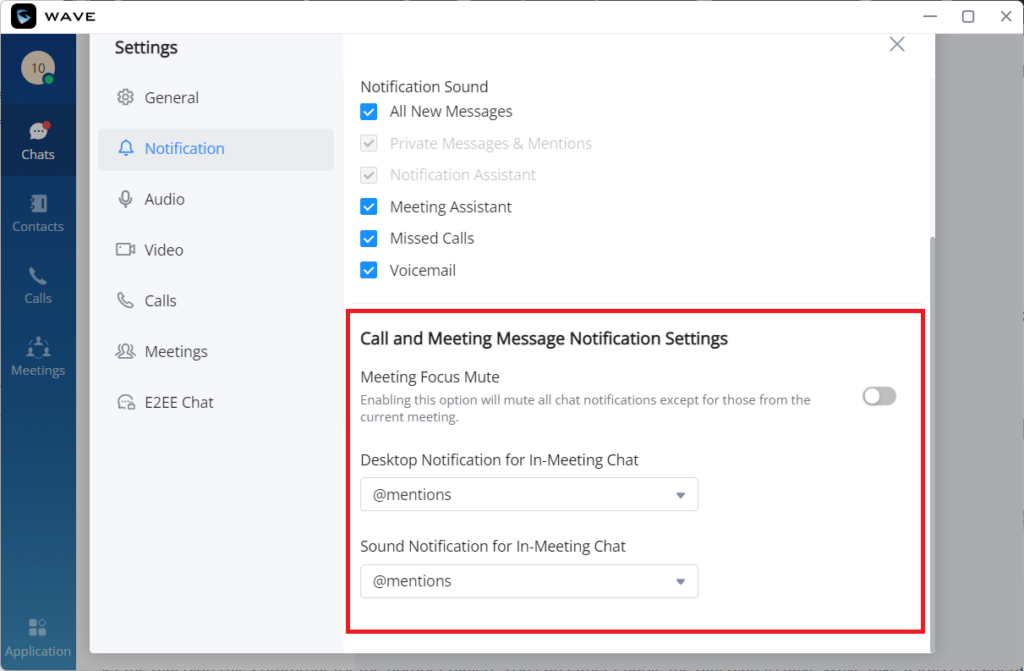
- Meeting Focus Mute
Enabling this option will mute all chats notifications except for those from the current meeting.
- Desktop Notification for In-Meeting Chat
Select the condition to display the Desktop Notification for In-Meeting Chat: “All New Messages”, “@mentions” or “None”. The desktop notification looks as below:
The user can directly reply to the message from the notification.
- Sound Notification for In-Meeting Chat
Select the condition to play the Sound Notification for In-Meeting Chat: “All New Messages”, “@mentions” or “None”.
Audio Settings
When the device is connected to multiple audio devices, the user can select audio device through audio settings.
For PC client users, the application allows users to select the alternative ringing speaker. When the user receives an incoming call, the preferred and alternative speakers ring at the same time.
Reference Scenario: The PC connects to a headphone, but the user does not wear the headphone. The alternative ringing speaker is set, when the user receives an incoming call, the user can hear the ring tone from the PC’s built-in speaker.
Step 1: The user can click the user icon then click on “Settings“, move the cursor to “Audio/Video Device” option, and click “Audio Settings” to enter the microphone/speaker settings interface, as the figure shows below:
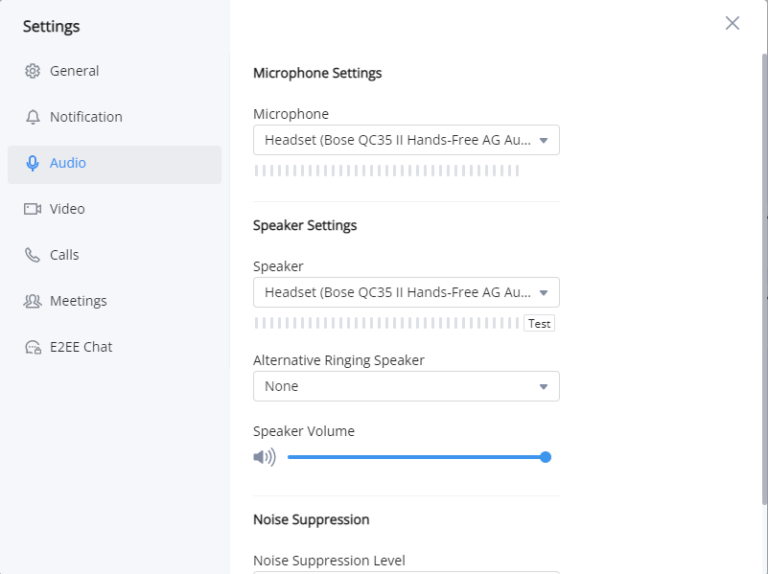
Step 2: Go to “Alternative Ringing Speaker” option and click to set the alternative speaker.
Step 3: Click “OK” button to apply the changes. The preferred and alternative speakers will ring at the same time when there is an incoming call.
Video Settings
Video settings screenshot is shown as below:
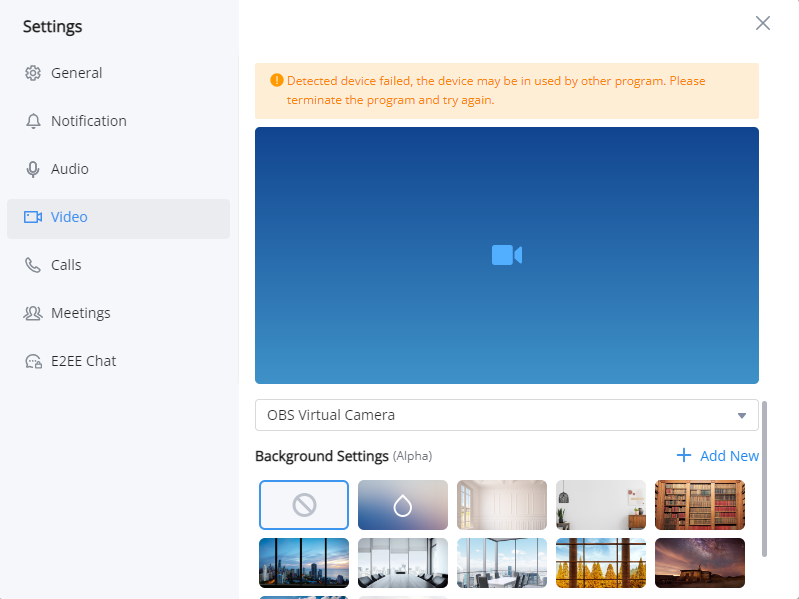
When the PC connects to multiple camera devices, the user can select the video device by “Video Settings”. The user can also set the virtual background in Wave application.
Step 1: The user can click the user icon to enter the settings menu, move the cursor to “Audio/Video Device” option, and click “Video Settings” to enter the camera settings interface, as the figure shows below.
Step 2: The user can select the camera and set the virtual background.
Step 3: The user can view the preview result and save/apply the changes. When the virtual background is set, the setting will be saved locally in the application, and the virtual background will be applied for each call/meeting.
When the user first time logs into Wave application, the system will ask the user to set up a video device.
Virtual Background Settings
In meetings and peer-to-peer calls, the user can set the virtual background in the application locally and the virtual background will replace the background in the camera and send to the remote client.
Step 1: The user should click on the profile image, then select “Settings“, then chose “Video” from the list of settings.

Step 2: Users can select the images in the library or customize the uploaded images to create a virtual background.
Step 3: Customize Uploaded Image: Click the button ![]() on the virtual background settings interface to open the local file selection window, and the user can select and customize the image to upload.
on the virtual background settings interface to open the local file selection window, and the user can select and customize the image to upload.
Step 4: The user can view the preview result and save/apply the changes. When the virtual background is set, the setting will be saved locally in the application, and the virtual background will be applied for each call/meeting.
- Remove Background
- Fuzzy Background
Calls Settings
Call Features
Set Call Transfer, voicemail password, etc. Press “Edit” button to be redirect to the UCM management page.
Ringtone Settings
- Play Ringtone: Check/uncheck to whether play ringtone.
- Call Ringtone: Select the ringtone to play for incoming calls. Custom ringtone is supported.
Incoming Call Settings
- Auto answer: Enable this option to have Wave answer the calls received automatically.
- Call Waiting: If enabled, new incoming calls can be received during calls.
- Call Waiting Tone: If enabled, a tone will be played when there is a call waiting.
Dial Plan Settings
- Dial Plan Rules
Enable/disable dial plan rules. Only applicable to the Call tab’s dial pad.
- Dial Plan Settings
Set the dial plan rules grammar for the number dialed. You can either enable the dial plan to have Wave take it into consideration, or to ignore completely when dialing numbers.
Here are the valid values:
1, 2, 3, 4, 5, 6, 7, 8, 9, 0, *, #, T,+, A-Z, a-z
Dial Plan rules:
- xx – Any 2-digit number
- xx+ – At least 2-digit number
- xx. – At least 1-digit number
- xx? – 1-digit or 2-digit number
- ^ – Reject
- T – Delay call after matching
- | – Or
- + – Add + to the number
- [3-5] – Dial the number 3, 4, or 5
- [147] – Dial the number 1, 4, or 7
- <2=011> – When the dial number is 2, it is replaced with 011
- Set \{x+\} – All all digital numbers to make outgoing calls
- “+character” – It indicates a fixed character. Note: it does not need to be added in front of * and #, and it cannot be added in front of T^,; and |
- Set \{X+\} Allow all 0-9, A-Z, a-z inputs with at least one character
Example:
- Example 1: {[369]11 | 1617xxxxxx} – Allow 311, 611, 911, any 10-digit call that starts with 1617 to make the outgoing calls.
- Example 2: {^1900x+ | <=1617>xxxxxxx} – It will refuse to dial numbers starting with 1900, and adding the prefix 1617 when dialing any 7-digit number
- Example 3: \{ax+\} – It will dial a number starting with a and followed by at least 1-digit
- Ignore Dial Plan
If enabled, outgoing calls will ignore dial plan rules.
- Dial Tone
Enable this option to play a tone for each key when dialing a number using the number pad.
Call Interface Customization
- Call Toolbar
You can also customize the buttons to be displayed at the bottom toolbar of the call interface, and put common buttons at the bottom bar and display permanently. You can set up on Settings -> Calls, and select the preferred buttons to be displayed.
Press “Edit” to customize the call toolbar.
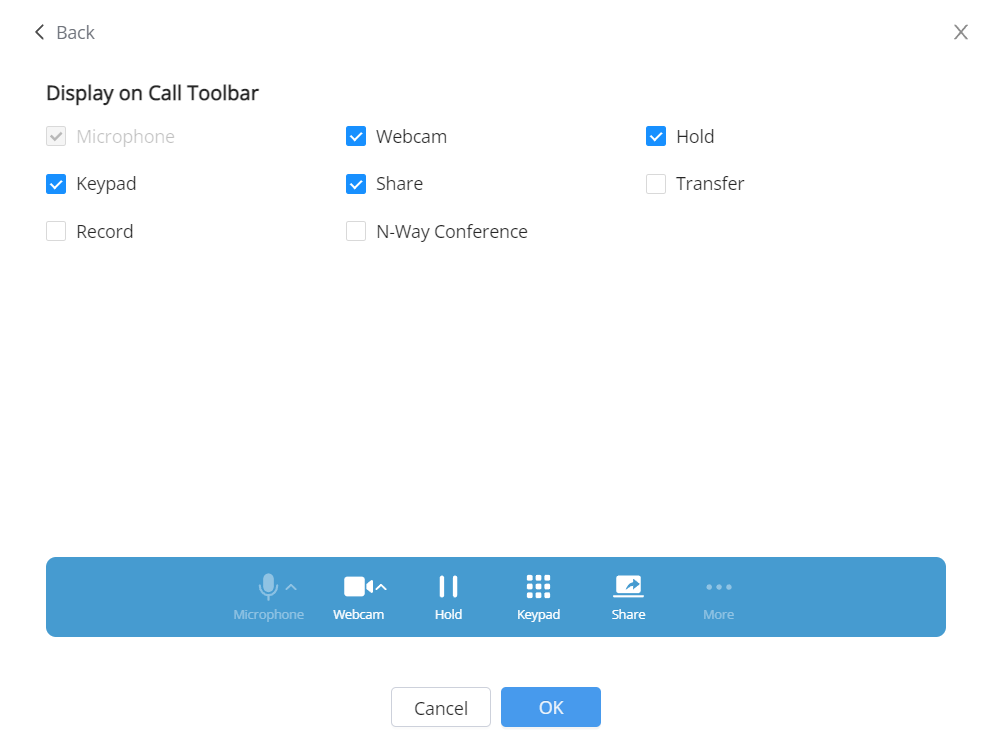
- Call Feature Shortcuts
You can set shortcut keys such as DTMF and add-in commands, which are commonly used on the call interface. After the shortcut keys are set, you can perform operations during a call or meeting with one-click. Users can configure this feature in Settings -> Calls.
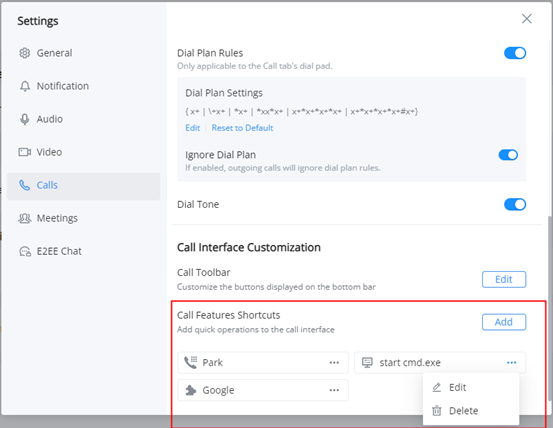
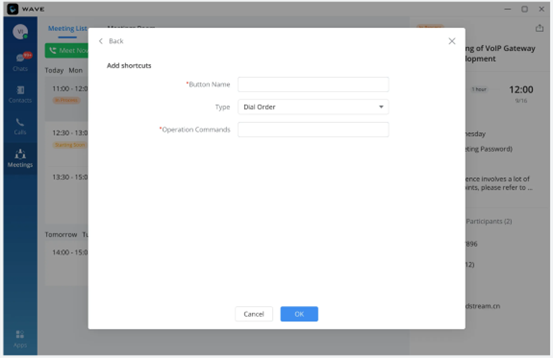
After setting the shortcut key, you can click the “More” option on the Call/Meeting interface to view the key.
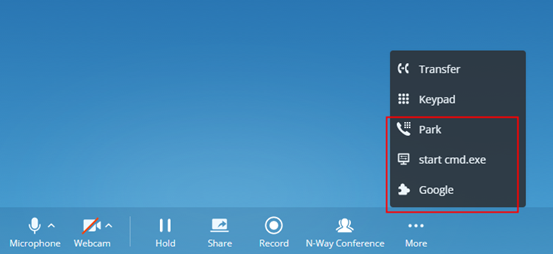
Button Name | You need to fill in the display name of the button on the interface. |
Type |
|
Command | Enter the feature code or enter the system command, or select the add-in to run. |
Click the button

following the shortcut key on the Settings page to modify/delete the shortcut key.
Meetings Settings
Video Layout
- Default Layout
Select the default layout in Meetings: “Tiled Screen Layout” (Default) or “Speaker Layout”.
- Hide Non-video Participants
Check to hide non-video participants in the meetings video layout. (Default is disabled)
Display Settings
- Show Chat Bubble
Check/uncheck to enable/disable displaying the chat bubbles during meetings. (Default is enabled)
- Display Shared Toolbar
Check/uncheck to enable/disable displaying the sharing toolbar. (Default is enabled)
The sharing toolbar will be displayed after sharing the screen or application.
Meeting Interface Customization
- Meeting Toolbar
You can also customize the buttons to be displayed at the bottom toolbar of the meeting interface, and put common buttons at the bottom bar and display permanently. You can set up on Settings -> Meetings, and select the preferred buttons to be displayed.
Press “Edit” to customize the meeting toolbar.
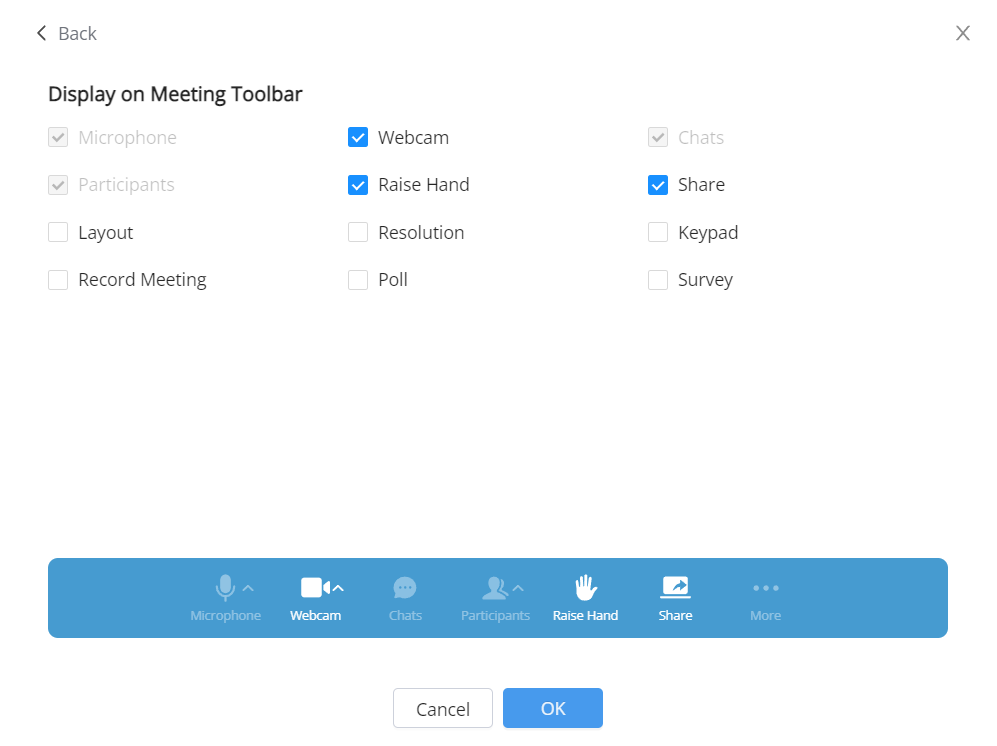
- Meeting Feature Shortcuts
You can set shortcut keys such as DTMF and add-in commands, which are commonly used on the meeting interface. After the shortcut keys are set, you can perform operations during a meeting with one-click. Users can configure this feature in Settings -> Meetings.
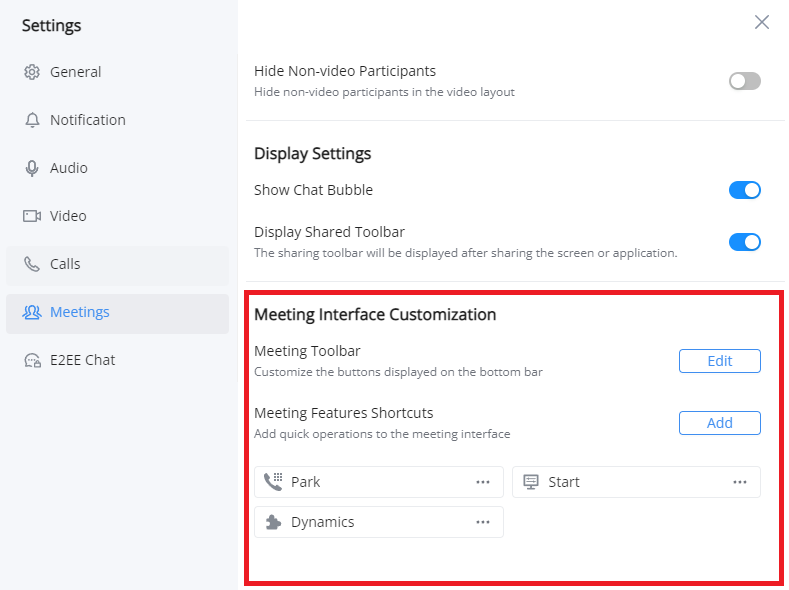
After setting the shortcut key, you can click the “More” option on the Call/Meeting interface to view the key.
Button Name | You need to fill in the display name of the button on the interface. |
Type |
|
Command | Enter the feature code or enter the system command, or select the add-in to run. |
Click the button
following the shortcut key on the Settings page to modify/delete the shortcut key.
E2EE Chat Settings
Sync Secret Key
If the user wants to use another device to log in and the local secret key is not up to date, the user needs to sync the secret key before using the E2EE chat feature. The user can synchronize the secret key by exporting it then importing it in the other device. Please follow the sections Export a secret key and Import a secret key below.
Export Secret Key
Wave allows exporting the privacy key from one device to another, to do that, please click on you profile picture on Wave Desktop interface to open Wave Settings menu, the click on E2EE Chat Settings. The following window will appear:
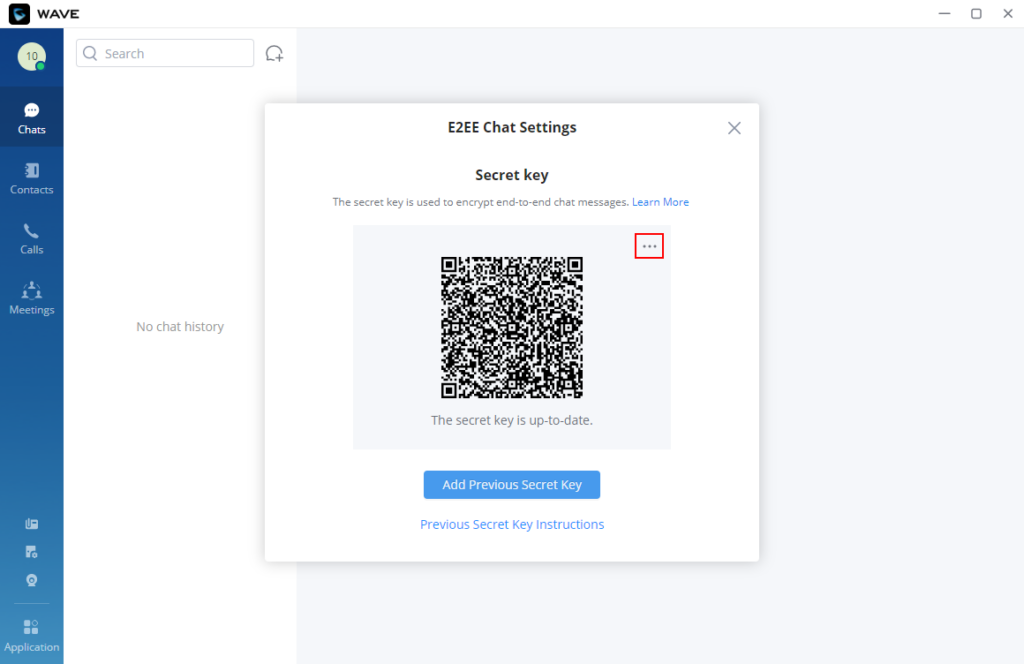
The select Export Secret Key
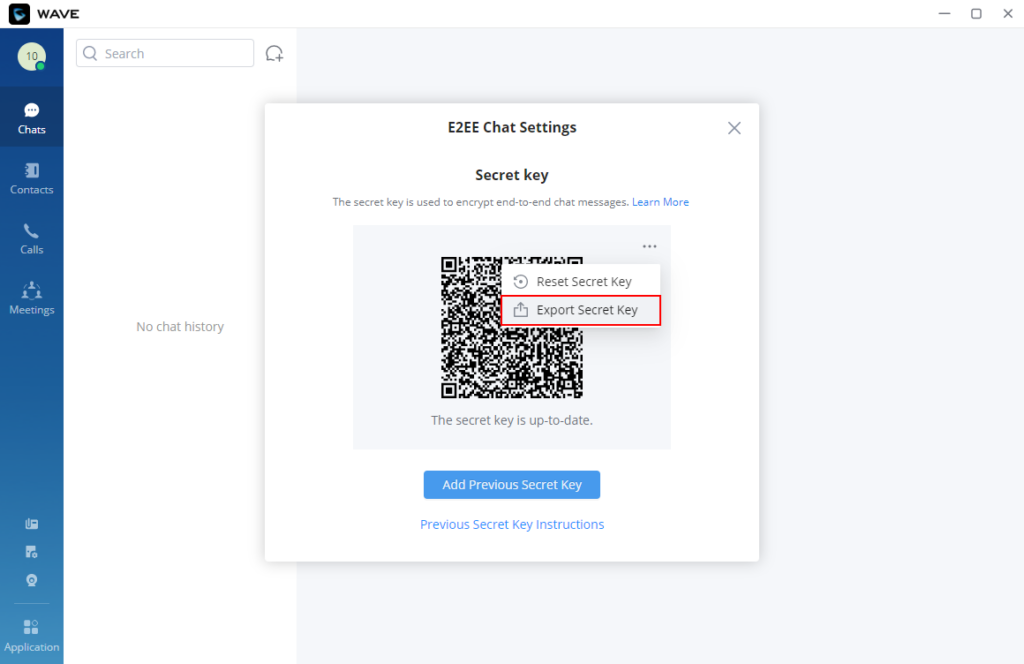
Then select the directory where you want to save the key file, then click Save.
Add Previous Secret Key
To import a secret key, click on Add Previous Secret Key as the screenshot below shows
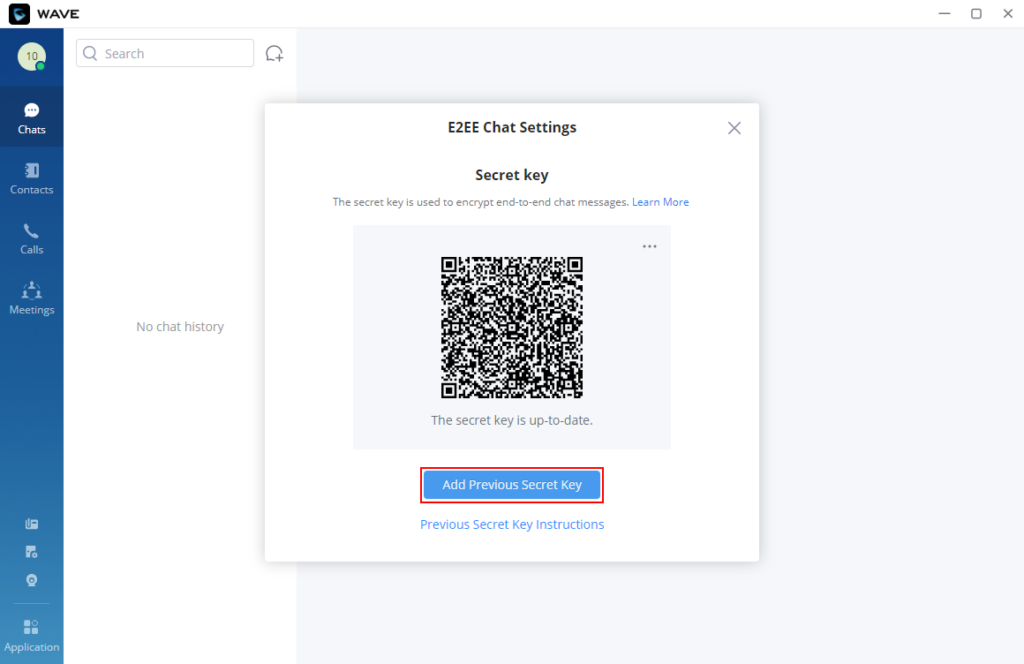
Select the secret key from the location where it is stored, then click on Open, and the key will be imported to Wave Desktop.
Reset Secret Key
To reset Wave end to end encryption to the initial key, open E2EE Chat Settings, click on the three dots on the top right side of the key window and then select Reset Secret Key.

Keyboard Shortcuts
Wave desktop supports performing many actions quickly by using keyboard shortcuts. These are the keyboard shortcuts and the actions that they correspond to.
General | |
Display Keyboard Shortcuts | Ctrl + . |
Open Filter | Ctrl + Shift+ F |
Open a New Chat | Ctrl + N |
Open Help | F1 |
Export Logs | Ctrl + Shift + L |
Close/Exit | ESC |
Navigation | |
Open the Chat Tab | Ctrl + 1 |
Open the Contacts Tab | Ctrl + 2 |
Open the Call Tab | Ctrl + 3 |
Open the Meeting Tab | Ctrl + 4 |
Open the Application Tab | Ctrl + 5 |
Message | |
Search Current Chat | Ctrl +F |
Enter Compose Box | Alt + Shift + 2 |
Attach File | Ctrl + O |
Edit Last Sent Message | Ctrl + Arrow up key |
Send Message | Available options:
|
Calls and Meetings | |
Toggle Mute | Ctrl + Shift + M |
Temporarily Unmute | Long press the button Space |
Display Shared Toolbar | Ctrl + Shift + Space |
Invite Participants | Ctrl + Shift + P |
Open Meeting Chat | Ctrl + Shift + S |
Raise/Lower Hand | Ctrl + Shift + K |
End Call/Leave Meeting | Ctrl + Shift + Q |
Speed Dial | Select the number or email on the desktop or application and press the shortcut to dial to the selected number or email. Ctrl + Shift + E |
Answer | Ctrl + Shift + H |
To open the list of keyboard shortcuts, please click on your profile picture, and choose “Keyboard Shortcut” from the list.
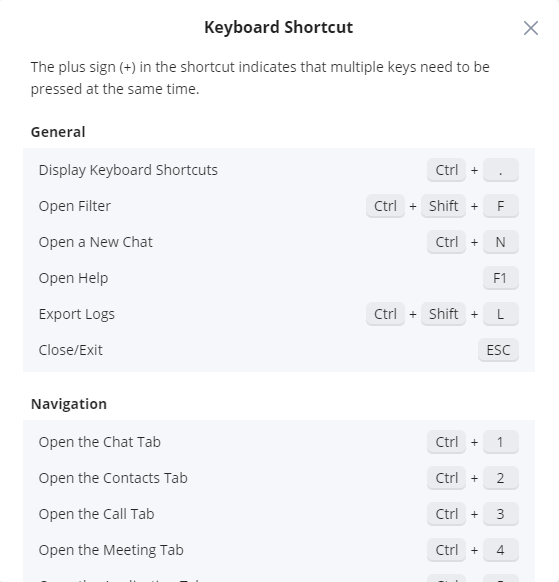
Help and Feedback
Users can go to the settings menu and click “Help and Feedback” to display the, What’s New, help, feedback, and exporting logs menu.
What’s New
A popup window will display the new features introduced in the current version.
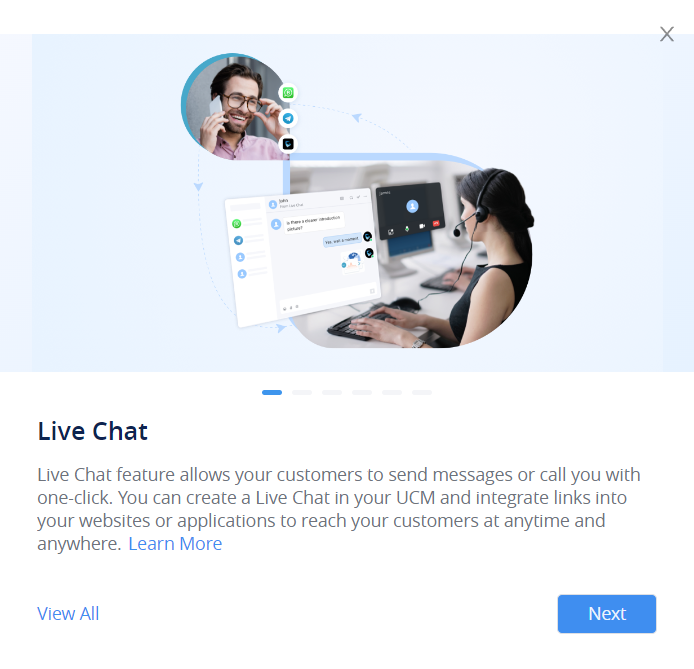
User Guide
If the user has any questions while using Wave application, the user can click “User Guide” option to go to the official website of Grandstream and view the user guide of Wave application.
Feedback
If the user encounters any problems with Wave application, or the user wants to share any suggestions about Wave application, the user can click “Feedback” option to connect to the Grandstream Feedback System. It allows users to share feedback and we can collect questions/suggestions from users, so that we can provide better using experiences for users.
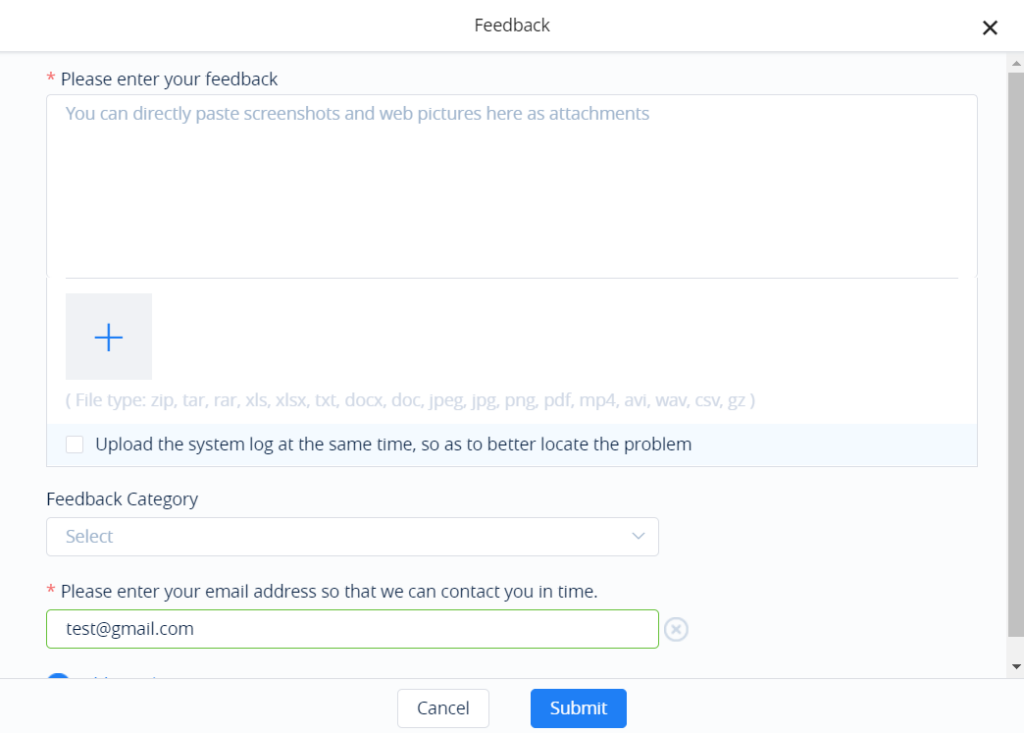
Export Logs
Users can go to the settings interface and click “Export Logs” option to export the application logs. If the user encounters any issues about the Wave application, the user can export the logs and save them in the PC. The exported logs can help users to troubleshoot the issues so that we can offer users better using experiences.
About
- Users can go to the settings interface and click “About” to get more details about the Wave application.
- Display the current version of the Wave application.
- If there is an updated application version, the user can click “Update Version” to upgrade the application.
- The user can click on “Privacy Terms” to view the privacy terms of Wave application.
- The user can click on “Help” to direct to Grandstream Official website to view the Wave application user manual.
Download Mobile Client
Users can download Wave application from Grandstream Official website. When the application has been downloaded to the local PC, the user can follow the instructions to install the application.
https://fw.gdms.cloud/wave/download/
Intergrate Wave
Users can learn about the available Add-in API and SDK for further development to integrate Wave with other platforms. When clicked, the user will be redirected to the corresponding instruction guide.
- Add-in Development Instructions
- SDK Development Instructions
UCM Remote Connection
Users can learn more about UCM RemoteConnect services by accessing this menu.
The users will be redirected to UCMRC website: https://ucmrc.gdms.cloud/home
Log out
Users can click “Log out” to jump to the login interface and log in again.
APPLICATIONS
More applications interface screenshot is shown as below:
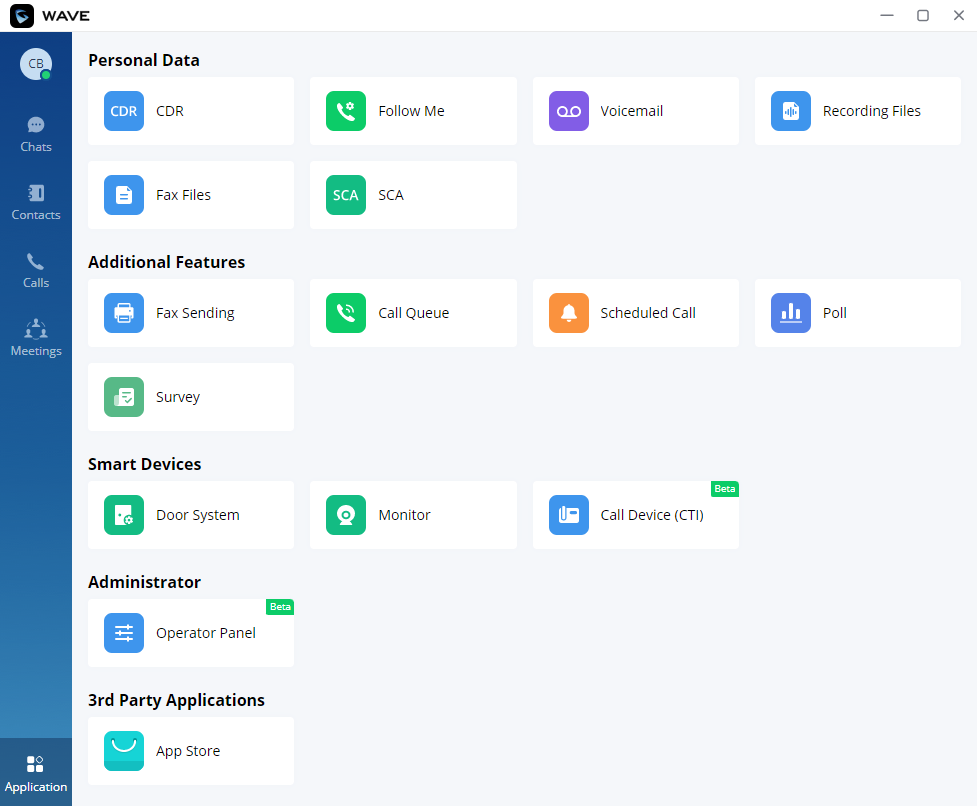
Users can click “More” button on the left menu on the main application UI to view more applications. It includes personal services, value-added services, and smart devices. Users can also set door system and monitors according to the requirements.
Services
The services include personal services and value-added services.
The Wave application integrates UCM’s User Portal functionality. Users can directly enter the User Portal interface through the services entry. Please see the screenshot below:
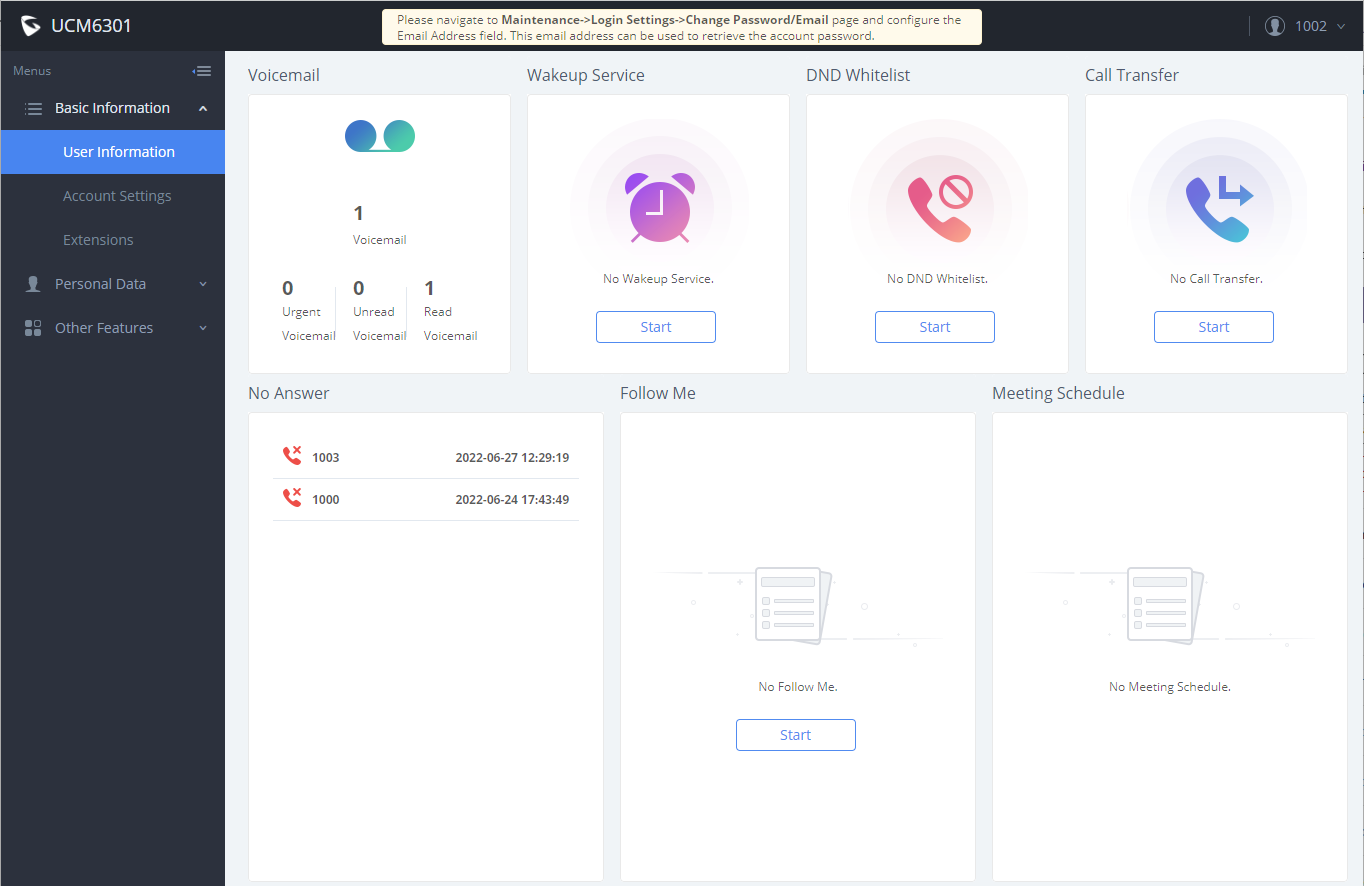
Users can set the following personal services and value-added services:
- CDR
- Follow me
- Voicemail
- Recording Files
- Fax Files
- SCA
- Fax Sending
- Call Queue
- Wakeup Service
For more information about the services, please refer to the UCM User Portal Guide in Grandstream official website.
Smart Devices
Door System
Please follow the instructions below to set up the door system:
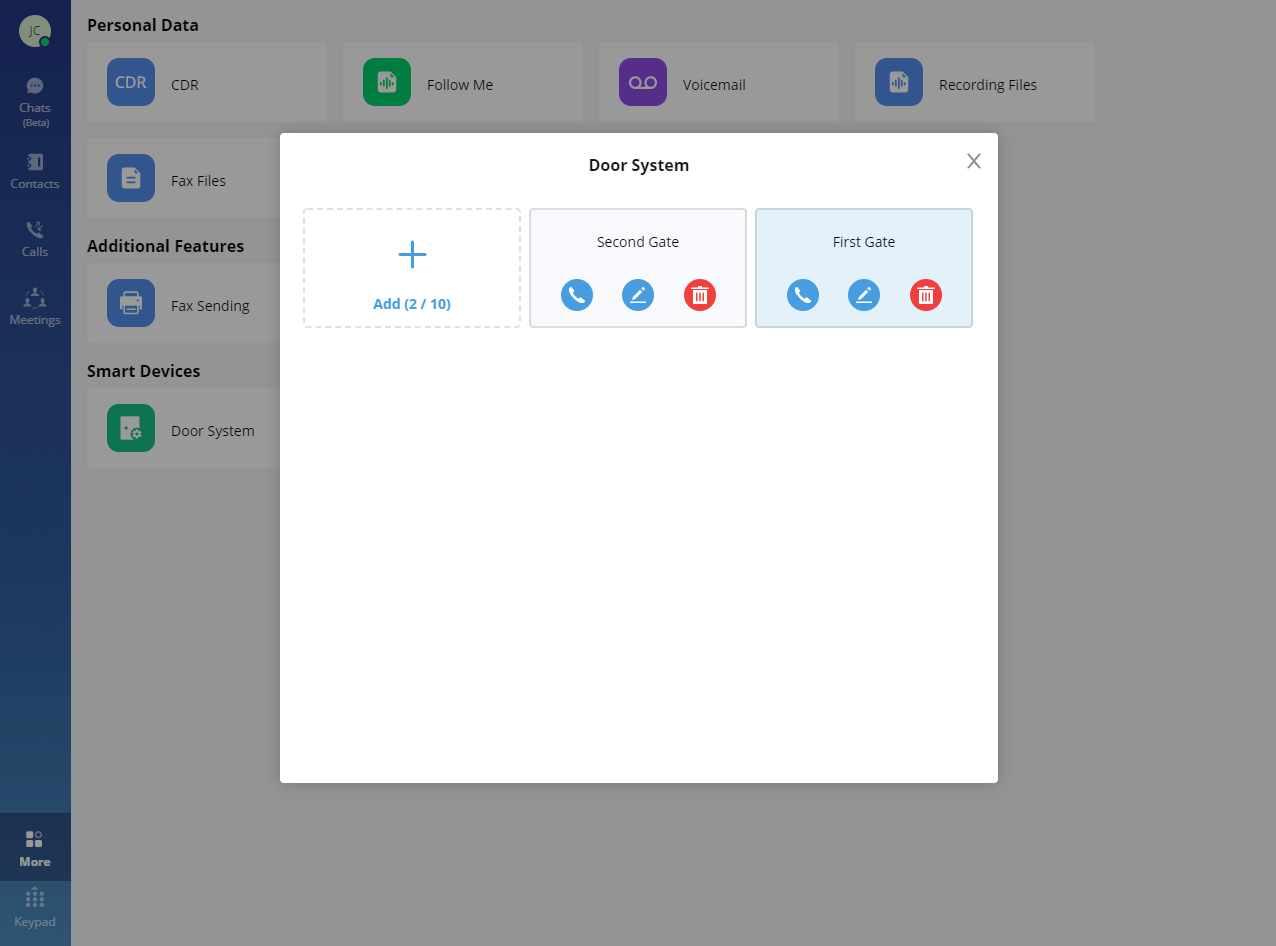
Users can click “Add” button to set up the relevant parameters for door system. Please see the screenshot below:
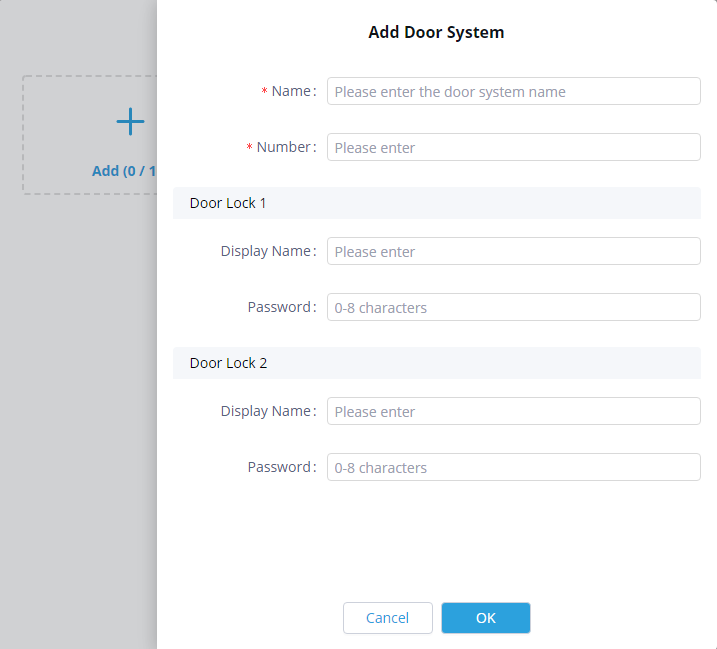
When the door system is set up, the user can receive an incoming call from the door system once someone rings the doorbell. Please see the screenshot below:
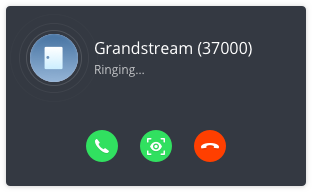
The user can click ![]() button to answer the call, and initiate the video call, as the screenshot shows below:
button to answer the call, and initiate the video call, as the screenshot shows below:
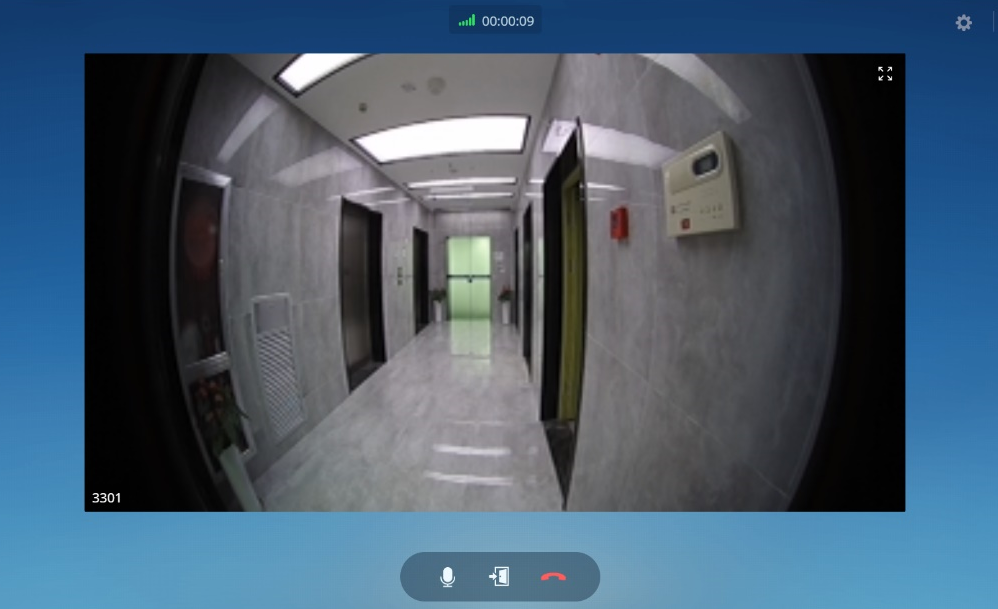
Users can click  button to open the door.
Monitor
This feature allows the user to retrieve the video feed of the monitoring devices that he/she has permission to user. These devices and permissions are handled by the UCM. To know how to configure these devices on the UCM side, please refer to this guide below.
UCM63XX Device Management Guide
CTI Mode
CTI mode allows the user to manage calls received on the desk phone through the Wave Desktop client. For example, if you receive a call on your desk phone you can choose to answer it or reject it through the Wave Desktop.
When the user enables CTI function, the DND status in the Wave account and Desk phone will be synchronized. If the user sets DND in Wave Desktop application, the same account in the Desk phone will be set as DND; If the Desk phone disables DND status, the same account in the Wave application will disable the DND function at the same time.
For the point-to-point call, if the user has enabled the CTI function, the user can dial/end the call, or answer/reject the call through the Wave application for the Desk phone.
If the user joins the meeting through the Wave Desktop client, the account in the Desk phone will also join the meeting simultaneously. During the meeting, if the user mutes/unmutes the microphone through the Wave Desktop application, or end/leave the meeting, the account in Desk phone will also mute/unmute, or end/leave the meeting simultaneously.
First you need to go to “More” tab on your Wave Desktop client, then select CTI Mode.
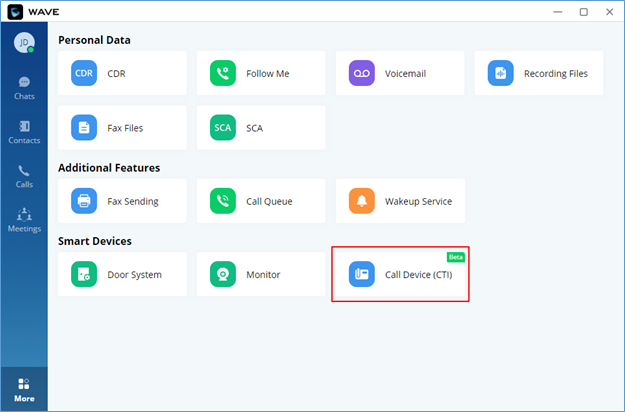
Then click on “Bind Device”
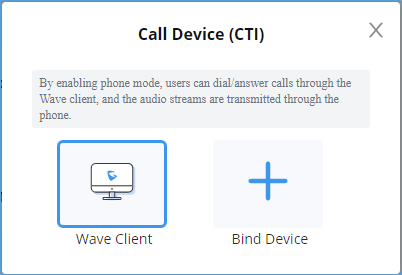
Enter your desk phone IP address

Then enter the authentication code that is displayed on your desk phone’s screen
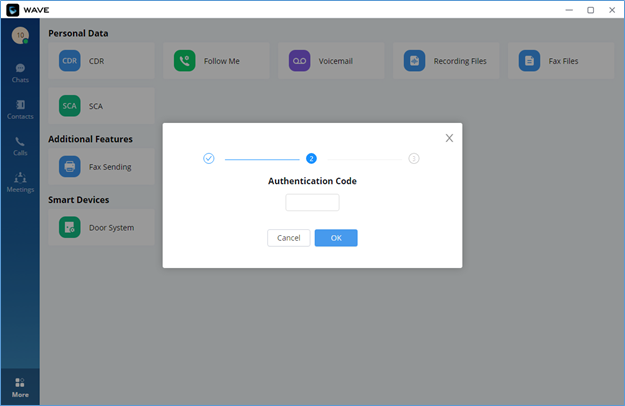
Once that’s the one this prompt will appear informing you that the binding has been established successfully
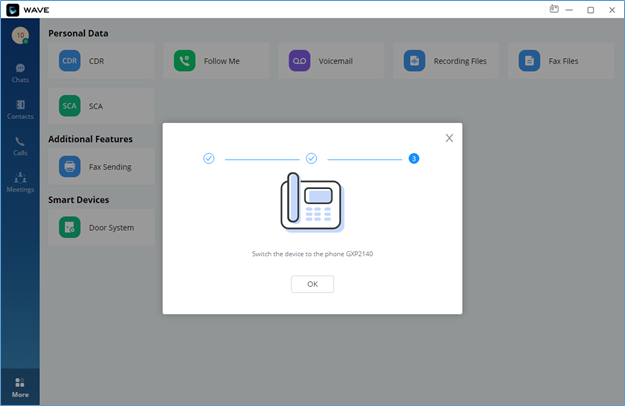
You can choose which device to receive the call on, to do that go to the top right-hand corner of the screen and click on the call device icon ![]() then pick which device you want receive the calls on.
then pick which device you want receive the calls on.
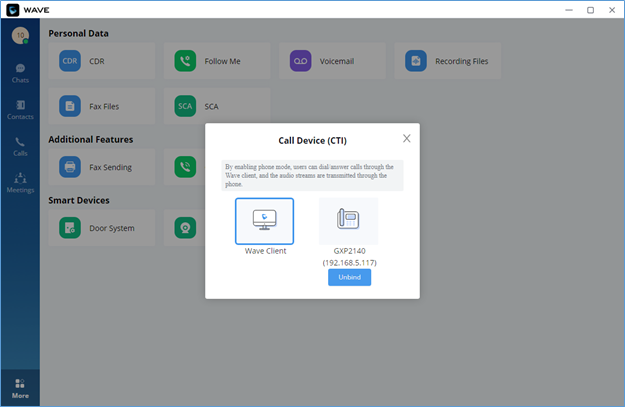
Operator Panel
Operator Panel in the Wave application is used as call management platform, including Extension module, Call module, Ring Group module, Call Queue module, Parking Lot module, and Voicemail Group module, as the screenshot shows below:
In the Operator Panel, the administrator who has the permission can manage calls from this module. The administrator needs to get the permission from UCM Web UI -> Call Features -> Operator Panel and add the administrator’s Wave account in the Operator Panel list before using this function. The administrator can simply click/drag the calls/extensions to manage incoming/outgoing multiple calls in real time, it greatly improves the call management efficiency for users.
The administrator who has the permission can click “More” menu on left side of the Wave application UI and click “Operator Panel” to access to the management platform.
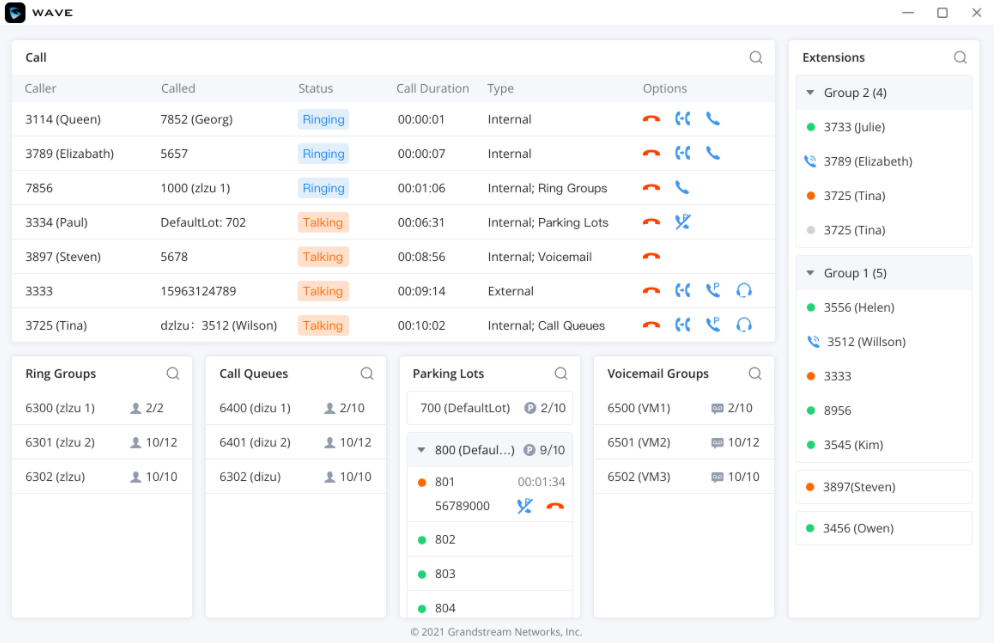
The user can customize the panels that will be displayed on the board of the operator panel.
To do that, please click on the settings icon ![]() on the top left of the operator panel, the tick off the panels you would like to hide
on the top left of the operator panel, the tick off the panels you would like to hide
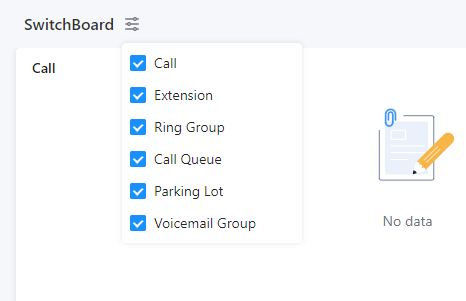
Extension
The Extension list will show all extensions and extensions group you have permission for management, including extensions/extensions group names, and the extensions status.
The administrator can move the mouse over the extension to view the status of the extension, received voicemail amount and unread voicemail amount.
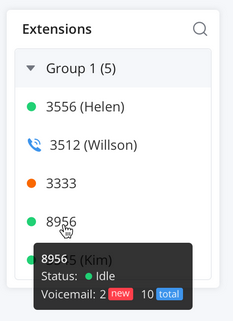
 : Idle
 : Ringing
 : Call in progress
 : Offline
Call
The Call module displays all calls allocated to local management extensions, ringing groups, call queues, parking lots, and voicemail. The administrator can pick up the call, monitor the call, transfer/park/end the call, as the screenshot shows below:
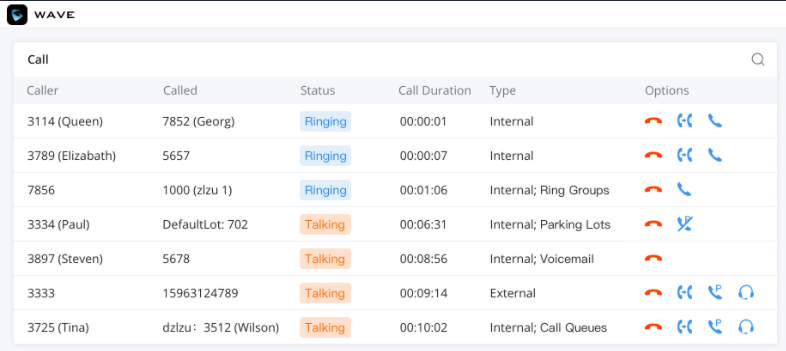
 : Call Pickup. Users can click the button to answer the call.
- : Monitoring. Users can click the button to monitor the call, including Call Monitoring, Whisper Monitoring, and Barge Monitoring.
 : Transfer. Users can click the button to transfer the call, including Blind Transfer and Attended Transfer.
 : Call Park. Users can click the button to park the call to the corresponding parking lot.
 : End. Users can click the button to end the call.
Call Pickup
When one of the managed extensions receives an incoming call and the call is not answered, the administrator can pick up the call on Operator Panel.
Step 1: The user can click ![]() button to pick up the ringing call on the Operator Panel. The system will transfer the call to the administrator.
button to pick up the ringing call on the Operator Panel. The system will transfer the call to the administrator.
Step 2: The call is answered in the administrator’s client successfully.

Monitoring
The monitoring methods include Call Monitoring, Whisper Monitoring, and Barge Monitoring. The administrator can select to monitor the calls based on different service scenarios.
- Call Monitoring: The administrator can monitor the call directly. The line of the administrator will be muted, both caller and callee cannot hear the audio from the administrator.
- Whisper Monitoring: The administrator can select to join the caller or callee side to assist the caller or callee through the call. Only the monitored extension can hear the audio from the administrator during the call.
- Barge Monitoring: The administrator can join the call to assist the caller and callee through the call. Both caller and callee can hear the audio from the administrator.
Step 1: On the Operator Panel, select the call which the user wants to monitor.
Step 2: Click on ![]() button, and select the monitoring method between Call Monitoring, Whisper Monitoring, and Barge Monitoring. As the screenshot shows below:
button, and select the monitoring method between Call Monitoring, Whisper Monitoring, and Barge Monitoring. As the screenshot shows below:

Step 3: Click Call Monitoring button or Barge Monitoring button, the administrator will receive the incoming call from the caller’s extension, and the administrator can click answer button to pick up the call.
Step 4: Click Whisper Monitoring button to select the monitored extension from the popup window. As the screenshot shows below:
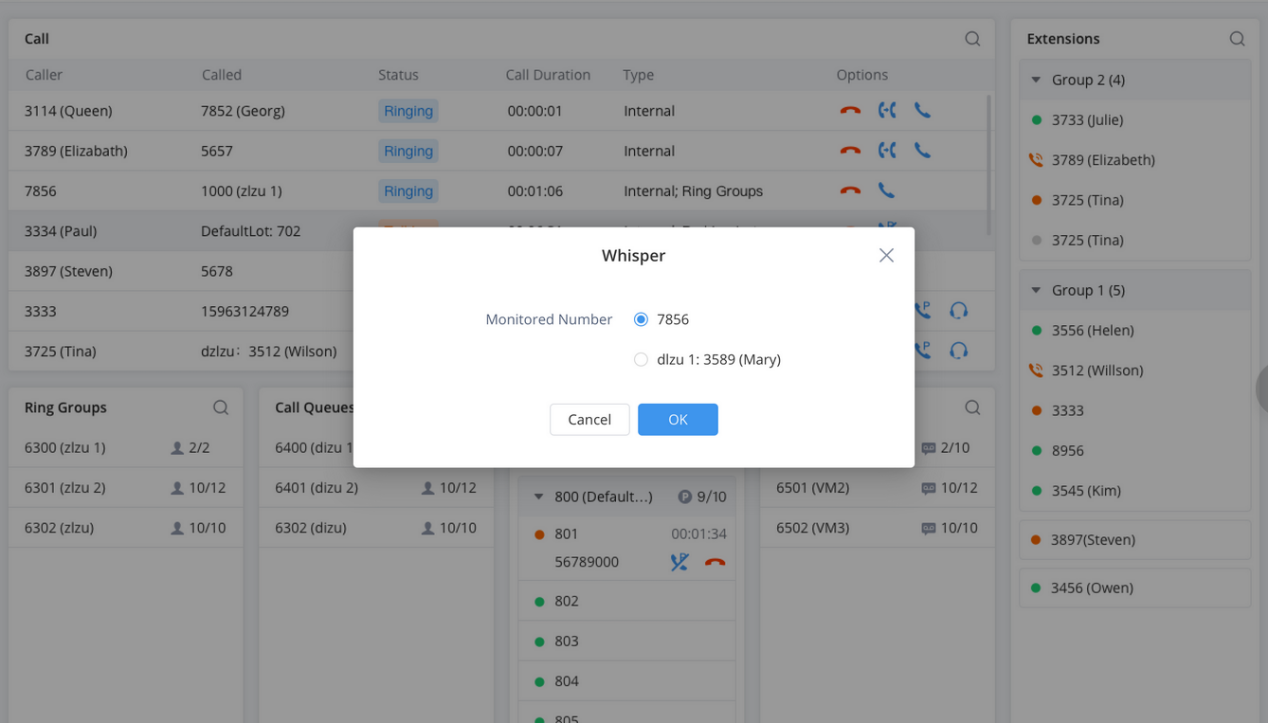
Step 5: The user can click “OK” button, and the system will send an incoming call to the administrator’s extension.
Step 6: Once the administrator’s extension receives the incoming call from the monitored extension, the administrator can click answer button to monitor the call.
Transfer
The administrator can transfer the selected calls via Operator Panel, including Blind Transfer and Attended Transfer.
Blind Transfer
Step 1: There is a call which is in progress between John and Arthur.
Step 2: The administrator can select the call and click ![]() button following the call, select Blind Transfer, and select the transferred extension 1001 as the screenshot shows below:
button following the call, select Blind Transfer, and select the transferred extension 1001 as the screenshot shows below:
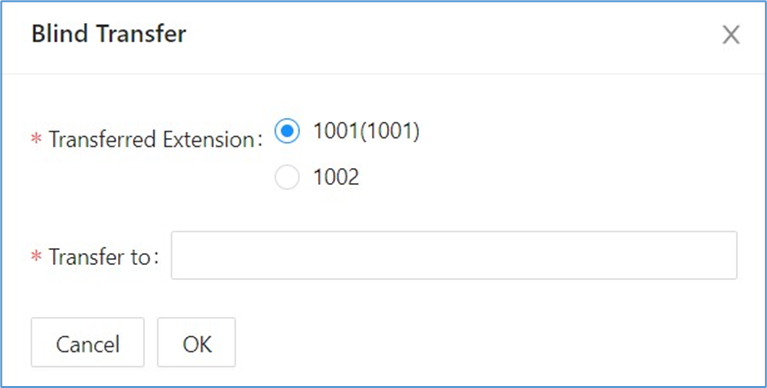
Step 3: Enter the transferring target extension 1003 in “Transfer to” field and click “OK” button.
Step 4: The extension 1003 will receive the new incoming call from extension 1001.
Step 5: The call between extension 1001 and 1002 will be ended. The call between extension 1001 and 1003 will be established. The Blind Transfer is successful.
On the Operator Panel, the administrator can drag the call to Ringing Group, Call Queue, or Voicemail Group to blind transfer the call to these groups.
Attended Transfer
Step 1: There is a call which is in progress between extension 1001 and 1002.
Step 2: The administrator can select the call and click ![]() button following the call, select Attended Transfer, and select the transferred extension 1001 as the screenshot shows below.
button following the call, select Attended Transfer, and select the transferred extension 1001 as the screenshot shows below.
Step 3: Enter the transferring targe extension 1003 in “Transfer to” field and click “OK” button.
Step 4: The extension 1003 will receive the new incoming call from extension 1002. The call of extension 1001 will be held. The call between extension 1002 and 1003 will be established. Once the extension 1003 hangs up, the call between extension 1001 and 1002 will be resumed.
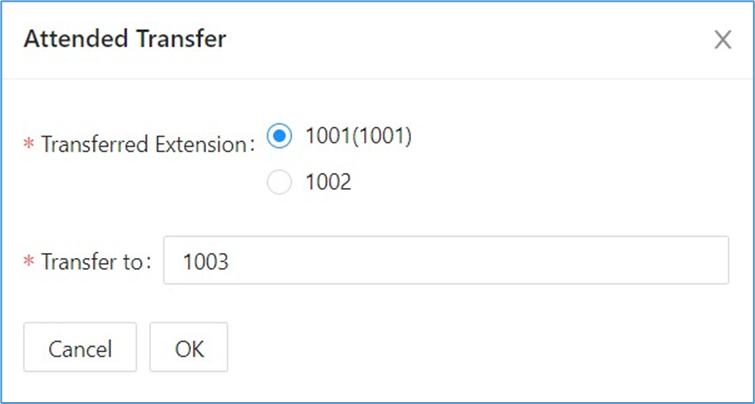
Call Park/Retrieve
The administrator can park the calls and retrieve the calls through Operator Panel.
Call Park
There are two methods to park calls.
Method 1:
Step 1: Select the call in Operator Panel which the user wants to park.
Step 2: Click ![]() button, and there will be a popup window to allow the user to select the parked extension, as the figure shows below:
button, and there will be a popup window to allow the user to select the parked extension, as the figure shows below:
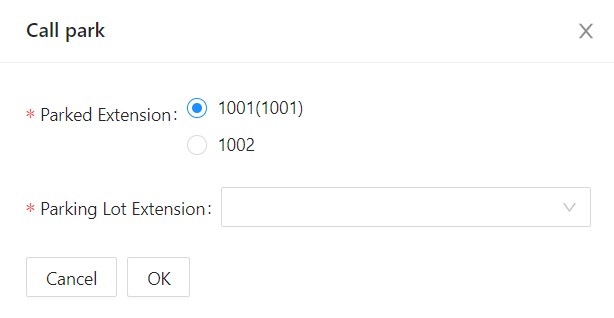
Step 3: Select the Parked Extension and Parking Lot Extension.
Step 4: Click “OK” button to park the call to the idle parking lot.
Method 2:
Step 1: Select the call in Operator Panel which the user wants to park.
Step 2: Drag the call to the idle parking lot on the Parking Lot list directly to park the call.
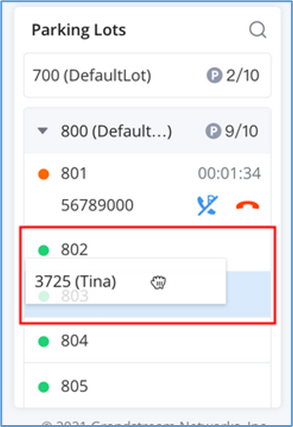
Call Retrieve
There are 2 methods to retrieve the parked calls.
Method 1:
Step 1: Select the call which the user wants to retrieve in the Operator Panel.
Step 2: Click ![]() button, the call will be retrieved in the administrator’s Wave account.
button, the call will be retrieved in the administrator’s Wave account.

Step 3: The administrator can click to answer the call to retrieve the parked call.
Method 2:
Step 1: Select the parked call which the user wants to retrieve from a busy parking lot.
Step 2: Click ![]() button, the call will be retrieved in the administrator’s Wave account. As the screenshot shows below:
button, the call will be retrieved in the administrator’s Wave account. As the screenshot shows below:
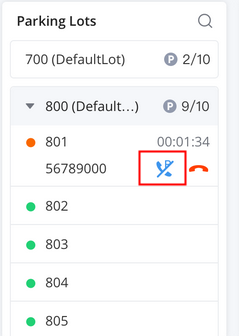
End Call
Step 1: Select the call which the user wants to end in Operator Panel.
Step 2: Click ![]() button and click “OK” button to end the call. As the screenshot shows below:
button and click “OK” button to end the call. As the screenshot shows below:
Step 3: The current call will be ended.

Ringing Group
The Ringing Group panel will show the information of each ringing group, including the number of free members and the total number of members.
The administrator can search the ringing group by number or name.
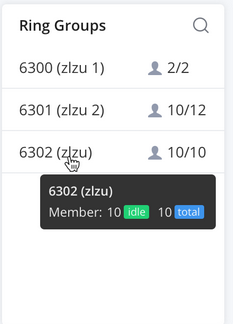
Call Queue
The Call Queue panel shows the information of each call queue, including the number of free members and the total number of members.
The administrator can search the call queue by number or name.
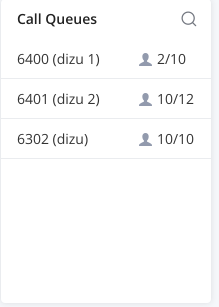
Parking Lot
The Parking Lot panel shows the status of each parking lot (parking extension).
If the parking lot is busy, the administrator can view the parking period, parking call information, and the administrator can also end/retrieve the parked call. As the screenshot shows below:
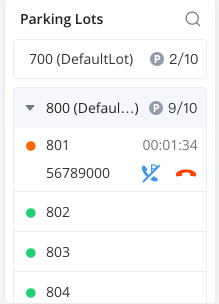
Voicemail Group
The Voicemail Group panel shows the status of each voicemail group, including the name and number of each voicemail group, and unread voicemail amount and total voicemail amount.
The administrator can search the voicemail group by number or name.
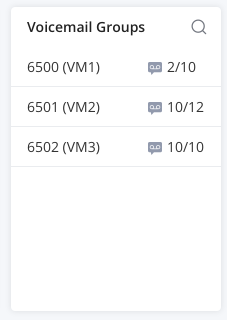
Add-ins
Wave desktop offers a number of add-ins with various features, for example, customer relationship management (CRM) which allow the user to track and synchronize contacts and call detail records, as well as productivity integrations like Google Drive, Office 365 and integrations for messaging service like WhatsApp. Or our conferencing solution IPVideoTalk. Please find below a comprehensive list of all the integrations offered on Wave desktop.
- CRM Add-ins
- Act! CRM
- Bitrix24
- Dynamics 365
- Freshdesk
- HubSpot
- SalesForce
- Sugar CRM
- Vtiger CRM
- Zendesk
- Zoho CRM
- Other Add-ins
- Office 365
- IPVideoTalk
- Wave Add-in for Outlook
- Wave H5 Add-in for Google Chrome
- Step 1: navigate to “Application” tab on Wave Desktop app then click on “App Store”, as the figure below shows:
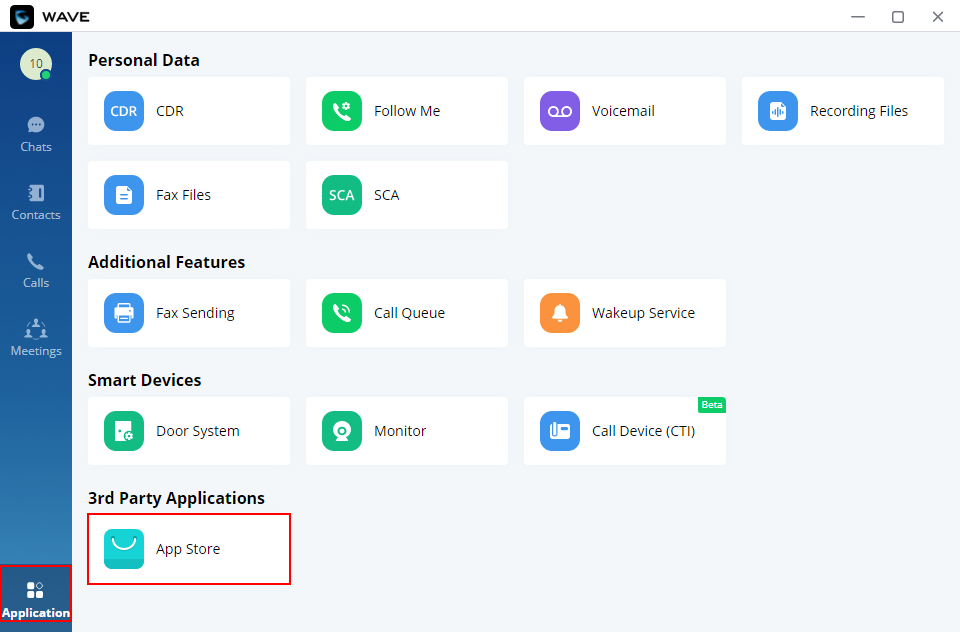
Step 2: Choose the add-in you want to install.
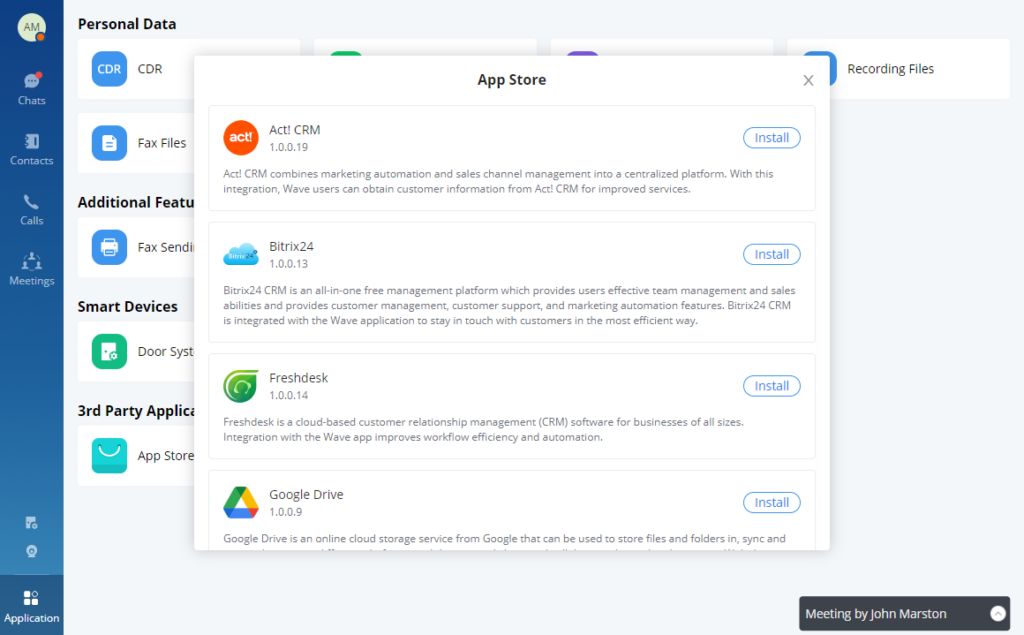
Once installed, the add-in will appear in the 3rd Party Applications section.
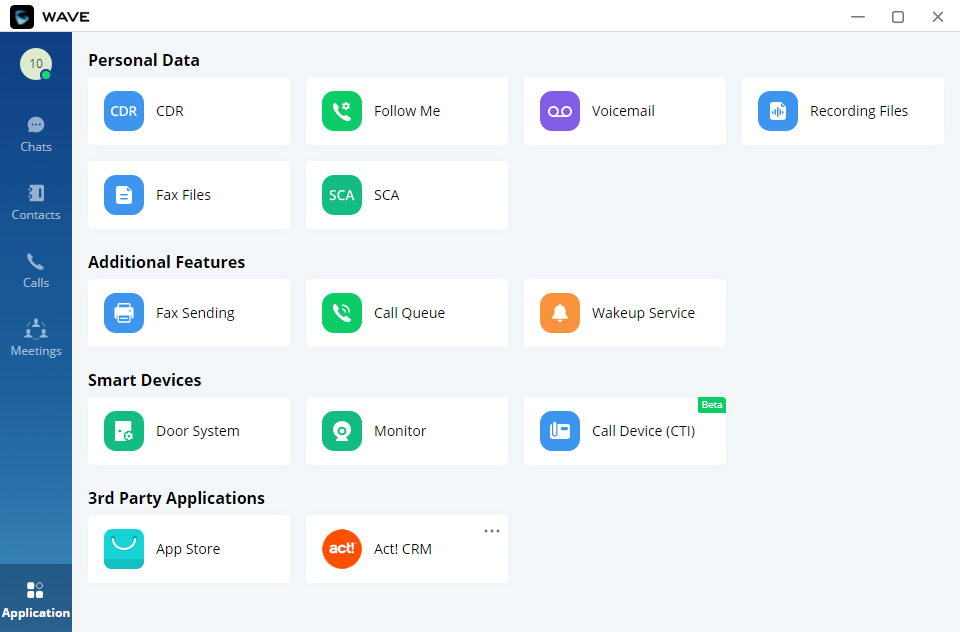
LOGO CUSTOMIZATION
Once done, the administrator can log in to the UCM management platform and customize the Wave LOGO, please refer to the UCM RemoteConnect user guide for details:
After customizing the logo, all Logos on the Wave page are displayed as customized Logos.

CHANGELOG
Version 1.25.9
- Added Slovenian language.
Version 1.25.6
- The user can now pin messages in group chats. [Pin Messages]
- The user can now save messages sent or received in chat. [Save Messages]
- The user can now view the processed Whatsapp Business and Telegram sessions. [Whatsapp and Telegram Sessions]
- The user can now convert simultaneous calls received on the lines into a meeting. [Multiple Lines]
- The user can now view the read status of messages received in chat groups. [View Unread Messages]
- The user can now reply directly through desktop notifications.
- Added support for the following CRM platform add-ins: Oracle NetSuite CRM, Odoo CRM, Monday Sales CRM, Capsule CRM, and Less Annoying CRM. [Add-ins]
- Users can now share desktop audio during a call. [Share Desktop Audio]
- Users can enable auto-login when logging in using the QR code scanning method. [Log In by Scanning QR Code]
- Added new shortcut keys: Raise Hand/Lower Hand, End Call, Leave Meeting. [Keyboard Shortcuts]
- Improved interfaces: added the CTI entrance to the home page, and hide the minimized call window when sharing screens or applications.
Version 1.23.18
- No major changes.
Version 1.23.16
- Added Dutch language. [Language]
- Updated Hebrew language display.
Version 1.23.13
- Whiteboard New Revision for In-meeting Sharing [Share WhiteBoard]
- Customize Shortcuts Keys in Meetings/Calls [Call Interface Customization] [Meeting Interface Customization]
- Customize Bottom Display Buttons in Meetings/Calls [Call Interface Customization] [Meeting Interface Customization]
- Merge Multiple Settings Pages to One Interface [SETTINGS MENU]
- Import/Export Personal Contacts [Import/Export Personal Contacts]
- Notification Assistant [Notification Assistant]
- Newly Added Keyboard Shortcuts [Keyboard Shortcut]
- Added search for the recent 6 months meeting history. [MEETING LIST]
Version 1.21.10
- Users can login into Wave Web/Desktop by scanning the QR code on Wave Mobile. [Log In By Scanning QR Code]
- Raise Hand feature has been added. [Multimedia Meeting]
- When a participant is muted, the participant can press and hold the space bar to activate the microphone. [Meeting Call Layout]
- The users can now hide meeting participants who do not have their webcam on. [Meeting Call Layout]
- Users can now configure a dial plan on Wave. [Dial Plan Settings]
- Users can now delete call history and voicemail all at once or by batches. [Call History][Voicemail]
- “Delivered” and “Read” messages are now supported in point-to-point chats. [View Unread Messages]
- Users can quickly delete multiple chats or choose to delete all the chats at once. [Delete Message]
- Poll and Survey features have been added. [Create Poll/Survey]
- The Operator Panel can now be customized by hiding some panels. [Operator Panel]
- Users can now annotate and sketch when they are sharing their screen. [Screen Sharing]
- Wave Desktop now supports keyboard shortcut keys. [Keyboard Shortcut]
- Wave Desktop now supports T9 contact search. [Contacts]
Version 1.19.12
- Added WhatsApp add-in, Office 365 add-in, and IPVideoTalk add-in to the Wave App Store. [Add-ins]
- Added Wave add-in on Outlook [Add-ins]
- Added Wave H5 Google Chrome add-in [Add-ins]
- Added a toolbar and a small personal window that appears during screen share [During a Call]
- Calls and meetings will now use their own window [During a Call]
- Users can now change what they are sharing without exiting the current screen share [Screen Sharing]
- Added a call/meeting ending indicator tone
- Added support for GSFEC, which improves audio packet loss protection capabilities.
- Users can now forward multiple chat messages to a contact [Forward Message]
- The local time of Wave contacts outside the user’s time zone will now be displayed at the bottom of chats and under contact details [Contact Local Time]
- Images can now be forwarded to other chats and rotated. Note: Forwarded images will not retain rotation [Send Files]
- Added end to end encryption feature to chat [End to End Encryption Chat]
- Added the Personal Contacts feature [Personal Contacts]
- Users can now schedule onsite meetings [Schedule Onsite Meetings]
- Meeting hosts can now edit and cancel upcoming meetings from the Meeting List page. Ongoing meetings can also be ended from this page. [Meeting List]
Version 1.17.8
- Made several UI improvements.
- The last 10 server addresses logged into will now be remembered. These server addresses can be viewed and selected by clicking on the arrow icon in Server Address field on the login page. [Logging In To Wave Desktop]
- Added Notification Settings that would allow the user to select the notifications to receive from Wave. [Application Settings]
- Users can now drag and drop items in the application page to the wave sidebar for easy access. Note: Users may need to long-click on an item before it can be dragged.
- Google Drive add-in is now available and can be installed from the Application →3rd Party Applications→App Store page. Once installed, users can log into their Google account and share files from it directly to chats. [Send Files]
- The following CRM add-ins are now available and can be installed from the Application→3rd Party Applications→App Store page: Bitrix24 CRM, Freshdesk CRM, HubSpot CRM, Zendesk CRM.
- Users can now select to download application updates in the background.
- Users can now have up to 6 simultaneous calls instead of just 2.
- Added a callback button to missed call notifications. [Missed Calls]
- Improved attended transfer functionality. [Attended Transfer]
- Improved CTI functionality. After a call between Wave Desktop and an IP endpoint is established and is converted into a meeting, the Wave Desktop user can start presentations during the meeting.
- When copy/pasting a number with special characters into the dial pad, the special characters will be automatically filtered out.
- Added the Change Group Owner option to the group chat settings to transfer ownership of the group to an existing group member. [Meeting Group Chat]
- Added additional emojis.
- Improved image viewing functionality when looking at images uploaded to chats.
- Users can now start and stop video recordings during meetings. Recordings can be viewed and played directly from Wave. If the meeting does not support video recordings, audio will be recorded instead. [Record an Ongoing Meeting]
- Users can now change the video feed layout of meetings by clicking on the More button during meetings and selecting either Speaker Layout (1 large video feed w/ others being smaller) or Tile Layout (equally sized video feeds). [Meeting Call Layout]
- Meeting hosts can now access options under each video feed such as muting, selecting the feed as the focus video, full screening the feed, or removing the participant from the meeting. [Meeting Call Layout]
- Users can now create a meeting group chat when scheduling a meeting. [Schedule Meeting]
- When there is only 1 participant in a meeting, and the meeting duration has reached 30 minutes, a prompt will appear asking whether to extend the meeting. If extended, the meeting will last another 30 minutes. Otherwise, the meeting will automatically end after 5 minutes. [End Meeting]
- If the duration of a meeting is about to reach 12 hours, and the meeting host is in the meeting, they can extend the meeting for another 12 hours once. The meeting will automatically end once another 12 hours have passed. If the meeting host is not in the meeting after the initial 12 hours, the meeting will automatically end. [End Meeting]
- Users can now transition a screenshare into a whiteboard. The last frame on the screenshare will be used as the background image of the whiteboard.
- Users can now see their own shared screen.
- Users can now also share their PC audio in addition to sharing their screens by toggling on the Share PC Audio checkbox when selecting the application or screen to share. [Screen Sharing]
- Users can now invite IP camera devices they have permission to access to meetings. Other meeting participants can view the video feed of invited IP camera devices.
- Added the Allowed to override Host Mute option to the Edit Meeting / Schedule Meeting pages → Advanced Settings page. If enabled, participants muted by the meeting host will be able to unmute themselves. [Schedule Meeting]
- The meeting start notification will no longer appear if the user is already in the meeting waiting room.
Version 1.15.11
- Added Basic call control support for Microsoft Teams-certified headsets.
Version 1.15.7
- Added support for sharing whiteboard and pdf files. [On Screen Sharing]
- Added support for joining meetings via entering the correspondent link. [Invite Participants]
- Added support to control whether chat group participants can invite other users. [Add Group Members]
- Added support for voice message in instant messaging. [Audio Message]
- Added support for searching within discussions.[Search Within a Conversation]
- Added support for downloading the chat history during and after a meeting has ended. [Download The Chat History]
- Microphone level can be checked directly when clicking “audio settings”. [Audio Settings]
- Added support for searching for contacts within a specific directory.
- Added support for enabling and disabling “Dial Tone”. [Application Settings]
- Added support for CRM add-ins.
Version 1.13.9
- Made several UI improvements.
- Added ability to change date and time format. [Date/Time Format]
- Added Portuguese and Vietnamese language support. [Table 2: Wave Desktop Specifications] [Language]
- Added support for recording an ongoing point-to-point call. [Record an Ongoing Point-to-Point Call]
- Added support for recording an ongoing Wave meeting. [Record an Ongoing Meeting]
- Meeting hosts can now view the list of invited participants that don’t attend a meeting. [Invitees List]
- Meeting creators can now create group chats from past meetings and their participants. [Meeting Group Chat]
- Added Meeting Agenda information to Meeting Details.[Meeting Agenda]
- Added support for Call Flip function. [Call Flip Function]
- Added support for viewing contacts based on UCM contact privilege settings. [Contacts]
- Added support for restricting visibility of chat history when inviting contacts to a group chat. [Contacts]
- Added more emojis. [Reply with Emoji]
- Added support for emoji previewing when using emoji shortcuts. [Reply quickly with an emoji shortcut]
- Added support to delete messages that failed to send. [Message Sending Failure]
- Up to 500 users can be selected when creating a group chat. [Start a group chat]
- The server address field now has a character limit of 64 characters. [LOGGING IN TO WAVE DESKTOP]
- The Enter key can now be used to dial out. [Initiating a Call from Keypad]
- Added a file download failure prompt. [Send Files]
- Added a red box to the screen share feed. [Share Desktop]
- Added CTI support for GXP, GRP, and GXV endpoints. [CTI Mode]
- Improved noise detection and reduction during calls.
- Added support for displaying all the received and sent files in one list. [Files List]
- Added support for changing the group chat name quickly. [Change Group Name]
- Added the ability to quickly invite other participants to a meeting. [Quickly Invite Participants]
- Added Operator Panel function in Wave Desktop. [Operator Panel]
- Added Voicemail function in Wave Desktop. [VOICEMAIL]
- Added more functions in Chat module. [Reply with Emoji] [Receive New Messages]
- Added custom avatar function in Wave Desktop. [Custom Avatar]
- Added Help and Feedback module in Wave Desktop. [Help] [Feedback]
- Added chat bubble function during the meeting. [bubble function]
- Merged audio conference and video conference to Conference module. [Conference]
- Added noise detection function during the meeting and supported to enable noise reeducation mode in Audio settings for Wave Desktop users. [Audio Settings]
- Added support to login via User Password instead of the SIP Password. [LOGGING IN TO WAVE DESKTOP]
- Added support for Custom status on wave web. [Custom Status]
- Added support for sending 5000 characters on chat. [Send messages]
- Added possibility to send excel content under chat. [Send Excel Content]
- Added support for sending DTMF under meeting. [DTMF]
- Added possibility to complete meeting from the Meeting list. [COMPLETE MEEINTG]
- Added more account related settings. [Settings]
- Added more applications. [More Applications].
- Added support for virtual background. [Virtual Background Settings]
- Added support for alternative ringing speaker. [Audio Settings]
- Added New features in chat module: [Quote to Reply Message] [Delete Message] [Pin Chat Box to Top] [Hide Chat Box]
- Supported multi-lines calls. [MULTIPLE LINES]
- Supported to transfer an active call to a video conference. [Transfer to Meeting Room]
- Added public meeting room list and the list will show the meeting room status in different periods. [PUBLIC ROOM]
- Added to create a meeting with random meeting number. The meeting can be created as instant meeting or scheduled meeting. [Meet Now] [Schedule Meeting]
- Added to display the actual meeting duration and actual participants list for the previous meetings. [MEETING LIST]
- Supported to add participants from contacts/groups when scheduling a meeting. [Schedule Meeting]
- Supported to set meeting subject and add invitees for instant meetings. [Meet Now]
- Added meeting assistant module. When there are new meeting invitations, meeting reminders and meeting cancelation notifications, the meeting assistant will send messages to the host and participants. [MEETING MANAGEMENT]
- This is the initial version.