Live Chat feature is an online customer service solution that allows website visitors to directly create instant messaging sessions or make calls to customer service staff. This will help visitors contact you to solve their problems or learn more about your services, easily connecting all of your customers. The integration method of the Live Chat feature is very simple. You can simply integrate the link of the Live Chat feature to your website.
Applicable Scenarios:
Website Customer Service: Integrate customer service entry to your official website, e-commerce platform, products website, etc.
Hotel Room Customer Service: Provide a live chat QR code in the room, allow customers to scan the QR code, and contact the customer service staff.
Social Media Customer Service: Provide a customer service link or QR code in your email, Facebook, Twitter, Ins, and other messages.
Product After-sales: Provide customer service QR code in your hardware products or software products, and customers can scan it for free to contact after-sales service staff.
You need to create a Live Chat on your UCM and configure it.
Prerequisites: You have purchased a UCMRC plan for your UCM device.
Basic Live Chat Configuration
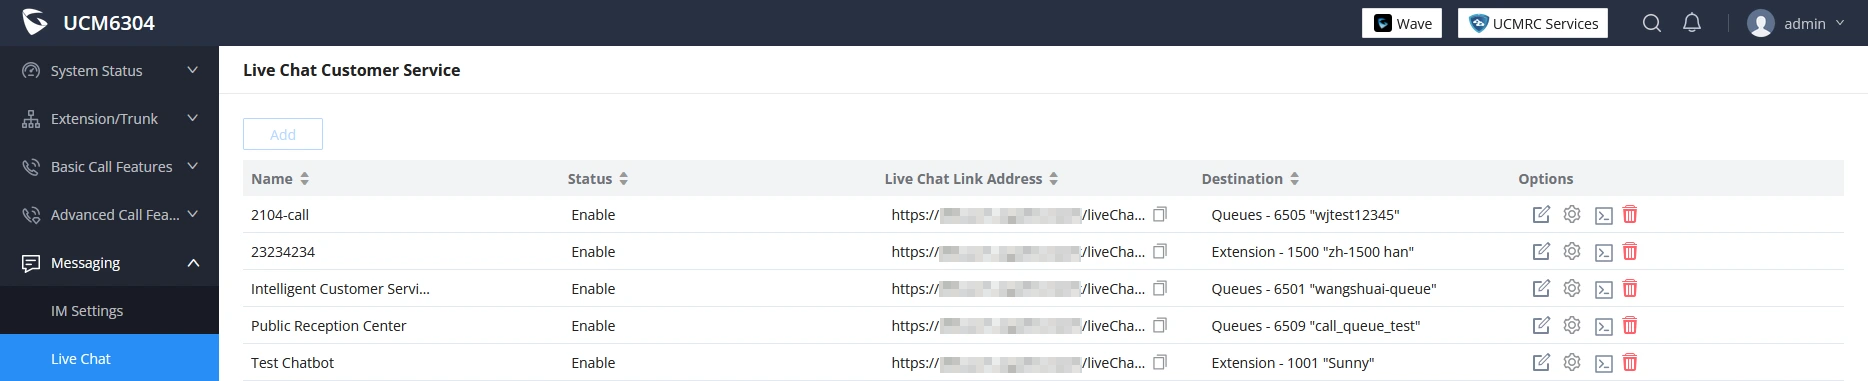
The administrator can log in to the Web UI of the UCM, and find the “Live Chat” configuration page under the “Message” tab:
UCM Live Chat
2. Click the “Add” button to create a “Live Chat”:
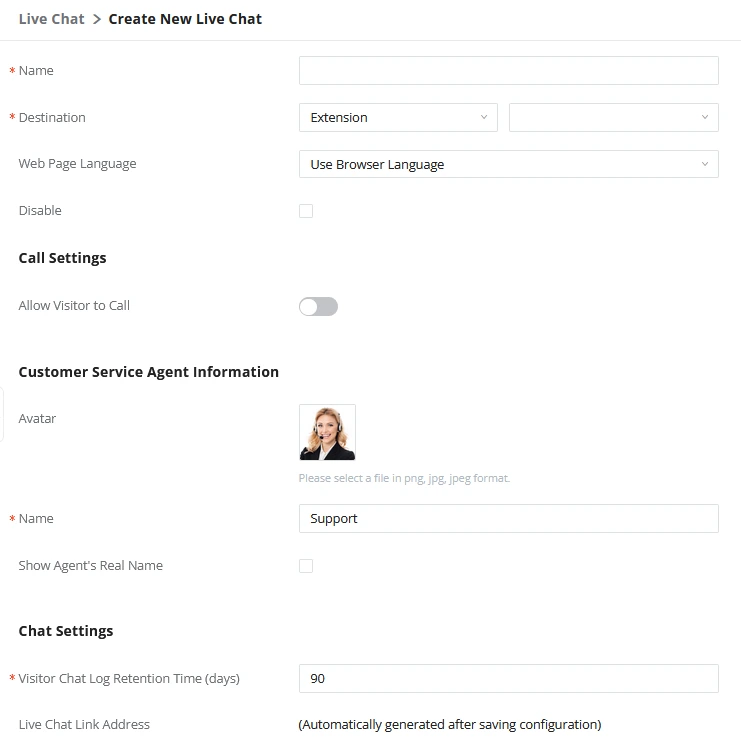
Create Live Chat
Name
Fill in the name of the Live Chat. It will be displayed on the chat session page of the agent (customer service), and the agent will know which Live Chat the visitor is accessing through.
Destination
Select the destination number, which is the extension or queue number of this Live Chat (receiving message).
Web Page Language
Select the display language on the visitor’s Live Chat interface.
Disable
If disabled, this live chat will no longer be available for use.
Call Settings
Allow Visitor to Call
Select whether to allow visitors to make calls.
Allow Calling Before Chat
Select whether to allow visitors to make phone calls before an agent (customer service) receive the session.
WebRTC Trunks
Select the WebRTC trunk of the phone customer service which is applicable. You can create it in Extension/Trunk -> WebRTC Trunk in advance. It is recommended that the destination number of the WebRTC Trunk be the same as the destination number of the live chat, so that after transferring the chat to a call the receiver will be the same agent.
Select the profile picture that visitors will see. You can upload a picture or use the default picture.
Name
Fill in the name of the agent that visitors will see.
Show Customer Service Real Name
Select whether to display the extension name of the agent
Chat Settings
Visitor Side Chat Log Retention Time (Days)
When the session ends, the visitor can view the chat history during this configured period. After this time, the chat history cannot be viewed.
Note: If the session never ends, the visitor will always see the chat history.
Live Chat Link Address
This link can be embedded onto web pages. Clicking it will connect visitors to the configured Live Chat destination. This link can also be entered directly into the browser address bar for testing purposes.
3. After creating the Live Chat successfully, you can get a link to the Live Chat, or click to copy the code of the Live Chat, and embed it into your own website.
Note
You can generate a QR code from your live chat link, which your customers can scan this QR code to make calls or send you messages.
Live Chat links can carry parameters such as name, email, or phone number. The format is live chat link + “&name=xxxx&email=xxxx&phoneNumber=xxxx”. The “xxxx” is the parameter you need to fill in, such as your hotel room number, your product model number, etc. After the customer opens this link, the customer will fill in the information and send it to you.
Users can configure advanced options to control Live Chat behavior by opening the settings for a specific Live Chat via its gear icon in the Live Chat list.
On the Advanced Settings page, users can configure the following:
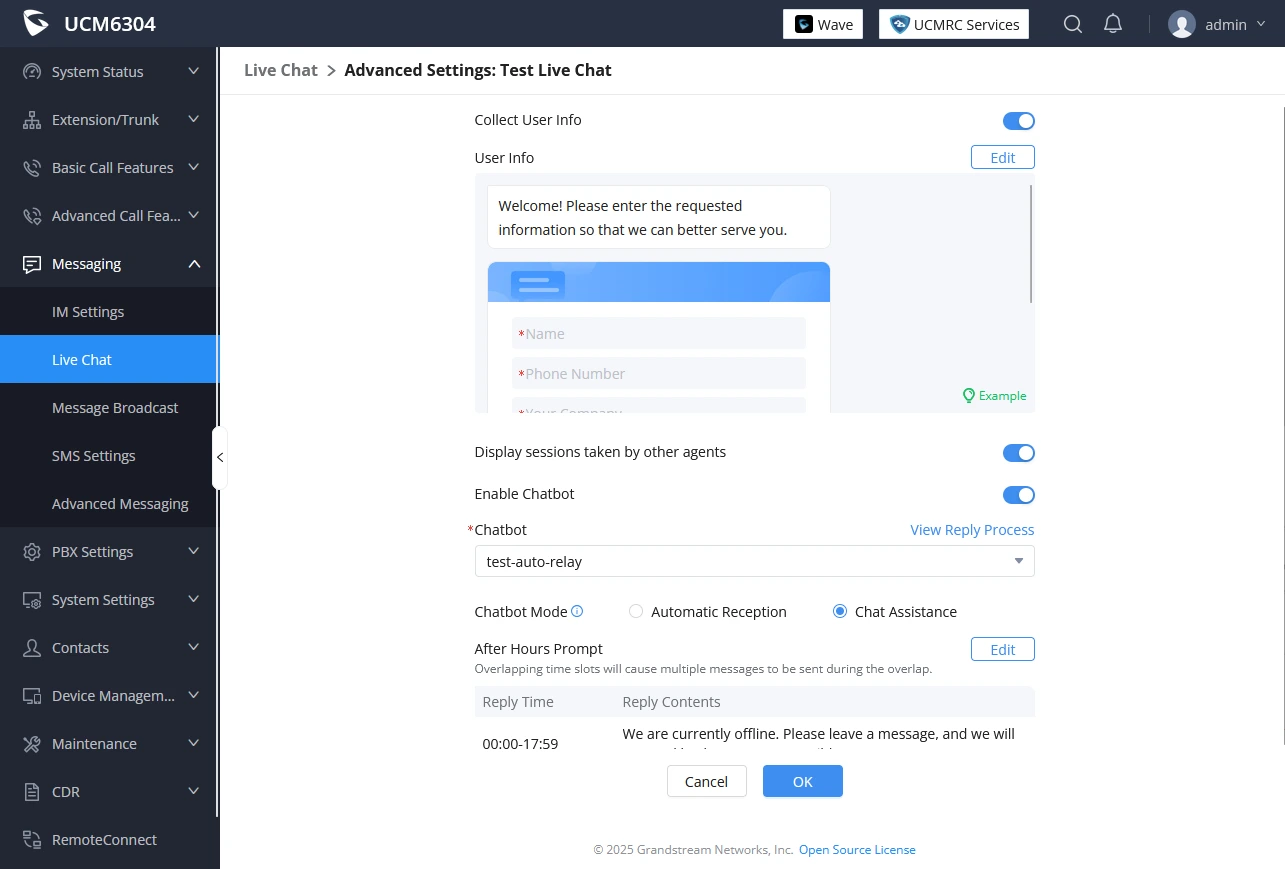
Live Chat – Advanced Settings
Collect User Info
When enabled, visitors must fill in their information before initiating a Live Chat.
User Info
Click “Edit” to customize the prompt requesting visitor details. You can specify which fields are required and choose whether visitors must agree to the privacy policy, with the option to edit the policy content. The default fields are:
Name
Email
Phone Number
Display Sessions Taken by Other Agents
When enabled, the agent’s Wave interface will only display Live Chats that are unassigned or assigned to them. Chats taken by other agents will not be shown.
Note: Wave administrators can view all sessions regardless of this setting.
Enable Chatbot
Activates the automated reply function.
Chatbot
When enabled, allows selection of an existing Chatbot to handle sessions.
Chatbot Mode
Once the Chatbot is enabled, choose one of the following modes:
Automatic Reception: All Live Chat sessions are handled entirely by the Chatbot. No message notifications are sent to Wave extension users (agents) unless the visitor clicks “Transfer to Agent”.
Chat Assistance: The Chatbot automatically replies to visitors while also notifying Wave extension users (agents) in real time, allowing them to take over the conversation at any time.
Transfer to Agent
Required only when the Chatbot is enabled in “Automatic Reception” mode. If the Chatbot cannot respond automatically, it sends a configured fallback message.
When the visitor clicks “Transfer to Agent”, a notification is sent to the assigned agent.
Welcome Message
Used when the Chatbot is disabled. Defines the message displayed when visitors enter the Live Chat interface.
Reply to First Message
Used when the Chatbot is disabled. Automatically replies to the first message sent by a visitor.
Note: If an After Hours Prompt is set, it will be used instead during its configured time period.
After Hours Prompt
Allows setting different automatic replies for specific time periods (start time, end time).
When the Chatbot is enabled, this message is only sent if the visitor clicks “Transfer to Agent” or sends a message the Chatbot cannot answer.
When the Chatbot is disabled, this message automatically replies to the visitor’s first message during the defined time period.
Advanced Messaging
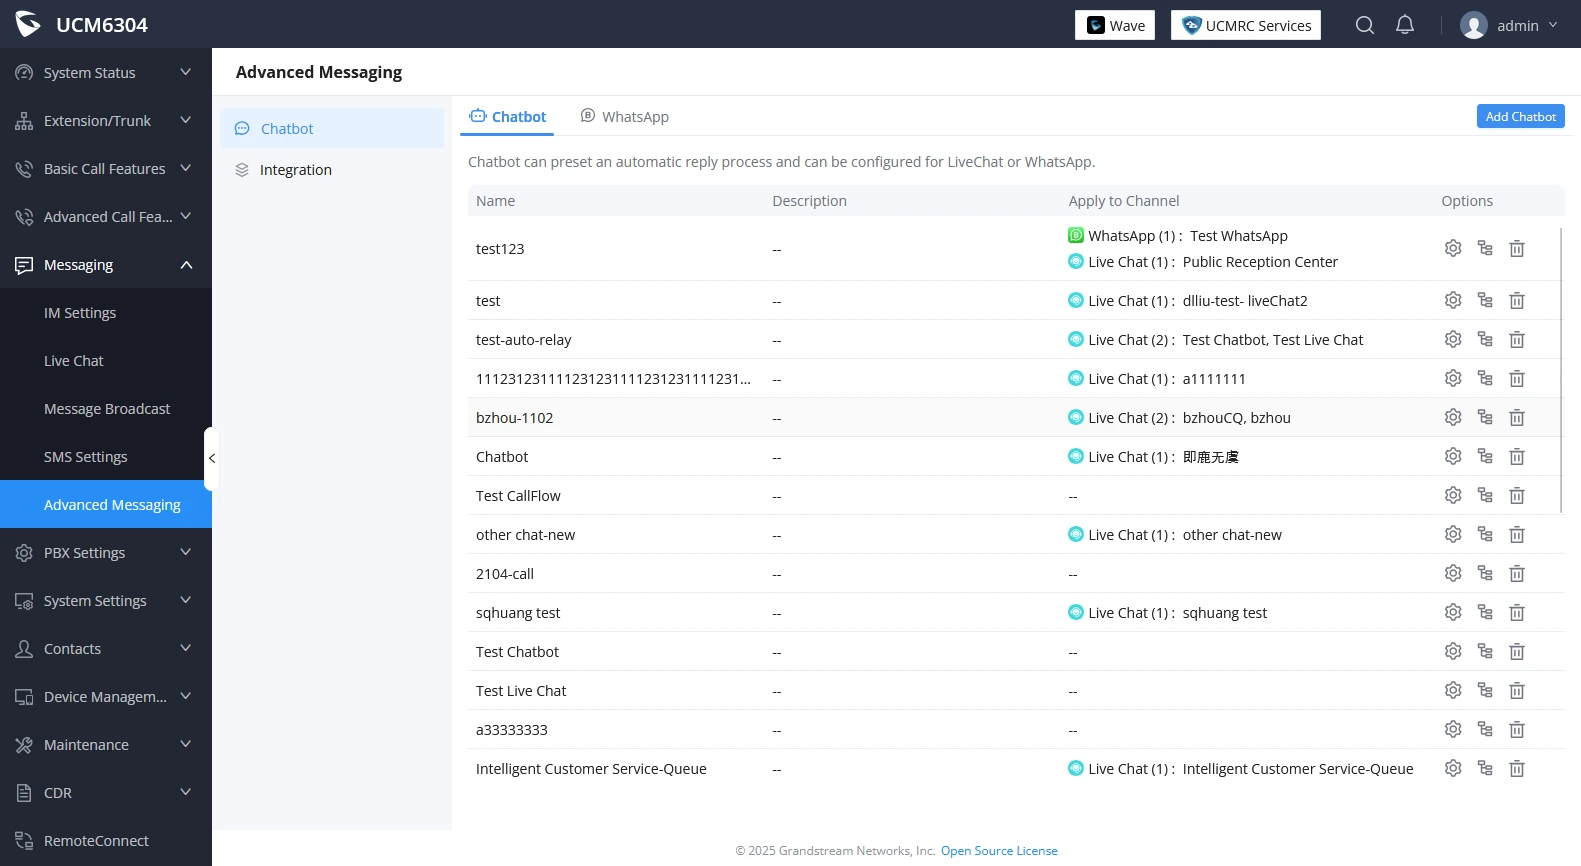
The UCM Web UI includes an Advanced Messaging tab where users can create and control automated reply flows for Live Chat, as well as assign a single chatbot to multiple channels simultaneously.
Go to Advanced Messaging → Chatbot.
Click “Add Chatbot”, then:
Enter a name and description.
Select “Live Chat” channel.
Configure the default reply flow (e.g., greetings, FAQs).
Assign the Chatbot to Live Chats via Advanced Settings.
Advanced Messaging
Security Settings
Users can control the access security of the Live Chat feature, you can set “Live Chat Message Attack Defense” in Security Settings → Fail2Ban:
Live Chat Message Attack Defense
Max Retries
Set the times for the same IP address to access the Live Chat web page during the configured time.
Max Retry Duration
Set the duration that limits the number of times to access the Live Chat web page from the same IP address.
Integrate Live Chat On Website
The chat feature and call feature in the Live Chat feature are compatible with browsers on PCs and mobile devices. It can be integrated anywhere.
There are 2 integration methods:
Method 1:
You can copy this link to your website, email, or any messages. Your customers will be able to create instant chats for messaging or make calls through this link:
Live Chat
After integration:
Live Chat Portal
Method 2:
You can click the Live Chat icon to copy the code or download the Javascript code file:
Download/Copy Live Chat Code
After embedding into your website, an online chat entrance will be generated in the lower right corner of the website. Visitors can click to see the Live Chat interface. Please refer to the screenshot below:
Live Chat Portal
Create Sessions or Make Calls (by Visitors)
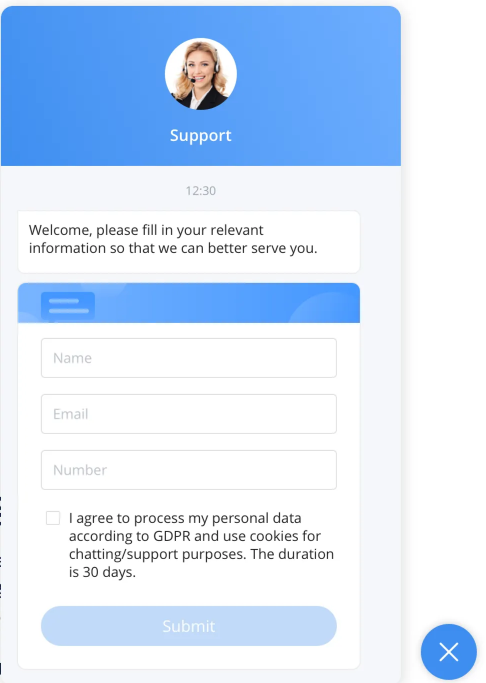
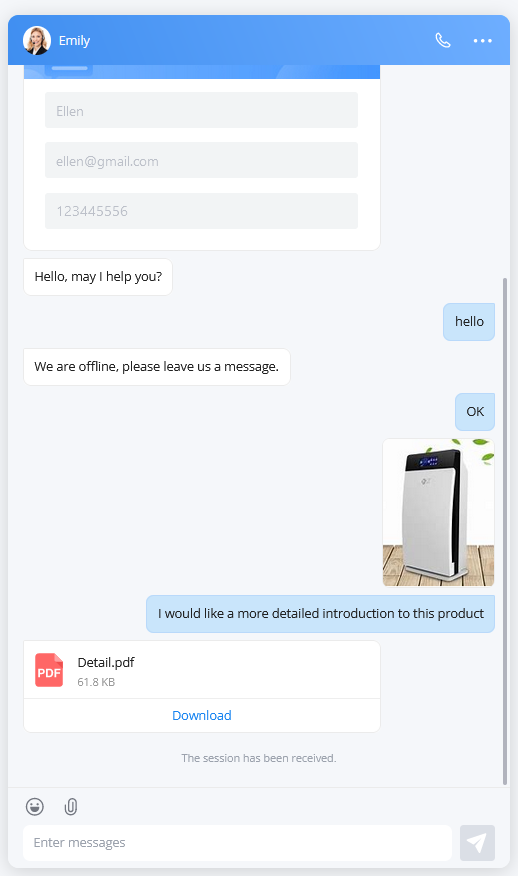
Visitors can tap to view the interface below through your integrated Live Chat entrance on PCs and mobile devices. If you have configured the option “Collect Visitor Information” for your Live Chat, visitors must enter the corresponding information before sending messages and making calls.
Live Chat
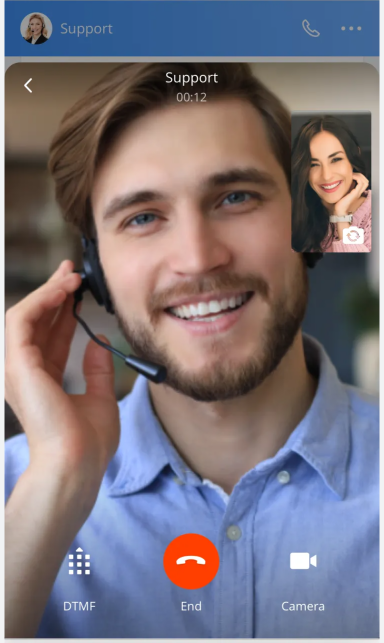
If you have configured it to allow making calls in live chat, your customers will see a call button at the top of the live chat interface. After clicking this button, the customer can make a call to the live chat’s configured destination number, and it will call the customer service number of the session receiver first.
Note: If the WebRTC Trunk has been configured to allow video calls, customers will see the button, and customers can tap to turn on the camera for video calls.
Live Chat Audio
Live Chat Video
Reply to Live Chat on Wave (by Customer Service)
Agents can receive Live Chat messages from visitors after logging in to the Wave Desktop application or Wave Web client, and agents can reply to messages directly through Wave.
After receiving messages, agents can click the “Reception” button or send a message to receive a visitor for this live chat and a visitor’s session can only be processed by one Wave agent.
Live Chat on Wave
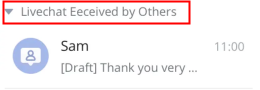
Note: In the reception queue, other service staff can also view the session and reply to the message. You can also expand this list to see sessions processed by other agents:
Collapse Live Chats
2. After customer service receives the session, the action button will appear in the upper right corner of the chat:
Live Chat Actions
Options on the right upper corner of the chat window.
: The user can click this option to view the CRM contact corresponding to this phone number. This entrance can be seen only if the user has installed and logged into the CRM.
: The user can click this option to forward the session to another Wave client user. After forwarding the session, the user will exit this session, and the other Wave client user will continue chatting with this visitor.
: The user can click this option to mark this session as processed, which means the visitor’s problem has been resolved, and the session will be deleted from the session list.
: The user can click this option to initiate a video or audio call with the selected contact or visitor. Once the call is accepted, the conversation will switch to a real-time video or audio session.
: The user can click this option to search within the current chat to quickly locate specific messages or keywords without manually scrolling through the conversation history.
: The user can click this option to access additional actions for the current chat. Available options include adding the contact to personal contacts and downloading the chat history.
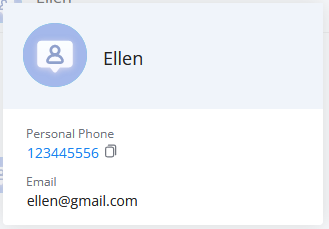
: You can click the profile picture of a visitor to view the information about the visitor. You cannot view the details if you have not configured the feature “Collect Visitor Information” for live chat.
Client Information
View Resolved Live Chat Sessions
You can view all live chat sessions in your queue, including those hosted by yourself and others.
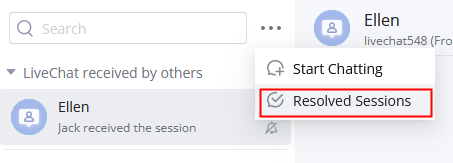
You can click the button in the upper right corner of the session list to view resolved live chat sessions:
View Resolved Sessions
2. The following screenshot shows a list of resolved sessions. The search feature has been supported.
Processed Chats
Answer Calls (by Customer Service)
Customer service staff can log into the Wave Desktop application or web client, and receive calls from visitors, as well as video calls (The WebRTC trunk of the live chat allows making video calls).
Wave Live Chat Call
Wave Video Chat
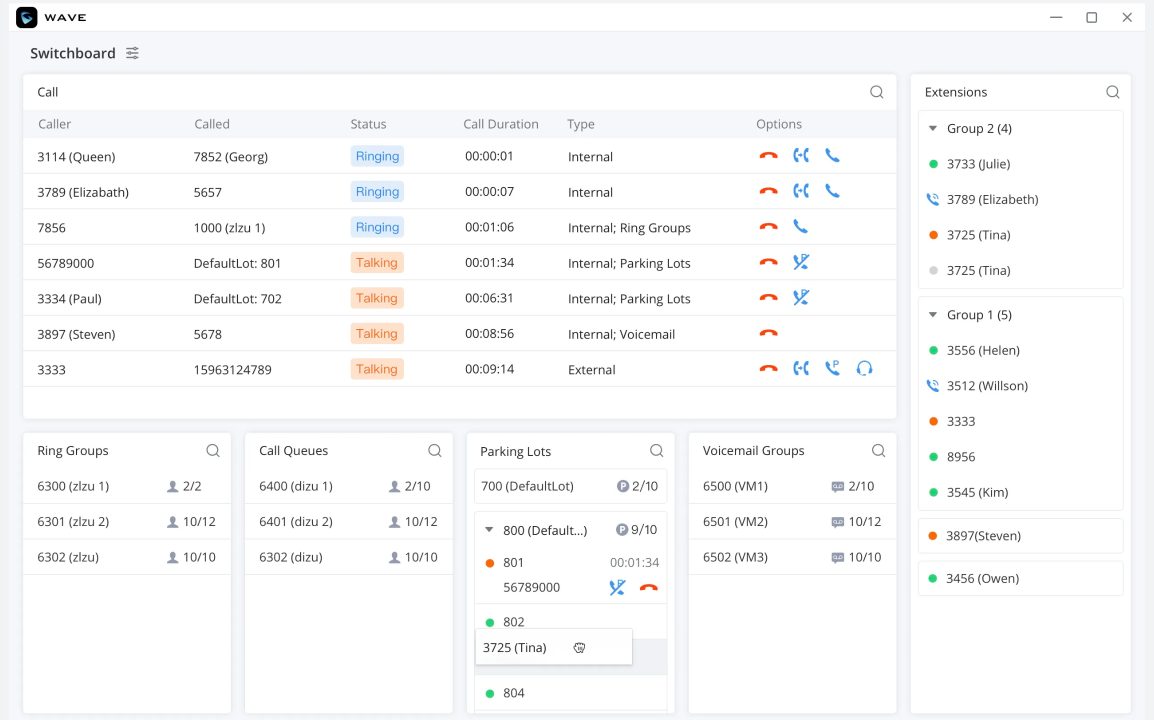
If you have more than one customer service staff and more calls, you can use the “Switchboard” feature:







 to copy the code or download the Javascript code file:
 at the top of the live chat interface. After clicking this button, the customer can make a call to the live chat’s configured destination number, and it will call the customer service number of the session receiver first.
 , and customers can tap to turn on the camera for video calls.


 : The user can click this option to view the CRM contact corresponding to this phone number. This entrance can be seen only if the user has installed and logged into the CRM.
 : The user can click this option to forward the session to another Wave client user. After forwarding the session, the user will exit this session, and the other Wave client user will continue chatting with this visitor.
 : The user can click this option to mark this session as processed, which means the visitor’s problem has been resolved, and the session will be deleted from the session list.
 : The user can click this option to initiate a video or audio call with the selected contact or visitor. Once the call is accepted, the conversation will switch to a real-time video or audio session.
 : The user can click this option to search within the current chat to quickly locate specific messages or keywords without manually scrolling through the conversation history.
 : The user can click this option to access additional actions for the current chat. Available options include adding the contact to personal contacts and downloading the chat history.
 : You can click the profile picture of a visitor to view the information about the visitor. You cannot view the details if you have not configured the feature “Collect Visitor Information” for live chat.