The purpose of this guide is to underline the VPN client/server feature on Grandstream GWN70xx Routers and use this feature to implement Site-to-Site VPN using OpenVPN® to connect multiple locations.
SCENARIO OVERVIEW
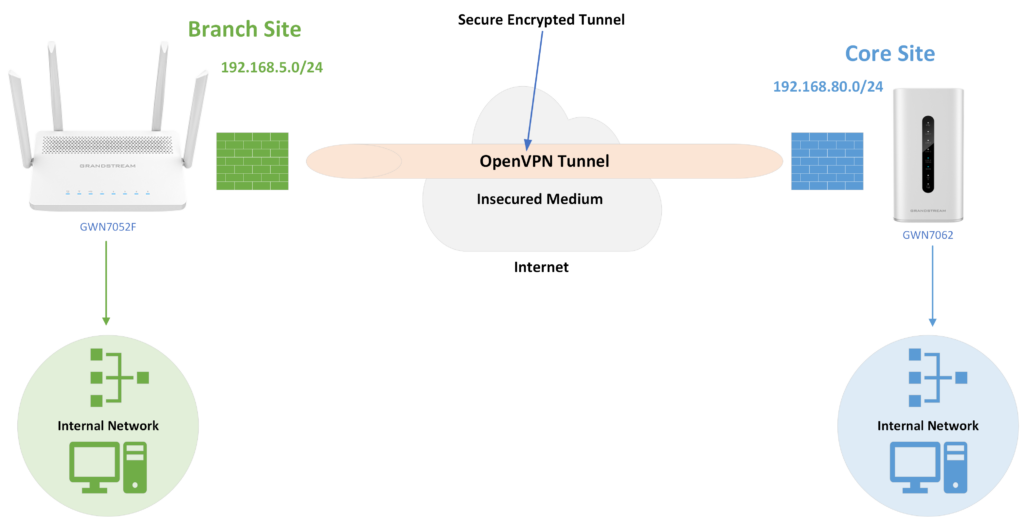
Company ABC has several locations offices connected to the Internet using Grandstream GWN70xx routers and for security reasons the traffic between the main office in LA and one of the branch offices in NY, the admin has decided to establish a VPN Site-to-Site between the two sites to ensure that sensitive data between the two networks is forwarded securely into the encrypted tunnel. This will allow also phone calls to go encrypted and protected against possible rogue eavesdropping of phone calls between the two offices.
- The Core Site has a LAN subnet with a range of: 192.168.80.0/24 (OpenVPN® Server)
- The Branch Site has a LAN Subset with a range of: 192.168.5.0/24 (OpenVPN® Client)
- The VPN tunnel will have the following IP range: 10.0.10.0/24
The figure below shows the actual diagram of the network:
OPENVPN® SERVER CONFIGURATION
Before configuring OpenVPN® Client/Server, first we need to generate Certificate Authority (CA), Server Certificate, and add a user with a Client Certificate.
Generate Self-issued Certificate Authority (CA)
A Certificate Authority (CA) is a trusted entity that issues electronic documents that verify a digital entity’s identity on the Internet. Electronic documents (a.k.a. Digital Certificates) are an essential part of secure communication and play an important part in the public key infrastructure (PKI).
To create a Certification Authority (CA), follow the below steps:
- Go to “System Settings → Certificate Management → CA Certificate” on the GWN70xx web GUI.
- Click on
 button. A popup window will appear.
 - Enter the CA values including Cert Name, Key Length, and Digest algorithm… depending on your needs.
 button. A popup window will appear.
Refer to the below figure showing an example of configuration and the below table showing all available options with their respective description.
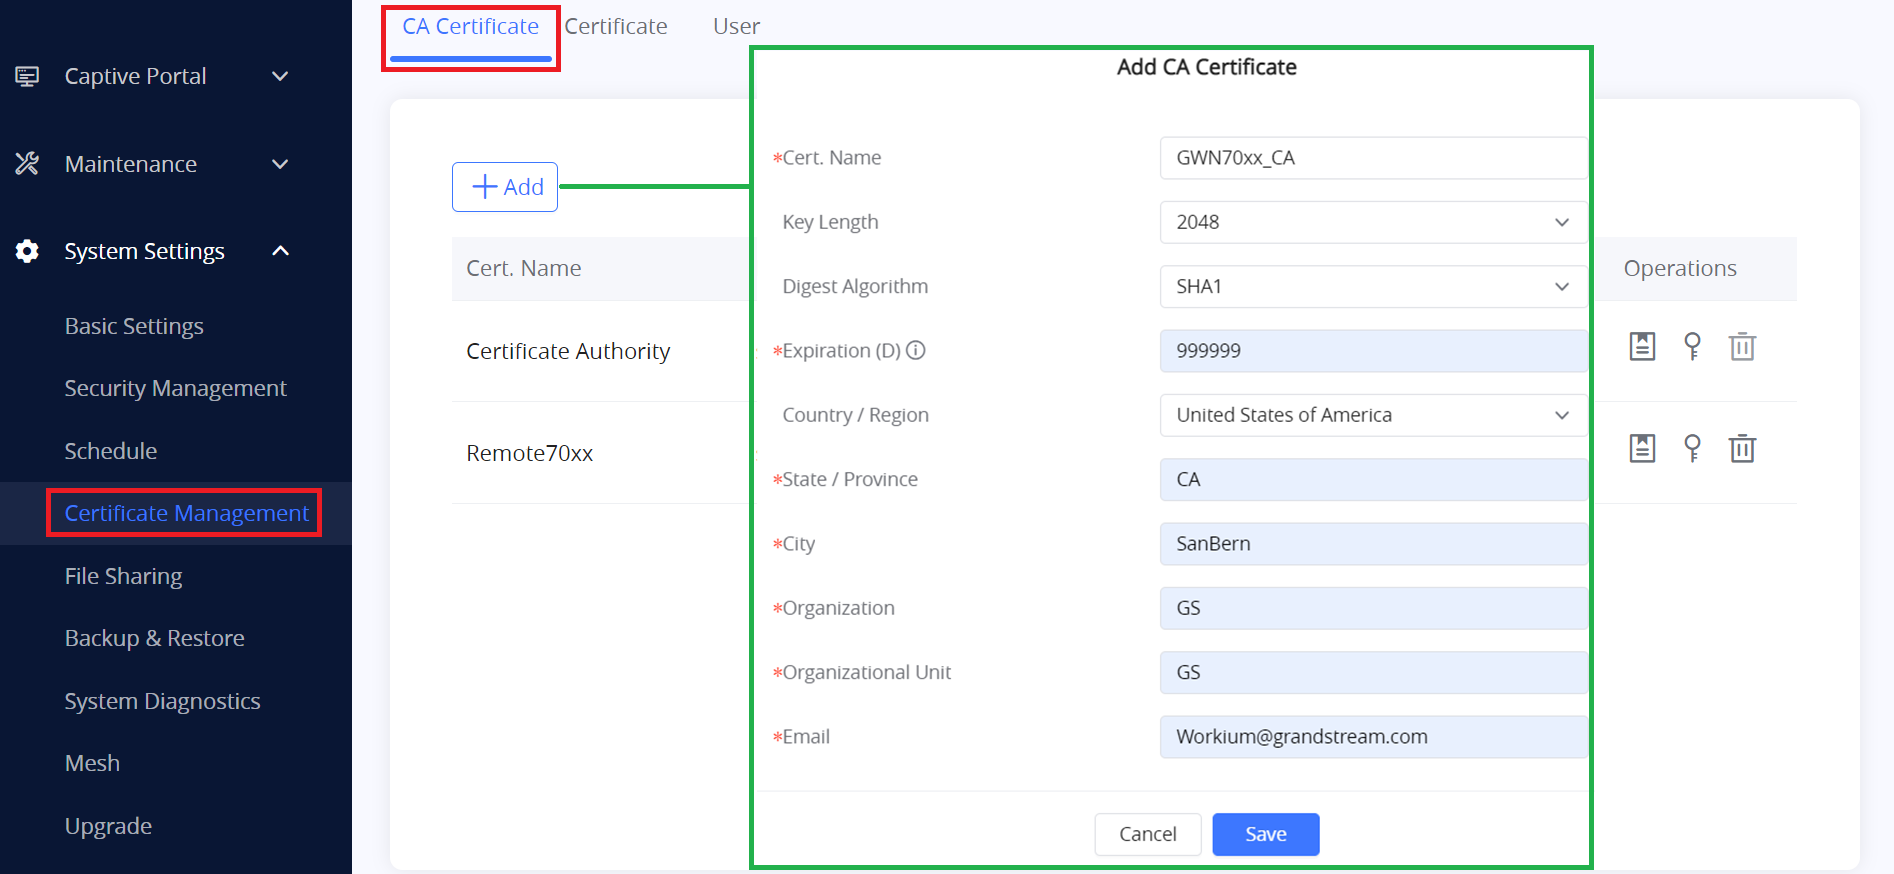
Cert. Name | Enter the Certificate name for the CA. Note: It could be any name to identify this certificate. Example: “CATest”. |
Key Length | Choose the key length for generating the CA certificate. The following values are available:
|
Digest Algorithm | Choose the digest algorithm:
Note: Hash is a one-way function, it cannot be decrypted back. |
Expiration (D) | Enter the validity date for the CA certificate in days. The valid range is 1~999999.. |
Country / Region | Select a country code from the dropdown list. Example: “United Stated of America”. |
State / Province | Enter a state name or province. Example: “Casablanca”. |
City | Enter a city name. Example: “SanBern”. |
Organization | Enter the organization’s name. Example: “GS”. |
Organizational Unit | This field is the name of the department or organization unit making the request. Example: “GS Sales”. |
Enter an email address. Example: “EMEAregion@grandstream.com” |
Create CA Certificate
- Click on
 button after completing all the fields for the CA certificate.
 - Click on
 button to export the CA to the local computer. The CA file has the extension “.crt”.
 button after completing all the fields for the CA certificate.
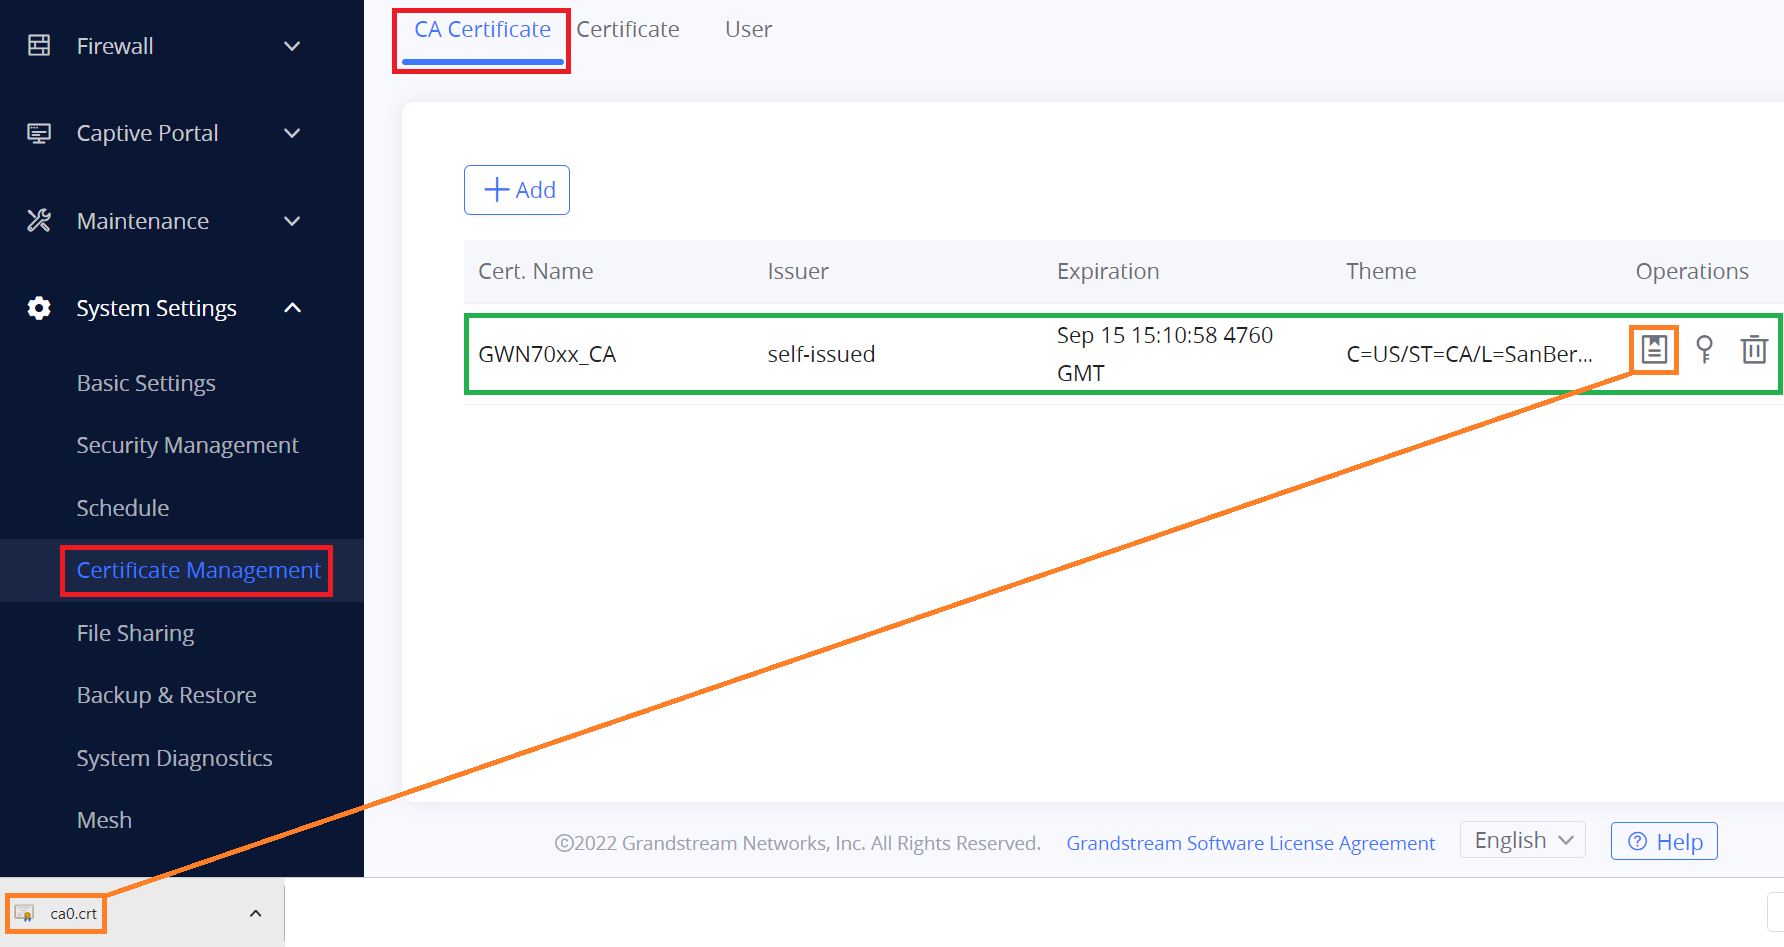
Generate Server/Client Certificates
Users need to create both server and client certificates for encrypted communication between clients and the GWN70xx router acting as an OpenVPN® server.
Generate Server Certificate
To create a server certificate, follow the below steps:
- Go to “System Settings → Certificate Management → Certificate” on the GWN70xx web GUI.
- Click on button. A popup window will appear.
Refer to the below figure showing an example of configuration and the below table showing all available options with their respective description.
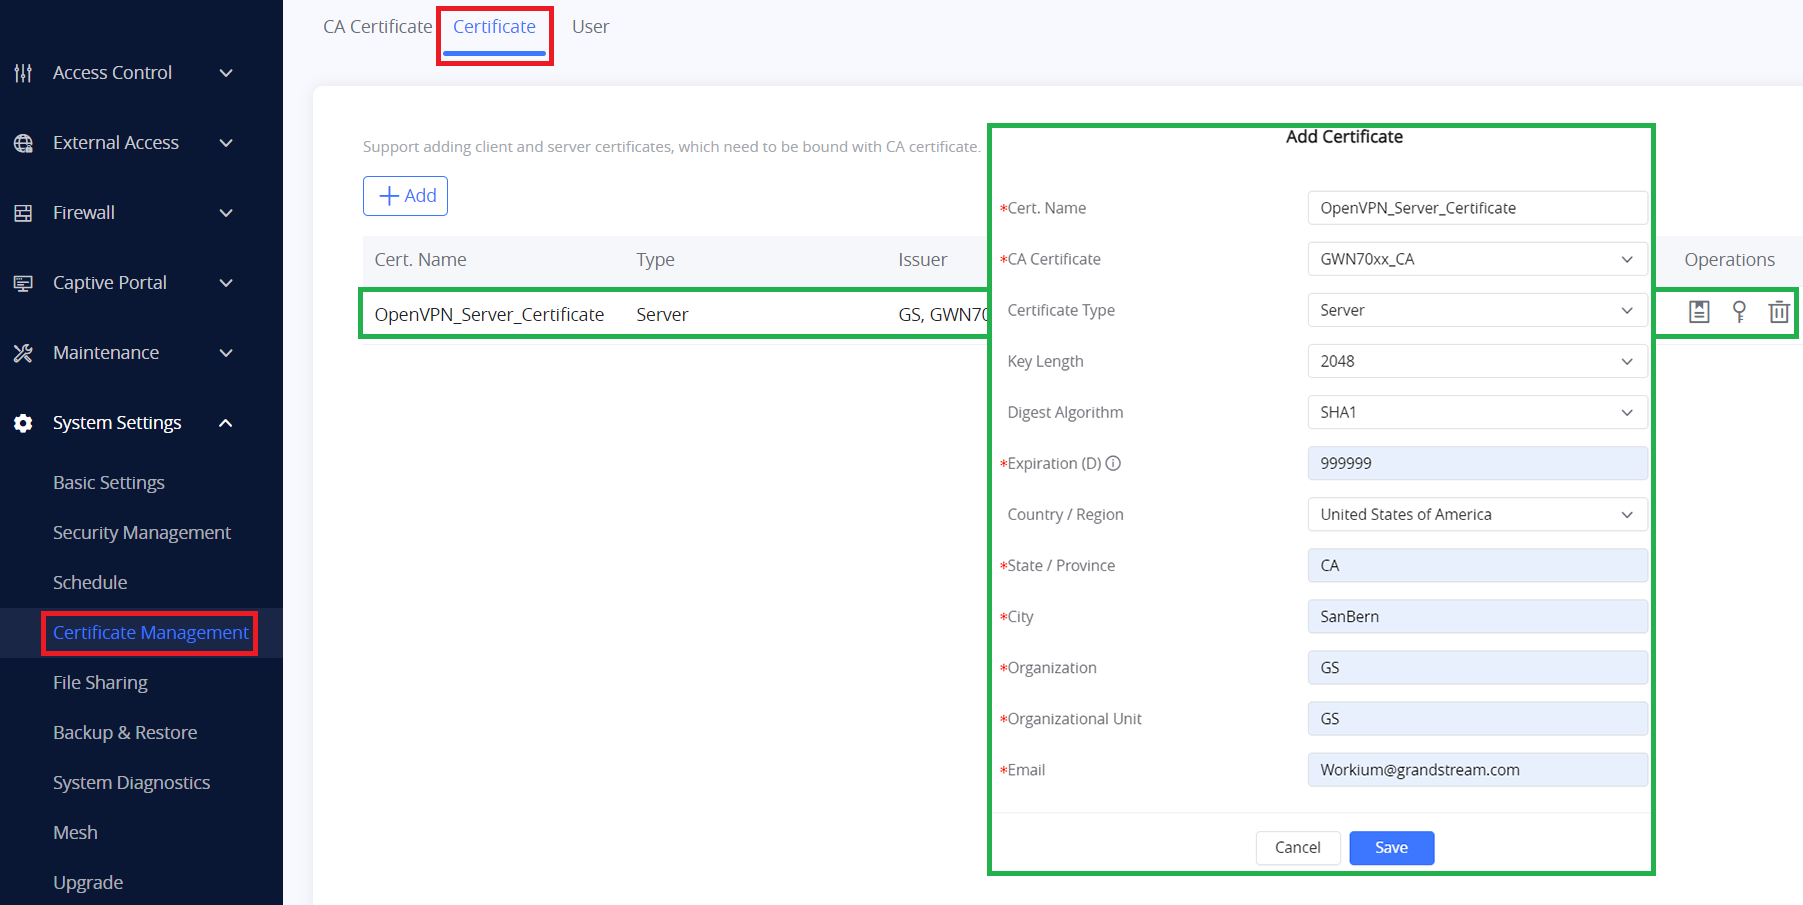
Cert. Name | Enter the common name for the server certificate. Note: It could be any name to identify this certificate. Example: “ServerCertificate”. |
CA Certificate | Select the CA certificate previously generated from the drop-down list. Example: “CATest”. |
Certificate Type | Choose the certificate type from the drop-down list. It can be either a client or a server certificate. Choose “Server” to generate a server certificate. |
Key Length | Choose the key length for generating the CA certificate. The following values are available:
|
Digest Algorithm | Choose the digest algorithm:
Note: Hash is a one-way function, it cannot be decrypted back. |
Expiration (D) | Enter the validity date for the CA certificate in days. The valid range is 1~999999. |
Country / Region | Select a country code from the dropdown list. Example: “MA”. |
State / Province | Enter a state name or province. Example: “Casablanca”. |
City | Enter a city name. Example: “NY”. |
Organization | Enter the organization’s name. Example: “GS”. |
Organizational Unit | This field is the name of the department or organization unit making the request. Example: “GS Sales”. |
Enter an email address. Example: “EMEAregion@grandstream.com” |
OpenVPN® Server Certificate
- Click on button after completing all the fields for the CA certificate.
Generate Client Certificate
To create a Client Certificate, first add a User, and follow the below steps:
Add User
- Go to “System Settings → Certificate Management → User”.
- Click on button. A popup window will appear.
Refer to the below figure and table showing all available options with their respective description.
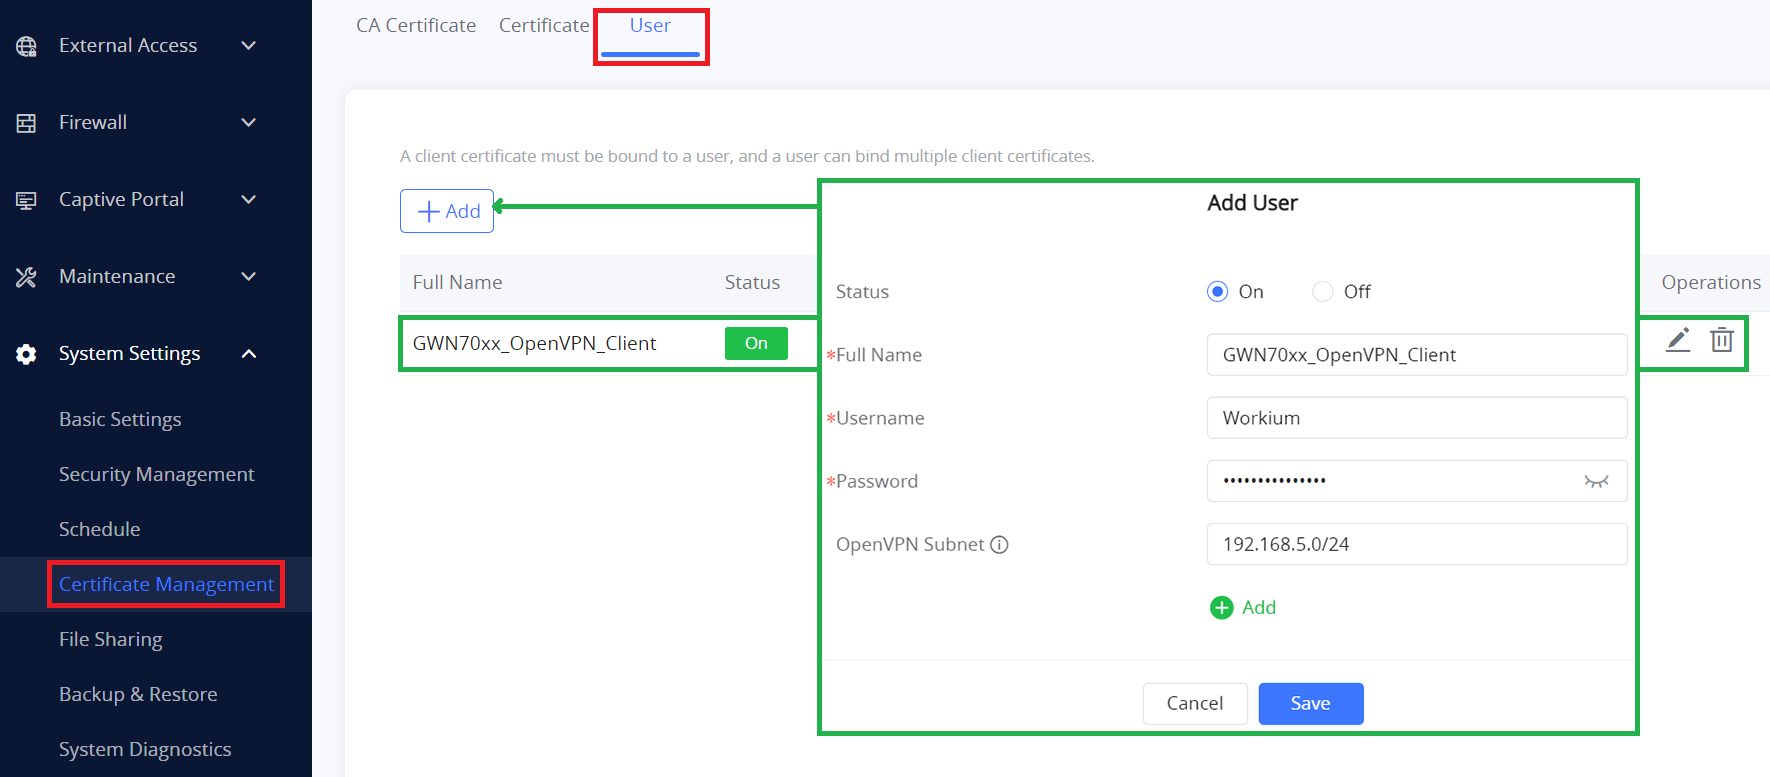
Status | Click on "ON" to enable the user. |
Full Name | Choose full name to identify the users. |
User Name | Choose username to distinguish user’s certificate. |
Password | Enter user password for each username. |
OpenVPN Subnet | Used to indicate which networks are located behind the remote device when the user account is used by an OpenVPN client router to establish a site-to-site VPN. |
Add User
After adding the users, create Client Certificate, follow below steps:
- Go to “System Settings → Certificate Management → Certificate” on the GWN70xx web GUI.
- Click on button. A popup window will appear.
- Enter Client Certificate information, refer to the figure and table below.
- Click on button after completing all the fields.
- Click on and
 buttons to export the Client Certificate and Client Key to local computer. The Client Certificate file has extension “.crt” and the Client key file has extension “.key”. In case you want to delete the Client Certificate, click on
 button.
 button.
Cert. Name | Enter the common name for the server certificate. Note: It could be any name to identify this certificate. Example: “ClientCertificate”. |
CA Certificate | Select the CA certificate previously generated from the drop-down list. Example: “CATest”. |
Certificate Type | Choose the certificate type from the drop-down list. It can be either a client or a server certificate. Choose “Client” to generate a Client certificate. |
Username | Select created user to generate his certificate. |
Key Length | Choose the key length for generating the CA certificate. The following values are available:
|
Digest Algorithm | Choose the digest algorithm:
Note: Hash is a one-way function, it cannot be decrypted back. |
Expiration (D) | Enter the validity date for the CA certificate in days. The valid range is 1~999999. |
Country / Region | Select a country code from the dropdown list. Example: “MA”. |
State / Province | Enter a state name or province. Example: “Casablanca”. |
City | Enter a city name. Example: “Casablanca”. |
Organization | Enter the organization’s name. Example: “GS”. |
Organizational Unit | This field is the name of the department or organization unit making the request. Example: “GS Sales”. |
Enter an email address. Example: “user@grandstream.com” |
OpenVPN® Client Certificate
Create OpenVPN® Server
Once Client and Server certificates are successfully generated, users can configure OpenVPN® Server, so that clients can be connected to it, by navigating under “VPN → VPN Server→ OpenVPN® Server”.
To configure the OpenVPN® Server, refer to below figure and table:
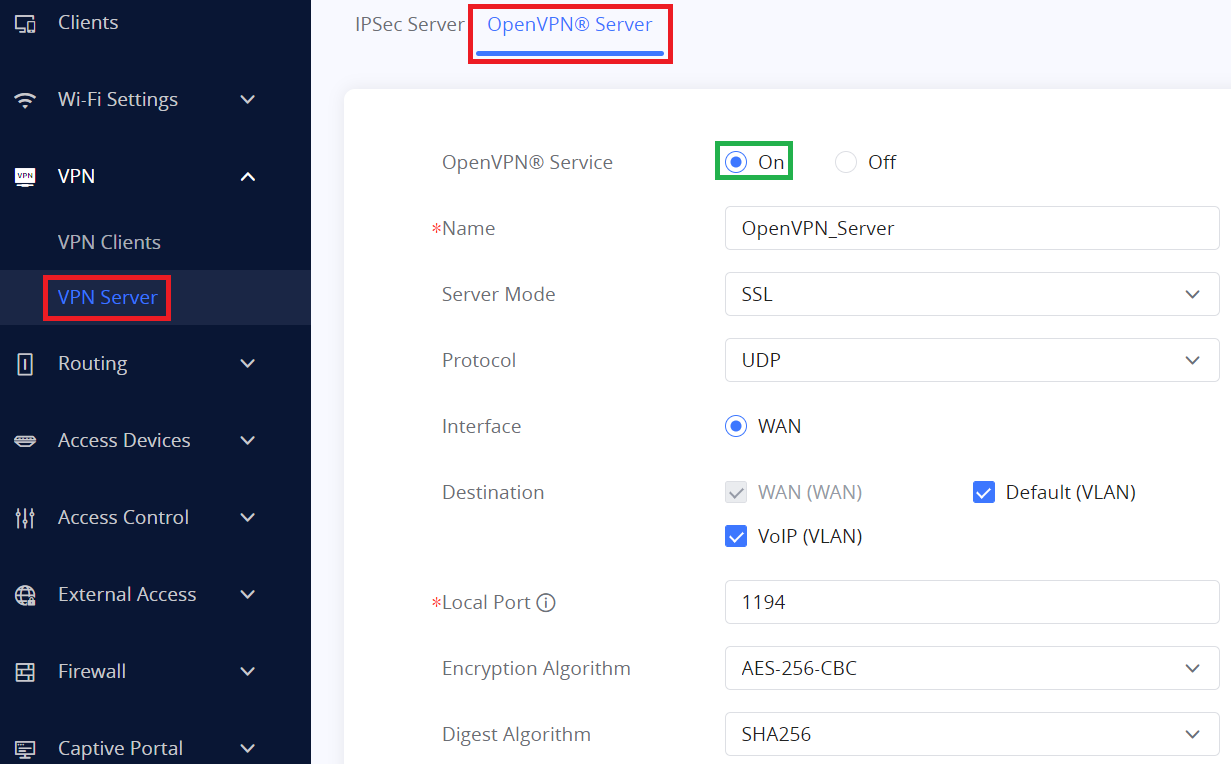  |
OpenVPN® Server Settings page
Type | Select the OpenVPN®: Client or Server |
Name | Enter a name for the OpenVPN® server. |
Status | Toggle ON or OFF to enable or disable the OpenVPN® Server. Note: Once disabled, the OpenVPN® service will also be disabled. |
Protocol | Choose the Transport protocol from the dropdown list, either TCP or UDP. The default protocol is UDP. |
Router | Select from the drop-down list the router/device group that this VPN will be using. |
Interface | Select from the drop-down list the exact interface of the router/device group. |
Local Port | Configure the listening port for OpenVPN® server. The default value is 1194. |
Authentication Mode | Choose the server mode the OpenVPN® server will operate with. 4 modes are available:
|
Encryption Algorithm | Choose the encryption algorithm from the dropdown list to encrypt data so that the receiver can decrypt it using same algorithm. |
Digest Algorithm | Choose digest algorithm from the dropdown list, which will uniquely identify the data to provide data integrity and ensure that the receiver has an unmodified data from the one sent by the original host. |
TLS Identicy Authentication | This option uses a static Pre-Shared Key (PSK) that must be generated in advance and shared among all peers. This feature adds extra protection to the TLS channel by requiring that incoming packets have a valid signature generated using the PSK key. |
TLS Identity Authentication Direction | Select from the drop-down list the direction of TLS Identity Authentication, three options are available (Server, Client or Both). |
TLS Pre-Shared Key | If TLS Identicy Authentication is enabled, enter the TLS Pre-Shared Key. |
Duplicate client certificates are allowed | Click on "ON" to allow duplicate Client Certificates |
Redirect Gateway | When redirect-gateway is used, OpenVPN® clients will route DNS queries through the VPN, and the VPN server will need to handle them. |
Push Routes | Specify route(s) to be pushed to all clients. Example: 10.0.0.1/8 |
LZO Compression Algorithm | Select whether to activate LZO compression or no, if set to “Adaptive”, the server will make the decision whether this option will be enabled or no. |
Allow Peer to Change IP | Allow remote change the IP and/or Port, often applicable to the situation when the remote IP address changes frequently. |
CA Certificate | Select a generated CA from the dropdown list or add one. |
Server Certificate | Select a generated Server Certificate from the dropdown list or add one. |
IPv4 Tunnel Network/Mask Length | Enter the network range that the GWN70xx will be serving from to the OpenVPN® client. Note: The network format should be the following 10.0.10.0/16. The mask should be at least 16 bits. |
OpenVPN® Server Settings page
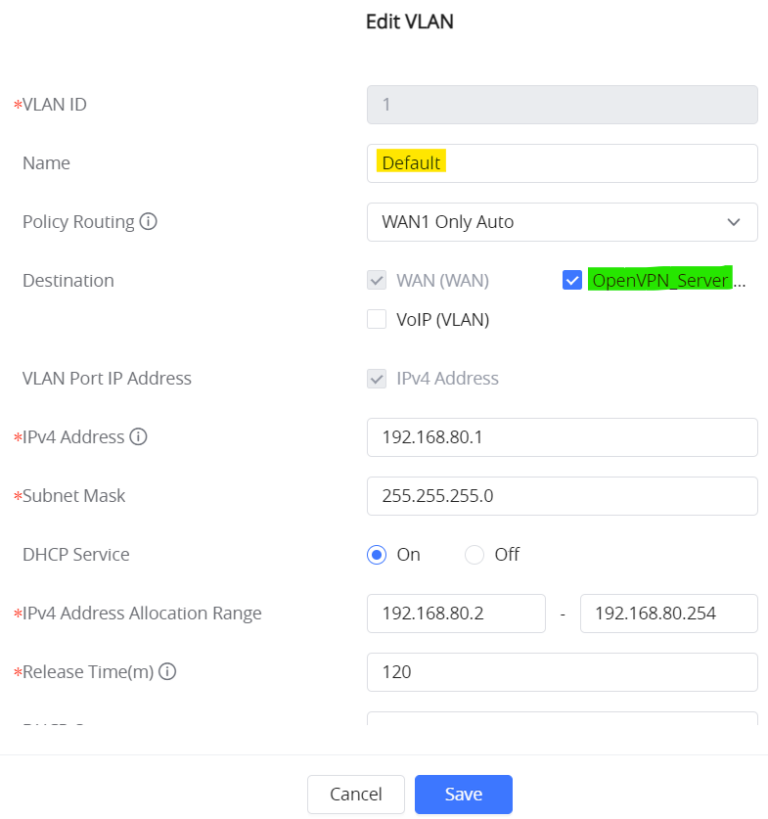
Add OpenVPN® Server to Destination Network Groups
Finally, make sure to allow OpenVPN® Server on the desired network groups.
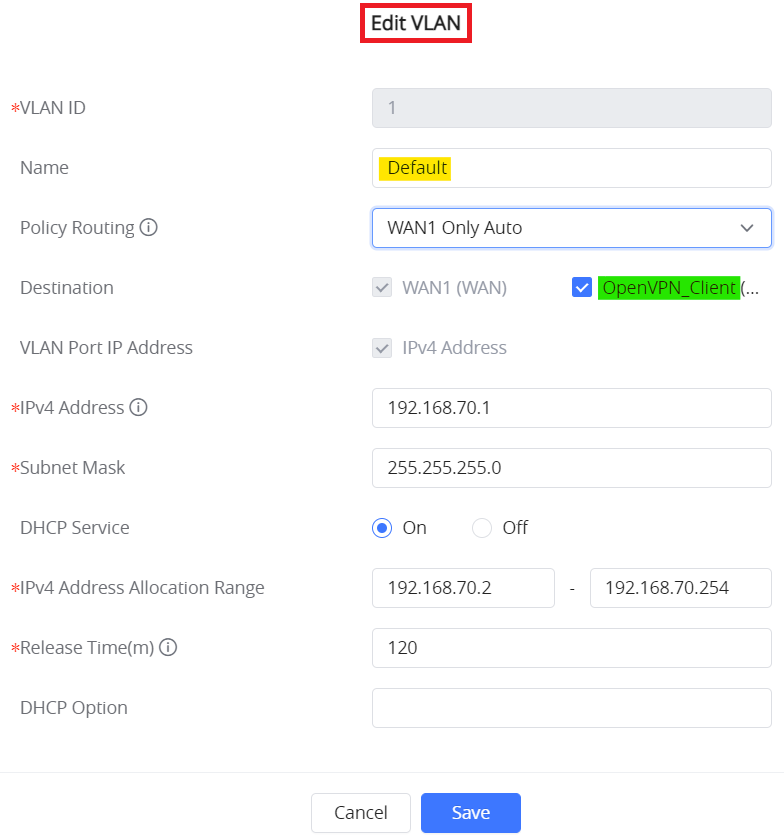
Example: OpenVPN® Server is allowed on the Default VLAN, refer to the figure below.
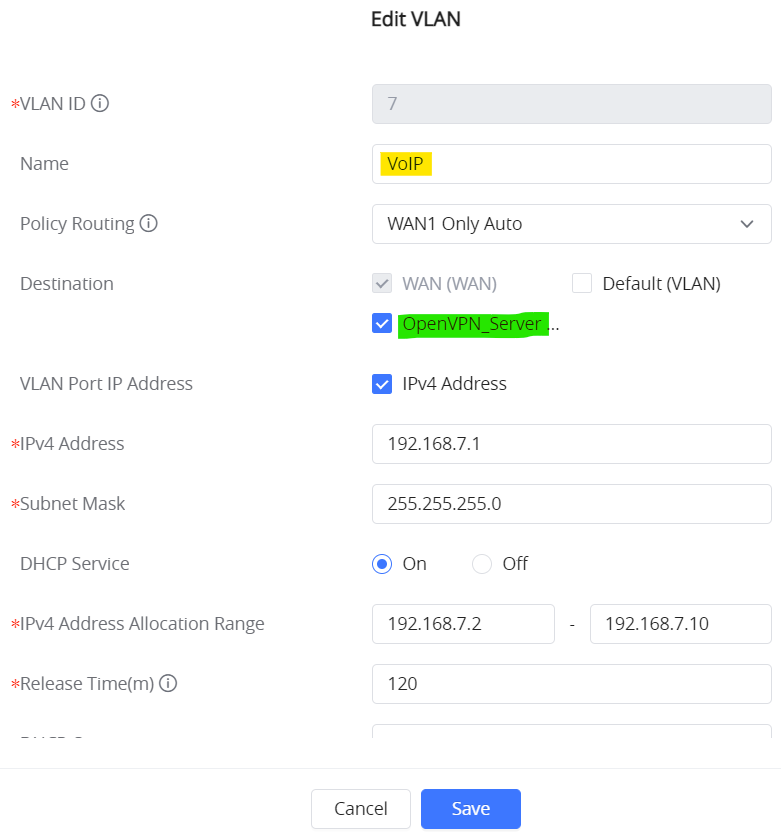
Example: OpenVPN® Server is allowed on the VLAN 7 (VoIP), refer to the figure below.
OPENVPN® CLIENT CONFIGURATION
Now that the GWN70xx router at the Core Site is up and running, we move on to configure an OpenVPN® client instance under the GWN70xx router on the Branch Site. Please follow the below steps to set it up.
- Go to “VPN → VPN Clients” on the GWN70xx web GUI.
- Click on button. A popup window will appear.
To configure OpenVPN® Client, refer to below figure and table:
| |
OpenVPN® Client Settings page
Name | Enter a name for the OpenVPN® Client. |
Connection Type | Select from the drop-down list "OpenVPN". |
Protocol | Choose the Transport protocol from the dropdown list, either TCP or UDP. The default protocol is UDP. |
Interface | Select the WAN port to be used by the OpenVPN® Server. |
Destination | Select the WANs, VLANs and VPNs (clients) destinations that will be using this OpenVPN® Server. |
Local Port | Configure the listening port for OpenVPN® server. The default value is 1194. |
Remote OpenVPN® Server | Configure the remote OpenVPN® server IP address. Note: put the public IP of the OpenVPN Server router to where the client will initiate tunnel connection. |
Remote OpenVPN® Server Port | Configures statically the local VPN tunnel IP address for the remote server. The default value is 1194. |
Authentication Mode | Choose the server mode the OpenVPN® server will operate with. 4 modes are available:
|
Encryption Algorithm | Choose the encryption algorithm from the dropdown list to encrypt data so that the receiver can decrypt it using same algorithm. |
Digest Algorithm | Choose digest algorithm from the dropdown list, which will uniquely identify the data to provide data integrity and ensure that the receiver has an unmodified data from the one sent by the original host. |
TLS Identicy Authentication | This option uses a static Pre-Shared Key (PSK) that must be generated in advance and shared among all peers. This feature adds extra protection to the TLS channel by requiring that incoming packets have a valid signature generated using the PSK key. |
TLS Identity Authentication Direction | Select from the drop-down list the direction of TLS Identity Authentication, three options are available (Server, Client or Both). |
TLS Pre-Shared Key | If TLS Identicy Authentication is enabled, enter the TLS Pre-Shared Key. |
Routes | Add the list of networks that are reachable through the GWN70xx router running OpenVPN® server. Here we set the IP range for the Core Site LAN (i.e. 192.168.80.0/24). Note: it's also possible to add the VLANs on server side. |
Deny Server Push Routes | If enabled, client will ignore routes pushed by the server. |
IP Masquerading | This feature is a form of network address translation (NAT) which allows internal computers with no known address outside their network, to communicate to the outside. It allows one machine to act on behalf of other machines. |
LZO Compression | Select whether to activate LZO compression or no, if set to “Adaptive”, the server will make the decision whether this option will be enabled or no. LZO encoding provides a very high compression ratio with good performance. LZO encoding works especially well for CHAR and VARCHAR columns that store very long character strings. |
Allow Peer to Change IP | Allow remote change the IP and/or Port, often applicable to the situation when the remote IP address changes frequently. |
CA Certificate | Click on “Upload” and select the “CA” certificate Note: This can be generated in "System Settings → Certificate Management → CA Certificate" |
Customer Certificate | Click on “Upload” and select the “Client Certificate”. Note: This can be generated in "System Settings → Certificate Management → Certificate" |
Customer Private Key | Click on “Upload” and select the “Client Private Key”. Note: This can be generated in "System Settings → Certificate Management → Certificate" |
Customer Private Key Password | Enter the client private key password Note: This can be configured in "System Settings → Certificate Management → User" |
OpenVPN® Client Settings page
Add OpenVPN® Client to Destination Network Groups
The same as the OpenVPN® Server, make sure to allow OpenVPN® Client on the desired network groups.
Example: OpenVPN® Client is allowed on the Default VLAN, refer to the figure below.
© Copyright 2022 OpenVPN | OpenVPN is a registered trademark of OpenVPN, Inc.