
IPVideoTalk meeting can be scheduled in IPVideoTalk Portal. Before scheduling meeting, the user must have IPVideoTalk Portal account signed up in http://www.ipvideotalk.com and have the GVC32xx linked to the IPVideoTalk Portal account.
For more information about IPVideoTalk usage or GVC32xx usage, please refer to the links below:
- IPVideoTalk:https://documentation.grandstream.com/knowledge-base/ipvideotalk-user-guide/
- GVC320x User Manual: User Guide / Administration Guide
- GVC3210 User Manual: User Guide / Administration Guide
- IPVideoTalk Website: http://www.ipvideotalk.com/
- Grandstream Networks Website: http://www.grandstream.com/
PREREQUISITES
If you would like to schedule IPVideoTalk meetings, please make sure you have signed up in IPVideoTalk Portal and use Basic plan or your GVC32xx is already linked in the IPVideoTalk Portal with a valid Plan.
Sign Up
- Log in our official website http://www.ipvideotalk.com to sign up.
-
Fill in related information as shown below:
- Display Name: Enter current company name. If the company already has an account signed up, the users will not be able to sign up again. It is recommended to sign up one account per company so that all devices can be centrally managed under the same account.
- Email: Fill in company Email or Work Email address.
- Country: Fill in the located country of the company.
- State/Province: Fill in the located State/Province of the company if USA is set as country.
- Business Name: Fill in the user’s contact name.
- Company Size: Fill in the users’ amount size of the company.
- Verification Code: Fill in the characters on the right for verification purpose.
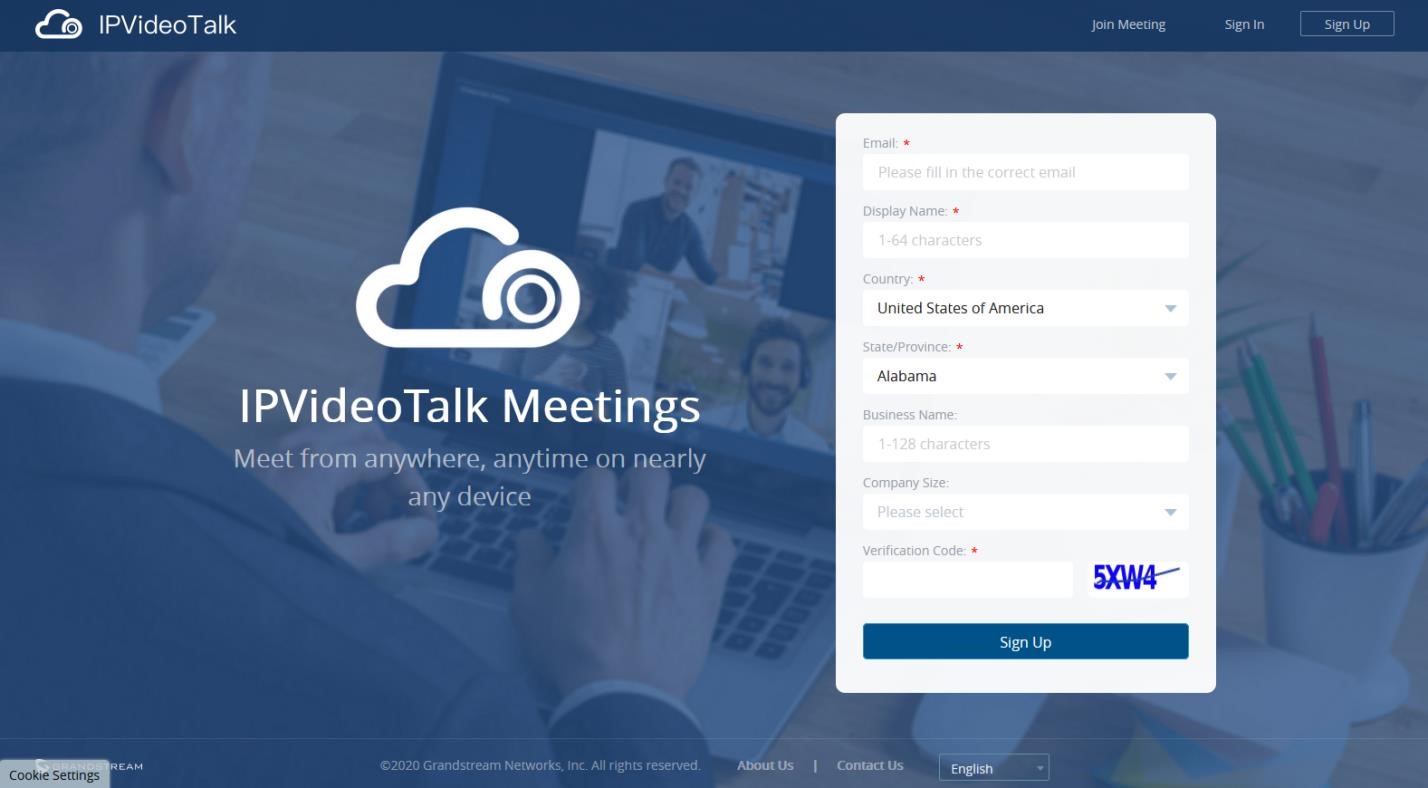
- Click on “Sign Up” button. A prompt will pop up to remind users to log in Email to activate IPVideoTalk account.
-
Click
 in activation Email to set up login account and password.
- The users can now successfully access IPVideoTalk Portal.
Link GVC32xx to IPVideoTalk Portal
There are two ways to link the GVC32xx to IPVideoTalk Portal:
Link device using device code
• Link device using MAC address
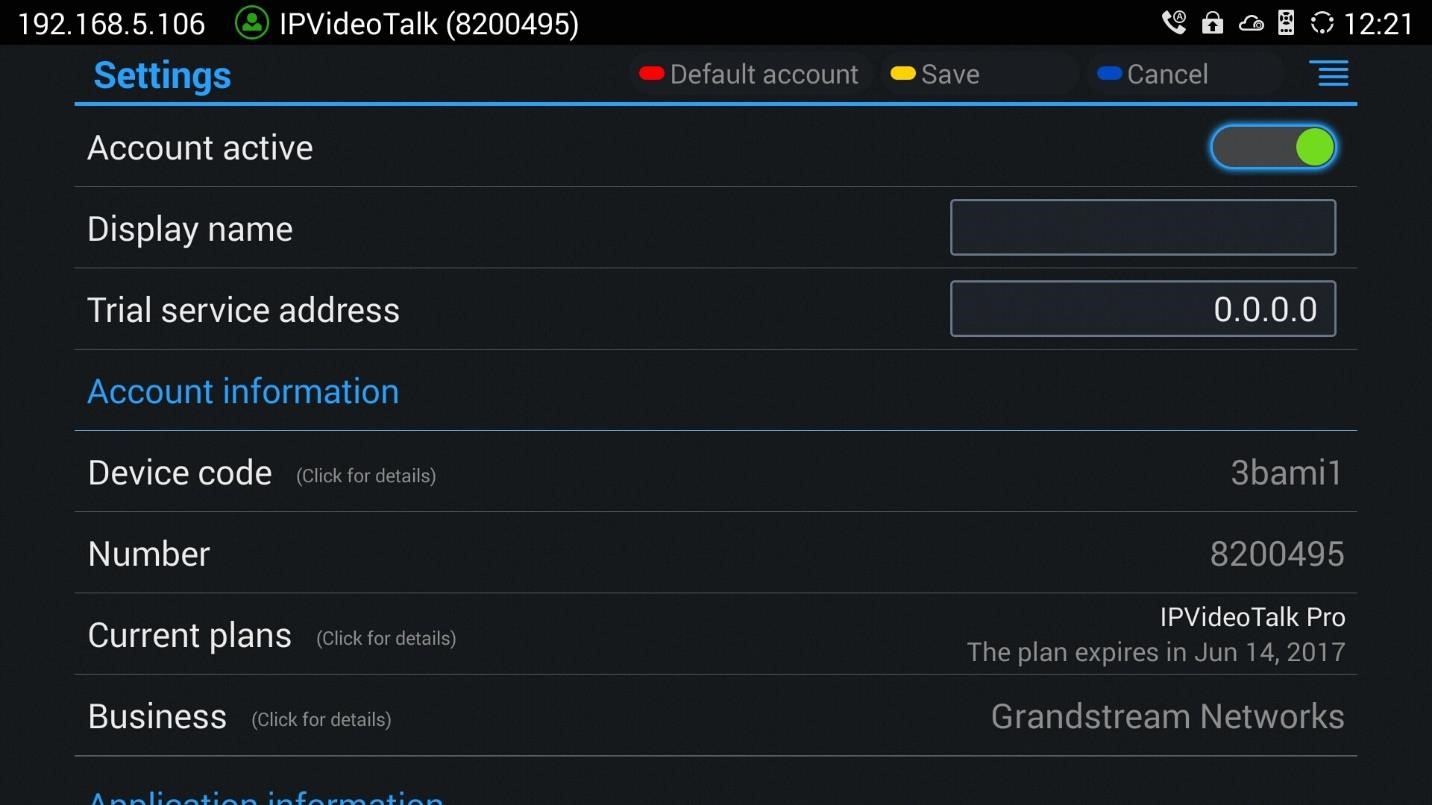
Before linking your device, make sure your GVC32xx’s IPVideoTalk ID is active and registered.
You can check this by going to the GV32xx LCD menu->Applications->IPVideoTalk application->Settings:
“Account active”. The indication should be green to show “registered”.
Link Device Using Device Code

This is the easiest way to link device to IPVideoTalk Portal, and it is recommended. Please see the steps:
- Go to the GVC32xx LCD menu->Applications->IPVideoTalk application->Settings, find the device code.
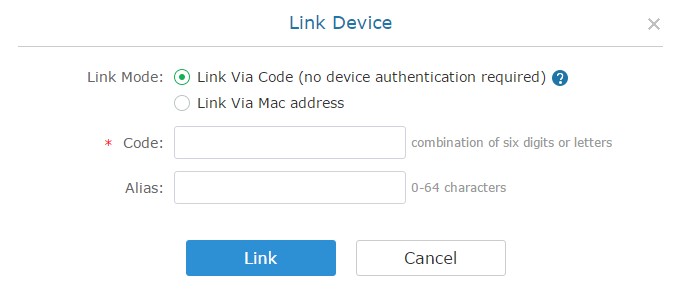
- Log in IPVideoTalk Portal using your IPVideoTalk Portal account. Click on tab “Devices”, and select
“Link Device”. Enter the device code in the prompt.
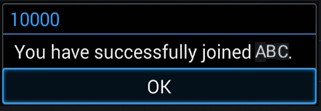
- On the GVC32xx LCD menu->Applications->IPVideoTalk application->Notices, the user will see a new message as below. This means you have linked your device successfully. Your GVC32xx will be shown as “online” in IPVideoTalk Portal now.
Link Device Using MAC Address
- Log in IPVideoTalk Portal->Devices, click on “Link Device” and enter the device MAC address.
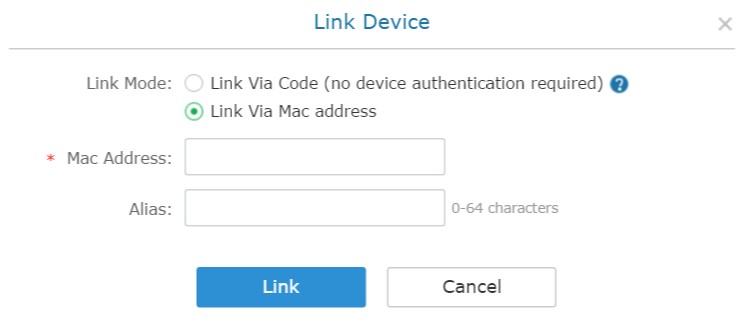
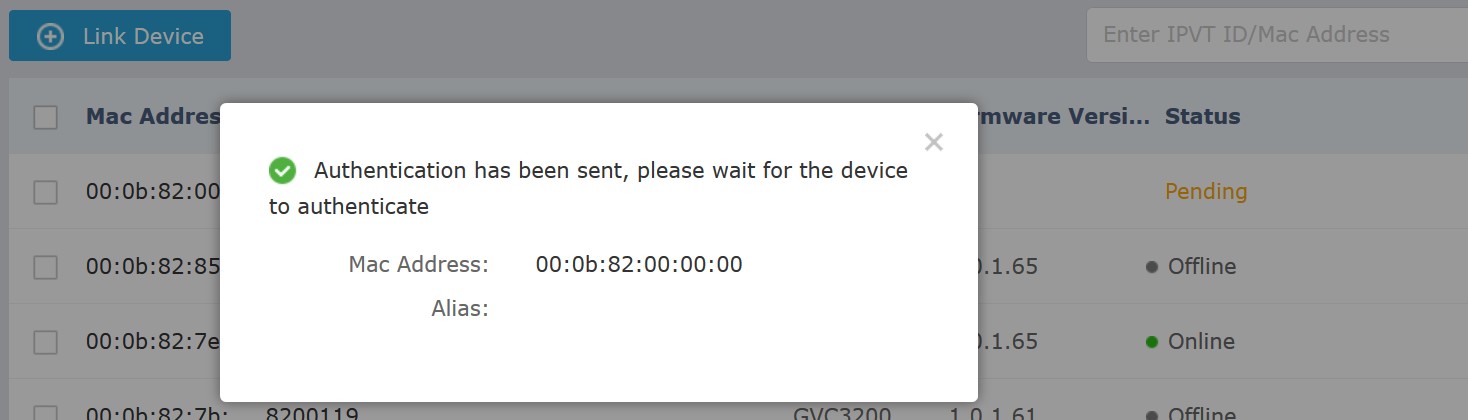
- Click on “Link” to send authentication request to the GVC32xx. This device will be shown as “Pending” in IPVideoTalk Portal.
-
The GVC32xx will receive a new message from IPVideoTalk system. Icon
 will be displayed on the top status bar of the GVC32xx display device to indicate the new message notification.

In the GVC32xx LCD menu->Applications->”IPVideoTalk” application, the user will also see a new
unread message notification on the upper right of the IPVideoTalk application icon
 .
.
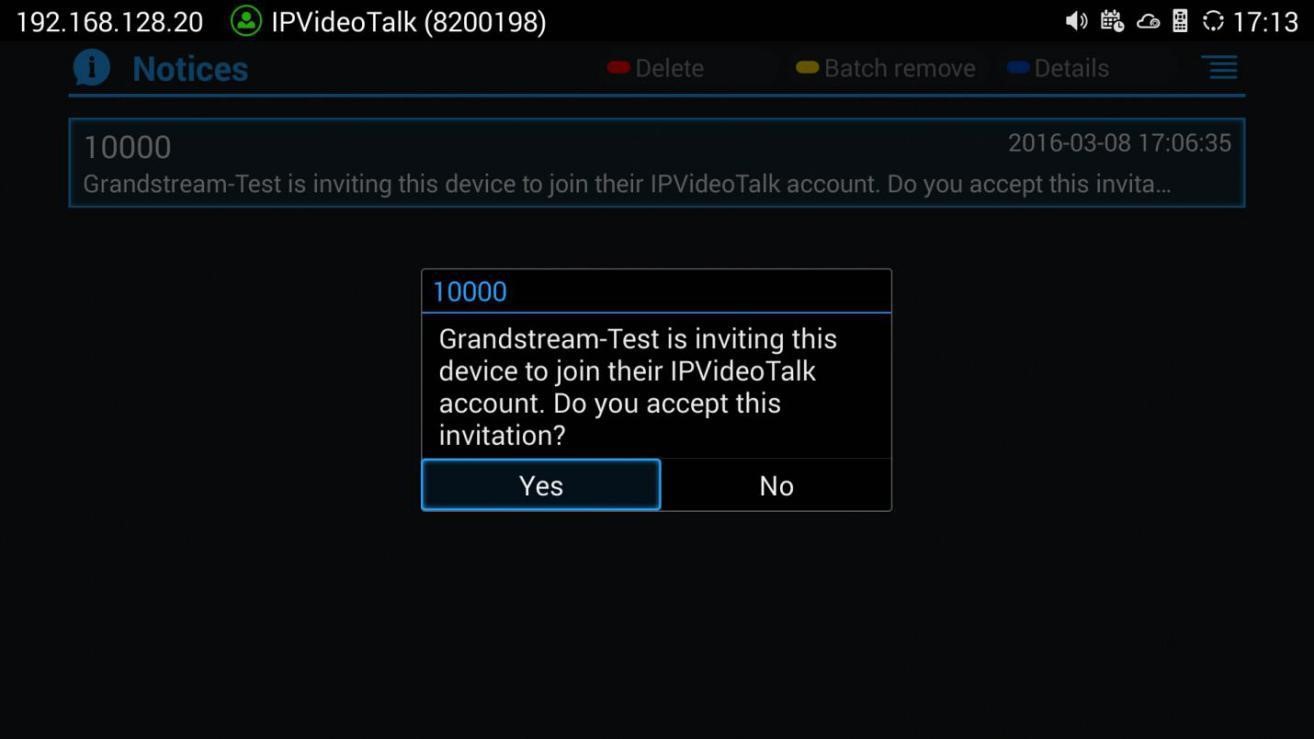
- Open the IPVideoTalk application and click on “Notices”, the user will see a new message about “Device authentication”. Open this message to check the enterprise name and ID. If the enterprise name and ID belong to the user, please select “Yes” to confirm to link the device. Otherwise, select “No” to reject to link the device.
- Once the user confirms to link the device, the administrator could see the device shown as online in IPVideoTalk Portal.
SCHEDULE MEETING
Schedule One-Time Meeting
Log in IPVideoTalk Portal->Meetings, there are three possibilities for Meetings:

- Meet Now, to start an instant meeting from IPVideoTalk portal
- Schedule a New Meeting, to schedule a meeting and send invitation to hosts and invitees.
- Schedule a New Webinar, to schedule a webinar and assign panelist roles, and set host and invitees.
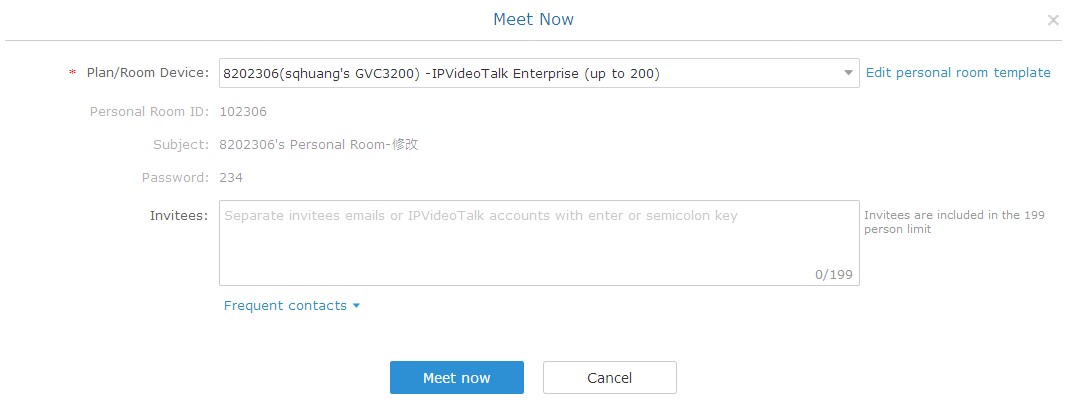
Meet Now
Users can start an instant meeting on IPVideoTalk Portal.
-
Go to IPVideoTalk Portal and click on
 .
.
-
Enter the meeting information into the appropriate fields, and the meeting will be considered as an instant meeting by default:
- Plan/Room Device: Select the host device or web meeting plan for the meeting. Users can choose from the authenticated devices, input alias or input IPVideoTalk ID of the authenticated device. Or, select the purchased/assigned web meeting plan.
- If the user selects “Room Device”, the default setting is “Personal Room”, and the meeting title and password will be loaded with the information in the “Personal Room Template”. If the user wants to update the information, please click on “Edit Personal Room Template”.
- If the current plan or room device has a meeting in progress, the user cannot start an instant meeting. If the room device has a “To be hosted” Personal Room, the user cannot start an instant meeting.
- Subject: Fill in the subject of the meeting.
- Password: Users can set meeting password for the meeting. This is optional. Setting meeting password can prevent meeting from being interrupted by any unexpected callers.
- Invitees: The user could input the Email or IPVideoTalk ID to invite the participant. The user could also click on “Frequent Contacts” to select the invitees.
- When done, click “Meet now” to confirm. Then, users will be directed to the WebRTC meeting starting interface and will automatically initiate a call to the host device.
- Users could modify the default information for “Meet Now”. Click on “Edit personal room template”, users could modify the default meeting information.
Schedule a new Meeting
-
Access Meeting screen and click on
 , and select the meeting type.
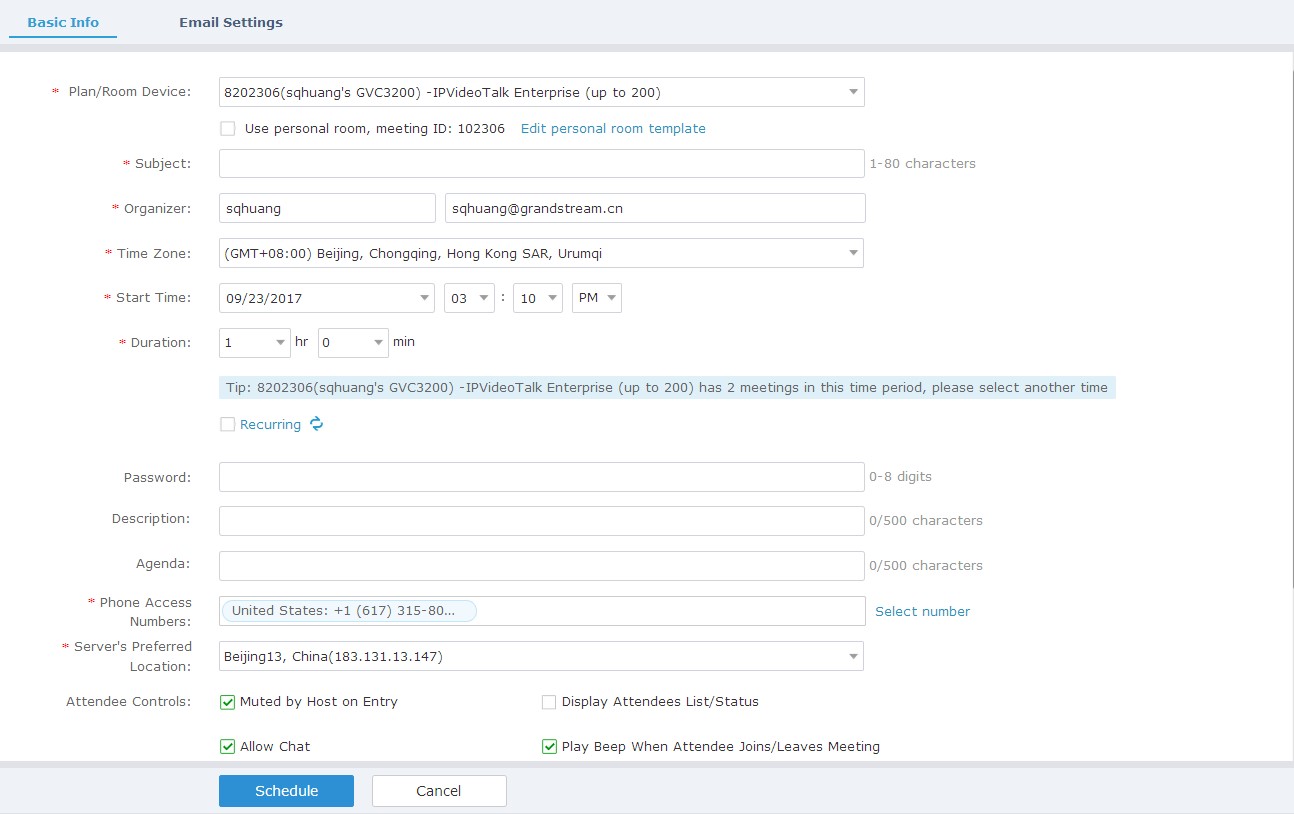
- Fill in meeting information.
Basic Info:
- Plan/Room Device: Select the host device or web meeting plan for the meeting. Users can choose from the authenticated devices, input alias or input IPVideoTalk ID of the authenticated device. Or, select the purchased/assigned web meeting plan.
- Personal Room: If the user selects Room Device, the user could also select to use the Personal Room Number. This Conference ID is the personal conference room, and the Conference Password, Attendees Control, Server Location will be loaded from the Personal Room Template. If the user wants to update the information, please click on “Edit Personal Room Template”.
- Subject: Fill in the subject of the meeting.
- Time Zone: Select time zone for the meeting.
- Start Time: Set start time for the meeting.
- Duration: Set the expected meeting duration and it is visible to other participants. Users can end the meeting in advance or delay the meeting, the meeting is not restricted by the configured duration.
- Recurring: Recurring meeting on regular time basis. Please refer to chapter Schedule a Recurring Meeting for more information.
- Password: Users can set meeting password for the meeting. This is optional. Setting meeting password can prevent meeting being interrupted by any unexpected callers.
- Description: Users could input the descriptions of the meeting, in order to mark the meeting.
- Agenda: Users could enter the agenda of the meeting. The participants will see it in the meeting invitation Email.
- Meeting Settings – Automatic Recording: If this option is selected, the meeting will be recorded automatically once the meeting is started.
- Meeting Settings – Meeting Locked: If the option is enabled, the meeting is locked by the meeting host, and only the invitees can join into the meeting. The meeting host still can invite other participants join into the meeting at this time.
- Attendees Control – Mute Attendees on Entry: If checked, all participants will be muted when entering the meeting.
- Attendees Control – Display Attendees List: If set to “Yes”, WebRTC participants could view the participants list during the meeting. If set to “No”, WebRTC participants can only see the host in the participants list.
- Attendees Control – Allow Chat: If checked, all participants can chat.
- Attendees Control – Play Beep When Join/Leave Meeting: If checked, when there is a meeting participant join/leave the meeting, other participants will hear the beep notification.
- Attendees Control – Disable Presentation: If selected, Presentation will be disabled during the meeting.
- Attendees Control – Call host automatically when joined the meeting: Only available when GVC is the meeting host. When selected, a call will be made immediately by the attendee who joined the meeting before the host did until the meeting started.
- Host Email:Users could enter the Email of the host who will receive an Email that contains host code and reminds him/her about the meeting to be hosted.
- Server Location:Specify the server where the meeting will be hosted. When the meeting starts, it will automatically connect to the specified server region, and all participants will connect to it. To ensure the meeting quality, users should select the closest sever to the meeting location, or where most participants are located. e.g., Oregon for US area, Frankfurt for EU area, and Sydney for Asia and Pacific area.
- Participants: Users can enter Email to invite meeting participants or enter IPVideoTalk ID of other GVC32XX devices. Users can also input name or the key words to search for company contacts.
The user could also click on “Frequent Contacts” to select the invitees.
- Meeting Layout: Users can pre-select the layout of the meeting, and the meeting will apply this meeting layout by default when the meeting starts. The Meeting Layout supports: Tiling (1+1, 2*2, 3*3, 4*4, Automatic Mode), Focus Mode (Solo, 1 (large) +3 (small), 1+5, 1+7), and Speaker Mode (The speaker will see the other participants’ video in sequence, and the other participants will see the speaker’s video in full screen).
If the selected Meeting Layout is Speaker Mode, the user needs to configure the speaker’s IPVideoTalk ID or email address, and the user needs to select them among panelists or invitees. The “Speaker Display Name” is the name displayed in the meeting video image when the speaker has not joined into the meeting yet.

Email settings:
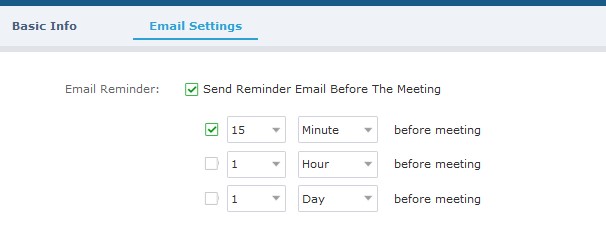
- Email Reminder: If set to “Yes”, the notification Email will be sent to the host and all invited participants 15 minutes before the meeting starts. Users could also configure the Email reminder, set the sending time before the meeting. Users could set 3 Email reminders for each meeting.
- If the meeting is scheduled successfully, the system will send notification Email to the Email participants automatically. Users could also check the meeting detailed on the host device schedule interface on LCD or Web UI. The host device will initiate meeting automatically when the meeting time starts.
- If the two scheduled meetings time are overlapped during the same period, there will a prompt to indicate users to change the schedule. Users still can schedule the meeting and ignore the overlap.
Schedule a new Webinar
-
Access Meeting screen and click on
, and select the meeting type to Webinar.
-
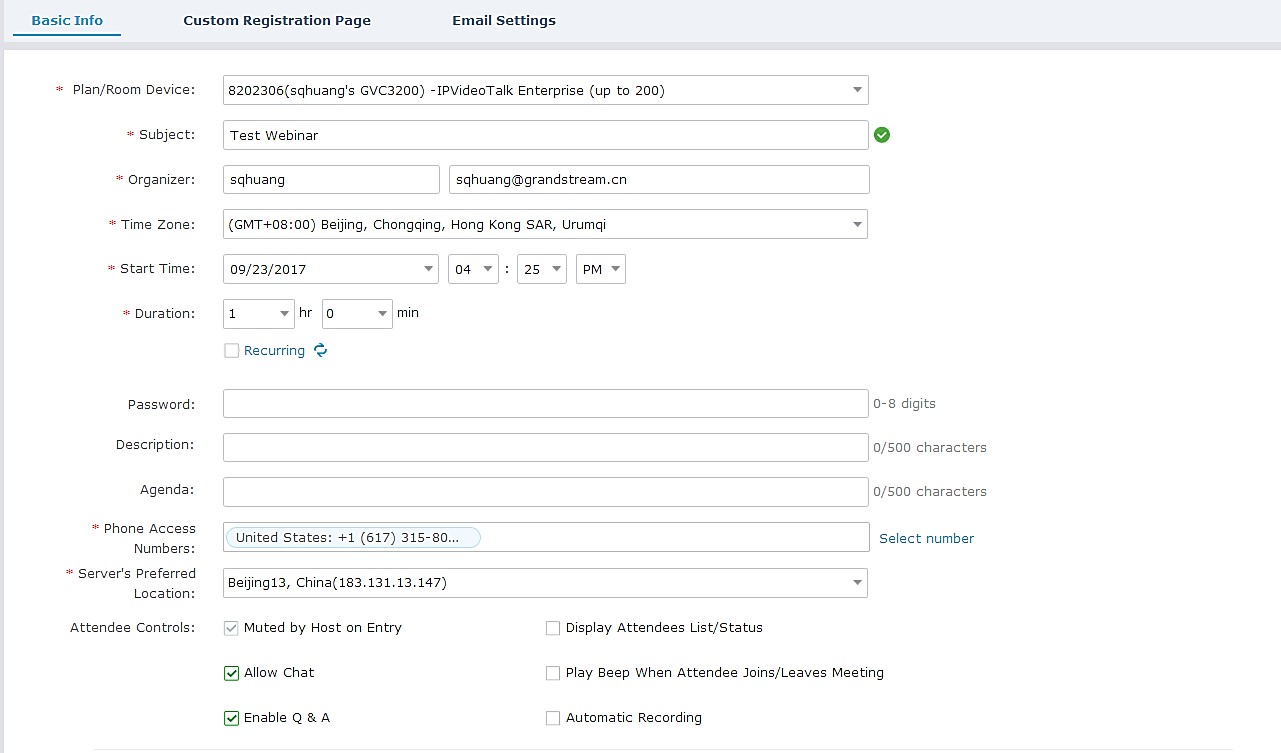
Fill in Webinar information: Basic Info:
- Plan/Room Device: Select the host device or web meeting plan for the Webinar. Users can choose from the authenticated devices, input alias or input IPVideoTalk ID of the authenticated device. Or, select the purchased/assigned web meeting plan.
- Subject: Fill in the subject of the Webinar.
- Time Zone: Select time zone for the Webinar.
- Start Time: Set start time for the Webinar.
- Duration: Set the expected Webinar duration and it is visible to other participants. Users can end the Webinar in advance or delay the Webinar, the Webinar is not restricted by the configured duration.
- Recurring: Recurring Webinar on regular time basis. Please refer to chapter Schedule a Recurring Meeting for more information.
- Password: Users can set Webinar password for the Webinar. This is optional. Setting Webinar password can prevent Webinar being interrupted by any unexpected callers.
- Description: Users could input the descriptions of the Webinar, in order to mark the Webinar.
- Agenda: Users could enter the agenda of the Webinar. The participants will see it in the Webinar Invitation Email.
- Phone Access Number: In the Invitation Emails, it will show the default Phone Access Numbers. The scheduler could also select to show only 2 default Phone Access Numbers.
- Attendees Control – Mute Attendees on Entry: If checked, all participants will be muted when entering the Webinar.
- Attendees Control – Display Attendees List: If set to “Yes”, WebRTC participants could view the participants list during the Webinar. If set to “No”, WebRTC participants can only see the host in the participants list.
- Attendees Control – Allow Chat: If checked, all participants can chat.
- Attendees Control – Play Beep When Join/Leave Meeting: If checked, when there is a Webinar participant join/leave the Webinar, other participants will hear the beep notification.
- Attendees Control – Enable Q&A: If this option is selected, the Q&A feature is supported during the Webinar. The Q&A module will be shown up on the Webinar interface. The Webinar participants could send questions for the Webinar host/panelists, and the Webinar host/panelists could select to answer the questions.
- Attendees Control – Automatic Recording: If this option is selected, the Webinar will be recorded automatically once the Webinar is started.
- Host Email:Users could enter the Email of the host who will receive an Email that contains host code and reminds him/her about the Webinar to be hosted.
- Server Location:Specify the server where the Webinar will be hosted. When the Webinar starts, it will automatically connect to the specified server region, and all participants will connect to it. To ensure the Webinar quality, users should select the closest sever to the Webinar location, or where most participants are located. e.g., Oregon for US area, Frankfurt for EU area, and Sydney for Asia and Pacific area.
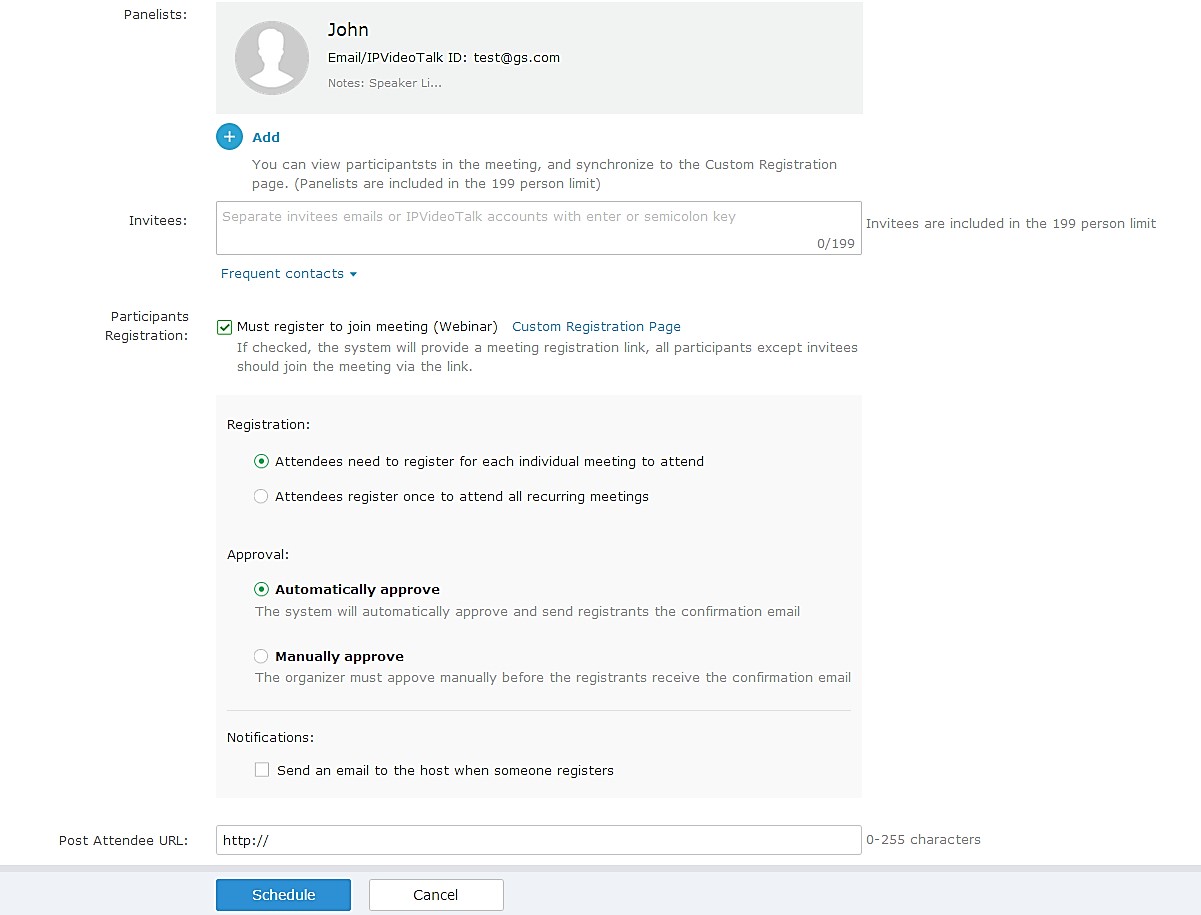
- Add Panelists: Users could add panelists (meeting host) with their names, Email addresses, photos and introductions. Other participants will see the information of the invited panelists (meeting host). And, when users customize the registration page, users could add the information of the panelists (meeting host) into the registration page. In this case, other participants will see the Webinar host/panelists information when joining into the Webinar.
- Participants: Users can enter Email to invite Webinar participants or enter IPVideoTalk ID of other device devices. Users can also input name or the key words to search for company contacts. The number of invitees is depending on the plan of the organizer.
- Participants Registration: If checked, the participants except invitees should register before joining the Webinar, this feature will help the host to collect the participants’ information. The system will provide Webinar registration link, all participants except invitees need to register the Webinar via the link. Users could customize the registration page.
- Registration: If the Webinar is recurring Webinar, the user could also select to allow the invitee to register only once and join all recurring Webinars, or only for the next Webinar.
- Approval: Users could set to get verified automatically or verified manually. If it is set to get verified manually, the participant will not receive the confirmation Email immediately after registering, and the participant cannot join into the Webinar until passing the verification.
- Notifications: If this option is checked, when someone registers for this Webinar, the Webinar system will send a notification automatically to the Webinar host.
- Meeting Layout: Users can pre-select the layout of the meeting, and the meeting will apply this meeting layout by default when the meeting starts. The Meeting Layout supports: Tiling (1+1, 2*2, 3*3, 4*4, Automatic Mode), Focus Mode (Solo, 1 (large) +3 (small), 1+5, 1+7), and Speaker Mode (The speaker will watch the other participants’ video in sequence, and the other participants will see the speaker’s video in full screen).
If Meeting Layout is set to Speaker Mode, user needs to configure the speaker’s IPVideoTalk ID or email address, and the user needs to select them among panelists or invitees. The “Speaker Display Name” is the name displayed in the meeting video image when the speaker has not joined into the meeting yet.
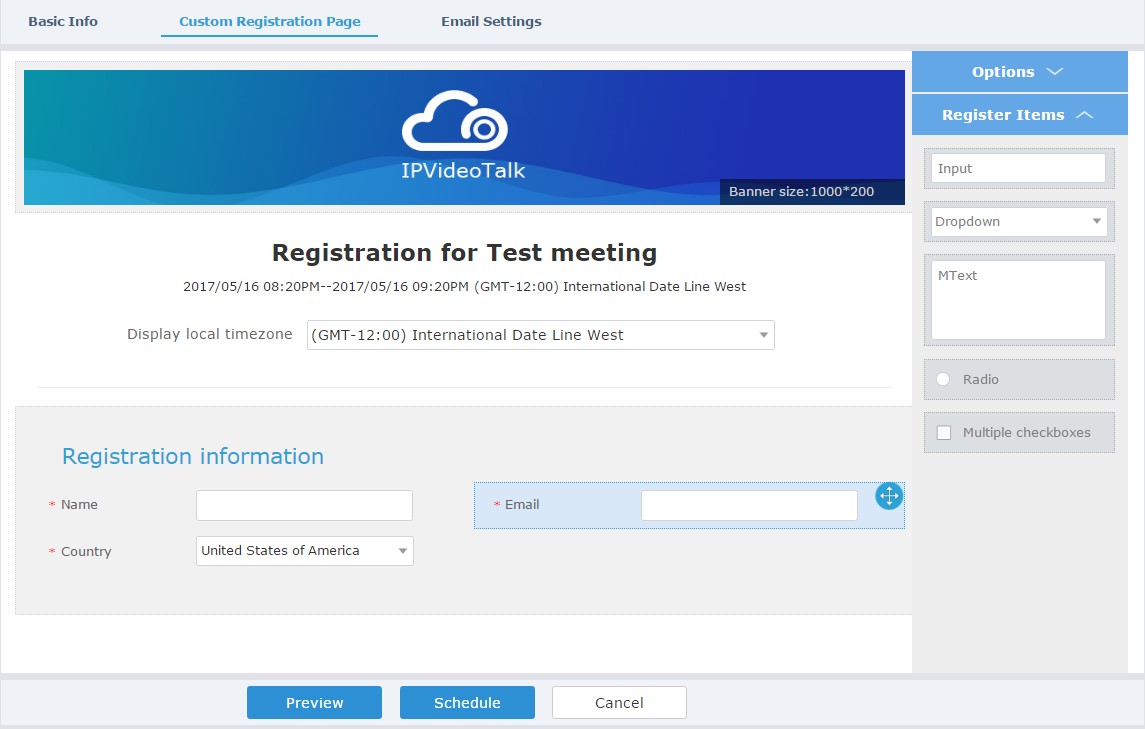
- Fill in Webinar information:Custom Registration Page.
i. Users could customize the banner, the information options from the participants, the Webinar host/panelists’ business card and so on. ii. The figure below shows the registration page for Webinar participants. Users could drag the items from “Register Items” / ”Options” from the right side to the left-side page. When done, users could click
on the button
![]() on the bottom page to preview the registration page.
on the bottom page to preview the registration page.
- Banner: The size is up to 1000*200, and the image format includes png, jpg, jpeg and other common image formats.
- Register Items: The default displaying items are Name, Email address and Country. Users could customize and add up to 20 options. The Registration Items include Input, Drop-down, MText, Radio, and Multiple Checkboxes. Users could customize and add the items by requirements, and users could also define the customize option is a required option or not.
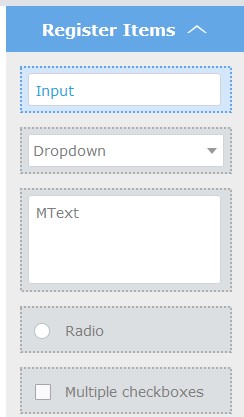
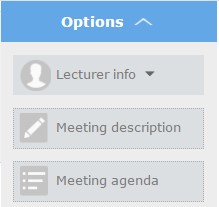
- Options: Users could drag options “Lecturer Info”, “Meeting Description” and “Meeting Agenda” to the registration page. Users could add up to 5 lecturers on the registration page. Users need to select the lecturers from the invited Webinar panelists. Users could move the panelist to the registration page or add a new lecturer. The new added lecturer will not be moved to the Webinar panelists.
- Move Options: Move the mouse to the option, and there will be an icon
 shown on the right upper side of the option. Click on the icon and drag the option to the location where you preferred.
- Edit Options: Move the mouse to the option, and there will be an icon
 shown on the right upper side of the option. Click on the icon and start to edit this option such as the option name, the sub-options, and whether if the option is required.
- Delete Options: Move the mouse to the option, and there will be an icon
 shown on the right upper side of the option. Click on the icon and users could delete this option.
iii. The language on the customized registration page is depending on the language of Webinar scheduler. For example, if the person who schedules this Webinar is using French, the registration page for the participants is in French, and this cannot be updated.
-
Fill in Webinar information:Email Settings.
- Email Reminder: If set to “Yes”, the notification Email will be sent to the host and all invited participants 15 minutes before the Webinar starts. Users could configure the time when users want to send the notification Emails, up to 3 times.
- Thank-you Email: If checked, the system will send a Thank-you Email to the Webinar participants, the host can also customize the contents in the Email. Users could customize the Thank-you Email and preview the Email.
- Missed-you Email: If this option is selected, the Webinar system will send the Emails to the users who registered/invited but miss the Webinar.

- If the Webinar is scheduled successfully, the system will send notification Email to the panelists and participants automatically. Users can also check the Webinar details on the host device schedule interface on LCD or Web UI. The host device will initiate Webinar automatically at scheduled Webinar starting time.
- If the Webinar time of two scheduled Webinars are overlapping during the same period, there will a prompt to indicate users to change the schedule. Users can still schedule the Webinar and ignore the overlap.
Schedule a Recurring Meeting
Users could schedule a recurring meeting if users want to have a meeting on daily/weekly/monthly basis.
Select “Recurring” below “Duration” option when scheduling a meeting as the figure shown below:
Users can set the following recurring range:
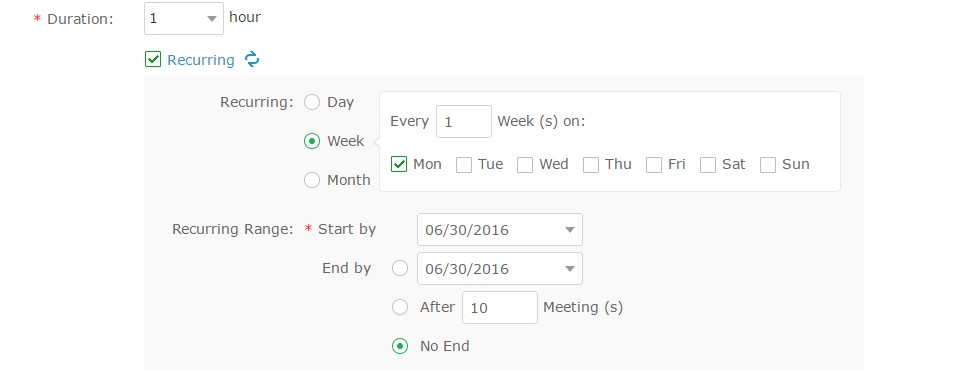
Recurring | Options | Examples |
Day | Every N day (s) | e.g.: have meeting per day |
Day | Every workday (Monday to Friday) | e.g.: have meeting per day from Monday to Friday |
Week | Every N week (s) + weekday (Optional: from Sunday to Saturday) | e.g.: have meeting on Monday every two weeks |
Month | Every N month (s) + one exact day (day-of-month, weekday-of-month) | e.g.: have meeting on the first day of every month, or on the fourth Friday of each March |
Start by | Start recurring meeting since this day |
|
End by | No end: recurring meeting always takes effect |
|
| End by date: set the date until when the recurring meeting will end | |
| End by times: the meeting ends recurring after N meeting (s) |
When one of the recurring meetings ends, it will automatically display the next upcoming one in the recurring meeting schedule.
View Scheduled Meeting
After the meeting is scheduled, the user could view it on the IPVideoTalk Portal or the GVC32xx (If a GVC32xx is being used as Organizer).
View Scheduled Meeting on IPVideoTalk Portal
- Log in IPVideoTalk Portal https://meetings.ipvideotalk.com/login and click on “Meetings”-> “Upcoming” meetings page.
- Your scheduled meetings will be displayed in upcoming meetings page. Icon
 means this is a recurring meeting.
 - Click on the scheduled meeting to view its detailed information. The information cannot be edited here.
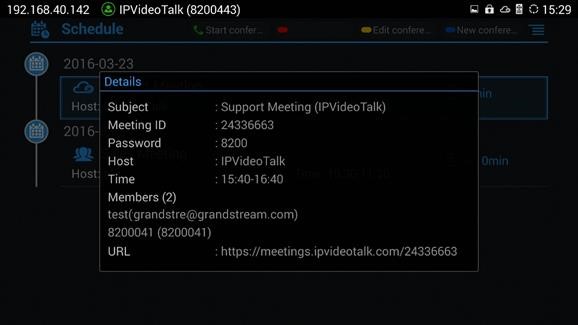
View Scheduled Meeting on GVC32XX
-
On the GVC32xx LCD display device, click on icon
 on the home screen or click on Application button
and select icon
on the home screen or click on Application button
and select icon
 to access to the schedule screen.
 on the home screen or click on Application button
 and select icon
 to access to the schedule screen.
- In the scheduled meeting list, the meeting synced from IPVideoTalk cloud system will be marked with
icon
![]() .
.
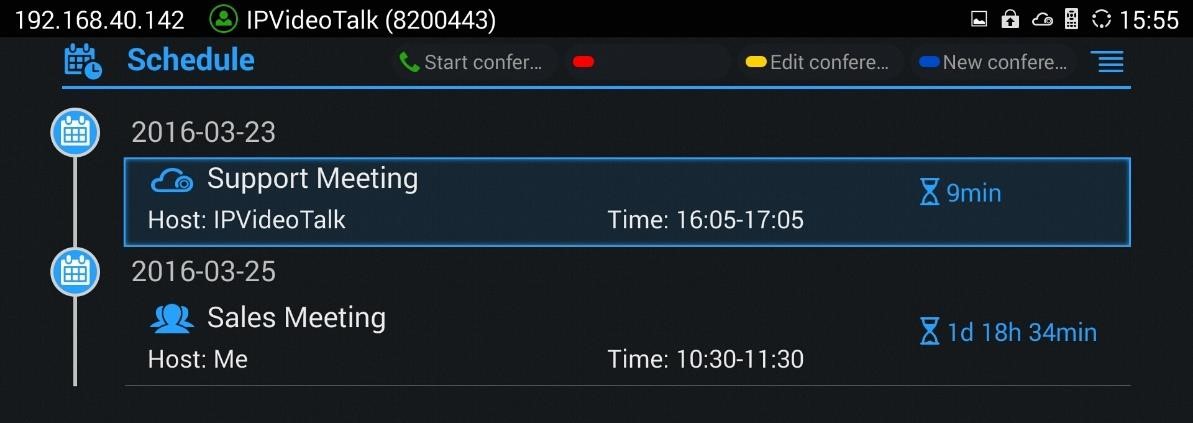
- Click on scheduled meeting to view its detailed information.
Note:
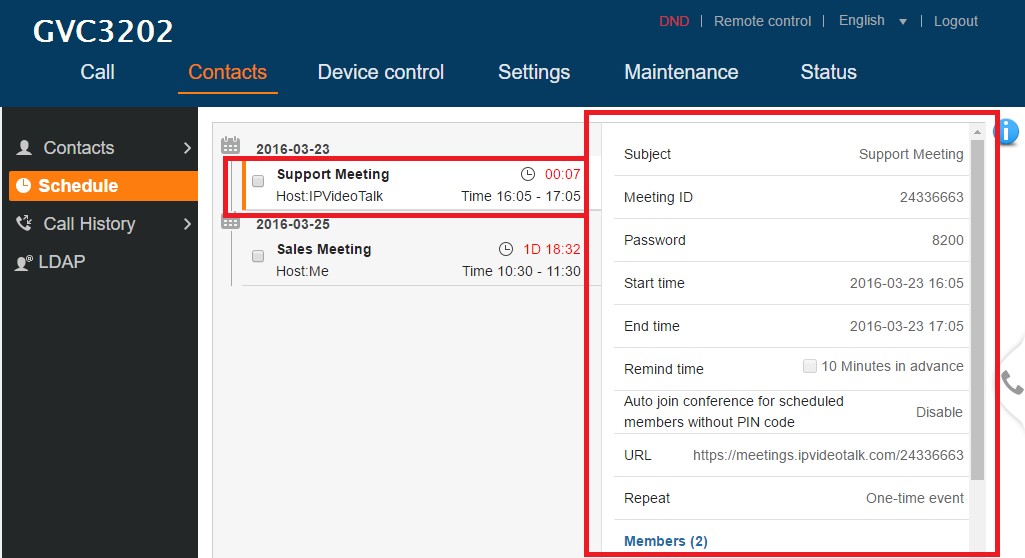
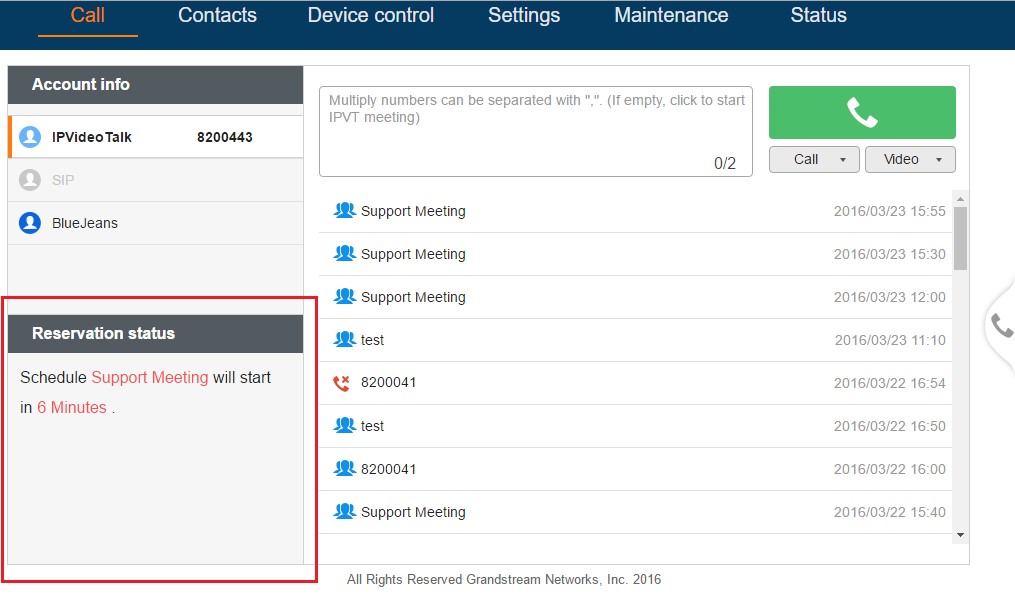
The scheduled meeting can also be viewed on the GVC32xx web UI->Contacts->Schedule.
The scheduled meeting also shows up on GVC32xx web UI->Call->Reservation Status section (on the lower left side of the page).
MANAGE SCHEDULED MEETING
Start Meeting or Webinar
Users can start an IPVideoTalk meeting or Webinar manually before the starting time.
-
Access upcoming meetings list: Move the mouse cursor on the meeting and click on
 button.
- If the current organizer is in an ongoing IPVideoTalk meeting, or the meeting is in time conflict with another one, it cannot be started manually.
- When the meeting is started, the user will join the meeting automatically, and becomes a meeting host by default.
- If the meeting organizer is a GVC320x device, it will receive the call automatically if the meeting is started before the starting time.
- For IPVideoTalk Webinar, the user could start the Webinar or join into the Webinar preparation period 1 hour before the Webinar starting time.
Upcoming Meeting – Edit
Follow the steps below to edit scheduled meeting:
-
Access upcoming meetings list and move the mouse cursor on the meeting and click on

button.
- Fill in the new meeting information and click “Save”. Once the meeting is saved, the users can edit all fields, including the meeting organizer.
- If the meeting status is “To be Hosted”, the user can only add invitees, and other information cannot be revised.
- When users try to edit a recurring meeting, users could only “Edit this meeting”, or “Edit the recurring meeting”.
Notes:

- If the plan for the IPVideoTalk ID is changed, the number of allowed participants will be adjusted accordingly.
- If the meeting subject or meeting time is changed, an Email will be sent automatically to inform all Email participants.
- If users add or delete a new participant, the Email participants will receive Email notifications.
Upcoming Meeting – Cancel
- Access “Upcoming” meetings list and move the mouse cursor on the meeting. Then click the Cancel button

- To confirm canceling the meeting, click “OK” in the pop-up dialog. Otherwise, click “Cancel”.
- If it is a recurring meeting, users could cancel all the repeated meetings or the meeting only to be held this time.
Reschedule Meeting
If users would like to host a meeting that has the same meeting information as the past meetings, the users could find the past meeting in history meeting list and reschedule it from there.
- Access history meetings list: Move the mouse cursor on the meeting and click “Reschedule” button.
- The user could select whether to use the previous scheduled meeting number. If the user selects the previous scheduled meeting number, the current scheduled meeting number will be the same as the previous scheduled meeting number. Otherwise, the new scheduled meeting number will be assigned to this meeting.
- Users could import the previous participants, registrants, or invitees. Once the option is checked, the participants/registrants/invitees will be filled into the corresponding section, and users could edit the section if needed.
- Fill in the new meeting information and click “Save”. The users can edit all fields including the host device when editing the meeting for rescheduling.
- After the meeting is saved, Email notifications will be sent to Email participants.
Restart Meeting
- Access history meetings list: Put the mouse cursor on the meeting and click “Restart” button.
- Users will see the meeting in Upcoming meeting list with the same meeting ID, and a notification Email will be sent to Email participants automatically.
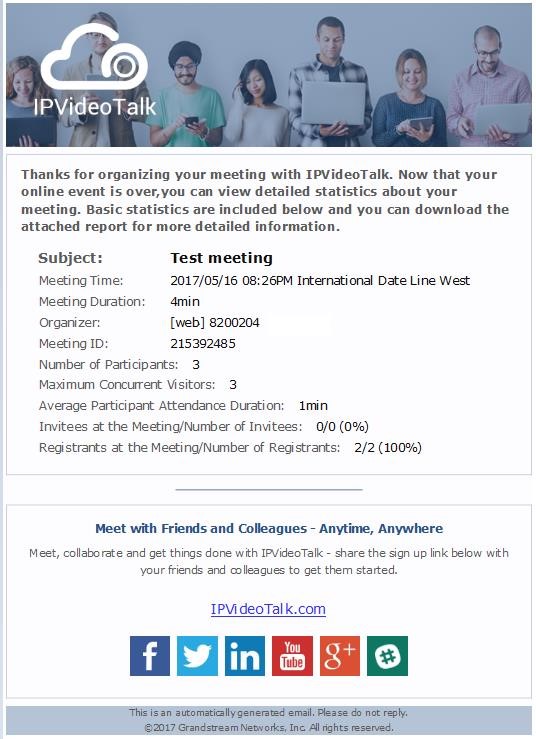
After-Meeting Report Email
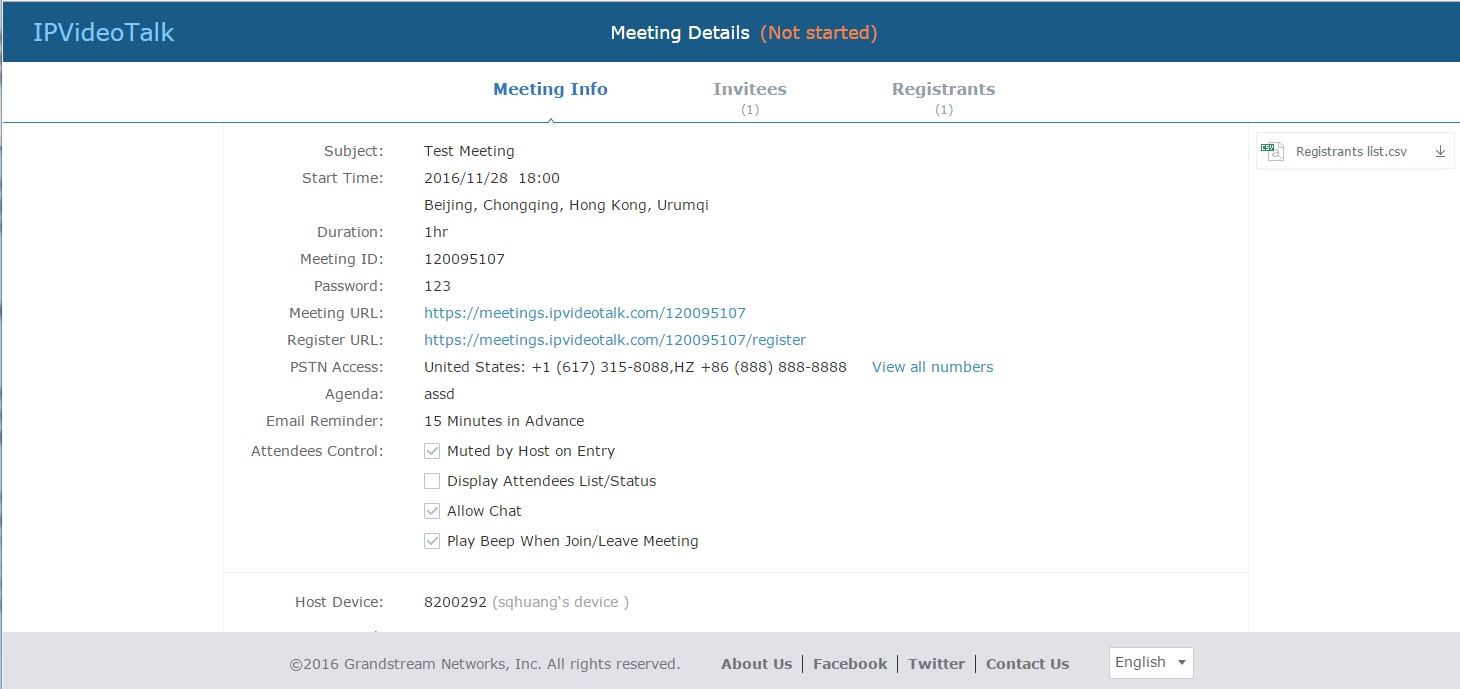
When the meeting is ended, a report Email will be sent to the registered Email address and the host Email address.
The Email contains the meeting information such as meeting duration, the number of participants and registrants list as shown in figure below, host Email will also get a pdf attachment containing detailed report statistics. You can also log in to www.ipvideotalk.com to view the meeting details.
Notification Email
When the plan has expired or about to be expired, the device firmware version is too low, or the device is frozen by IPVideoTalk server, a notification Email will be sent to the registered Email address to inform the users.