
Intercom and Paging are ways to broadcast an announcement over one or more speakers. These could be the speakerphones on a desk phone in an office, a mounted speaker in a warehouse, or an outdoor area. These pages can be sent from any connected device such as a desk phone or even a doorbell. In general, paging systems are powerful tools used to relay information quickly to a large audience.
This document explains how to set up and use Paging & Intercom features on Grandstream UCM6XXX series. The following scheme will be used for different Paging/Intercom features explanation.
Paging and Intercom
Paging and Intercom Group can be used to make an announcement over the speaker on a group of phones. Targeted phones will answer immediately using speaker. The UCM6xxx paging and intercom can be used via feature code to a single extension or a paging/intercom group. This section describes the configuration of paging/intercom group under Web GUI🡪Call Features🡪Paging/Intercom.
- Click on
 to add Paging/Intercom Group.
 - Click on
 to edit the Paging/Intercom Group.
 - Click on
 to delete the Paging/Intercom Group.
 - Click on “Paging/Intercom Group Settings” to edit Alert-Info Header. This header will be included in the SIP INVITE message sent to the callee in paging/intercom call.
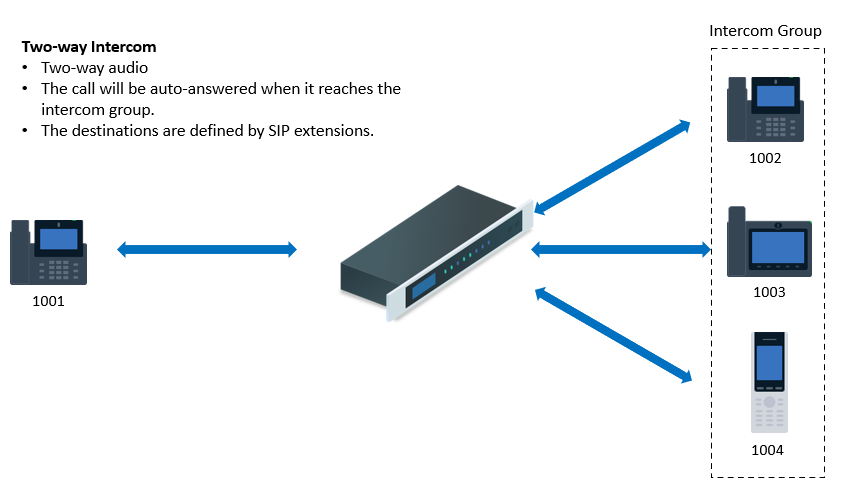
2-way Intercom
2-way intercom allows initiating a intercom between one and multiple SIP endpoints. When the extensions receive the call, it will be answered automatically and the user will start hearing the initiator’s voice. When a user responds to the initiator, all the other users will be able to hear the initiator and the user’s voice; the other users cannot be heard while a user is speaking. When the user is done talking, other user can start talking and will be heard by the initiator and all other users.
To configure 2-way intercom, please navigate to Call Feature > Paging/Intercom > Paging/Intercom Groups
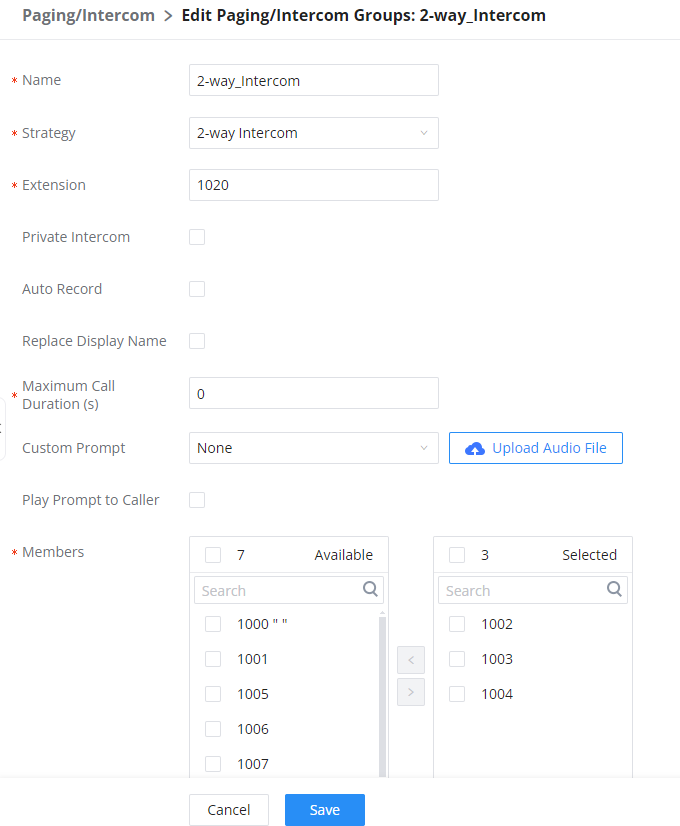
Name | Configure paging/intercom group name. |
Strategy | Select “2-way Intercom”. |
Extension | Configure the paging/intercom group extension. |
Private Intercom | If enabled, members can only hear the voice of the initiator and cannot hear the voice of other members. The initiator can hear the voice of all members. |
Auto Record | Enable this option to record in WAV format. |
Replace Display Name | If enabled, the UCM will replace the caller display name with Paging/Intercom name. |
Maximum Call Duration | Specify the maximum call duration in seconds. The default value 0 means no limit. |
Custom Prompt | This option is to set a custom prompt for a paging/intercom group to announce to caller. Click on ‘Upload Audio File’, it will direct the users to upload the customized voice prompts. |
Play Prompt to Caller | Play the prompt to the caller. |
Members | Select available users from the left side to the paging/intercom group member list on the right. |
Paging/Intercom Whitelist | Select which extensions are allowed to use the paging/intercom feature for this paging group. |
Table 2: 2-way Intercom Configuration Parameters
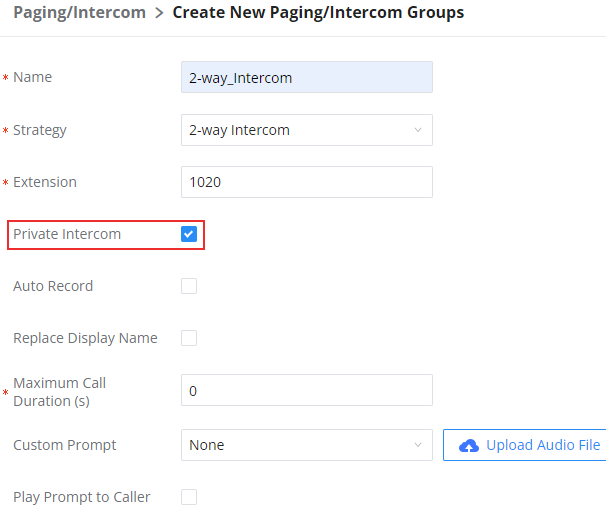
Private Intercom
Private intercom allows the user to initiate an intercom to many endpoints. Whichever endpoint microphone has detected sound input first, only the intercom initiator and the responder will be able to hear each other. Once the first responder has finished talking, the second responder cna sta To configure private intercom, the user can follow the steps mentioned above in 2-way intercom and while creating the intercom, the user may tick the option “Private Intercom” as indicated in the screenshot below.
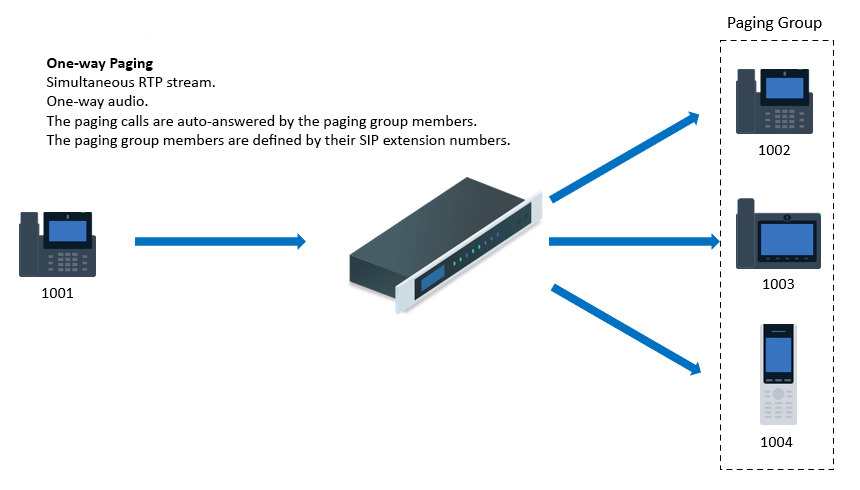
1-way Paging
One-way paging is a feature that allows a user to initiate a page to one or multiple SIP endpoints. The call will be answered automatically and then the users will start hearing the initiator’s voice. Since this is a one-way paging, the initiator will not hear any of the users.
To configure a 1-way paging, please navigate to Call Features >Paging/Intercom Groups

Name | Configure paging/intercom group name. |
Strategy | Select “1-way Paging”. |
Extension | Configure the paging/intercom group extension. |
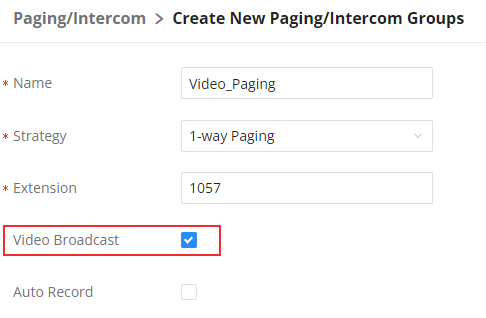
Video Broadcast | If checked, video paging will be supported. If the caller sends a video page, the paging group members will be able to receive and view the video. |
Auto Record | Enable this option to record in WAV format (audio) and MKV format (video). |
Replace Display Name | If enabled, the UCM will replace the caller display name with Paging/Intercom name. |
Delayed Paging | If enabled, a caller can enter *82 before the paging group extension to start a delayed paging call. In a delayed paging call, the system will prompt the caller to record a message. Once the messaging is recorded and saved, and the configured delay has passed, the paging call will be sent out. When a paging group member answers the call, the prerecorded message will be played, and the call will end after it is finished playing. |
Maximum Call Duration | Specify the maximum call duration in seconds. The default value 0 means no limit. |
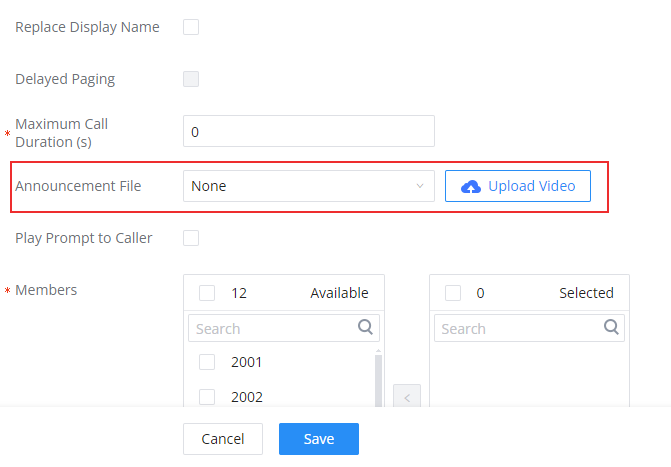
Announcement File | Configures an audio/video file to play to the paging members. This can be used to play preconfigured audio/video at the beginning of paging calls or to simply notify members that it is a paging/intercom call. |
Play Prompt to Caller | Play the prompt to the caller. |
Members | Select available users from the left side to the paging/intercom group member list on the right. |
Paging/Intercom Whitelist | Select which extensions are allowed to use the paging/intercom feature for this paging group. |
Table 3: 1-way Paging Configuration Parameters
Video Broadcast
Using this feature, the user can send a video to the SIP endpoints which support streaming video to notify the users of the beginning of a paging. To configure Video Broadcast before a paging, the user can create a 1-way paging following the steps mentioned in the previous section. Then the user can enable “Video Broadcast” in the settings.
The user can upload the video in the “Annoucement File” section as shown in the screenshot below.
Multicast Paging
Create Multicast Paging
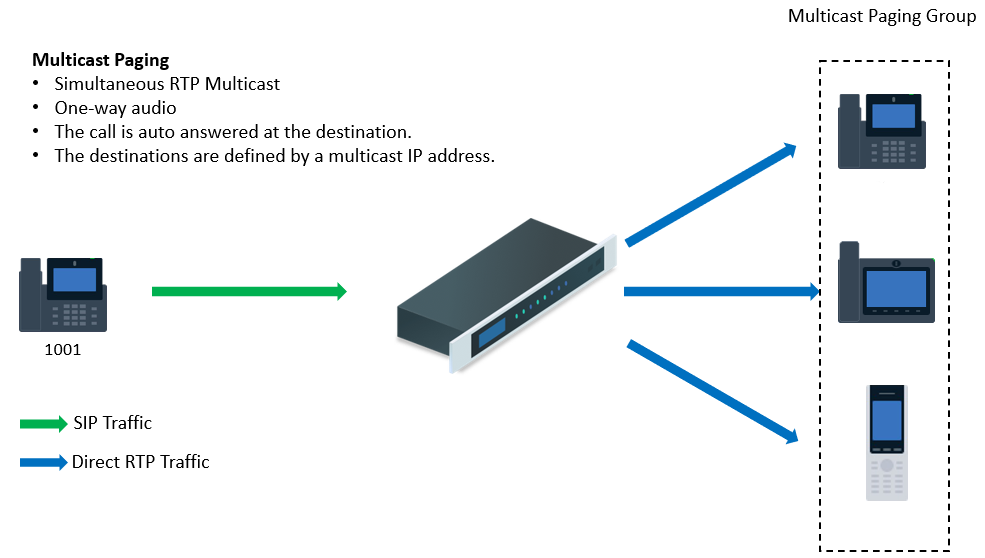
Multicast paging is a feature used to send a paging to multiple SIP endpoints which are grouped under one multicast IP address. When the paging has reached the UCM, SIP is not involved at this point. The UCM will relay the paging directly using RTP stream to the endpoints using the multicast IP address as the destination. The paging will immediately start on the endpoints.
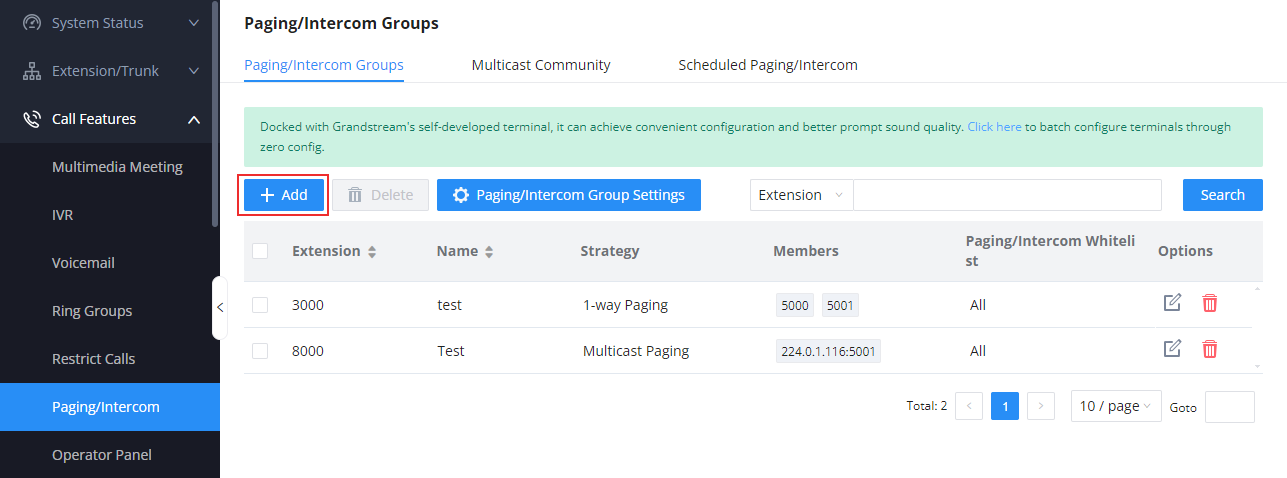
To create a multicast paging, please navigate to Call Features > Paging/Intercom > Paging/Intercom Groups, then click on the button “add”.
Then follow the instructions mentioned in the table below.
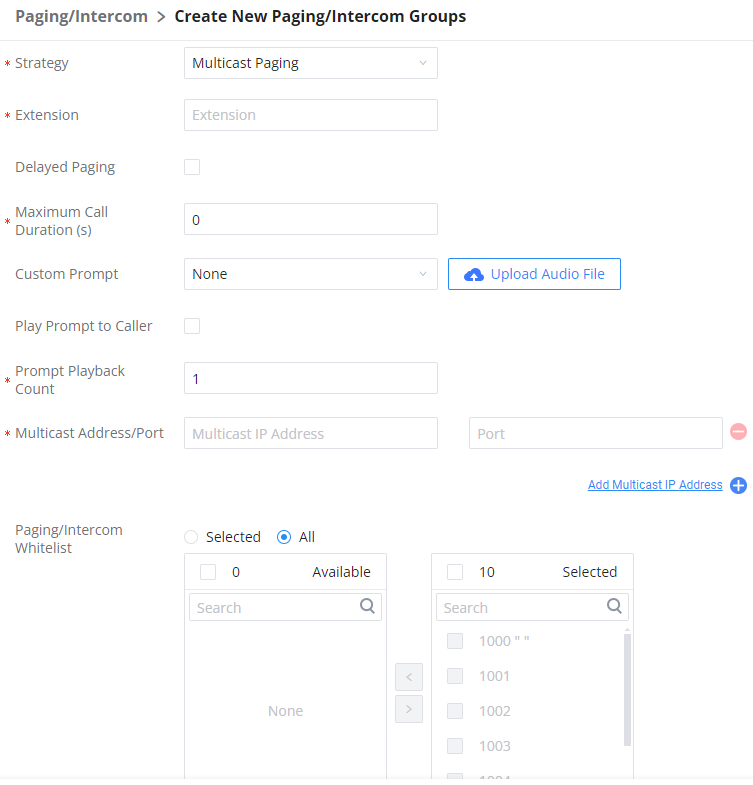
Name | Configure paging/intercom group name. |
Strategy | Select “Multicast Paging”. |
Extension | Configure the paging/intercom group extension. |
Delayed Paging | If enabled, a caller can enter *82 before the paging group extension to start a delayed paging call. In a delayed paging call, the system will prompt the caller to record a message. Once the messaging is recorded and saved, and the configured delay has passed, the paging call will be sent out. When a paging group member answers the call, the recorded message will be played, and the call will end after it is finished playing. |
Delay (s) | Configure the amount of delay in seconds after a message is recorded to send out the delayed paging call. Default is 5 seconds. |
Maximum Call Duration | Specify the maximum call duration in seconds. The default value 0 means no limit. |
Custom Prompt | This option is to set a custom prompt for a paging/intercom group to announce to caller. Click on ‘Prompt’, it will direct the users to upload the customized voice prompts. Note: Users can also refer to the page PBX Settings🡪Voice Prompt🡪Custom Prompt, where they could record new prompt or upload prompt files. |
Play Prompt to Caller | Play the prompt to the caller. |
Prompt Playback Count | Sets the number of times the prompt is played during the page/intercom. To ensure the prompt is played the specified number of times, please set an appropriate max call duration. |
Multicast IP Address/Port | The allowed multicast IP address range is 224.0.1.0 – 238.255.255.255. Note: You can add up to 30 multicast addresses. |
Paging/Intercom Whitelist | Select the extension which can initiate this paging. If none is selected, all extensions will be able to use this paging/intercom group. |
Table 1: Multicast Paging Configuration Parameters
To configure the multicast paging on Grandstream IP phone, please refer to the guide below:
https://documentation.grandstream.com/knowledge-base/grp26xx-multicast-paging-guide/#receiving-multicast-paging
Create Multicast Community
Multicast community allows to add multiple multicast paging under one community. The multicast community can be configured with a specific extension to allow the user to dial one extension and trigger multiple multicast paging at once.
To create a multicast community please navigate to Call Features > Paging/Intercom > Multicast Community, then click “Add”.

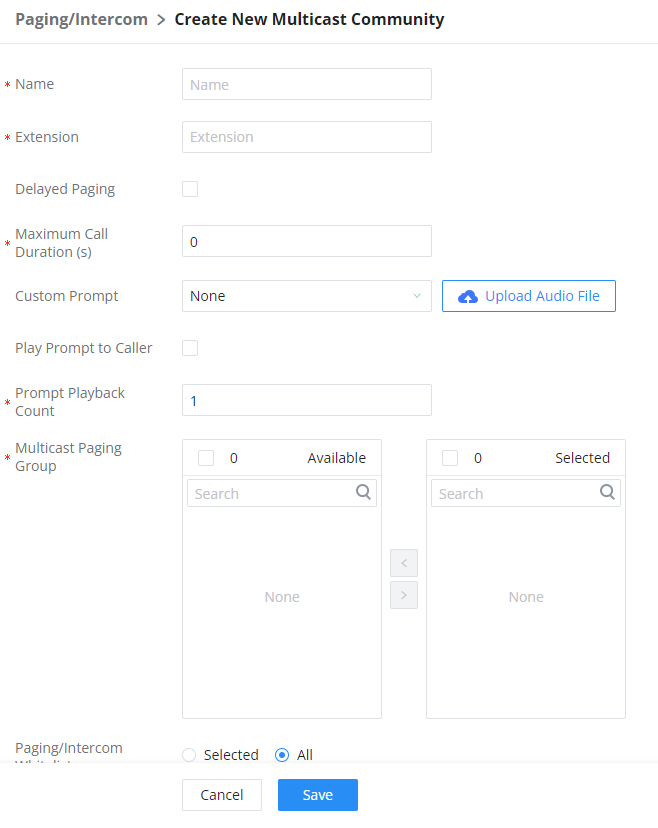
Name | Enter the name of the multicast community. |
Extension | Configure the extension number for the paging/intercom group. When this number is dialed, the paging/intercom will be initiated. |
Delayed Paging | If enabled, a caller can enter *82 before the paging group extension to start a delayed paging call. In a delayed paging call, the system will prompt the caller to record a message. Once the messaging is recorded and saved, and the configured delay has passed, the paging call will be sent out. When a paging group member answers the call, the precorded message will be played, and the call will end after it is finished playing.
|
Maximum Call Duration (s) | The maximum allowed duration of a call in seconds. Default value is 0 (no limit). Note: Please note that the call duration that can be configured can be within the range 0 - 86400. |
Custom Prompt | Choose the custom prompt to play for the callees at the beginning of the paging. The user can also directly upload a prompt file directly on this page. Note: When uploading the custom prompt file, please make sure it respects the following requirements:
|
Play Prompt to Caller | When this option is enabled, the prompt will be played back on the caller's phone. |
Prompt Playback Count | Sets the number of times the prompt is played during the page/intercom. To ensure the prompt is played the specified number of times, please set an appropriate max call duration. Note: The minimum number of playcounts which can be configured is 1 and the maximum is 10. |
Multicast Paging Group | Configures multicast paging groups within a community. When dialing the extension number of the community, users may simultaneously initiate paging to linked multicast paging groups. |
Paging/Intercom Whitelist |
|
When the extension of the multicast community is dialed, the multicast will be initiated to the groups which are selected. The prompt configured for the multicast community will be played, then the initiator can start talking.
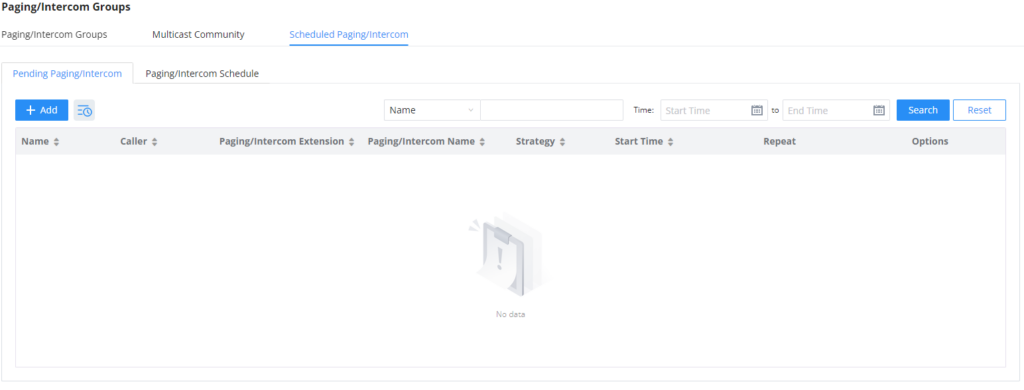
Scheduled Paging/Intercom
Users can schedule paging/intercom calls by using the Schedule Paging/Intercom page. To schedule, click the “Add” button on the new page and configure the caller, the group to use, and the time to call out.
Paging/Intercom | Select existing paging/intercom groups and multicast communities. |
Name | Configures the name of a scheduled paging/intercom. |
Caller | Once a caller is selected, and the specified start time is reached, the system will contact the caller. If this call is rejected, the page/intercom will be cancelled. If caller is set to None, the system will call all group members and play the configured prompt. |
Start Date | Configure the start date of the paging/intercom. |
Start Time | Configure the start time of the paging/intercom. Note: Up to 20 start times can be configured for the scheduled/intercom. |
Repeat | Choose the frequency of repeating the scheduled paging/intercom.
|
Include Holidays | Only appears when Weekly or Monthly is selected on the option "Repeat". If enabled, scheduled pages/intercoms will run during holidays. Otherwise, scheduled pages/intercoms displayed on the calendar will not actually be run. |
Sync to Google Calendar | This feature cannot be used if Google Services have not been authorized. Please resolve this in the Integrations -> Google Services page. |
Table 5: Schedule Paging / Intercom Settings

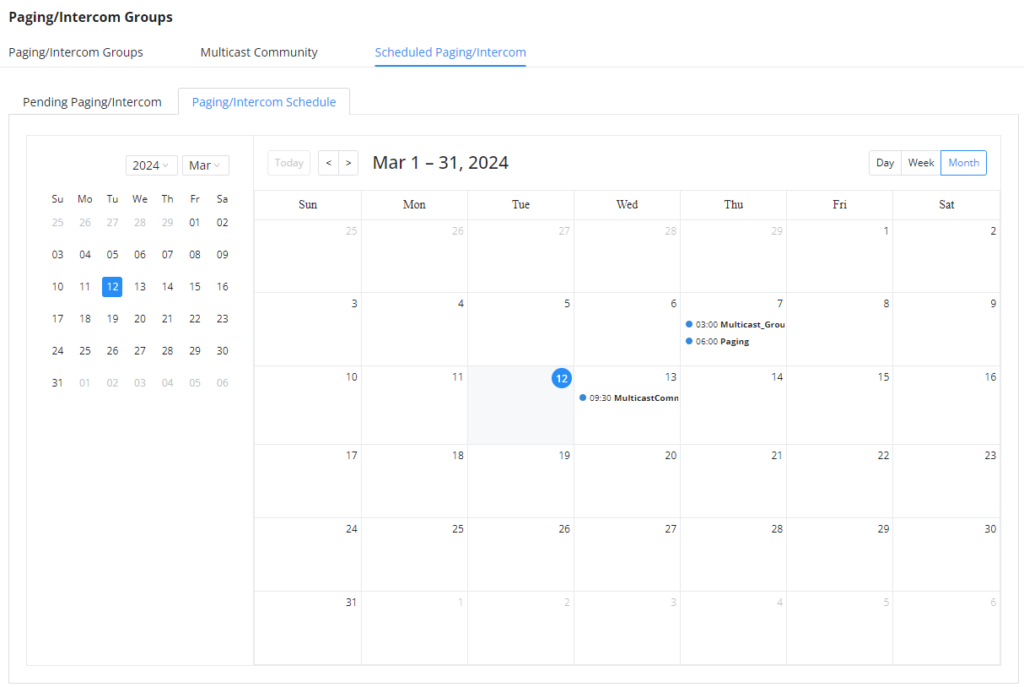
Once the paging/intercom has been scheduled, it will be displayed as the figure below shows.
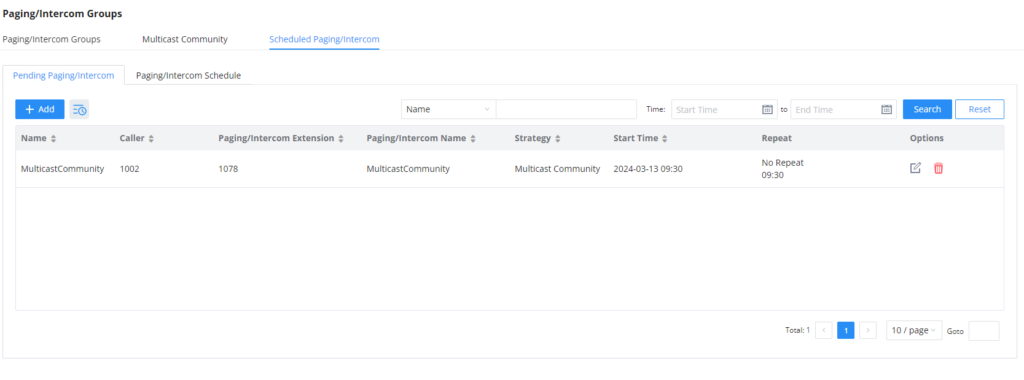
To see the scheduled intercom and paging in a calendar view, click on “Paging/Intercom Schedule”.
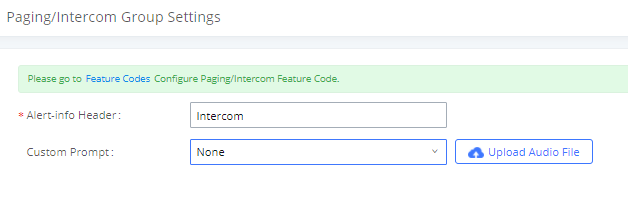
Paging/Intercom Group Settings
Users can configure under Web GUI 🡪 Paging/Intercom 🡪 Paging/Intercom Group Settings 🡪 Alert-Info Header the alert-info header value that will be included in paging/intercom calls to endpoints. It is highly recommended to not modify the default value. Users can also upload custom prompt to be used as an announcement to the person receiving a paging/intercom call. The file can be uploaded from the Custom Prompt page. Click on the Upload Audio File button to add additional recordings. The custom prompt will apply to paging/intercom call initiated via feature code (*80 and *81 by default).
The UCM6XXX has a pre-configured paging/intercom feature code. By default, the Paging Prefix is *81 and the Intercom Prefix is *80. To edit page/intercom feature code, click on “Feature Codes” in the “Paging/Intercom Group Settings” dialog. Or users could go to Web GUI🡪Call Features🡪Feature Codes directly.