
OVERVIEW
Thank you for purchasing the UCM630X Series IPPBX. The Grandstream UCM6300 Series IPPBX is based on Asterisk 16 and provides powerful features, a user-friendly interface for remote management, and a scalable all-in-one communication solution for enterprises of all sizes. Offering up to 3000 extensions, PBX features such as audio/video calling and conferencing, video surveillance support, PBX data management and statistics, and remote device access and management via UCM RemoteConnect, it is the perfect solution to improve communication efficiency and productivity.
The UCM630X Series IPPBX offers UCM RemoteConnect, a service that allows users to quickly set up remote communication and management using Grandstream Wave. Grandstream Wave is a multi-platform application available on web browsers, Windows, macOS, Android, and iOS that supports calling, conferencing, extension management, system alert event monitoring, call/meeting reports, cloud storage access, and more.
UCM RemoteConnect is highly recommended for easy-to-use, secure, and stable network traversal. If UCM RemoteConnect is not used, users can use this guide to set up their remote work environments with the UCM630X. This guide has three sections:
- SIP Signaling Traversal
- Media Traversal
- Configuring for Wave
SIP SIGNALING TRAVERSAL
To allow successful SIP registration and call establishment, users will need to configure SIP signaling NAT traversal by associating their private local network addresses and ports with their public addresses and ports. To do so, please see the following steps:
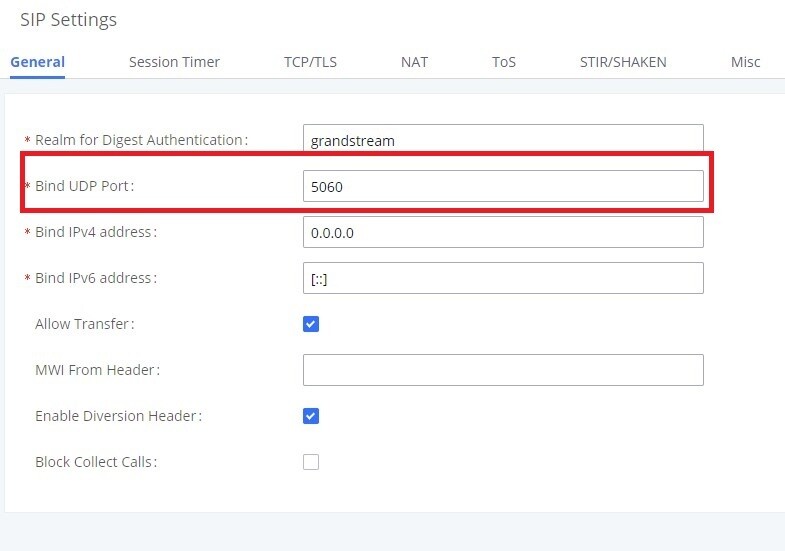
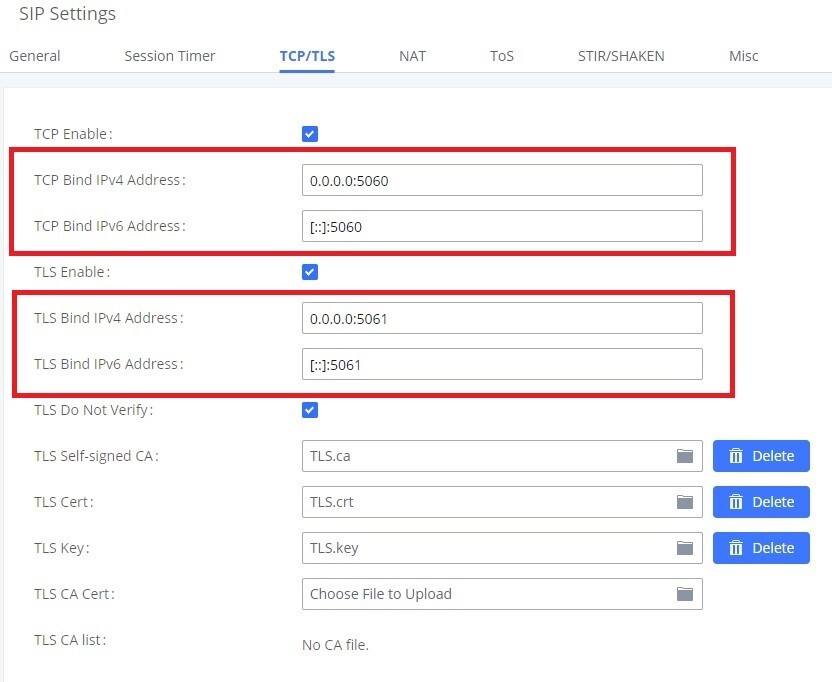
Step 1: From the UCM630X web UI, users can retrieve or modify their internal UDP port from the PBX Settings -> SIP Settings -> General page. In the same section, the TCP/TLS ports can be found in the TCP/TLS tab. Please see the figures below:
Step 2: Once the internal port information has been confirmed, users can then map them to the corresponding external ports on the router.
Example: If the internal UDP port is 5060, users would map port 5060 to whatever is designated as the external UDP port for SIP traffic on the router. Please contact your enterprise’s IT administrator for this information.
Note:
- For security purposes, it is not recommended to use an external port number that is the same as the internal port number.
- If the router supports SIP ALG, it will need to be disabled.
Step 3: Configure NAT settings as shown in the figure below:
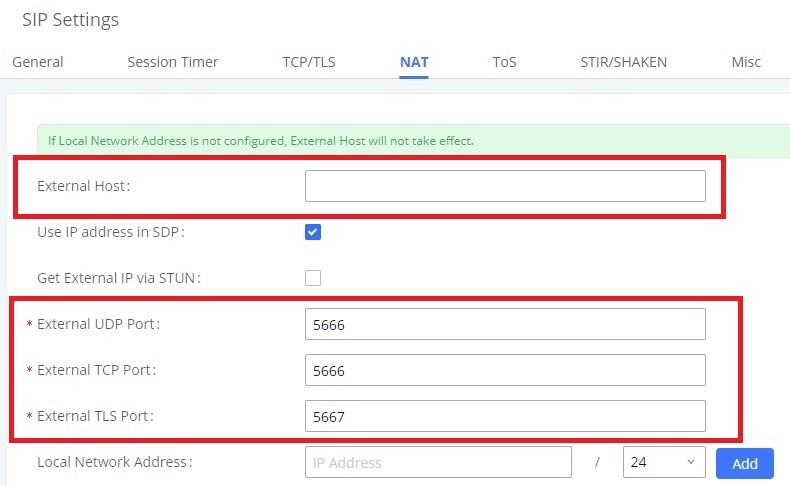
- Configure External Host with the public network address of the UCM630X.
- Configure the External UDP Port, External TCP Port, and/or External TLS Port fields based on the router mappings created in the previous step.
- Configure Local Network Address with the UCM630X’s local network subnets.
NAT Settings | |
External Host | Configure the IP address or domain that would be used in outbound SIP messages if the UCM is behind a NAT. Typically, this would be the public network address. |
Use IP Address in SDP | If enabled, the SDP connection will use the IP address resolved from the external host. |
Get External IP via STUN | If enabled, the external IP address will be retrieved via STUN. Please confirm the configured STUN server is working properly. |
External UDP Port | Configure the externally mapped UDP port when the UCM is behind a static NAT or PAT. |
External TCP Port | Configure the externally mapped TCP port when the UCM is behind a static NAT or PAT. |
External TLS Port | Configure the externally mapped TLS port when the UCM is behind a static NAT or PAT. The default setting is 5061. |
Local Network Address | Configure a list of subnets under the internal network. Multiple entries are supported. This must be configured for successful NAT traversal. Example: 192.168.0.0/16 |
If properly configured, users can then register their extensions to the UCM630X’s public network address and port. If one-way audio issues are encountered, please confirm your NAT settings (SIP signaling traversal) and SIP/RTP ports (media traversal) on the UCM and/or router. For details about media traversal configuration, please see the Media Traversal section below.
MEDIA TRAVERSAL
To ensure correct audio and video exchange between call parties on different networks, proper media traversal configurations are required. For IP endpoints, users will need to configure RTP and BFCP port mappings. For Wave, users will need to configure STUN and TURN server settings instead. Please see the following steps:
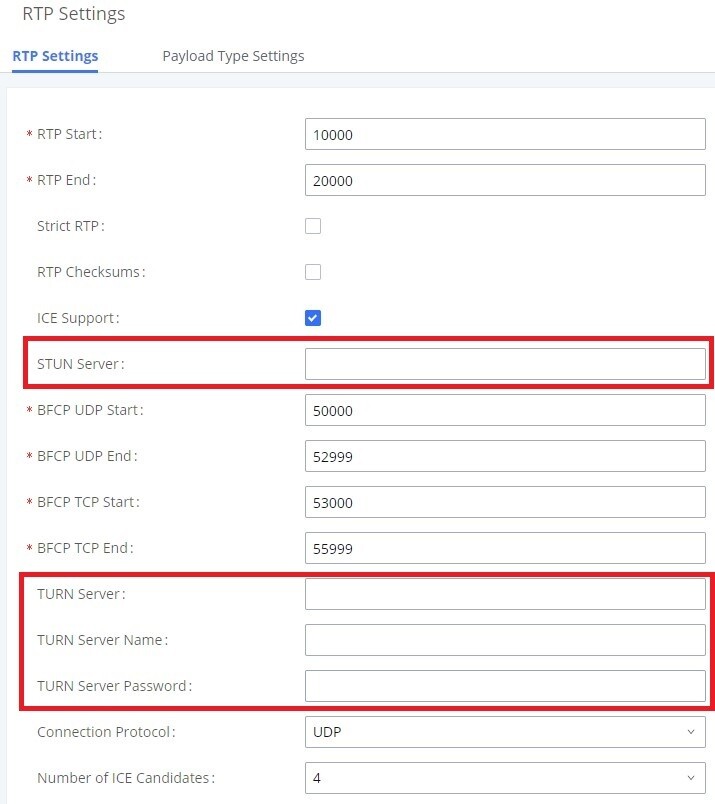
Step 1: From the UCM630X Web UI, navigate to the PBX Settings -> RTP Settings page as shown in the figure below:
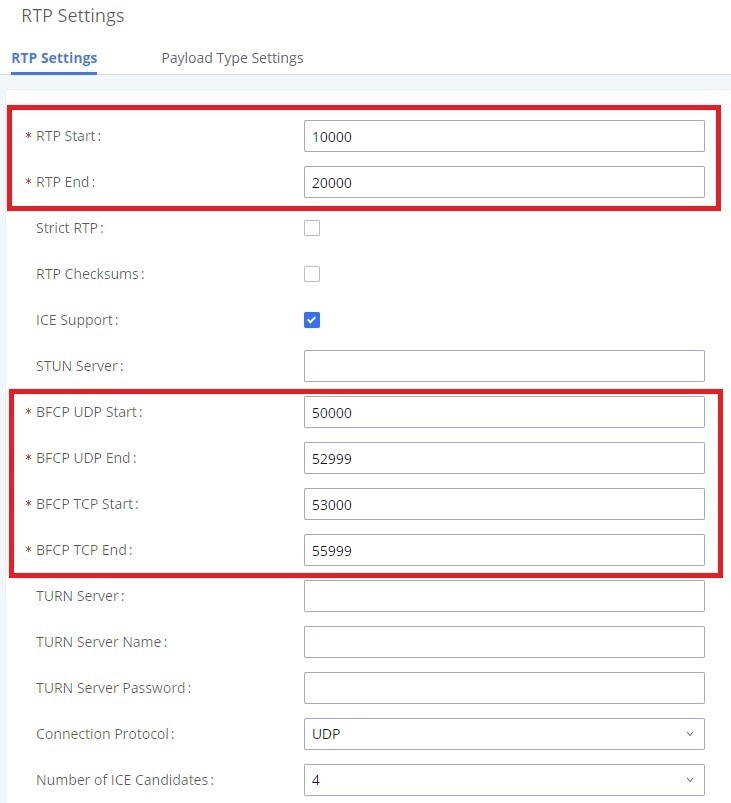
Step 2 (for IP endpoints): Confirm the starting and ending ports for RTP and BFCP.
- For proper audio/video exchange, create an RTP port range mapping on your router. From the figure above, this would be 10000-20000.
- For proper presentation sharing, create a port range mapping on your router. From the figure above, this would be 53000-55999.
Step 3 (for Wave): Configure the STUN and TURN server settings as highlighted in the figure below. Without UCM RemoteConnect, users would need to confirm their own STUN/TURN server information.
RTP Settings | |
RTP Start | Configure the starting RTP port. Default is 10000. |
RTP End | Configure the ending RTP port. Default is 20000. |
Strict RTP | Enable strict RTP protection. If enabled, RTP packets that do not originate from the RTP stream source will be dropped. Disabled by default. |
RTP Checksums | Toggles UDP checksums on RTP traffic. Disabled by default. |
ICE Support | Configure ICE support. ICE is the integrated use of STUN and TURN structures to provide a reliable VoIP or media transmission via a SIP request/response model for multiple candidate endpoints. These endpoints exchange IP addresses and ports such as private addresses and TURN server addresses. Enabled by default. |
STUN Server | Configure the STUN server address. STUN protocol is both a client-server protocol and a request-response protocol that is used to check the connectivity between two endpoints and maintain a NAT-binding Keep-Alive agreement between entries. If blank, STUN monitoring is disabled. Default is blank. Supported format: [hostname/IP address]: [port] If the port number is not specified, 3478 will be used by default. |
BFCP UDP Start | Configure the starting BFCP UDP port. Default is 50000. |
BFCP UDP End | Configure the ending BFCP UDP port. Default is 52999. |
BFCP TCP Start | Configure the starting BFCP TCP port. Default is 53000. |
BFCP TCP End | Configure the ending BFCP TCP port. Default is 55999. |
TURN Server | Configure the TURN server address. TURN is an enhanced version of the STUN protocol and is dedicated to processing symmetric NAT problems. |
TURN Server Name | Configure the TURN server account name. |
TURN Server Password | Configure the TURN server account password. |
Connection Protocol | Protocol used to connect to the TURN server. |
Number of ICE Candidates | Configure the number of ICE candidates to gather and send to remote peers. Increasing this value slightly increases network traffic to and from the TURN server. High network traffic to the TURN server may negatively affect call quality. |
CONFIGURING FOR WAVE
To successfully log in and use Wave, please see the following steps:
Step 1: From the UCM630X Web UI, navigate to the System Settings -> HTTP Server -> Wave Settings section to configure the External Host with the UCM630X’s public network address and retrieve/modify the Wave Port information.
Step 2: Map the internal Wave port to an external port number on your router.
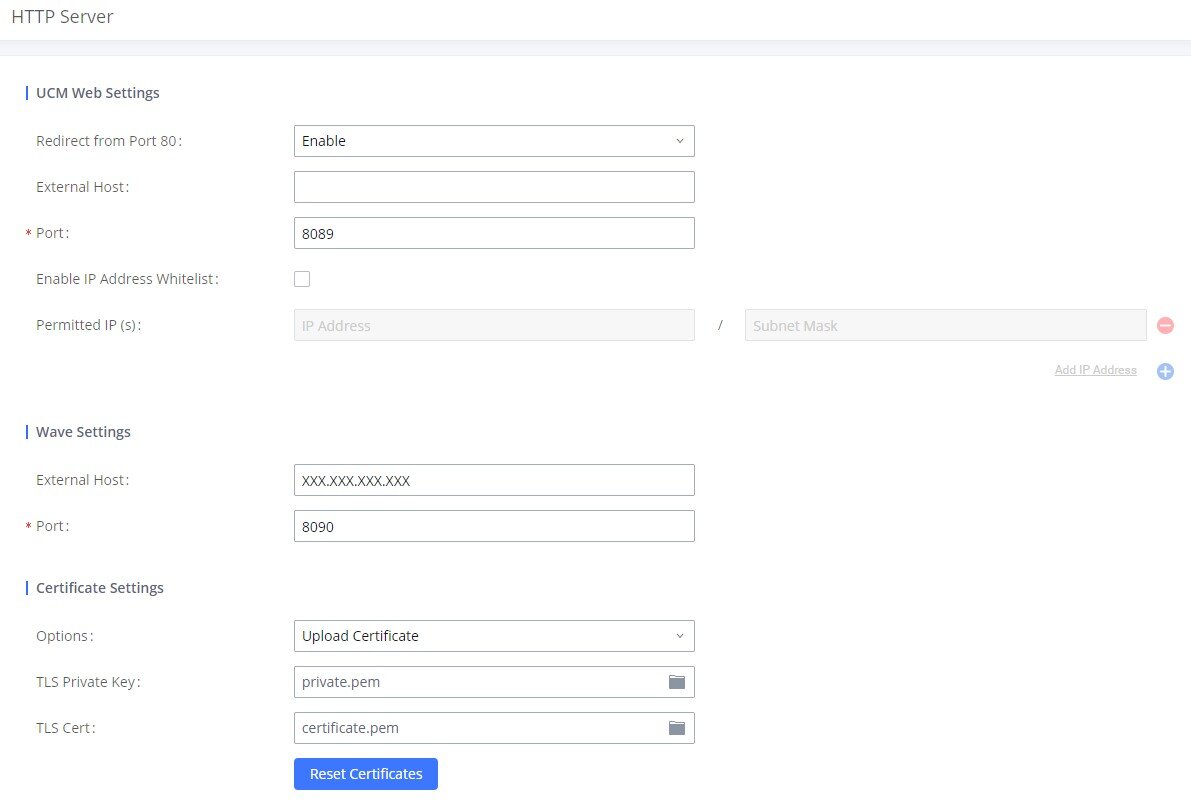
If properly configured, users should now be able to access the Wave login page via the public network address and external port.
Wave Settings | |
External Host | Configure the URL and port (optional) used to access the Wave portal or UCM meeting rooms if the UCM is behind NAT. If UCM RemoteConnect is used, this field will be configured automatically. |
Port | The port to access the UCM’s Wave portal. If behind NAT, please confirm that a mapping to this port has been configured on the router. |
When logging into the UCM remotely using the UCM’s IP address, the user must disable Media NAT Traversal Service. If the user leaves this option enabled, the calls initiated by the aforementioned extensions will be considered Remote Calls, therefore, they will count towards the Remote Calls’ total duration limit. To do that, the user must navigate to UCM63xx Web GUI → RemoteConnect → Plan Settings, then tick off the option “Media NAT Traversal Service” as indicated in the screenshot below:
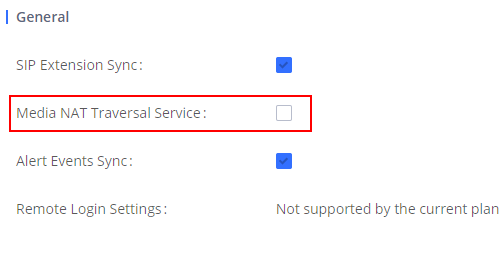
This option doesn’t account for the extensions registered on IP phones, Wave Lite, and other non-Wave clients which are able to initiate calls. Thus, the calls initiate but those devices won’t be considered Remote Calls.
In order for the user to establish unlimited calls without purchasing a RemoteConnect plan, the user needs to do the following:
- Build his/her own STUN/TURN server and configure them in the UCM63xx.
- Disable “Media NAT Traversal Service” option on the UCM Web UI → RemoteConnect → Plan Settings.
- Set up the STUN/TURN server address in your endpoints.