


INTRODUCTION
Grandstream IP PBX systems include a built-in billing solution that gives enterprises financial control over their VoIP communications. This native feature automatically calculates call costs based on configurable destination rates and call duration, eliminating the need for external billing software or manual tracking.
The system also integrates an intelligent Least Cost Routing (LCR) engine, which compares multiple carriers in real time to select the most cost effective route for each outgoing call, directly lowering operational expenses.
This guide provides a comprehensive overview of these capabilities along with step-by-step configuration instructions to help administrators implement, manage, and optimize the billing system for maximum cost efficiency.
CONCEPT
Call Billing
Grandstream IP PBX systems calculate call charges using prefix-based rates combined with a simple formula. This ensures that calls are billed accurately based on their destination.
When a user dials a number, the system first checks the dialed digits against a set of configured prefixes. Each prefix corresponds to a specific rate.
Once the applicable rate is determined through prefix matching, the IP PBX calculates the total charge using the following formula:
Call Charge = Starting Cost + (Rate × Amount of Time Exceeding Start Time)
In this formula:
- Starting Cost is the initial fixed cost for the call.
- Rate is the configured cost for the specific prefix, applied using the billing unit (e.g., per 30 seconds).
- Amount of Time Exceeding Start Time is the portion of the call beyond the starting time, rounded up to the nearest billing unit (For example, if the billing unit is 60 seconds and the call lasts 90 seconds (1.5 units), the system bills for 2 full units).
Example:
A call lasts 1 minute 10 seconds (70 seconds) with the following configuration:
- Starting Cost: 0.20
- Starting Time: 30 seconds
- Rate: 2.00
- Billing Unit: 60 seconds
The starting cost covers the first 30 seconds of the call. The remaining time beyond the starting period is:
70 sec – 30 sec = 40 sec
Since the billing unit is 60 seconds, the remaining time is divided by the billing unit to determine the number of units to charge:
40 ÷ 60 = 0.666… units
Even though only 40 seconds remain after the starting time, the system rounds up to 1 full billing unit. This ensures that calls are always billed according to the configured billing unit, and partial units are never undercharged.
The total charge is calculated by multiplying the rate by the number of billing units and adding the starting cost:
Total Charge = 0.20 + (1 × 2.00) = 2.20
Least Cost Routing (LCR)
Grandstream IP PBX systems feature Least Cost Routing (LCR), which automatically selects the most cost effective trunk for outgoing calls. This ensures that every call is routed through the carrier offering the lowest rate, reducing operational costs without manual intervention.
First, the outbound route matches the dialed number to a pattern. If the route destination is set to “LCR”, the PBX checks all carriers that are marked as LCR-supported. Each trunk is linked to a single carrier, though a carrier can have multiple trunks. The PBX compares the rates for the dialed prefix across these carriers, selects the lowest cost carrier, and routes the call through one of its trunks.
Example Call Flow:
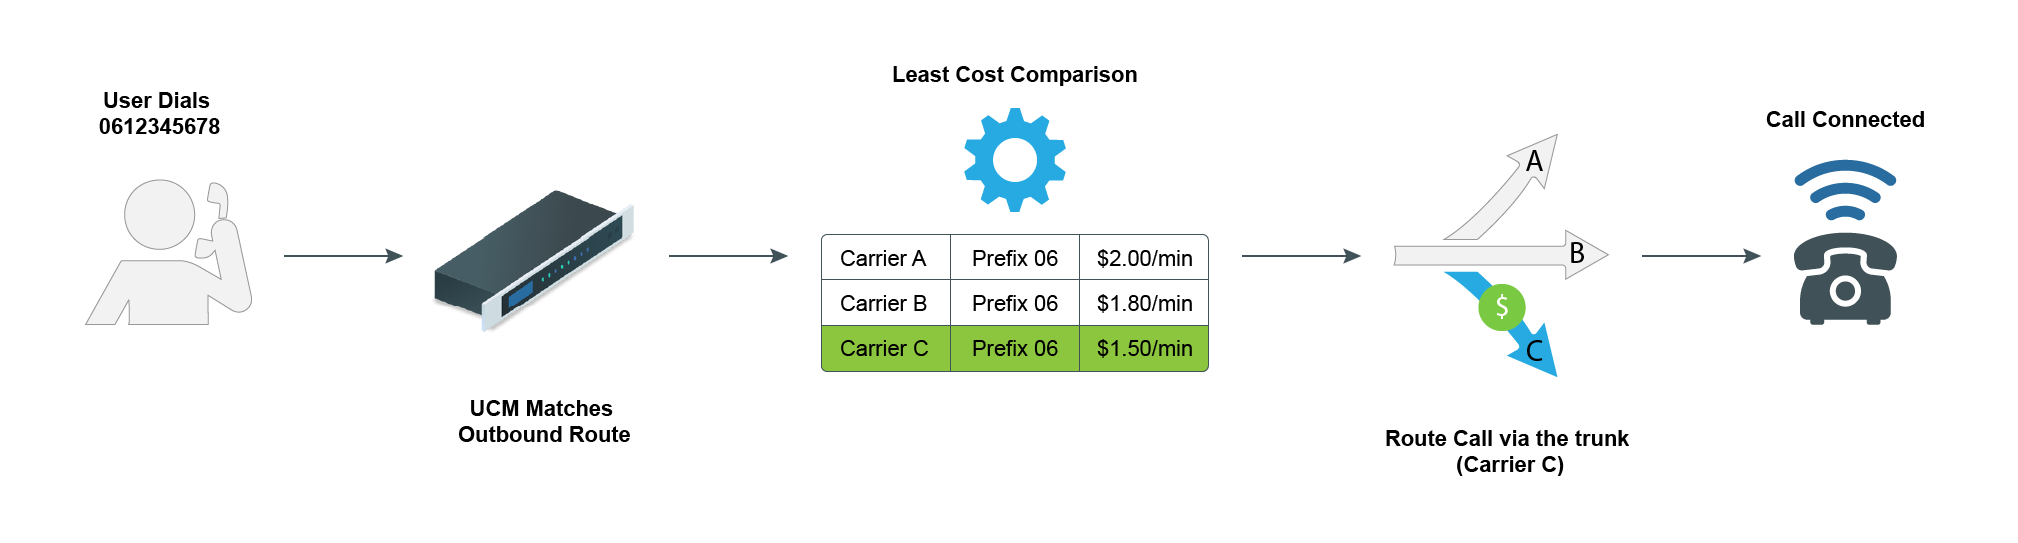
- User Dials Number: 0612345678
- Pattern Matching: The outbound route identifies the dialed pattern and forwards the call to the LCR destination.
- Carrier Rate Lookup: The PBX checks all LCR-supported carriers for the prefix “06”:
- Carrier A: $2.00/min
- Carrier B: $1.80/min
- Carrier C: $1.50/min
- LCR Comparison: The PBX compares the rates returned for the prefix.
- Route Selection: Carrier C is chosen as it offers the lowest cost.
- Call Connection: The call is routed through Carrier C’s trunk and connected to the destination.
CALL BILLING CONFIGURATION
Carrier Rates
Configuring Carrier Rates
Carrier rates are used for both LCR decisions and call cost calculations. Each trunk applies the rate of its associated carrier. All carrier rates must use the same global billing unit (for example, 60 second intervals) to ensure consistent calculations across carriers.
To configure a carrier rate, please refer to the steps below:
- Navigate in the web UI to Extension/Trunk → Outbound Routes → Carrier.
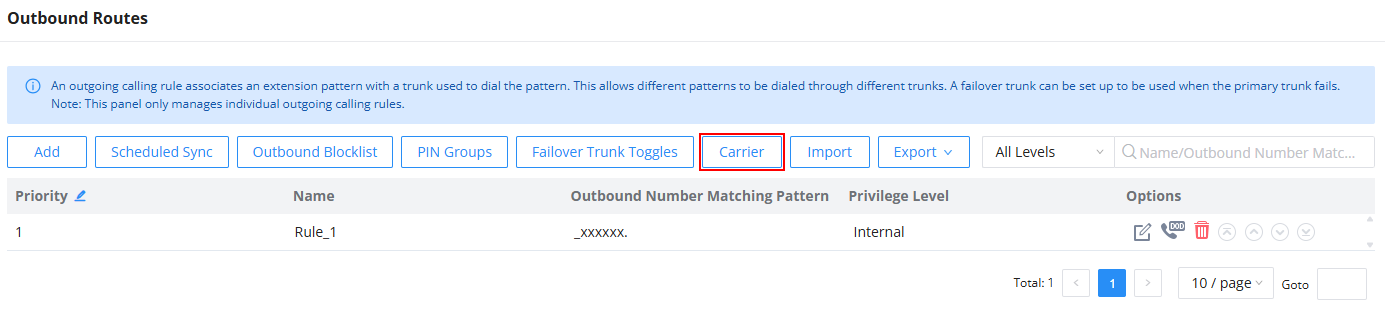
- On this page users can click “Add” to create a new carrier entry or “Global Billing Unit” button.
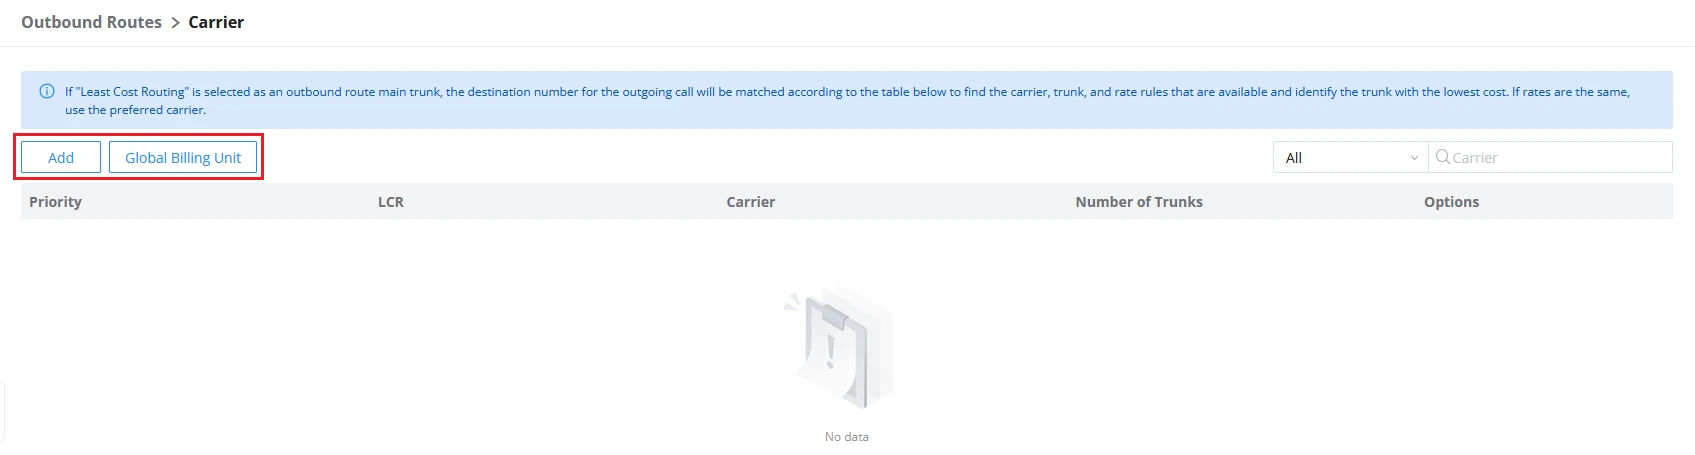
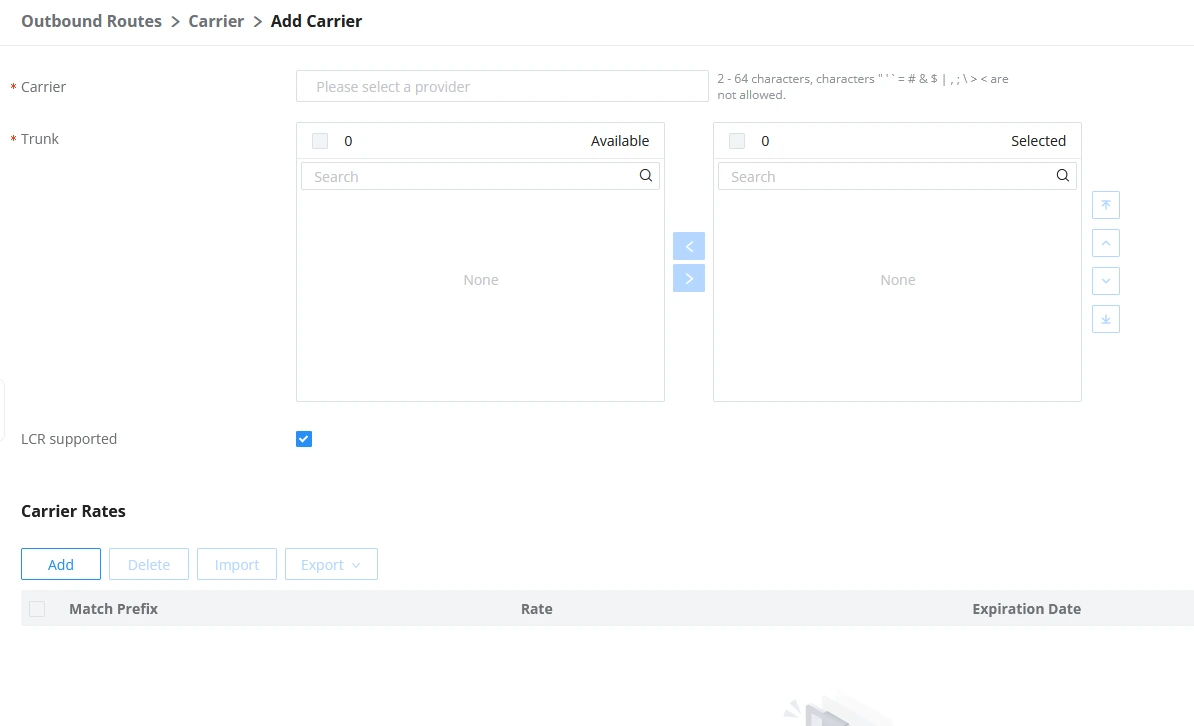
- On the Add/Edit Carrier page, users can configure the following:
- Carrier (Name): Enter a descriptive name, e.g., VoIP-Provider-A.
- Trunk: Select one or more trunks for this carrier. Each trunk can only be associated with one carrier, but a carrier can have multiple trunks.
- LCR Supported: Enable this option if you want the carrier to be included in Least Cost Routing. If disabled, the carrier is ignored for LCR decisions.
- Carrier Rates: Add, delete, import, or export rate entries:
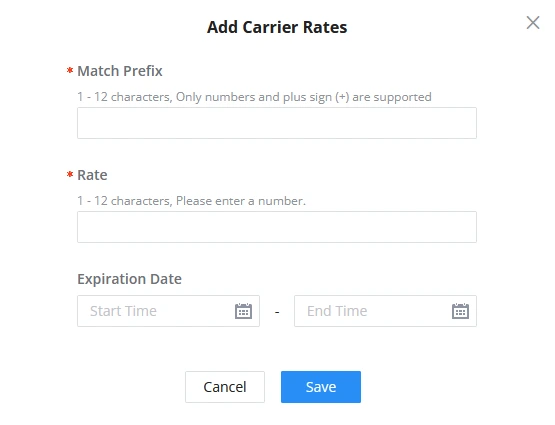
- Add: Specify the Match Prefix, Rate, and optional Expiration Date.
- Delete: Select one or more rates to remove.
- Import: Upload Excel or CSV files (max 50 MB). Importing replaces all existing rates, so it is recommended to first export a template or backup.
- Export: Download current rates as Excel or CSV files for backup or editing.
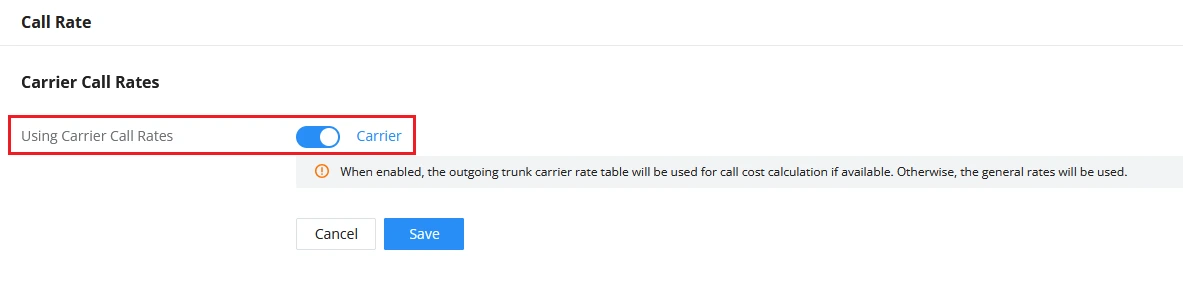
- Once the carrier is saved successfully, navigate to CDR → Call Rate and enable “Using Carrier Call Rates“. When this option is turned on, the PBX will use the carrier’s rate table for outgoing trunks to calculate call costs whenever a rate is available.
Verifying Carrier Rate Calculation
In this example, we will verify that a configured carrier rate is correctly applied to calculate the cost of an outgoing call.
Configuration:
- Carrier: Carrier A
- Trunk: Trunk 1 → Carrier A
- Prefix: 07
- Rate: 1.50/min
- Global Billing Unit: 60 seconds
Test Steps:
- The user dials 0714081000, which matches the outbound route configured for this prefix.
- The call is routed through Trunk 1 (Carrier A).
- The call duration is 2 minutes 28 seconds (148 seconds).
CDR Verification:
After the call ends, the CDR page shows:
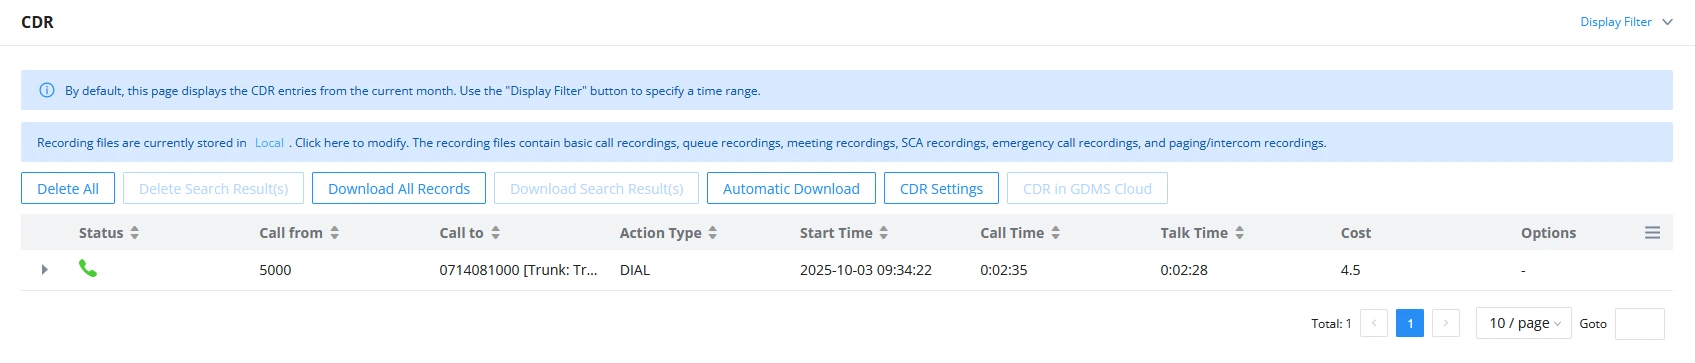
After the call, the CDR confirms that the carrier rate was applied correctly. The call lasted 2 minutes 28 seconds (148 seconds) and the billing unit is 60 seconds. Dividing 148 by 60 gives 2.466…, which is rounded up to 3 units. Multiplying by the rate of 1.50 per unit gives a total cost of 4.50.
This shows the IP PBX correctly calculates call charges using the carrier rate and billing unit.
Other Call Rates
Configuring Other Call Rates
In addition to carrier rates, Grandstream IP PBX systems allow administrators to configure general call rates that apply system-wide. These rates provide a standard method for calculating call costs across the PBX, regardless of the trunk or carrier used.
To configure the Other Call Rates table, navigate to CDR → Call Rate. On this page, you can view, add, edit, delete, import, or export system-wide call rates.
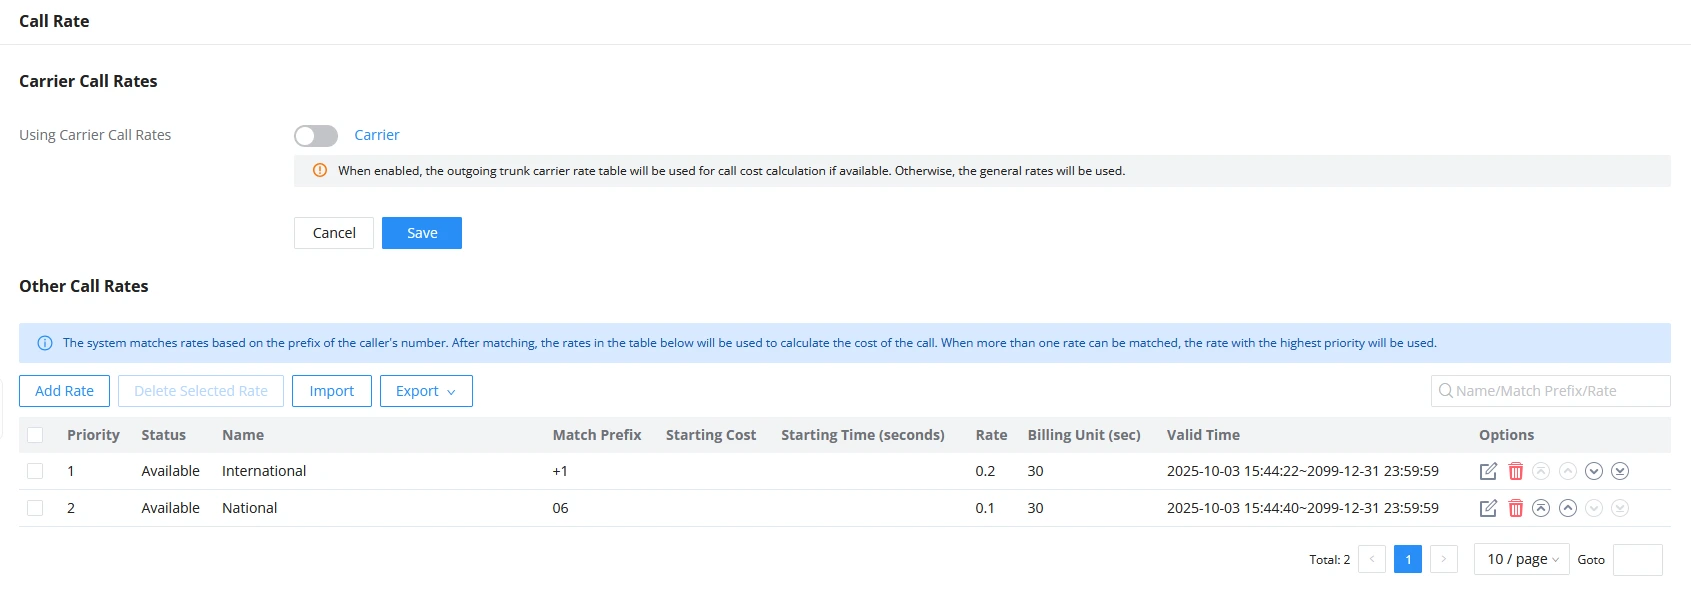
To create a new general rate, please refer to the steps below:
- Click “Add” to create a new call rate entry.
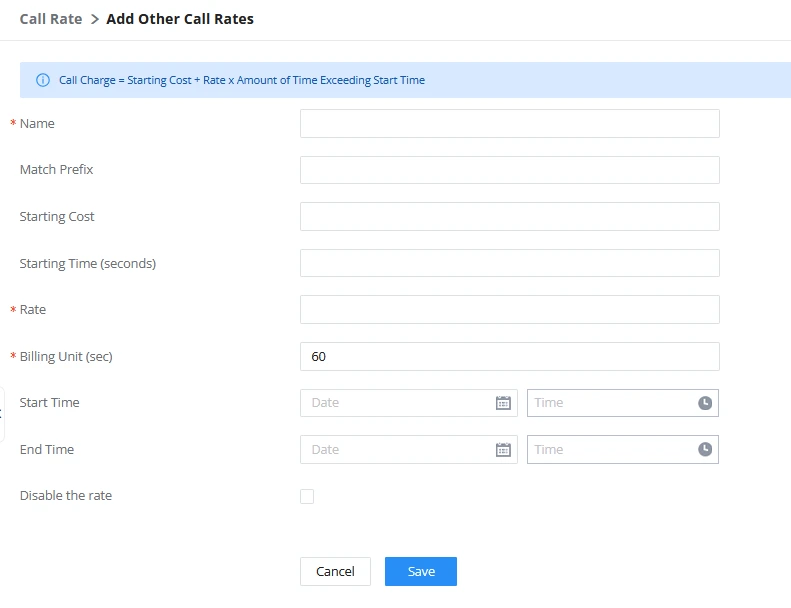
- Configure the following fields:
- Name: Enter a descriptive name for the rate.
- Match Prefix: Number prefix to match (1–12 digits, and “+” supported).
- Starting Cost: Flat fee applied at the beginning of the call.
- Starting Time (seconds): Time period covered by the starting cost.
- Rate: Ongoing cost per billing unit after the starting time.
- Billing Unit (sec): Time interval for applying the rate (e.g., 60 seconds).
- Start Time: The date and time when this rate becomes active.
- End Time: The date and time when this rate expires.
- Disable the rate: Check this box to disable the rate without deleting it.
- Click “Save” to add the rate.
Verifying General Rate Calculation
This test demonstrates how the PBX applies general system-wide call rates when no matching carrier rate exists and ensures that the highest priority rate is used when multiple general rates match the dialed prefix.
Configuration:
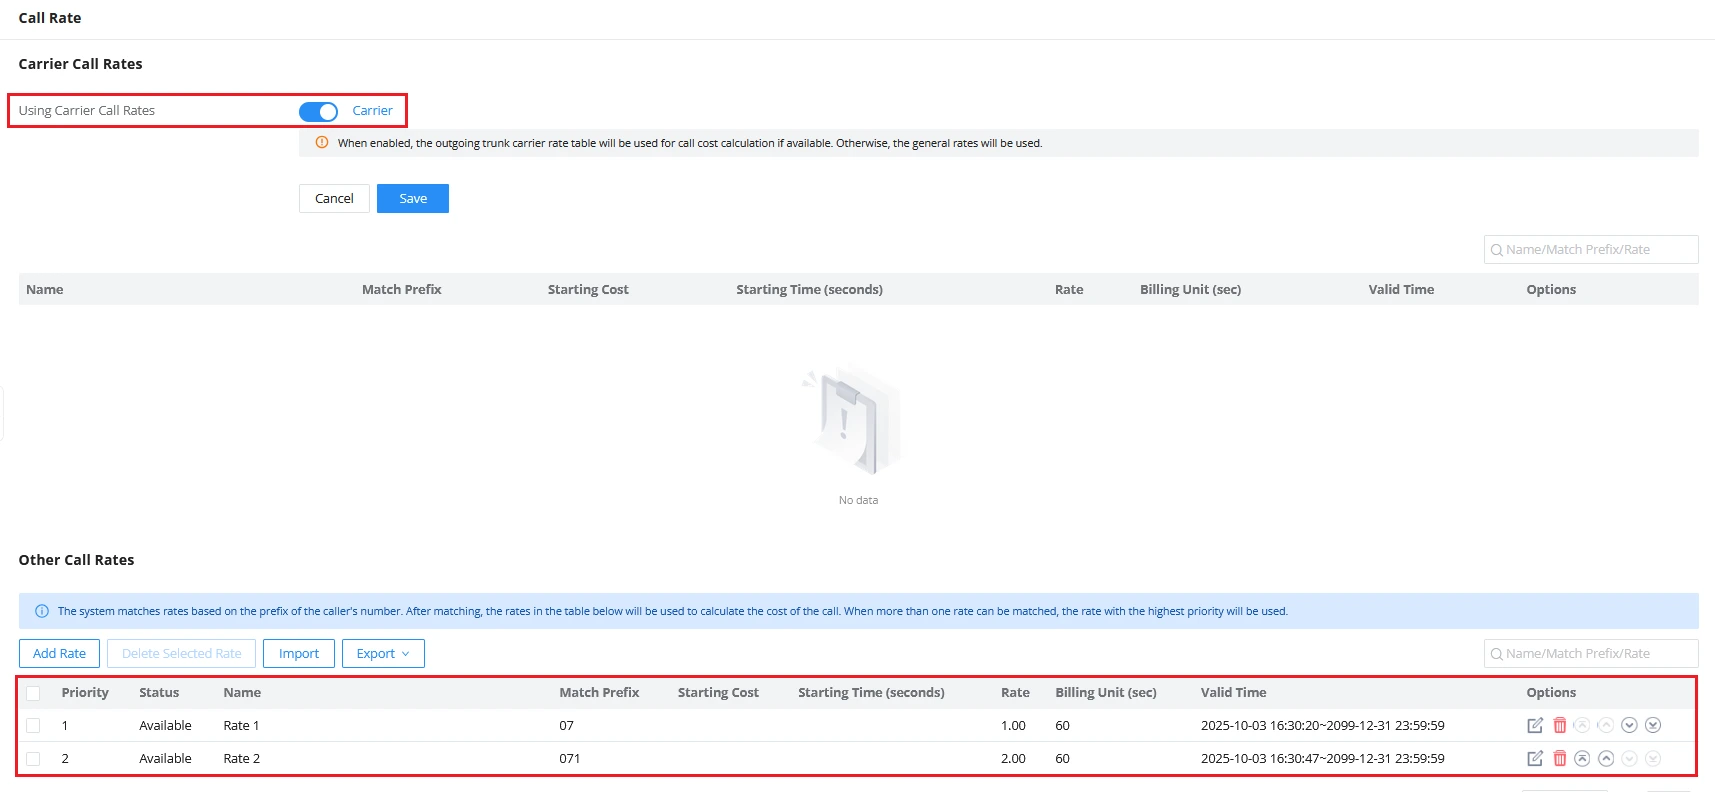
For demonstration, we will enable the “Using Carrier Call Rates” option (CDR → Call Rate) and configure the following rates under the Other Call Rates table (No carrier rates are configured for the test prefixes).
- Rate 1: Prefix 07, Rate 1.00 per 60 second billing unit.
- Rate 2: Prefix 071, Rate 2.00 per 60 second billing unit.
We will also ensure that Rate 1 is at the top of the list by using the up/down arrows in the table to set its priority.
Test Steps:
- Dial 0714081000, which matches both general rates prefixes (07 and 071).
- Since no carrier rate exists for this prefix, the highest priority general rate (Rate 1) is applied.
- End the call shortly after. In this example, the call lasted 6 seconds, which is billed as 1 full unit.
- Check the CDR to verify the call cost: 1.00 (Rate 1).

- Use the up/down arrows in the Other Call Rates table to make Rate 2 the highest priority rate.
- Make another call to the same number (0714081000) and hang up after the same duration (6 seconds which is billed as 1 unit).
- Check the CDR to verify the call cost: 2.00 (Rate 2).

Least Cost Routing
Configuring Least Cost Routing
Least Cost Routing (LCR) allows the PBX to automatically select the cheapest carrier when making outbound calls. When a call matches an outbound route set to Least Cost Routing, the PBX compares the rates of all carriers that are marked as LCR Supported and selects the carrier offering the lowest cost for the dialed prefix.
Before configuring LCR, ensure that your carriers and rates are already set up as described in the Configuring Carrier Rates section.
Each trunk can be associated with only one carrier, but a carrier can have multiple trunks. Only carriers marked as LCR Supported will be considered during least cost routing decisions.
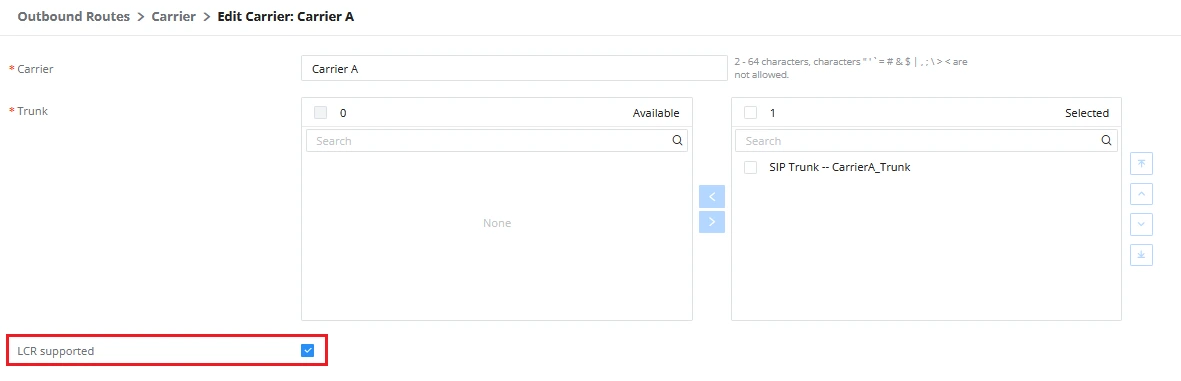
On the Carrier page, you can use the up/down arrows to adjust the carrier priority. This order acts as a tiebreaker when two or more carriers have the same rate for a matching prefix.

Since an outbound route defines which numbers should be routed through which trunks. By setting a route’s Trunk to Least Cost Routing, the PBX knows to dynamically select the lowest cost carrier trunk whenever a call matches the route pattern.
To configure LCR in an outbound route:
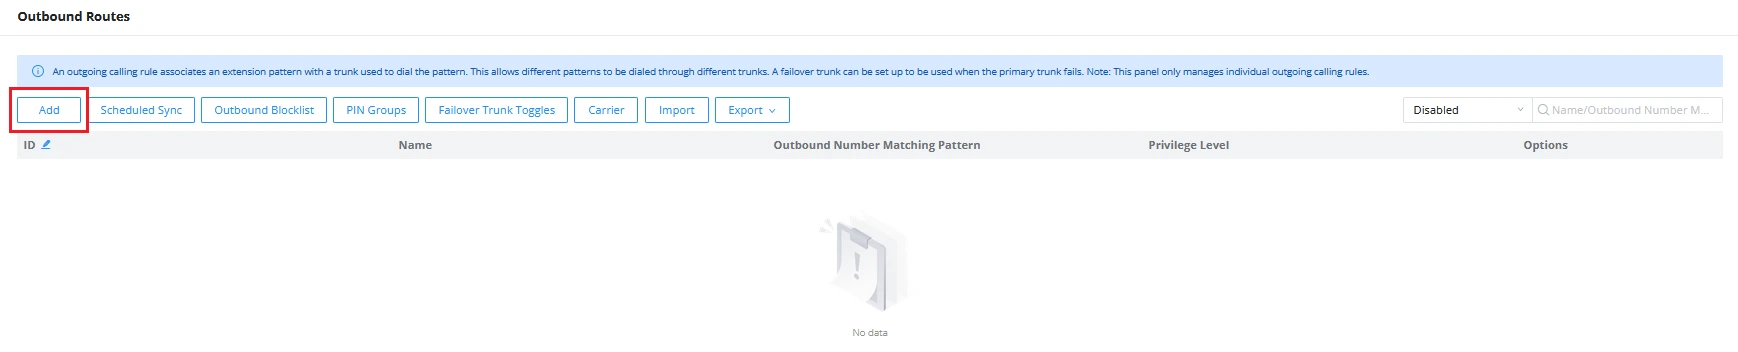
- Navigate to Extension/Trunk → Outbound Routes and click Add.
- Define a Dial Pattern that matches the type of outbound call (for example, +1123xxxxxxx).
- In the Trunk field, select Least Cost Routing as the destination.
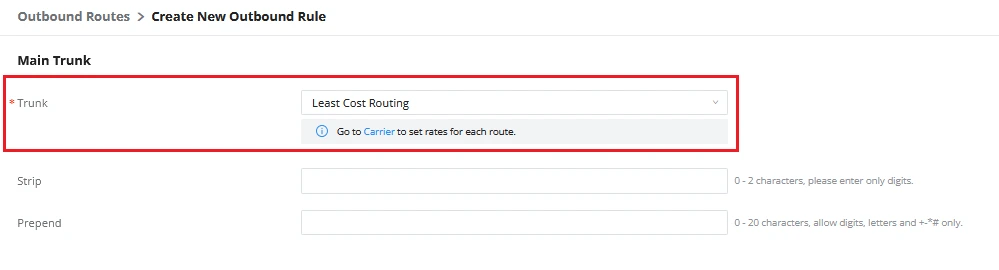
- Click Save and apply the changes.
Once configured, any outbound call matching this pattern will trigger an LCR comparison across all LCR-supported carriers with a matching prefix.
Verifying Least Cost Routing
This test demonstrates how the PBX selects the lowest cost carrier for an outbound call when Least Cost Routing is enabled, and how carrier priority acts as a tiebreaker when multiple carriers have identical rates.
Configuration:
For this demonstration, we configure two carriers with the following settings:
- Carrier A is linked to Trunk 1, and has a rate of 0.10 per minute for the prefix +1.
- Carrier B is linked to Trunk 2, and has a rate of 0.08 per minute for the prefix +1.
- Both carriers are marked as LCR Supported.
- The outbound route for the dial pattern +11234567890 is configured with Trunk = Least Cost Routing.
- Initially, we set Carrier B (the cheaper carrier) to lower priority than Carrier A to demonstrate that the PBX still selects the lowest cost option regardless of priority.
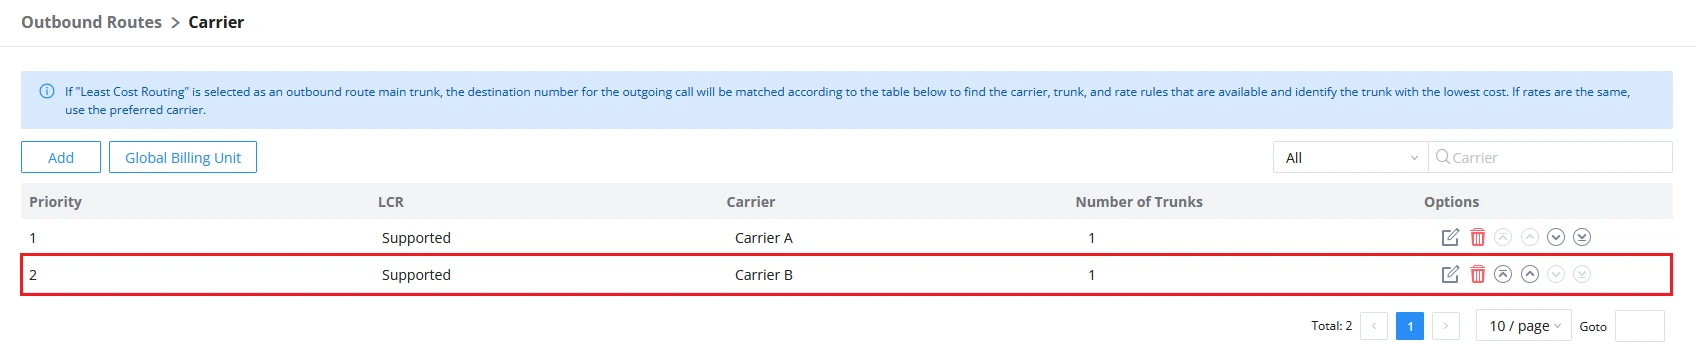
Test Steps:
- Dial +11234567890, which matches both carriers’ prefix +1.
- End the call shortly after. In this example, the call lasts 6 seconds, which is billed as 1 full unit.
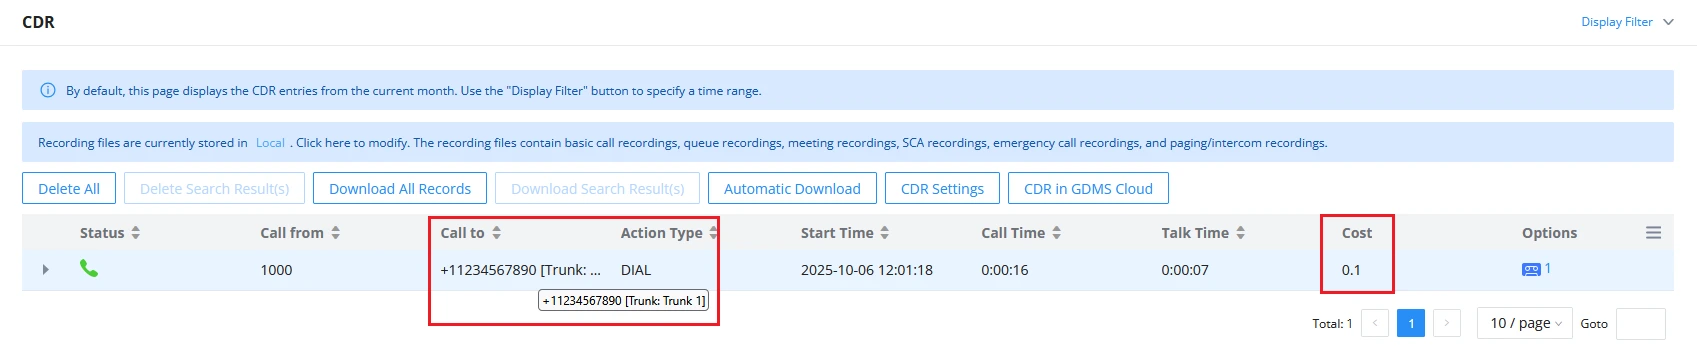
- Check the CDR to verify the call cost and the selected carrier. Even though Carrier B has a lower priority, it offers the lowest rate (0.08/min), so the call is routed through Trunk 2.
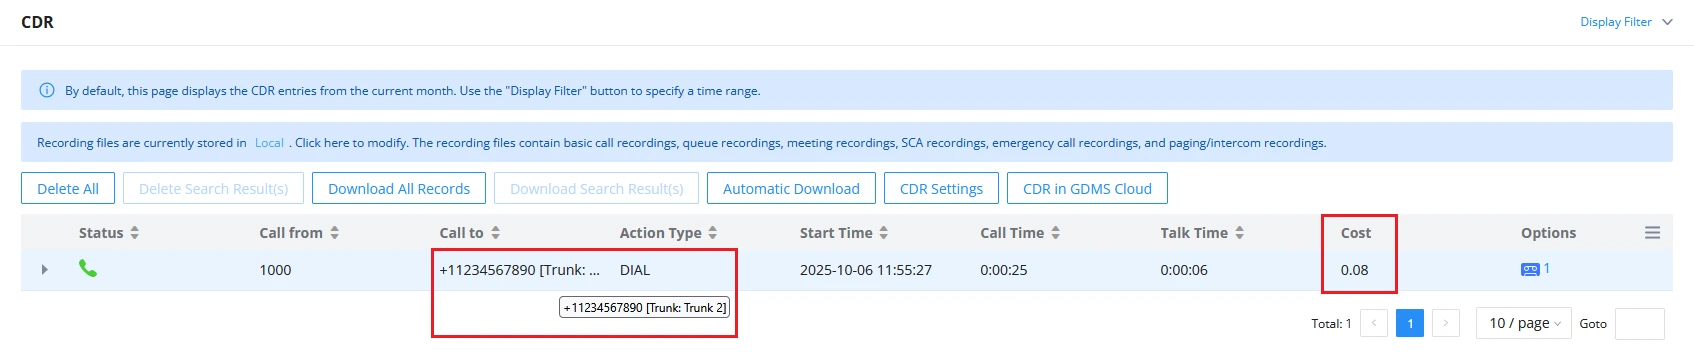
- Create a tie, by setting both carriers’ rates to 0.10/min.
- Dial +11234567890 again and hang up after 7 seconds (billed as 1 unit).
- Check the CDR to verify the selected trunk. With identical rates, the PBX selects the higher priority carrier (Carrier A), which corresponds to Trunk 1.
CALL BILLING STATISTICS
The Call Charge Statistics page in the IP PBX Web UI (CDR → Statistics) provides a comprehensive overview of call costs and usage, helping administrators analyze expenses and call patterns over time. The page is divided into three main sections: Call Charges Overview, Call Charges Statistics, and Statistics Report.
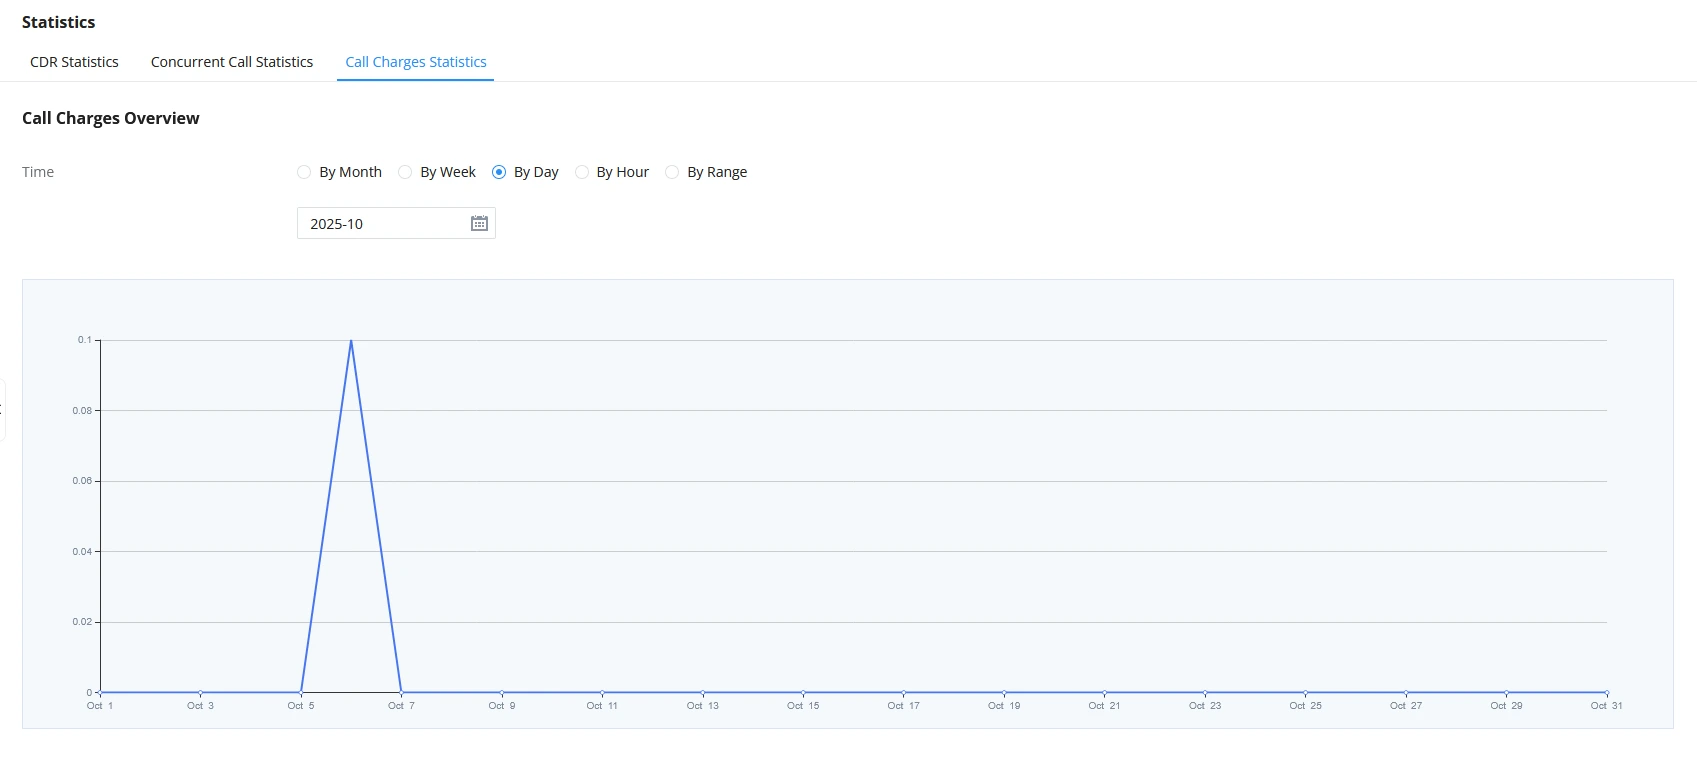
Call Charges Overview
This section provides a graphical summary of call charges over time. Users can choose the interval for the chart By Month, By Week, By Day, By Hour, or By Range.
Call Charges Statistics
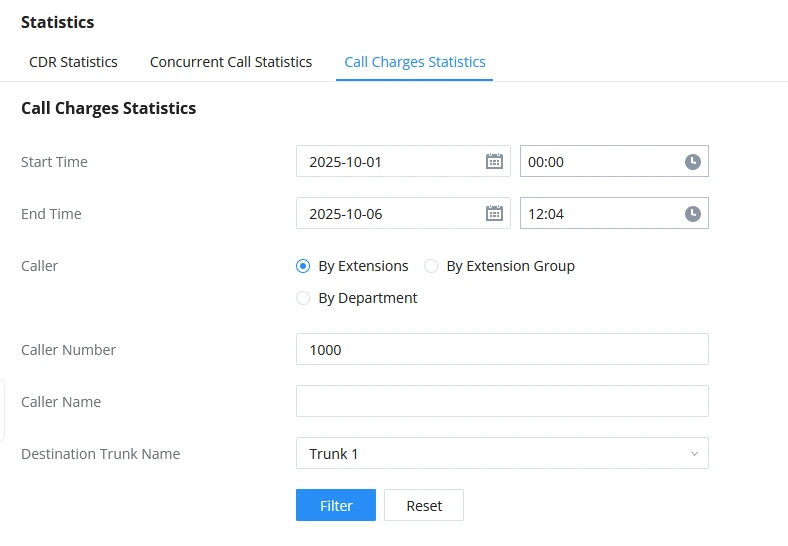
This section allows users to filter and narrow down the data before generating the report by selecting the following options:
- Start Time / End Time: Specify the date and time range for the statistics.
- Caller: Filter by Extensions, Extension Groups, or Departments.
- Destination Trunk Name: Select one or more trunks to focus on specific call routes.
- Filter / Reset Buttons: Apply the selected criteria in the report, or clear all filters.
Statistics Report
After applying filters in the Call Charges Statistics section, the Statistics Report displays the filtered results with the following metrics:
- Total Calls: Number of calls matching the filters.
- Total Talk Time: Combined duration of all calls.
- Average Talk Time: Average call duration.
- Total Costs: Total cost of all calls in the selected range.
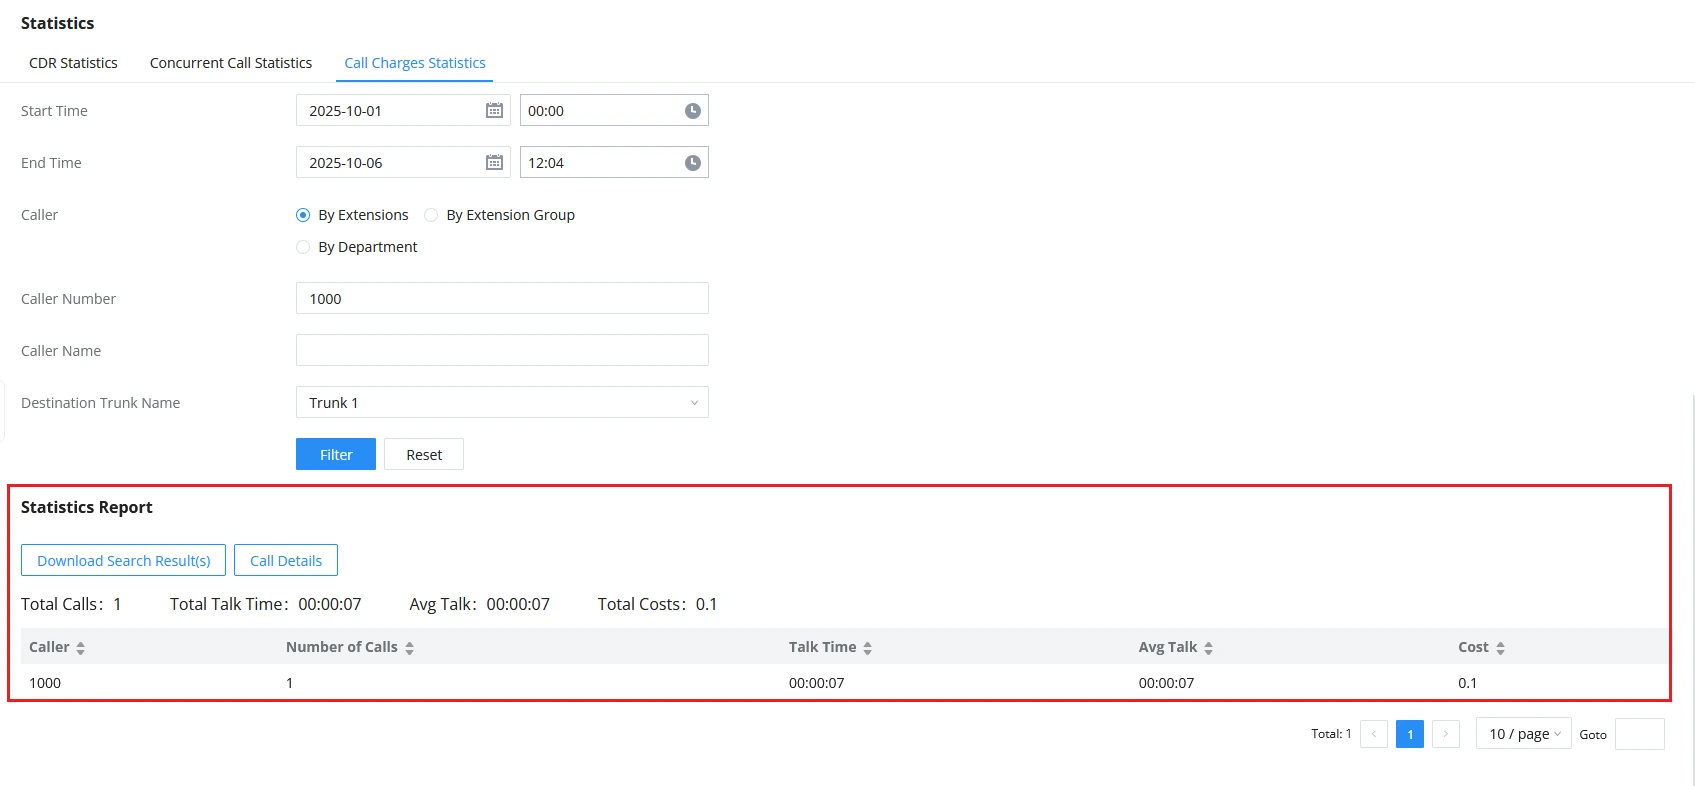
Users can click the “Download Search “Results” button to export the filtered statistics for offline analysis, or use the “Call Detail” button to navigate to the CDR page, where individual call records matching the applied filters are displayed.
TROUBLESHOOTING COMMON ISSUES
This section helps administrators identify and resolve common problems related to call billing, carrier rates, and Least Cost Routing (LCR).
Calls Not Using the Expected Cheaper Carrier
When a call is routed through a trunk or carrier that is more expensive than expected, it may indicate misconfiguration in LCR or carrier rates.
Verify LCR Support:
- Ensure the “LCR Supported” checkbox is enabled for all participating carriers.
- Confirm that the carrier and its associated trunk are Enabled.
Check Rate Configuration:
- Verify that the dialed prefix exists in the carrier’s rate table.
- Ensure there are no overlaps in prefixes causing conflicts. For carrier rates, overlapping prefixes (e.g., +1 and +11) are resolved differently:
- With LCR, the PBX selects the cheapest matching rate, regardless of prefix specificity.
- Without LCR, the PBX selects the most specific prefix, even if its rate is higher.
Validate Outbound Route:
- Confirm the outbound route Trunk is set to “Least Cost Routing”.
- Verify that the dial pattern matches the test number.
- Check for time based restrictions or failover trunk configuration on the outbound route.
Understand Carrier Priority vs Cost:
- PBX always selects the lowest cost carrier, even if it has lower priority.
- Priority only acts as a tiebreaker when two carriers have the same rate for the prefix.
Check Outbound Route Priority Strategy:
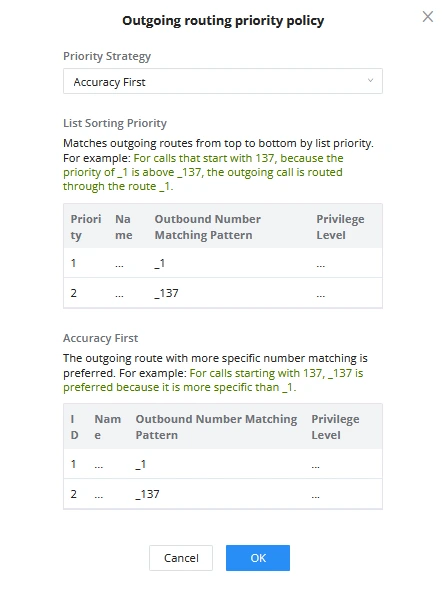
- If the PBX outbound routes use “List Sorting Priority”, the first matching route in the outbound routes list may override a more specific route.
- Use “Accuracy First” to ensure the PBX selects the most specific outbound route for the dialed number.
Call Costs Not Appearing in CDR
If calls are successfully connected but the cost column is empty or shows zero, billing may not be applied correctly.
Enable Carrier Rate Usage:
- Navigate to CDR → Call Rate and enable “Using Carrier Call Rates”.
Verify Prefix Matching:
- Test calls with numbers matching configured prefixes.
- Ensure the dialed number format matches the prefix in the rate table.
- Confirm no rates are disabled for the tested prefix.
Check CDR Display Settings:
- Ensure the Cost checkbox in the CDR page’s Options menu is checked to display call costs.
- Confirm the selected date/time range includes test calls.
Incorrect Call Cost Calculations
When the calculated cost of a call does not match the expected value based on the configured rates and billing formula, please check the following.
Verify Billing Parameters:
- Ensure Starting Cost, Starting Time, and Billing Unit are configured correctly.
- Confirm Rate matches the prefix of the dialed number.
- Check for competing rates that might match the same prefix.
Understand Call Billing Calculations:
- Remember that partial billing units always round up.
- Verify the Starting Cost is applied correctly for the initial period.
- Use the formula: Call Charge = Starting Cost + (Rate × Amount of Time Exceeding Start Time).
Time-Based Rate Issues:
- Ensure any time-based rates are active during the test call.
SUPPORTED MODELS
The table below lists the supported Grandstream IP PBX models that include the Call Billing feature, along with the minimum firmware version that introduced support for each model.
PBX Model | Minimum Firmware Version |
UCM630x | 1.0.29.11+ |
UCM630xA | 1.0.29.11+ |
CloudUCM | 1.0.29.7+ |
SoftwareUCM | 1.0.33.7+ |