


INTRODUCTION
Zero Config is Grandstream’s solution to provision IP phones. Provisioning is the process of creating, sending, and parsing the configuration by the IP phones. Provisioning mechanisms make configuring a large number of IP phones easier and quicker. Instead of accessing the web UI of each IP phone and adding the configuration manually, the user can create templates on the IPPBX, then push the configuration to all the devices.
In this guide, we will explain what are the steps of provisioning and the different templates which can be created to manage the configuration of the IP Phones.
Zero Config is supported on the following Grandstream IPPBXs:
- UCM6300 Series
- UCM6300 Audio Series
- SoftwareUCM
- GCC6000 Series
These are the categories which can be configured:
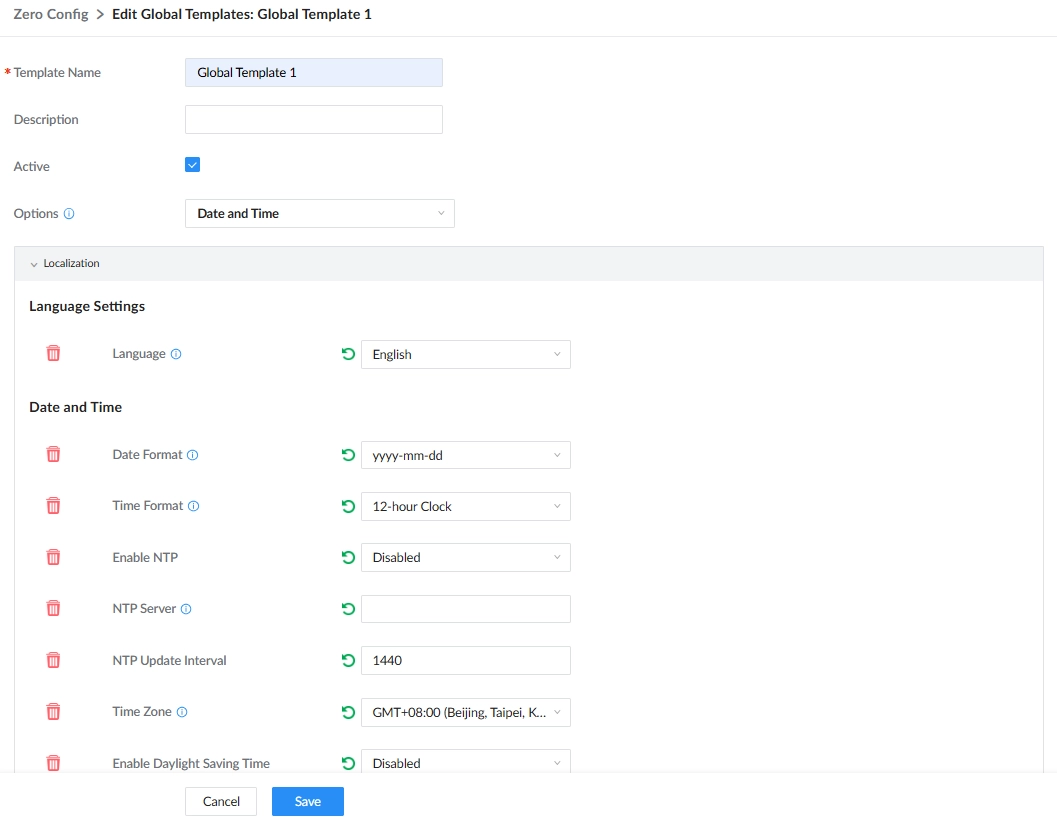
- Localization: Includes settings regarding language, date and time setting such as format, timezone, daylight saving time, NTP server, etc…
- Phone Settings: Includes settings regarding call settings like dial plan, NAT traversal, and call-related tones, etc…
- Contact List: Includes settings LDAP integration and XML Phonebook.
- Maintenance: Includes setting for upgrade and provision, web access, SSH access, and Syslog.
- Network Settings: Includes settings such as QoS, SIP port, RTP port, etc…
- Customization: Includes customization-related settings like wallpaper customization.
- Communication Settings: Includes settings like SMTP server configuration and FTP server configuration.
CONCEPTS
Discovery
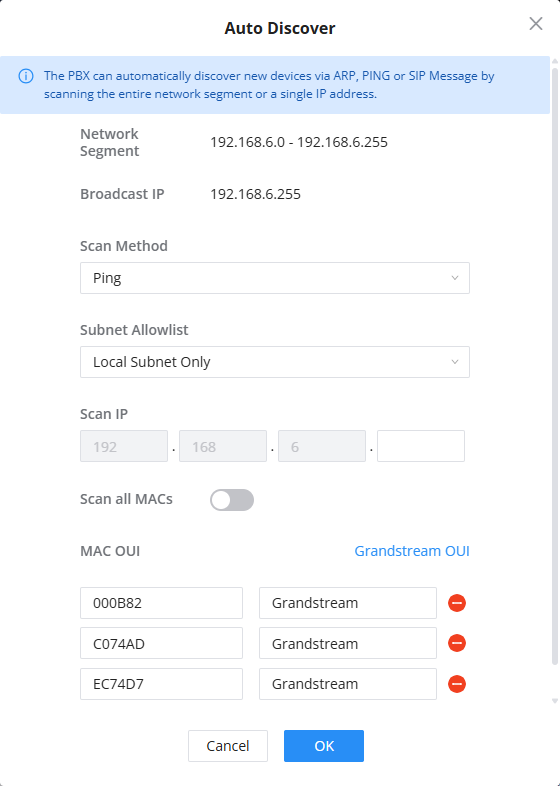
SIP endpoints are automatically discovered after boot up. Users could also manually discover devices by specifying the IP address or scanning the entire LAN network. Three methods are supported to scan the devices.
- PING
- ARP
- SIP Message (NOTIFY)
To start the discovery process:
- Click on “Auto Discover” under Device Management→Zero Config→Zero Config.
- Choose the “Scan Method” and enter the “Scan IP”. The IP address segment will be automatically filled in based on the network mask detected on the UCM630x. If users need to scan the entire network segment, enter 255 (for example, 192.168.40.255) instead of a specific IP address.
- Click on “Save” to start discovering the devices within the same network. To successfully discover the devices, “Zero Config” needs to be enabled on the Device Management→Zero Config→Auto Provisioning Settings.
Provisioning
Zero Config provisioning mechanism uses TFTP/HTTP/HTTPS as protocols to send the configuration files to the IP phones.
The configuration files are written in XML, which makes the files easy for human-reading, and quick parsing by the devices. The user does not need to have any knowledge of XML to be able to create configuration files, since they can rely on the graphical web UI to do that.
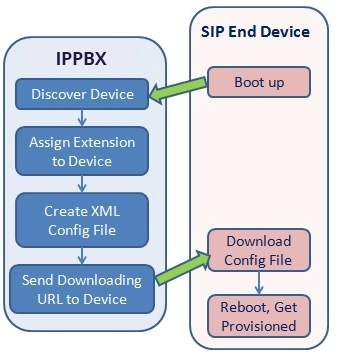
By default, the Zero Config feature is enabled on the IPPBX for auto-provisioning. Three methods of auto-provisioning are used.
- SIP SUBSCRIBE
When the phone boots up, it sends out SUBSCRIBE to a multicast IP address in the LAN. The IPPBX discovers it and then sends a NOTIFY with the XML config file URL in the message body. The phone will then use the path to download the config file generated in the UCM630x/A and take the new configuration.
- DHCP OPTION 66
Route mode needs to be set to use this feature. When the phone restarts (by default DHCP Option 66 is turned on), it will send out a DHCP DISCOVER request. The UCM630x/A receives it and returns DHCP OFFER with the config server path URL in Option 66, for example, https://192.168.2.1:8089/zccgi/. The phone will then use the path to download the config file generated in the IPPBX.
CONFIGURATION
In this section, we will talk about the needed configuration to start provisioning the devices.
To find the Zero Config menu, please follow the path mentioned below, depending on the Grandstream IPPBX that you are using.
- For UCM6300/A Series and SoftwareUCM: Navigate to Device Management > Zero Config
- GCC6000 Series: Go to UC Endpoints module, then navigate to Device Management > VoIP Devices. For the provisioning configuration of the GCC6000 Series, please refer to the following guide: https://documentation.grandstream.com/knowledge-base/gcc6xxx-uc-endpoints-user-manual/
Auto-Discovery
Auto-discovery mechanism lists all the IP phones in the network automatically. If no phones are listed or only some phones are displayed, it is recommended to run a scan using the SIP message method, see the screenshot below.
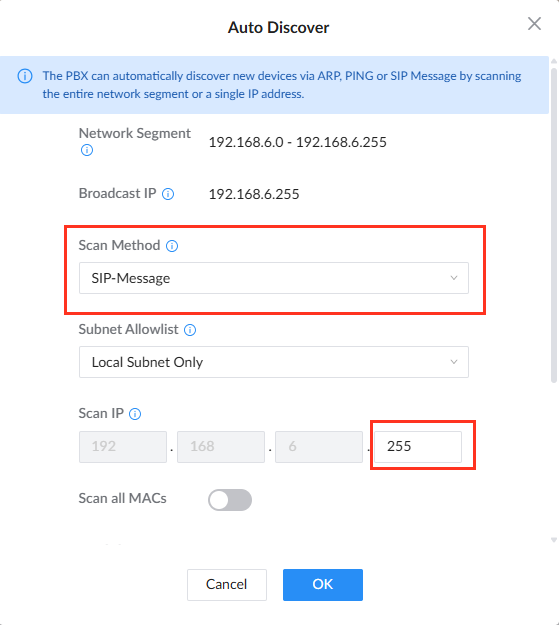
In the screenshot above, we have picked SIP-message as the scan method, then set 192.168.6.255 as the scan IP address. This IP address is used for broadcast, therefore, the SIP message will be broadcasted to all the IP addresses in this range, to which the IP phones will reply and be discovered by the IPPBX.
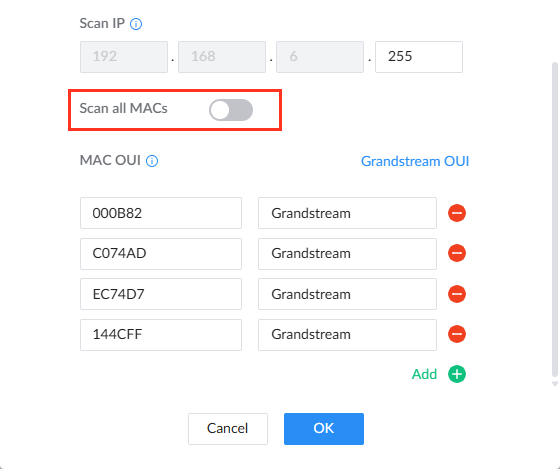
Keeping “Scan all MACs” disabled will result in only the preconfigured OUI to be considered. Enable this option if you wish to scan devices which are not made by Grandstream, otherwise add the OUI of the manufacturer you want to appear in the list of discovered devices.
Templates
In this step, we will create the different templates and explain their differences, their priority, and the use case for each type of template and when to use it.
There are three types of templates which can be created and applied, Global Policy, Global Template, and Model Template.
When the same parameter is configured in different templates, the parameter of the template with the higher priority will apply instead. The priority of the templates is as follows: Global Policy < Global Template < Model Template. Also, note that the configuration made on the web UI of the devices will not overwritten by configuration set on any template.
Global Policy
Global policy is a one and unique template of configuration that defines the general configurations for the IP phones which are provisioned by this IPPBX. This configuration template applies to all the IP phones regardless of their model and it defines the general configuration parameters rather than the specific parameters. E.g., it defines the timezone, the date and the hour, the language etc… Since these parameters are ubiquitous in all types of IP phones, then it makes sense to define them at this level.
While this template applies globally, it still has a lower priority in comparison with the other template levels. Therefore, any explicit configuration of a parameter that had been already configured at this level will be overwritten. E.g., if the administrator configures English as the language of the display of the IP phones on the global policy, then configures french as the display language of the IP phones at the level of a model template, that specific model will be configured with french as the display language instead of English, since the model template has a higher priority over the the global policy or the global template.
To edit the global policy, click navigate to Global Policy tab, then you can modify any of the parameters displayed.
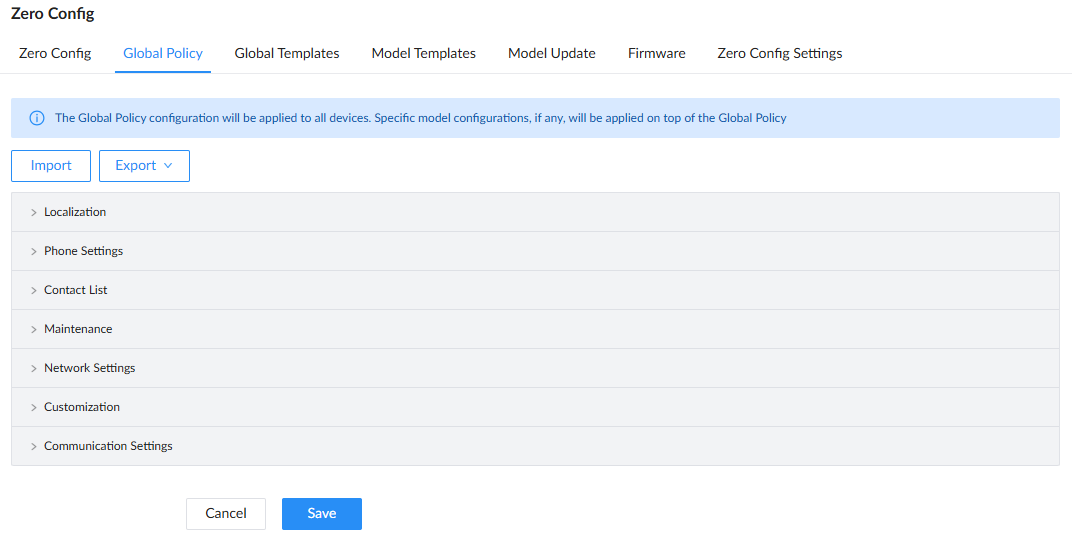
Click save once the configuration is done to save the parameters changed.
Global Template
Global Template is similar to Global Policy, it offers the same parameters but the difference is that the user can create multiple templates and choose a default one to apply across all the devices.
To create a global template, go to Global Templates tab, then click “Add”.
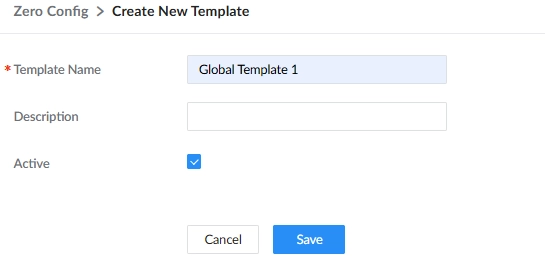
Enter the name of the template and the description the click save.
When “Save” is clicked, a new drop-down menu will appear where you can choose a category.
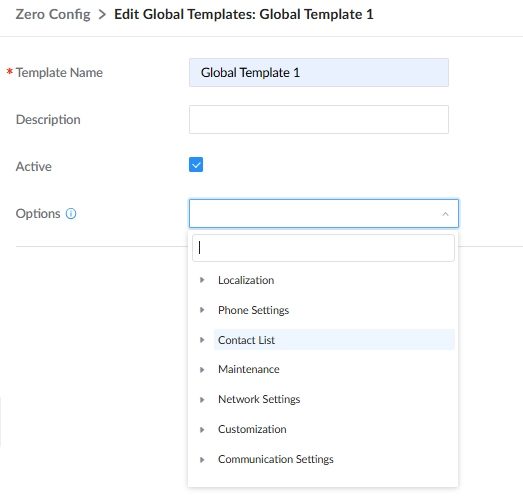
Click on a certain category to open it, the options will be displayed as shown below.
Model Template
This type of template is specific to each model, it contains parameters which are found on the WebGUI of the phone. This template has the highest priority compared to the other templates, therefore, any configuration made in this template will overwrite the configuration on the previous templates.
Follow the steps below to learn how to create and configure a model template.
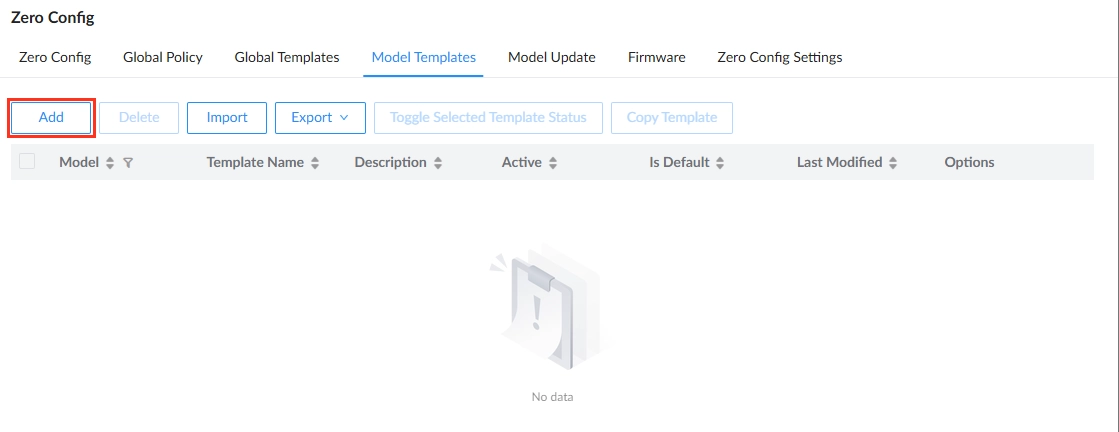
- Navigate to Device Management > Zero Config > Model Templates, then click “Add” button.
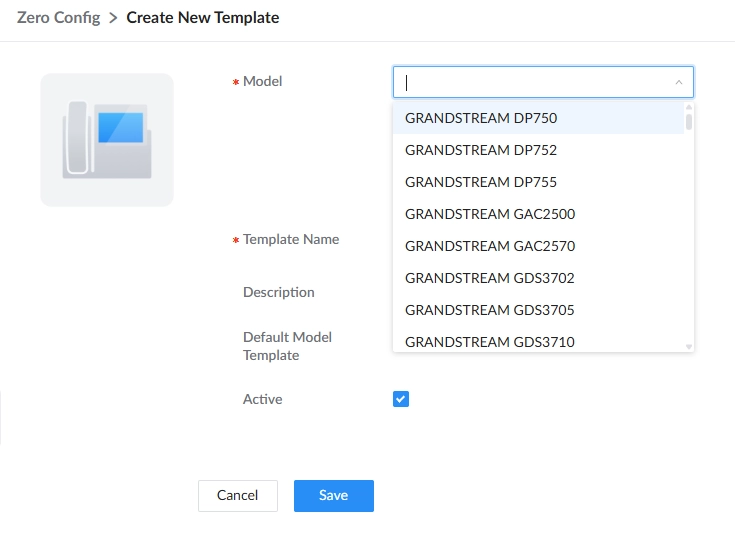
- Select the model of the device.
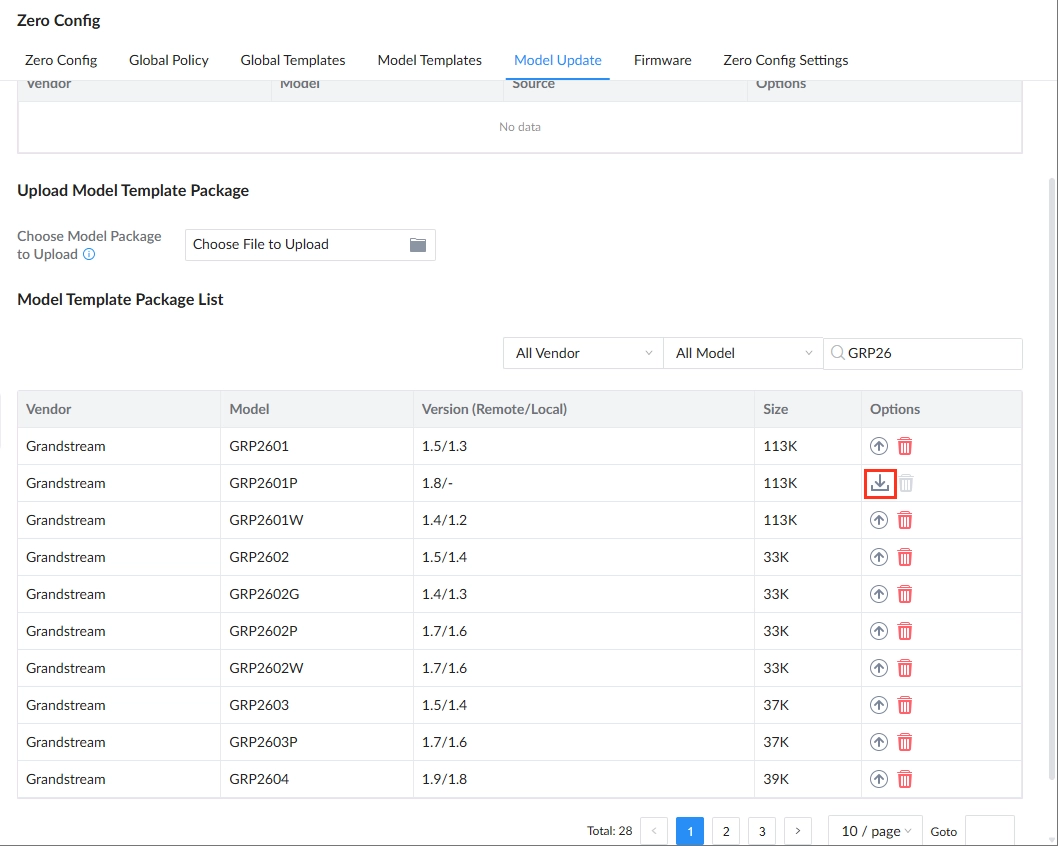
- If you can not find your device model, you need to download the template. To download the template, navigate to Device Management > Zero Config > Model Update
Once you find the template of your model, click on the download button to download it to the IPPBX.
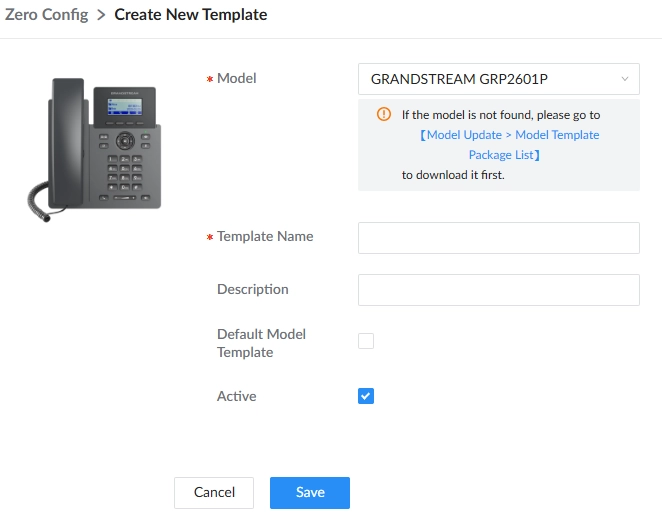
- Once the template has been downloaded, it can be assigned to your devices in Model Templates.
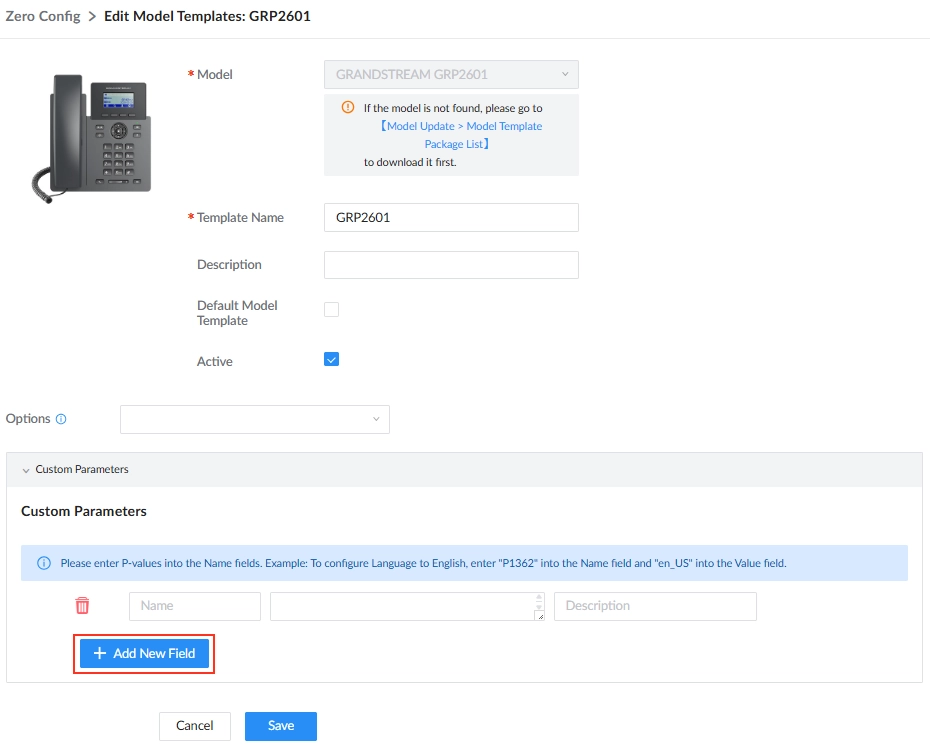
- Custom Settings
For the settings that can be configured through P-values, the administrator can add these configuration to the template by creating new custom parameters as shown in the screenshot below.
Template Export/Import
The user can import and export Global Templates and Model Templates which have been created on the UCM. We’ll use Global Templates as an example to demonstrate the import/export feature.
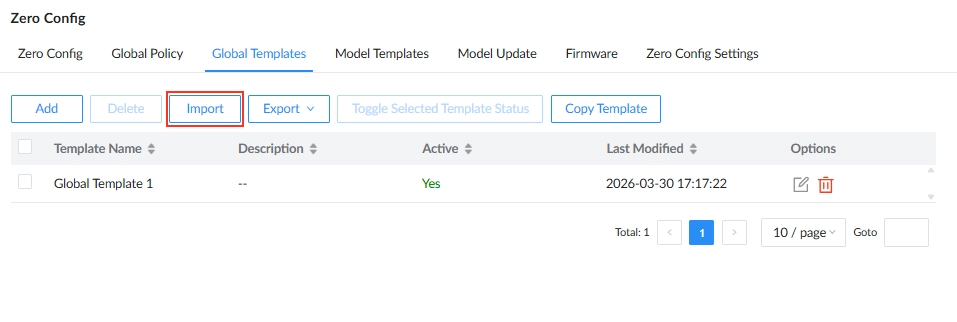
Template File Import
- Click on “Import” button on the page, then choose the file of the template.
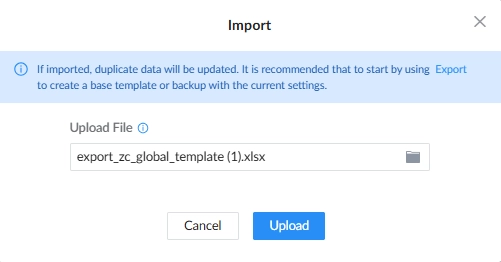
- Once the file has been chosen, click on “Upload”.
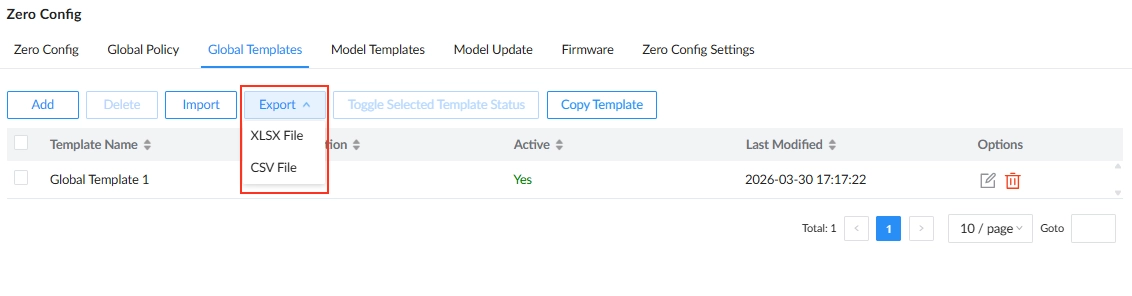
Template File Export
Click on “Export”, then select the format of the file to export.
When the template is downloaded in XLSX, it can be opened in Microsoft Excel to view the parameters configured. Only the parameters which were enabled will appear in the file.
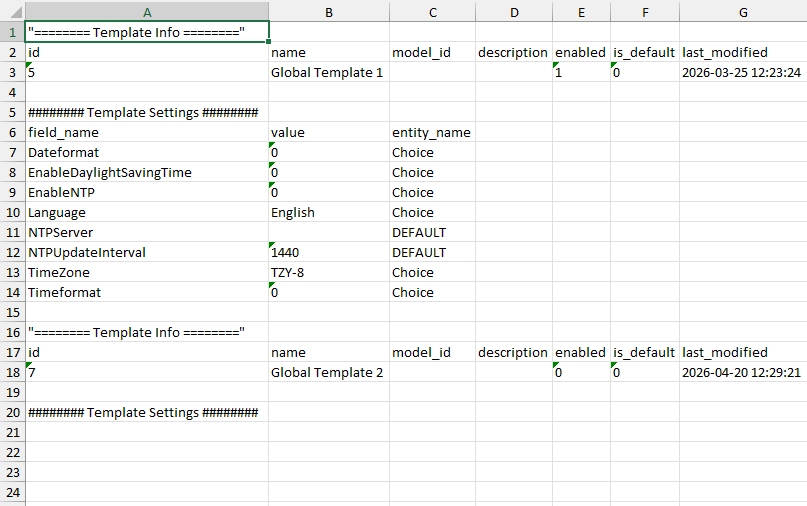
When the template is downloaded as a CSV file, the file can be opened using a text editor.
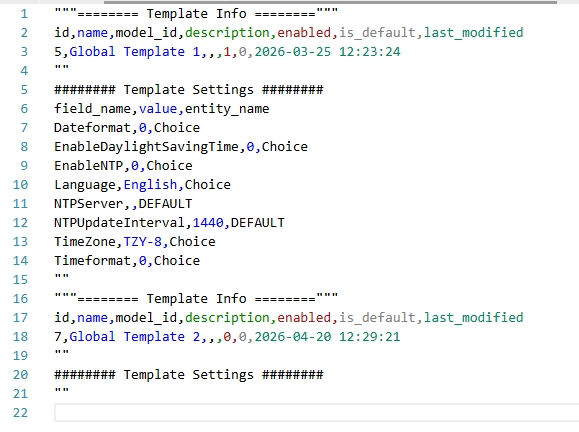
Each template starts at the following string"""==== Template Info ========""" in this section, the user can enter the name of the template, select if it is active, and if it is the default template etc…
The settings are included under the following string ######## Template Settings ######## , in between quotation marks, the related template settings are included.
Device Configuration
The administrator can also provision individual devices from the IPPBX by entering the configuration page of the device on Zero Config and pushing the configuration to the device. Please follow the steps below.
- Click on “edit” button of the device you wish to edit.
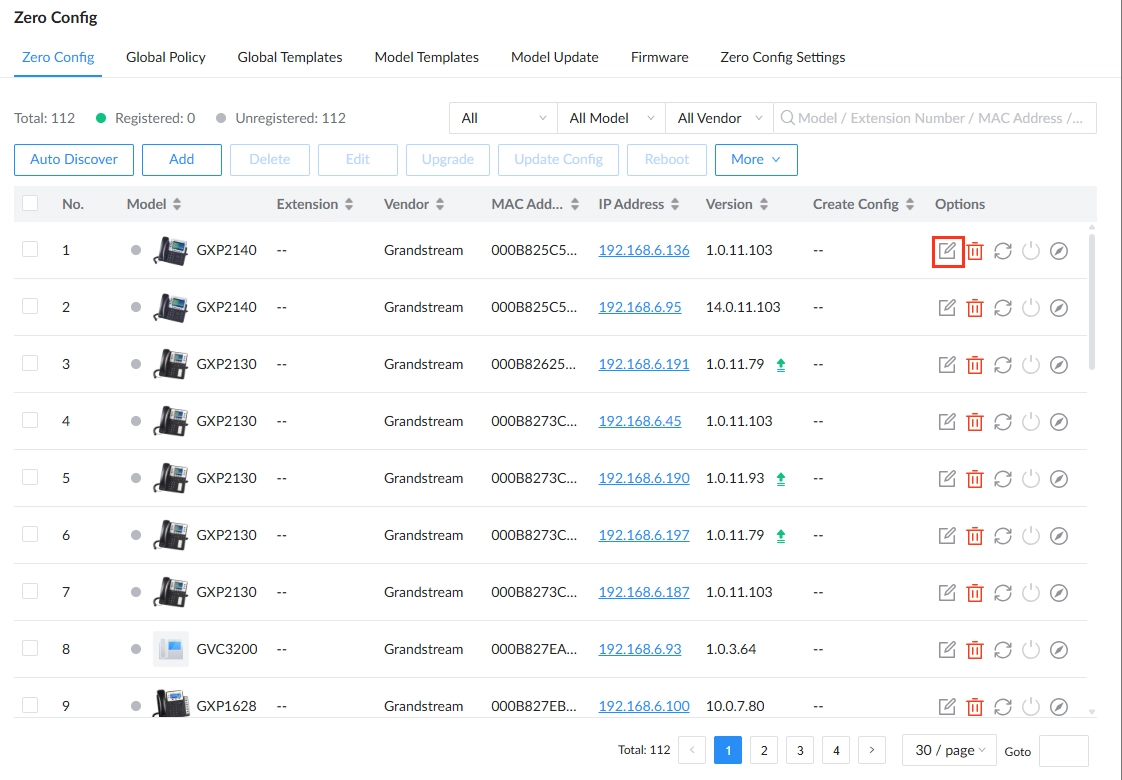
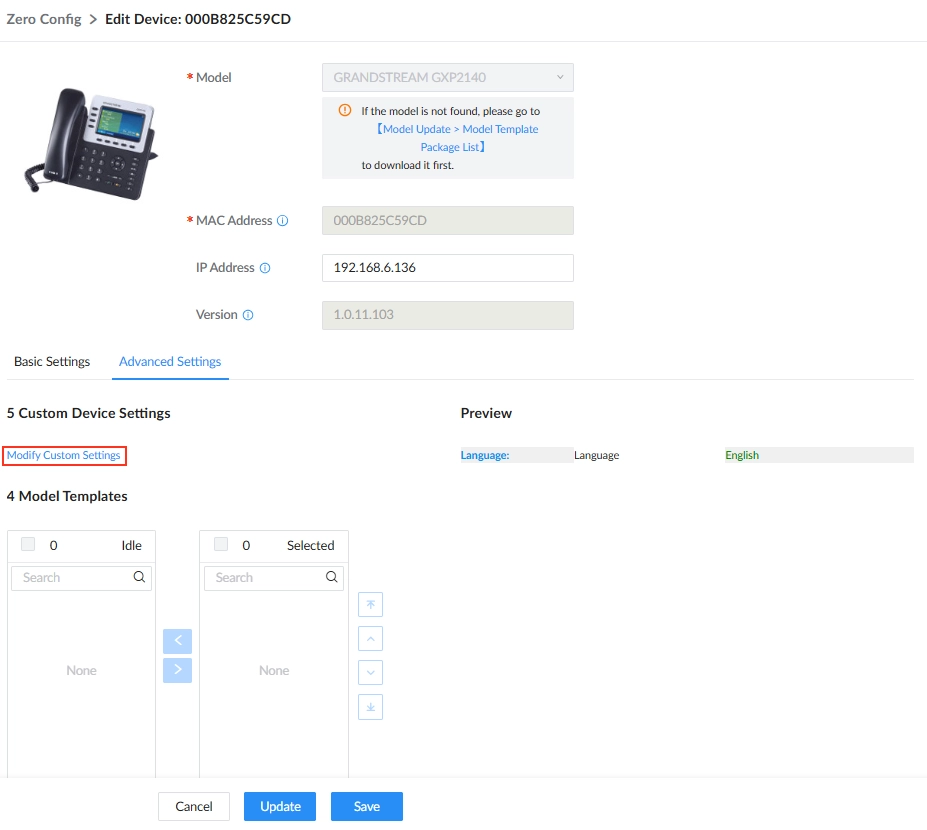
- Click on “Advanced Settings” then click on “Modify Custom Settings”.
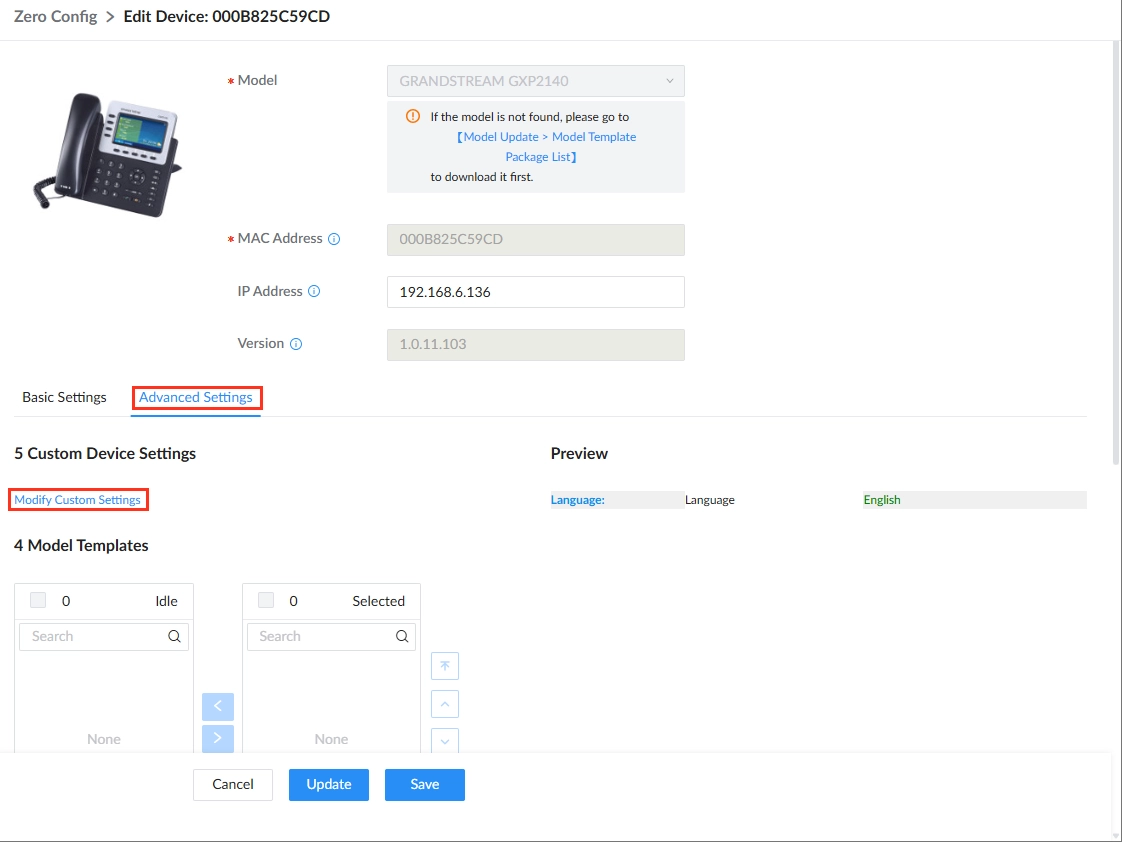
- Enable the options to provision to the device.
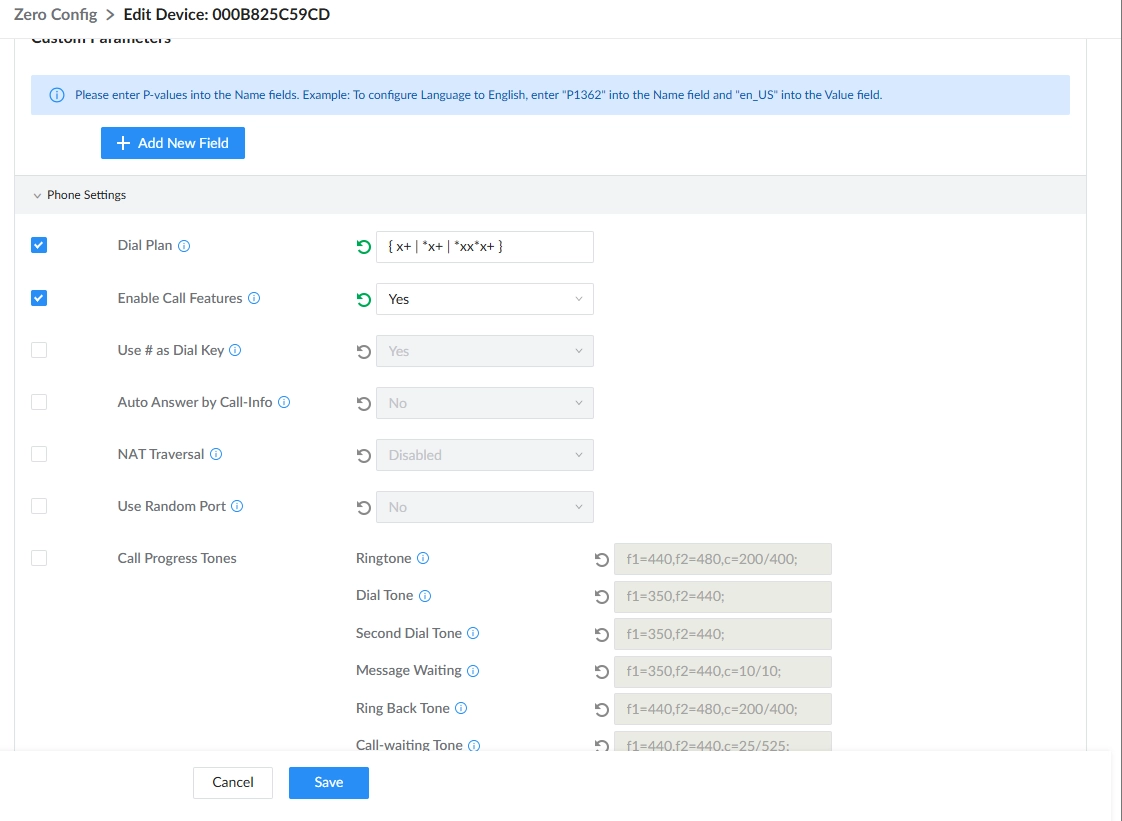
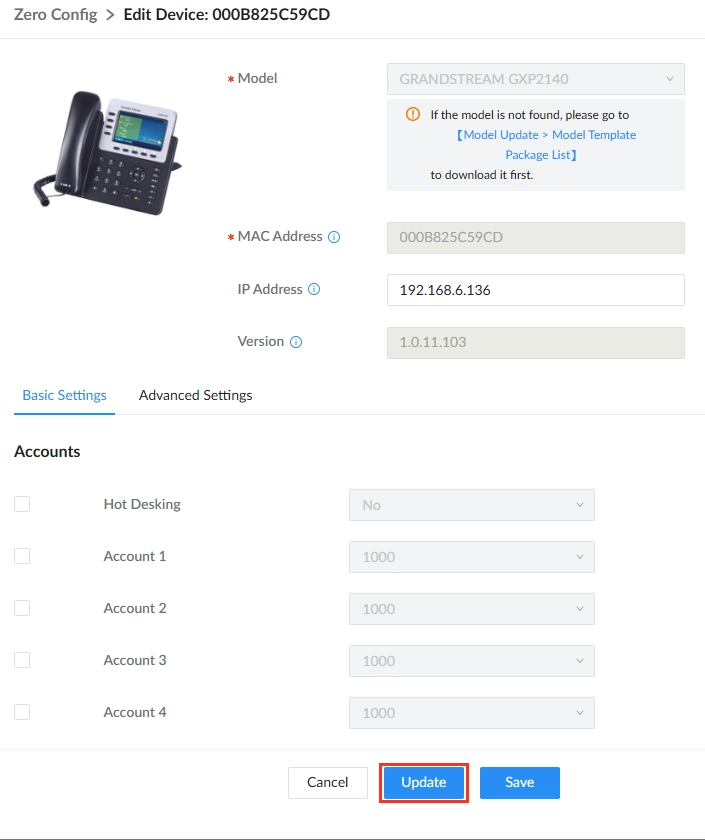
- Once the configuration has been made, click on “Save” to save the configuration.
- Click “Update” to push the configuration to the device.
- Modify Custom Settings
To include custom parameters using P-value, click on “Advanced Settings” tab then click on “Modify Custom Settings”.
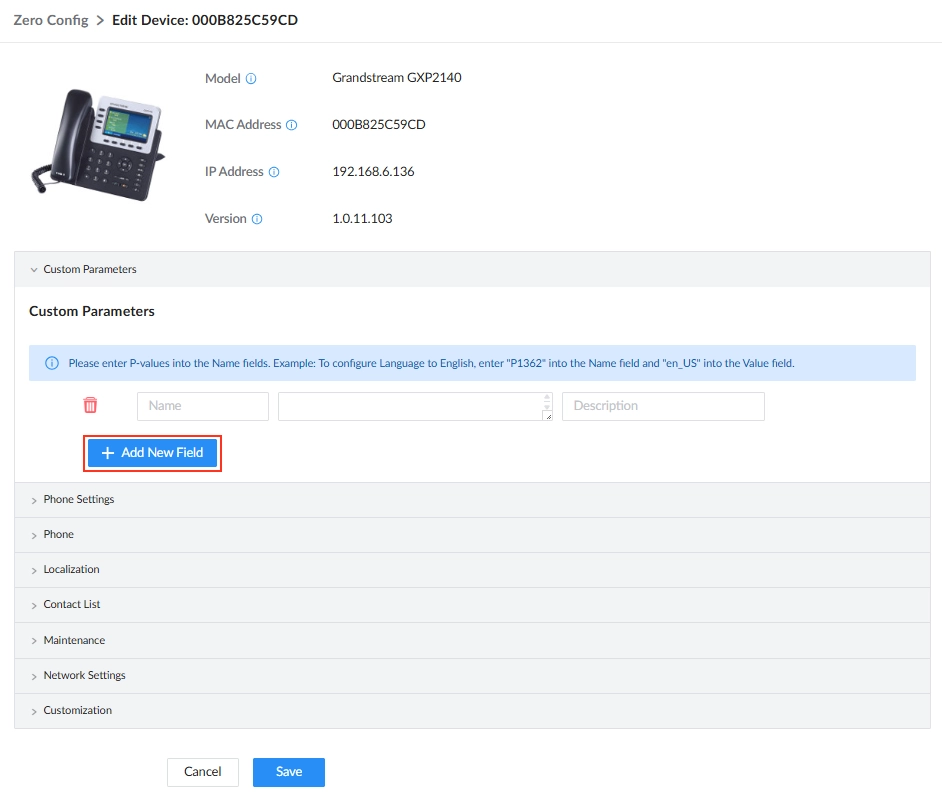
Click on “Add New Field”, then add the P-value in the name field, and in the field next to it enter the value to attribute to the P-value.
Extension Assignment
Extension assignment can be done manually or dynamically. Follow the instructions in this section to learn how to assign the extensions either manually or dynamically.
Manual Configuration
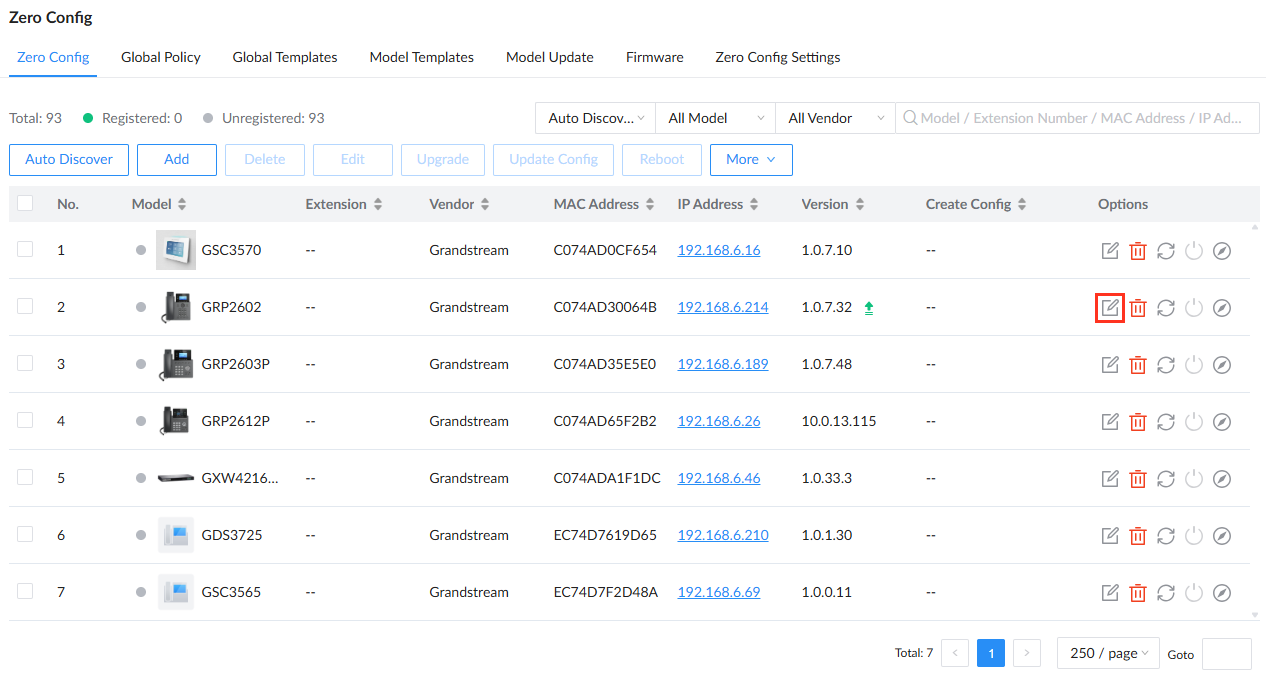
To assign an extension manually, click on the edit button of the device, as shown in the screenshot below.
From the list corresponding to the account that you wish to configure, select a specific extension.
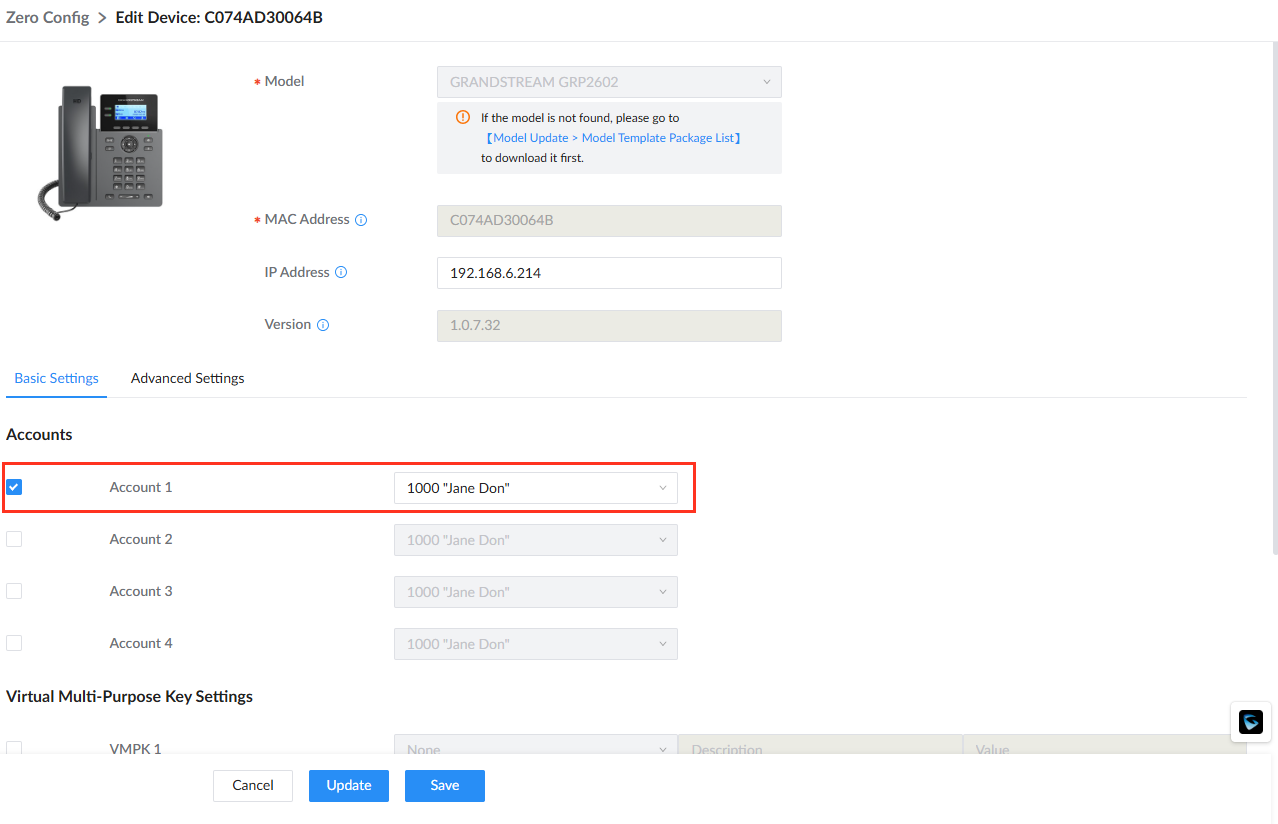
Click “Save” then you will be redirected back to the page of the list of the devices. Click on the configuration synchronization button of the phone we have just configured, as shown in the screenshot below.
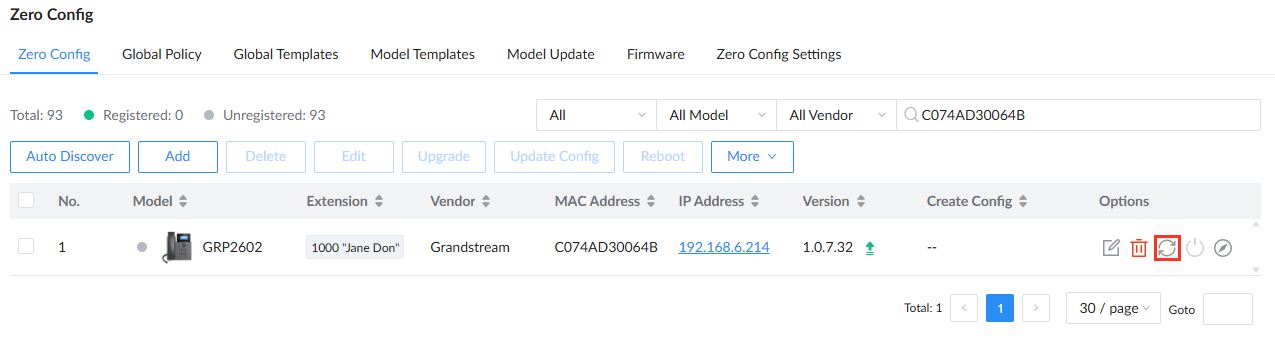
The phone will be provisioned with the new extension configuration.
Dynamic Configuration
To configure the IP phones with the extensions dynamically, we need to activate “Auto Assign Extension”. To find this option, please navigate to Zero Config > Zero Config Settings
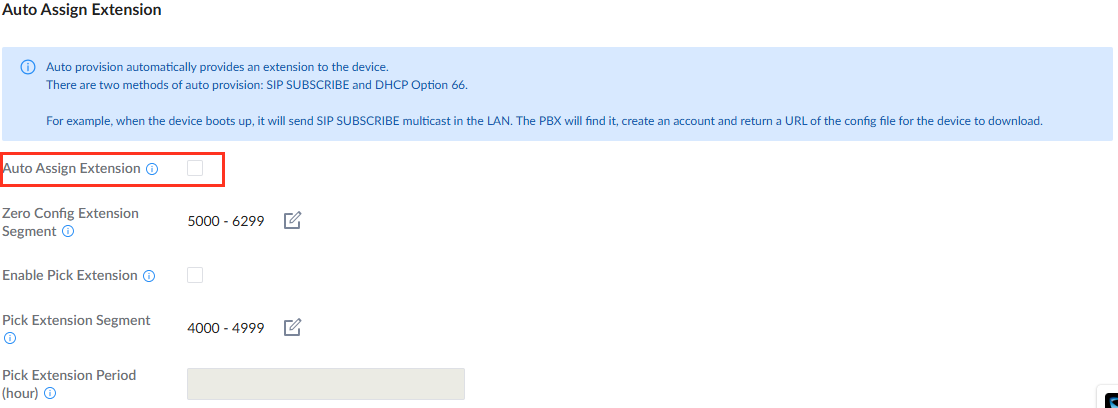
Enabling this option only will result in assigning the extensions without giving the user to choose the extension number.
To allow the user to choose the extension number, activate “Enable Pick Extension”, the user will then be prompted to pick an extension on the IP phone.
Device List Import/Export
- Export
To export the device list, click on the button “More”, hover the mouse cursor on “Export”, then choose to export the file in either xlsx or csv file format.
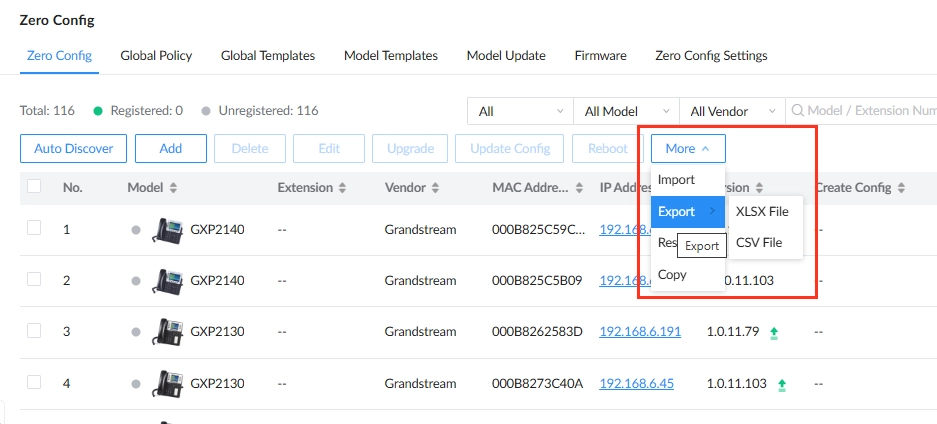
If the list is exported in XLSX format, the user can view the list using Microsoft Excel.
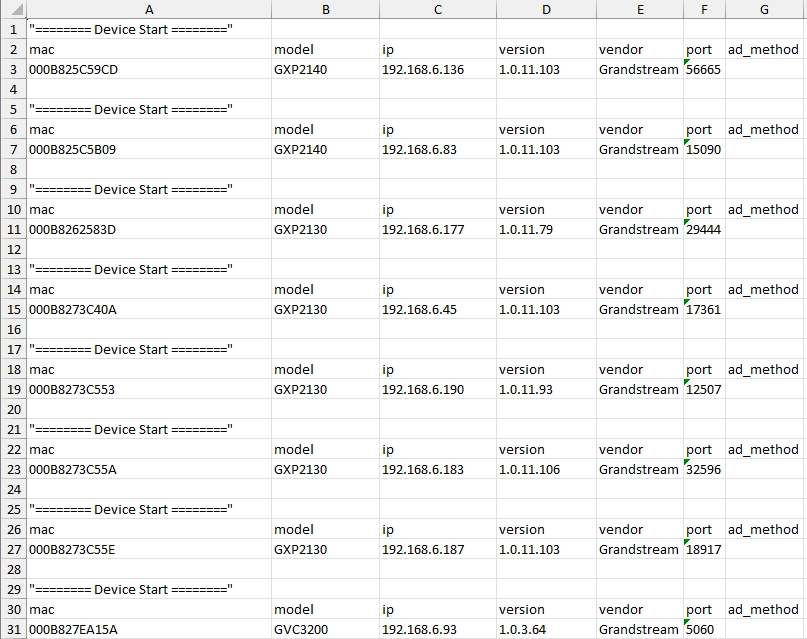
If the list was exported using CSV format, the user can view the list using a text editor or Microsoft Excel.
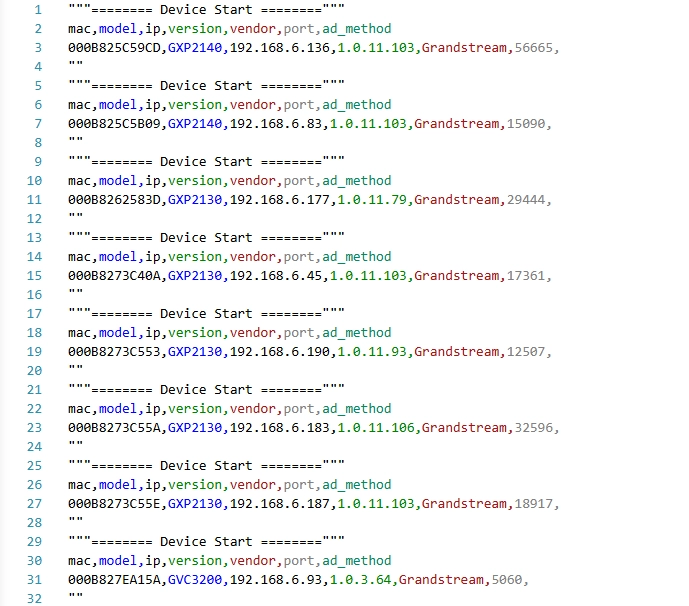
Every device entry start with the line """======== Device Start ========""". The parameters which can be configured are Mac address, model, IP address, firmware version, vendor, and port.
The basic settings and advanced settings are included under ######## Basic Settings ######## and ******** Advanced Settings ******** .
- Import
To import a list of devices, click on “More”, then select on Import.
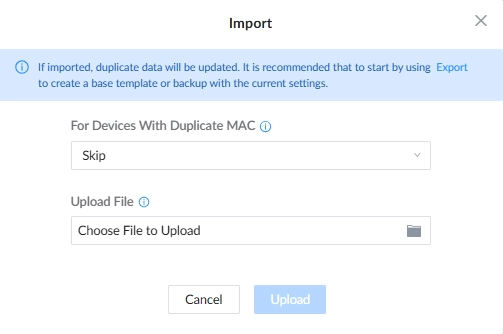
In “For Devices With Duplicate MAC”, choose the behaviour of the importing for the existing MAC addresses
- Skip: The existing devices will be skipped.
- Replace: The existing devices will be replaced.
- Update: The existing devices will be updated.
OEM Models
For OEM models made by Grandstream, the administrator can create the custom model templates based on Grandstream endpoint model. To do so, please follow the steps mentioned below.
- Navigate to Device Management > Zero Config > Model Update
- On the page, click on “Add OEM Models”.
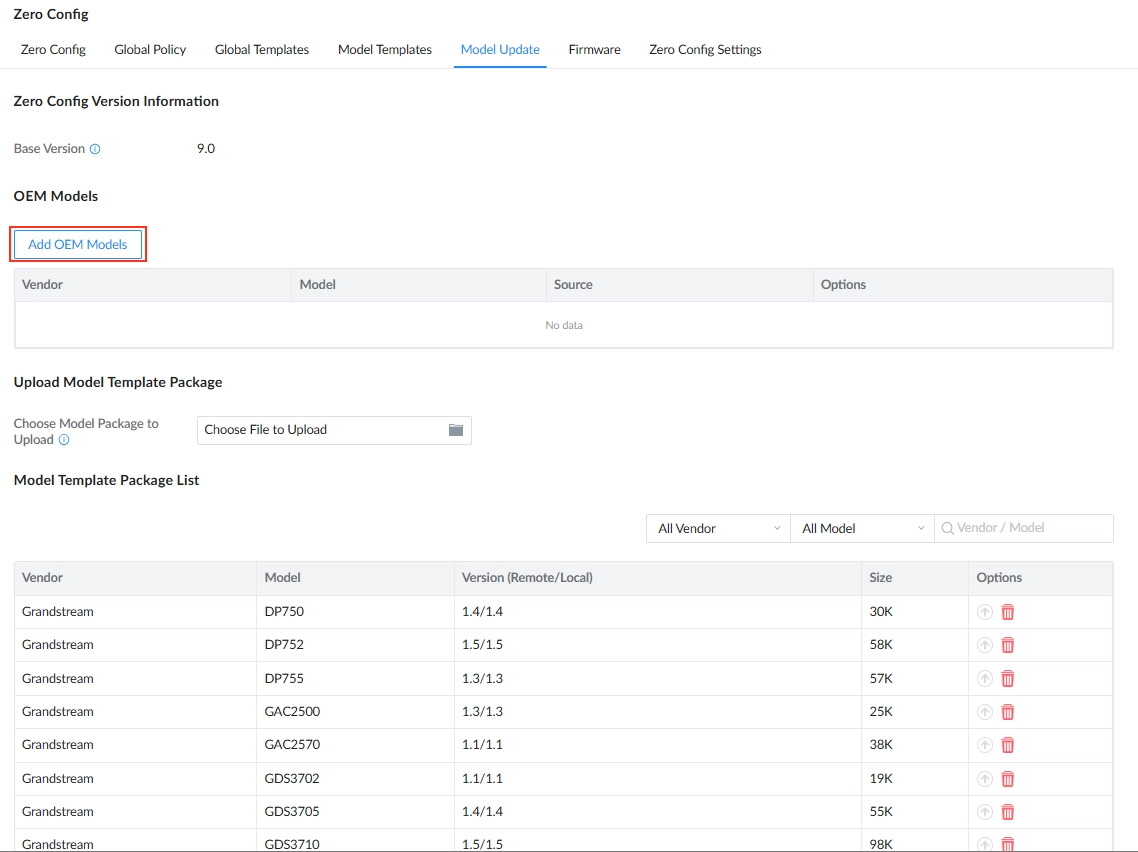
- Define the parameters explained below.
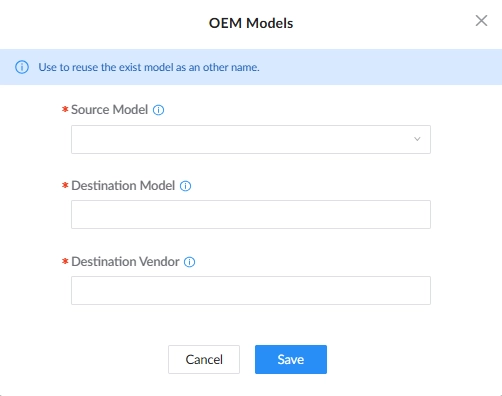
- Source Model: Select the Grandstream model that the OEM is based on.
- Destination Model: Enter the name of the OEM model.
- Destination Vendor: Enter the vendor of the OEM model.
Once the OEM template has been created, the administrator can create model templates based on this OEM template.
ADDITIONAL FEATURES
Firmware
Zero Config provides a management feature for the different firmware versions of the IP phones, where the user can upload firmware files to maintain the software of all the devices up-to-date with the most recent features, bug fixes, and security patches.
Before looking at that feature, first let’s look at the new firmware version detection that the IPPBX performs and prompts the user to install it on the corresponding devices.
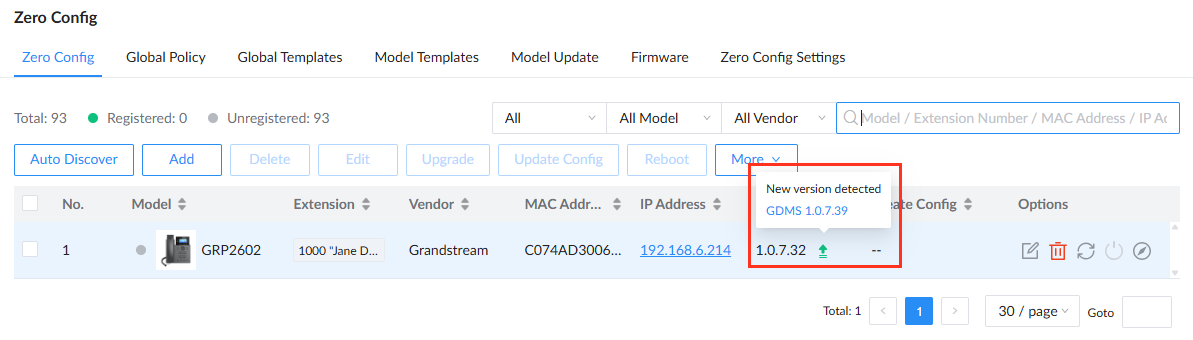
When a new firmware version is released, a small green arrow will appear next to the firmware version of the device, indicating that upgrading a newer version is possible. The user can hover over that arrow to see the new version and the source of the firmware file.
In the example below, the source of the firmware file is GDMS Unified Communications platform.
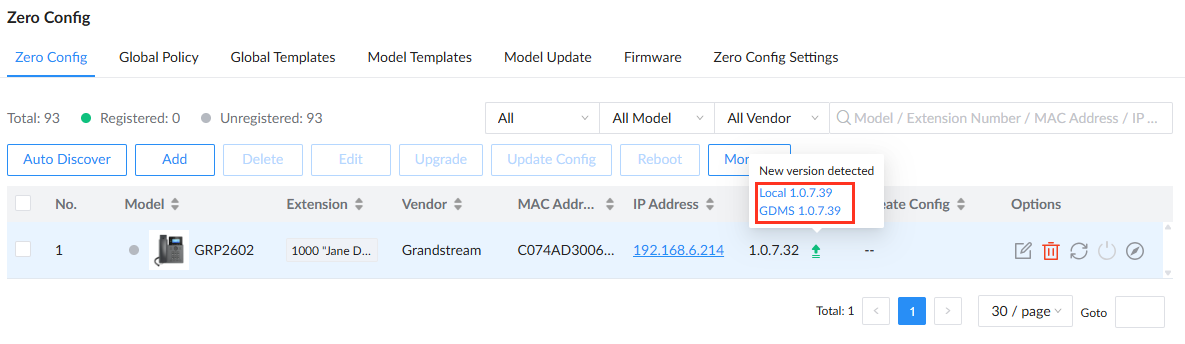
If a newer version of the firmware has been uploaded to the local storage of the IPPBX, it will appear as the source of the file. Uploading the firmware file to the local storage of the IPPBX will significantly reduce the use of bandwidth during the firmware update process, when many IP phones are deployed in the network.
Batch Firmware Upgrade
Zero Config supports batch firmware upgrades for multiple devices using firmware files stored on the local IPPBX storage. This allows administrators to select multiple compatible devices and upgrade their firmware simultaneously, instead of upgrading each device individually.
When Local is selected from the Upgrade menu, Zero Config uses the firmware files available in the IPPBX’s local storage and pushes the selected firmware to the selected devices.
The batch upgrade feature is particularly useful in deployments with a large number of IP phones, as it simplifies firmware maintenance and reduces the time required to upgrade devices individually.
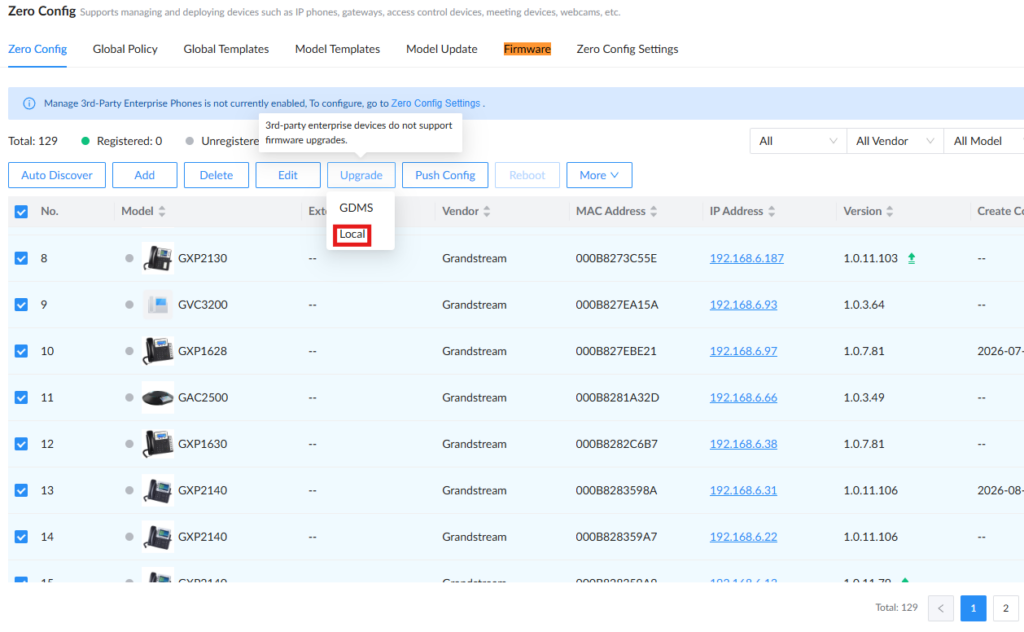
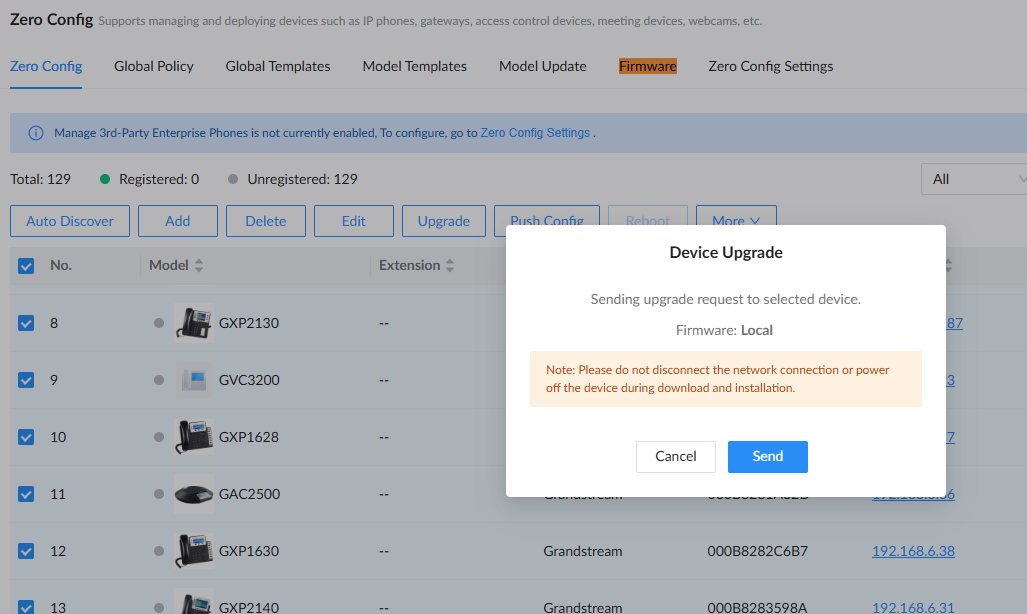
When a local firmware upgrade is initiated, Zero Config sends the upgrade request to all selected devices. The confirmation window indicates that the Local firmware source will be used for the upgrade.
Once the upgrade request is sent, the devices download and install the firmware from the IPPBX. The devices should remain connected to the network and powered on throughout the process.
SUPPORTED ENDPOINTS
The table below lists the supported endpoint manufactured by Grandstream and other manufacturers.
Vendor | Supported Device Series |
Grandstream | GXP Series |
GRP Series | |
GXV Series | |
GHP Series | |
GVC Series | |
GAC Series | |
GSC Series | |
GDS Series | |
GXW Series | |
HT Series | |
DP Series | |
WP Series | |
Cisco | CP-78xx |
CP-88xx | |
DP-98xx | |
Cisco CP-6921 | |
Cisco CP-3905 | |
Poly | Edge-E |
Edge-B | |
VVX (non-OBi) | |
Avaya | J100 Series |
Yealink | AX Series |
T4 Series | |
T5 Series | |
T7 Series | |
T8 Series |
*: Currently supported only on the UCM6300 Series, UCM6300 Audio Series, and SoftwareUCM.
**: Currently supported only on the UCM6300 Series, UCM6300 Audio Series, SoftwareUCM, and GCC6000 Series.