


OVERVIEW
SAML (Security Assertion Markup Language) is a standard protocol that enables applications to use an external Identity Provider (IdP) for user authentication and Single Sign-On (SSO). With SAML SSO, users can authenticate using their existing enterprise identity provider instead of maintaining a separate username and password on the UCM.
The UCM6300 Series supports SAML SSO by acting as the Service Provider (SP). During the authentication process, the UCM redirects the user to the configured third-party IdP. After successful authentication, the IdP returns a signed SAML response containing the user’s identity information. The UCM validates the response and uses the configured user-mapping information to associate the authenticated IdP user with the corresponding UCM user.
SAML SSO can be integrated with enterprise identity providers such as Microsoft Entra ID (Azure AD), AD FS, Okta, OneLogin, and Google Workspace. The identity provider is responsible for authenticating users, while the UCM relies on the SAML assertion provided by the IdP to complete the login process.
SAML COMPONENTS
When using SAML, there are two key elements:
- Identity Provider (IdP): The authority for the user’s identity. It validates user credentials and provides identity attributes by knowing the user’s username, password, and any groups/attributes (Example: Microsoft Entra ID, AD FS, Duo).
- Service Provider (SP): The application that the user wishes to use. In this case, the UCM63xx.
SAML SSO CONFIGURATION IN UCM63XX
SAML Single Sign-On (SSO) allows users to authenticate to the UCM through an external Identity Provider (IdP) instead of using a separate UCM username and password.
In this configuration:
- UCM acts as the Service Provider (SP).
- The external IdP performs user authentication; in our example, Microsoft Entra ID
- The UCM uses the SAML response from the IdP to identify and authorize the corresponding UCM user.
Firstly, users need to sign up for an Azure account by visiting this web page:
This section mainly introduces how to configure Microsoft Entra ID (formerly known as Azure AD) as the identity provider (IdP) for UCM63xx.
Step 1: Add a new application in Azure
- Sign in to the Microsoft Entra admin center as a Cloud Application Administrator or higher.
- Go to Entra ID → Enterprise apps → New application.
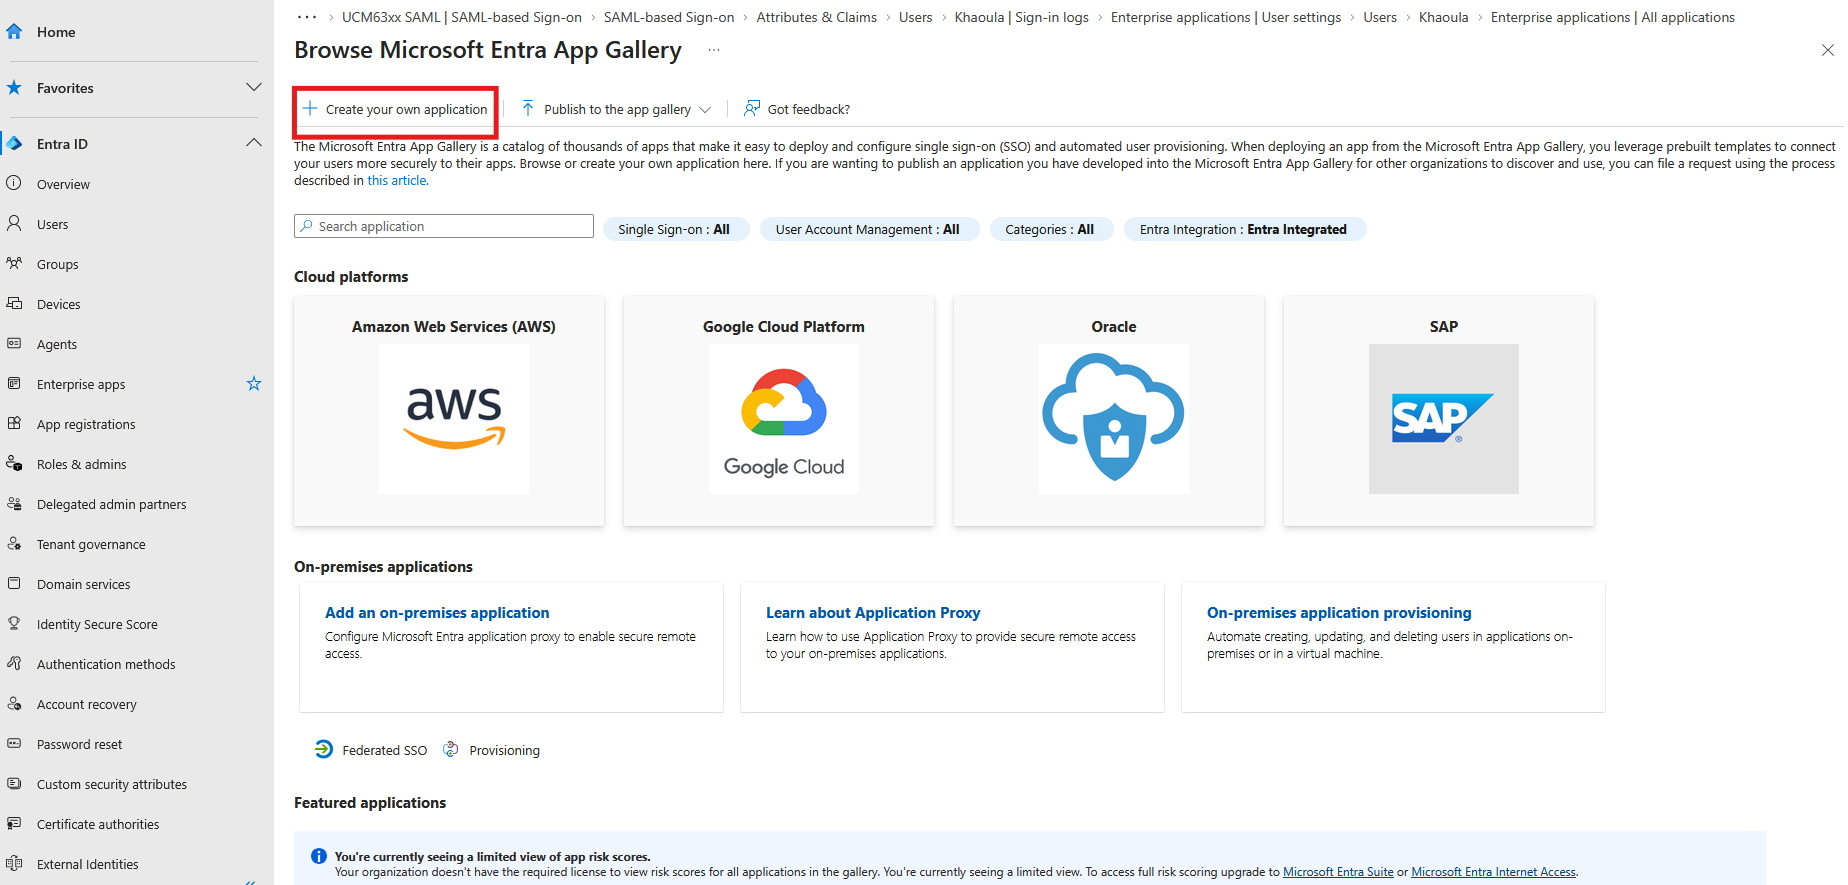
- In the Browse Microsoft Entra Gallery section, click Create your own application.
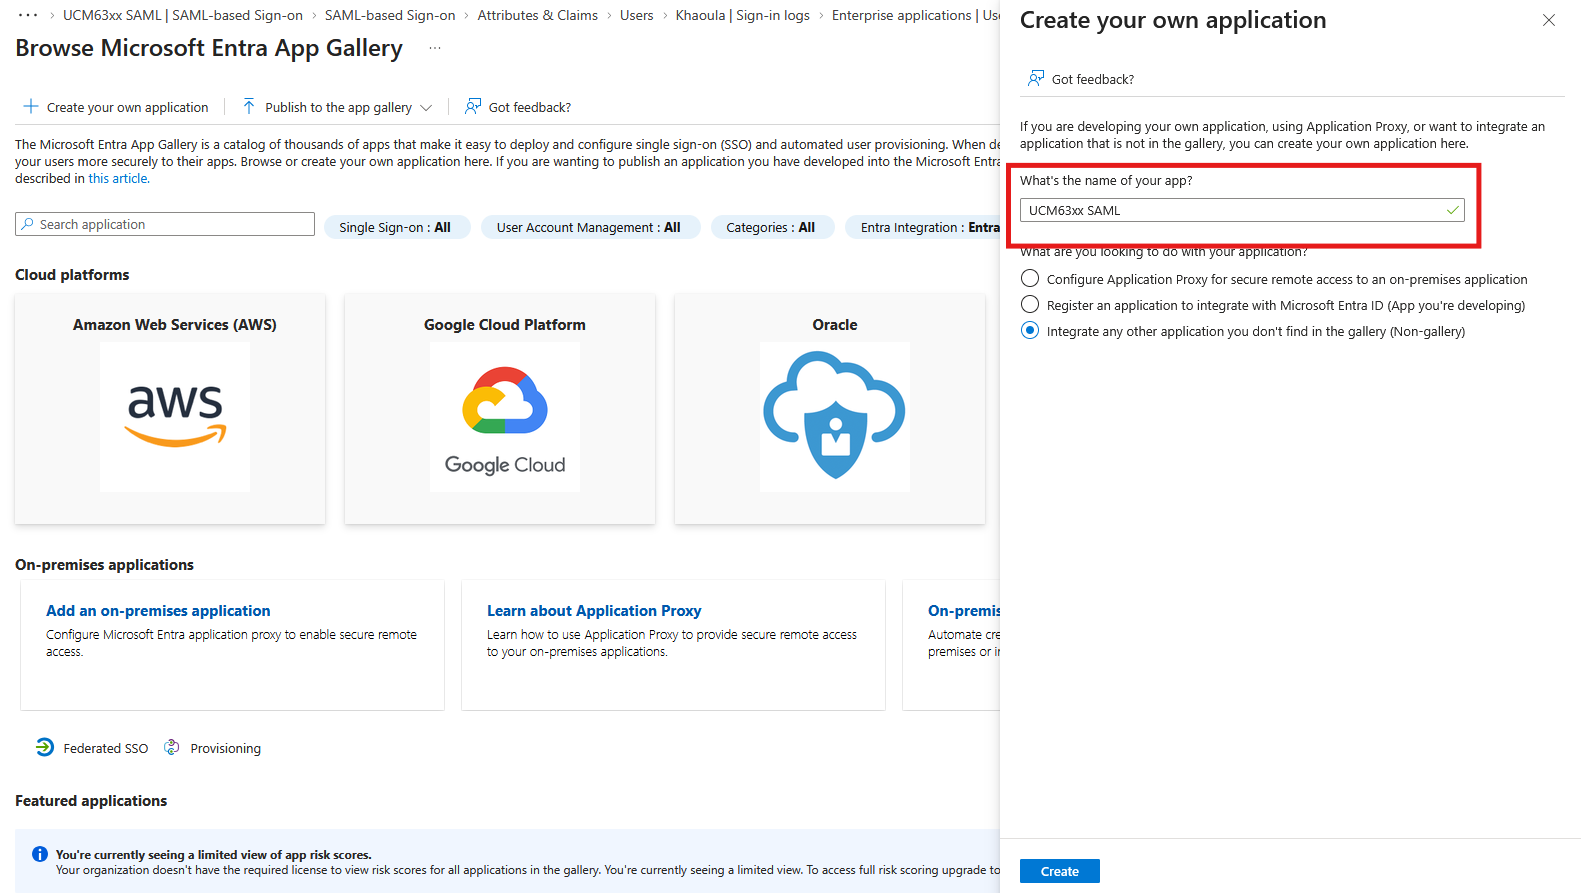
- Enter your application name, such as “UCM63xx SAML”, and select “Integrate any other application you don’t find in the gallery (Non-gallery)“.
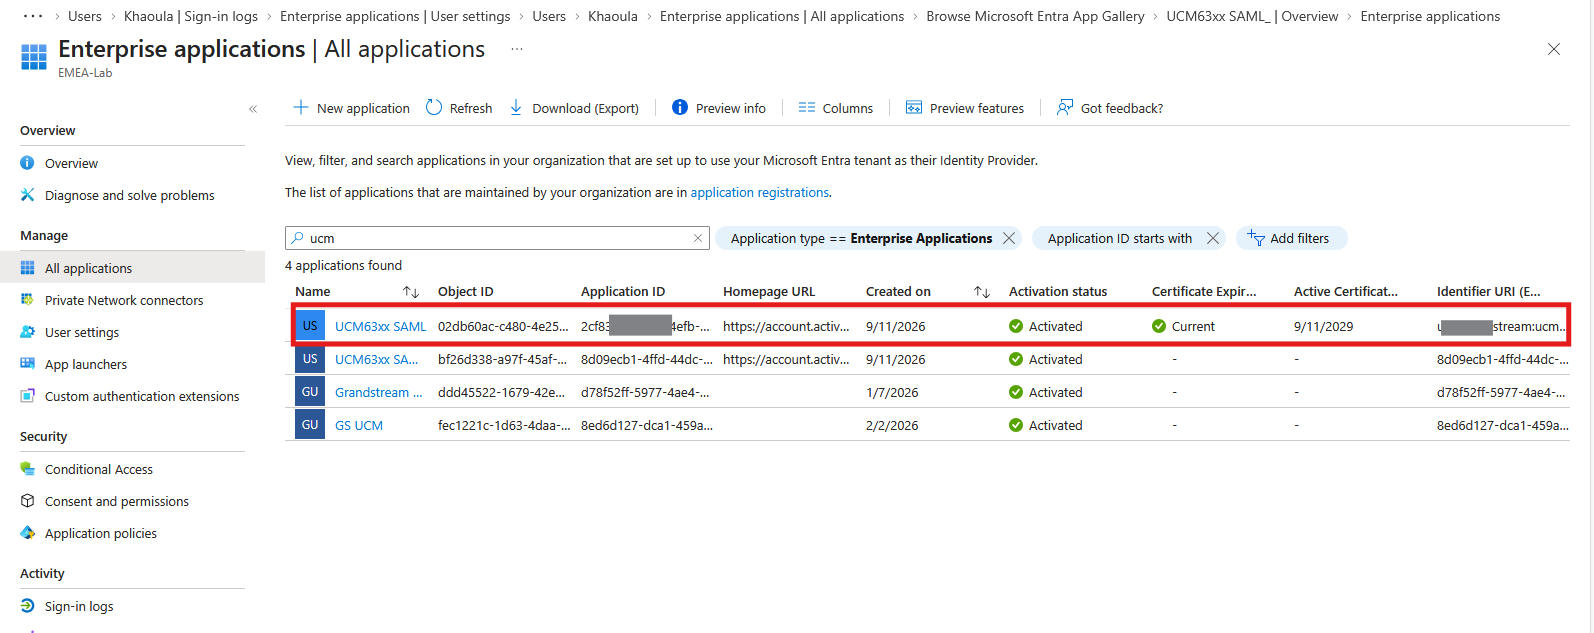
- Click Create to successfully create the application. You can view the application in the list.
Step 2: Create an application role in Azure
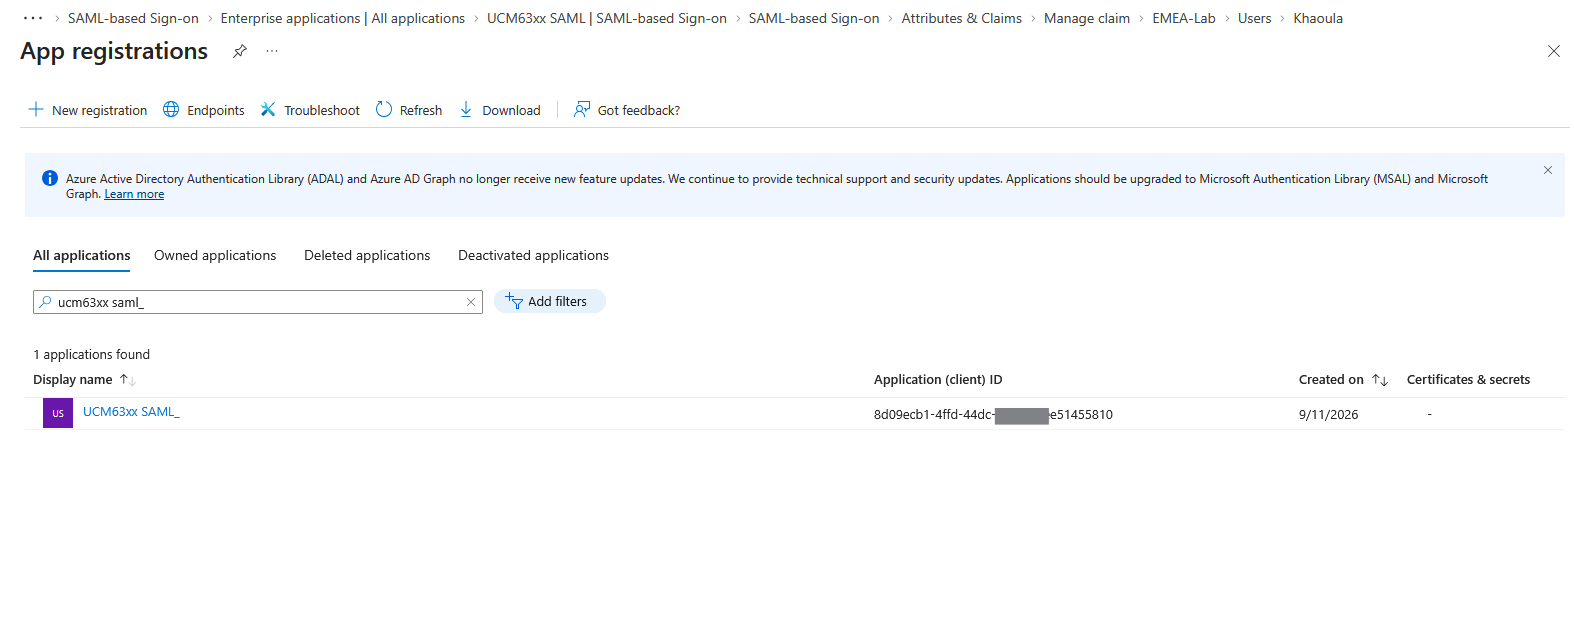
- Sign in to the Microsoft Entra admin center, go to Entra ID→ Applications → APP registrations, and click on the app you have created.
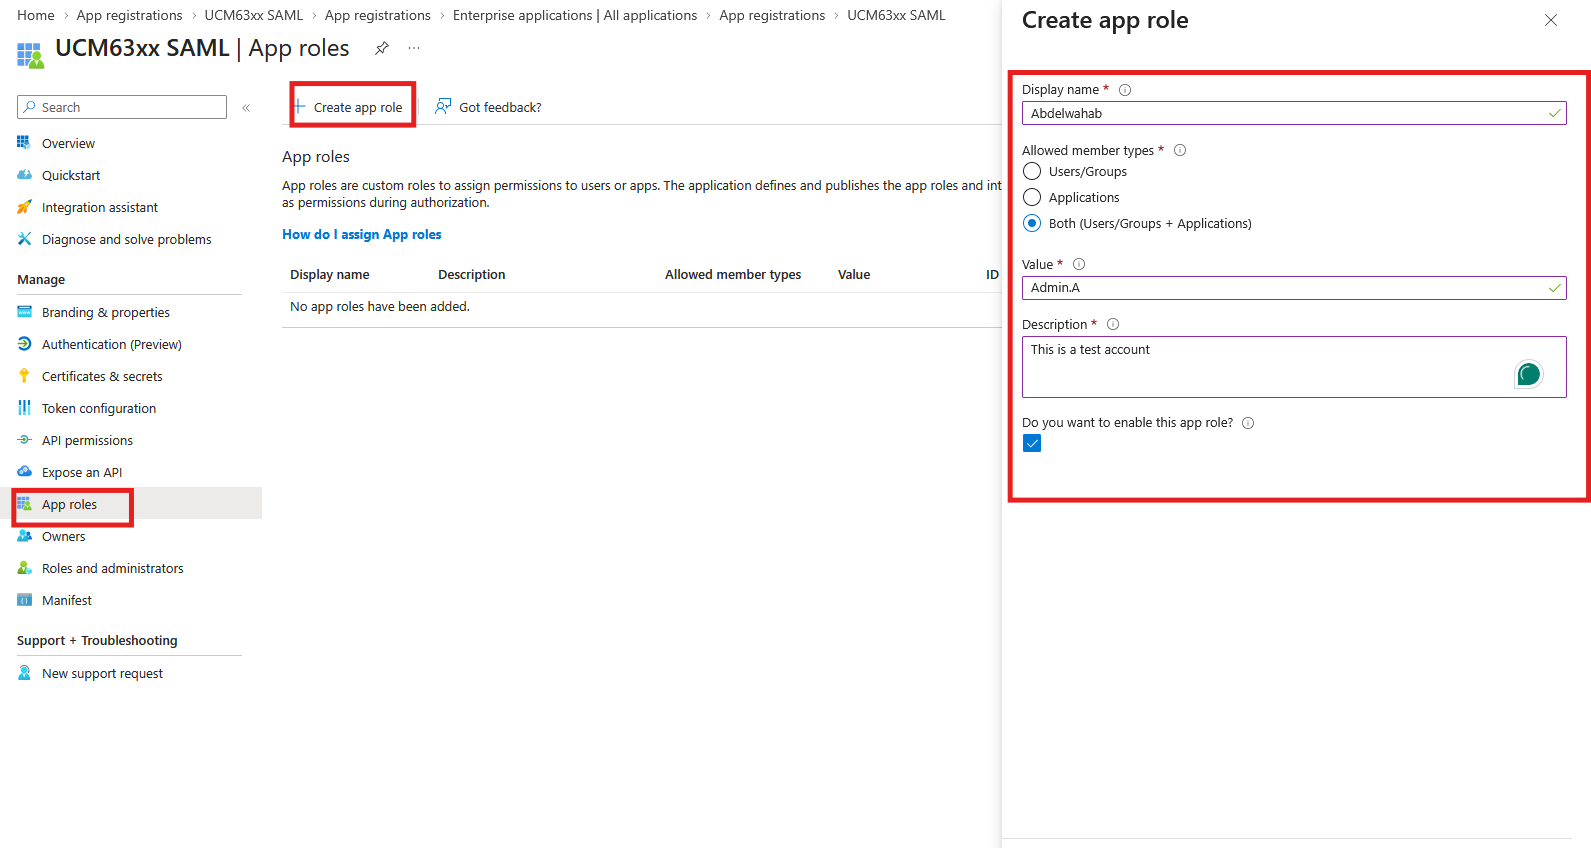
- Click APP roles on the left, and then click Create app role. Then fill in the display name, select “Both” for type, and the Value must be consistent with the SAML role value expected by the Service Provider, such as “Admin.A“.
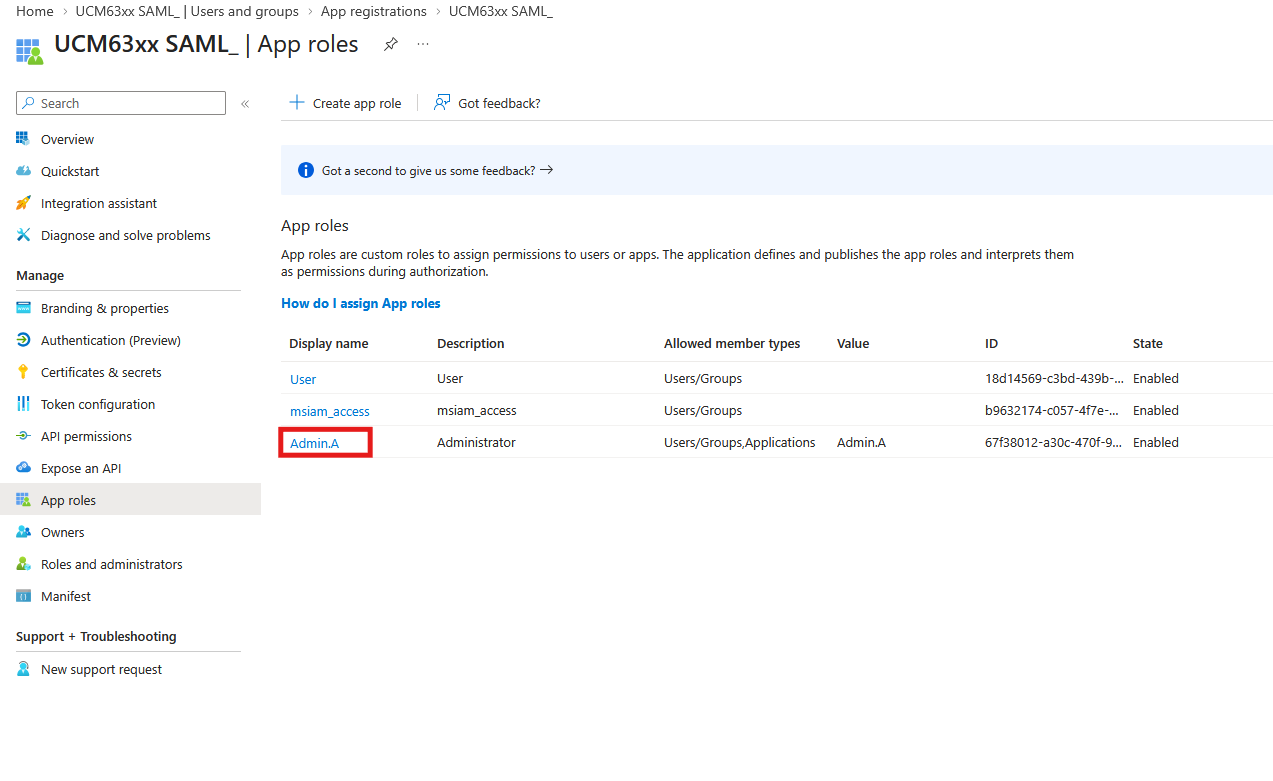
- After successful creation, you can see this role in the list.
Step 3: Add users to the application in Azure
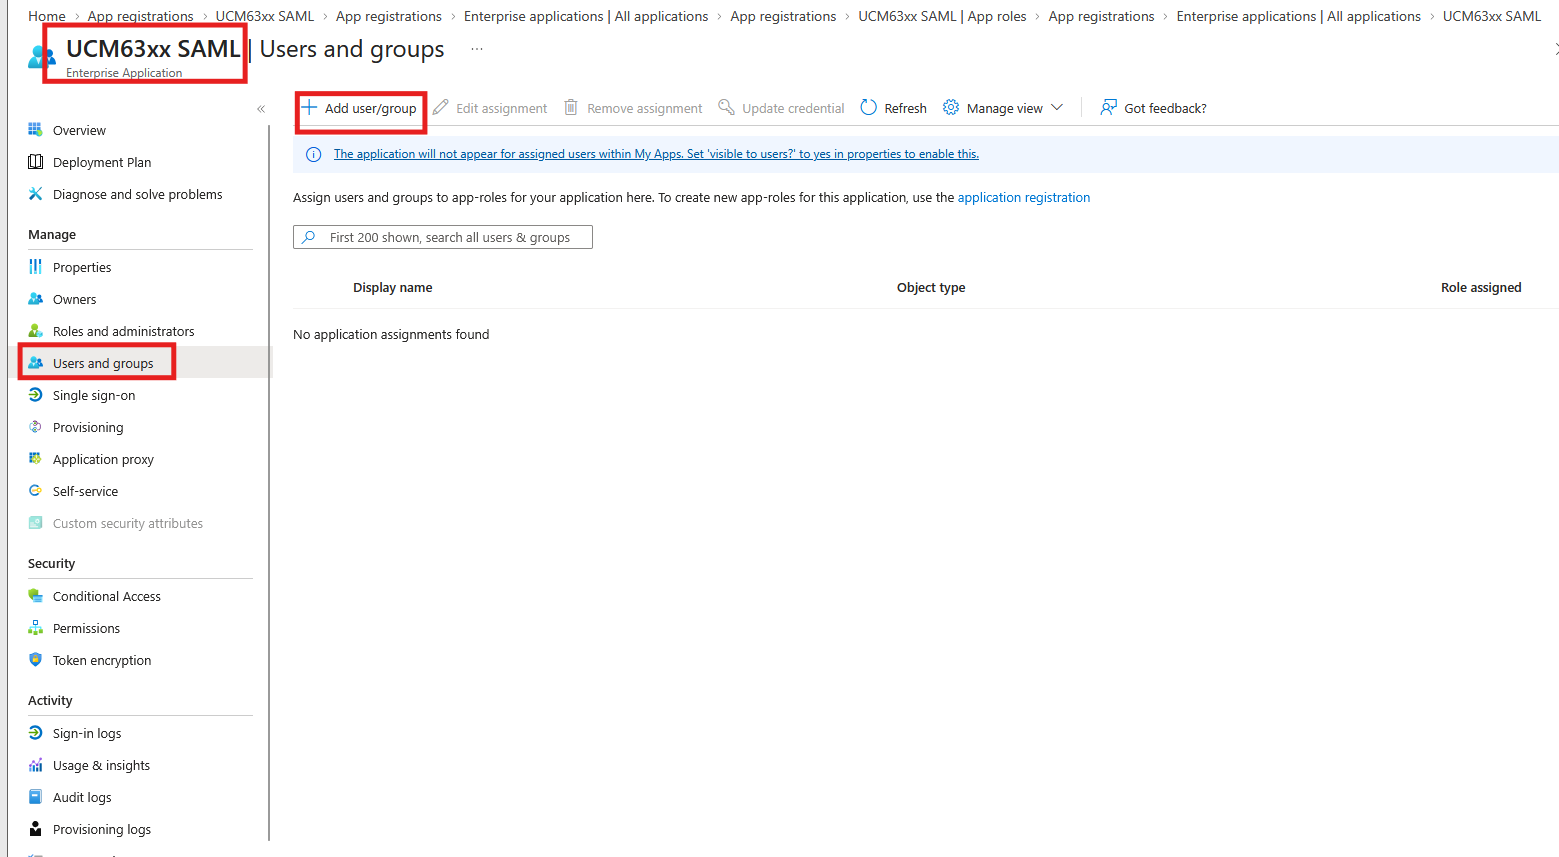
- Sign in to the Microsoft Entra admin center, go to Identity → Applications → Enterprise applications, find and select the app you created in the application list.
- Then, click Users and groups on the left bar and select Add user/group.
- Select the users you want to assign to use this app.
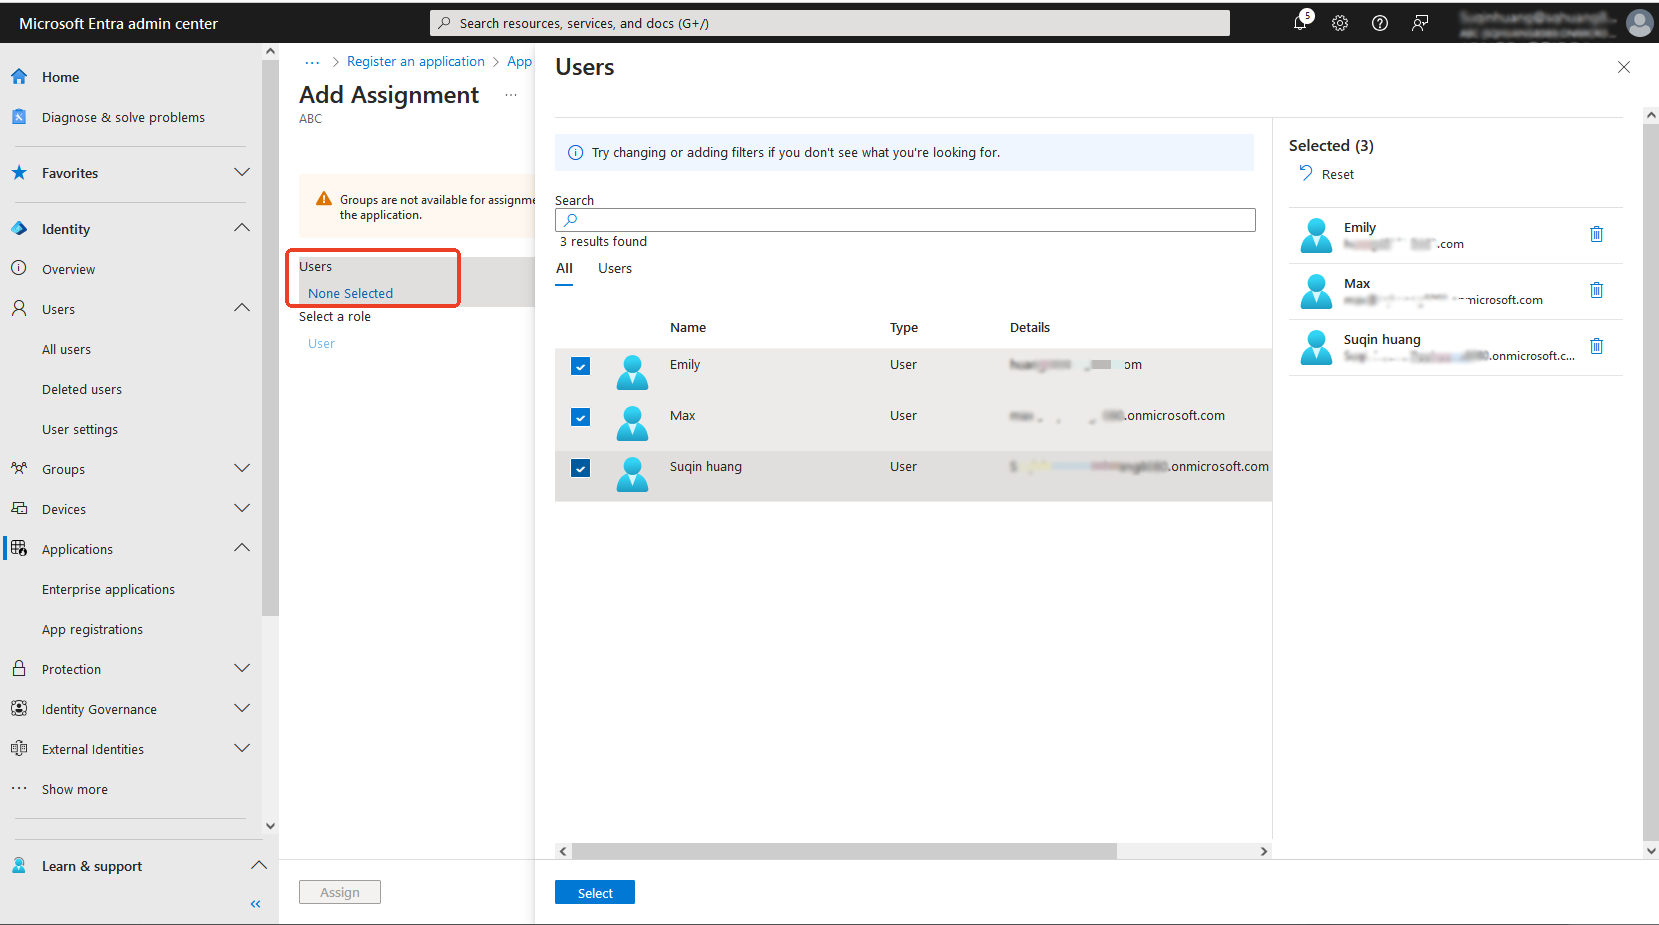
- Select Assigned Roles and choose from the application roles you just created.
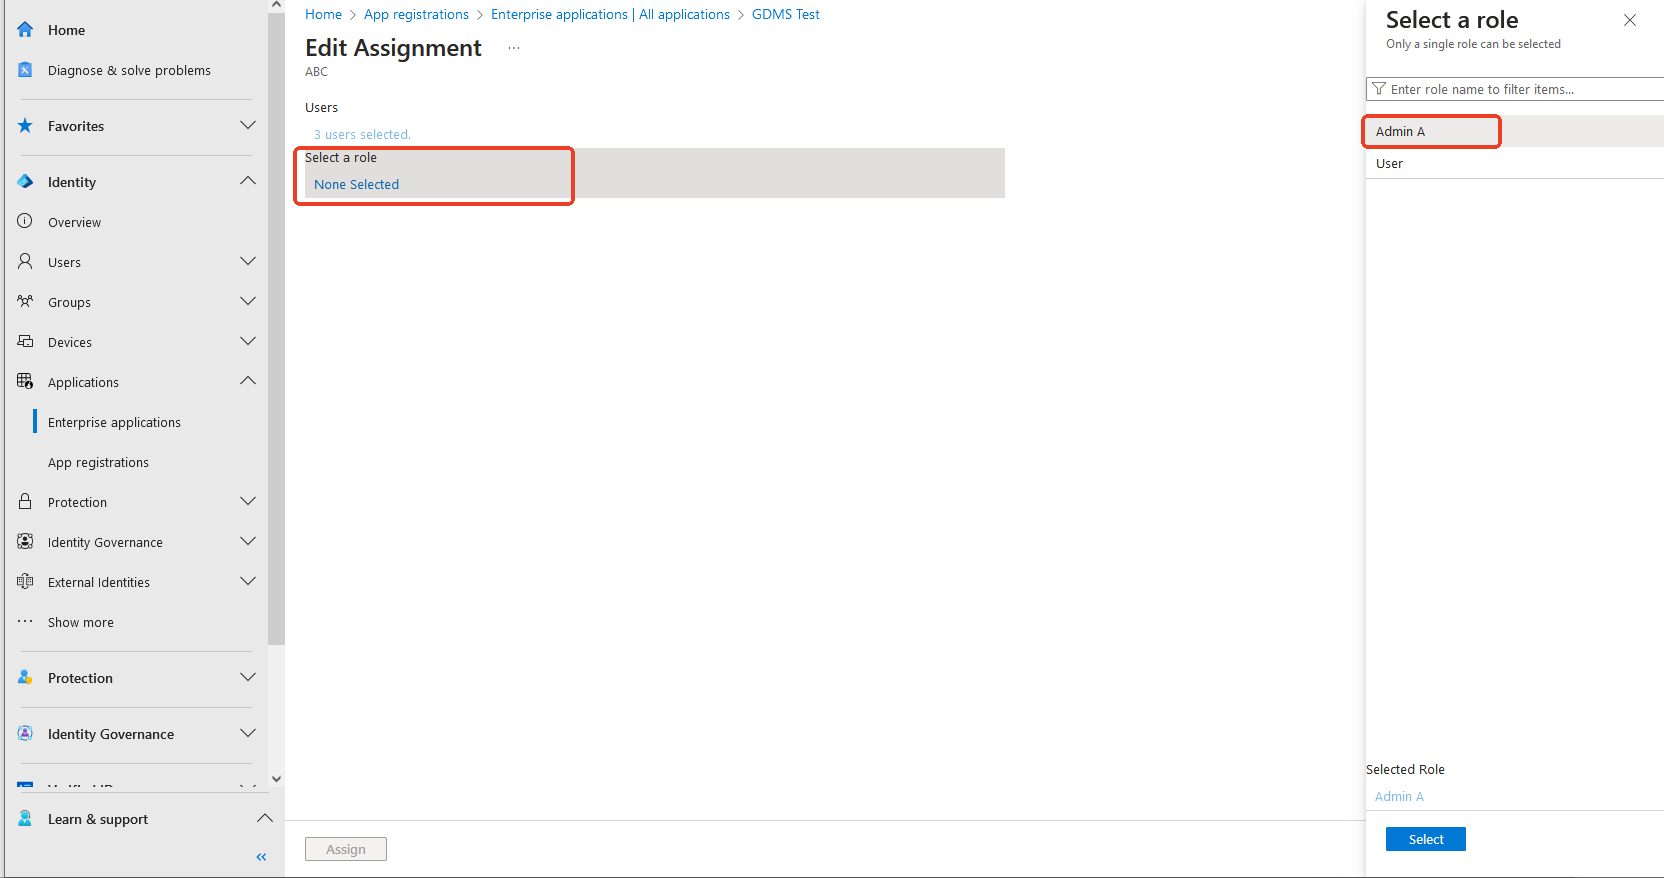
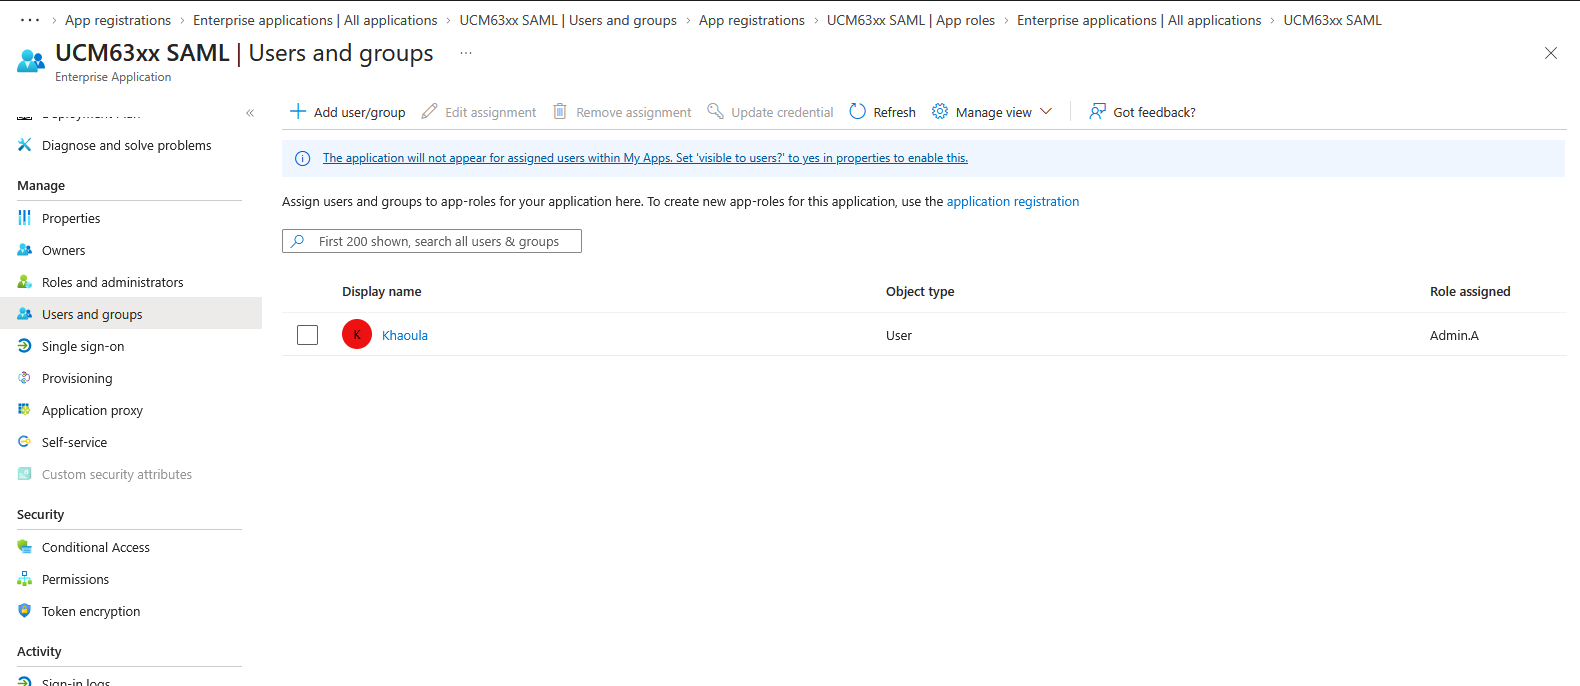
- Then click Assign. After the assignment is successful, you can see the selected users and the assigned roles in the list. (These users can then log in to UCM63xx with a single sign-on)
Step 4: Set up SSO in Azure
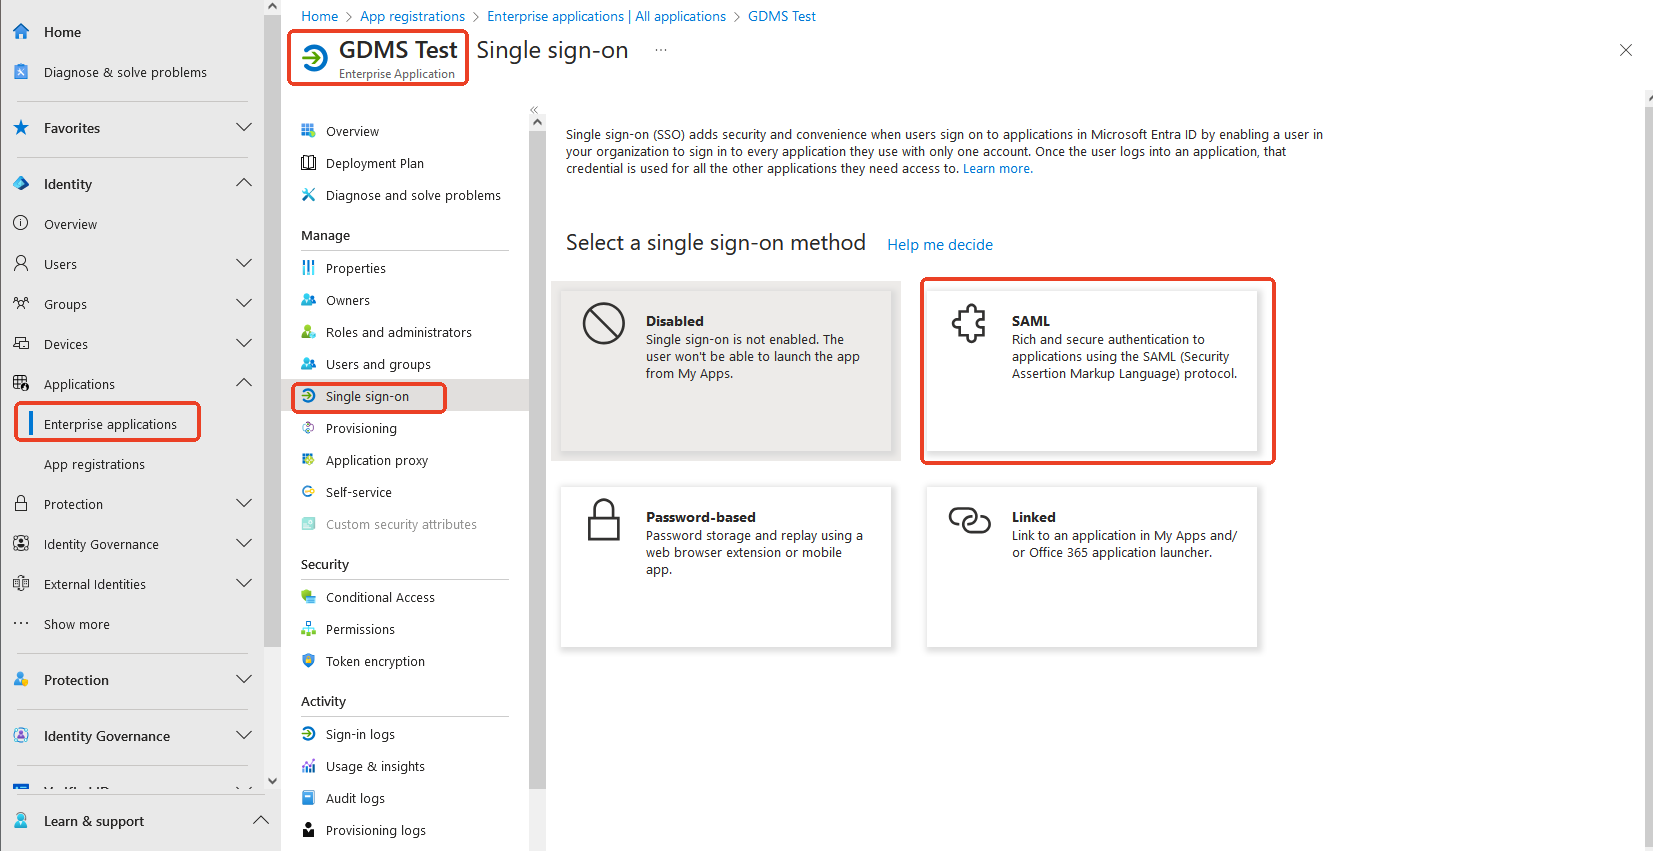
- Sign in to the Microsoft Entra admin center, go to Identity → Applications → Enterprise applications, find and click the app you have previously created.
- Click Single Sign-on on the left and click SAML on the page.
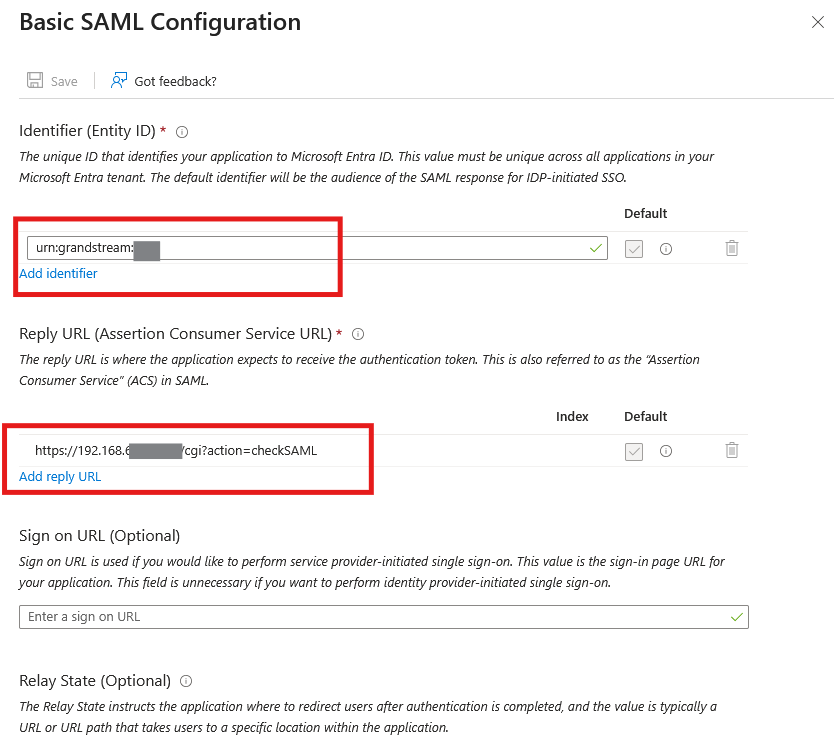
- First, within the Basic SAML Configuration section, click Edit.
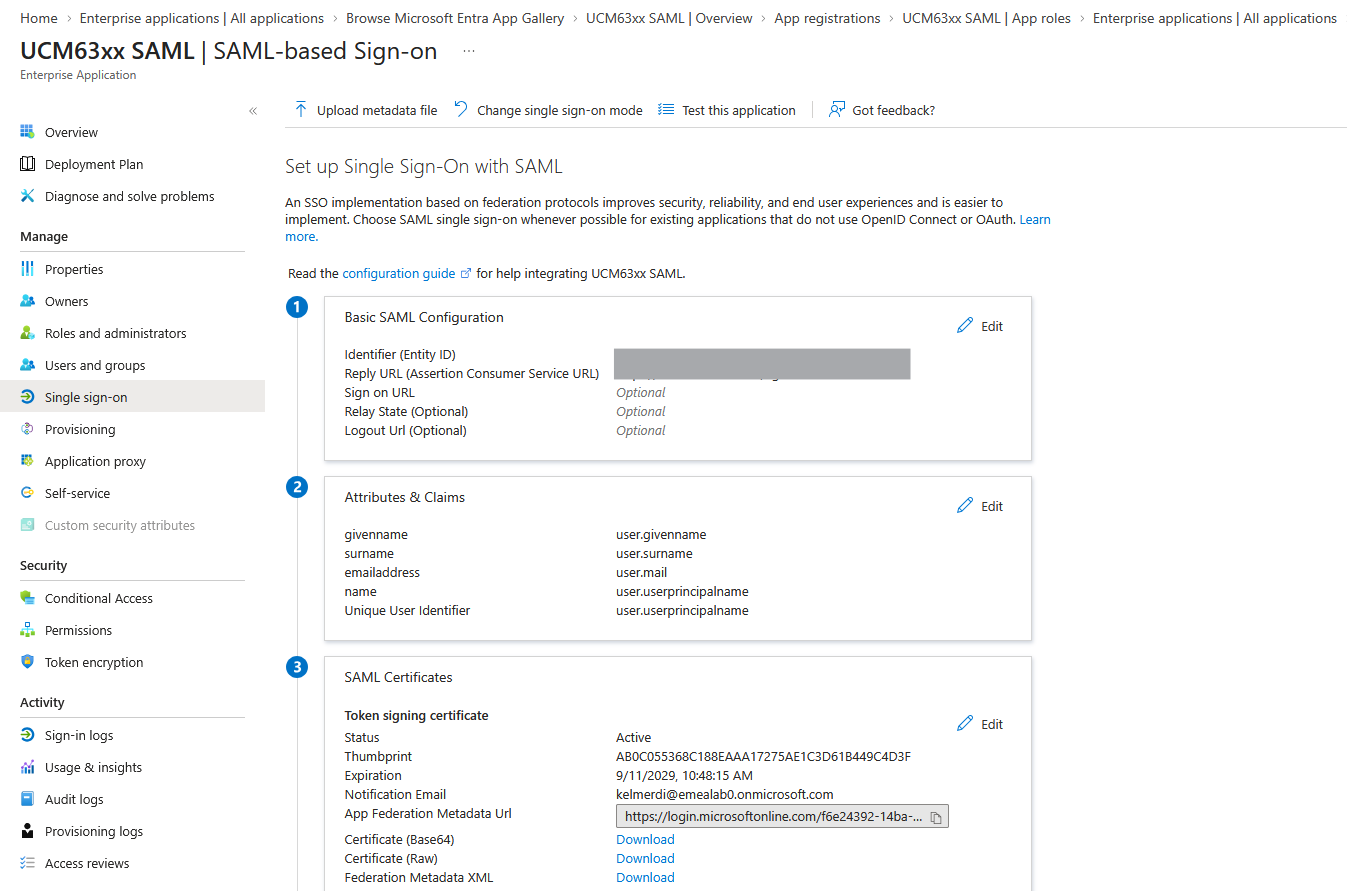
- Copy the information from the UCM63xx platform and fill in the following information:
Identifier (Entity ID) | Fill in the Entity ID displayed on the SAML SSO page in Users (as shown in the picture, click one-click copy) |
Reply URL | Fill in the ACS URL displayed on the SAML SSO page in Users (as shown in the figure, click one-click copy) |
Relay State | Specify the Service Provider URL that users should be redirected to after successful authentication. Note: Although this field appears optional, it is required for this integration. You must configure it to prevent user errors. |
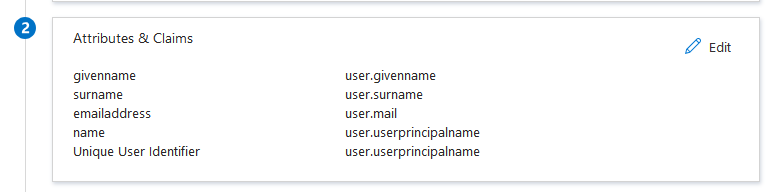
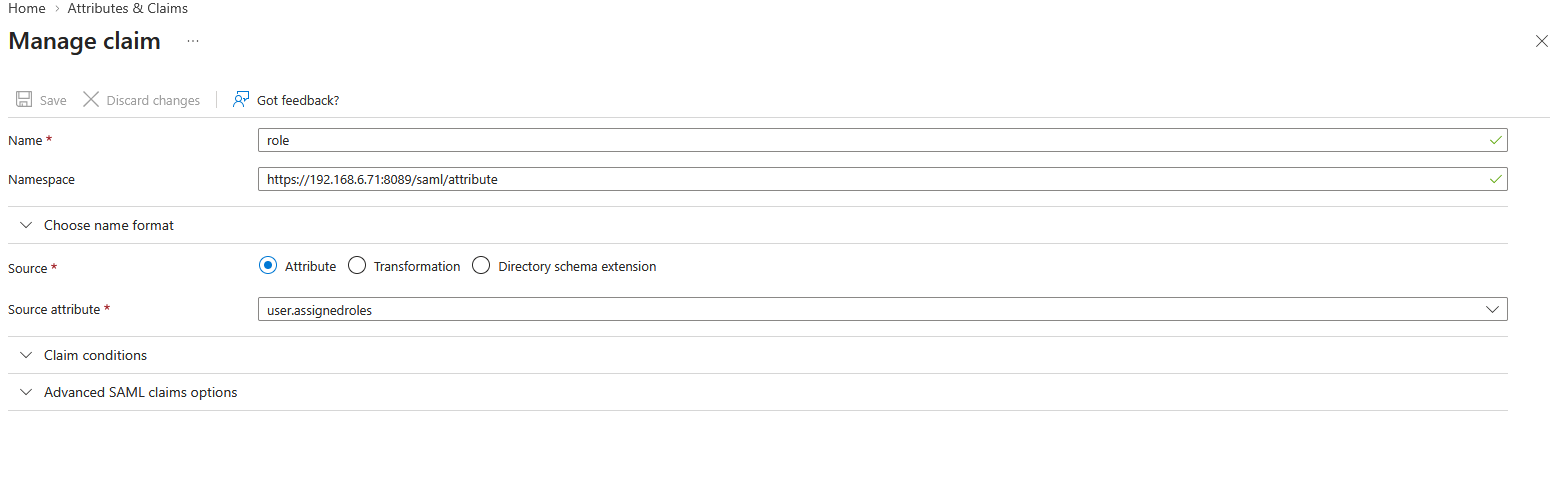
- Then, within the Attributes & Claims section, click Edit.
- Click Add new Claim.
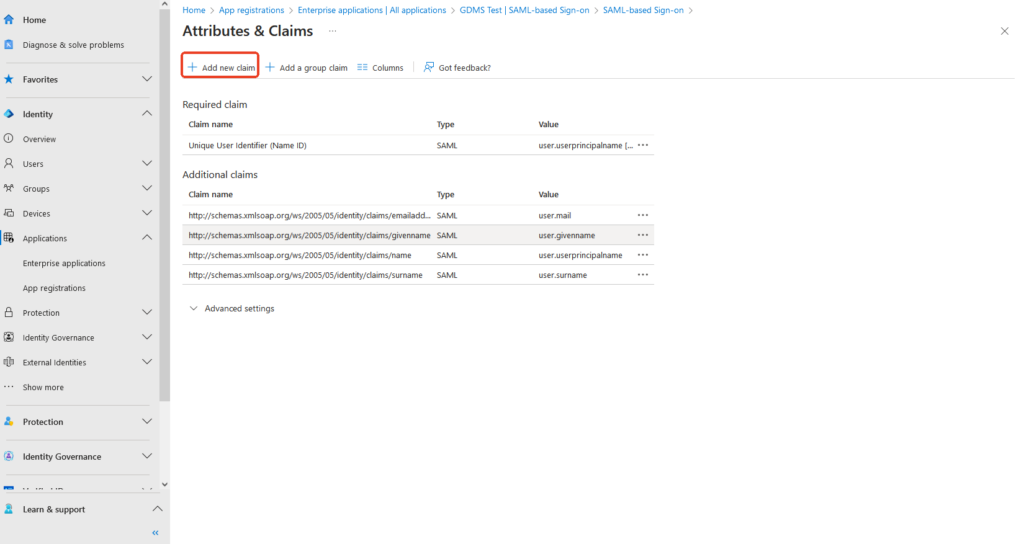
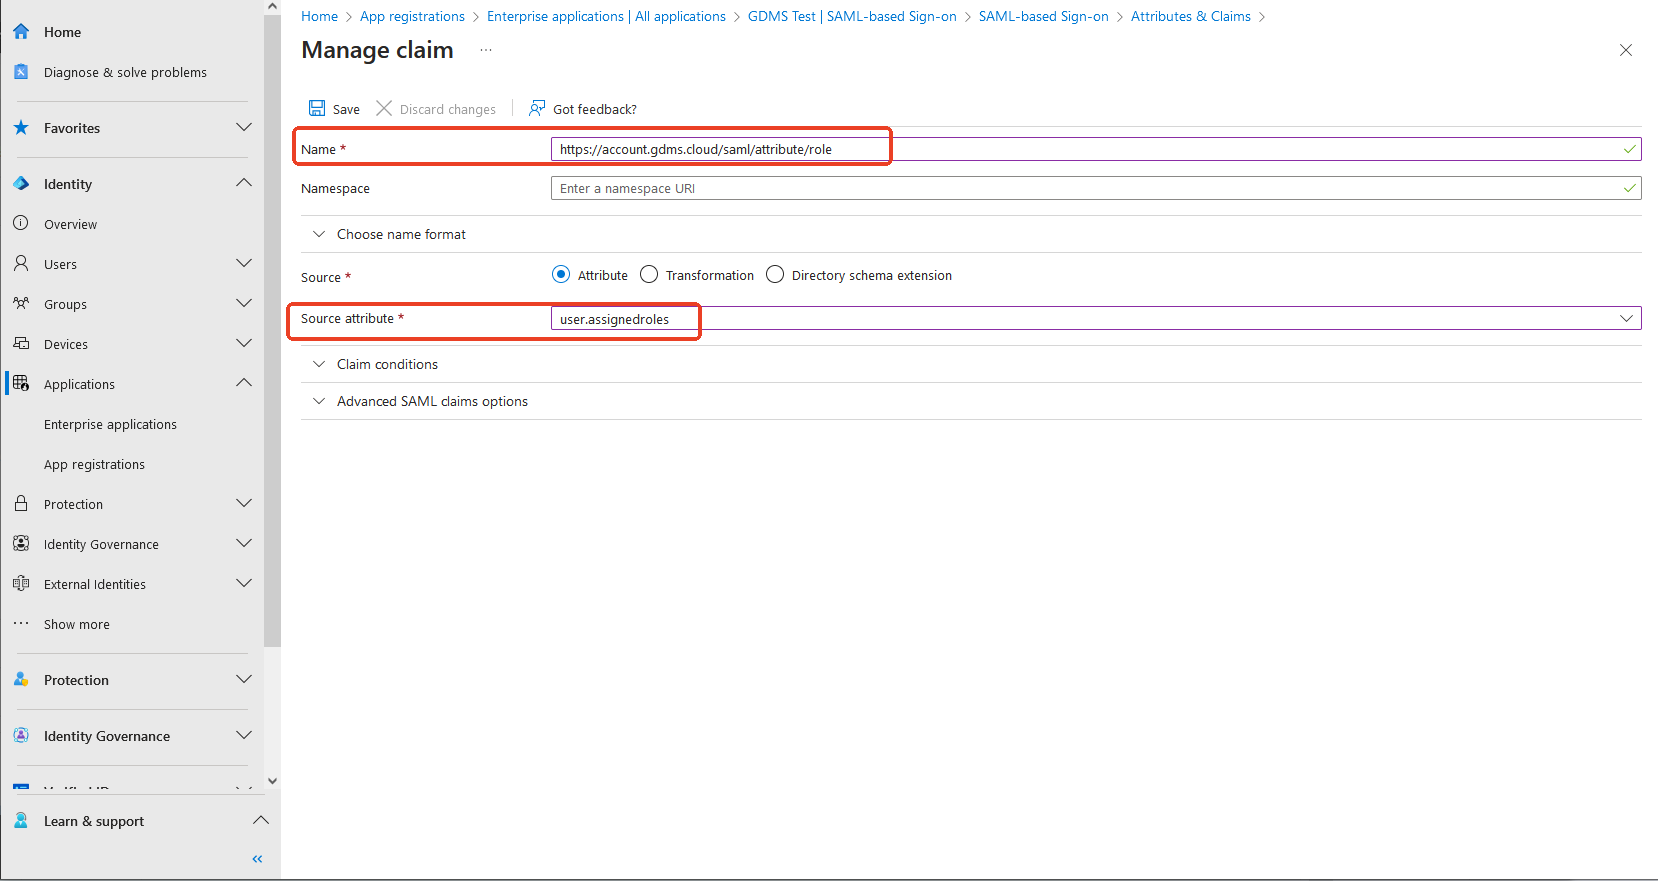
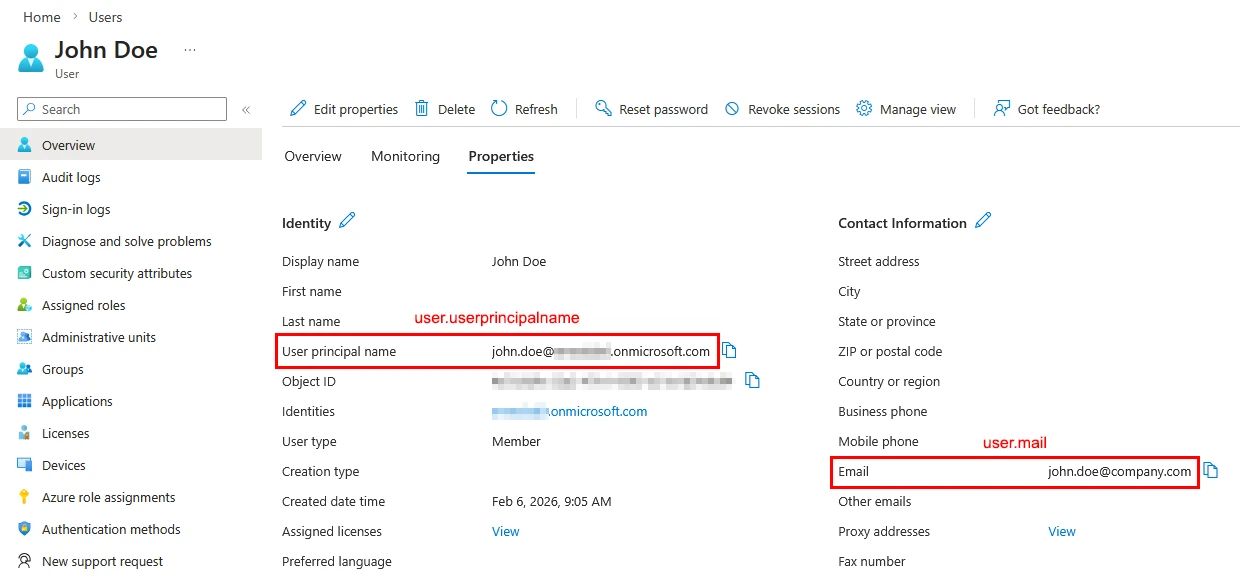
- Add the following SAML claims in Microsoft Entra ID. The claim names (URIs) must match the requirements of the target platform.
Claim | Name | Source attribute | |
UCM63xx | Claim 1 (Role) |
| user.assignedroles |
Claim 2 (Email) |
| Primary: user.userprincipalname | |
Claim 2 (Secondary Email) |
| Fallback: user.mail |
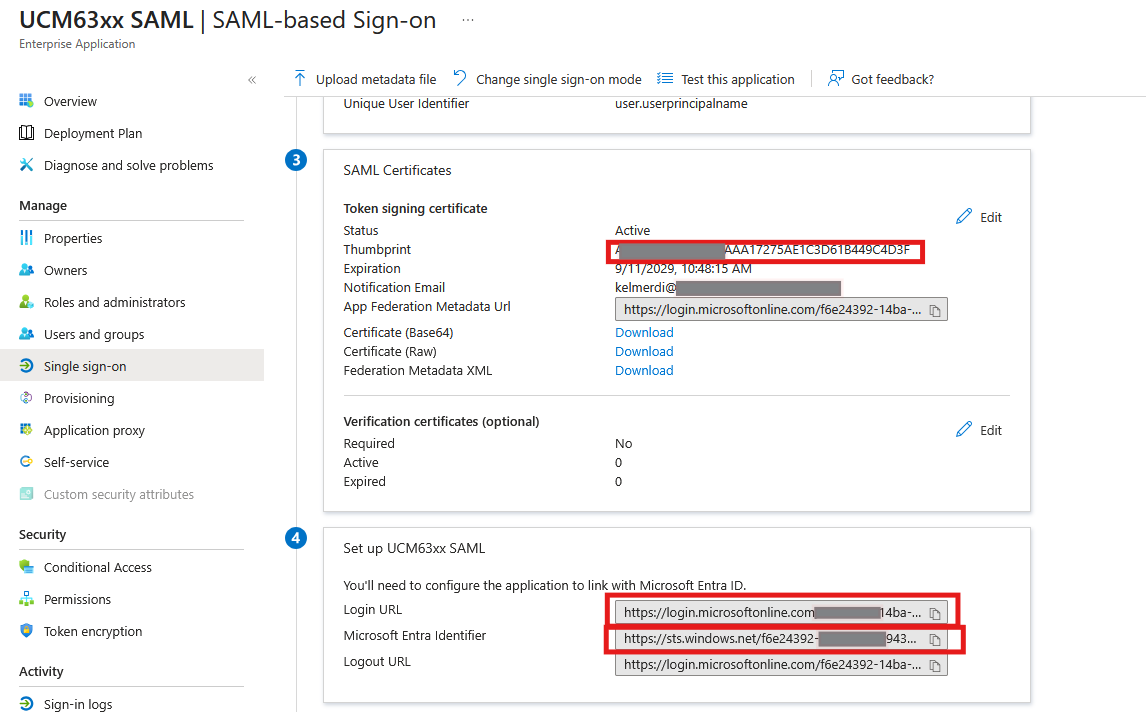
- Copy the highlighted information below required to complete the UCM63xx SAML configuration and authentication.
Step 5: SAML SSO in Configuration on UCM63xx
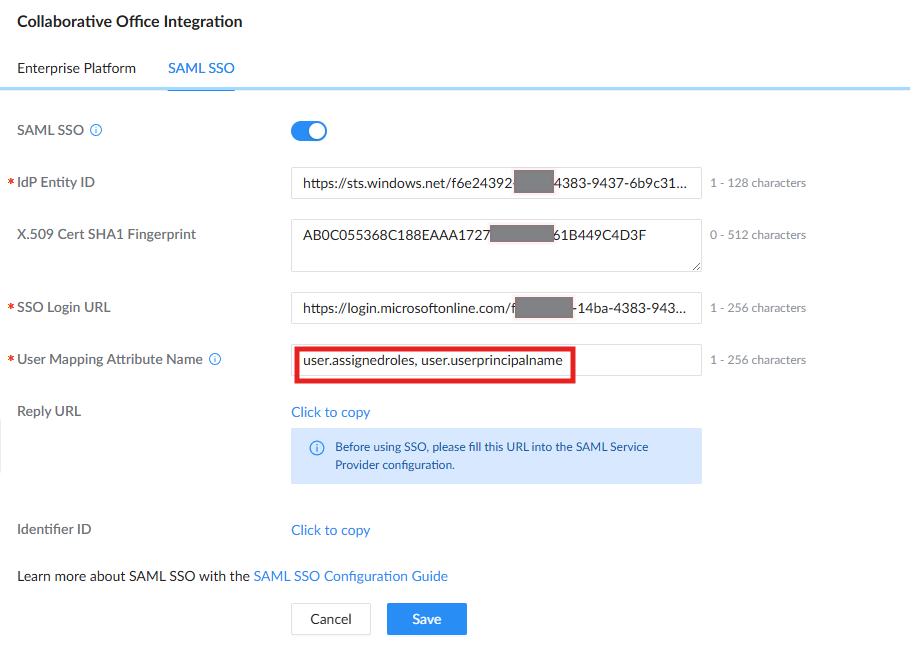
- Paste the copied information into the SAML SSO configuration page on the UCM63xx. Navigate to: Integrations → Collaborative Office Integration → SAML SSO.
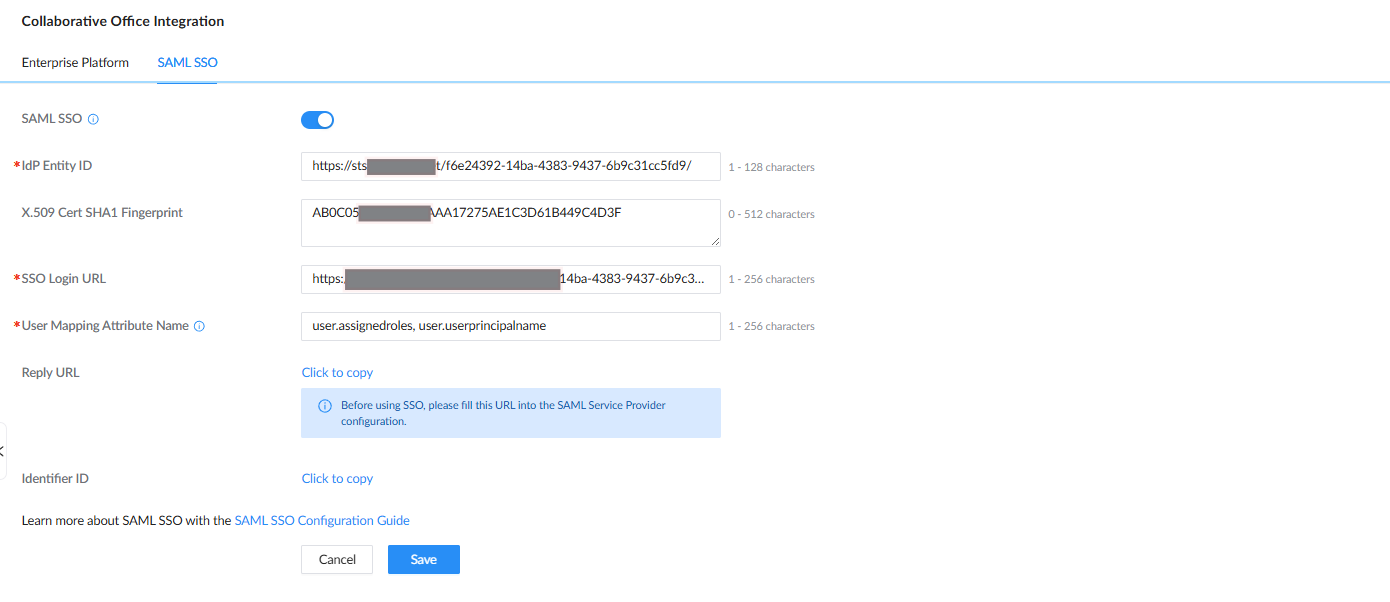
- In the User Mapping Attribute Name field, enter the Source Attribute defined in the Manage claim section of the Microsoft Entra admin center. This attribute is used to retrieve the corresponding user value from Entra ID and map it to the UCM6300 user.
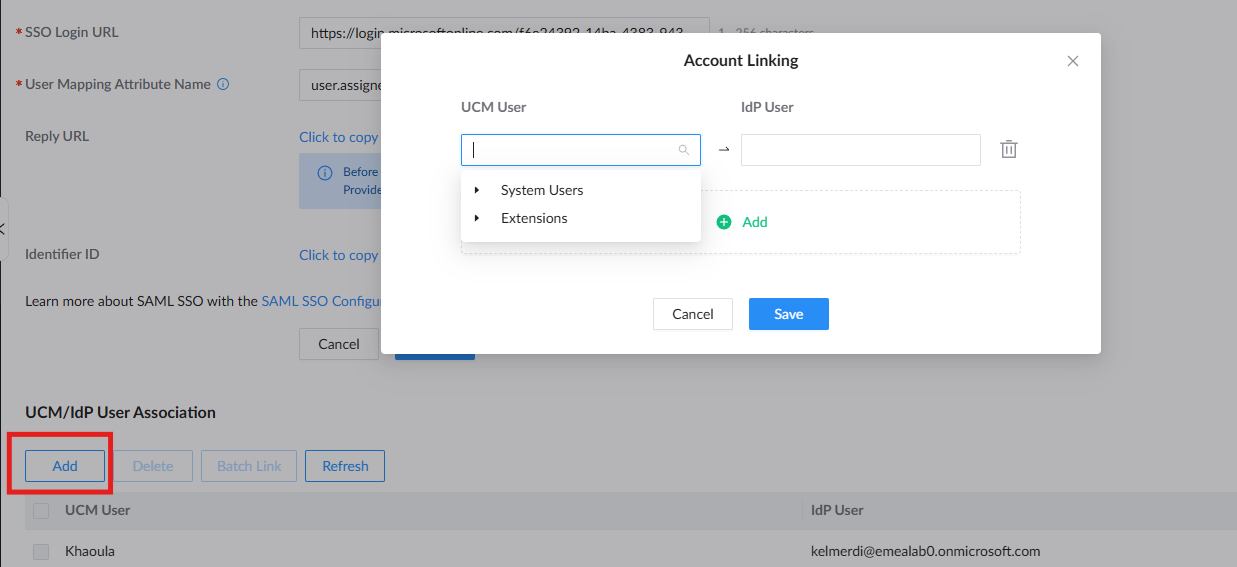
- After establishing the SAML connection, create a UCM User/IdP User mapping to associate the users configured on the UCM6300 with their corresponding users in Microsoft Entra ID. UCM users can be selected either from the Extension List or from the registered users under User Management.
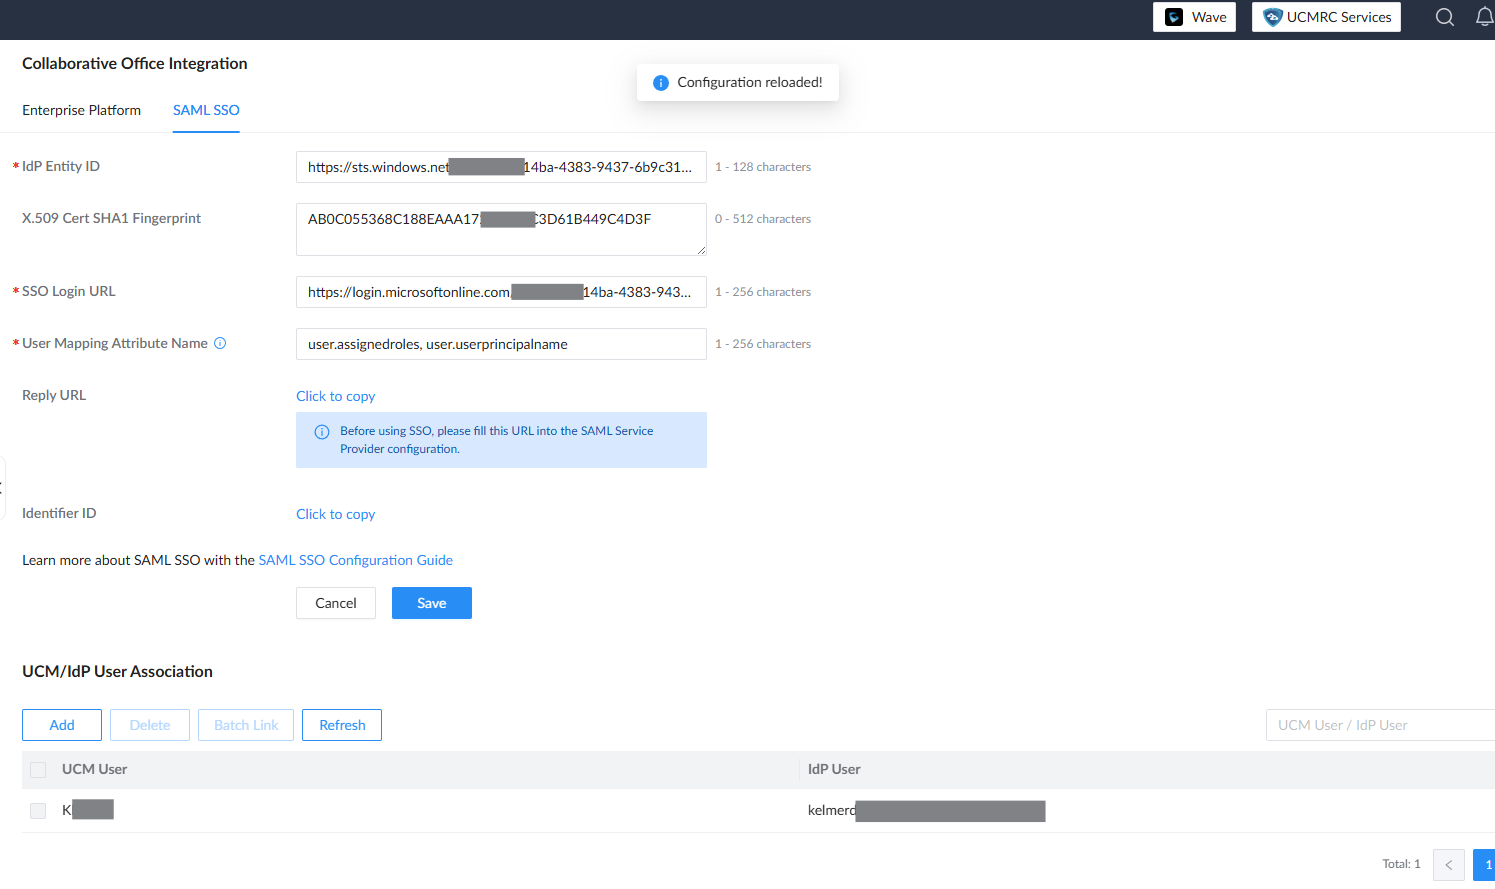
- After adding the UCM User/IdP User mapping, save the configured users and click Apply Changes to save the SAML SSO configuration. The configuration is now complete.
5. To test the setup, return to the UCM login page and click the highlighted Log in with SAML icon to initiate SSO authentication.
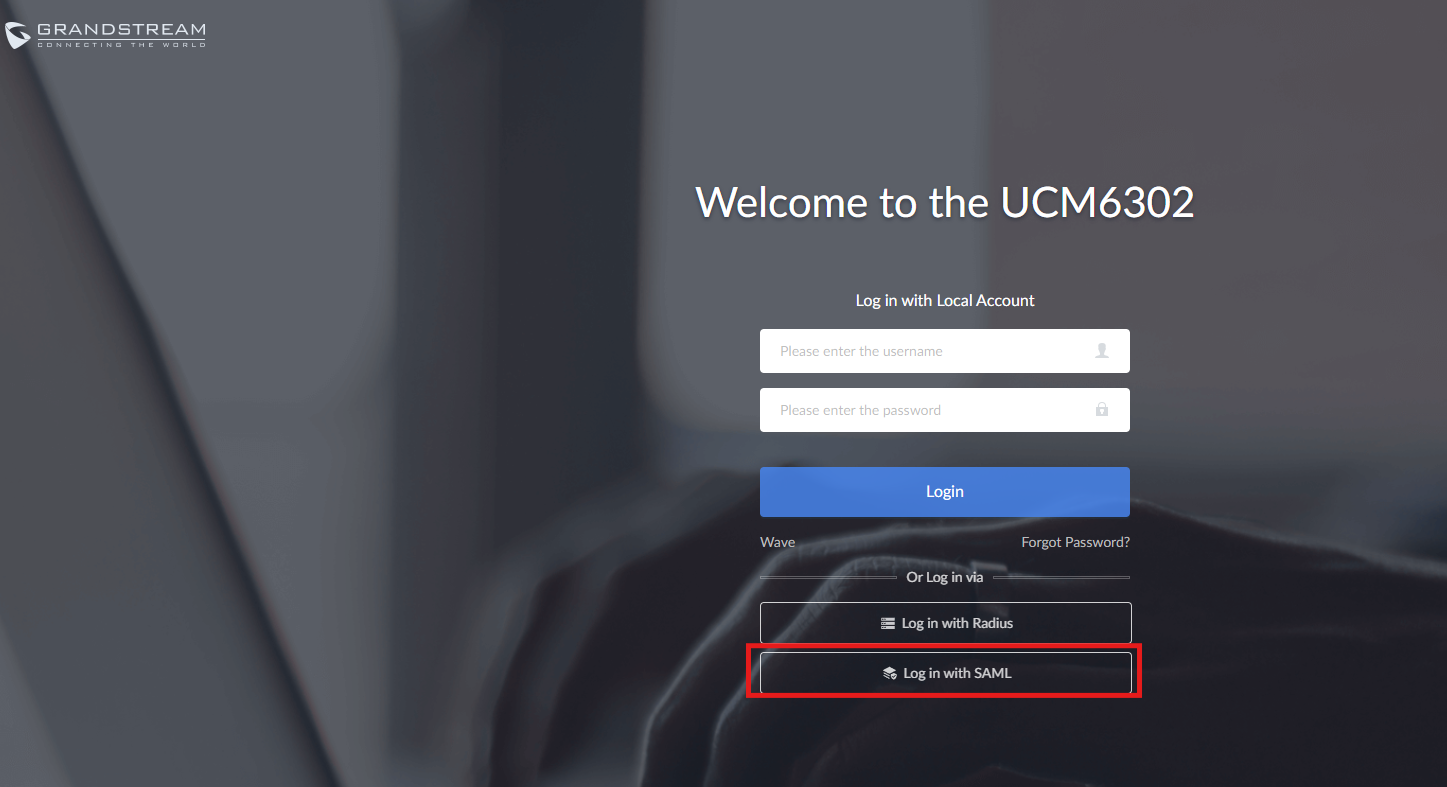
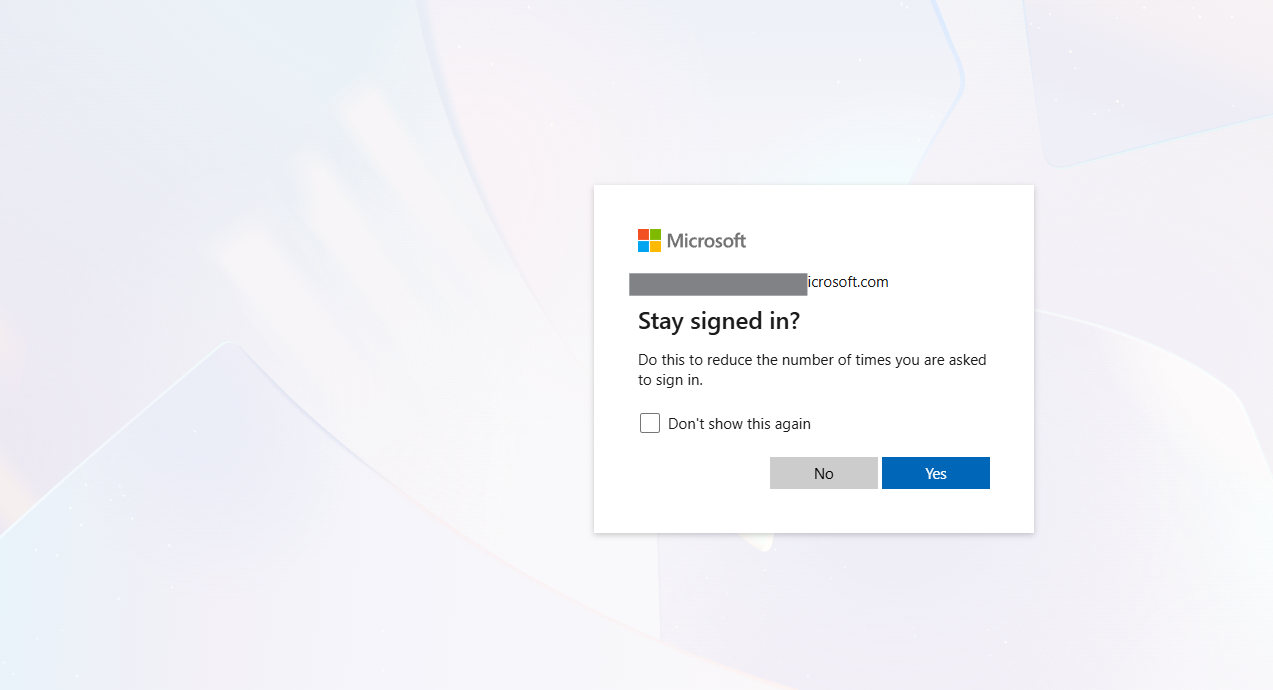
6. You will then be redirected to the Microsoft login page. Enter the email address and password of the Microsoft Entra ID user associated with the UCM/IdP mapping. After successful authentication, you will be automatically logged in to the UCM6300.

SAML SSO LOGS
Administrators can review SAML SSO authentication activity from both the UCM6300 local WebUI and Microsoft Entra ID logs.
- UCM6300: Review the system logs from the local WebUI to troubleshoot SAML SSO authentication activity.
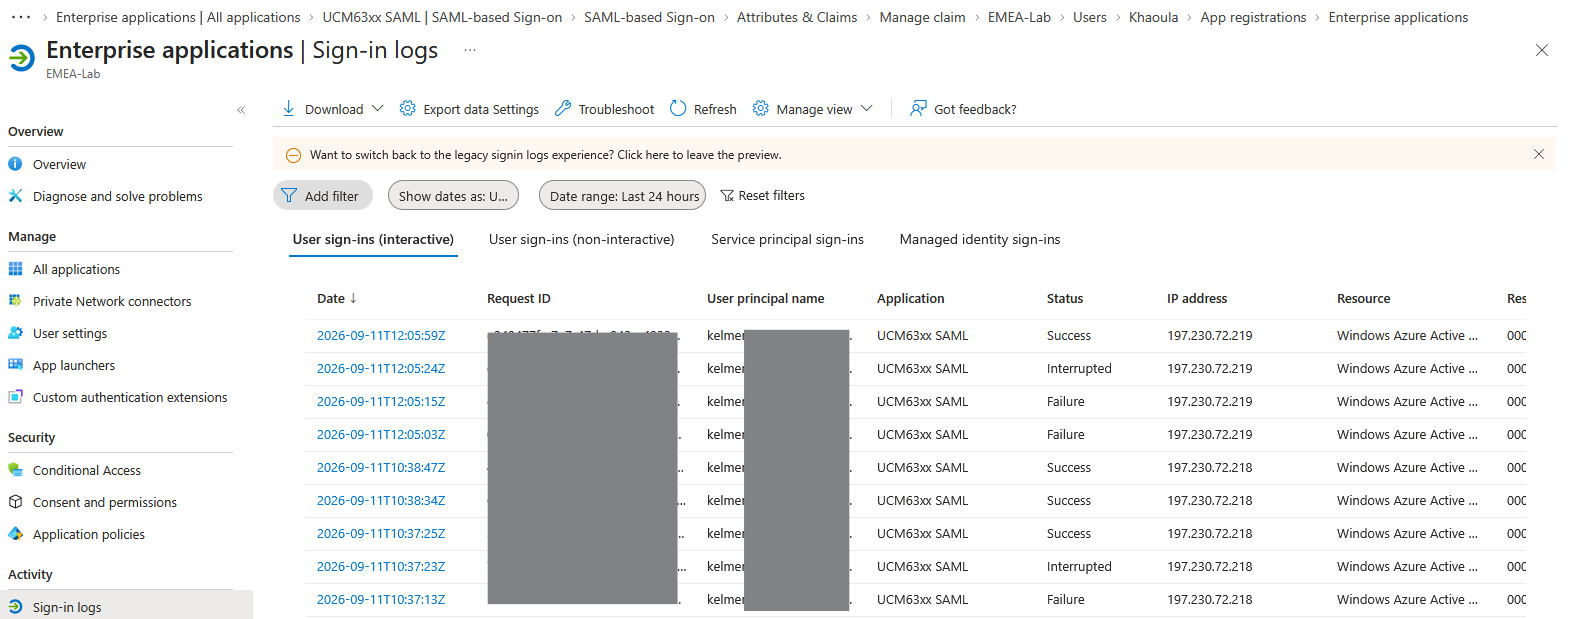
- Microsoft Entra ID: Review the sign-in logs for authentication attempts and related SAML activity.
Reviewing logs on both the Service Provider (UCM6300) and Identity Provider (Microsoft Entra ID) sides can help identify configuration or authentication issues.
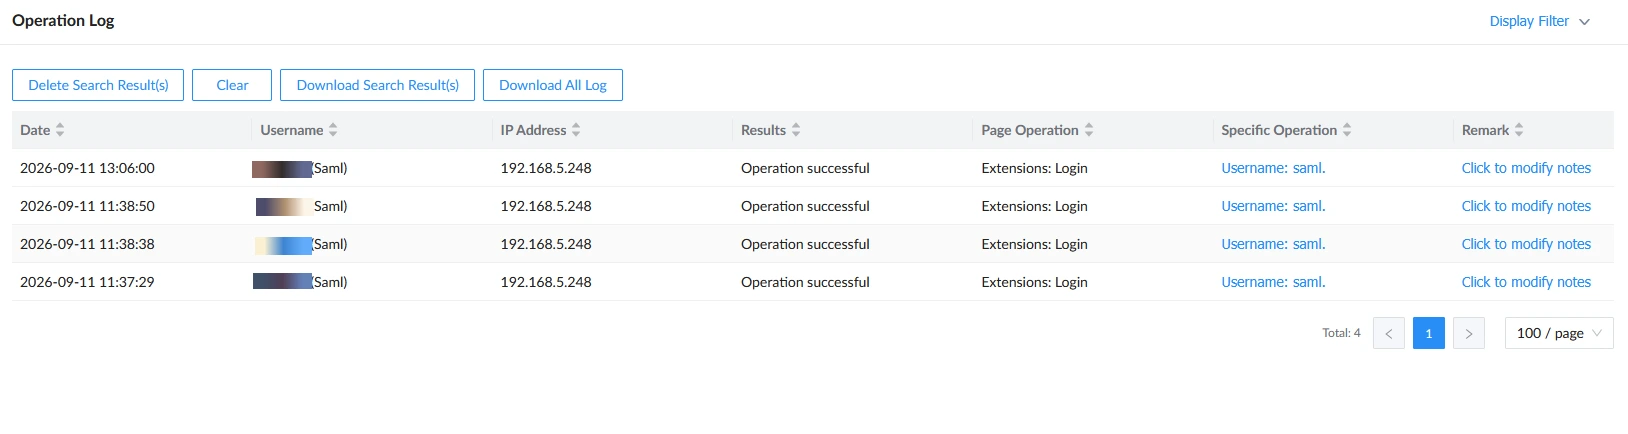
UCM6300 records SAML SSO login and logout events in the System Log.
- Log in to the UCM6300 WebUI as a Super Administrator.
- Access the logs using the following path:
- Navigate to Maintenance → Operation Log.
- SAML-based login attempts are recorded in the operation log and can be reviewed for authentication activity and troubleshooting.
You can also review SAML SSO login attempts in the Microsoft Entra ID sign-in logs, including successful and failed authentication events.
SUPPORTED DEVICES
Models | Firmware Required |
UCM630x Series | 1.0.35.8+ |
UCM630xA Series | 1.0.35.8+ |