INTRODUCTION
While UCM’s primary role is managing voice and video communications, its configuration as an email client adds a valuable layer of functionality. It improves the user experience by delivering email notifications and updates on important events, such as password resets, missed calls, or emergency alerts. This feature helps users stay informed in real-time, ensuring they don’t miss any crucial communications.
The emails sent to users are based on specific templates that incorporate variables recognized by the UCM, enabling personalized and relevant communication. This guide provides an overview of these email templates, detailing their purpose and the variables they contain. This explanation helps users better understand how the UCM customizes messages to address their specific needs.
EMAIL TEMPLATES CONFIGURATION
In order to personalize and configure the emails sent by the UCM, users need to access the web UI and go to System Settings → Email Settings → Email Template
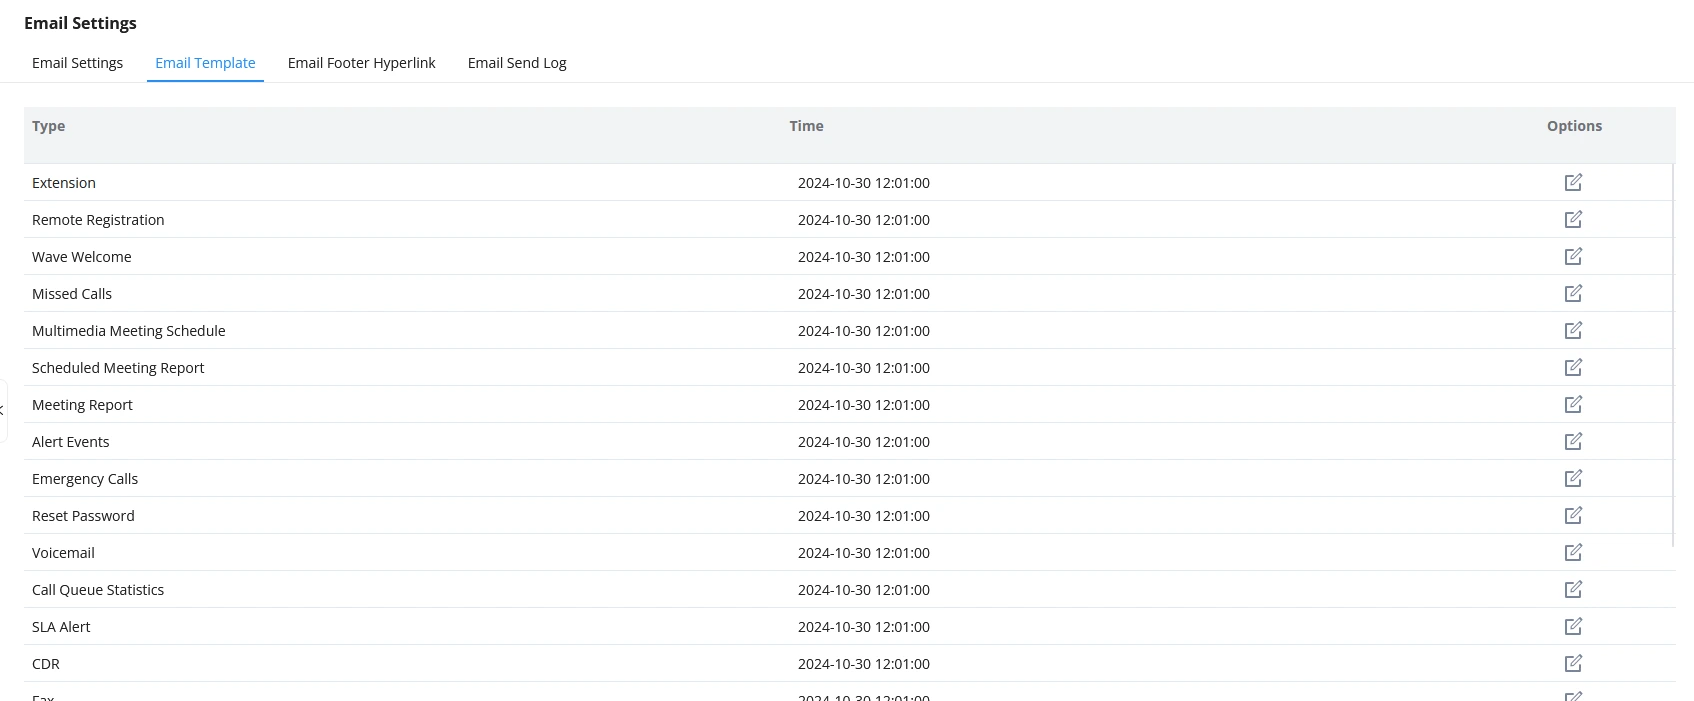
Under options, click this icon  to edit a specific template. In this example, we will be editing the “Missed Calls” template.
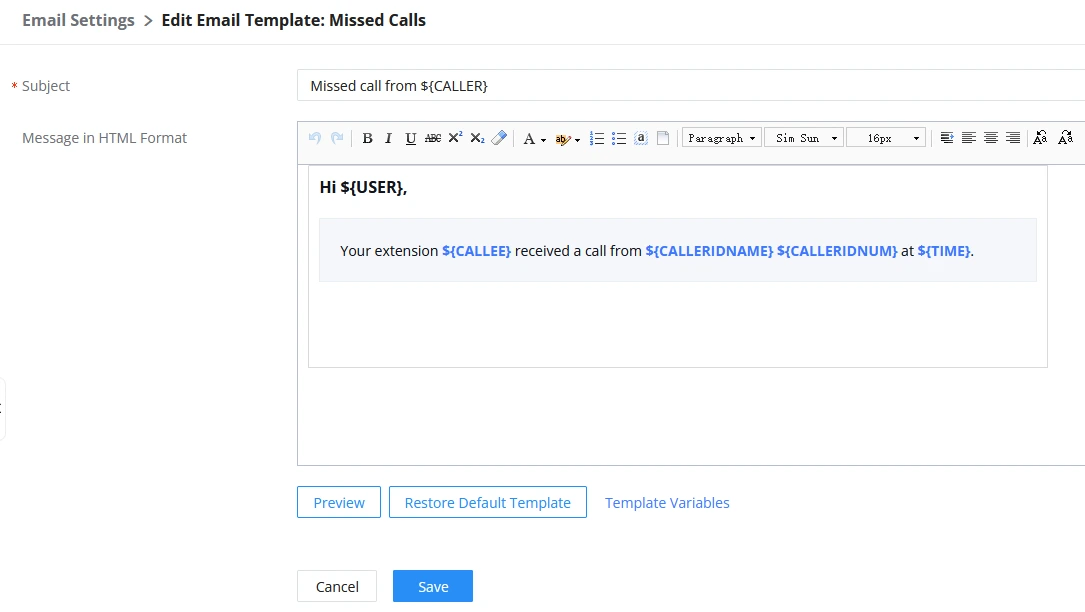
To check how the email will appear once received, click on 
In order to restore the default email template, click on 
EMAIL TEMPLATES DESCRIPTION
To receive emails from the UCM, it must be set as an SMTP client first. In order to do this, please refer to the following guide: UCM630X Series – Email Settings Guide
Once the UCM has been configured correctly, users can receive notification emails for different scenarios which will be explained individually in this section of the guide.
Extension
This template is used to send users an email with general SIP extension information along with Wave settings. The email also includes a QR code that can be scanned using the Wave app for quick log in.
The following tables describe the extension email template settings:
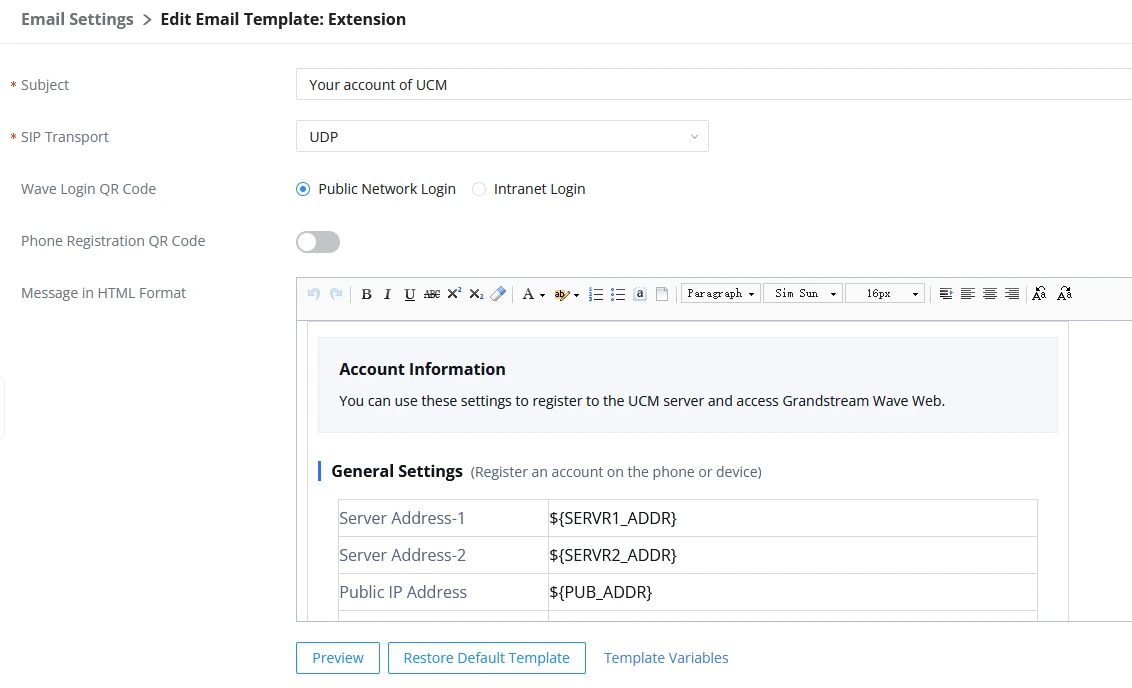
Subject | The subject of the email. |
SIP Transport | Choose the SIP transport mode of the extension. This will determine the port registration information that will be sent in the extension email. The default setting is UDP. Note: When selecting TCP or TLS, make sure that they are enabled on the PBX Setting→SIP Settings→TCP/TLS page. Otherwise the UDP port will be sent. |
Wave Login QR Code | Configures the type of IP address that the login QR code will contain in the Extension email. The options are:
|
Interface | Choose the network interface used for registration when “Intranet Login” is selected. If the UCM network method is changed, the QR code for the Extension email will also need to be updated. |
Phone Registration QR Code | If enabled, the phone registration QR code will appear in the extension email. When this QR code is scanned, it will attempt to register to the selected addresses in order of priority, starting with the highest. For remote use and/or on a public network, please choose the UCM public address or the UCMRC domain. Note: Addresses are displayed in the order they were checkmarked with the first checked item having the highest priority for registration. |
Message in HTML Format | Shows the email message body in HTML format. |
The variables included in the email are:
${SERVR1_ADDR} | The 1st IP address of the UCM. |
${SERVR2_ADDR} | The 2nd IP address of the UCM. |
${PUB_ADDR} | The public IP address of the UCM. |
${RC_ADDR} | RemoteConnect Server Address. |
${AUTH_ID} | The SIP service subscriber’s ID used for authentication. |
${AUTH_PWD} | The SIP service subscriber’s password used for authentication. |
${USR_PWD} | The password for the user to log in to the system. |
${SERVR1_QR_IMG} | The location used to show the 1st server address QR code picture. |
${SERVR2_QR_IMG} | The location used to show the 2nd server address QR code picture. |
${SERVR_PUB_ADDR_QR} | The location used to show the server public address QR code picture. |
${LDAP_PATH} | The base DN of the LDAP server. |
${LDAP_SERVR1_ADDR_QR} | The location used to show the 1st LDAP server address QR code picture. |
${LDAP_SERVR2_ADDR_QR} | The location used to show the 2nd LDAP server address QR code picture. |
${LDAP_SERVR_PUB_ADDR_QR} | The location used to show the LDAP server public address QR code picture. |
${FULL_NAME} | Username. |
${EXTEN_TYPE} | Extension Type. |
${USER_ID} | The extension number. |
${SERVER1_GSWAVE_URL} | The 1st login address for Wave. |
${SERVER2_GSWAVE_URL} | The 2nd login address for Wave. |
${PUB_GSWAVE_URL} | The public login address for Wave. |
${TRAN_MOD} | SIP transport mode. |
${TLS_NOTE} | Prompts to be displayed when the SIP transfer method is TLS. |
${STUN_ADDR} | STUN Server Address. |
${LOGIN_SIP_QR} | The server SIP registration QR code image. |
${LOGIN_GSWAVE_QR} | The location used to show the Wave public login address QR code picture. |
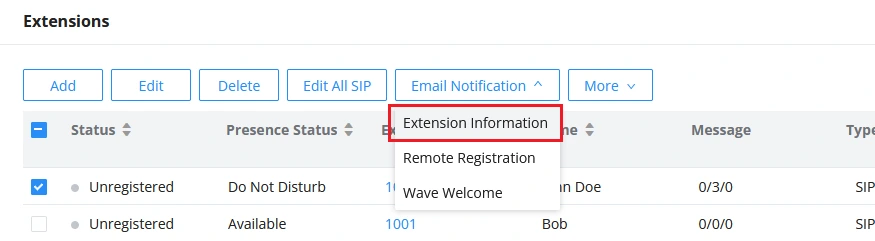
To send an extension email, please follow the steps below:
- Go to Extension/Trunk→Extensions and select the desired extension(s) by checking the box on the left.
- From the “Email Notification” list, click on Extension Information.
Remote Registration
This email contains RemoteConnect registration information with the following variables:
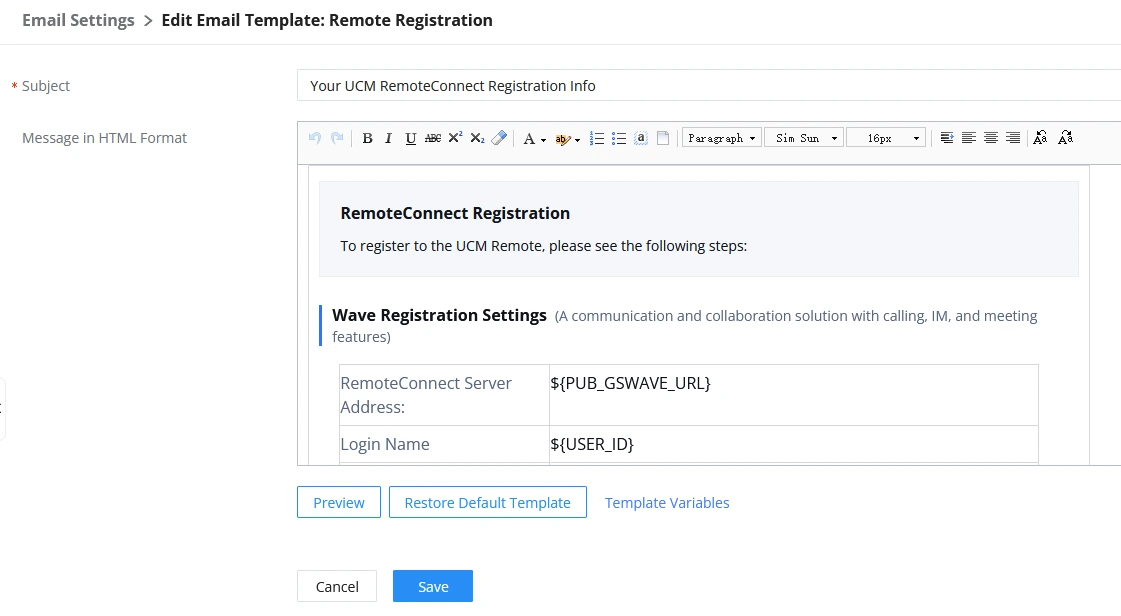
${PUB_GSWAVE_URL} | The public login address for Wave. |
${USER_ID} | The extension number. |
${USR_PWD} | The password for the user to log in to the system. |
${PUB_ADDR} | IP Endpoint RemoteConnect Address. |
${FULL_NAME} | Username. |
${AUTH_ID} | The SIP service subscriber’s ID used for authentication. |
${AUTH_PWD} | The SIP service subscriber’s password used for authentication. |
${STUN_ADDR} | STUN Server Address. |
${SERVR1_ADDR} | The 1st IP address of the UCM. |
${SERVR2_ADDR} | The 2nd IP address of the UCM. |
${EXTEN_TYPE} | Extension Type. |
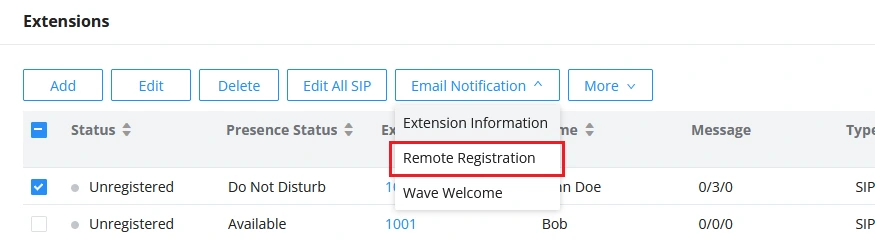
To send a remote registration email, please follow the steps below:
- Go to Extension/Trunk→Extensions and select the desired extension(s) by checking the box on the left.
- From the “Email Notification” list, click on Extension Information.
Wave Welcome
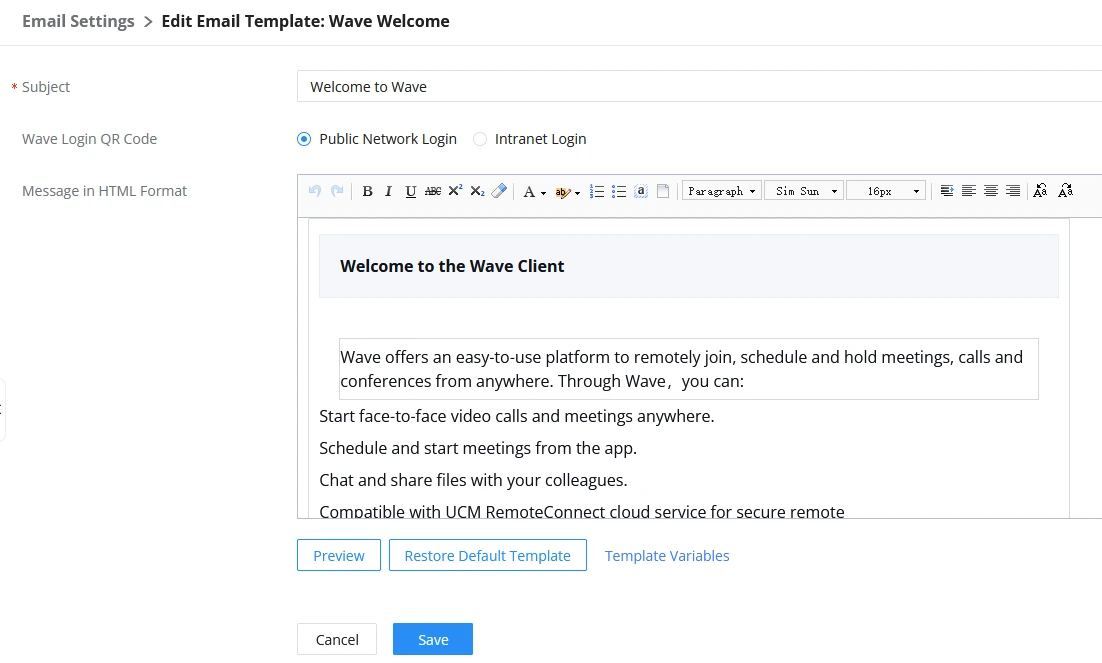
On this page, users can personalize an email that welcomes users to Wave Client and provides them with their Wave login information.
The email also includes a login QR code that contains either a public IP address or an address that belongs to the UCM’s local network. Based on the UCM’s network method, users will need to select a network interface in case of intranet login.
The Wave welcome email can contain these variables:
${SERVER1_GSWAVE_URL} | The 1st login address for Wave. |
${SERVER2_GSWAVE_URL} | The 2nd login address for Wave. |
${PUB_GSWAVE_URL} | The public login address for Wave. |
${USER_ID} | The extension number. |
${USR_PWD} | The password for the user to log in to the system. |
${LOGIN_GSWAVE_QR} | The location used to show the Wave public login address QR code picture. |
There are two methods to send the wave welcome email:
The first method is:
- Go to Extension/Trunk→Extensions and select the desired extension(s) by checking the box on the left.
- From the “Wave Welcome” list, click on Extension Information.
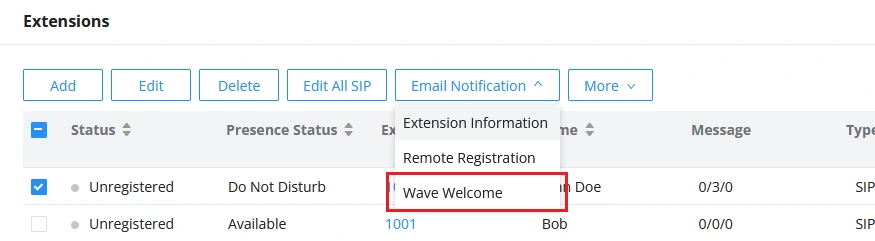
The second method:
- Go to Extension/Trunk→Extensions→ Edit, to edit the desired extension.
- Access the Wave Client tab and click on “Send to Extension” under Wave Welcome Email.
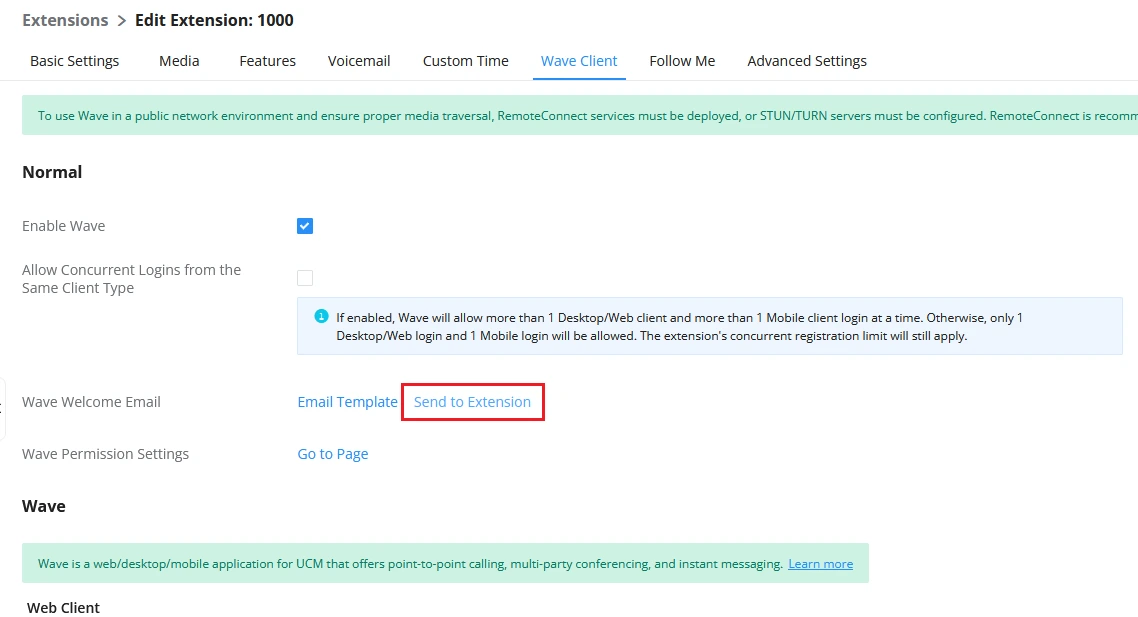
The welcome email appears in the following manner:
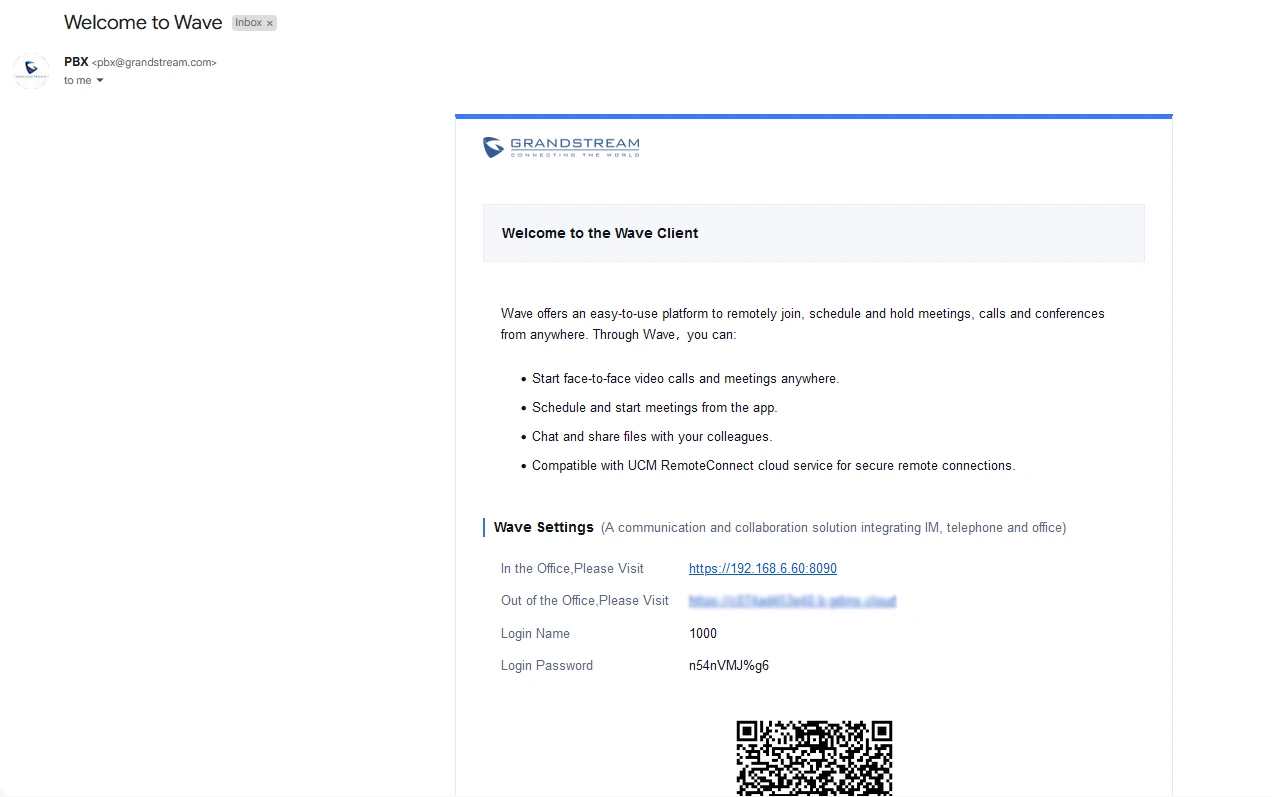
Missed Calls
Missed calls email allows users to be notified of any missed calls on their extension. The template includes these variables:
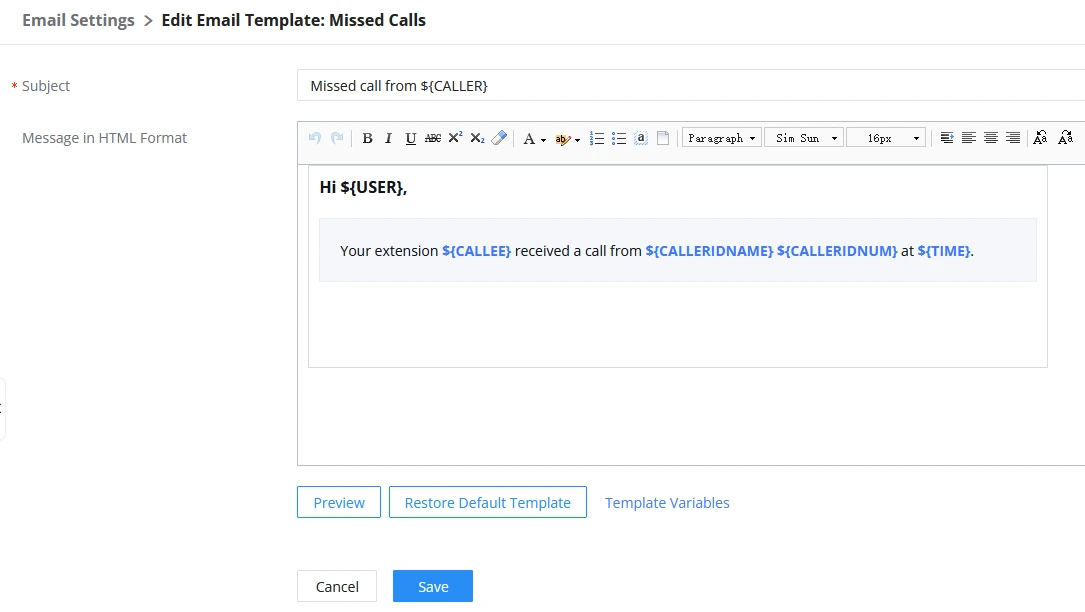
${CALLER} | Caller’s extension. |
${CALLEE} | Callee’s extension. |
${USER} | Username. |
${CALLERIDNUM} | Caller ID Number. |
${CALLERIDNAME} | Caller ID Name. |
${TIME} | Time of the call. |
Multimedia Meeting Schedule
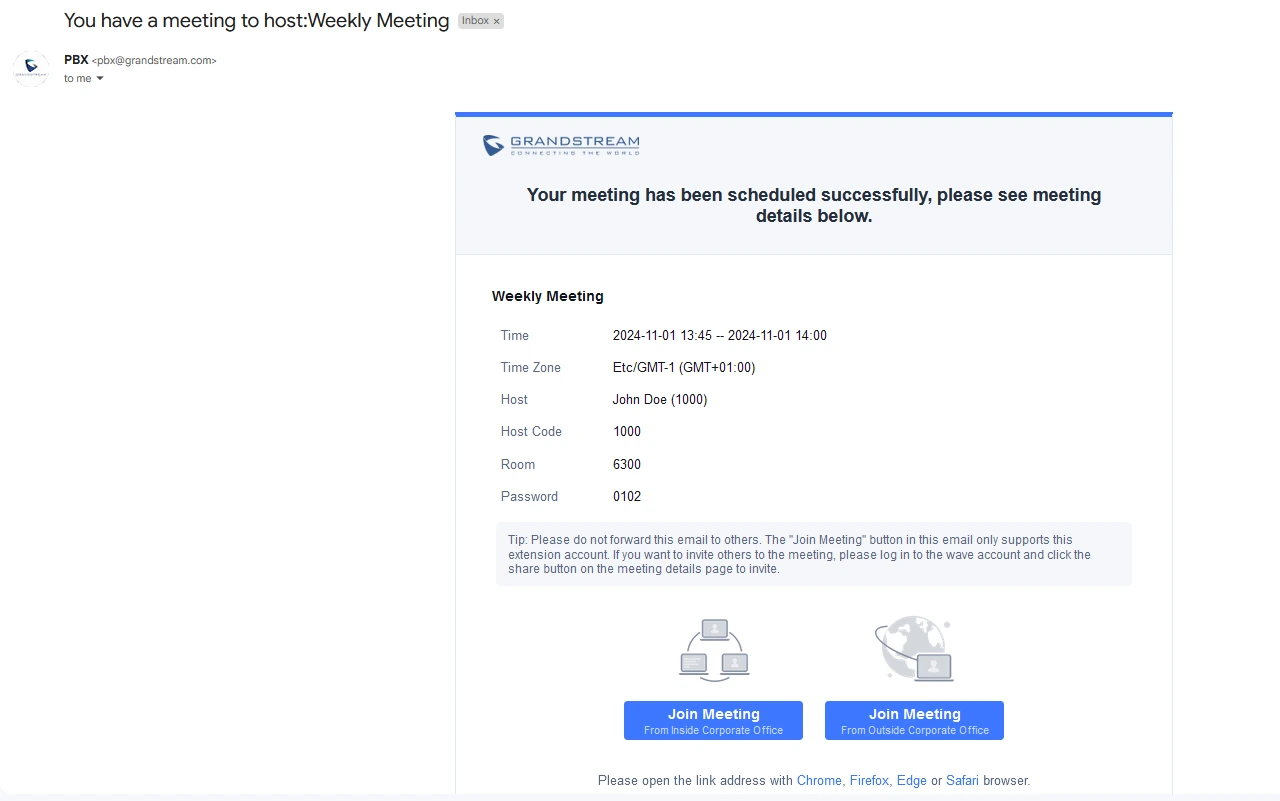
After scheduling a meeting, the host will receive a this email containing the meeting details as well a Wave QR code and links that can be used to join.
The links provided can either be used to join the meeting locally or remotely. Based on the scheduled meeting configuration and the UCM network settings, the email template can include the following variables:
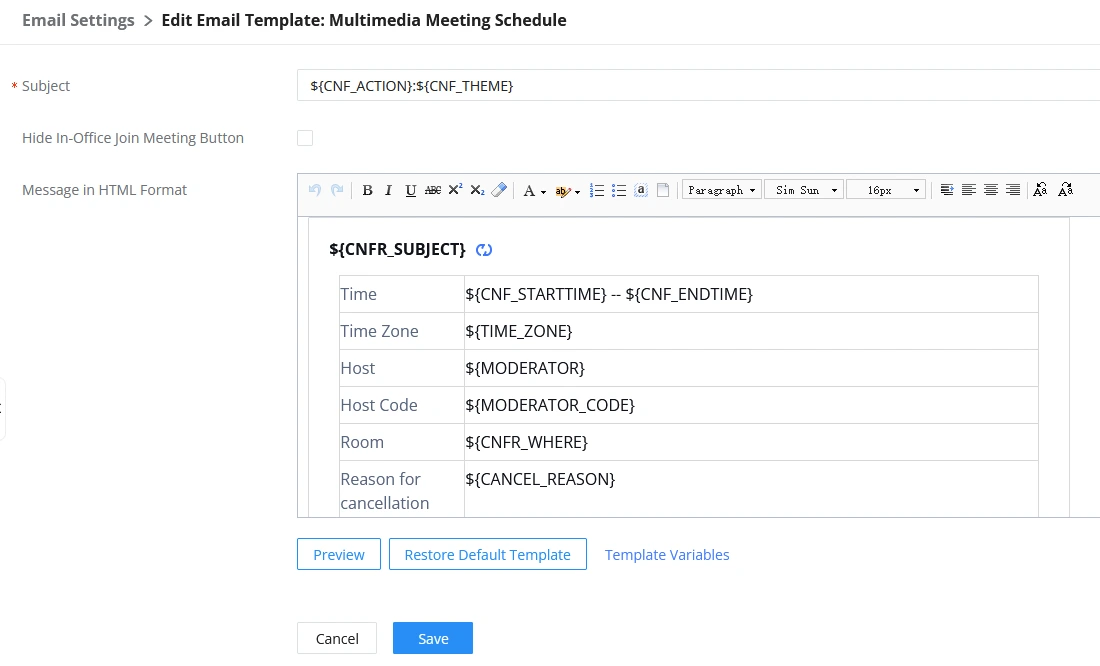
${CNF_ACTION} | The status of the scheduled meeting. |
${CNF_THEME} | The theme of the meeting. Used in the email subject field by default. |
${CNF_STARTTIME} | The start time of the meeting. |
${CNF_ENDTIME} | The end time of the meeting. |
${CNFR_MSG} | Detailed information of the scheduled meeting. |
${CNFR_SUBJECT} | The topic of the meeting. Used in the email body by default. |
${CNFR_DESCRIPTION} | The description of the meeting. |
${CNFR_PASSWORD} | The password of the meeting. |
${CNFR_WHERE} | The meeting room. |
${TIME_ZONE} | Time zone details. |
${REPEAT} | Repeat meeting cycle. |
${MODERATOR} | Meeting host. |
${MODERATOR_CODE} | Host password. |
${CANCEL_REASON} | Reason for cancelation. |
${PSTN} | Enterprise contact number. |
${LAN1_CNFR_LINK} | LAN1 meeting link. |
${LAN2_CNFR_LINK} | LAN2 meeting link. |
${LAN_CNFR_LINK} | Meeting Link (In Office). |
${WAN_CNFR_LINK} | Meeting Link (Remote Office). |
${JOIN_MEETING_WAN_QR} | QR code meeting link. |
Once a meeting is scheduled, the automatically received email will appear as follows:
Scheduled Meeting Report
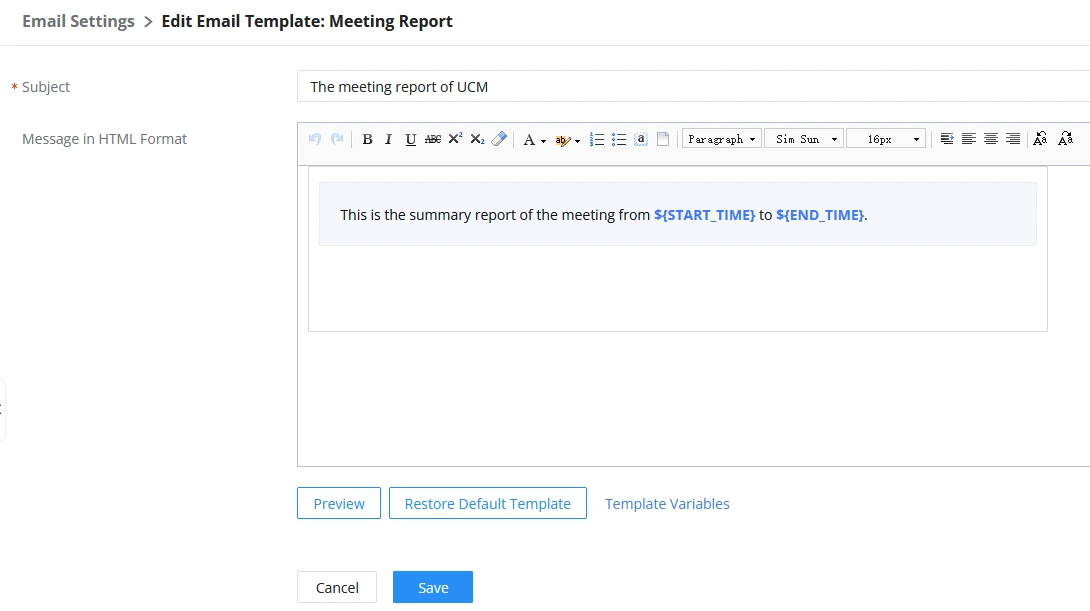
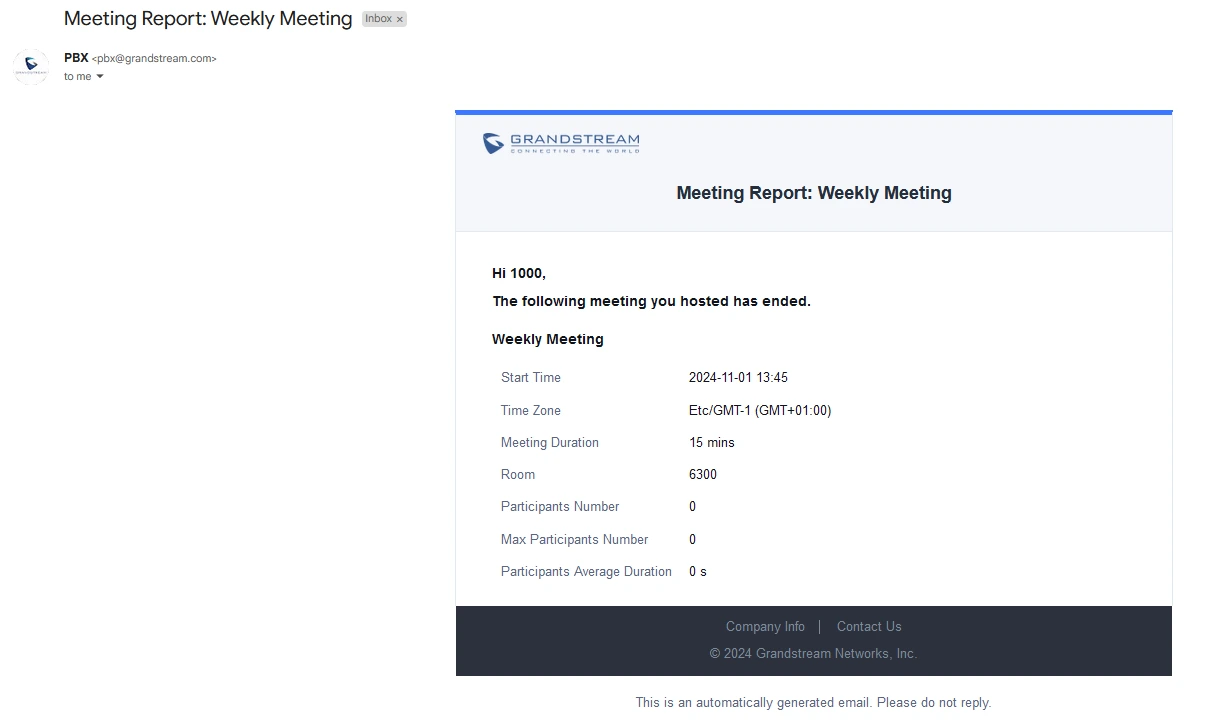
Once a scheduled meeting has concluded, this email will be automatically generated and sent out to the host as a report. It will summarize the meeting information such as the duration and the number of participants.
The variables of this email template are:
${CNFR_MSG} | The meeting report email introduction. |
${HELLO} | The invitees of the meeting. |
${CNFR_SUBJECT} | The topic of the meeting. Used in the email body by default. |
${CNF_STARTTIME} | The start time of the meeting. |
${CNF_ZONE} | Time Zone. |
${CNFR_DURATION} | The meeting duration. |
${CNFR_WHERE} | The meeting room. |
${CNF_TOTALUSER} | The number of participants. |
${CNF_MAXUSER} | Maximum number of participants. |
${CNF_AVERTIME} | Average participant meeting time |
After a scheduled meeting ends, the user will receive an email containing the report, including a PDF version, which is presented as follows:
Meeting Report
The meeting report email allows users to receive a statistics report to be informed about all UCM meetings on a scheduled period.
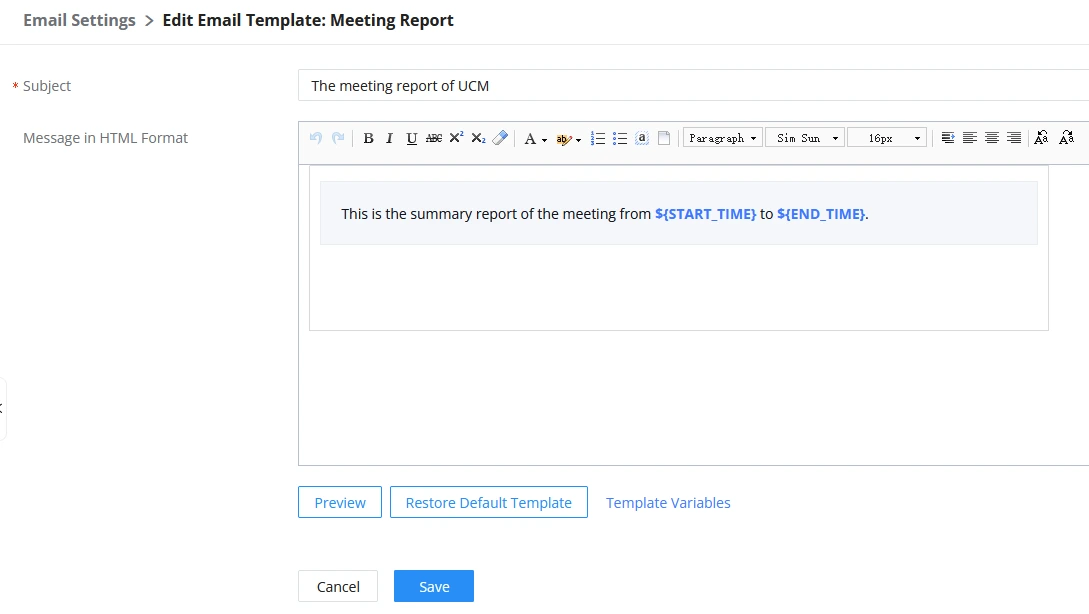
This template is designed to personalize this email. It features two variables, ${START_TIME} and ${END_TIME}, which specify the beginning and ending times of the statistics.
In order to schedule meeting report emails, please follow the steps below:
- Go to Basic Call Features→Multimedia Meeting, and click on Call Statistics.
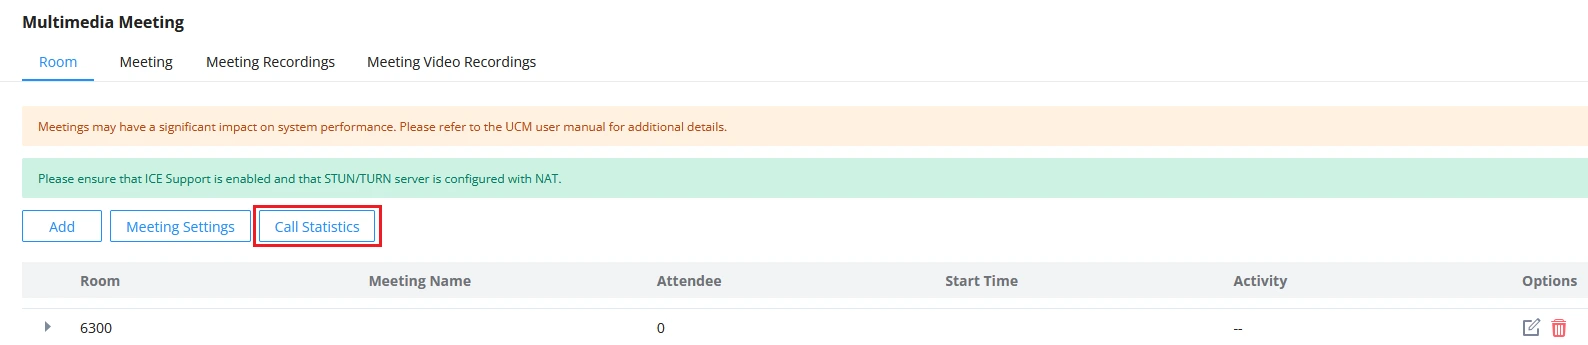
- On the call statistics page, select Scheduled Export.

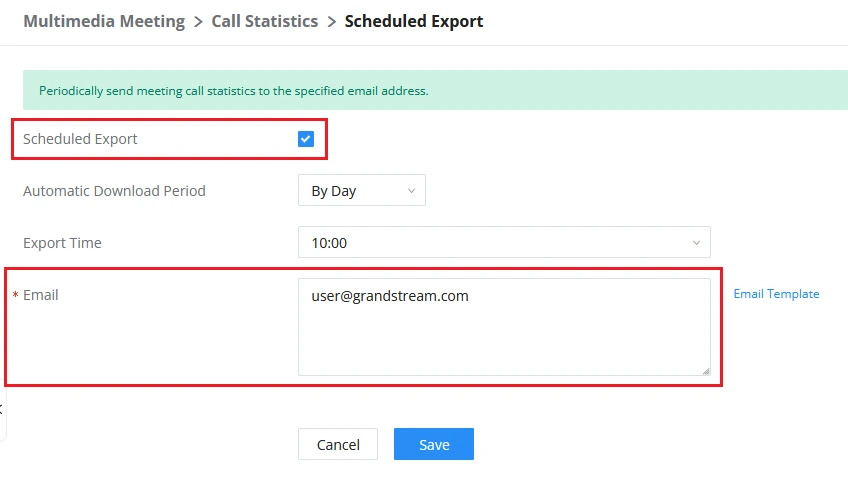
- Enable Scheduled Export and configure an email address to receive the meeting report emails.
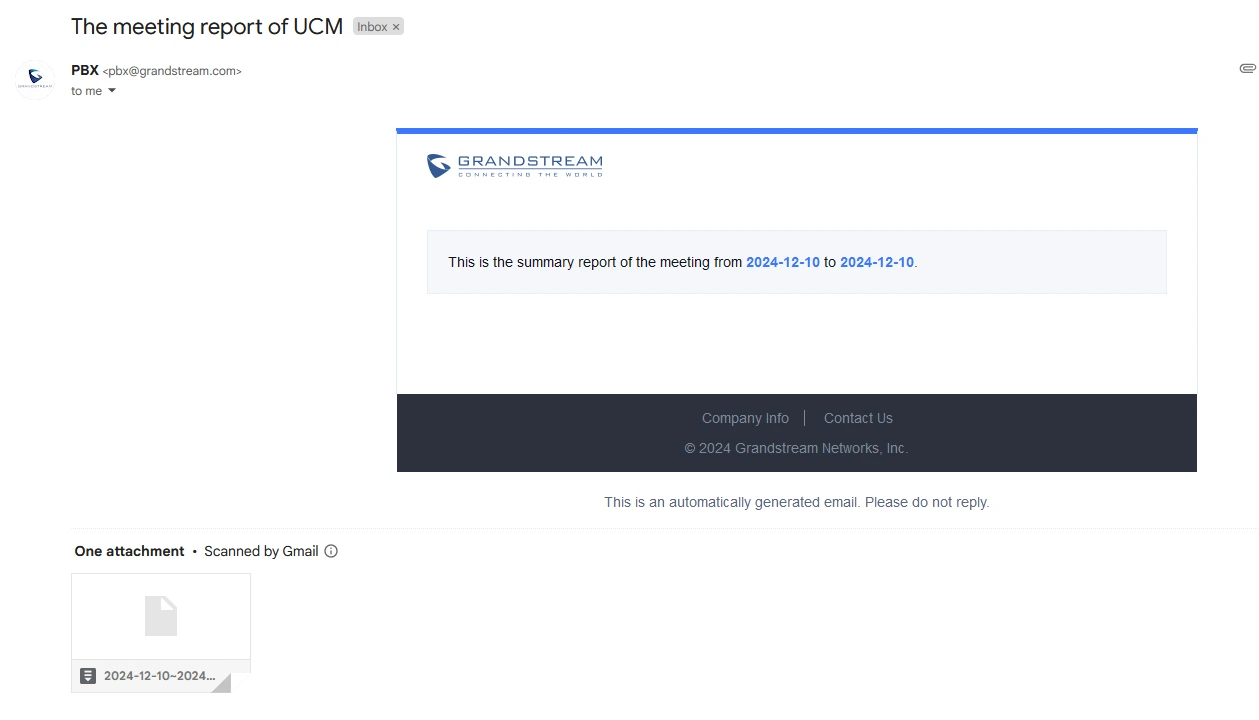
The selected email address will receive a meeting report, with a compressed file containing a csv file, based on the configured automatic download period and the export time. The image below provides an example of the email:
Alert Events
Alert events are notifications generated by the UCM to inform users of important events, changes, or issues that require attention. They can include warnings about errors, security threats, system updates, etc.
For more information regarding UCM63xx/A alert events, please refer to this section of the user manual.
The email template for the alert events includes three variables, which can be found in the table below.
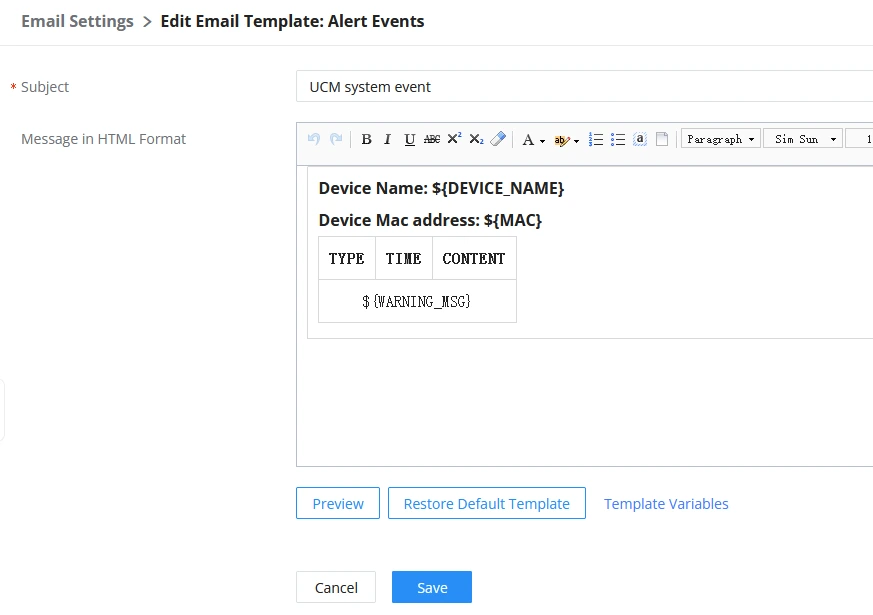
${DEVICE_NAME} | Device Name. |
${MAC} | MAC Address of the device. |
${WARNING_MSG} | The alert event warning message. |
To receive alert events emails, please follow these instructions:
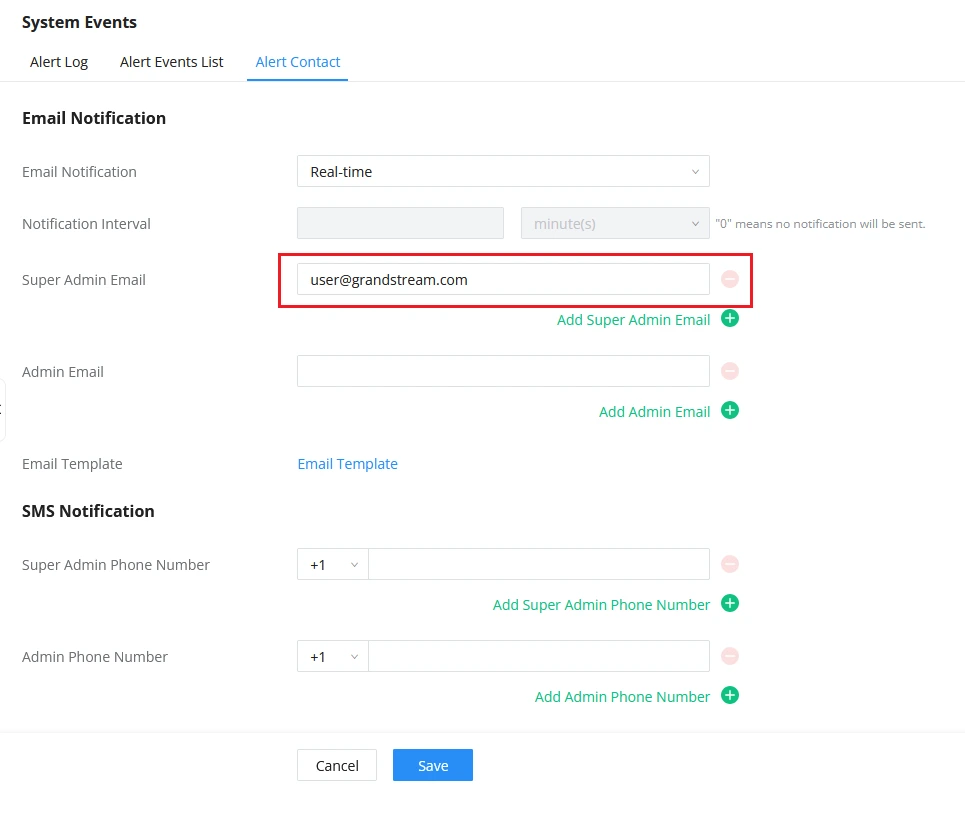
- Access the Alert Contact tab under Maintenance→System Events and enter a Super Admin/Admin Email.
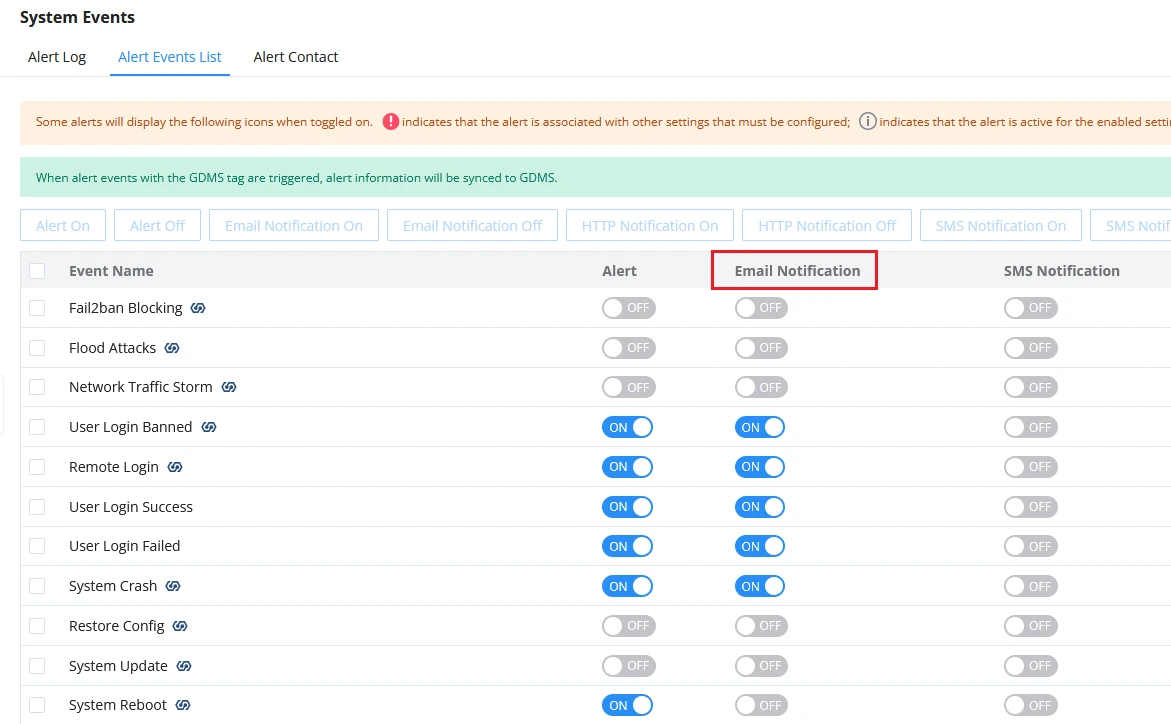
- Go to Alert Events List tab and turn on the email notification for the chosen events.
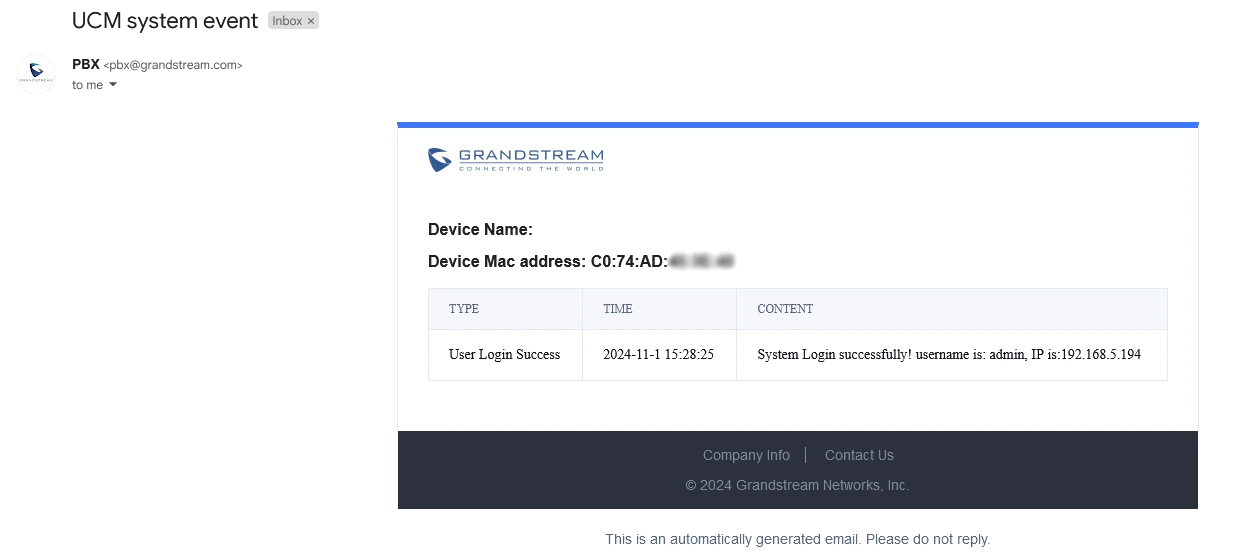
If an event with notification enabled occurs, the designated alert contact will receive an email. Below is an example of an alert email for a successful login:
Emergency Calls
When an emergency call is triggered, the UCM will send this email based on the configured email address under Advanced Call Features→Emergency Calls.
The variables of this template are:
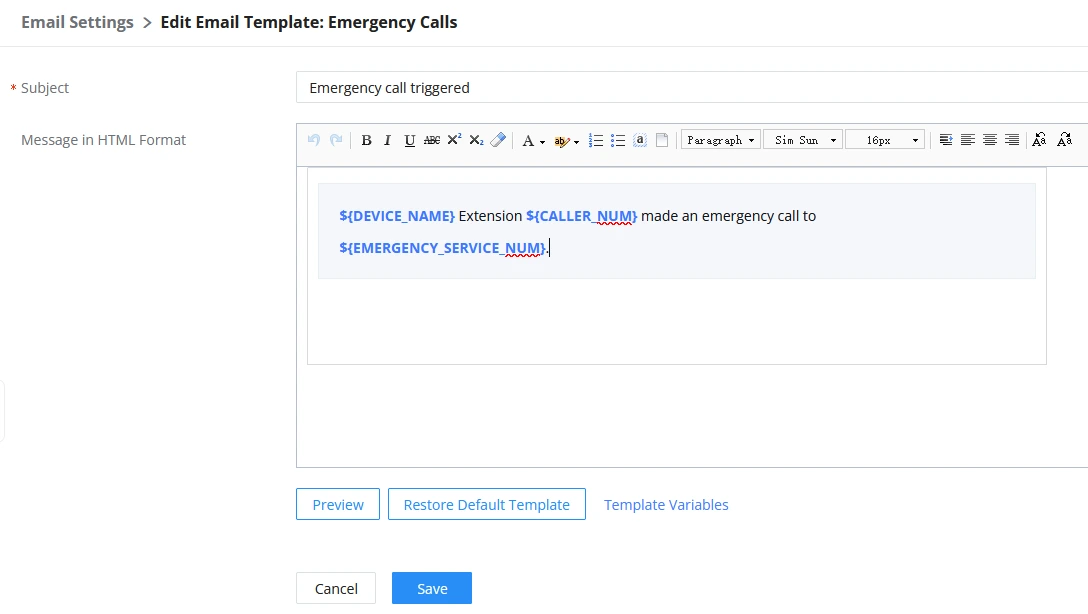
${DEVICE_NAME} | Device Name. |
${CALLER_NUM} | Caller Name and Number. |
${EMERGENCY_SERVICE_NUM} | Emergency Number. |
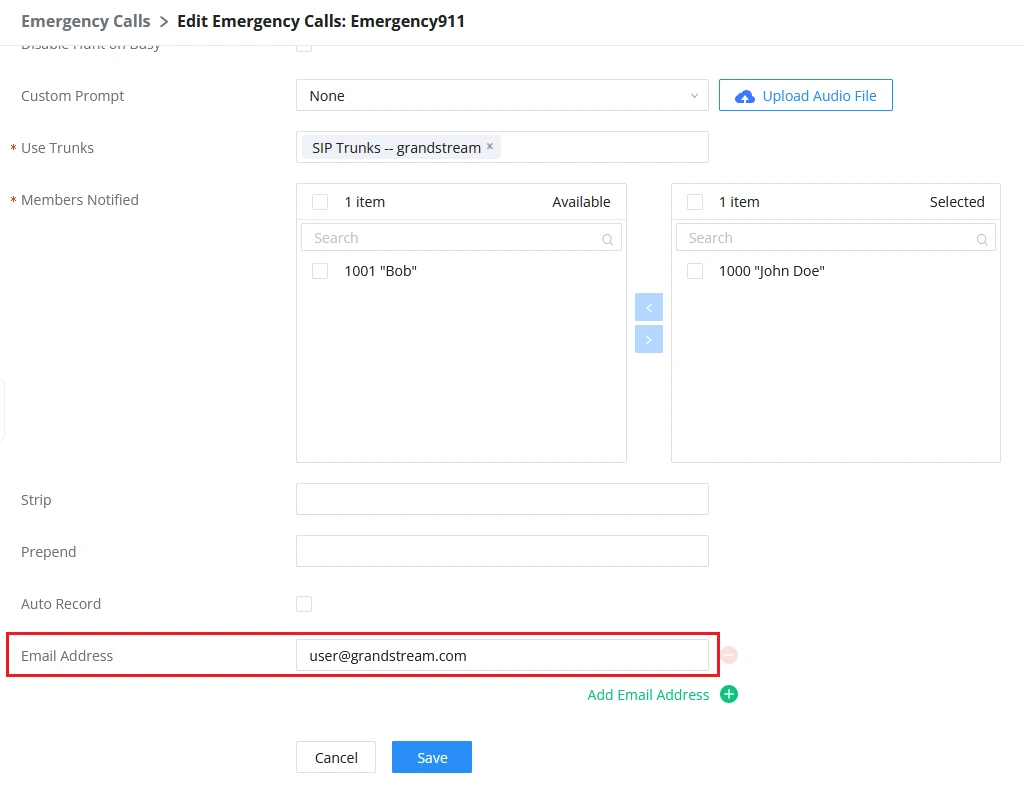
Please refer to the steps below to configure an email address for emergency calls:
- Go to Advanced Call Features→Emergency Calls→Edit/Create an Emergency Call.
- Type an email under “Email Address” as shown in the following image.
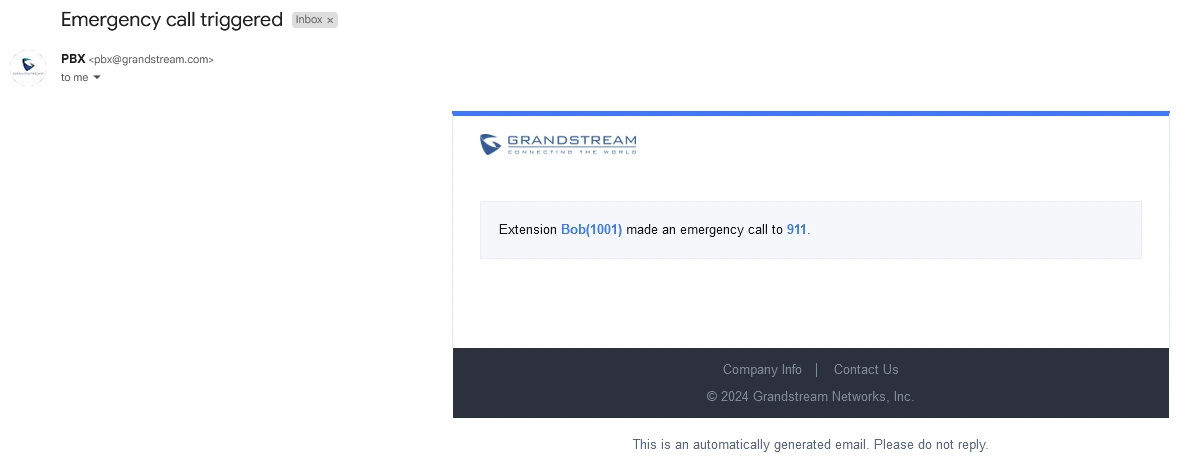
In the case of an emergency call, the email will be received as follows:
Reset Password
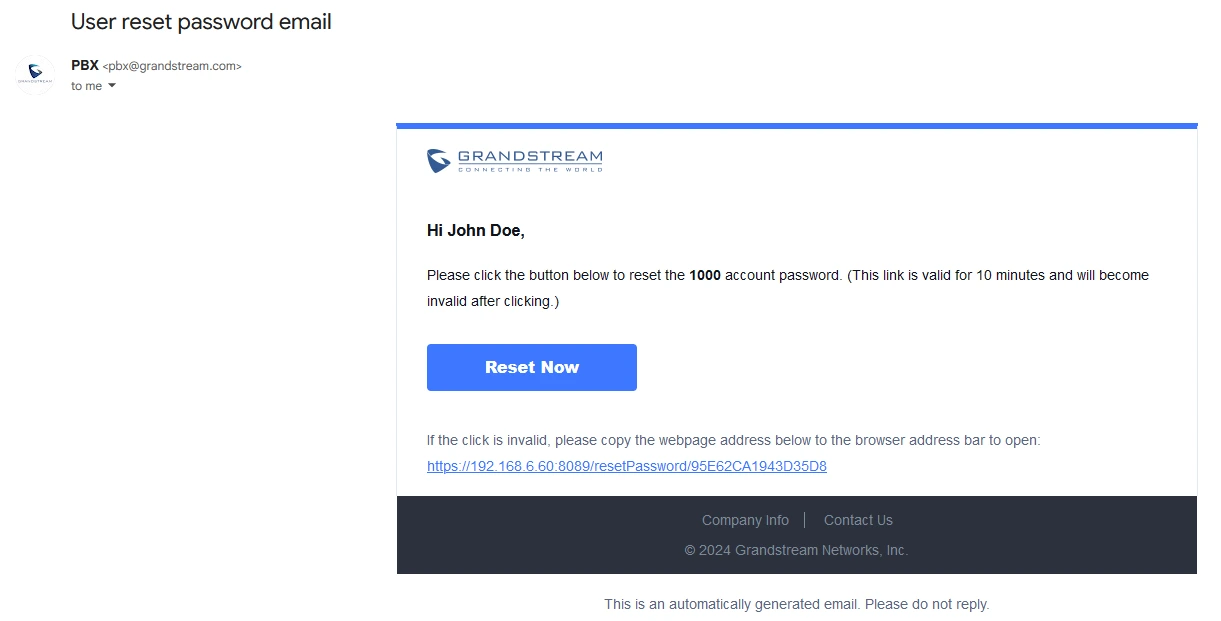
If a user attempts to reset their password for UCM login, an automatic email will be generated. This email contains a link for password reset, which users can click to follow the instructions and change their password. The template includes these variables:
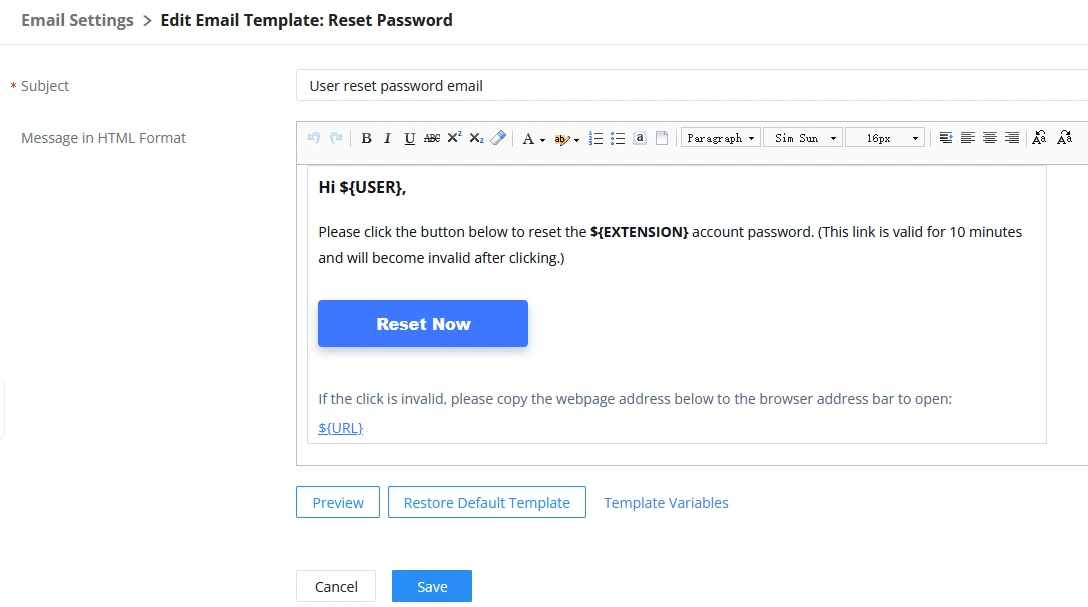
${USER} | Username. |
${EXTENSION} | The extension number. |
${URL} | The password reset link. |
Once the user clicks “Forgot Password?” on the UCM login page, a password reset email will be sent to the email address associated with the extension. Below is an example of the email:
Voicemail
If a user receives a voicemail, they will also get an email notification informing them about the message. This way, they can easily access and listen to the voicemail from their email, ensuring they don’t miss important communications.
The voicemail email templates contains the following variables:
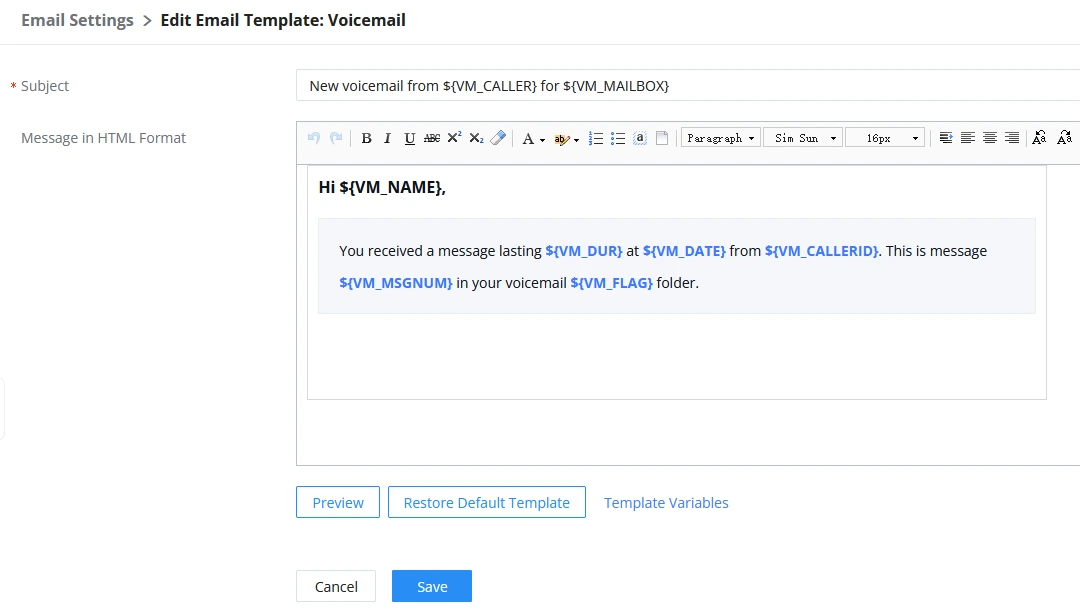
${VM_NAME} | Recipient’s first and last name. |
${VM_DUR} | The duration of the voicemail message. |
${VM_MAILBOX} | The recipient’s extension and name. |
${VM_CALLERID} | The caller ID and name of the party that left the message. |
${VM_CALLER} | The caller ID of the party who has left the message. |
${VM_MSGNUM} | The message number in the mailbox. |
${VM_DATE} | The date and time when the message was left. |
${VM_FLAG} | Type of voicemail. There are two types of voicemail messages: regular and urgent. |
${RINGGROUP_ID} | The name and number of the ring group dialed by the caller. This can be configured to display ring group information. |
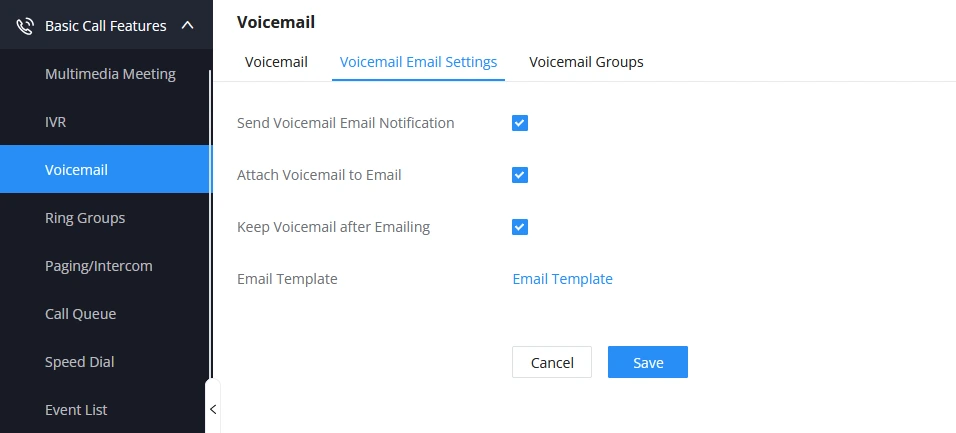
First, users need to unable voicemail email notification under Basic Call Features→Voicemail→Voicemail Email Settings.
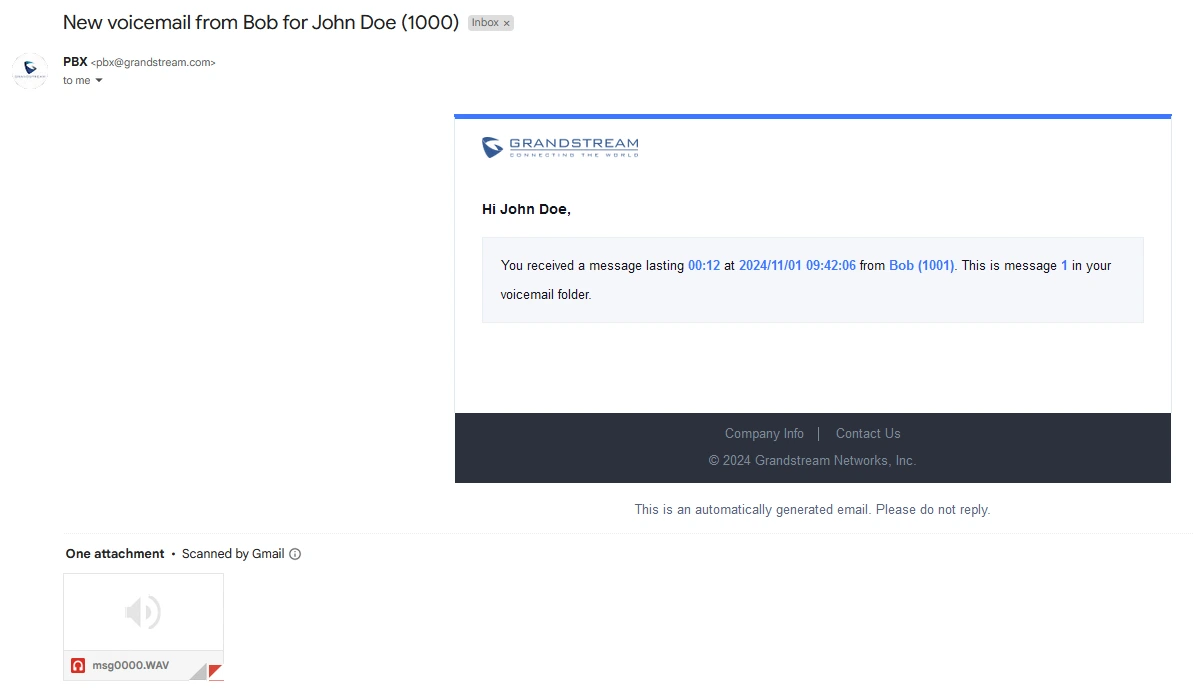
When an extension receives a voicemail, the associated email address will receive an email, as shown below, which includes the voicemail recording.
Call Queue Statistics
Users can gather detailed call queue statistics and send them automatically by email allowing them to make better changes/decision to manage the call distribution and handling based on time, agent, and queue.
This template is designed to personalize the call queue statistics email sent by the UCM. It features two variables, ${START_TIME} and ${END_TIME}, which specify the beginning and ending times of the statistics.
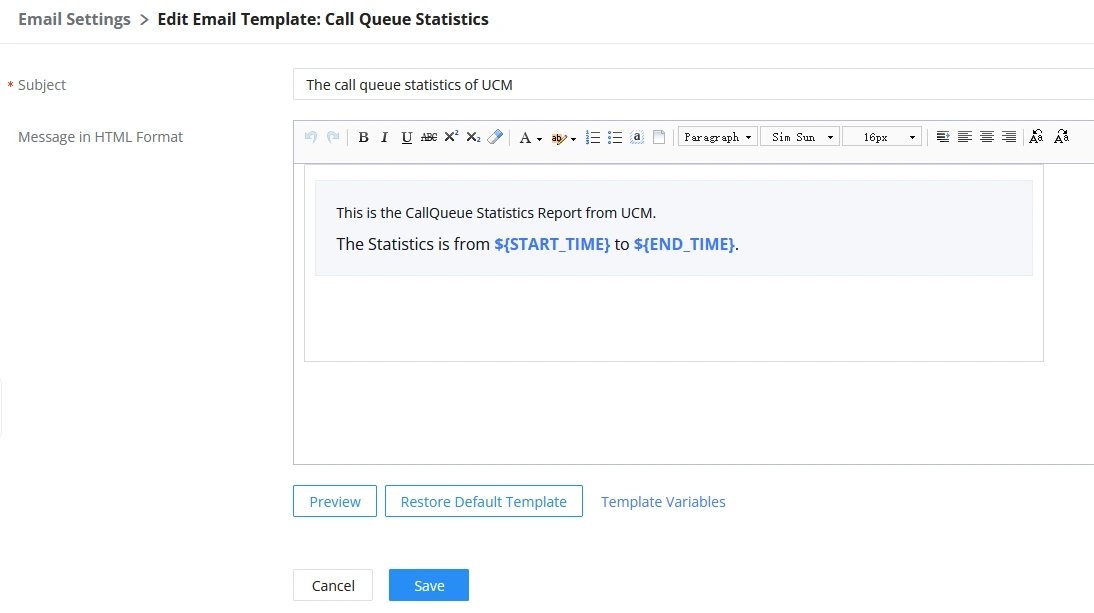
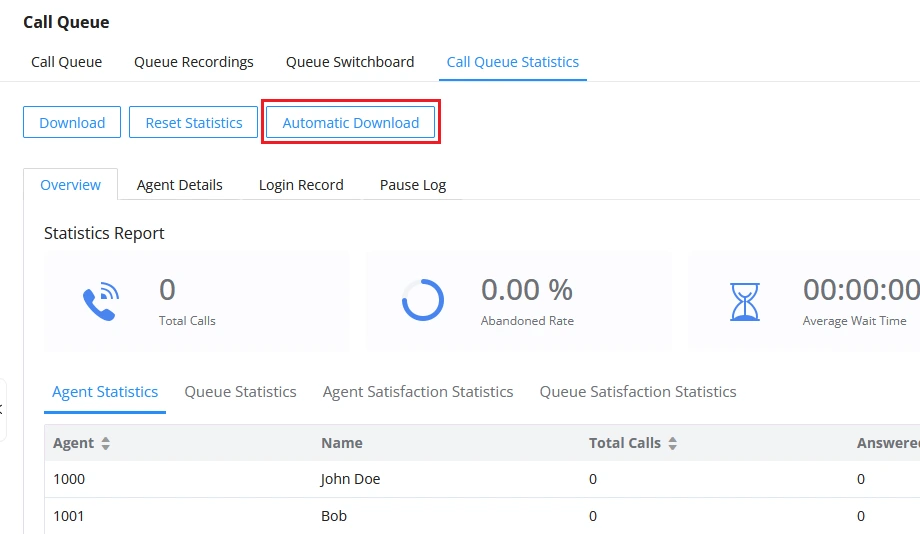
Users can choose an email address to send the Call Queue Statistics by following the instructions below:
- Click on the “Automatic Download” button under Basic Call Features→Call Queue→Call Queue Statistics.
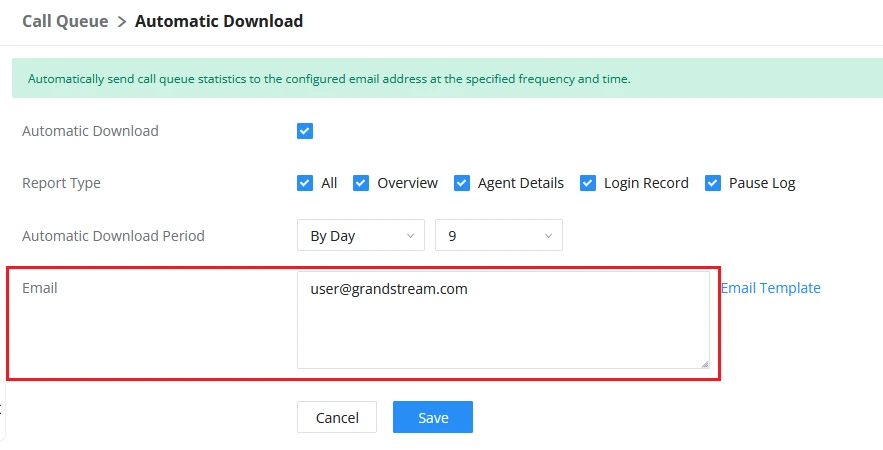
- Turn on Automatic Download by checking the box, select the report type and type an email address in the Email field.
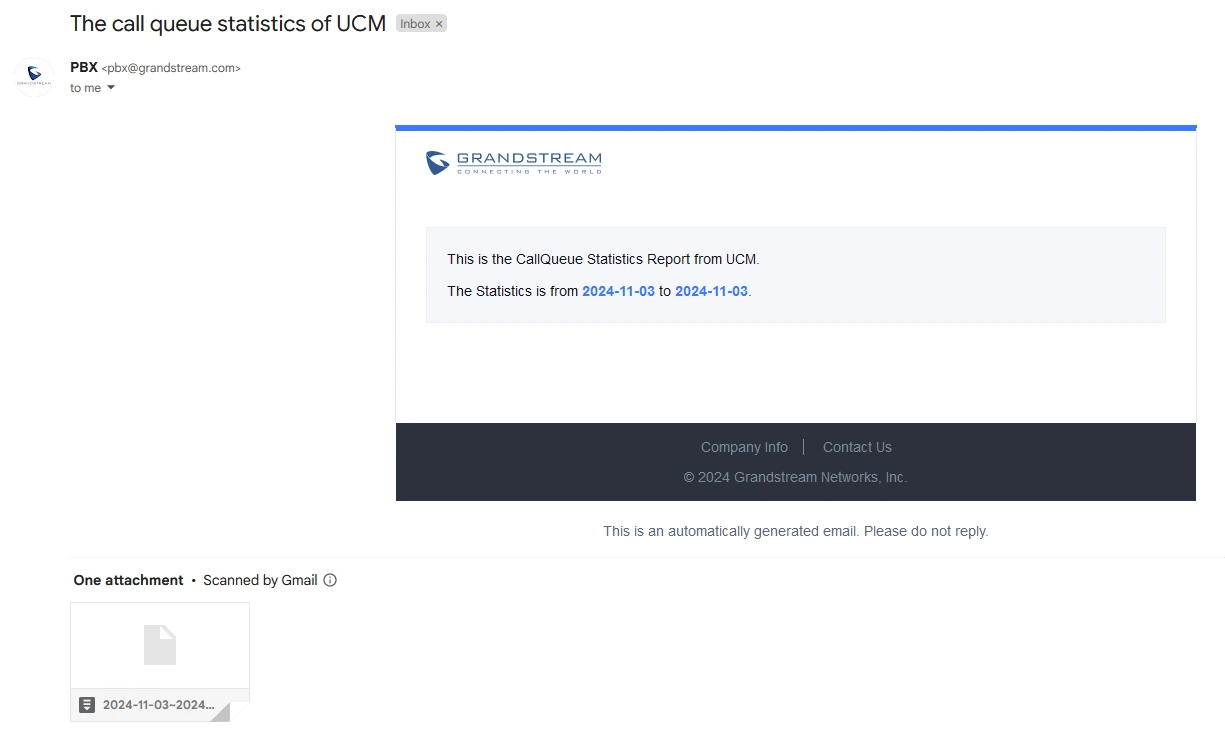
The selected email address will receive a call queue statistics report according to the configured automatic download period. The image below provides an example of this email:
SLA Alert
SLA measures the percentage of calls that a queue group answers within a specified time frame. When SLA is enabled for a call queue and the performance falls below the configured threshold, users can set up an email address to receive automated alerts from the UCM.
The variables that can be included in this email are:
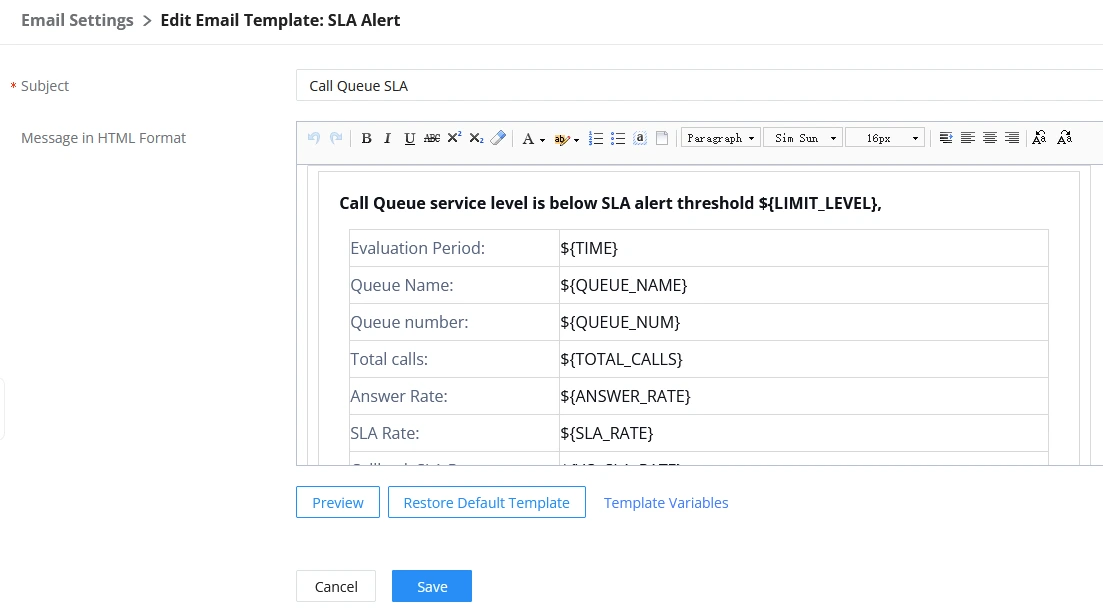
${LIMIT_LEVEL} | SLA Alert Threshold (%) |
${CURRENT_LEVEL} | Current Queue Service Level |
${TIME} | Evaluation Period |
${QUEUE_NAME} | Queue Name |
${QUEUE_NUM} | Queue Extensions |
${TOTAL_CALLS} | Total Calls |
${ANSWER_RATE} | Answered Rate |
${SLA_RATE} | Answer rate of the call queue for a specified period of time |
${VQ_SLA_RATE} | Answer rate of the virtual queue for a specified period of time |
${DEVICE_NAME} | Device Name |
${DEVICE_MAC} | MAC Address |
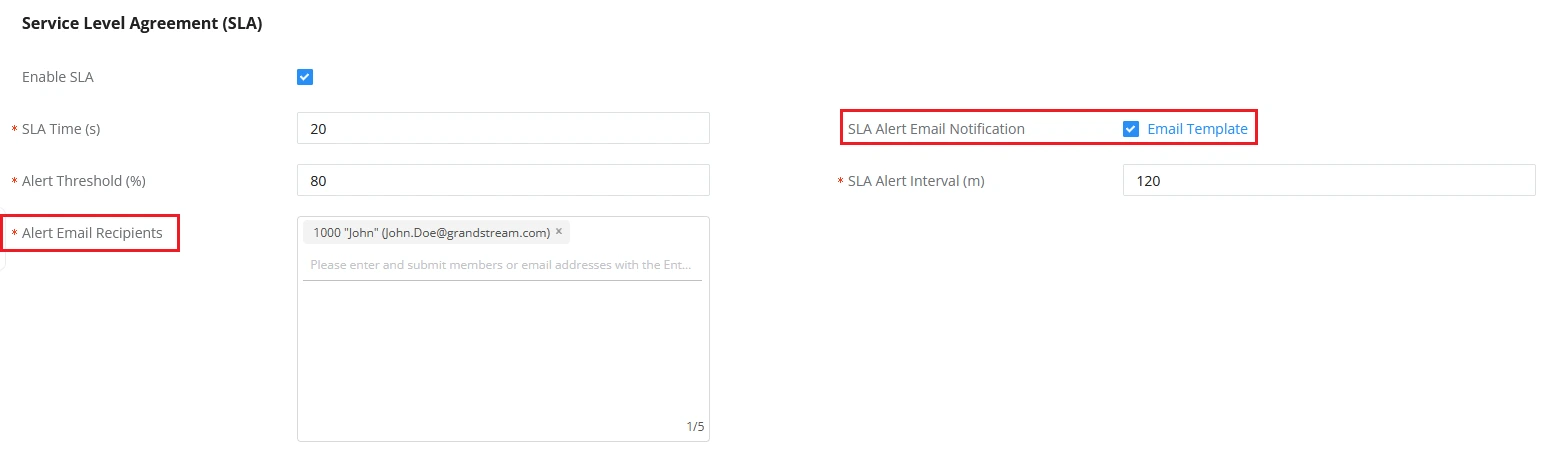
The SLA Alert email is sent to the email address associated with the extension selected in Basic Call Features→Call Queue→Edit Call Queue→Advanced Settings→Service Level Agreement (SLA).
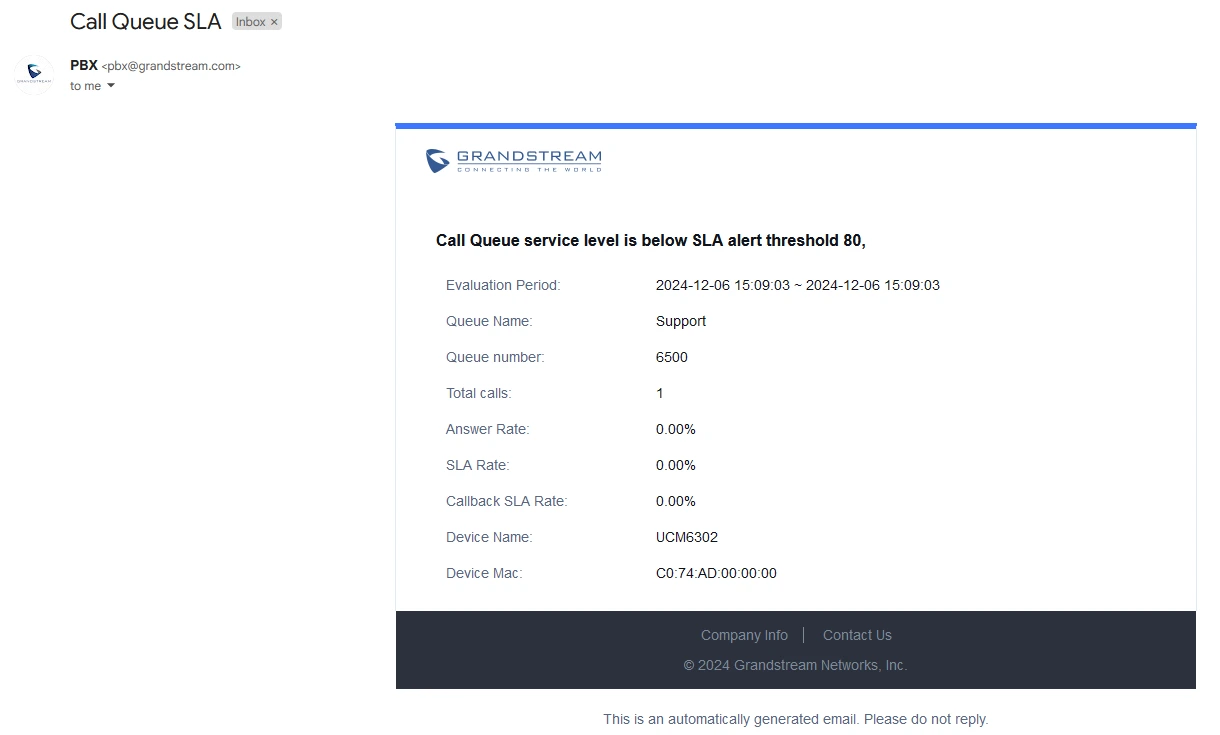
If the SLA of the call queue falls below the configured alert threshold, the recipients of the alert email will receive a message like the one below:
CDR
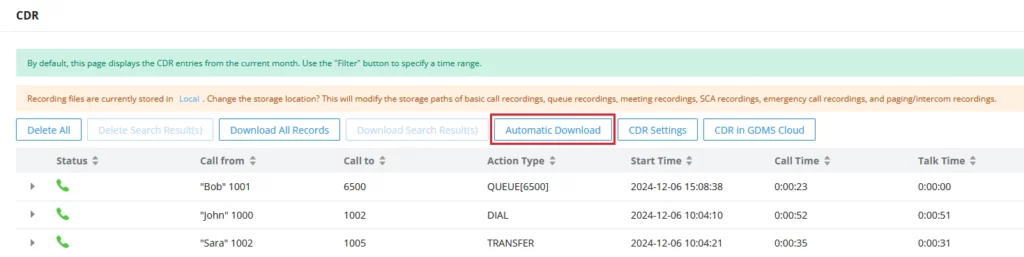
CDR (Call Detail Record) refers to data records generated by the UCM that provides detailed information about phone calls made or received.
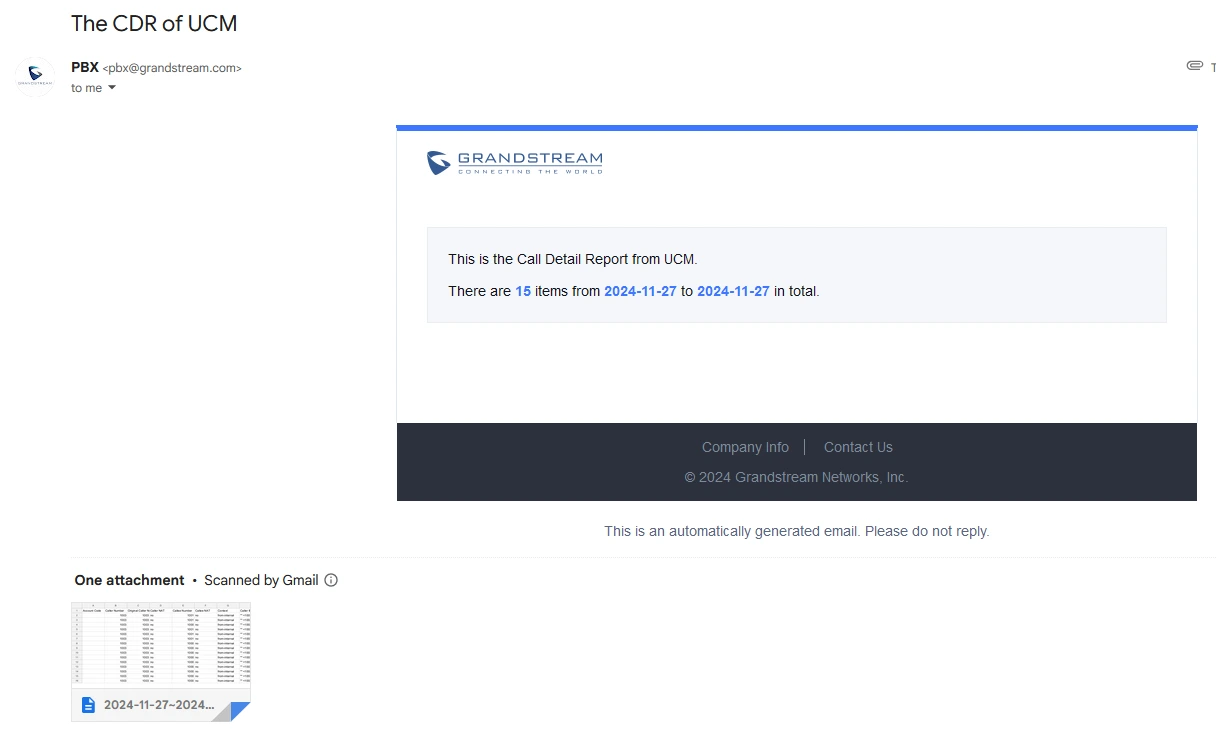
This template is used to personalize the CDR information email sent by the UCM. It includes three variables that are defined below:
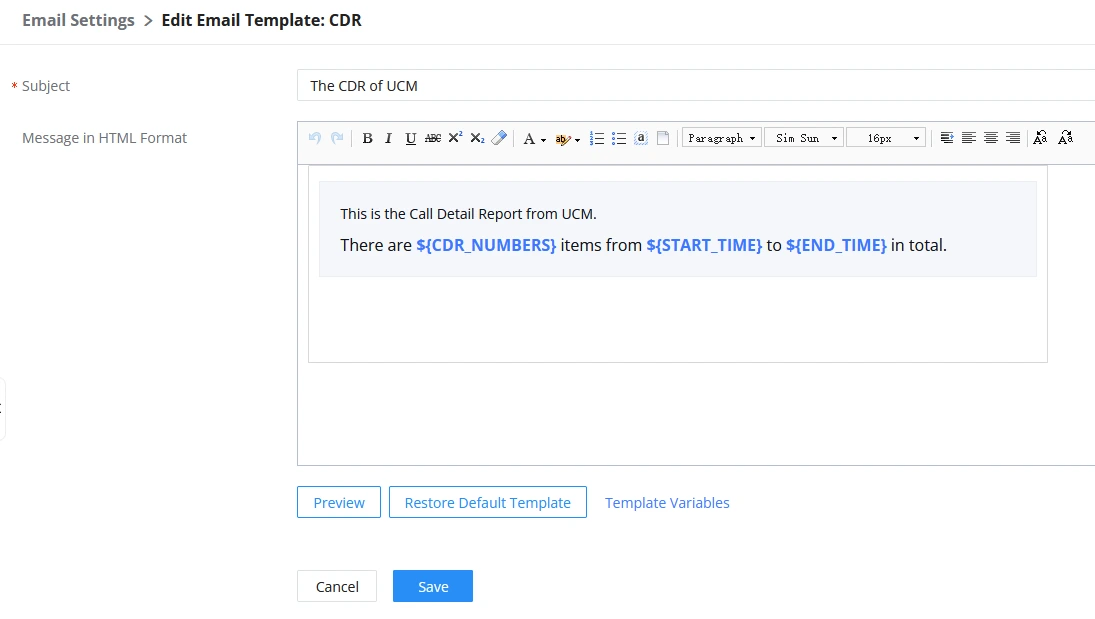
${CDR_NUMBERS} | The amount of CDR (number of entries) |
${START_TIME} | The start time of CDR |
${END_TIME} | The end time of CDR |
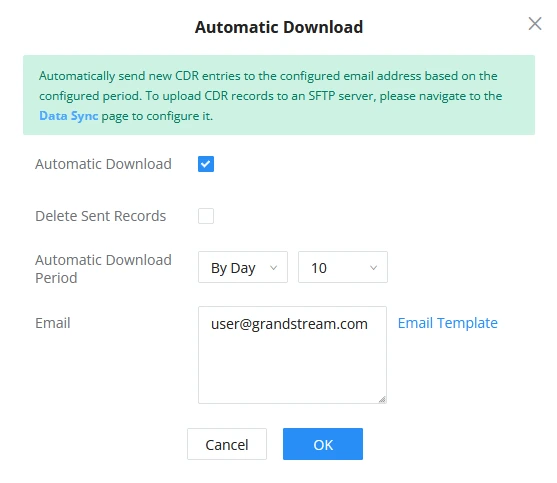
To choose an email address to send the CDR to, please follow these steps:
- Click on the “Automatic Download” button under CDR→CDR.
- Turn on Automatic Download by checking the box, select download period and type an email address in the Email field.
The selected email address will receive CDR information based on the configured automatic download period as shown below:
Fax
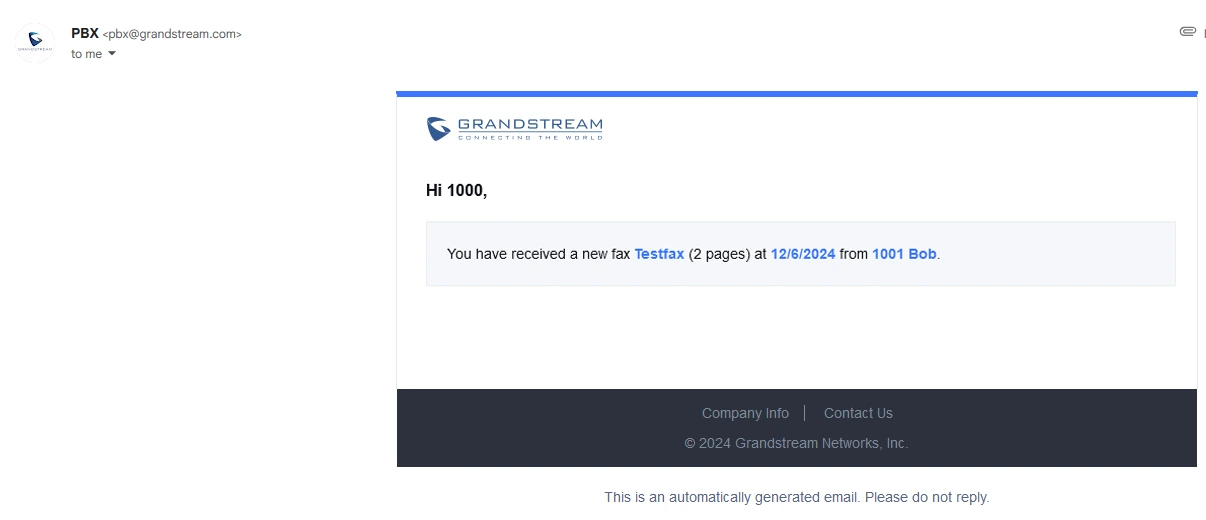
This email template is used to notify users of received fax and the contains the following variables:
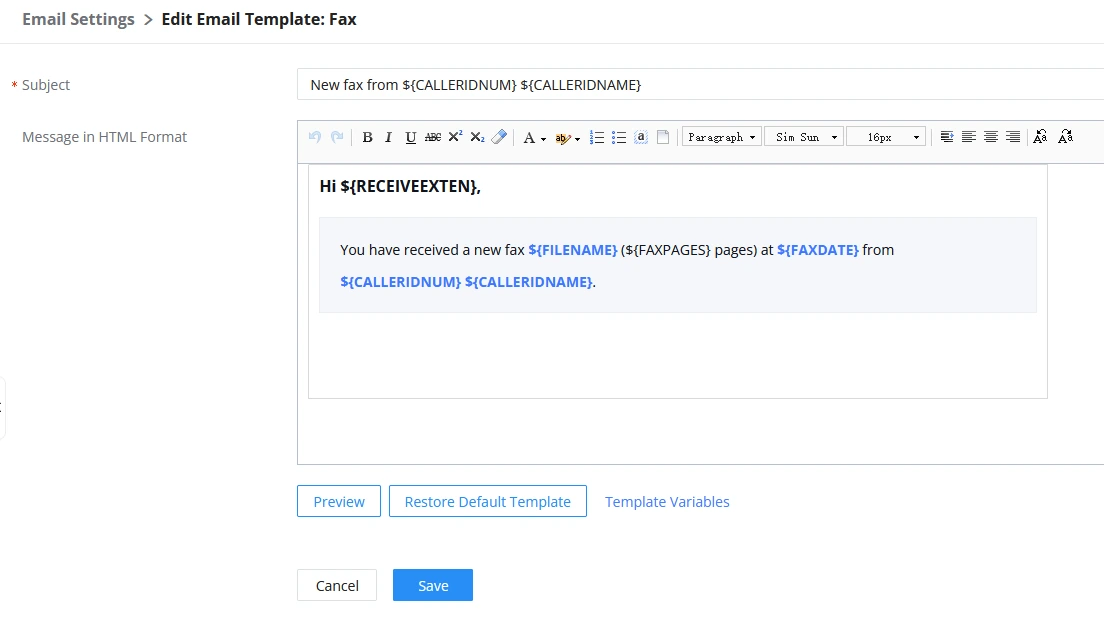
${CALLERIDNUM} | Caller ID Number |
${CALLERIDNAME} | Caller ID Name |
${RECEIVEEXTEN} | The extension receiving the fax |
${FILENAME} | The name of the generated fax file |
${FAXPAGES} | The number of pages in the fax |
${FAXDATE} | The date and time of when the fax was received |
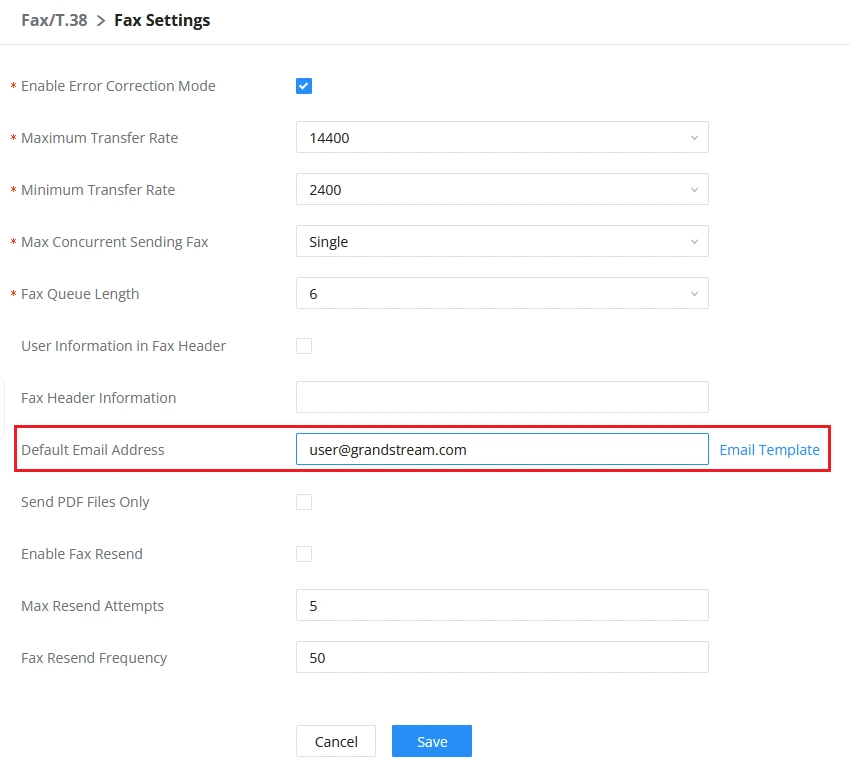
Users can receive Fax emails on the email address associated with their extension, or they can configure an alternate email address in the Fax settings, which will be used if no extension email address is available.
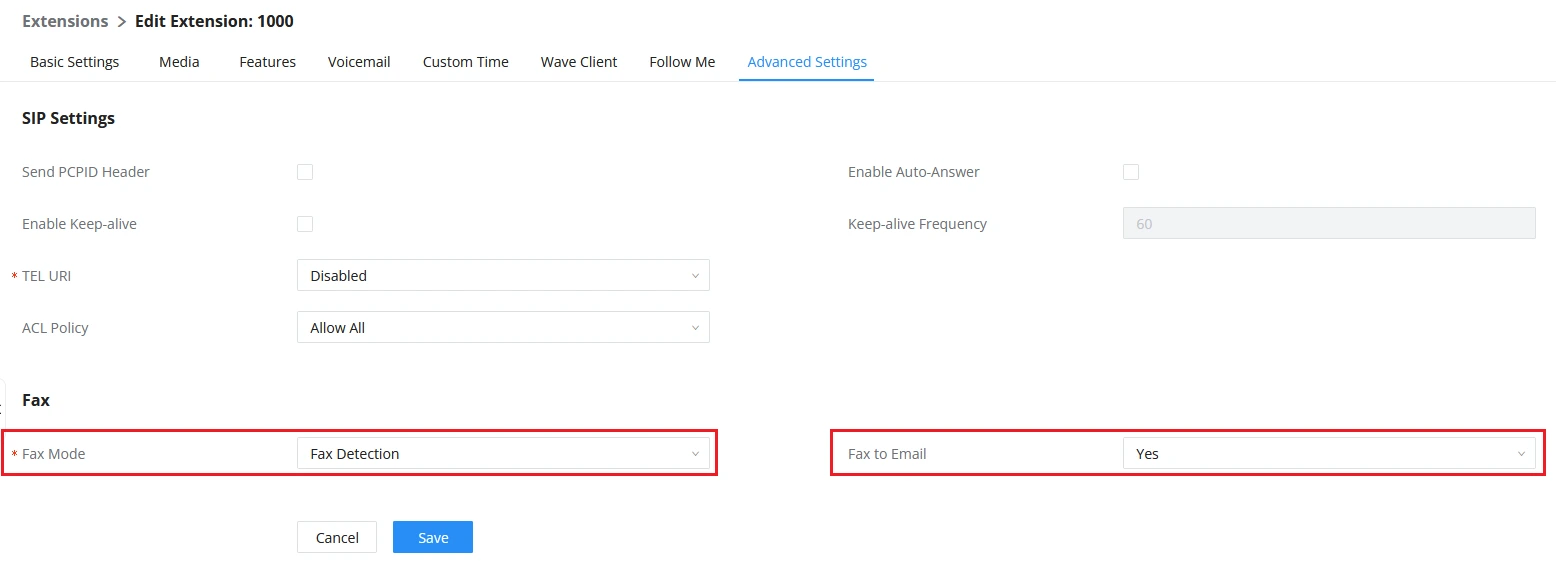
In order to enable Fax emails for a specific extension, please set “Fax Mode” to Fax Detection and “Fax to Email” to Yes, under Extension→Edit Extension→Advanced Settings.
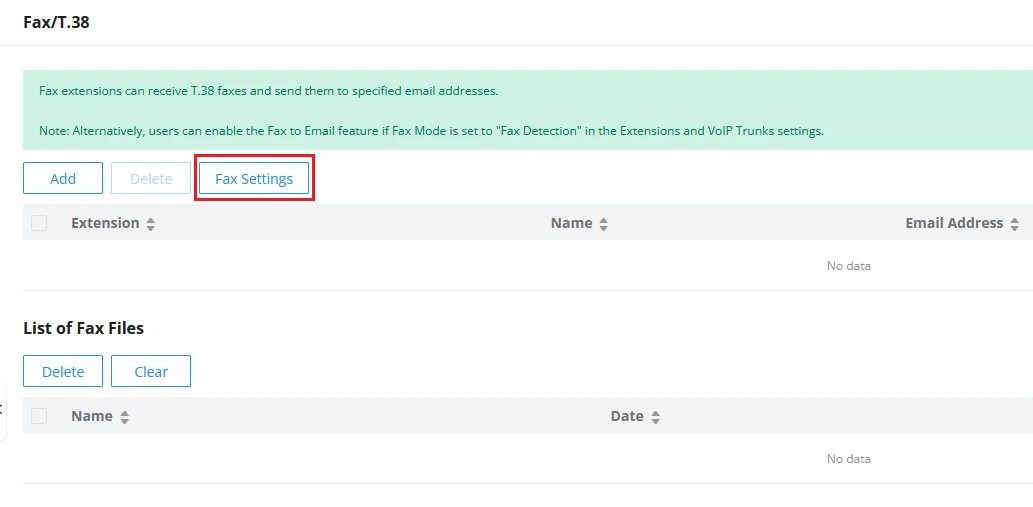
To set the default email address that will be used if the fax destination does not have an email address configured, go to Advanced Call Features→Fax/T.38→Fax Settings.
The image below is an example of the received Fax email:
Fax Sending
The Fax sending email template allows to customize the emails received by users after sending Fax. The variables of this template are:
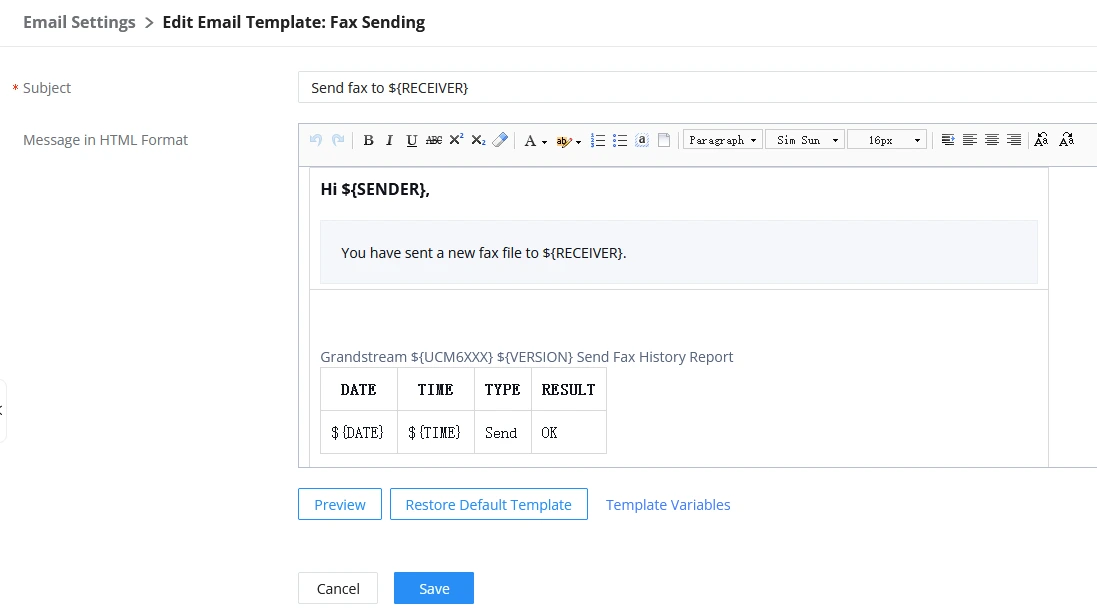
${SENDER} | Display Name |
${RECEIVER} | Recipient |
${UCM6XXX} | UCM Model |
${VERSION} | Firmware Version |
${DATE} | Date Sent |
${TIME} | Time Sent |
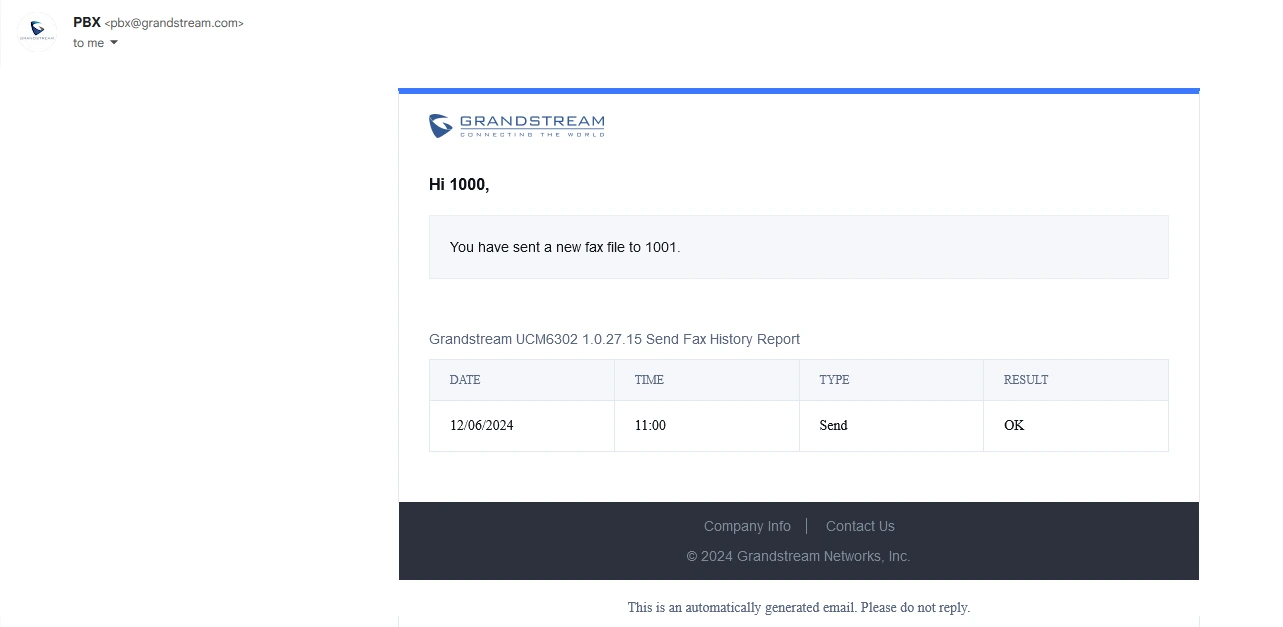
The configuration of the Fax Sending email address follows the same steps mentioned in the Fax section. The email received appears as follows:
PMS
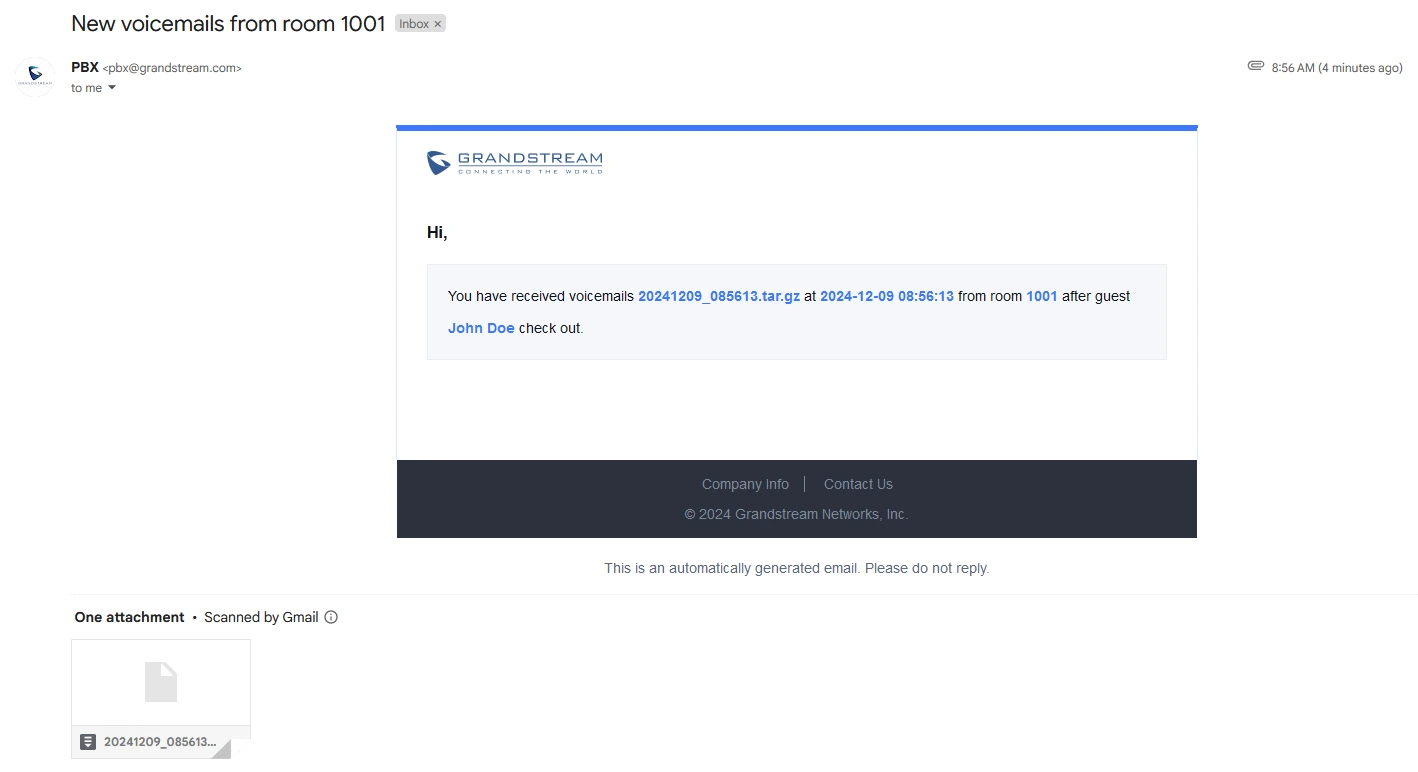
The PMS template allows admins to receive the entirety of voicemails received by the room extension after guest checkout. The variables of this template are:
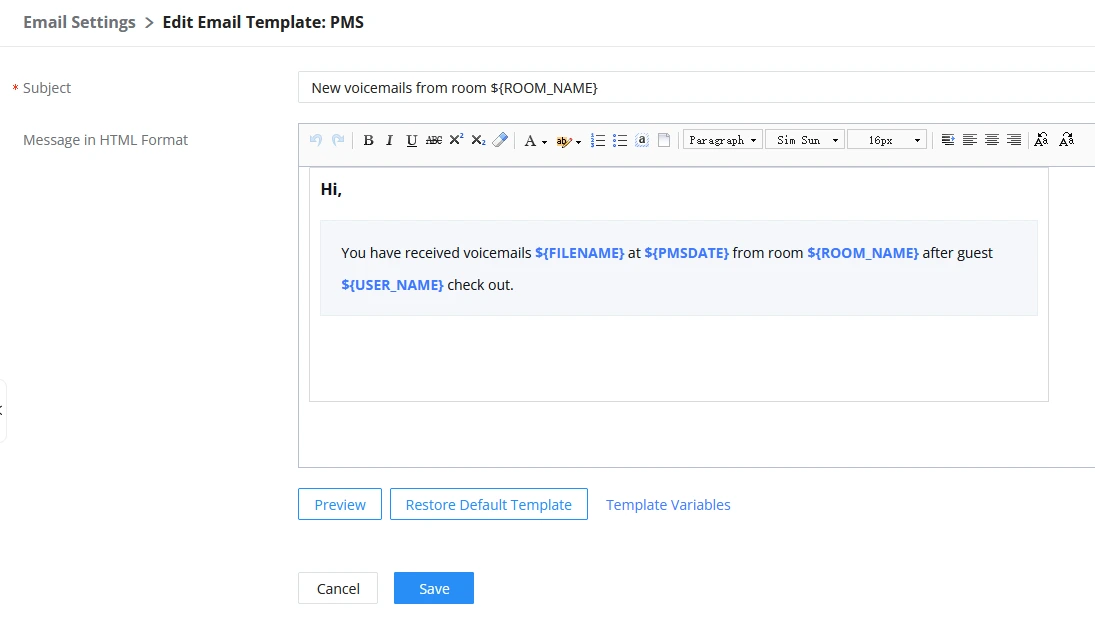
${FILENAME} | Name of the created PMS voicemail backup |
${PMSDATE} | Date and time of when the PMS voicemail backup was received |
${ROOM_NAME} | Room Number |
${USER_NAME} | The name of guest |
To receive these email notifications, users need to enable voicemail backup for local PMS and configure a recipient email address under Integrations→PMS→Basic Settings.
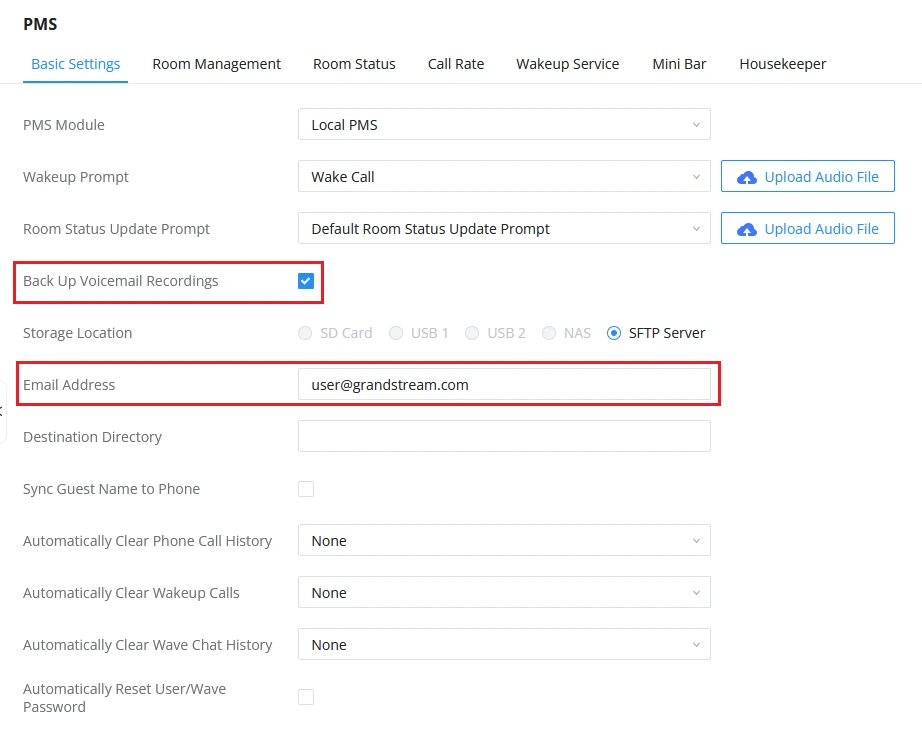
If the settings are properly configured, the chosen recipient chosen will receive this email after every guest checkout:
Onsite Meeting
When an onsite meeting is scheduled, the host and participants receive an automated email with the details of the meeting. This template can be used to personalize that email and it includes the following variables:
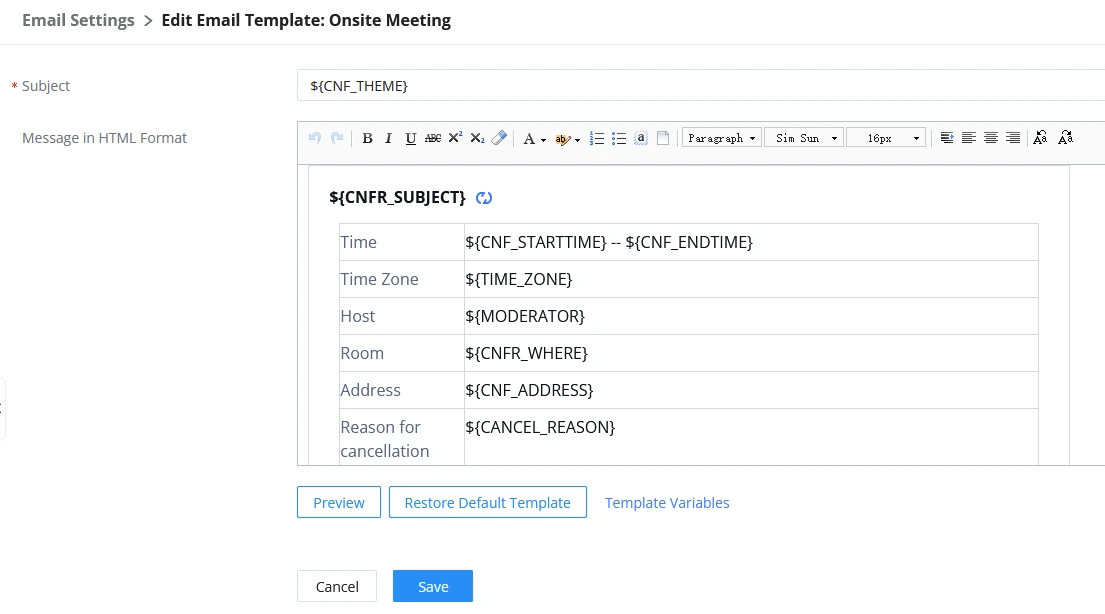
${CNF_THEME} | The theme of the meeting. Used in the email subject field by default. |
${CNF_STARTTIME} | The start time of the meeting |
${CNF_ENDTIME} | The end time of the meeting |
${CNFR_MSG} | Detailed information of the scheduled meeting |
${CNFR_SUBJECT} | The topic of the meeting. Used in the email body by default. |
${CNFR_DESCRIPTION} | The description of the meeting |
${CNFR_WHERE} | The meeting room |
${TIME_ZONE} | Time zone details |
${REPEAT} | Meeting repeat meeting cycle |
${MODERATOR} | Meeting host |
${CNFR_ADDRESS} | Office building |
${CANCEL_REASON} | Reason for cancelation |
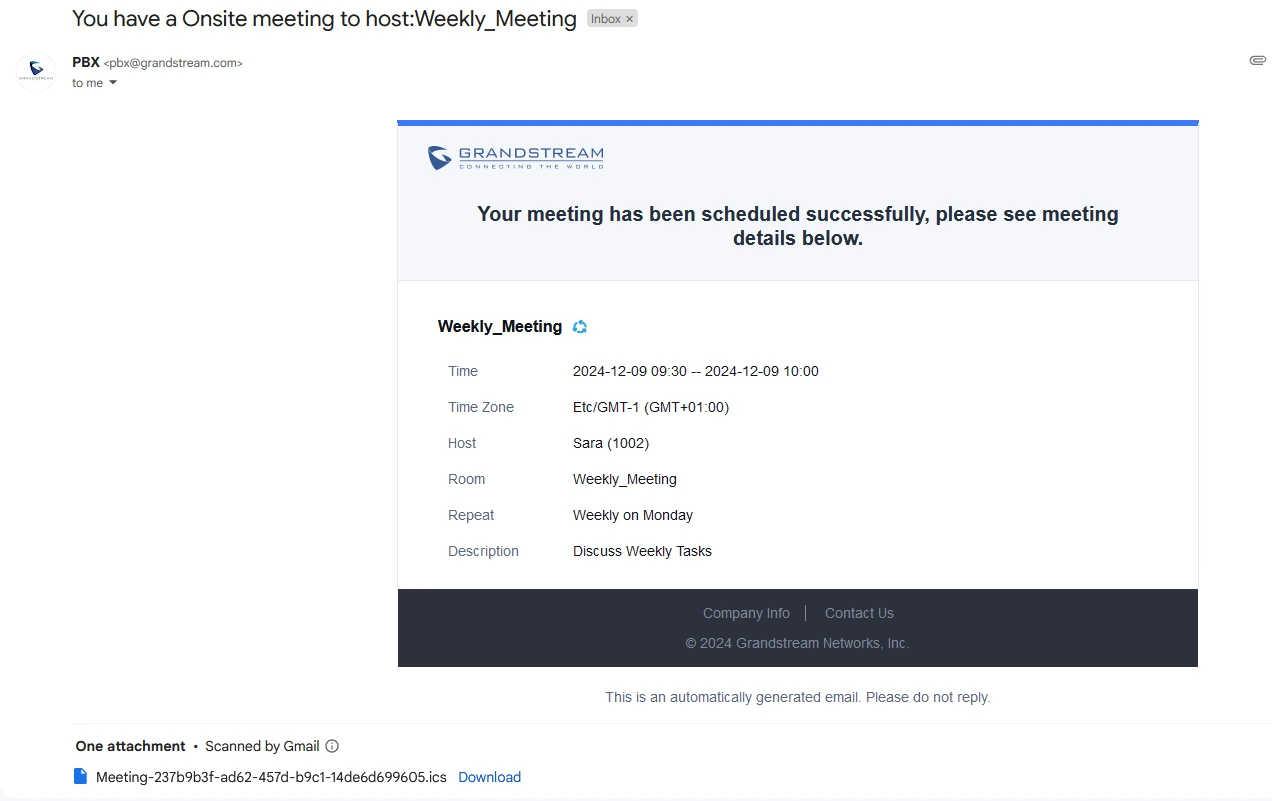
Besides the meeting information, the email also contains a calendar file (.ics) for the scheduled meeting. Below is an example of the email:
Cloud IM Service
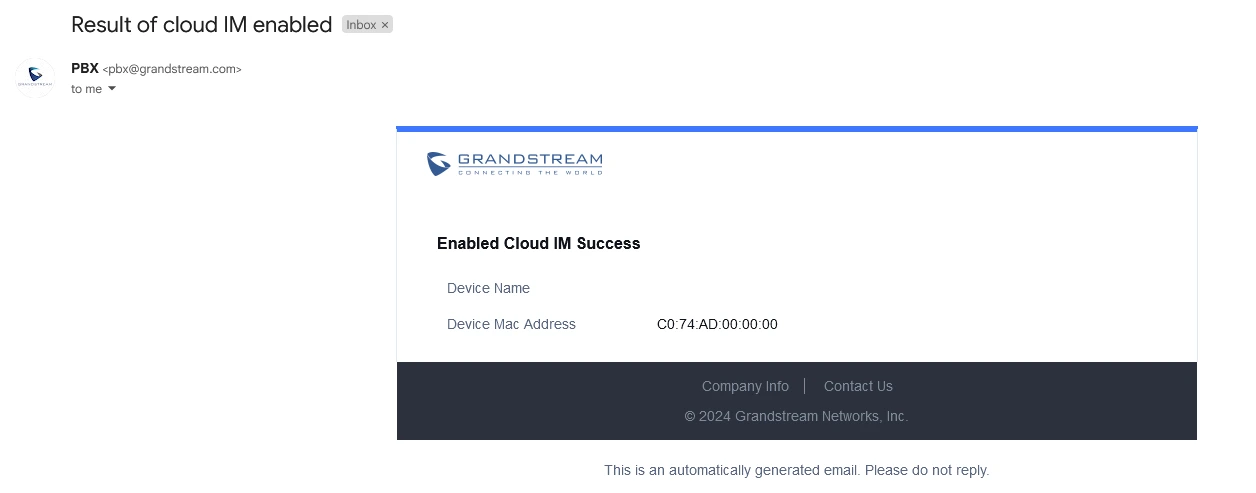
The Cloud IM Service email is used to notify administrators that the service has been enabled for the UCM. The template of this email contains three variables:
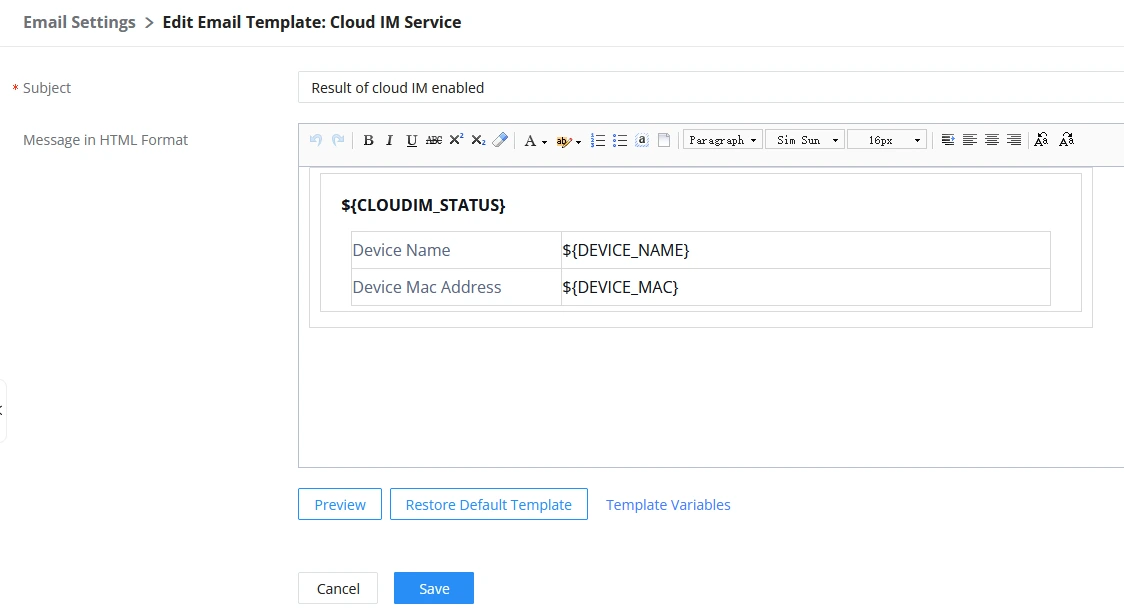
${CLOUDIM_STATUS} | Cloud IM Status |
${DEVICE_NAME} | Device Name |
${{DEVICE_MAC} | MAC Address of Current UCM |
Once Cloud IM is enabled, the admin receives this email:
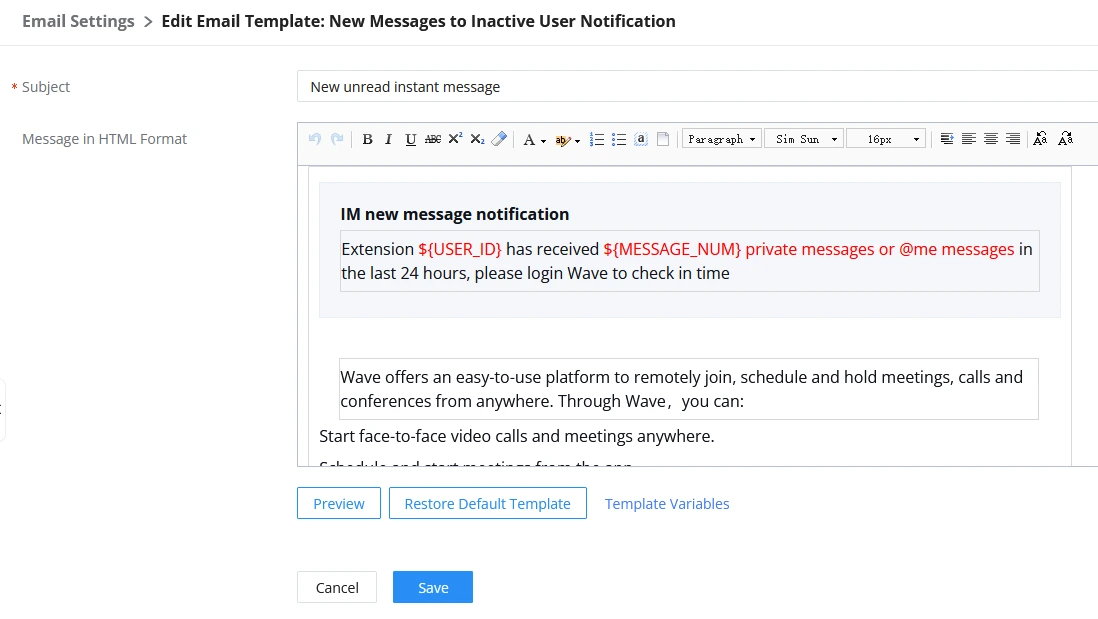
New Messages to Inactive User Notification
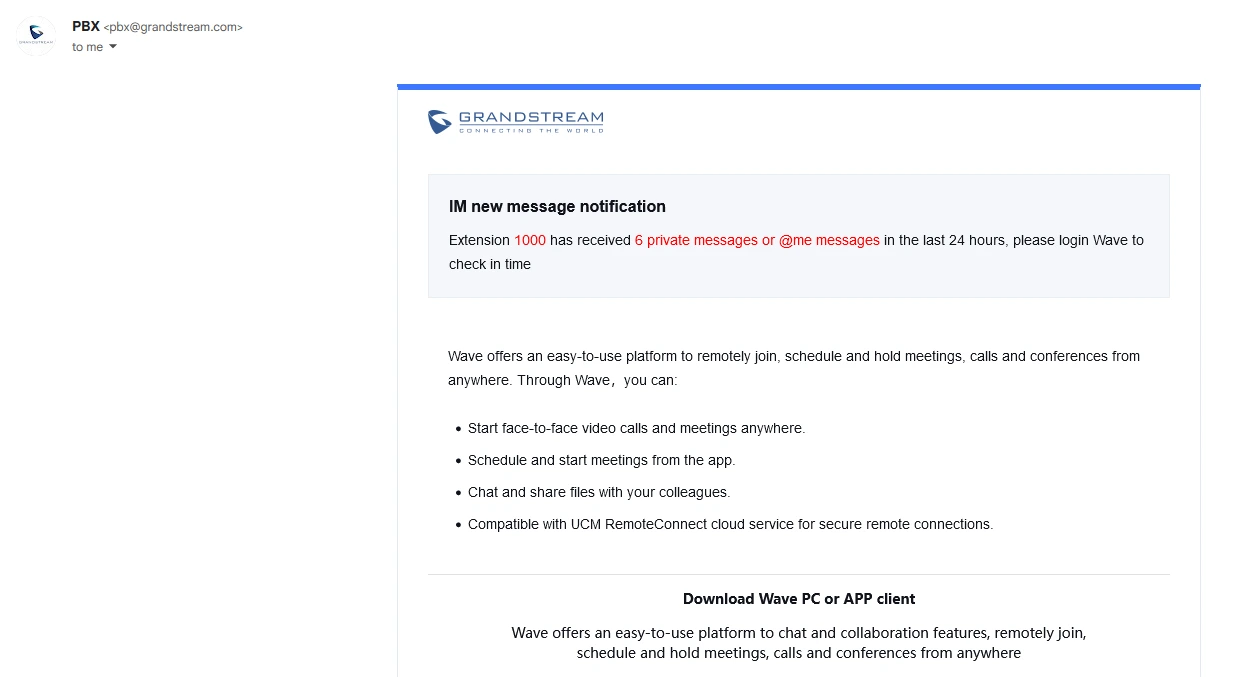
If an extension under the UCM has not logged into Wave for more than 7 days, and a new message is received, an email notification will be sent to the extension notifying them of the amount of direct messages received in the last 24 hours. This applies to both local IM and Cloud IM.
This template allows for customization of email notifications and includes two key variables: ${MESSAGE_NUM}, which represents the number of missed messages, and ${USER_ID}, which corresponds to the extension number in question.
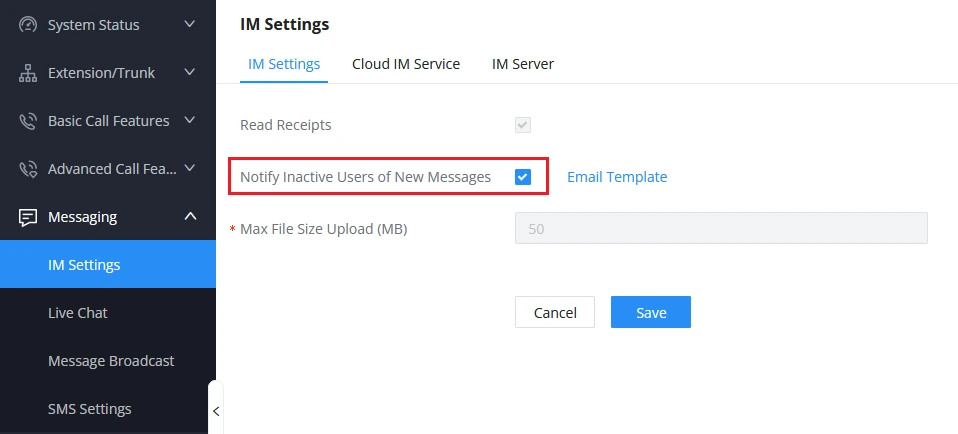
To enable the New Messages to Inactive User Notification, go to Messaging→IM Settings.
If a user extension meets the criteria mentioned above, it is considered inactive and its corresponding email address automatically receives an email as follow:
Wake-up Call Service Failure
A wake-up call service is a service provided by the UCM’s local PMS where a guest can request to be woken up at a specific time. If the wake-up call fails, an automated email will be sent to the administrator that follows this template.
The variables of the Wake-up Call Service Failure are:
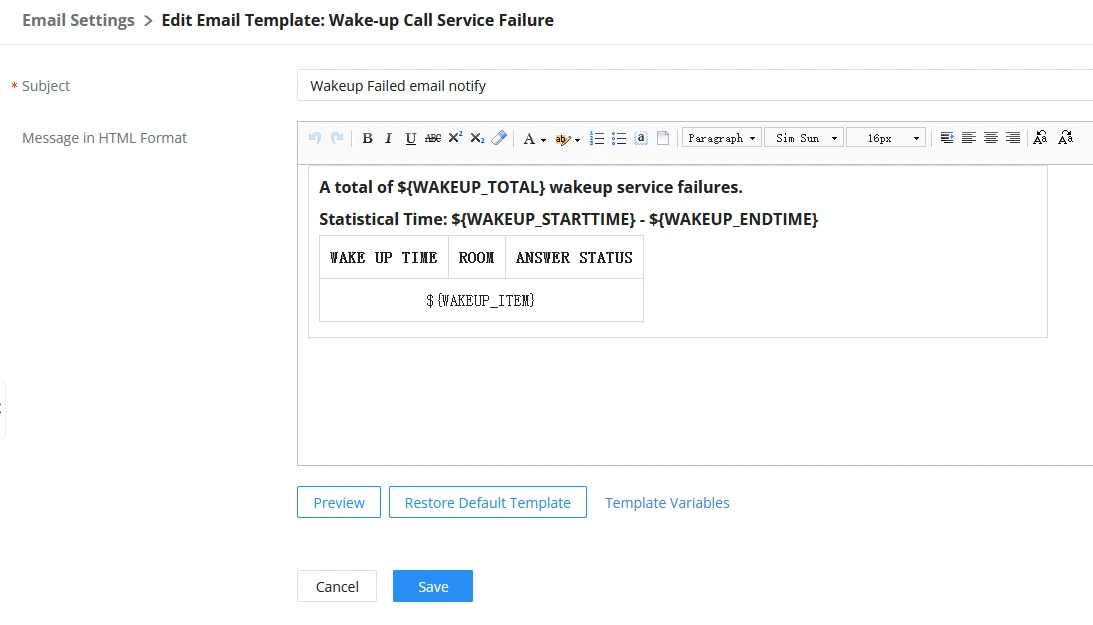
${WAKEUP_TOTAL} | Number of Wake-up Call Service Failure |
${WAKEUP_STARTTIME} | The Start Time of The Wake-up Call Failure Statistics |
${{WAKEUP_ENDTIME} | The End Time of the Wake-up Call Failure Statistics |
${{WAKEUP_ITEM} | Wake-up Call Failure Message |
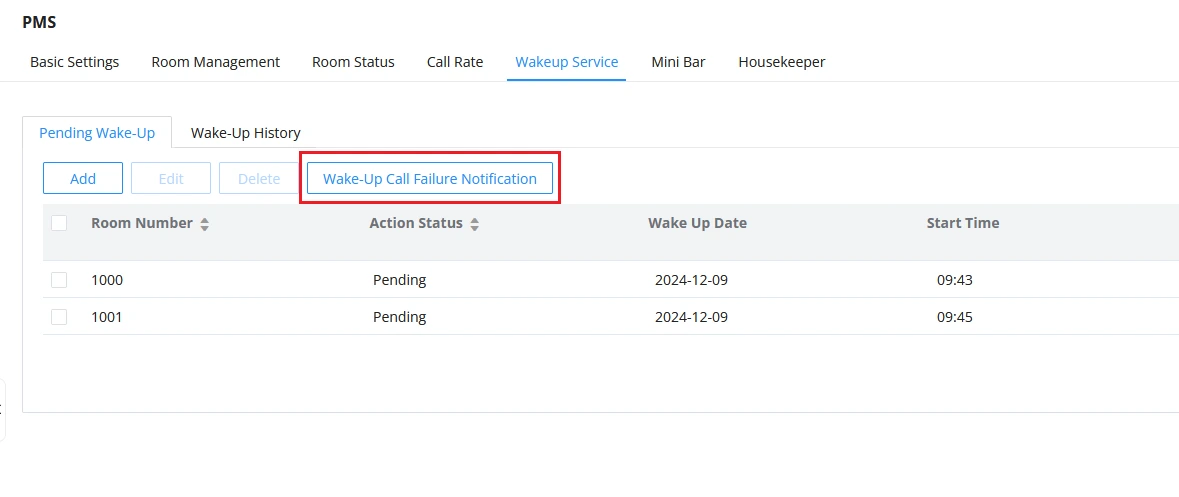
Users can enable the Wake-up Call Service Failure email under Integrations→PMS→Wakeup Service.
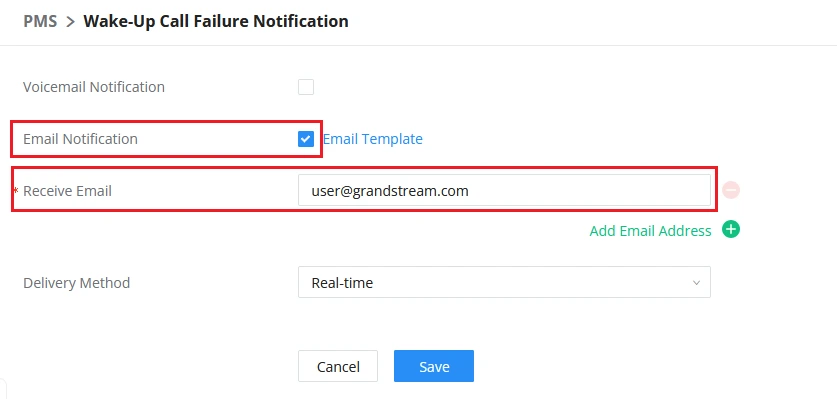
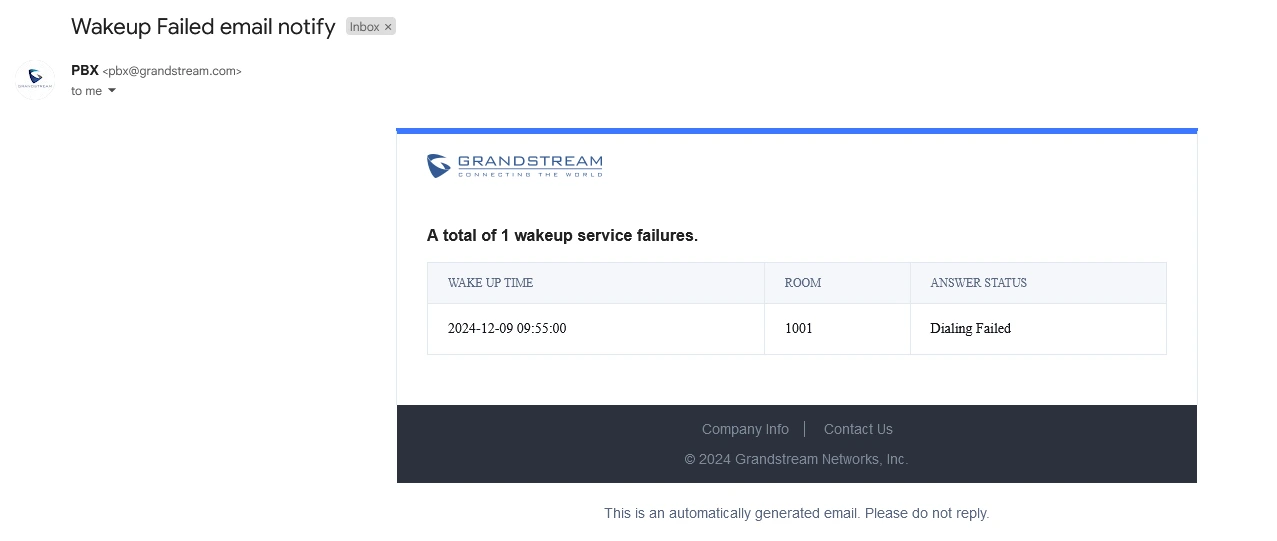
If a scheduled wake-up call fails, the email address configured above will receive the following message:
PMS Records
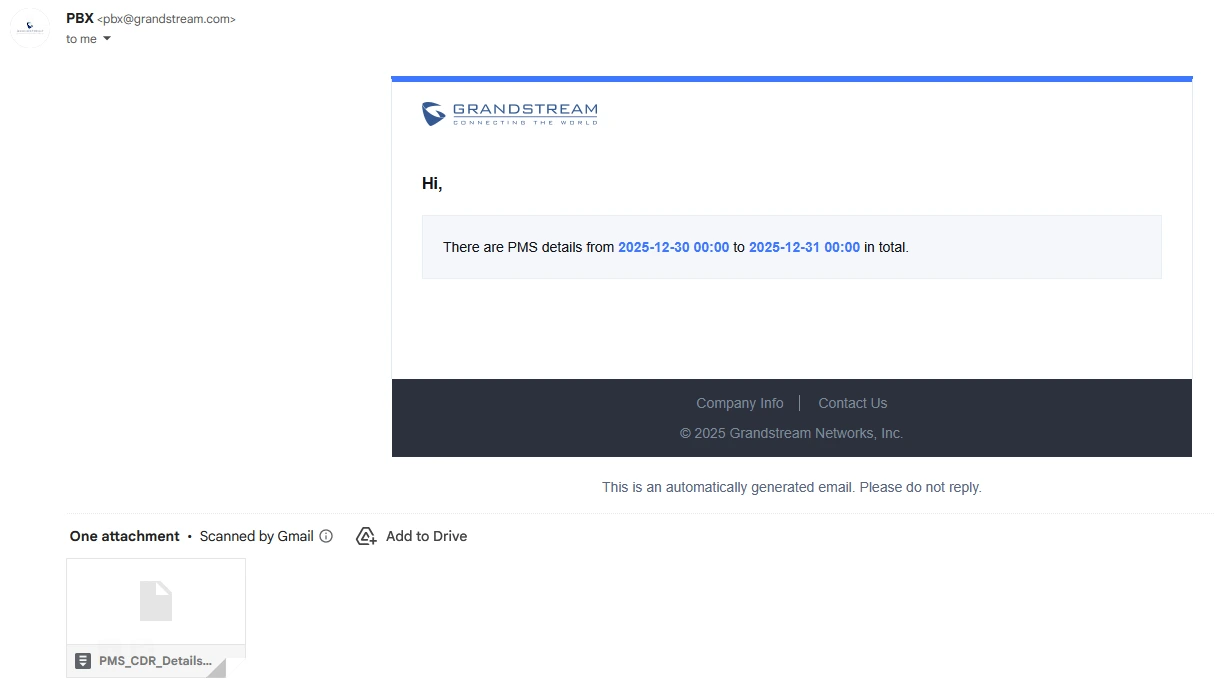
The PMS Records email template is used to automatically deliver past PMS data (such as wake-up logs, check-in/check-out history, or CDR PMS entries) to the configured recipient at scheduled intervals.
The export period is defined from the PMS Basic Settings page and may be daily, weekly, or monthly. The variables available for this template are listed below:
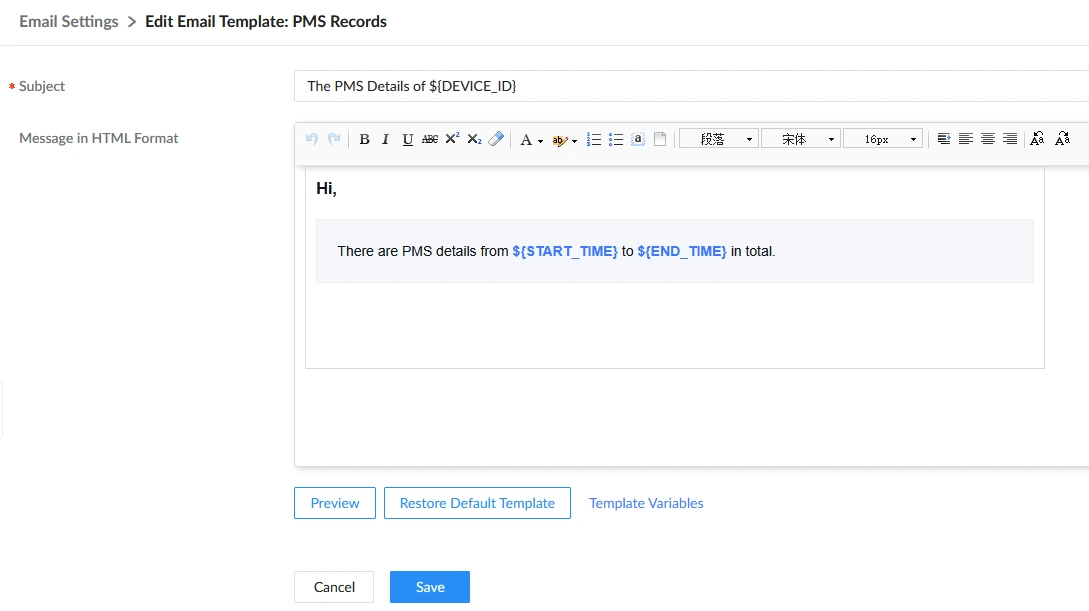
${DEVICE_ID} | The UCM identifier that generated the PMS export. |
${START_TIME} | Start timestamp of the PMS record export window. |
${END_TIME} | End timestamp of the PMS record export window. |
To configure automatic PMS records email delivery:
- Navigate to Integrations→PMS→Basic Settings.
- Enable Periodically Email Records.
- Under Type, select the PMS data you want included.
- Configure the Period and Time when the export should run.
- Enter one or more Email addresses to receive the PMS records.
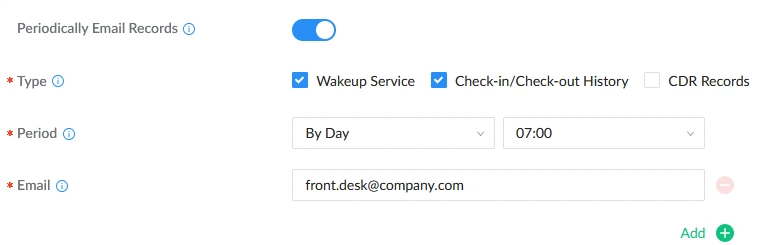
Once PMS record delivery is triggered, the configured recipients will receive an email similar to the example shown below.
Wake-up Call Service IVR Notification
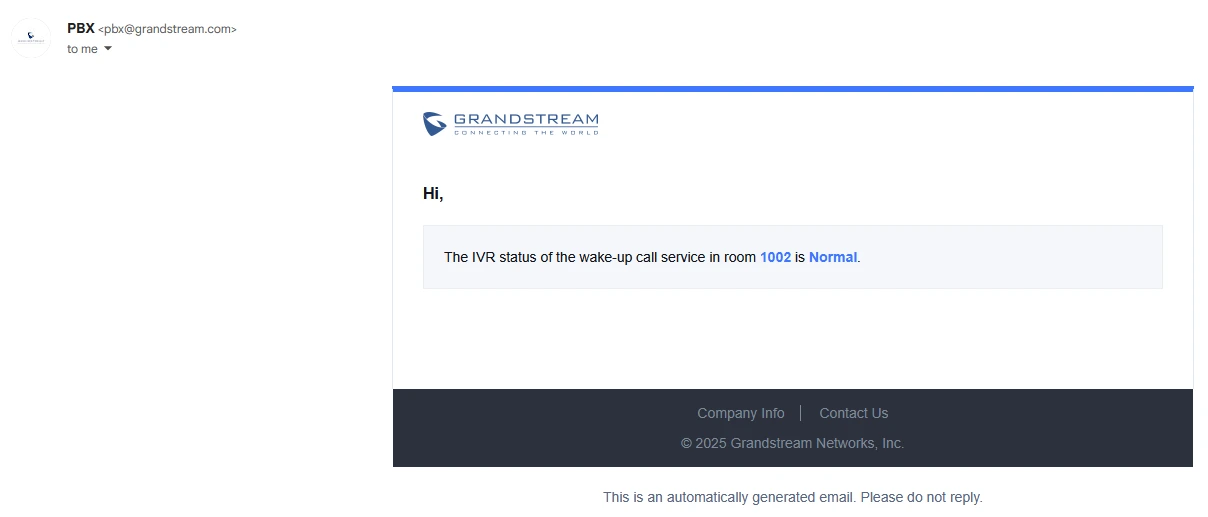
The Wake-up Call Service IVR Notification email template is used to notify designated recipients when a guest interacts with the Wake-up Call IVR. Based on the key pressed by the guest (for example, Normal, Need Help, or Abnormal), the UCM sends an email reporting the IVR status for the associated room.
This notification helps hotel staff respond quickly to guest requests or abnormal wake-up situations.
The variables available for this template are listed below:
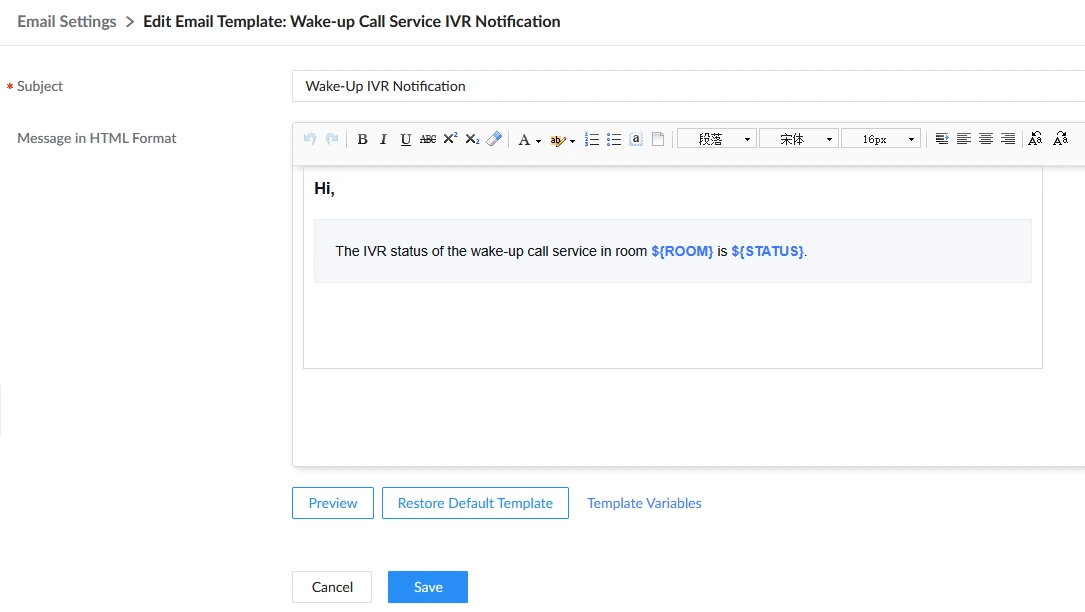
${ROOM} | Room number where the wake-up IVR was triggered. |
${STATUS} | Wake-up Call IVR press notification status associated with the pressed key. |
To configure IVR notifications for wake-up calls, please refer to the following instructions:
- Navigate to Integrations→PMS→Wakeup Service and create or edit a wake-up entry.
- Enable Wake-Up Call IVR.
- Select a Wake-up Call IVR Strategy (IVR flow).
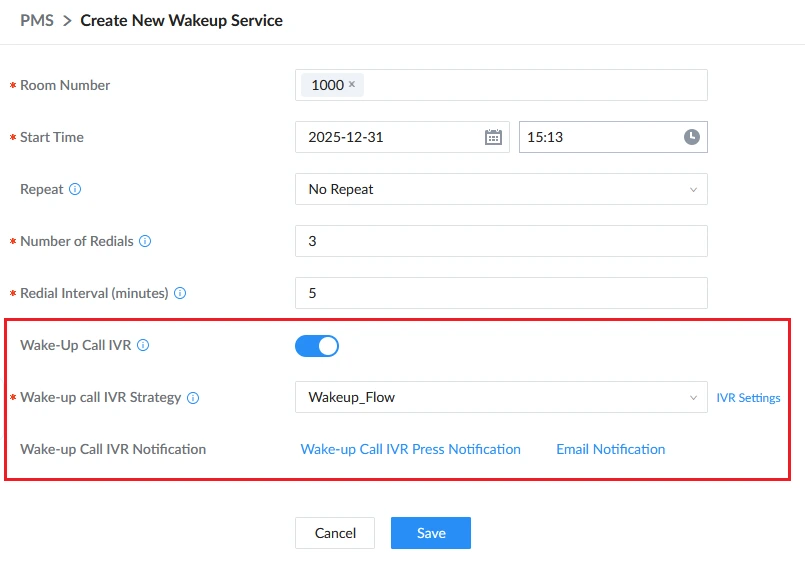
- Click Wake-up Call IVR Press Notification to map each IVR key to a status (Normal, Need Help, Abnormal, Custom, etc.).
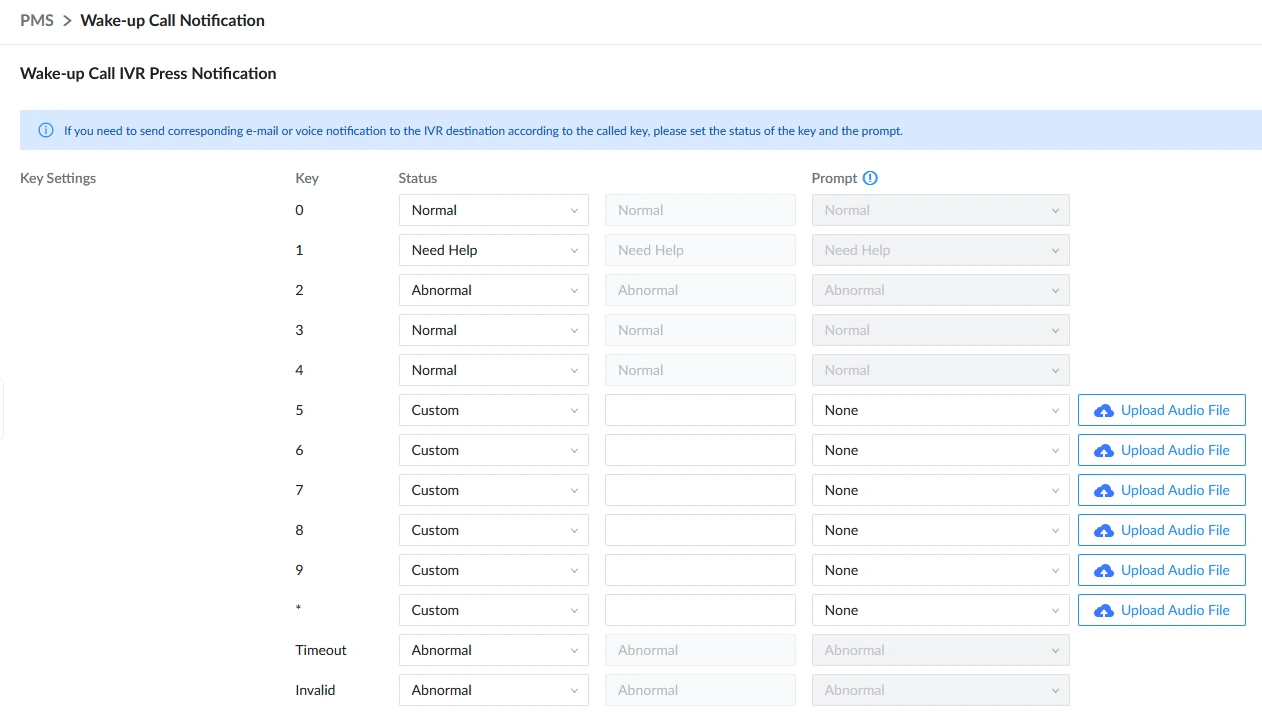
To configure email delivery when a guest presses a key during the wake-up IVR:
- Go to Basic Call Features→IVR, edit/create the wake-up IVR, and open Key Pressing Events.
- For each key, set Destination to Email (PMS Wake-up Call Notification).
- Enter the recipient email address (for example, front desk or hotel management).
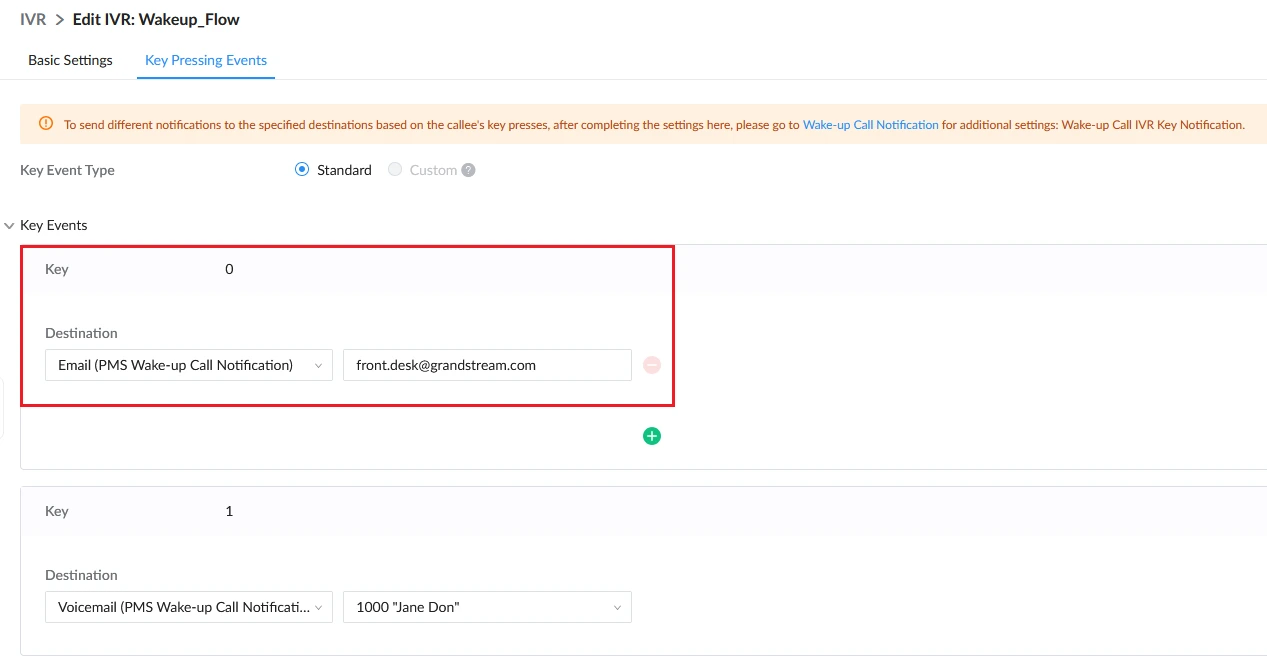
- Save and apply the configuration.
When the guest presses a key during the wake-up call, the UCM sends an email using the template, indicating the room number and IVR status.
Reservation Notification
The Reservation Notification email template is used to notify the booking contact when a reservation is created. The email includes the core reservation details such as guest contact information, room type, and expected stay period.
The variables available for this template are listed below:
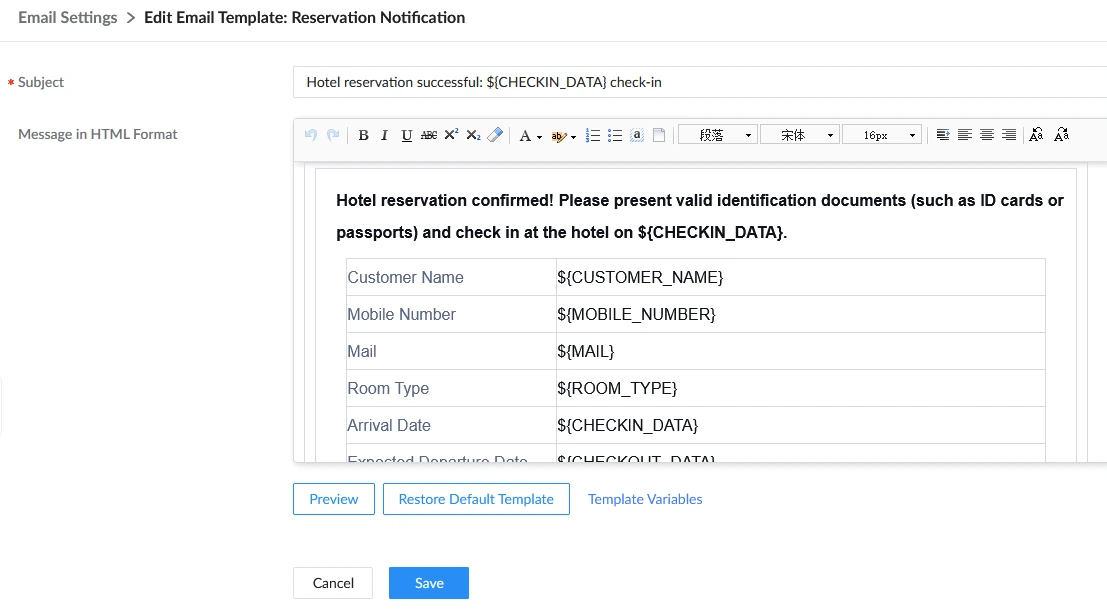
${CUSTOMER_NAME} | Booking contact name. |
${MOBILE_NUMBER} | Booking contact mobile phone. |
${MAIL} | Booking contact email address. |
${ROOM_TYPE} | Reserved room type. |
${CHECKIN_DATA} | Estimated check-in time. |
${CHECKOUT_DATA} | Expected check-out time. |
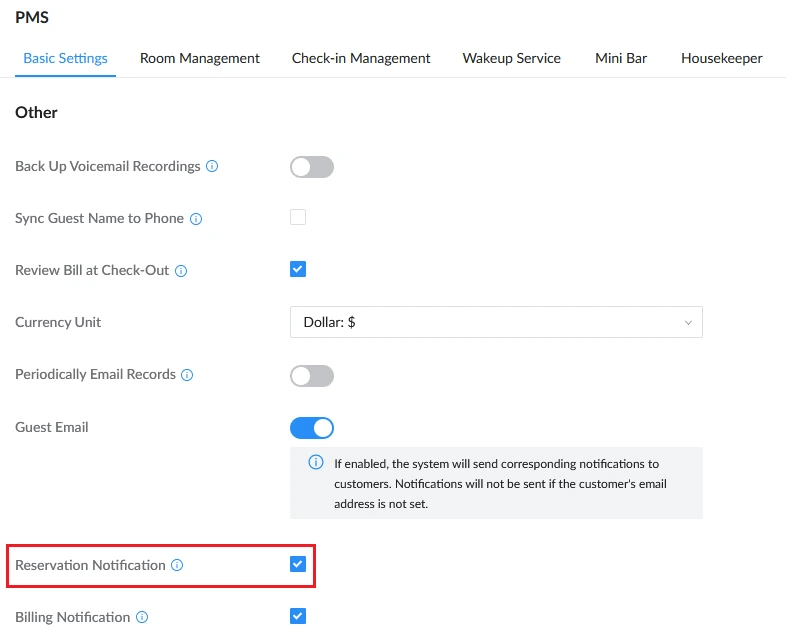
To allow the PMS to automatically send reservation emails:
- Navigate to Integrations→PMS→Basic Settings.
- Enable Guest Email.
- Enable Reservation Notification.
- Ensure the reservation record contains a valid customer email address.
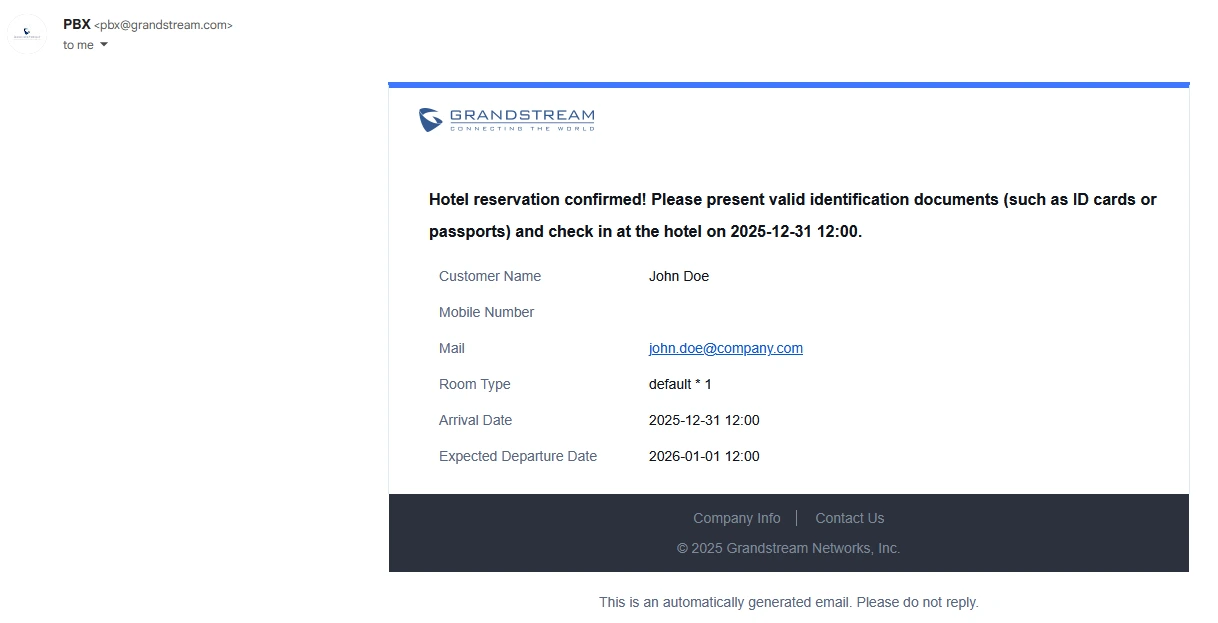
Once a reservation is successfully created, the booking contact will receive an email similar to the example shown below, summarizing the reservation details.
Reservation Cancellation Notification
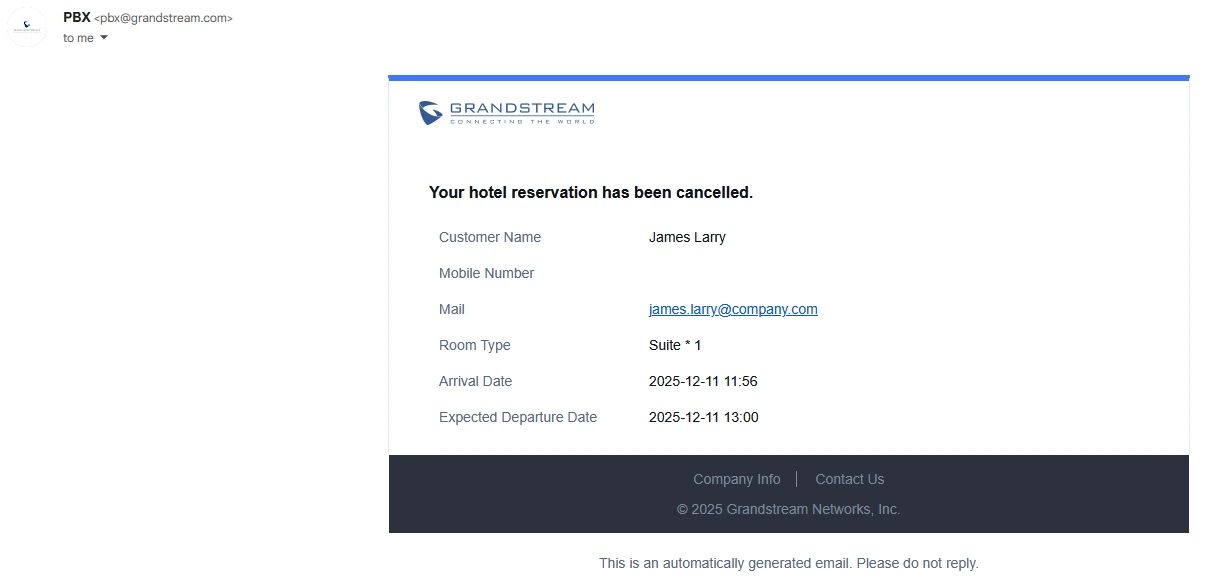
The Reservation Cancellation Notification email template is used to notify the booking contact when an existing reservation is cancelled. The email summarizes the reservation details and confirms that the booking is no longer active.
Cancellation notifications are sent automatically when reservation records are deleted or cancelled in the PMS, provided that reservation email notifications are enabled.
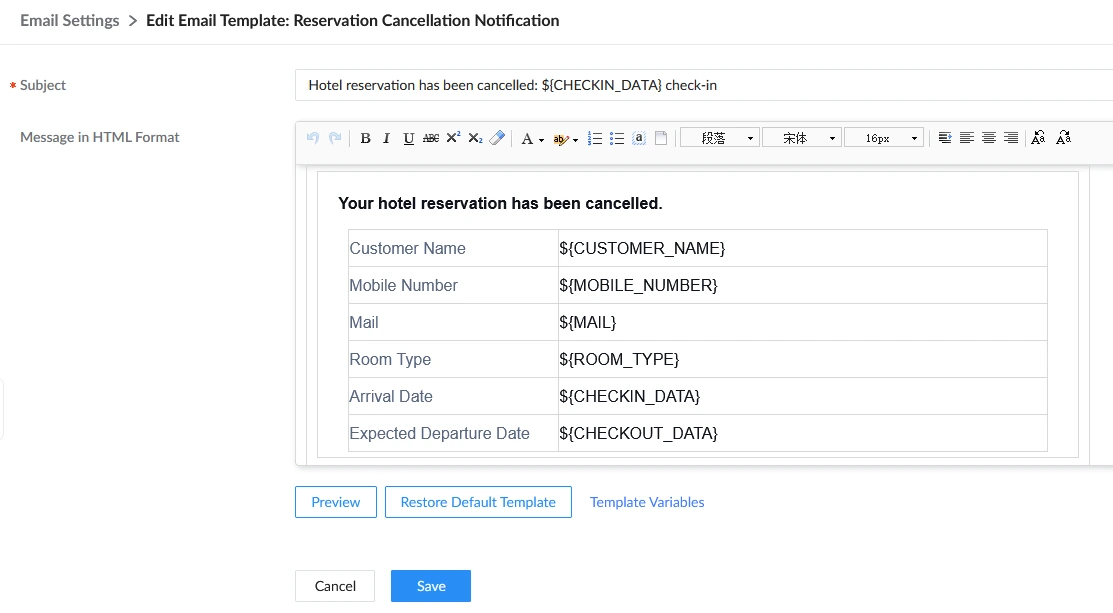
${CUSTOMER_NAME} | Booking contact name. |
${MOBILE_NUMBER} | Booking contact mobile phone. |
${MAIL} | Booking contact email address. |
${ROOM_TYPE} | Reserved room type. |
${CHECKIN_DATA} | Estimated check-in time. |
${CHECKOUT_DATA} | Expected check-out time. |
To enable automatic cancellation notifications:
- Navigate to Integrations→PMS→Basic Settings.
- Enable Guest Email.
- Enable Reservation Notification.
- Ensure the reservation record contains a valid customer email address.
Once a reservation is cancelled, the booking contact will receive an email similar to the example shown below, confirming the cancellation and listing the reservation details.
Billing Notification
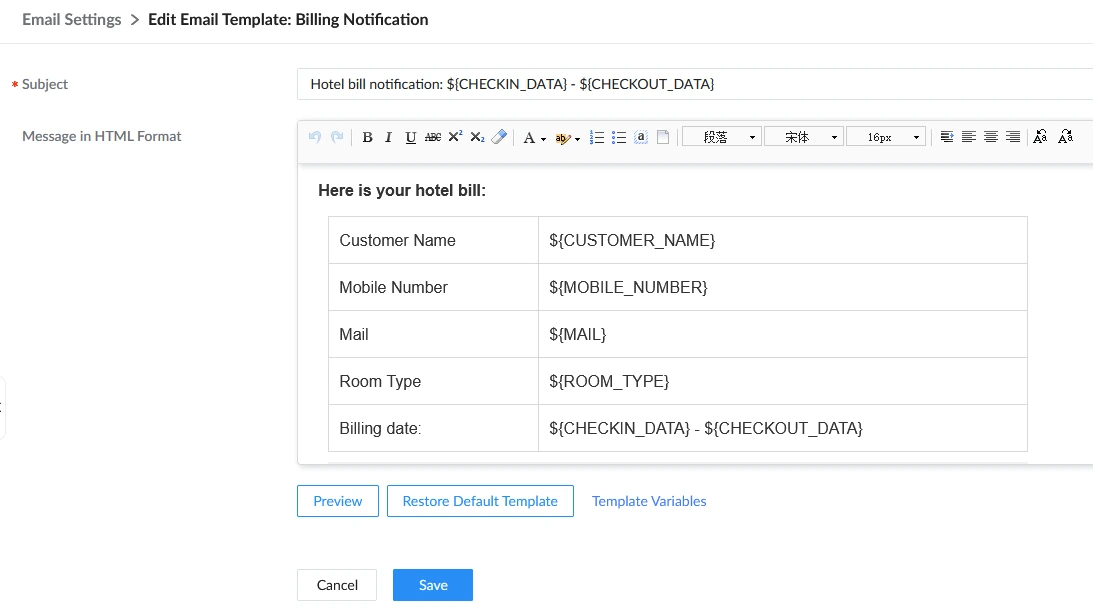
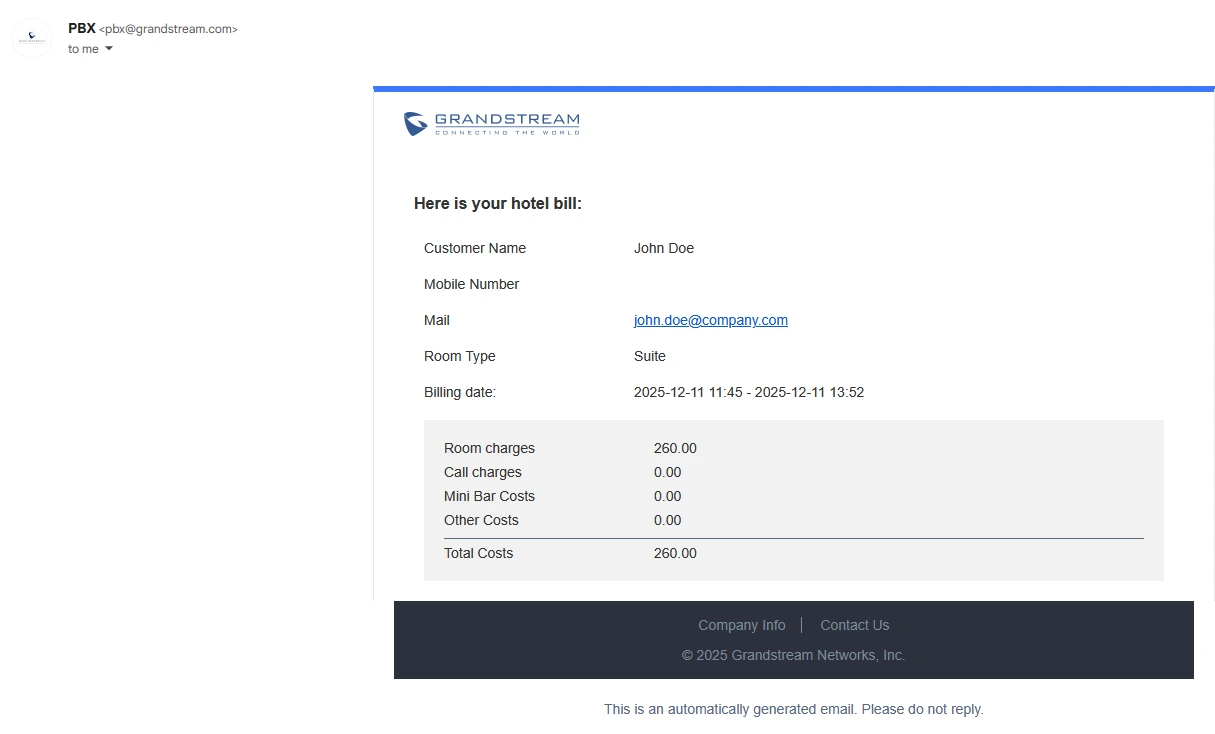
The Billing Notification email template is used to send guests a summary of their hotel bill during check-out. The email includes the guest’s contact information, room type, stay period, and a breakdown of billable charges such as room fees, call charges, minibar costs, and any additional charges applied during the stay.
The variables available for this template are listed below:
${CUSTOMER_NAME} | Booking contact name. |
${MOBILE_NUMBER} | Booking contact mobile phone. |
${MAIL} | Booking contact email address. |
${ROOM_TYPE} | Room type assigned to the guest. |
${CHECKIN_DATA} | Actual check-in time. |
${CHECKOUT_DATA} | Actual check-out date. |
${ROOM_CHARGES} | Total room fee for the stay. |
${CALL_CHARGES} | Total call charges incurred. |
${MINI_BAR_COST} | Total minibar charges. |
${OTHER_COSTS} | Additional charges applied. |
${TOTAL_COSTS} | Overall total cost for the stay. |
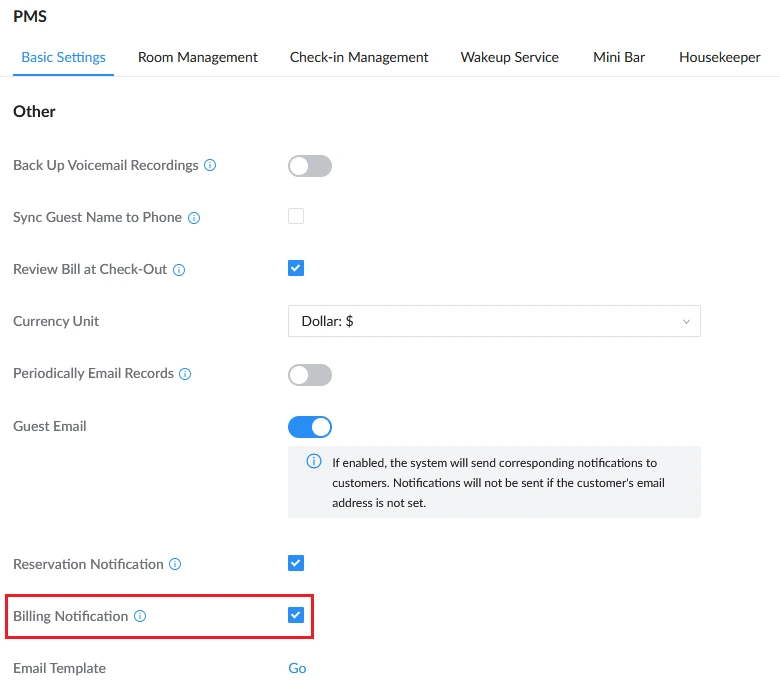
To allow the PMS to automatically send billing emails:
- Navigate to Integrations→PMS→Basic Settings.
- Enable Guest Email.
- Enable Billing Notification.
- Ensure the guest profile or reservation includes a valid email address.
During check-out, the guest will receive an email similar to the example shown below, summarizing their stay and all associated charges.
Self-Check-in Notice
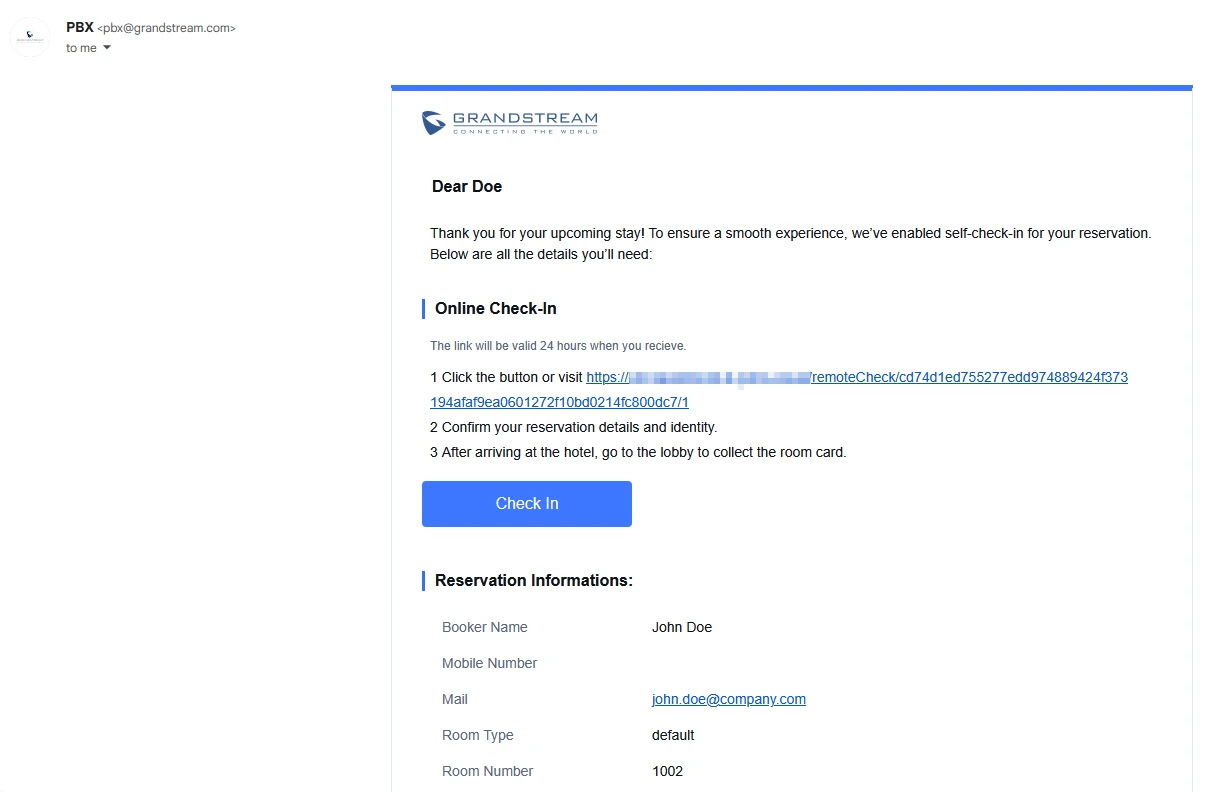
The Self-Check-In Notice email template is used to guide guests through the online check-in process. The email contains a secure self-check-in link, reservation details, and step-by-step instructions that the guest must complete prior to arrival.
The variables available for this template are listed below:
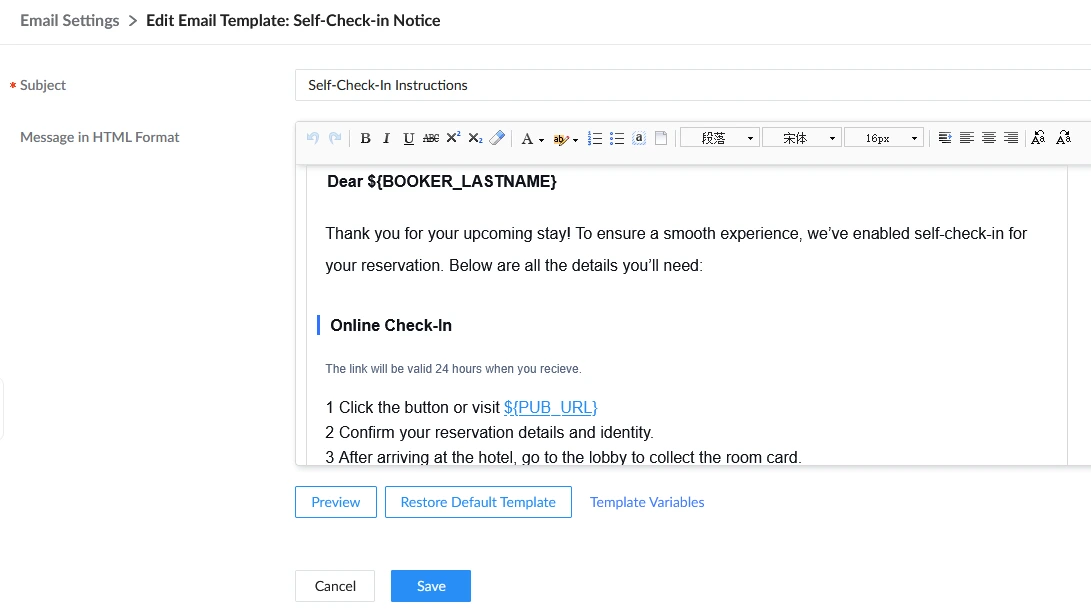
${BOOKER_LASTNAME} | Booking contact last name. |
${BOOKER_NAME} | Booking contact first name. |
${MOBILE_NUMBER} | Booking contact phone number. |
${MAIL} | Booking contact email address. |
${ROOM_TYPE} | Reserved room type. |
${ROOM_NUMBER} | Assigned room number (if pre-assigned). |
${CHECKIN_DATE} | Estimated check-in date and time. |
${CHECKOUT_DATE} | Expected check-out date and time. |
${PRE_PAYMENT} | Paid amount before arrival (if applicable). |
${PUB_URL} | Public self-check-in link. |
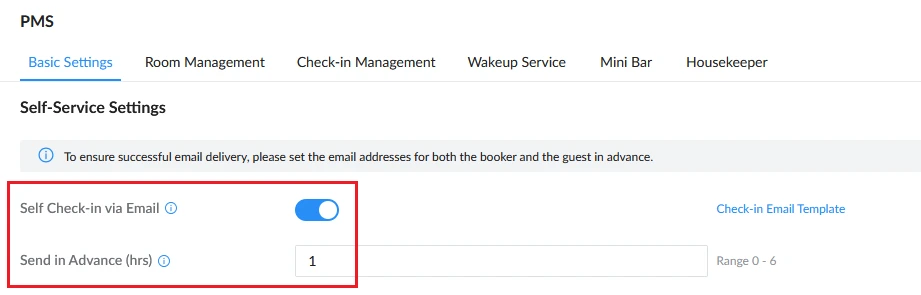
To automatically send self-check-in emails to guests, please refer to these instructions:
- Navigate to Integrations→PMS→Basic Settings.
- Under Self-Service Settings, enable Self Check-in via Email.
- Configure Send in Advance (hrs) to define how long before arrival the email is sent.
- Ensure a valid email address is configured for the booking contact.
Before the guest’s estimated check-in, the system sends a self-check-in email similar to the example shown below. The guest can click the link to complete identity verification and check-in steps online.
Self Check-Out Notice
The Self-Check-Out Notice email template is used to notify guests before their scheduled departure that self-service check-out is available. The email provides a secure link the guest can use to review payment, confirm departure, and complete check-out without visiting the front desk.
The variables available for this template are listed below:
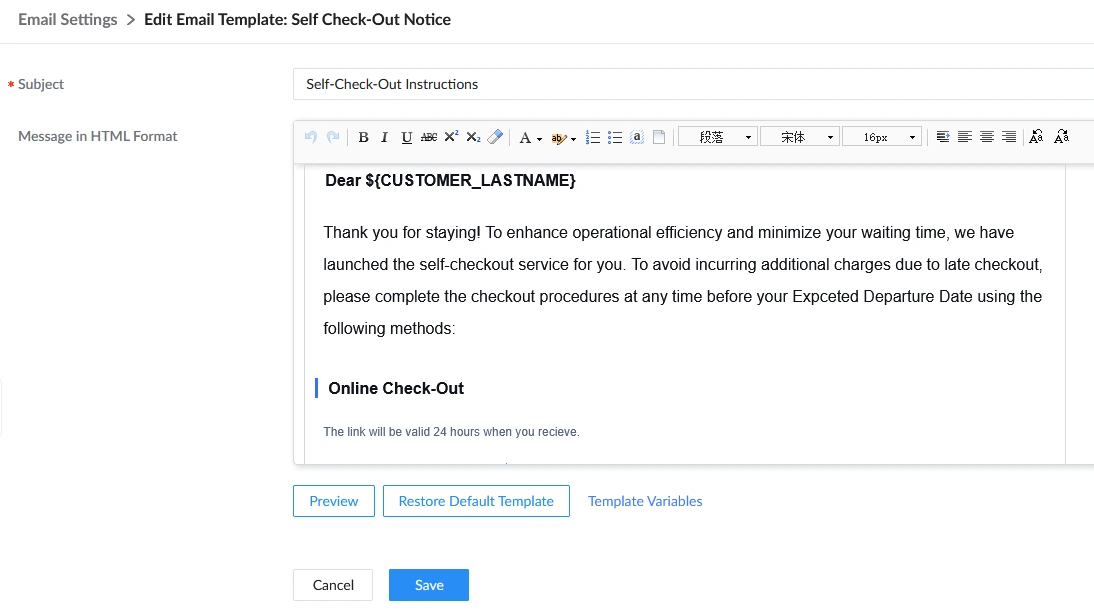
${CUSTOMER_LASTNAME} | Guest last name. |
${CUSTOMER_NAME} | Guest full name. |
${MOBILE_NUMBER} | Guest contact phone. |
${MAIL} | Guest email address. |
${ROOM_TYPE} | Room type assigned to the guest. |
${ROOM_NUMBER} | Current room number. |
${CHECKIN_DATE} | Check-in time. |
${CHECKOUT_DATE} | Expected check-out time. |
${PRE_PAYMENT} | Amount paid in advance (if applicable). |
${PUB_URL} | Public self-check-out link. |
To automatically send self-check-in emails to guests, please refer to these instructions:
- Navigate to Integrations→PMS→Basic Settings.
- Under Self-Service Settings, enable Self Check-Out via Email.
- Configure Send in Advance (hrs) to define how long before check-out the email is delivered.
- Ensure a valid email address exists in the reservation record.
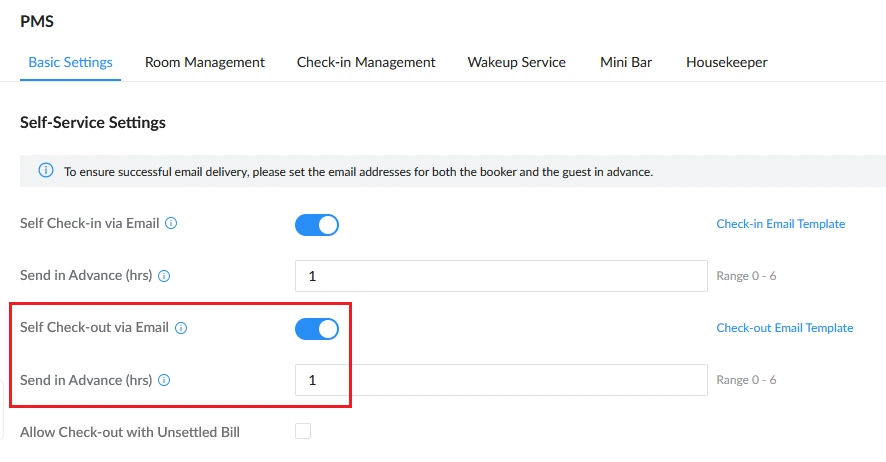
Before departure, the system sends a self-check-out email similar to the example shown below. Guests can use the link to complete the process online and finalize their stay.