
The UCM6300/A series IP PBX provides UCM RemoteConnect service which offers users a quick setup to start working remotely including GS Wave web app using WebRTC and Wave mobile app on Android and iOS system to communicate and join meetings, sync up and manage extension, receive alerts and reports, view and manage storage via cloud, and much more. The UCM6300/A UCM RemoteConnect service is offered via Grandstream Device Management System (GDMS). Please visit GDMS platform for UCM RemoteConnect service plan information and purchasing plan, device remote management, cloud storage management and etc.
This document describes how to configure end users’ IP phones to register to UCM6300/A series IP PBX UCM using RemoteConnect service. With RemoteConnect service, IP phones behind NAT can register to UCM6300/A series and communicate with other devices without additional settings in your network.
Prerequisites
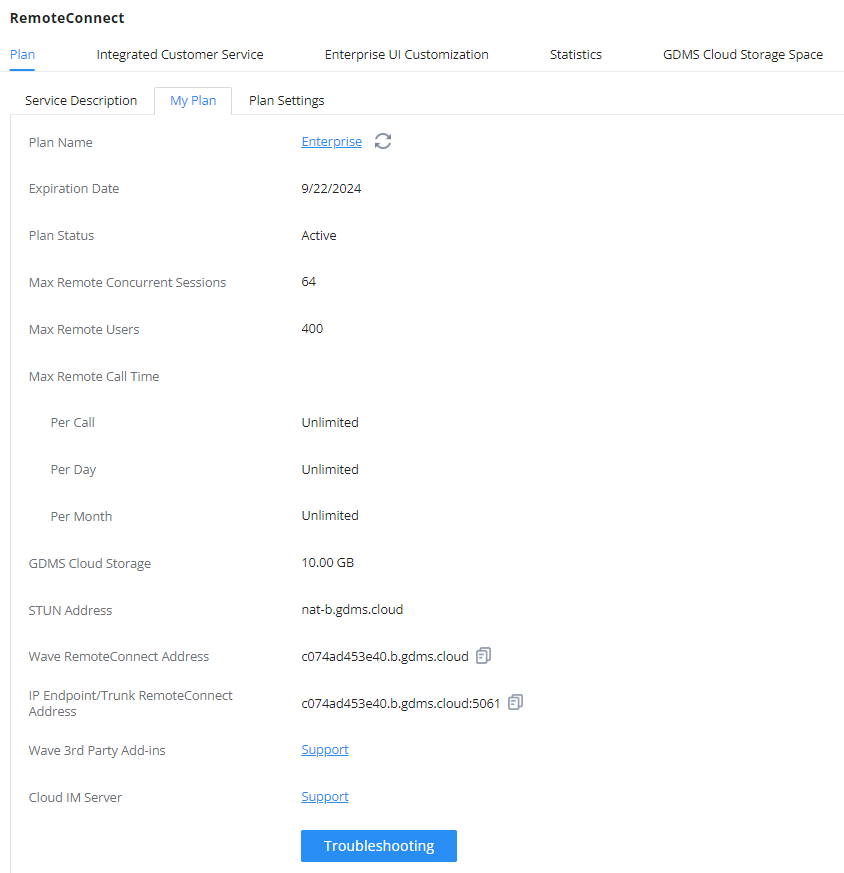
The UCM RemoteConnect service on UCM6300/A series must be used with Grandstream Device Management System (GDMS). After the UCM is connected with GDMS, the RemoteConnect information displays as below on UCM6300/A web GUI🡪UCM RemoteConnect page. In this page, STUN Address, UCM Public Address and Public TLS Port information are needed for IP phone to register to UCM6300/A series.
The clients can configure the IP phone to register to UCM6300/A series and manage the IP phone remotely via GDMS, or directly configure the account information on IP phone manually.
Configure SIP Extensions on GDMS
The GDMS admin can configure SIP extensions remotely with the settings required for RemoteConnect. To do so please follow the steps below:
Step 1: In your web browser, open the GDMS address and log in with your GDMS account: http://www.gdms.cloud/login
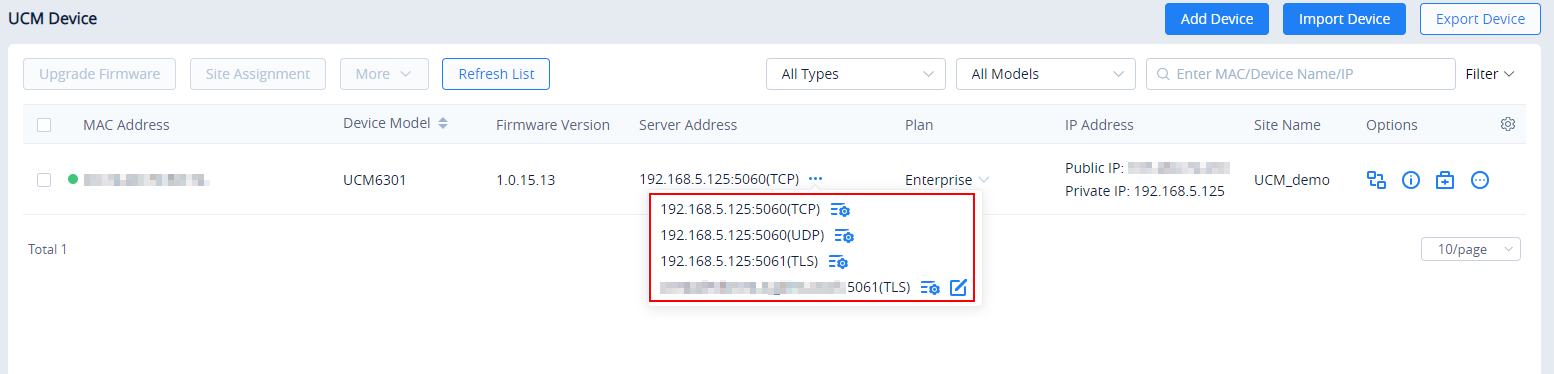
Step 2: After adding UCM into your GDMS, got UMCRC System and UCM Device to quickly navigate all the SIP servers. For a specific SIP server address, users can click on icon  to quickly check the SIP server settings.
Step 3: To assign/modify the IP Phones, firstly go to the Extension page on GDMS. Users can check all the extension information and modify the SIP server for the extensions as long as the server is under the same organization. See Figure 3 for an example.
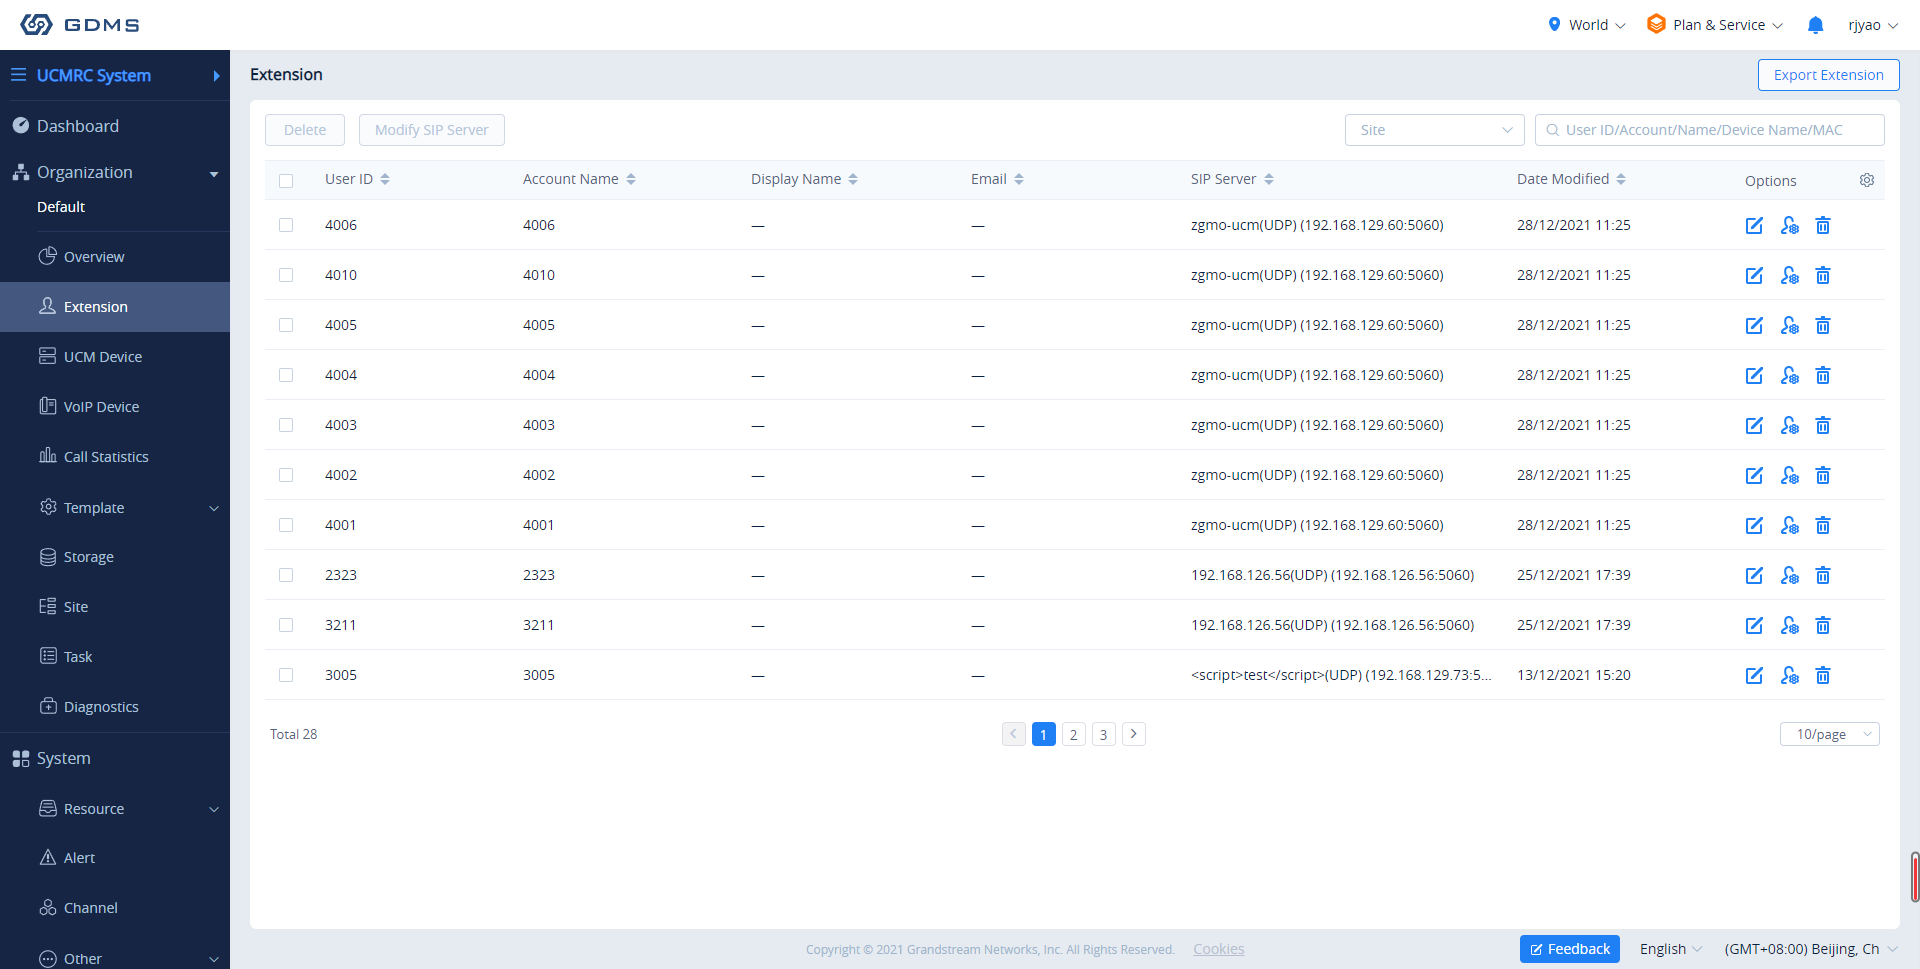
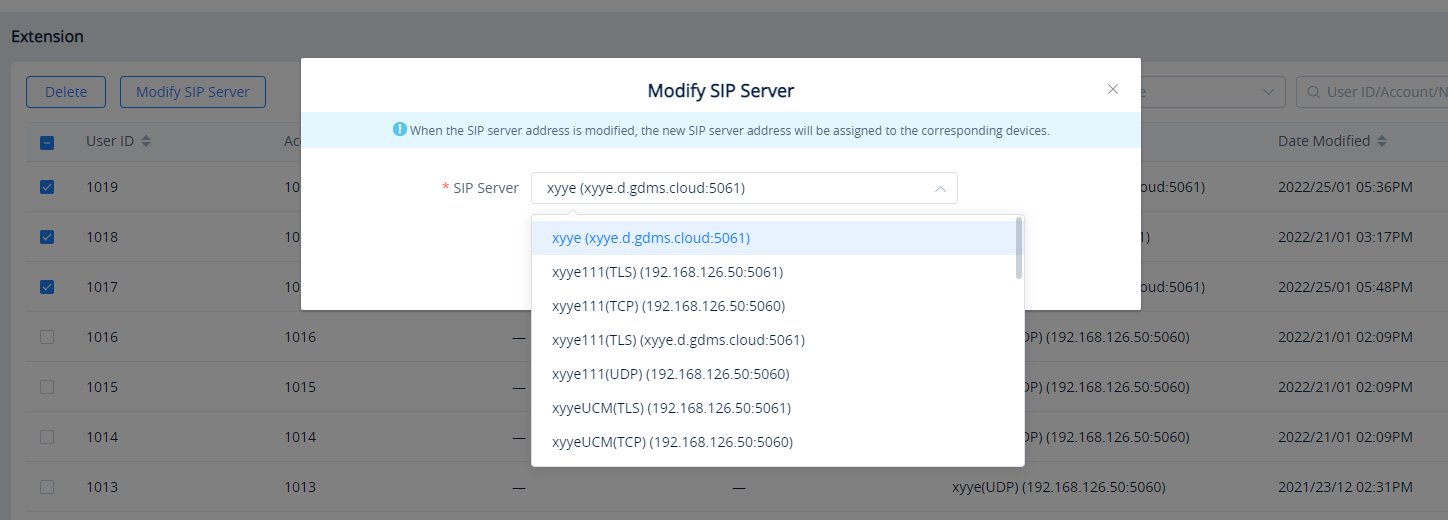
- Select the desired extension(s).
- Click on
 then select the server.
 - Click on “Save” to apply changes. After changing the SIP server, the new settings will be pushed to the associate extensions.
Configuring SIP Accounts on End Devices
IP phone end devices behind NAT in external networks can register to the UCM6300/A series for remote work purposes.
Method 1: Configure SIP Account from End Device Web User Interface
In this method, the user needs to configure the SIP server on the end device web UI using the UCMRC SIP Phone/Trunk Traversal Address and configure NAT to STUN with a specific STUN server. For SIP transport protocol, it must be set to TLS using TLS version 1.2.
Please refer to the below configuration example on GXV3370.
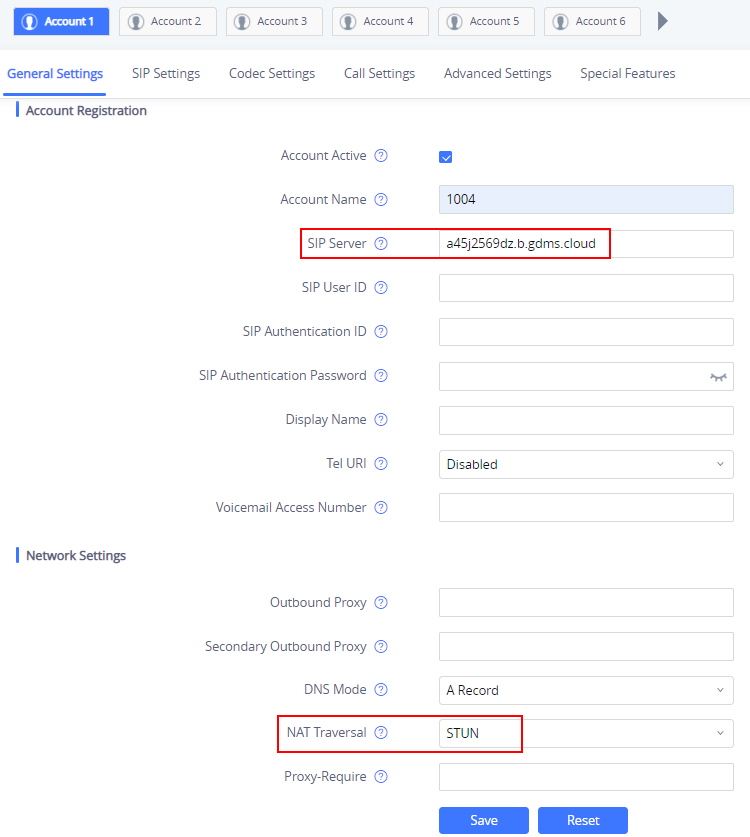
Step 1: Log in GXV3370 web UI as admin, navigate to Account🡪Basic Settings page and configure the following:
- SIP Server: Enter the UCM Public Address: Public TLS Port. This information can be found under UCM Web GUI🡪RemoteConnect🡪Plan page.
- NAT Traversal: STUN
Step2: Go to Account🡪SIP Settings and configure SIP transport to “TLS”.

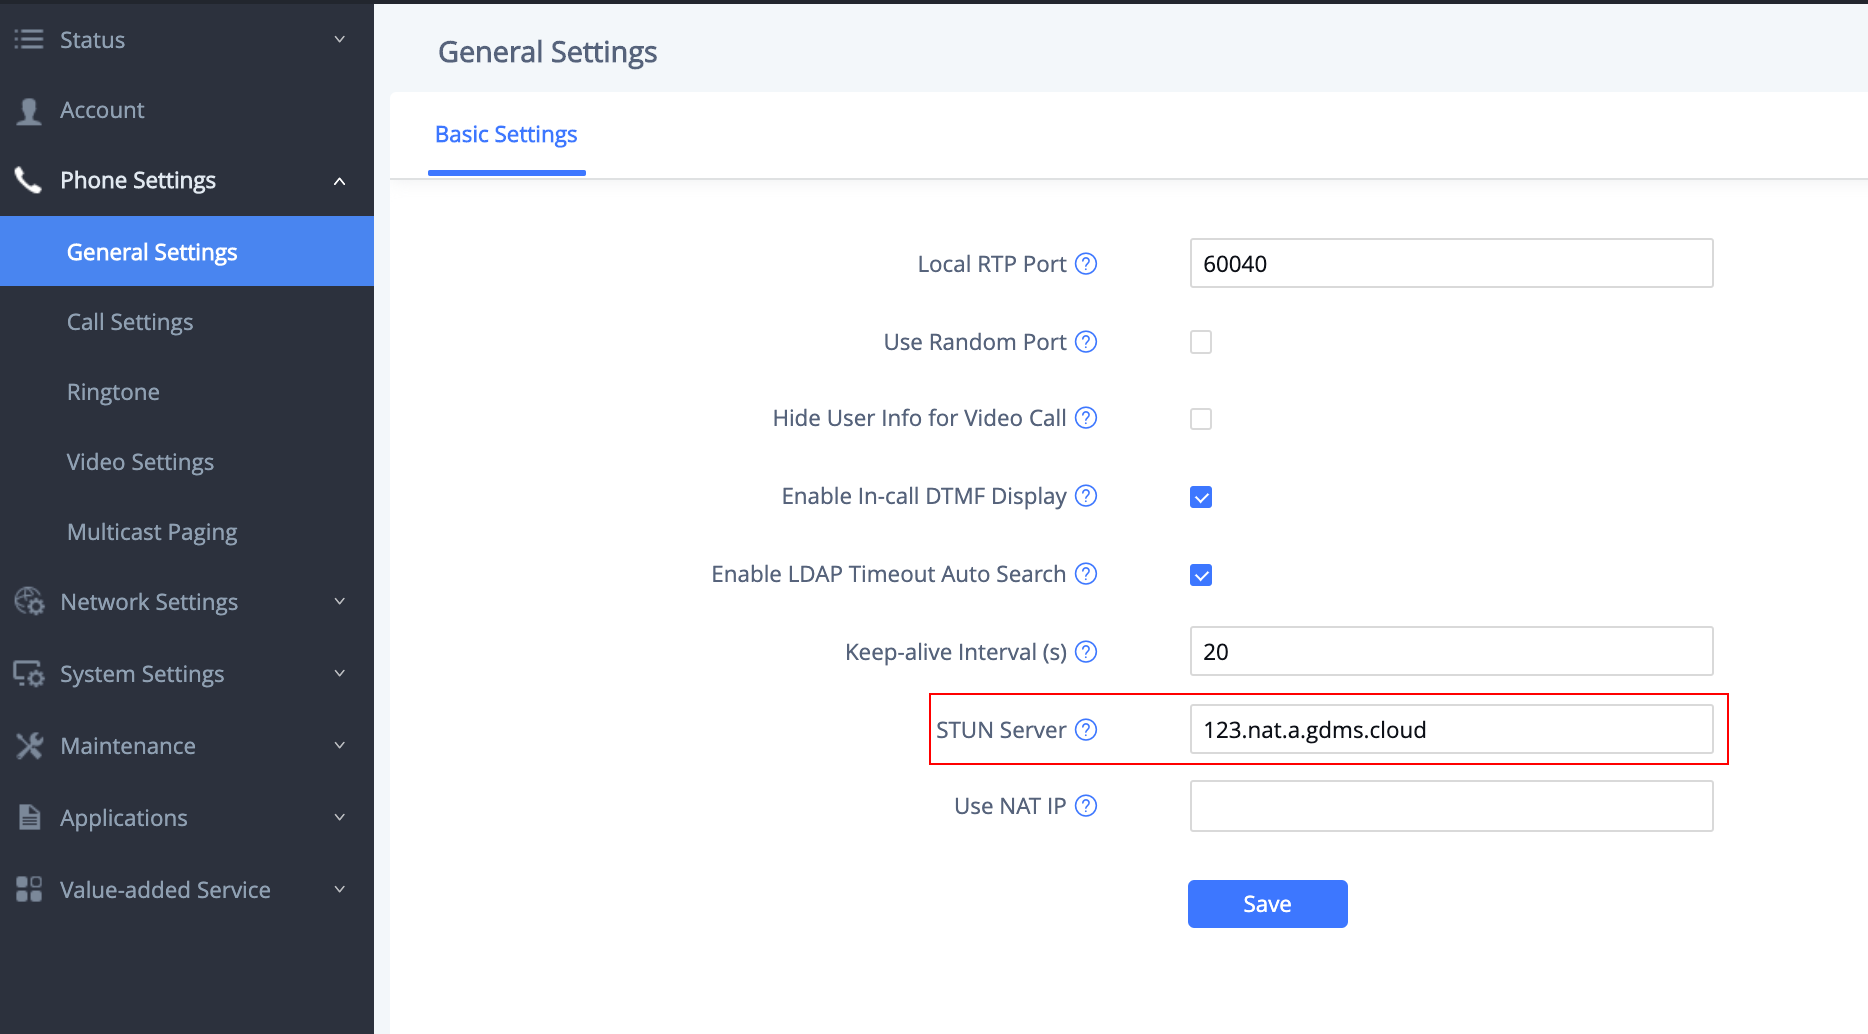
Step 3: Go to phone’s Web UI🡪Phone Settings🡪General Settings, configure the STUN server to be same as the one under UCM Web UI🡪 RemoteConnect🡪Plan page.
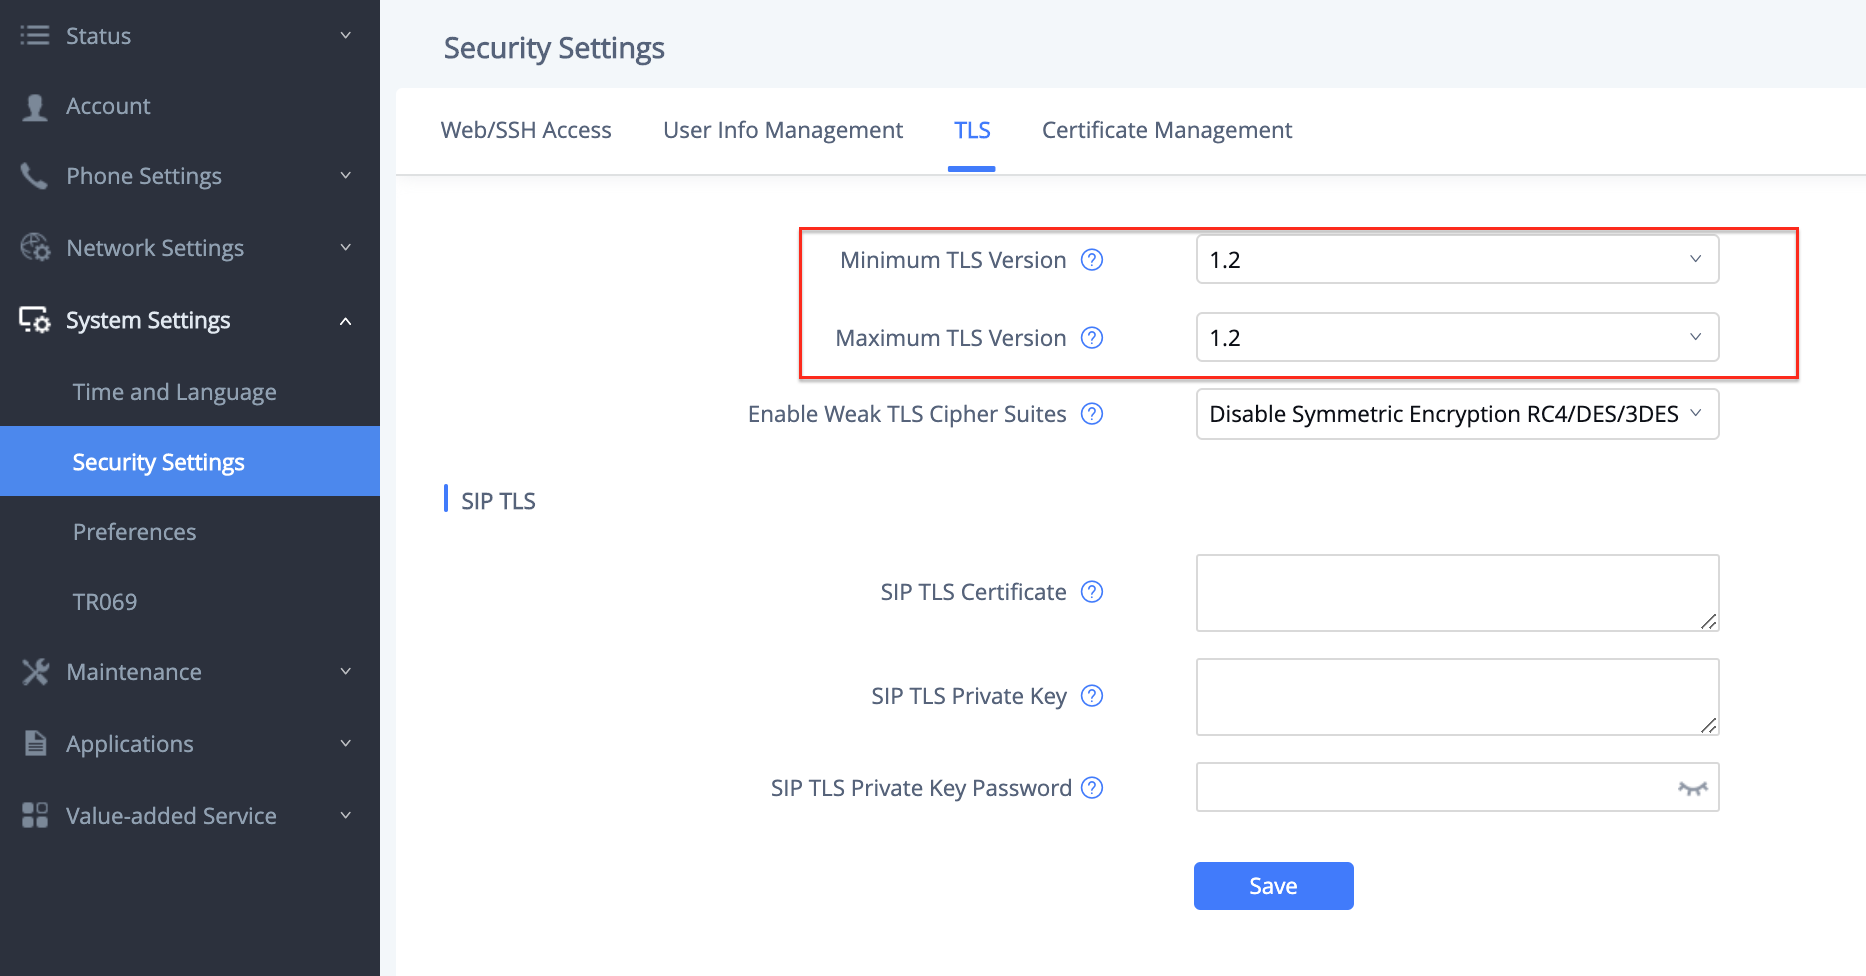
Step 4: Go to the phone’s web UI🡪System Settings🡪Security Setting🡪TLS page, configure “Minimum TLS Version” and “Maximum TLS Version” to be 1.2
Method 2: Assign SIP Account for End Device from GDMS
In this method, user needs to log in GDMS to assign SIP account to the end device.
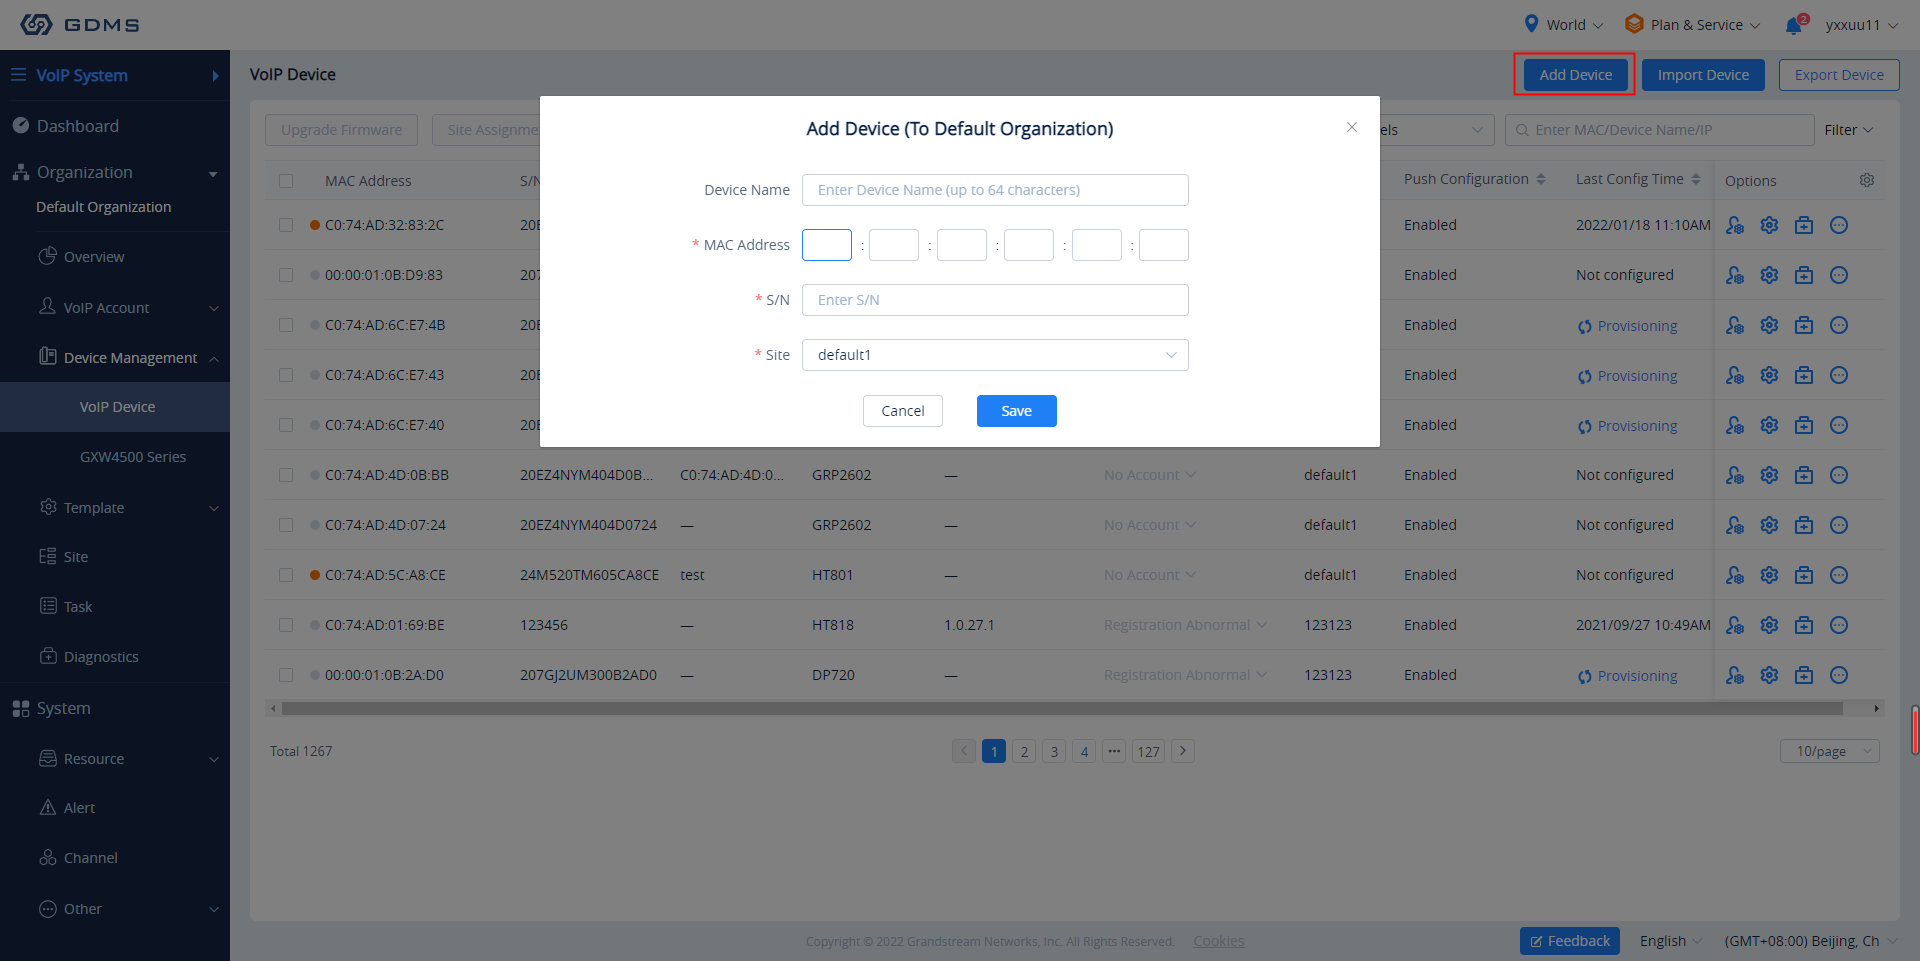
Step 1: Add the end device as VOIP Device to GDMS. Click on “Save” to save the configuration.
Step 2: There are two methods to assign the SIP accounts for the end device on GDMS.
Assign Method (1): Configure SIP Accounts from VoIP Device Page
a. In the VoIP Device Page, click on ![]() to enter the Account Configuration page.
to enter the Account Configuration page.
b. In this page, users can choose to deploy the extensions from the Extension page to the device.
They can also change the existing extension to another or remove existing extensions.
c. Save and apply the configuration.

Assign Method (2): Assign SIP Account from Extension Page
Step 1: Select “UCMRC System” on the upper left page in GDMS and go to the Extension page, select the extension that needs to be assigned to the phone, and click ![]() to assign an account.
to assign an account.
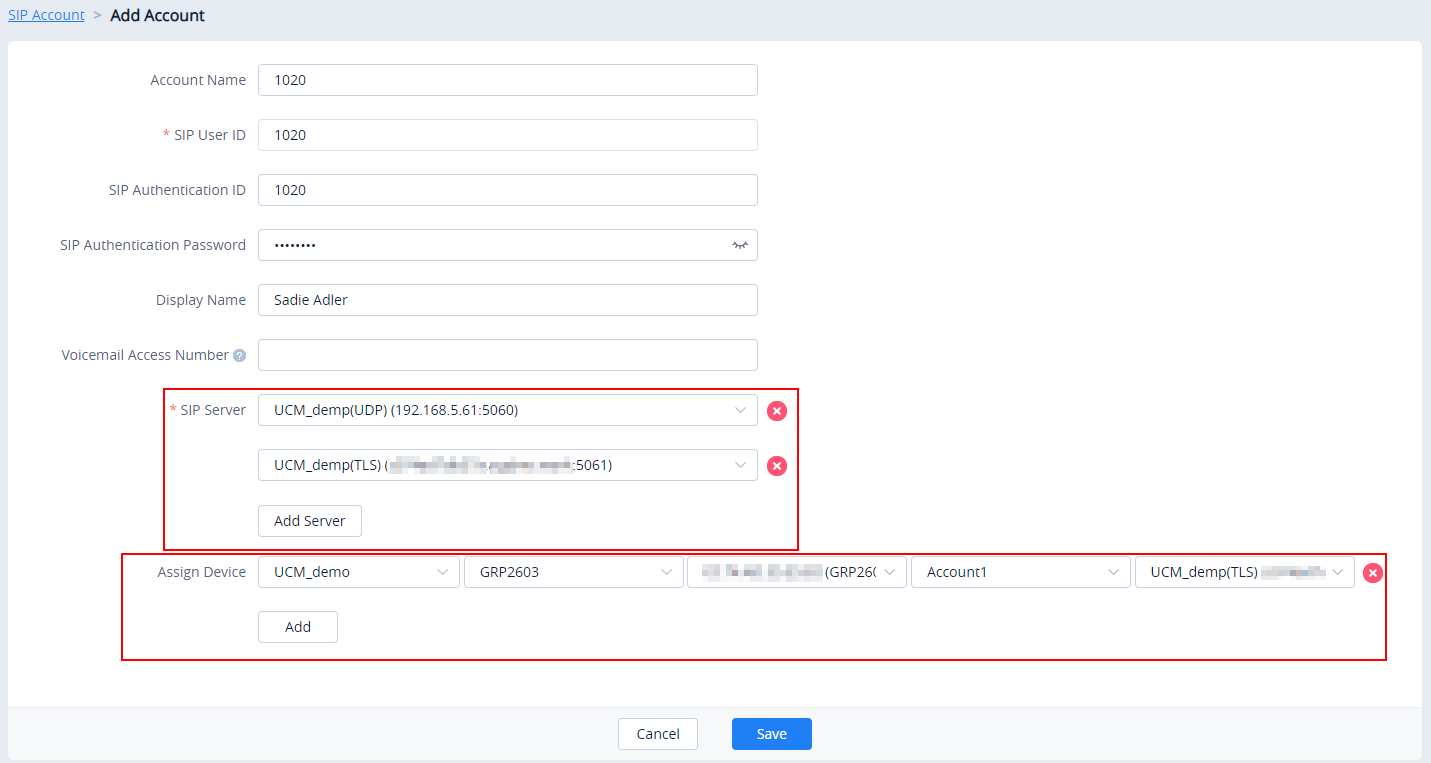
Step 2: Click the “Add Server” button and select the server address that the user wants to add for the extension.
Step 3: Assign the server to the phone. Select the site, device, MAC address, account location and the UCMRC server address to assign.
Step 4: Click the “Save” option to complete assigning the extension to the phone.
Make Calls using IP Phones
After configurating the IP phones with UCM RemoteConnect service, users can use the phone to make audio/video calls and join GS Wave audio/video conferences.
Below are the Grandstream devices that supports RemoteConnect services with UCM6300/A series:
- GXV3350/GXV3370/GXV3380
- GXP series
- GRP series
- WP820
- DP750
- GVC series.