


In this guide, we will introduce the configuration parameters of the GCC6020 Firewall Module.
OVERVIEW
The overview page gives users global insight into the GCC firewall module, security threats, and statistics. The overview page contains:
- Firewall Service: displays the license type, active period, and authorized security services, including Anti-Malware, IDS/IPS, Application Identification, and others. Licensed services are automatically activated. Users can manually check the service status by clicking Refresh, which displays the last updated time in a tooltip. For more details, click Learn More to visit the official firewall service info page: cloud.grandstream.com/firewall
- Top Security Log: shows the top logs for each category. The user can select the category from the drop-down list or click on the arrow icon to get redirected to the security log page for more details.
- Protection Statistics: This displays various protection statistics. You can clear all the statistics by clicking on the settings icon.
- Top Filtered Applications: shows the top applications filtered with the count number.
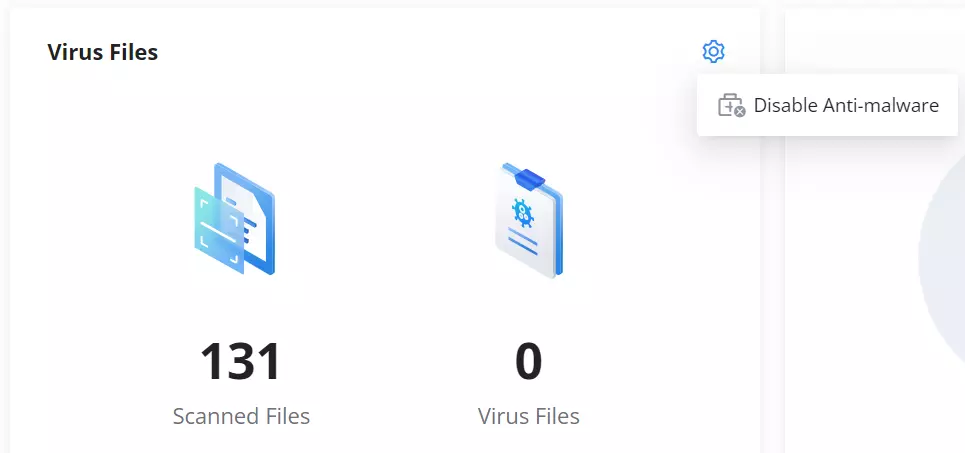
- Virus Files: displays the scanned files and found virus files as well, to enable/disable the anti-malware, the users can click on the settings icon.
- Threat Level: shows the threat level from critical to minor with a color code.
- Threat Type: displays the threat types with color code and number of repetitions; the users can hover the mouse cursor over the color to display the name and the number of occurrences.
- Top Threat: shows top threats with type and count.
The users can easily spot the most important notifications and threats.
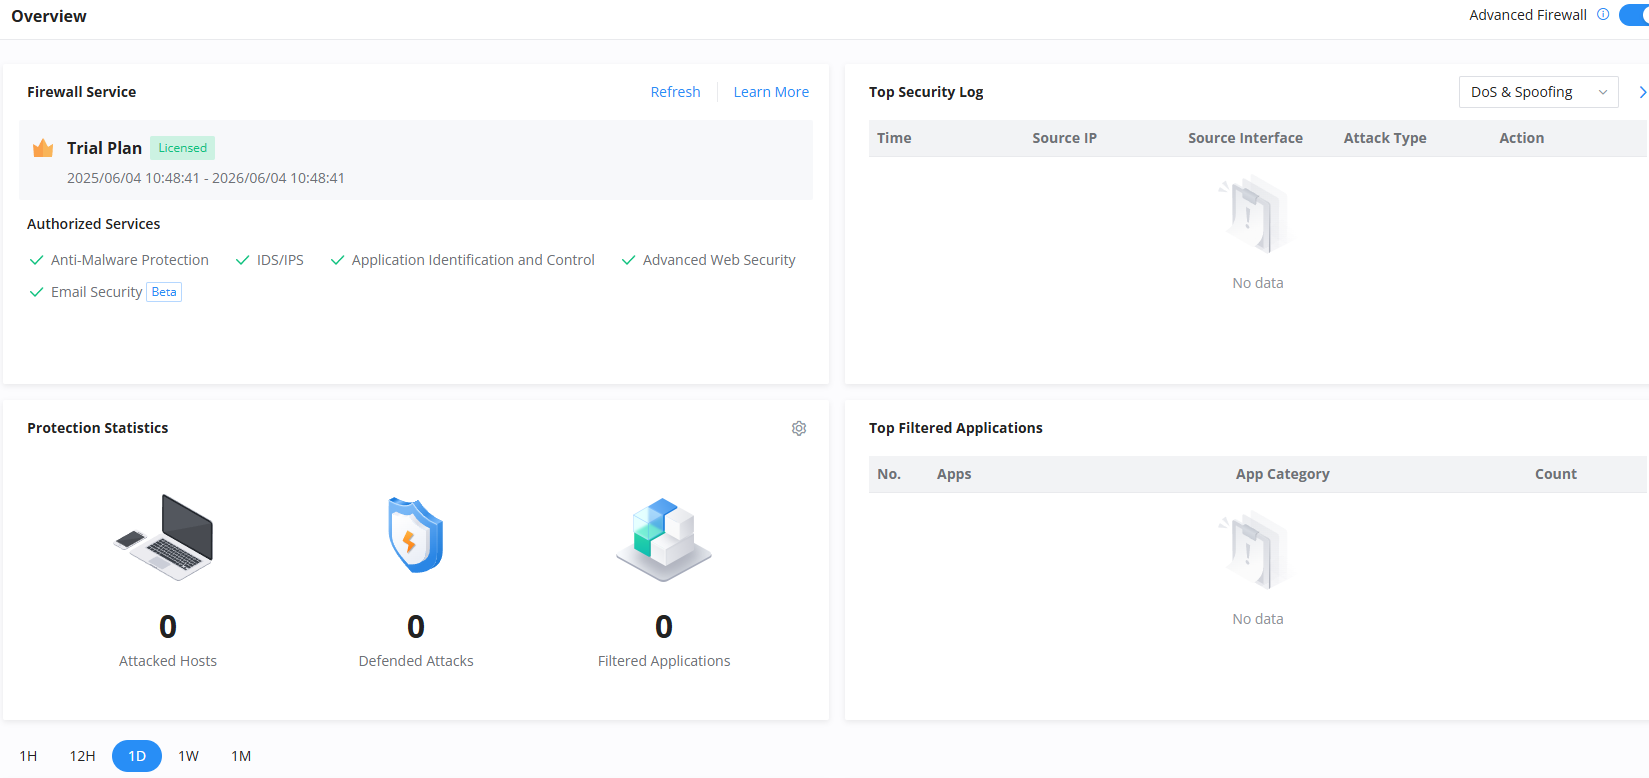
The Overview page is a dynamic interface that adapts in real time, displaying content based on ongoing activities, alerts, notifications, and other events.


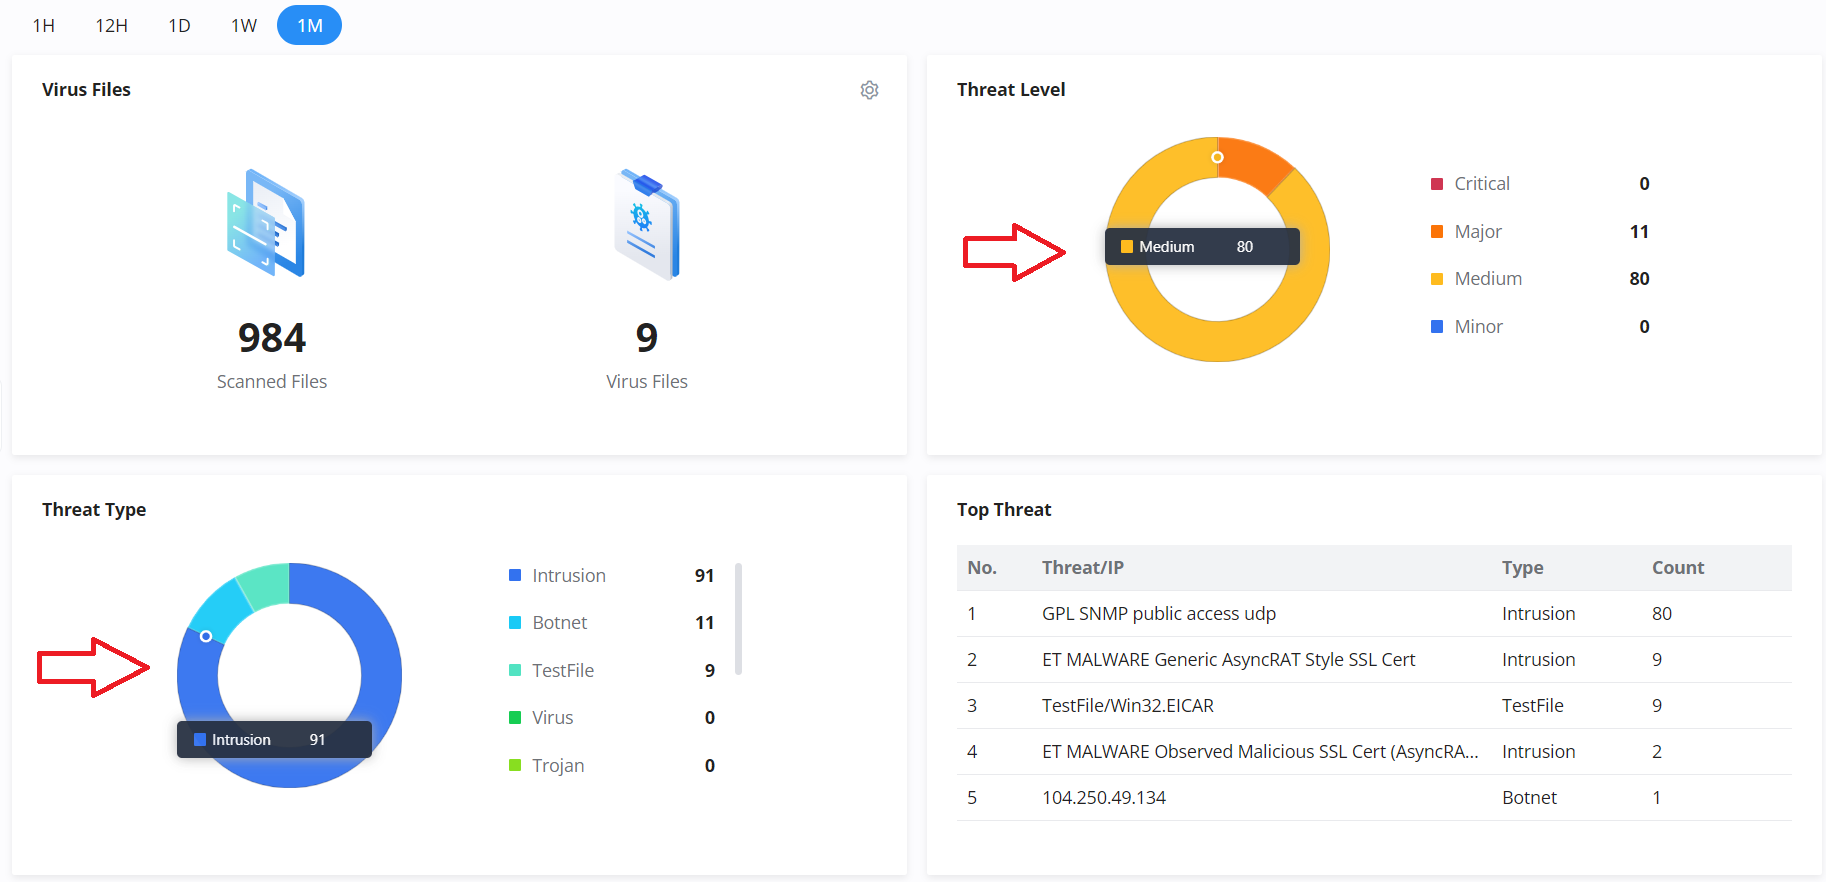
The users can click on the arrow icon under Top Security Log to get redirected to the Security Log section, or hover over the gear icon under Protection Statistics to clear the statistics, or under Virus files to disable the Anti-malware. Under Threat Level and Threat Type, users can also hover over the graphs to show more details. Please refer to the figures above.
Disabling/Enabling Advanced Firewall
The Advanced Firewall option allows administrators to enable or disable the system’s advanced security features depending on deployment needs. When enabled, the device provides full protection through capabilities such as DNS filtering, web filtering, application filtering, file filtering, intrusion prevention, and SSL proxy inspection. This ensures comprehensive network security but requires higher system resource consumption, which may reduce the maximum number of PBX extensions and concurrent calls that can be supported.
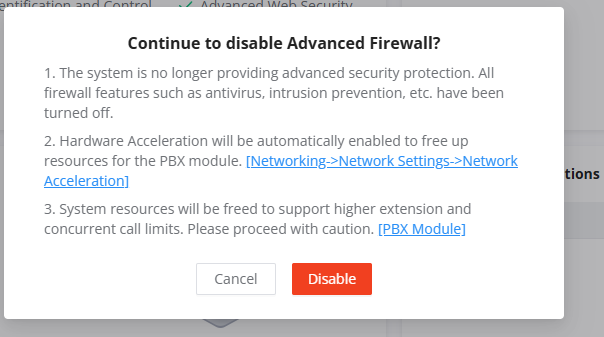
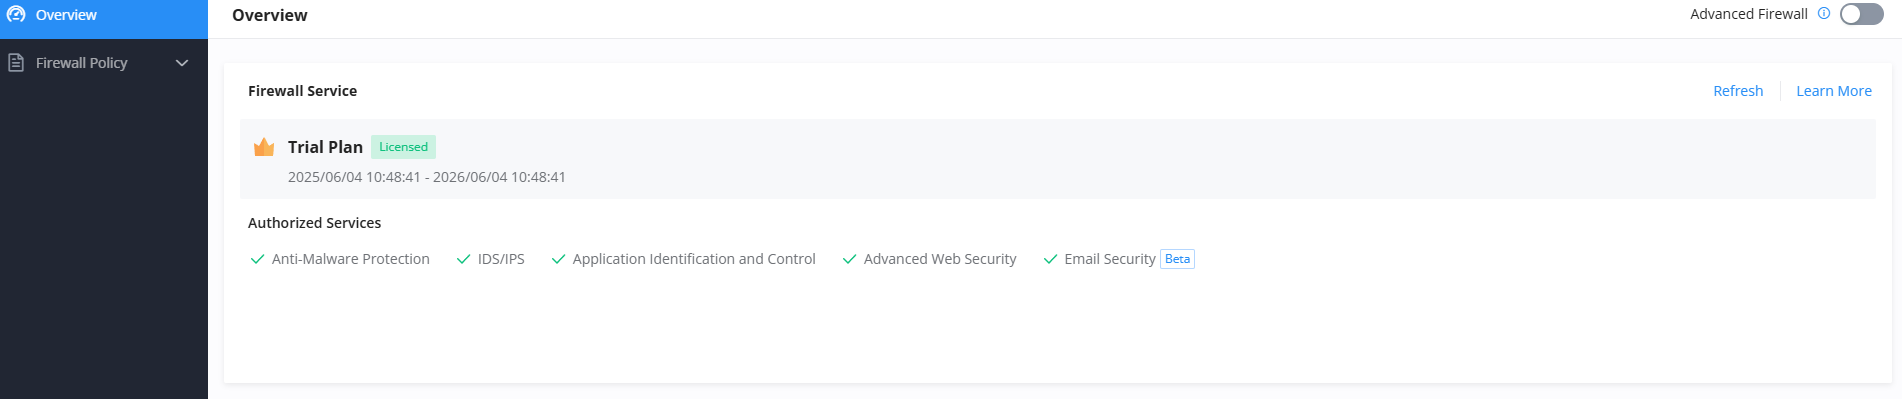
When disabled, the system no longer performs advanced firewall inspection. This frees up CPU and memory resources, and allows the PBX to dynamically allocate more capacity for extensions and concurrent calls. Disabling the feature is recommended only in controlled environments where another perimeter firewall is already in place to handle security, and where the priority is maximizing telephony performance (e.g., high-density PBX deployments such as call centers). Administrators should proceed with caution, as disabling this function significantly reduces the built-in security protection of the device.
FIREWALL POLICY
Rules Policy
Rules policy allows to define of how the GCC device will handle the inbound traffic. This is done per WAN, VLAN, and VPN.
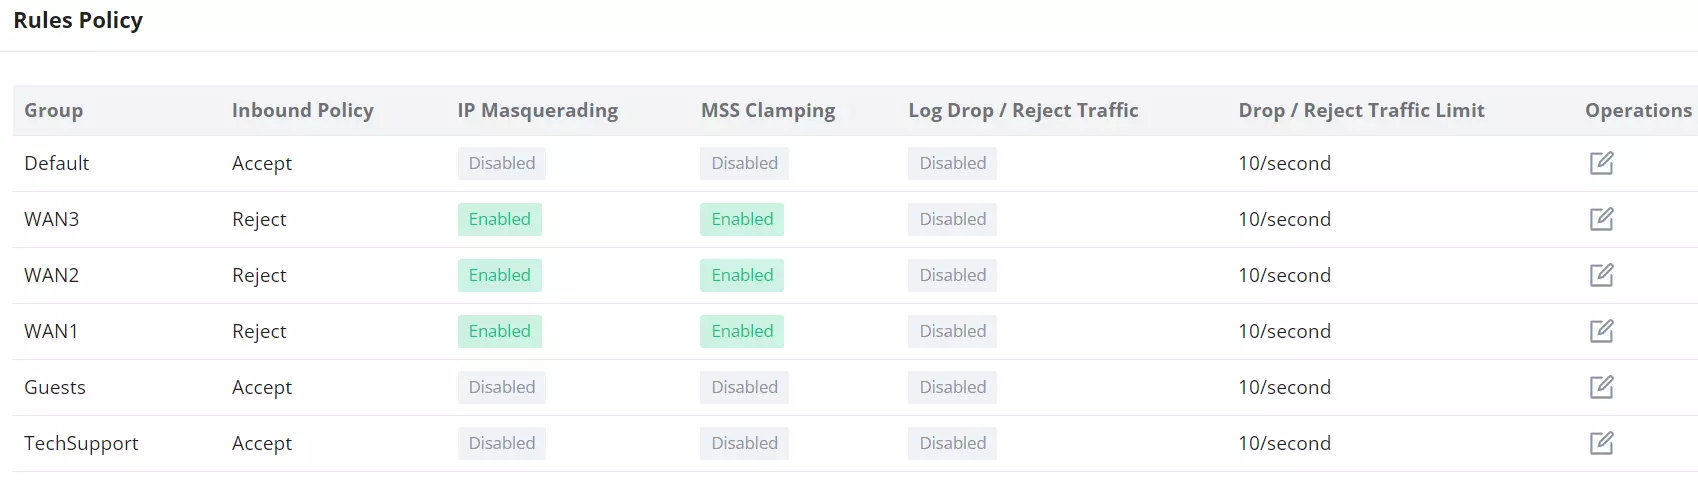
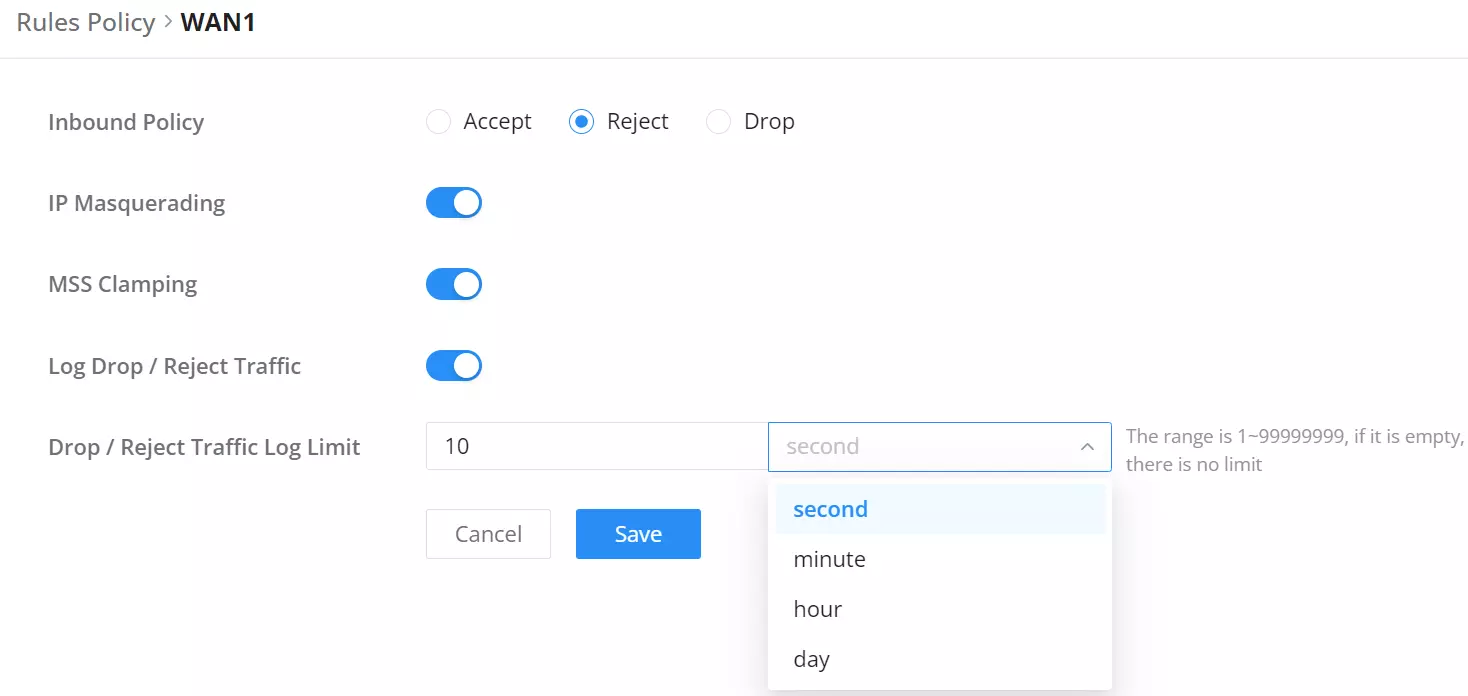
- Inbound Policy: Define the decision that the GCC device will take for the traffic initiated from the WAN or VLAN. The options available are Accept, Reject, and Drop.
- IP Masquerading: Enable IP masquerading. This will mask the IP address of the internal hosts.
- MSS Clamping: Enabling this option will allow the MSS (Maximum Segment Size) to be negotiated during the TCP session negotiation
- Log Drop / Reject Traffic: Enabling this option will generate a log of all the traffic that has been dropped or rejected.
- Drop / Reject Traffic Log Limit: Specify the number of logs per second, minute, hour, or day. The range is 1~99999999, if it is empty, there is no limit.
Inbound Rules
The GCC6020 allows filtering of incoming traffic to network groups or WAN ports. Users can apply the following rule types:
- Accept: To allow the traffic to go through.
- Deny: A reply will be sent to the remote side stating that the packet is rejected.
- Drop: The packet will be dropped without any notice to the remote side.
You can add a new rule by clicking Add, duplicate existing ones with Clone, or reprioritize them using Move to Top. To modify any rule, click the Edit icon under the Operations column.


Name | Enter the name of the inbound rule. |
Status | Toggle on/off the status of the inbound rule. |
IP Family | Pick the IP family.
|
Protocol Type | Choose the protocol type.
|
Source Group | If set to “All”, rules will be matched in preference to other specific ones. |
Source MAC Address | Specify the source MAC address. |
Source IP Address | Specify the source IP address. |
Source Port | To enter multiple port/port ranges, separate them using commas (,), for example:4,5-10. |
Destination IP Address | Specify the destination IP address. |
Destination Port | To enter multiple port/port ranges, separate them using commas (,), for example:4,5-10. |
Action | If set to “Accept”, the external devices are allowed to access the router; if set to “Deny”, the access of the external devices is denied and the result is returned; if set to “Drop”, the access request of the external device will be directly droped. |
Traffic Rules – Inbound Rules
Outbound Rules
The outbound rules enable managing outgoing traffic from local LAN networks to external networks by applying customizable rules, including:
- Accept: Permits the traffic to pass through.
- Deny: Sends a response to the remote side, indicating that the packet has been rejected.
- Drop: Silently discards the packet without notifying the remote side.
To manage outbound rules, users can:
- Click Add to create a new outbound rule.
- Select an existing rule and click Clone to duplicate it.
- Click Delete to remove selected rules.
- Use Move to Top to change rule priority instantly.
To edit an existing rule, click the Edit icon under the Operations column.

Please refer to the figure and table below for guidance on completing the fields:

Field | Description |
Name | Specifies the name of the outbound rule (1-64 characters). |
Enable | Indicates whether the rule is enabled or disabled. |
IP Family | Determines the IP family for the rule: Any, IPv4, or IPv6. |
Protocol Type | Defines the protocol type (e.g., UDP, TCP) for filtering traffic. |
Source IP Address | Specifies the source IP address or range in CIDR notation (e.g., 192.168.80.0/24). |
Source Port | Lists the source port(s) or range of ports (e.g., 80, 8080). |
Destination Group | Specifies the destination group or interface (e.g., WAN2). |
Destination IP Address | Defines the destination IP address or range in CIDR notation (e.g., 34.21.9.50). |
Destination Port | Lists the destination port(s) or range of ports (e.g., 443). |
Schedule | Select a predefined schedule to control when the rule is active. You can choose from existing schedules or create a new one directly from the dropdown. Note: If the option includes an absolute date, that date will not take effect. |
Action | Defines the action to apply: Accept (allow traffic), Deny (reject traffic with a notice), or Drop (silently discard traffic). |
Add/Edit an Outbound Rule
Forwarding Rules
Forwarding rules control the traffic that is passed between different networks or terminals within the same network. This is different from:
- Inbound Rules handle traffic entering the device from external sources.
- Outbound Rules handle traffic leaving the device to external destinations.
Users can click the “Add” button to create a new rule or use the “Edit” icon to modify an existing one.
The “Clone” and “Move to Top” buttons help manage rule setup more efficiently.


Advanced NAT
NAT or Network Address Translation, as the name suggests it’s a translation or mapping of private or internal addresses to public IP addresses or vice versa, and the GCC6020 supports both.
- SNAT: Source NAT refers to the mapping of clients’ IP addresses (Private or Internal Addresses) to a public one.
- DNAT: Destination NAT is the reverse process of SNAT, where packets are redirected to a specific internal address.
The Firewall Advanced NAT page provides the ability to set up the configuration for source and destination NAT. Navigate to Firewall Module → Firewall Policy → Advanced NAT.
SNAT
To add an SNAT entry, click on the Add button to create a new entry, or use the Edit icon to modify an existing one. The Clone button allows duplicating a selected SNAT rule for faster rule creation.
Refer to the figure and table below:

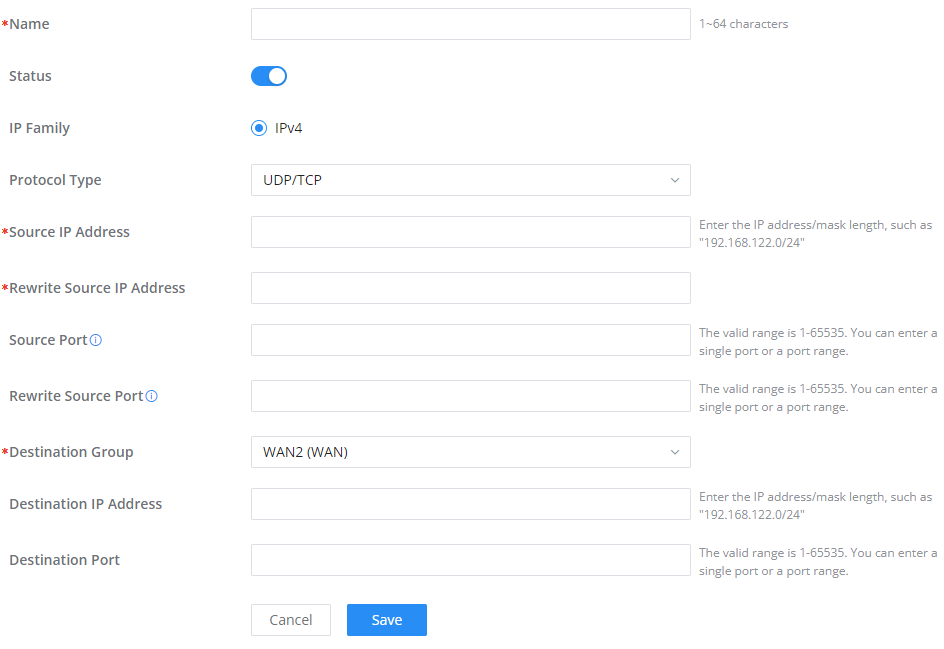
Refer to the table below when creating or editing an SNAT entry:
Name | Specify a name for the SNAT entry |
IP Family | Select the IP version, two options are available: IPv4 or Any. |
Protocol Type | Select one of the protocols from dropdown list or All, available options are: UDP/TCP, UDP, TCP and All. |
Source IP Address | Set the Source IP address. |
Rewrite Source IP Address | Set the Rewrite IP. The source IP address of the data package from the source group will be updated to this configured IP. |
Source Port | Set the Source Port |
Rewrite Source Port | Set the Rewrite source port. |
Destination Group | Select a WAN interface or a VLAN for Destination Group. |
Destination IP Address | Set the Destination IP address. |
Destination Port | Set the Destination Port |
SNAT page
DNAT
To add a DNAT, click on the “Add” button to add a new DNAT or click on the “Edit” icon to edit a previously created one. Refer to the figures and table below:
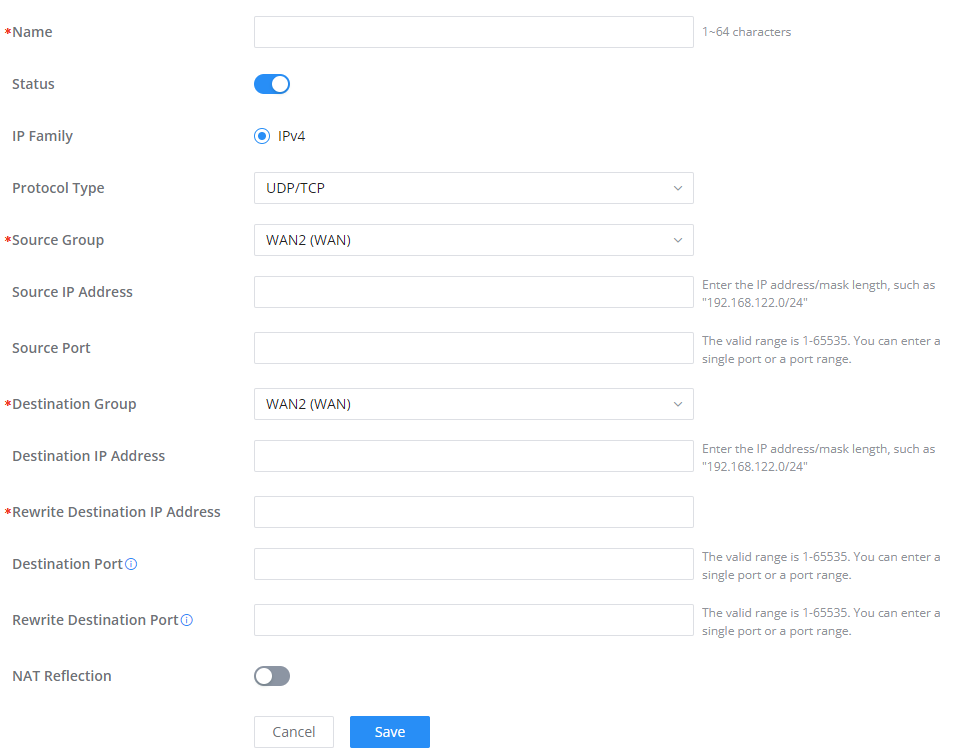
Refer to the table below when creating or editing a DNAT entry:
Name | Specify a name for the DNAT entry |
IP Family | Select the IP version, three options are available: IPv4, IPv6 or Any. |
Protocol Type | Select one of the protocols from dropdown list or All, available options are: UDP, TCP, TCP/UCP and All. |
Source Group | Select a WAN interface or a LAN group for Source Group, or select All. |
Source IP Address | Set the Source IP address. |
Source Port | Set the Source Port. |
Destination Group | Select a WAN interface or a LAN group for Destination Group, or select All. Make sure that destination and source groups are different to avoid conflict. |
Destination IP Address | Set the Destination IP address. |
Rewrite Destination IP Address | Set the Rewrite Destination IP Address. |
Destination Port | Set the Destination Port. |
Rewrite Destination Port | Set the Rewrite Destination Port |
NAT Reflection | Click on “ON” to enable NAT Reflection |
NAT Reflection Source | Select NAT Reflection either Internal or External. |
Advanced NAT – DNAT
Global Configuration
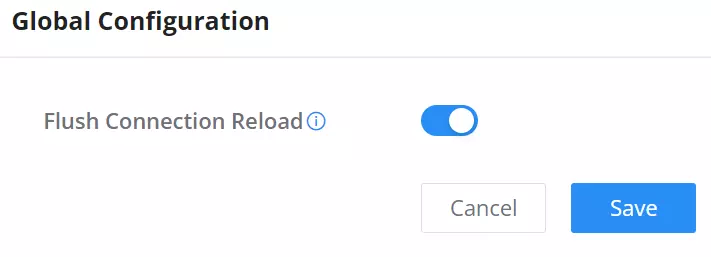
- Flush Connection Reload
When this option is enabled and the firewall configuration changes are made, existing connections that had been permitted by the previous firewall rules will be terminated.
If the new firewall rules do not permit a previously established connection, it will be terminated, and will not be able to reconnect. With this option disabled, existing connections are allowed to continue until they timeout, even if the new rules would not allow this connection to be established.
SECURITY DEFENSE
DoS Defense
Basic Settings – Security Defense
A Denial-of-Service Attack is an attack aimed at making the network resources unavailable to legitimate users by flooding the target machine with so many requests, causing the system to overload or even crash or shut down.
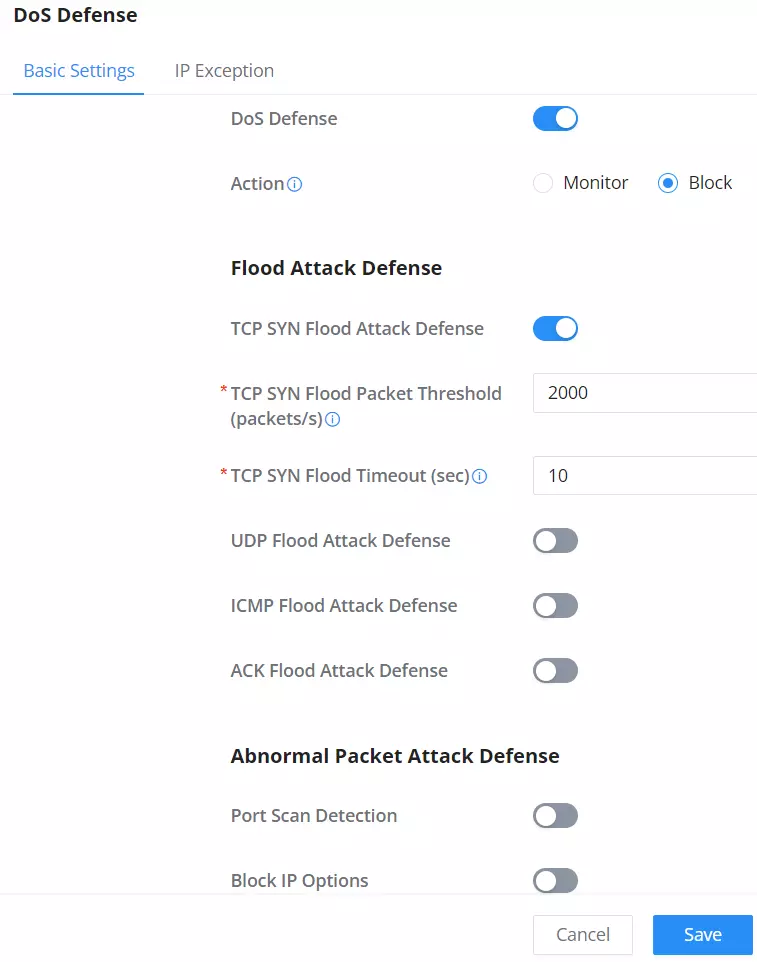
DoS Defence | Toggle on/off DoS Defence |
Action | Select the action: Monitor: An alarm is generated but is not blocked. |
Flood Attack Defense | |
TCP SYN Flood Attack Defense | When this option is enabled, the router will take counter measures to SYN Flood Attack.
|
UDP Flood Attack Defense | When this option is enabled, the router will take counter measures to the UDP Flood Attack.
|
ICMP Flood Attack Defense | When this option is enabled, the router will take counter measures to the ICMP Flood Attack.
|
ACK Flood Attack Defense | When this option is enabled the router will take counter measures to ACK Flood Attack.
|
Abnormal Packet Attack Defense | |
Port Scan Detection | When this option is enabled, the router will take counter measure to the port scanning attempts
|
Block IP Options | When this option is enabled, the router will ignore any IP packets with Options field. |
Block TCP Flag Scan | When this option is enabled, the router will ignore any packets with unexpected information in the TCP flags. |
Block Land Attack | When this option is enabled, the router will block any SYN packets which may have been spoofed and modified to set the source and the destination address to the address of the router. If this option is disabled, it might cause the router to be stuck in a loop of responding to itself. |
Block Smurf | When this option is enabled, the router will drop any ICMP echo requests. |
Block Ping of Death | When this option is enabled, the router will drop any abnormal or corrupted ping packets. |
Block Traceroute | When this option is enabled, the router will not allow the traceroute requests initiated from the WAN side. |
Block ICMP Fragment | When this option is enabled, the router will drop the ICMP packets which are fragmented. |
Block SYN Fragment | When this option is enabled, the router will drop the SYN packets which are fragmented. |
Block Unassigned Protocol Numbers | If enabled, the device will reject IP packets receiving IP protocol number greater than 133. |
Block Fraggle Attack | If enabled, the router will drop any UDP broadcast packets initiate from the WAN side. |
DoS Defense
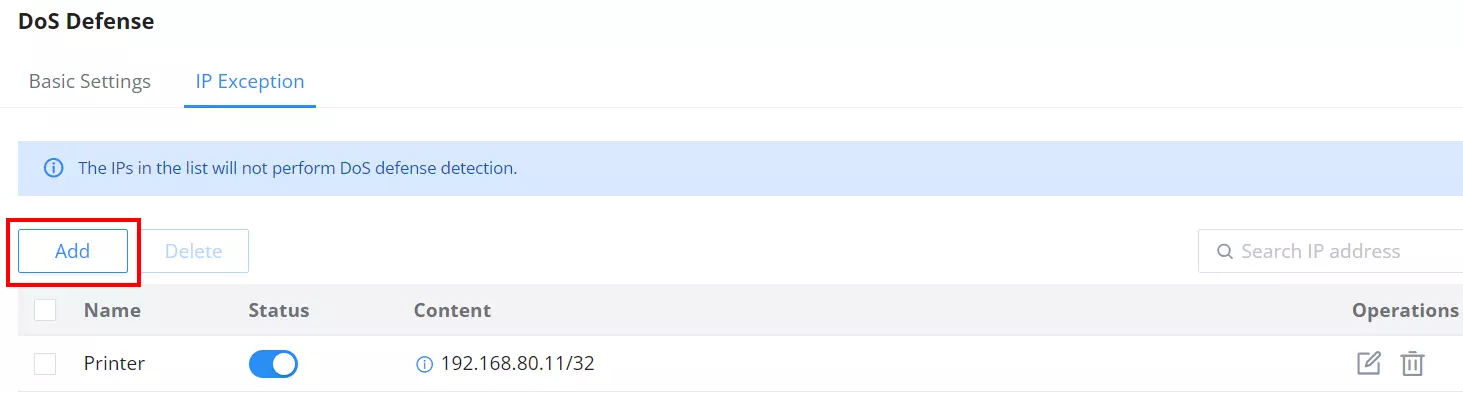
IP Exception
On this page, users can add IP addresses or IP ranges to be excluded from the DoS Defense scan. To add an IP address or IP range to the list, click on the “Add” button as shown below:
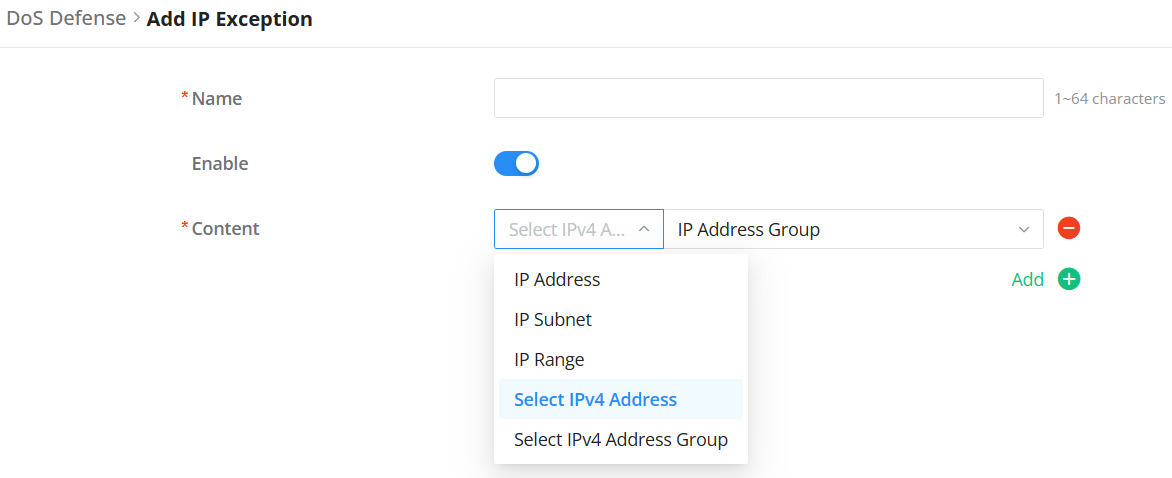
Specify a name, then toggle the status ON. In the Content field, select the type of IP source to be added.
Users can choose from:
- IP Address
- IP Subnet
- IP Range
- Select IPv4 Address (from profiles)
- Select IPv4 Address Group (from profiles)
Once a type is selected, provide the corresponding address or object.
You may also click on the “Add” icon to create a new object inline.
Note: Profile objects (such as IPv4 Address and Address Groups) are managed underNetworking module → Profiles → IP Address Group.
ARP Protection
Spoofing Defense
The Spoofing defense section offers several countermeasures to the various spoofing techniques. To protect your network against spoofing, please enable the following measures to eliminate the risk of having your traffic intercepted and spoofed. GCC6020 devices offer measures to counter spoofing on ARP information, as well as on IP information.

Static ARP List
Users can also still use static ARP by binding an IP address with a MAC address for trusted devices. Under the Static ARP List, click on the “Add” button to add a new Static ARP entry as shown below:

Enable the entry, then specify the IP address of a connected device. The user can enter the MAC address manually or click on “Automatic Acquisition” for the MAC address to be filled in automatically, then select the interface (LAN or WAN) and a description for easy identification.

ARP Spoofing Defense
- Block ARP Replies with Inconsistent Source MAC Addresses: The GCC device will verify the destination MAC address of a specific packet, and when the response is received by the device, it will verify the source MAC address and it will make sure that it matches. Otherwise, the GCC device will not forward the packet.
- Block ARP Replies with Inconsistent Destination MAC Addresses: The GCC6020 will verify the source MAC address when the response is received. The device will verify the destination MAC address, and it will make sure that it matches. Otherwise, the device will not forward the packet.
- Decline VRRP MAC Into ARP Table: The GCC device will decline, including any generated virtual MAC address in the ARP table.
ANTI-MALWARE
In this section, the users can enable Anti-malware.
To enable Anti-malware, navigate to the Firewall module → Anti-Malware.
- Anti-malware: toggle ON/OFF to enable/disable the Anti-malware.
- Detection Protocol: Select the detection protocols to be scanned by the anti-malware. Available options include HTTP, SMTP, and POP3.
- Data Packet Inspection Depth: Check the packet content of each traffic according to the configuration. The deeper the depth, the higher the detection rate, and the higher the CPU consumption. There are 3 levels of depth: Low, Medium, and High.
- Scan Compressed Files: supports scanning of compressed files.

On the Overview page, users can check the statistics and have an overview. Also, it’s possible to disable the Anti-malware directly from this page by clicking on the settings icon as shown below:
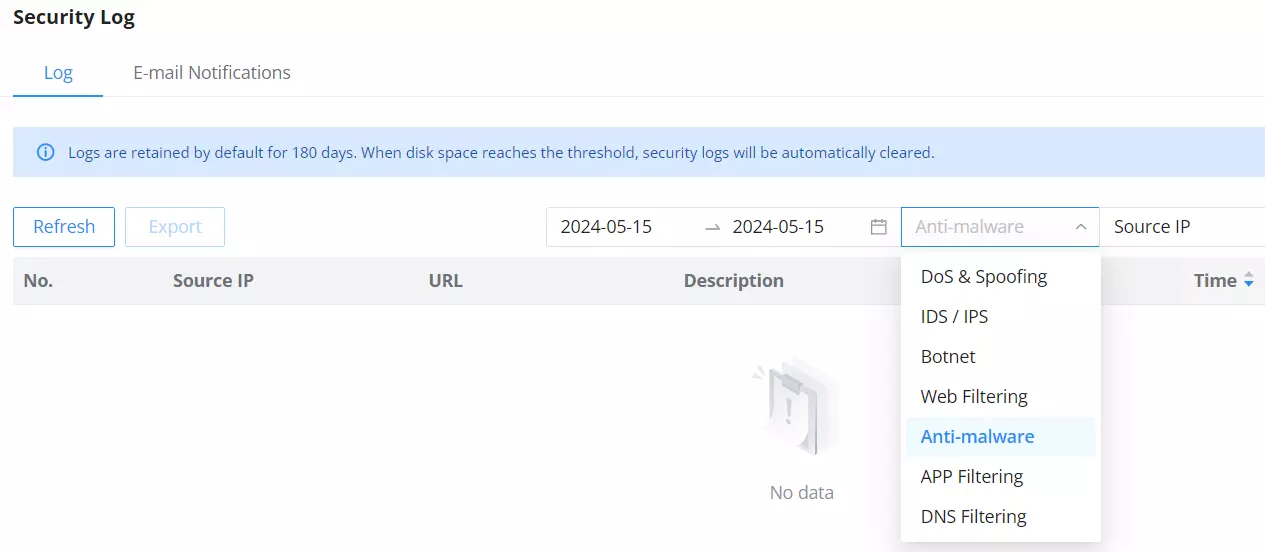
It’s also possible to check the security log for more details:
INTRUSION PREVENTION
Intrusion Prevention System (IPS) and Intrusion Detection System (IDS) are security mechanisms that monitor network traffic for suspicious activities and unauthorized access attempts. IDS identifies potential security threats by analyzing network packets and logs, while IPS actively prevents these threats by blocking or mitigating malicious traffic in real-time. Together, IPS and IDS provide a layered approach to network security, helping to protect against cyberattacks and safeguard sensitive information. A botnet is a network of compromised computers infected with malware and controlled by a malicious actor, typically used to carry out large-scale cyberattacks or illicit activities.
IDS/IPS
Basic Settings – IDS/IPS
On this tab, the users can select IDS/IPS mode, Security Protection Level.
IDS/IPS Mode:
- Notify: detect traffic and only notify the users without blocking it, this is equal to IDS (Intrusion Detection System).
- Notify & Block: detects or blocks traffic and notifies about the security issue, this is equal to an IPS (Intrusion Prevention System).
- No Action: no notifications or prevention, IDS/IPS is disabled in this case.
Security Protection Level: Select a protection level (Low, Medium, High, Extremely High, and Custom). Different protection levels correspond to different protection levels. Users can customize the protection type. The higher the protection level, the more protection rules, and “Custom” will enable the users to select what IDS/IPS will detect.

It’s also possible to select a custom security protection level and then select from the list the specific threats. Please refer to the figure below:

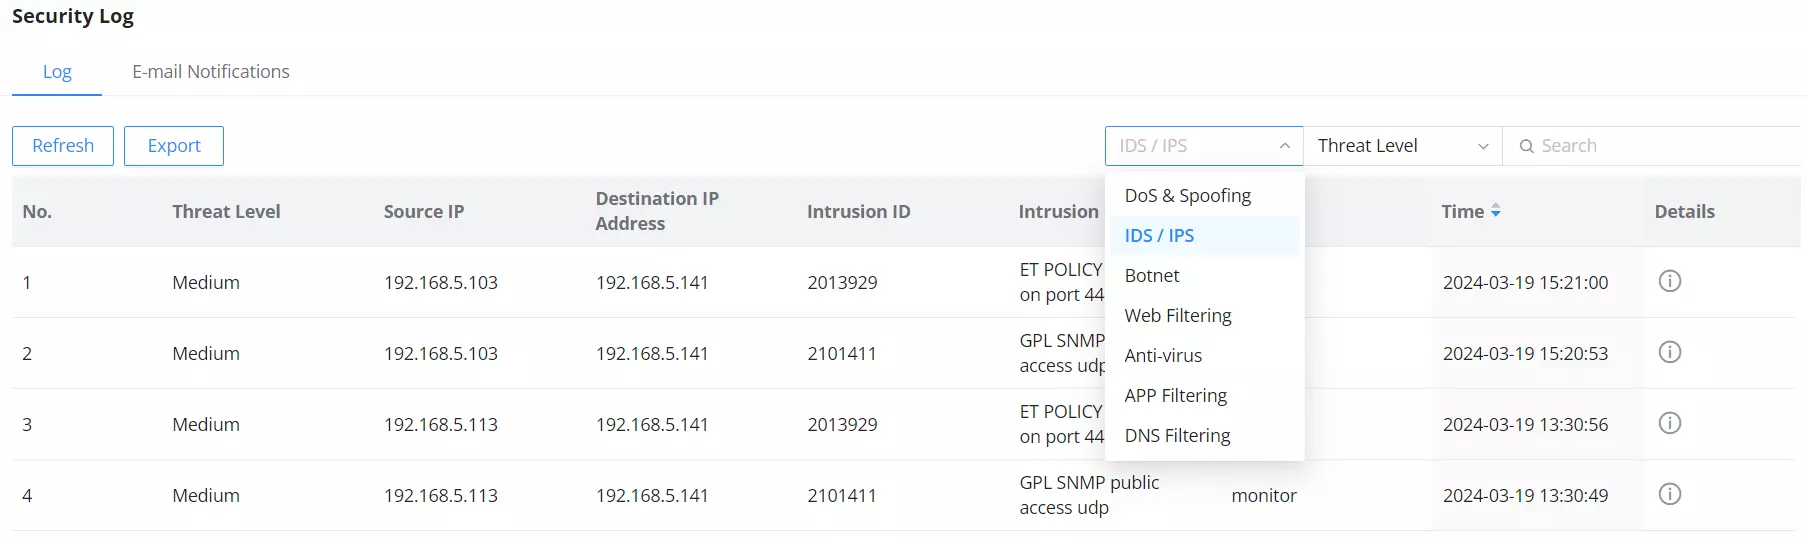
To check the notifications and the actions taken, under the Security log, select IDS/IPS from the drop-down list as shown below:
IP Exception
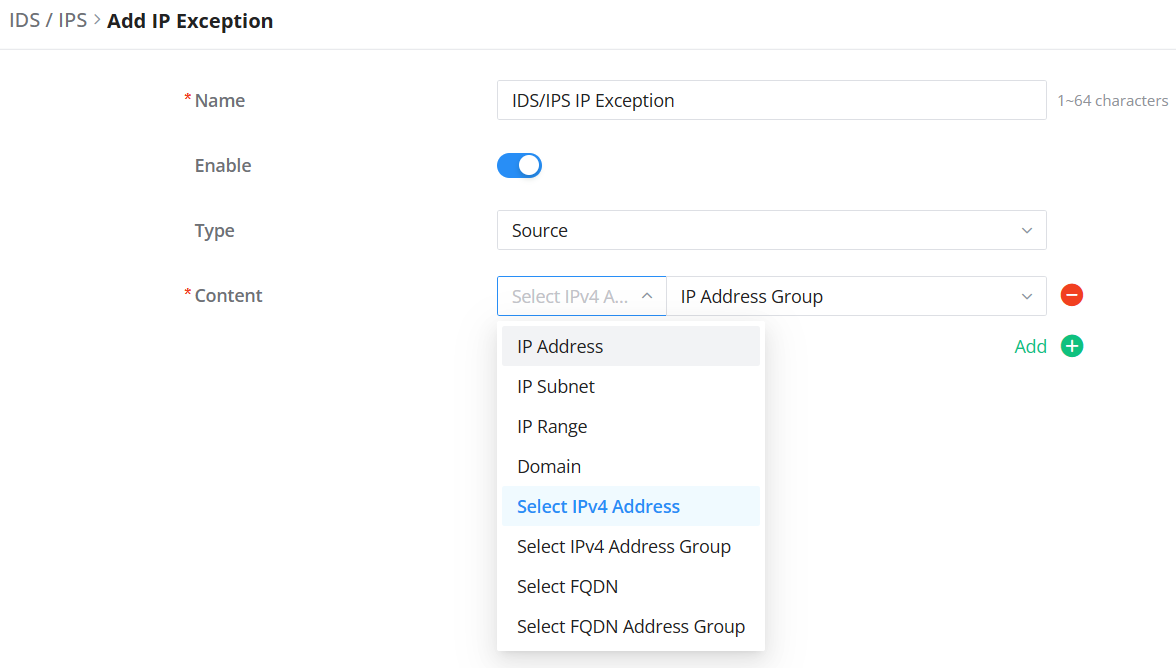
The IP addresses on this list will not be detected by IDS/IPS. To add an IP address to the list, click on the “Add” button as shown below:
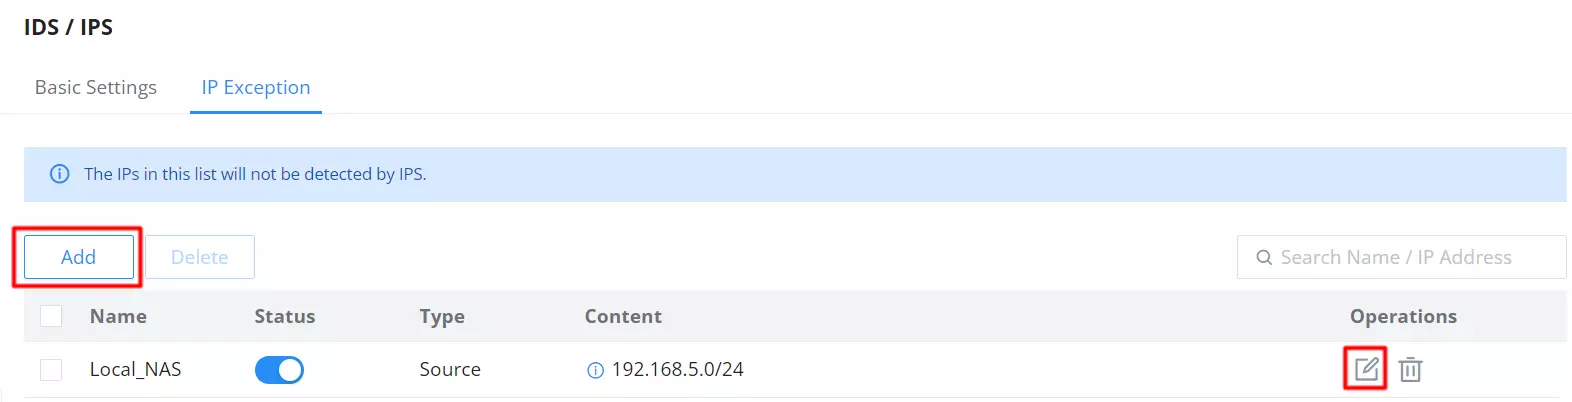
To add an IP exception, click the “Add” button, then configure the following:
- Name: Enter a label for the exception entry.
- Enable: Toggle the rule ON.
- Type: Select whether the exception applies to the
SourceorDestinationIP. - Content: Choose one of the following input types:
Available input types:
- IP Address
- IP Subnet
- IP Range
- Domain
- Select IPv4 Address (from profiles)
- Select IPv4 Address Group (from profiles)
- Select FQDN (from profiles)
- Select FQDN Address Group (from profiles)
After selecting a type, input the value or use the Add icon to define a new object directly.
Note: IP and FQDN objects are managed under: Networking module → Profiles → (IP Address Group / FQDN)
Botnet
Basic Settings – Botnet
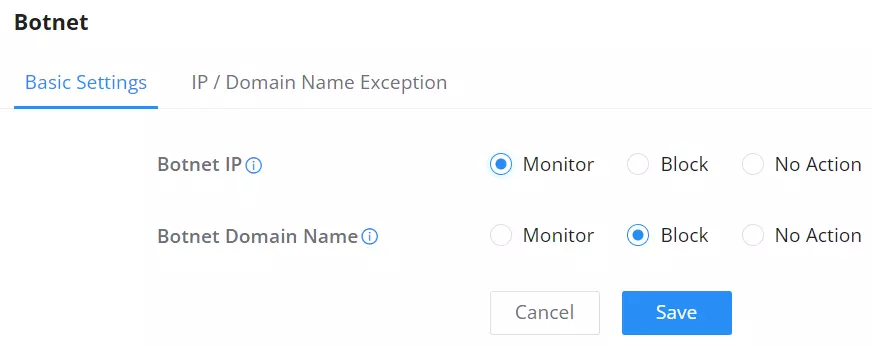
On this page, users can configure the basic settings for monitoring the outbound Botnet IP and Botnet Domain Name, and there are three options:
Monitor: alarms are generated but are not blocked.
Block: monitors and blocks outbound IP addresses/Domain names that access botnets.
No Action: The IP address/Domain name of the outbound botnet is not detected.
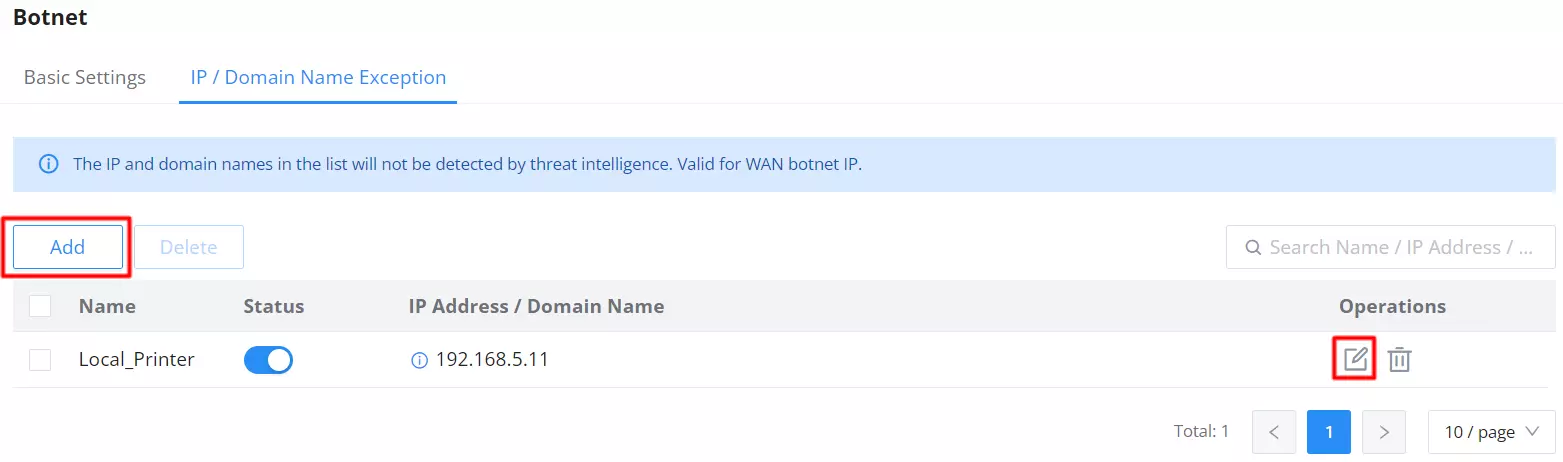
IP/Domain Name Exception
To exclude trusted IP addresses or domain names from Botnet filtering, click the “Add” button and configure the exception:
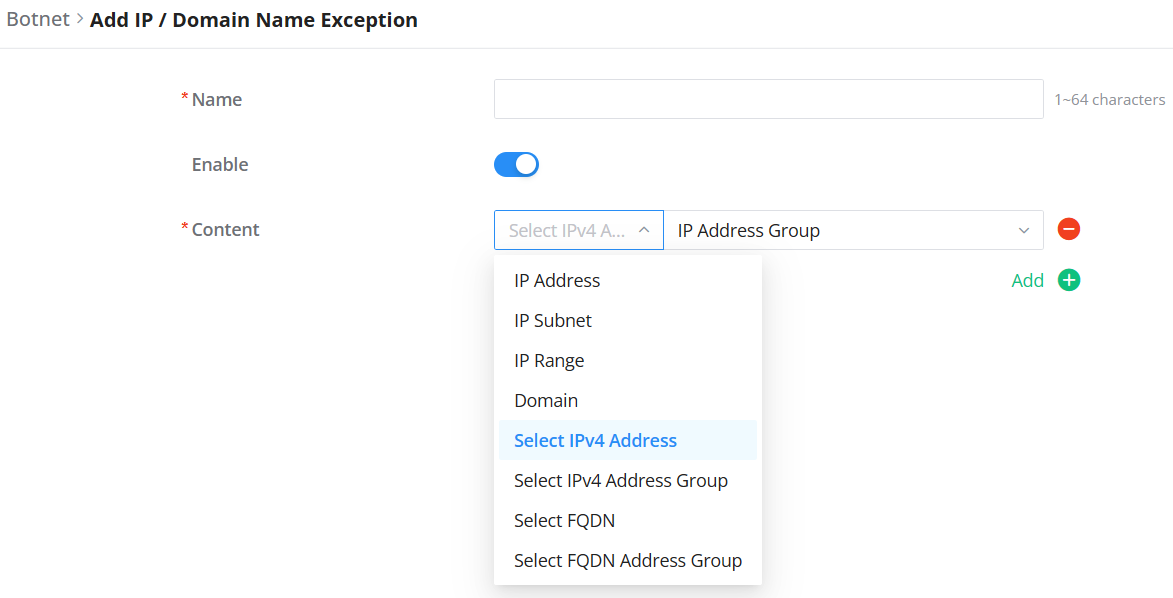
- Name: Provide a label for the exception.
- Enable: Toggle the entry ON.
- Content: Choose the type of entry to exclude.
Supported input types:
- IP Address
- IP Subnet
- IP Range
- Domain
- Select IPv4 Address (from profiles)
- Select IPv4 Address Group (from profiles)
- Select FQDN (from profiles)
- Select FQDN Address Group (from profiles)
Use the Add icon to create new objects inline if needed.
Note: Profile objects (IP/FQDN addresses and groups) are managed under: Networking module → Profiles → (IP Address Group / FQDN)
CONTENT CONTROL
The Content Control feature provides users with the ability to filter (allow or block) traffic based on DNS, URL, keywords, and application.
DNS Filtering
Basic Settings – DNS Filtering
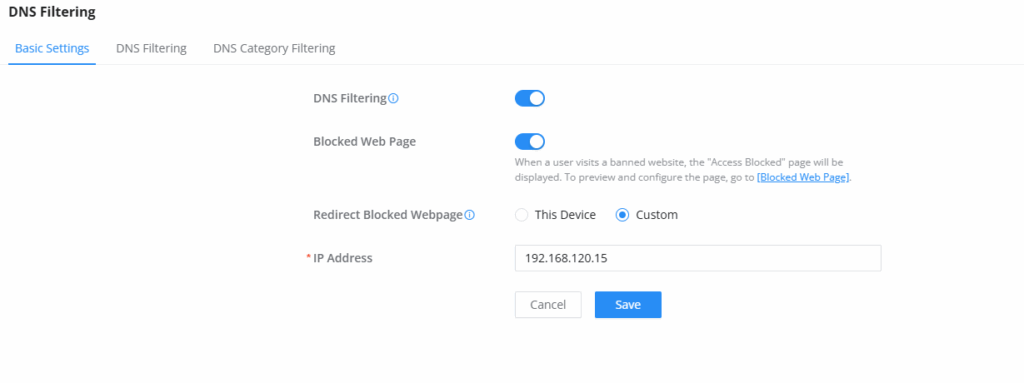
The basic settings in DNS filtering allows the user to set whether to enable the global DNS filtering feature. Both DNS filtering rules and DNS category filtering will be toggled on/off accordingly.
Blocked Web Page: When a user tries to access a blocked domain, they are redirected to an “Access Blocked” page instead of simply failing to load the site.
Redirect Blocked Webpage works differently depending on which option is selected:
- This Device: Redirects blocked requests to the built-in blocked page hosted by the GCC device.
- Custom: Allows redirection to an external server hosting a custom block/notice page. if this option is selected, the admin will need to enter the ip address of the external web server that will host the custom block page, if for example, a company has a branded “Access Denied” page on a web server, you would point this here.
DNS Filtering
To filter traffic based on DNS, navigate to the Firewall module → Content Control → DNS Filtering. Click on the “Add” button to add a new DNS Filtering as shown below:

To simplify the process, you can import a list of DNS filters. First, click “Download the template” and fill in the file as needed. Once done, click “Import” to upload your list. Alternatively, you can export the current list by clicking the “Export” button, make any necessary changes, and then re-import the updated list.

Filtering based on VLAN: You can bind filtering rules to specific VLANs, which provides much more control on your network, this allows administrators to isolate policies per department, group, or service that is related to the VLAN.
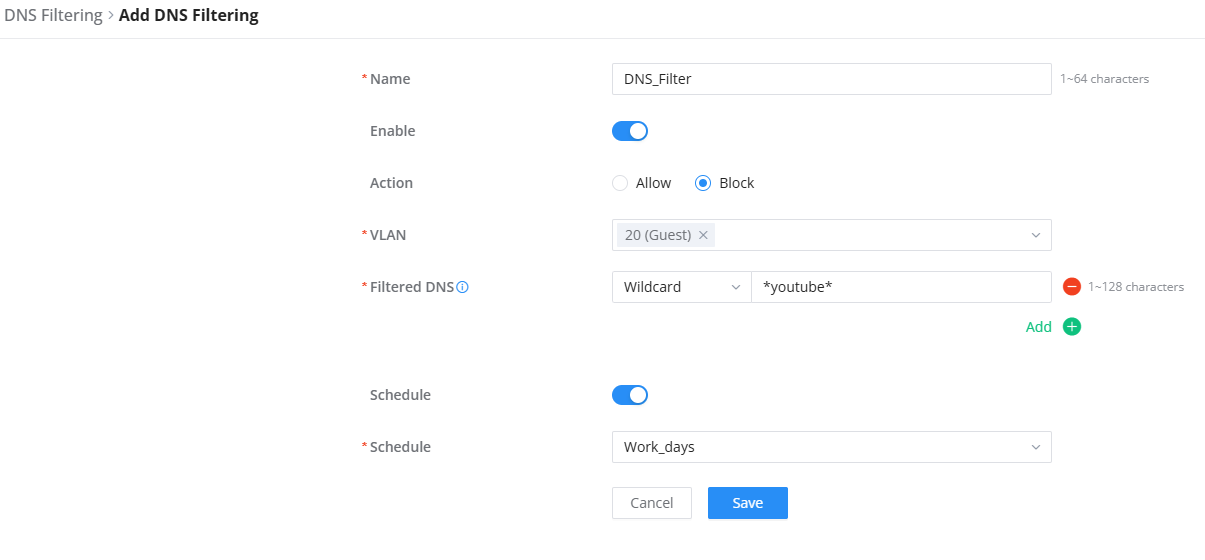
Then, enter the name of the DNS filter, enable the status, and select the action (Allow or Block), for Filtered DNS, there are two options:
- Simple Match: The domain name supports multi-level domain name matching.
- Wildcard: keywords and wildcard * can be entered, wildcard * can only be added before or after the entered keyword. For example: *.imag, news*, *news*. The * in the middle is treated as a normal character.
It’s worth mentioning that the added DNS filtering rule can be scheduled by selecting a schedule or adding one, as shown below:
DNS Category Filtering
The DNS Category Filtering tab enhances DNS filtering by allowing users to block or allow entire domain categories or sub-categories, providing a broader and more efficient way to manage DNS traffic.
Unlike the first DNS Filtering tab, which filters based on individually defined entries, this tab enables bulk control of predefined domain categories such as Adult, Advertisement, Bad Websites, and more.
🛠️ Key Features:
- Select or block an entire category (e.g., Advertisement, Game)
- Filter specific sub-categories (e.g., Marketingware, Educational Games)
- Use Select All, Allow, or Block buttons for quick action
- Blocked entries display a red icon
- Allowed entries show a green dot
- A search bar is available to query domain names and check their category classification

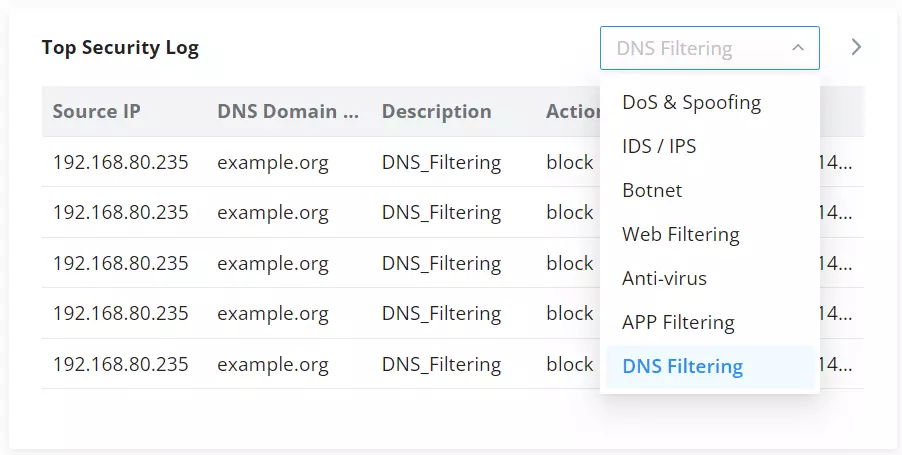
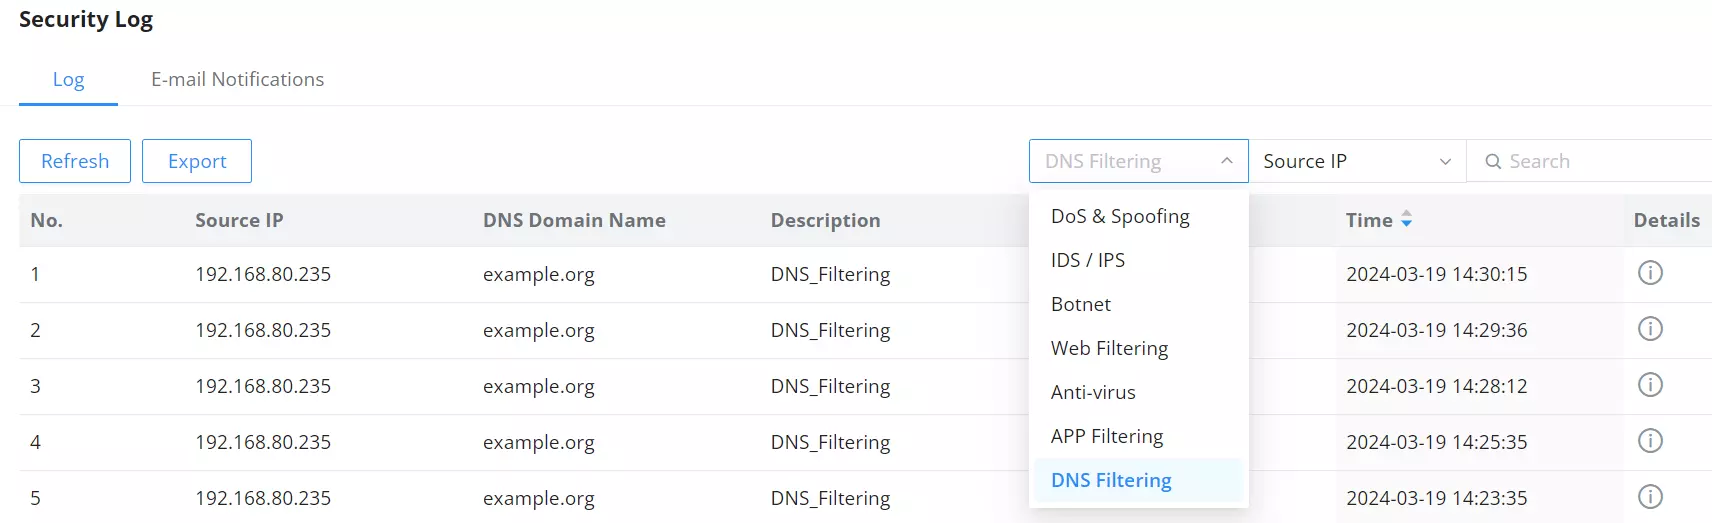
To check the filtered DNS, the users can either find it on the Overview page or under the Security log as shown below:
Web Filtering
Basic Settings – Web Filtering
On the page, the users can enable/disable the global web filtering, then the users can enable or disable web URL filtering, URL category filtering, and keyword filtering independently, and to filter HTTPs URLs, please enable “SSL Proxy“.
Blocked Web Page: When a user tries to access a blocked domain, they are redirected to an “Access Blocked” page instead of simply failing to load the site.
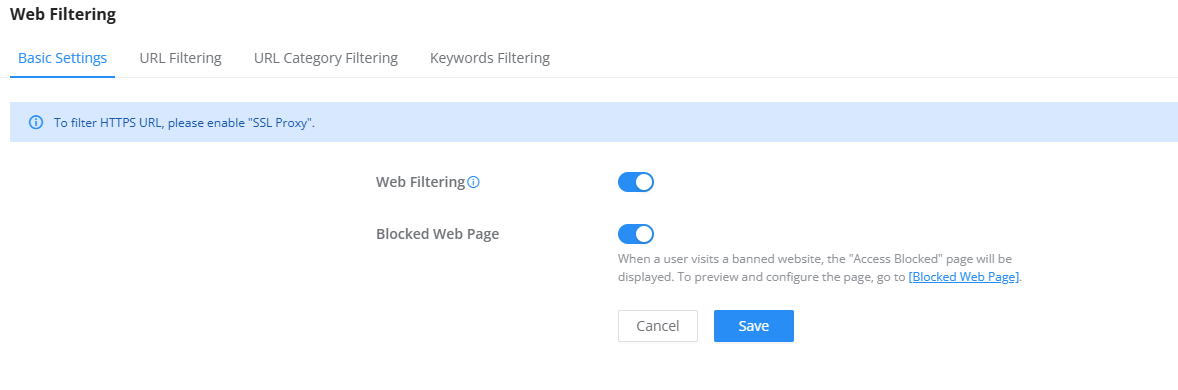
URL Filtering
URL filtering enables users to filter URL addresses using either a Simple match (domain name or IP address) or a Wildcard (e.g., *example*).
To create a URL filtering, navigate to the Firewall Module → Content Filtering → Web Filtering page → URL Filtering tab, then click on the “Add” button. To streamline the process, you can import a list of URL filters. Start by clicking “Download the template” and completing the file as required. Then, click “Import” to upload your list. Alternatively, you can export the existing list by selecting “Export“, make the necessary adjustments, and re-import the updated file.

Specify a name, then toggle the status ON, select the action (Allow, Block), and finally specify the URL either using a simple domain name, IP address (Simple match), or using a wildcard.
Filtering based on VLAN: You can bind filtering rules to specific VLANs, which provides much more control on your network, this allows administrators to isolate policies per department, group, or service that is related to the VLAN.
It’s also worth mentioning that the added DNS filtering rule can be scheduled by selecting a schedule or adding one, as shown below:
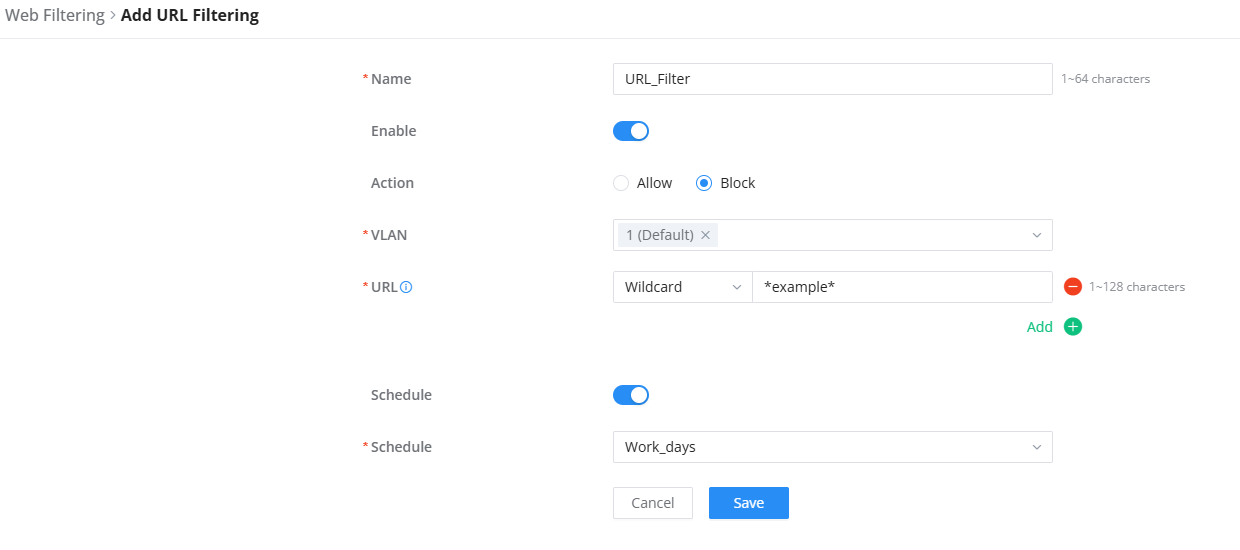
URL Category Filtering
The users also have the option not only to filter by specific domain/IP address or wildcard, but also to filter by categories, for example, Attacks and Threats, Adult, etc.
To block or allow the whole category, click on the first option in the row and select All Allow or All Block. It’s also possible to block/allow by sub-categories as shown below:
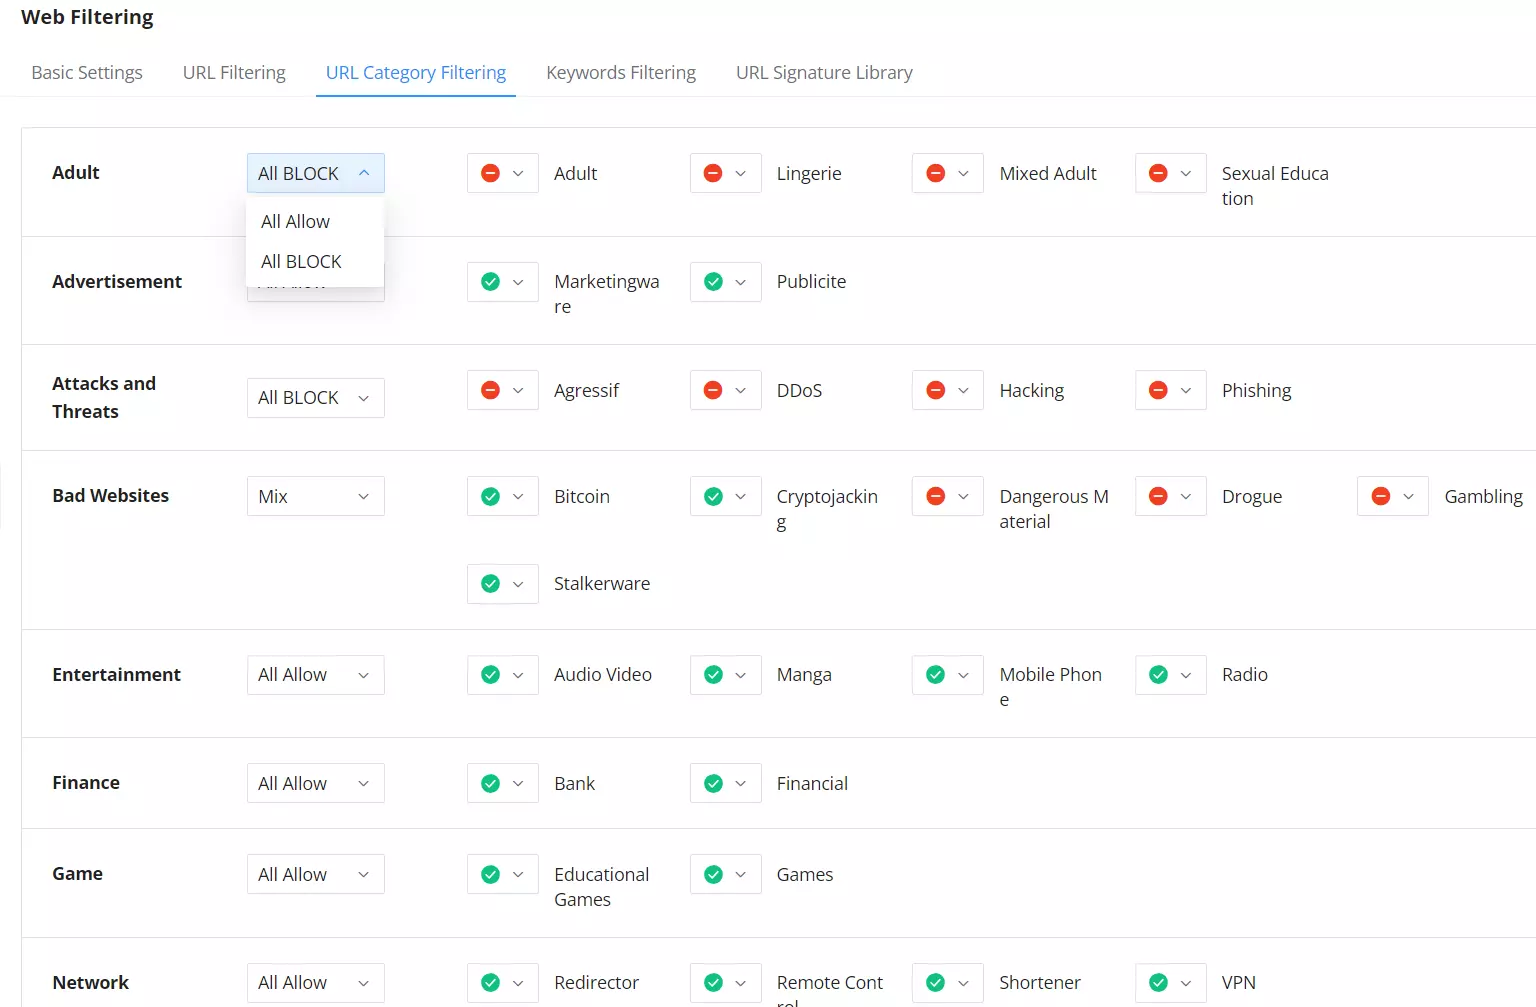
Keywords Filtering
Keyword filtering enables users to filter using either a regular expression or a Wildcard (e.g., *example*).
To create a keywords filtering, navigate to Firewall Module → Content Filtering → Web Filtering page → Keywords Filtering tab, then click on the “Add” button as shown below:
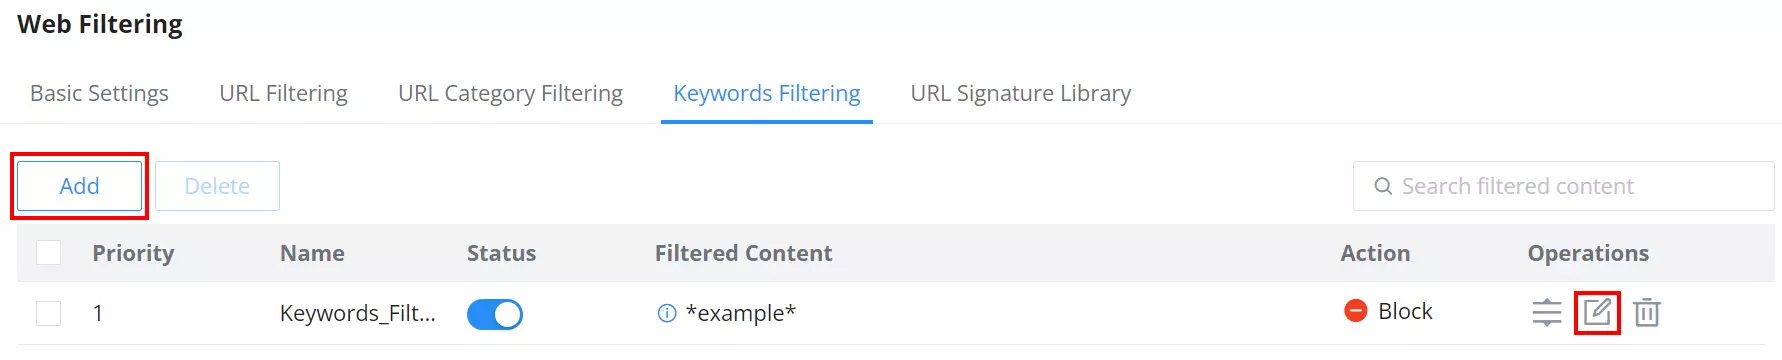
Provide a name for the rule, toggle the status to ON, and choose the desired action (Allow or Block). Then, define the filtered content using a wildcard. Additionally, you can schedule the DNS filtering rule by selecting an existing schedule or creating a new one. See the figure below for reference.

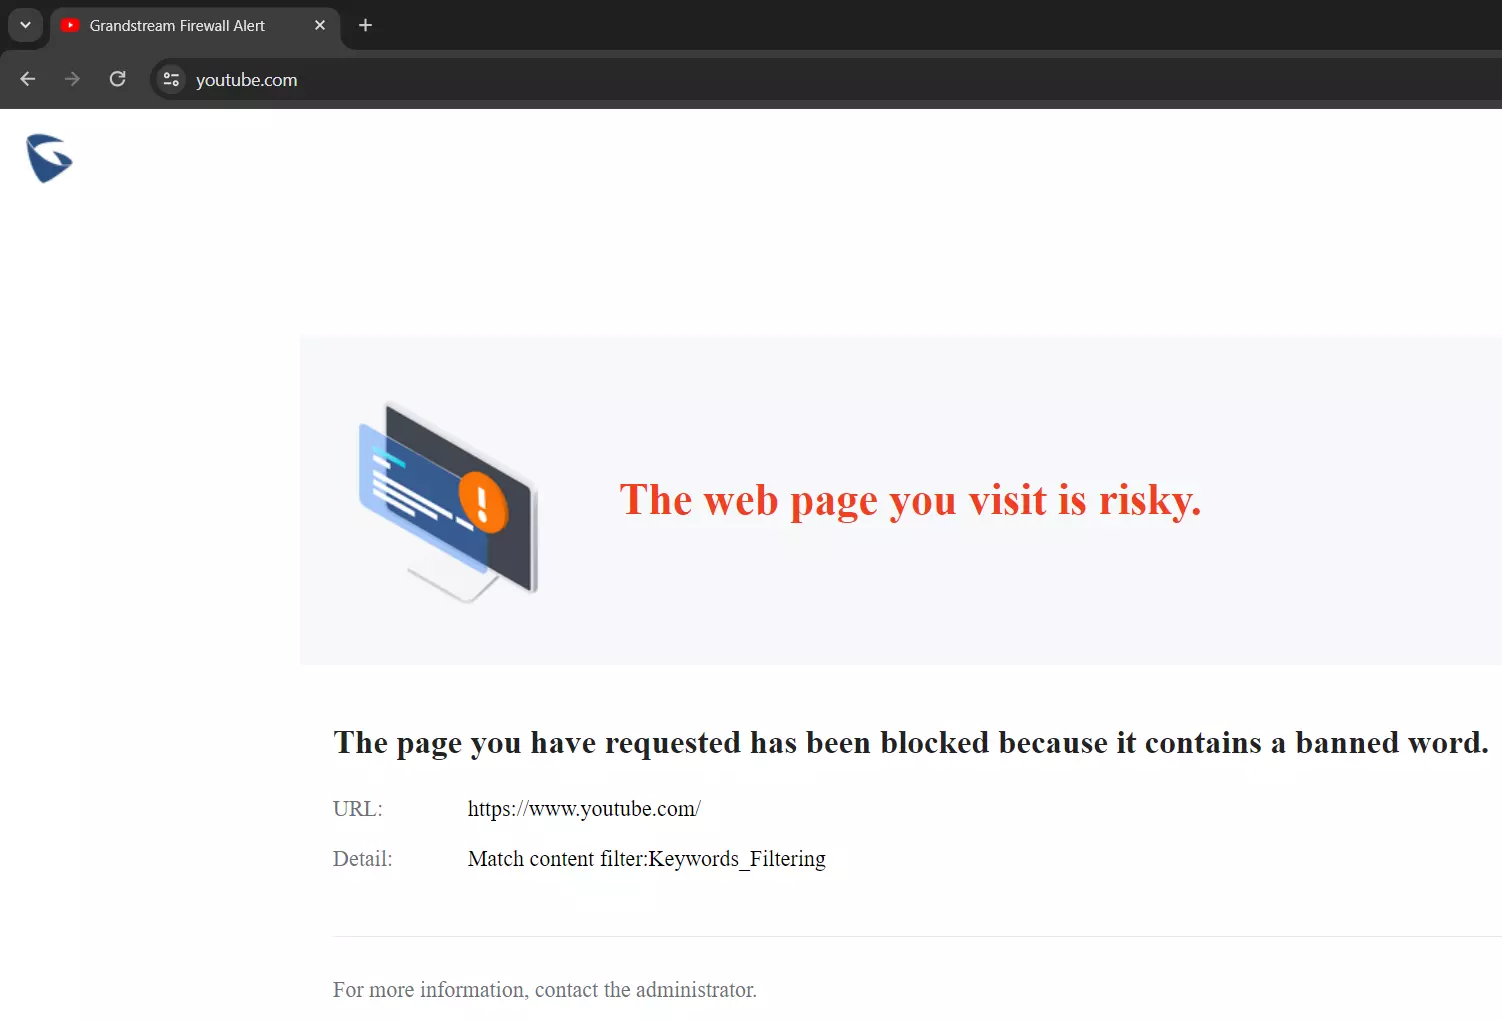
When the keywords filtering is ON and the action is set to Block. If the users try to access, for example, “YouTube” on the browser, they will be prompted with a firewall alert as shown below:
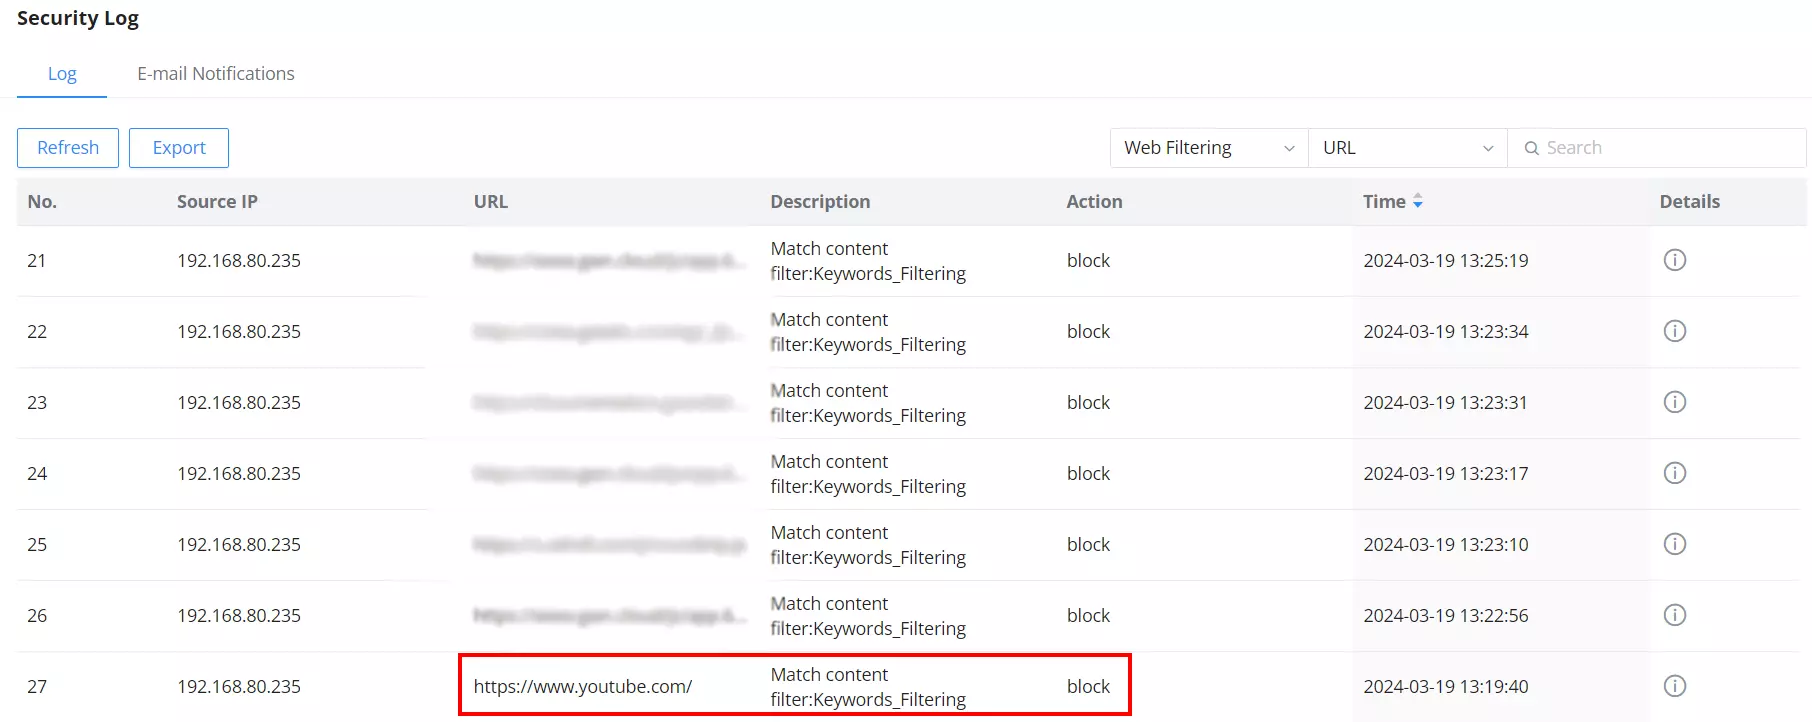
For more details about the alert, the users can navigate to the Firewall module → Security Log.
File Filtering
Basic Settings – File Filtering
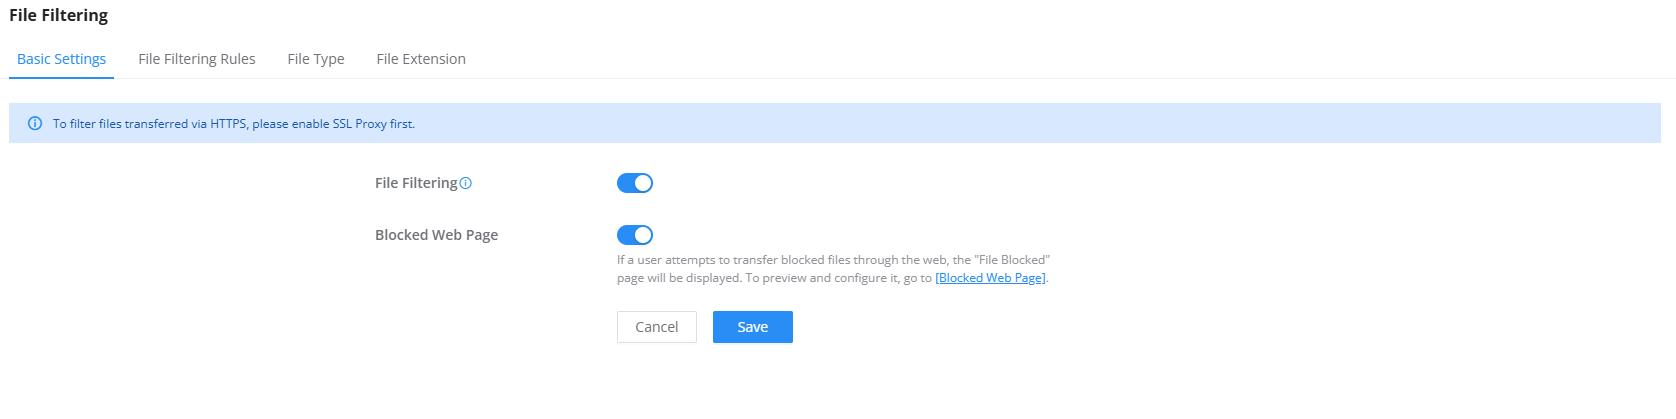
The File Filtering module allows administrators to control file transfers over HTTP/HTTPS based on file types or extensions. This enhances network security by blocking risky files such as executables, archives, or torrent files.
File Filtering (Toggle): Enables or disables the file filtering function globally.
Blocked Web Page (Toggle): When enabled, users attempting to transfer blocked files are redirected to a “File Blocked” page instead of the transfer failing silently.
File Filtering Rules
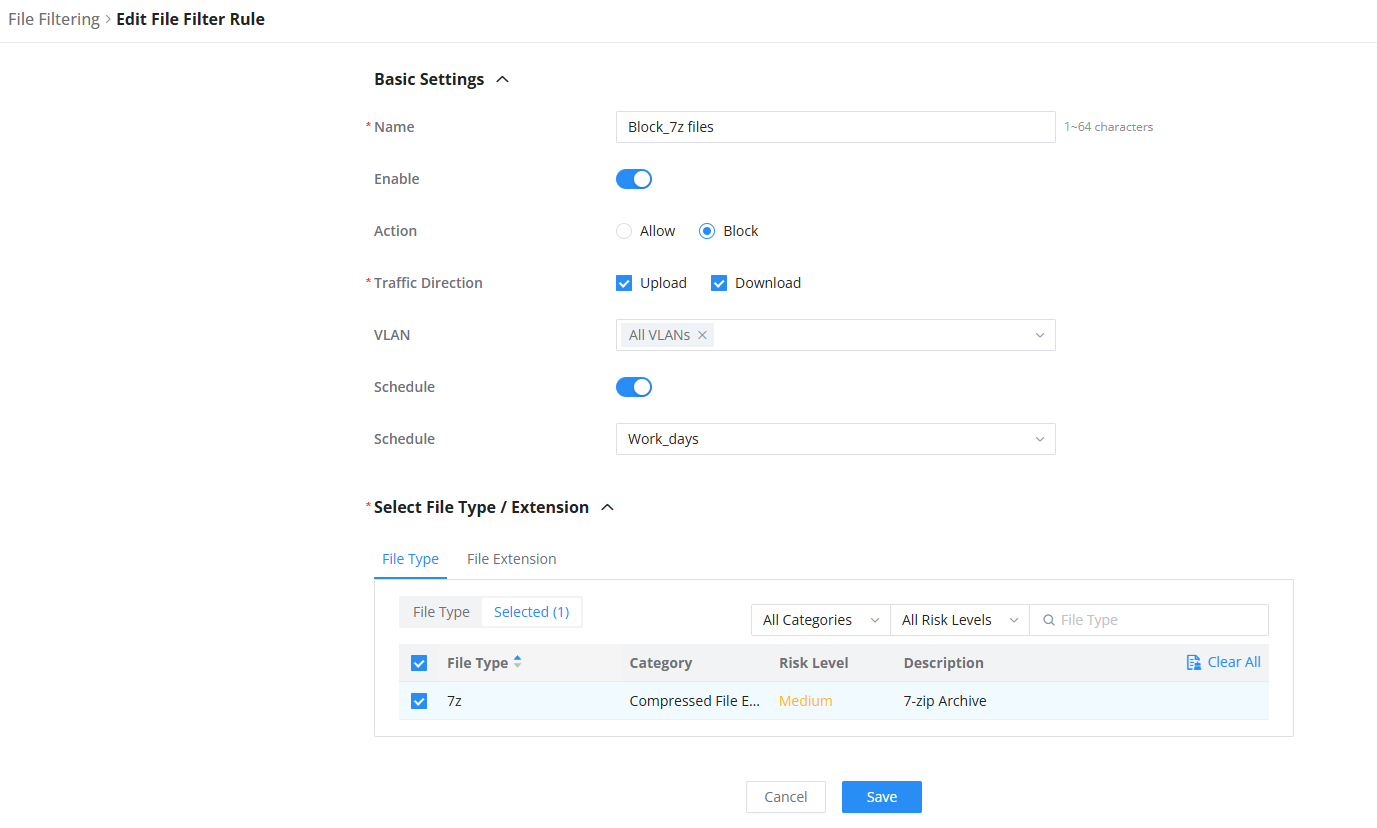
Defines custom rules for handling file transfers.
- Name: Identifier for the rule.
- Enable: Turn the rule on or off.
- Action: Choose Allow or Block.
- Traffic Direction: Apply filtering to Upload, Download, or both.
- VLAN: Apply the rule to specific VLANs or all VLANs.
- Schedule: Apply the rule at specific times.
- File Type / Extension Selection: Choose which files to block or allow from predefined categories.
Example: Block .7z archive downloads during working hours on Guest VLAN.
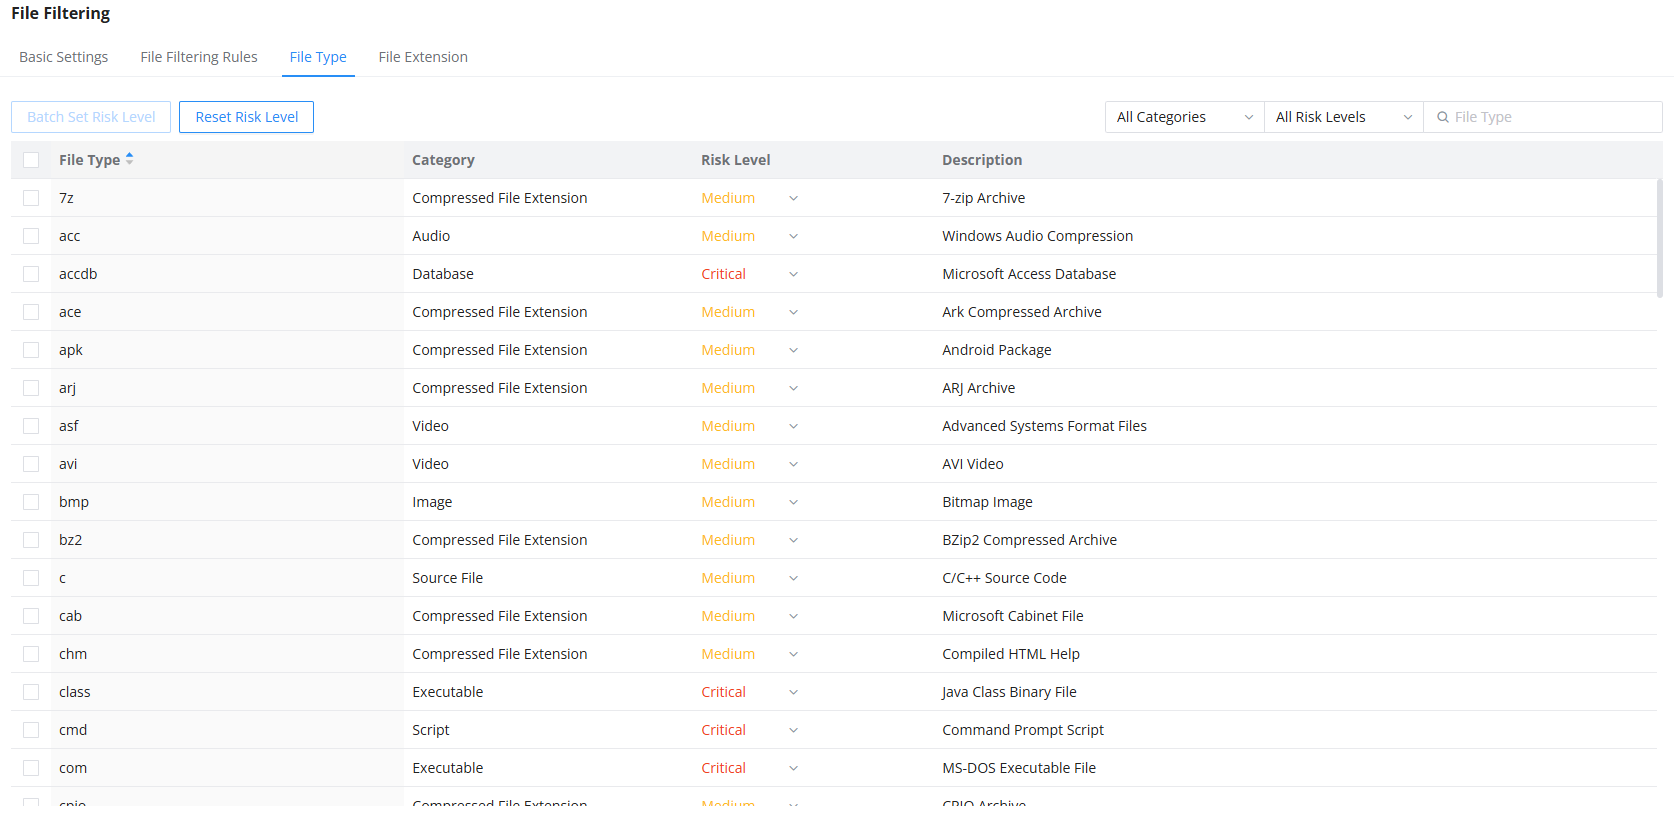
File Type
Displays a categorized list of common file types (e.g., archives, audio, video, executables).
Each file type includes:
- Category (e.g., Compressed, Audio, Video, Executable).
- Risk Level (Medium, Critical, etc.).
- Description (brief explanation of the file type).
Administrators can adjust the risk level of file types globally (e.g., setting all executables as “Critical”), they can also reset t default risk levels.
File Extension
Administrators can add custom extensions (e.g., .torrent, .bat, .reg).
Each extension can be assigned a Risk Level for security classification.

Application Filtering
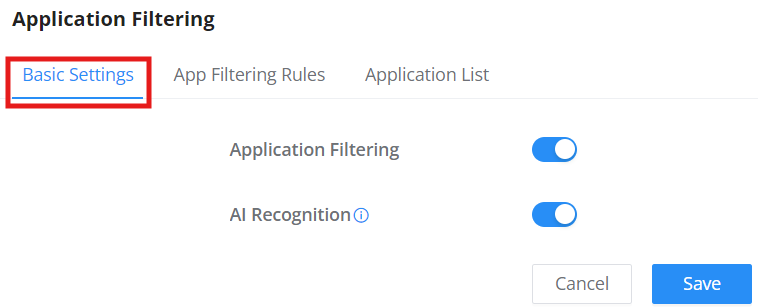
Basic Settings – Application Filtering
On the page, the users can enable/disable the global application filtering, then the users can enable or disable by app categories.
Navigate to the Firewall module → Content Control → Application Filtering, and on the basic settings tab, enable Application Filtering globally. It’s also possible to enable AI Recognition for better classification.
App Filtering Rules
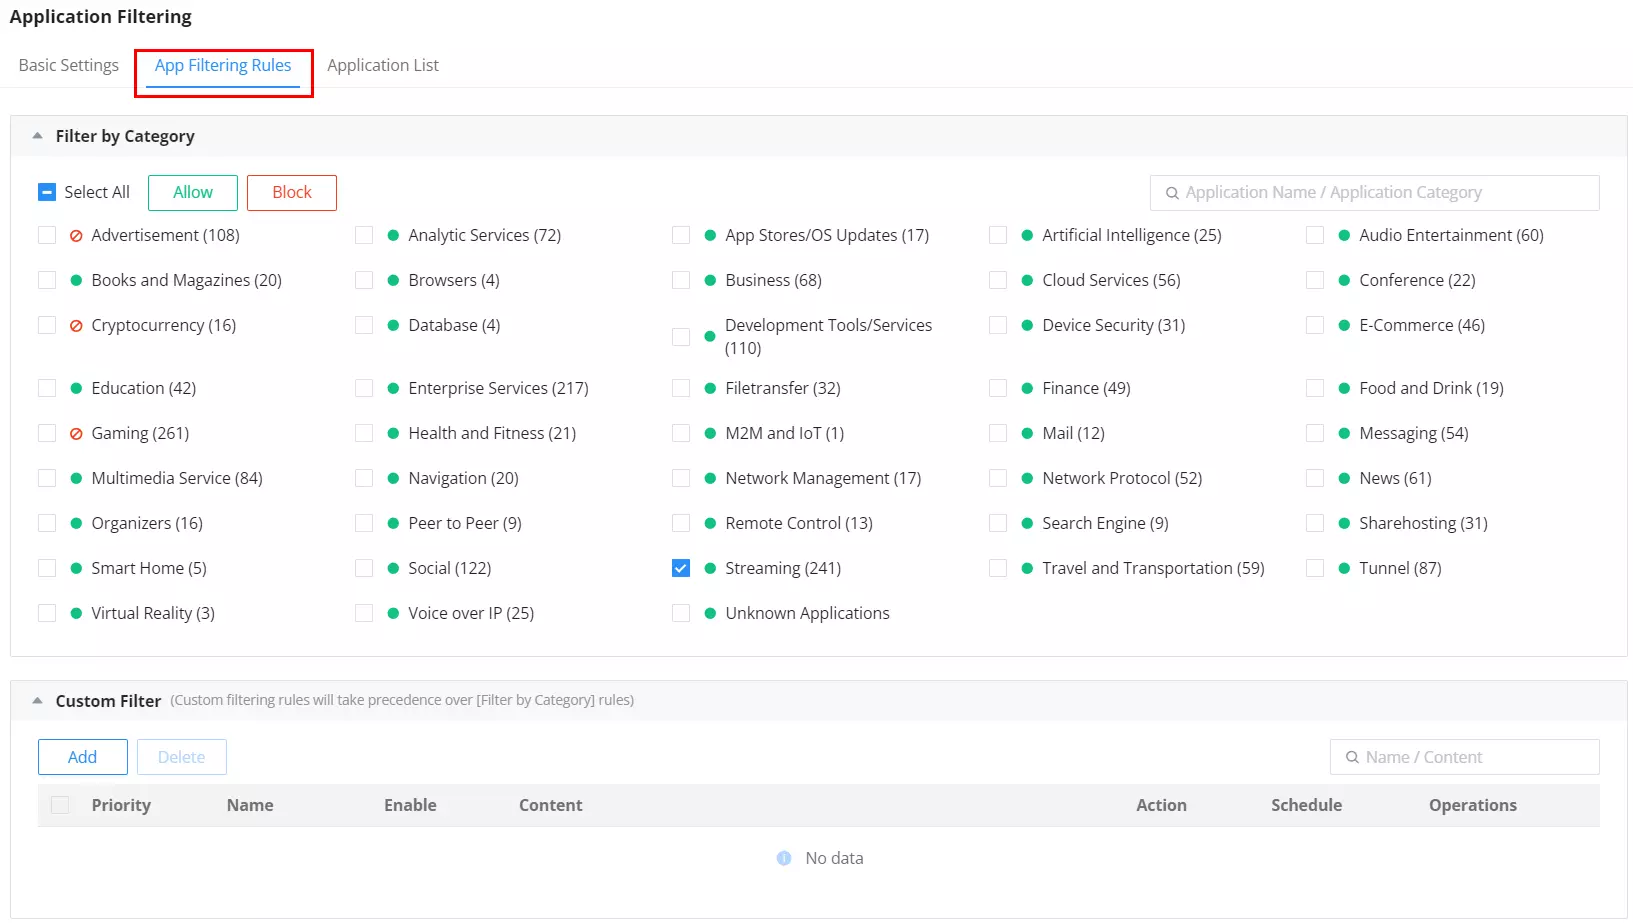
The App Filtering Rules tab allows administrators to block or allow network traffic based on specific application categories. This enables precise control over which types of applications are permitted across the network.
Administrators can filter applications using two methods:
1. Filter by Category
This section provides predefined application categories (e.g., Gaming, Social, Streaming). Each category displays the number of applications it contains. Administrators can:
- Select individual or multiple categories
- Use Allow or Block to define access behavior
Example: Blocking “Gaming” will prevent traffic from all applications categorized under gaming.
2. Custom Filter
Custom filters allow advanced control over individual applications or custom-defined rules. These filters take precedence over category-based rules

When a full application category (e.g., “Streaming”) is blocked using the Filter by Category option, the Custom Filter section can be used to make exceptions.
Administrators can define rules that explicitly allow or block specific applications within those categories. These custom filters override the category-wide settings and allow more precise traffic control.
For example, if “Streaming” is blocked but YouTube is allowed through a custom rule, users will still be able to access YouTube while other streaming apps remain restricted.
Each custom filter includes:
- A rule name and status toggle
- Allow/Block action
- Application list selection
- Optional schedule
This approach enables flexible enforcement while maintaining centralized policy control.

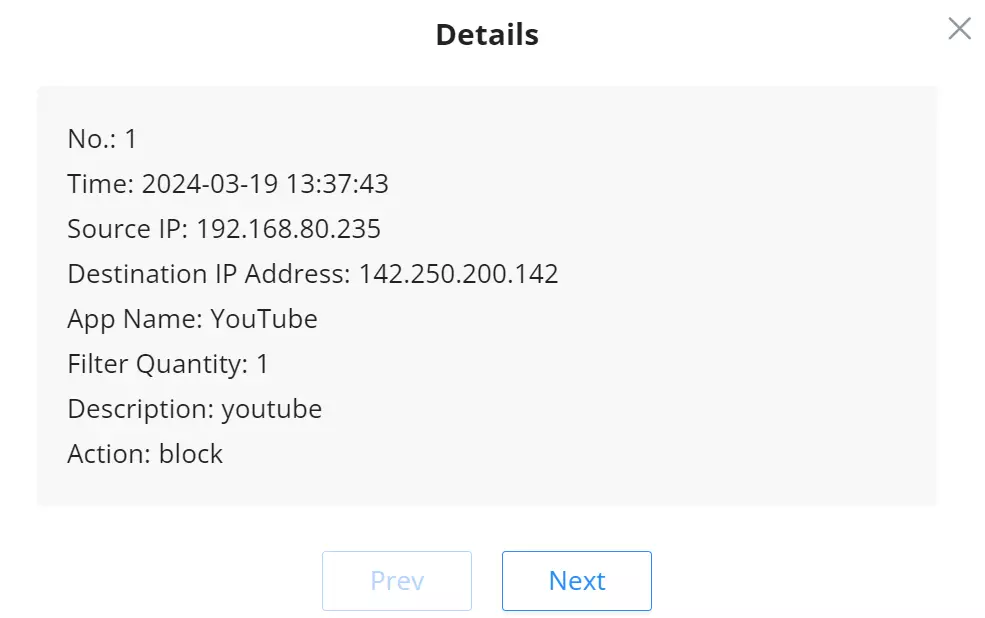
An example of application filtering is used on the app “YouTube” and the action set to “Block”; this information will be displayed under the Security Log.
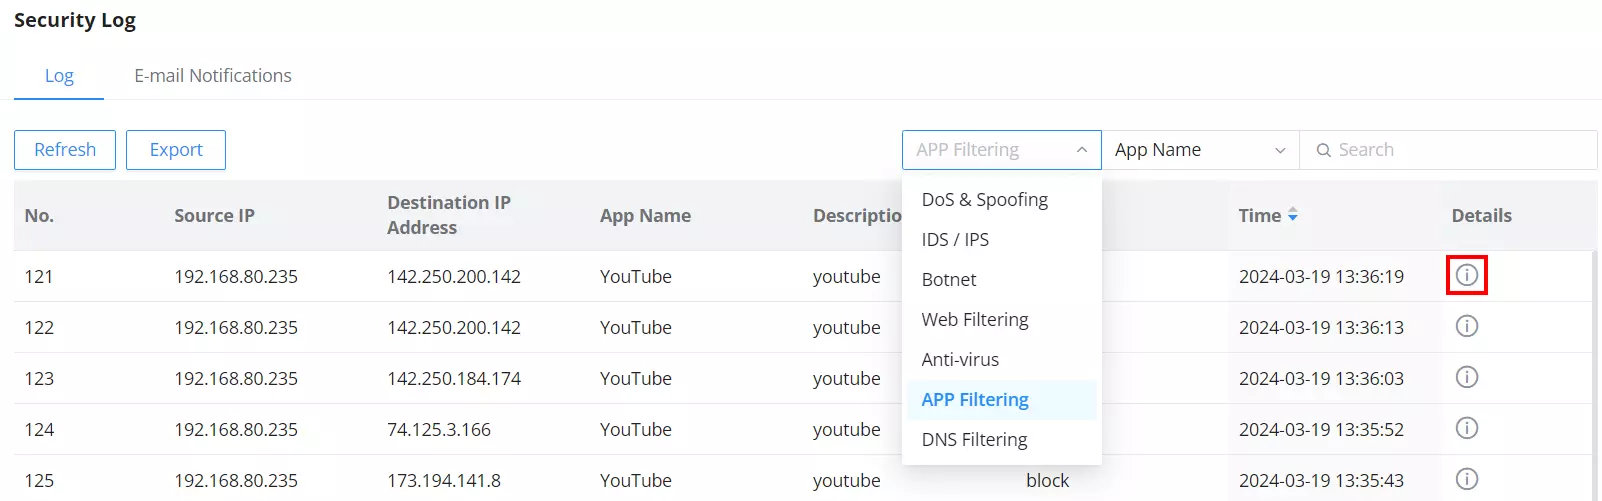
For more details, click on the exclamation icon as shown above:
Application List
In this tab, users can view, filter, and adjust the risk classification for each detected application. The interface now provides enhanced visibility through summary charts and a redesigned table layout.
Overview
- The App Category chart groups applications by function (e.g., Gaming, Streaming, Enterprise Services, etc.).
- The Risk Level chart classifies apps by importance: Critical, High, Medium, and Low.
- Hovering over either chart displays the number of apps in each category or risk class.

Application Table
The table below provides a full list of recognized applications, including:
- Name: Application or domain.
- Category: App function or usage group.
- Risk Level: Priority level (Critical, High, Medium, Low) assigned to each app.
- Description: Brief details about each app’s role or behavior.
Users can:
- Change the Risk Level per app using the dropdown.
- Filter by Category, Risk Level, or keyword using the search field.
- Use Batch Set Risk Level or Reset Risk Level to apply changes in bulk.
Risk level updates are reflected in the chart instantly for live visibility.
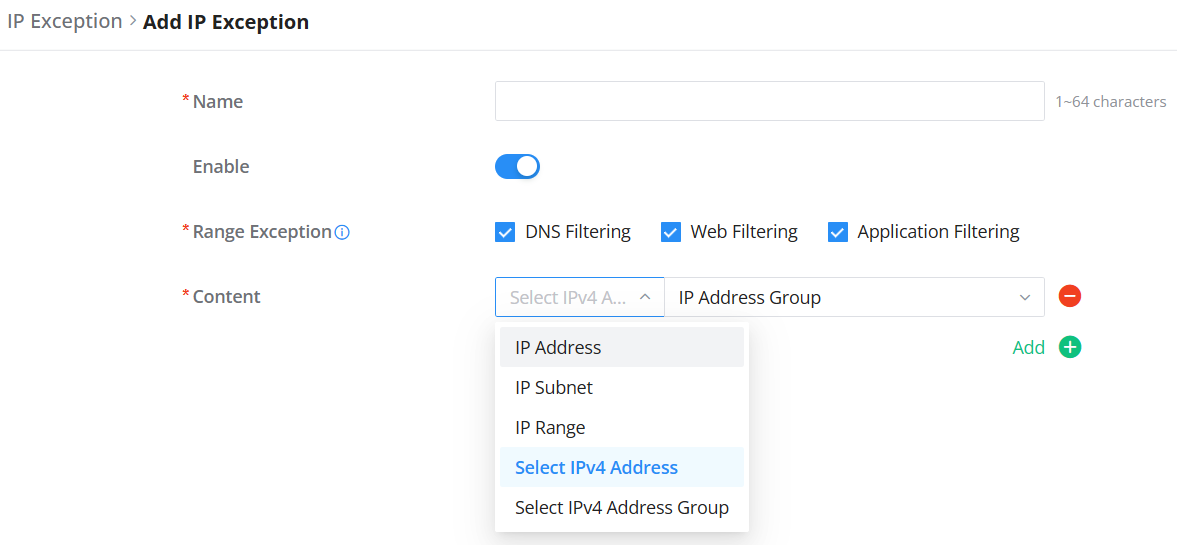
IP Exception – Content Control
In this section, users can add IP address ranges or IP addresses with masks to an exception list, exempting them from the filtering process.
To add an exception, click the “Add” button under the Firewall module → Content Control → IP Exception.

To exclude IPs from Content Control filtering, click “Add” and configure the following:
- Name: Enter a descriptive label for the exception.
- Enable: Toggle the rule ON.
- Range Exception: Select which filtering to apply the exception to:
- DNS Filtering
- Web Filtering
- Application Filtering
- Content: Choose the type of IP entry.
Supported input types:
- IP Address
- IP Subnet
- IP Range
- Select IPv4 Address (from profiles)
- Select IPv4 Address Group (from profiles)
Use the Add button to create new objects directly from this screen.
Note: IP object profiles are managed under: Networking module → Profiles → IP Address Group
Geo-IP Filtering
Geo-IP Filtering is a powerful security tool that allows you to manage and control network traffic based on geographic locations. With this feature, you can allow or block access to your network from specific countries or regions, define custom IP ranges for granular control, and look up the geographic origin of IP addresses. This helps enhance security, enforce compliance, and manage access policies effectively.
Geo-IP Filtering – Basic Settings
To start using Geo-IP Filtering, follow the steps below:
- Enable Geo-IP Filtering:
Toggle the switch at the top to activate Geo-IP Filtering. - Action Selection:
- Allow: Only allow traffic from the selected countries/regions. All others will be blocked.
- Block: Only block traffic from the selected countries/regions. All others will be allowed.
- Select Countries/Regions:
- Use the checkboxes to select specific countries/regions for your rule.
- Use the dropdown menu to filter and navigate by global categories like Asia, Europe, or North America.
- Save Your Configuration:
After selecting the desired settings, click Save to apply the rules.

Custom Geo-IP
For more specific configurations, use Custom Geo-IP to define rules based on individual IP addresses or ranges.
- Access the Custom Geo-IP: Navigate to the “Custom Geo-IP” tab.
- Add a New Rule: Click Add to create a new custom Geo-IP rule.

- Configure the Rule:
- Enable: Toggle the switch to activate the rule.
- Country/Region: Choose the relevant country or region.
- Content: Choose the input type from the dropdown and enter the value. Supported types:
- IP Address
- IP Subnet
- IP Range
- Select IPv4 Address (from profiles)
- Select IPv4 Address Group (from profiles)
You may also click the Add button to create new entries directly.
Note: IP object profiles are managed under: Networking module → Profiles → IP Address Group

IP Lookup
The IP Lookup section allows you to query the geographic origin of a specific IP address.
- Access the IP Lookup Tab:
Go to the “IP Lookup” tab in the Geo-IP Filtering section. - Search for an IP Address:
- Enter the desired IP address into the search bar.
- Click the Lookup button to start the query.
- View Results:
Once the query is processed, the system will display the corresponding country/region for the provided IP address.

SSL PROXY
An SSL proxy is a server that uses SSL encryption to secure data transfer between a client and a server. It operates transparently, encrypting and decrypting data without being detected. Primarily, it ensures the safe delivery of sensitive information over the internet.
When the SSL Proxy is enabled, the GCC device will act as an SSL Proxy server for the connected clients.
Basic Settings – SSL Proxy
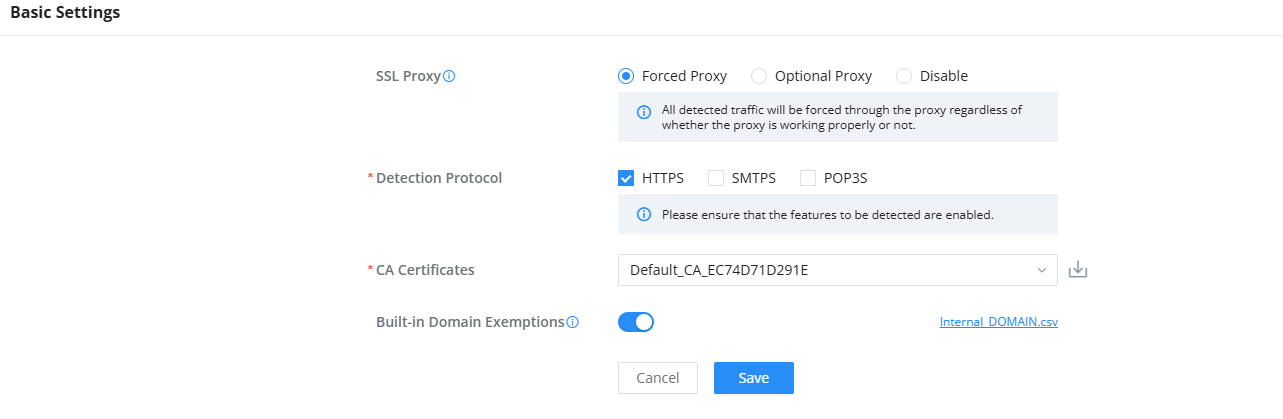
The SSL Proxy allows the firewall to inspect encrypted traffic (HTTPS, SMTPS, POP3S) by decrypting and re-encrypting connections. This enables filtering features (DNS, Web, File, Application) to function even on encrypted traffic.
SSL Proxy Modes
- Forced Proxy
- All detected traffic is mandatorily proxied, regardless of whether the proxy is functioning correctly.
- If the proxy fails, connections will still be blocked until the proxy resumes.
- This mode provides the highest security because no encrypted traffic bypasses inspection.
- Best suited for strict environments (corporate LAN, regulated industries).
- Optional Proxy
- The system attempts to proxy traffic up to three times.
- If proxying fails, the traffic will be allowed to continue without SSL inspection.
- Balances security and availability, ensuring services remain accessible even if the proxy encounters issues.
- Useful for networks where uptime is critical but inspection is still desired.
- Disable
- SSL Proxy is disabled. Encrypted traffic passes through without decryption or inspection.
- Filtering features (e.g., file filtering for HTTPS downloads) will not apply.
- Select which encrypted protocols should be inspected:
- HTTPS → Web browsing traffic.
- SMTPS → Secure email sending.
- POP3S → Secure email retrieval.
CA Certificates
- Determines the certificate authority (CA) used by the proxy when re-signing traffic after decryption.
- Administrators can select a default or custom CA certificate.
- End-user devices must trust this CA for SSL proxying to work without browser warnings.
Built-in Domain Exemptions
- When enabled, certain predefined domains (system and widely used services) are automatically exempted from SSL inspection.
- Purpose:
- Reduce compatibility issues with critical services (e.g., banking sites, software update servers, certificate-pinned apps).
- Improve performance by not decrypting traffic where inspection is unnecessary or could cause failures.
- Administrators can download the exemption list (
Internal_DOMAIN.csv) and review or customize it.
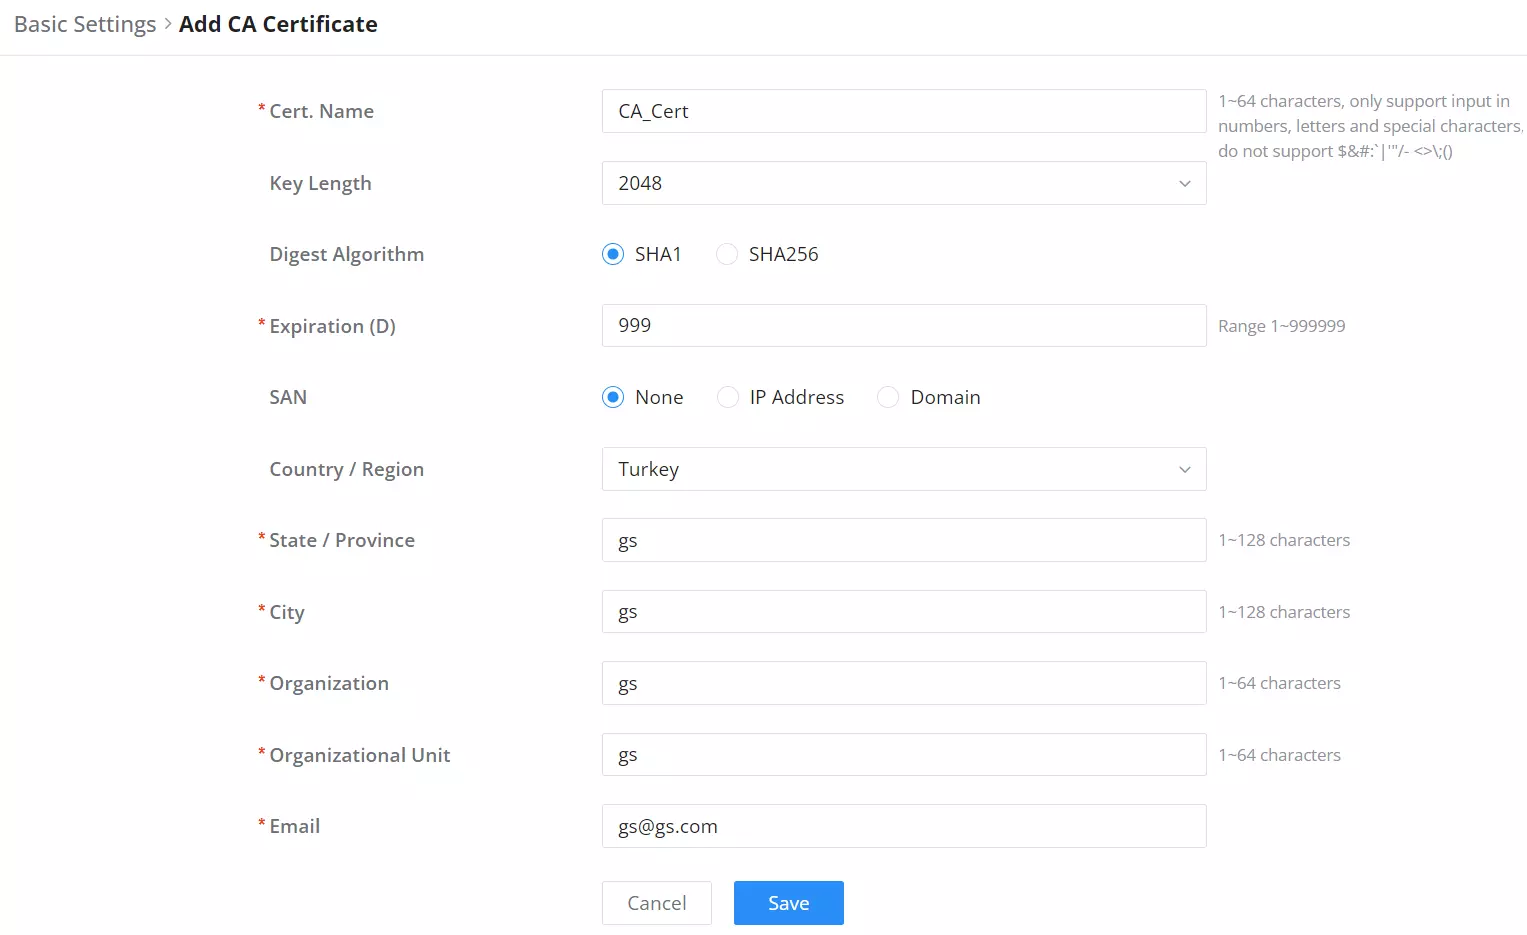
Cert. Name | Enter the Certificate name for the CA. Note: It could be any name to identify this certificate. Example: “CATest”. |
Key Length | Choose the key length for generating the CA certificate. The following values are available:
|
Digest Algorithm | Choose the digest algorithm:
Note: Hash is a one-way function, it cannot be decrypted back. |
Expiration (D) | Enter the validity date for the CA certificate in days. The valid range is 1~999999.. |
SAN | Enter the address IP or the domain name of the SAN (Subject Alternate Name). |
Country / Region | Select a country code from the dropdown list. Example: “United Stated of America”. |
State / Province | Enter a state name or province. Example: “Casablanca”. |
City | Enter a city name. Example: “SanBern”. |
Organization | Enter the organization’s name. Example: “GS”. |
Organizational Unit | This field is the name of the department or organization unit making the request. Example: “GS Sales”. |
Enter an email address. Example: “EMEAregion@grandstream.com” |
SSL Proxy – Add CA Certificate
For the SSL Proxy to take effect, users can manually download the CA certificate by clicking on the download icon as shown below:
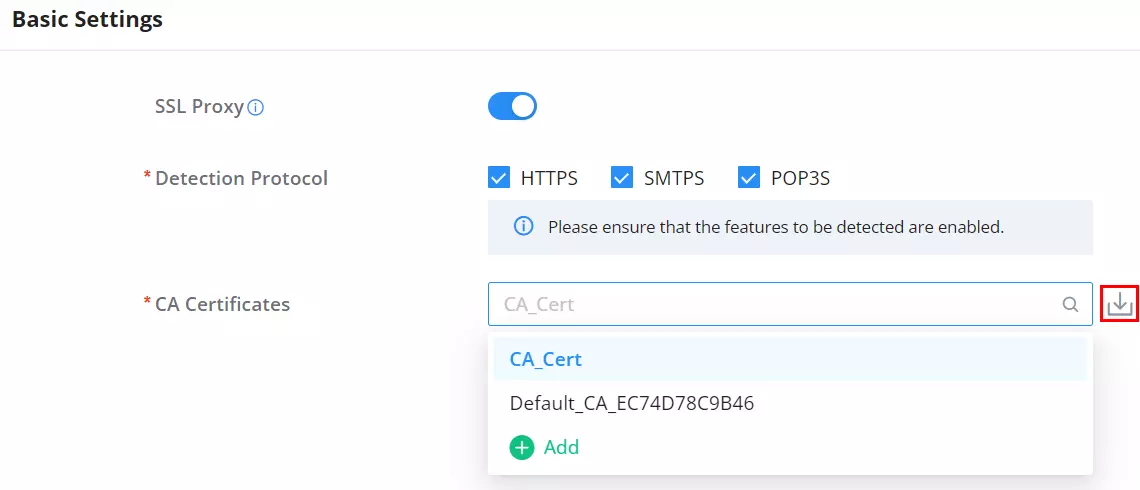
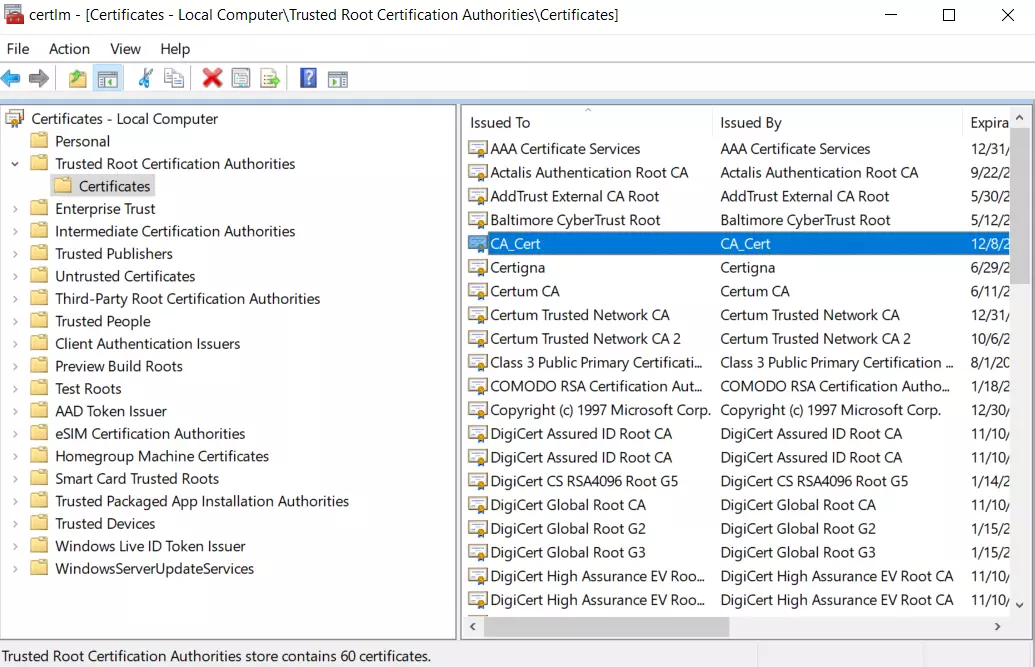
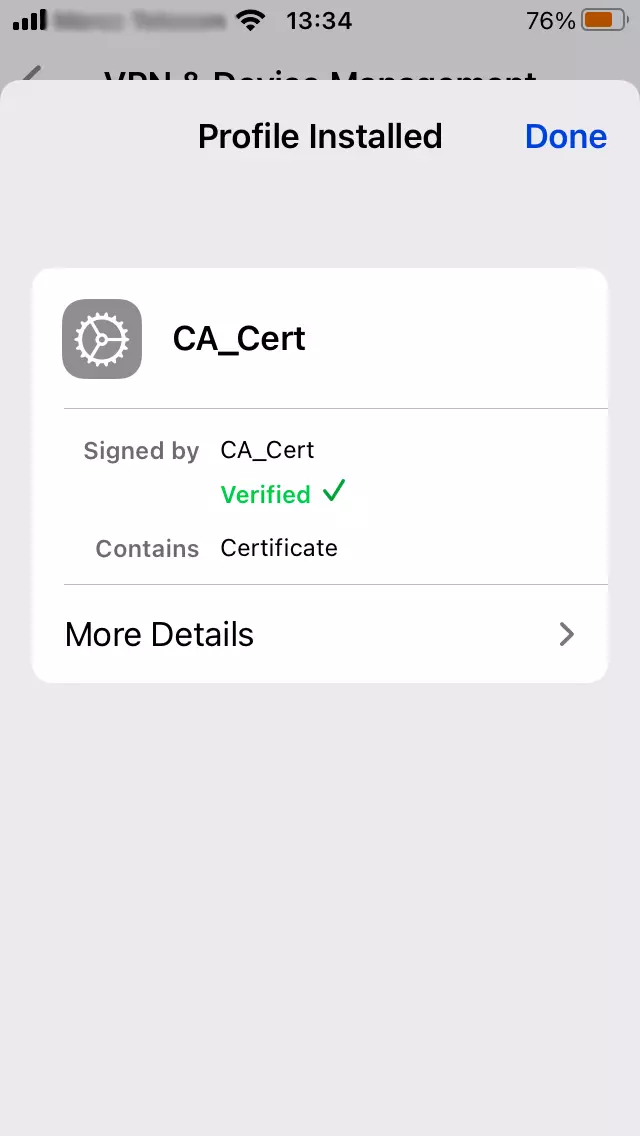
Then, the CA certificate can be added to the intended devices under the trusted certificates.
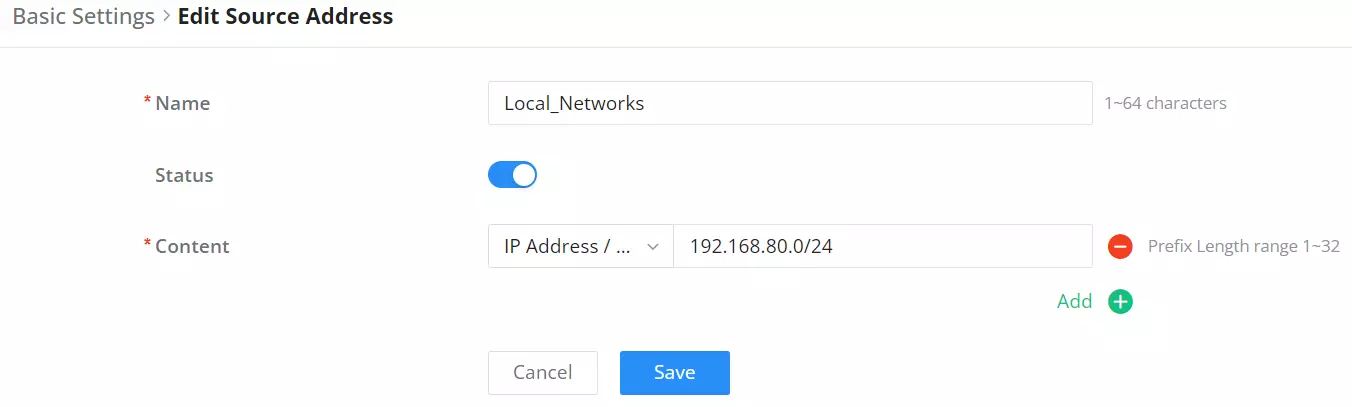
Source Address
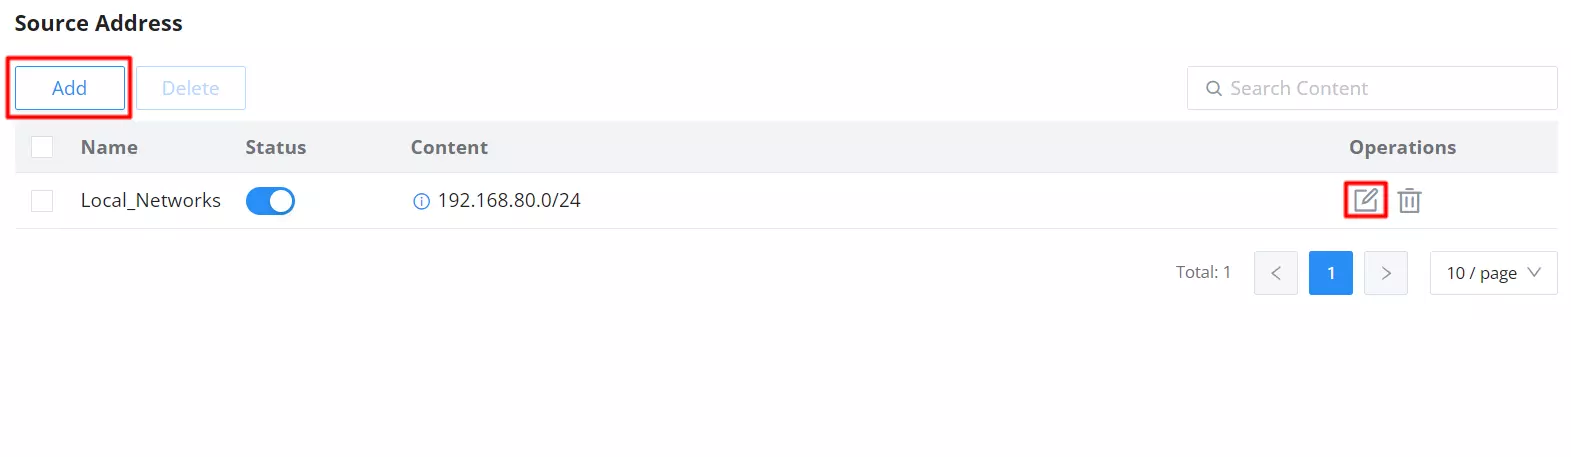
When no source addresses are specified, all outgoing connections are automatically routed through the SSL proxy. However, upon manually adding new source addresses, only those specifically included will be proxied through SSL, ensuring selective encryption based on user-defined criteria.
SSL Proxy Exemption List
SSL proxy involves intercepting and inspecting SSL/TLS encrypted traffic between a client and a server, which is commonly done for security and monitoring purposes within corporate networks. However, there are certain scenarios where an SSL proxy may not be desirable or practical for specific websites or domains.
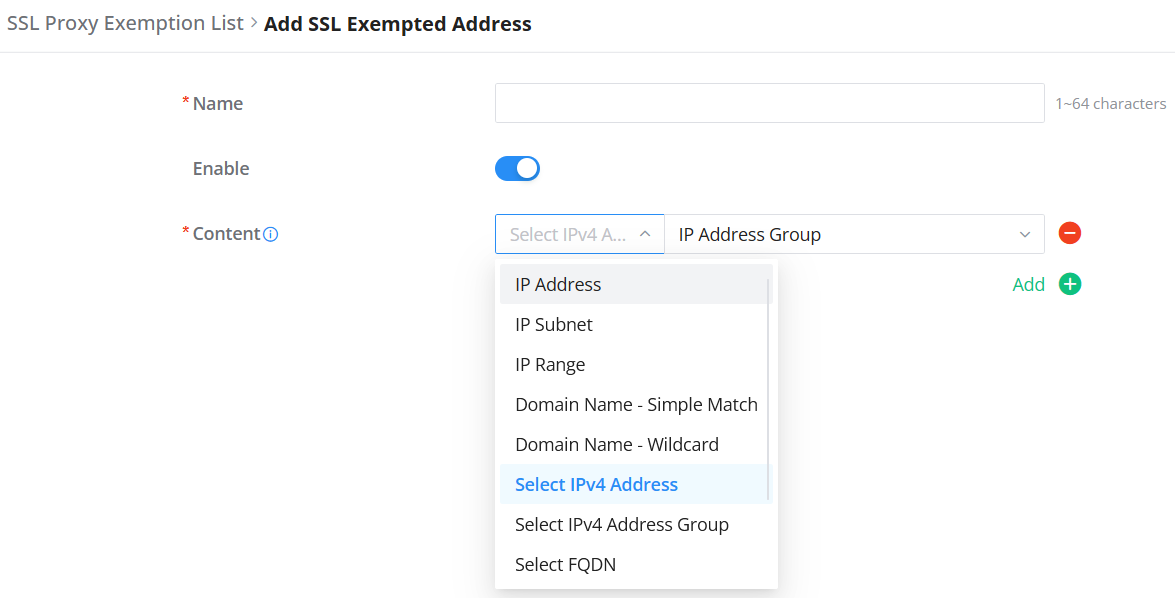
The exemption list allows users to specify their IP address, domain, IP range, and web category to be exempted from SSL proxy.
To add an SSL exemption, click the “Add” button. You can also import a list by selecting “Download the template,” completing the file as needed, and clicking “Import” to upload it. Alternatively, export the current list by clicking “Export“, make the necessary changes, and re-import the updated file. Refer to the example below for guidance:

Under the Content section, users can now select from both manual entries and reusable objects.
Supported types include:
- IP Address: Add a specific IP address.
- IP Subnet: Add a subnet using CIDR notation.
- IP Range: Define a range of IPs.
- Domain Name – Simple Match: Match an exact domain (e.g.,
example.com). - Domain Name – Wildcard: Match subdomains (e.g.,
*.example.com). - Select IPv4 Address: Use predefined objects created under IP Profiles.
- Select IPv4 Address Group: Use a saved group of IPv4 addresses.
- Select FQDN: Use predefined FQDN entries from the FQDN profile.
- Web Category: Select predefined web categories (e.g., “Adult”, “Advertisement”, “Finance”, etc.).
Click the Add icon to create objects directly from this screen.
Note: All reusable objects (IPv4/FQDN/Groups) are managed under: Networking module → Profiles → (IP Address Group / FQDN)
Signatures Update
The Signature Update page provides a unified interface to manage all signature databases used by the Firewall. This includes:
- Virus Signature Library
- IPS Signature Library
- URL Signature Library
- Application Signature Library
Each signature section displays the following information:
- Version: Current signature database version.
- Update Time: The Time the signature library was last updated.
- Last Checked Time: The Time the system last checked for updates.
- Check for Updates: Shows whether the system has the latest version.
Users can configure update behavior using the Scheduled Update dropdown.
Available options include:
- Auto (Updated Daily) (default for Virus signatures)
- Auto (Updated Weekly) (default for IPS, URL, and Application signatures)
- Custom Schedules: Users can create schedules under Home → System Settings → Schedule, and apply them to any of the signature libraries.
The Save button applies the selected schedule, and the Update Now button triggers a manual update.

Blocked Web Page
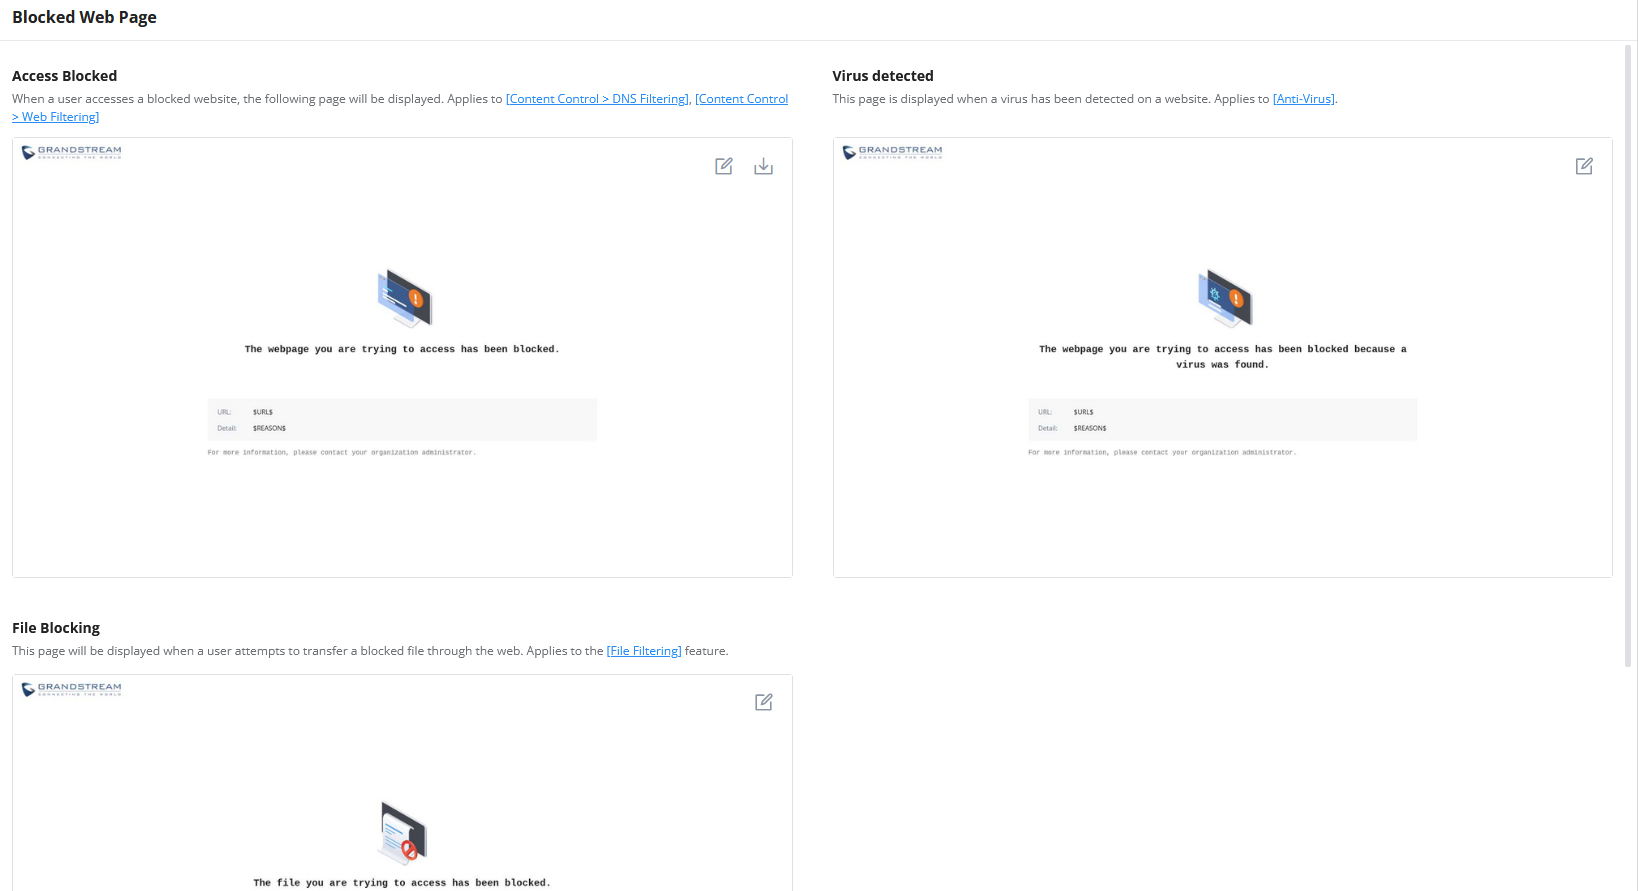
This section allows administrators to configure the custom intercept pages that are displayed when a user is denied access to a website due to web filtering or antivirus policies.
By default, generic block pages are shown. These can now be customized using a drag-and-drop editor with basic widgets such as logo, text, and contact information.
Overview
- Access Blocked: This notification page is triggered when a user attempts to access a website that has been explicitly restricted by security policies. It applies to Web Filtering (content-based restrictions), preventing access to sites deemed unsafe, inappropriate, or non-compliant with organizational rules.
- Virus Detected: This page appears when the security system identifies and blocks a website containing malicious code or an active virus threat. It applies to the Anti-Virus engine, which scans web traffic in real-time to prevent endpoint infections and safeguard the network from malware propagation.
- File Blocking: This page is displayed when a user attempts to download or upload a file type that has been restricted by security policies. It applies to the File Filtering feature, which enforces control over file transfers (e.g., executable, archives) to mitigate risks such as data leakage, malware infiltration, or policy violations.
Each page can be edited by clicking the “Edit” icon in the top-right corner of the preview.
Applies to:
Page Editor
Clicking the edit icon opens a WYSIWYG editor that lets you customize the intercept page using the following elements:
- Logo – Show or hide your company logo.
- Text – Main message area.
- Contact – Add contact details or help desk info.
- Restore Default Template – Revert to default.
Placeholders such as $URL$ and $REASON$ will automatically be replaced with the relevant details at runtime.

SECURITY LOG
Log
On this page, security logs will be listed with many details such as Source IP, Source interface, Attack Type, Action, and Time. Click on the “Refresh” button to refresh the list and the “Export” button to download the list to the local machine.
The users also have the option to filter the logs by:
- Time
- Attack
Sort log entries by:
- Source IP
- Source Interface
- Attack Type
- Action
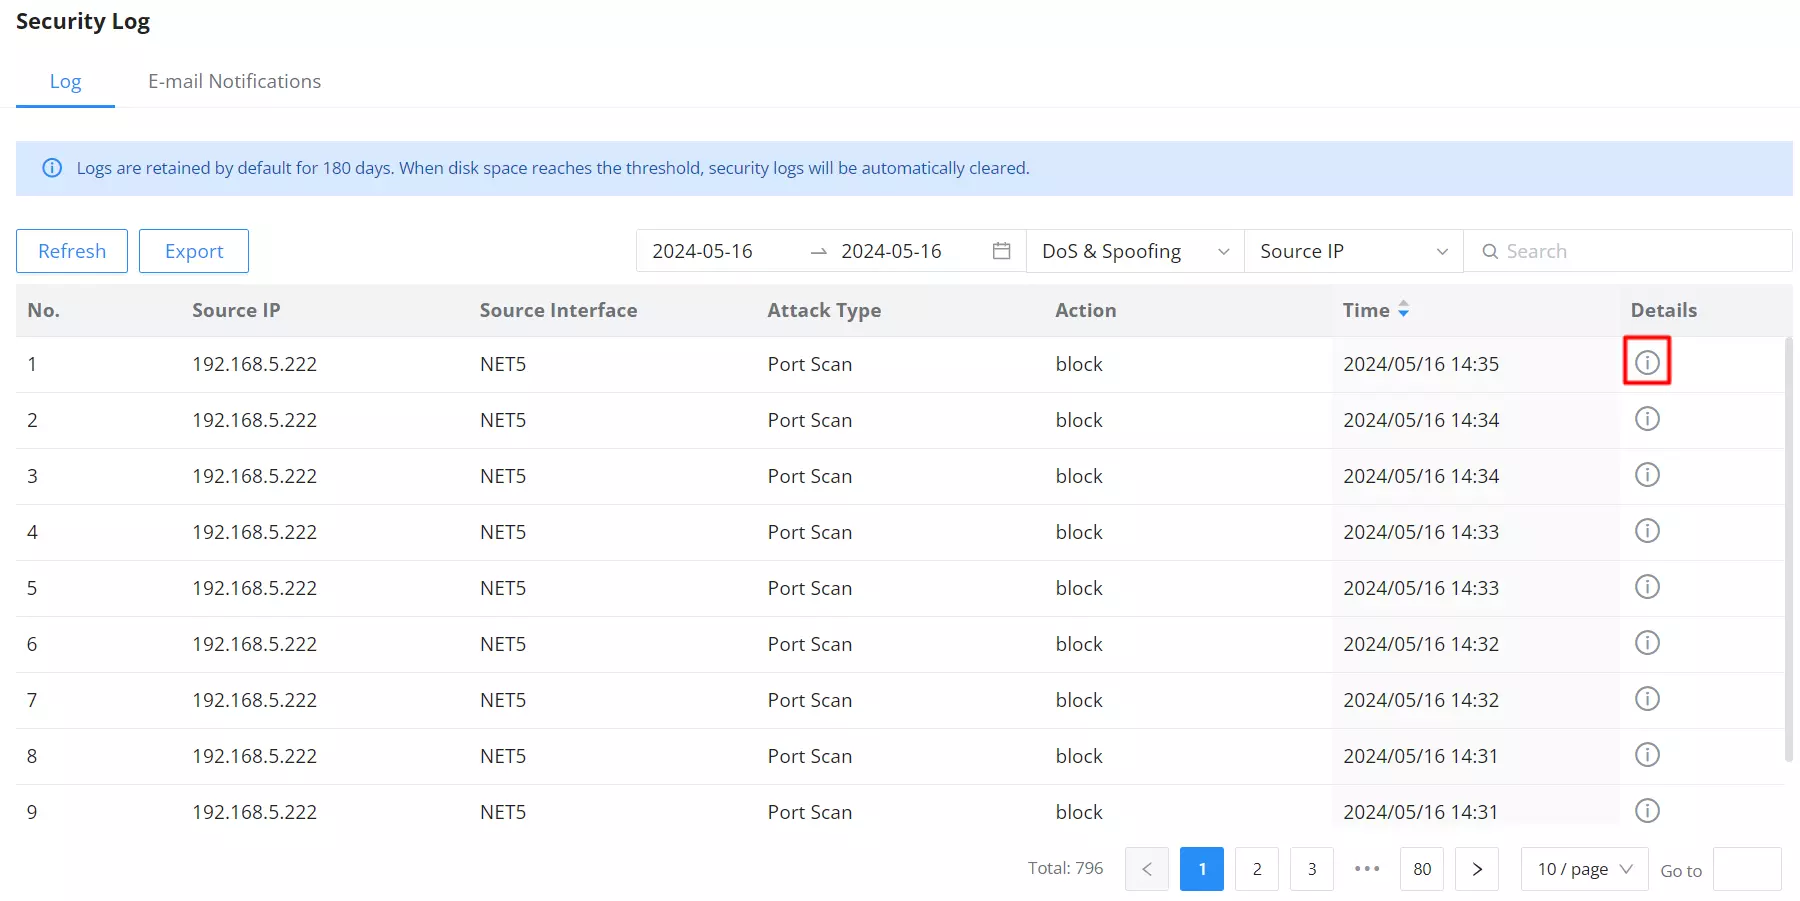
For more details, click on the “exclamation icon” under the Details column as shown above:
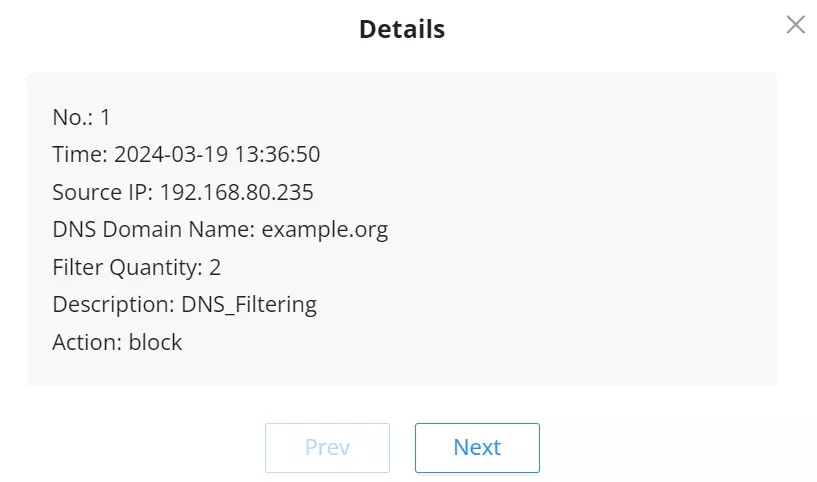
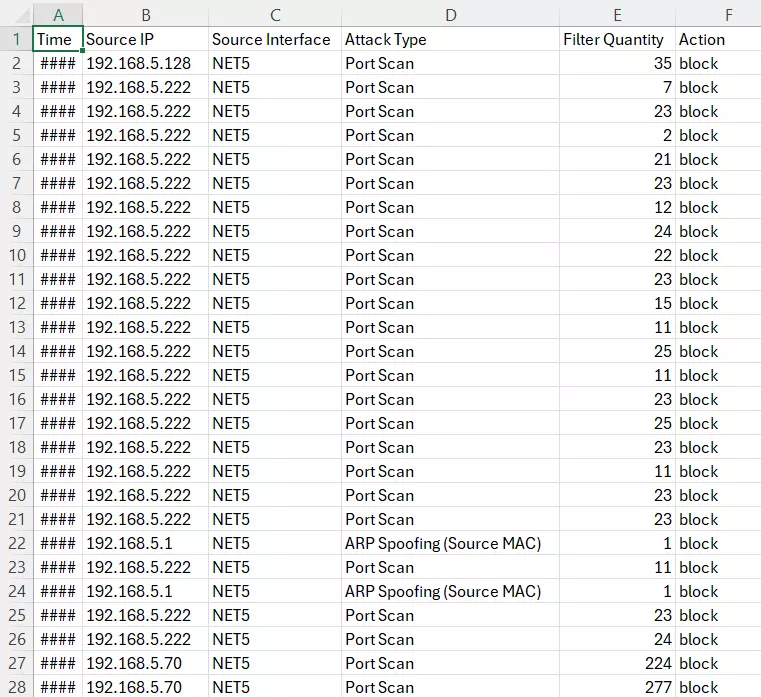
Users can export security logs by clicking on the Export button. Two options are available:
- Export Current: Exports only the logs displayed on the current page.
- Export All: Exports the entire security log history available on the device.
The logs will be downloaded as an Excel file. Refer to the figures below for guidance:
Log Level and Email Notification
In this section, users can configure the risk levels (Critical, High, Medium, Low) for different security features. When a risk level is triggered, an alert email will be sent based on the selected thresholds.
Some categories offer direct risk level selection, while others provide more granular control. For detailed configuration, click on the category name to open additional options.
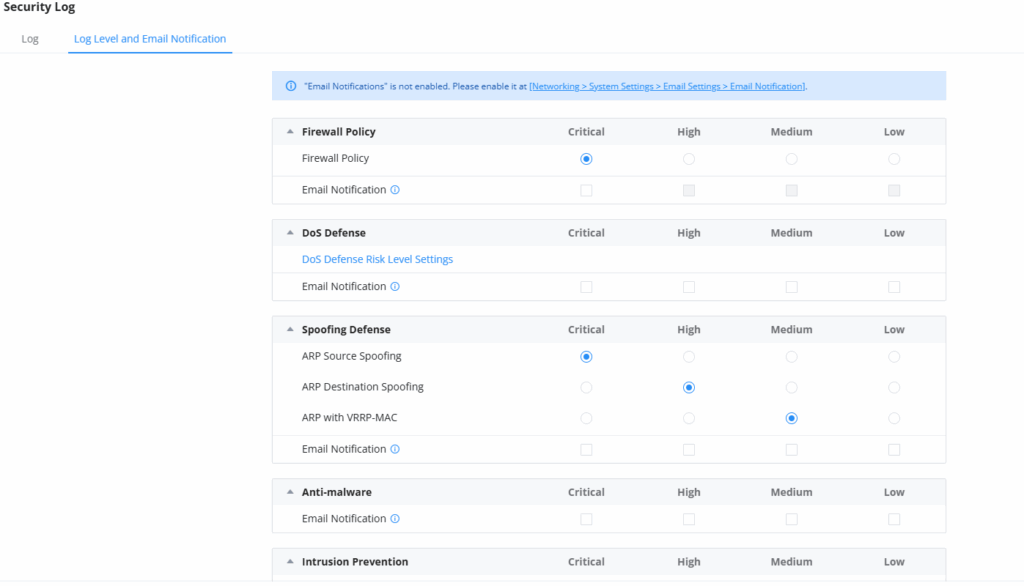
For categories with multiple sub-options, users can define individual risk levels by clicking the category link.
After configuring, click Save to apply the settings.

PERMISSION MANAGEMENT
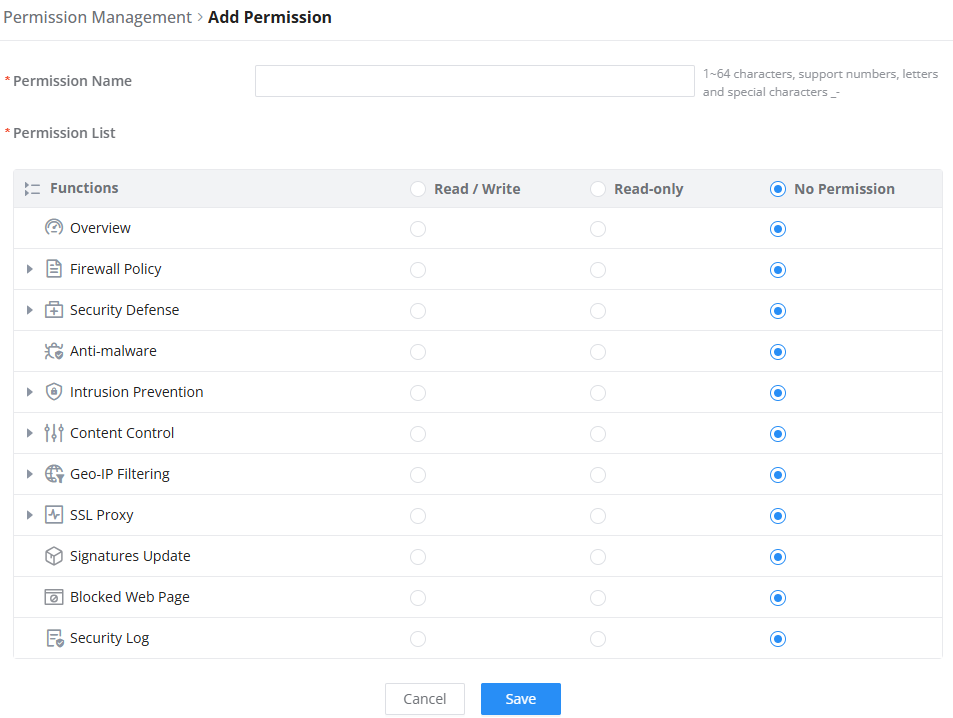
Permission Management allows the administrator to create multiple roles with different permissions, it allows creating roles with permissions of reading, or reading and writing privileges which allow monitoring, or monitoring and changing the settings on the Firewall module, respectively.
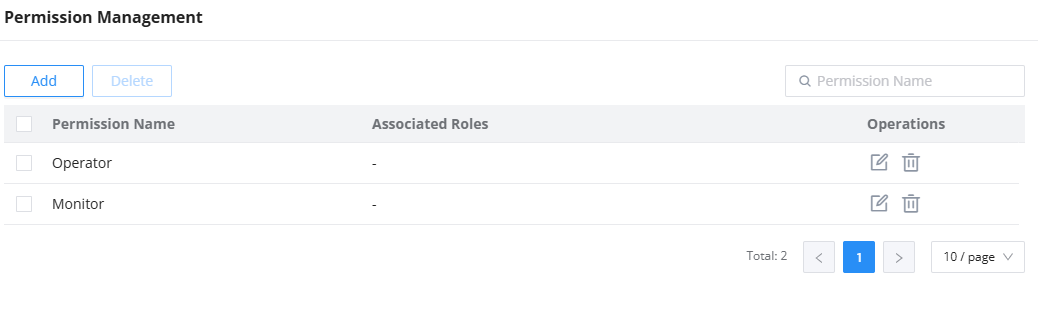
Click on  button to add a new permission category. Enter the permission name, then select the functions, you can select to allow read, or read and write permissions.
CHANGE LOG
This section documents significant changes from previous versions of the GCC6020 series – Firewall module user manuals. Only major new features or major document updates are listed here. Minor updates for corrections or editing are not documented here.
Firmware version 1.0.7.69 (PBX version 1.0.27.90)
- Added Permission Management section [PERMISSION MANAGEMENT]
Firmware version 1.0.7.48 (PBX version 1.0.27.90)
- No major changes.
Firmware version 1.0.7.46 (PBX version 1.0.27.90)
- No major changes.
Firmware version 1.0.7.44 (PBX version 1.0.27.89)
- Added option for Enabling/Disabling Advanced Firewall. [Disabling/Enabling Advanced Firewall]
- Added VLAN configuration option under DNS Filtering, Web Filtering, Application Filtering. [Filtering based on VLAN]
- Added Redirect Intercept Page IP Configuration option. [Redirect Blocked Webpage]
- Added support for File Filtering. [File Filtering]
- Added “Forced Proxy” and “Non-Forced Proxy” configuration. [Forced Proxy] [Optional Proxy]
- Added “Built-in Domain Exemption” (bypass inspection for specified domains). [Built-in Domain Exemptions]
- Added logging support for Firewall Policies.[Log Level and Email Notification]
Firmware version 1.0.7.32
- This is the initial version.