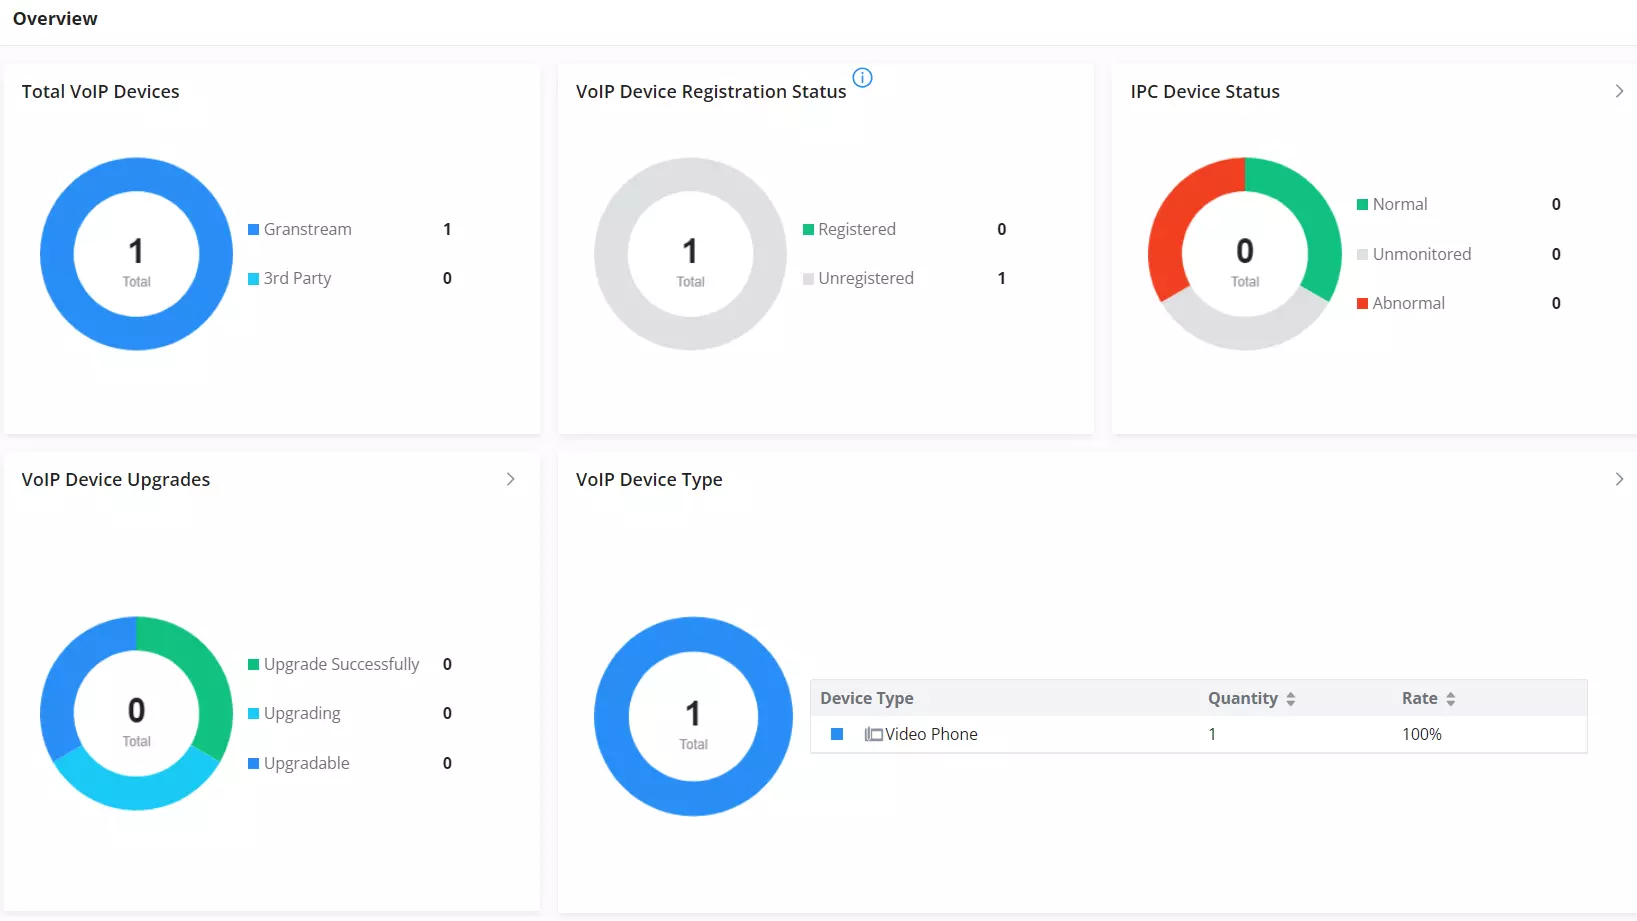
After successful login to the GCC device’s UC Endpoints Web Interface, the overview web page will provide an overall view of the GCC device’s information presented in a Dashboard style for easy monitoring. Please refer to the figure and table below:
Overview
Total Devices
Displays the total number of added devices, this includes Grandstream devices, and devices from other manufacturers.
VoIP Device Registration Status
Displays the total number of the registered or unregistered devices to the SIP server.
IPC Device Status
Displays the added IP cameras, and their respective status, monitored, unmonitored, or Abnormal
VoIP Equipment Upgrades
Displays the status of upgrades for certain equipment added through VoIP devices. It provides information on the number of devices that have successfully completed the upgrade, the number of devices that are eligible for upgrade, and the number of devices currently undergoing the upgrade process. This allows administrators to monitor the progress and success of equipment upgrades within the VoIP network.
VoIP Equipment Type
Specifies the category of hardware utilized in VoIP networks, including devices like IP phones, gateways, IP-PBX systems for communication over the internet.
Overview
FAST PROVISION
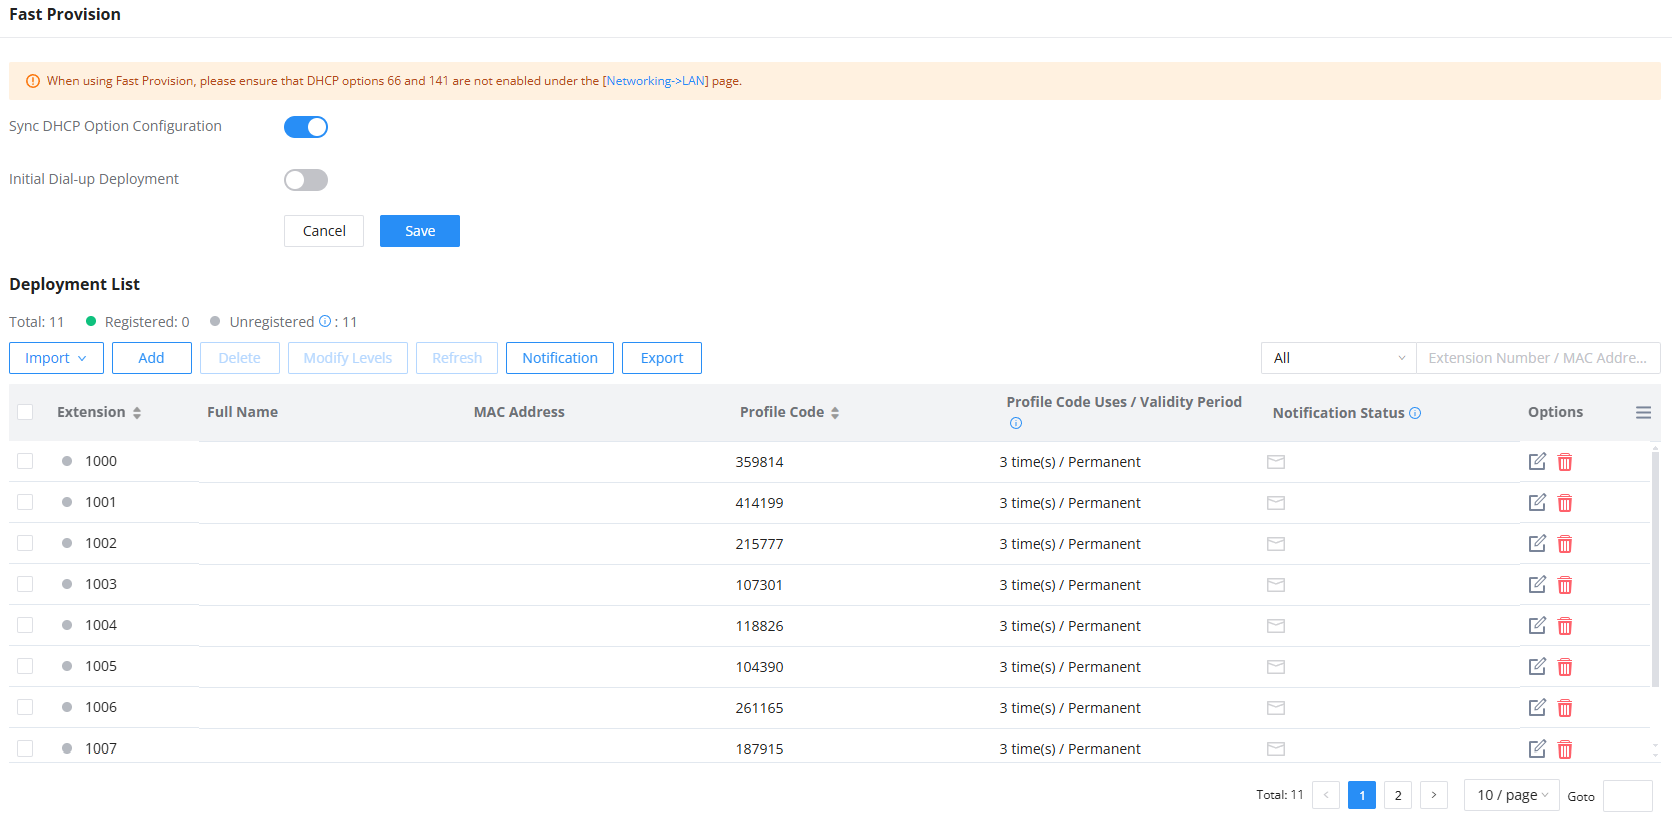
Fast provision feature allows users to provision many Grandstream endpoint devices at once, without the need to provision each device individually. This is an extension of the GCC device IP-PBX module. please refer to the Fast Provisioning Guide for more information on how to configure the feature.
Fast Provision
Fast Provision
Sync DHCP Option Configuration
If enabled, Fast Provision configuration will be synced to the DHCP server.
Initial Dial-up Deployment
After enabling the option, the VOIP devices will automatically register with the GCC “Initial Dial-up Deployment” account. You need to make sure that GCC and the phone to be deployed are in the same LAN, and the VoIP terminal needs to use the “Initial Dial-up Deployment” account to dial the profile code to complete the deployment. Disabled by default.
Import
This option helps users upload a list of SIP extensions with its corresponding device MAC, Network Priority, Call Security level… as the name implies, this option helps administrators to fast provision a list of extensions with its corresponding information all at once without the need to add each extension individually. Note:
In order to import the extensions you have a template that you can populate with your data, the template is called fast_provision_upload_template and it is in excel format.
You can import up to 24 extension per excel file by default, If users purchase the PBX upgrades plan, up to 200 users can be imported.
Add
creates a new extension number and define its different parameters: MAC Address, Network priority…
Delete
Delete a created extension, or extensions
Modify levels
Defines the following parameters: Network Priorirty, Call Security level, Call Voice Quality.
Refresh
Updates the ID code for the selected extension, or extensions
Notification
When adding the email address of the extension, and when configuring an SMTP server on the PBX module, you can send notification email to the selected extension
Export
Exports all the information and data of the created extensions.
Device Information
Extension Number
Defines the extension number.
MAC Address
Defines the MAC Address
Profile code
Defines the Profile code
Validity Period of Profile Code
Defines for how long the Profile code will be valid, the options are:
Permanently Active
1 day(s)
2 day(s)
7 day(s)
30 day(s)
Custom
Profile Code Uses
Defines how many times the Profile code can be used, it can either be set to 3 times or Custom, where you can define a custom value between 1-10
Call QoS If modified, the system applies network priority (for Wi-Fi phones connected to Grandstream AP), call security, and call quality settings based on the selected level. After saving, the current phone configuration will be overwritten.
Network Priority
Defines how the system prioritizes voice traffic over the network for the specific extension, particularly when there is congestion or limited bandwidth. The available levels are:
Follow Device: Disables network priority for this extension. The system will use the device’s settings without applying specific prioritization for voice traffic.
Low: Assigns the lowest priority to voice traffic for this extension. Suitable when voice is not mission-critical or to conserve bandwidth for higher-priority services.
Medium: Voice traffic is given higher priority over other types of data traffic, like file transfers or browsing.
Advanced: Voice traffic is given the highest level of priority on the network, this is for critical for environments with high congestion
Call Security Level
Defines the call security level, controlling the encryption and security protocols applied to voice calls. This setting helps protect communications from interception, tampering, or unauthorized access. The four options are:
Follow Device: Disables custom call security settings for this extension. The system will apply the security policies configured at the device level.
Low: Minimal or no encryption is applied.
Medium: Moderate security measures, such as Secure RTP (SRTP), are applied.
Advanced: Maximum encryption and security features are applied, including TLS for signaling and SRTP for media.
Call Voice Quality
Defines the compression and encoding algorithms used to maintain voice clarity and reduce latency.three levels are available: Normal, intermediate, and advanced.
Follow Device: Disables custom voice quality settings for this extension.
Low: Standard codecs (e.g., G.711) with no special optimization.
Medium: Slightly optimized codecs (e.g., G.729) that balance voice clarity with bandwidth efficiency.
Advanced: High-quality codecs with advanced processing (e.g., Opus or wideband codecs).
Identity information
Employee ID
Displays the employee ID
First Name
Defines the First Name
Last Name
Defines the Last Name
Job Title
Defines the Job Title
Email
Defines the email address
Mobile Number
Defines the mobile number
Fast Provision
DEVICE MANAGEMENT
IPC Devices
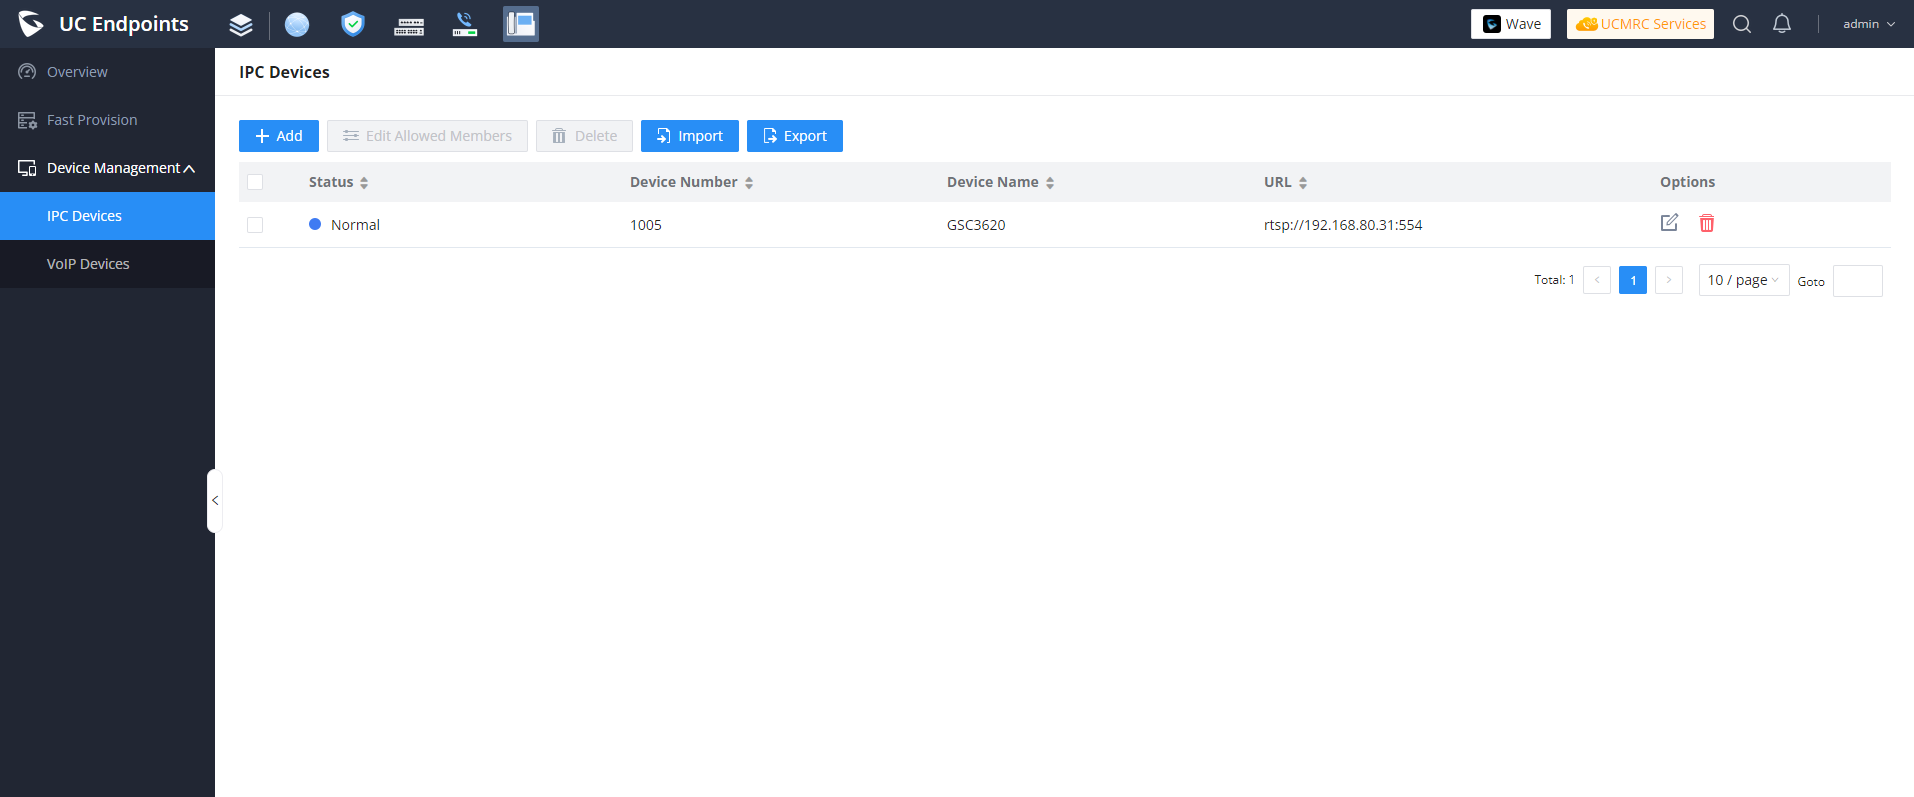
This section manages the added Grandstream IP Cameras devices.
General
Device Number
Defines the number that allowed members can dial to access the IPC devices.
Device Name
Defines the device name
Protocol
Defines the streaming protocol, the available option is RSTP
IP Address
Defines a valid IP address of the IP Camera
Port
Defines the port number of the IPC device by default it is port 554
Channel Path
To view the stream of a specific channel, please configure the channel path (e.g., if the stream URL is “rtsp://user:password@192.68.1.1:554/channel/ch0” the channel path would be “channel/ch0”).
Username
If a username is set on the device, fill in this field to allow the UCM to access the device.
Password
If a password is set on this device, fill in this field to allow the UCM to access the device.
Transmission Protocol
Defines the transport protocol of the IPC devices. Default is UDP.
Heartbeat Detection
If enabled, the PBX will regularly send RTSP OPTIONs messages to check the device online status.
User Settings
Allowed Members
Extensions, Extension Groups, and Departments can be selected to access this IP camera by dialing the configured Device Number.
VoIP Devices
Overview
Grandstream SIP Devices can be configured via Web interface as well as via configuration file through TFTP/HTTP/HTTPS download. All Grandstream SIP devices support a proprietary binary format configuration file and an XML format configuration file. The GCC device provides a Plug and Play mechanism to auto-provision the Grandstream SIP devices in a simple manner by generating an XML config file and having the phone download it within the LAN area. This allows users to finish the installation with ease and start using the SIP devices in a managed way.
To provision a phone, three steps are involved, i.e., discovery, configuration, and provisioning. This section explains how VoIP Devices work on the GCC. The settings for this feature can be accessed via Web GUI🡪Device Management🡪VoIP Devices.
Configuration Architecture for End Point Device
The endpoint device configuration in VoIP Devices is divided into the following three layers with priority from the lowest to the highest:
Global
This is the lowest layer. Users can configure the most basic options that could apply to all Grandstream SIP devices during provisioning via VoIP Devices.
Model
In this layer, users can define model-specific options for the configuration template.
Device
This is the highest layer. Users can configure device-specific options for the configuration of the individual device here.
Each layer also has its structure at different levels. Please see the figure below. The details for each layer are explained in sections [Global Configuration], [Model Configuration], and [Device Configuration].
The configuration options in the model layer and device layer have all the options in the global layers already, i.e., the options in the global layer are a subset of the options in the model layer and the device layer. If an option is set in all three layers with different values, the highest layer value will override the value in the lower layer. For example, if the user selects English for Language setting in Global Policy and Spanish for Language setting in Default Model Template, the language setting on the device to be provisioned will use Spanish as the model layer has higher priority than the global layer. To sum up, configurations in the higher layer will always override the configurations for the same options/fields in the lower layer when presented at the same time.
After understanding the VoIP Devices configuration architecture, users could configure the available options for endpoint devices to be provisioned by the GCC by going through the three layers. This configuration architecture allows users to set up and manage the Grandstream endpoint devices in the same LAN area in a centralized way.
Auto-Provisioning Settings
By default, the VoIP Devices feature is enabled on the GCC for auto-provisioning. Three methods of auto-provisioning are used.
SIP SUBSCRIBE
When the phone boots up, it sends out SUBSCRIBE to a multicast IP address in the LAN. The GCC discovers it and then sends a NOTIFY with the XML config file URL in the message body. The phone will then use the path to download the config file generated in the GCC and take the new configuration.
DHCP OPTION 66
Route mode needs to be set to use this feature. When the phone restarts (by default DHCP Option 66 is turned on), it will send out a DHCP DISCOVER request. The GCC device receives it and returns the DHCP OFFER with the config server path URL in Option 66, for example, https://192.168.2.1:8089/zccgi/. The phone will then use the path to download the config file generated in the GCC device.
mDNS
When the phone boots up, it sends out an mDNS query to get the TFTP server address. The GCC device will respond with its address. The phone will then send a TFTP request to download the XML config file from theGCC.
Note:
GCC only responds to provisioning requests that include a specific filename in the URL, such as cfg.xml or cfg{mac}.xml (e.g., https://192.168.80.122:8089/zccgi/cfg000c93689f08.xml)
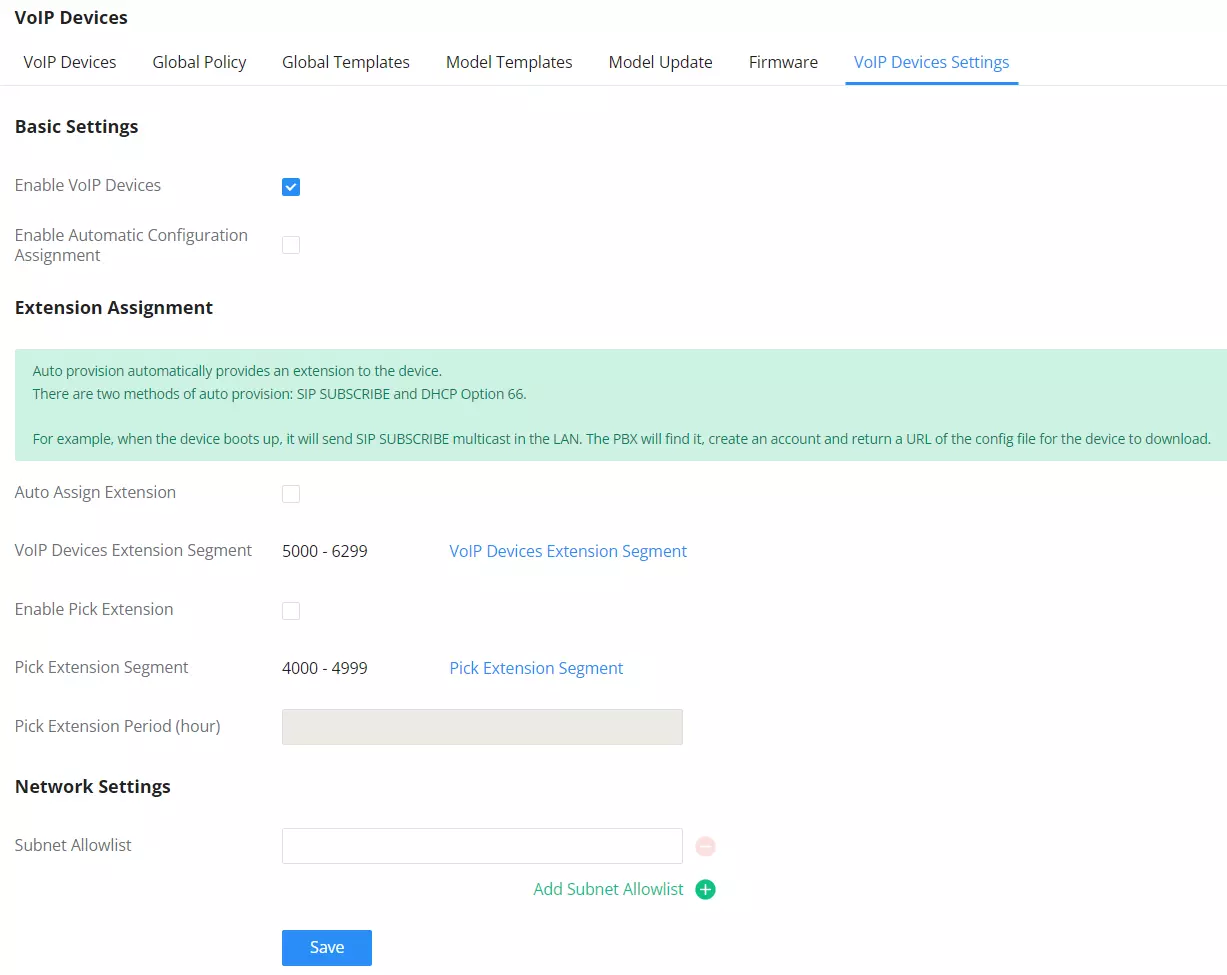
To start the auto-provisioning process, under Web GUI🡪Device Management🡪VoIP Devices🡪VoIP Devices Settings, fill in the auto-provision information.
Auto Provision Settings
Enable VoIP Devices
Enable or disable the VoIP Devices feature on the PBX. The default setting is enabled.
Enable Automatic Configuration Assignment
By default, this is disabled. If disabled, when the SIP device boots up, the
GCC
will not send the SIP device the URL to download the config file, and therefore the SIP device will not be automatically provisioned by the GCC.
Note: When disabled, SIP devices can still be provisioned by manually sending NOTIFY from the GCC which will include the XML config file URL for the SIP device to download.
Auto Assign Extension
If enabled, when the device is discovered, the PBX will automatically assign an extension within the range defined in the “VoIP Devices Extension Segment” to the device. The default setting is disabled.
VoIP Devices Extension Segment
Click on the link “VoIP Devices Extension Segment” to specify the extension range to be assigned if “Automatically Assign Extension” is enabled. The default range is 5000-6299. VoIP Devices Extension Segment range can be defined in Web GUI🡪PBX Settings🡪General Settings🡪General page🡪Extension Preference section: “Auto Provision Extensions”.
Enable Pick Extension
If enabled, the extension list will be sent out to the device after receiving the device’s request. This feature is for the GXP series phones that support selecting extensions to be provisioned via the phone’s LCD. The default setting is disabled.
Pick Extension Segment
Click on the link “Pick Extension Segment” to specify the extension list to be sent to the device. The default range is 4000 to 4999. Pick Extension Segment range can be defined in Web GUI 🡪 PBX Settings 🡪 General Settings 🡪 Generalpage 🡪 Extension Preference section: “Pick Extensions”.
Pick Extension Period (hour)
Specify the number of minutes to allow the phones being provisioned to pick extensions.
Subnet Whitelist
This feature allows the GCC to provision devices in different subnets other than the GCC network.
Enter subnet IP addresses to allow devices within these subnets to be provisioned. The syntax is <IP>/<CIDR>.
Examples:
10.0.0.1/8
192.168.6.0/24
Note: Only private IP ranges (10.0.0.0 | 172.16.0.0 | 192.168.0.0) are supported.
Auto Provision Settings
Please make sure an extension is manually assigned to the phone or “Automatically Assign Extension” is enabled during provisioning. After the configuration on the GCC Web GUI, click on “Save” and “Apply Changes”. Once the phone boots up and picks up the config file from the GCC, it will take the configuration right away.
Discovery
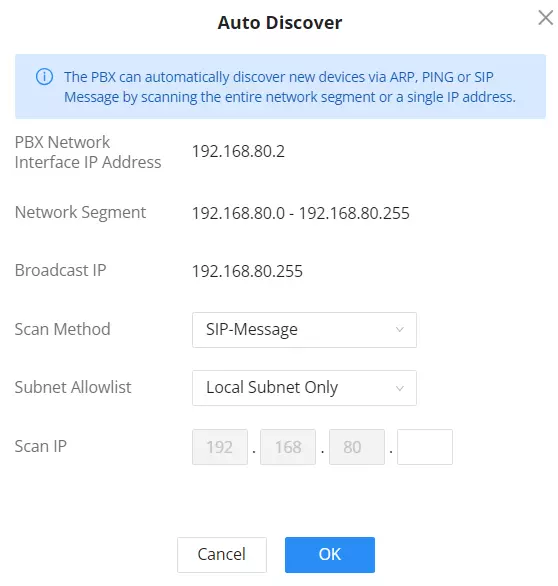
Grandstream endpoints are automatically discovered after bootup. Users could also manually discover devices by specifying the IP address or scanning the entire LAN network. Three methods are supported to scan the devices.
PING
ARP
SIP Message (NOTIFY)
Click on “Auto Discover” under Web GUI🡪Device Management🡪VoIP Devices🡪VoIP Devices, fill in the “Scan Method” and “Scan IP”. The IP address segment will be automatically filled in based on the network mask detected on the GCC. If users need to scan the entire network segment, enter 255 (for example, 192.168.40.255) instead of a specific IP address. Then click on “Save” to start discovering the devices within the same network.
Auto Discover
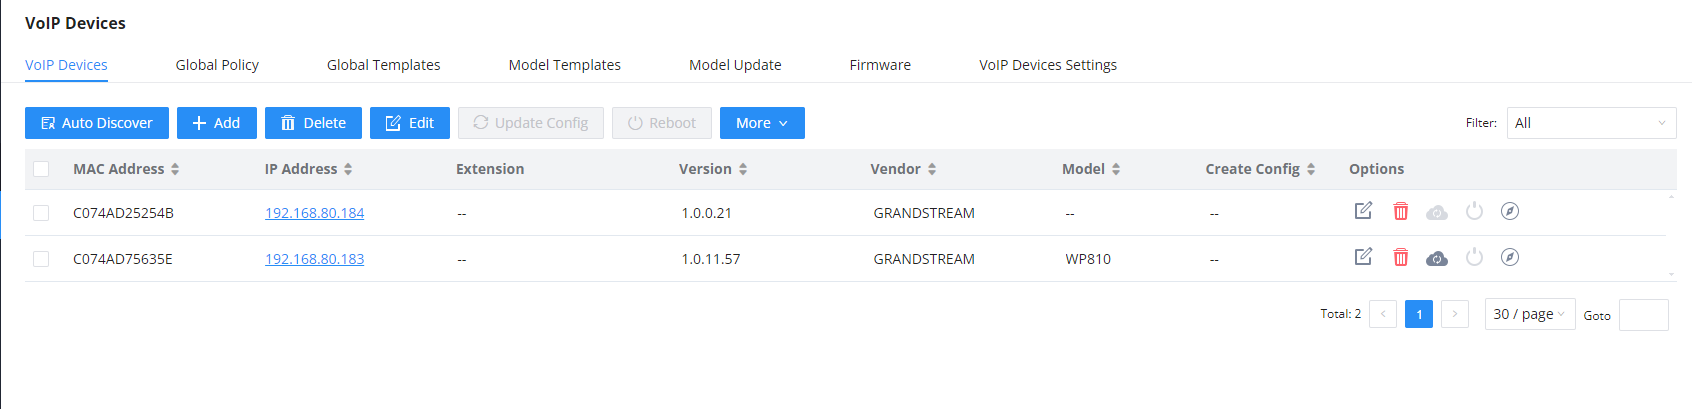
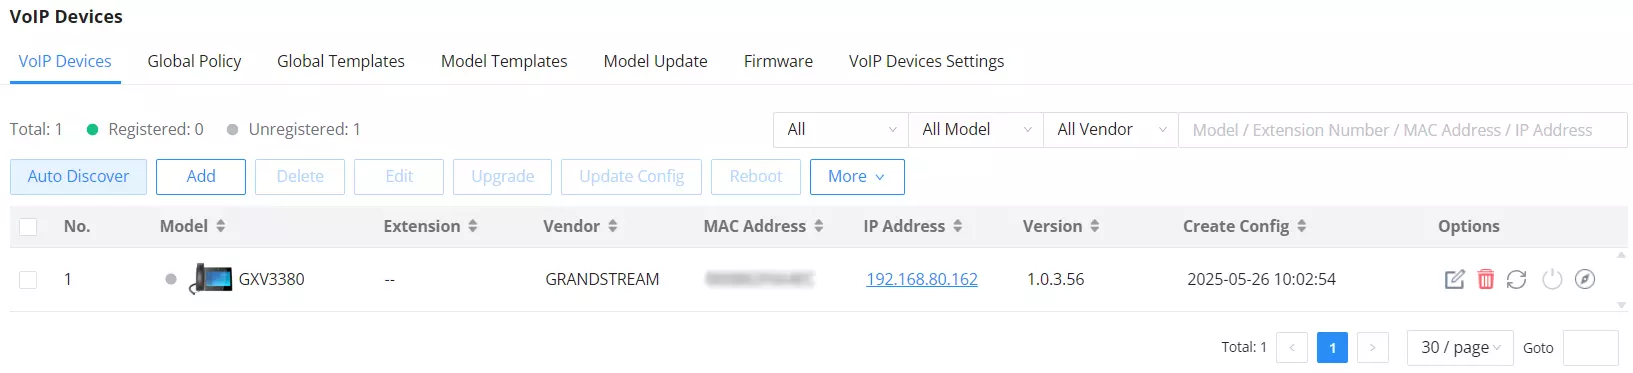
The following figure shows a list of discovered phones. The MAC address, IP Address, Extension (if assigned), Version, Vendor, Model, Connection Status, Create Config, and Options (Edit /Delete /Update /Reboot /Access Device Web GUI) are displayed in the list.
Discovered Devices
Firmware
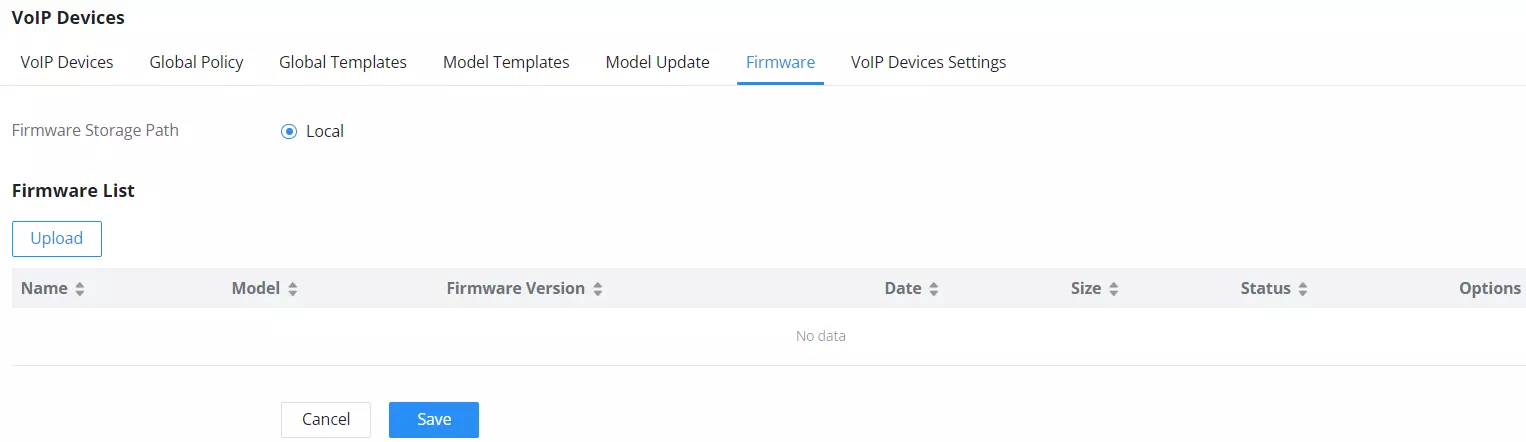
In the Firmware tab, users can upload to and manage firmware for endpoints. Additionally, the firmware upload size limit has been increased from 300MB to 1GB.
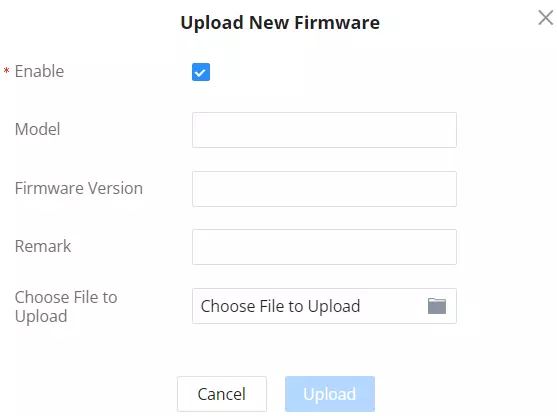
Upload Firmware Files to the GCC
Upload New Firmware
Enable: toggles whether the GCC will provision this firmware to endpoints if they are using the GCC as the firmware server. If not enabled, the GCC will reject requests from endpoints for this firmware.
Model: The device model for which this firmware is intended. Only for self-reference and does not affect provisioning.
Firmware: The firmware version of the file being uploaded. Only for self-reference and does not affect provisioning.
Remark: Add a comment about the uploaded firmware. Only for self-reference and does not affect provisioning.
Choose File to Upload: Select the firmware file to upload from the user’s PC. The file name must match the firmware file name requested by the endpoint.
Uploading Devices List
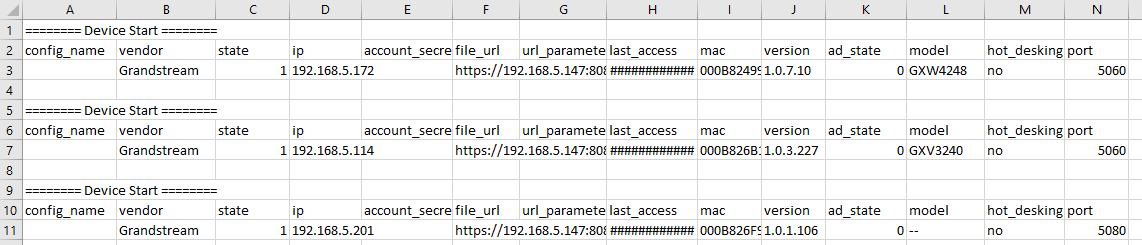
Besides the built-in discovery method on the GCC, users could prepare a list of devices on a .CSV file and upload it by clicking on the button ”Import”, after which a success message prompt should be displayed.
Users need to make sure that the CSV file respects the format as shown in the following figure and that the entered information is correct (valid IP address, valid MAC address, device model, and an existing account), otherwise the GCC will reject the file and the operation will fail:
Device List – CSV file Sample
Note
Please ensure that the .csv file is encoded in UTF-8 to be able to import the devices correctly into the GCC.
Managing Discovered Devices
Sorting: Press or sort per MAC Address, IP Address, Version, Vendor, Model, or Create Config columns from lower to higher or higher to lower, respectively.
Filter: Select a filter to display corresponding results.
All: Display all discovered devices.
Scan Results: Display only manually discovered devices. [Discovery]
IP Address: Enter the device IP and press the Search button.
MAC Address: Enter the device MAC and press the Search button.
Model: Enter a model name and press the Search button. Example: GXP2130.
Extension: Enter the extension number and press the Search button.
Managing Discovered Devices
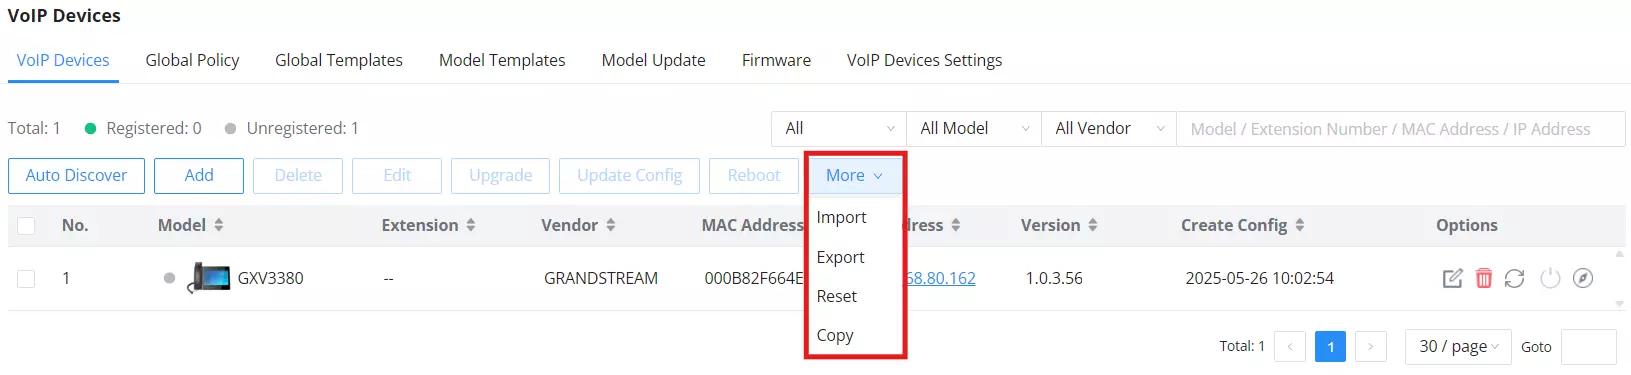
From the main menu of VoIP Devices, users can perform the following operations:
Click to access the discovery menu as shown in the [Discovery] section.
Click to add a new device to the VoIP Devices database using its MAC address.
Click to delete selected devices from the VoIP Devices database.
Click to modify selected devices.
Click to batch update a list of devices. In this case, the GCC will send a SIP NOTIFY message to all selected devices to initiate the update simultaneously. Alternatively, users can update individual devices by clicking the icon in the “Options” column of each device. The table below outlines the supported status indicators that reflect the progress of the update process.
The update command has been sent, and the device is waiting to start the update process
The device has successfully received the update and completed the process.
The update process has failed.
Click to reboot selected devices (the selected devices, should have been provisioned with extensions since the phone will authenticate the server which is trying to send it reboot command). Alternatively, users can reboot individual devices by clicking the icon in the “Options” column of each device. The table below outlines the supported status indicators that reflect the progress of the reboot process.
The reboot command has been sent, and the device is waiting to start the process
The device has been successfully rebooted and completed the process.
Click to clear all device configurations.
Click to upload xlsx file containing a list of devices.
Click to export CSV file containing a list of devices. This file can be imported to another GCC to quickly set it up with the original GCC devices.
Click to copy the configuration from one device to another. This can be useful for easily replacing devices and note that this feature works only between devices of the same model.
All these operations will be detailed in the next sections.
Global Configuration
The global configuration will apply to all the connected Grandstream SIP endpoint devices in the same LAN with the GCC no matter what the Grandstream device model it is. It is divided into two levels:
Global Policy
Global Templates
Global Templates configuration has higher priority than Global Policy configuration.
Global Policy
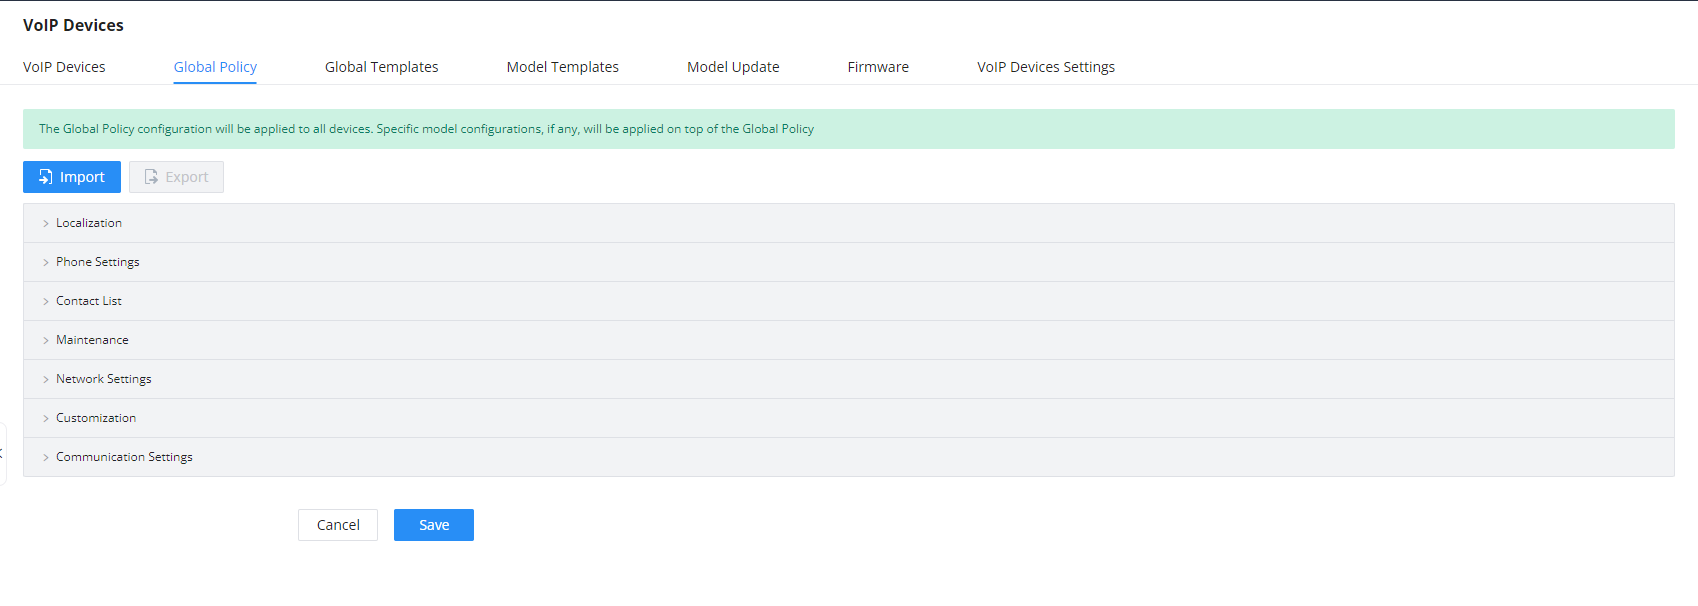
Global Policy can be accessed on the Web GUI🡪Device Management🡪VoIP Devices🡪Global Policy page. On the top of the configuration table, users can select a category in the “Options” dropdown list to quickly navigate to the category or they can also complete the configuration by importing/exporting. The categories are:
Localization: configure display language, data, and time.
Phone Settings: configure the dial plan, call features, NAT, call progress tones, etc.
Contact List: configure LDAP and XML phonebook download.
Maintenance: configure upgrading, web access, Telnet/SSH access, and Syslog.
Network Settings: configure the IP address, QoS, and STUN settings.
Customization: customize LCD screen wallpaper for the supported models.
Communication Settings: configure Email and FTP settings
Select the checkbox on the left of the parameter you would like to configure to activate the dropdown list for this parameter.
Global Policy Categories
The following tables list the Global Policy configuration parameters for the SIP end device.
Language settings
Language
Select the LCD display language on the SIP end device.
Date and Time
Date Format
Configure the date display format on the SIP end device’s LCD.
Time Format
Configure the time display in 12-hour or 24-hour format on the SIP end device’s LCD.
Enable NTP
To enable the NTP service.
NTP Server
Configure the URL or IP address of the NTP server. The SIP end device may obtain the date and time from the server.
NTP Update Interval
Configure the NTP update interval.
Time Zone
Configure the time zone used on the SIP end device.
Enable Daylight Saving Time
Select either to enable or disable the DST.
Global Policy Parameters – Localization
Default Call Settings
Dial Plan
Configure the default dial plan rule. For syntax and examples, please refer to the user manual of the SIP devices to be provisioned for more details.
Enable Call Features
When enabled, “Do Not Disturb”, “Call Forward” and other call features can be used via the local feature code on the phone. Otherwise, the ITSP feature code will be used.
Use # as Dial Key
If set to “Yes”, pressing the number key “#” will immediately dial out the input digits.
Auto Answer by Call-info
If set to “Yes”, the phone will automatically turn on the speaker phone to answer incoming calls after a short reminding beep, based on the SIP Call-Info header sent from the server/proxy.
The default setting is enabled.
NAT Traversal
Configure if the NAT traversal mechanism is activated.
User Random Port
If set to “Yes”, this parameter will force random generation of both the local SIP and RTP ports.
General Settings
Call Progress Tones
Configure call progress tones including ring tone, dial tone, second dial tone, message waiting tone, ring back tone, call waiting tone, busy tone, and reorder tone using the following syntax:
Frequencies are in Hz and cadence on and off are in 10ms).
“on” is the period (in ms) of ringing while “off” is the period of silence. Up to three cadences are supported.
Please refer to the user manual of the SIP devices to be provisioned for more details
HEADSET Key Mode
Select “Default Mode” or “Toggle Headset/Speaker” for the Headset key. Please refer to the user manual of the SIP devices to be provisioned for more details.
Global Policy Parameters – Phone Settings
LDAP Phonebook
Source
Select “Manual” or “PBX” as the LDAP configuration source.
If “Manual” is selected, the LDAP configuration below will be applied to the SIP end device.
If “PBX” is selected, the LDAP configuration built-in from GCC device Web GUI🡪System Settings🡪LDAP Server will be applied.
Note: When GCC enables Fast Provision feature, the configuration template sent to the phones will automatically include LDAP address book information, and the data source on the phones will be GCC-PBX, for this to work, users will need to enable the LDAP server on the GCC PBX Module, this can be found under PBX Module => System Settings => LDAP Server => LDAP Server Configuration.
Address
Configure the IP address or DNS name of the LDAP server.
Port
Configure the LDAP server port. The default value is 389.
Base DN
This is the location in the directory where the search is requested to begin. Example:
dc=grandstream, dc=com
ou=Boston, dc=grandstream, dc=com
Username
Configure the bind “Username” for querying LDAP servers. The field can be left blank if the LDAP server allows anonymous binds.
Password
Configure the bind “Password” for querying LDAP servers. The field can be left blank if the LDAP server allows anonymous binds.
Number Filter
Configure the filter used for number lookups. Please refer to the user manual for more details.
Name Filter
Configure the filter used for name lookups. Please refer to the user manual for more details.
Version
Select the protocol version for the phone to send the bind requests. The default value is 3.
Name Attribute
Specify the “name” attributes of each record that are returned in the LDAP search result.
Example:
gn
cn sn description
Number Attribute
Specify the “number” attributes of each record that are returned in the LDAP search result.
Example:
telephoneNumber
telephoneNumber Mobile
Display Name
Configure the entry information to be shown on the phone’s LCD. Up to 3 fields can be displayed.
Example:
%cn %sn %telephoneNumber
Max Hits
Specify the maximum number of results to be returned by the LDAP server. The valid range is 1 to 3000. The default value is 50.
Search Timeout
Specify the interval (in seconds) for the server to process the request and the client waits for the server to return. The valid range is 0 to 180. The default value is 30.
Sort Results
Specify whether the search result is sorted or not. The default setting is No.
Incoming Calls
Configure to enable LDAP number searching when receiving calls. The default setting is No.
Outgoing Calls
Configure to enable LDAP number searching when making calls. The default setting is No.
Lookup Display Name
Configures the display name when LDAP looks up the name for an incoming call or outgoing call.
It must be a subset of the LDAP Name Attributes.
XML Phonebook
Phonebook XML Server
Select the source of the phonebook XML server.
Disable
Disable phonebook XML downloading.
Manual
Once selected, users need to specify the downloading protocol HTTP, HTTPS, or TFTP and the server path to download the phonebook XML file. The server path could be an IP address or URL, with up to 256 characters.
Local UCM Server
Once selected, click on the Server Path field to upload the phonebook XML file. Please note after uploading the phonebook XML file to the server, the original file name will be used as the directory name and the file will be renamed as phonebook.xml under that directory.
Phonebook Download Interval
Configure the phonebook download interval (in minutes). If set to 0, the automatic download will be disabled. The valid range is 5 to 720.
Remove manually edited entries on download
If set to “Yes”, when the XML phonebook is downloaded, the entries added manually will be automatically removed.
Global Policy Parameters – Contact List
Upgrade and Provision
Firmware Source
Firmware source via Zero Config provisioning could be a URL for an external server address, local UCM directory, or USB media if plugged into the SoftwareUCM. Select a source to get the firmware file: URL, Local UCM Server, Local USB Media, Local SD Card Media
URL: If selected to use URL to upgrade, complete the configuration for the following four parameters: “Upgrade Via”, “Server Path”, “File Prefix” and “File Postfix”.
Local UCM Server: Firmware can be uploaded to the UCM internal storage for firmware upgrade. If selected, click on the “Manage Storage” icon next to the “Directory” option, upload the firmware file, and select a directory for the end device to retrieve the firmware file.
Local USB Media: If selected, the USB storage device needs to be plugged into the UCM and the firmware file must be put under a folder named “ZC_firmware” in the USB storage root directory.
Local SD Card Media: If selected, an SD card needs to be plugged into the UCM and the firmware file must be put under a folder named “ZC_firmware” in the USB storage root directory.
Upgrade via
When the URL is selected as a firmware source, configure upgrade via TFTP, HTTP, or HTTPS.
Server Path
When the URL is selected as a firmware source, configure the firmware upgrading server path.
File Prefix
If configured, only the firmware with the matching encrypted prefix will be downloaded and flashed into the phone.
File Postfix
If configured, only the firmware with the matching encrypted postfix will be downloaded and flashed into the phone.
Config Server Path
When the URL is selected as a firmware source, configure the firmware file postfix. If configured, only the configuration file with the matching encrypted postfix will be downloaded and flashed onto the phone.
Allow DHCP Option 43/66
If DHCP option 43 or 66 is enabled on the LAN side, the TFTP server can be redirected.
Automatic Upgrade
If enabled, the endpoint device will automatically upgrade if a new firmware is detected. Users can select automatic upgrading by day, by week, or by minute.By week Once selected, specify the day of the week to check the HTTP/TFTP server for firmware upgrades or configuration file changes.
By day: Once selected, specify the hour of the day to check the HTTP/TFTP server for firmware upgrades or configuration file changes.
By minute: Once selected, specify the interval X that the SIP end device will request for new firmware every X minutes.
Firmware Upgrade Rule
Specify how firmware upgrading and provisioning requests are to be sent.
Web Access
Zero Config
Select either to enable or disable Zero Config
Admin Password
Configure the administrator password for admin-level login.
End-User Password
Configure the end-user password for the end-user-level login.
Web Access Mode
Select HTTP or HTTPS as the web access protocol.
Web Server Port
Configure the port for web access. The valid range is 1 to 65535.
RTSP Port
Configure the RTSP Port.
Enable UPnP Discovery
Select either to enable or disable Enable UPnP Discovery.
User Login Timeout
Configure User Login Timeout.
Maximum Consecutive Failed Login Attempts
Configure Maximum Consecutive Failed Login Attempts.
Login Error Lock Time
Configure Login Error Lock Time.
Security
Disable Telnet/SSH
Enable Telnet/SSH access for the SIP end device.
• If the SIP end device supports Telnet access, this option controls the Telnet access of the device.
• if the SIP end device supports SSH access, this option controls the SSH access of the device.
Syslog
Syslog Server
Configure the URL/IP address for the Syslog server.
Syslog Level
Select the level of logging for Syslog.
Send SIP Log
Configure whether the SIP log will be included in the Syslog message.
Global Policy Parameters – Maintenance
Basic Settings
IP Address
Configure how the SIP end device shall obtain the IP address. DHCP or PPPoE can be selected.
DHCP
Once selected, users can specify the Host Name (option 12) of the SIP end device as DHCP client and Vendor Class ID (option 60) used by the client and server to exchange vendor class ID information.
PPPoE
Once selected, users need to specify the Account ID, Password, and Service Name for PPPoE.
Host Name
Specify the name of the client. This field is optional but may be required by Internet Service Providers.
Vendor Class ID
Used by clients and servers to exchange vendor class ID.
Account ID
Enter the PPPoE account ID.
Password
Enter the PPPoE Password.
Service Name
Enter the PPPoE Service Name.
Advanced Setting
Layer 3 QoS
Define the Layer 3 QoS parameter. This value is used for IP Precedence, Diff-Serv, or MPLS. The valid range is 0-63.
Layer 3 QoS For RTP
Assign the priority value of the Layer 3 QoS for RTP packets.
The valid range is 0 -63.
Layer 3 QoS For SIP
Assign the priority value of the Layer 3 QoS for SIP packets.
The valid range is 0 -63.
Layer 2 QoS Tag
Assign the VLAN Tag of the Layer 2 QoS packets.
The valid range is 0 -4095.
Layer 2 QoS Priority Value
Assign the priority value of the Layer 2 QoS packets.
The valid range is 0-7.
STUN Server
Configure the IP address or Domain name of the STUN server. Only non-symmetric NAT routers work with STUN.
Keep-Alive
Select either to enable or disable Keep Alive.
Keep Alive Interval
Specify how often the phone will send a blank UDP packet to the SIP server to keep the “ping hole” on the NAT router open. The valid range is 10-160.
Register Expiration
Specify the Register Expiration.
Local SIP Port
Configure Local SIP Port.
Local RTP Port
Configure Local RTP Port.
Auto On-Hook Timer(s)
Configure Auto On-Hook Timer(s).
Ring Timeout
Configure Ring Timeout.
SIP Transport
Select either UDP, TCP, or TLS/TCP as the SIP transport protocol.
Direct IP Call
Select either to disable or enable Direct IP Call support.
SIP Proxy Compatibility Mode
Select either to disable or enable SIP Proxy Compatibility Mode.
Unregister On Reboot
Select either to disable or enable Unregister On Reboot.
Whitelist
Whitelist
Select either to enable or disable the Whitelist
SIP Phone Number Whitelist
Configure the SIP Phone Number Whitelist.
Global Policy Parameters – Network Settings
Wallpaper
Screen Resolution 1024 x 600
Check this option if the SIP end device shall use 1024 x 600 resolution for the LCD screen wallpaper.
Source
Configure the location where wallpapers are stored.
File
If “URL” is selected as the source, specify the URL of the wallpaper file. If “Local UCM Server” is selected as the source, click to upload the wallpaper file to the GCC device.
Screen Resolution 800 x 400
Check this option if the SIP end device shall use 800 x 400 resolution for the LCD screen wallpaper.
Source
Configure the location where wallpapers are stored.
File
If “URL” is selected as the source, specify the URL of the wallpaper file. If “Local UCM Server” is selected as the source, click to upload the wallpaper file to the GCC.
Screen Resolution 480 x 272
Check this option if the SIP end device shall use 480 x 272 resolution for the LCD screen wallpaper.
Source
Configure the location where wallpapers are stored.
File
If “URL” is selected as the source, specify the URL of the wallpaper file. If “Local UCM Server” is selected as the source, click to upload the wallpaper file to the GCC.
Screen Resolution 320 x 240
Check this option if the SIP end device supports 320 x 240 resolution for the LCD screen wallpaper.
Source
Configure the location where wallpapers are stored.
File
If “URL” is selected as the source, specify the URL of the wallpaper file. If “Local UCM Server” is selected as the source, click to upload the wallpaper file to the GCC.
Global Policy Parameters – Communication Settings
Email Settings
SMTP Settings
Check this option to configure the email settings that will be sent to the provisioned phones:
Server
The IP address of the SMTP server
Port
SMTP server port
From E-Mail address
Email address
Sender Username
Username of the sender
Password Recovery Email
Email where the recovered password will be sent
Alarm receive Email 1
Email address where alarm notifications will be sent
Alarm receive Email 2
Email address where alarm notifications will be sent
Enable SSL
Enable SSL protocol for SMTP
FTP
FTP
Check this option to configure the FTP settings that will be sent to the provisioned phones:
Storage Server Type
Either FTP or Central Storage
Server
FTP server address
Port
FTP port to be used
Username
FTP username
Path
FTP Directory path
Global Policy Parameters – Communication Settings
Global Templates
Global Templates can be accessed in Web GUI🡪Device Management🡪VoIP Devices🡪Global Templates. Users can create multiple global templates with different sets of configurations and save the templates, or click on the “Import/Export” button to add multiple global templates. Later on, when the user configures the device in the Edit Device dialog🡪Advanced Settings, the user can select to use one of the global templates for the device. Please refer to section [Manage Devices] for more details on using the global templates.
When creating a global template, users can select the categories and the parameters under each category to be used in the template. The global policy and the selected global template will both take effect when generating the config file. However, the selected global template has higher priority to the global policy when it comes to the same setting option/field. If the same option/field has a different value configured in the global policy and the selected global template, the value for this option/field in the selected global template will override the value in the global policy.
Click on “Add” to add a global template. Users will see the following configurations.
Template Name
Create a name to identify this global template.
Description
Describe the global template. This is optional.
Active
Check this option to enable the global template.
Create New Template
Click on the “edit” icon to edit the global template.
The window for editing the global template is shown in the following figure. In the “Options” field, after entering the option name keyword, the options containing the keyword will be listed. Users could then select the options to be modified under the global template.
Edit Global Template
The added options will show in the list. Users can then enter or select the value for each option to be used in the global template. On the left side of each added option, users can click
to delete this option from the template. On the right side of each option, users can click on
to reset the option value to the default value.
Click on “Save” to save this global template.
The created global templates will show in the Web GUI🡪Device Management🡪VoIP Devices🡪Global Templates page. Users can click on to delete the global template or delete multiple selected templates at once.
Click on “Toggle Selected Template(s)” to toggle the status between enabled/disabled for the selected templates.
Model Templates
Model layer configuration allows users to apply model-specific configurations to different devices. Users could create/edit/delete a model template by accessing Web GUI, page Device Management🡪VoIP Devices🡪Model Templates. If multiple model templates are created and enabled, when the user configures the device in the Edit Device dialog🡪Advanced Settings, the user can select to use one of the model templates for the device. Please refer to section [Manage Devices] for more details on using the model template.
For each created model template, users can assign it as the default model template. If assigned as the default model template, the values in this model template will be applied to all the devices of this model. There is always only one default model template that can be assigned at one time on the GCC device.
The selected model template and the default model template will both take effect when generating the config file for the device. However, the model template has a higher priority than the default model template when it comes to the same setting option/field. If the same option/field has a different value configured in the default model template and the selected model template, the value for this option/field in the selected model template will override the value in the default model template.
Click on “Add” to add a model template.
Model
Select a model to apply this template. The supported Grandstream models are listed in the dropdown list for selection.
Template Name
Create a name for the model template.
Description
Enter a description for the model template. This is optional.
Default Model Template
Select to assign this model template as the default model template. The value of the option in the default model template will be overridden if another selected model template has a different value for the same option.
Active
Check this option to enable the model template.
Create a New Model Template
Click on the “edit” icon to edit the model template.
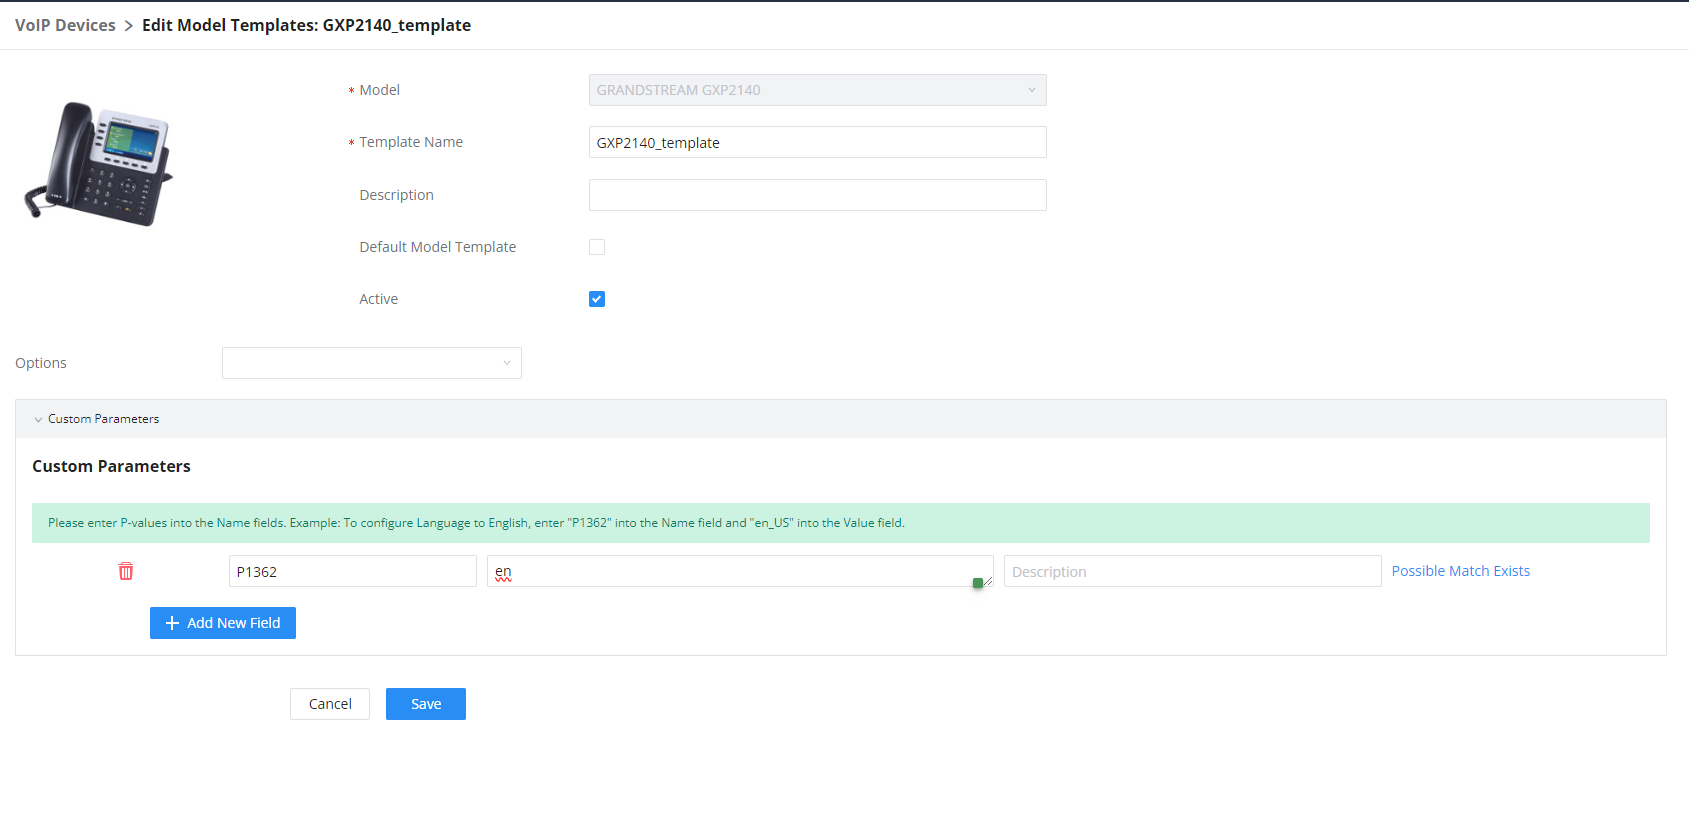
The editing window for a model template is shown in the following figure. In the “Options” field, enter the option name keyword, the option that contains the keyword will be listed. The user could then select the option to be modified under the model template.
Once added, the option will be shown in the list below. On the left side of each option, users can click on
to remove this option from the model template. On the right side of each option, users can click on
to reset the option to the default value.
The user could also click on “Add New Field” to add a P-value number and the value to the configuration. The following figure shows setting P-value “P1362” to “en”, which means the display language on the LCD is set to English. For P-value information of different models, please refer to the configuration template here http://www.grandstream.com/support/tools
Edit Model Template
Click on Save when done. The model template will be displayed on the Web GUI🡪Device Management🡪VoIP Devices🡪Model Templates page.
Click on the trash icon to delete the model template or click on “Delete Selected Templates” to delete multiple selected templates at once.
Click on “Toggle Selected Template(s)” to toggle the status between enabled/disabled for the selected model templates.
Click on the “Import/Export” button to upload/export the model template list in .CSV format.
To make it easier for the administrator to search through the templates, a filter button has been added the user interface. Please see the screenshot below:
Filter Model Templates
Model Update
GCC device VoIP Devices feature supports provisioning all models of Grandstream SIP end devices including OEM device models.
OEM Models
Users can associate OEM device models with their original Grandstream-branded models, allowing these OEM devices to be provisioned appropriately.
Click on the “Add OEM Models” button.
In the Source Model field, select the Grandstream device that the OEM model is based on from the dropdown list.
For the Destination Model and Destination Vendor field, enter the custom OEM model name and vendor name.
The newly added OEM model should now be selectable as an option in Model fields.
OEM Models
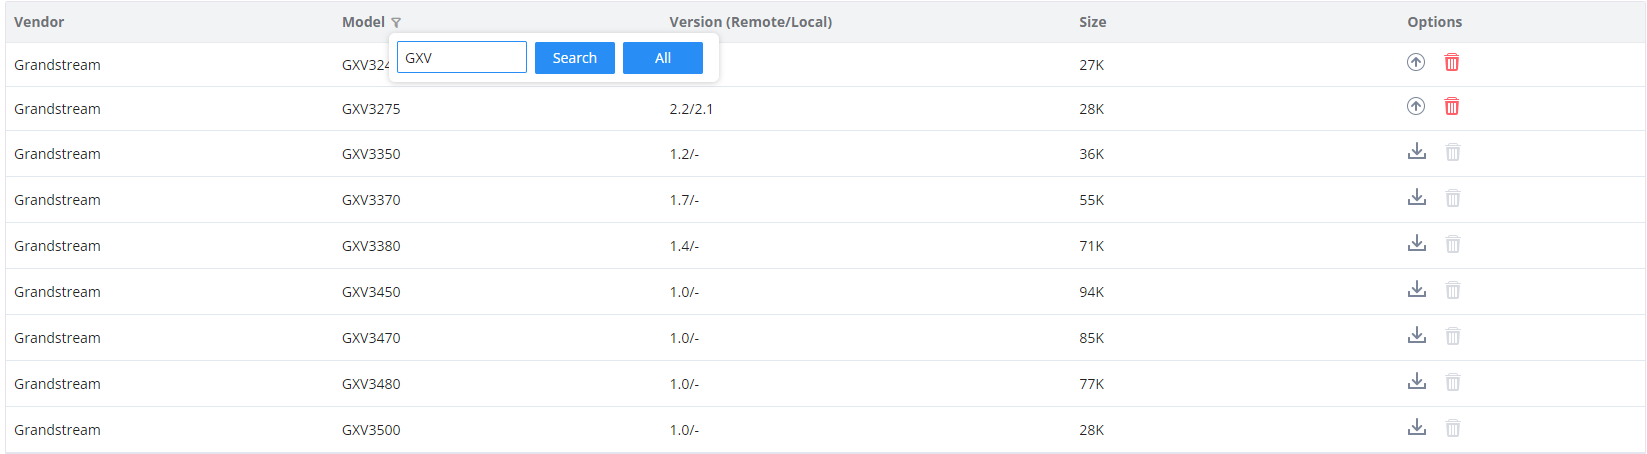
To make it easier for the users to search for the model templates to download or update, a filter button has been added to the user interface.
Filter Endpoint Models
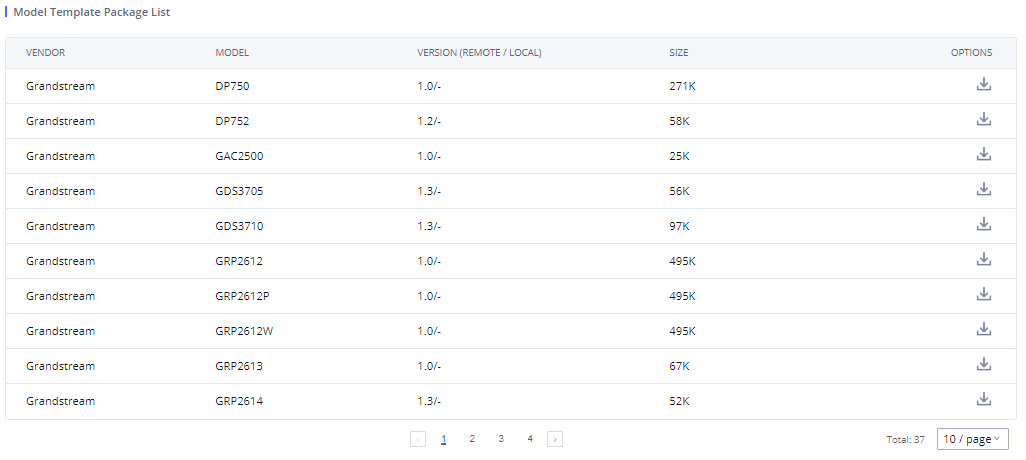
Model Template Package List
Templates for most of the Grandstream models are built-in with the GCC device already. Templates for Wave and Grandstream surveillance products require users to download and install under Web GUI🡪Device Management🡪VoIP Devices🡪Model Update first before they are available in the GCC devcie for selection. After downloading and installing the model template to the GCC device, it will show in the dropdown list for the “Model” selection when editing the model template.
Template Management
Click on the “download” icon to download the template. (Users can download multiple model template packages at the same time)
Click on the “upgrade” icon to upgrade the model template. Users will see this icon available if the device model has a template updated in the GCC device. (Users can view the upgrade status of each model template package in the list as shown below)
Upload Model Template Package
In case the GCC device is placed in the private network and Internet access is restricted, users will not be able to get packages by downloading and installing from the remote server. Model template packages can be manually uploaded from a local device through Web GUI. Please contact Grandstream customer support if the model package is needed for manual uploading.
Upload Model Template Manually
Device Configuration
On the Web GUI, page Device Management🡪VoIP Devices🡪VoIP Devices, users could create a new device, delete existing device(s), make a special configuration for a single device, or send NOTIFY to an existing device(s).
Create New Device
Besides configuring the device after the device is discovered, users could also directly create a new device and configure basic settings before the device is discovered by the GCC device. Once the device is plugged in, it can then be discovered and provisioned. This gives the system administrator adequate time to set up each device beforehand.
Click on “Add” and the following dialog will show. Follow the steps below to create the configurations for the new device.
Firstly, select a model for the device to be created and enter its MAC address, IP address, and firmware version (optional) in the corresponding field.
Basic settings will show a list of settings based on the model selected in step 1. Users could assign extensions to accounts, and assign functions to Line Keys and Multiple-Purposed Keys if supported on the selected model.
Click on “save” to save the configuration for this device.
Create New Device
Manage Devices
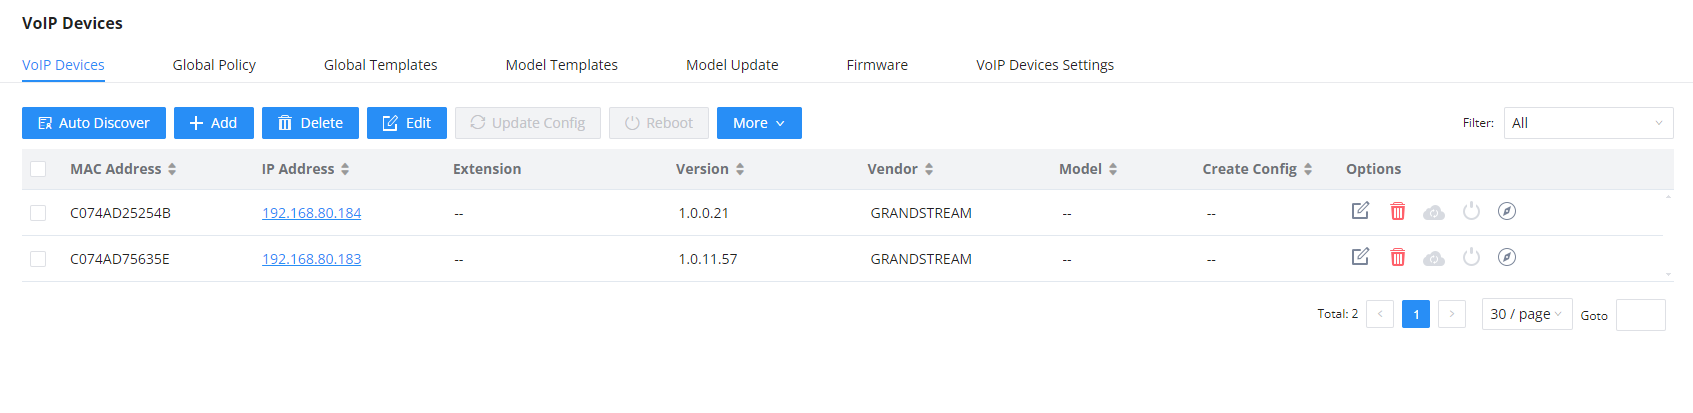
The device manually created or discovered from Auto Discover will be listed in the Web GUI🡪Device Management🡪VoIP Devices🡪VoIP Devices page. Users can see the devices with their MAC address, IP address, vendor, model, etc.
Manage Devices
Click on this icon to access the Web GUI of the phone.
Click on the “edit” icon to edit the device configuration.
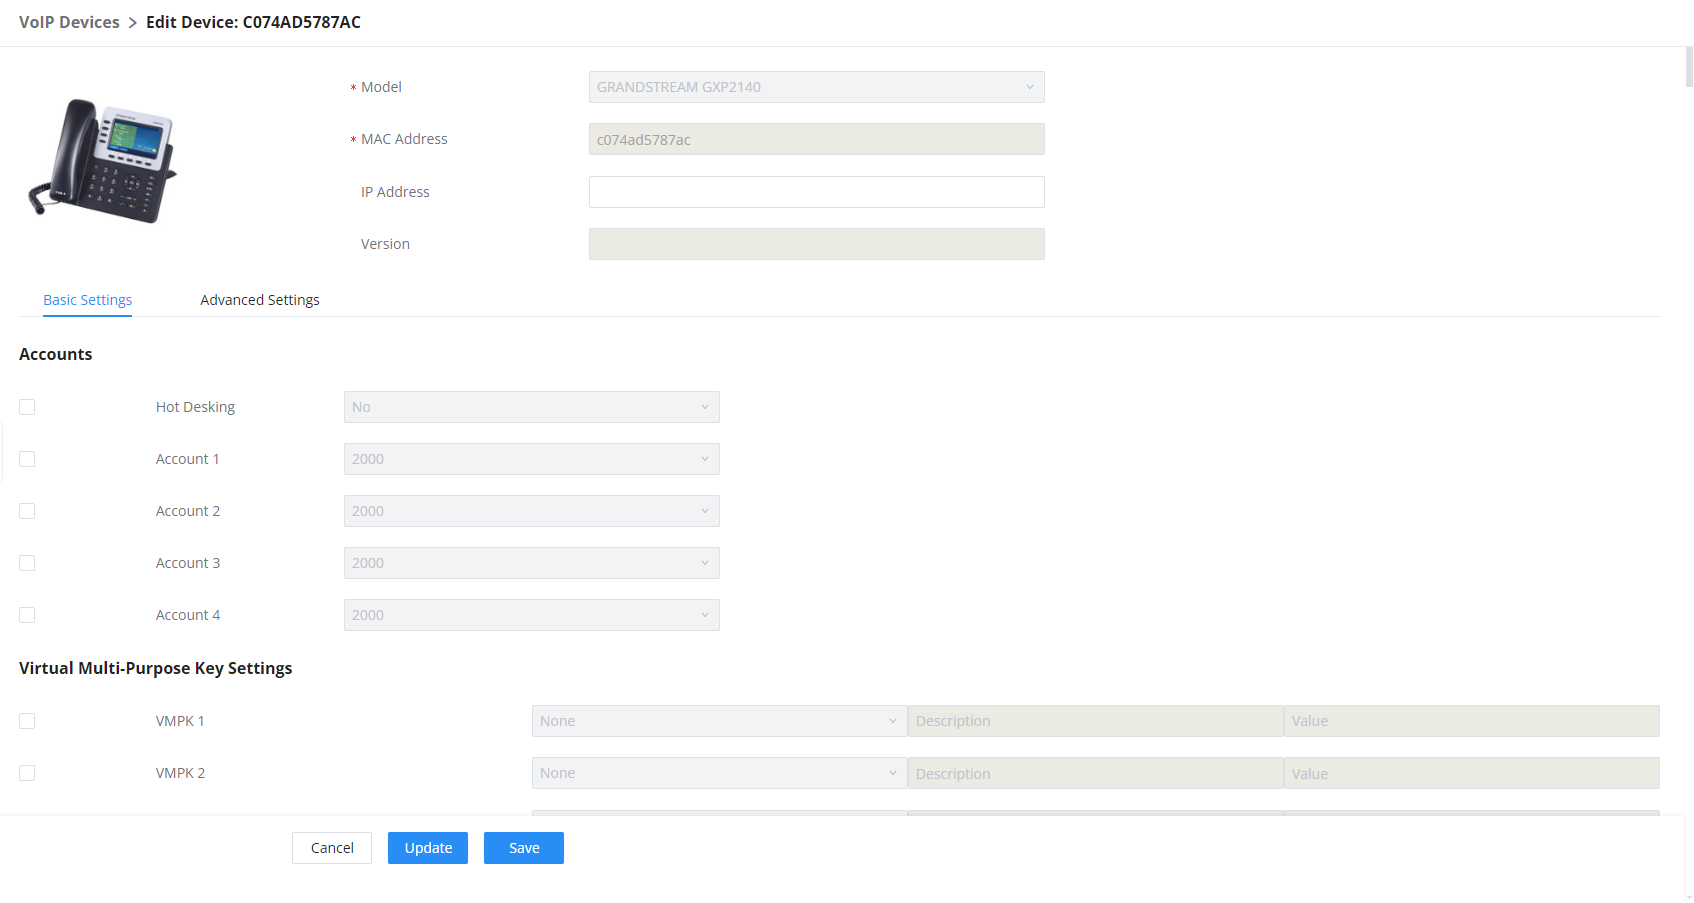
A new dialog will be displayed for the users to configure “Basic” settings and “Advanced” settings. “Basic” settings have the same configurations as displayed when manually creating a new device, i.e., account, line key, and MPK settings; “Advanced” settings allow users to configure more details in a five-level structure.
Edit Device
A preview of the “Advanced” settings is shown in the above figure. There are five levels configurations as described in (1) (2) (3) (4) (5) below, with priority from the lowest to the highest. The configurations in all levels will take effect for the device. If the same options exist in different-level configurations with different values configured, the higher-level configuration will override the lower-level configuration.
Global Policy
This is the lowest-level configuration. The global policy configured in Web GUI🡪Device Management🡪VoIP Devices🡪Global Policy will be applied here. Click on “Modify Global Policy” to redirect to the Device Management🡪VoIP Devices🡪Global Policy.
Global Templates
Select a global template to be used for the device and click on
to add. Multiple global templates can be selected, and users can arrange the priority by adjusting orders via
and
. All the selected global templates will take effect. If the same option exists on multiple selected global templates, the value in the template with higher priority will override the one in the template with lower priority. Click on
to remove the global template from the selected list.
Default Model Template
The Default Model Template will be applied to the devices of this model. The Default model template can be configured in the model template under the Web GUI🡪Device Management🡪VoIP Devices🡪Model Templates page. Please see the default model template option in [Create New Model Template].
Model Templates
Select a model template to be used for the device and click on
to add. Multiple model templates can be selected, and users can arrange the priority by adjusting orders via
and
. All the selected model templates will take effect. If the same option exists on multiple selected model templates, the value in the template with higher priority will override the one in the template with lower priority. Click on
to remove the model template from the selected list.
Customize Device Settings
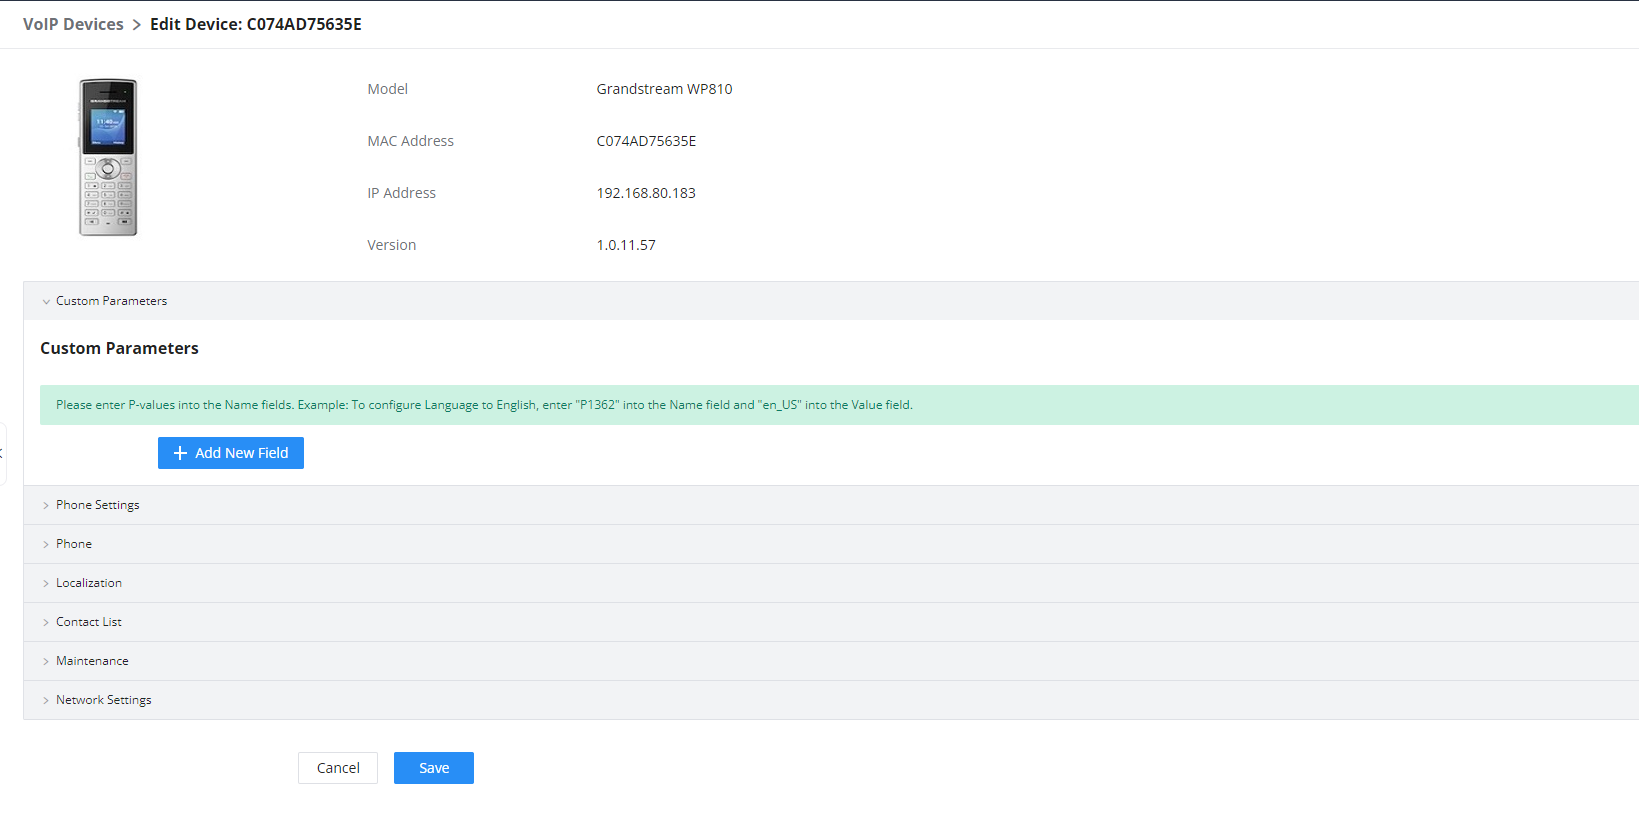
This is the highest-level configuration for the device. Click on “Modify Customize Device Settings” and the following dialog will show.
Edit Customize Device Settings
Scroll down in the dialog to view and edit the device-specific options. If the users would like to add more options that are not in the pre-defined list, click on “Add New Field” to add a P-value number and the value to the configuration. The above figure shows setting P-value “P1362” to “en”, which means the display language on the LCD is set to English. The warning information on the right tells that the option matching the P-value number exists and clicking on it will lead to the matching option. For P-value information of different models, please refer to the configuration template here https://www.grandstream.com/sites/default/files/Resources/config-template.zip.
Select multiple devices that need to be modified and then click on ”Update Config” to batch-modify devices.
Performing batch operation will override all the existing device configurations on the page.
After the above configurations, save the changes and go back to the Web GUI🡪Device Management🡪VoIP Devices🡪VoIP Devices page. Users could then click on to send NOTIFY to the SIP endpoint device and trigger the provisioning process. The device will start downloading the generated configuration file from the URL contained in the NOTIFY message.
Device List in VoIP Devices
On this web page, users can also click on “Reset All Extensions” to reset the extensions of all the devices.










 to edit the global template.
  to edit the global template.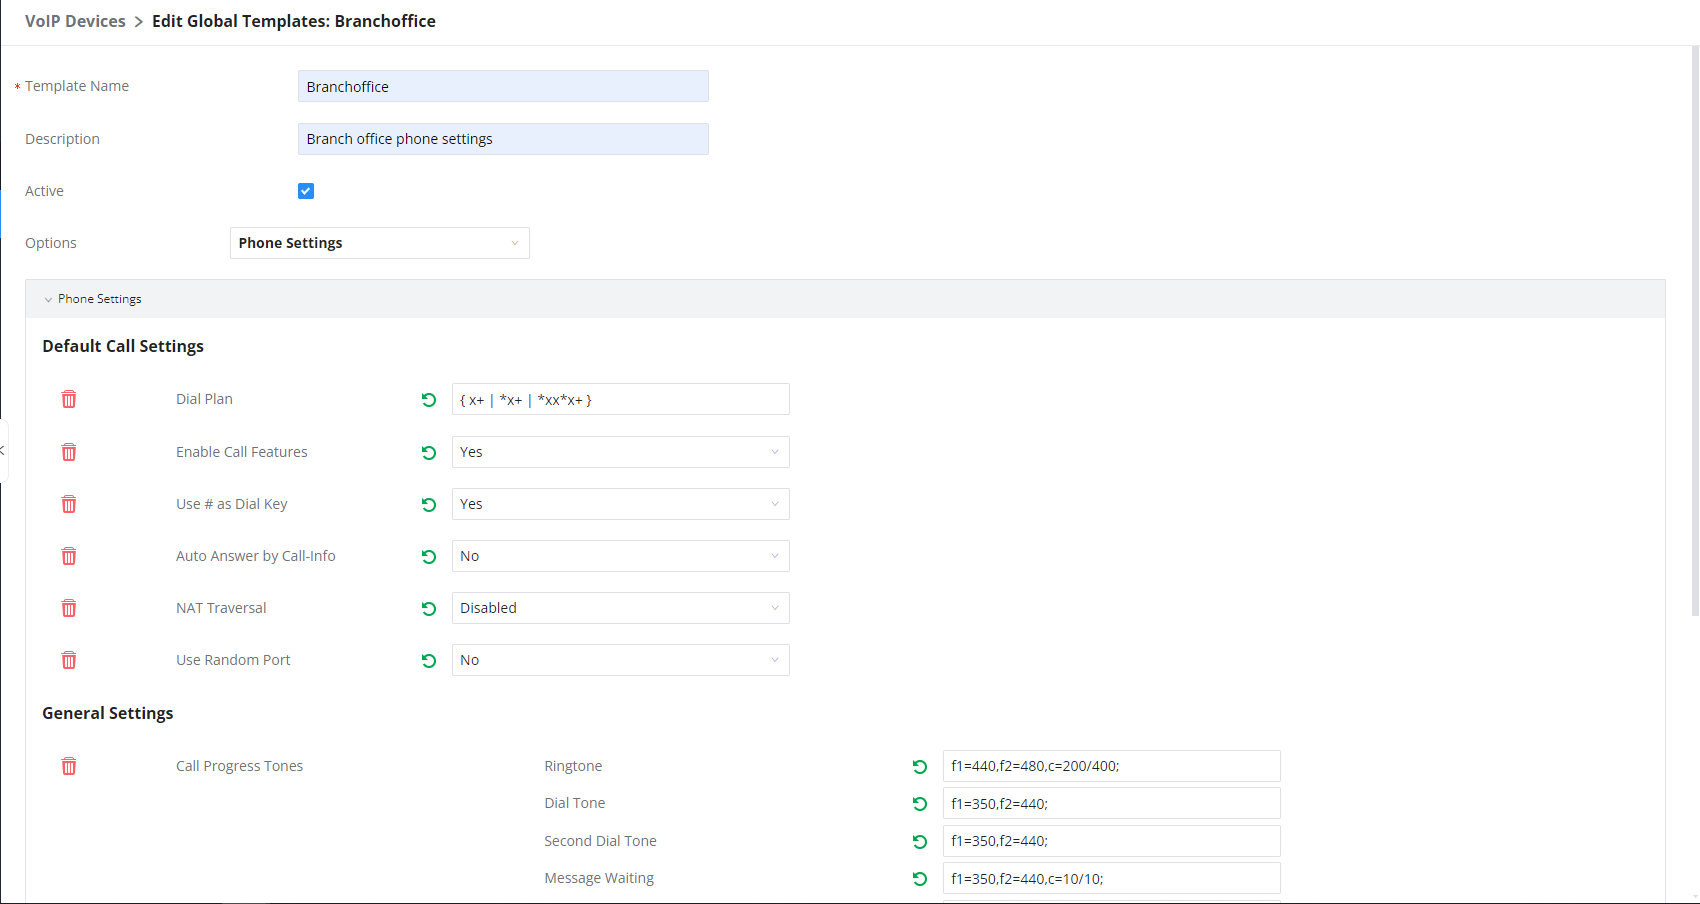
 to delete this option from the template. On the right side of each option, users can click on
 to reset the option value to the default value.


 to remove this option from the model template. On the right side of each option, users can click on
 to reset the option to the default value.
 to delete the model template or click on “Delete Selected Templates” to delete multiple selected templates at once.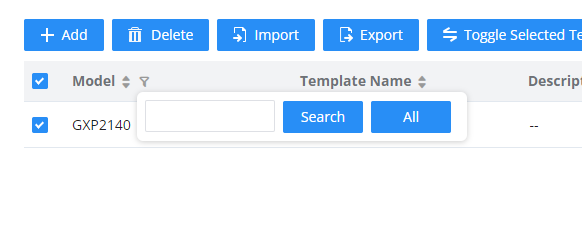
 button.
 button.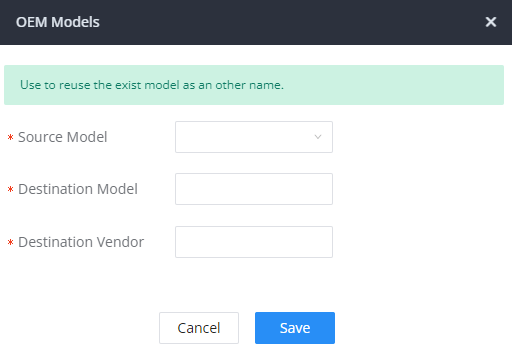
 to download the template. (Users can download multiple model template packages at the same time)
 to upgrade the model template. Users will see this icon available if the device model has a template updated in the GCC device. (Users can view the upgrade status of each model template package in the list as shown below)
 to download the template. (Users can download multiple model template packages at the same time)
 to upgrade the model template. Users will see this icon available if the device model has a template updated in the GCC device. (Users can view the upgrade status of each model template package in the list as shown below)

 to access the Web GUI of the phone.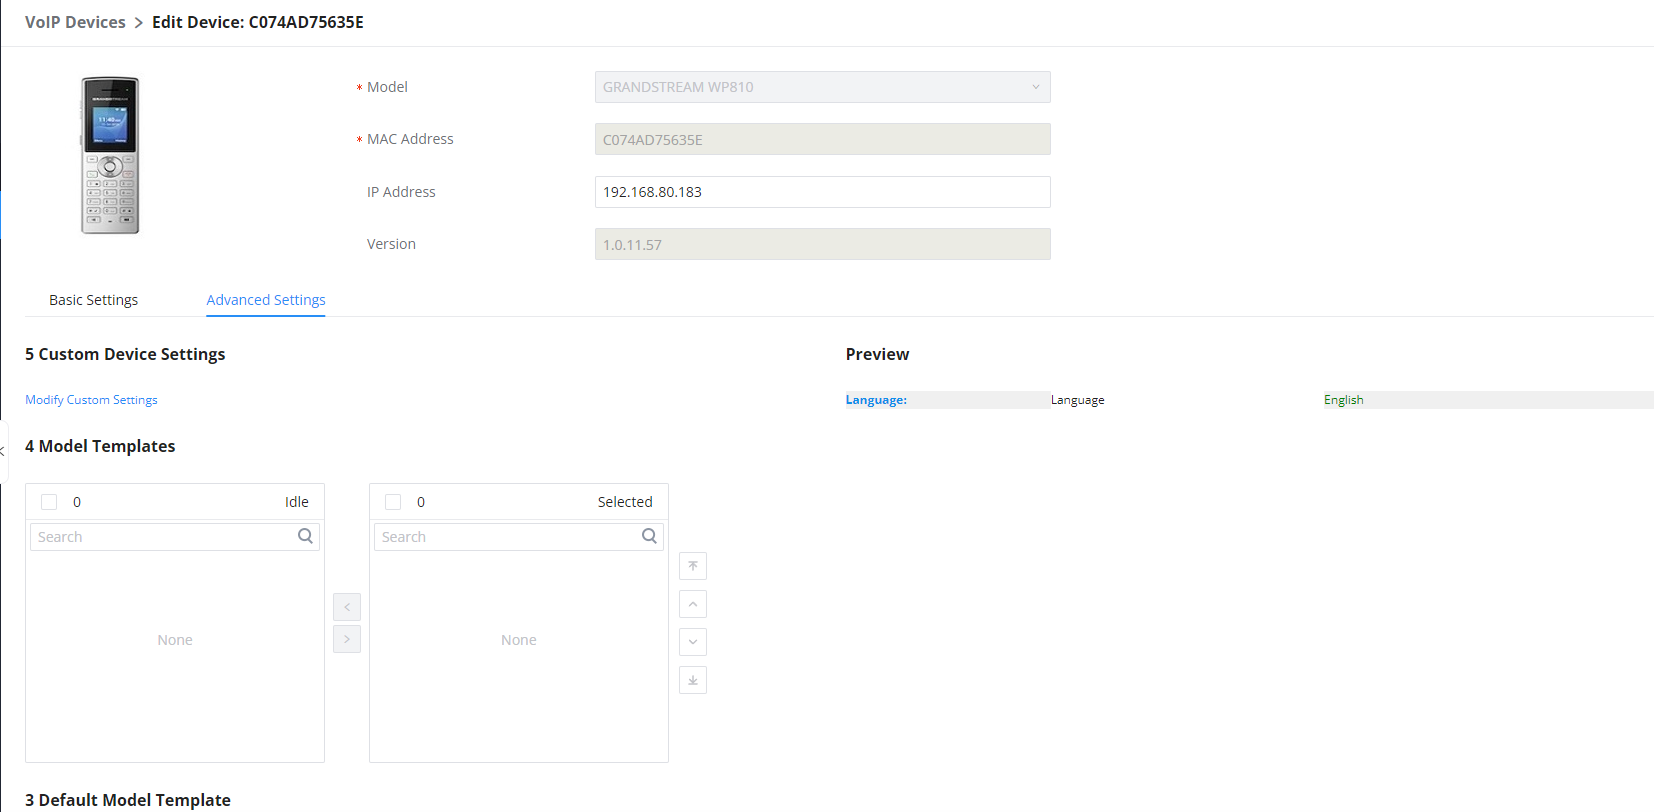
 to add. Multiple global templates can be selected, and users can arrange the priority by adjusting orders via
 and
and
 . All the selected global templates will take effect. If the same option exists on multiple selected global templates, the value in the template with higher priority will override the one in the template with lower priority. Click on
 to remove the global template from the selected list.
 to add. Multiple model templates can be selected, and users can arrange the priority by adjusting orders via
 and
and
 . All the selected model templates will take effect. If the same option exists on multiple selected model templates, the value in the template with higher priority will override the one in the template with lower priority. Click on
 to remove the model template from the selected list.
 to send NOTIFY to the SIP endpoint device and trigger the provisioning process. The device will start downloading the generated configuration file from the URL contained in the NOTIFY message.