
Fax Server is one of the most useful and important UCM6xxx features that allows the user to send and receive Fax files. The UCM6xxx IP-PBX series supports T.30 for legacy analog Fax transmissions along with T.38 and Pass-through for Fax Over IP. The UCM6xxx series provides a lot of options and methods to perform sending/receiving Fax files depending on the user’s resources and the way he/she wants to proceed.

UCM Fax Server supports T.38 which is a protocol that dictates how to send a fax over a computer data network and requires a T.38-capable VoIP service or gateway (please check with your service provider for this protocol support), otherwise, the transmission of Fax will proceed via pass-through using RTP for sending facsimile signals.
This guide describes the steps to follow to perform sending and receiving fax files when the user has an Analog Fax machine connected to UCM6xxx’s FXS Port or when he only wants to use a virtual fax machine and benefit from the value-added features of the UCM6xxx related to fax.
Setup UCM6XXX with a Physical Fax Machine
FXS Extension Configuration
FXS (Foreign Exchange Station) is any telephone interface that is used for end-user analog telephony equipment, (i.e. analog fax machine and analog phones) to provide battery power, dial tone, and generate the ringing voltage and therefore the user needs to create a “FXS Extension” for the Fax machine to be used.
All the UCM IP-PBX models have two FXS ports to connect analog phones and Fax machines for typical SMB installations.
Please, refer to the following steps to create the FXS extension:
- Go to UCM6xxx Web GUI 🡪 Extension/Trunk 🡪 Extension.
-
Click on
 .
.
- Under “Basic Settings”, configure the extension’s parameters.
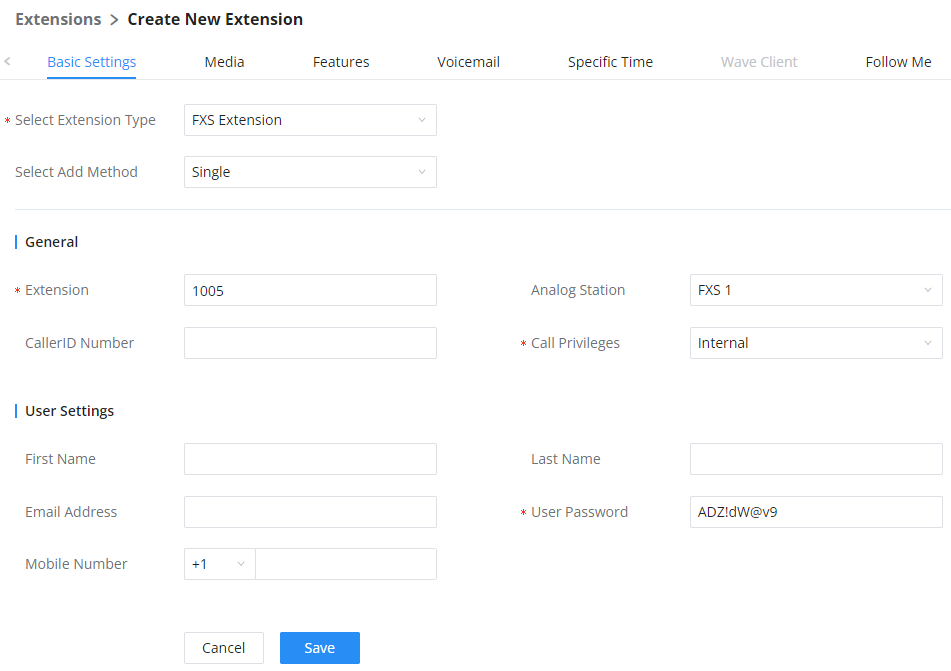
- Select the extension type to be “FXS Extension” and select which FXS port the Fax machine will be connected to.
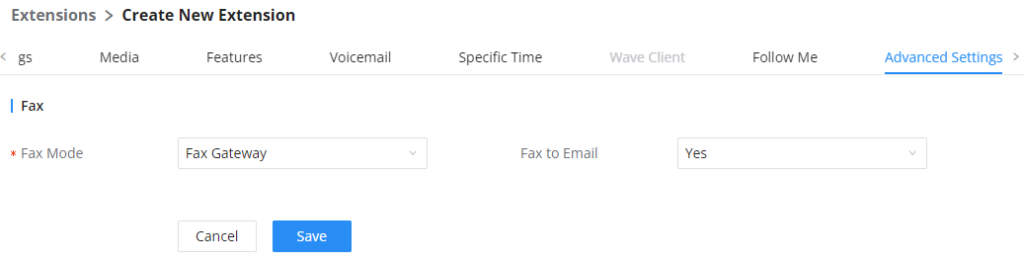
- Under “Media”, set the “Fax Mode” to “Fax Gateway” so that the UCM6xxx can support conversation and processing of Fax data from T.30 to T.38 and T.38 to T.30.
- Click on Save and Apply changes.
Connecting FAX Machine to UCM
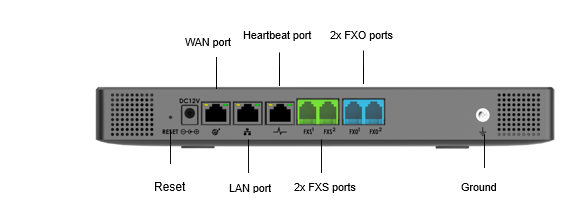
After creating the FXS extension, the user needs to make sure of connecting his Fax Machine to the chosen and configured FXS Port. The following figure shows the example of UCM3202’s FXS Ports.
Routing FAX Calls
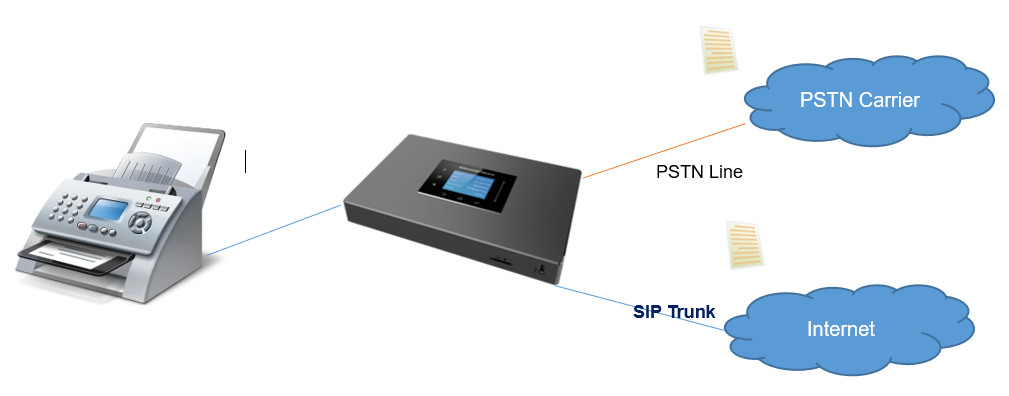
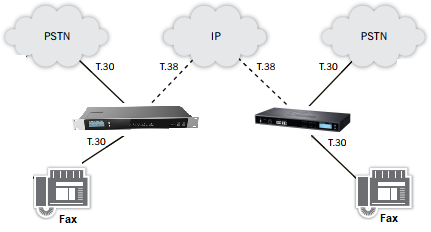
As shown in the below diagram, the fax transmission originates from the physical Fax machine as a T.30 fax. Then the built-in T.38 gateway module in UCM6xxx translates the fax transmission to T.38 format and sends it over the IP network to the other UCM6xxx.
The second Server translates back the transmission to T.30 and sends it to the attached Fax Machine or over the PSTN line for external numbers.
The user needs to set up Trunks and call routing rules to route incoming and outgoing faxes through the desired trunk, we will show the steps to use analog and VoIP trunks to perform sending and receiving Fax files.
Create Analog Trunk
Please, refer to the following steps to create an analog trunk:
- Go to UCM6xxx Web UI 🡪 Extension/Trunk 🡪 Analog trunks.
-
Click on
 to create a new Analog Trunk, or on
 to edit an existing one.
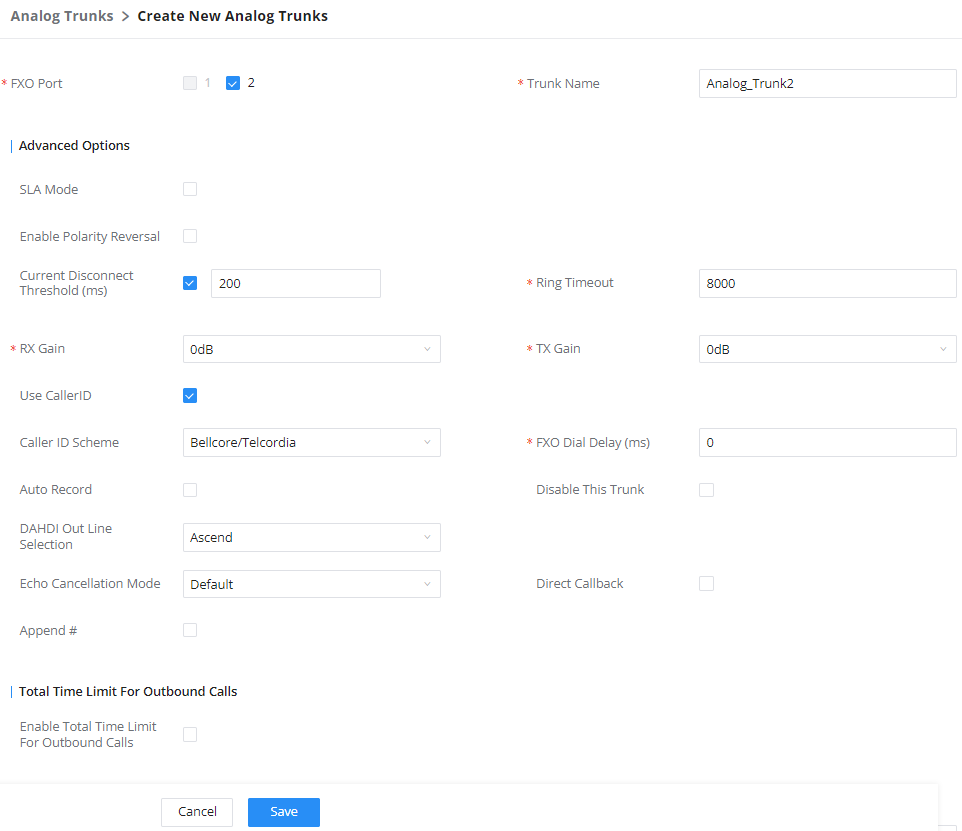
- Click on “Save” and “Apply Changes”.
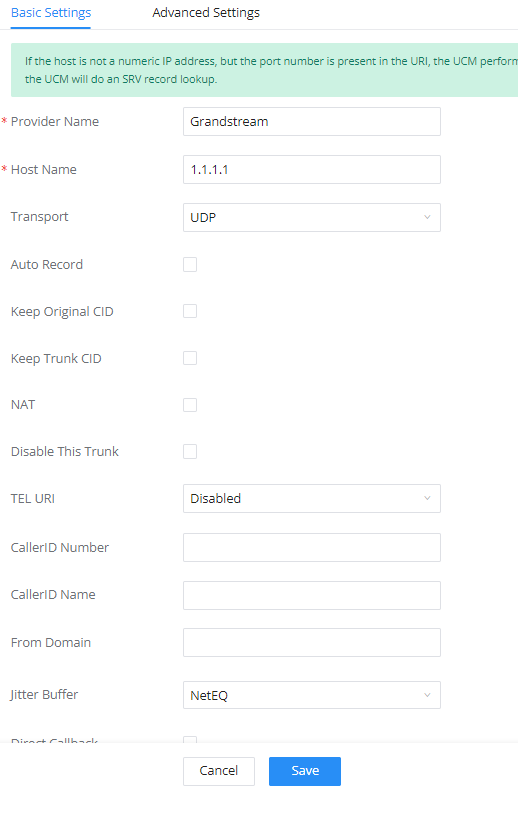
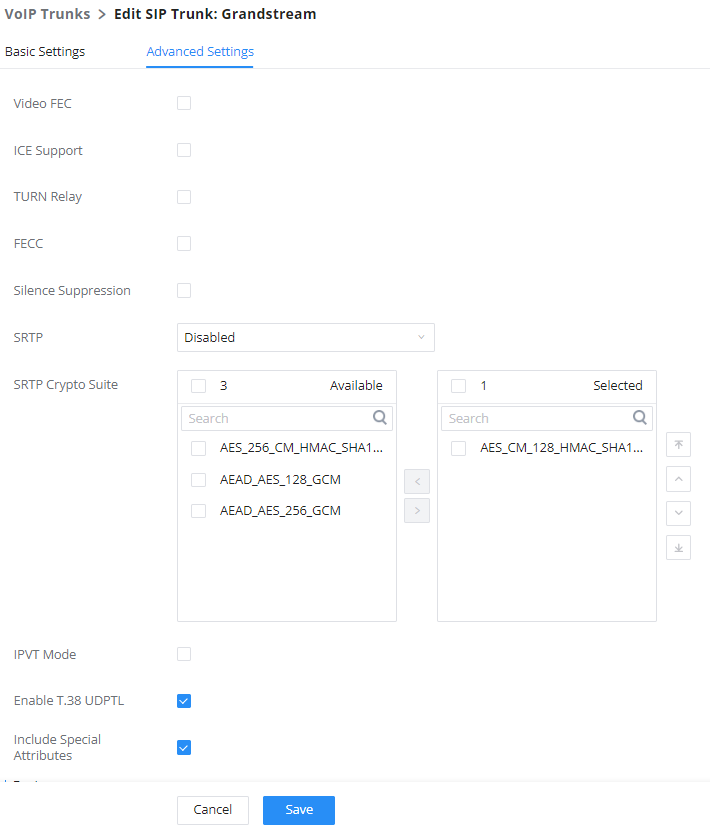
Create VoIP Trunk
Please, refer to the following steps to create a VoIP Trunk:
- Go to UCM6xxx Web UI 🡪 Extension/Trunk 🡪 VoIP Trunks.
- Click on
 to create a new VoIP Trunk.
 - Set the SIP credentials given by the service provider (server IP or domain, username and password…etc).
- Click on “Save” and “Apply Changes”.
Sending/Receiving Fax Files using Fax Machine
Please, refer to the following steps to manage sending/receiving faxes using a fax machine.
- Connect the Fax machine to the UCM6xxx FXS port.
- Connect the PSTN line to the UCM6xxx FXO port (in the case of using Analog Trunk).
- Go to the Web GUI 🡪 Extension/Trunk page.
- Create or edit a Trunk:
- Analog trunk: Please, refer to the chapter [Create Analog Trunk]
- VoIP trunk: Please, refer to the chapter [Create VoIP Trunk]
- Go to the UCM6xxx Web GUI🡪Extension/Trunk🡪Extensions page.
- Create or edit the extension for the FXS port. Please, refer to the chapter [FXS Extension Configuration].
- Under Web GUI🡪Extension/Trunk🡪Inbound Routes page, click on
 to create an inbound route to use the Fax trunk to receive fax files.
 - Select the trunk you created (Analog Trunk or SIP Trunk).
- Enable Fax Detection so that the fax signals from the trunk during a call will be detected. Users can afterward set the fax destination as Extension to send the fax to the designated Extension. or as Fax to Email to send the fax as an email attachment to the designated extension’s email address. If the selected extension does not have an associated email address, it will be sent to the default email address configured in the Call Features->Fax/T.38->Fax Settings page. (Email settings need to be pre-configured).
- If fax detection is not enabled, Users can select the created FXS extension for the Fax machine under the Default Destination setting, this way all the incoming traffic through this inbound route will be forwarded to the selected destination.
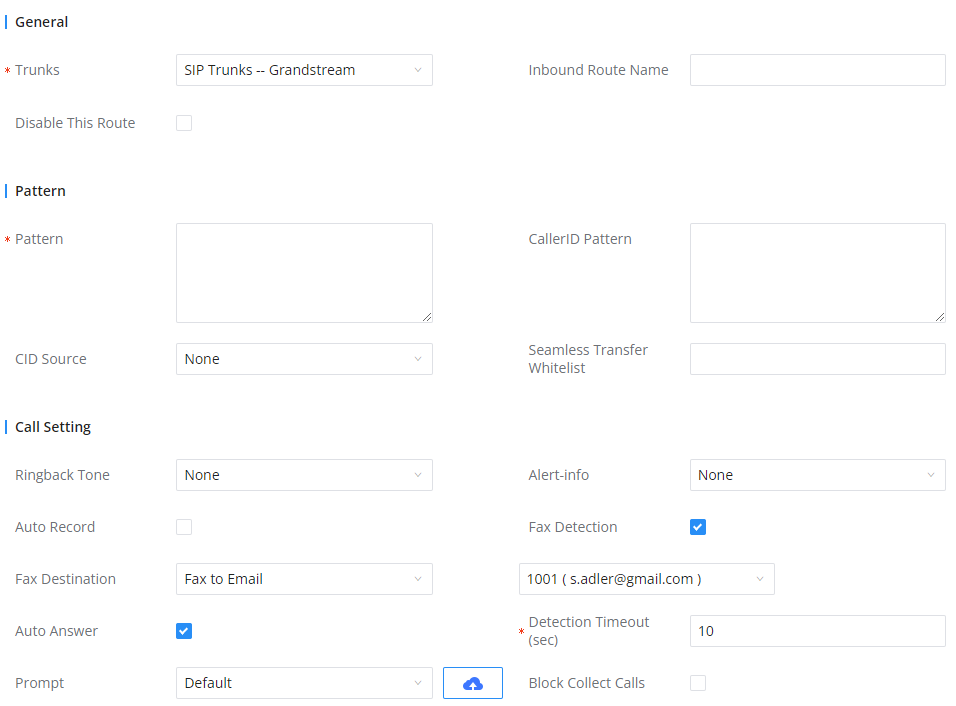
- If you want to automatically receive faxes, you can enable the “Auto Answer” option following the “Fax Detection” option. When a fax call is received by the UCM6300 series, the UCM will answer the call and detect the fax tone. Please note that if this inbound route is also used to receive regular calls, it may slow down other normal calls.
- Click on “Save” and “Apply Changes”.
To send outbound faxes, users should follow below steps:
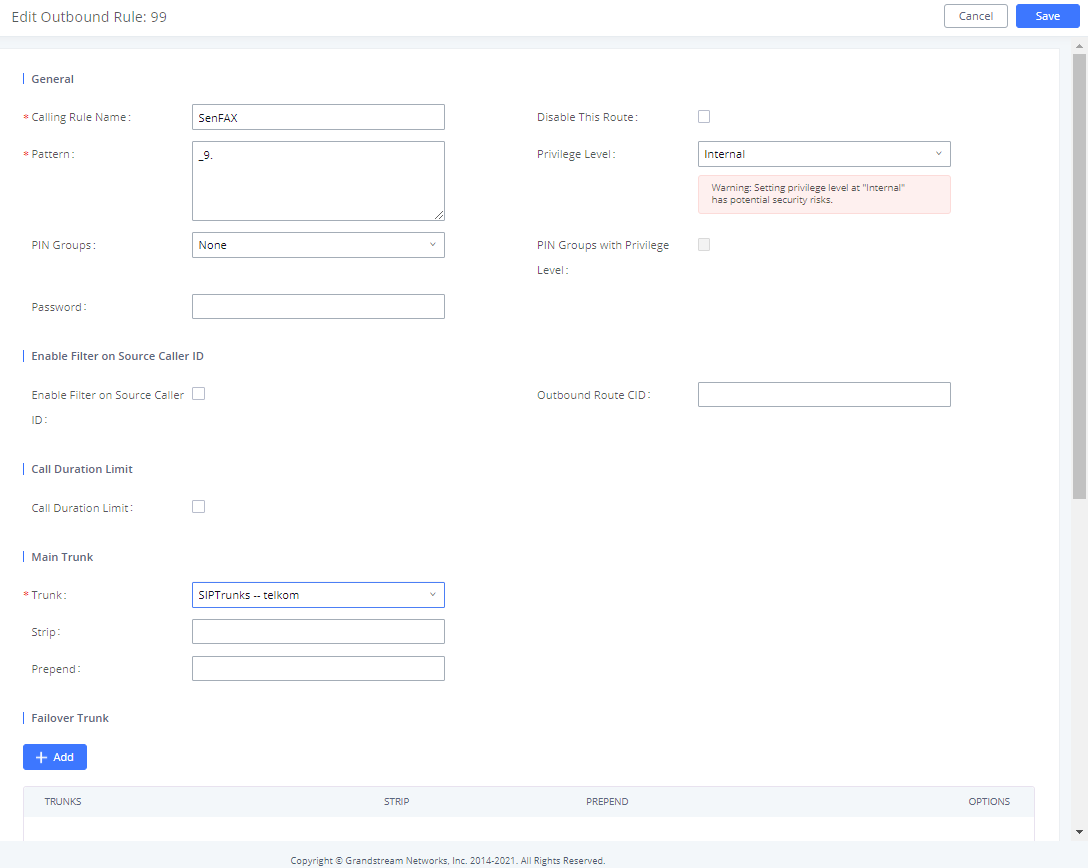
- Under Web GUI🡪Extension/Trunk🡪Outbound Routes page, click on to create an outbound route to use the fax trunk to send files.
- Select the trunk you created (Analog Trunk or SIP Trunk).
- Click on “Save” and “Apply changes”.
After this configuration is done, Fax files can be received and sent with the Fax Machine connected to UCM6xxx on the FXS Port.
UCM6XXX Fax Value-Added Features
The UCM IP-PBX series have many value-added features related to fax which can help users who don’t have PSTN lines and FAX machine to send and receive fax files in PDF format.
Among these features, we have fax sending from web GUI, fax to email, email to fax, and fax detection.
WEB GUI Fax Sending
To use the FAX sending feature of the UCM, users need to follow below steps:
- Under Web GUI🡪Extension/Trunk🡪Outbound Routes page, click on to create an outbound route to use the fax trunk to send files. Refer to the previous steps [Outbound Routes].
- Select the trunk already created (Analog Trunk or SIP Trunk).
- Access to UCM web GUI either using the admin account or user portal.
- Go to UCM6xxx Web GUI 🡪 Other Features 🡪Fax Sending (Value-Added Features 🡪Fax Sending for the UCM62XX and UCM6510).
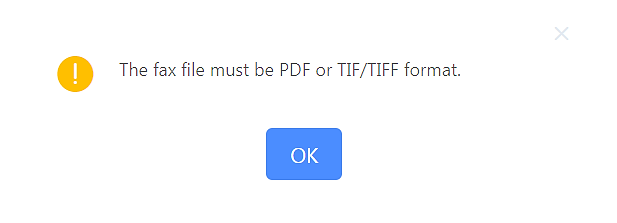
- Enter the fax number and upload the file to be faxed.
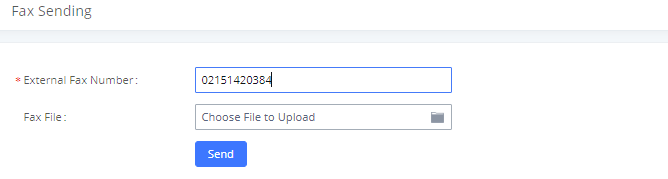
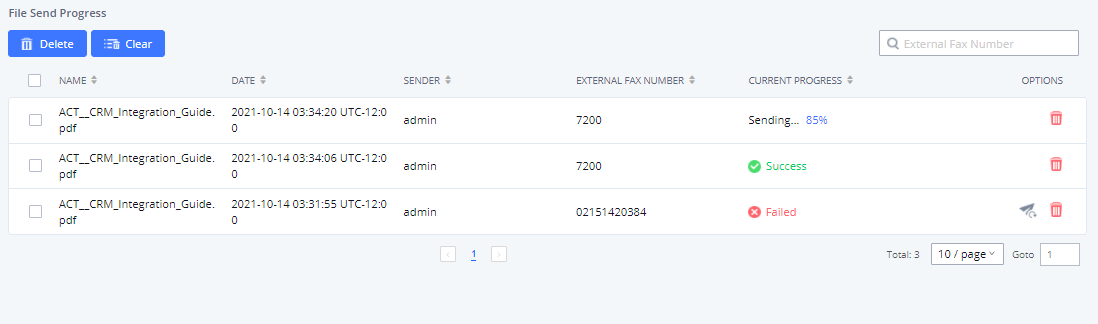
Once the right file is selected, the Fax File will be successfully placed in the send queue and the user can view the File Send progress that shows the status and progress percentage of files with also the possibility to resend the failed ones using the resend button.

Fax Resending
The UCM6xxx supports the options “Enable Fax Resend” and “Max Resend Attempts” which are available under Call Features🡪Fax/T.38🡪Fax Settings page. These options allow the UCM to keep attempting to send faxes up to a specified amount of times.
Additionally, if a fax still fails to send, a Resend button will appear in the File Send Progress list in Value-Added Features🡪Fax Sending (for the UCM6300 go to Other Features🡪Fax Sending) to allow manual resending.
To enable the FAX resend feature, please refer to the following steps:
- Under UCM6xxx Web UI 🡪 Call Features 🡪 Fax/T.38, check the option “Enable FAX Resend”.
- Configure the “MAX Resend Attempts” with the maximum attempts number to resend the FAX.
- Click on “Save” and “Apply Changes”.
Note: When the fax fails to send, a Resend button will appear in the File Send Progress list in Value-Added Features 🡪 Fax Sending to allow manual resending as displayed in the following screenshot.
Using Fax-to-Mail
UCM Email Settings
The first step in setting up fax-to-email feature is to configure UCM Email settings; this can be done by below steps:
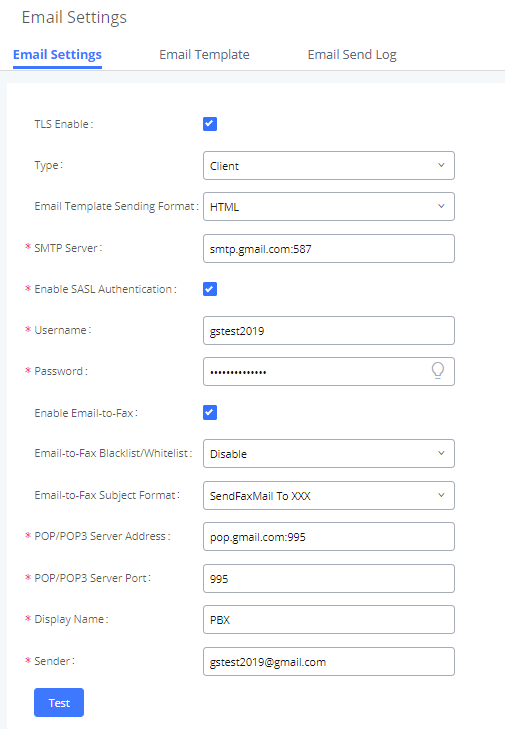
- Log into the web GUI as an admin under System Settings🡪Email Settings🡪Email Settings
- Enter the required information for SMTP.
- Click on “Save” then “Apply Changes”.
- Click on the “Test” button and test if the email settings are correct and that a test mail has been received.
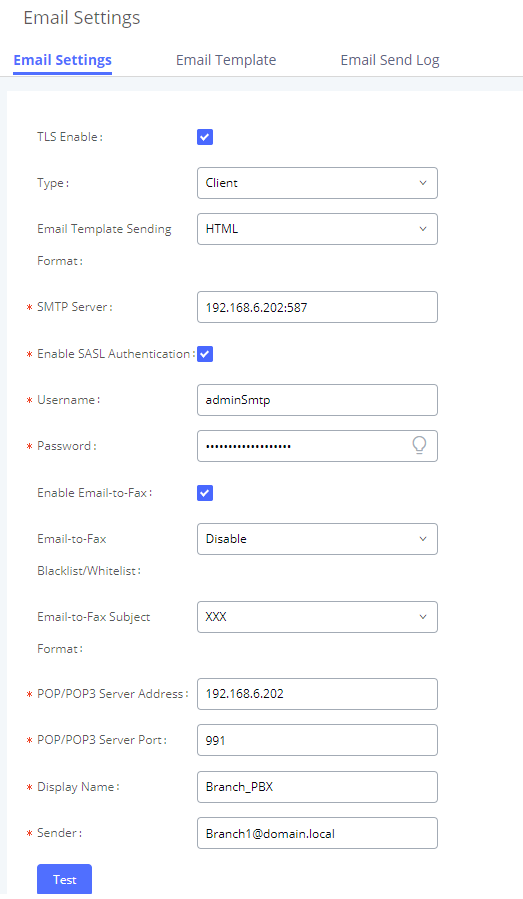
Please refer to the following table and screenshot to have more information about the email settings configuration.
Parameter | Description |
TLS Enable | If enabled, TLS will be used when forwarding emails to the SMTP server. |
Type |
|
Email Template Sending Format | Select the email template format to be sent. The "HTML" format is compatible with most mail clients and is recommended. If the mail client does not support the "HTML" format, please select the "Plain Text" format. |
SMTP Server | Enter the SMTP server. |
Enable SASL Authentication | Toggles SASL authentication. If disabled, IPPBX will not use the username and password for email client authentication. Most email servers require login authentication while private email servers may allow anonymous login. If using Microsoft Exchange Server or if credentials are not required, please disable this option. |
Username | Enter the username of the email account. |
Password | Enter the password of the email account. It is highly recommended to use HTTPS when saving and applying password changes. |
Enable Email-to-Fax | Monitors the inbox of the configured email address for the specified subject. If detected, the IPPBX will get a copy of the attachment from the email and send it to the XXX extension by fax. The attachment must be in PDF/TIF/TIFF format. |
POP/POP3 Server Address | Enter the IP address of the POP/POP3 server. |
POP/POP3 Server Port | Enter the port of the POP/POP3 server. |
Display Name | Enter the name of the PBX that will be displayed in sent emails. |
Sender | Enter the email used to send the emails. |
This way we confirmed that UCM can send emails via Its built-in SMTP client, and specified The Email address blacklist for local/external contacts preventing faxing from unauthorized email addresses. Moreover, users can customize the emails that will be sent along with the FAX, this can be done under the Email template page as shown below.
Create/Edit Virtual FAX Extensions
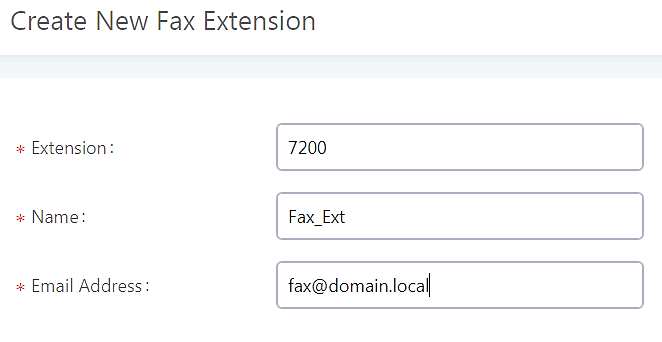
The second step is to create a new Fax extension which will be mapped with a certain email address.
Please, follow the below steps:
- Go to UCM6xxx Web GUI 🡪 Call features 🡪 FAX/T.38
-
Click on
 and enter the number and name of the extension.
- Enter the Email Address where to send the received Faxes.

Once the user created the extension, it will be displayed in the FAX/T.38 menu with the possibility of editing the extension’s information by clicking on ![]() button or deleting them with
button or deleting them with ![]() button.
button.
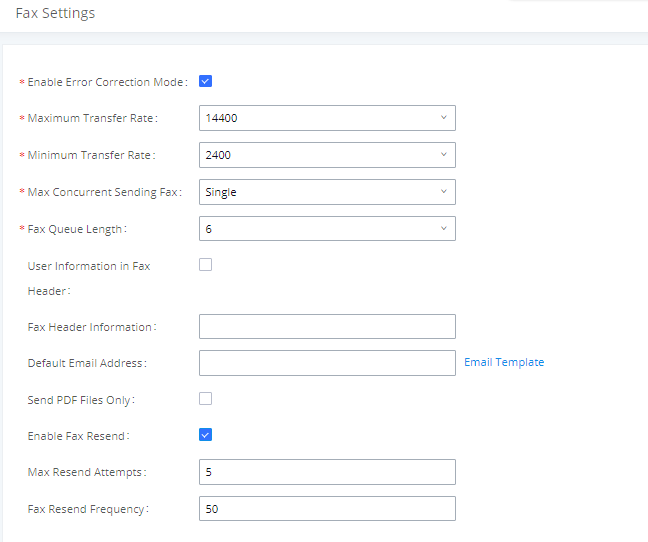
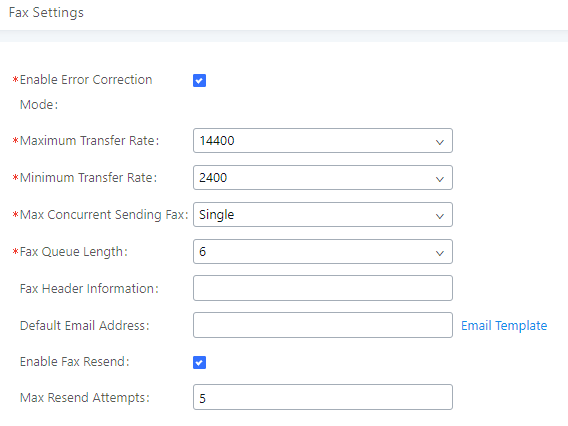
User can click on “Fax settings” to configure the Fax/T.38 parameters as the following figure.
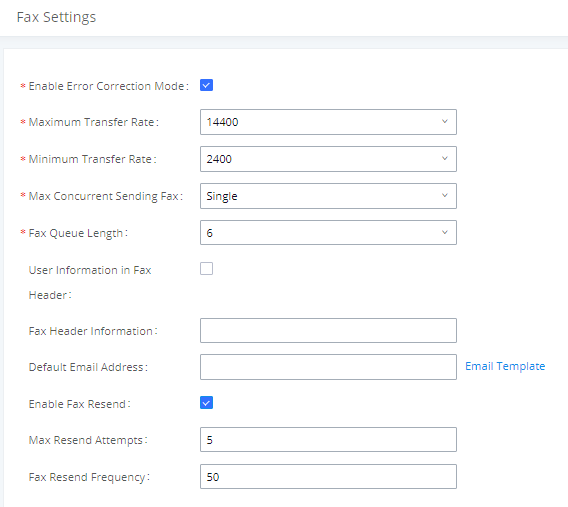
Parameter | Description |
Enable Error Correction Mode | Configure to enable Error Correction Mode (ECM). |
Maximum Transfer Rate | Configure the maximum transfer rate during Fax rate negotiation. |
Minimum Transfer Rate | Configure the minimum transfer rate during Fax rate negotiation. |
Max Concurrent Sending Fax | Determines how many users can send fax at the same time. |
Fax Queue Length | Maximum length of fax queue. |
Fax Header Information | Adds header information to fax files. |
Default Email Address | Send fax to this email address if the fax destination does not have an email address configured. |
Send PDF Files Only | If enabled, fax emails will no longer attach TIFF files. Only PDF files will be attached. |
Enable Fax Resend | Enable Fax Resend. |
Max Resend Attempts | Max Resend Attempts. |
Fax Resend Frequency | Fax Resend Frequency. |
Receiving FAX Files using Virtual Faxing
Now, that email settings and virtual fax extension have been set up and to receive Fax files using virtual faxing, please refer to the following steps:
- Under UCM6xxx Web UI 🡪 Call Features 🡪 Fax/T.38, create a new Fax extension. Please refer to the chapter [Create/Edit Virtual FAX Extensions].
- Create or edit a Trunk:
- Analog trunk: Please, refer to the chapter [Create Analog Trunk]
- VOIP trunk: Please, refer to the chapter [Create VoIP Trunk]
-
Under Web GUI🡪Extension/Trunk🡪Inbound Routes page, click on
in order to create an inbound route to use the Fax trunk to receive fax files.
- Select the trunk you created (Analog Trunk or SIP Trunk).
- Select the created FAX extension as the default destination.
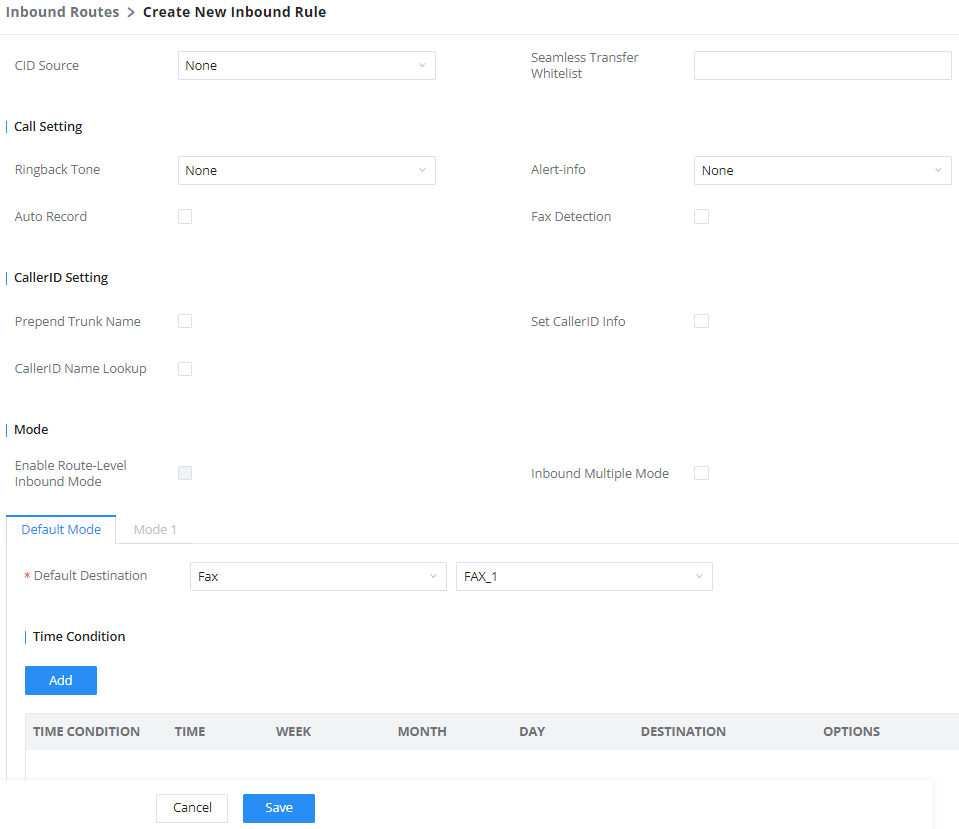
- Click on “Save” and “Apply Changes”.
Once successfully configured, the incoming Fax from an external Fax machine to the PSTN line number will be converted to a PDF file and sent to the Email address fax@domain.local set when the Fax Extension was created. The list of received Fax files is displayed under UCM6xxx Web UI 🡪 Call Features 🡪 Fax/T.38.
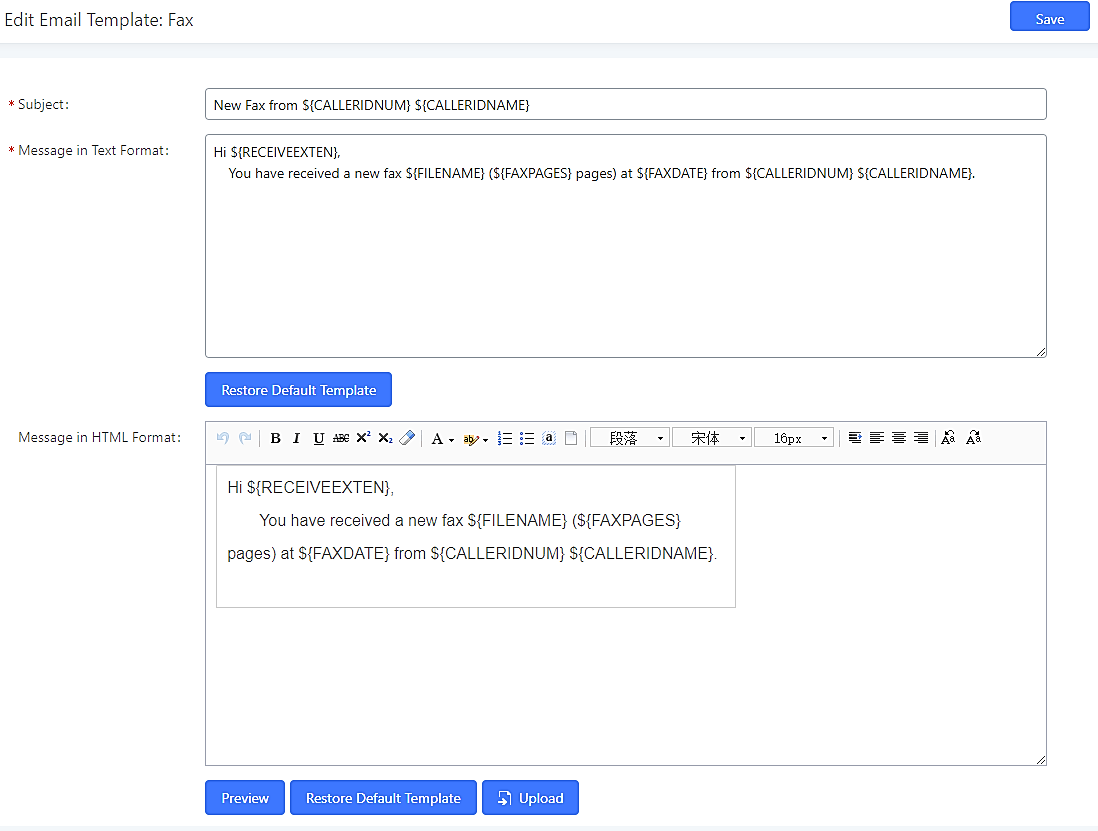
Customizing FAX EMAIL Template
The EMAIL templates on the UCM can be used to send an email notification about the fax and the users can customize this template based on their needs.
Please refer to the following steps to have more details about the customization of the FAX EMAIL template:
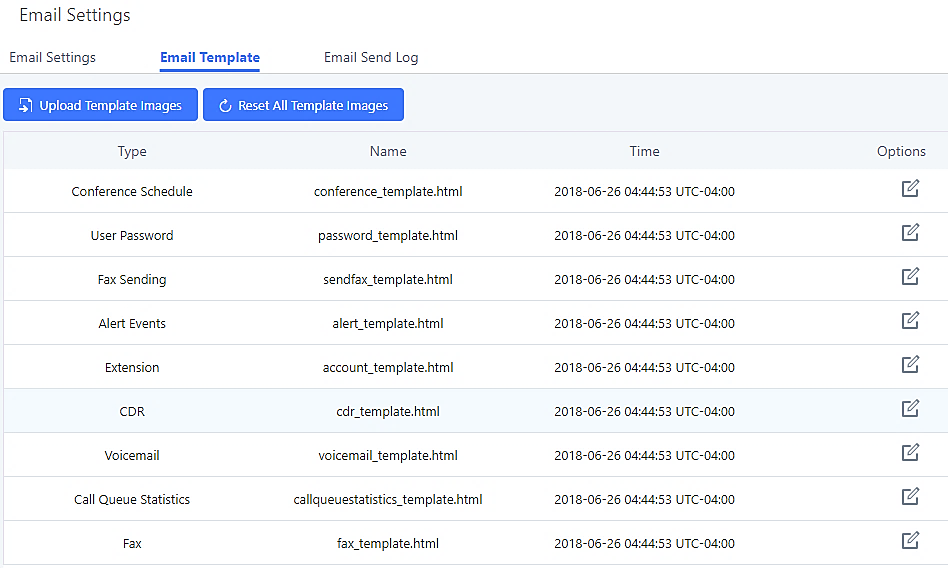
- Access the Web GUI🡪Settings🡪Email Settings🡪Email Templates
-
Select the FAX template and press the edit button
 under the options column to edit the template as desired.
- Configure the fields of the template
- Users can preview mail samples by clicking on
 .
. - Click on
 to restore the default email template.
 - Finally, users can click on
 to upload a custom picture to the email template to display their logo in the sent emails for example.
Using Mail-to-Fax
UCM Email Settings
The first step in setting up the Email-to-fax feature is to configure UCM Email settings; this can be done by the below steps:
- Log into the web GUI as an admin under System Settings🡪Email Settings🡪Email Settings.
- Select the Type Client and enter the required information for SMTP.
- Click on “Save” then “Apply Changes”.
- Click on the “Test” Button and test if the email settings are correct and that a test mail has been received.
Please refer to the following table and screenshot to have more information about the email settings configuration.
Parameter | Description |
TLS Enable | If enabled, TLS will be used when forwarding emails to the SMTP server. |
Type |
|
Email Template Sending Format | Select the email template format to be sent. The "HTML" format is compatible with most mail clients and is recommended. If the mail client does not support the "HTML" format, please select the "Plain Text" format. |
SMTP Server | Enter the SMTP server. |
Enable SASL Authentication | Toggles SASL authentication. If disabled, IPPBX will not use the username and password for email client authentication. Most email servers require login authentication while private email servers may allow anonymous login. If using Microsoft Exchange Server or if credentials are not required, please disable this option. |
Username | Enter the username of the email account. |
Password | Enter the password of the email account. It is highly recommended to use HTTPS when saving and applying password changes. |
Enable Email-to-Fax | Monitors the inbox of the configured email address for the specified subject. If detected, the IPPBX will get a copy of the attachment from the email and send it to the XXX extension by fax. The attachment must be in PDF/TIF/TIFF format. |
POP/POP3 Server Address | Enter the IP address of the POP/POP3 server. |
POP/POP3 Server Port | Enter the port of the POP/POP3 server. |
Display Name | Enter the name of the PBX that will be displayed in sent emails. |
Sender | Enter the email used to send the emails. |
Create/Edit Virtual FAX Extensions
The second step is to create a new Fax extension which will be mapped with a certain email address.
Please, follow the next steps below:
- Go to UCM6xxx Web GUI 🡪 Call features 🡪 FAX/T.38.
-
Click on
and enter the number and name of the extension.
- Enter the Email Address where to send the received Faxes.
Once the user created the extension, it will be displayed in the FAX/T.38 menu with the possibility of editing the extension’s information by clicking on
![]() button or deleting them with
button or deleting them with
![]() button.
button.
Users can click on “Fax settings” to configure the Fax/T.38 parameters as the following figure.
Parameter | Description |
Enable Error Correction Mode | Configure to enable Error Correction Mode (ECM). |
Maximum Transfer Rate | Configure the maximum transfer rate during Fax rate negotiation. |
Minimum Transfer Rate | Configure the minimum transfer rate during Fax rate negotiation. |
Max Concurrent Sending Fax | Determines how many users can send fax at the same time. |
Fax Queue Length | Maximum length of fax queue. |
Fax Header Information | Adds header information to fax files. |
Default Email Address | Send fax to this email address if the fax destination does not have an email address configured. |
Send PDF Files Only | If enabled, fax emails will no longer attach TIFF files. Only PDF files will be attached. |
Enable Fax Resend | Enable Fax Resend. |
Max Resend Attempts | Max Resend Attempts. |
Fax Resend Frequency | Fax Resend Frequency. |
Sending Mail to FAX
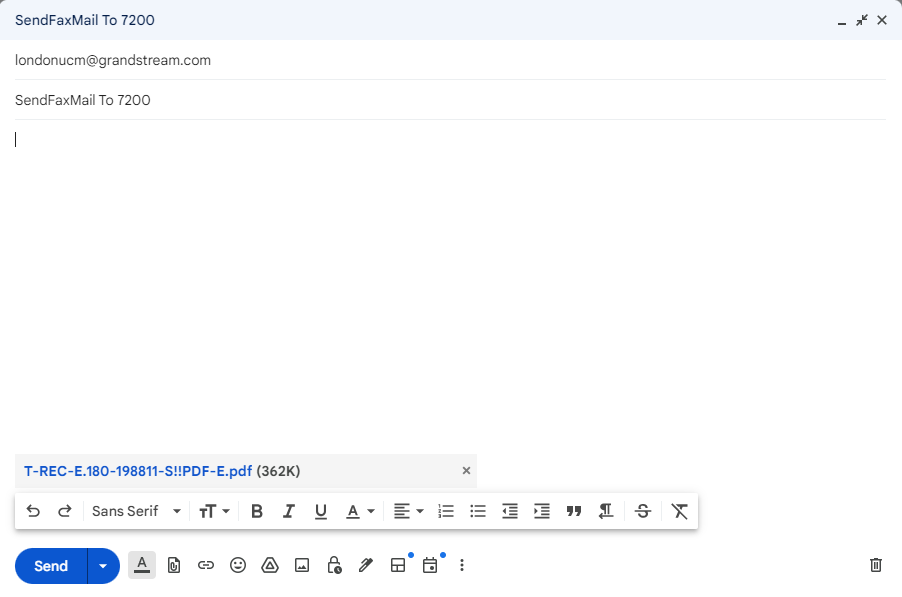
After enabling and configuring the MAIL to FAX option, the UCM monitors the configured email inbox for emails with the subject “SendFaxMail To XXX” and it will extract the attachments of detected emails and send it to the configured extension by fax. The attachment must be in PDF/TIF/TIFF format.
Please refer to the following steps:
- Access your EMAIL box and compose a new email.
- Fill in the email address configured on the UCM as the destination.
- Specify the subject with “SendFaxMail To 7200”, in this example 7200 is the FAX extension that we have already configured on the UCM.
- Insert the attachment to be sent (The attachment must be in PDF/TIF/TIFF format).
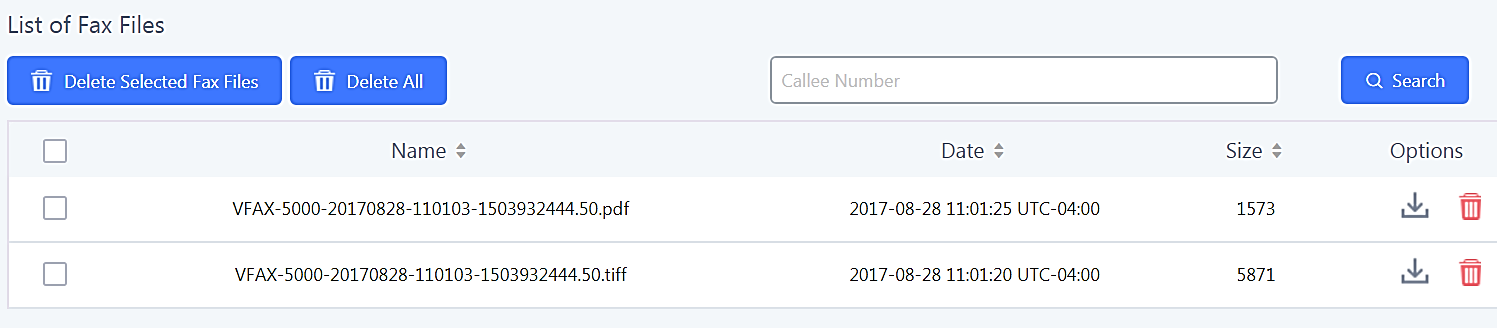
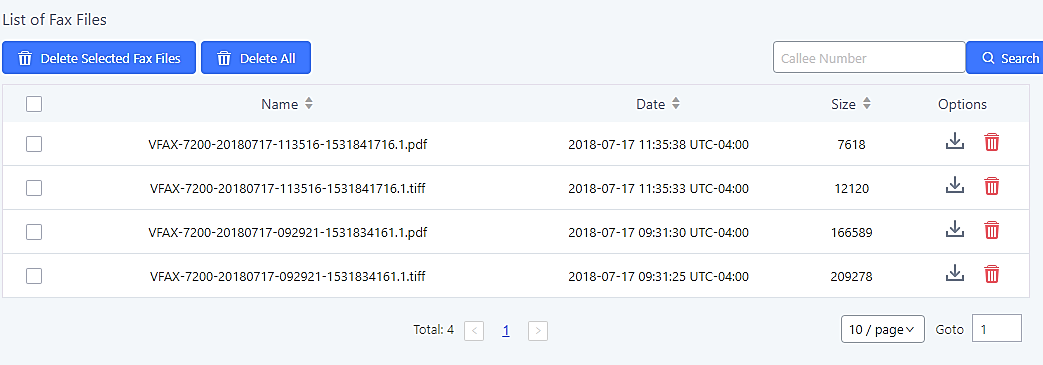
Now the UCM will extract the attachments of detected emails and send them to the configured extension by fax, users can also check the list of the fax files received under the web GUI 🡪 Call Features 🡪 Fax/T.38 as shown in the following screenshot.
Fax Detection and Intelligent Routing
Users can configure the Fax detection and intelligent routing of the Inbound Route of the trunk that they are using. Enabling the Fax Detection option will enable detecting the Fax Signal during a call, and the received Fax file will be sent to the designated extension or email address.

The user can also Enable Fax intelligent Routing to route directly the Fax signal to the appropriate FXS Extension connected to the Physical Fax Machine or the Virtual Faxing Extension. The user needs to choose this extension number from the available extensions in Fax Destination.