
Captive Portal feature on GWN76XX Access Points and GWN7000 router allows to define a Portal Web Page that will be displayed on WiFi clients’ browsers when attempting to access the Internet.
Once connected to GWN76XX AP, WiFi clients will be forced to view and interact with that landing page by providing authentication if required and accepting the use terms before Internet access is granted.
Captive portal can be used in different environments including airports, hotels, coffee shops, business centers and others offering free WiFi hotspots for Internet users.
This guide describes how to setup the captive portal feature on the GWN76XX series using RADIUS authentication.
The following figure illustrates an example of the landing page feature with RADIUS authentication.
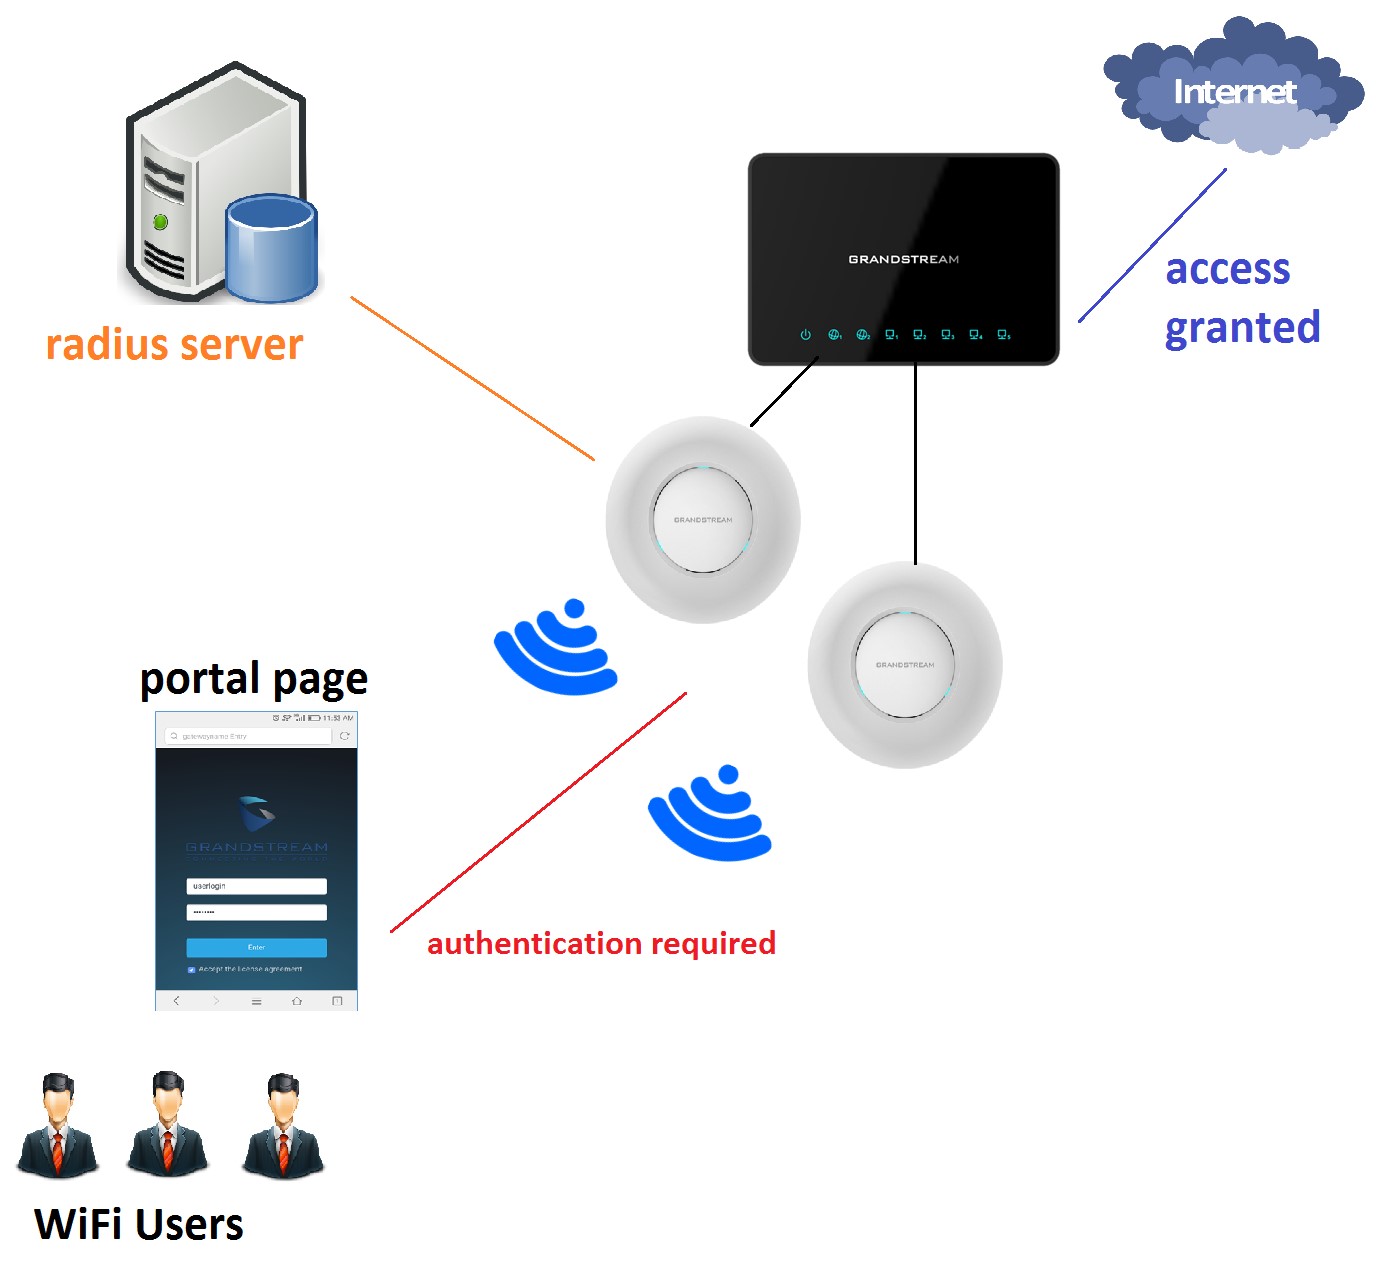
Figure 1: General Architecture
SYSTEM OVERVIEW
In order to configure the captive portal feature on GWN76XX access points with RADIUS authentication, the following requirements should be applied:
- A fully setup and working RADIUS server for authentication (ex: FreeRADIUS).
- GWN76XX Access point with firmware supporting RADIUS. Refer to [SUPPORTED DEVICES].
- Network setup allowing GWN76XX access point and RADIUS server communication.
RADIUS
Auhtentication via RADIUS server is commonly used on enterprise local netoworks, once this option selected the admin needs to configure the IP address and secret to connect the AP (RADIUS Client) to the RADIUS Server.
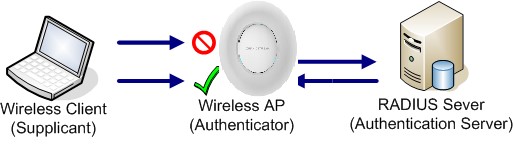
The supplicant will request to join an SSID, the authenticator will request an identity from the mobile device, the authenticator forwards the identity to the authentication server which will reply with a success or deny.
CAPTIVE PORTAL SETTINGS
Captive Portal feature on GWN76XX AP helps to define a Landing Page (Web page) that will be displayed on Wi-Fi clients’ browsers when attempting to access Internet. Once connected to a GWN76XX AP, Wi-Fi clients will be forced to view and interact with that landing page before Internet access is granted.
The Captive Portal feature can be configured from the GWN76XX Web page under “Captive Portal”. The page contains following sub-menus: Guest, Policy List, Splash Page and Vouchers.
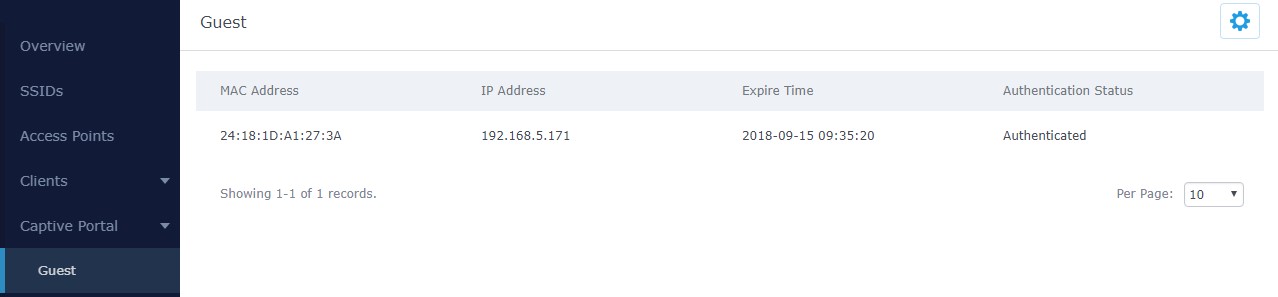
Guest
This section lists the clients connected or trying to connect to Wi-Fi via Captive Portal.
Policy Configuration Page
The Policy configuration allows users to configure and customize different captive portal policies which then can be selected on SSIDs configuration page, giving the admin the ability to set different captive portals for each SSID.
The following table describes the settings used for Captive Poral feature with RADIUS Authentication Basic.
Field | Description |
Name | Enter the name of the Captive Portal policy |
Splash Page | Select Splash Page type, Internal or External. |
Authentication Type | Following types of authentication are available:
|
Expiration | Configures the period of validity, after the valid period, the client will be reauthenticated again. |
| If Authentication Type is set to “RADIUS Authentication” | If Authentication Type is set to “RADIUS Authentication” |
RADIUS Server Address | Fill in the IP address of the RADIUS server. |
RADIUS Server Port | Set the RADIUS server port, the default value is 1812. |
RADIUS Server Secret | Fill in the key of the RADIUS server. |
RADIUS Authentication Method | Select the RADIUS authentication method, 3 methods are available: PAP, CHAP and MS-CHAP. |
| If Authentication Type is set to “Social Login Authentication” | If Authentication Type is set to “Social Login Authentication” |
Check to enable/disable WeChat Authentication | |
Shop ID | Fill in the Shop ID that offers WeChat Authentication. |
APP ID | Fill in the APP ID provided by the WeChat in its web registration page |
Secret Key | Set the key for the portal, once clients want to connect to the Wi-Fi, they should enter this key. |
Check to enable/disable Facebook Authentication | |
Facebook App ID | Fill in the Facebook App ID. |
Facebook APP Key | Set the key for the portal, once clients want to connect to the Wi-Fi___33, they should enter this key. |
Check this box to enable Twitter Authentication. | |
Force to Follow | If checked, users need to Follow owner before been authenticated. |
Owner | Enter the app Owner to use Twitter Login API. This field appears only when Force to Follow is checked. |
Consumer Key | Enter the app Key to use Twitter Login API. |
Consumer Secret | Enter the app secret to use Twitter Login API. |
| For all Authentication Types | For all Authentication Types |
Use Default Portal Page | If checked, the users will be redirected to the default portal page once connected to the GWN. If unchecked, users can manually select which Portal Page to use from Portal Page Customization drop-down list. |
Portal Page Customization | Select the customized portal page (if “Use Default Portal Page” is unchecked). /facebook.html
|
Landing Page | Choose the landing page, 2 options are available:
|
Redirect External Page URL Address | Once the landing page is set to redirect to external page, user should set the URL address for redirecting. This field appears only when Landing Page is set to “Redirect to an External Page”. |
Enable Daily Limit | If enabled, captive portal will limit user connection by times of one day. |
Failsafe Mode | If checked, AP will grant access to STA if AP can’t reach to external authentication server. This option is available only when Authentication Type is set to “RADIUS Server” or “Vouchers”. |
Enable HTTPS | Check to enable/disable HTTPS service. |
Landing Page Redirection
This feature can be configured using the option “Redirect External Page URL” under the policy settings, and could be useful in the case the network admin wants to force all connected guest clients to be redirected to a certain URL (ex: company’s website) for promotion and advertisement purposes.
Pre-Authentication Rules
Using this option, users can set rules to match traffic that will be allowed for connected Wi-Fi users before authentication process. This can be needed for example to setup Facebook authentication where some traffic should be allowed to Facebook server(s) to process the user’s authentication. Or simply to be used to allow some type of traffic for unauthenticated users.
Post-Authentication Rules
On the other hand, post authentication rules are used to match traffic that will be banned for Wi-Fi clients after authentication. As an example, if you want to disallow connected Wi-Fi clients to issue Telnet or SSH traffic after authentication then you can set post authentication rules to match that traffic and once a connected client passes the authentication process they will be banned from issuing telnet and SSH connections.
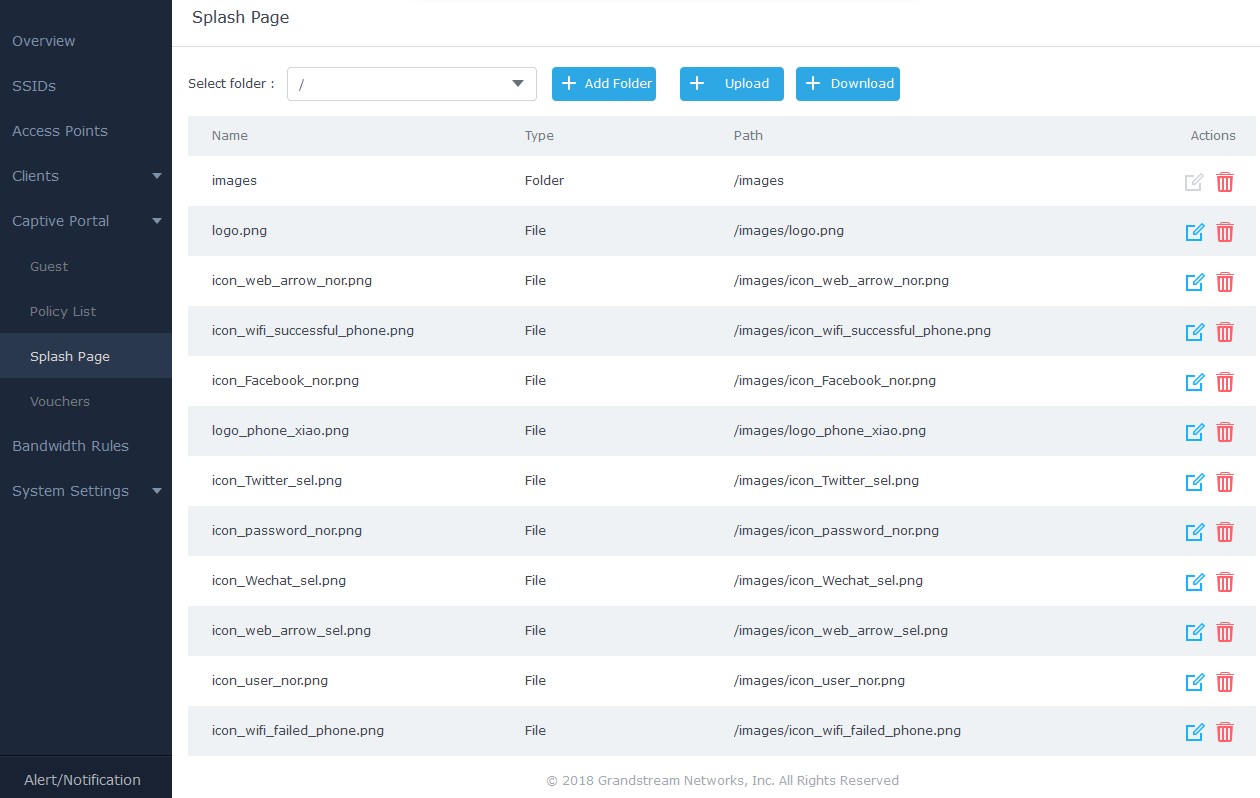
Files Configuration Page
Files configuration page allows to view and upload HTML pages and related files (images…).
The captive portal uses portal_default.html as default portal page. When using RADIUS authentication, users need to select portal_pass.html as the portal page to let the user login via RADIUS.
The following figure shows default files used for Captive Portal in GWN Access point.
Click ![]() to upload a new web page.
to upload a new web page.
Click ![]() to add a new folder.
to add a new folder.
Click ![]() to upload files to the selected folder.
to upload files to the selected folder.
Folder can be selected from the dropdown list![]() .
.
Click on ![]() to download all the files/folders.
to download all the files/folders.
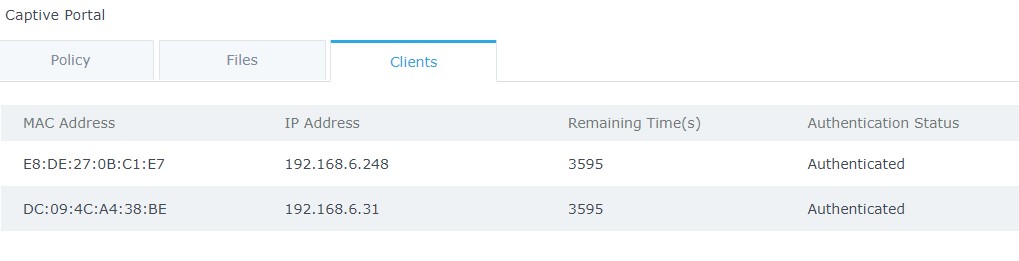
Clients Page
For Information Purposes Clients page lists MAC addresses of authenticated devices using captive portal. As we can see on the below figure, two WiFi clients have been authenticated and granted internet access from the GWN7610 access points:
Client 1 → E8:DE:27:0B:C1:E7
Client 2 → DC:09:4C:A4:38:BE
CONFIGURATION STEPS
In this section, we will provide the steps needed to setup basic captive portal policy supporting RADIUS authentication with FreeRADIUS server.
Installing FreeRADIUS
FreeRADIUS includes a RADIUS server, a BSD licensed client library, a PAM library, and an Apache module. In most cases, the word FreeRADIUS refers to the RADIUS server.
FreeRADIUS is the most widely deployed RADIUS server in the world. It is the basis for multiple commercial offerings. It supplies the AAA needs of many Fortune-500 companies and Tier 1 ISPs.
It is also widely used for Enterprise Wi-Fi and IEEE 802.1X network security, particularly in the academic community, including eduroam.
The following steps summarize simple installation procedure on Linux Debian based machines.
- Run as root the command #apt-get install freeradius in order to install the server along with all its necessary dependencies.
- After this is done you can verify succefull installation by checking the version of the server using the command : $sudo freeradius -v following screenshot shows that we are using version 2.2.8.

- You can run the command sudo $freeradius -CX in order to run a quick config check. The output shoud display Configuration appears to be OK.
- All the configuration files are located at the directory /etc/freeradius. The following screenshot shows the list of the available files.

-
The following files are the most important ones for the configuration:
- radiusd.conf: This is the main configuration files of FreeRADIUS to tune the parameters of the running instance.
- clients.conf: On this file we can add the list of authorized clients (clients means the authenticators and should not be confused with WiFi clients, i.e. clients in FreeRADIUS configuration are your Access Points and Switches that are between the server and end devices).
- eap.conf: On this file we can choose the eap method used for authentication (defaults to eapmd5).
Adding Clients (APs)
Next, we will include the list of authentication clients which are the access points relaying the requests back and forward between WiFi stations and the RADIUS server.
To do so, access to the file clients.conf and add each client as the following format:
client Client_IDENTIFIER { ipaddr = IP_Address_of_AP
secret = Shared_Secret }
Following figure shows that we have added two GWN76XX access points as authenticators for the freeraiuds server.
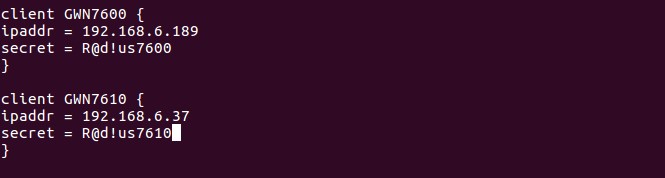
After this, save the file and let’s add some users in the FreeRADIUS database.
Adding WiFi Users
To add users, edit the file named users under the configuration folder /etc/freeradius. At the bottom of the file, create new WiFi users and assgin usernames and passwords as the following examples show:
Syntax:
USERNAME Cleartext-Password := “PASSWORD”

Once this is done, save the file and run the following command to check if the server is operational.
$radtest User1 admin123 127.0.0.1 0 testing123
The results should be something like following:
User-Name = “User1”
User-Password = “admin123”
NAS-IP-Address = 192.168.x.x
NAS-Port = 0
Message-Authenticator = 0x00000000000000000000000000000000
rad_recv: Access-Accept packet from host 127.0.0.1 port 1812, id=156, length=20
Now that the server is configured, you can stop the server using the command $service freeradius stop and run it again on debug mode in order to see the log mesages when requests are handled by the server, to run the server in debug mode run the command #freeradius -X.
Configuring RADIUS Authentication for Captive Portal
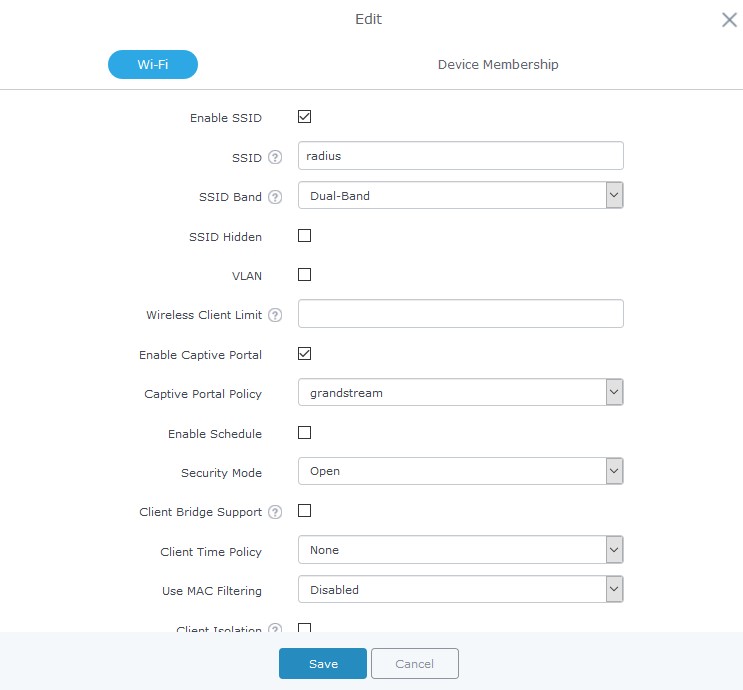
After setting up the RADIUS server and making sure that it is running properly, users could configure captive portal feature under the GWN76XX web GUI menu by following below steps:
- First, access the web GUI menu Captive Portal.
- Under the Policy List tab, click on Add button to create new portal policy.
- Set the name of the policy (in our example we named it RadiusPortal).
- Then on Authentication type choose “RADIUS Server” and set the IP and listening port of the configured server. (FreeRADIUS default listening port for authentication is 1812).
- Enter the RADIUS shared secret which was configured for the Access point under clients.conf file (In this example, we set it to R@d!usPass).
- Select portal_pass as portal page to allow users to under their username and password.
- From here you can leave the rest to default, following screenshot shows the configuration.

- After this save and apply to complete the settings.
Now, the next step is to enable this portal on the SSID.
For this, users should go to the menu SSIDs and edit the desired SSID then go to WiFi settings tab and enable the captive portal Checkbox to select the created policy before saving and applying the new configuration.
At this stage, our GWN76XX access points is ready to receive authentication requests from WiFi clients and hand them over to the RADIUS server.
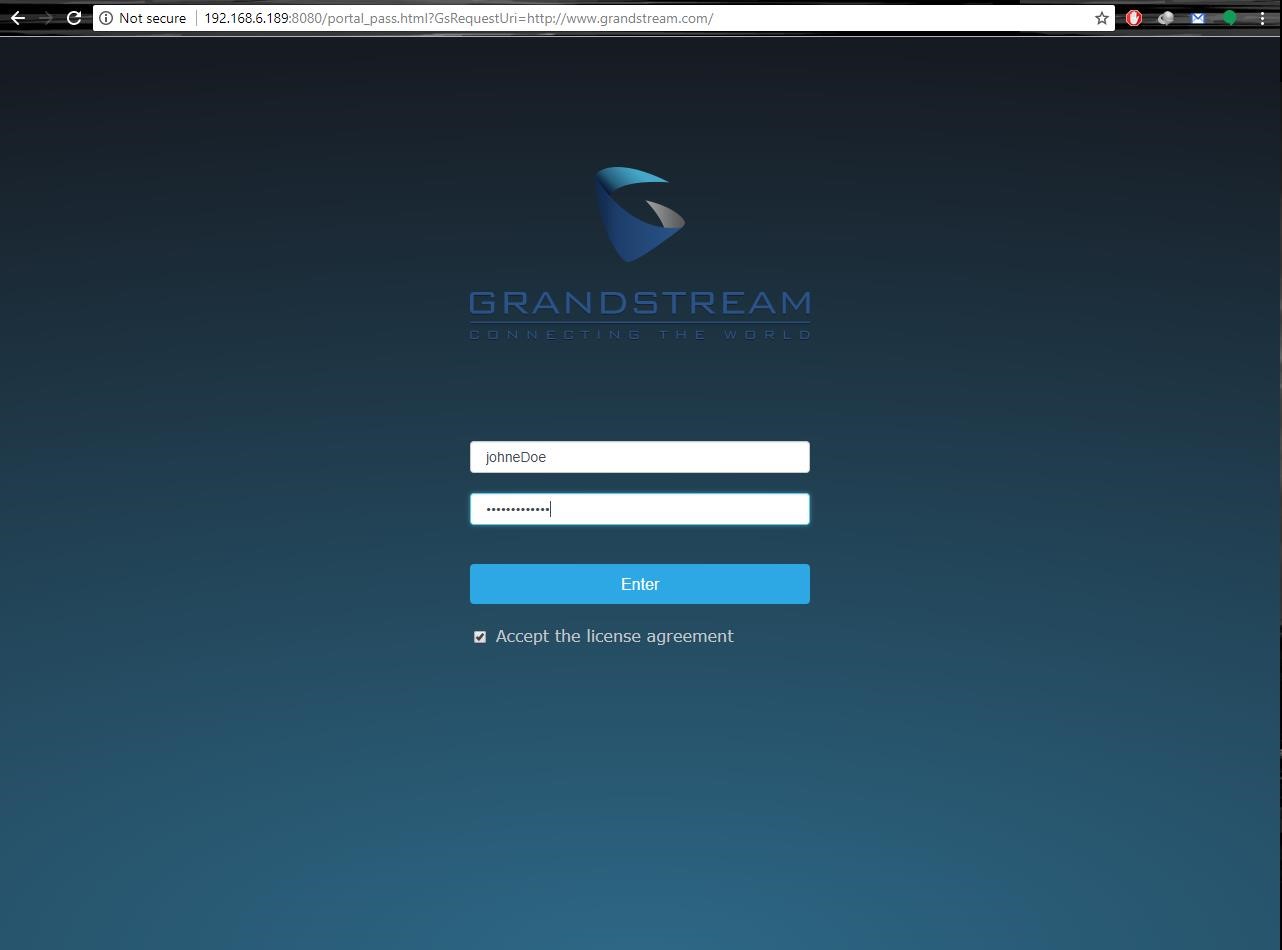
The default portal page is shown to provide his credentials as shown on the following figure:
Authenticated clients will get access to the Internet and be listed on the Clients tab under Captive Portal menu.
After successful authentication, clients will be directed either to the original requested URL or a specific Configured URL depending on the option configured under Captive Portal→Policy→Redirect External Page URL.
SUPPORTED DEVICES
Following table shows Grandstream devices supporting Captive Portal with RADIUS Authentication feature:
Model | Supported | Firmware |
GWN7610 | Yes | 1.0.3.19 or higher |
GWN7630 | Yes | 1.0.9.12 or higher |
GWN7600 | Yes | 1.0.3.19 or higher |
GWN7600LR | Yes | 1.0.3.19 or higher |
GWN7000 | Yes | 1.0.2.75 or higher |