Grandstream UCM6XXX series has the possibility to act as a firmware server allowing to upgrade Grandstream endpoints introduced by the Zero-Config module using different template levels.
Using UCM6XXX as a firmware server allows to manage firmware files for Grandstream endpoints in a single server, the firmware files can be uploaded and stored using UCM internal memory or using a connected SD card/USB flash drive.
This feature is very useful in closed network environments (without Internet access) with many Grandstream devices, and it can help also to reduce bandwidth usage; instead of having each device contacting a remote server to upgrade, this can be managed locally using the UCM6XXX series.
This guide provides steps on how to configure the UCM6XXX as a firmware upgrade server and provision discovered Grandstream devices via Zero Config.
UCM6XXX Setup Overview
The following diagram illustrates a typical scenario using the Grandstream UCM6XXX series (UCM6302 as an example in this guide) and different endpoints:

With route mode set as the network method, The WAN port interface is used for uplink connection and will act as DHCP client while the LAN port interface is used as a router assigning IP addresses to connected devices (default segment is 192.168.2.0/24).
The administrator can change the networking method from Web UI🡪Settings🡪Network Settings🡪Basic Settings to use UCM6XXX as Switch or Dual modes.
Configuring UCM6XXX as Firmware Server
The ability for the UCM6XXX series to act as a firmware server is introduced by the Zero-Config module and it can be used with different templates levels (Global Policy, Global Templates, Model Templates, Device Template).
In the following sections, we will provide steps on how to use each method and users may choose the best method fitting their environments depending on deployed units (models, quantity). Different templates levels can be combined, and the template with the highest priority will override settings in other templates with a lower ones.
Prerequisites
Download Firmware files
We will assume that needed firmware files are previously downloaded from the Grandstream website: https://www.grandstream.com/support/firmware
Update and Download Default Model Templates
Users may need first to update and download Model Templates for their specific Grandstream devices.
To update or download default model templates:
- Access to Value-added Features🡪Zero Config🡪Model Update as shown on the below figure.
-
Click on
 to download or update the corresponding default template for the device’s model.

Configuration via Zero-Config Templates
Using Global Policy
- Access web UI🡪Value-added Features🡪Zero Config🡪Global Policy.
- Under Maintenance section, check “Firmware Source”.
- Select “Local UCM Server” from “Source” dropdown list.

- Select “Directory” where firmware files are uploaded.
- Once firmware file(s) uploaded, press “Save” button to store Global Policy settings.
- Provision endpoints to start upgrade process. Please refer to [PROVISIONING DEVICES].
Notes:
Using Global Template(s)
- In “Options” dropdown list, select “Firmware Source”.
- Select “Local UCM Server” from “Source” dropdown list as shown in [Figure 3: Firmware Source].
- Select “Directory” where firmware files are uploaded.
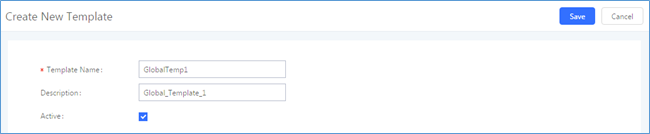
Steps 2 and 3 can be skipped if Global Templates are previously created. Customers can press the Edit button and follow the below instructions.
- Provision endpoints using created Global Template to start upgrade process.
Using Model Template(s)
- Access web UI🡪Value-added Features🡪Zero Config🡪Model Templates.
- Click on “Add” to add a model template.
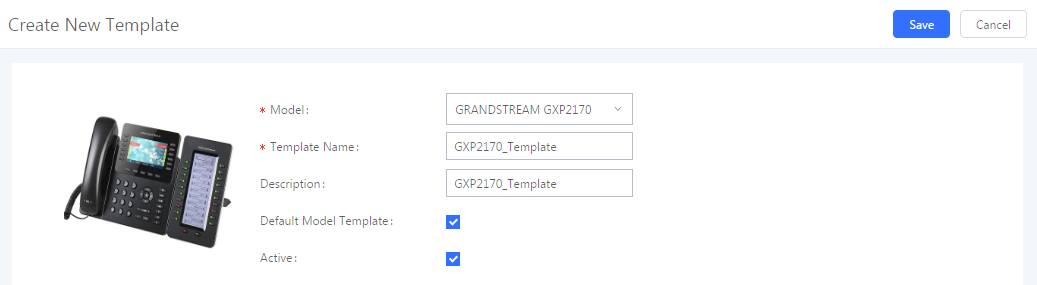
- Choose the Model, enter the Template Name and Description (optional).
- Check Default Model Template if you want to use this template as default for the chosen device’s model.
- Check Active to make this template active and press “Save”.
- In “Options” dropdown list, select “Firmware Source”.
- Select “Local UCM Server” from “Source” dropdown list as shown in [Figure 3: Firmware Source].
- Select “Directory” where firmware files are uploaded.
- Provision endpoints using created Model Template to start upgrade process.
Notes:
Using Device Configuration
- Access web UI🡪Value-added Features🡪Zero Config🡪Zero Config.
-
Locate the device to upgrade and press
 to edit device configuration.
- Access “Advanced” tab as shown in next figure.
- Press “Modify Customize Settings” and go to “Custom Parameters” 🡪 “Maintenance”.
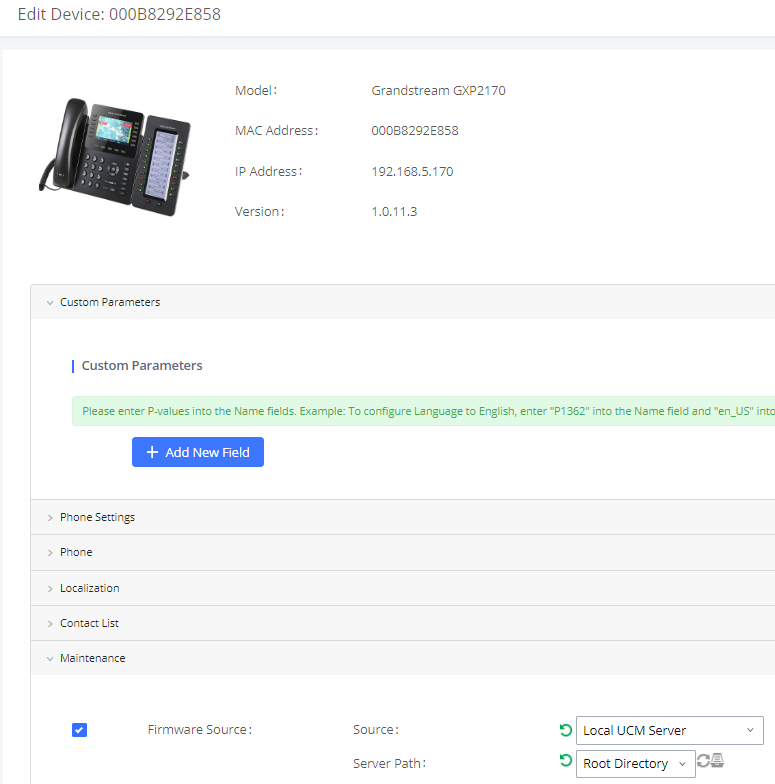
- Check “Firmware Source”, then select “Local UCM Server” from “Source” dropdown list as shown in [Figure 3: Firmware Source].
- Select “Directory” where firmware files are uploaded.
- Press “Save” button and provision the device to start upgrade process.
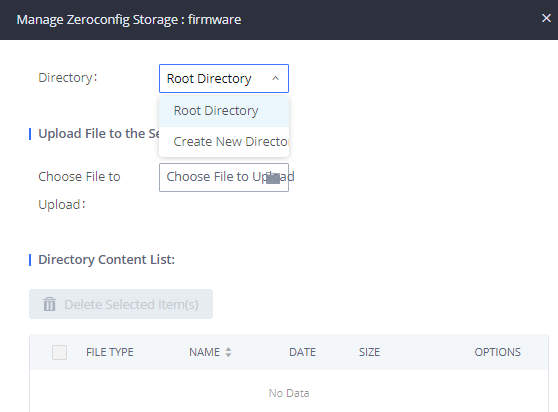
Managing Firmware Storage
During template creation/edition, after selecting “Local UCM Server” in the “Source” list under the “Maintenance -> Upgrade and Provision” section, press ![]() button next to the “Directory” option to manage UCM6XXX local storage for firmware files.
button next to the “Directory” option to manage UCM6XXX local storage for firmware files.
Root Directory
Users may upload firmware files to Root Directory or create another personalized directory when using UCM6XXX local storage.
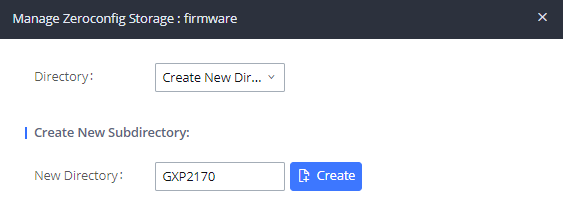
Create New Directory
For better management, it’s recommended to create a directory for each model/firmware. For instance, create a directory named “GXP2170” where to upload firmware version 1.0.11.3 for GXP2170.
- Select “Create New Directory” from “Directory” list.
- Enter a name in “New Directory” field and press “Create” button.
Upload Firmware Files
- Select “Root Directory” or create new directory as “Directory”.
-
Click on
 to browse for the firmware files and select them.
-
Click on
 to upload the selected firmware file to the directory.

Users can click
![]() to delete a previously uploaded firmware file or directory.
to delete a previously uploaded firmware file or directory.
Local USB / SD Card Media
Users can connect a USB flash drive to the USB port of UCM6XXX or SD card to its corresponding port and use them as external firmware file storage.
In this case, firmware files need to be stored in the “ZC_firmware” directory under root of the USB or SD card.
Provisioning Devices
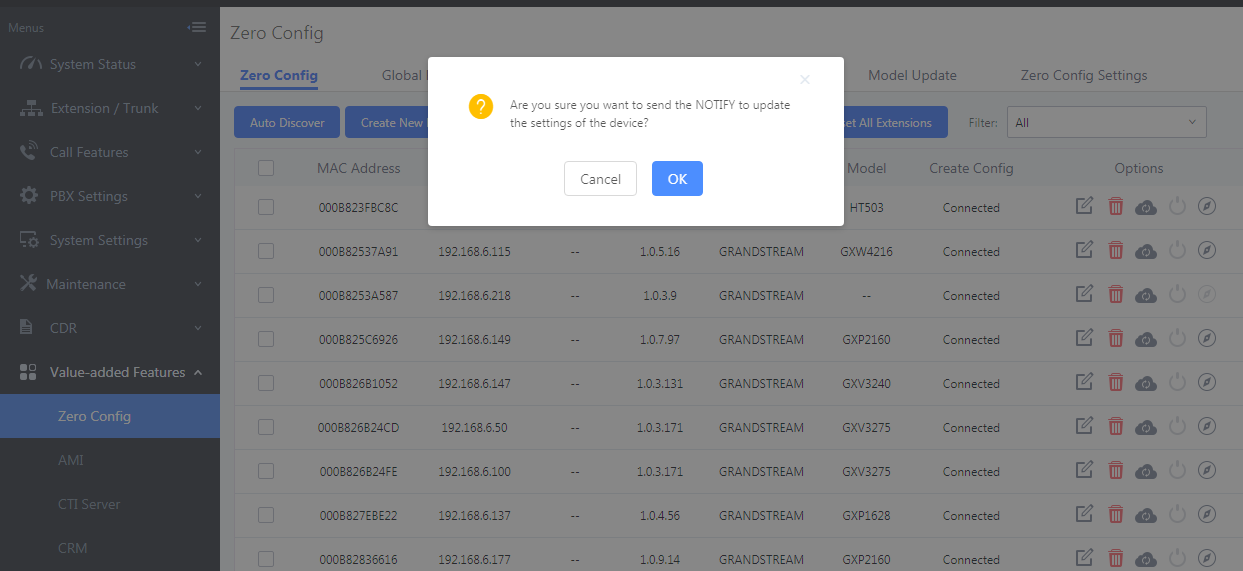
- Access web UI🡪Value-added Features🡪Zero Config🡪Zero Config.
-
Locate the device to provision and press
 to send a notify to the device.
The device will then reboot to apply the config, and use the UCM6XXX as a firmware upgrade server.
Note: If the “Default Model Template” option is enabled as shown in [Figure 5], default template settings will be applied to all discovered new devices matching the template model. Otherwise users will have to click on ![]() to edit the device configuration, and assign the template(s) to use for the device.
to edit the device configuration, and assign the template(s) to use for the device.