


This guide provides an overview of the available CA certificate types and explains how they are used for authentication when configuring secure network connections on the WP816/WP826/WP836 Wi-Fi Phone series. It outlines the different certificate source options and helps users select the appropriate method based on their deployment requirements.
802.1x Authentication
The WP8x6 Wi-Fi Phone series supports various Wi-Fi security modes, including open networks, WEP, WPA/WPA2-PSK, WPA3-SAE, and enterprise authentication methods such as WPA-802.1x, WPA3-802.1x, and WPA3-192.
This guide specifically focuses on enterprise-grade security modes. These modes implement 802.1x authentication via a RADIUS server and EAP methods, and typically rely on a CA certificate to validate network connections.
Authentication Roles
Enterprise-grade 802.1x authentication operates through three distinct roles:
- Supplicant (Client): The device requesting network access and providing credentials.
- Authenticator: The network device that controls access and relays authentication messages. A wireless router or access point that supports 802.1x security methods.
- Authentication server: The system that verifies credentials and decides whether to allow or deny access. A RADIUS server that stores authentication credentials and verifies them via a CA certificate.
In this guide, these roles are represented as follows:
- Supplicant → WP836 Wi-Fi phone.
- Authenticator → GWN76xx
- Authentication server → FreeRADIUS
Communication between the roles is handled by EAP (Extensible Authentication Protocol), which defines how authentication messages are exchanged.
EAP Authentication Flow
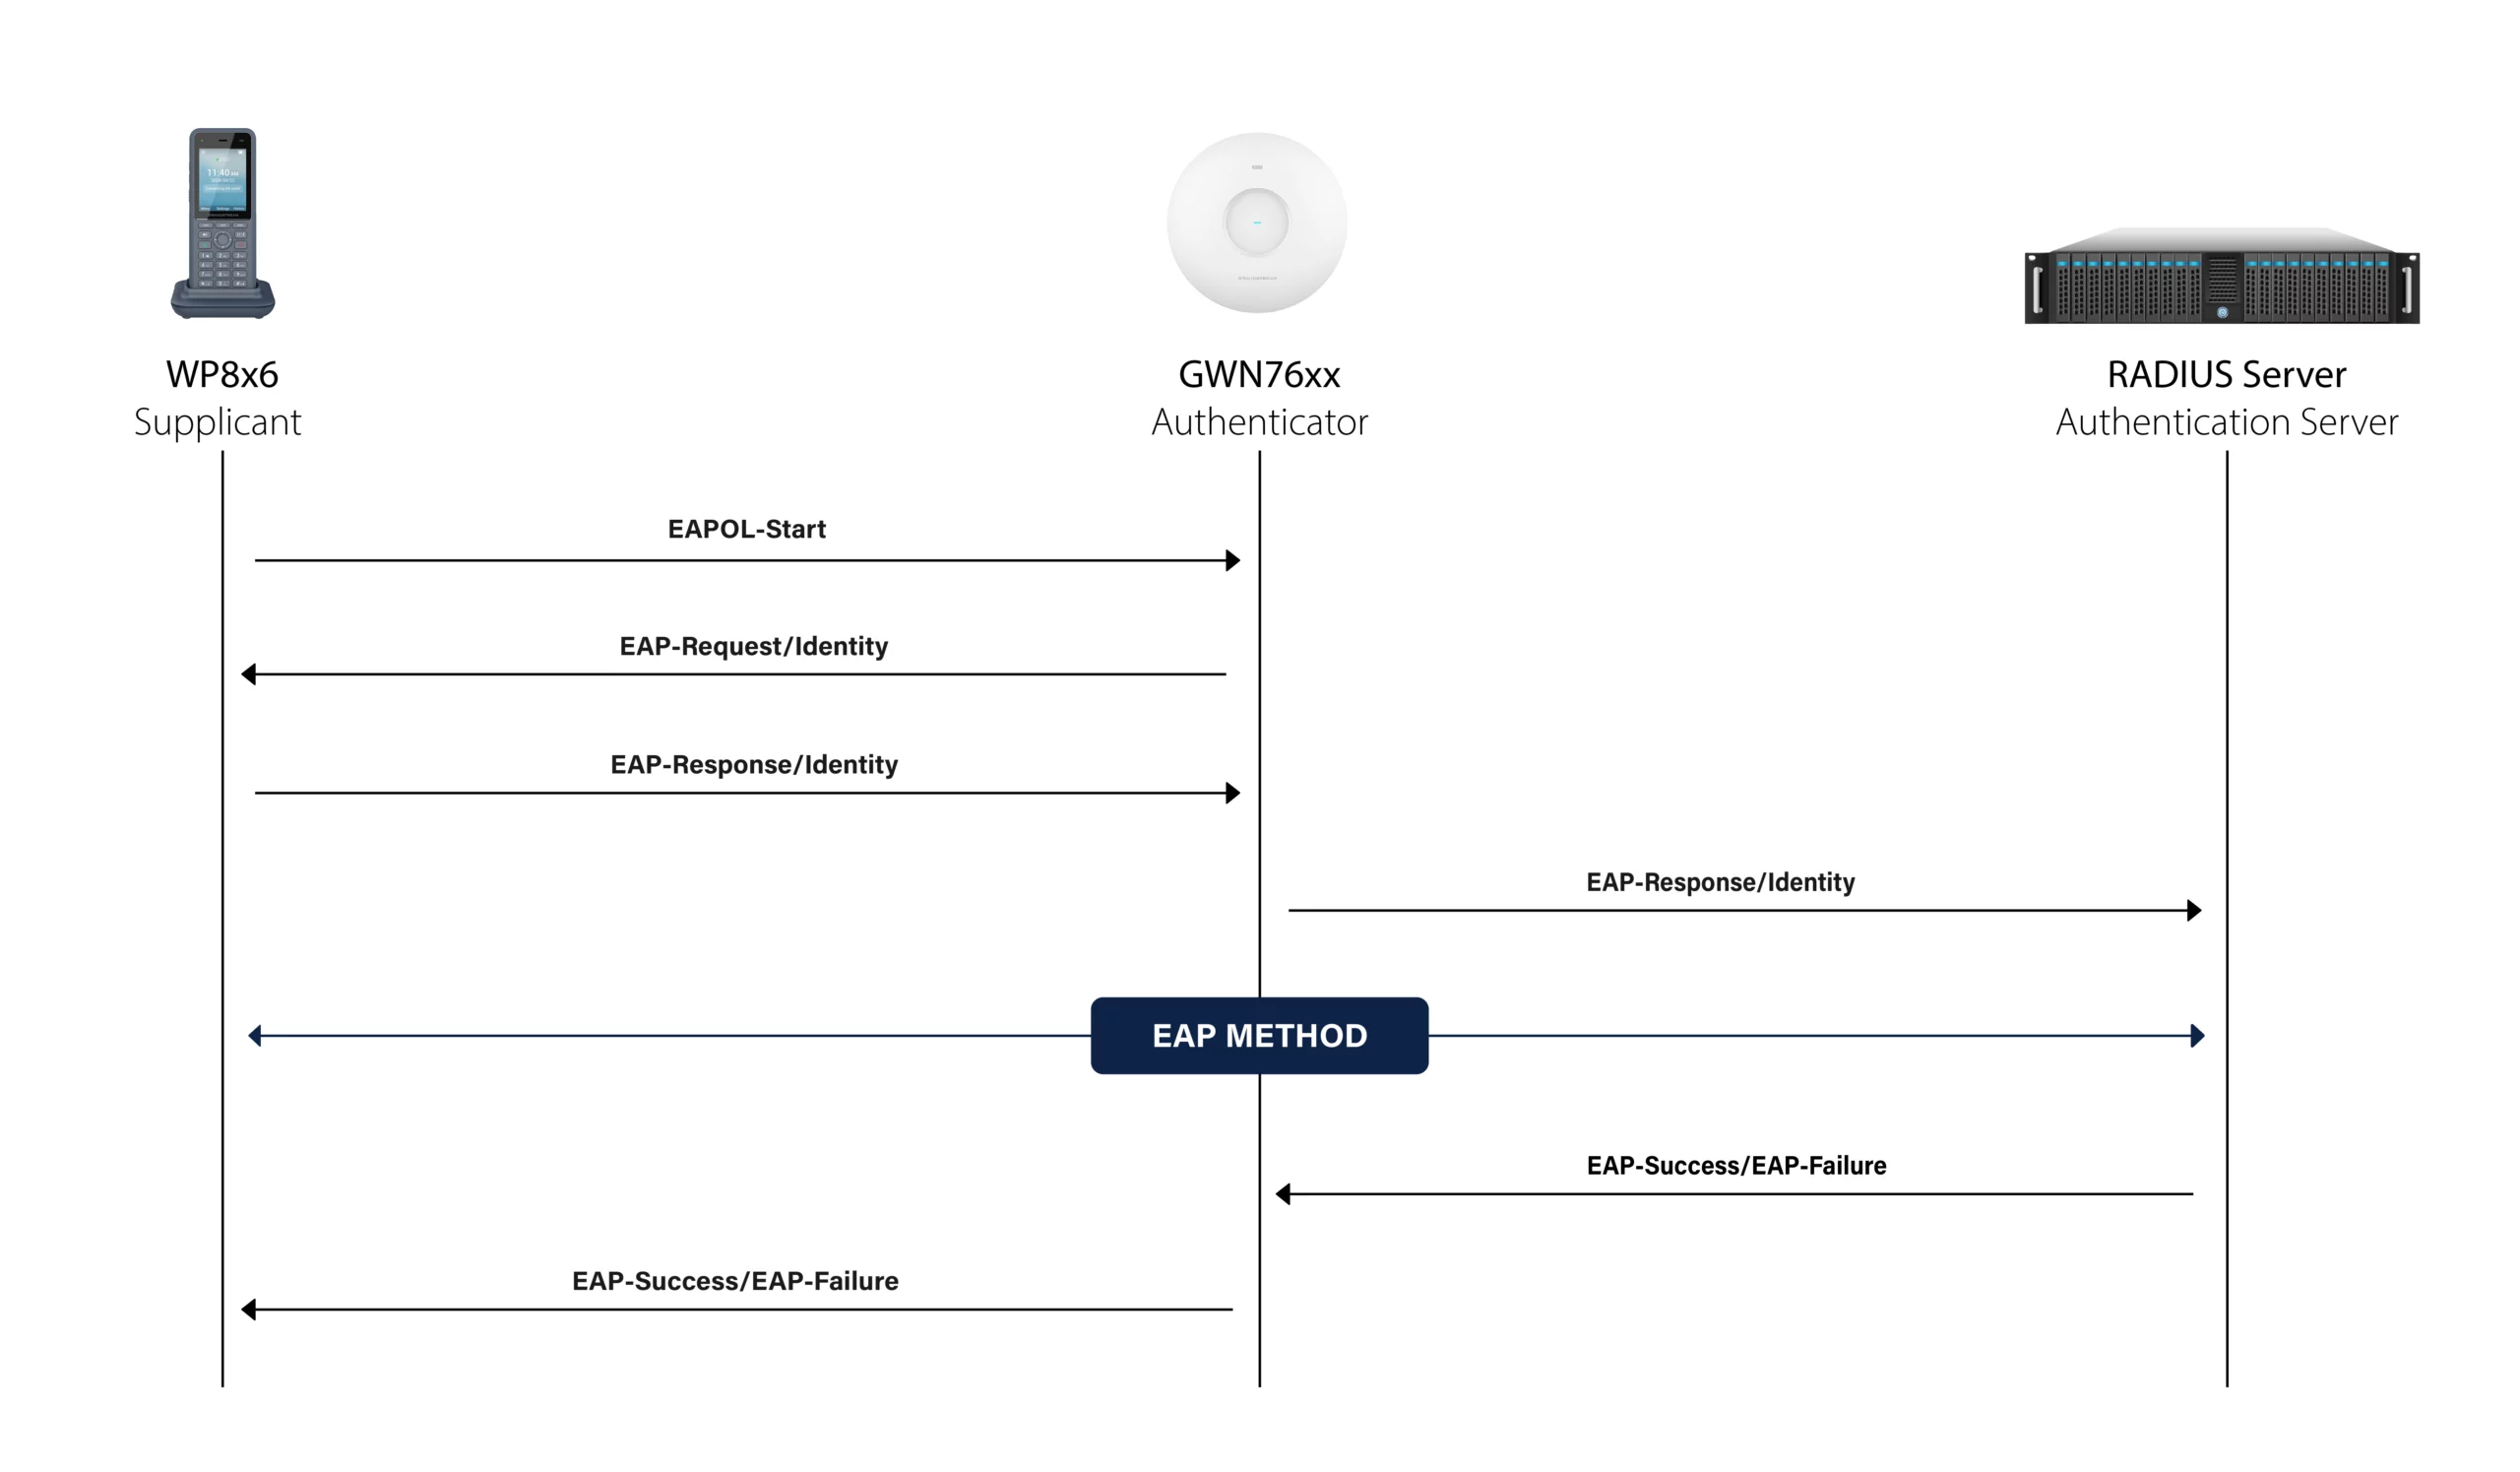
The EAP authentication flow consists of a sequence of message exchanges between the supplicant, authenticator, and authentication server:
- The supplicant sends an EAPOL-Start message to initiate authentication.
- The authenticator replies with an EAP-Request/Identity.
- The supplicant responds with EAP-Response/Identity, forwarded to the authentication server.
- The server performs the chosen EAP method through exchanges relayed by the authenticator.
- The server sends an Access-Accept or Access-Reject.
- The authenticator relays this as EAP-Success or EAP-Failure to the supplicant.
- If successful, the port is authorized, and normal traffic is allowed.
The following table provides an overview of the 802.1X EAP methods supported on the WP8x6, along with the corresponding supplicant (client) authentication mechanisms and authentication server validation through certificates issued by a trusted Certification Authority (CA). Inner authentication methods, used within tunneled EAP types such as PEAP and TTLS, provide an additional layer of security by securely transmitting user credentials within an encrypted TLS tunnel:
EAP Method | Client Authentication Method | Server Authentication Method |
EAP-TLS | Client Certificate | Server Certificate (CA-trusted) |
EAP-PEAP (Inner Methods) | ||
MSCHAPv2 | Username/Password | Server Certificate (CA-trusted) |
GTC | Token / One-Time Password | |
TLS | Client Certificate | |
EAP-TTLS (Inner Methods) | ||
MSCHAPv2 | Username/Password | Server Certificate (CA-trusted) |
MSCHAP | Username/Password (Legacy) | |
PAP | Username/Password (Plaintext) | |
GTC | Token / One-Time Password | |
802.1X EAP Authentication Methods
The WP8x6 supports multiple CA certificate source types to validate the authentication server during the 802.1X EAP authentication process:
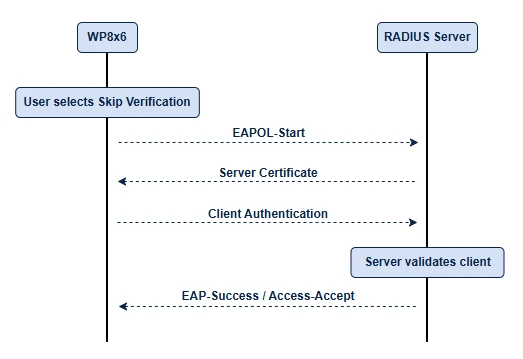
- Skip Verification: The device does not validate the server certificate, which simplifies setup but reduces security.
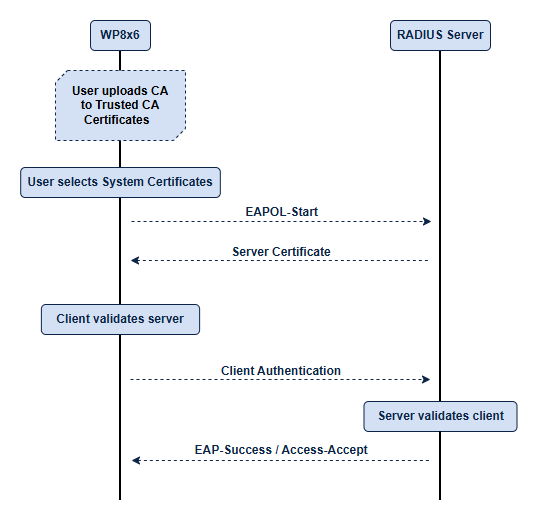
- System Certificates: Uses preloaded trusted CA certificates available on the device under System Settings → Security Settings → Trusted CA Certificates to verify the authentication server’s identity.
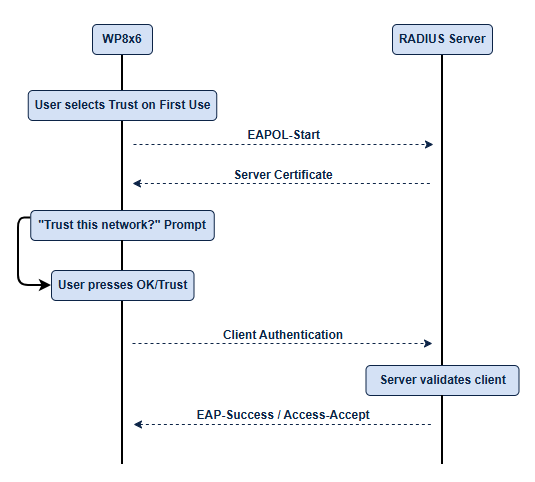
- Trust on First Use: Allows the user to accept and store the authentication server certificate during the initial connection, trusting it for subsequent authentications.
- Uploaded Certificates: Allows the user to manually upload CA certificates during configuration.
The following diagrams illustrate simplified authentication flows for each CA Certificate Type:
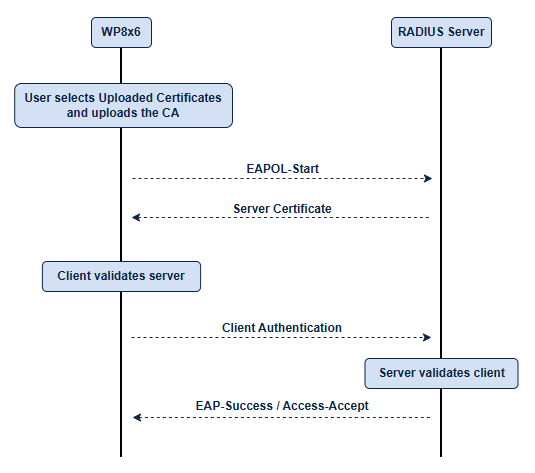
Prerequisites
Having established the 802.1x framework, authentication roles, and the EAP authentication flow and methods, the next step is to configure secure Wi-Fi connections. The following sections outline how to configure Wi-Fi on the device using either the Web UI or the handset interface.
Setting Up the RADIUS Server
Before configuring the WP8x6 Wi-Fi phone, a RADIUS server must be set up. For this guide, the following steps demonstrate the configuration used with a FreeRADIUS server:
- Install a Virtual Machine using Oracle VM VirtualBox and configure its network adapter to use Bridged Mode so that the VM is on the same network as your devices and the RADIUS server is accessible by them.
- Install a Linux operating system. In this guide, Ubuntu Desktop serves as the environment.
- Install FreeRADIUS on Ubuntu by following the installation instructions on the official website.
- Once the server is installed:
Install the necessary tools:
sudo apt update
sudo apt install freeradius freeradius-utils openssl -y
Enable and start the RADIUS server:
sudo systemctl enable freeradius
sudo systemctl start freeradius
The RADIUS server’s IP address is required later when configuring the access point and the WP8x6 device. You can find it by looking for the inet field of the server’s network interface using the following command:
ip aFor this guide, the RADIUS server’s IP is 192.168.6.47, and the authentication port is 1812 by default.
Ensure that UDP port 1812 is open on the VM if a firewall is enabled by running the command below:
sudo ufw allow 1812/udp
Configuring the Access Point
Establish the RADIUS server connection with the access point to ensure network connectivity between the device and the authentication server
Access the clients.conf:
sudo nano /etc/freeradius/clients.confThen, add the access point as a client:
- ipaddr: The IP address of the access point acting as the RADIUS client.
- secret: The shared secret configured on both the RADIUS server and the access point, used to secure and authenticate RADIUS communication.
client router {
    ipaddr = 192.168.6.45
    secret = [insert secret]
}
Access the access point’s Web UI by entering its IP address in a browser and logging in using the admin credentials:
- Navigate to Access Points, press
 .
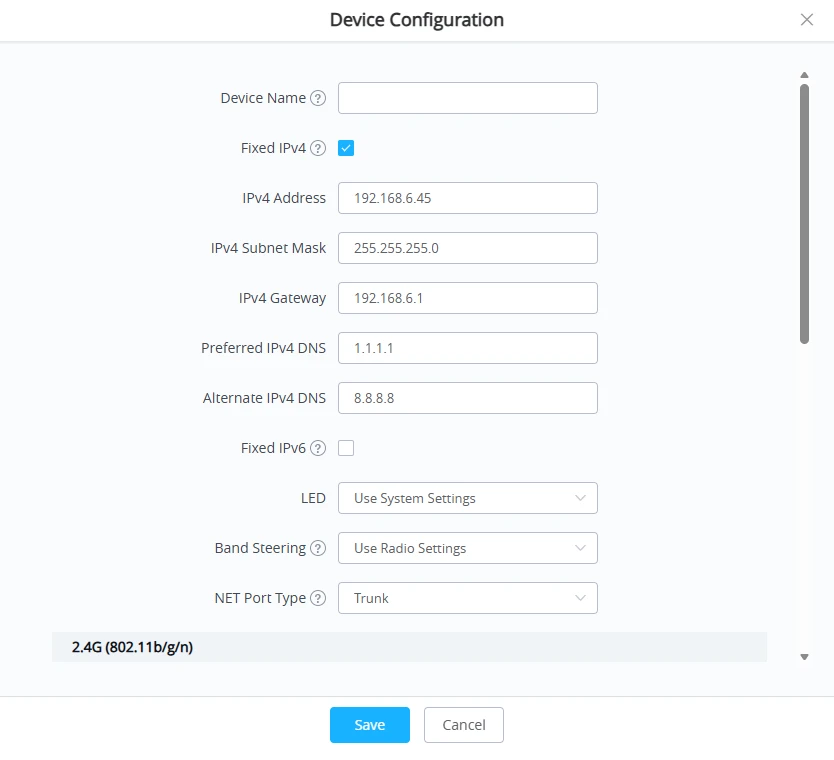
. - Check Fixed IPv4 and configure the device as shown in the image below.
- Press Save.
 .
.
- Navigate to SSIDs and press
 .
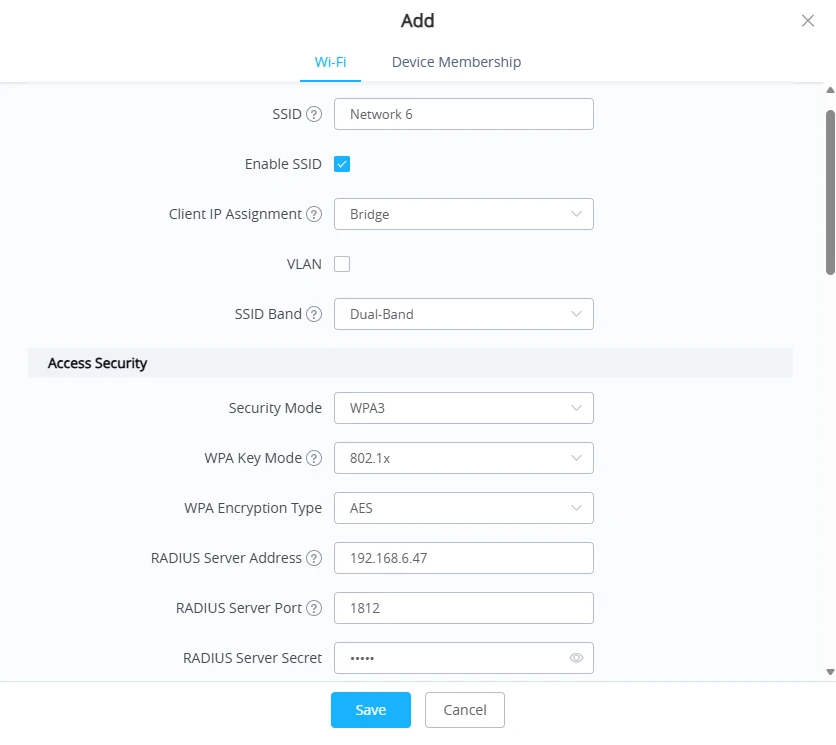
. - Enable the SSID and configure its Basic Settings.
- Under Access Security:
- Security Mode: Set to WPA or WPA3 as required.
- WPA Key Mode: Select 802.1x.
- RADIUS Server Address: Enter the RADIUS server’s IP address.
- RADIUS Server Port: Enter the authentication port (1812 by default).
- RADIUS Server Secret: Enter the shared secret previously defined in the
clients.conffile on the RADIUS server.
- Press Save.
 .
.
Generating the Certificates and EAP File Configuration
Generate the certificates required for secure Wi-Fi authentication, including the root CA certificate, the server certificate for the RADIUS server, and client certificates for the WP8x6 device.
- CA Certificate: A
.pemfile containing the public key of the CA in Base64 text format. - Server Certificate: A
.crtfile paired with a private key.keyfile. - Client Certificate: Exported as a
.p12file, bundling the client’s certificate and private key into a single file for easy import on devices.
Before proceeding to the generation, navigate to the certificates directory:
cd /etc/freeradius/certsGenerating the CA Certificate
The root Certificate Authority (CA) serves as the trusted entity for signing server and client certificates, establishing the chain of trust by verifying the authenticity of all certificates it signs. Create the CA by entering the following commands:
openssl genrsa -out ca.key 4096
openssl req -x509 -new -nodes -key ca.key -sha256 -days 3650 -out ca.pem -subj "/CN=CA"
Generating the Server Certificate
The server certificate is sent during the TLS handshake to identify the RADIUS server to clients. To create it, enter the following commands:
openssl genrsa -out server.key 2048
openssl req -new -key server.key -out server.csr -subj "/CN=RadiusServer"
Once created, sign with the root CA:
openssl x509 -req -in server.csr -CA ca.pem -CAkey ca.key -CAcreateserial -out server.crt -days 365 -sha256Generating the Client certificate
If the EAP Method is set to EAP-TLS or EAP-PEAP with Phase 2 Authentication set to TLS, create a client certificate for the WP8x6 phone by entering the following commands:
openssl genrsa -out wp836.key 2048
openssl req -new -key wp836.key -out wp836.csr -subj "/CN=WP836"
Once created, sign with the root CA:
openssl x509 -req -in wp836.csr -CA ca.pem -CAkey ca.key -CAcreateserial -out wp836.crt -days 365 -sha256After signing the client certificate, export it as a .p12 file and provide a PKCS#12 export password when prompted. This password will be used as the Client Certificate Password on the Web UI:
openssl pkcs12 -export -out wp836.p12 -inkey wp836.key -in wp836.crt -certfile ca.pemEAP TLS Parameters Configuration
With the certificates created and properly stored, the RADIUS server is now ready to handle secure authentication. The next step is to configure EAP, which uses these certificates to establish a trusted, encrypted communication channel between the WP8x6 device, the access point, and the FreeRADIUS server.
Access the eap file:
sudo nano /etc/freeradius/mods-available/eapThe tls-config tls-common section sets the TLS parameters for FreeRADIUS to establish a secure connection with clients. During the TLS handshake, the server presents its certificate and uses its private key to prove its identity, which the client verifies against the trusted CA. This TLS layer is used by all TLS-based EAP methods to create the encrypted tunnel for authentication.
tls-config tls-common {
    private_key_password = [insert password]
    private_key_file = /etc/freeradius/certs/server.key
    certificate_file = /etc/freeradius/certs/server.crt
    ca_file = /etc/freeradius/certs/ca.pem
}WP816/WP826/WP836 Configuration
After generating the certificates and configuring EAP on the RADIUS server, the next step is to configure the WP8x6 device via the Web UI. This section covers both the server-side EAP settings and the device-side Web UI configuration, ensuring the client can authenticate securely with the RADIUS server for any supported EAP method.
- Connect the device to an available and accessible Wi-Fi network.
- Long-press the Up navigation key to view the device’s IP address.
- On a computer, open a browser, enter the WP8x6 IP address, and log in with the administrator credentials.
- Navigate to Network Settings → Wi-Fi Settings → General Settings.
- Enable Wi-Fi by checking Wi-Fi Function, select the Wi-Fi Band, and set the Country Code.
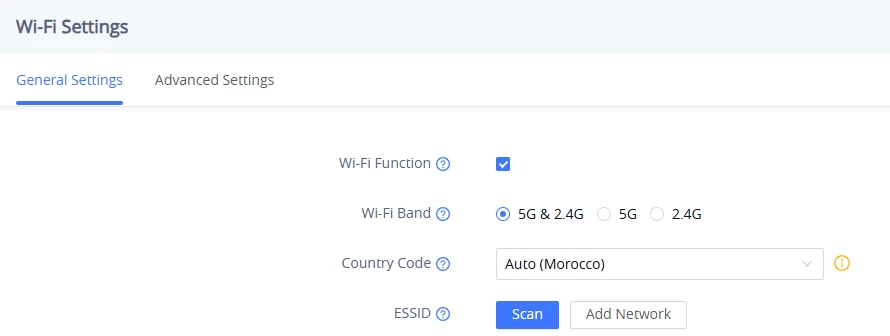
- Press Scan to find the ESSID and select Connect, or press Add Network and fill in the following fields:
- Enter the ESSID configured on the AP.
- Select the Security Mode configured on the AP. The relevant options for this guide are WPA-802.1x, WPA3-802.1x, and WPA3-192, which will display the EAP Method option.
- Set the Network Priority.
- Select the Preferred Account.
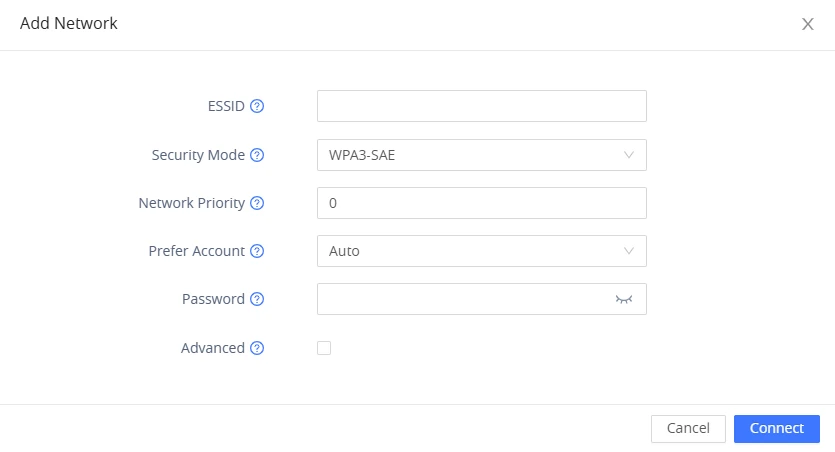
When choosing an EAP Method of EAP-TLS, EAP-PEAP, or EAP-TTLS, the CA Certificate Type will be required. The configuration varies depending on the selected method and certificate type. Below are the steps for both the server and web UI configurations.
EAP-TLS
When the EAP Method is set to EAP-TLS, the server must be configured to handle TLS authentication and validate client certificates.
TLS Server Configuration
On the RADIUS server, access the eap file and make the necessary changes to the eap and tls sections as shown below:
sudo nano /etc/freeradius/mods-available/eapeap {
default_eap_type = tls
}
tls {
tls = tls-common
}EAP-TLS Web UI Configuration per CA Certificate Type
On the Web UI, configure the EAP-TLS settings for the selected CA Certificate type. The steps below guide you through each CA Certificate option to ensure proper authentication.
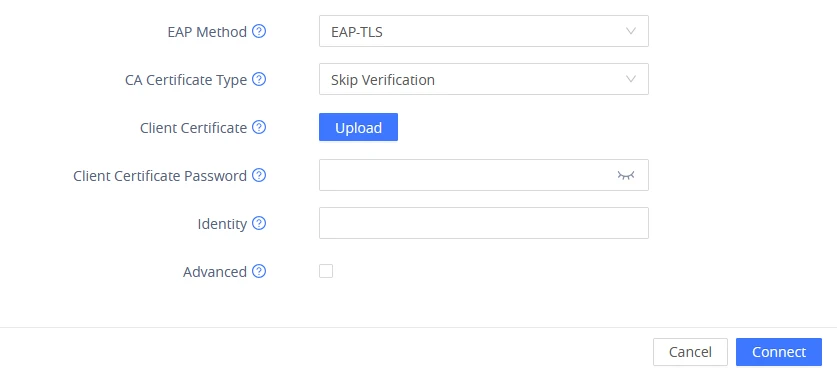
Selecting Skip Verification disables CA certificate validation of the server certificate. To proceed with configuration:
- Client Certificate: Upload the client certificate previously generated in PKCS#12 format
.p12. - Client Certificate Password: Enter the password set when exporting the client certificate.
- Identity: Enter an identity for the device. Although this field is required, authentication is performed using the client certificate.
- Press Connect.
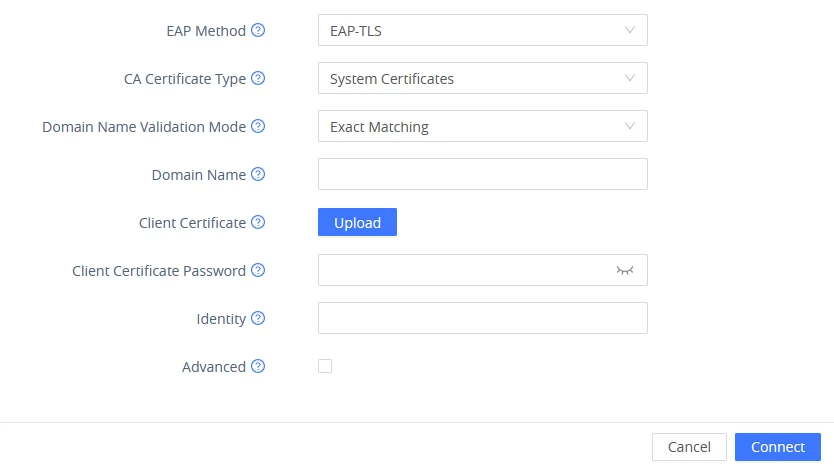
When selecting System Certificates, the validation is performed using the device’s system certificates. The CA certificate needs to be uploaded on the Web UI under System Settings → Security Settings → Trusted CA Certificates → Upload. To complete the configuration:
- Domain Name Validation Mode: Select the validation mode; both Suffix Match and Exact Match are supported.
- Domain Name: Enter the domain name or IP address of the RADIUS server.
- Configure Client Certificate, Client Certificate Password, and Identity as previously demonstrated.
- Press Connect.
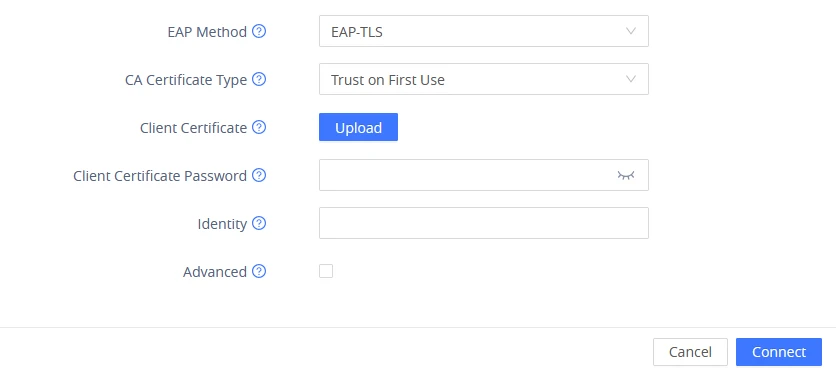
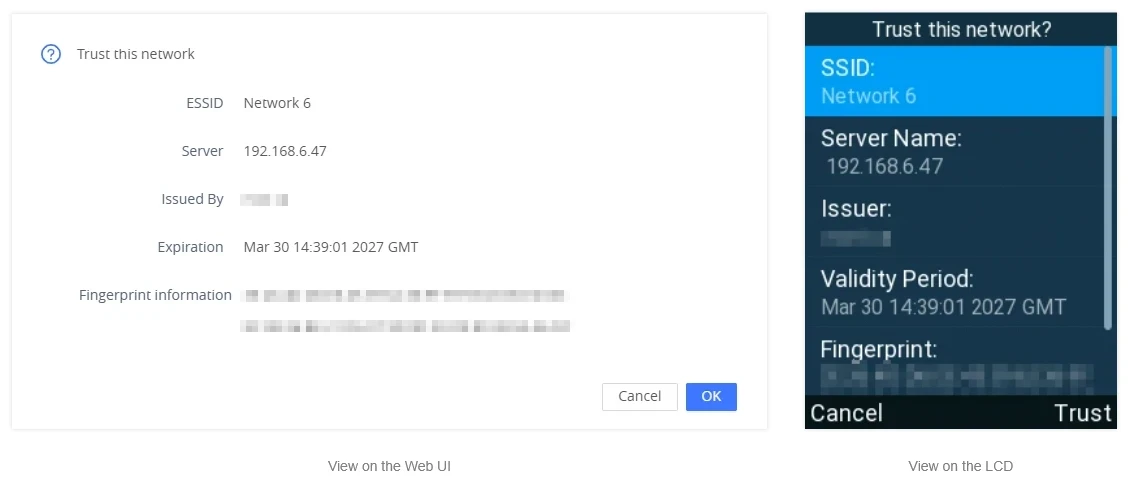
When Trust on First Use is selected, a confirmation prompt appears on the device and Web UI during the first connection attempt. Once confirmed, the server certificate is trusted for all future connections. It can be configured using the following steps:
- Configure Client Certificate, Client Certificate Password, and Identity as previously demonstrated.
- Press Connect.
- Press Trust/Ok to confirm connection.
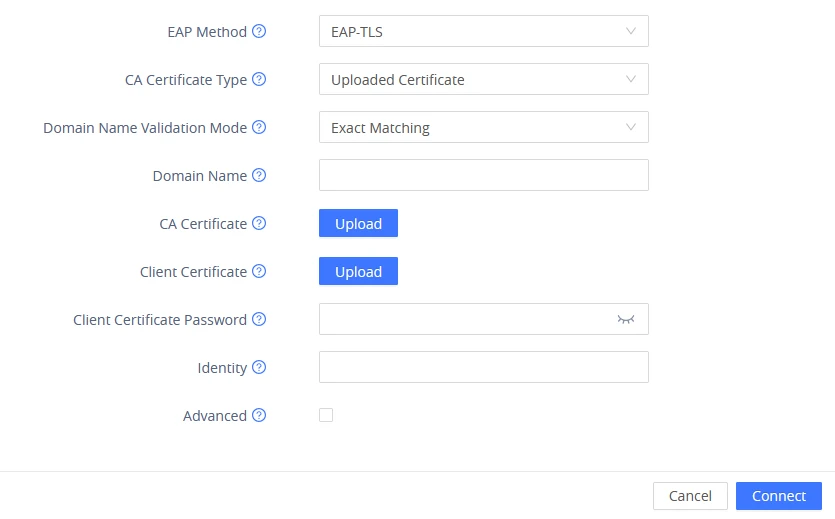
If the Uploaded Certificate is selected, configure this option by following the steps below:
- Configure Domain Name Validation Mode, Domain Name, Client Certificate, Client Certificate Password, and Identity as previously demonstrated.
- Upload the generated CA Certificate.
- Press Connect.
EAP-PEAP and EAP-TTLS
When the EAP Method is set to EAP-PEAP or EAP-TTLS, the server must be configured to handle PEAP and TTLS authentication and validate user credentials using the chosen inner authentication method. Since the Web UI configuration for both methods is largely similar, the examples for each are provided below:
- MSCHAPv2 is used as the inner method for EAP-PEAP
- PAP is used as the inner method for EAP-TTLS
PEAP and TTLS Server Configuration
On the RADIUS server, access the eap file and make the necessary changes:
sudo nano /etc/freeradius/mods-available/eapIf configuring PEAP, set the eap and peap as shown below:
eap {
    default_eap_type = peap
}
peap {
    tls = tls-common
    default_eap_type = mschapv2
    copy_request_to_tunnel = yes
    use_tunnel_reply = yes
    virtual_server = "inner-tunnel"
}
If configuring TTLS, set the eap and ttls as shown below:
eap {
    default_eap_type = ttls
}
ttls {
    tls = tls-common
    default_eap_type = pap
    copy_request_to_tunnel = yes
    use_tunnel_reply = yes
    virtual_server = "inner-tunnel"
}
Ensure that the inner-tunnel virtual server is enabled to handle the inner authentication requests for the chosen method:
sudo nano /etc/freeradius/sites-available/inner-tunnelFor PEAP:
authorize {
    mschap
}
authenticate {
    Auth-Type MS-CHAP {
        mschap
    }
}
For TTLS:
authorize {
    pap
}
authenticate {
    Auth-Type PAP {
        pap
    }
}
Create a user entry with the username and password to allow authentication, which will be used during login on the Web UI:
sudo nano /etc/freeradius/mods-config/files/authorize[insert username] Cleartext-Password := "[insert user password]"EAP-PEAP and EAP-TTLS Web UI Configuration per CA Certificate Type
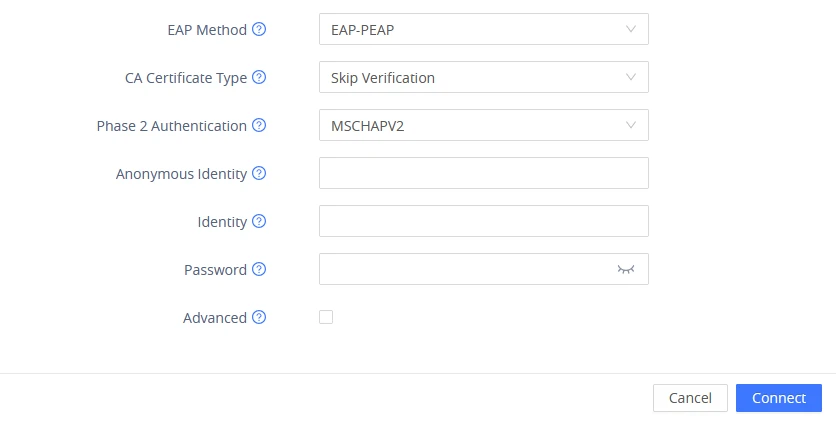
Selecting Skip Verification disables CA certificate validation of the server certificate. To proceed with configuration:
- Phase 2 Authentication: Select the inner authentication method configured on the RADIUS server. Available options include:
For EAP-PEAP:
MSCHAPv2: Username and password-based authentication.
GTC: Generic Token Card authentication, typically used for one-time passwords or token-based systems.
TLS: Client certificate-based authentication.
None: No inner authentication method is used.
For EAP-TTLS:
MSCHAPv2: Username and password-based authentication.
MSCHAP: Older version of MSCHAPv2, less secure.
PAP: Unencrypted username and password authentication.
GTC: Generic Token Card authentication, typically used for one-time passwords or token-based systems.
None: No inner authentication method is used.
- Anonymous Identity: Optional generic identity used to protect the user’s real identity during the initial phase of authentication.
- Identity: Enter the username configured on the RADIUS server.
- Password: Enter the user password configured on the RADIUS server.
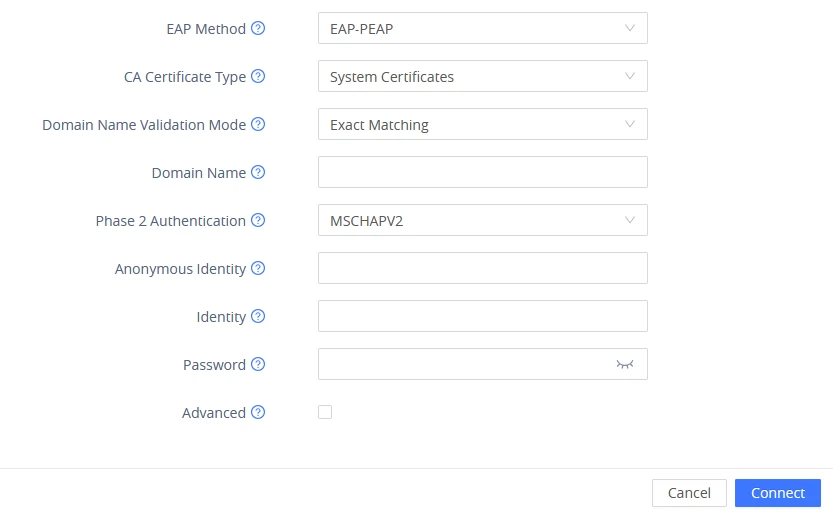
When selecting System Certificates, the validation is performed using the device’s system certificates. The CA certificate needs to be uploaded on the Web UI under System Settings → Security Settings → Trusted CA Certificates → Upload. To complete the configuration:
- Domain Name Validation Mode: Select the validation mode; both Suffix Match and Exact Match are supported.
- Domain Name: Enter the domain name or IP address of the RADIUS server.
- Configure Phase 2 Authentication, Anonymous Identity, Identity, and Password as previously demonstrated.
- Press Connect.
When Trust on First Use is selected, a confirmation prompt appears on the device and Web UI during the first connection attempt. Once confirmed, the server certificate is trusted for all future connections. It can be configured using the following steps:
- Configure Phase 2 Authentication, Anonymous Identity, Identity, and Password as previously demonstrated.
- Press Connect.
- Press Trust/Ok to confirm connection.
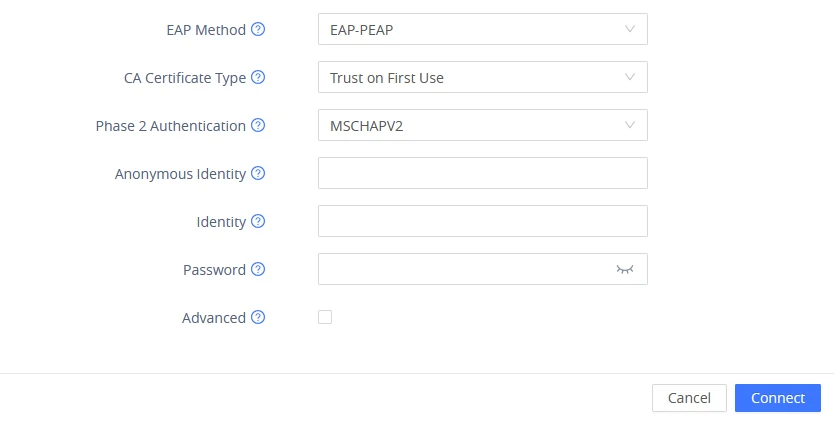
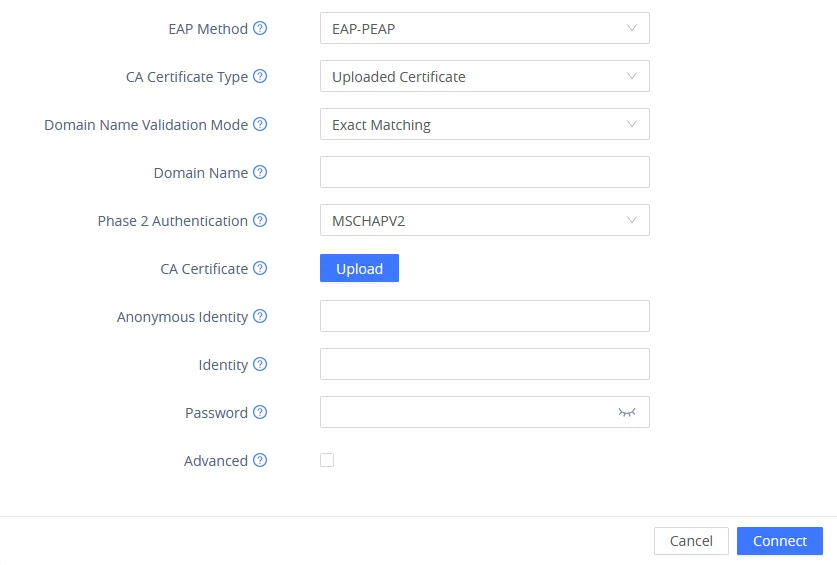
If Uploaded Certificate is selected, configure this option by following the steps below:
- Configure Phase 2 Authentication, Anonymous Identity, Identity, and Password as previously demonstrated.
- Upload the generated CA Certificate.
- Press Connect.
Supported Devices
Supported Devices | Firmware Version |
WP816 | 1.0.3.20+ |
WP826 | |
WP836 |