


This guide provides an overview of the Simple Certificate Enrollment Protocol (SCEP) feature and explains how it enables automatic enrollment and management of client certificates on the WP816/WP826/WP836 Wi-Fi Phone and the GRP260x IP Phone series. Devices can receive preconfigured SCEP parameters via provisioning, simplifying large-scale deployment and enabling automatic certificate renewal. This feature also leverages hardware-based security, including anti-counterfeiting, anti-impersonation, and device binding. The guide walks administrators through the workflow, prerequisites, and configuration steps required for seamless, certificate-based Wi-Fi 802.1x authentication.
SCEP Registration Layer
Simple Certificate Enrollment Protocol
The Simple Certificate Enrollment Protocol (SCEP) is a standardized protocol that enables automated issuance, renewal, and management of digital certificates for network devices. On the supported phone models, SCEP simplifies certificate deployment for large-scale environments, reducing administrative overhead while ensuring strong security through hardware-backed protection.
Benefits of Automating Certificate Management with SCEP:
- Automated Enrollment: Devices can request and obtain client certificates automatically using preconfigured SCEP parameters, eliminating manual intervention.
- Certificate Renewal: SCEP supports automatic renewal of certificates before expiration, ensuring uninterrupted 802.1x authentication.
- Hardware Security Integration: Certificates issued via SCEP leverage device-specific hardware protection features to prevent counterfeiting, impersonation, and unauthorized use.
- Scalable Management: Supports centralized deployment for large fleets of devices, making it ideal for enterprise networks.
By leveraging these benefits, SCEP provides a reliable and scalable mechanism for secure certificate management, laying the foundation for seamless 802.1x authentication.
802.1x Authentication Flow with SCEP
802.1x is a network access control standard that provides secure authentication for devices connecting to wired or wireless networks. It ensures that only authorized clients can access the network by using certificate-based or password-based credentials, protecting enterprise network environments from unauthorized access.
For more details about 802.1X Authentication, please refer to this guide: 802.1X Authentication Guide
In a certificate-based 802.1x deployment, the phones rely on SCEP to obtain client certificates automatically. SCEP acts as the registration layer, bridging the device with the Certificate Authority in the issuing layer, allowing devices to request, receive, and securely store client certificates. This automation reduces administrative effort and ensures continuous secure access without manual certificate installation.
Once installed on the device, the client certificates are used for EAP-TLS authentication by the RADIUS server in the authentication layer. For more information on the authentication layer and RADIUS server configuration, refer to the Wi-Fi CA Certificate Type Guide.
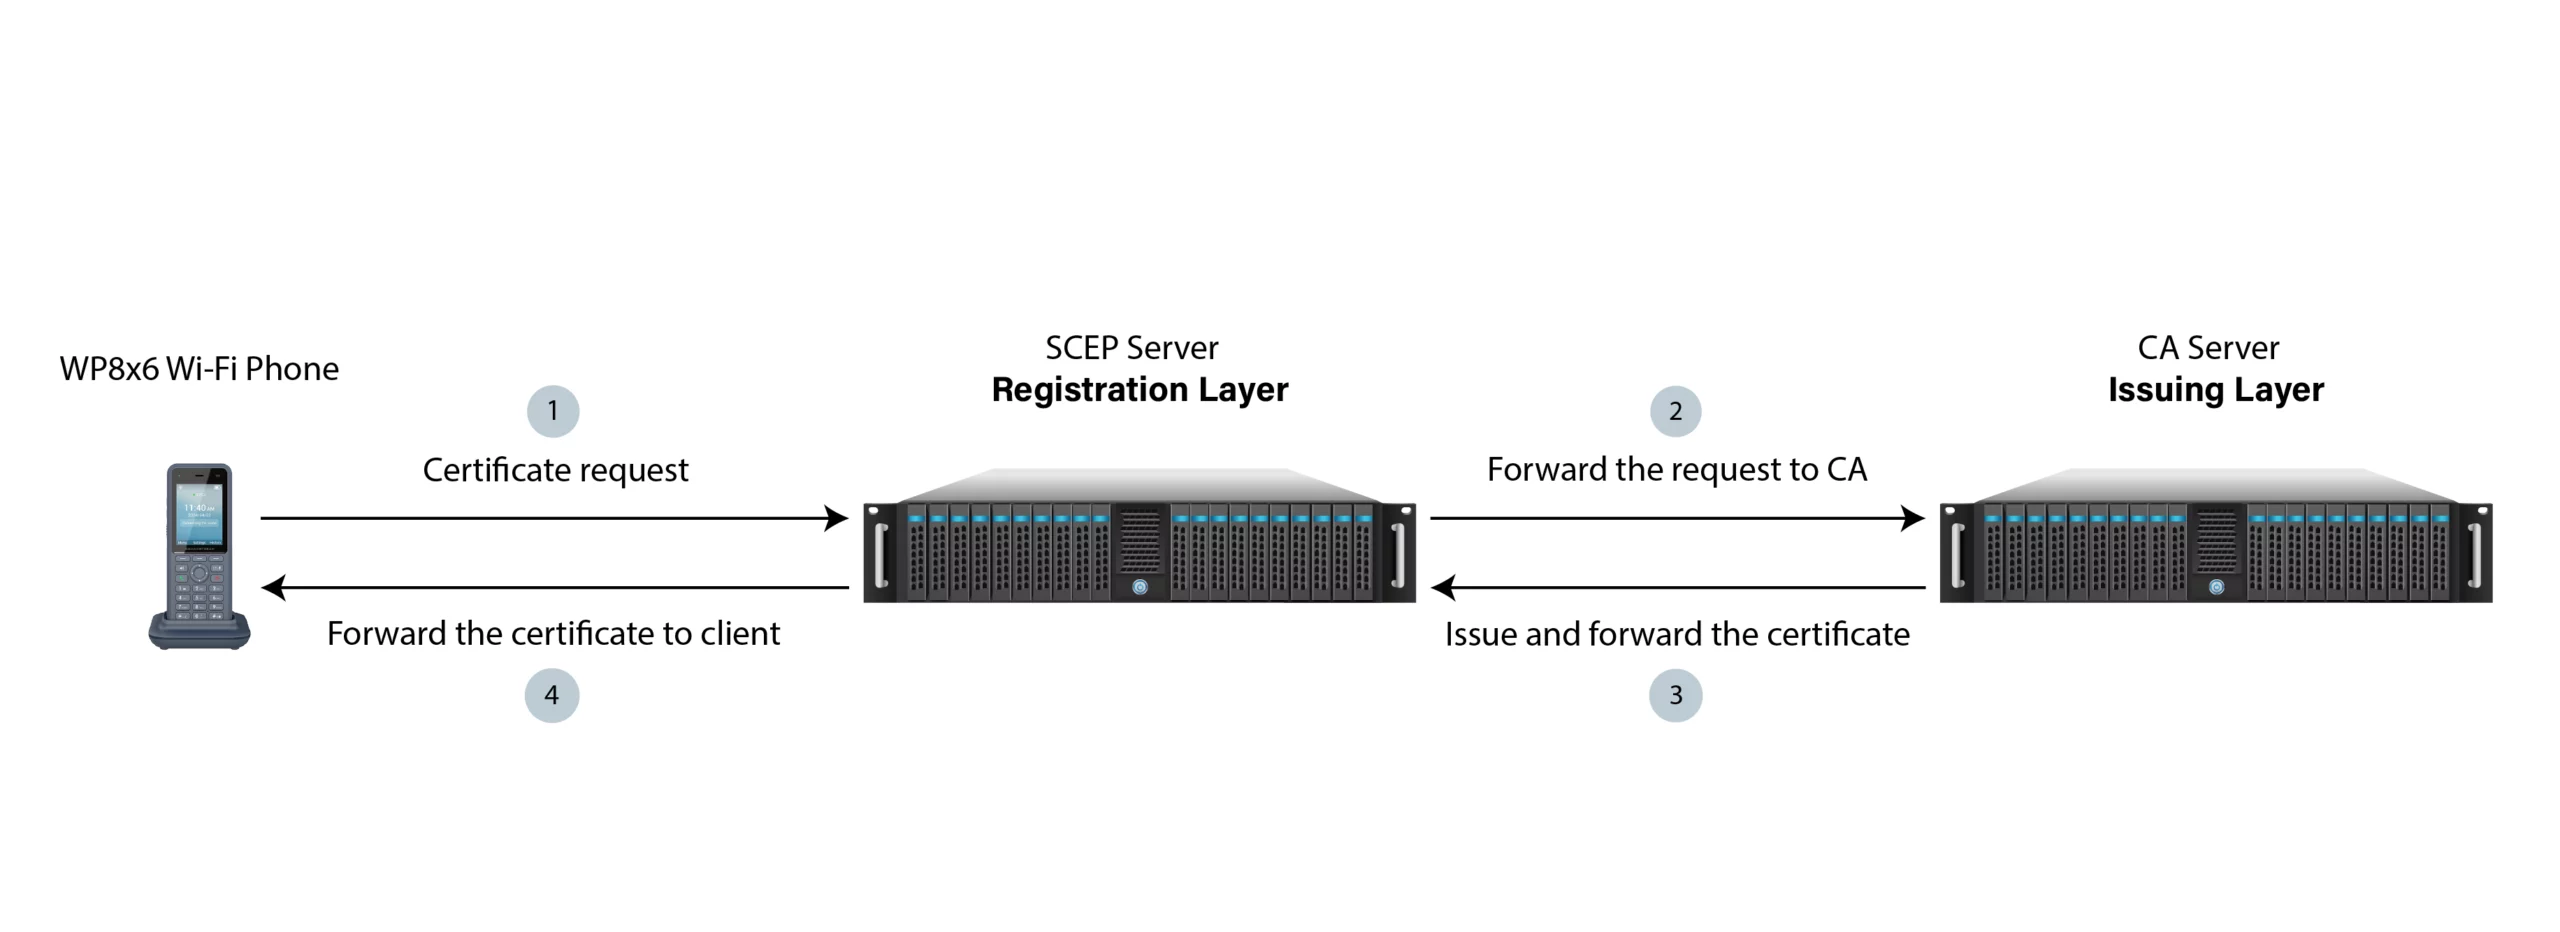
Prerequisites
Before configuring the phones, the necessary infrastructure components should be in place. This includes setting up a Certificate Authority (CA) to issue and manage client certificates and deploying a SCEP server to handle automated certificate enrollment. This section outlines the steps for preparing and configuring each component.
For this guide, a Microsoft Windows Server environment is used, where the Certificate Authority and SCEP services are deployed as server roles within the same infrastructure to support certificate issuance and automated enrollment:
- Microsoft Windows Server: infrastructure platform.
- Active Directory Domain Services (AD DS): directory service required for domain authentication and Active Directory Certificate Services integration
- DNS: name resolution service required for Active Directory domain and service discovery.
- Active Directory Certificate Services (AD CS): Certificate Authority role responsible for issuing and managing certificates
- Network Device Enrollment Service (NDES): SCEP-based enrollment service enabling automated certificate requests
AD DS Installation
Active Directory Domain Services is required to provide a domain environment for identity and authentication services. An Enterprise Certificate Authority must be installed on a domain-joined server because it relies on Active Directory for certificate templates, policy application, and user and computer identity mapping. Network Device Enrollment Service also requires a domain environment as it operates using a domain service account and integrates with Active Directory and Internet Information Services for SCEP-based certificate enrollment.
- Open Server Manager and press Manage, then select Add Roles and Features.
- Press Next on the Before you begin page.
- Select Role-based or feature-based installation and press Next.
- Select a server from the server pool and choose the local server being configured, then press Next.
- Select Active Directory Domain Services, then click Next. In the Add Roles and Features Wizard prompt, click Add Features.
- Press Next until the Confirmation page, then press Install.
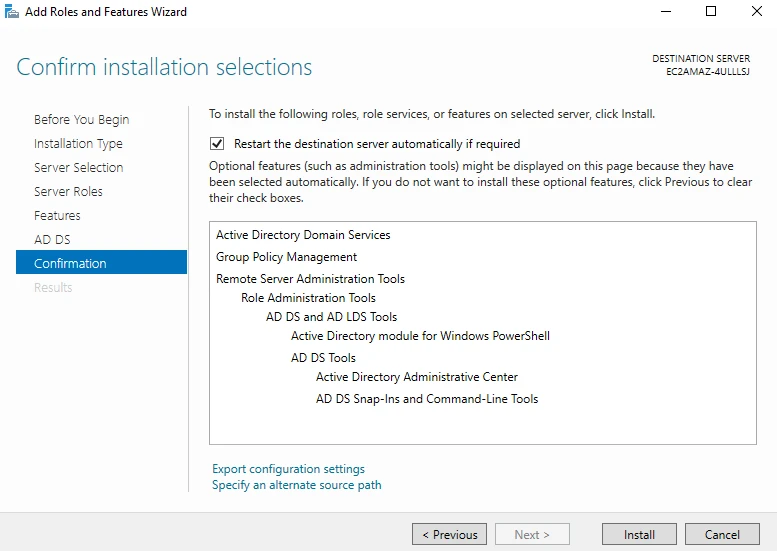
After installation, Active Directory Domain Services must be promoted to a domain controller to enable directory services functionality. This promotion creates a new forest or joins an existing domain and establishes the server as the central authority for authentication, directory lookups, and policy management. In this setup, the domain controller is required to support Active Directory Certificate Services and Network Device Enrollment Service by providing authentication for domain-based service accounts and enabling secure certificate enrollment requests within the infrastructure.
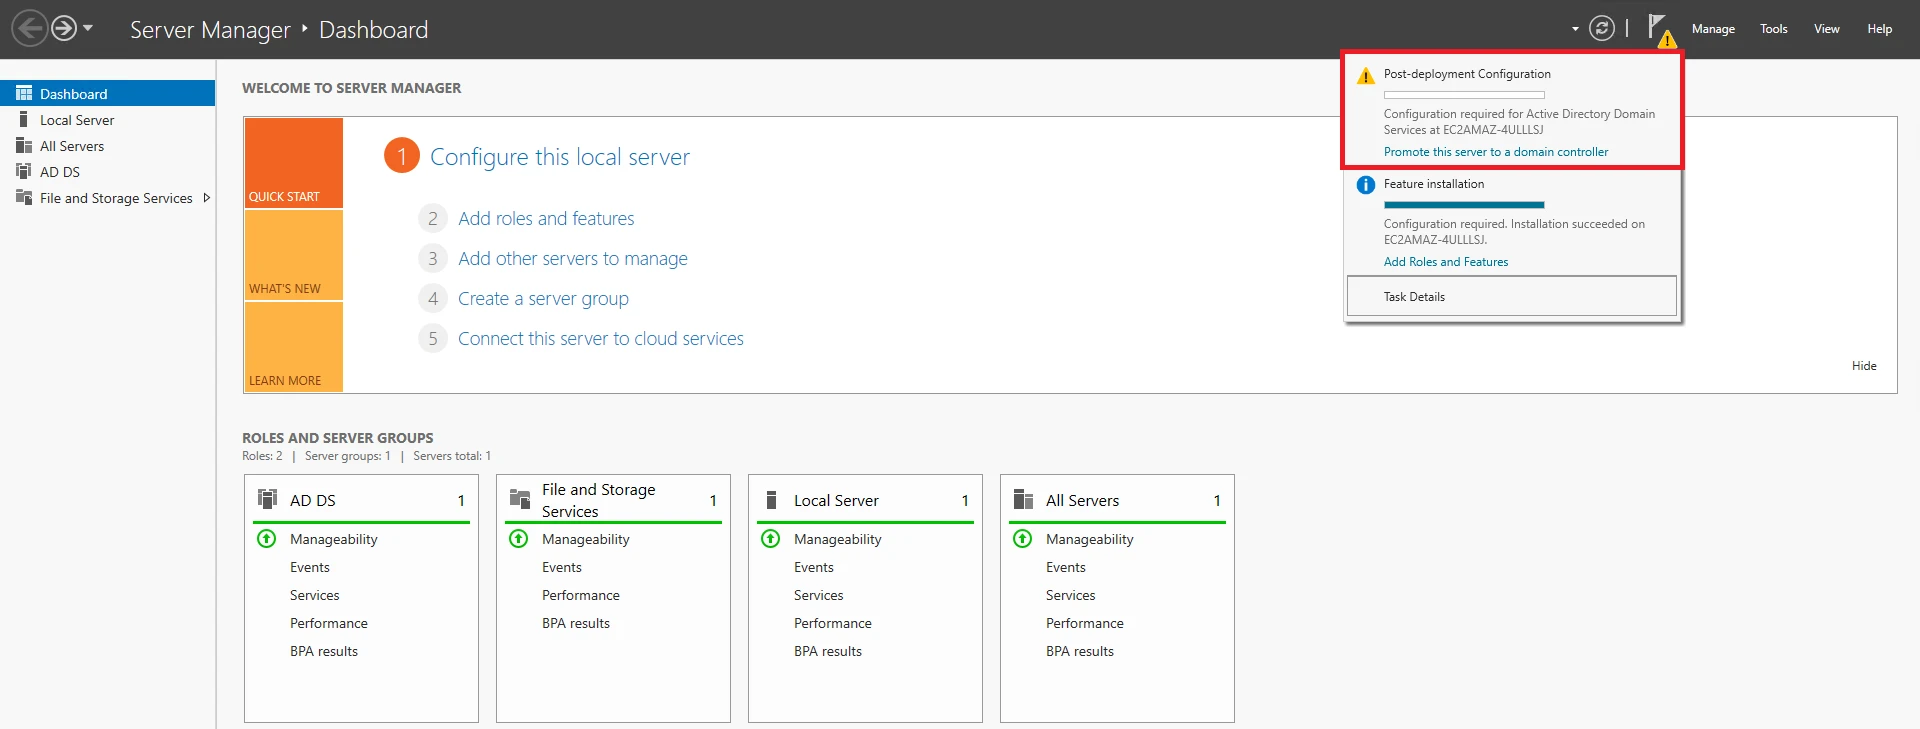
- Press Promote this server to a domain controller.
- Select Add a new forest, enter the Root domain name, and press Next.
- Enter the Directory Services Restore Mode password and press Next.
- On the DNS Options page, ensure Create DNS delegation is unchecked and press Next.
- Enter the NetBIOS name assigned to the domain and press Next.
- Specify the location for the Active Directory database, log files, and SYSVOL, and press Next.
- Review the selected options and press Install.
After Active Directory Domain Services is installed and promoted to a domain controller, the domain environment is in place. The next step is to deploy Active Directory Certificate Services to enable certificate issuance and management within the infrastructure.
AD CS Installation
The Certificate Authority is required to issue and manage certificates for domain-joined devices and services. In an Enterprise CA deployment, Active Directory is used to publish certificate templates and enforce certificate policies.
- In Server Manager, press Manage, then select Add Roles and Features.
- Press Next on the Before you begin page.
- Select Role-based or feature-based installation and press Next.
- Select a server from the server pool and choose the local server being configured, then press Next.
- Select Active Directory Certificate Service, then click Next. In the Add Roles and Features Wizard prompt, click Add Features.
- Press Next until the Role Services page, ensure Certification Authority is selected, then press Next
- On the Confirmation page, press Install.
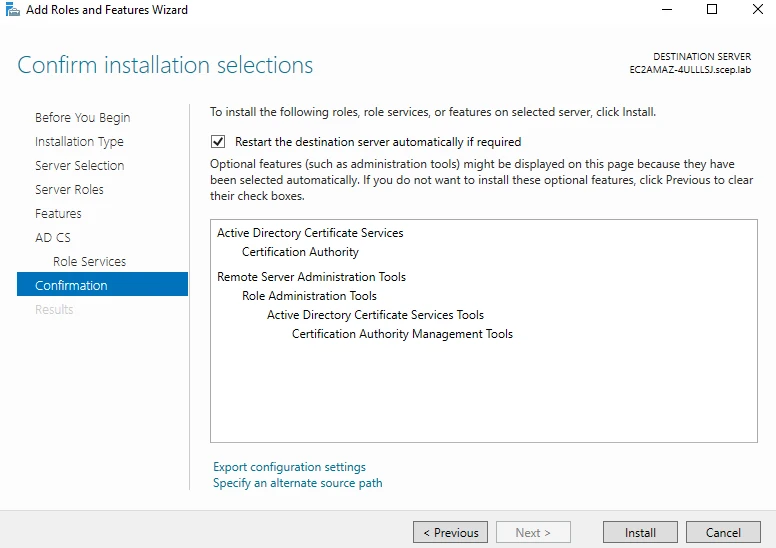
After installing Active Directory Certificate Services, the role requires post-deployment configuration to initialize the Certification Authority and complete the setup before it can issue certificates.
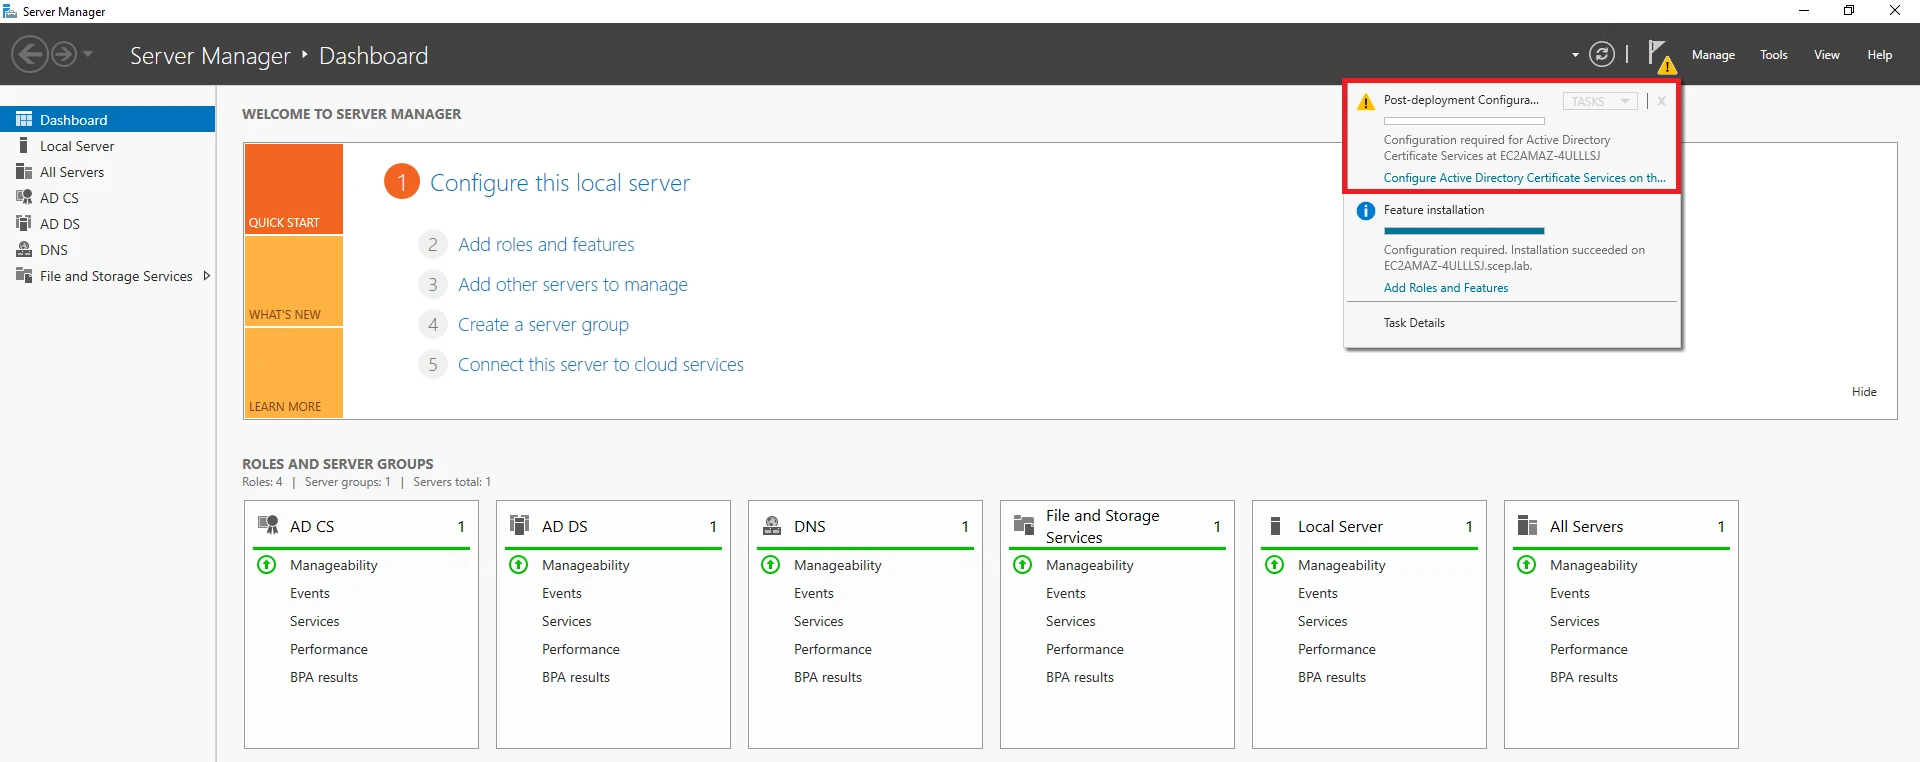
- Press Configure Active Directory Certificate Services on the destination server
- On the Credentials page, verify the account used and press Next.
- On the Role Services page, ensure Certification Authority is selected and press Next.
- On the Setup Type page, select Enterprise CA and press Next.
- On the CA Type page, select Root CA and press Next.
- On the Private Key page, select Create a new private key and press Next.
- On the Cryptography page, select the cryptographic provider, hash algorithm, and key length, and press Next (ensure compatibility with phone devices).
- On the CA Name page, enter or confirm the CA name and press Next.
- On the Validity Period page, set the CA validity period and press Next.
- On the Certificate Database page, specify the database and log locations and press Next.
- On the Confirmation page, review the configuration and press Configure.
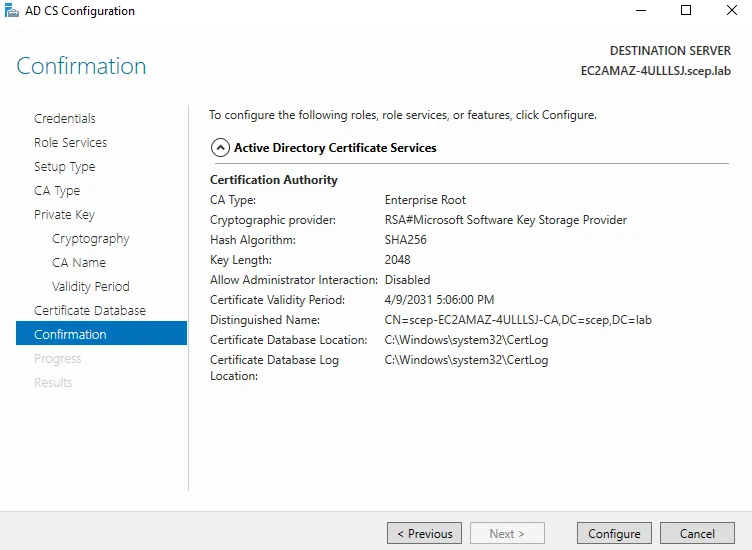
- In Tools, press Certification Authority, right-click the certificate, press Properties, and go to the Security tab. Grant Administrators “Issue and Manage Certificates” and “Manage CA”.
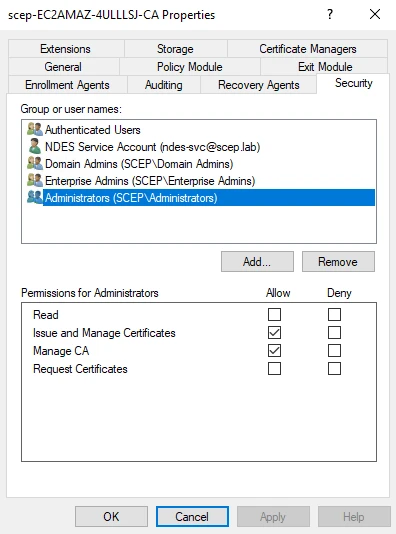
The infrastructure required for certificate issuance is now in place. In the next section, the prerequisites for Network Device Enrollment Service will be prepared before proceeding with its installation and configuration.
NDES Installation
Before installing and configuring NDES, a dedicated service account must be created in Active Directory, and the required certificate template must be prepared and published on the CA to support SCEP enrollment. These prerequisites ensure that NDES can properly authenticate and request certificates from the Certification Authority.
Creating the Service Account
- In Server Manager, press Tools, then select Active Directory Users and Computers.
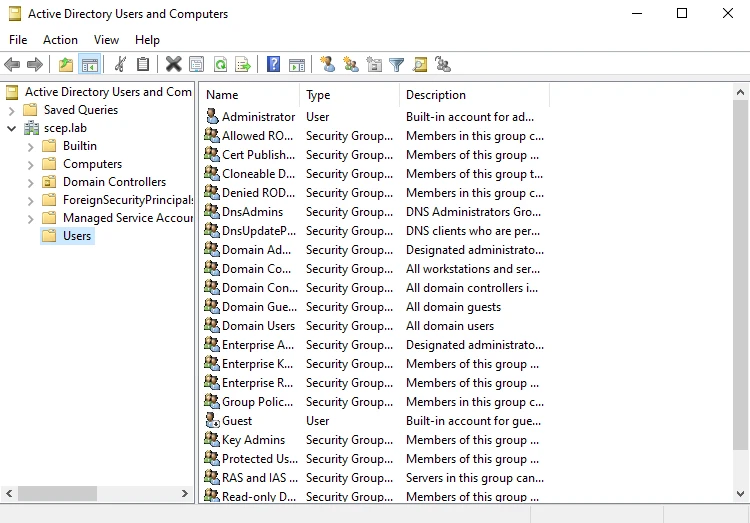
- Navigate to Users and press
 .
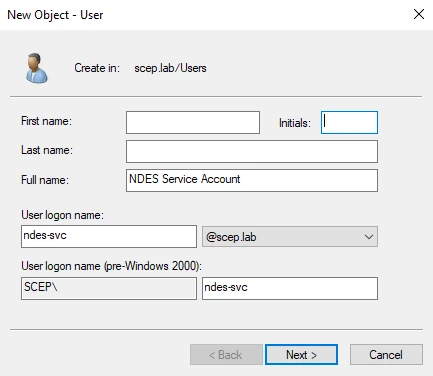
. - Enter the User logon name and press Next.
 .
.
- Enter and confirm the password, then configure password options, and press Next.
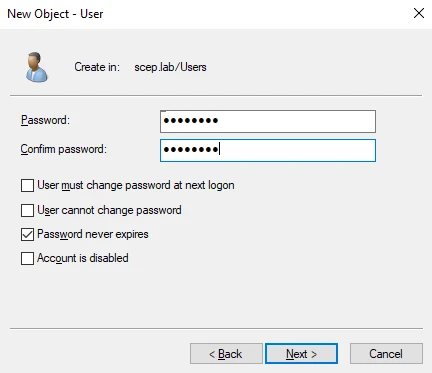
- Review the configuration and press Finish.
After creating the NDES service account, additional configuration is required by the NDES installation wizard to allow it to run the service and interact with Internet Information Services and Active Directory Certificate Services.
This includes adding the account to the IIS_IUSRS group in Active Directory Users and Computers and configuring the required user rights.
Adding the account to IIS_IUSRS
- In Active Directory Users and Computers, navigate to Builtin and press IIS_IUSRS.
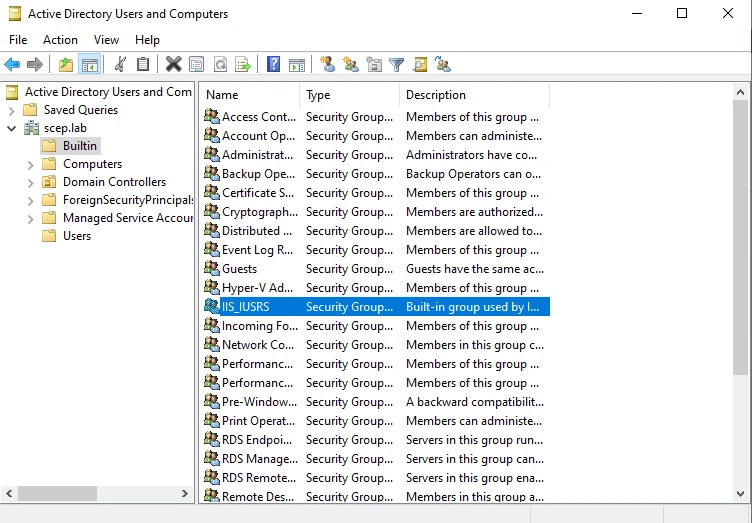
- Go to the Members tab and press Add, then enter the logon name of the created account in Select Users, Computers, Service Accounts, or Groups, press Check Names, select the account, and click OK.
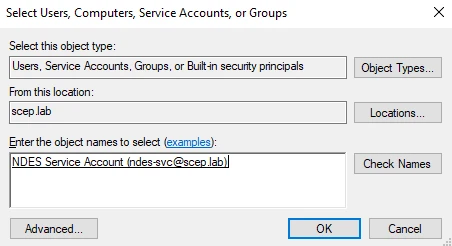
- Once the account is added as a member, press Apply.
Group Policy Management
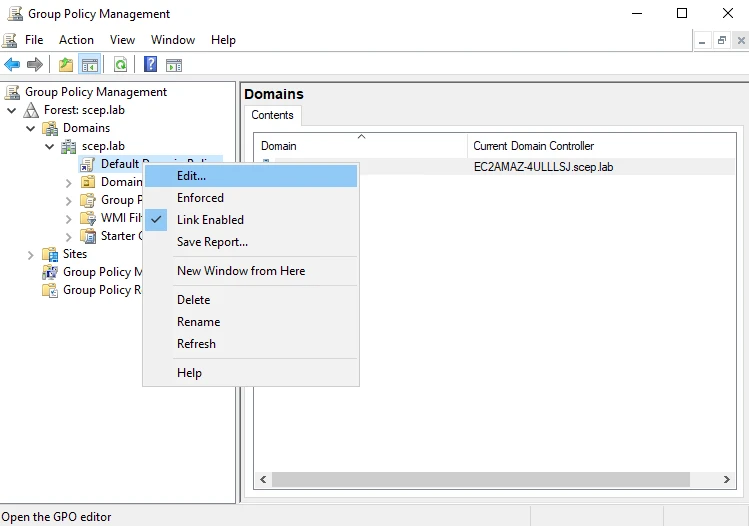
- Open Group Policy Management, go to Forest → Domains, and select the domain. Right-click Default Domain Controllers Policy and press Edit.
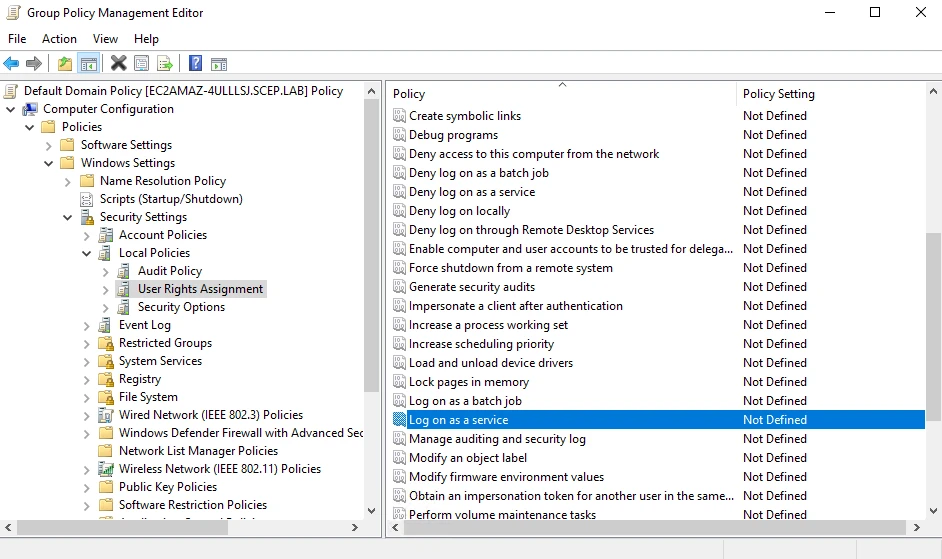
- Navigate to Group Policy Management Editor → Default Domain Controllers Policy → Computer Configuration → Windows Settings → Security Settings → Local Policies → User Rights Assignment and Select Log on as a service.
- Enable “Define these policy settings”, then click Add User or Group. Click Browse, and in Select Users, Computers, Service Accounts, or Groups, add the service account.
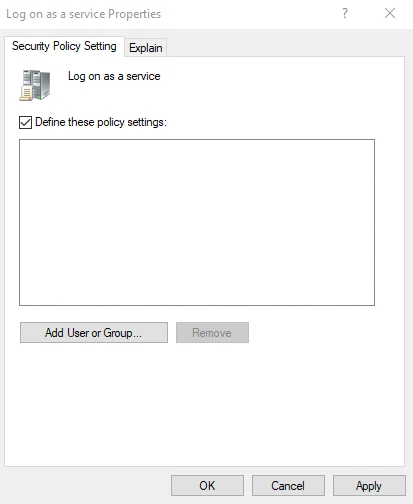
- Once the account is added, click Apply.
Creating the Certificate Template
- In Tools, open Certification Authority and click on the CA, then right-click Certificate Templates and select Manage.
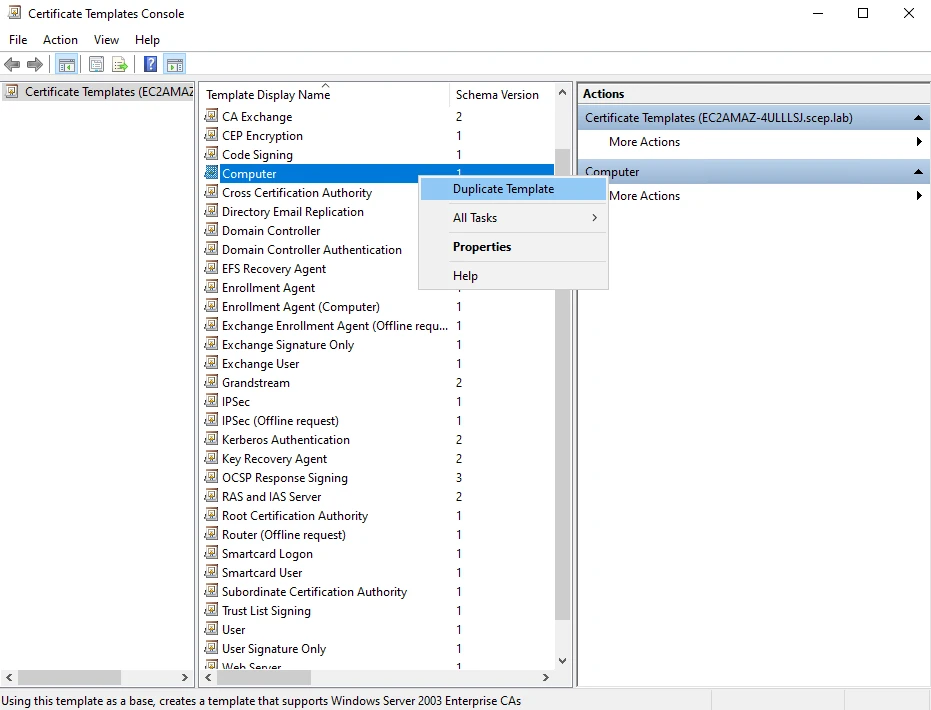
- In the Certificate Templates Console, right-click Computer and select Duplicate Template. Configure the tabs to match the desired settings, including security permissions to allow the service account to request and enroll certificates.
Configure the template as follows, ensuring the key settings required for SCEP/NDES functionality are applied. Other settings can remain at their default values unless specific requirements dictate otherwise.
- General
Template Display Name: Enter the template name, e.g., Grandstream
Validity Period: Set according to your policy
Publish certificate in Active Directory: Check to allow access during the lab - Request Handling
Purpose: Set to Signature and encryption.
Allow private key to be exported: Checked - Subject Name
Supply in the request: Select to allow non-domain devices like Grandstream phones to provide their own identity (e.g., MAC address) - Extensions
Application Policies: Must include Client Authentication.
Key Usage: Ensure Digital Signature and Key Encipherment are included - Cryptography
Minimum key size: Set to 2048 and ensure compatibility with the phone’s configuration
Providers: Select Requests can use any provider available on the subject’s computer to ensure maximum compatibility with different device hardwares - Security
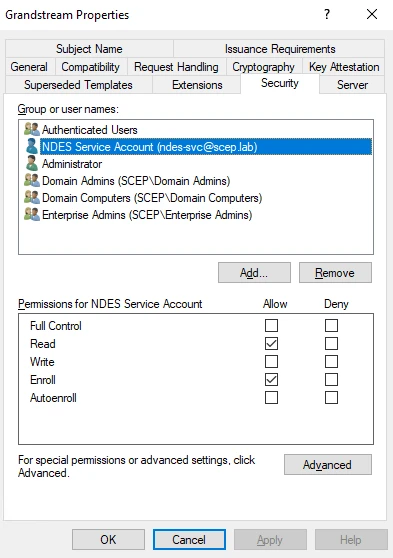
Permissions: Ensure the Service Account performing the enrollment has both Read and Enroll permissions
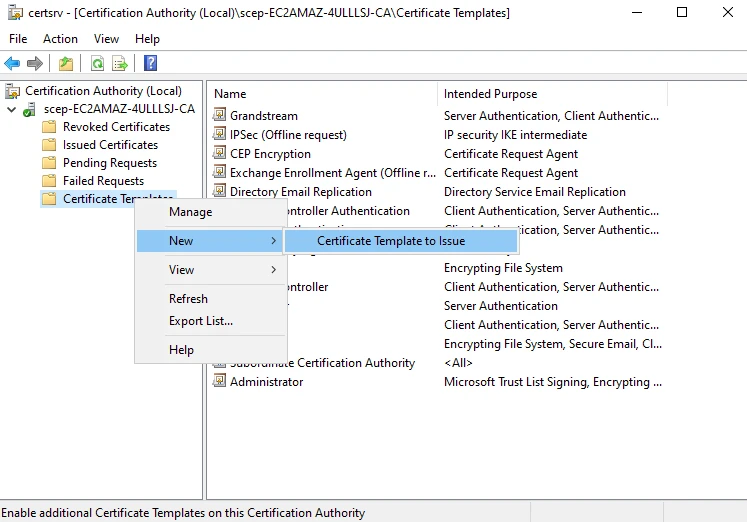
- Return to the Certification Authority console, right-click Certificate Templates, then select New and press Certificate Template to Issue.
- Select the newly created template and press OK.
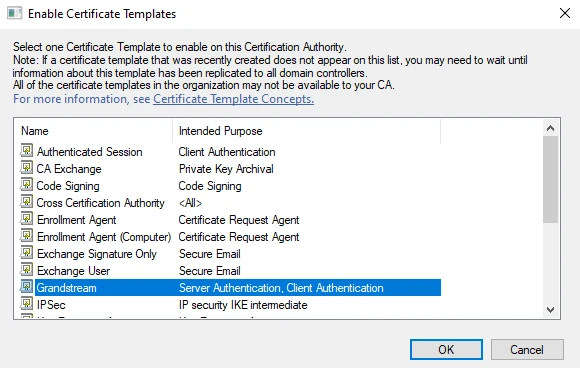
The template is now published on the Certification Authority and is available for use. It will be used by NDES when processing certificate enrollment requests to issue certificates to connecting devices based on this configuration.
Installing NDES
This section describes the installation and initial configuration of Network Device Enrollment Service, including role deployment, service account configuration, and required post-installation settings for certificate enrollment.
NDES Installation
- In Server Manager, click Manage, then select Add Roles and Features.
- On the Before you begin page, click Next.
- Select Role-based or feature-based installation, then click Next.
- Select a server from the server pool, choose the local server being configured, then click Next.
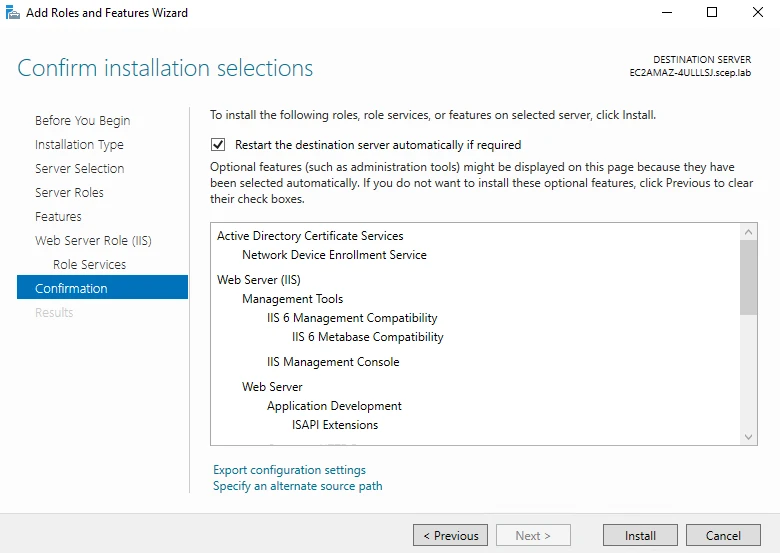
- Select Network Device Enrollment Service, then click Next. In the Add Roles and Features Wizard prompt, click Add Features to include the required components (such as Internet Information Services).
- Press Next through the remaining pages until the Confirmation page, then click Install.
NDES Post-installation Configuration
- In Credentials, enter credentials to be able to install the role and press Next.
- On the Role Services page, select Network Device Enrollment Service and click Next.
- On the Service Account for NDES page, select Specify service account, click Select, enter the service account name and password created earlier, click OK, then click Next.
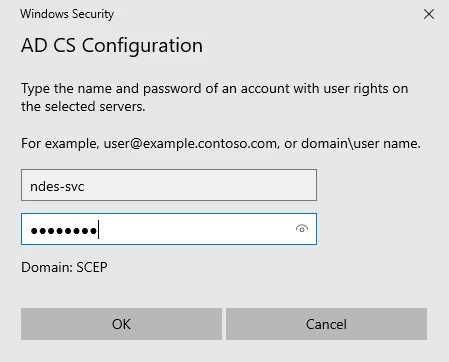
- On the RA Information page, enter the required and optional Registration Authority information and click Next.
- On the Cryptography for NDES page, select the signature key provider and choose an appropriate key length (ensure compatibility with target devices such as IP phones or SCEP clients), then click Next.
- On the Confirmation page, review the configuration and click Configure.
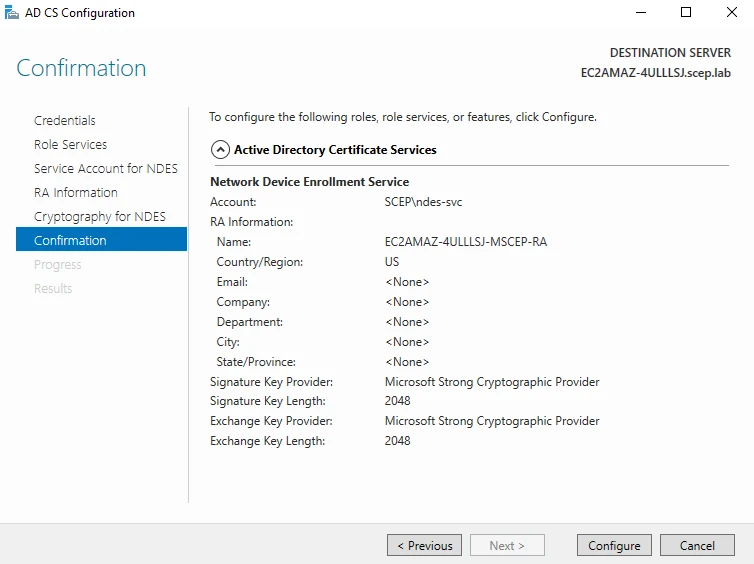
Configuration of Template Mapping
- In Server Manager, click Tools, then select Registry Editor.
- Navigate to HKEY_LOCAL_MACHINE → SOFTWARE → Microsoft → Cryptography → MSCEP. Right-click EncryptionTemplate and click Modify, then set the value of the data field to the name of the certificate template used by the Network Device Enrollment Service for SCEP enrollment requests, and press OK.
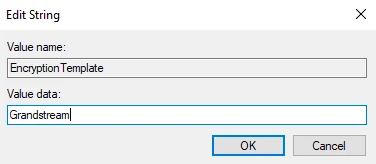
- Repeat the same step for GeneralPurposeTemplate and SignatureTemplate.
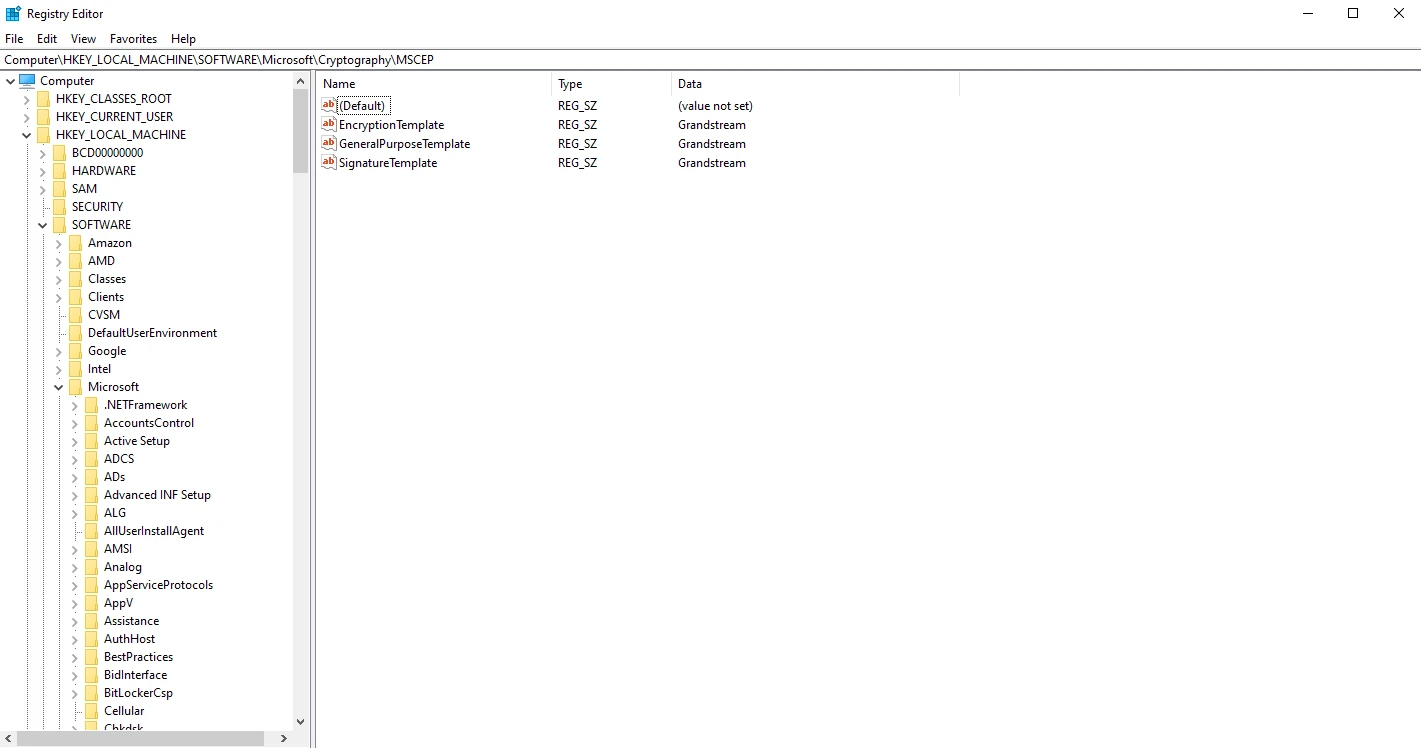
After installing Network Device Enrollment Service (NDES), the service automatically uses the configured MSCEP registry template mappings to request Registration Authority (RA) certificates from the Certificate Authority. These include a signing certificate and an encryption certificate, which are used to secure and validate SCEP communication. Once issued, they are installed in the local computer certificate store and used by IIS/mscep.dll to process enrollment requests. If RA certificate generation fails, the admin page may still load, but SCEP enrollment will not function.
To ensure everything is running correctly, open Command Prompt and run the following command to restart IIS and apply the configuration changes:
iisreset
Once the services have been restarted, verify that NDES is functioning correctly by accessing the SCEP endpoint in a web browser:
http://localhost/certsrv/mscep/mscep.dllThen access the administration page to retrieve the challenge password and verify the configuration:
You might be prompted to log in
http://localhost/certsrv/mscep_admin/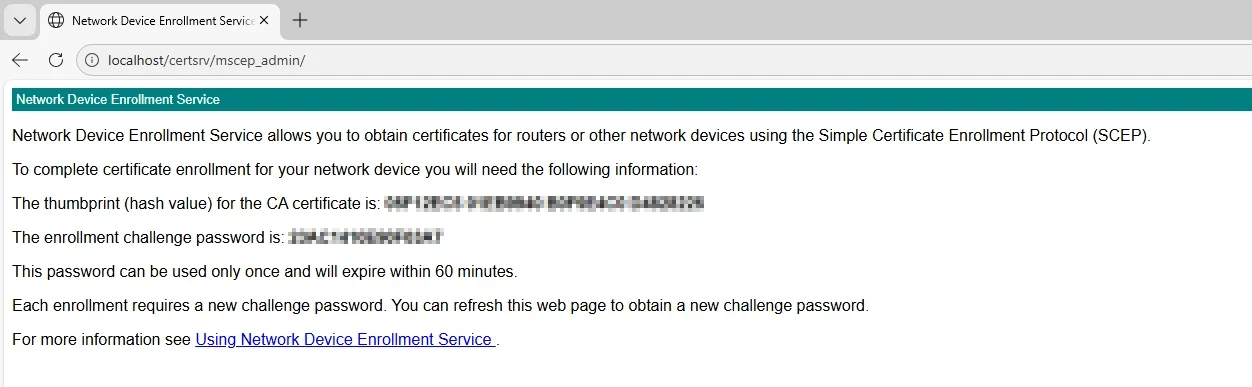
You may be prompted to authenticate; in this case, sign in using the NDES service account credentials to access the administration interface and view the current challenge password.
The /certsrv/mscep/mscep.dll endpoint is used by devices to submit SCEP enrollment requests, while /certsrv/mscep_admin is used by administrators to retrieve the challenge password and verify NDES functionality during configuration and troubleshooting.
Other Recommended SCEP Servers
Several trusted and commonly used SCEP server solutions are available to support automated certificate enrollment across different environments. The following options are recommended based on reliability, widespread use, and proven implementations:
- EJBCA
- Dogtag PKI
- OpenXPKI
Phone Configuration
Once the server infrastructure is prepared, the WP8x6/GRP260x phones can be preconfigured with SCEP parameters via provisioning to automatically request and renew client certificates. This section guides administrators through Basic Settings and Local Configuration steps, HTTP Authentication to enable CA server access, and Certificates and Updates, where the Update Interval before Certificate Expiration and Scope of Use can be specified to handle certificate renewal.
Basic Settings
To access SCEP Basic Configuration, navigate to System Settings → Security Settings → SCEP → Basic Settings and follow the steps below:
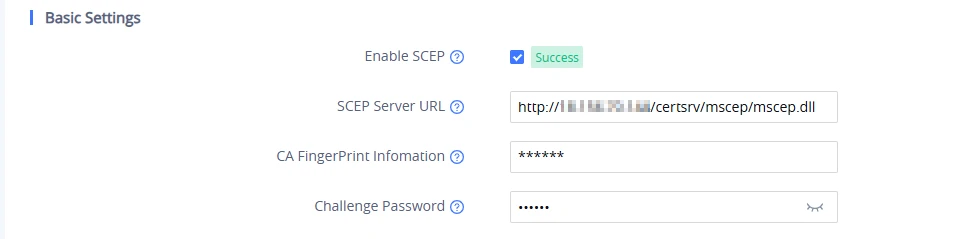
- Enable SCEP: Enables or disables the SCEP service.
- SCEP Server URL: Enter the SCEP enrollment endpoint provided by the NDES server, used by the device to request certificates via SCEP.
http://<server>/certsrv/mscep/mscep.dll- CA Fingerprint Information: Enter the CA thumbprint used to verify the identity of the issuing CA or RA certificate. This field is optional and can be retrieved from the NDES administration endpoint provided below.
- Challenge Password: Enter the one-time authentication password used in SCEP to validate and authorize certificate enrollment requests. This value is time-limited and can be obtained from the NDES administration endpoint provided below.
http://<server>/certsrv/mscep_admin/Local Configuration
To access SCEP Local Configuration, navigate to System Settings → Security Settings → SCEP → Local Configuration and follow the steps below:
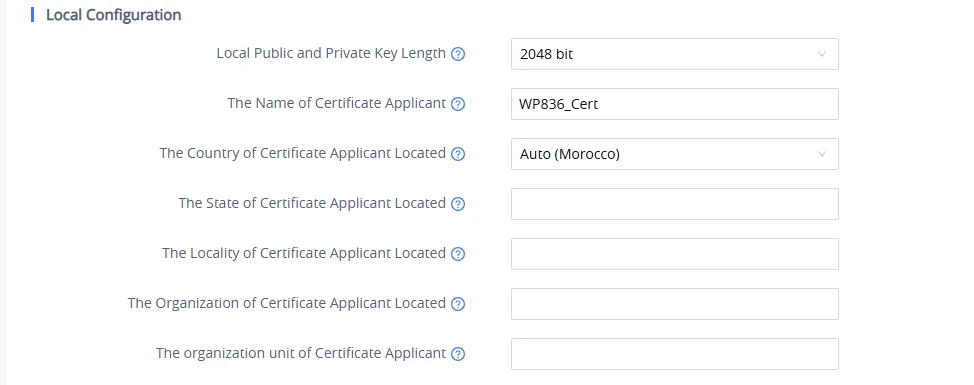
- Local Public and Private Key Length: Select the key size used for generating the device’s key pair. This value must comply with the CA’s minimum key requirements and ensure compatibility with the NDES/CA configuration. 1024-bit RSA is considered insecure and obsolete.
- The Name of Certificate Applicant: Enter the Common Name that will identify the device in the certificate request. This value is required and will be used as the Subject CN in the generated certificate.
- The Country of Certificate Applicant Located: Enter the applicant’s country. This field is optional and may be used depending on the CA’s policy.
- The State of Certificate Applicant Located: Enter the applicant’s state or province. This field is optional and may be used depending on the CA’s policy.
- The Locality of Certificate Applicant Located: Enter the applicant’s city or town. This field is optional and may be used depending on the CA’s policy.
- The Organization of Certificate Applicant Located: Enter the name of the applicant’s organization or company. This field is optional and may be used depending on the CA’s policy.
- The Organizational Unit of Certificate Applicant: The CSR may include the applicant’s organizational unit. This field is optional and depends on CA policy.
HTTP Authentication
To access HTTP Authentication, navigate to System Settings → Security Settings → SCEP → HTTP Authentication and follow the steps below:

- User ID: Enter the user ID for accessing the CA server. This field is optional.
- Password: Enter the password for accessing the CA server. This field is optional.
Certificates and Updates
To access Certificates and Updates, navigate to System Settings → Security Settings → SCEP → Certificates and Updates and follow the steps below:
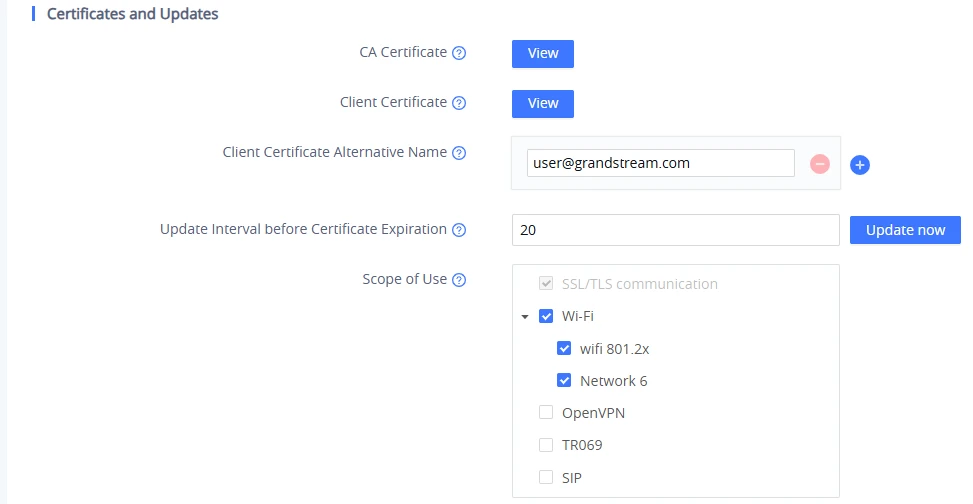
- CA Certificate: View the CA certificate in Text and Base64 formats.
- Client Certificate: View the client certificate issued by the CA in Text and Base64 formats.
- Client Certificate Alternative Name: Configure additional identifiers for the client certificate. These values are added as Subject Alternative Name (SAN) entries on the server and allow the device to be identified using multiple aliases:
- DNS Name: Enter a hostname or domain, for example
www.example.com. - IP Address: Enter the IPv4 or IPv6 address, for example
192.168.0.1or2001:db8::1. - Email Address (RFC822 Name): Enter an email address, for example
user@example.com. - URI: Enter a uniform resource identifier, for example
https://www.example.com. - The default setting is
$MAC.local, which assigns the phone device’s MAC address as the identifier used in the certificate request.
- DNS Name: Enter a hostname or domain, for example
- Update Interval before Certificate Expiration: Define the number of days (1–30) before expiration to trigger certificate renewal. The system attempts renewal when the remaining validity is less than the defined interval.
- Scope of Use: Configures which device services automatically adopt SCEP-issued certificates without manual upload or manual renewal. Available options depend on the hardware platform:
- WP8x6 Series: Wi-Fi (802.1X), OpenVPN, TR-069, and SIP.
- GRP260x Series: SSL/TLS Communication, Ethernet 802.1X, Wi-Fi (802.1X), and OpenVPN.
Configuration steps are now complete. Press Save and Apply to finalize the settings. If the configuration is successful, the Status indicator next to Enable SCEP will display Success in green, as shown in the image above.
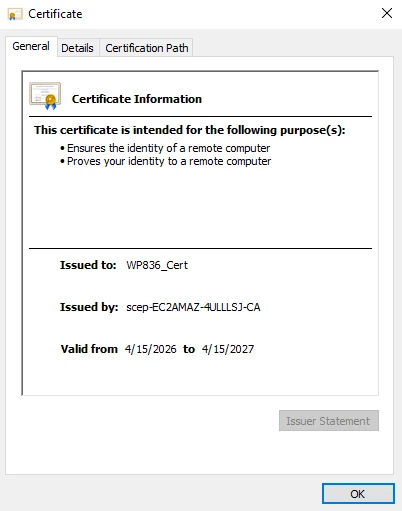
On the server side, the issued client certificate can be verified by opening Server Manager, selecting Tools, and launching Certification Authority. Then navigate to the created CA, open the Issued Certificates folder, where the newly issued certificate will be displayed.
Supported Devices
Supported Devices | Supported SCEP Scope | Firmware Version |
WP816 |
| 1.0.3.20+ |
WP826 | ||
WP836 | ||
GRP2601(P/W) |
*Note: Wi-Fi 802.1x is supported on GRP2601W/GRP2602W (Wi-Fi) models only | 1.0.7.10+ |
GRP2602(P/W/G) | ||
GRP2603(P) | ||
GRP2604(P) |