GDS3710 HD IP Video Door System is a hemispheric IP video door phone and a high-definition IP surveillance. GDS3710 is ideal for monitoring from wall to wall without blind spots. Powered by an advanced Image Sensor Processor (ISP) and state of the art image algorithms, it delivers exceptional performance in all lighting conditions. It contains integrated PoE, LEDs, HD loudspeaker, RFID card reader, motion detector, lighting control switch, Alarm Input/output and more.
The GDS3710 IP video door system features industry-leading SIP/VoIP for 2-way audio and video streaming to smart phones and SIP phones, allowing to receive calls from GDS3710 on associated SIP phones when doorbell is pressed, opening door from the SIP phone, initiate calls from the phone to GDS3710 and get real time audio/video stream.
The GDS3705 Audio Door Access System, an innovative IP based powerful door system. The GDS3705 Audio Door Access system features industry-leading SIP/VoIP for 2- way audio to SIP phones. It contains integrated PoE, HD loudspeaker, RFID card reader, and more
The GDS37xx can be connected with a Wireless Wi-Fi phones in 2 different ways, either using peering mode (without a SIP server) or through a SIP server.
This guide describes needed configuration for both peering and using SIP server scenarios. In this guide, WP820 will be used as Portable Wi-Fi phone and UCM6XXX as SIP server.
PEERING SCENARIO
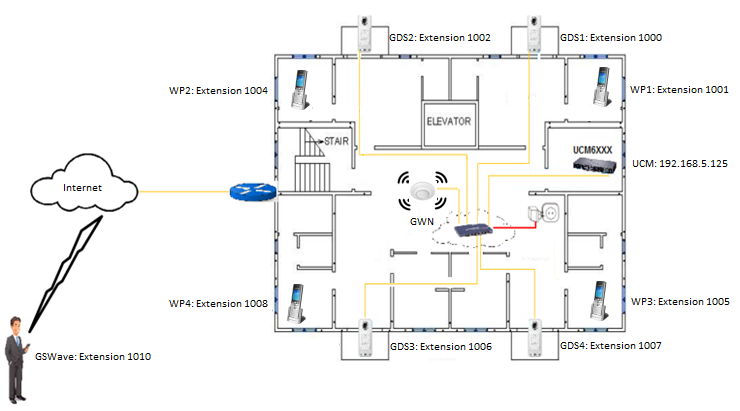
We assume that the GDS37xx is installed on a small warehouse at front door and WP820 is connected to the same network via Wi-Fi using an access point (GWN7610 for instance). Employees can swipe the RFID card to get in, while visitors need to press the Door Bell to initial video call and the related person at the WP820 side need to type the key PIN to open the door remotely to allow the visitors to get in as shown in the figure below.
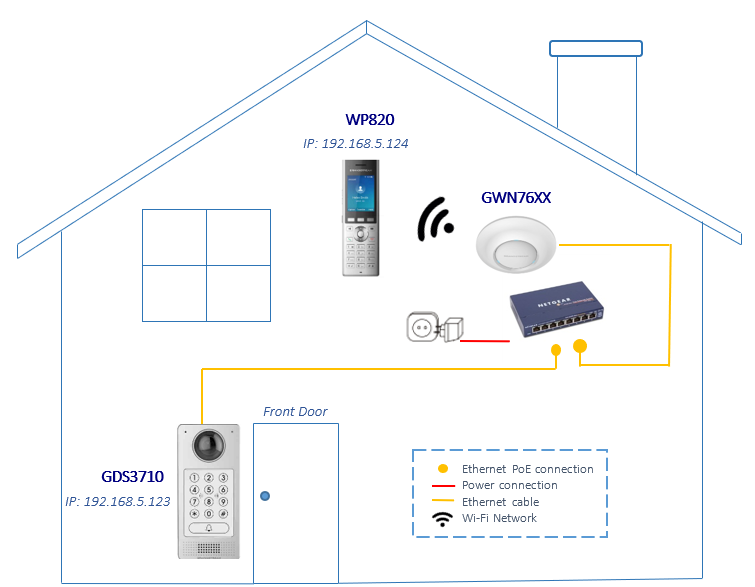
- The IP address used by the GDS3710 is 192.168.5.123.
- The IP address used by the WP820 is 192.168.5.124.
Settings Configuration on the GDS37xx Side
The GDS37xx needs to be configured with the IP address of the WP820 and related SIP port, and remote PIN for door opening. The first account will be used on the WP820 for this example, so the port number associated to the first port is 5060.
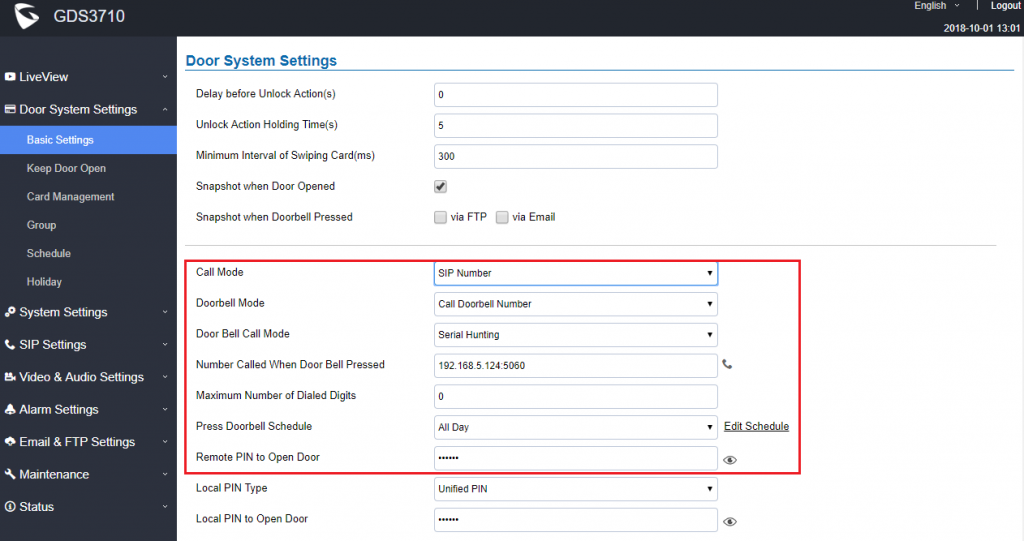
Access the GDS37xx web GUI and navigate to “Door System Settings 🡪 Basic Settings” then set the following as shown on the figure below:
- Choose the action to be taken when the doorbell is pressed, three options are available:
- Call Doorbell Number: When Doorbell is pressed, a call will be made to the “Number Called When Door Bell Pressed”
- Control Doorbell Output (Digital Output 1): When Door Bell is pressed electronic lock for Output 1 is opened.
- Both Of Above: When selected, both Call Doorbell Number and Control Doorbell Output options are enabled.
In our case we will choose “Call Doorbell Number”.
- The option “Door Bell Call Mode” can be used when multiple phones are configured to be called when pressing the doorbell button. Users can set this option to:
- Serial Hunting: the configured extensions and/or IP addresses will ring one after one by order.
- Parallel Hunting: The configured extensions and/or IP addresses will ring simultaneously (up to 4 simultaneous SIP calls).
- Enter the IP address and port number of the WP820 which is 192.168.5.124:5060 for the first account on the WP820.
- Enter the “Remote PIN to Open the Door” in order to open the door by sending a SIP message from the phone while in active call with the GDS37xx.
- Click
 in order to apply changes.
Make sure that the Direct IP Call feature is active from the GDS37xx Web GUI under “SIP Settings 🡪 SIP Advanced Settings” then click on “Enable Direct IP Call”.

Settings Configuration on the WP820 Side
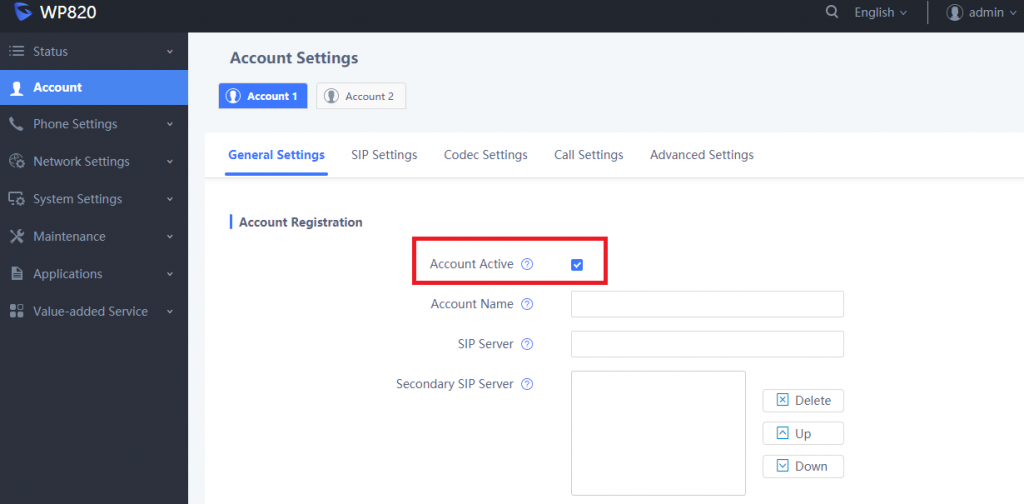
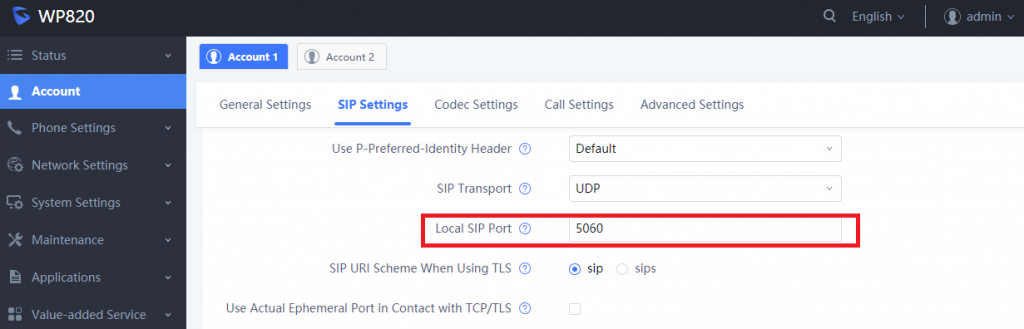
The WP820 related Account need to be set as “Active”, and correct “Local SIP Port” need to be configured at the GDS37xx side. These are the basic settings to make the peering scenario work.
- On the WP820 Web GUI navigate under “Account 🡪 General Settings” and set “Account Active” to Yes, then click on
 and
and  in order to apply new changes.
- Navigate to “Account 🡪 SIP Settings” and verify that the “Local SIP Port” set on the WP820 side is the same as the one on the GDS37xx.
CONNECTION USING SIP SERVER
In case of multiple GDS37xx and WP820 are available, a SIP server needs to be set in order to communicate between different devices.
The following shows a sample setup.
Settings Configuration on the GDS37xx Side
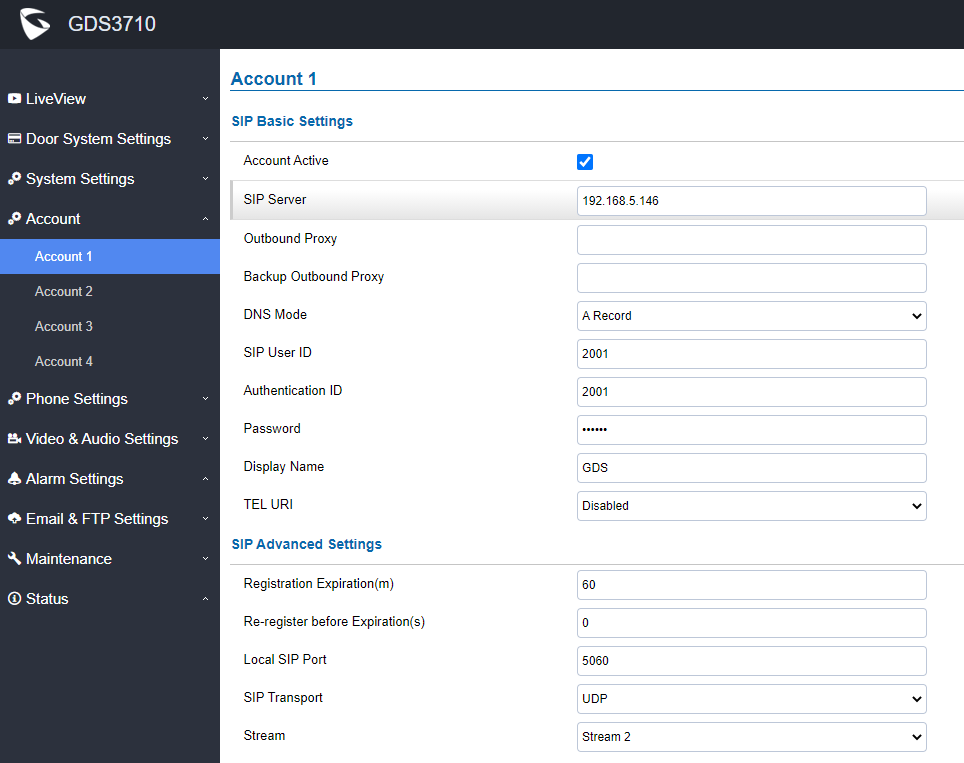
A SIP account needs to be registered on the GDS37xx to interact with other devices.
This can be done by entering the GDS37xx WebGUI under “Account 🡪 Account x”, then type the SIP account related information and click on ![]() .
.
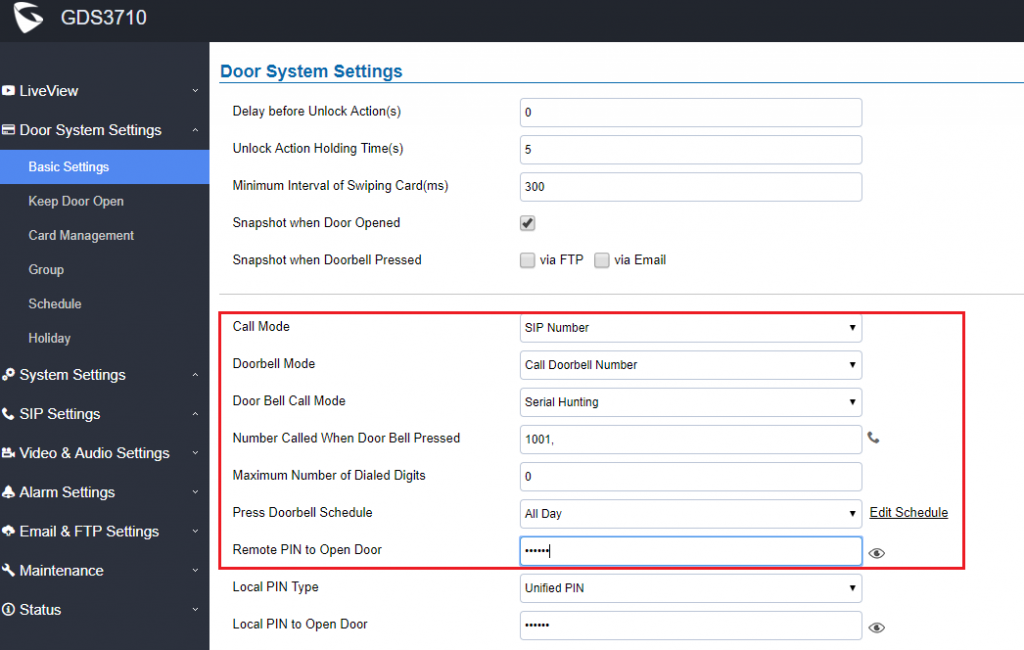
Go to “Door System Settings 🡪 Basic Settings” then set the following:
- Doorbell Mode set to “Call Doorbell Number”.
- (optional) Door Bell Call Mode: When using multiple phones. Please, refer to ”Door Bell Call Mode”
- Number Called When Door Bell Pressed (assuming 1001 is the WP820 number).
- Remote PIN to Open the Door.
The following figure shows an example of the configuration done.
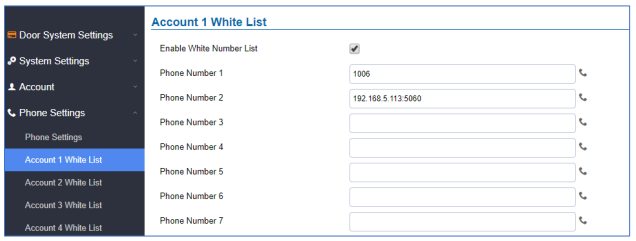
White List Settings
Any number calling the GDS37xx extension will have its call auto answered. To restrict allowed numbers to call the GDS37xx, user needs to navigate under “Phone Settings 🡪 Account x White List”.
- Check Enable White Number List.
- Click on Add to add numbers allowed to dial the GDS37xx.
- Click
 to apply the settings.
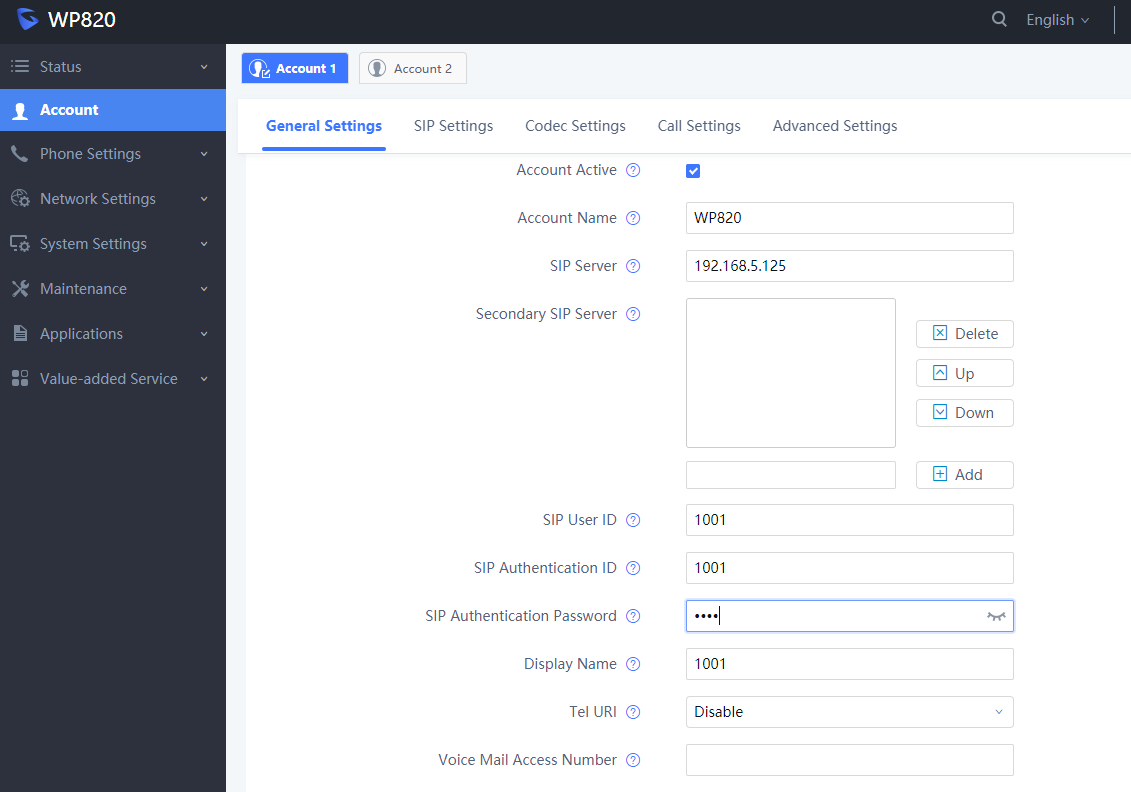
Settings Configuration on the WP820 Side
A SIP account needs to be registered on the WP820 side as well to interact with other devices available on the local network.
This can be done by entering the WP820 Web GUI under “Account 🡪 General Settings”, then type the SIP account relater information and click on ![]() and
and ![]() to apply new changes.
to apply new changes.
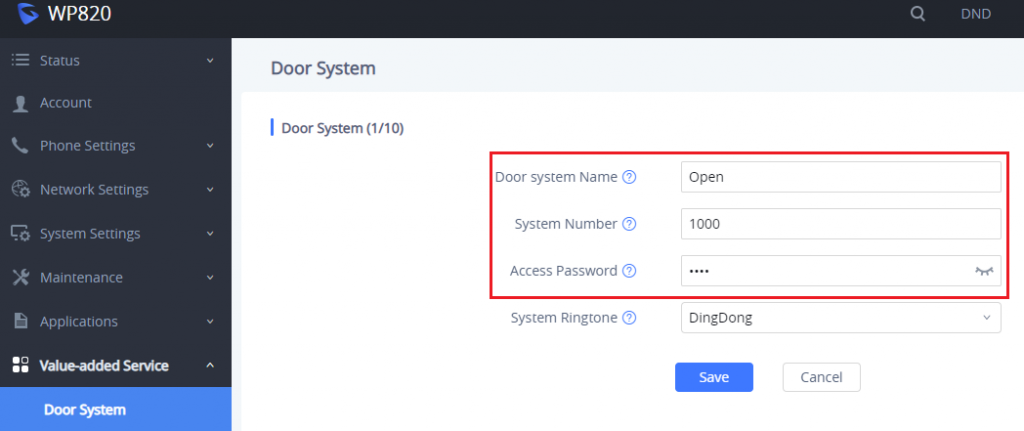
Users could configure “Remote PIN to Open the Door” on the WP820 WebGUI to open the door with a single click.
This can be done from the WP820 web UI 🡪 Value-added Service 🡪 Door System and set the following:
- Click on “Add” (The WP820 supports up to 10 GDS3710 devices).
- Enter the “Door system Name”, it can be any name to identify the GDS37xx, in our case its “GDS3710”.
- Enter the “System Number”, in our case its “1000”.
- Enter the “Access Password” which is the password set on “Remote PIN to Open the Door” on the GDS37xx.
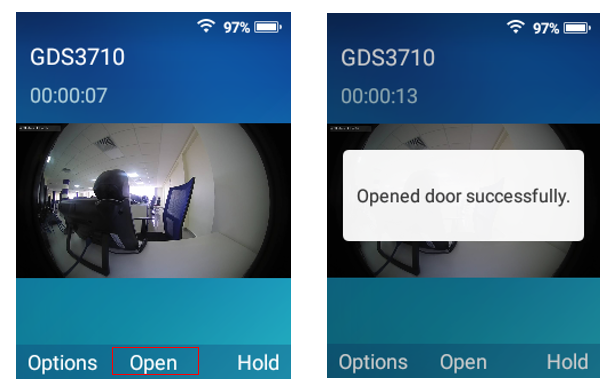
Once the user presses the ring button on the GDS37xx, an INVITE will be sent to the WP820 phone and the GDS3710 stream will be played on the WP820 phone with the “Open” button that appears in the bottom of the screen. If users press the “open” button, a SIP message will be sent to the GDS3710 in order to open the door as shown below.
A message prompt will appear confirming the opening of the door when the SIP message code sent by the phone matches the “Remote PIN for Open Door”.
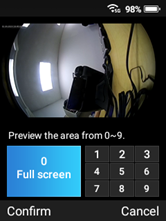
When Call is answered, the user can proceed from Options🡪 Zoom to enter the zoom interface. This interface allows the user to choose zoom in on certain sections of the image (use the direction arrows to move from sections or use the digits from “0” to “9”). Then you need to click on “Confirm” to view the selected section and to go back to the call screen.