
INTRODUCTION
The GDS37xx is used alongside GSC3570 to form a complete solution for intercom and facility control.
GDS37xx and GSC3570 can be connected together and function by IP peering (Without SIP server), or IP Pairing (using a SIP Server), this will allow the GSC3570 to perform remote open door while being on a SIP direct IP call with the GDS37xx. When using GDS3710/GDS3712 users have also the possibility to remote open door without being in SIP direct IP call (NOT supported in GDS3705/GDS3702).
The GSC3570 can be peered with the GDS37xx in many methods, we will focus on two methods:
- Using the GSC3570 as a door opener with GDS37xx controlling the door relay
- Using the GSC3570 as the door controller with GDS37xx to securely open door
We will look into each configuration separately.
Using GSC3570 as Door Opener
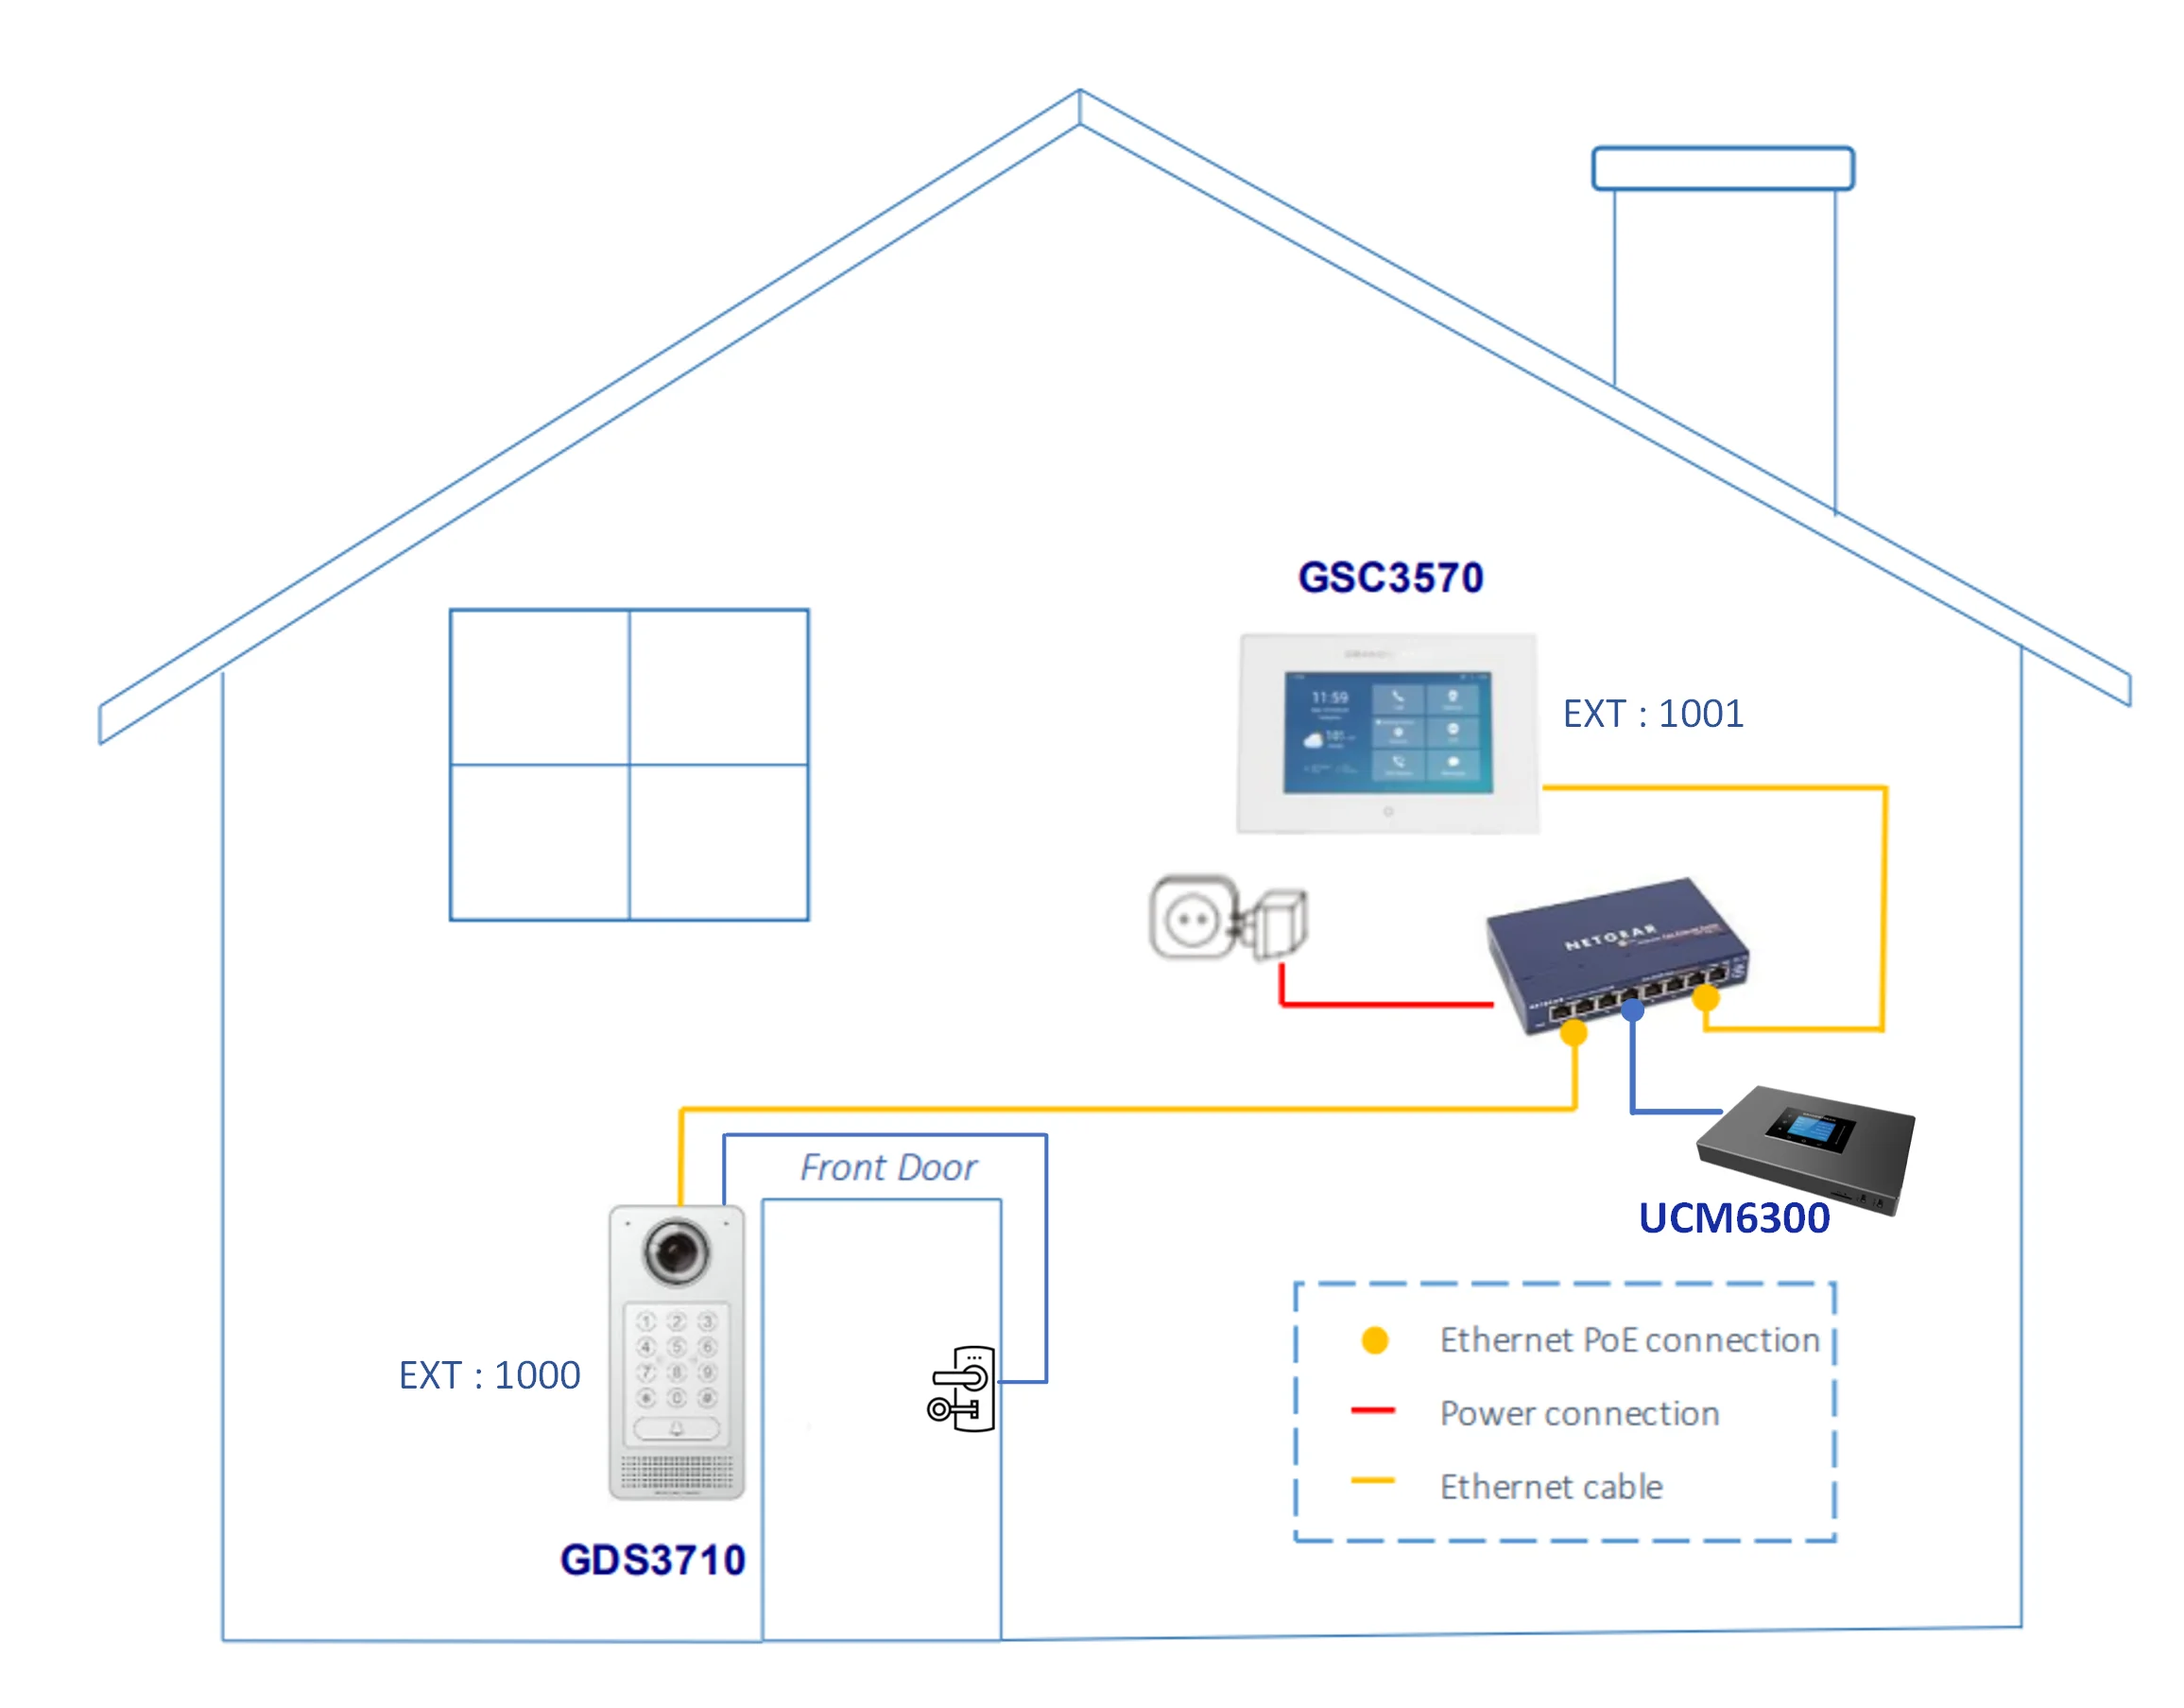
In this scenario, we connect the door electric lock to the GDS37xx directly, and we communicate between the GDS37xx and the GSC3570 through SIP to trigger the open door action, we have the GDS37xx deployed outdoors, and wired with the door lock and with other optional peripherals such as the door lock switch, the alarm siren…, and we deploy GSC3570 indoors.
One important distinction to make when using this set up, is whether we are deploying a SIP server in our environment or not:
Deployment with a SIP server
In this set up, we will register both the GDS37xx and GSC3570 to the SIP server as extensions, and the open door action will be done by syncing a remote access door password between the units, please follow along the configuration:
GDS37xx Configuration with SIP server
- Access the GDS37xx Web GUI and navigate to “Account Settings🡪Account 1”.
- Enter the information of the extension 1000 created in the UCM on the following fields : SIP server address, SIP User ID, Authentication ID, Password…., the extension will then be registered to the IP-PBX.
- Set the SIP transport to UDP
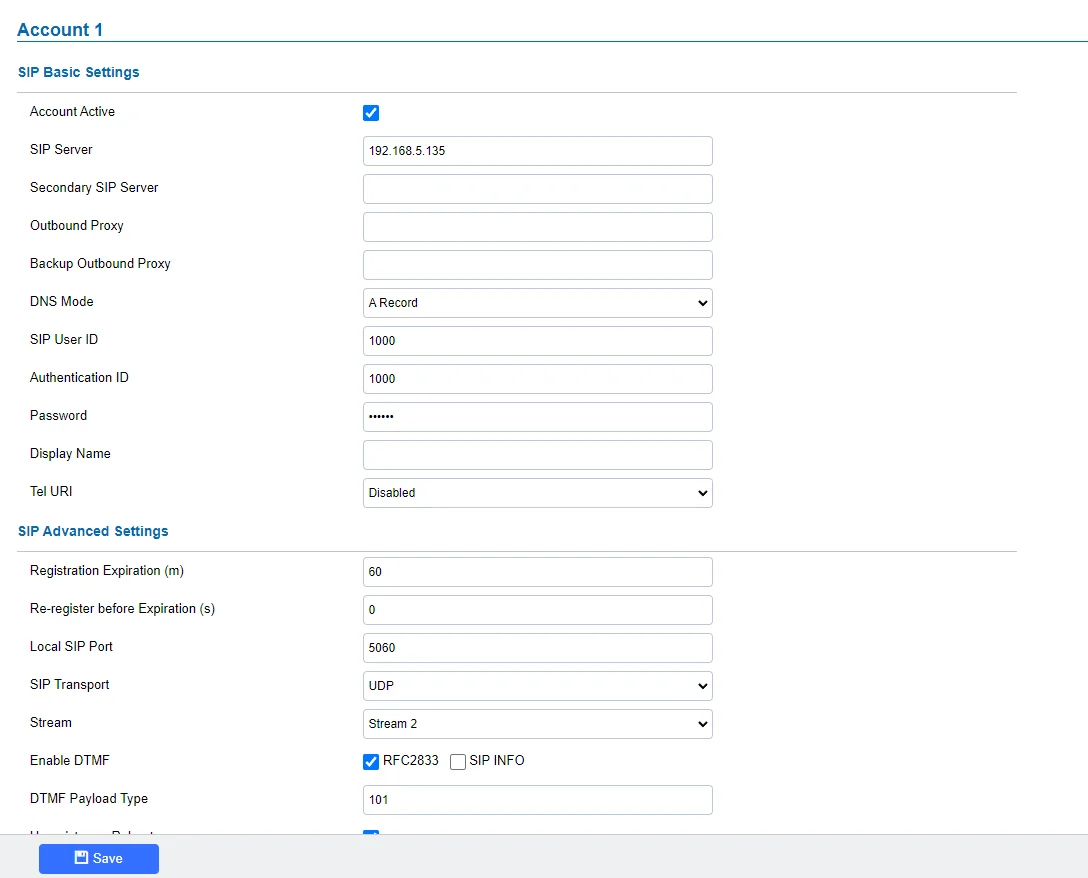
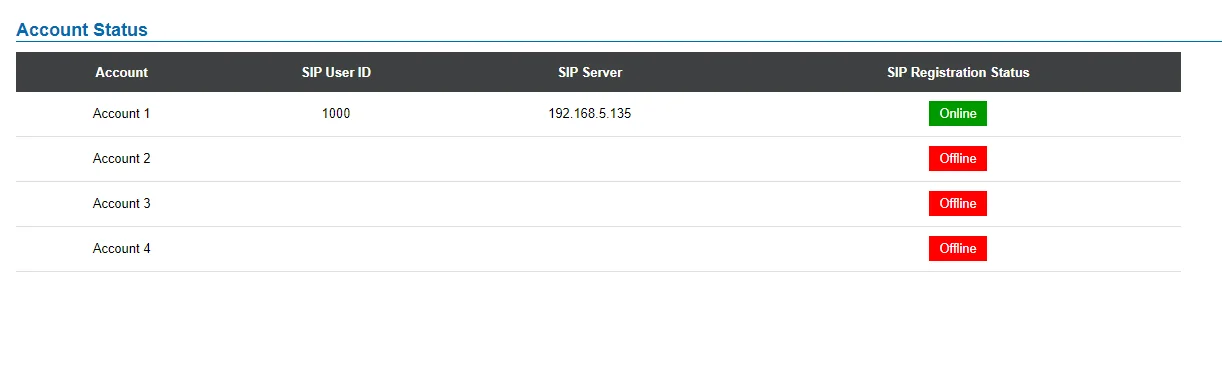
- Activate the account and make sure it has been registered correctly
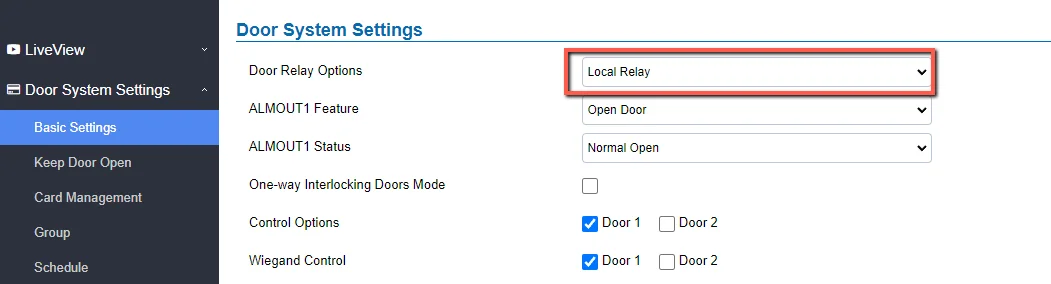
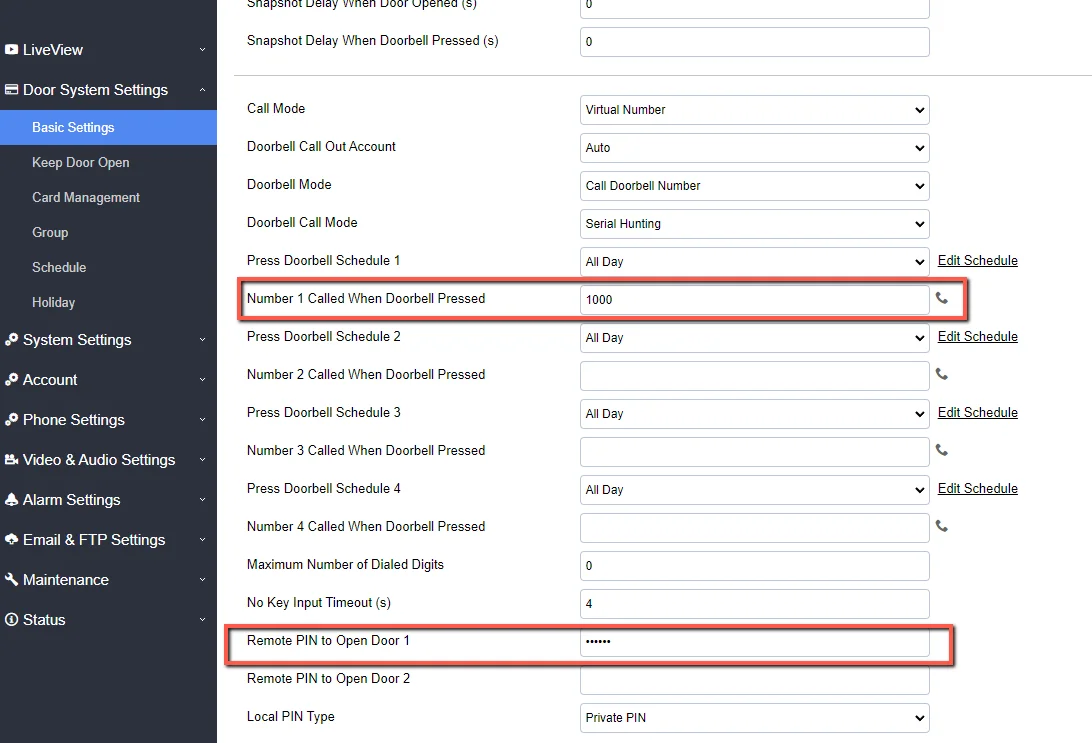
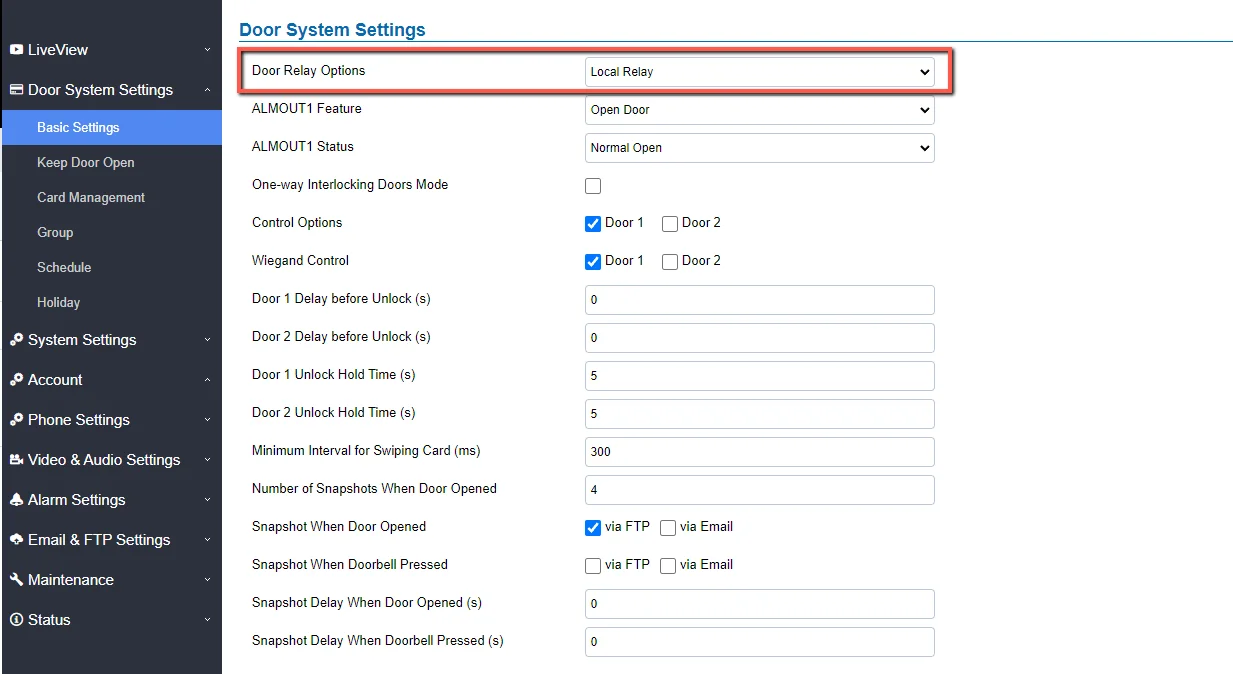
- Access the GDS37xx Web GUI and navigate to “Door System Settings🡪Basic Settings”.
- Set the local relay mode to “Local Relay” this indicates that the door lock is wired directly to the GDS37xx, and the open door action will be controlled by the GDS37xx, please note that the GDS37xx supports two Alarm_out wiring pins, which means it can support controlling up to two different doors.
- Under Doorbell Mode choose the action to be taken when the doorbell is pressed, three options are available:
- Call Doorbell Number: when Doorbell is pressed, a call will be made to the “Number Called When Door Bell Pressed”
- Control Doorbell Output (Digital Output 1): when Door Bell is pressed electronic lock for Output 1 is opened.
- Both of Above: When selected, both Call Doorbell Number and Control Doorbell Output options are enabled. In our case we will choose “Call Doorbell Number”.
- Since we want the GDS37xx to trigger a SIP call to the GSC3570 control station, then in “Number 1 Called when Door Bell Pressed” we will enter the value of the GSC3570 extension, in this case it is 1001
- Configure the “Remote PIN to Open the Door” to any random PIN, we will set it to “123456”, this will be used later to complete the authentication on the GSC3570 side
GSC3570 Configuration with SIP Server
- Access the account settings of GSC3570 under “Account Settings 🡪Account 1“
- Provide the information of extension 1001 created on the IP-PBX side to register it on the GSC3570, enter the following information: SIP User ID , SIP authentication ID , SIP Auth Password.
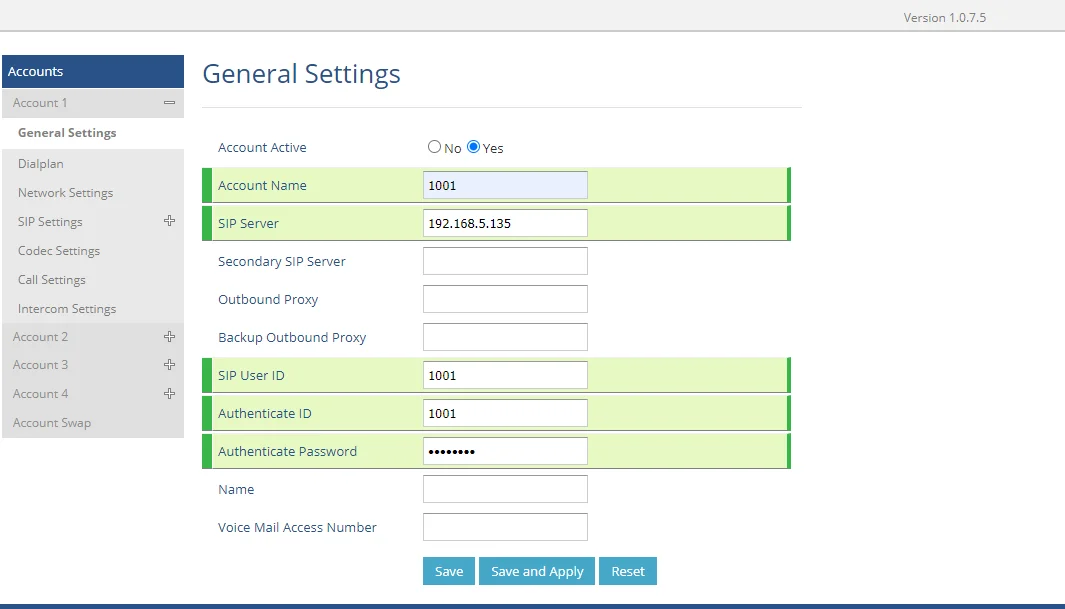
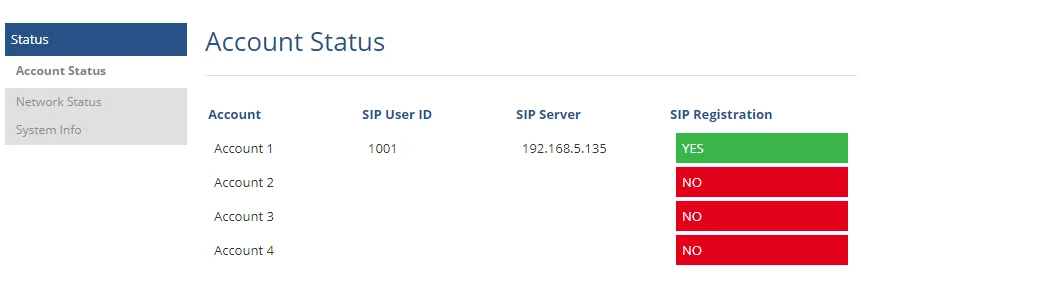
- Activate the account, after that the extension should be displayed as registered in green.
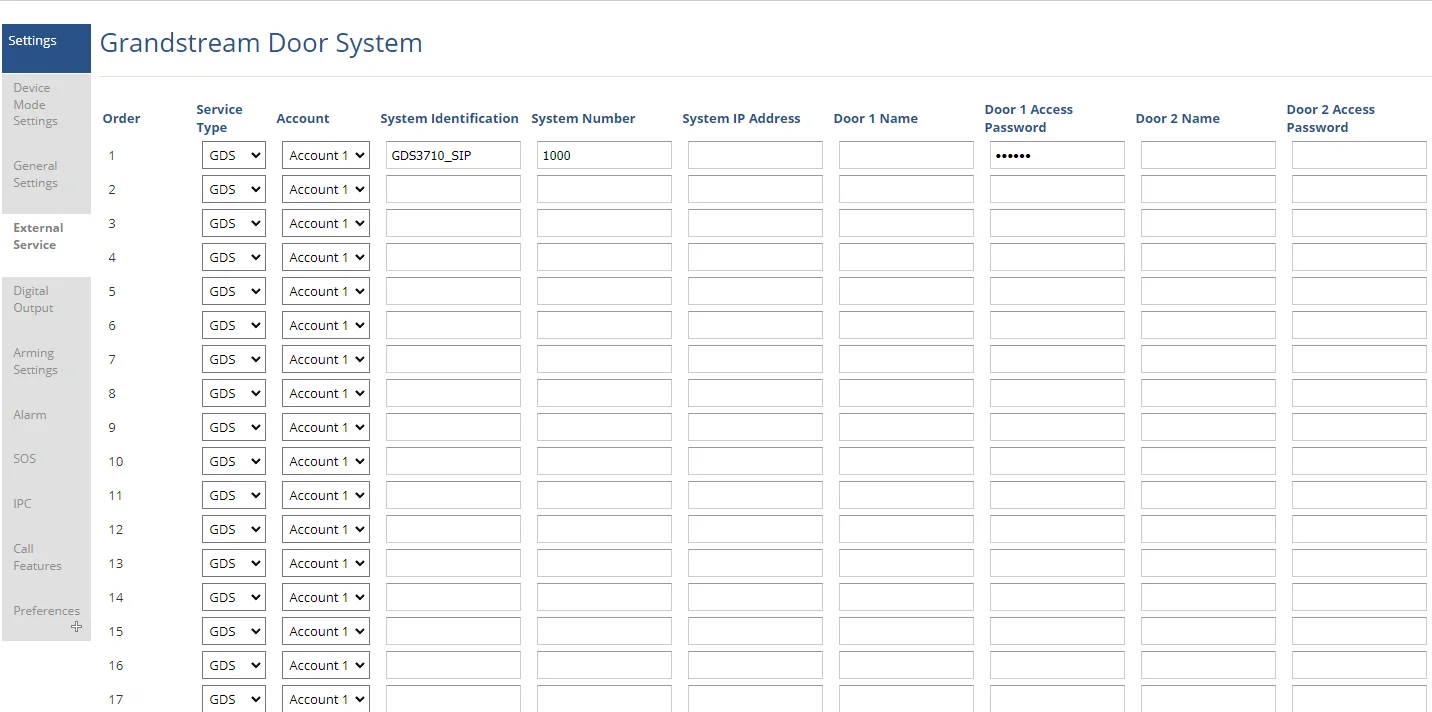
- Navigate to Settings🡪External Service to configure GDS settings as explained on the following:
- Set the Service Type to GDS.
- Select the related account, in our example, the account used is Account 1.
- Specifies the System Identification, to identify the GDS3710, in our example its “GDS3710_SIP”.
- Specifies the System Number which is the GDS3710 extension, the system number used in our example is 1000.
- Configures the Access Password for opening Door 1 remotely and it should match the password configured under “Remote PIN to Open the Door1” on the GDS3710 Web GUI settings. The password used in our example is “123456”.
Open Door via GSC3570 during SIP Call with GDS37xx
After you complete the above configuration:
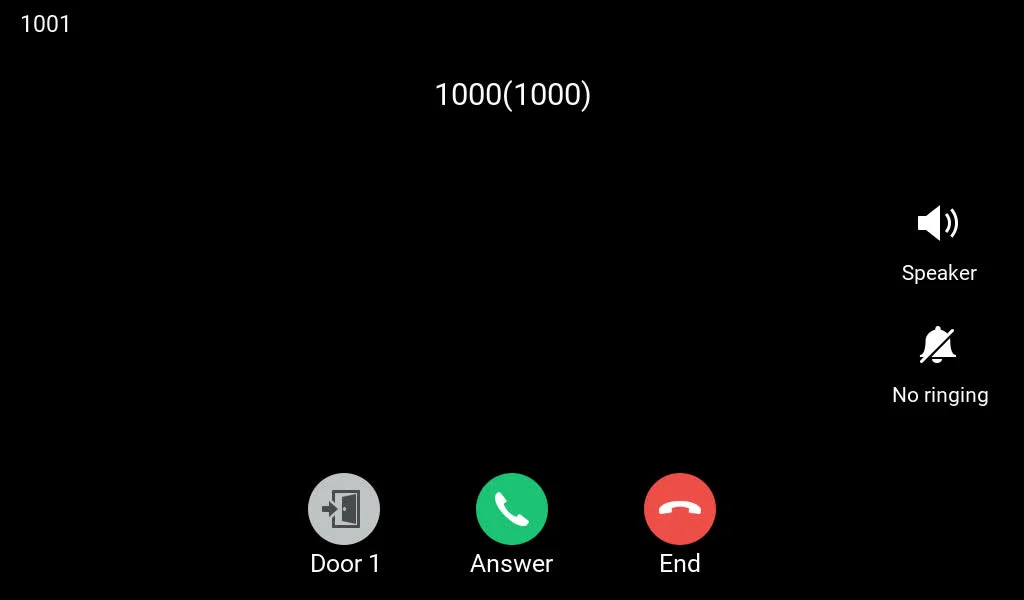
- Press the door bell on your GDS37xx
- A SIP call to the GSC3570 extension will be triggered
- While the call is ringing, you will see an open door option on the call preview, you can either open the door directly by clicking the icon “Open Door”, or answer the call first to talk with the caller, then press an “open door” during the call
Open Door via GSC3570 without SIP Call
After you complete the above configuration:
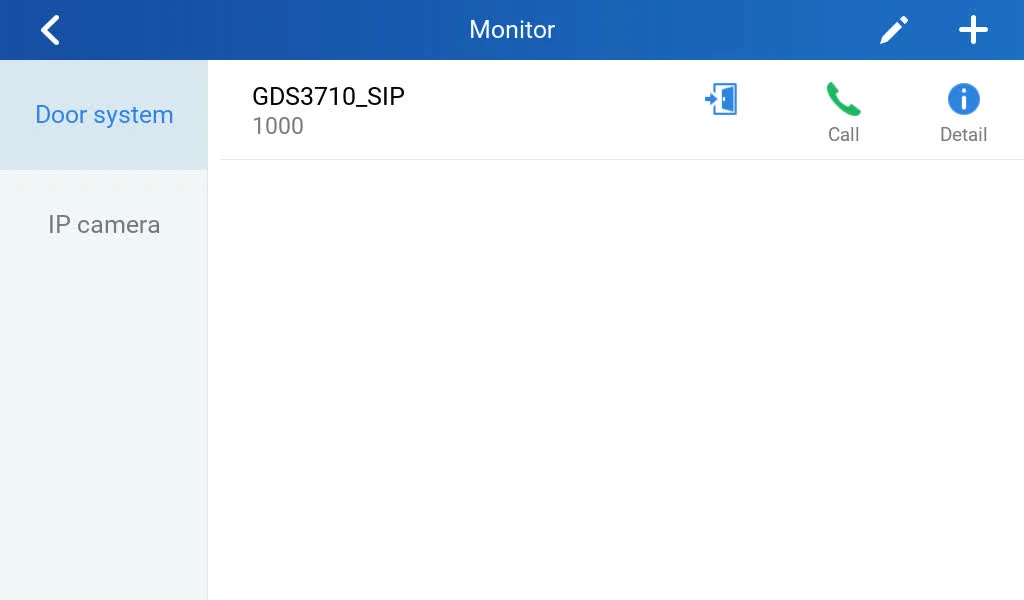
- On your GSC3570 door control station access Monitor app => Door System
- There will be a preview of the added GDS37xx devices that were configured on the external services section on the GSC3570 web UI
- Press the door icon to trigger opening the door
- In case you want to view the video stream from the GDS3710/GDS3712 before opening the door, press the icon to trigger the call, then open the door during the active SIP call.
Deployment without a SIP server
This scenario has a lot of similarities with the SIP server scenario, the main difference is that the GDS37xx and GSC3570 communicate directly with each other through Direct IP calling, without the need of an IP-PBX. the communication is basically done point-to-point.
Although it works (locally or remotely) using a SIP extension over the Internet via UCM/Proxy, as demonstrated previously, it is recommended to use a static IP if the GSC3570 (inside) and GDS37xx (outside) are in the same location on the same LAN. This ensures faster response and greater reliability, especially in case of an Internet/UCM outage or network failure.
GDS37xx Configuration without SIP Server
The GDS37xx needs to be configured with the IP address of the GSC3570, the related SIP port, and remote PIN for door opening. Please refer to following configuration steps:
- On the GDS37xx Web GUI, navigate to “Account🡪Account 1”, and set the the account to Active.

- Access the GDS37xx Web GUI and navigate to “Door System Settings🡪Basic Settings”.
- Set the Relay mode to “Local Relay“, since the door opening procedure will be wired to and controlled by the GDS37xx
- Under Doorbell Mode choose the action to be taken when the doorbell is pressed, three options are available:
- Call Doorbell Number: when Doorbell is pressed, a call will be made to the “Number Called When Door Bell Pressed”
- Control Doorbell Output (Digital Output 1): when Door Bell is pressed electronic lock for Output 1 is opened.
- Both of Above: When selected, both Call Doorbell Number and Control Doorbell Output options are enabled. In our case we will choose “Call Doorbell Number”.
- Under Number Called When Door Bell Pressed field, enter the GSC3570 IP address and port number which is 192.168.5.202:5060 in our example.
- Enter the “Remote PIN to Open the Door 1” in order to open the door via DTMF while in active call with the GDS37xx, the remote PIN used in our example is “123456”, incase of controlling two door by the GDS37xx, you can define “Remote PIN to Open the Door 2”

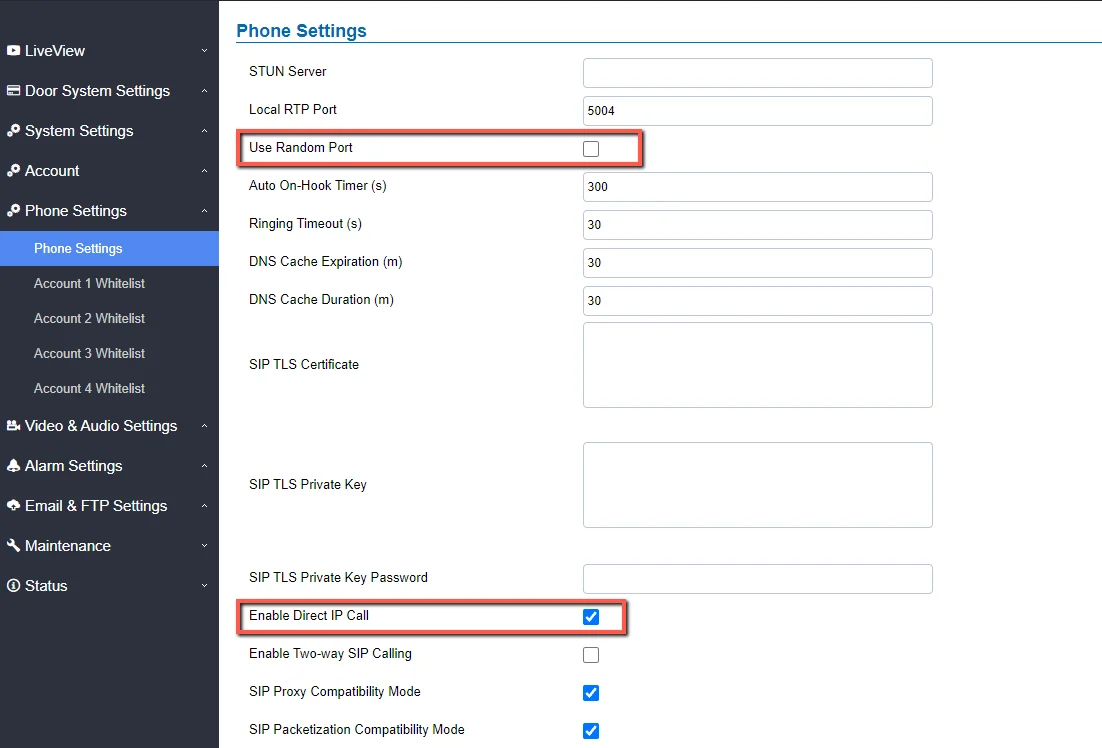
- You need to make sure that the Direct IP Call feature is enabled from the GDS37xx Web GUI under “Phone Settings” 🡪 “Enable Direct IP Call”. as shown in below screenshot.
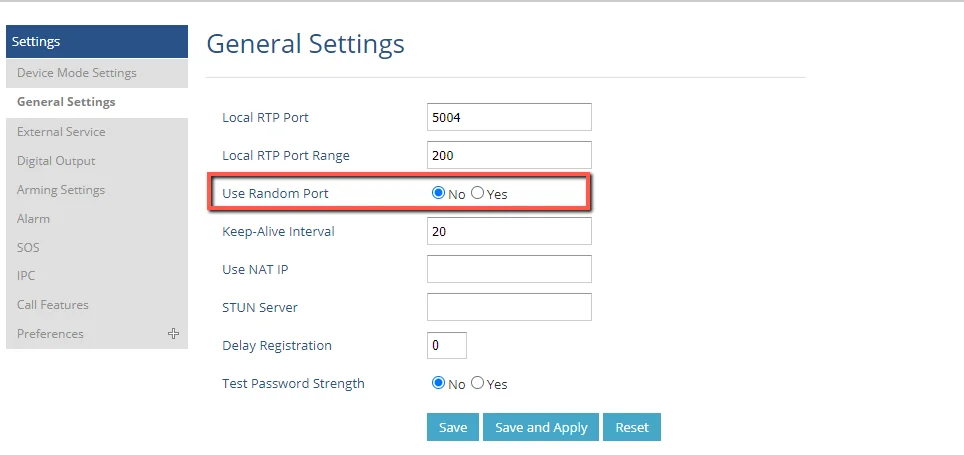
- Under Phone Settings, disable the option “Use Random Port“, to avoid ghost calling scenarios.
GSC3570 Configuration without SIP Server
The GSC3570 related account needs to be set as “Active”, and the “Local SIP Port” needs to match the port configured on GDS37xx. Please refer to the following steps for configuring the GSC3570 in order to interconnect with the GDS37xx.
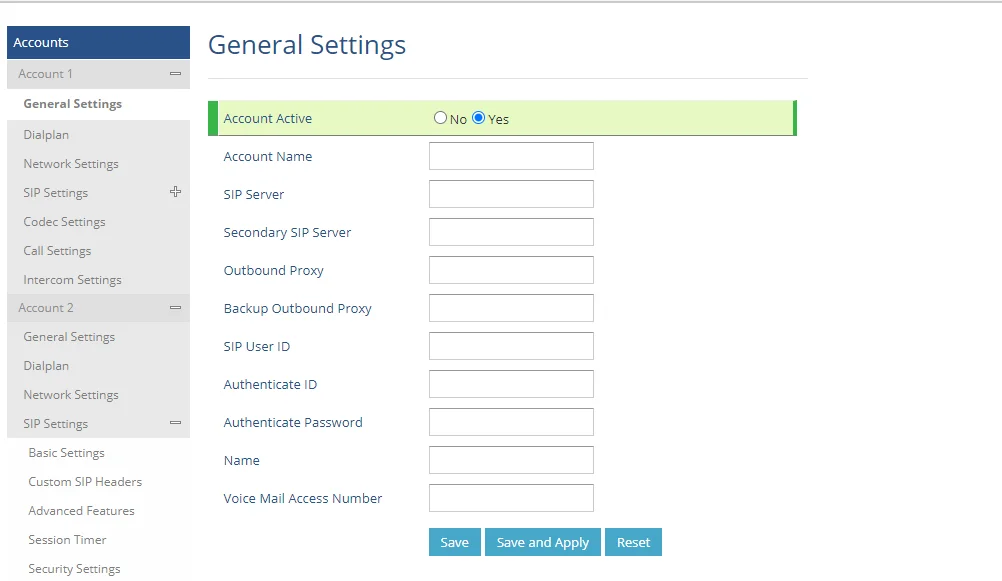
- Access GSC3570 Web GUI🡪Account 1🡪General Settings and set “Account Active” to Yes, then click on
 button to apply the new changes.
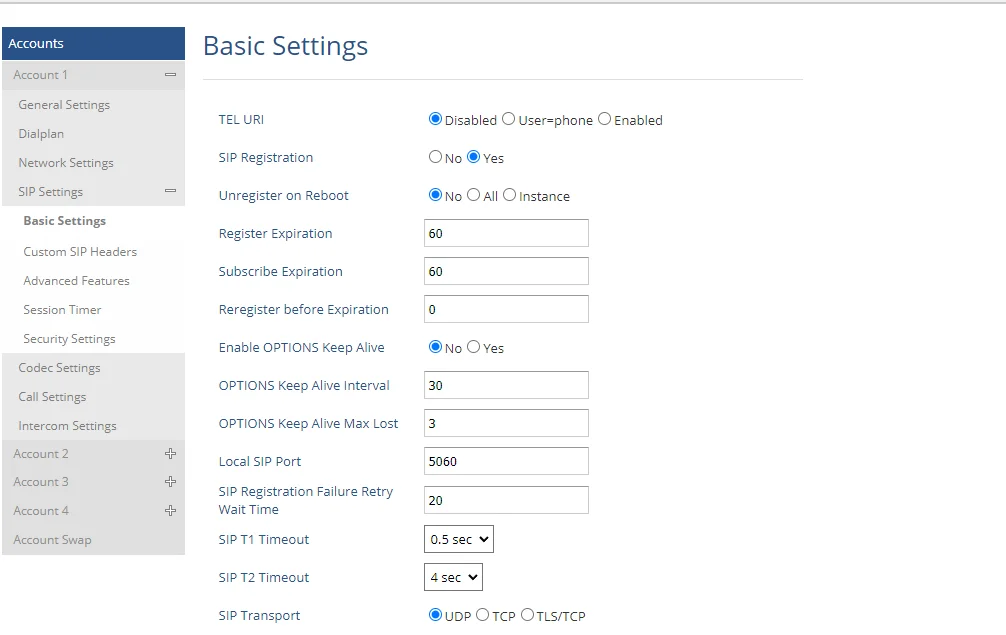
- Navigate to Account🡪SIP Settings and verify that the Local SIP Port configured on the GSC3570 is the same as the one on the GDS37xx, in our case it is port “5060”
- Make sure the option “Use Random Port” is set to “No” under Settings 🡪 General Settings
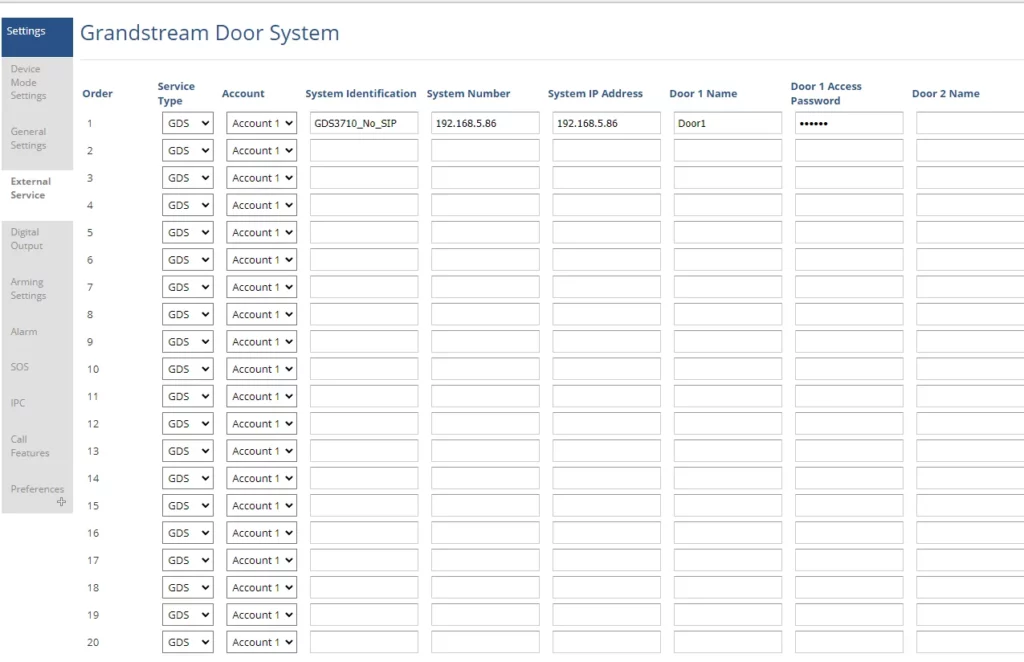
3. Navigate to Settings🡪External Service to configure GDS settings as explained on the following:
- Set the Service Type to GDS.
- Select the related account, in our example, the account used is Account 1.
- Specifies the System Identification, to identify the GDS37xx, in our example its “GDS3710_NO_SIP”.
- Specifies the System Number which is the GDS37xx number, the system number used in our example is 192.168.5.86.
- Configures the Access Password for opening Door 1 or Door 2 remotely and it should match the password configured under “Remote PIN to Open the Door 1” on the GDS37xx Web GUI settings. The password used in our example is “123456”.
Open Door via GSC3570 during Direct IP Call with GDS37xx
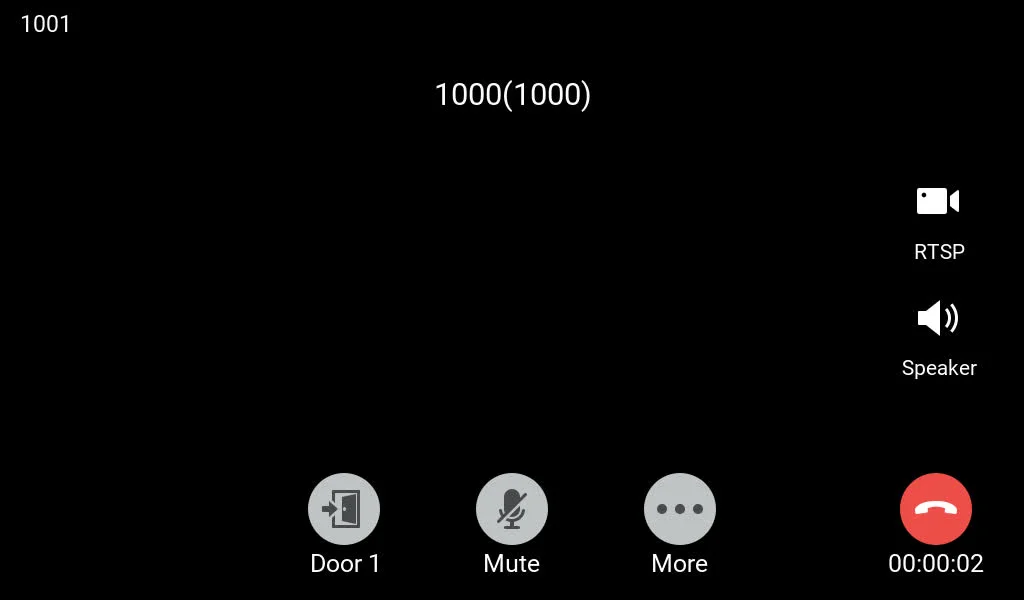
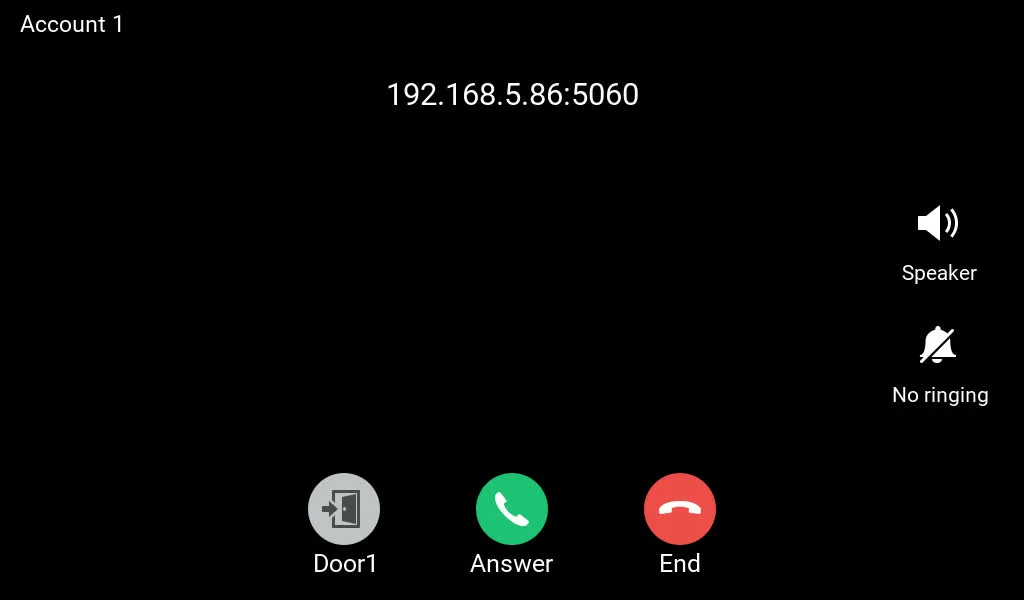
Once GDS37xx and GSC3570 paired together as described in the previous sections, the remote open door can be performed from the GSC3570 upon receiving a call from GDS for example when the doorbell button is pressed (Direct IP call).
To perform the remote open door from GSC3570 while on call with GDS, Press the door icon as shown in below example figure.
Open Door via GSC3570 Without Direct IP Call with GDS37xx
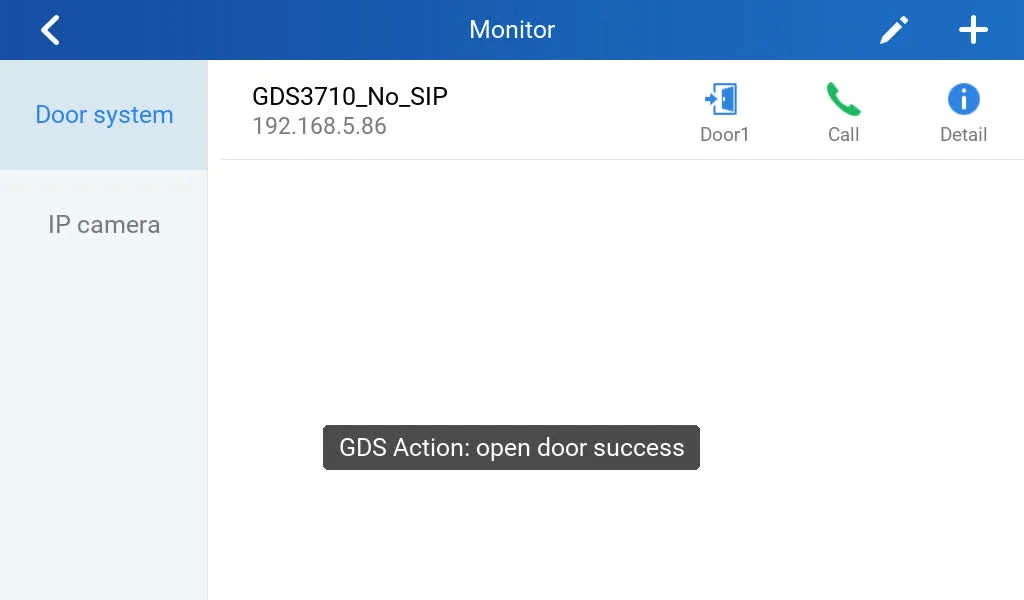
The users have the possibility to open door remotely via GSC3570 without SIP/Direct IP call (Supported ONLY in GDS3710/GDS3712).
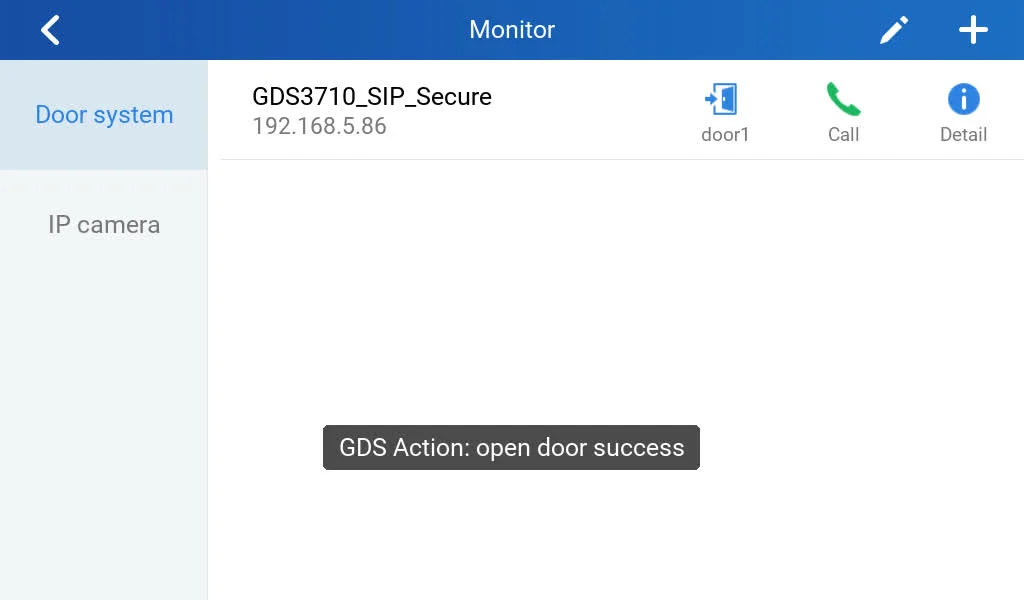
From the LCD touch screen of GSC3570, press “Monitor”, select “Door system”, then you can select the desired door to be opened as shown in below screenshot where the door for GDS3710_NO_SIP is selected.
Secure Open Door using GSC3570
In this scenario, we connect the door electric lock to the GSC3570, and communicate between the GDS37xx and the GSC3570 through SIP to trigger the open door action. The GDS37xx is deployed outdoors, and the GSC3570 is deployed indoors with the door electric lock wired directly to it. This setup is more secure, as the door control is managed from the inside rather than the outside, with the GSC3570 acting as the door control relay.
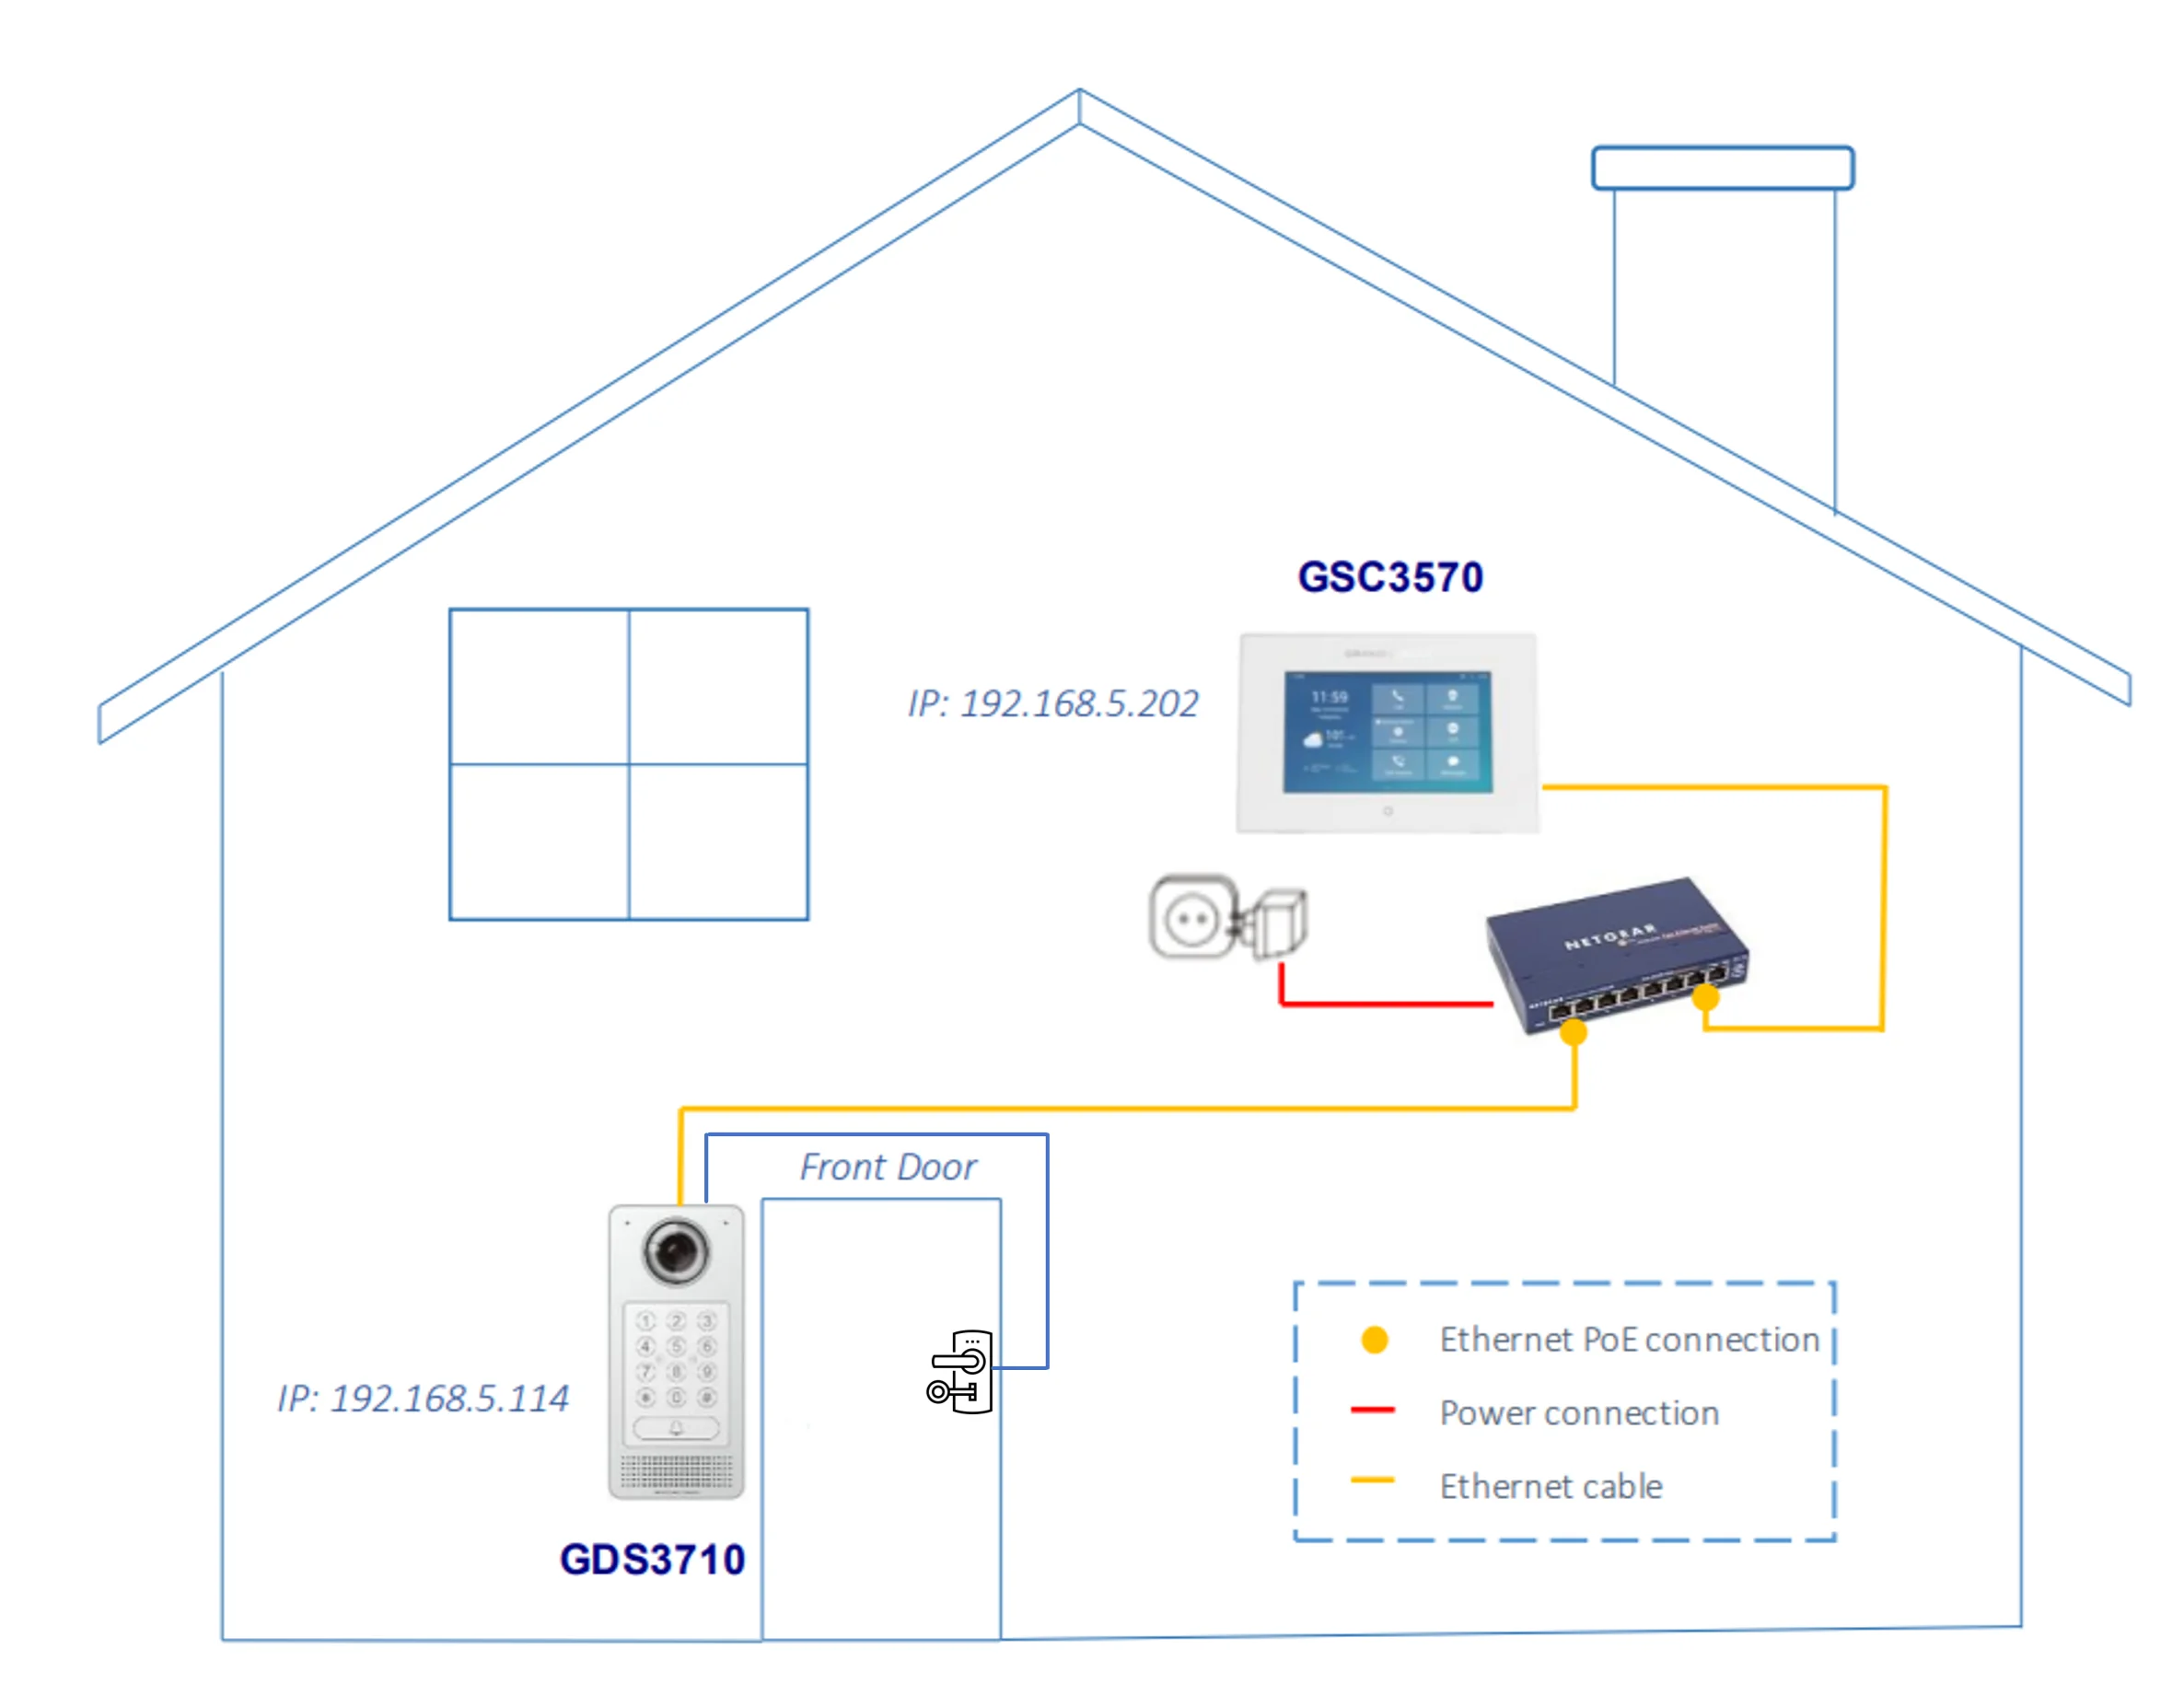
The following illustration describes the set up:

Wiring Diagram
Below diagram is representing an example of the wiring needed to connect GSC3570 with GDS37xx for secure open door mode.
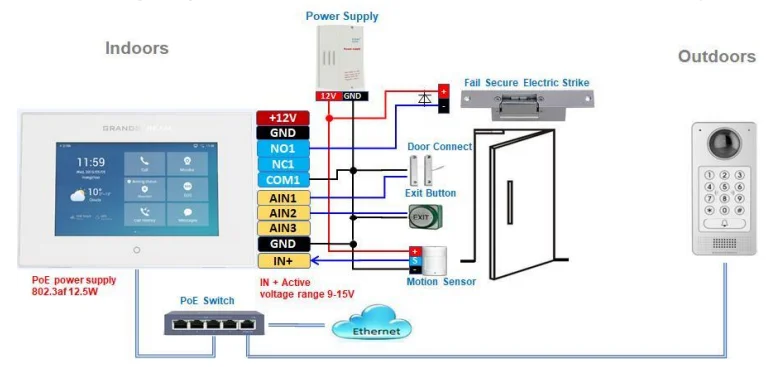
Please refer to the Wiring Diagrams document for more examples and possible connections.
GDS37xx configuration for Secure Open Door
On the GDS37xx, please follow the below steps:
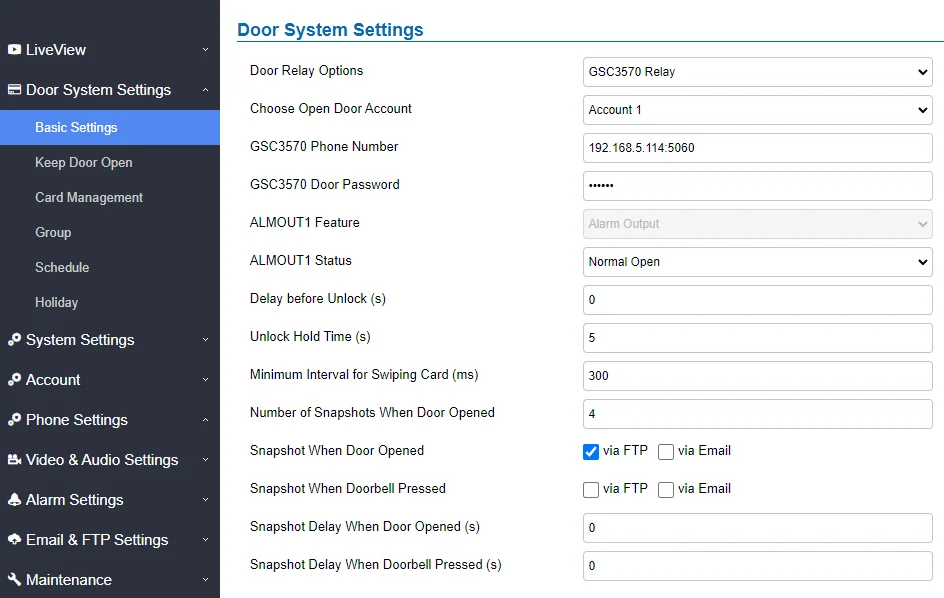
- Access the web UI settings, then under Door System Settings 🡪 Basic Settings, set Door Relay options to “GSC3570 Relay“, this ensures that the door control wiring will be connected directly to the GSC3570 device.
- Set the account to choose to “Account 1”, this will be the account used on GSC3570.
- The GSC3570 Phone number will be either, the GSC3570 SIP extension, in case of deploying a SIP server, or the GSC3570 IP Address, in case of using Direct IP Calling.
- GSC3570 Door Password is for establishing the secure link between the two devices to make the whole “secure open door” application able to work, the same password will be used on the digital output settings on the GSC3570.
- Make sure to set the SIP transport to UDP on Account 1 settings, and the SIP Port is identical to the one used on the GSC3570, we will use port 5060
- Enable Direct IP Calling under “Phone Settings” 🡪 “Enable Direct IP Call”
- Set the “Use Random Port” option to “No”
GSC3570 configuration for Secure Open Door
On the GSC3570, Please make sure to follow the below settings:
- On the Web UI settings, go to Settings 🡪 Digital Output
- Set the Digital Output mode to “To door”
- Set the account to “Account 1”
- For the System number, you can either provide the SIP extension of the GDS37xx, or its IP address in case of configuring it for Direct IP Calling
- Door System IP Address will be the IP address of the GDS3710
- Define the “Door Control Password” to match the the GSC3570 door password defined on the GDS37xx

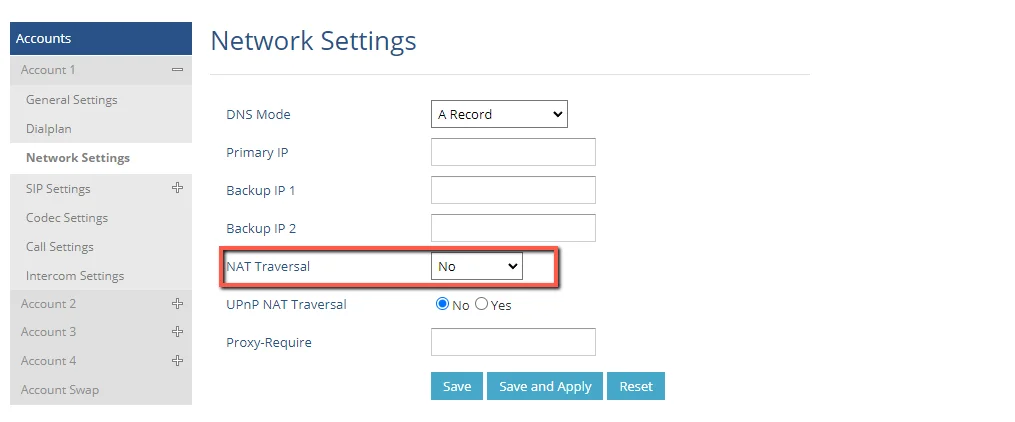
- On Account 1 => Network Settings, make sure to set the NAT Traversal option to “No”
- Disable “Use Random Port” option to avoid ghost calls (SIP Signaling working, but no media).

- Under Settings 🡪 External services, define the following:
- Set the Service Type to GDS.
- Select the related account, in our example, the account used is Account 1.
- Specify the System Identification, to identify the GDS37xx, in our example its “GDS37xx_NO_SIP”.
- Specify the System Number which is the GDS37xx number, the system number used in our example is 192.168.5.86.
- Specify the door name for reference

Open Door using GSC3570
To open the door:
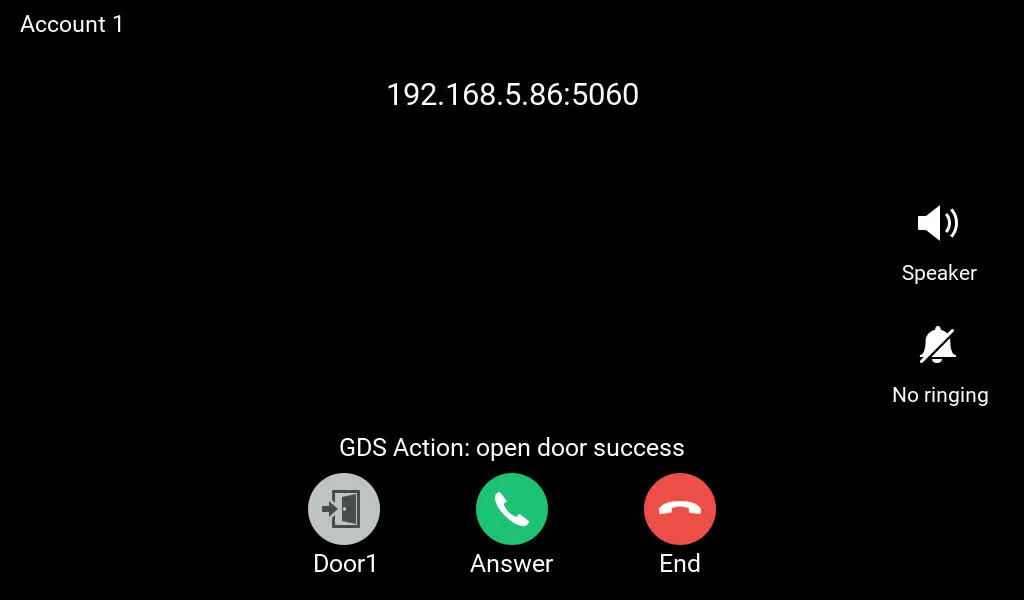
- With a call: you will have the option to open the door during an incoming SIP call from the GDS37xx.
- Without a SIP call: Go to Monitor, then, under door systems, you will find an option to open door by clicking the icon “open door”, only applicable for GDS3710/GDS3712 models.
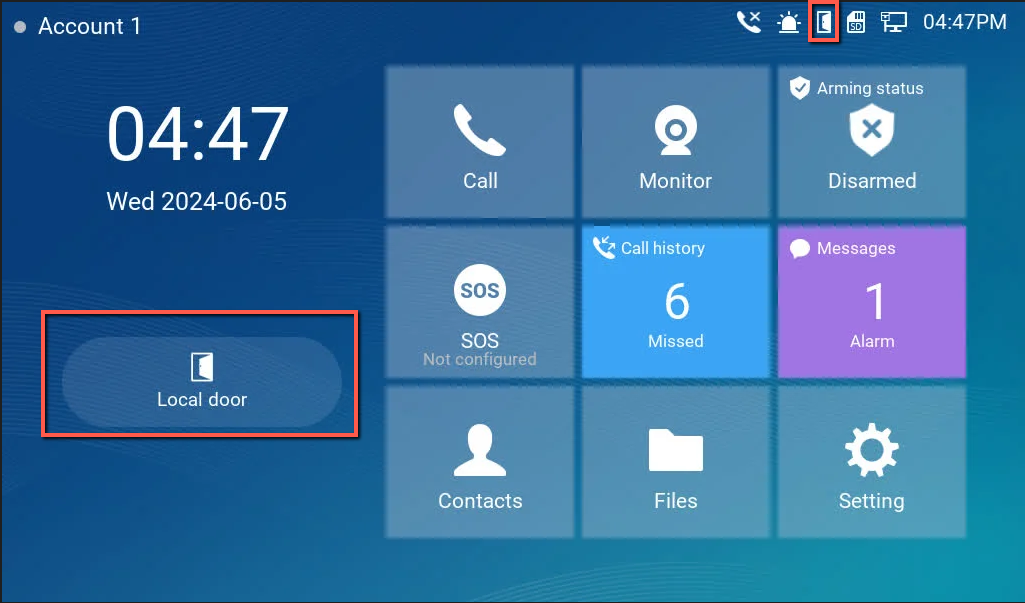
When this feature is activated and the door opens, the GSC3570 will emit a long ‘Beep’ to notify the successful relay operation. A relay click sound will also be heard, and an ‘Open Door’ icon will appear in the top right corner of the touch screen. The icon will disappear once the ‘Unlock holding time’ expires.
SUPPORTED DEVICES
Following table shows the shows the supported devices:
Model | Minimum firmware |
GDS3710 | 1.0.7.23 or higher |
GDS3705 | 1.0.1.11 or higher |
GDS3712 | 1.0.11.23 or higher |
GDS3702 | 1.0.3.11 or higher |
GSC3570 | 1.0.5.9 or higher |
Supported Devices