
OVERVIEW
The GDS37xx can be connected with a SIP phone in 2 different ways, either using peering mode (without a SIP server) or through a SIP server/registrar.
This guide illustrates the needed configuration for integrating the GDS37xx with GRP26xx Series for both peering and using SIP server scenarios.
PEERING WITHOUT USING SIP SERVER
In this scenario, we assume that the GDS37xx is installed in a small warehouse at the front door and the GRP26xx IP Phone inside to monitor and control the access of the premise. Visitors need to press the doorbell button on the GDS37xx to initiate a video/audio call, and the related person at the GRP26xx IP Phone side can open the door remotely to allow the visitors to get in.
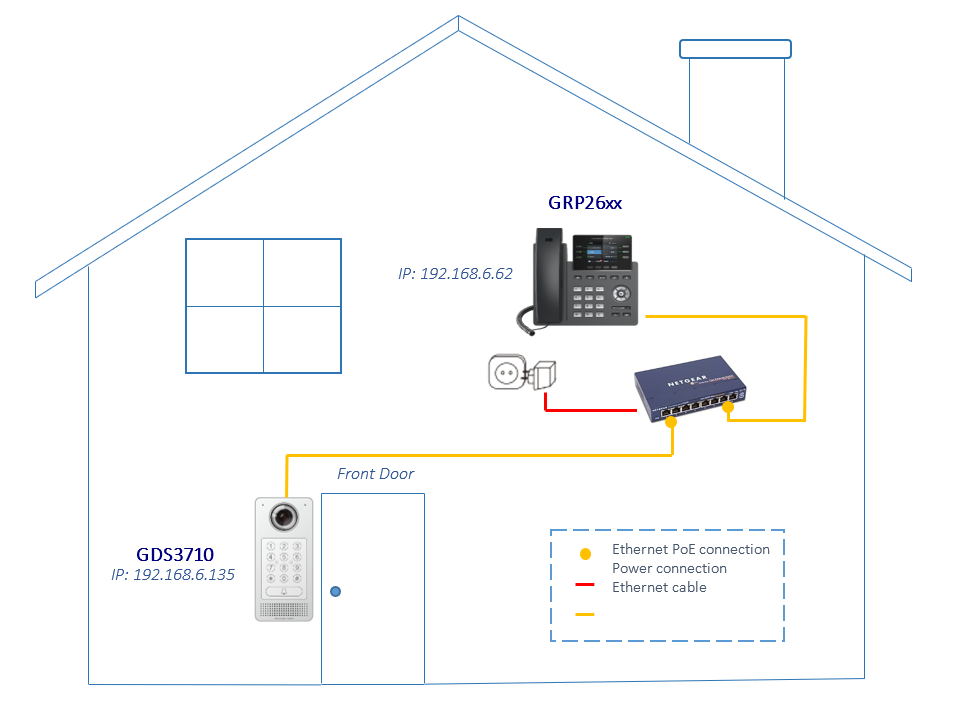
- The IP address used by the GDS3710 is 192.168.6.135
- The IP address used by the GRP26xx IP Phone is 192.168.6.62
GDS37xx Configuration Settings
The GDS37xx needs to be configured with the IP address of the GRP26xx IP Phone, the related SIP port, and remote PIN for door opening. Please refer to the following configuration steps:
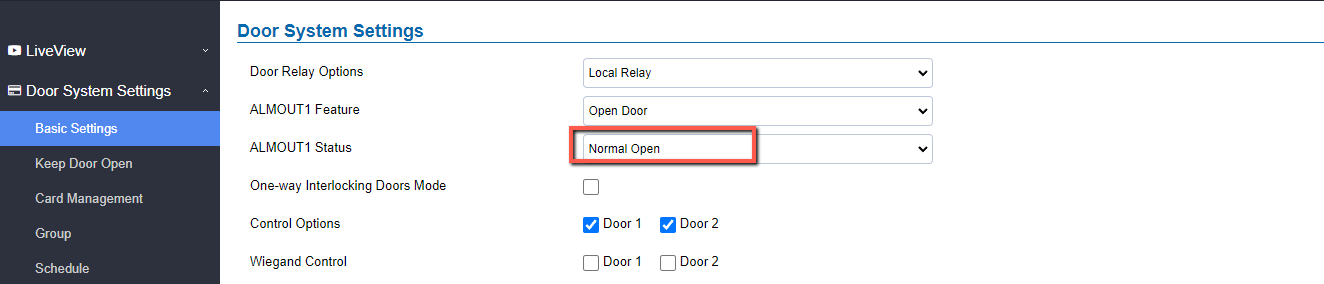
- Access the GDS37xx Web GUI and navigate to “Door System Settings🡪Basic Settings”.
- Select the ALMOUT1 Feature to “Open Door“
- Depending on weather you want to control one or two doors, you can select the doors to be controlled from the control options.
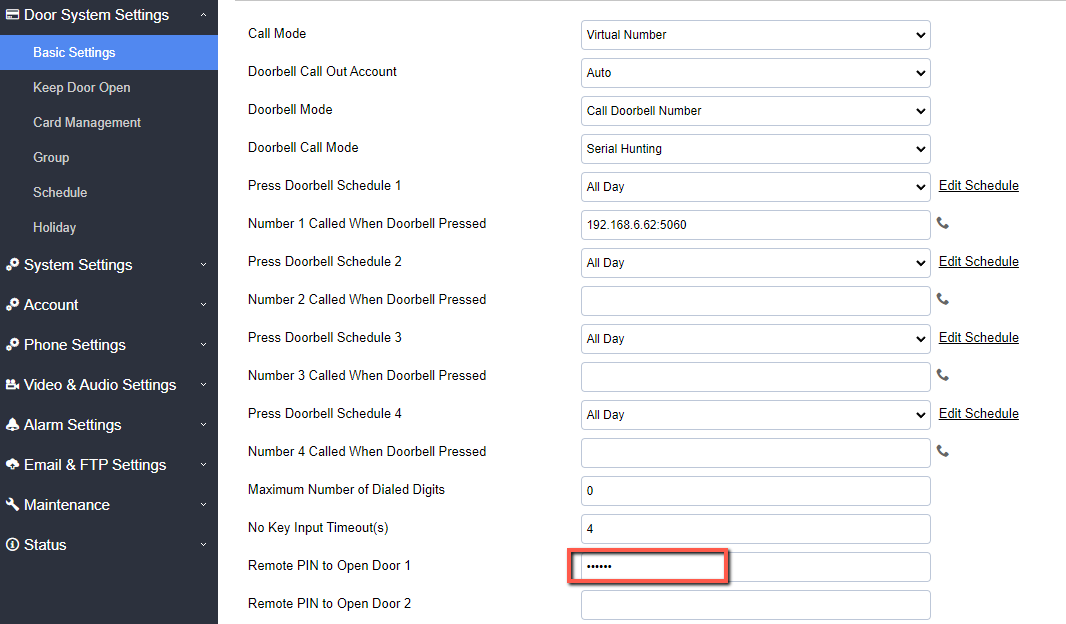
4. Choose the action to be taken when the doorbell is pressed, three options are available:
- Call Doorbell Number: when Doorbell is pressed, a call will be made to the “Number Called When Door Bell Pressed”
- Control Doorbell Output (Digital Output 1): when Door Bell is pressed electronic lock for Output 1 is opened.
- Both of Above: When selected, both Call Doorbell Number and Control Doorbell Output options are enabled. In our case, we will choose “Call Doorbell Number”. We will select option 1 “Call Doorbell Number“
5. Under Number 1 Called When Door Bell Pressed field, enter the GRP26xx IP address and port number which is 192.168.6.62:5060 in our example.
6. Enter the “Remote PIN to Open the Door 1 ” in order to open the door via DTMF while in active call with the GDS37xx, the remote PIN used in our example is “123456”.
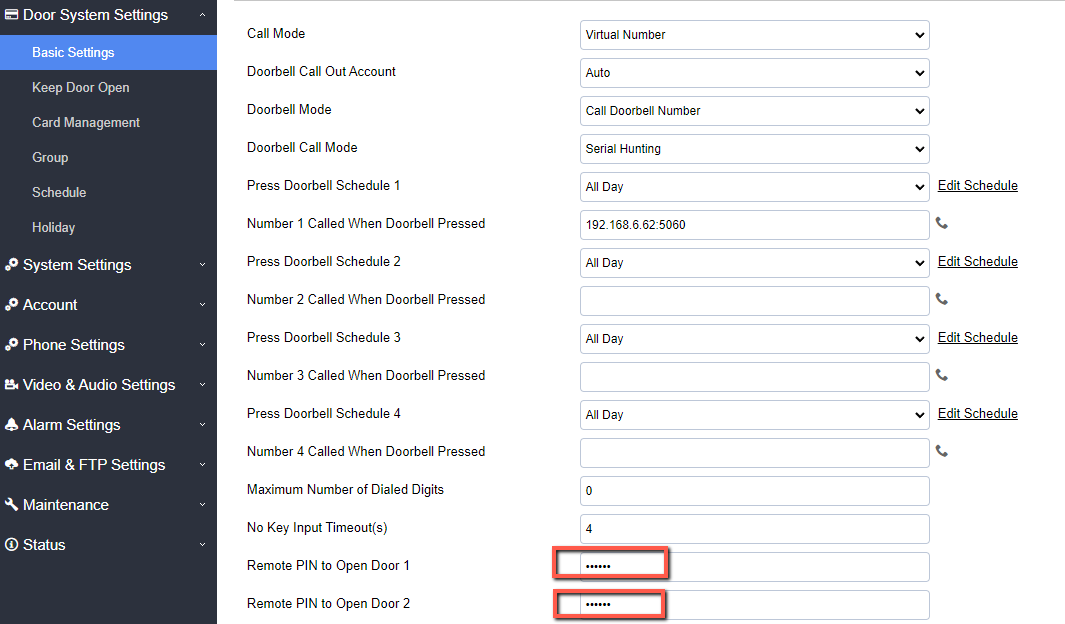
7. Incase you want to add two doors to be configured at once, then Enter the PIN for “Remote PIN to Open the Door 2” as well, set it to “123456”
8. Click ![]() button to apply changes.
button to apply changes.
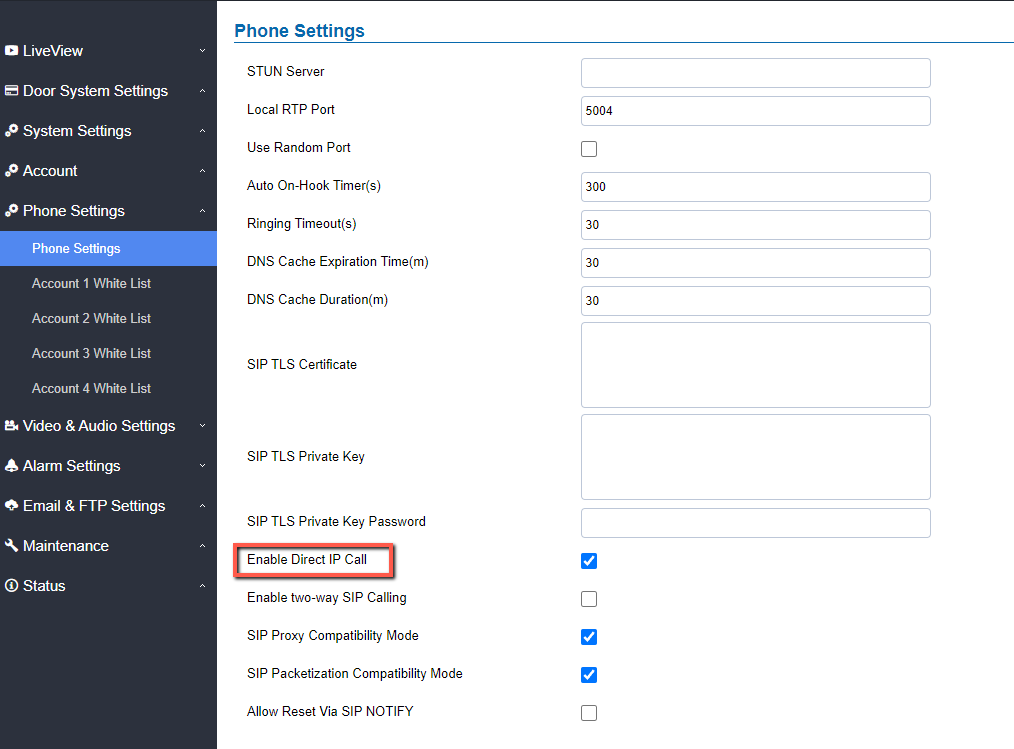
9. You need to make sure that the Direct IP Call feature is enabled from the GDS37xx Web GUI under Phone Settings 🡪 Phone Settings 🡪 Enable Direct IP Call.
GRP26xx IP Phone Configuration
The GRP26xx IP Phone-related account needs to be set as “Active”, and the “Local SIP Port” needs to match the port configured on GDS37xx. Please refer to the following steps for configuring the GRP26xx IP Phone in order to interconnect with the GDS37xx.
- Access GRP26xx IP Phone Web GUI🡪Account🡪General Settings and set “Account Active” to Yes, then click on
 button to apply the new changes.

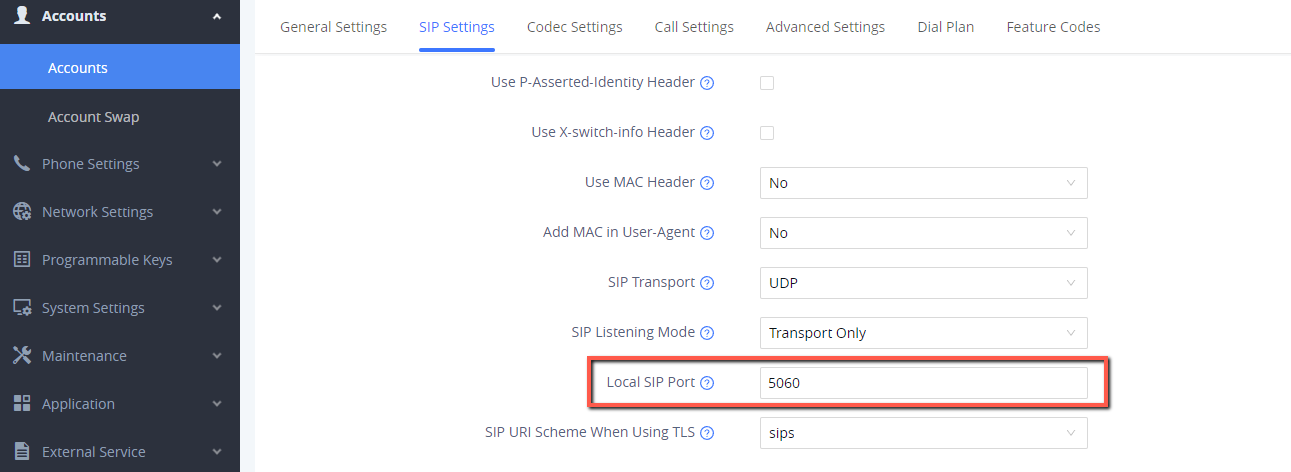
- Navigate to Account🡪SIP Settings and verify that the Local SIP Port configured on the GRP26xx IP Phone is the same as the one on the GDS37xx.
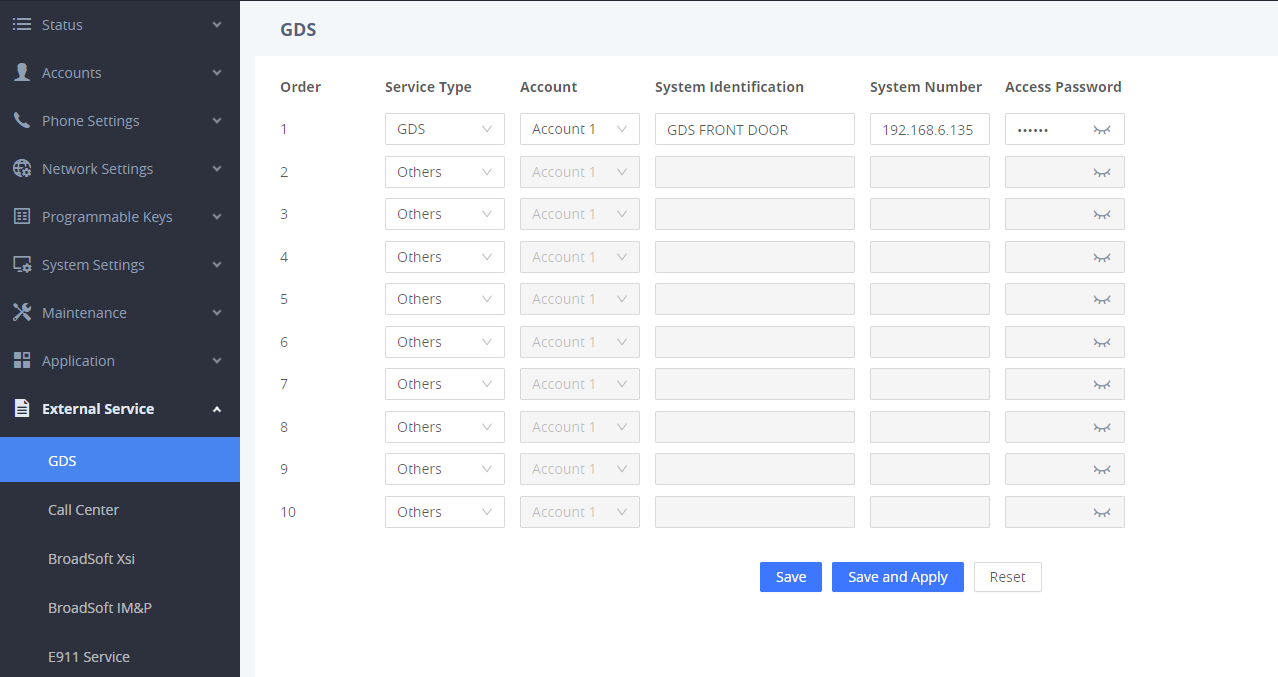
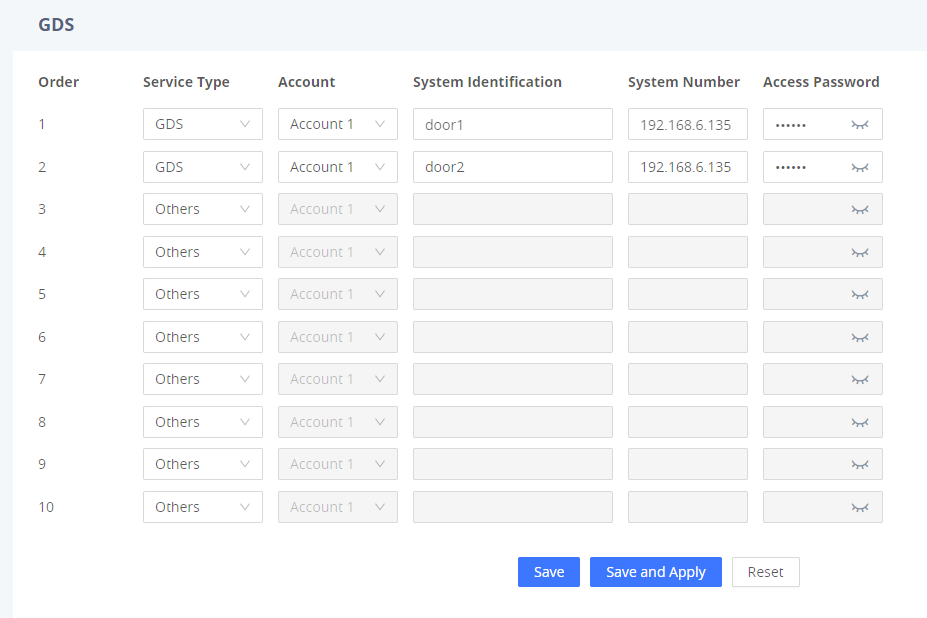
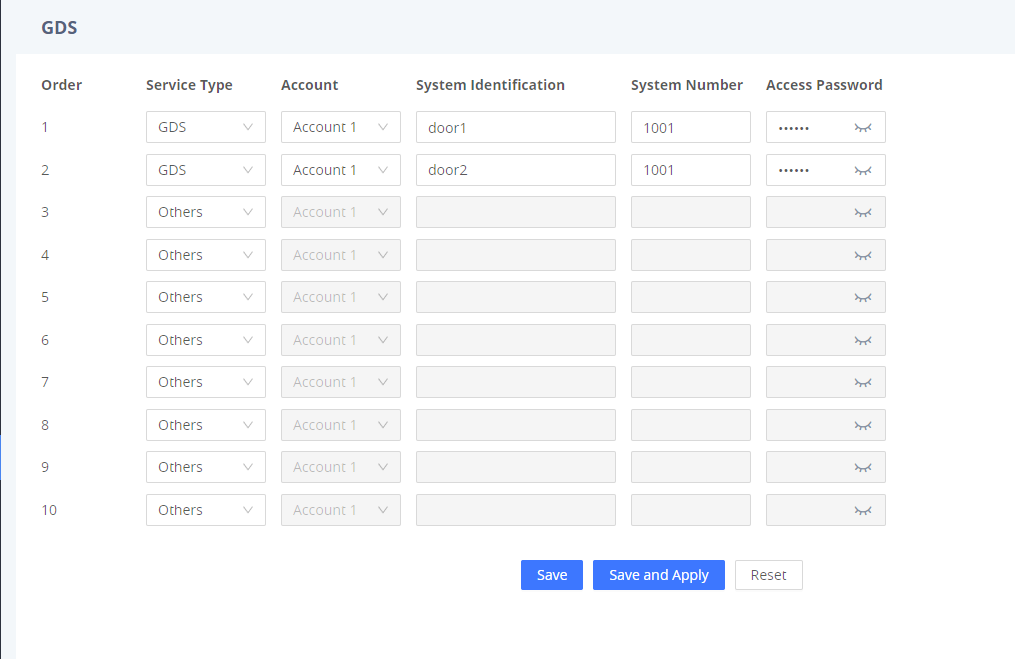
- Navigate to External Service 🡪 GDS to configure GDS settings as explained on the following:
- Set the Service Type to GDS.
- Select the related account, in our example, the account used is Account 1.
- Specifies the System Identification, to identify the GDS37xx, in our example its “GDS FRONT DOOR”.
- Specifies the System Number which is the GDS37xx number, the system number used in our example is 192.168.6.135.
- Configure the Access Password for opening the door remotely and it should match the password configured under “Remote PIN to Open the Door” on the GDS37xx Web GUI settings. The password used in our example is “123456”.
- Incase you want to control two doors then :
- For GRP260x:
- Click on icon
 to add second door
 - Add two access identifications with the same IP address as the access number of the GDS37xx used
- When receiving a call simply choose the door you want to open from the list of doors displayed ( Door1, Door2)
- Click on icon
 to add second door
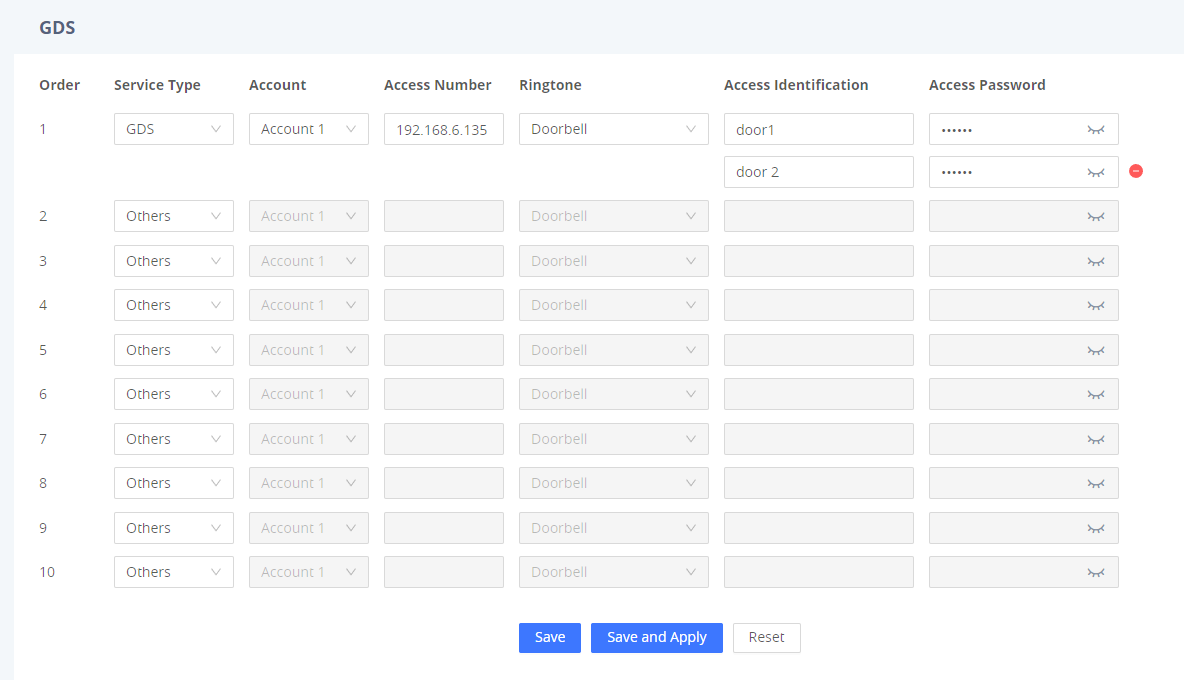
- For GRP261x/GRP262x/GRP263x/GRP2650/GRP2670
- Add two values with the same IP address of the GDS37xx used
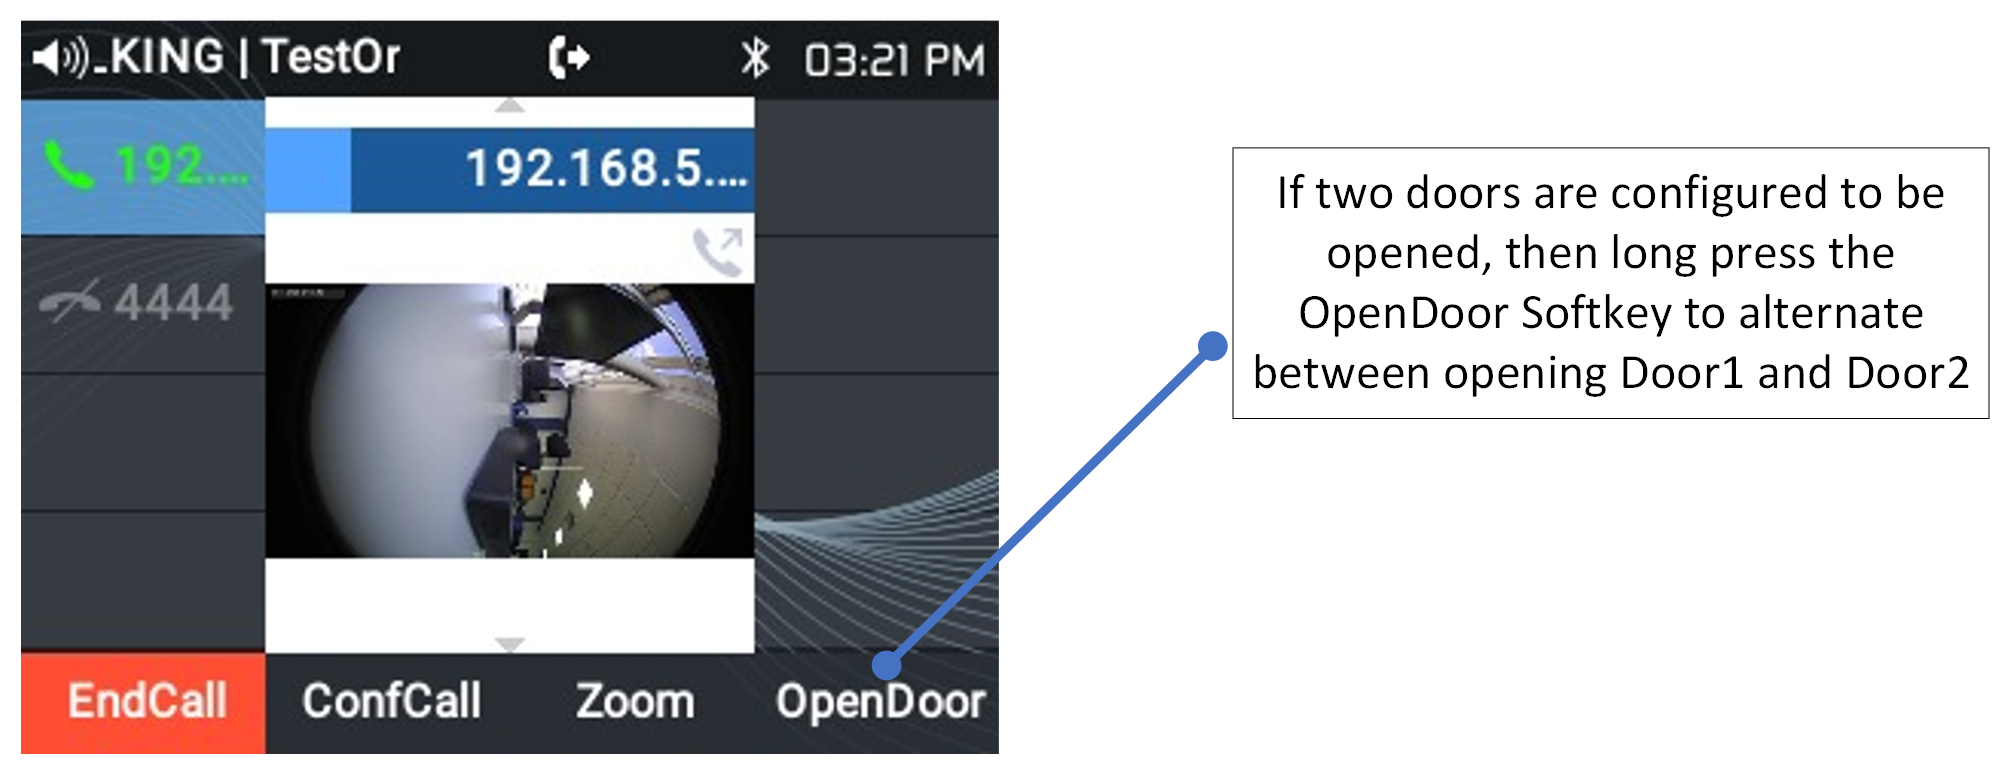
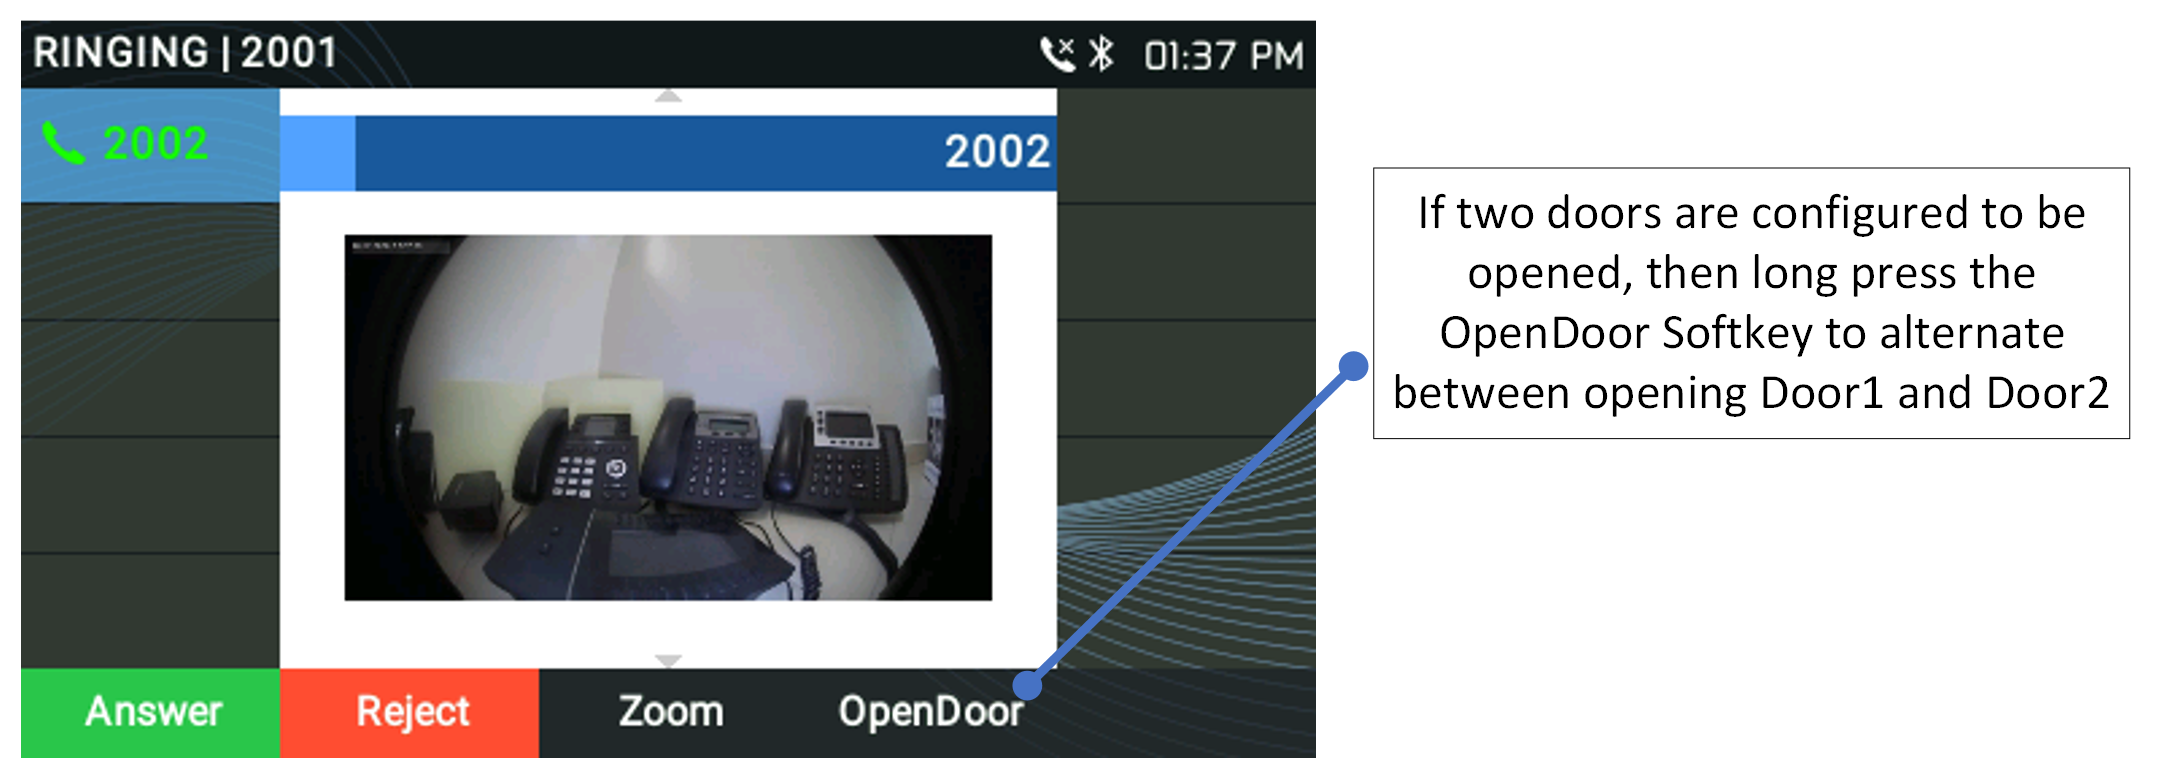
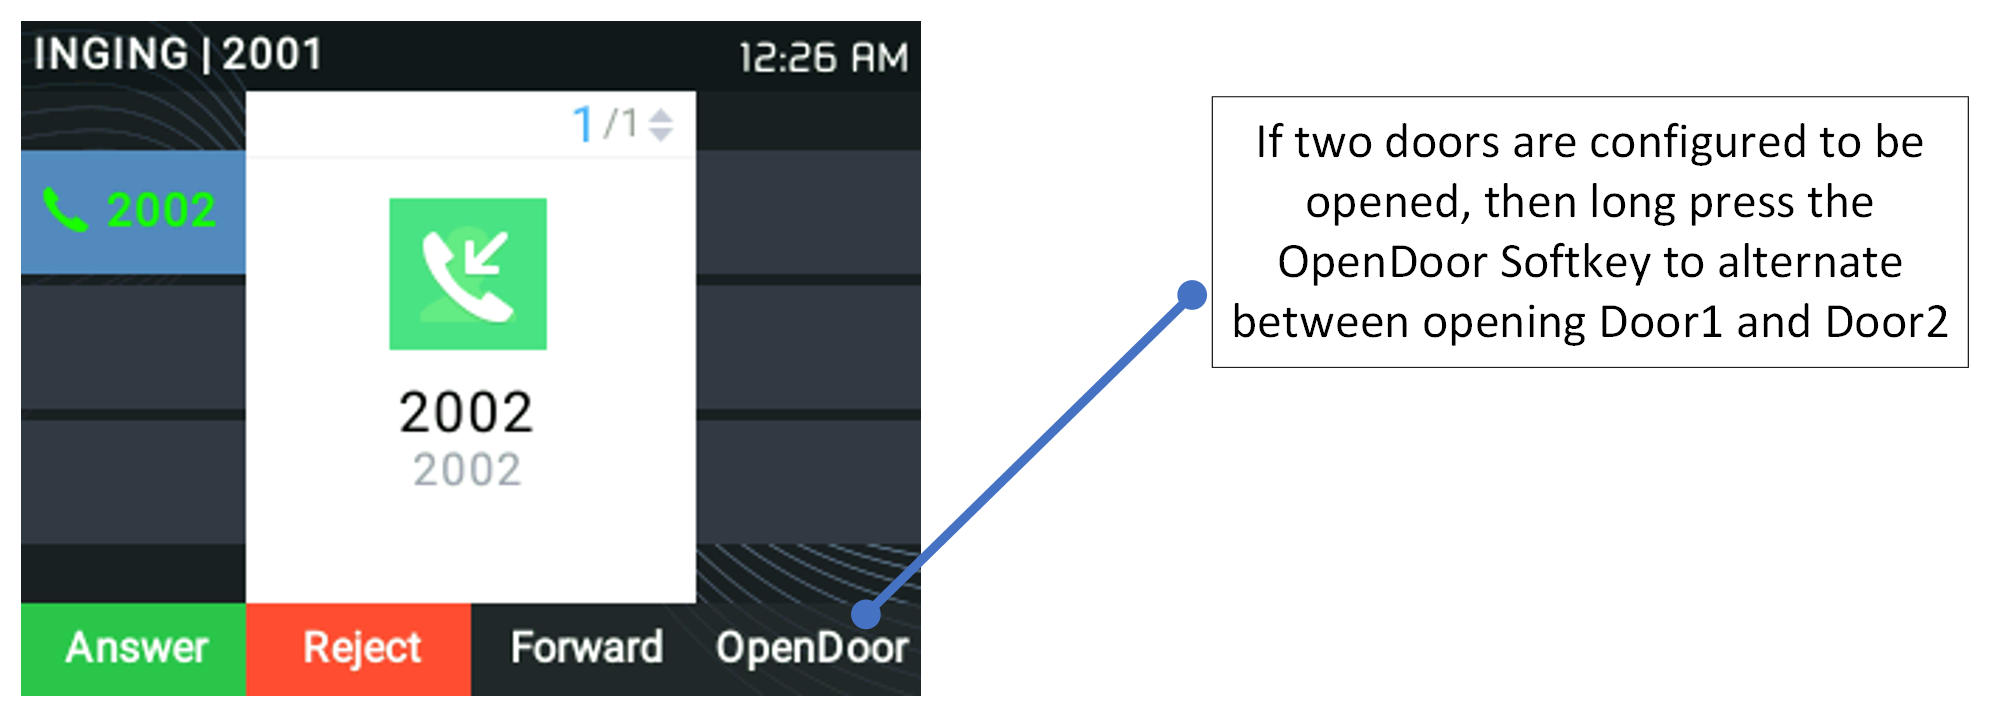
- When wanting to choose which door to open, Long Press the door1 soft key to alternate to door2
- Press button to apply the new settings.
PEERING USING SIP SERVER
In this scenario, we assume that the GDS37xx is configured with a SIP account, and the GRP26xx IP Phone is also configured with a SIP account under the same SIP server.
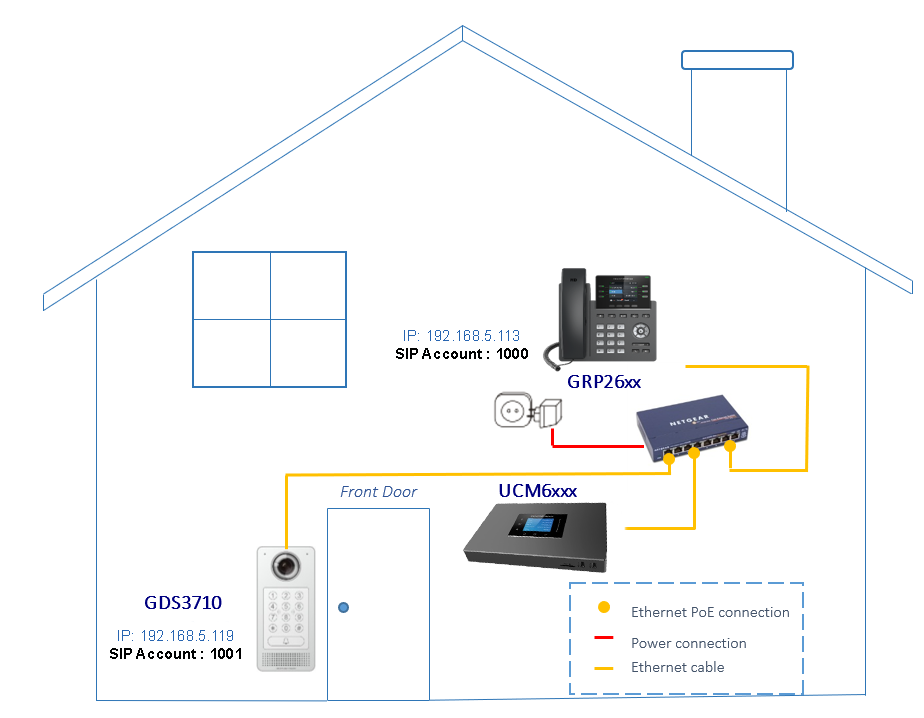
- The IP address used by the GDS3710 is 192.168.5.119 and it is configured with SIP account 1001.
- The IP address used by the GRP26xx IP Phone is 192.168.5.113 and it is configured with SIP account 1000.
- The SIP server has the IP address 192.168.5.54
GDS37xx Configuration Setting
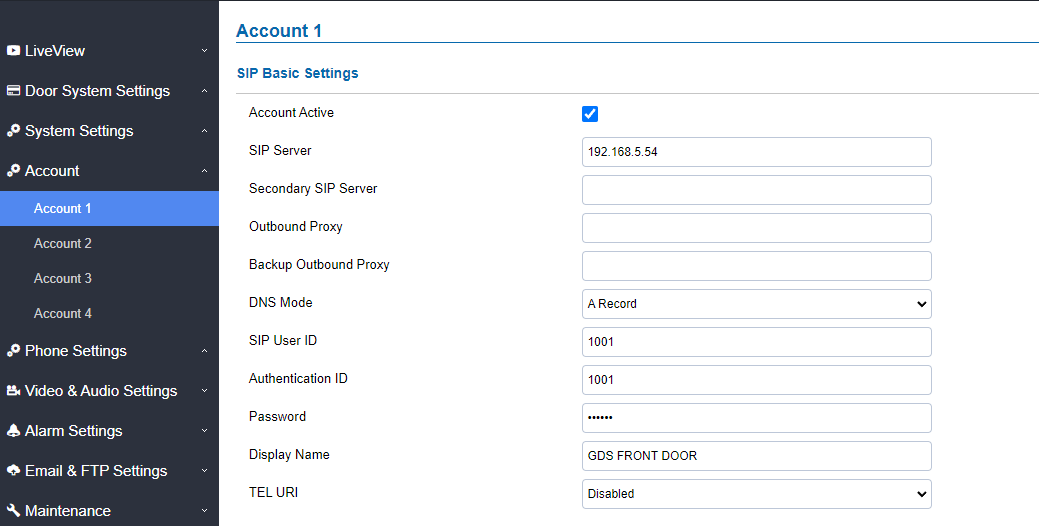
As mentioned in the previous diagram, the GDS37xx should be registered with a SIP account in order to interact with the GRP26xx IP Phone through the SIP server.
The GDS37xx SIP settings are available under the Web GUI🡪Account🡪Account(x).
After configuring the SIP account correctly, the user needs to configure the door system settings as detailed in the following steps:
- Select the ALMOUT1 Feature to “Open Door“, and depending on weather you want to control one or two doors, you can select the doors to be controlled from the control options.
2. Navigate to Door System Settings🡪Basic Settings then set the following:
- Doorbell Mode: Call Doorbell Number.
- Number Called When Door Bell Pressed: the GRP IP Phone number which is 1000 in our example.
- Remote PIN to Open the Door 1: the remote PIN used in our example is “123456”.
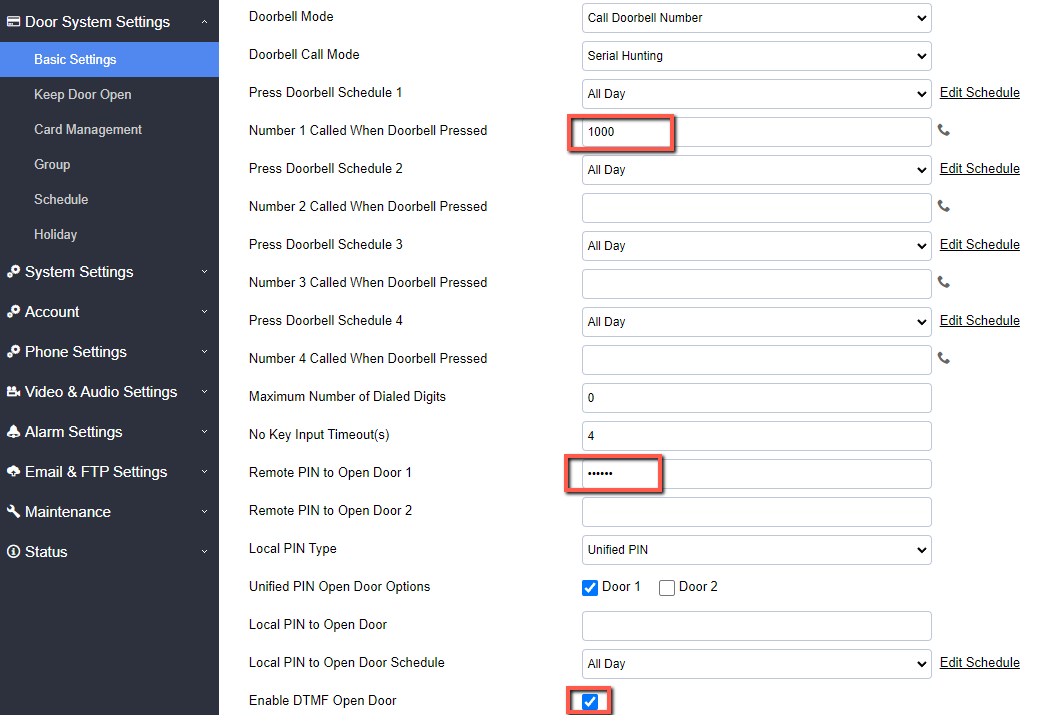
- Incase you want to control two doors to be opened then configure “Remote PIN to Open Door 2” as well, by setting the remote PIN to “123456“
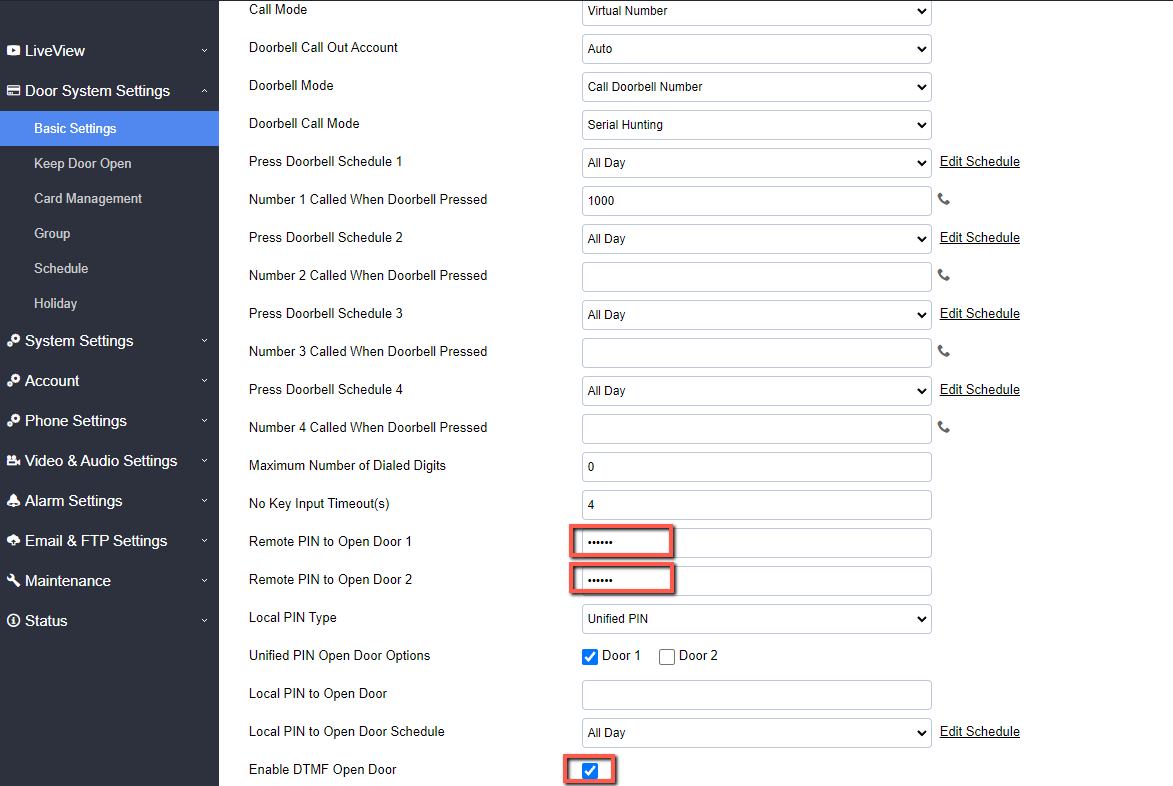
Please make sure to check “Enable DTMF Open Door”
3. Click ![]() button to apply changes.
button to apply changes.
GRP26xx IP Phone Configuration Settings
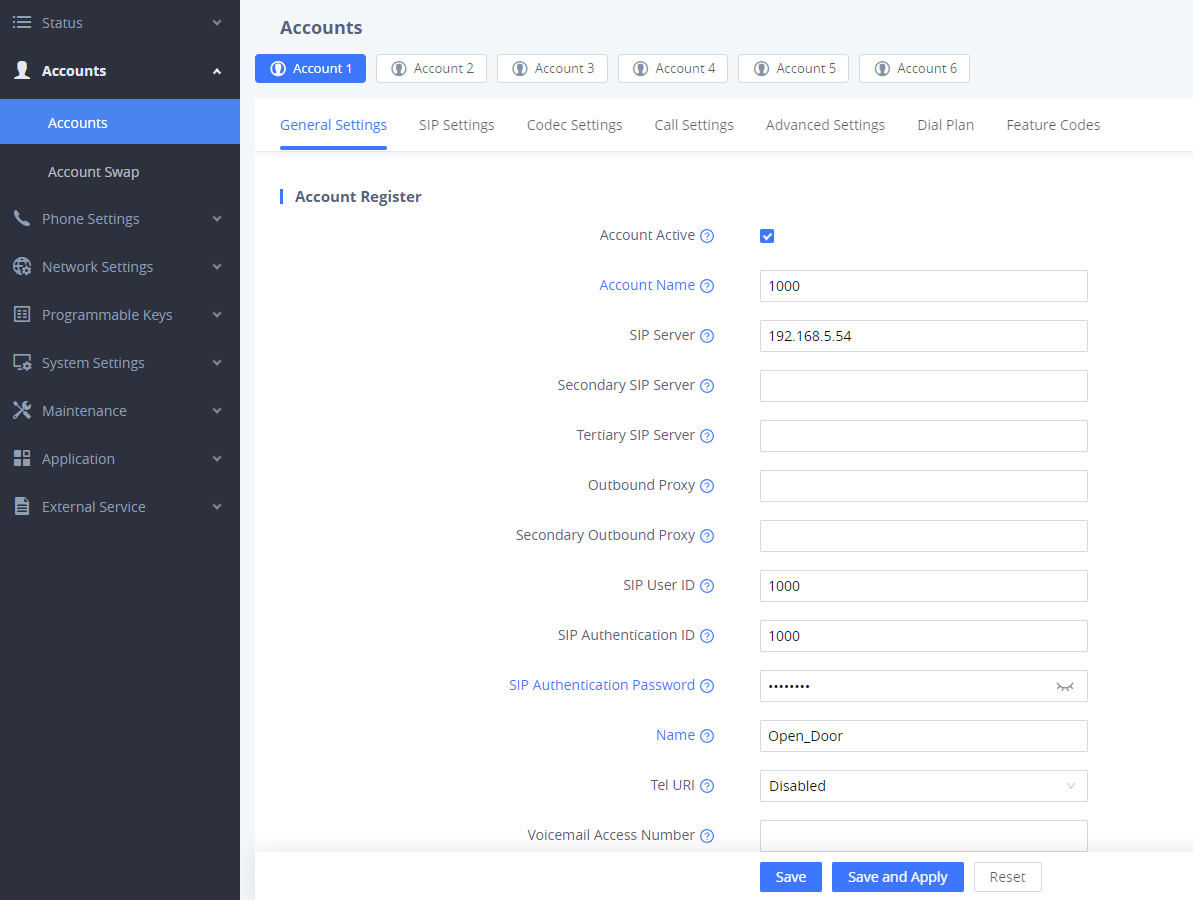
A SIP account needs to be registered on the GRP26xx IP Phone side as well to interact with the GDS37xx through the same SIP server.
The GRP26xx SIP settings are available under the Web GUI🡪Accounts 🡪Account(x) 🡪General Settings.
After configuring the SIP account correctly, users need to configure the door system settings as detailed on the following steps:
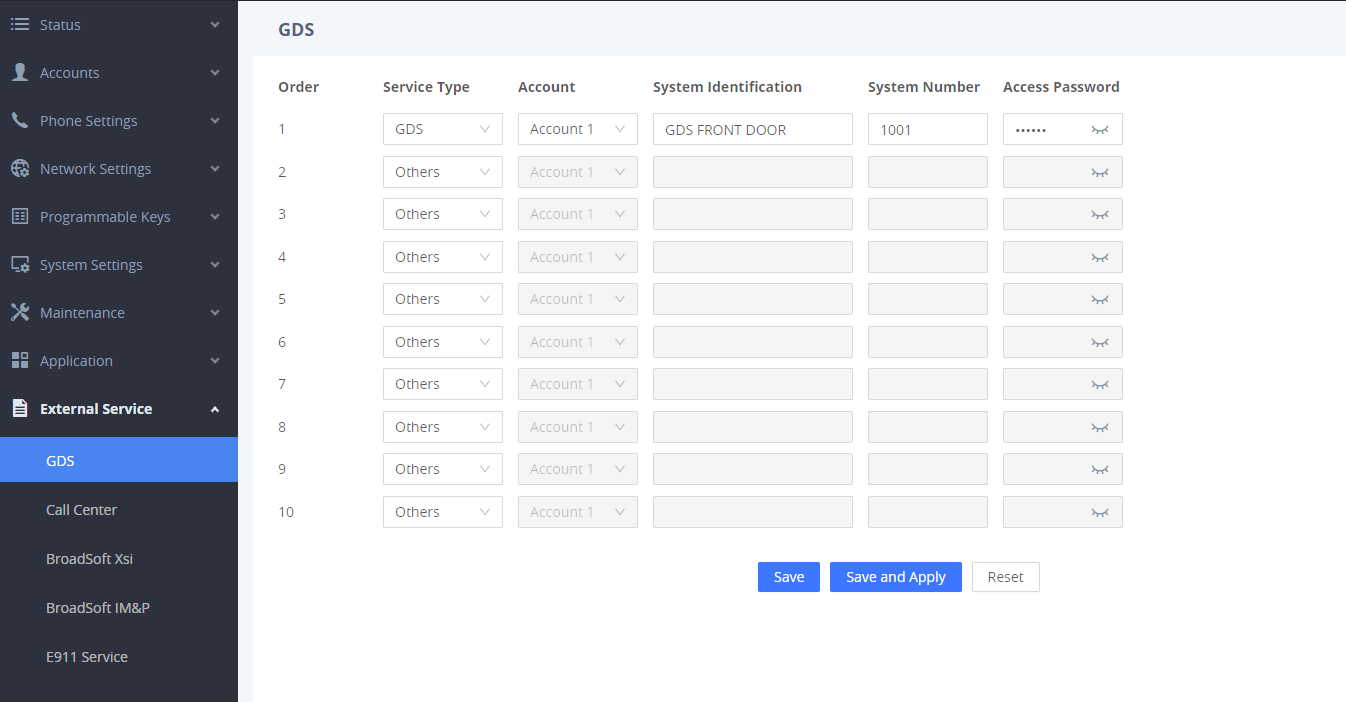
- Navigate to Settings🡪External Service and set the following:
- Set the Service Type to GDS.
- Select the related account, in our example, the account used is Account 1.
- Specifies the System Identification, to identify the GDS37xx, in our example, it is “GDS FRONT DOOR”.
- Specifies the System Number which is the GDS37xx number, the system number used in our example is 1001.
- Configure the Access Password which is the “Remote PIN to Open the Door” configured on the GDS37xx Web GUI settings. The password used in our example is “123456”.
- Incase you want to control two doors then :
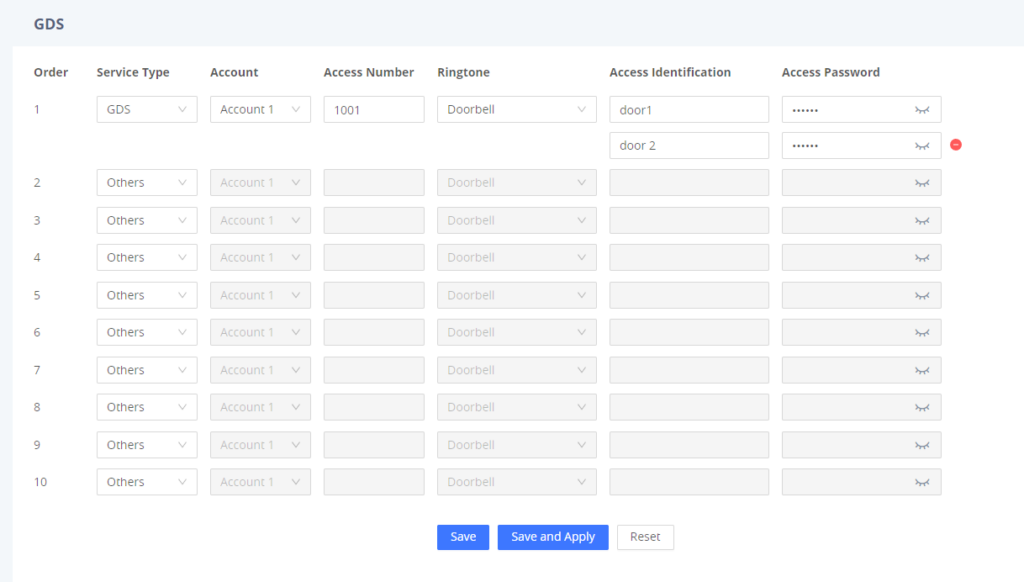
- For GRP260x:
- Click on icon to add second door
- Add two access identifications with the same GDS37xx extension as the access number of the GDS37xx used
- When receiving a call simply choose the door you want to open from the list of doors displayed ( Door1, Door2)
- Click on icon
- For GRP261x/GRP262x/GRP263x/GRP2650/GRP2670
- Add two values with the same extension of the GDS37xx used
- When wanting to choose which door to open, Long Press the door1 soft key to alternate to door2
2. Press ![]() button to apply the new settings.
button to apply the new settings.
CONFIGURATION RESULTS
Once someone presses the ring button on the GDS37xx, the door system will initiate automatically a call to the configured destination. In both cases, the users will have the ability to either answer the call, reject it or press the OpenDoor softkey, incase two doors are configured then depending on the GRP26xx model , either a list of two doors will be displayed and you can choose which door to open, or you can long press the OpenDoor softkey to alternate between the two doors to be opened.
Please refer to the screenshot below for the following GRP phone models:
- GRP2624/GRP2634 IP Phones
- GRP2614/GRP2615/GRP2616 IP Phones
- GRP2612/GRP2613 IP Phones
Users can open the door using the following methods:
- Pressing the “OpenDoor” Softkey without answering the call => Once the users press the “OpenDoor” softkey, a SIP Message will be sent to the GDS37xx to remotely open the door.
- OpenDoor after answering the call => You can either press the “OpenDoor” Softkey, then a SIP Message will be sent to the GDS37xx to remotely open the door, or dial the code for “Remote PIN for Open the Door” followed by “#” (for example “123456#”), and then DTMF codes will be sent to open the door.
SUPPORTED DEVICES
The following table shows GRP26xx products supporting GDS37XX integration:
Model | Supported | Firmware | |
Audio | Video (JPEG) | ||
GRP2612(P/W)/GRP2613 | Yes | No | 1.0.1.23 or higher |
GRP2614/GRP2615/GRP2616 | Yes | Yes | 1.0.1.23 or higher |
GRP2624/GRP2634 | Yes | Yes | 1.0.1.48 or higher |
GRP2636 | Yes | Yes | 1.0.9.22 or higher |
GRP2650/GRP2670 | Yes | Yes | 1.0.9.22 or higher |
GRP2601/GRP2602/GRP2603/GRP2604 | Yes | No | 1.0.1.41 or higher |