


1. Introduction
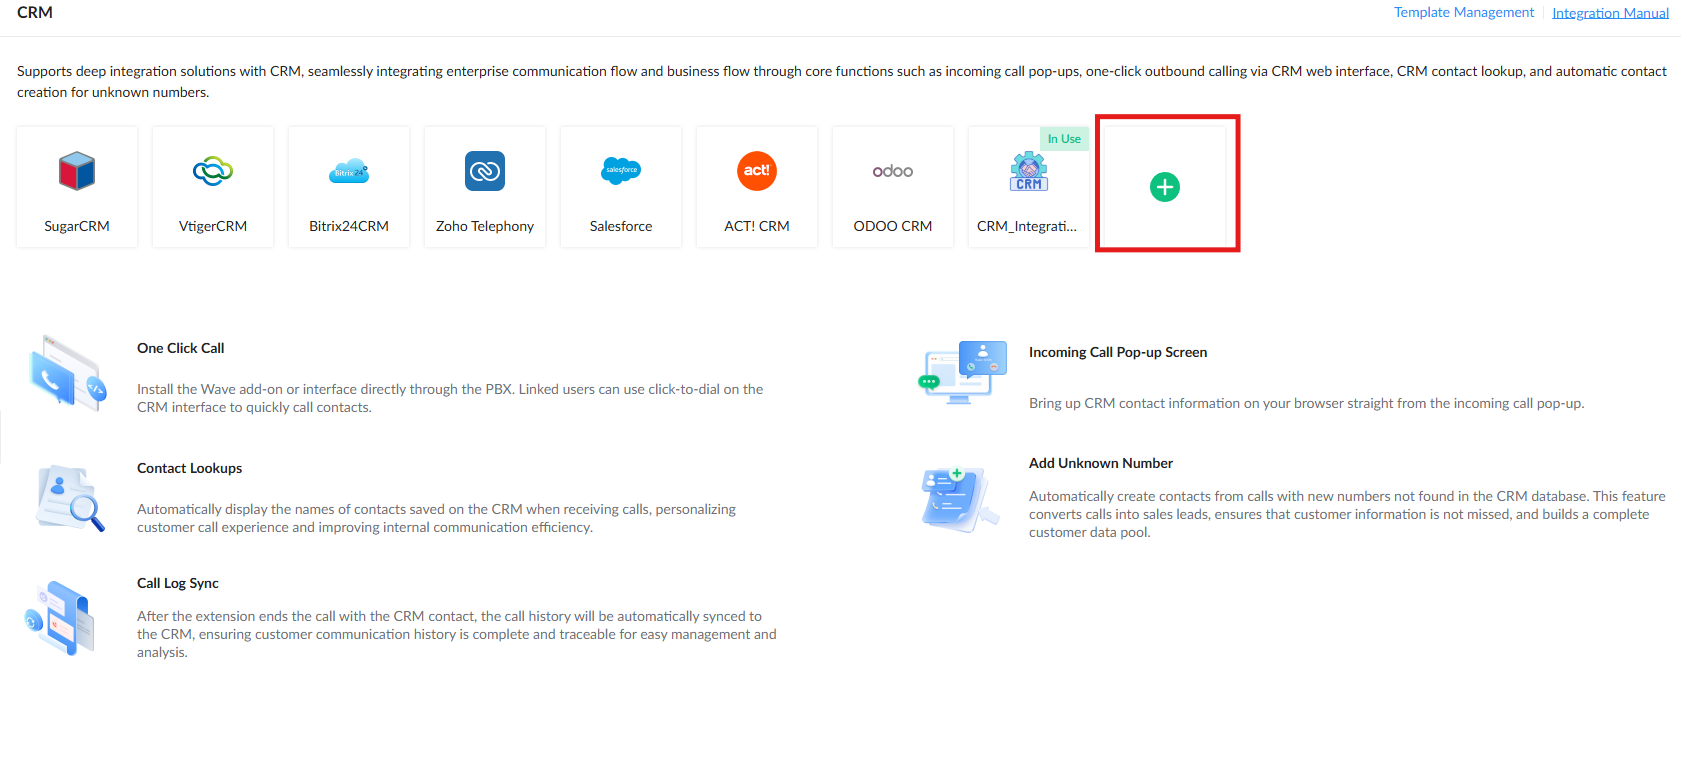
Custom CRM is a flexible CRM integration feature for the UCM6300 Series and UCM6300 Audio Series. It allows the UCM to communicate with CRM systems that provide HTTP APIs.
Unlike dedicated CRM integrations such as Zoho or Salesforce, Custom CRM allows the administrator to define the HTTP interaction details required by the target CRM. These details can include request URLs, HTTP methods, request bodies, HTTP headers, authentication methods, response-field extraction, and field mapping.
After Custom CRM is configured, the UCM can communicate with the CRM when an external call is received or placed. Depending on the configuration, the UCM can query the CRM for contact information, display contact information in a call pop-up, create a new contact for an unknown number, and synchronize call information to the CRM after the call ends.
Why Use Custom CRM?
Custom CRM is particularly useful when the CRM system does not have a dedicated built-in integration with the UCM but provides an HTTP API.
The feature allows an administrator to adapt the UCM to the CRM’s API by defining:
- The required authentication mechanism.
- The API endpoints used by the CRM.
- The HTTP GET or POST method.
- Required HTTP headers.
- Request bodies.
- CRM response fields.
- JSON paths used to extract returned values.
- The mapping between CRM contact fields and UCM contact fields.
- The process used to create unknown contacts.
- The information synchronized as call records.
This makes Custom CRM suitable for integrations where the CRM API or authentication workflow differs from the fixed behavior of a dedicated integration.
2. How Custom CRM Works
Custom CRM communicates with the CRM server through HTTP GET and POST requests.
The configuration supports dynamic Tags enclosed in double curly braces.
For example:
{{Phone}}When a request is sent, the UCM replaces the tag with the corresponding runtime value.
A contact lookup URL can therefore be configured as:
https://api.example.com/contacts/search?phone={{Phone}}If the external caller’s number is:
12345678the UCM replaces {{Phone}} and sends:
https://api.example.com/contacts/search?phone=12345678Custom CRM also supports extended tag replacement functions such as:
{{MD5(str)}}For example:
{{MD5({{Password}})}}causes the UCM to first replace {{Password}} with its actual value and then calculate the MD5 value of the resulting string.
3. Custom CRM Call Flow
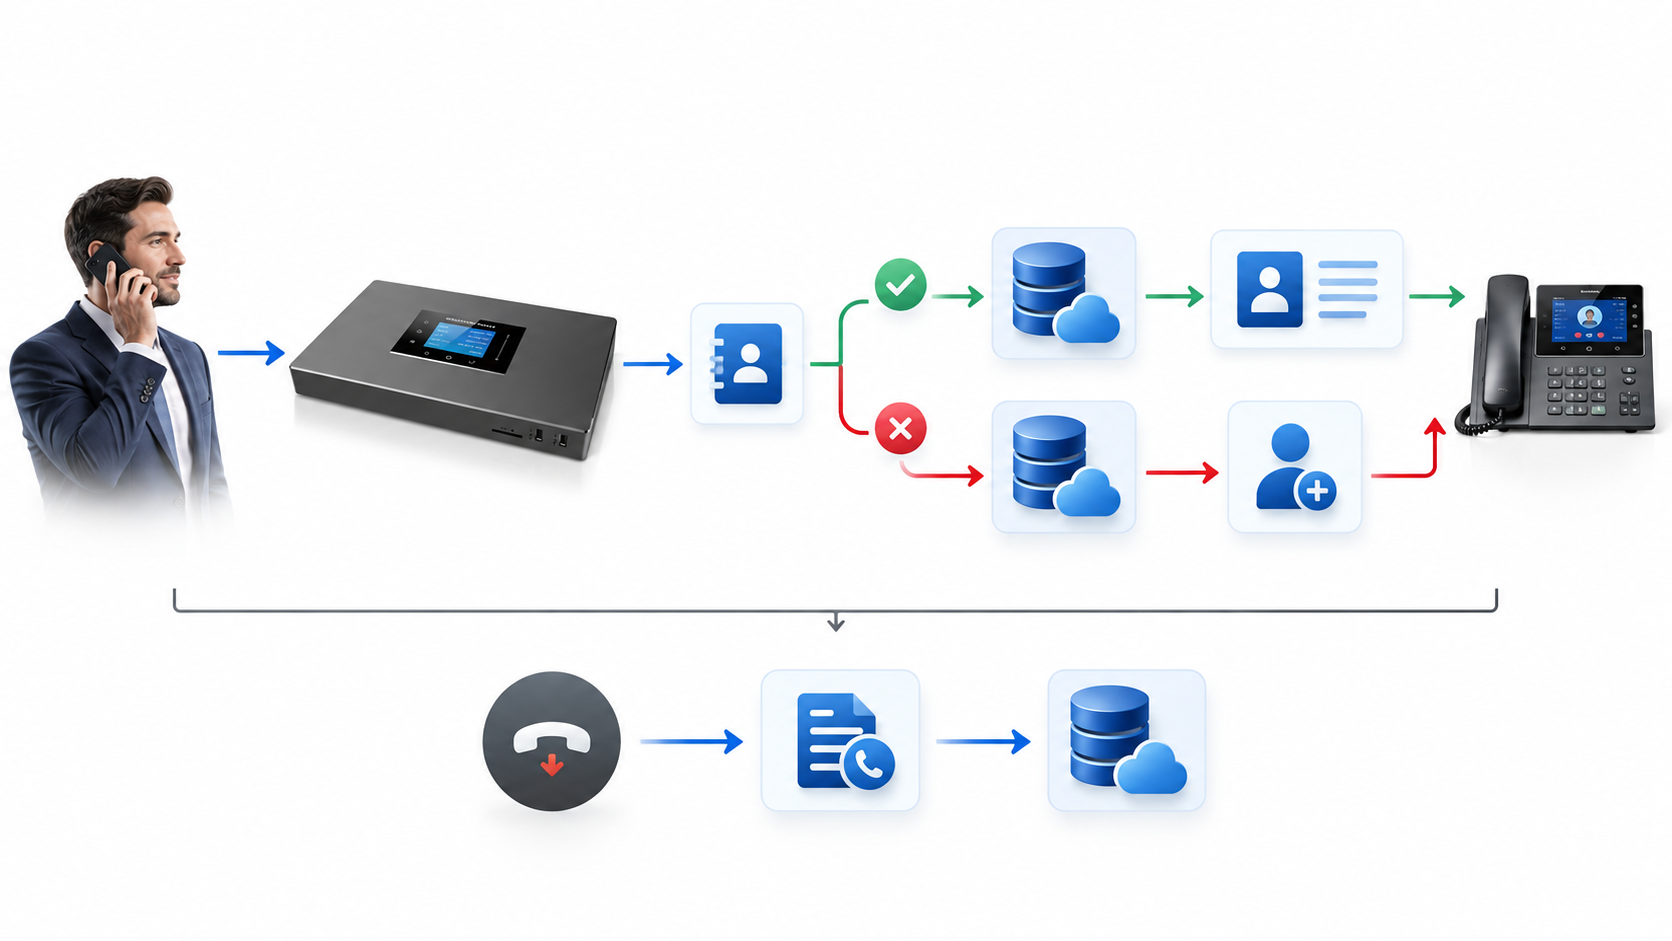
Custom CRM operations are performed at different stages of a call.
When the Call Starts
The UCM first checks its local contact information. If the contact is not found locally, the UCM can query the CRM using the external number. If the CRM returns a contact, the contact information can be displayed through the configured call pop-up. If the contact cannot be found and Add Unknown Number is enabled, the UCM can send a request to the CRM to create a new contact.
When the Call Ends
If Call Log Sync is enabled, the UCM sends the call record to the CRM after the call ends. If contact lookup or unknown-number creation has already succeeded when the call starts, the corresponding operation is not repeated when the call ends.
4. Prerequisites
Before creating a Custom CRM template, prepare the information required by the CRM API.
- Obtain the target CRM’s REST/API documentation.
- Confirm the CRM provides HTTP API access.
- Confirm that the UCM can reach the CRM server through the required network address.
- Prepare the CRM authentication information.
- Identify the relevant API endpoints and their request/response formats.
- Identify the JSON fields that will be required for authentication, contact lookup, and call-record synchronization.
5. Create a Custom CRM Template
Custom CRM configuration starts by creating a template under the UCM’s CRM Template Management section.
- Log in to the UCM Web UI as an administrator.
- Navigate to Integrations → CRM → Template Management, or click the
 icon.
icon. - Select the Custom Template tab.
- Click Add.
 icon.
icon.
6. Basic Settings
The Basic Settings section contains the general information associated with the Custom CRM template.
- Enter a clear template name.
- Enter a remark describing the purpose of the integration.
Example:
Template Name
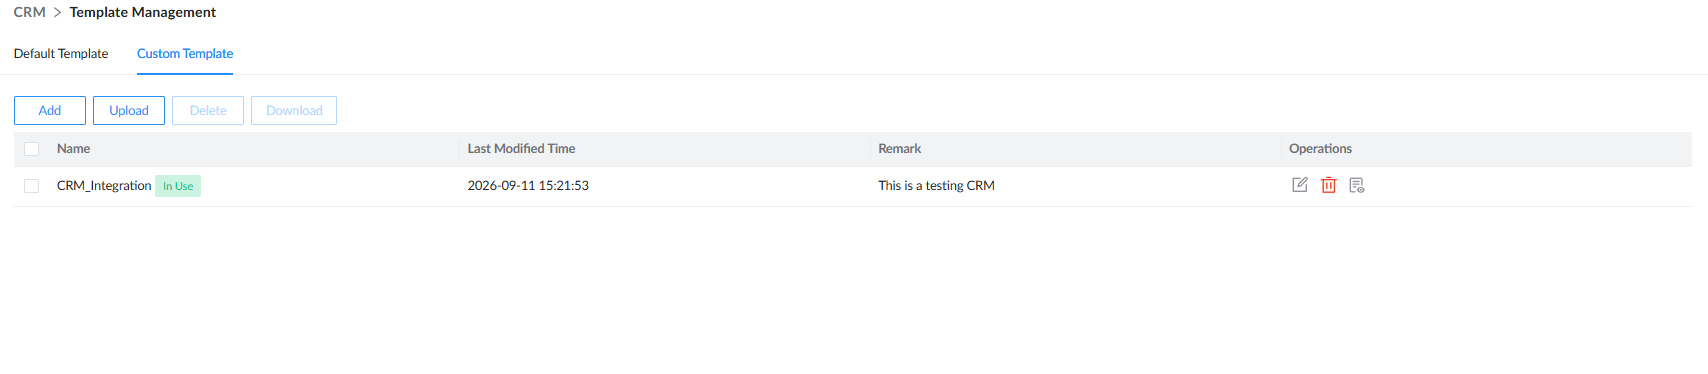
CRM_IntegrationRemark
This is a testing CRM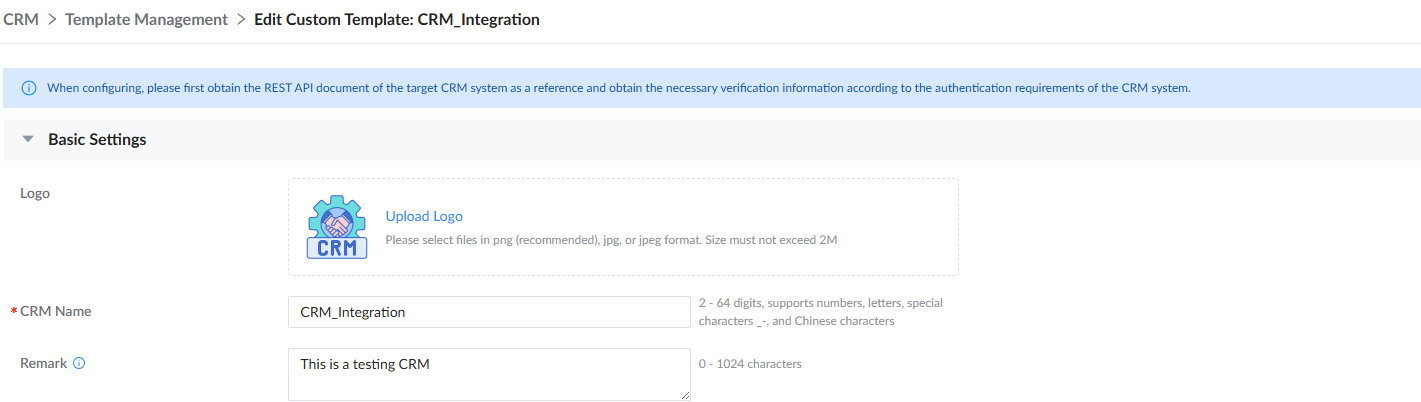
7. Request Configuration
Expand:
Request Configuration
This section contains the main HTTP and authentication configuration for the Custom CRM template.
- Authentication.
- Custom Parameters.
- Customized HTTP Request Headers.
- Follow-up Requests.

8. Configure Authentication
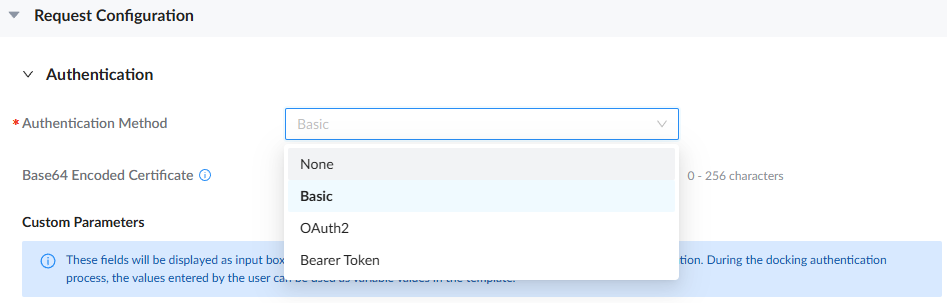
Custom CRM supports four authentication methods:
- No Authentication
- Basic
- OAuth2
- Bearer Token
Select the method required by the target CRM API.
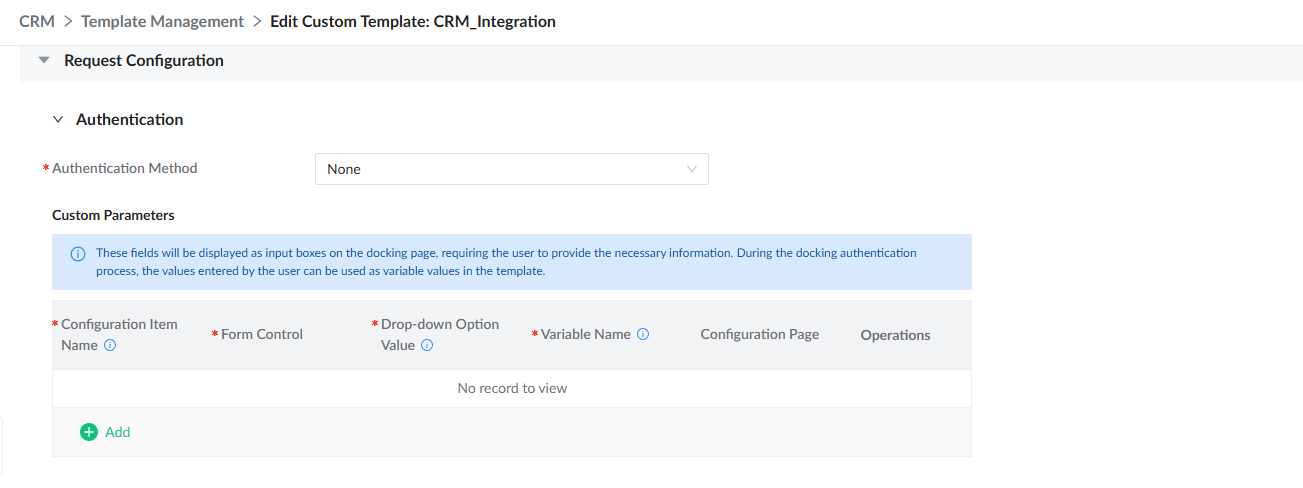
9. Configure No Authentication
No Authentication can be selected when the CRM does not require one of the dedicated authentication mechanisms, or when authentication is implemented through another configured request.
- Select No Authentication under Authentication Method.
- Configure the CRM request URLs required by the integration.
- Configure any required authentication headers under Customized HTTP Request Header.
- Use Follow-up Request when the CRM requires an additional authentication or initialization request.
- Save the configuration.
When this authentication mode is selected, the UCM does not automatically add authentication information. Any required authentication information, such as an API key, must therefore be supplied by the configured request headers or follow-up requests.
10. Configure Basic Authentication
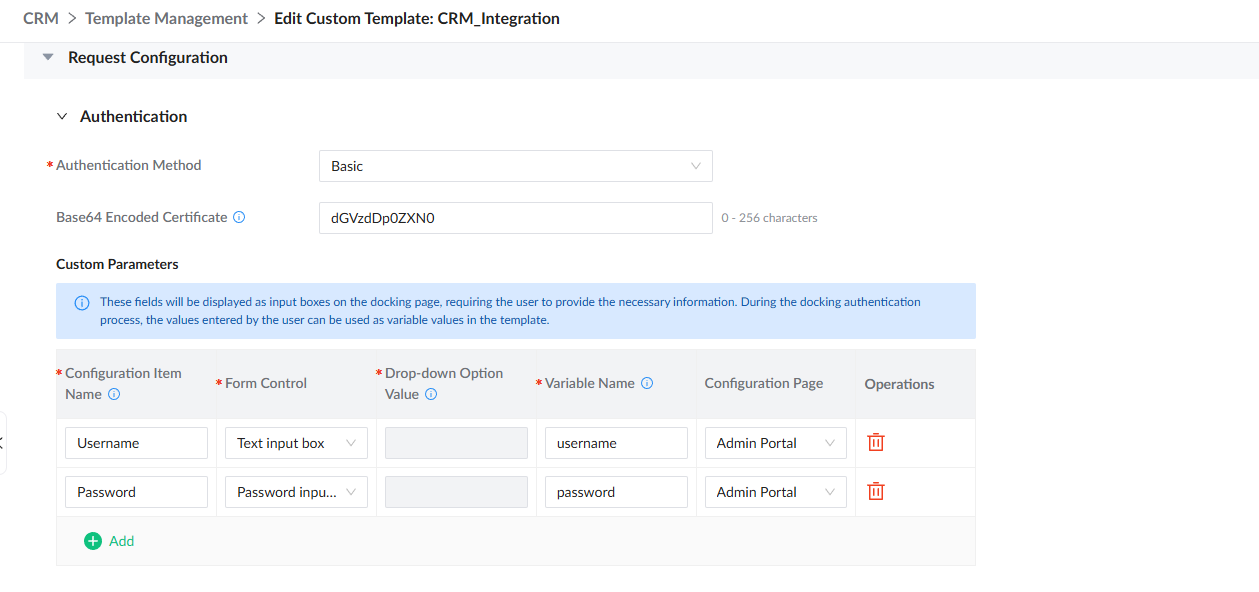
Basic Authentication uses a Base64-encoded credential based on:
username:passwordFor example:
demo:demois encoded as:
dGVzdDp0ZXN0The resulting Base64 value is entered into the Base64 Encoded Certificate field.
- Select Basic under Authentication Method.
- Prepare the CRM credentials in the
username:passwordformat. - Encode the complete credential using Base64.
- Enter the resulting Base64 value into Base64 Encoded Certificate.
- Save the configuration.
- Verify that the CRM request uses the generated Basic Authentication header.
After authentication, the UCM automatically uses:
Authorization: Basic {{BasicInfo}}where {{BasicInfo}} represents the configured Base64 credential. The Base64 credential also supports tag replacement.
11. Configure OAuth2 Authentication
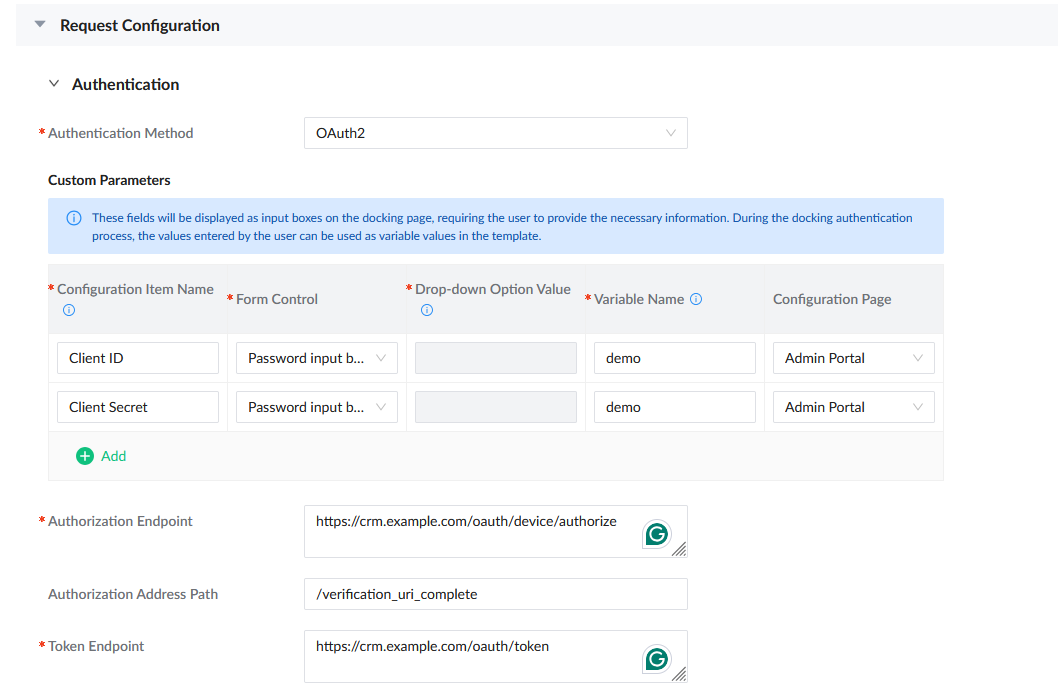
OAuth2 uses the Device Authorization Grant process.
This process allows the user to complete the CRM authorization from another device, such as a phone or computer browser.
Configuration steps:
- Select OAuth2 under Authentication Method.
- Enter the Authorization Endpoint supplied by the CRM.
- Enter the Authorization URL Path used to extract the authorization URL from the response.
- Configure the Token Endpoint.
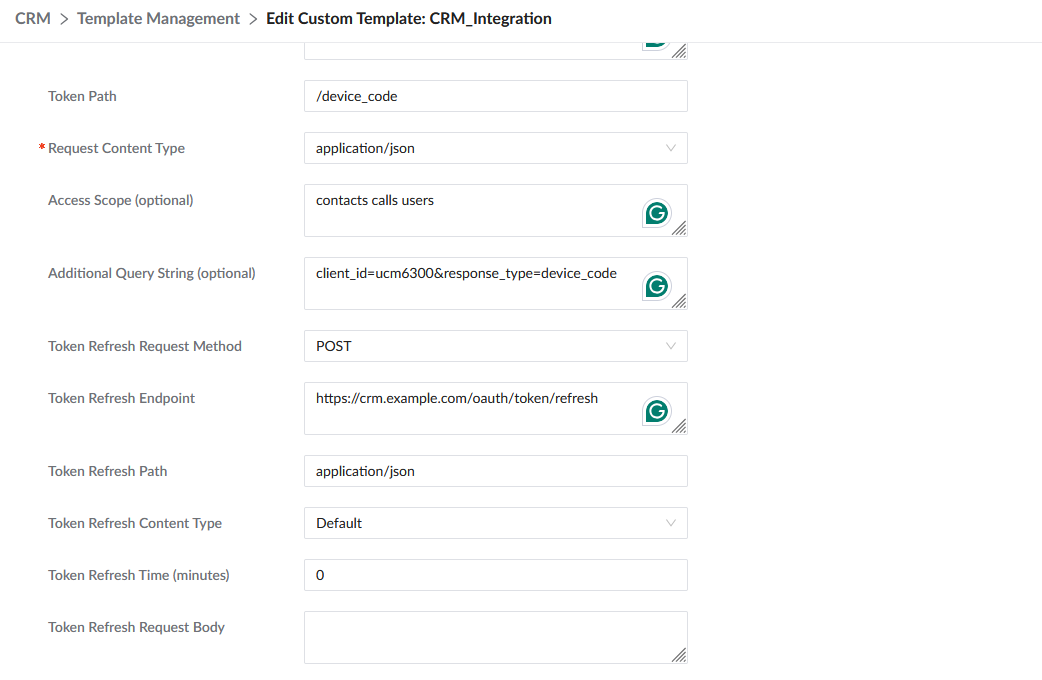
- Configure the Token Path used to extract the refresh token.
- Configure the required Request Content Type.
- Enter the required Scope.
- Configure any required Additional Query String.
- Select the Token Refresh Request Method.
- Configure the Token Refresh Endpoint.
- Configure the Token Refresh Path.
- Configure the Token Refresh Content Type.
- Configure the Token Refresh Interval in minutes.
- Configure the Token Refresh Request Body when POST is selected.
- Save the template.
- Have the extension user initiate the CRM binding from the User Portal.
OAuth2 Configuration Fields
| Field | Description |
|---|---|
| Authorization Endpoint | CRM-provided device authorization URL. |
| Authorization URL Path | RFC 6901 JSON path used to extract the authorization URL. If empty, /verification_uri_complete is used by default. |
| Token Endpoint | URL used to obtain the refresh token. |
| Token Path | RFC 6901 path used to extract the refresh token. |
| Request Content Type | Content-Type sent to the token endpoint. |
| Scope | OAuth2 scope defining the required access permissions. |
| Additional Query String | Additional query parameters appended to the authorization endpoint URL. |
| Token Refresh Request Method | GET or POST. |
| Token Refresh Endpoint | URL used to obtain the access token. |
| Token Refresh Path | RFC 6901 path used to extract the access token. If empty, /access_token is used by default. |
| Token Refresh Content Type | Content-Type used by the token refresh request. |
| Token Refresh Interval | Automatic token-refresh interval in minutes. |
| Token Refresh Request Body | Request body used when the refresh method is POST. |
The refresh token is stored as:
{{RefreshToken}}The access token is stored as:
{{AccessToken}}Subsequent requests automatically use:
Authorization: Bearer {{AccessToken}}The source documentation uses default_Zoho as an OAuth2 template example.
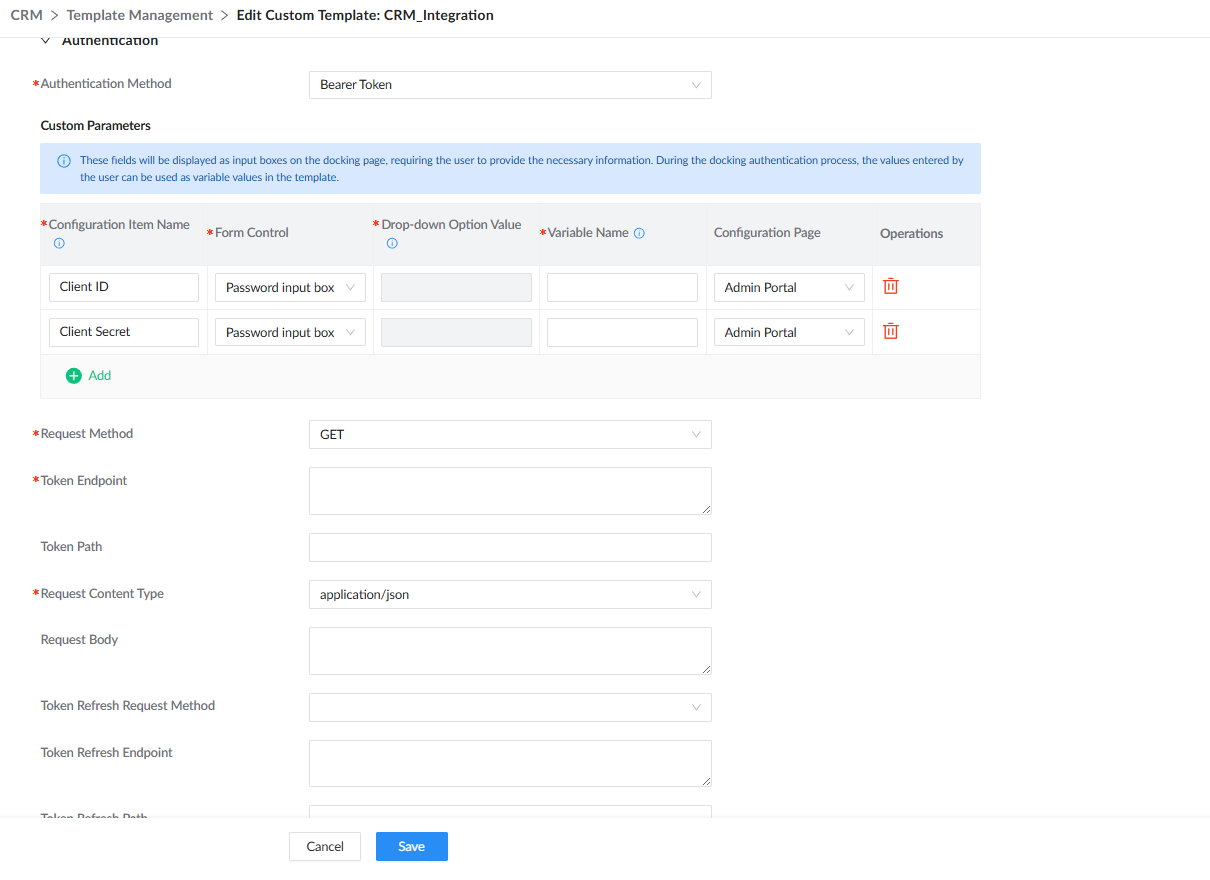
12. Configure Bearer Token Authentication
Bearer Token Authentication is used when the CRM provides an API for directly obtaining an access token.
Configuration steps:
- Select Bearer Token under Authentication Method.
- Select the request method used to obtain the initial token.
- Enter the Token Endpoint.
- Configure the request content type required by the CRM.
- Enter the request body when POST is selected.
- Configure the JSON path used to extract the token returned by the CRM.
- Configure the Token Refresh Request Method.
- Enter the Token Refresh Endpoint.
- Configure the JSON path used to extract the refreshed token.
- Configure the Token Refresh Content Type.
- Enter the token-refresh request body when POST is selected.
- Configure the Token Refresh Interval.
- Save the configuration.
After successful authentication, the UCM uses:
Authorization: Bearer {{AccessToken}}Token acquisition and token refresh use separate configuration fields. If refresh-specific settings are not configured, the system uses the token-acquisition configuration for refresh operations.
13. Configure Custom Parameters
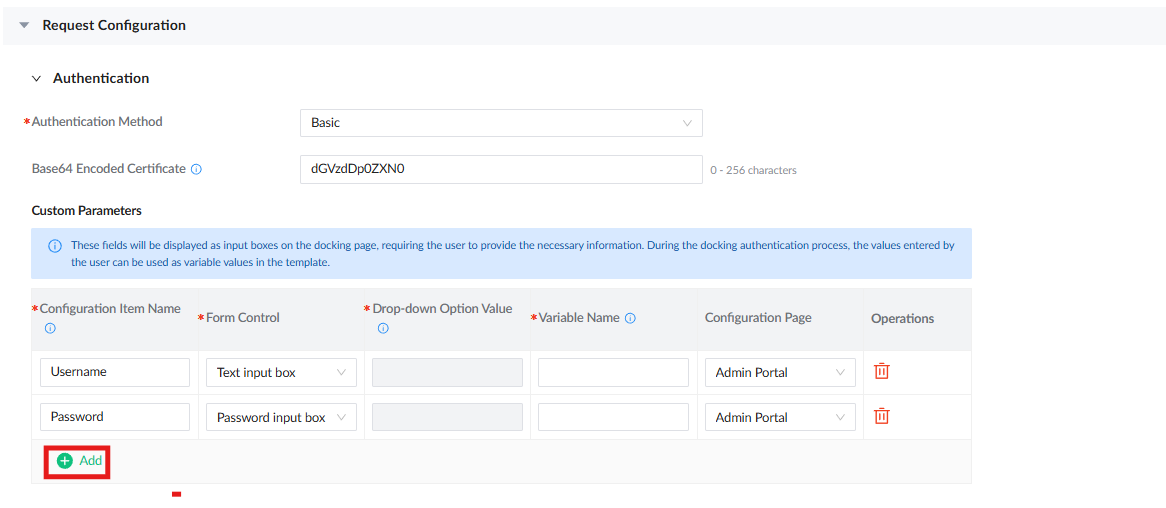
Custom Parameters allow administrator-defined or user-defined values to be reused by the Custom CRM template.
The feature supports up to five custom parameters.
Configuration steps:
- Expand Custom Parameters.
- Click Add to create a parameter.
- Enter a descriptive name under Configuration Item Name.
- Select the required Form Control.
- Enter Drop-down Option Value only when a dropdown control is selected.
- Enter a unique Variable Name.
- Select the appropriate Configuration Page.
- Repeat the process for additional parameters, up to the supported limit of five.
- Save the configuration.
Custom Parameter Fields
| Field | Description |
|---|---|
| Configuration Item Name | Name shown to the person entering the value. |
| Form Control | Determines the input type. Password input hides the entered value by default. Dropdown controls use predefined options. |
| Drop-down Option Value | Comma-separated values available to the dropdown. |
| Variable Name | Tag name used to reference the entered value in later requests. |
| Configuration Page | Determines whether the value is configured on the administrator page or by the extension user through the User Portal. |
Example
For a username parameter:
Configuration Item Name
UsernameForm Control
Text input boxVariable Name
usernameThe value can then be referenced as:
{{username}}For a password parameter:
Configuration Item Name
PasswordForm Control
Password inputVariable Name
passwordThe value can then be referenced as:
{{password}}Do not use a custom variable name that matches a built-in UCM system tag, because the custom value can overwrite the built-in tag.
14. Configure Customized HTTP Request Headers
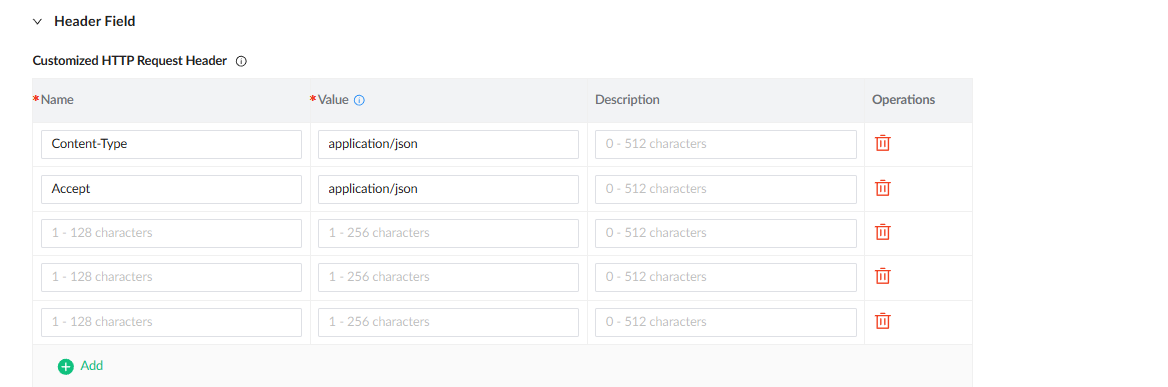
The Custom CRM template allows additional HTTP request headers to be configured.
Configuration steps:
- Expand Header Field.
- Under Customized HTTP Request Header, click Add when an additional header is required.
- Enter the header name under Name.
- Enter the corresponding value under Value.
- Enter a description when useful for identifying the purpose of the header.
- Repeat for each required HTTP header.
- Save the configuration.
An example can be:
Content-Type: application/jsonAccept: application/jsonand:
X-API-Key: your_api_keyHeader values support tag replacement.
Example Test Headers
| Name | Value | Description |
|---|---|---|
Content-Type | application/json | JSON request content |
Accept | application/json | JSON response |
Authorization Header
The Authorization header is treated specially.
It is not simply inserted as an ordinary custom header.
For OAuth2 or Bearer Token authentication, the normal format is:
Authorization: Bearer {{AccessToken}}A custom Authorization header can be used to change the authentication scheme.
For example, setting the value to:
Tokenresults in:
Authorization: Token {{AccessToken}}The same concept can be used to replace the Basic authentication scheme.
15. Configure Follow-up Requests
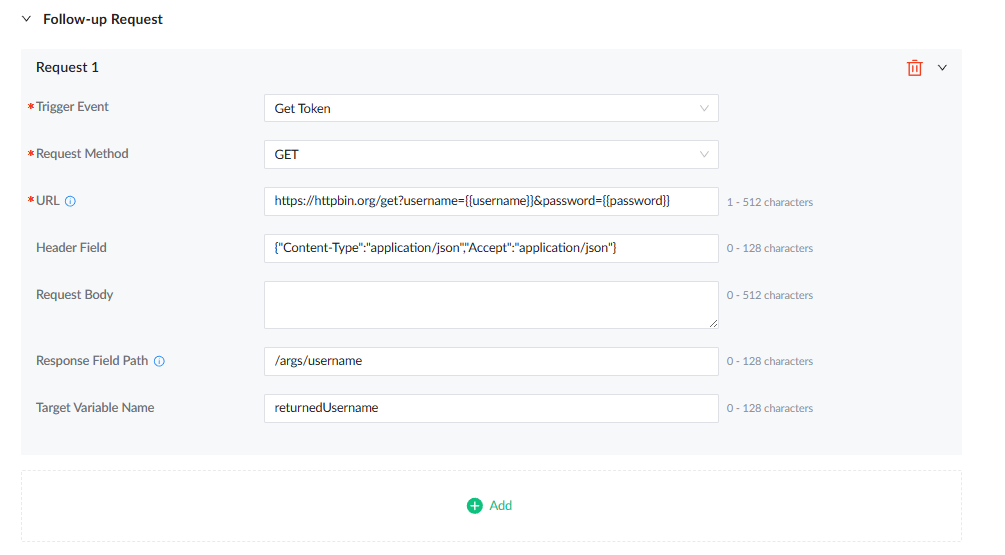
Follow-up Requests are additional HTTP requests executed after token acquisition or token refresh.
They can be used to:
- Obtain additional information from the CRM.
- Obtain additional parameters.
- Perform authentication when No Authentication is selected.
- Perform required initialization operations.
Configuration steps:
- Expand Follow-up Request.
- Click Add to create a request.
- Select the appropriate Trigger Event.
- Select GET or POST under Request Method.
- Enter the request URL under URL.
- Configure the request headers in JSON format.
- Enter the Request Body when POST is selected.
- Enter the required Response Field Path using RFC 6901 JSON Pointer syntax.
- Enter the Target Variable Name that will store the extracted response value.
- Add additional follow-up requests when required.
- Save the configuration.
Follow-up Request Fields
| Field | Description |
|---|---|
| Trigger Event | Determines whether the request runs after token acquisition or token refresh. |
| Request Method | GET or POST. |
| URL | Destination URL for the request. |
| Header Field | Headers entered in JSON format. |
| Request Body | Body sent when POST is selected. |
| Response Field Path | RFC 6901 JSON path used to extract values from the response. |
| Target Variable Name | Variable name under which the extracted value is stored. |
For example, if the CRM returns:
{
  "data": {
    "token": "abc123"
  }
}
use:
/data/tokenas the Response Field Path.
If the Target Variable Name is:
tokenthe extracted value becomes available as:
{{token}}Variables created by a follow-up request take effect immediately and can be used by subsequent follow-up requests.
16. Configure Contact Lookups
Custom CRM can query the CRM when a number is not available in the UCM’s local contact information.
Up to three contact types can be configured.
Configuration steps:
- Expand Contact Lookups.
- Click Add when a contact type is required.
- Enter the CRM module name under Contact Type, such as
ContactsorLeads. - Select GET or POST under Request Method.
- Enter the CRM contact-search API under Contact Matching Query URL.
- Use
{{Phone}}to insert the external number. - Use
{{ContactType}}where the CRM API requires the selected contact type. - When POST is selected, enter the required JSON content under Request Body.
- Configure the Contact Field Mapping after the lookup request has been defined.
- Repeat for additional contact types if needed, up to the supported limit of three.
Example Contact Matching URL
https://api.example.com/contacts/search?phone={{Phone}}&type={{ContactType}}If the external number is:
12345678and the contact type is:
Contactsthe resulting request becomes:
https://api.example.com/contacts/search?phone=12345678&type=Contacts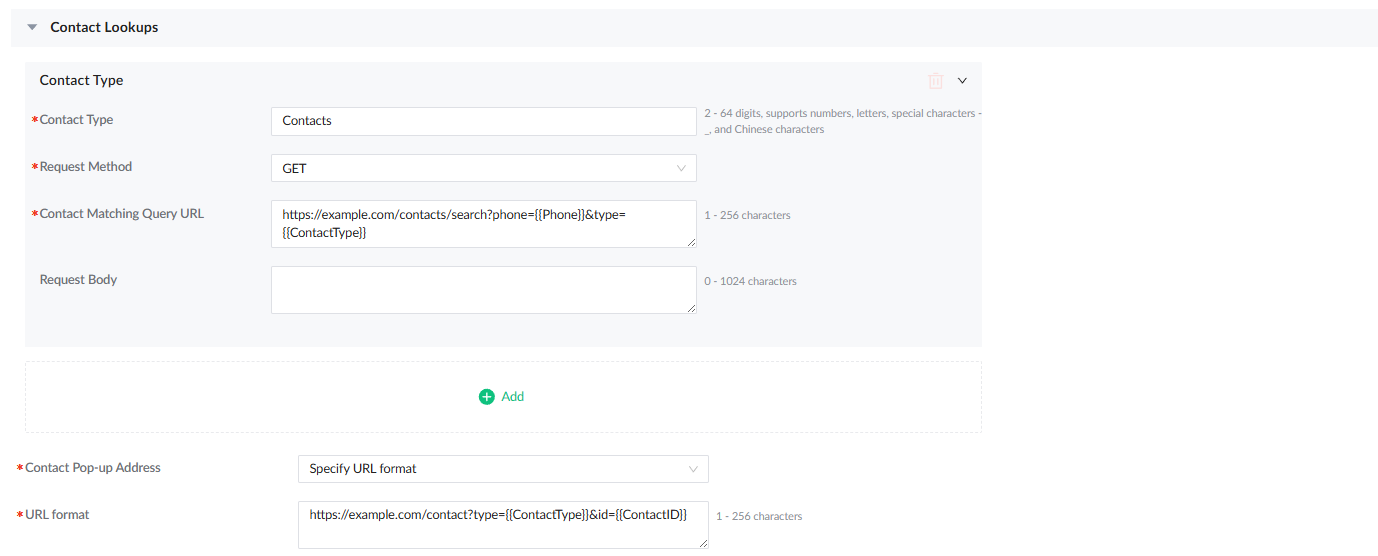
17. Configure Contact Pop-up Address
The UCM supports two methods for obtaining the CRM contact page URL.
Specify URL Format
Configuration steps:
- Under Contact Pop-up Address, select Specify URL format.
- Enter the CRM contact-page URL in URL format.
- Use
{{Phone}},{{ContactType}}, and/or{{ContactID}}as required. - Save the configuration.
Example:
https://crm.example.com/contact?type={{ContactType}}&id={{ContactID}}Obtain the URL from Contact Information
Configuration steps:
- Configure the contact lookup response to contain the CRM contact page URL.
- Enter one or more JSON paths that identify the URL in the CRM response.
- Separate multiple JSON paths with commas when more than one possible field can contain the URL.
- The UCM will try the configured paths in order and use the first successfully obtained URL.
The source documentation also specifies that when using grandstream_affinityCRM contact information can be displayed in the incoming-call screen pop with a link to the CRM contact page.

18. Configure Contact Field Mapping
Contact Field Mapping maps information returned by the CRM to UCM PBX contact fields.
The UI provides fields such as:
- Contact ID.
- First Name.
- Last Name.
- Department.
- Job Title.
- Email Address.
- Mobile Number.
- Home Number.
- Fax.
- Remark.
- Custom Value.
The CRM field entered for each PBX field must correspond to the relevant value returned by the CRM.
Configuration steps:
- Expand Contact Field Mapping.
- Enable Contact ID.
- Enter the value corresponding to the CRM contact ID.
- Enable at least one phone-number field.
- Enable Mobile Number or Home Number, depending on the CRM data.
- Enter the value corresponding to the selected phone-number field.
- Enable additional PBX fields when required.
- Enter the corresponding values for any additional fields if defined.
- Verify that the mappings match the structure of the CRM response.
- Save the configuration.
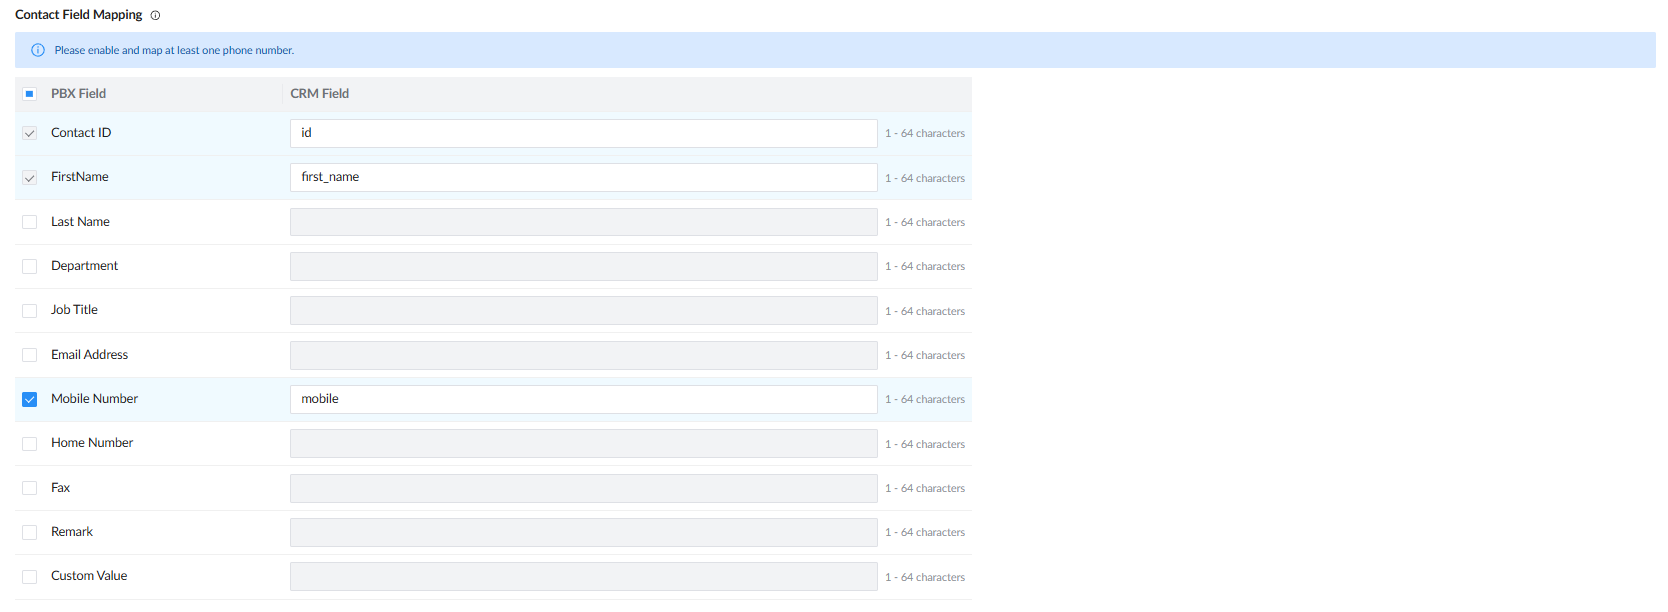
Contact ID is mandatory. The UCM uses the extracted Contact ID to determine whether the contact lookup succeeded. The resulting ID becomes available as:
{{ContactID}}At least one phone-number field must be enabled and mapped. For example, for Mobile Number:
/data/mobileThe exact JSON path must correspond to the actual response returned by the CRM.
19. Adding Unknown Number
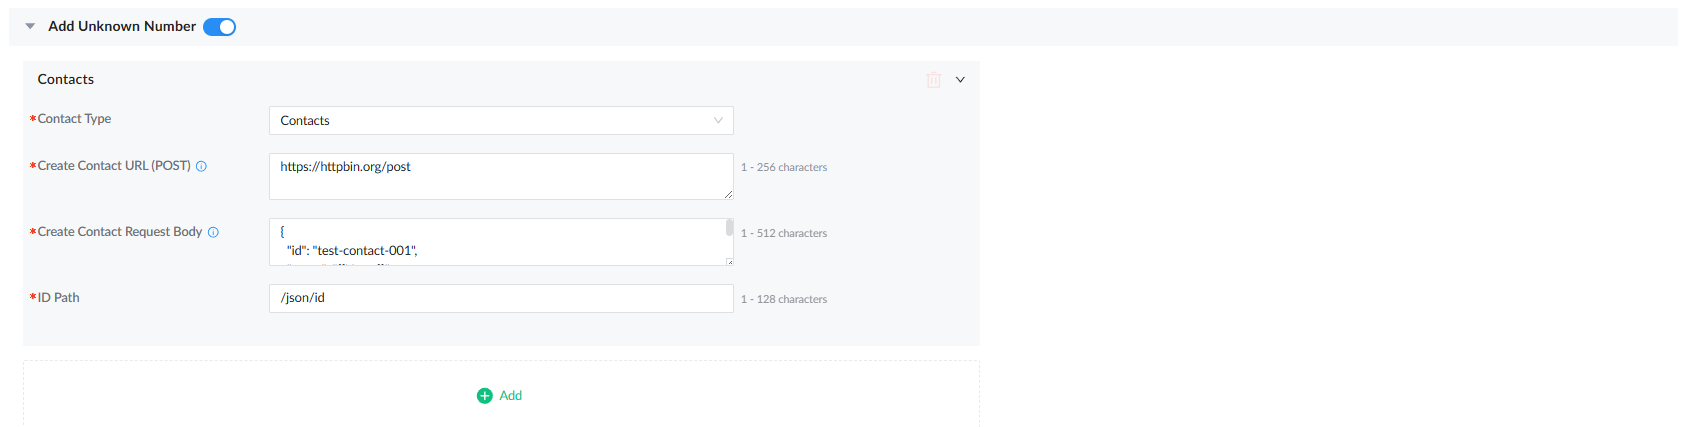
The Add Unknown Number function allows the UCM to create a new contact in the CRM when the external number is not found in either the UCM or the CRM.
Configuration steps:
- Enable Add Unknown Number.
- Select the required Contact Type.
- Use a contact type that has been configured under Contact Lookups.
- Enter the CRM API endpoint under Create Contact URL (POST).
- Build the CRM request under Create Contact Request Body.
- Use the supported unknown-number tags where required.
- Enter the JSON path that identifies the returned CRM Contact ID under ID Path.
- Save the configuration.
- Test the feature using a number that does not already exist in the UCM or CRM.
The create-contact URL, request body, and returned Contact ID are the main elements used by this function.
Supported Tags
The following tags can be used in the Create Contact Request Body:
| Tag | Description |
|---|---|
{{Name}} | External number name. If a name is available, it is used; otherwise the external number is used. |
{{Number}} | External number. |
{{InternalNumber}} | Local extension participating in the call. |
{{Direction}} | inbound or outbound. |
{{Disposition}} | Call result. |
20. Configure Call Log Sync
Call Log Sync synchronizes the call record to the CRM after the call has ended.
Configuration steps:
- Enable Call Log Sync.
- Enter the CRM call-record endpoint under Create Call Log URL (POST).
- Configure the call-record request under Create Call Record Request Data.
- Enable Meeting Subject when a subject should be sent.
- Configure the subject template.
- Enable Description when a description should be sent.
- Configure the description template.
- Use the supported call-related tags in the request body, subject, or description.
- Save the configuration.
- Complete a test call and verify that the resulting call record is sent after the call ends.
Call-log synchronization is a post-call operation.

Call Record Tags
| Tag | Description |
|---|---|
{{Subject}} | Call subject. |
{{Description}} | Call description. |
{{CallFrom}} | Calling number. |
{{CallTo}} | Called number. |
{{CallType}} | Call type: outbound or inbound. |
{{CallState}} | Call state. |
{{TimestampStart}} | Call start timestamp. |
{{DateStart}} | Call start time in YYYY-MM-DD HH:MM:SS format. |
{{DateStartT}} | Call start time in YYYY-MM-DDTHH:MM:SS format. |
{{Duration}} | Call duration in HH:MM:SS format. |
{{DurationHours}} | Call duration in hours. |
{{DurationMins}} | Call duration in minutes. |
{{DurationSecs}} | Call duration in seconds. |
{{TimeZone}} | Time zone in +08:00 format. |
{{ContactID}} | CRM Contact ID. |
{{ContactType}} | CRM contact type. |
Meeting Subject
Configuration Steps:
- Enable the Meeting Subject checkbox.
- Enter the required subject template.
- Use the supported call tags when dynamic information is required.
Example:
{{CallType}} Call - {{CallFrom}} to {{CallTo}}Description
Configuration Steps:
- Enable the Description checkbox.
- Enter the required description template.
- Use the supported call tags as required.
Example:
{{CallType}} call, from {{CallFrom}} to {{CallTo}}, duration {{Duration}}, state: {{CallState}}The subject and description are constructed when the call starts, while the call record is synchronized after the call ends.
21. Save the Custom CRM Template
After completing the required sections, save the Custom CRM template.
Configuration Steps:
- Review Basic Settings.
- Review Request Configuration.
- Review Contact Lookups.
- Review Add Unknown Number.
- Review Call Log Sync.
- Click Save.
- Return to CRM → Template Management → Custom Template.
- Verify that the Custom CRM template appears in the template list.
22. Configure the Active CRM
Creating the Custom CRM template does not by itself make it the CRM currently used by the UCM.
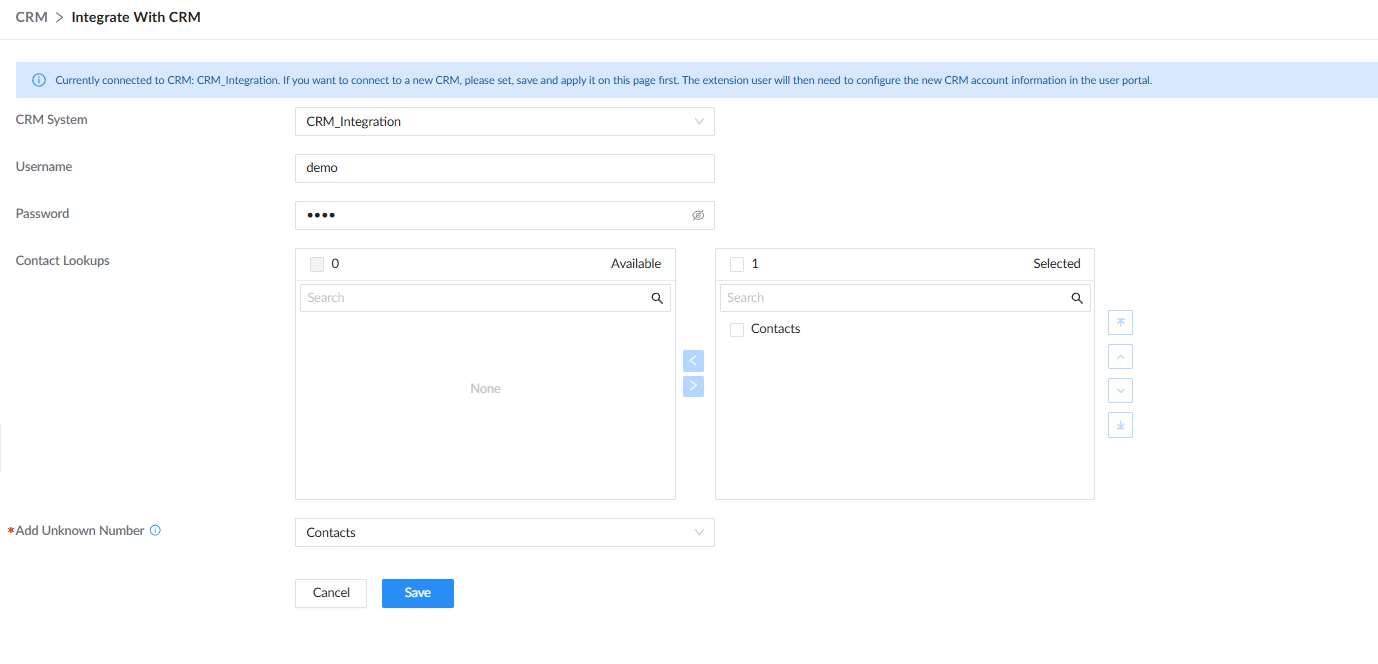
The administrator must select the template under Integrate With CRM.
Configuration steps:
- Navigate to CRM → Integrate With CRM.
- Open the CRM System dropdown.
- Select the newly created Custom CRM template.
- Provide the Username and Password defined in the authentication phase.
- Under Contact Lookups, move the required contact type from Available to Selected.
- Under Add Unknown Number, select the contact type to use when creating new contacts.
- Click Save.
- Click Apply Changes.
- Confirm that the UCM is now connected to the selected Custom CRM template.
23. Apply the CRM Configuration
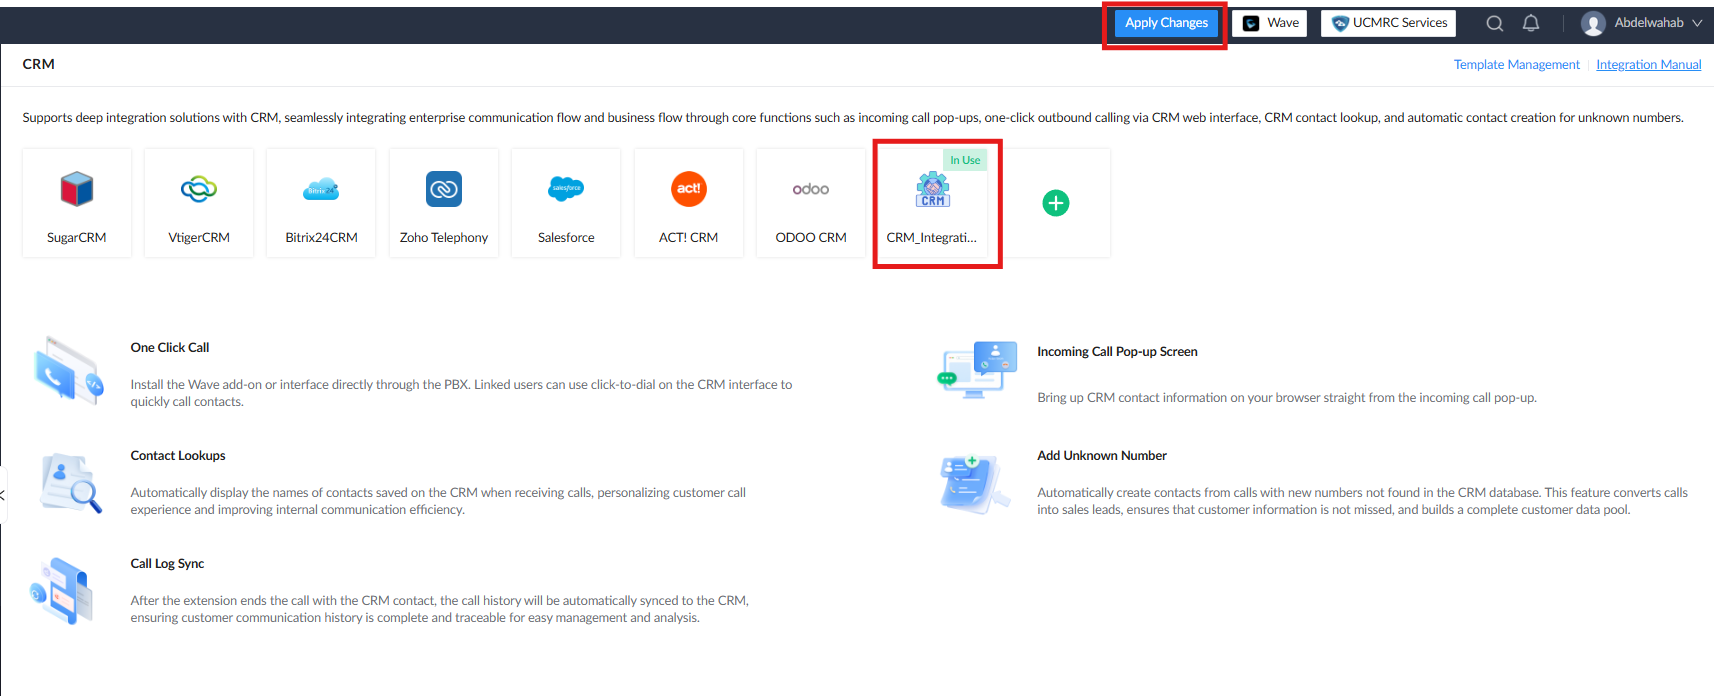
Once the Custom CRM has been selected, apply the configuration.
Configuration steps:
- Click Save on the Integrate With CRM page.
- Click Apply Changes.
- Wait for the UCM to apply the new configuration.
- Verify that the selected CRM remains
CRM_Integration.
The UCM interface indicates that after a new CRM is selected and applied, the extension user must configure the CRM account information through the User Portal.
24. Configure CRM User Settings
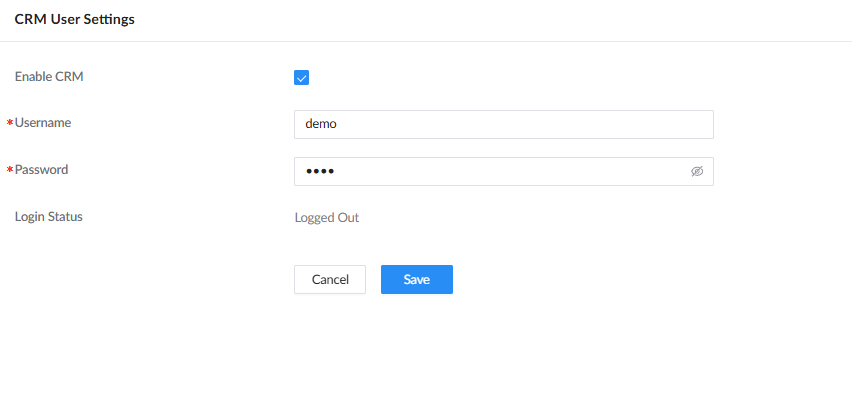
After the administrator has configured and applied the Custom CRM, the extension user configures their CRM account through:
Other Features → CRM User Settings
After the administrator-side configuration, the user must log in from the User Portal’s CRM settings.
Configuration steps:
- Log in to the User Portal using the extension account.
- Navigate to Other Features → CRM User Settings.
- Toggle the option Enable CRM.
- Enter the CRM username.
- Enter the CRM password or other user-specific information required by the configured template.
- Click Save.
- Check the Login Status field.
25. Verify the CRM User Connection
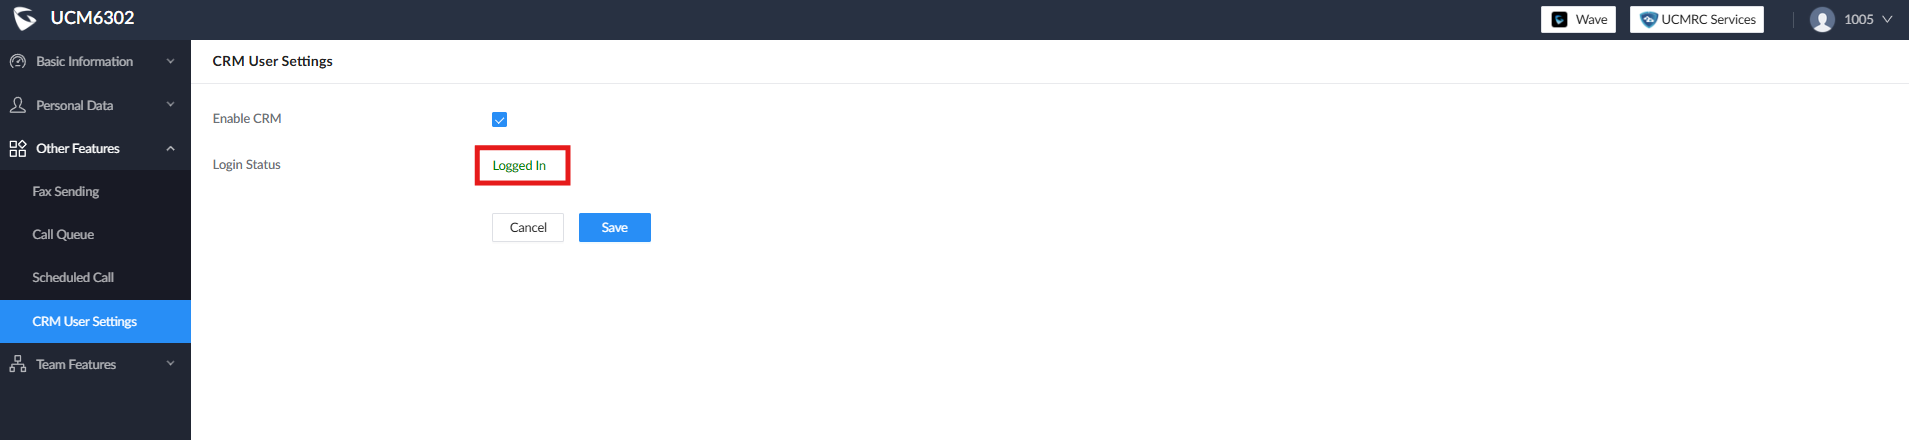
A successful user connection is indicated by:
Logged InIn the configuration verification performed for this guide, the User Portal displayed:
Login Status: Logged In
This confirms that the user-side CRM login process completed successfully.
26. Why the Extension User Connects to the CRM
The administrator creates and configures the Custom CRM template at the UCM level, while the individual extension user performs the user-side CRM authentication.
The workflow is therefore:
Administrator
    ↓
Create Custom CRM Template
    ↓
Configure CRM API behavior
    ↓
Select Custom CRM under Integrate With CRM
    ↓
Save and Apply Changes
    ↓
Extension User
    ↓
CRM User Settings
    ↓
Authenticate CRM Account
This user-level connection allows the CRM integration to operate in association with the extension using the configured CRM account.
27. System Tags Reference
The following built-in tags are automatically created and maintained by the UCM.
| Tag | Content | Availability |
|---|---|---|
{{CRMUser}} | Current user. | Created when the user authenticates CRM. |
{{DeviceCode}} | Device code. | OAuth2 authentication. |
{{RefreshToken}} | Refresh token. | OAuth2 authentication. |
{{AccessToken}} | Access token. | OAuth2 and Bearer Token authentication. |
{{BasicInfo}} | Basic Authentication credential. | Basic Authentication. |
{{CallFrom}} | Calling number. | External call start. |
{{CallTo}} | Called number. | External call start. |
{{CallType}} | outbound or inbound. | External call start. |
{{CallState}} | Call state. | External call start and call synchronization. |
{{Phone}} | External number. | Contact lookup only. |
{{ContactType}} | Contact type. | Contact lookup and call synchronization. |
{{ContactID}} | Contact ID. | Contact lookup and call synchronization. |
{{Name}} | External number name. | Unknown-number creation. |
{{Number}} | External number. | Unknown-number creation. |
{{InternalNumber}} | Local extension. | Unknown-number creation. |
{{Direction}} | Call direction. | Unknown-number creation. |
{{Disposition}} | Call result. | Unknown-number creation. |
{{TimestampStart}} | Call start timestamp. | Call synchronization. |
{{DateStart}} | Call start time in YYYY-MM-DD HH:MM:SS format. | Call synchronization. |
{{DateStartT}} | Call start time in YYYY-MM-DDTHH:MM:SS format. | Call synchronization. |
{{Duration}} | Call duration in HH:MM:SS format. | Call synchronization. |
{{DurationHours}} | Call duration in hours. | Call synchronization. |
{{DurationMins}} | Call duration in minutes. | Call synchronization. |
{{DurationSecs}} | Call duration in seconds. | Call synchronization. |
{{TimeZone}} | Time zone. | Call synchronization. |
{{Subject}} | Call subject. | Call synchronization. |
{{Description}} | Call description. | Call synchronization. |
28. JSON Path and RFC 6901
Custom CRM uses RFC 6901 JSON Pointer paths to extract values from CRM responses.
For example:
{
  "data": {
    "token": "abc123",
    "user": {
      "name": "John",
      "id": "1001"
    }
  },
  "contacts": [
    {
      "id": "001",
      "name": "Alice"
    },
    {
      "id": "002",
      "name": "Bob"
    }
  ]
}
The corresponding paths are:
| JSON Path | Extracted Value |
|---|---|
/data/token | abc123 |
/data/user/name | John |
/data/user/id | 1001 |
/contacts/0/id | 001 |
/contacts/1/name | Bob |
Configuration steps:
- Identify the JSON object containing the required value.
- Identify the relevant key or array index.
- Construct the JSON Pointer path beginning with
/. - Enter the path into the relevant Custom CRM field.
- Verify that the extracted value is the value required by the next CRM operation.
Array indexes begin at 0.
If a JSON key contains /, replace it with:
~1If a JSON key contains ~, replace it with:
~029. Example Test Configuration
The following configuration can be used as a simple functional test structure.
Basic Authentication
Authentication Method
BasicBase64 Encoded Certificate
dGVzdDp0ZXN0This represents:
demo:demoCustom Parameters
Username
Configuration Item Name: Username
Form Control: Text input box
Variable Name: username
Configuration Page: Admin Portal
Password
Configuration Item Name: Password
Form Control: Password input
Variable Name: password
Configuration Page: Admin Portal
HTTP Headers
Content-Type: application/jsonAccept: application/jsonContact Type
ContactsUser CRM Settings
Username: demo
Password: demo
After successful authentication, the User Portal should display:
Login Status: Logged In30. Testing with a Generic HTTP Endpoint
A generic HTTP test endpoint can be useful for validating that the UCM sends HTTP requests and performs tag replacement correctly before connecting to a production CRM.
For example, a test URL can be configured as:
https://httpbin.org/postor:
https://httpbin.org/basic-auth/demo/demoThese endpoints are useful for testing HTTP request behavior, but they are not CRM services and therefore do not provide a real CRM contact database.
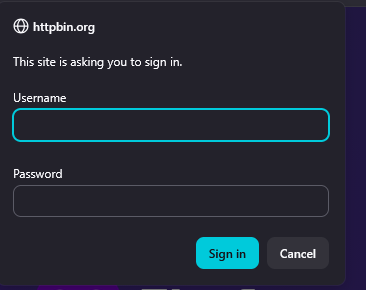
A generic HTTP endpoint can be used to validate mechanisms such as:
- HTTP request generation.
- GET / POST operation.
- Tag substitution.
- Request-body construction.
- Response processing.
- JSON-path extraction.
A genuine CRM deployment still requires the API endpoints and response structure supplied by the target CRM. Below is an example for the confirmation response

31. Summary
Custom CRM provides a configurable way for the UCM6300 Series and UCM6300 Audio Series to integrate with CRM systems through HTTP APIs.
The administrator first creates a Custom CRM template and defines the required API behavior, including authentication, custom parameters, HTTP headers, follow-up requests, contact lookup, field mapping, unknown-number creation, and call-log synchronization.
The template is then activated through:
CRM → Integrate With CRM
The administrator selects the Custom CRM template, selects the appropriate contact lookup and unknown-number options, saves the configuration, and applies the changes.
The extension user then accesses:
Other Features → CRM User Settings
and authenticates the CRM account.
A successful user connection is confirmed when:
Login Status: Logged InThe integration can then be validated through the complete call workflow:
External Call → Contact Lookup → Contact Mapping / Screen Pop → Unknown Contact Creation when required → Call Log Synchronization
This allows the UCM’s call activity to interact with the external CRM according to the API integration configured by the administrator.
32. Supported Devices
Models | Firmware Required |
UCM630x Series | 1.0.35.8+ |
UCM630xA Series | 1.0.35.8+ |