
Thank you for using Grandstream Device Management System Mobile Application!
GDMS is a cloud-based solution that provides the ability to easily manage Grandstream products before, during, and after deployment. GDMS separates subsystems independently based on different product lines: VoIP phone systems, PBX systems, network systems, and gateway systems.
GDMS provides a centralized management interface for configuring, managing, monitoring, and troubleshooting by site, group, and model, including device management, account management, device configuration, firmware upgrades, device monitoring, intelligent alarm, and statistical analysis, for an individual device or a batch of devices. This powerful cloud management platform adds powerful security features, including bank-level client-to-client, two-way certificate TLS encryption, authentication and encryption for all device information. By providing centralized, secure, and zero-operations management to Grandstream end users, GDMS is ideal for enterprises, service providers, and multi-site enterprises because it allows them to easily deploy and manage Grandstream products.
This document introduces the GDMS platform mobile application and how to use it to manage various Grandstream products such as GXV series, GRP series, DP series, WP series etc.
To learn more information about GDMS platform, please visit link www.grandstream.com to get more information.
Overview
Feature Highlights
GDMS mobile application provides users the ability to manage Grandstream audio and video clients with centralized, secure and zero-operation management methods.
The administrator can manage the devices remotely such as scanning the code to add a device, configure an account or upgrade a device firmware quickly, and receive the alert messages with mobile application.
- Add devices by scanning codes: Support to add a batch of devices quickly by scanning bar codes of the devices.
- Easy to manage devices: Configure accounts, upgrade devices firmware, and start devices remotely.
- Monitor devices in real-time: Push the account registration status, device exception message, and alert message to GDMS mobile application.
Getting Started
System Requirements
Android OS: Android 4.1 or later version.
iOS: iOS 9.0 or later version.
Download GDMS Mobile Application
Android users can download GDMS mobile application Android version from Google Play Store, and iOS users can download the application from Apple Store.
Login
Users can log in to GDMS Cloud platform or GDMS Local Deployment platform through GDMS mobile application.
- Start GDMS mobile application.
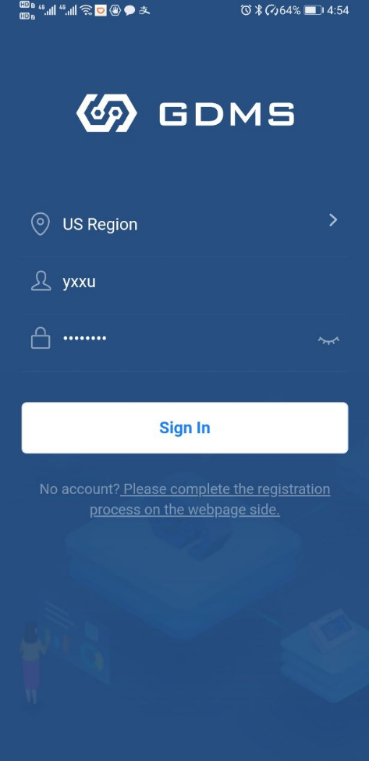
- Select the server region. If the user is using GDMS Local Deployment platform, the user needs to select “Custom”, and enter the server address.
- Enter the login account username and password to log in.
Registration
If the user has no account, the user can log in to GDMS Cloud platform (https://www.gdms.cloud/) to register a GDMS account.
Management Overview
On the Overview page of the application, users can see the details of the device status under the current organization, including accounts amount, devices amount, sites amount, account status, device status, and devices type distribution.
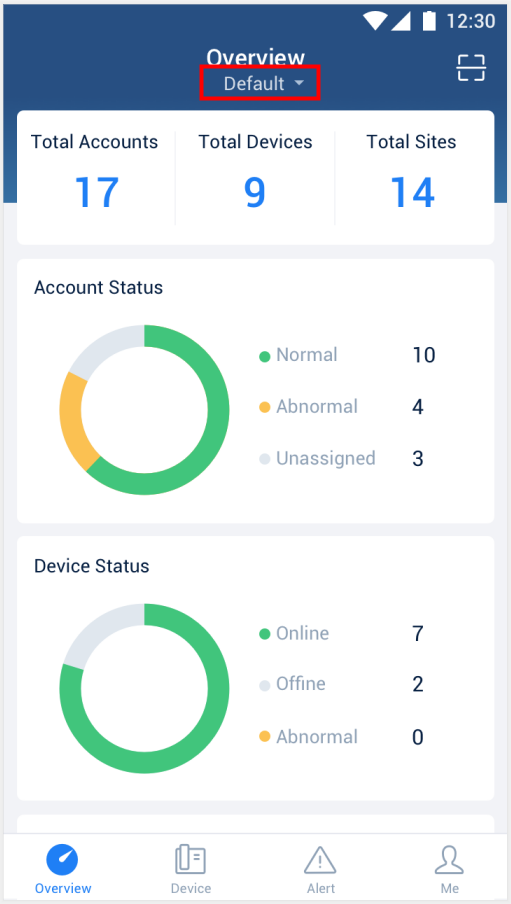
| Module | Descriptions |
|---|---|
Total Accounts | Display the total number of all SIP accounts in the current system. |
Total Devices | Display the total number of devices in the current system. |
Total Sites | Display the total number of all sites in the current system. |
Account status | Summarize the number of accounts for each status, including:
|
Device status | Summarize the number of devices online and offline respectively.
|
Devices type distribution | Summarize the number of audio devices, video devices, and conferencing devices:
|
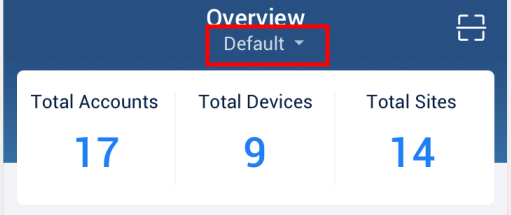
If there are more than one organization under the user’s enterprise account, the user can click ![]() button to switch organizations to see the statistics of different organizations.
button to switch organizations to see the statistics of different organizations.
Device Management
The current version does not support PBX device management.
Scan Device
Users can scan the bar code of the device to add the device to GDMS platform or configure SIP accounts for the device quickly.
- On the Overview or Device page of the application, click on the scanning icon on the right upper corner to access to scanning interface:
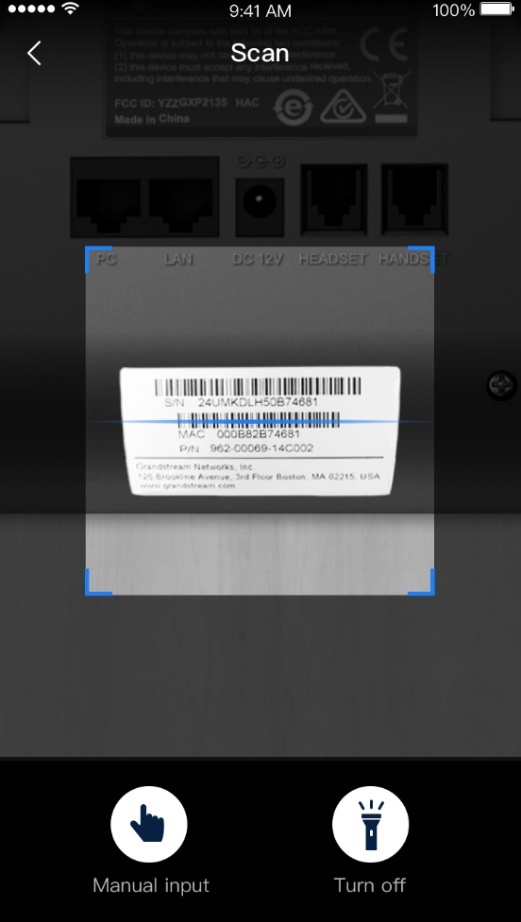
-
Scan the bar code of the device. If the light is dim, it is recommended to open the phone flashlight by clicking
 button.
- After scanning the bar code successfully, the application will direct the user to add the device. The user can enter the device name and location of the device to add the device.
 button.
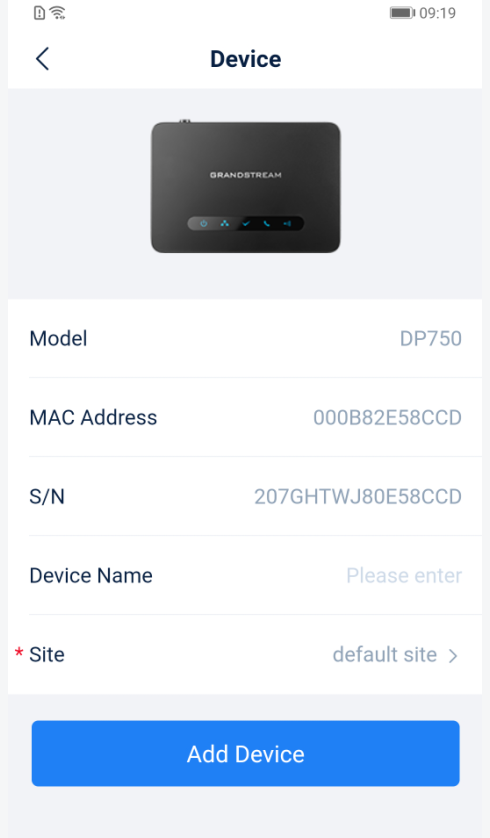
- Click on “Add device” button to add the device to the specific site.
- If the device has been added to the user’s account, the user can obtain the device information, configure the SIP account, upgrade the device firmware through GDMS platform.
Add Device Manually
For the remote device, or the device which does not have bar code, the user can add the device manually.
- Click the scan icon at the right upper corner of the application, and click on “Manual Add” button to go to add the device manually:
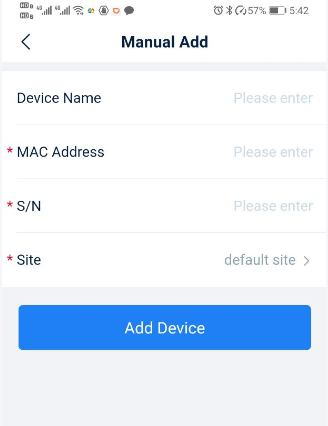
- Fill in device information:
Device name | (Optional) Set a note name that identifies the device, up to 64 characters. |
MAC address | (Required) Enter the MAC address of the device. (Locate the MAC address on the MAC tag of the unit, which is on the underside of the device, or on the package) |
Serial number | (Required) Enter the serial number of the device. (Locate the serial number on the MAC address sticker on the underside of the device, or on the package) |
Site | (Required) Set which site the device belongs to, and the default setting is “Default” site. |
- Click “Save” button to apply the changes.
View/Search Device
On the Device page, the user can view all associated devices.
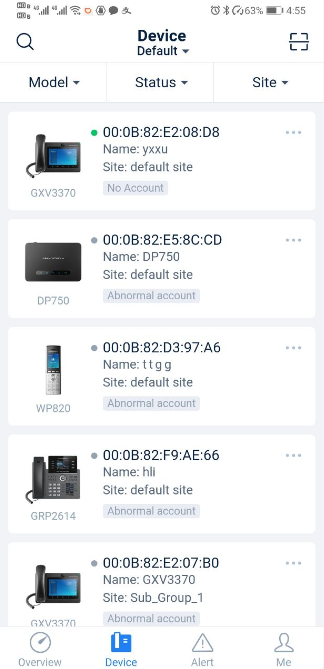
- Click on the device to view the details of the device, including the account information of the device.
-
If the user has permissions for multiple organizations, the user can click the button
 to switch the organizations to view the devices list for different organizations.
-
Click on the button
 on the left side and enter the MAC address of the device or device name to search the device.
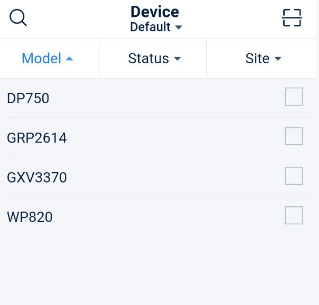
- The user can search the device by clicking the filters on the top of the interface. The user can select multiple filters such as device model, device status, site to search the device.
-
Click the button
 on the right side of the device to view various operations for the device, such as account configuration, edit device information, delete device, upgrade firmware, restart device, etc.
Account Configuration (Non-DP Series)
-
Click
button on the devices list and select “Account Configuration” option to access to account configuration page.
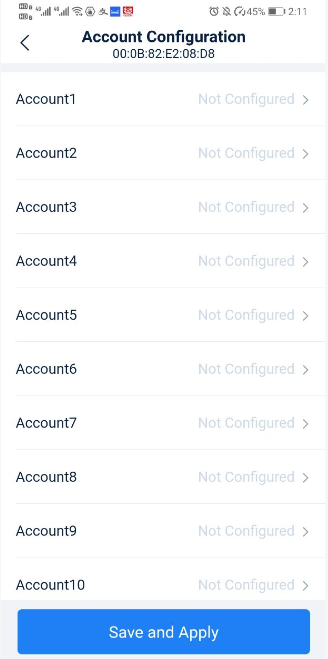
- Click the account which needs to be configured, and then select the SIP account under the current organization. If the SIP account status is “Assigned”, it indicates the account has been assigned to other devices; if the SIP account status is “Unassigned”, it indicates the account has not been assigned to any device.
- Users can also re-select the existing SIP account or delete it.
- Click “Save and Apply” button and the account will be assigned to the device immediately.
Configure SIP Account and Line (DP series)
Users can configure the SIP accounts and lines for the DP devices through GDMS platform, and the existing SIP accounts of the current DP device can be viewed/edited/deleted.
-
Click
button on the devices list and select “Account Configuration” option to access to account configuration page.
- Click “Account Configuration” to configure SIP accounts.

Select SIP account | Assigned: The SIP account has been assigned to another device. Unassigned: The SIP account has not been assigned to any device. |
Template | Different SIP servers cannot be set with the same DP template. |
Handset | If this option is not filled, the default setting is “Circular” mode. |
- Click “Line” tab to enter the Line configuration page:
a. Set the line account for each handset and select the existing SIP accounts in the device.
- Support to re-select the existing SIP account or line or delete the SIP account or line configuration.
- Click “Save and Apply” button to assign the configuration to the device immediately.
Edit Device
Users can edit the note name and site of the device.
-
Click
button on the devices list and select “Edit Device” option to access to device editing page.
- Click “Save” button and it will take effect immediately.
Upgrade Firmware
GDMS mobile application allows users to upgrade a specific device.
-
Click
button on the devices list and select “Upgrade Firmware” option to access to device upgrading page.
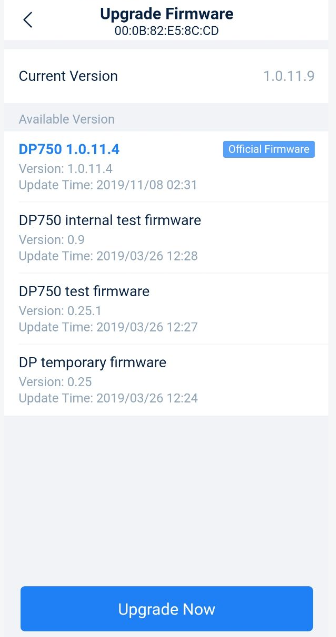
- Select the target version to upgrade the device, and the firmware marked with “Official Firmware” is the firmware issued by Grandstream official technical support.
- Click “Upgrade Now” button, and the task of upgrading firmware will be assigned to the device immediately.
Reboot Device
GDMS mobile application allows users to reboot a specific device.
-
Click
button on the devices list and select “Reboot Device” option to restart the device.
- After clicking “OK” button, the task of restarting the device will be assigned to the device immediately.
Delete Device
GDMS mobile application allows users to delete a specific device.
-
Click
button on the devices list and select “Delete” option to delete the device from GDMS platform.
- After clicking “OK” button, the task of deleting the device will be assigned to the device immediately. The device will be removed from the current GDMS account.
View Alert Message
View/Search Alert Message
- Access to the “Alert” page.
- Users can view all alert messages through the GDMS mobile application:

- Search: Users can filter the alert messages by alert type or level. Users can also search the alert messages by entering the MAC address or task name.
- Latest alert: The red dot in front of the alert message represents the latest unread alert message.
- View details: Users can click on a specific alert message to view the details, while the red dot will disappear.
Alert Message Reminder (Pending)
When the user’s GDMS account receives an alert message, it will be pushed to the GDMS mobile application.
Users can view the alert messages from the system notification menu (drop-down menu) and click to enter the GDMS mobile application to view the details of the alert messages.
Settings
Personal Information
- Click “Me” tab and click “Personal Information” to view the user’s personal information.
- Editing personal information function is not supported, users can access to the GDMS Cloud platform to edit personal information.
Logout
- Click “Me” tab and click “Personal Information” to access the user’s personal information page.
- Click on the “Sing out” button at the button of the page, and the GDMS account will be logged out once clicking “OK” button. The user will be direct to the login page.
About Version
- Users can view the current application version number by clicking “Me” tab.
- The application will detect whether there is a new version automatically. If there is a new version, users can click “Upgrade Now” button to upgrade the application.
- The system starts to download the latest application version and install it.
Feedback
If users encounter problems in the process of usage, or have any suggestions, users can send feedback to us for evaluation.
- Click “Me” tab and click “Feedback” button to access to the feedback page.
- Describe the problem and suggestion. If there is a screenshot of the problem or suggestion, users can click “Upload” button to upload the screenshot as an attachment.
- Click “Submit” button to submit the feedback/suggestion to us. Our technical support will respond the feedback/suggestion soon.
Supported Models
Users can view the supported models list for GDMS mobile application.
Click “Me” tab and click “Supported Models” to view which device models are supported in GDMS mobile application.
Change Log
GDMS Platform Mobile Application Version for iOS
- This is the initial version.
GDMS Platform Mobile Application Version for Android
- This is the initial version.