OVERVIEW
GDMS and GWN Manager support SAML (Security Assertion Markup Language) to provide external authentication and Single Sign-On (SSO) using third-party identity providers such as Microsoft Entra ID (Azure AD), AD FS, and Duo.
This guide outlines how to configure SAML information on supported third-party identity providers as well as how to use SAML SSO on GDMS (Cloud) and GWN Manager (On-Prem).
SAML COMPONENTS
When using SAML, there are two key elements:
- Identity Provider (IdP): The authority for the user’s identity. It validates user credentials and provides identity attributes by knowing the user’s username, password, and any groups/attributes (Example: Microsoft Entra ID, AD FS, Duo).
- Service Provider (SP): The application that the user wishes to use. In this case, the GDMS platform and GWN Manager.
SAML SSO LOGIN METHODS
SAML SSO login supports two methods:
SAML SSO WITH MICROSOFT ENTRA ID
Firstly, users need to sign up for an Azure account by visiting this web page:
This section mainly introduces how to configure Microsoft Entra ID (formerly known as Azure AD) as the identity provider (IdP) for GDMS.
Step 1: Add a new application in Azure
- Sign in to the Microsoft Entra admin center as a Cloud Application Administrator or higher.
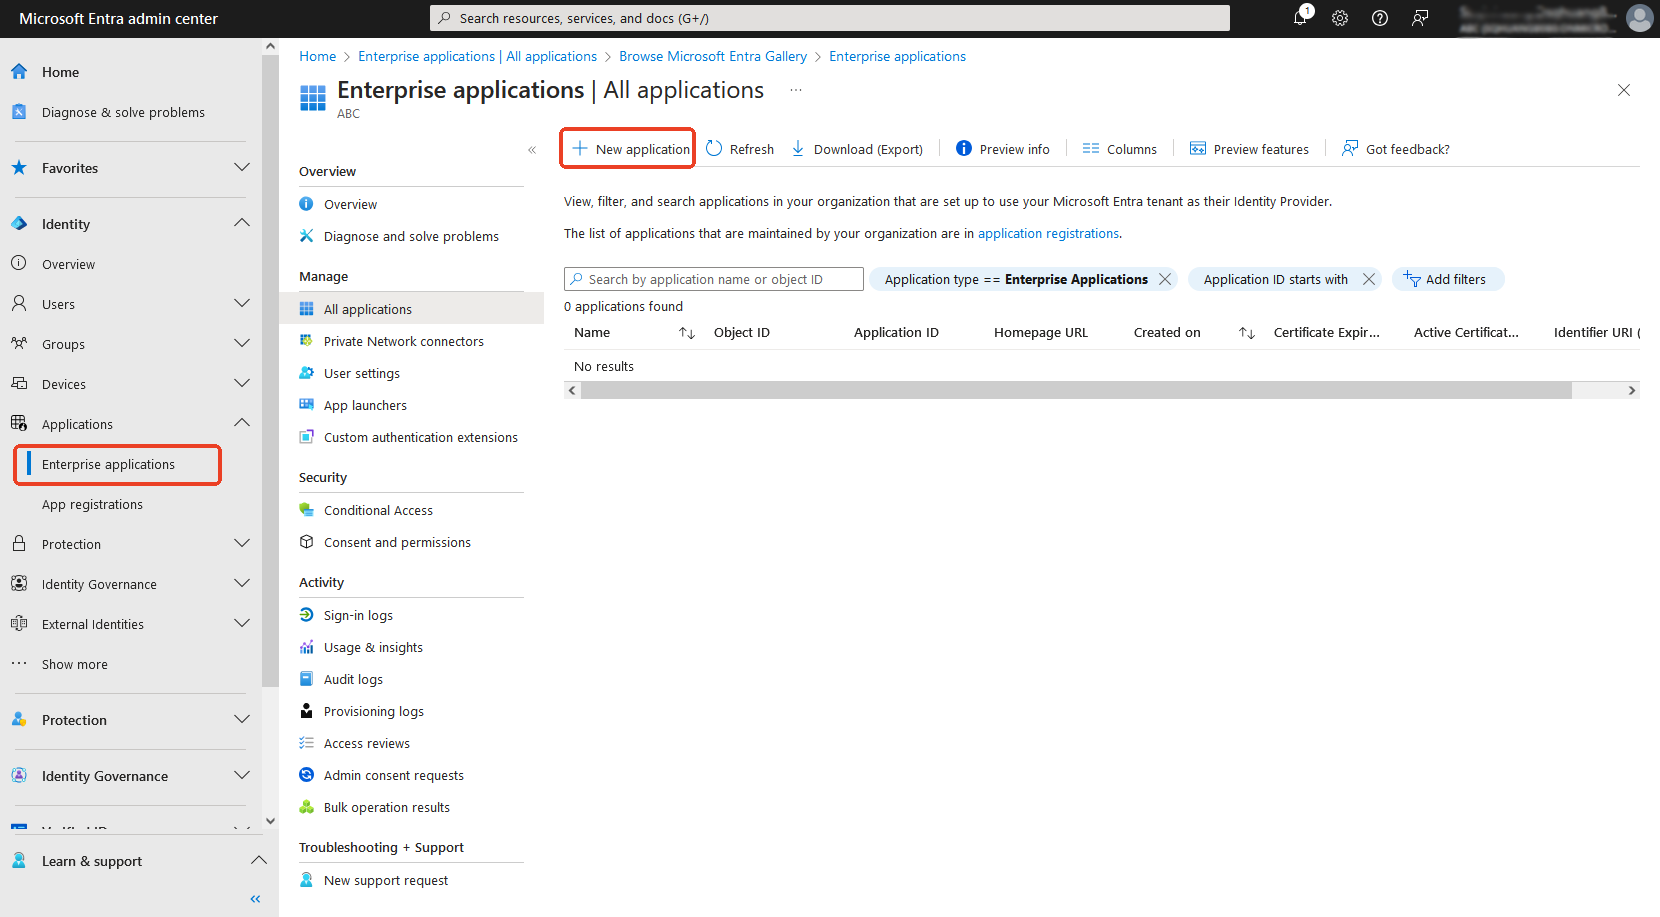
- Go to Identity → Applications → Enterprise applications → New application.
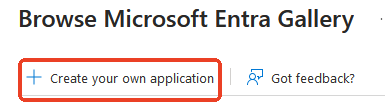
- In the Browse Microsoft Entra Gallery section, click Create your own application.
- Enter your application name, such as “GDMS”, and select “Integrate any other application you don’t find in the gallery (Non-gallery)“.
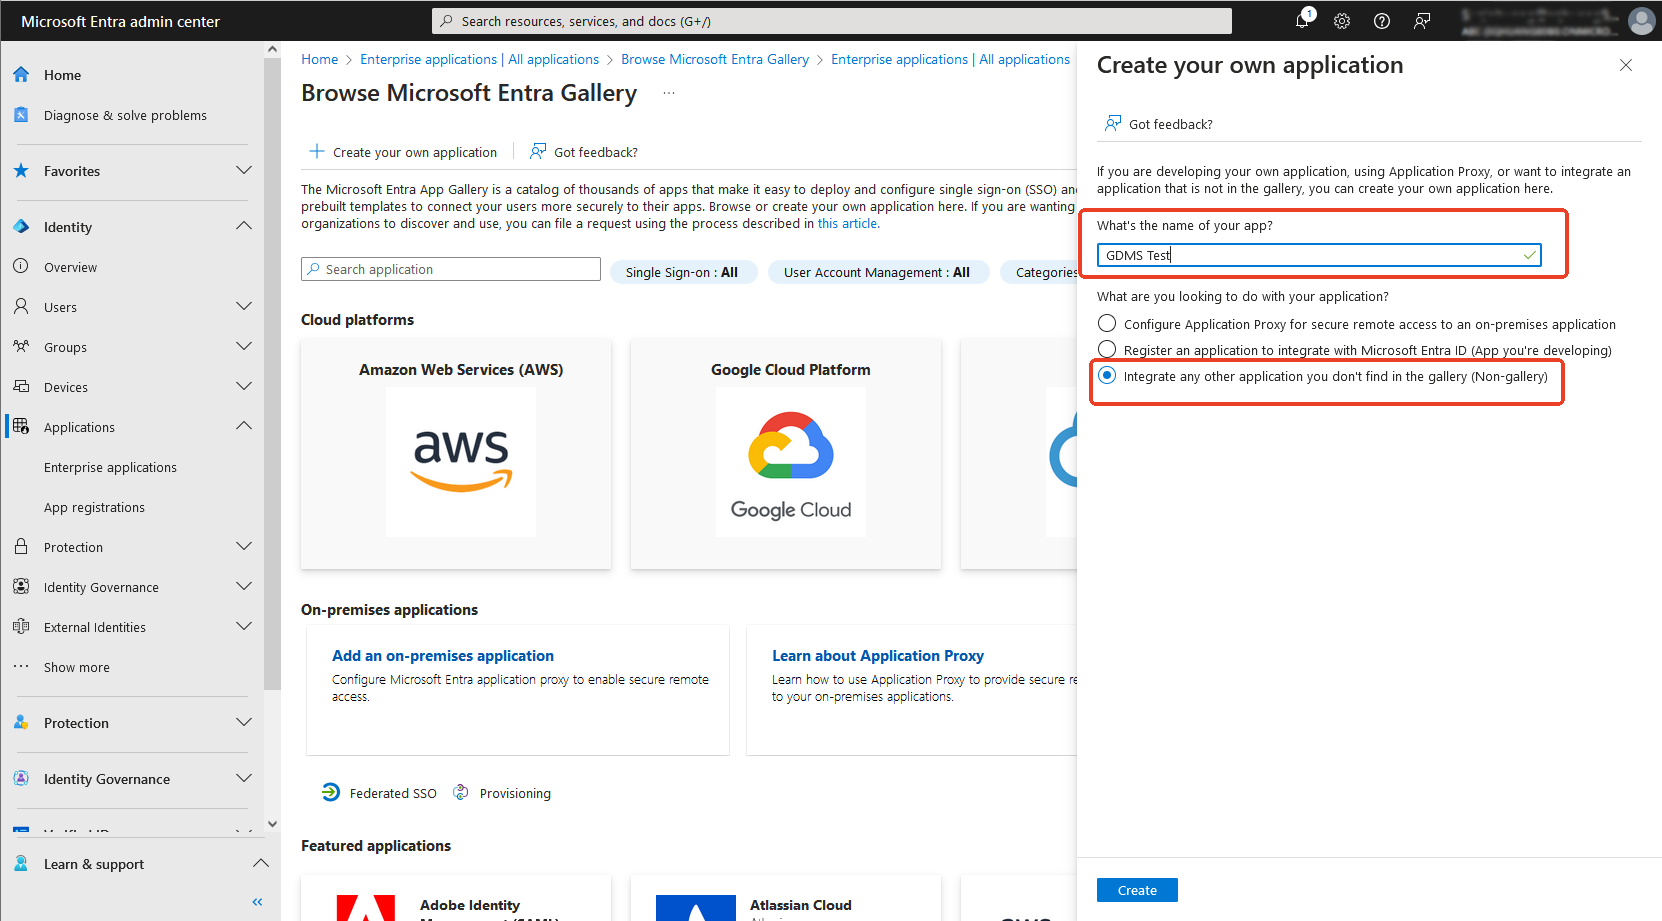
- Click Create to successfully create the application. You can view the application in the list.

Step 2: Create an application role in Azure
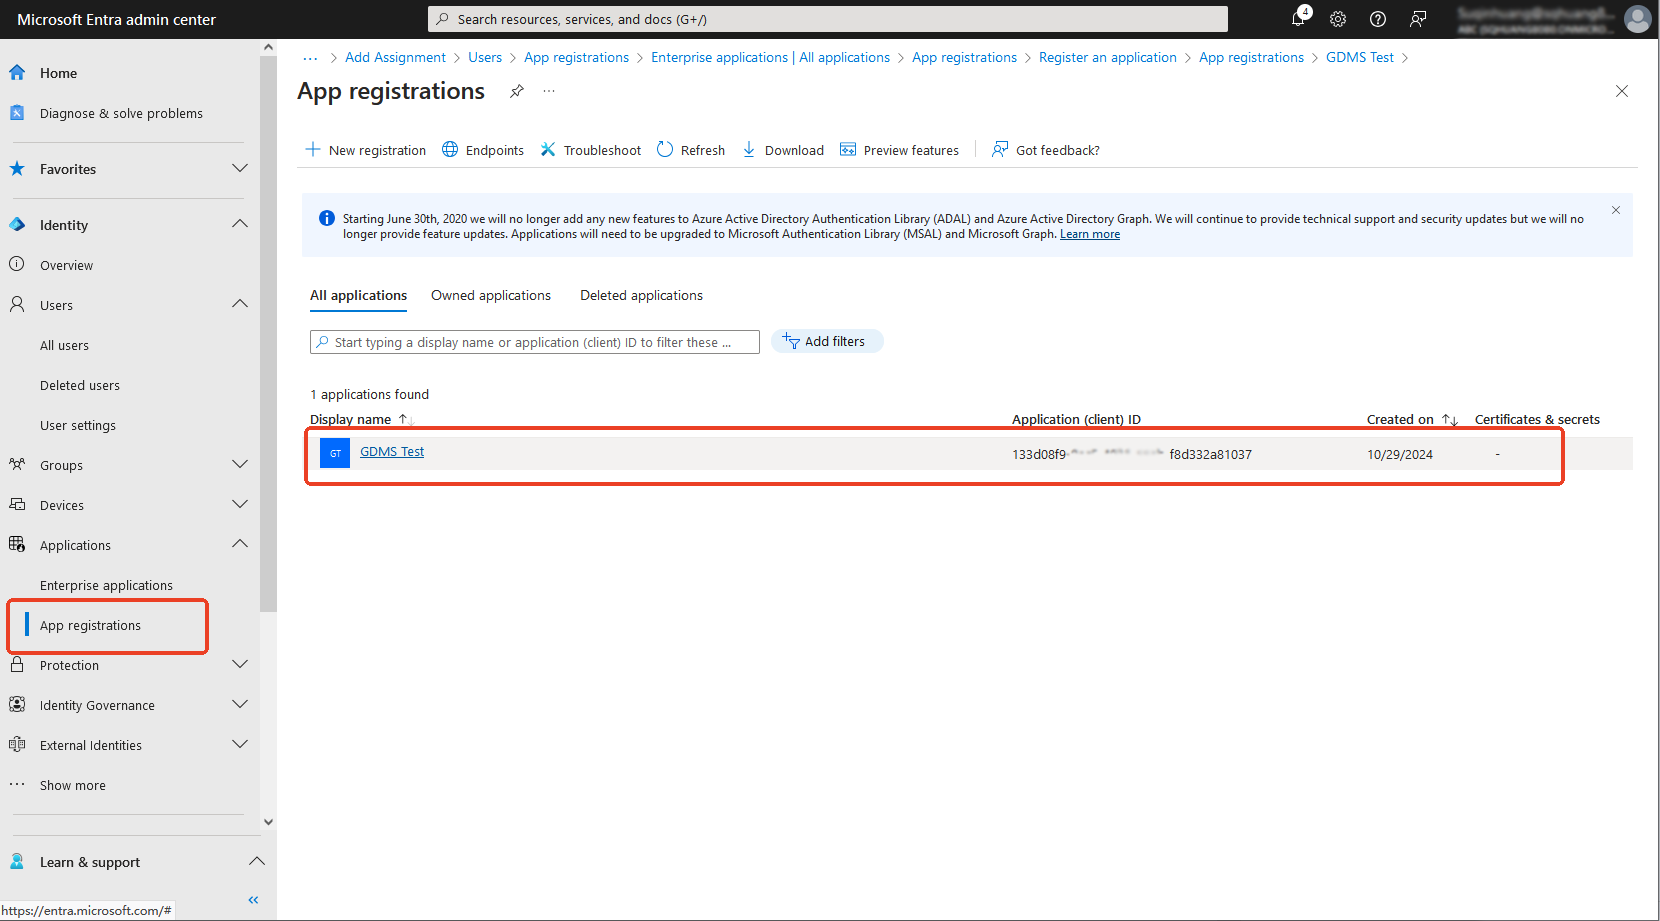
- Sign in to the Microsoft Entra admin center, go to Identity → Applications → APP registrations, and click on the app you have created.
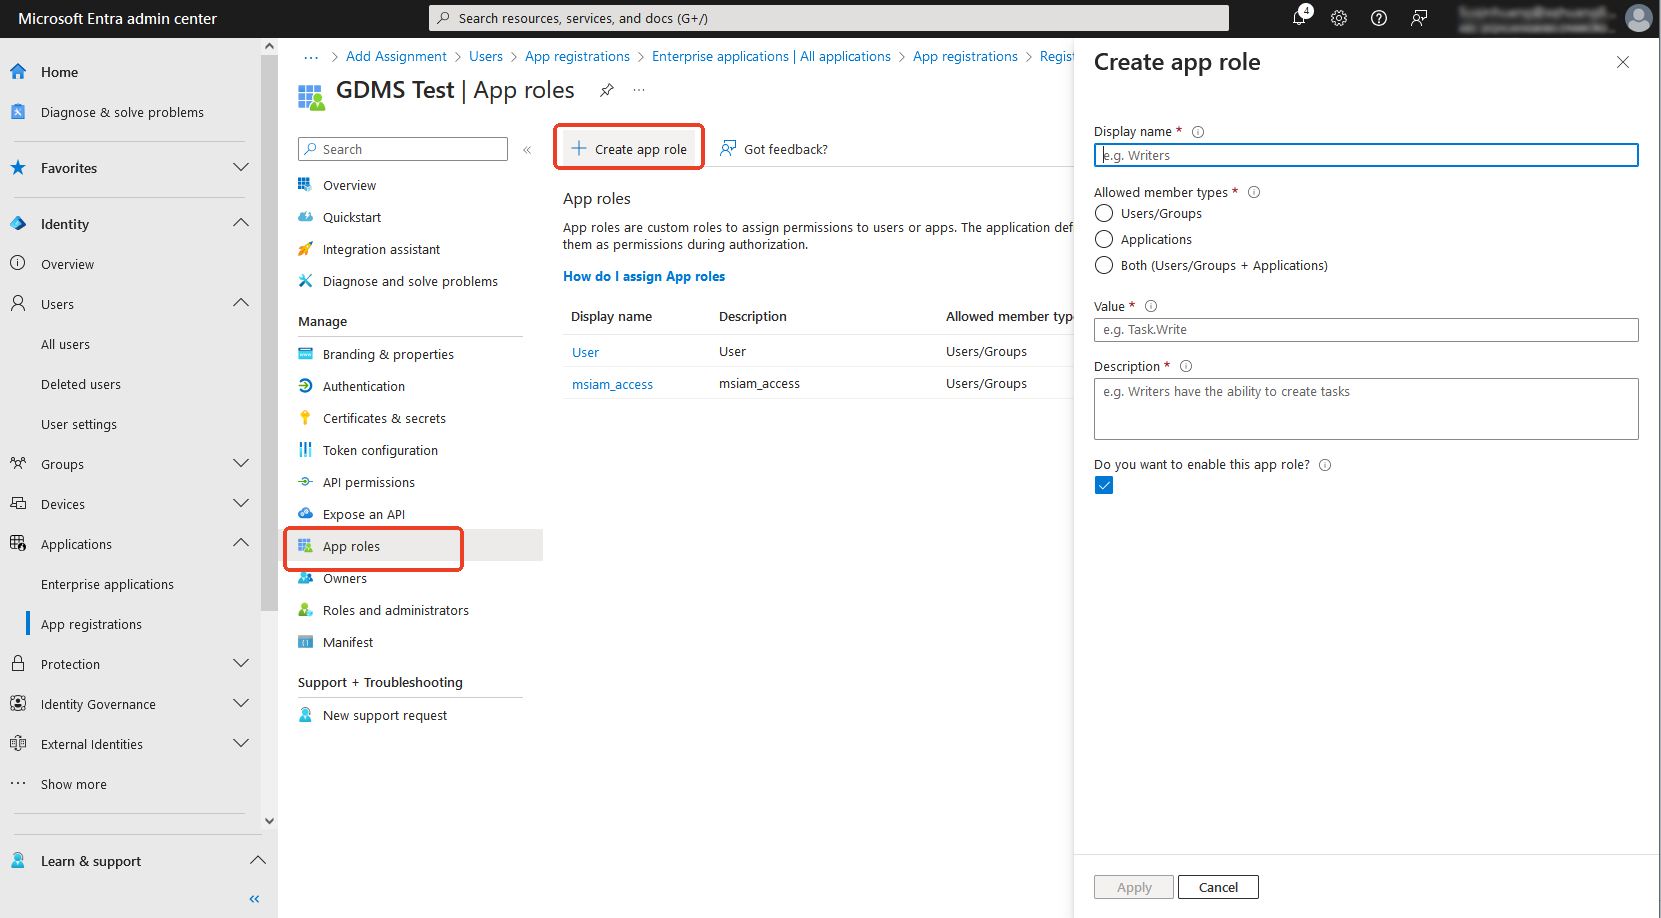
- Click APP roles on the left, and then click Create app role. Then fill in the display name, select “Both” for type, and the Value must be consistent with the SAML role value expected by the Service Provider, such as “Admin.A“.
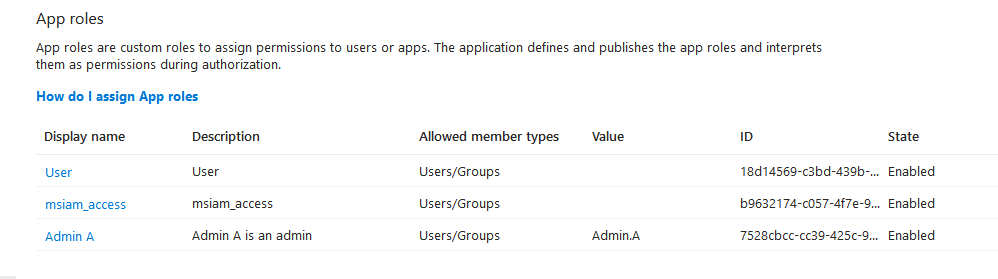
- After successful creation, you can see this role in the list.
Step 3: Add users to the application in Azure
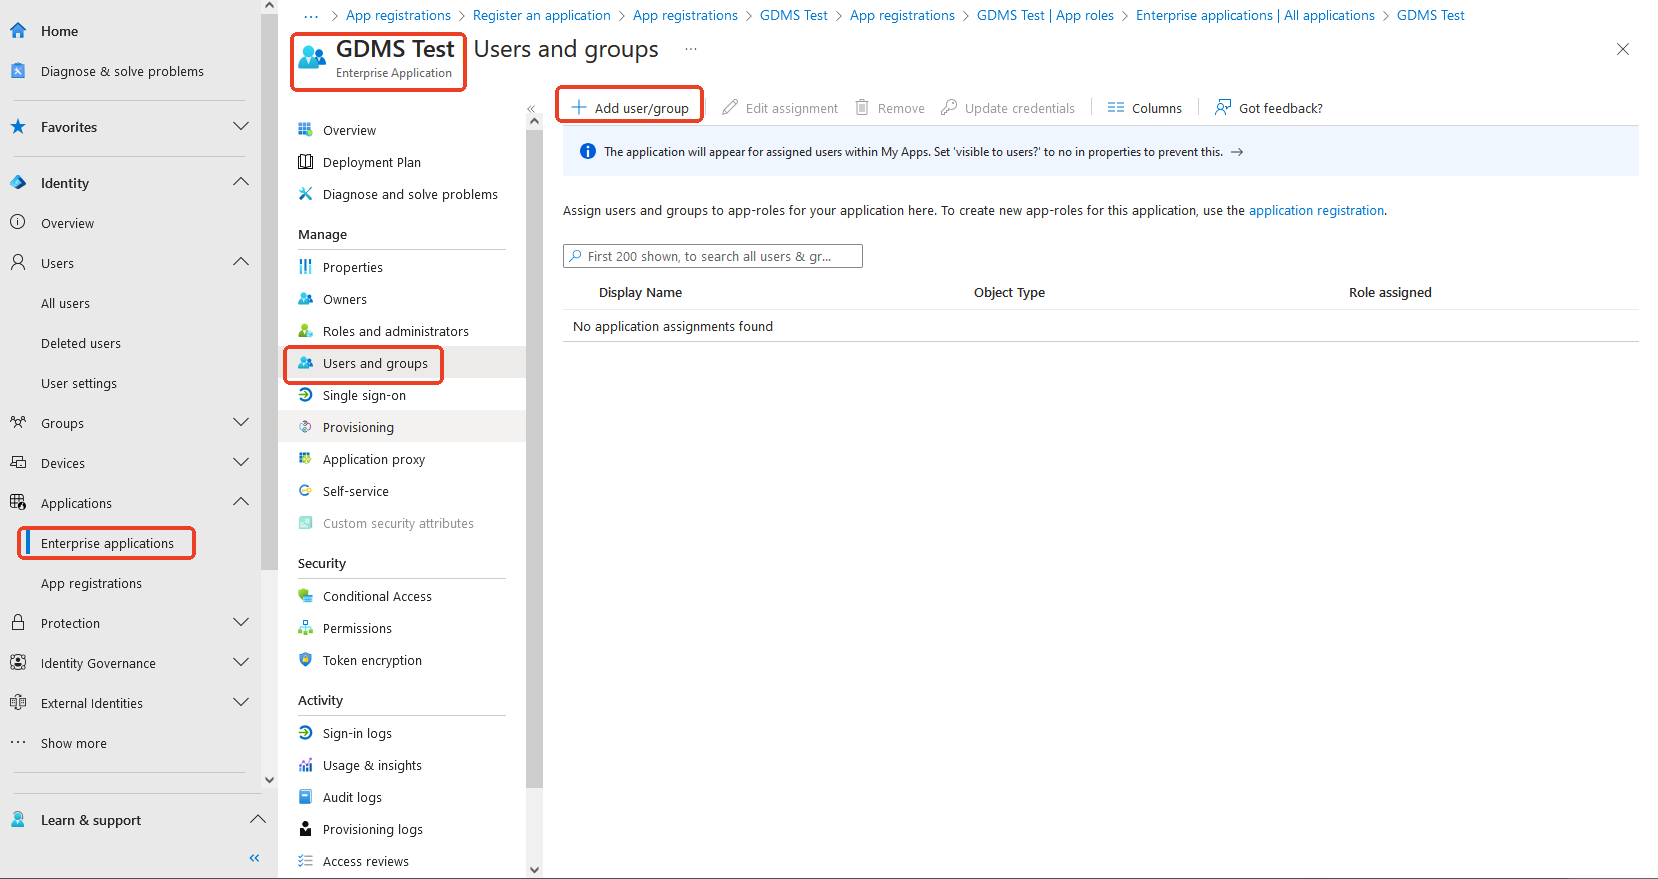
- Sign in to the Microsoft Entra admin center, go to Identity → Applications → Enterprise applications, find and select the app you created in the application list.
- Then, click Users and groups on the left bar and select Add user/group.
- Select the users you want to assign to use this app.
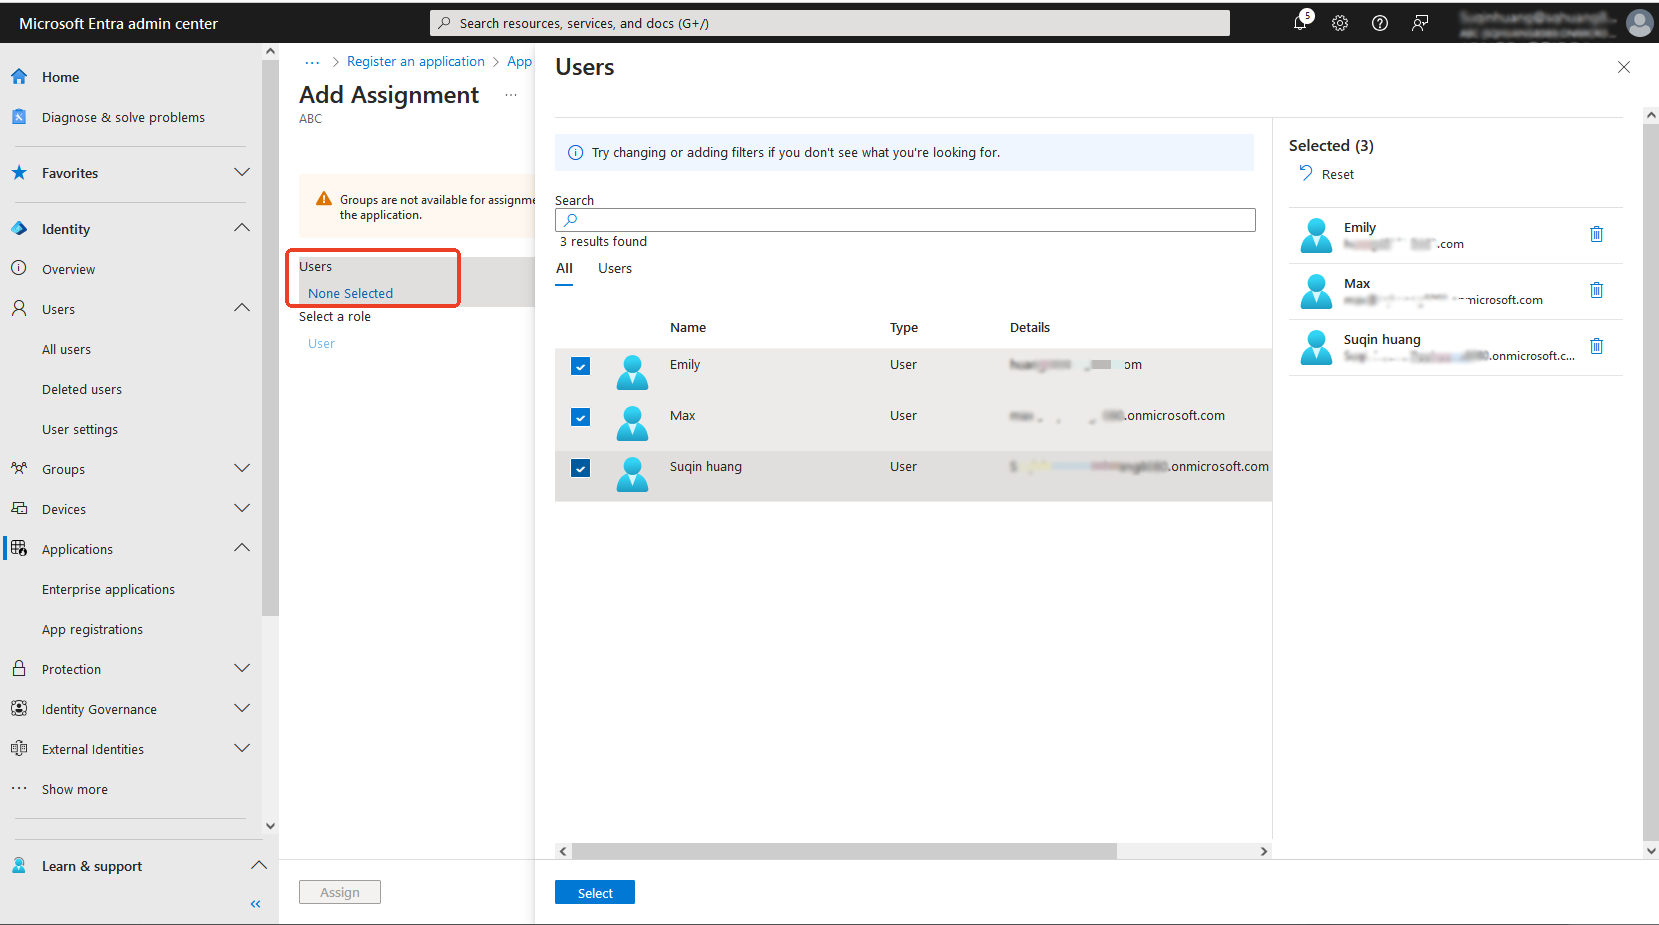
- Select Assigned Roles and choose from the application roles you just created.
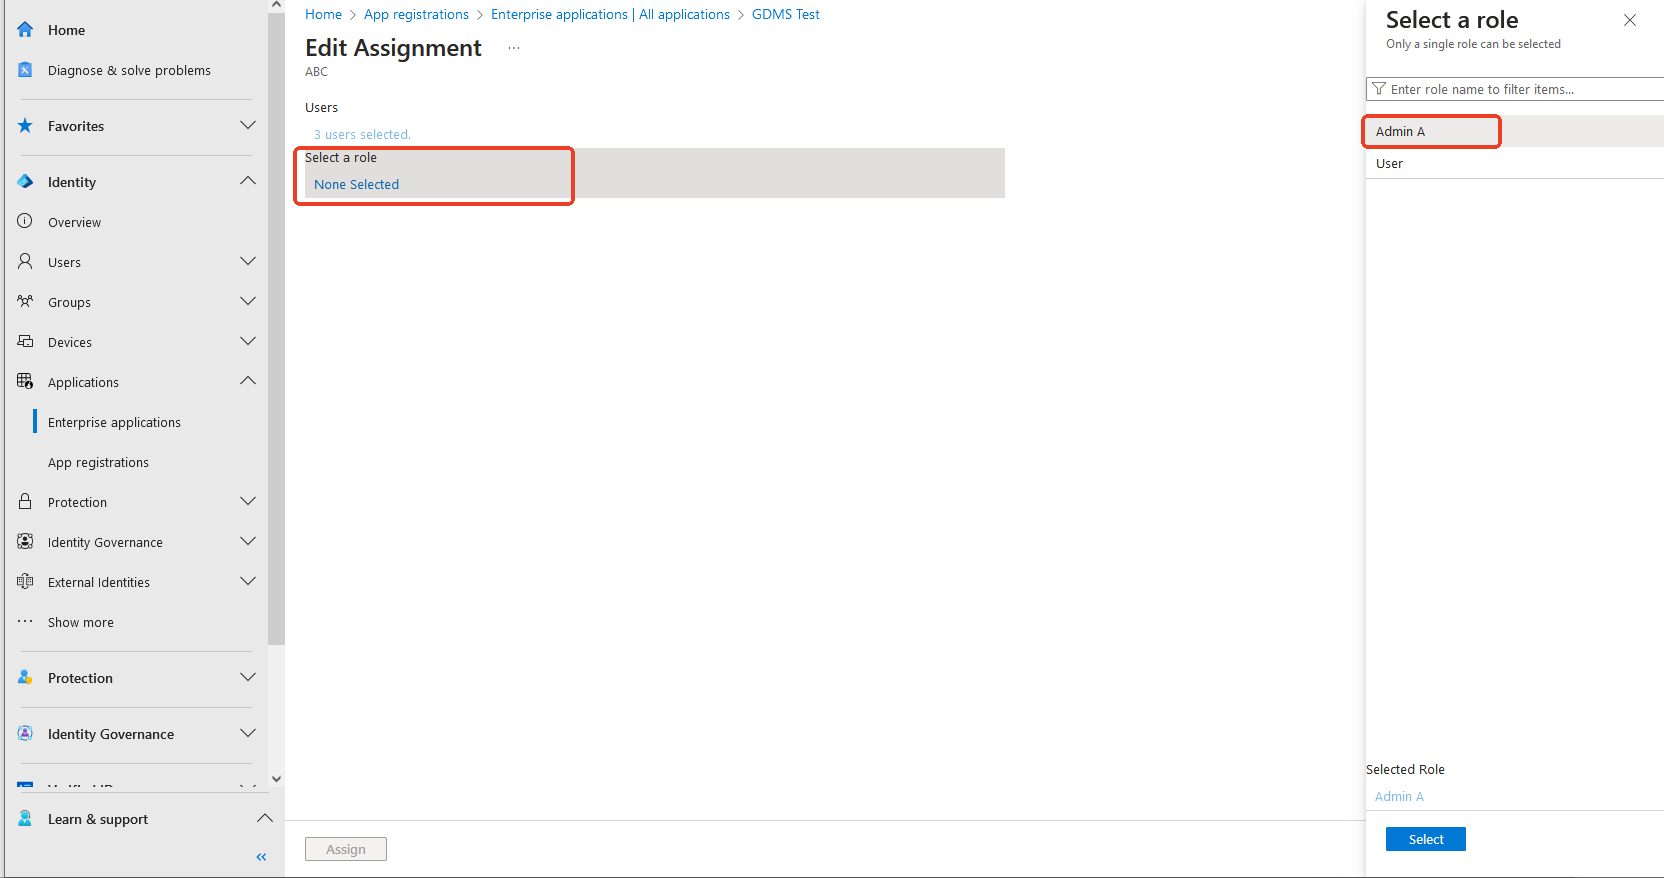
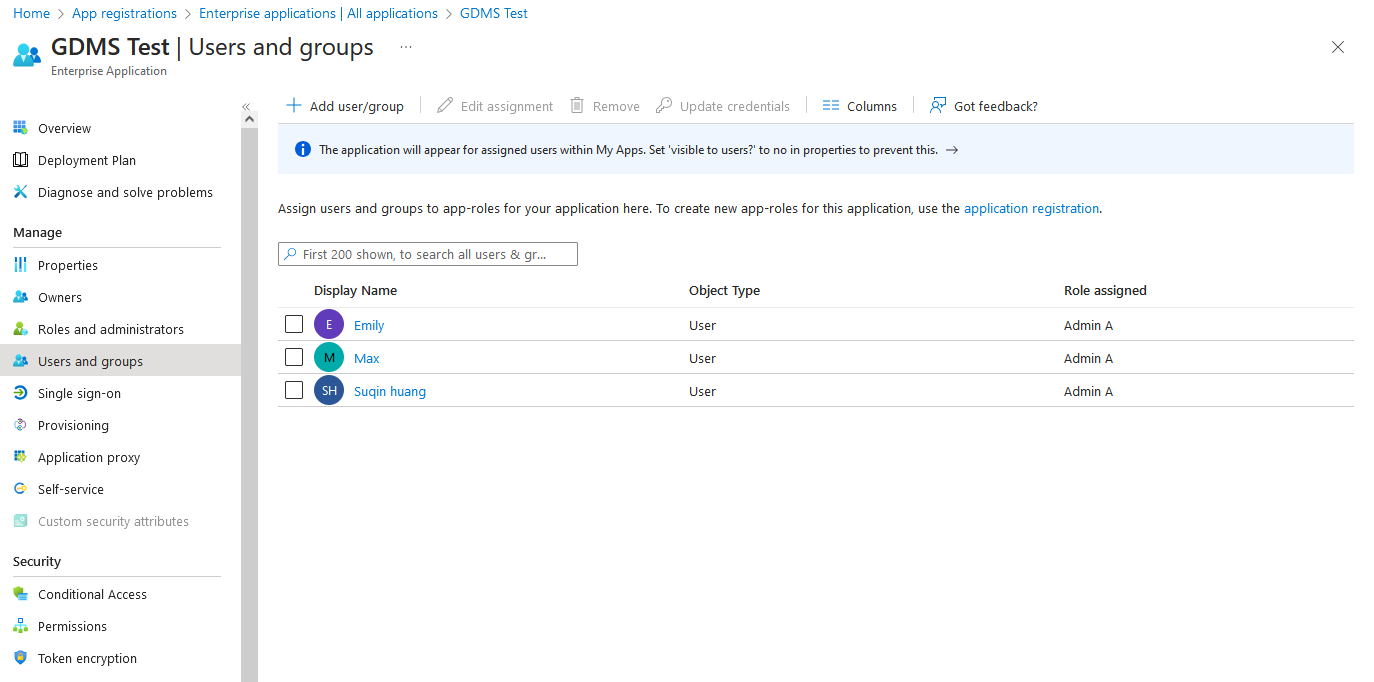
- Then click Assign. After the assignment is successful, you can see the selected users and the assigned roles in the list. (These users can then log in to GDMS/GWN Manager with a single sign-on)
Step 4: Set up SSO in Azure
- Sign in to the Microsoft Entra admin center, go to Identity → Applications → Enterprise applications, find and click the app you have previously created.
- Click Single Sign-on on the left and click SAML on the page.
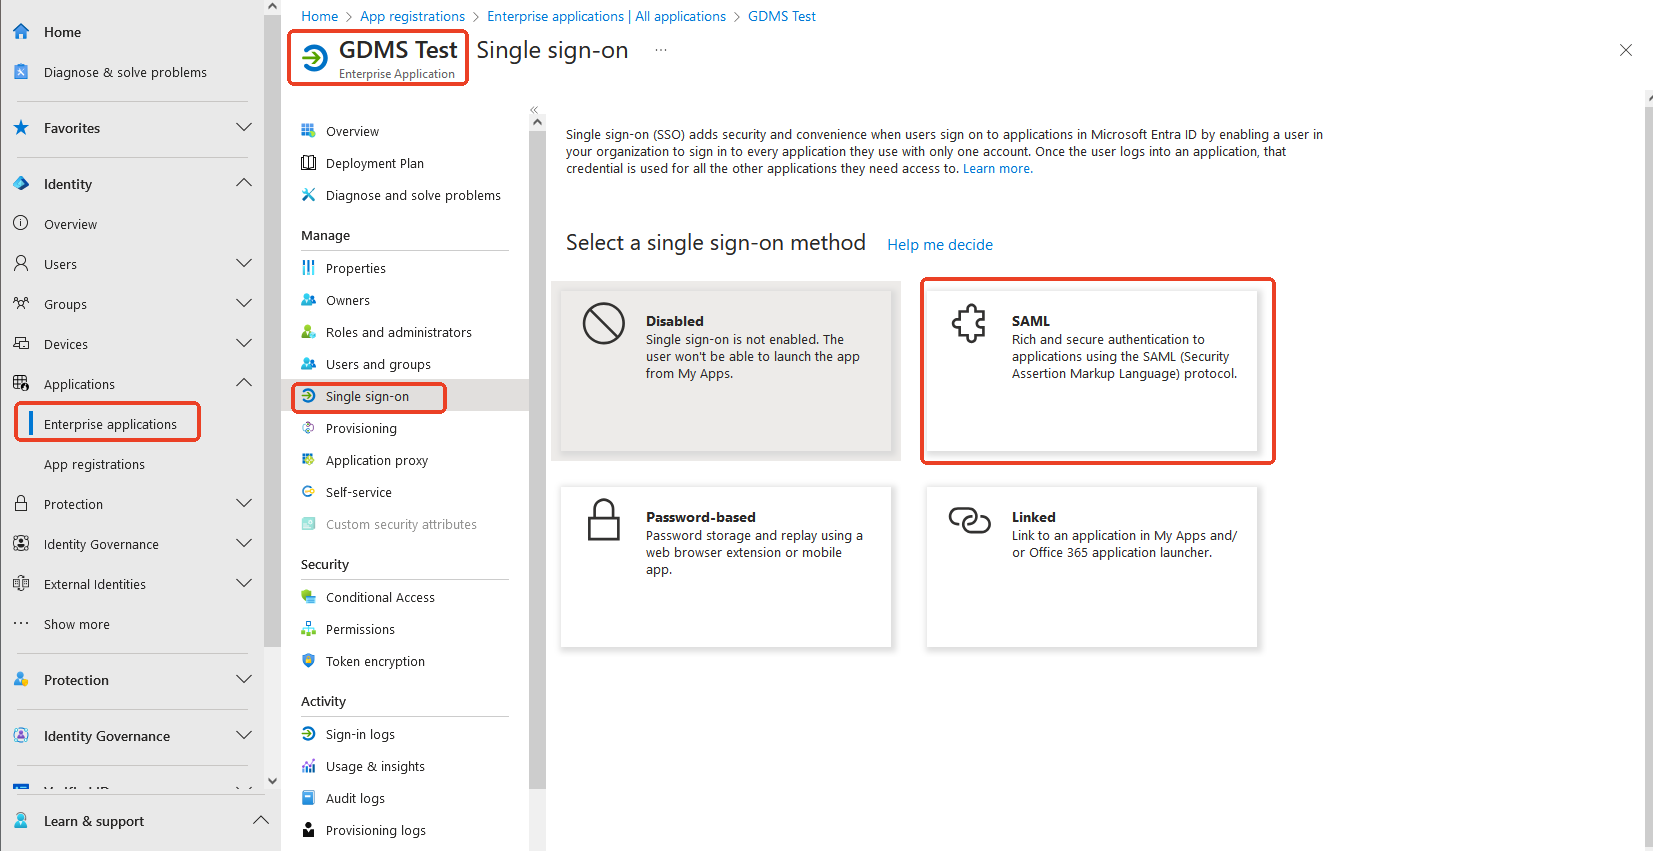
- First, within the Basic SAML Configuration section, click Edit.
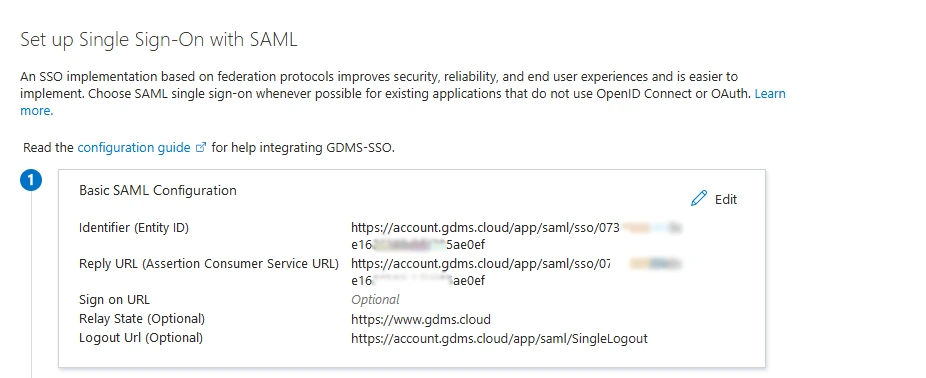
- Copy the information from the GDMS/GWN platform and fill in the following information:
Identifier (Entity ID) | Fill in the Entity ID displayed on the SAML SSO page in Users (as shown in the picture, click one-click copy) |
Reply URL | Fill in the ACS URL displayed on the SAML SSO page in Users (as shown in the figure, click one-click copy) |
Relay State | Specify the Service Provider URL that users should be redirected to after successful authentication.
Note: Although this field appears optional, it is required for this integration. You must configure it to prevent user errors. |
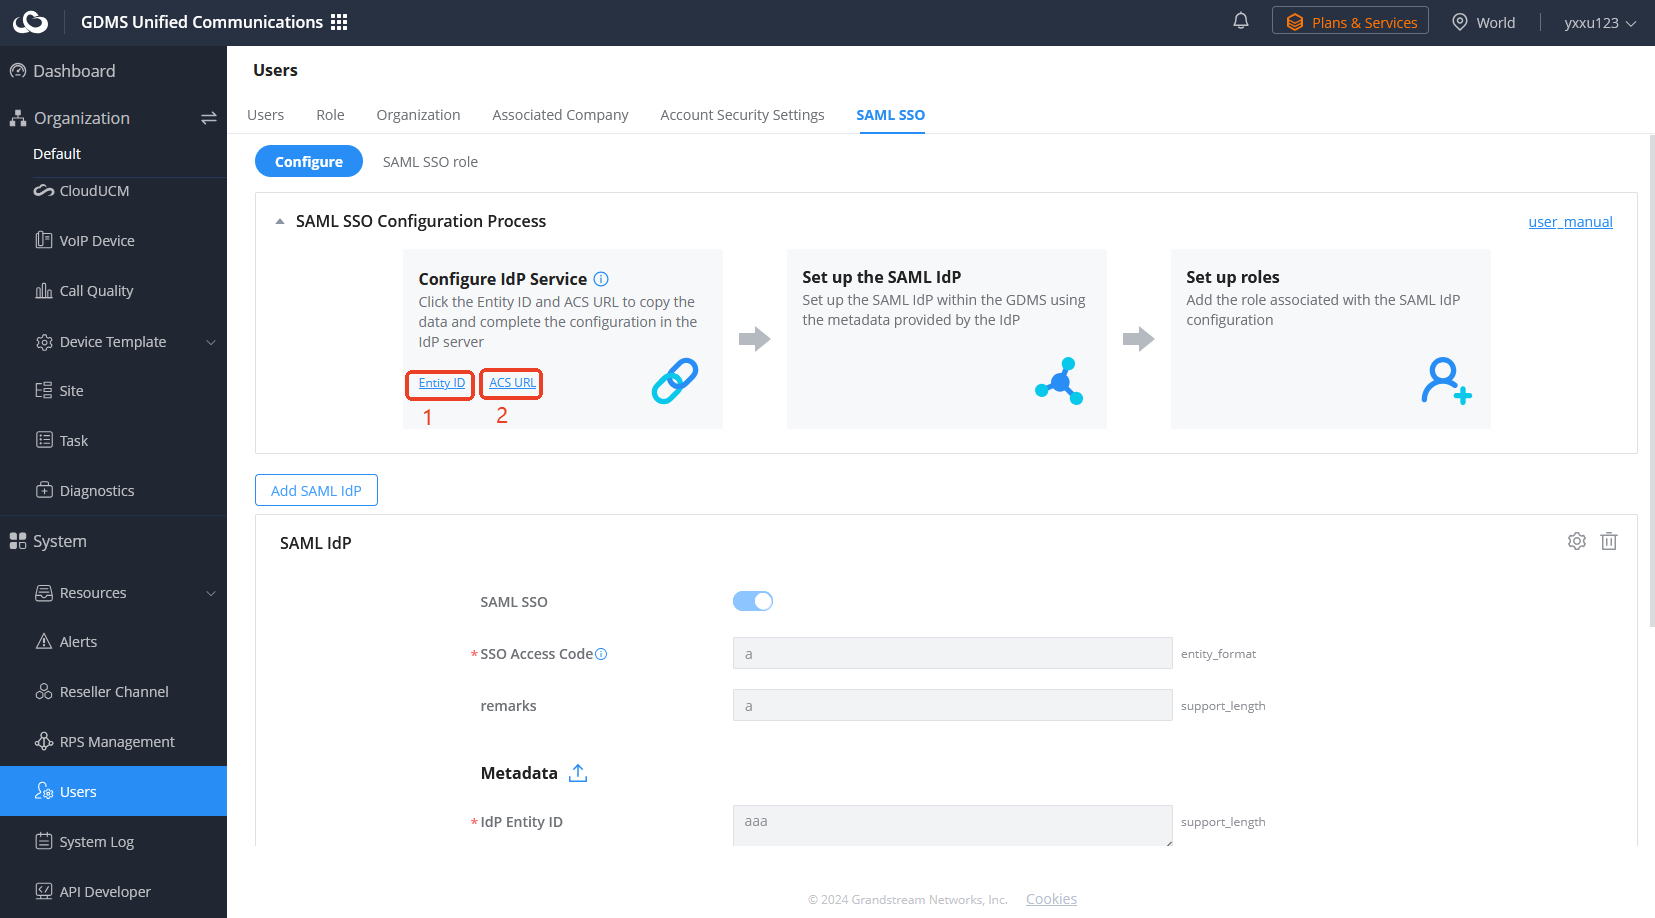
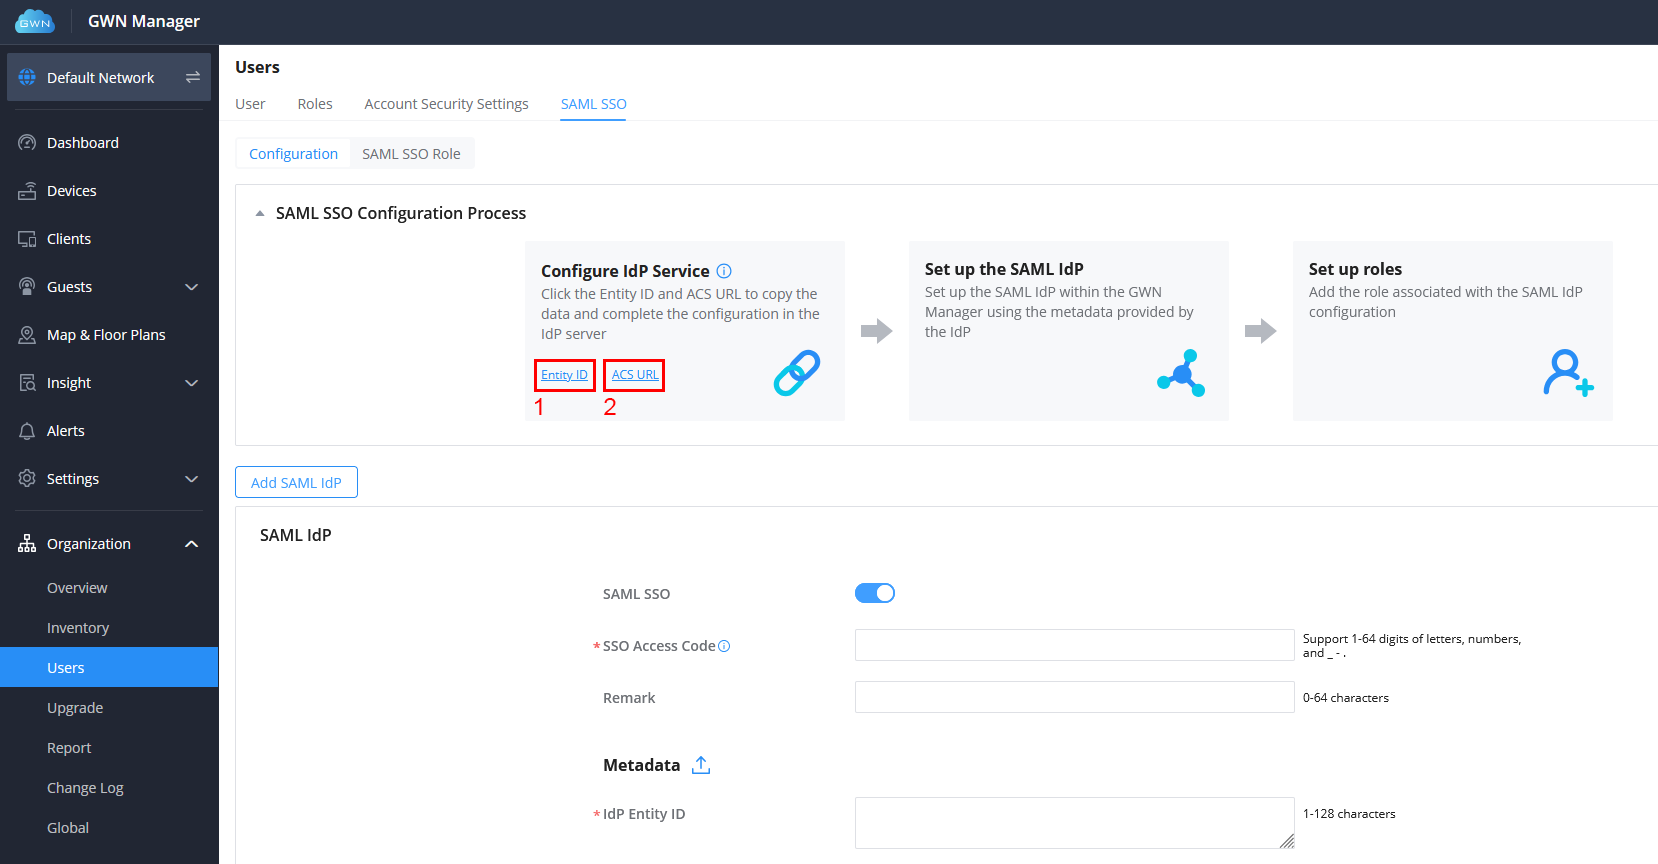
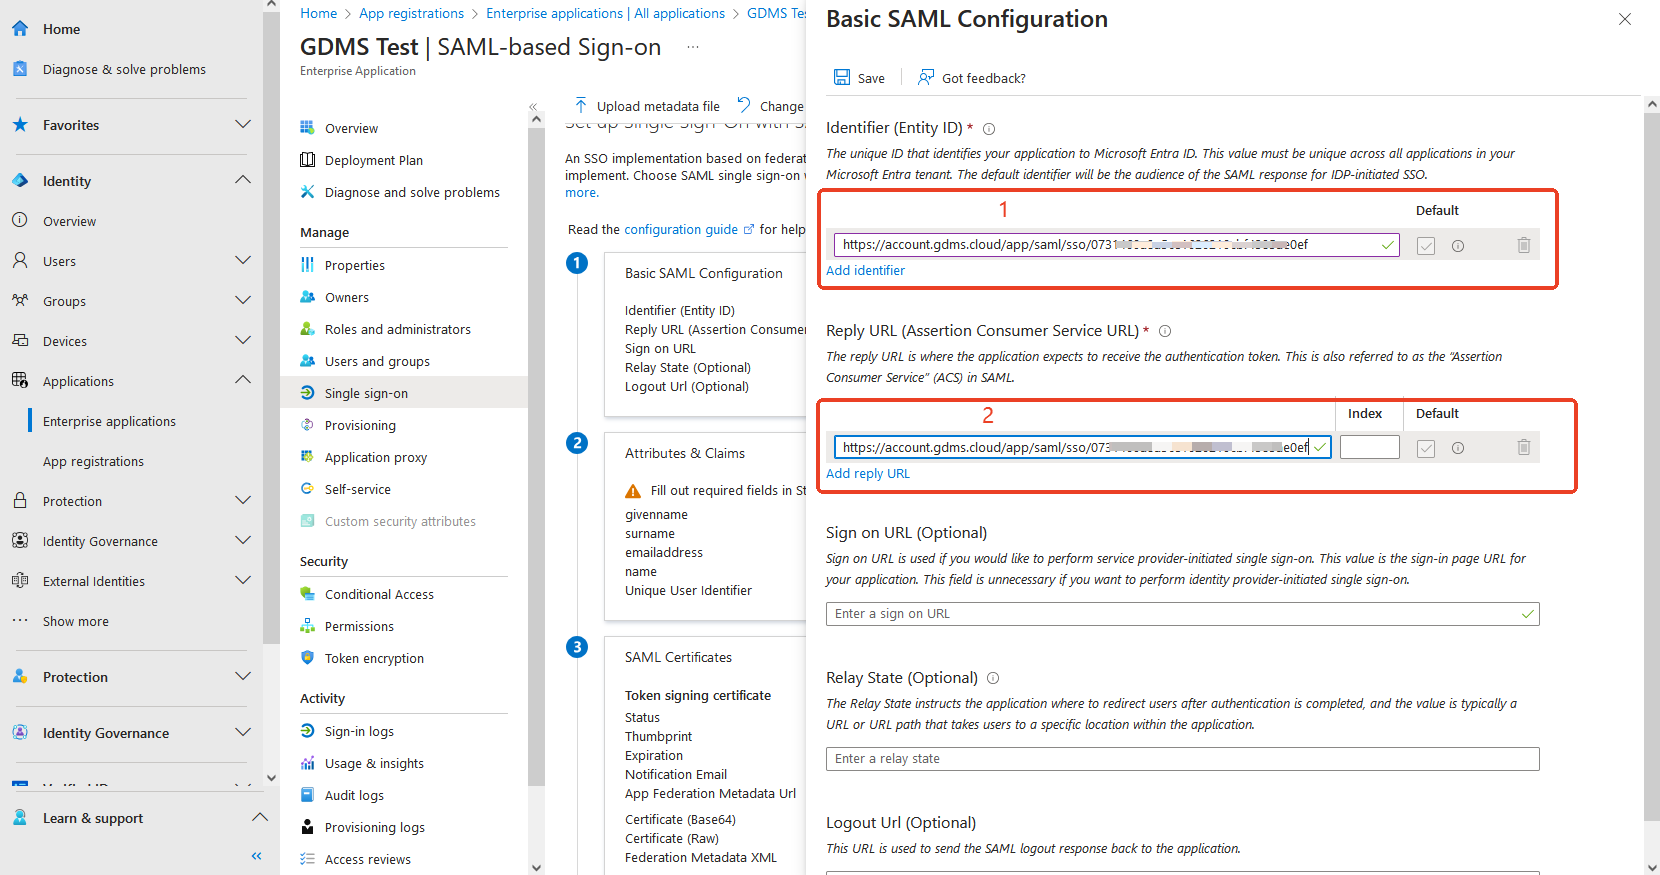
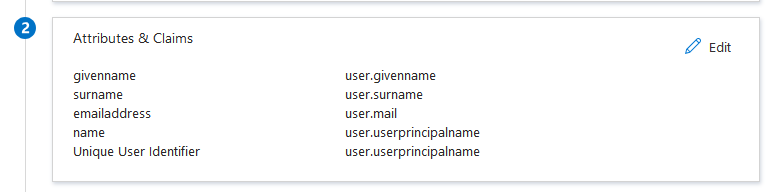
- Then, within the Attributes & Claims section, click Edit.
- Click Add new Claim.
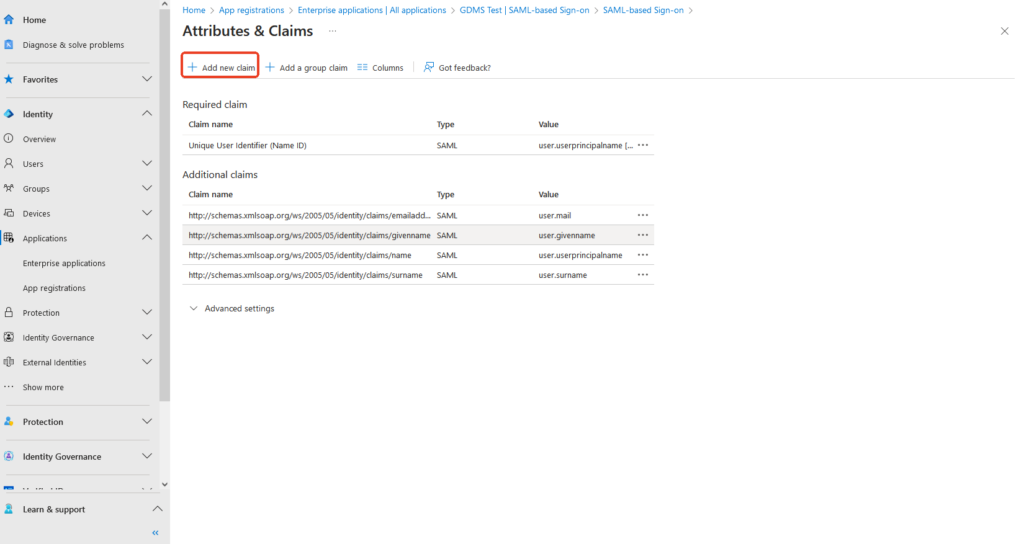
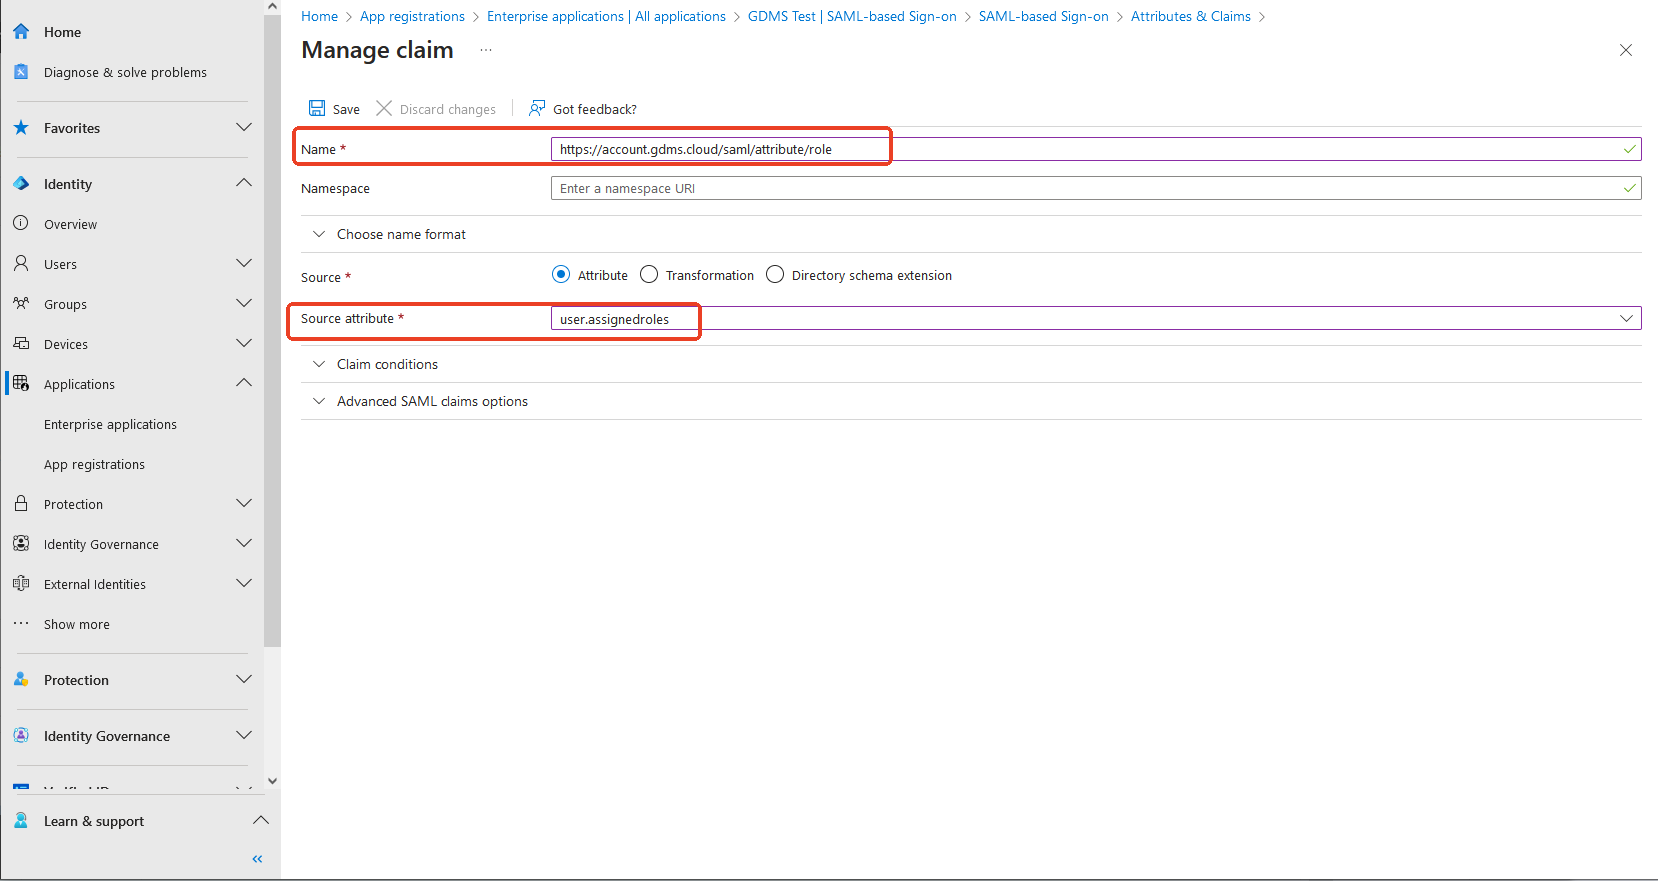
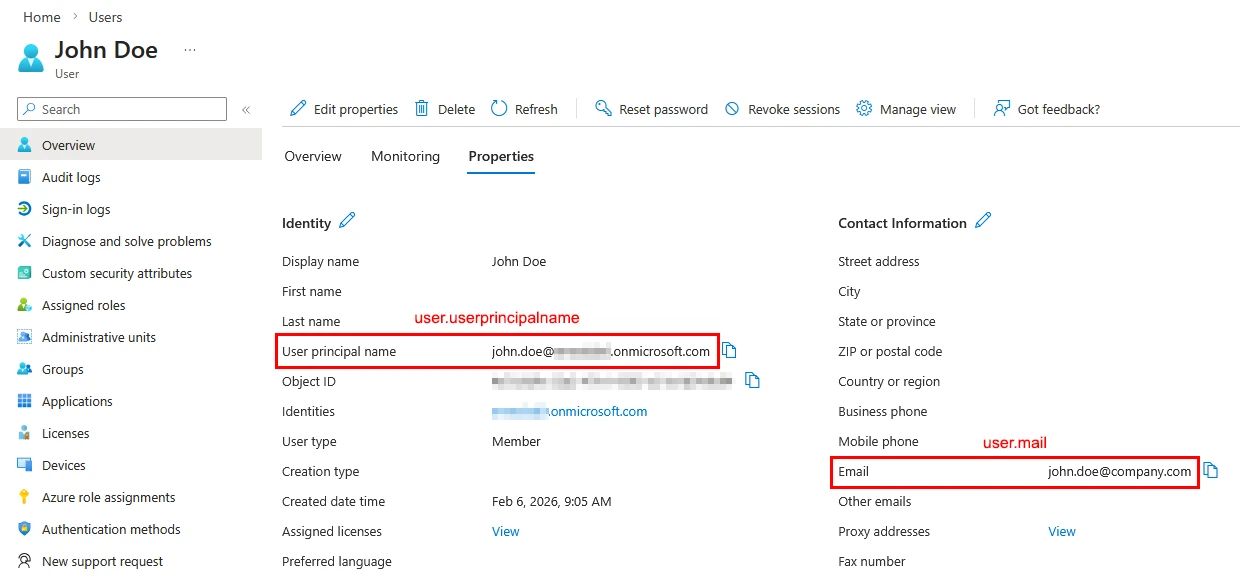
- Add the following SAML claims in Microsoft Entra ID. The claim names (URIs) must match the requirements of the target platform.
Claim | Name | Source attribute | |
GDMS | Claim 1 (Role) | user.assignedroles | |
Claim 2 (Email) |
| ||
Claim 3 (Other Email) | user.mail | ||
GWN Manager | Claim 1 (Role) | user.assignedroles | |
Claim 2 (Email) |
| ||
Claim 3 (Other Email) | user.mail |
- Download the metadata file for configuration on GDMS.
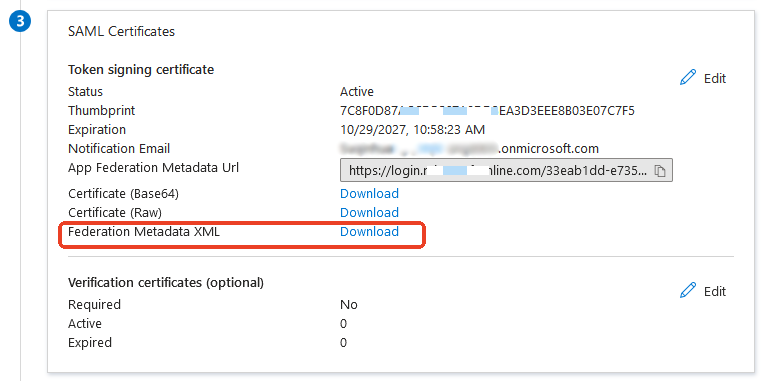
Step 5: SAML SSO in GDMS/GWN Manager
- Download the metadata of the GDMS application you created from Azure.
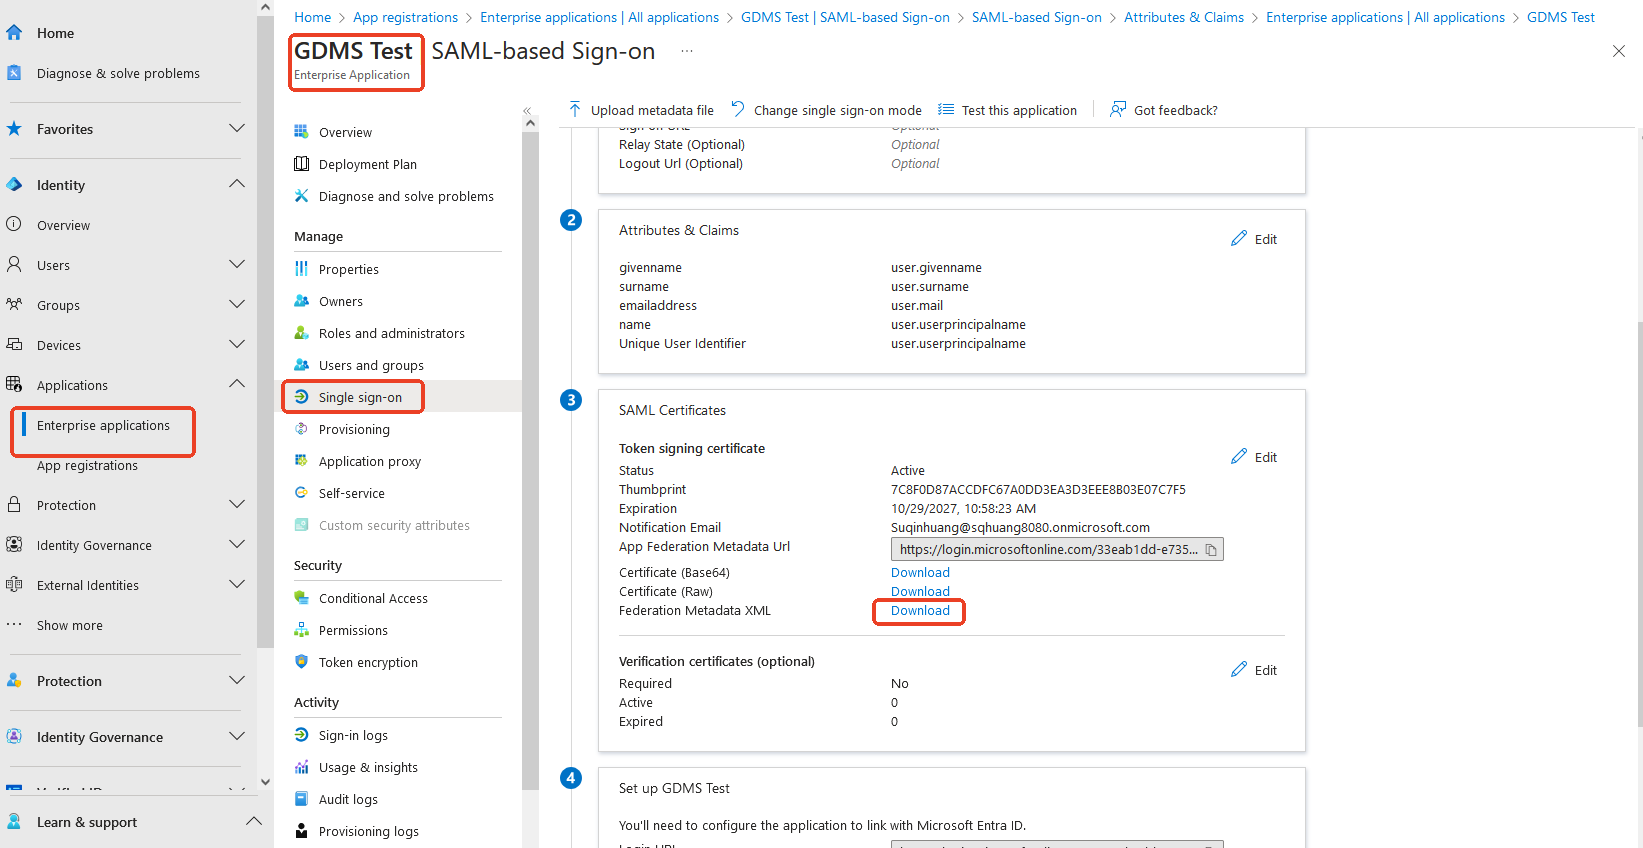
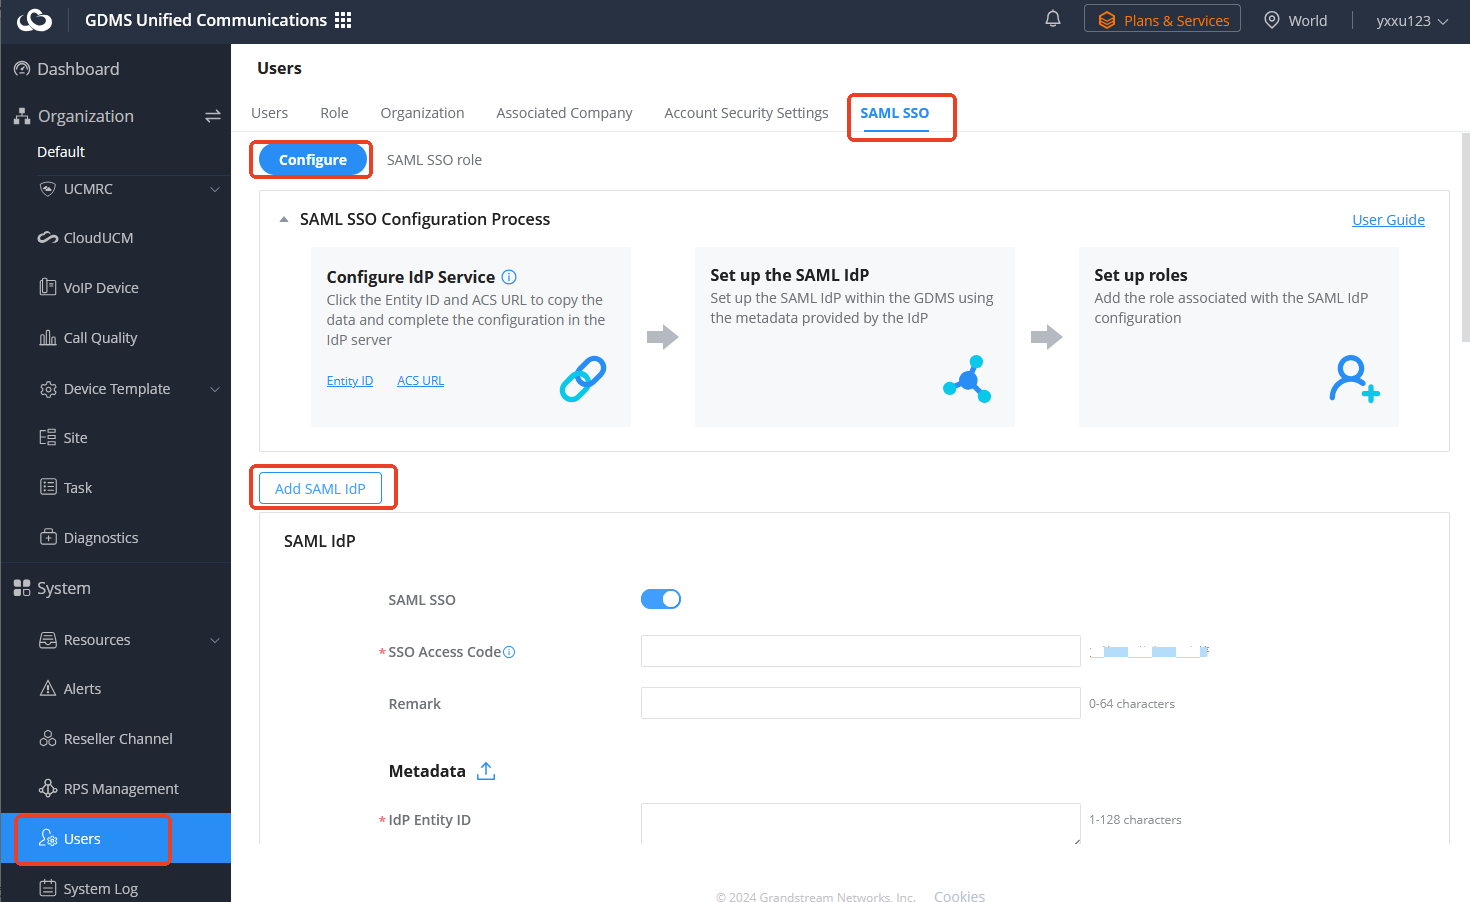
- Log in to the GDMS or GWN Manager platform as a super administrator and navigate to Users→SAML SSO.
- To configure the identity provider, click “Add SAML IdP” and fill in the information:
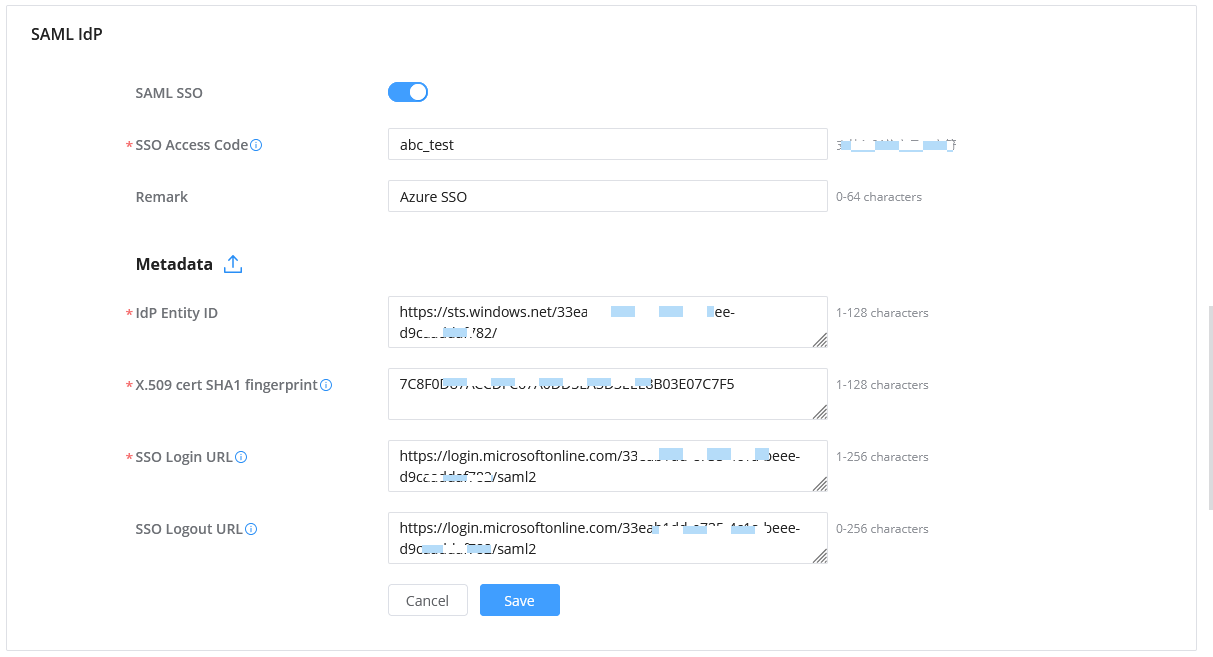
SAML SSO | Enable or disable. If disabled, users will no longer be able to use the configured SSO authentication to log in. |
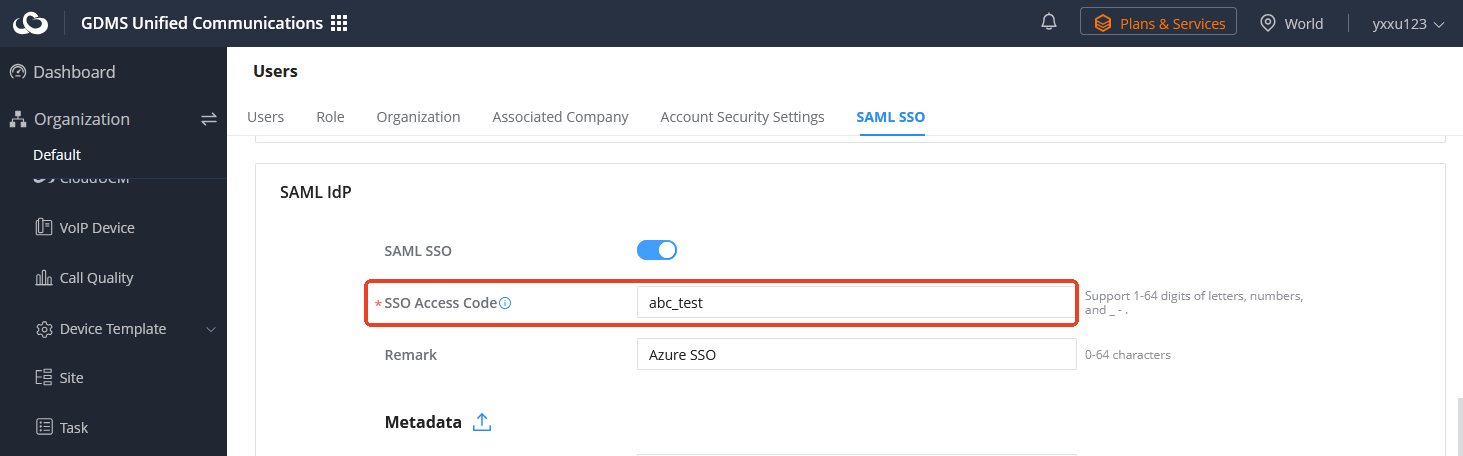
SSO Access Code | Used to enter this SSO Access Code on the GDMS/GWN Manager login page, and can log in through this IdP service authentication. |
Remarks | Enter your remarks. |
Metadata | Upload the “Federation Metadata XML” file downloaded from Azure. |
- After adding the IdP, configure the SAML SSO role as described in section [SAML SSO ROLES IN GDMS/GWN MANAGER]. The Role Name must exactly match the role value sent by the IdP.
SAML SSO WITH ADFS
This section describes how to configure AD FS as the Identity Provider for GDMS Cloud and GWN Manager. For more configuration instructions on ADFS, refer to Microsoft’s deployment guide.
Step 1: Add Relying Party Trust in ADFS
- Open the AD FS management console via Server Manager→Tools→AD FS Management.

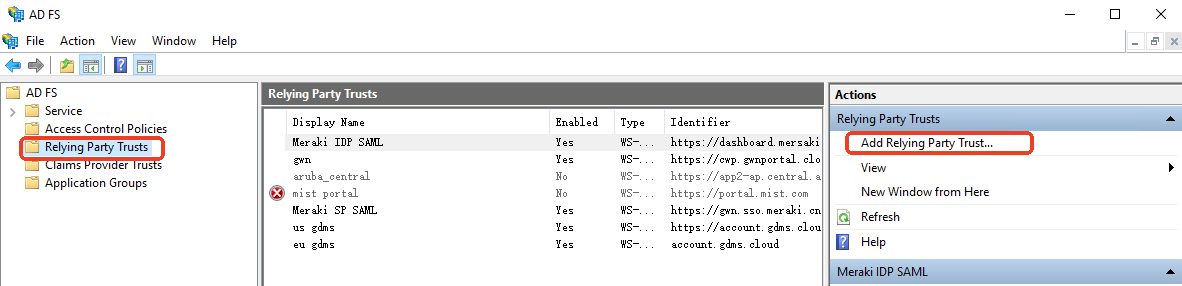
- Click on the top-level folder (AD FS) and click Add Relying Party Trust from the Actions menu.
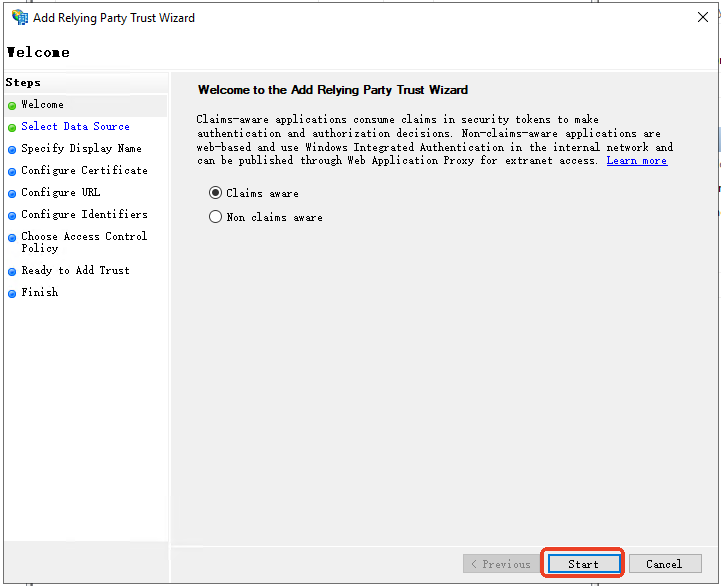
- Click Start to launch the wizard.
- Choose to Enter data about the relying party manually. Then click Next.

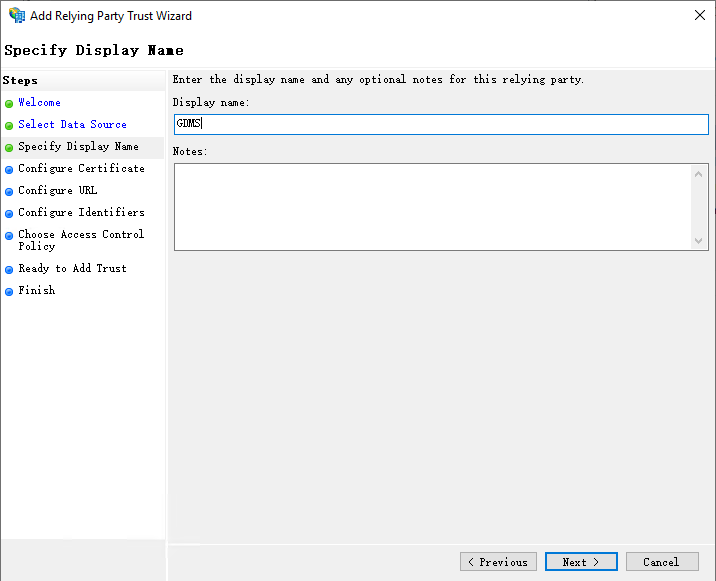
- Enter a Display name, such as “GDMS” or “GWN Manager”, which will be displayed in the management console and to users connecting to GDMS. Then click Next.
- Click Next to skip the step of Configure Certificate.
- Enable Support for the SAML 2.0 WebSSO protocol.
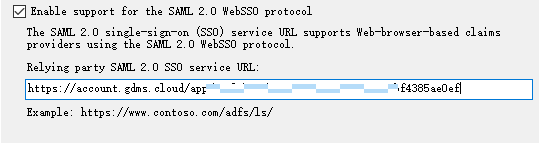
- Enter the Relying Party SAML 2.0 SSO service URL (ACS URL), which can be copied from:
- GDMS: Users→SAML SSO
- GWN Manager: Organization→Users→SAML SSO
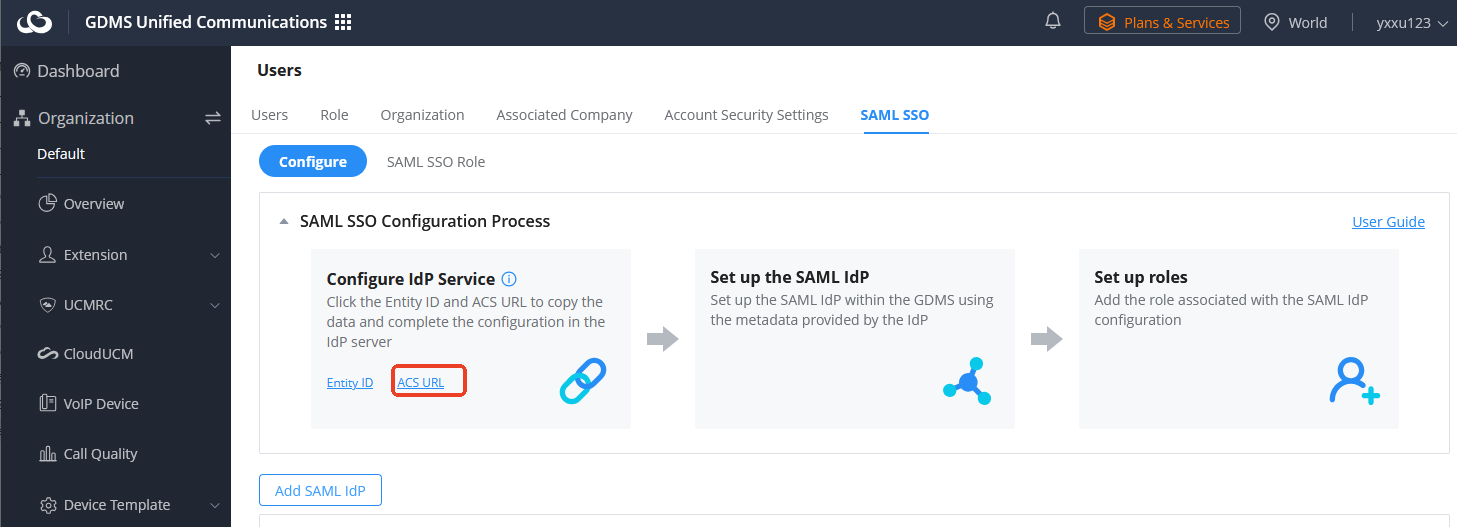
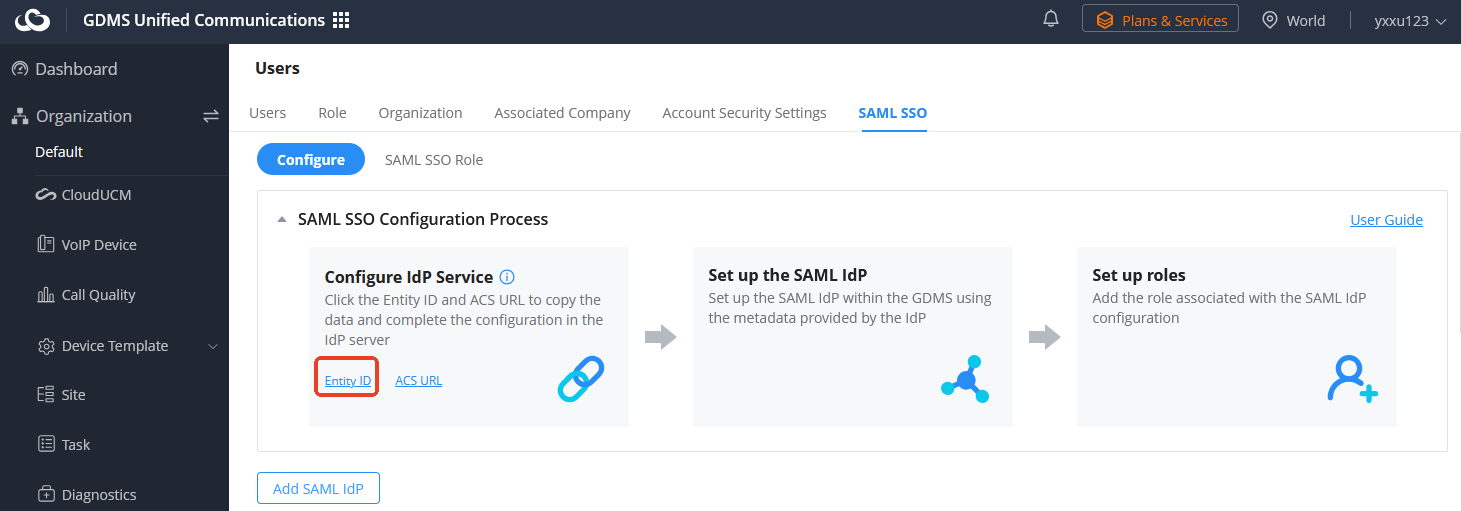
- For the Relying party trust identifier, fill in the Entity ID displayed on the corresponding SAML SSO (as shown in the figure, click one-click copy). Then click Add and Next.

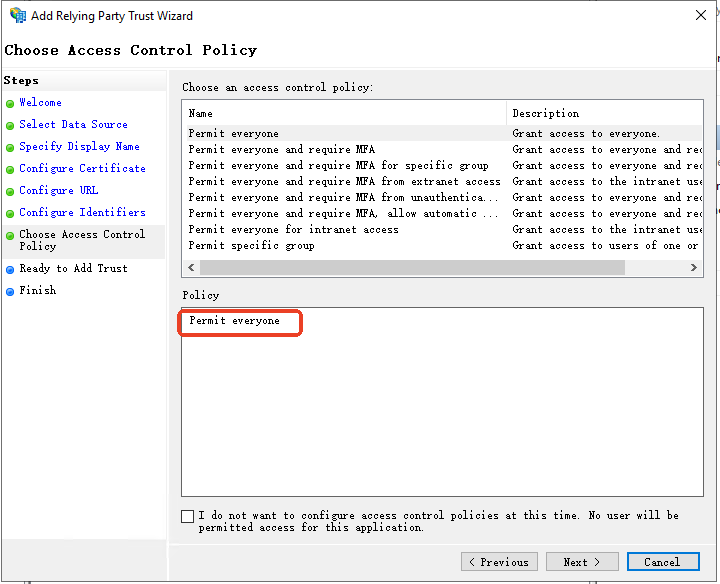
- Select the default issuance authorization rule based on your preferred security behavior. For this example, select Permit everyone. Then click Next.
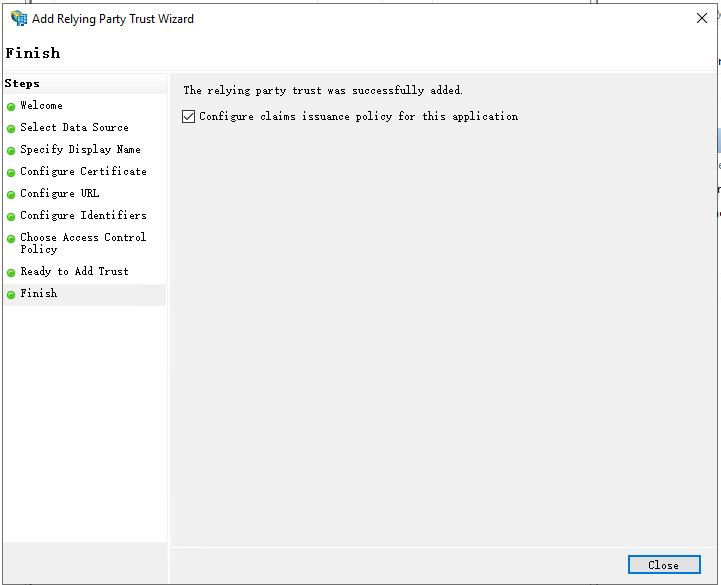
- Review your settings and complete the wizard.
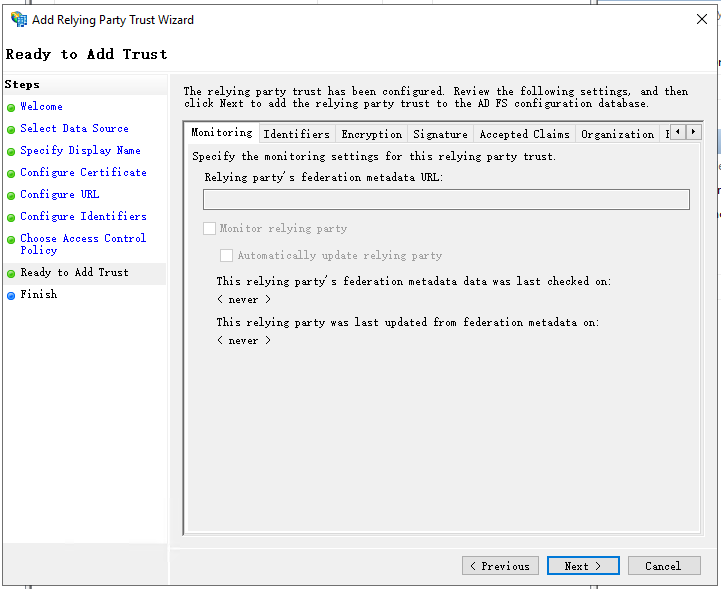
- Ensure Configure claim issuance policy for this application is checked.
Step 2: Set NameID Attribute in ADFS
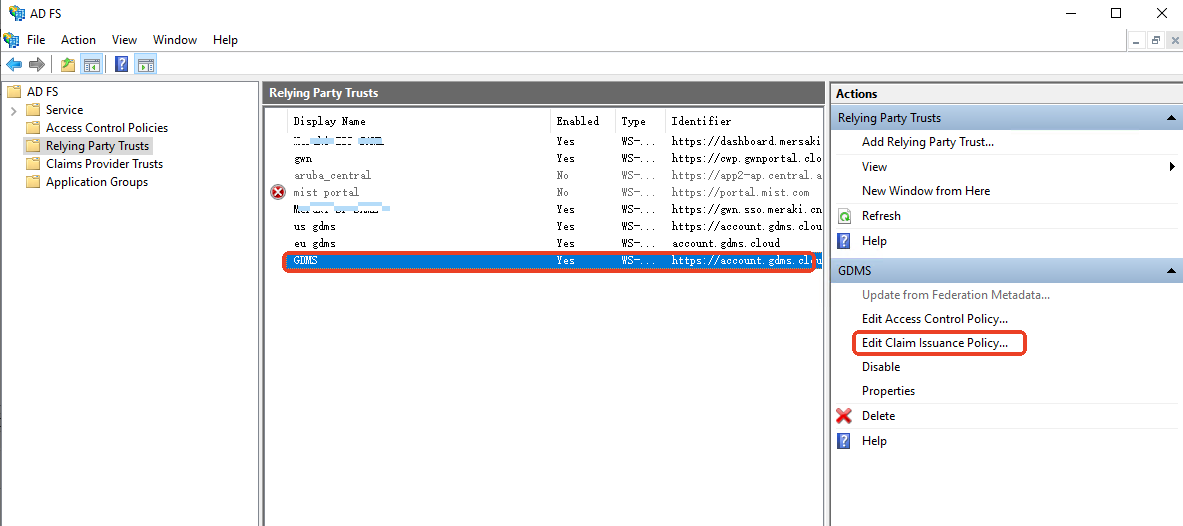
- Select the Relying Party Trusts you created and click “Edit Claim Issuance Policy” on the right.
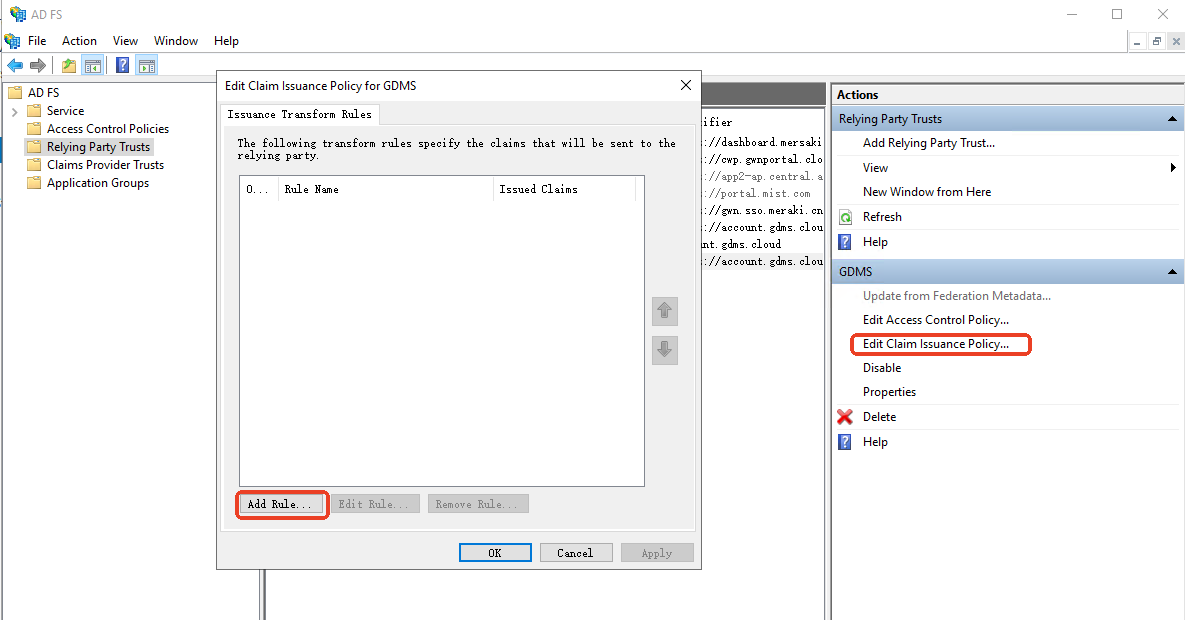
- In the Edit Claim Rules dialog, click Add Rule.
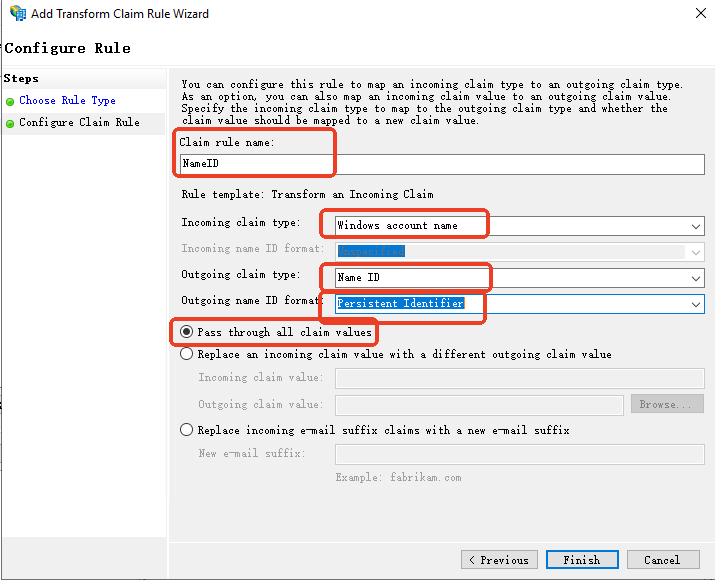
- For the Claim rule template, choose to Transform an Incoming Claim. Then click Next.

- Fill in the Claim rule name, Incoming claim type, Outgoing name ID Format, and select Pass Through all claim values as shown in the following screenshot. Then click Finish.
Step 3: Set Email Address Attribute in ADFS
- Select the Relying Party Trusts you created and click “Edit Claim Issuance Policy” on the right.
- In the Edit Claim Rules dialog, click Add Rule.
- For the Claim rule template, choose to Send LDAP Attributes as Claims. Then click Next.
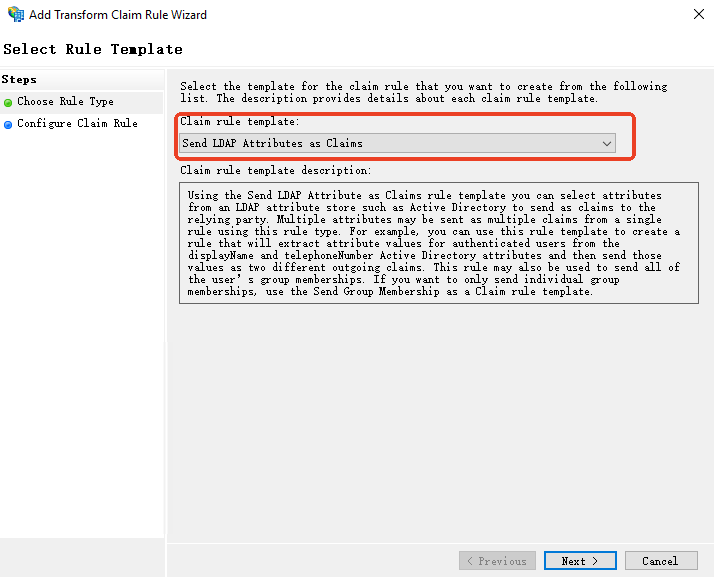
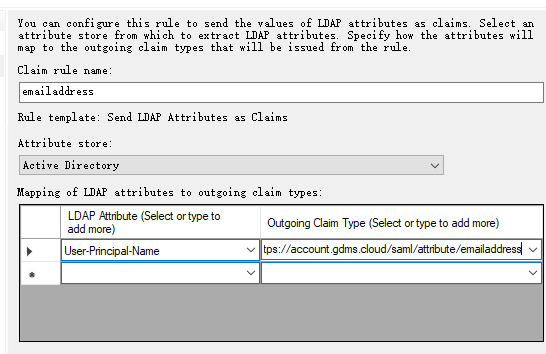
- Fill in the following information and click Finish.
Claim Rule Name | Enter a name, such as “emailaddress”. |
Attribute Store | Select Active Directory |
LDAP Attribute | Select User-Principal-Name |
Outgoing Claim Type | Enter the following based on the service provider: Note: If GWN Manager is not bound to port 443, the port number must be included in the URI. |
Step 4: Set Role Attribute in ADFS
- In the Edit Claim Rules dialog, click Add Rule.
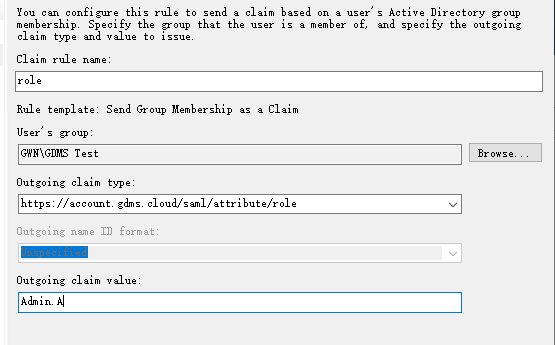
- For the Claim rule template, choose to Send Group Membership as a Claim.

- Fill in the following information and click Finish.
Claim Rule Name | Enter a name, such as “role”. |
User’s Group | Select the AD user group that will use this Relying Party Trust. |
Outgoing Claim Type | Enter the following based on the service provider: Note: If GWN Manager is not bound to port 443, the port number must be included in the URI. |
Outgoing Claim Value | The value of the role must be the same as the SAML SSO role name configured on GDMS or GWN Manager, such as “Admin.A”. |
Step 5: Configure Single Logout (Optional)
This step describes how to configure SAML Single Logout for GDMS Cloud and GWN Manager when using AD FS as the Identity Provider.
If SAML Single Logout is not configured correctly, users will encounter errors when selecting “Logout from both application and SSO system”.
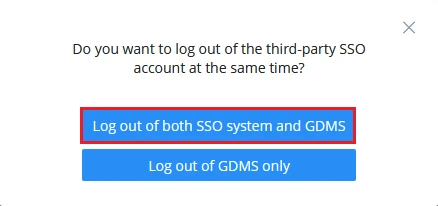
The following AD FS configuration is required for both GDMS and GWN Manager:
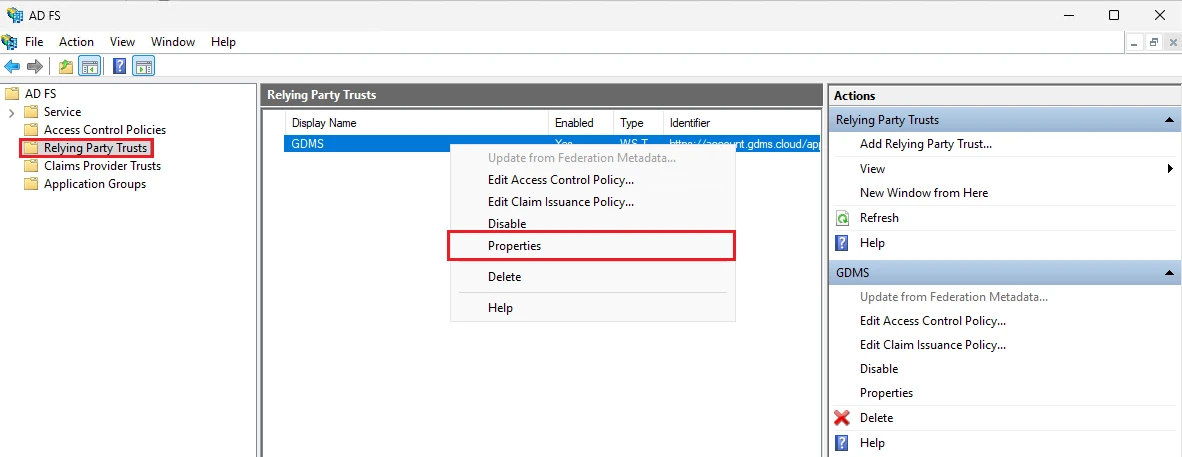
- Open AD FS Management.
- Navigate to Relying Party Trusts and right-click the relevant Relying Party Trust (GDMS or GWN Manager) and select Properties.
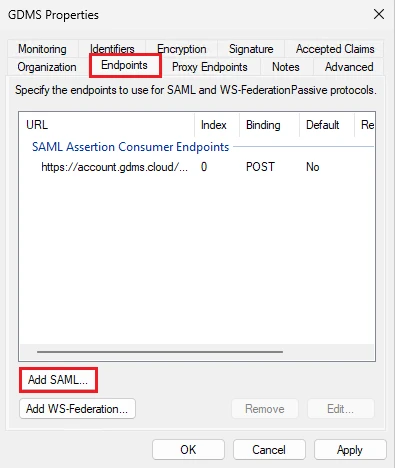
- Open the Endpoints tab and click Add SAML.
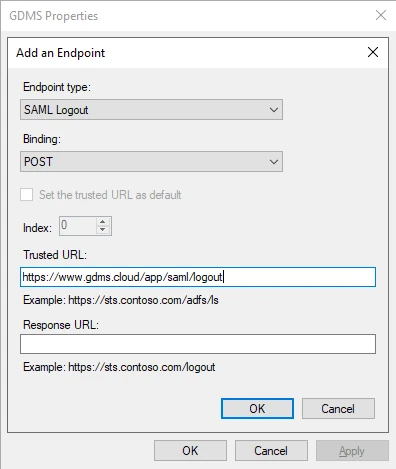
- Configure the endpoint as follows:
Field | Value |
Endpoint Type | SAML Logout |
Binding | POST |
Trusted URL |
Step 6: Configure Token-Signing Certificate
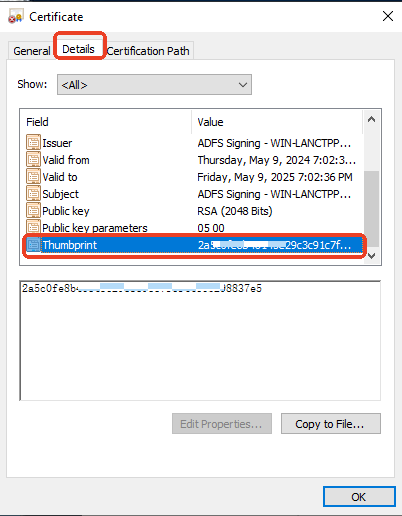
- In the management console, go to AD FS→Service→Certificates. Select a valid certificate under Token-signing.
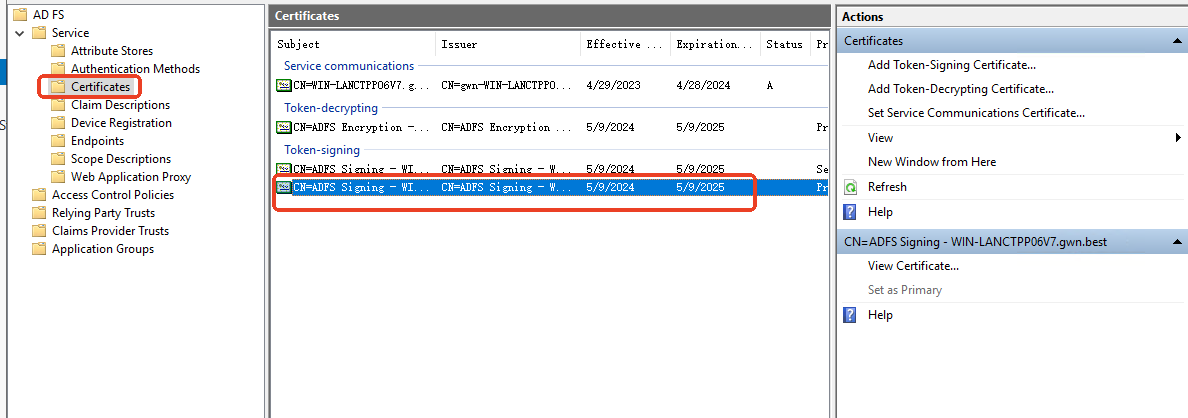
- Double-click on the certificate under Token-signing. Under Details→Thumbprint, copy this string and paste it into the X.509 cert SHA1 fingerprint field in GDMS/GWN Manager.
Step 7: SAML SSO in GDMS/GWN Manager
- The super administrator logs in to the GDMS platform and goes to Users→SAML SSO.
- Click Add SAML IdP and fill in the information:
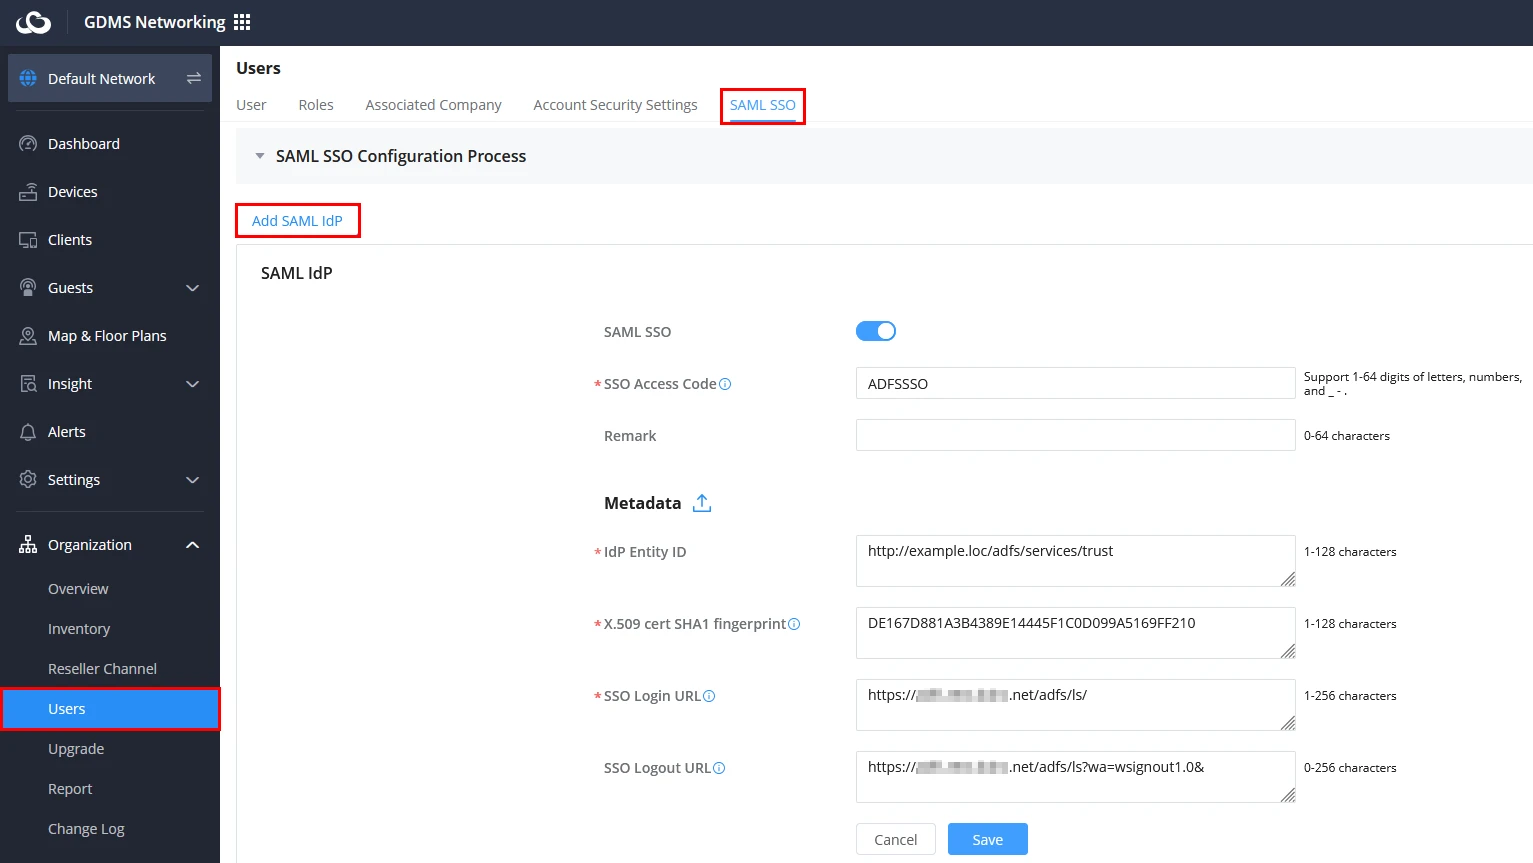
SAML SSO | Enable or disable. If disabled, users will no longer be able to use the configured SSO authentication to log in. |
SSO Access Code | Used to enter this SSO Access Code on the GDMS/GWN Manager login page, and can log in through this IdP service authentication. |
Remarks | Enter your remarks. |
IdP Entity ID | Must exactly match the ADFS Federation Service Identifier, as advertised in ADFS metadata. By default, ADFS uses: http://<FederationServiceName>/adfs/services/trust Note: This value is a logical identifier and does not need to be publicly reachable. It is recommended to Import ADFS metadata instead of manually entering this value. |
X.509 cert SHA1 fingerprint | Fill in the Thumbprint value under the Details of the certificate in ADFS→Certificates→Token-singing |
SSO Login URL | URL address for login authentication, fill in: https://<ADFS_server>/adfs/ls/ Replace “<ADFS_server>” with the IP address or DNS name of your AD FS server. |
SSO Logout URL | When logging out of GDMS/GWN Manager, you can log out of the ADFS redirection address at the same time. Fill in the following information based on the platform:
Replace “<ADFS_server>” with the IP address or DNS name of your AD FS server. |
- After adding the IdP, configure the SAML SSO role as described in section [SAML SSO ROLES IN GDMS/GWN MANAGER]. The Role Name must exactly match the role value sent by the IdP.
SAML SSO WITH DUO
Users will have to set up a DUO account first by using this link: https://signup.duo.com/
This section describes how to configure DUO SSO as a SAML Identity Provider for GDMS or GWN Manager.
Duo Single Sign-On is a cloud-hosted SAML 2.0 Identity Provider (IdP) and OpenID Connect Provider (OP) that enables centralized authentication with multi-factor authentication (MFA) and access policy enforcement. Duo can integrate with upstream identity providers such as Microsoft Entra ID, allowing organizations to combine enterprise identity management with Duo MFA.
For details, please refer to the DUO manual: https://duo.com/docs/sso
The screenshots in this section use GWN Manager as the Service Provider (SP). The configuration steps for GDMS are identical except for the SAML attribute URLs used in the Duo application configuration.
Step 1: Create a DUO Authentication Source
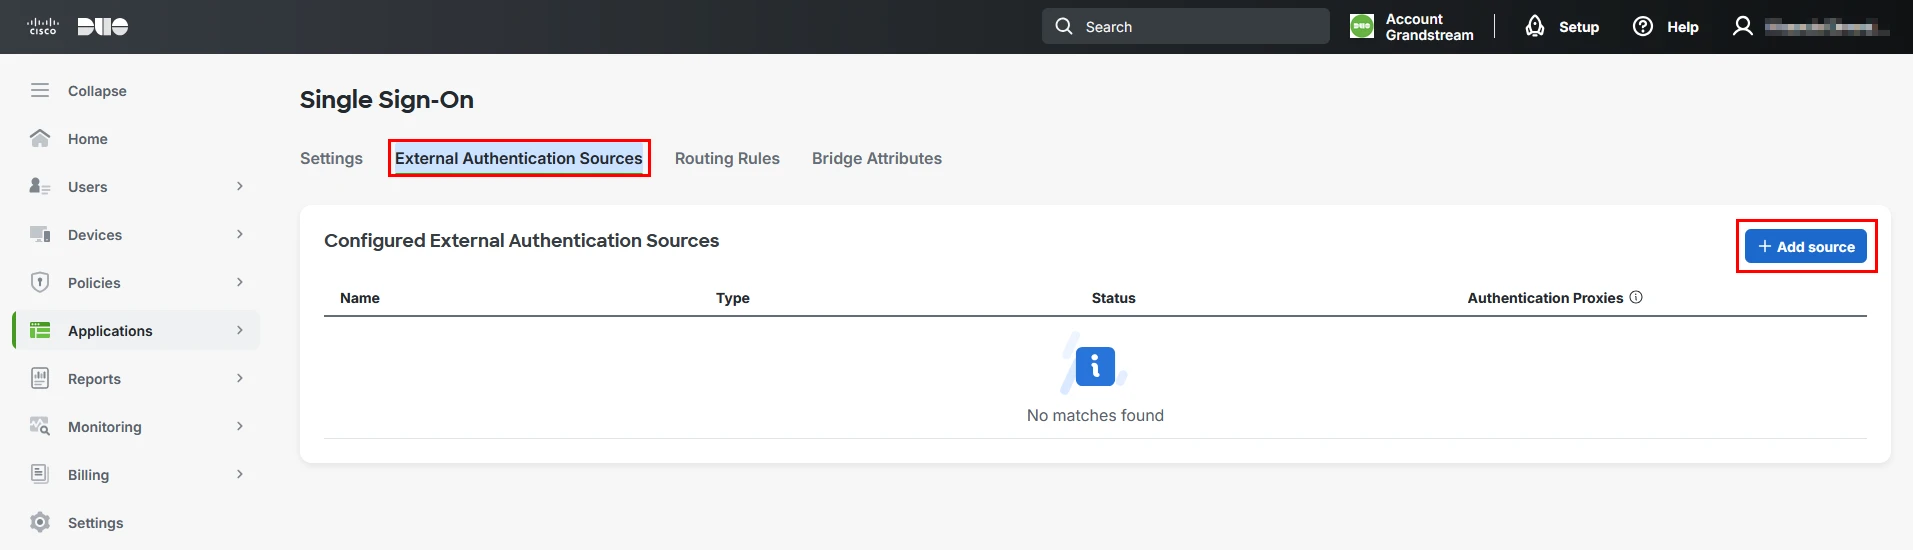
- Log in to the Duo Admin Panel and navigate to Applications→SSO Settings.
- Click Add source in the External Authentication Sources tab.
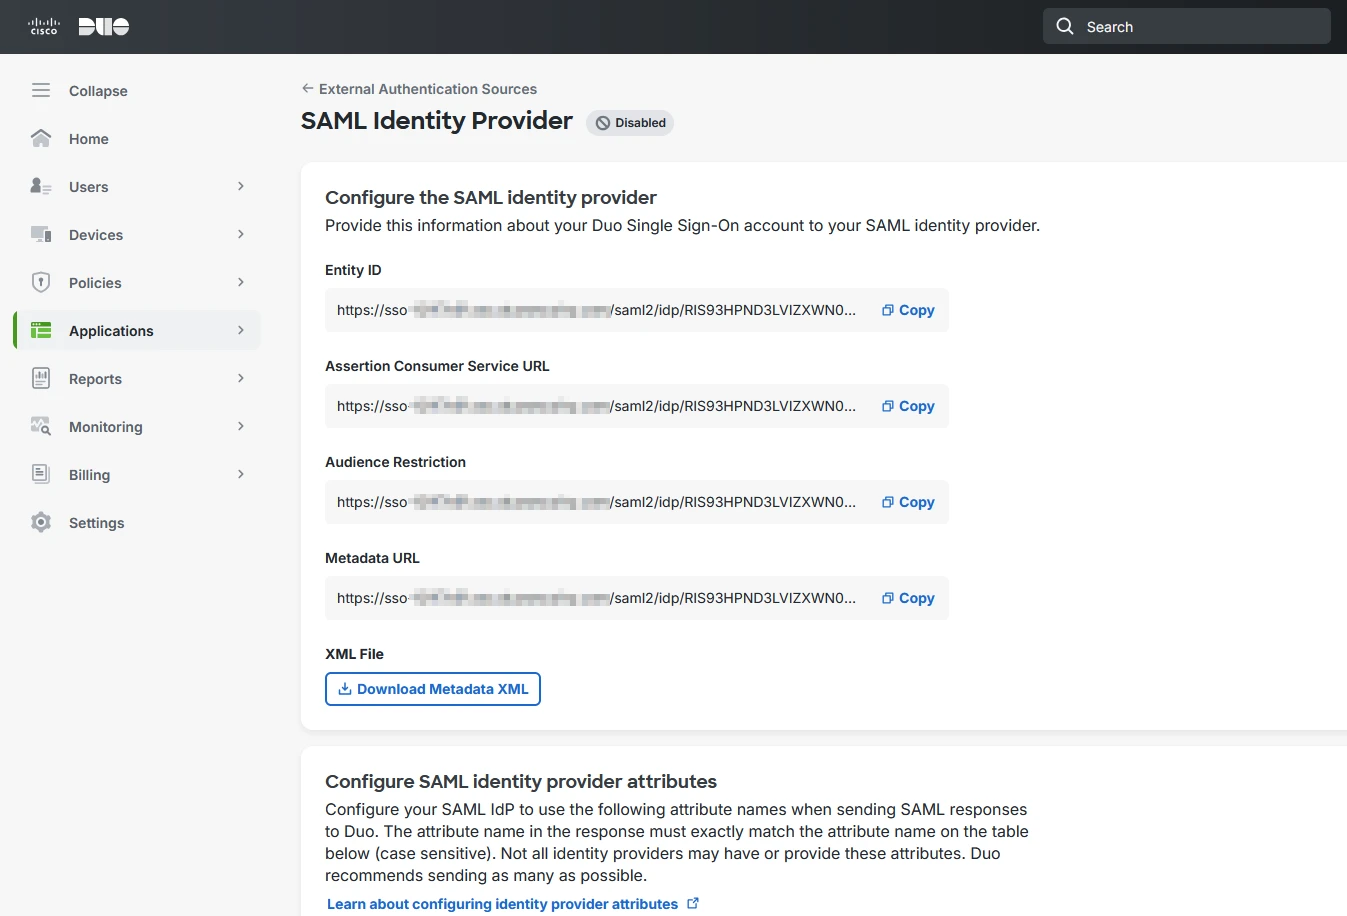
- Click Add SAML Identity Provider.
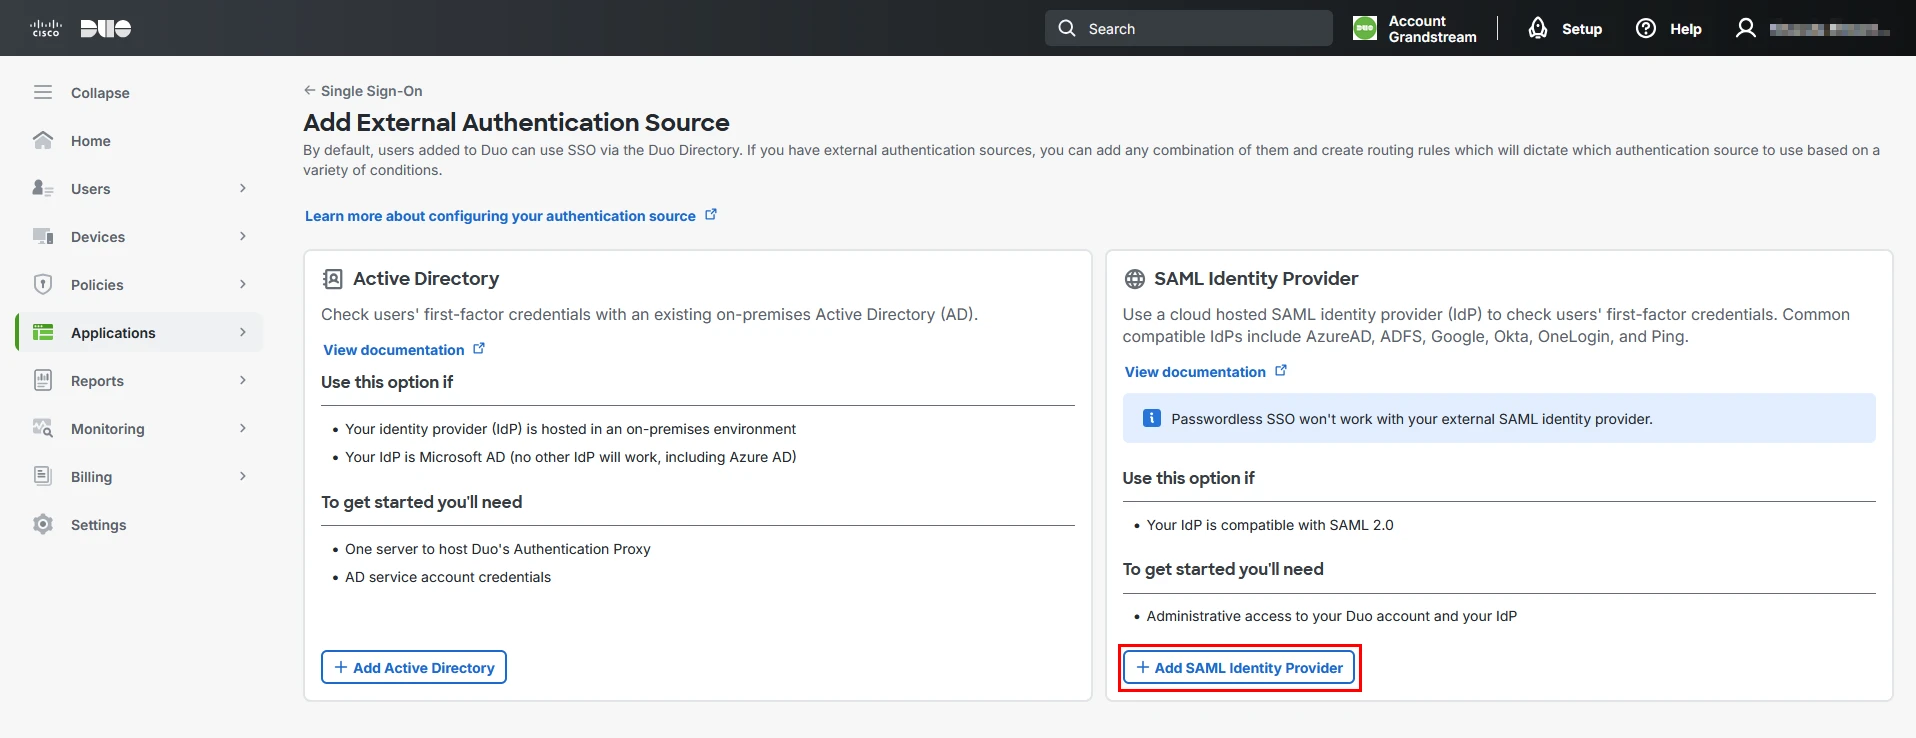
- This page contains the values that will be used when configuring the upstream identity provider (for example, Microsoft Entra ID).
Step 2: Configure the Azure Application
In this deployment model, Entra ID authenticates the user and sends the identity assertion to Duo, which then acts as the IdP for GDMS/GWN Manager.
Please refer to the first section of the guide for more information on configuring an App on Entra ID.
- Add a new application in Azure.
- Add users to the application in Azure.
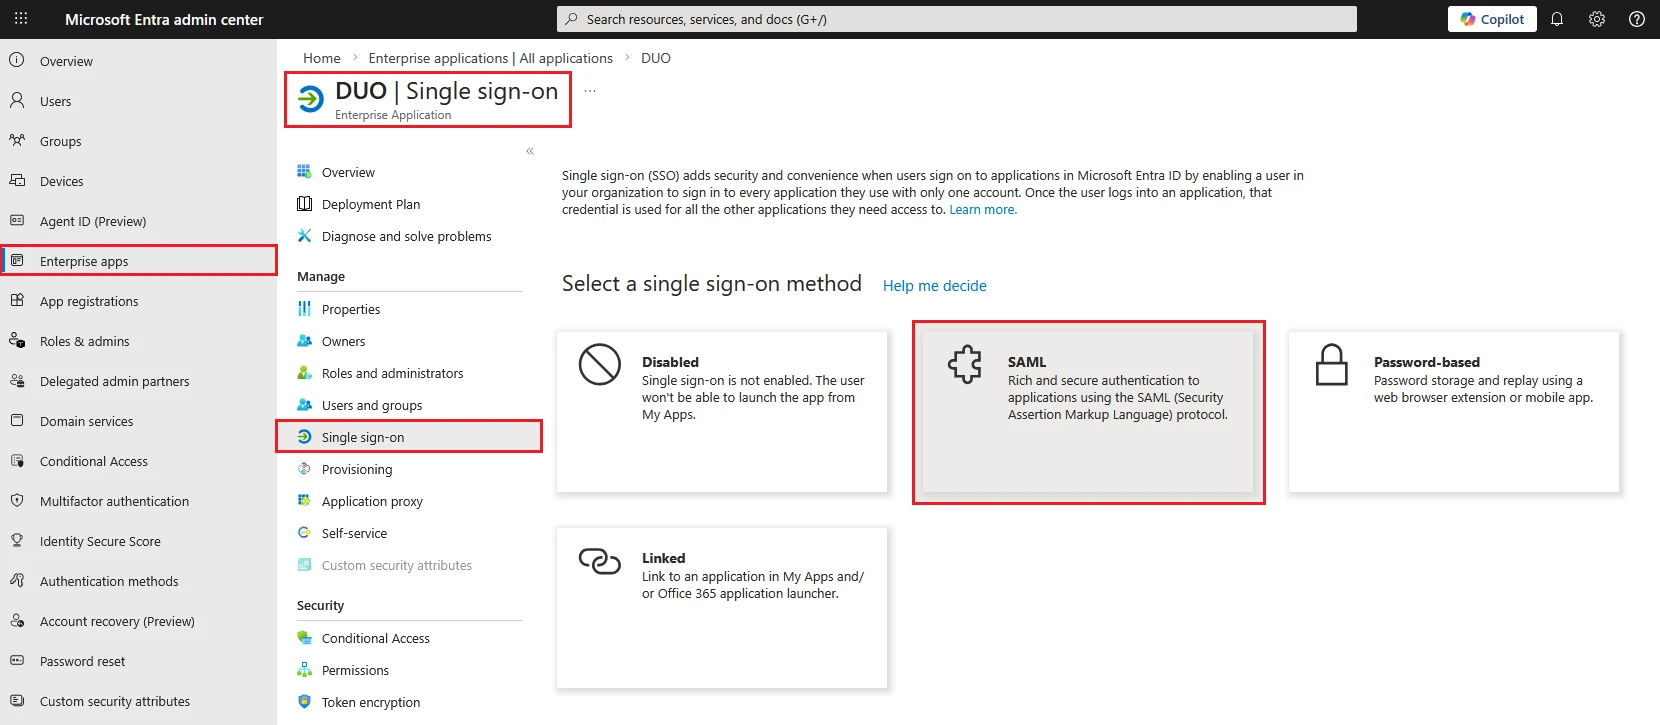
- Go to Identity→Applications→Enterprise applications, find and click the DUO application you created in the application list.
- Click Single Sign-on on the left and click SAML on the page.
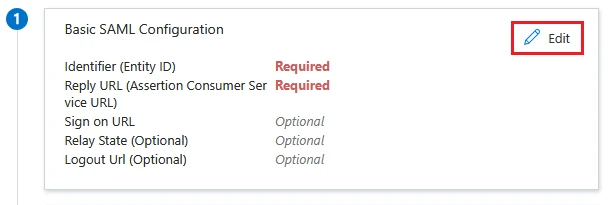
- Within the Basic SAML Configuration section, click Edit, and configure the following values using the information obtained from Duo.
Identifier (Entity ID) | Duo Entity ID |
Reply URL (ACS URL) | Duo ACS URL |
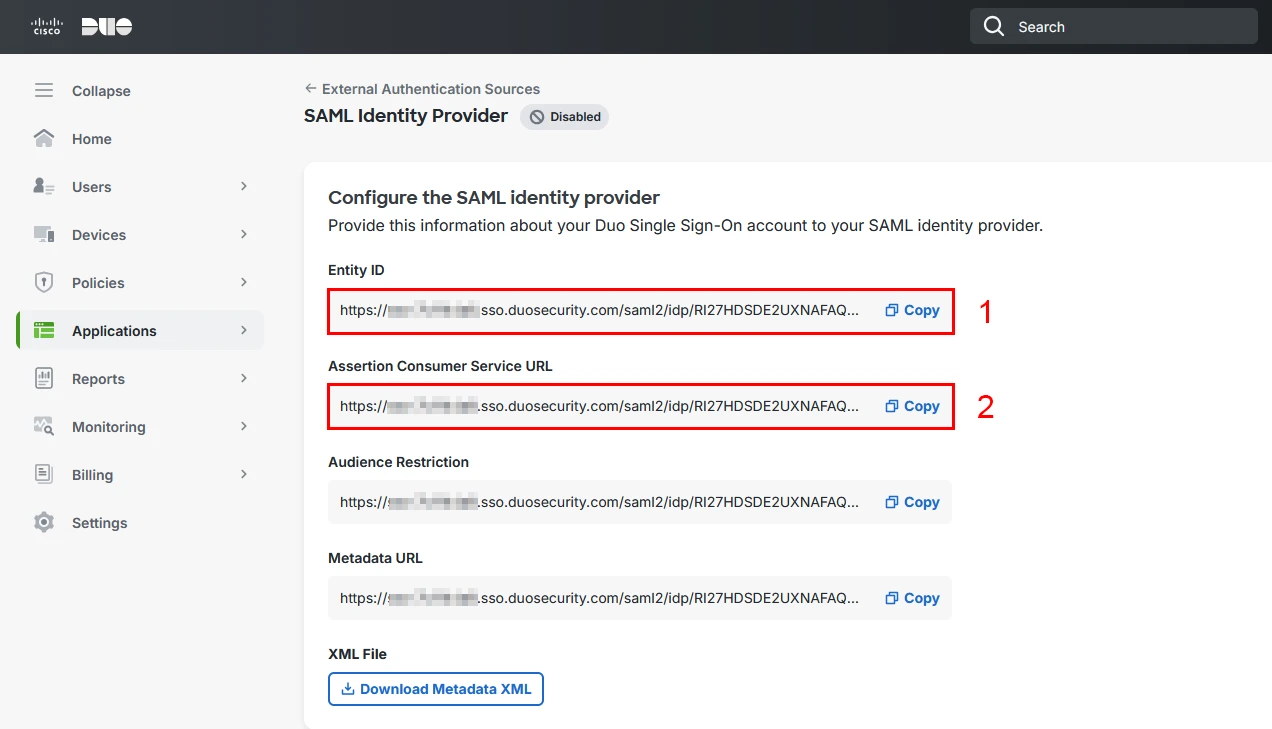
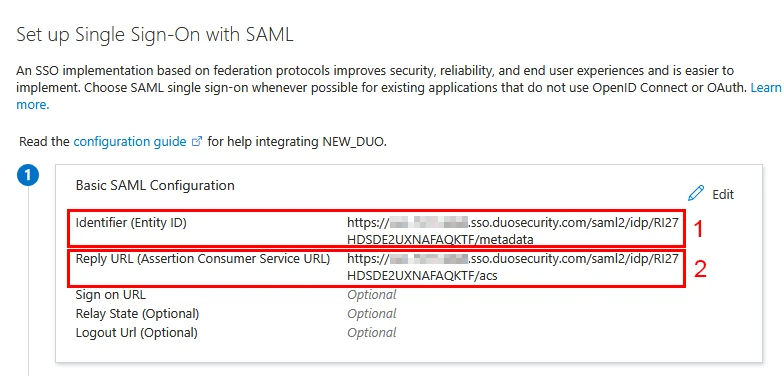
- Within the Attributes & Claims section, click Edit, then click Add new claim. Configure the claim as follows:
Name | Source Attribute |
user.userprincipalname |
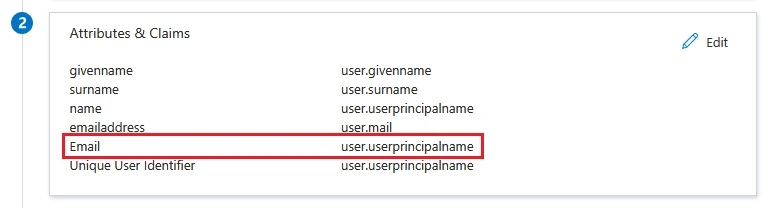
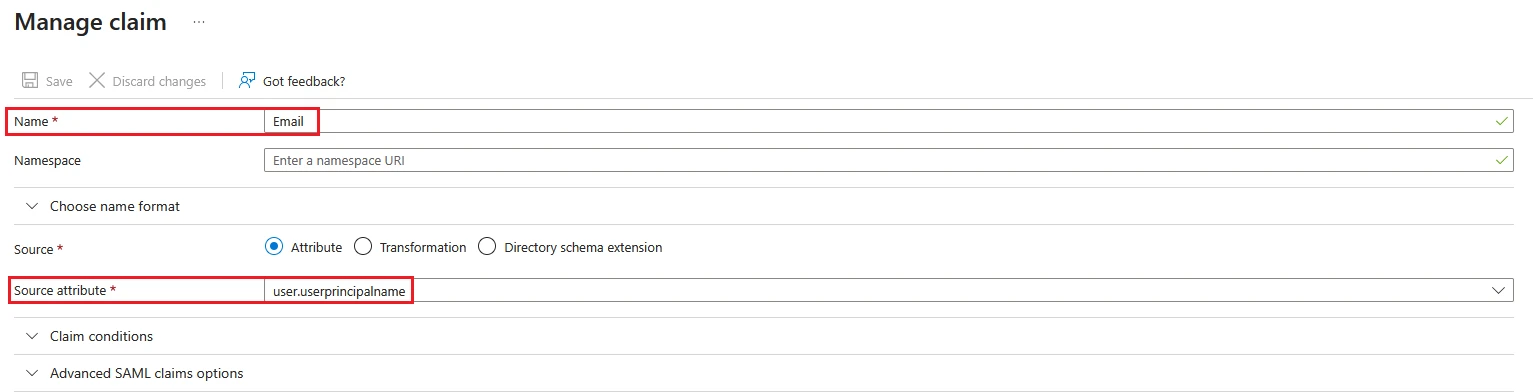
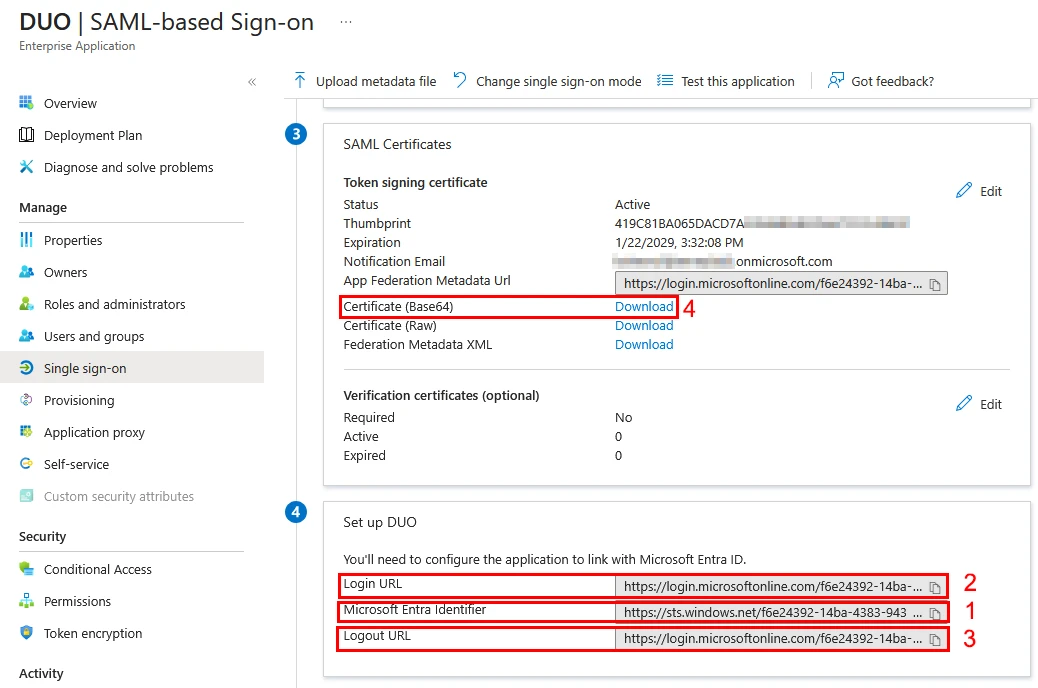
- From the SAML Signing Certificate section, download the Federation Metadata XML or copy the following values:
- Login URL
- Microsoft Entra Identifier
- Logout URL
- Certificate (Base64)
Step 3: Configure Single Sign-On in DUO
- Log in to the Duo Admin Panel and navigate to Single Sign-On.
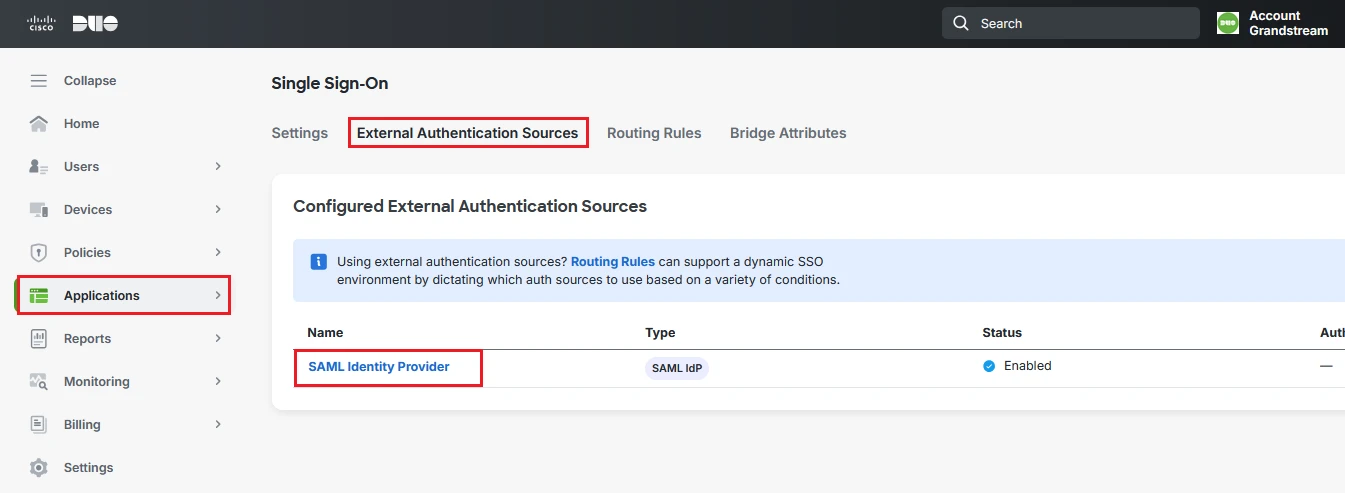
- Select the resource you created in Step 1 (SAML Identity Provider).
- Enter the information copied from Entra ID:
IdP Entity ID | Microsoft Entra Identifier |
Single Sign-On URL | Entra Login URL |
Single logout URL | Entra Logout URL |
Certificate | Upload Entra app Base64 certificate |
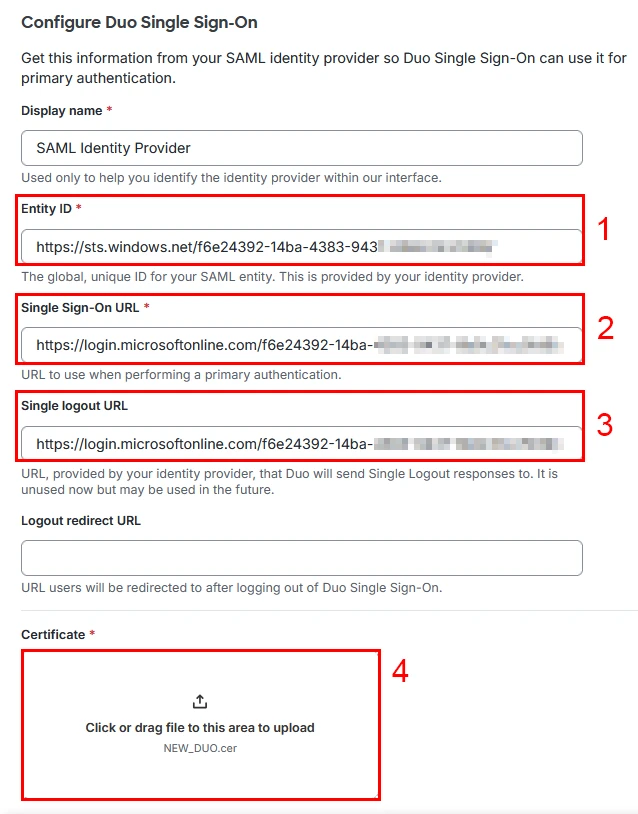
- Click Save, and verify that the status of the external source appears as “Enabled“.
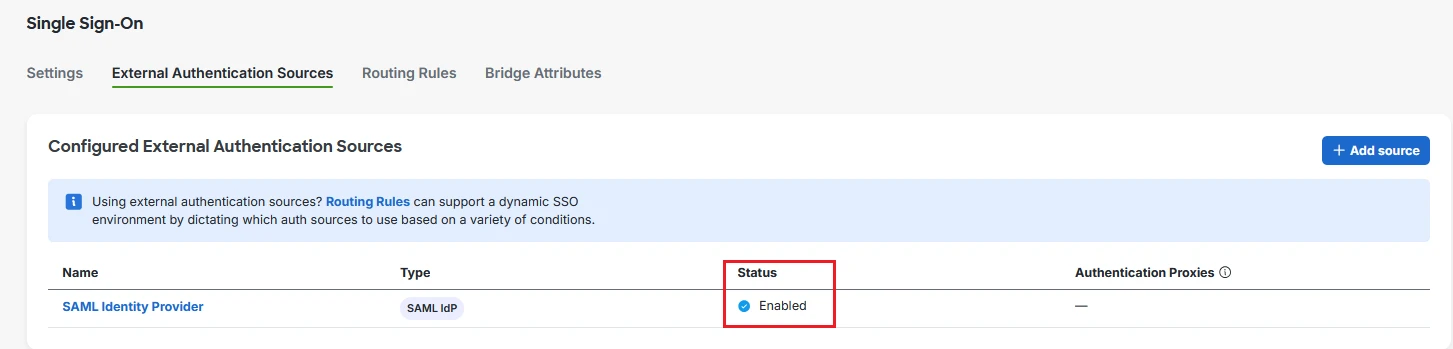
Step 4: Create Users and Groups in DUO
This section describes how to create Duo users and groups for this integration.
- Log in to the Duo Admin Panel
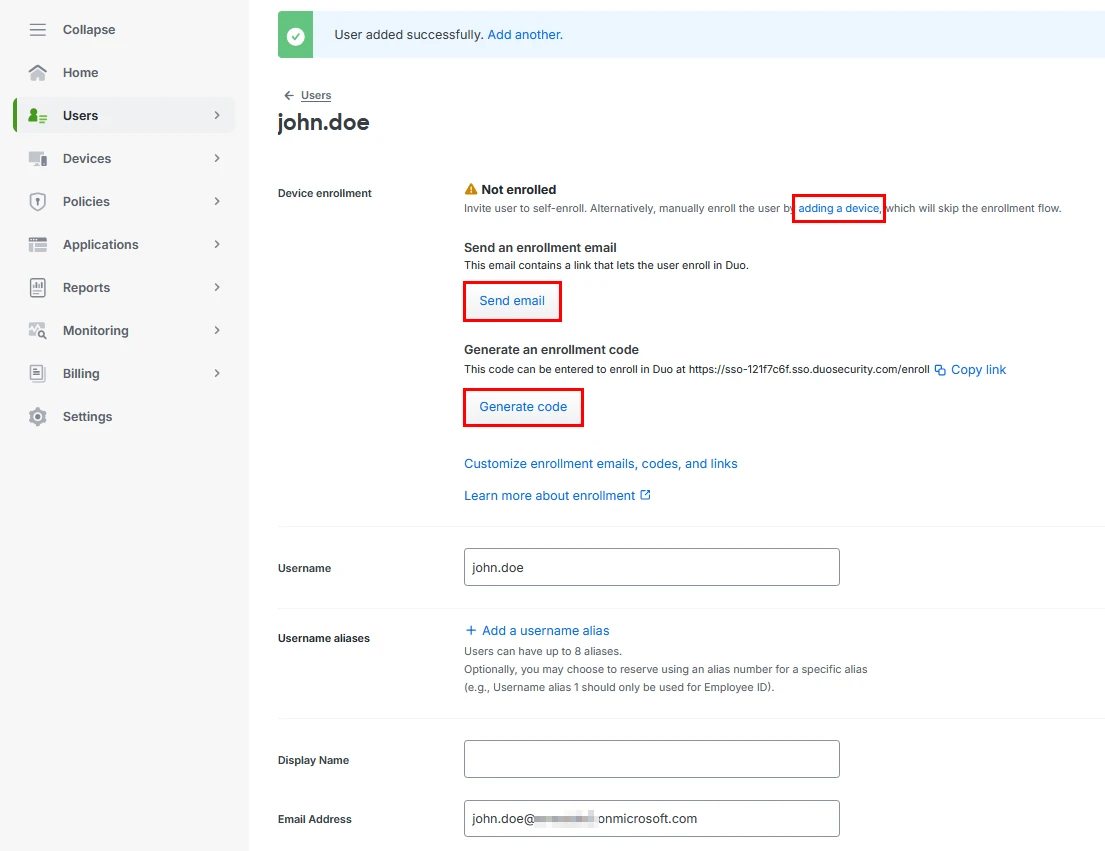
- Navigate to Users→Add User
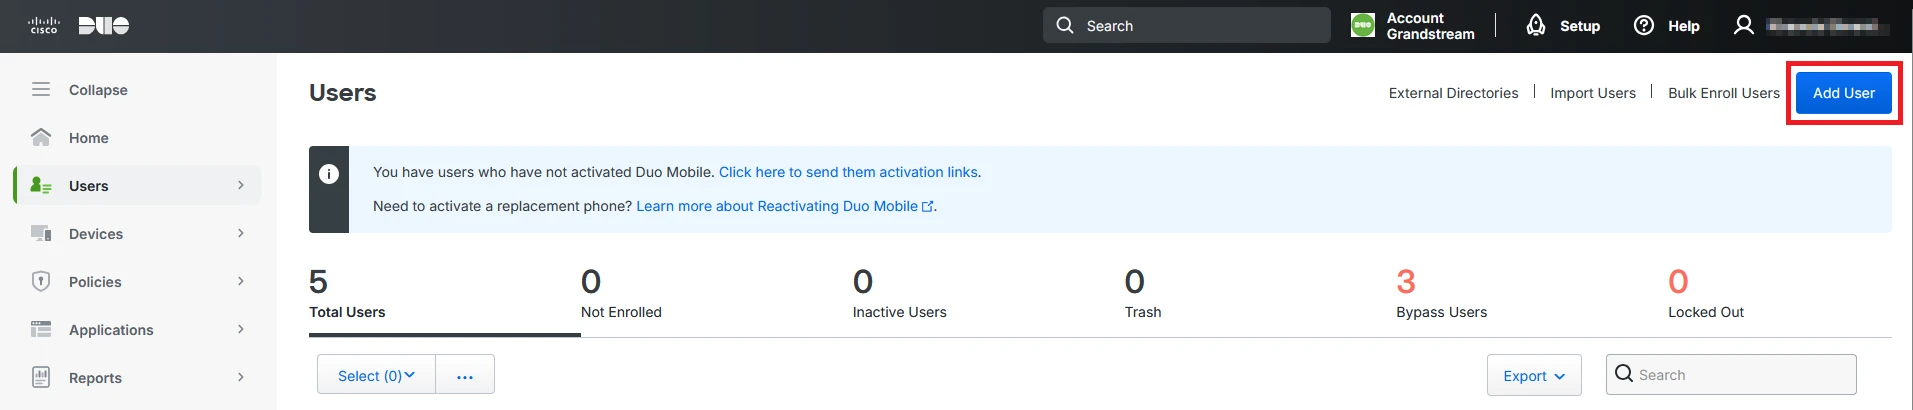
- Fill in the following fields:
Field | Value |
Username | Must match the local part of the Entra ID UPN (value before @) |
Email Address | Must match the full Entra ID UPN |
- After creating the user, complete enrollment using any supported method:
- Email enrollment
- Enrollment code
- Device enrollment
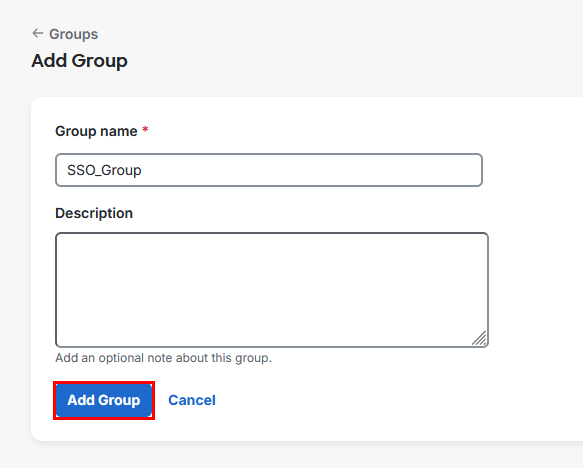
- Navigate to groups Users→Groups and click “Add Group”.

- Choose a name for the user group and add an optional description.
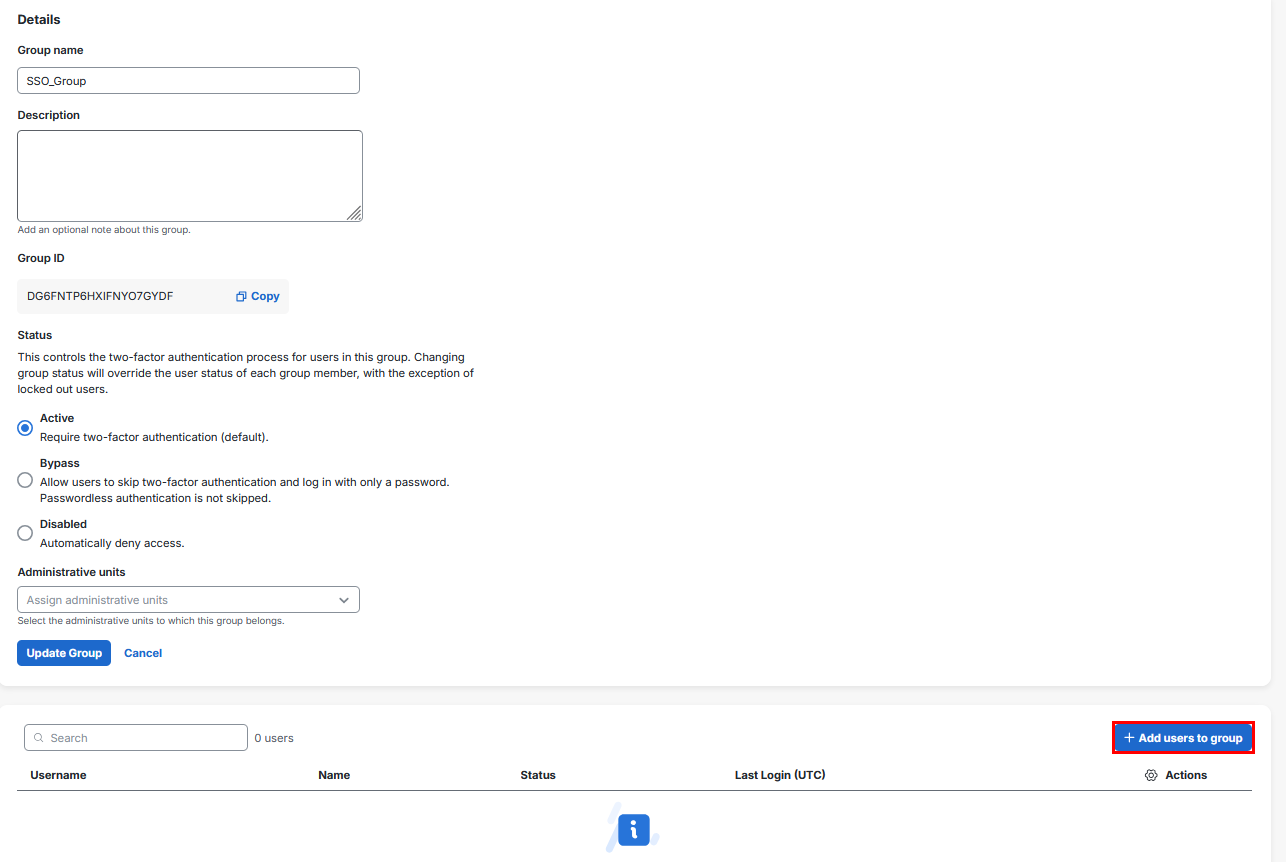
- Click on “Add users to group” to configure users allowed to access GDMS/GWN Manager.
Step 5: Create the DUO SAML Application
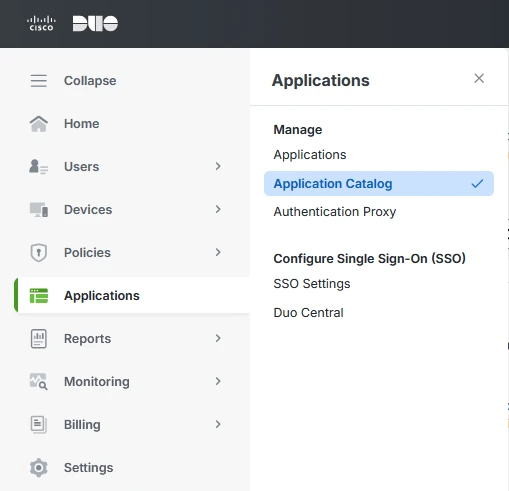
- Log in to the Duo Admin Panel and navigate to Application→Application Catalog.
- Search for Generic SAML Service Provider.
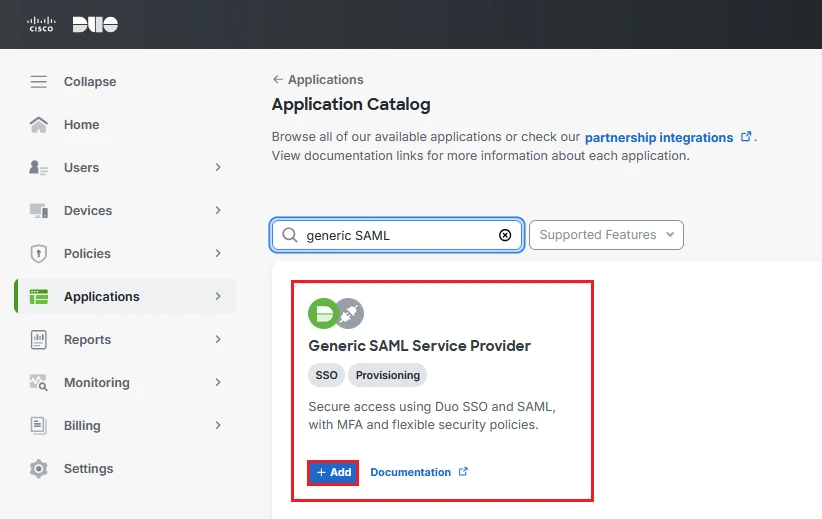
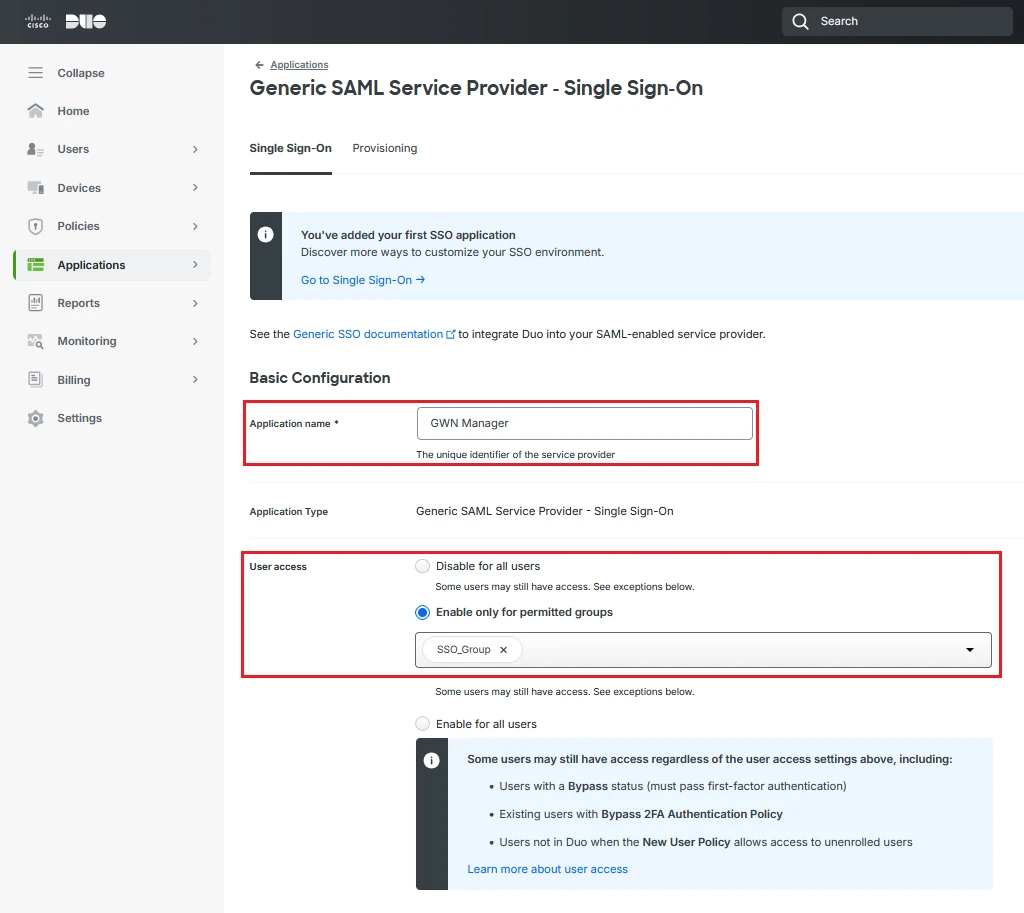
- Configure the application name (example: GWN Manager or GDMS).
- Enable access for all users or select a specific group to grant application access.
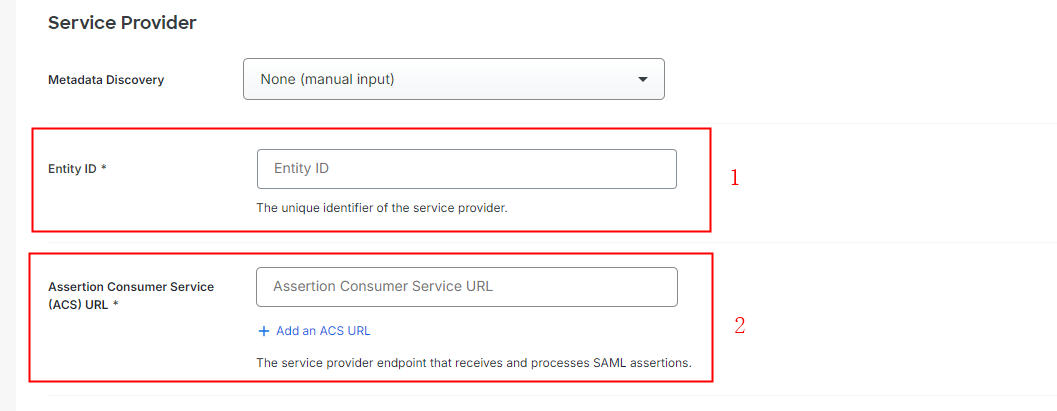
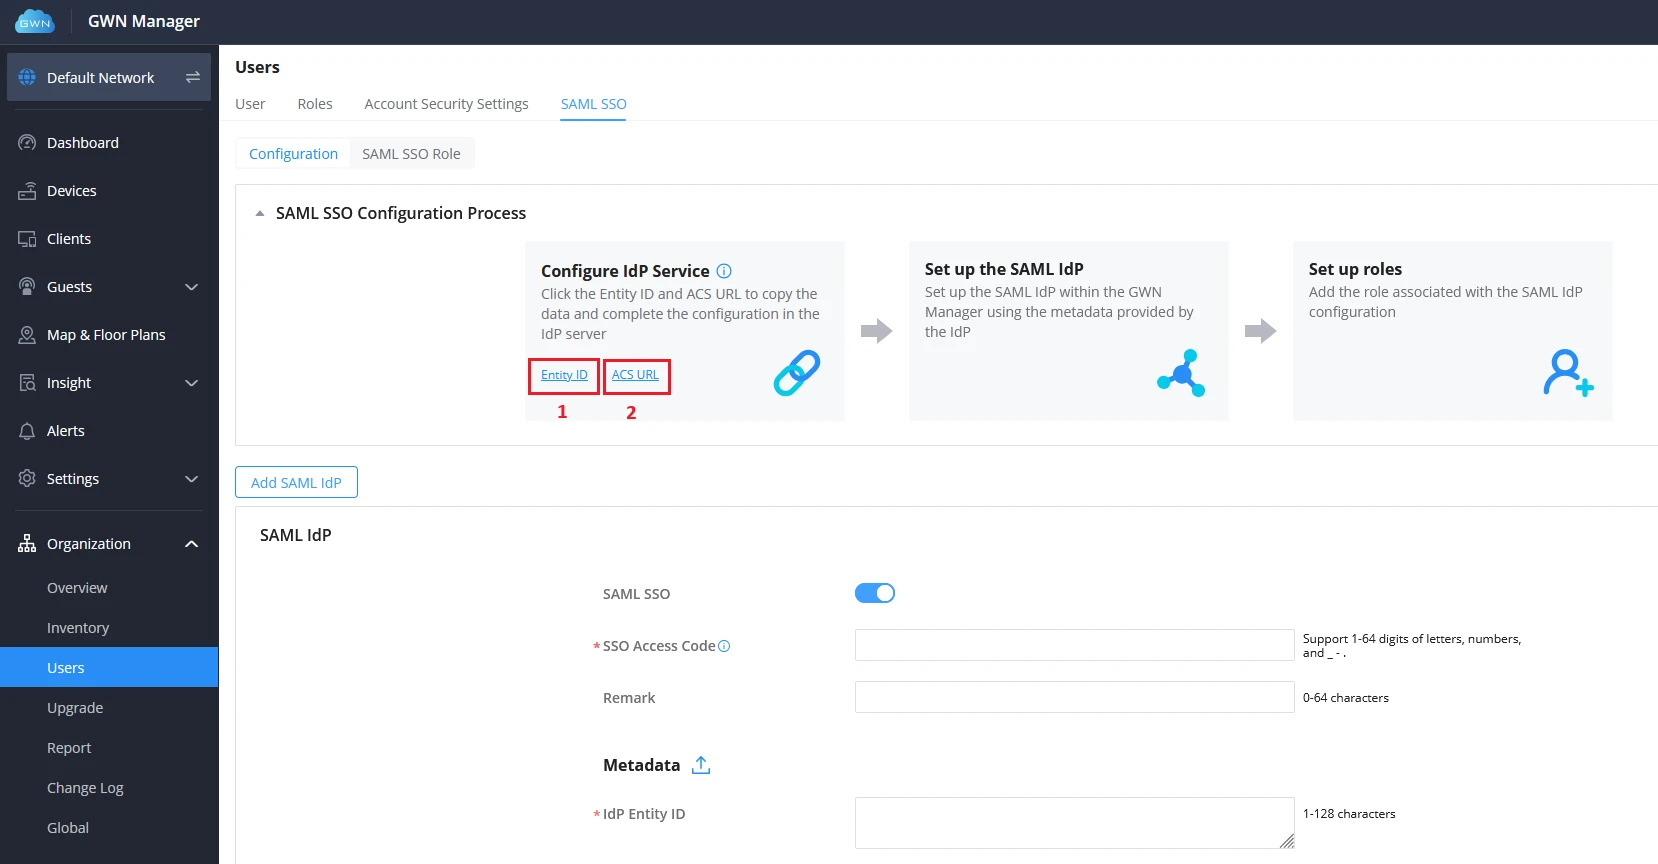
- Configure the Entity ID and ACS URL by copying them from GDMS/GWN Manager, as shown below:
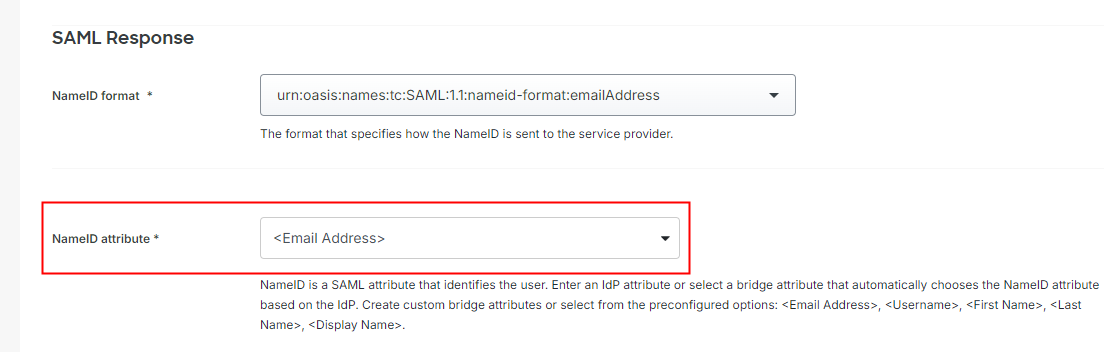
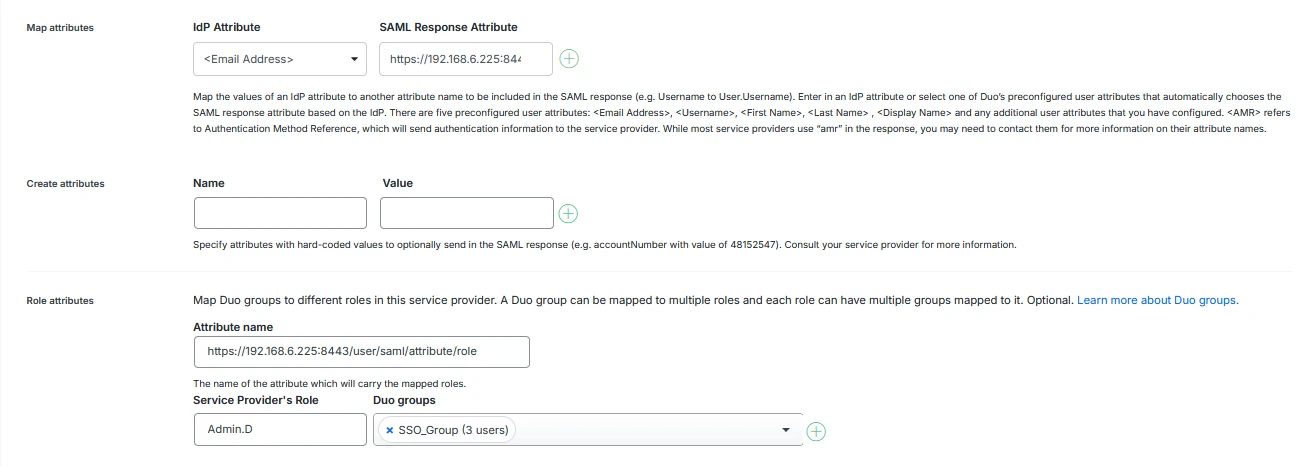
- Scroll down to continue the configuration. The following three parameters are mandatory and must be configured.
NameID attribute | Select <Email Address> | |
Map attributes | IdP Attribute | Select <Email Address> |
SAML Response Attribute | Fill in the fixed parameters for: Note: If GWN Manager is not bound to port 443, the port number must be included in the URI. | |
Role attributes | Attribute name | Fill in the fixed parameters for: Note: If GWN Manager is not bound to port 443, the port number must be included in the URI. |
Service Provider’s Role | Fill in the role value, which must be the same as the SAML SSO Role name in Users→SAML SSO Role, such as “Admin.A” | |
Duo Groups | Select the user group to use. Only users who belong to the selected Duo group will be allowed to authenticate using SAML SSO. User groups in Duo can be created and managed under Users→Groups in the Duo Admin Panel. | |
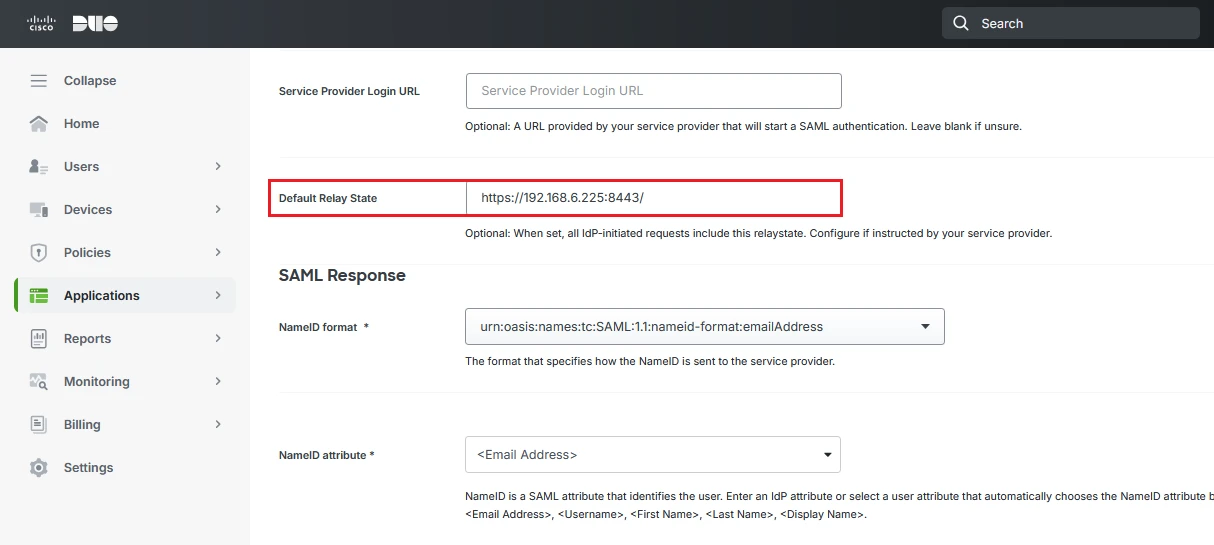
- To enable IdP-initiated login from the Duo dashboard, configure the Default Relay State to point to the GDMS or GWN Manager login page.
Step 6: SAML SSO in GDMS/GWN Manager
- Log in to the Duo Admin Panel and navigate to the GDMS/GWN Manager Application.
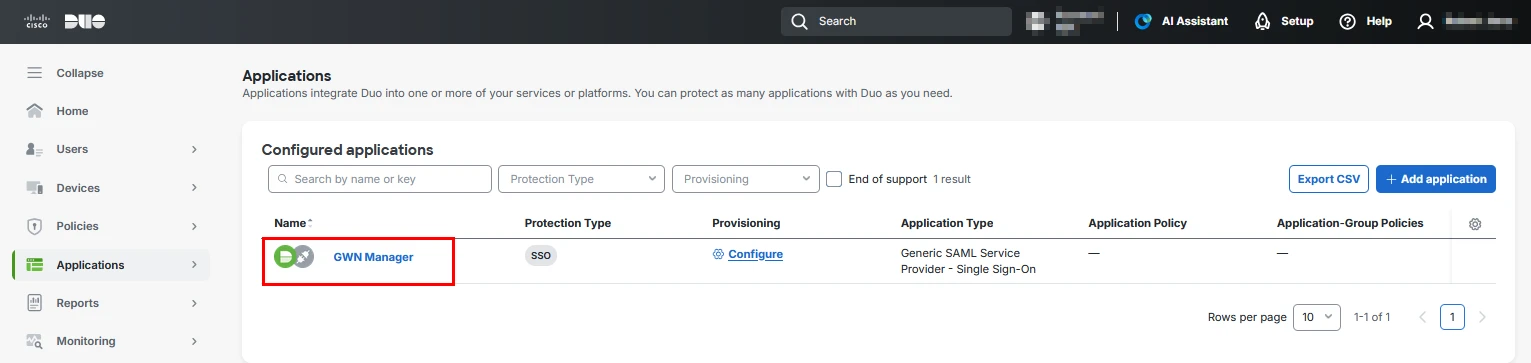
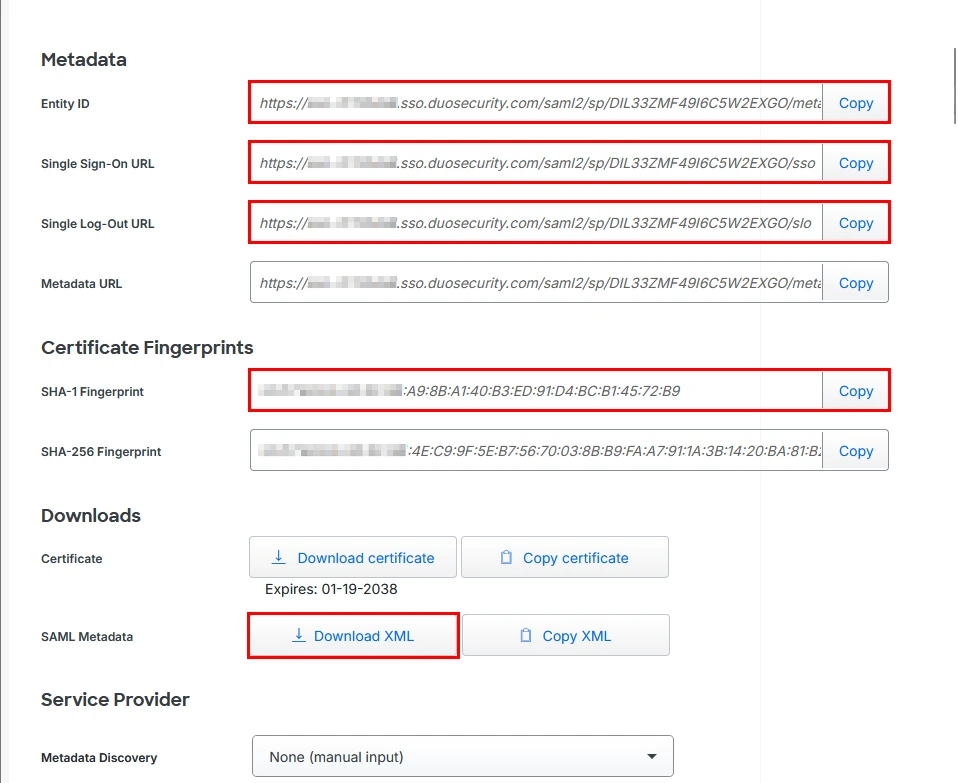
- Access the application you created, and copy the following information or download the metadata.
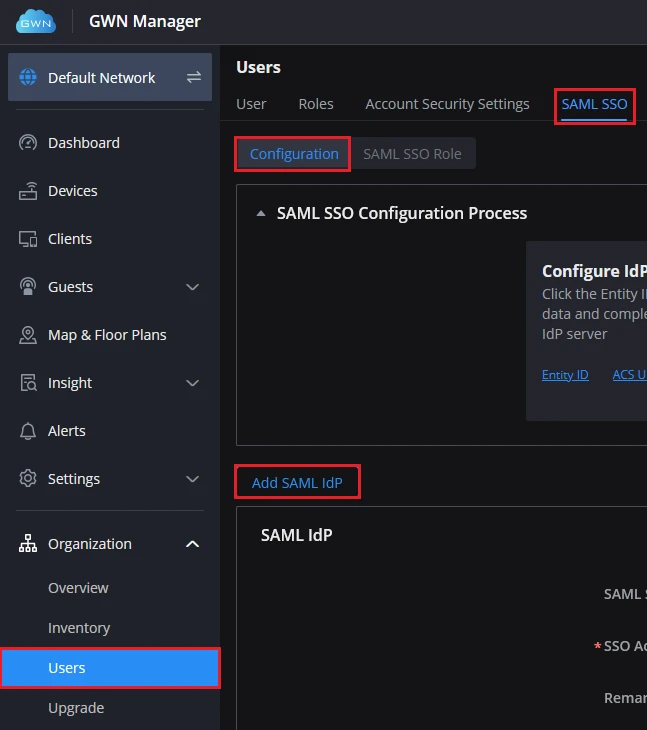
- Log in to GDMS or GWN Manager using a Super Administrator account.
- Navigate to Users→SAML SSO.
- Click Add SAML IdP and fill in the information:
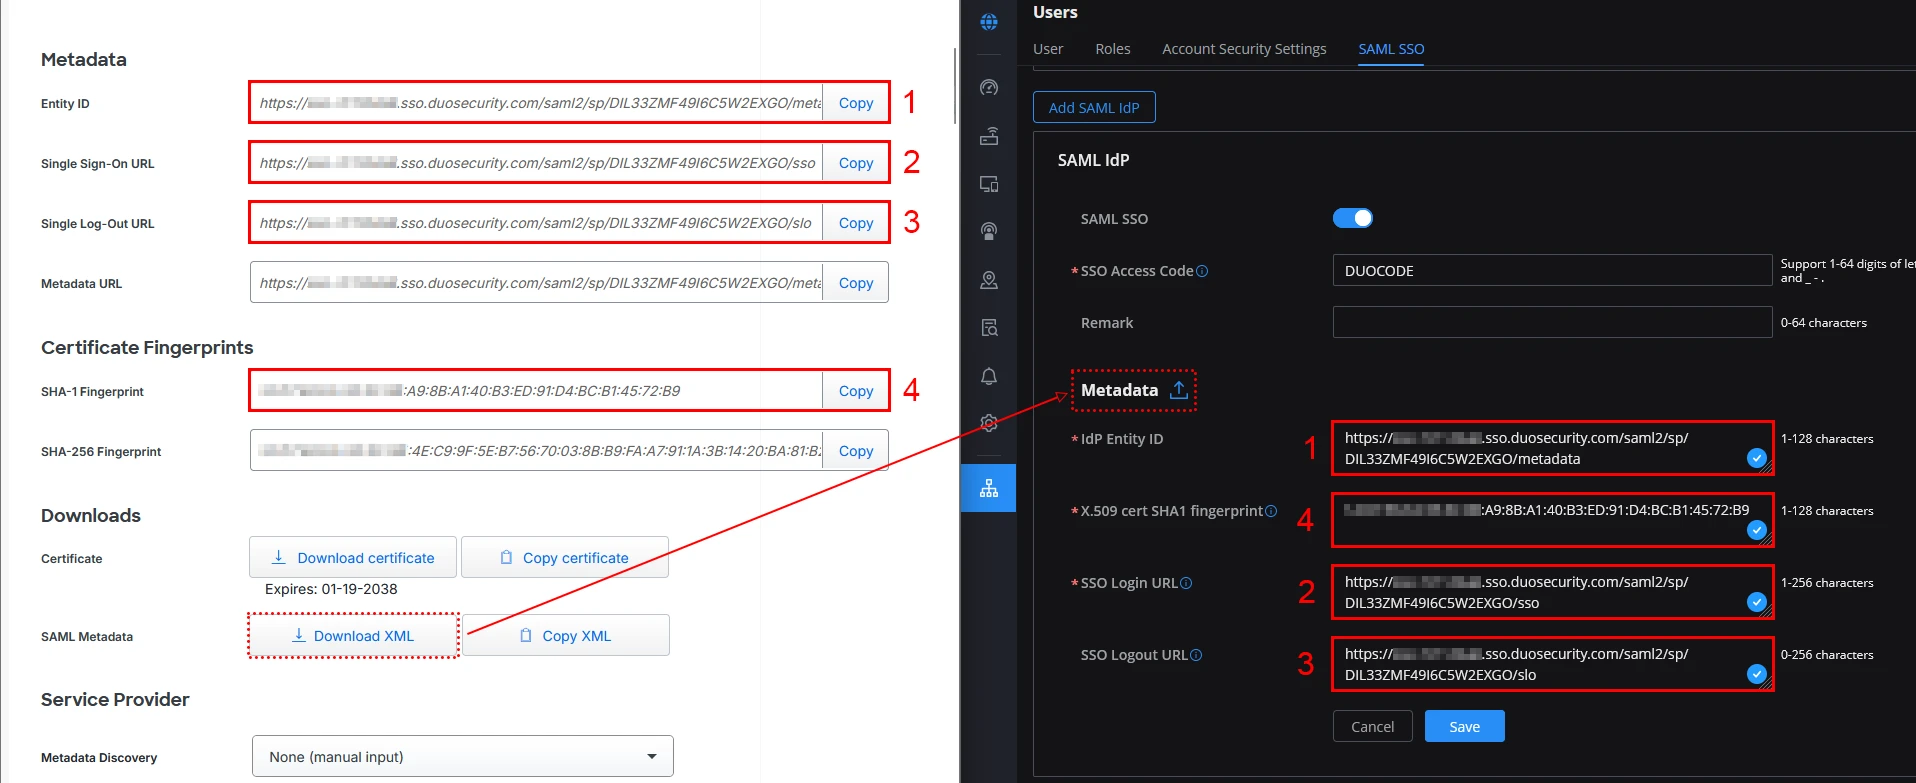
SAML SSO | Enable or disable. If disabled, users will no longer be able to use the configured SSO authentication to log in. |
SSO Access Code | Used to enter this SSO Access Code on the GDMS/GWN Manager login page, and can log in through this IdP service authentication. |
Remarks | Enter your remarks |
Metadata |
|
IdP Entity ID | Fill in the Entity ID of the Metadata module in Duo→Application. |
X.509 cert SHA1 fingerprint | Fill in the SHA-1 Fingerprint of the Metadata module in Duo→Application. |
SSO Login URL | Fill in the Single Sign-on URL of the Metadata module in Duo→Application. |
SSO Logout URL | (Optional) Fill in the Single Sign-out URL of the Metadata module in Duo→Application. |
- After adding the IdP, configure the SAML SSO role as described in section [SAML SSO ROLES IN GDMS/GWN MANAGER]. The Role Name must exactly match the role value sent by the IdP.
SAML SSO ROLES IN GDMS/GWN MANAGER
GDMS Role Configuration
- Log in as Super administrator logs in to GDMS and goes to Users→SAML SSO→SAML SSO Role.
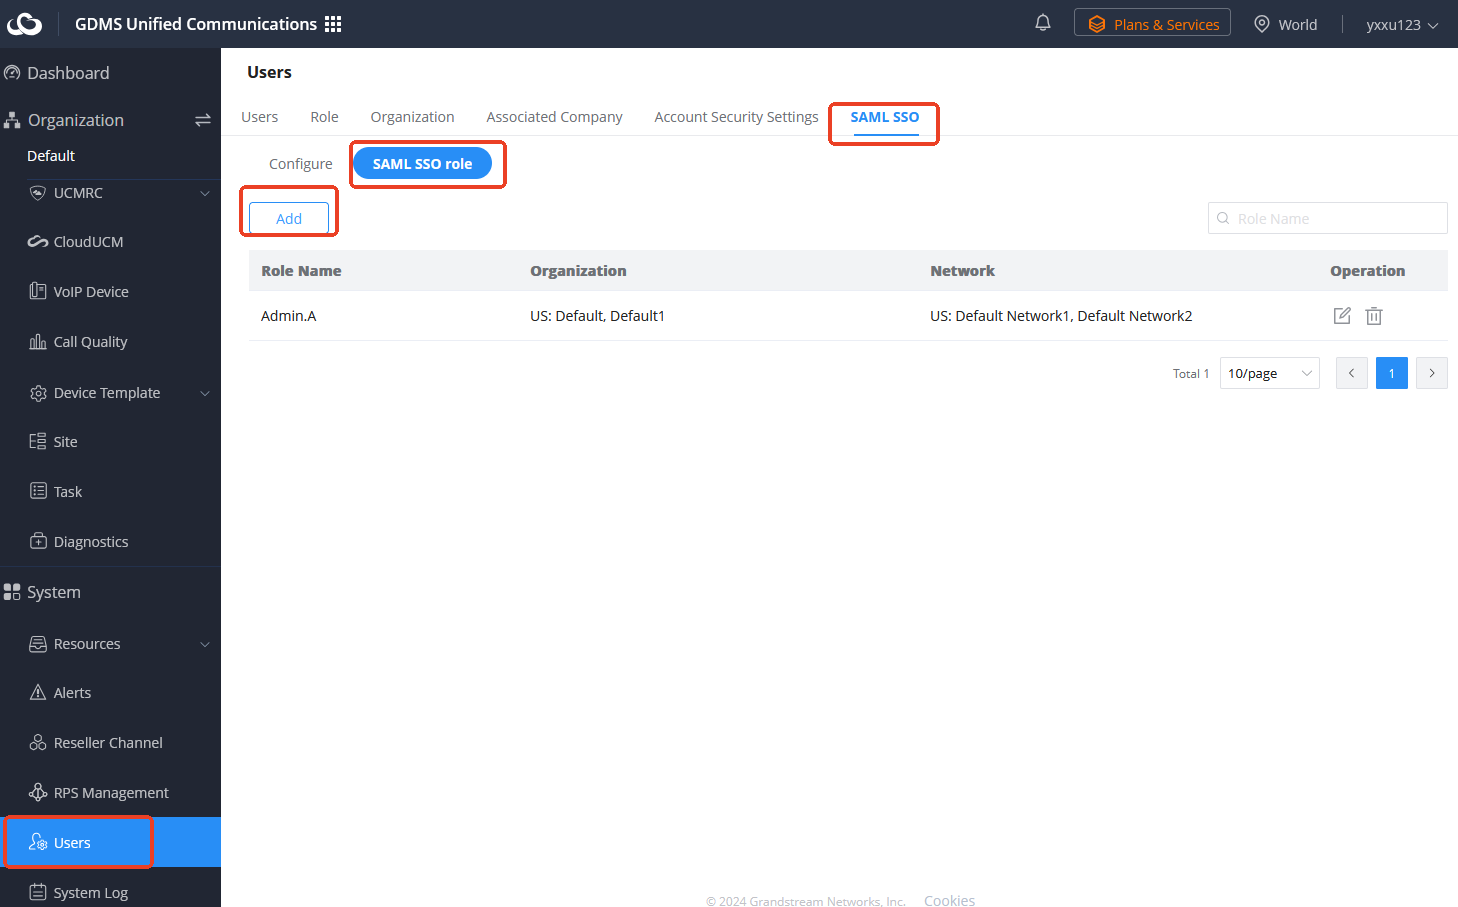
- Click Add Role and fill in the following information:
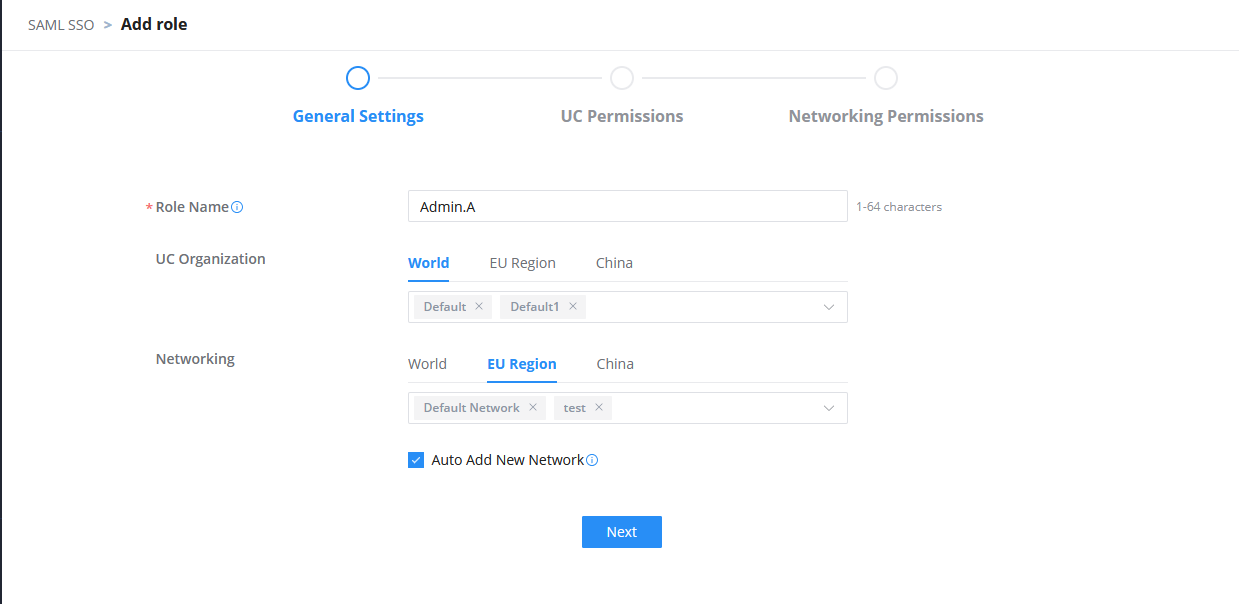
Role Name | Enter the name of this role. Note: It must be the same as the value of the application role created in Azure. For example “Admin.A”. |
UC Organization | (Optional) Assigned to the Unified Communications organizations that this role can manage. |
Networking | (Optional) Assign networkings that this role can manage. |
- Click Next to configure the permissions for the GDMS UC system. If this role does not have permissions for the GDMS UC system, you do not need to select any permissions.
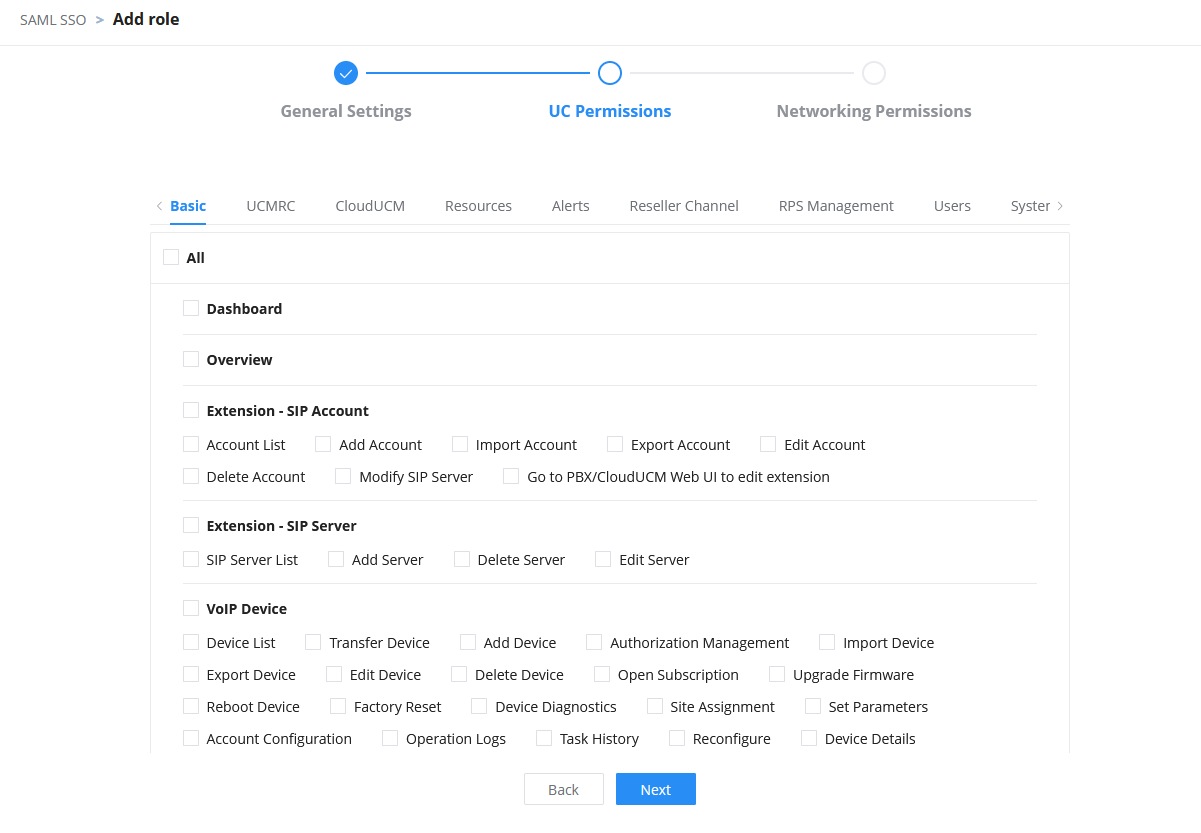
- Click Next to configure the permissions for the GDMS Networking system.
- If you select Platform Administrator, you must select Manage All Networking in the previous step, otherwise you cannot select Platform Administrator.
- If this role has permissions for the GDMS Networking system, you can select “None”.
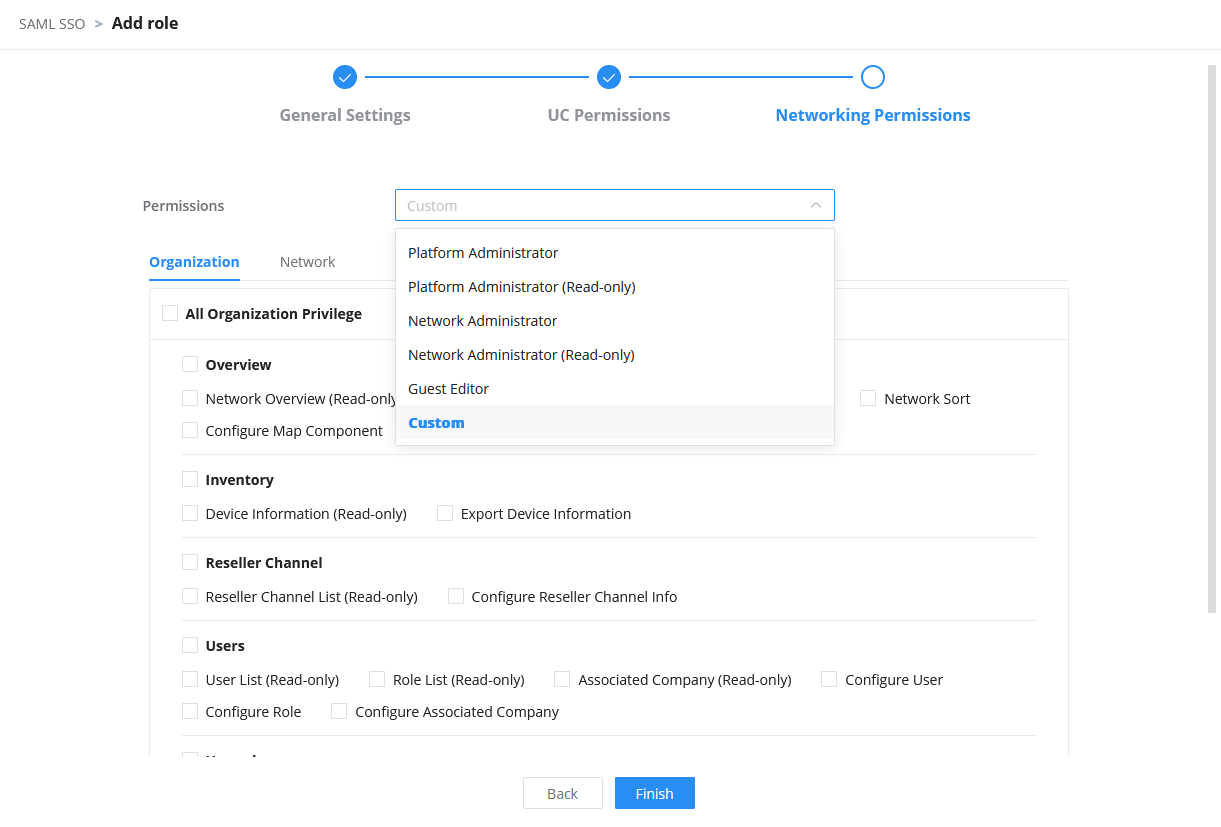
- Click Finish to successfully create the SSO role.
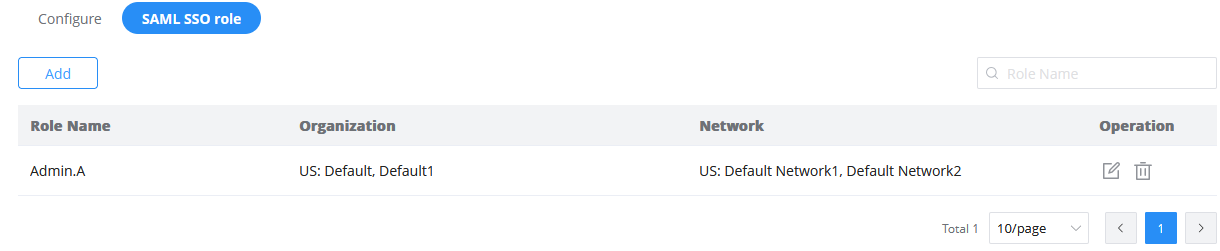
GWN Manager Role Configuration
- Log in to GWN Manager using a local administrator account.
- Navigate to Organization→Users→SAML SSO.
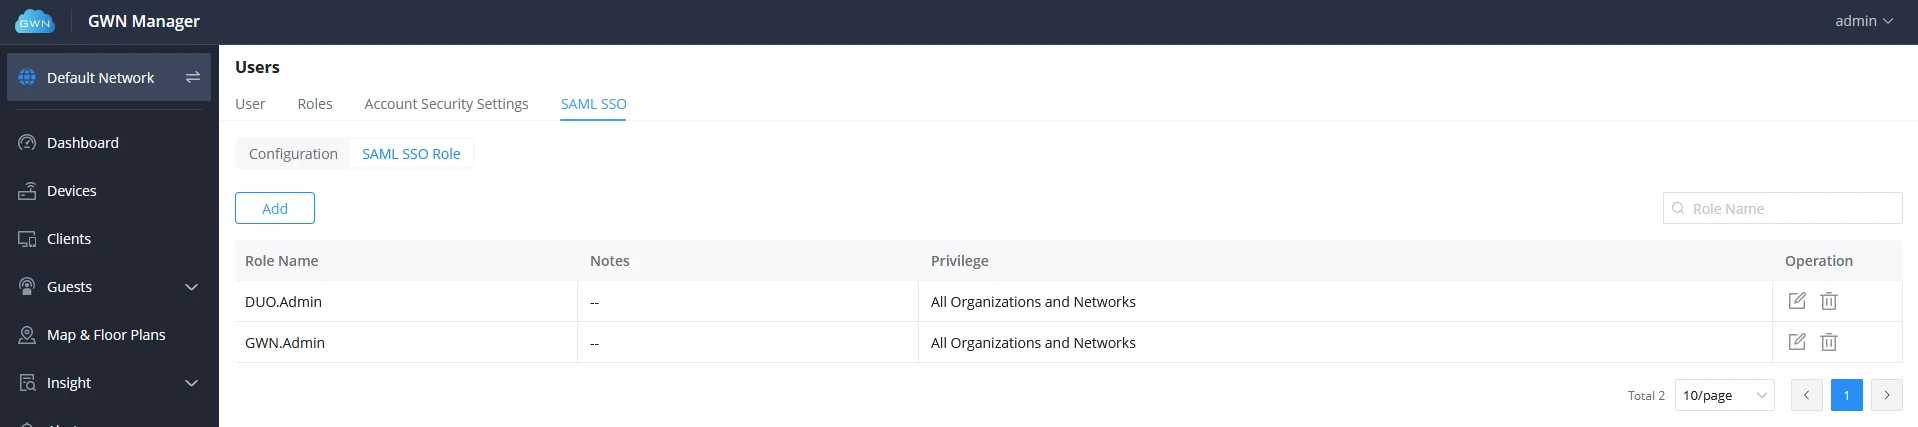
- Select the SAML SSO Role tab.
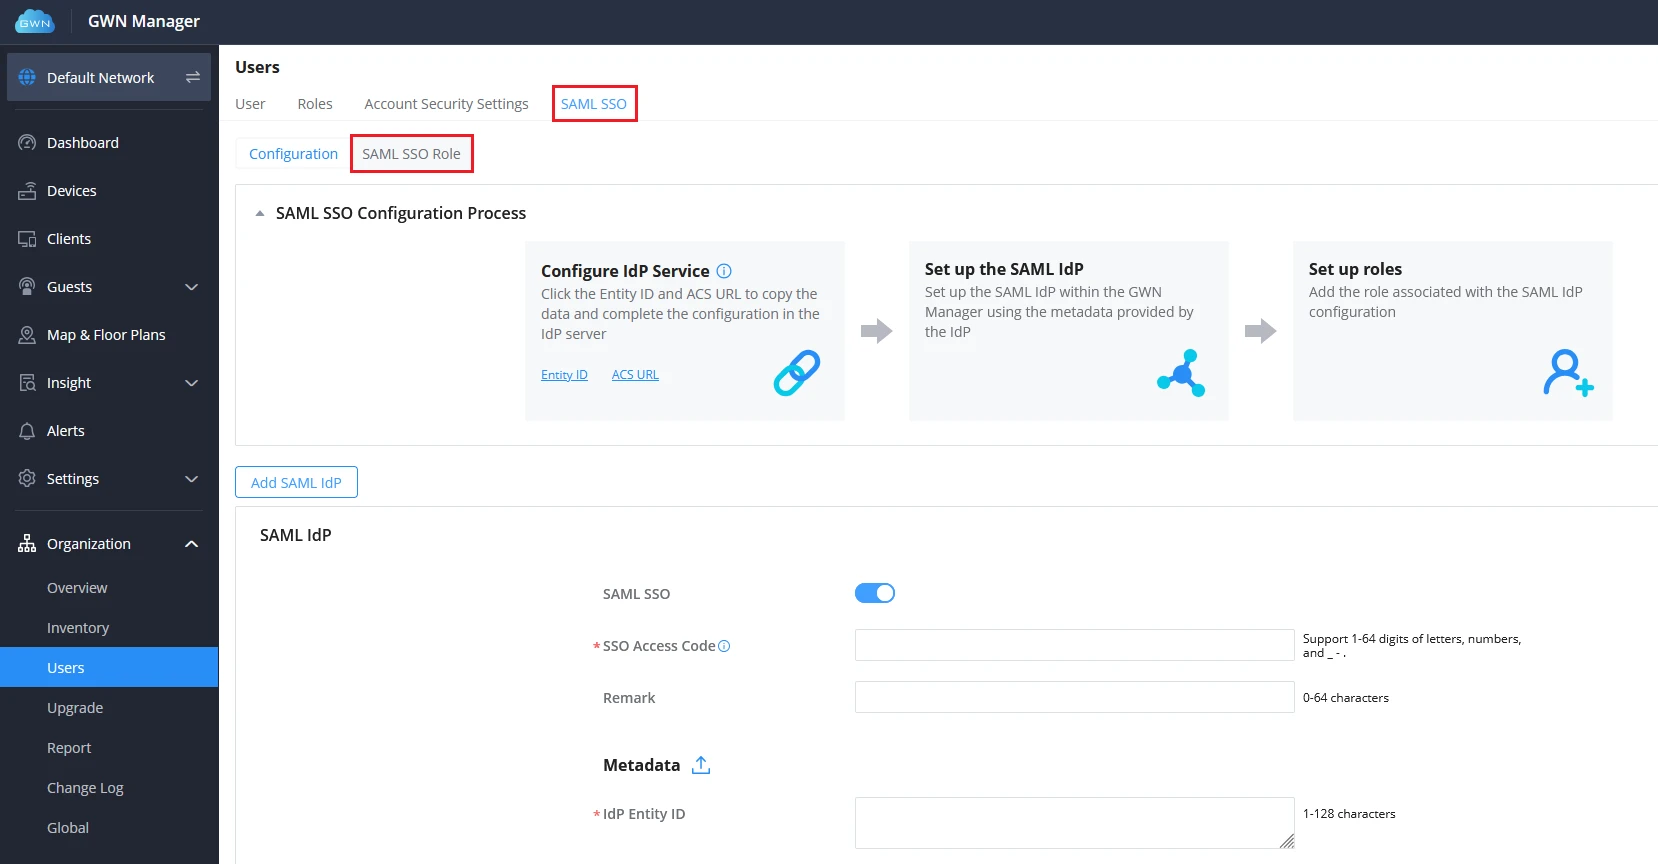
- Click Add to create a new SAML SSO role.
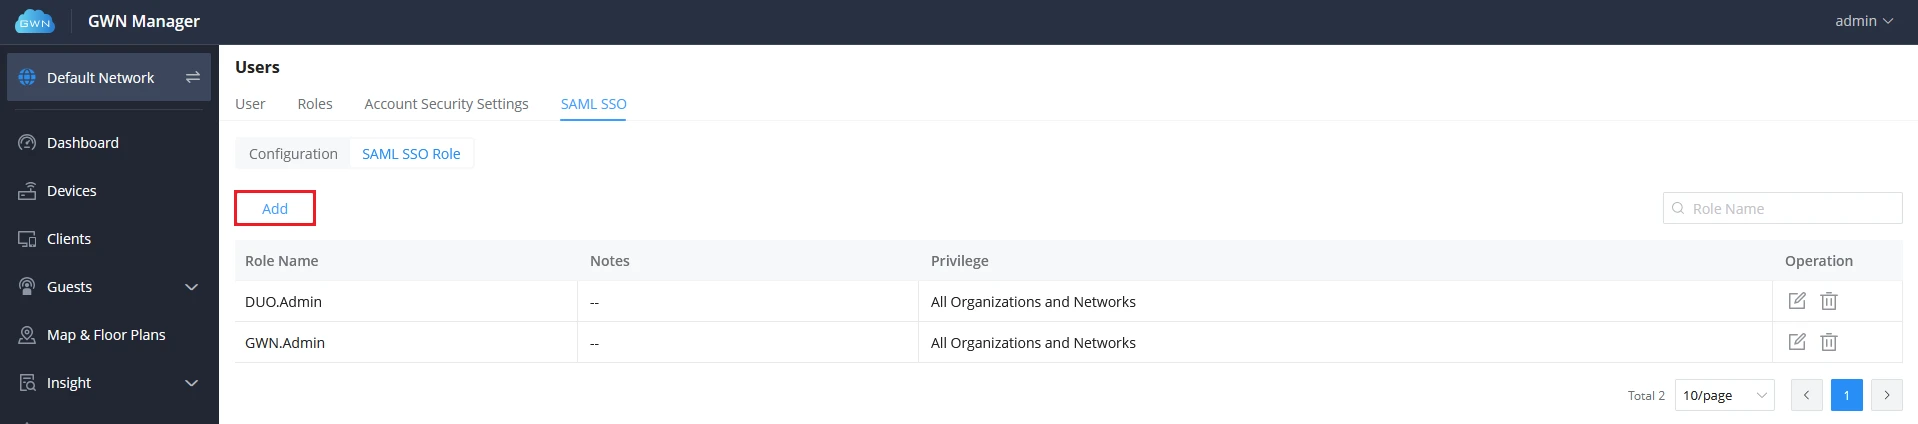
- Enter the name of the SAML SSO role. This value must exactly match the role value sent by the IdP in the SAML assertion.
- After defining the Role Name, configure the permissions associated with this role. Each option corresponds to a predefined permission scope within GWN Manager.
- If Custom is selected, granular permissions can be assigned manually.
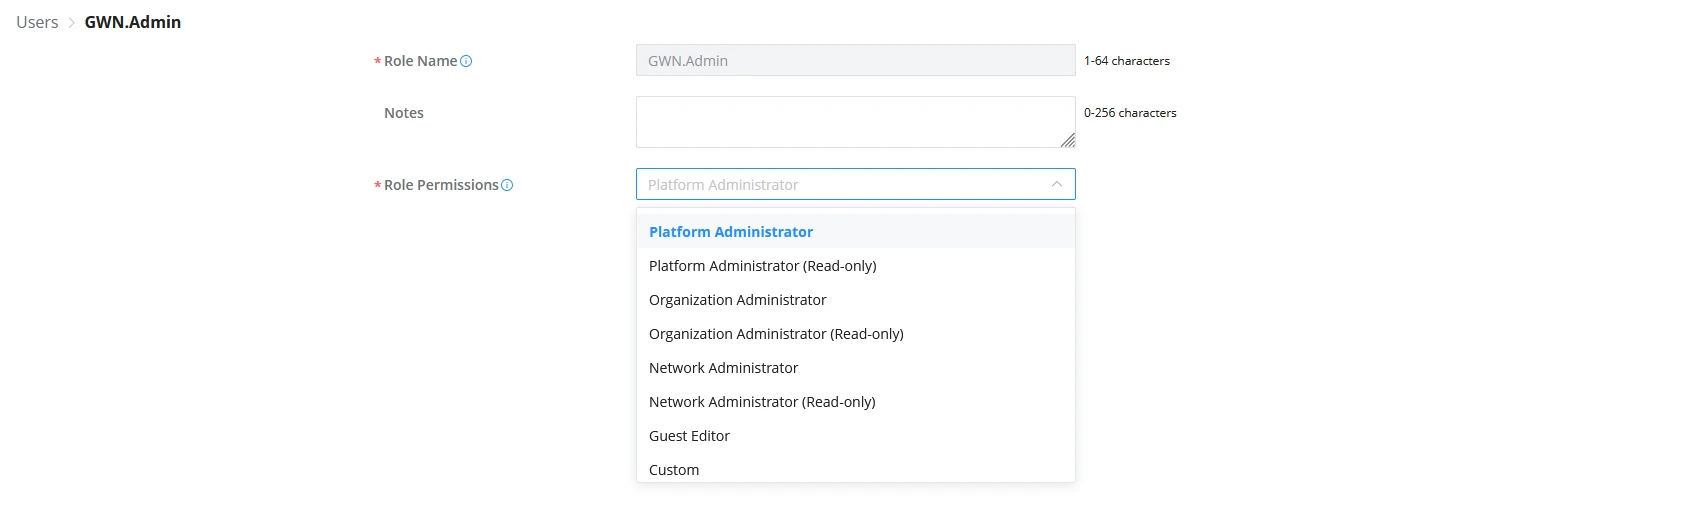
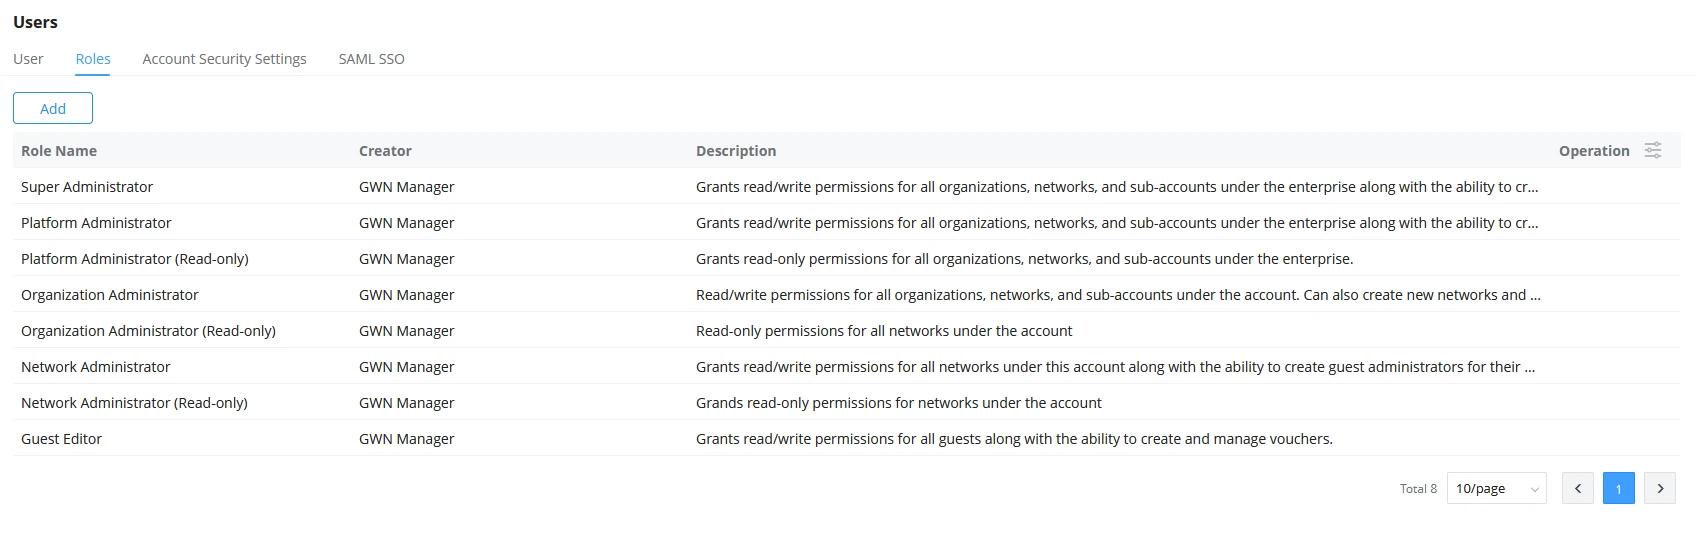
- Click Save to complete role creation. The newly created role will appear in the SAML SSO Role list.
SAML SSO TESTING AND VALIDATION
This section describes how to validate SAML SSO authentication and logout behavior when GDMS or GWN Manager is integrated with an Identity Provider.
Testing should verify both authentication flows:
- SP-initiated login: authentication starts from the GDMS or GWN Manager.
- IdP-initiated login: authentication starts from the Identity Provider portal (Entra ID, Duo).
SP-Initiated Login Test
Web Login Test
This test verifies authentication initiated from GDMS or GWN Manager.
- Open a web browser.
- Navigate to:
- GDMS: https://www.gdms.cloud
- GWN Manager: https://<gwn-manager>:<port>
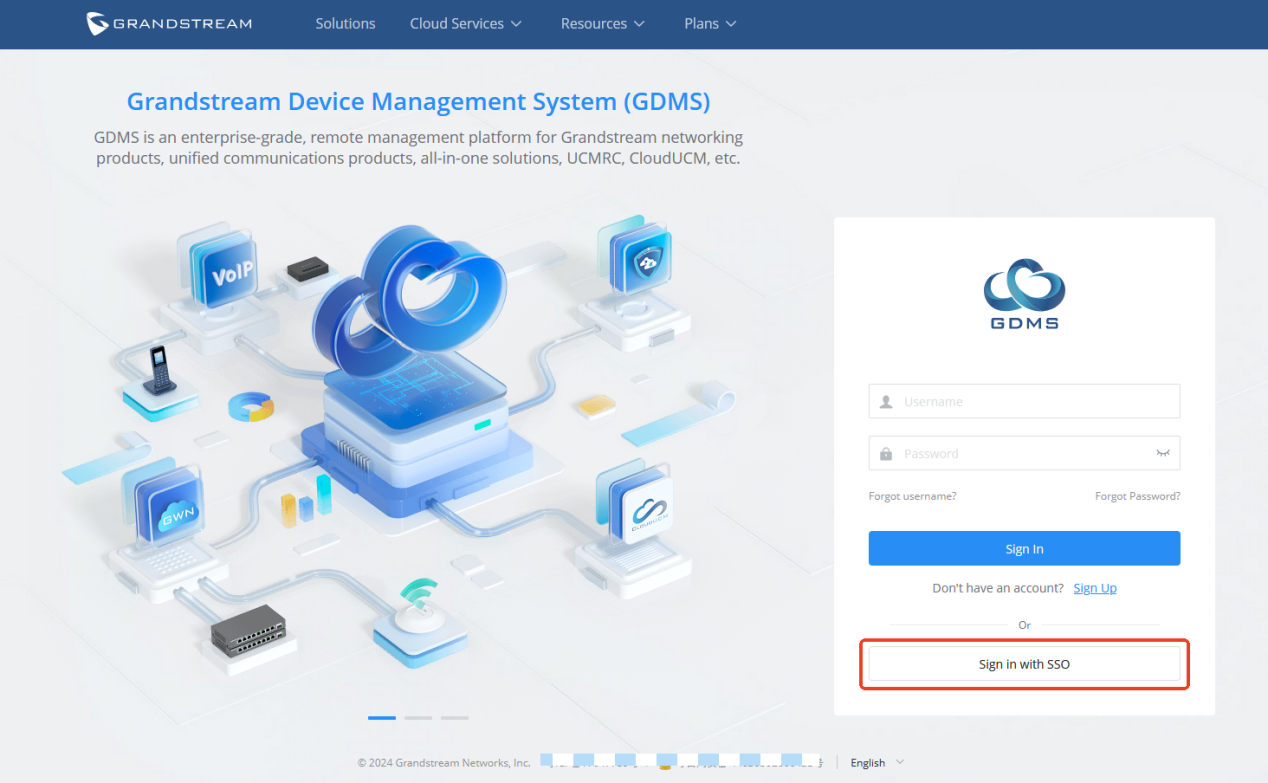
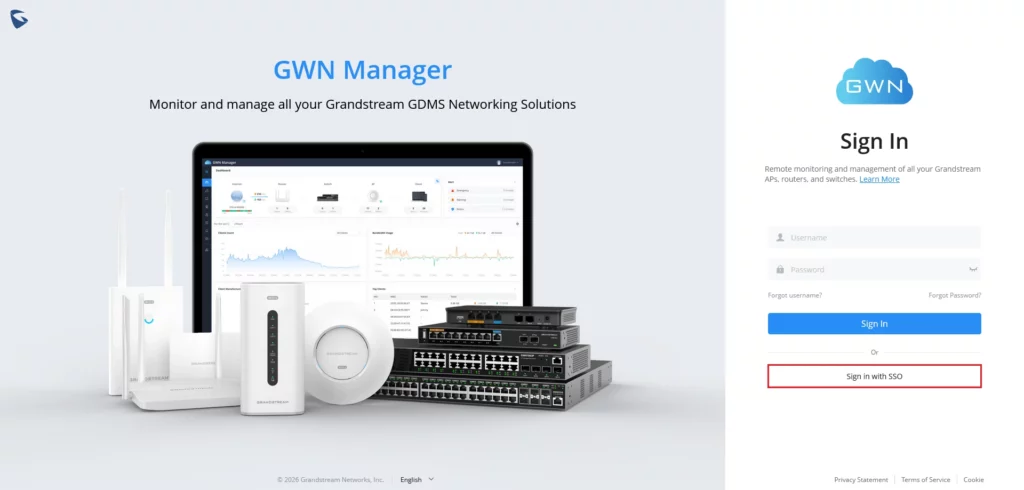
- Click Sign in with SSO at the bottom of the GDMS/GWN Manager login page.
- Enter the SSO Access Code configured by the administrator.
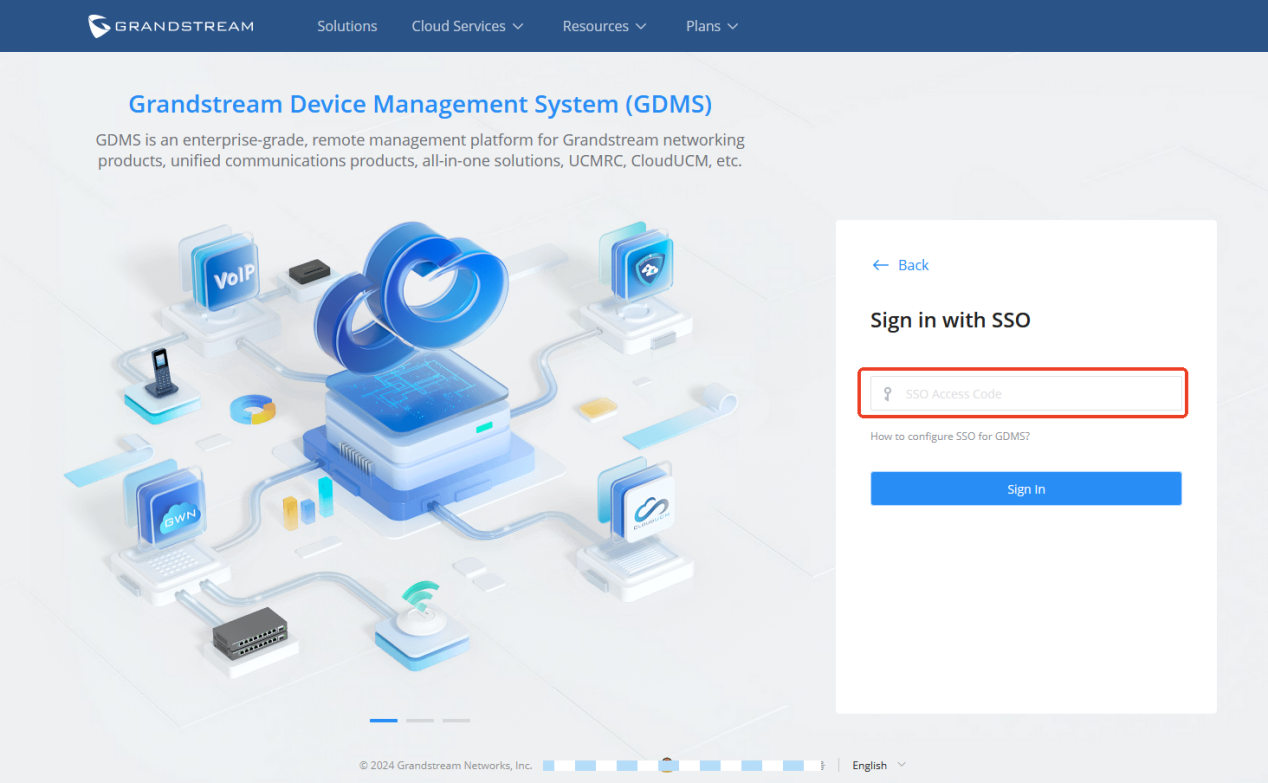
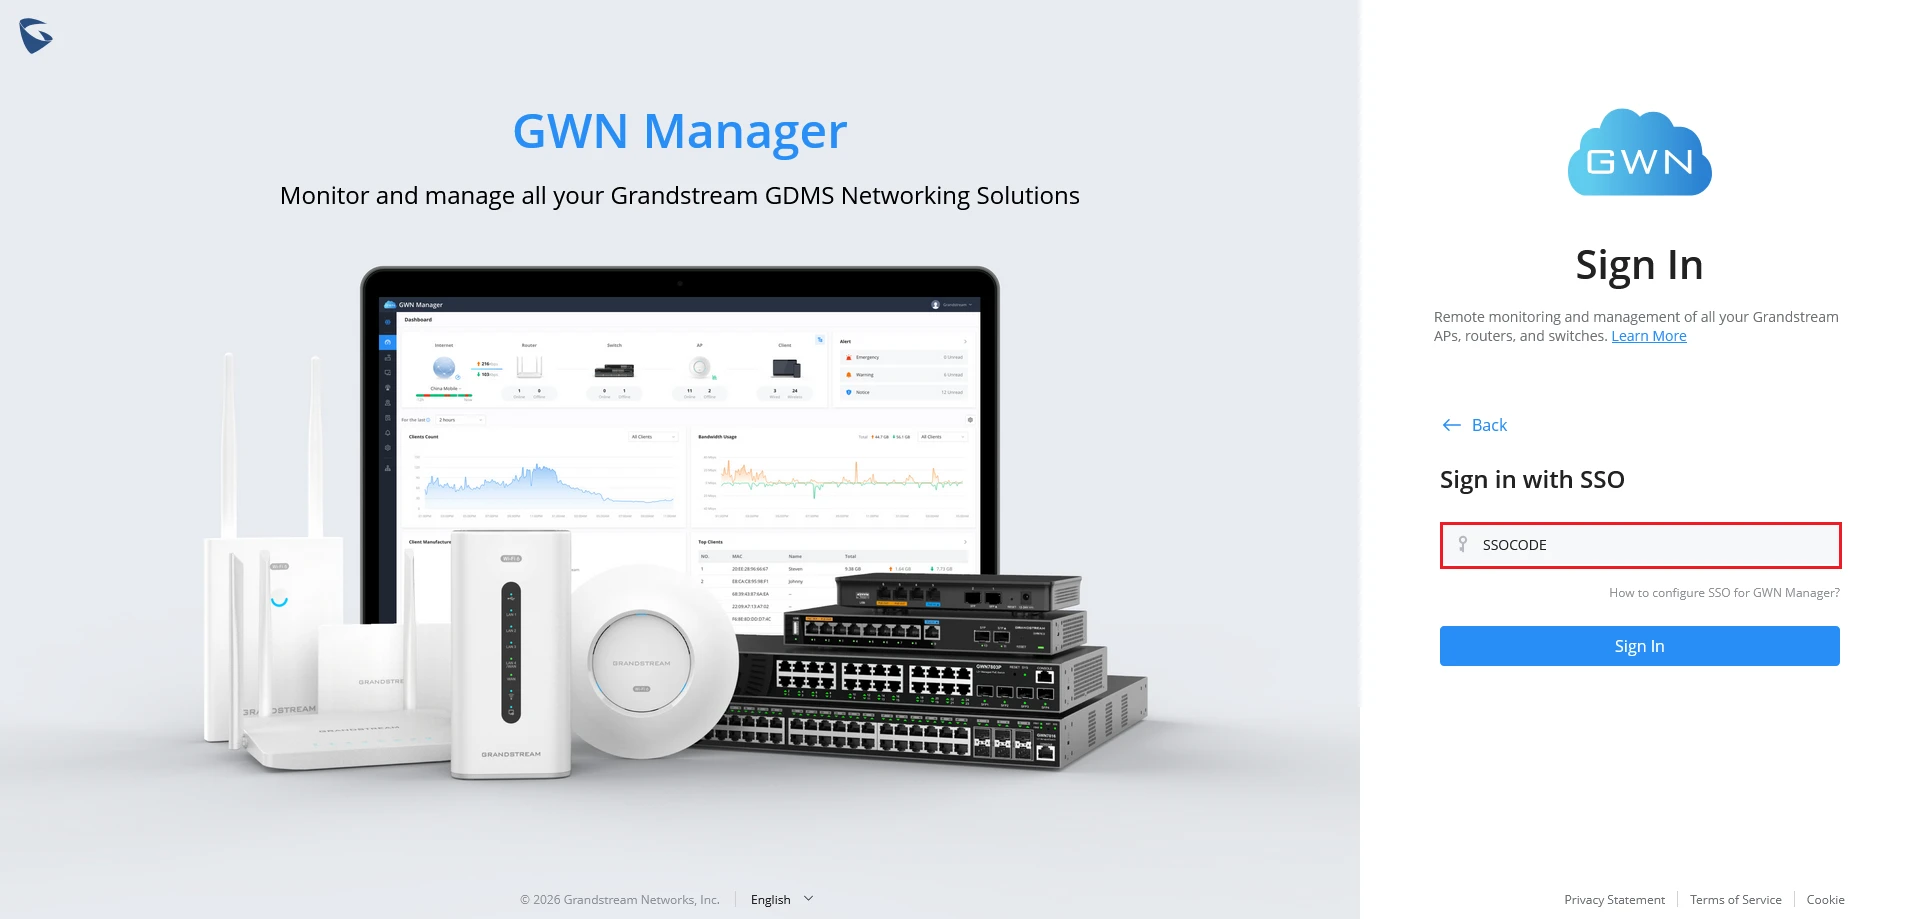
- The SSO Access Code from the GDMS/GWN Manager can be configured on the SAML SSO page as follows:
- The browser must redirect to the configured IdP login page:
- Microsoft Entra ID login page
- AD FS login page
- Duo authentication page
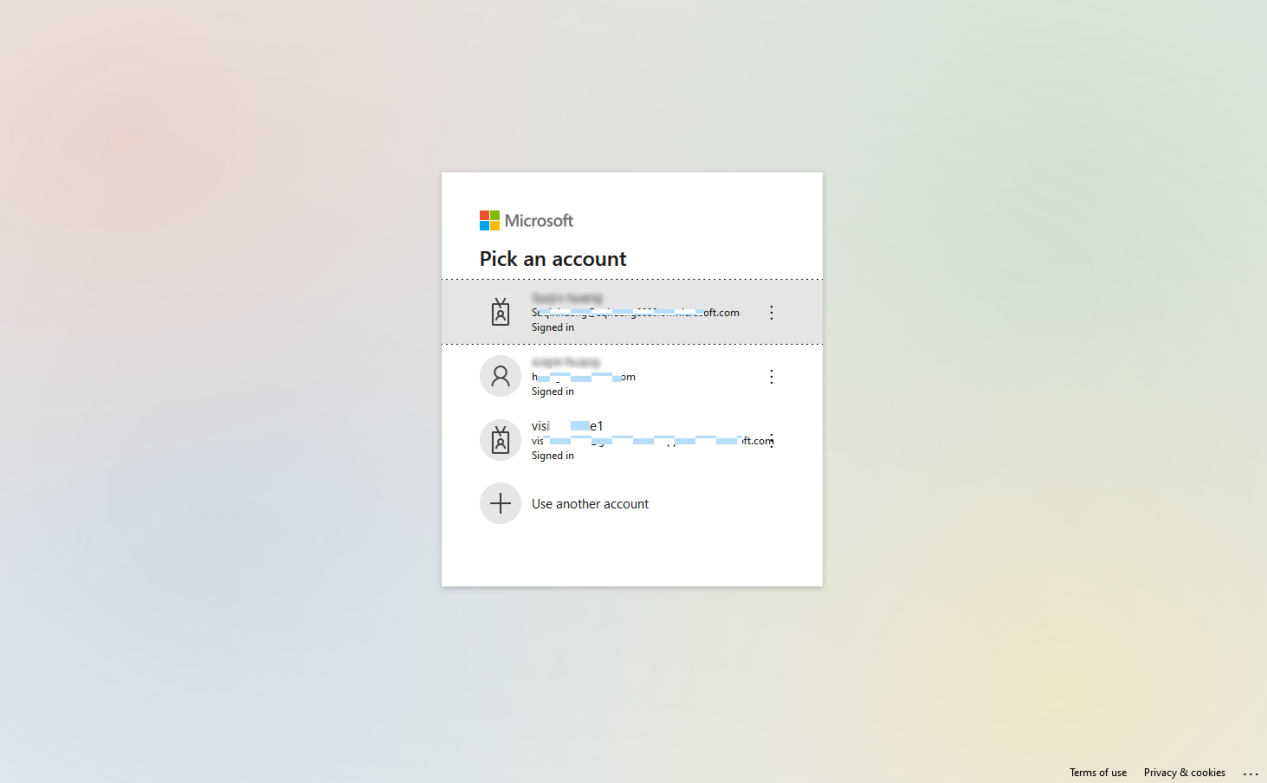
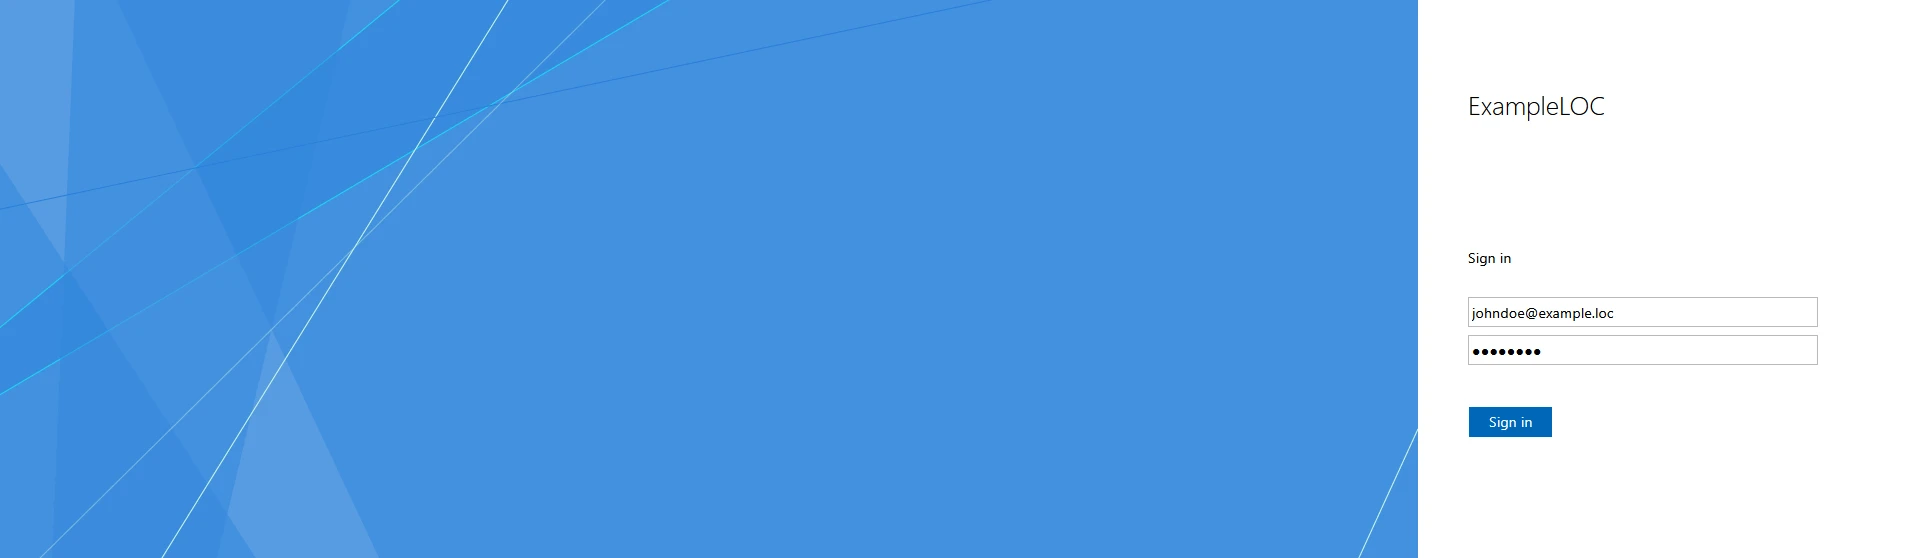
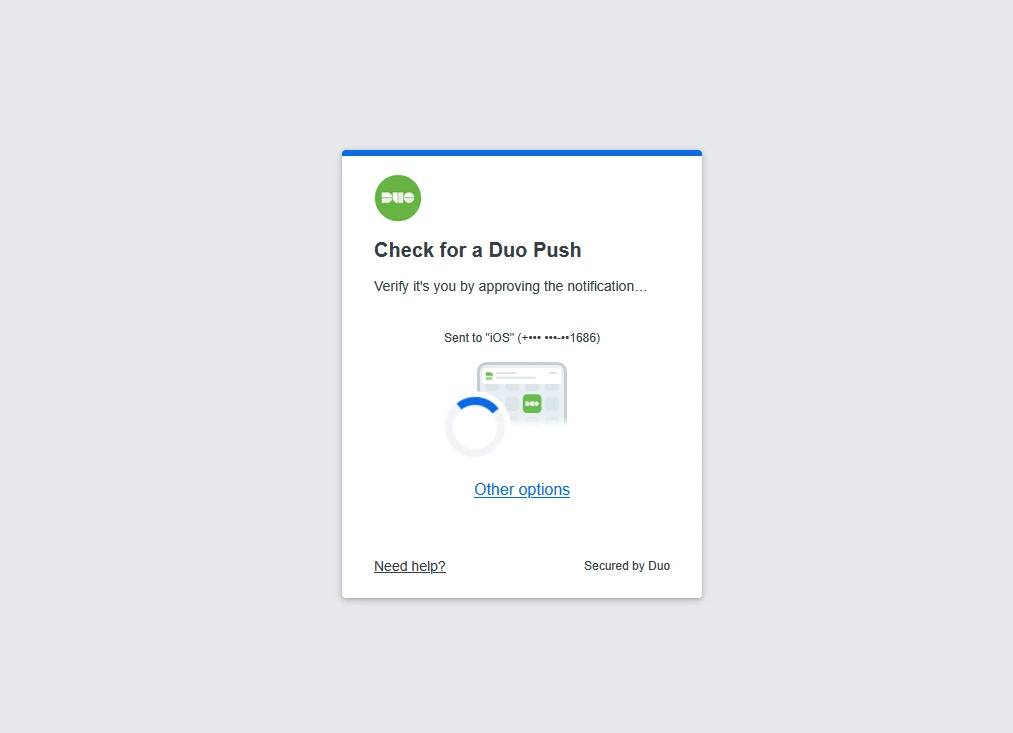
- After successful authentication, verify that:
- You are redirected back to the application
- Login completes successfully
- The correct SAML SSO role is applied
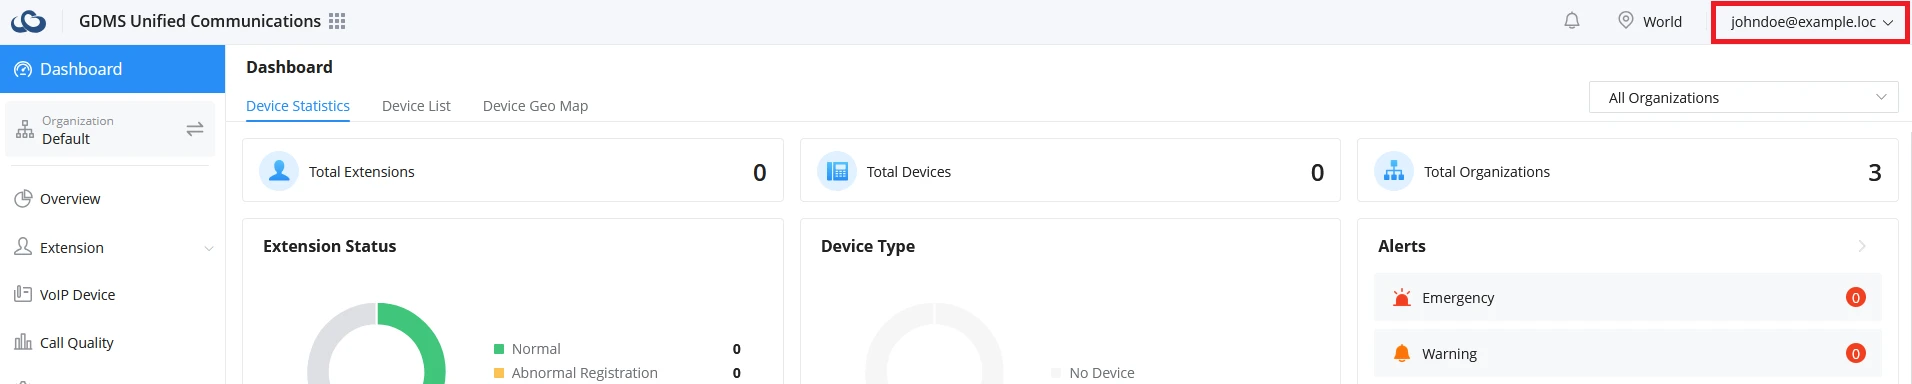

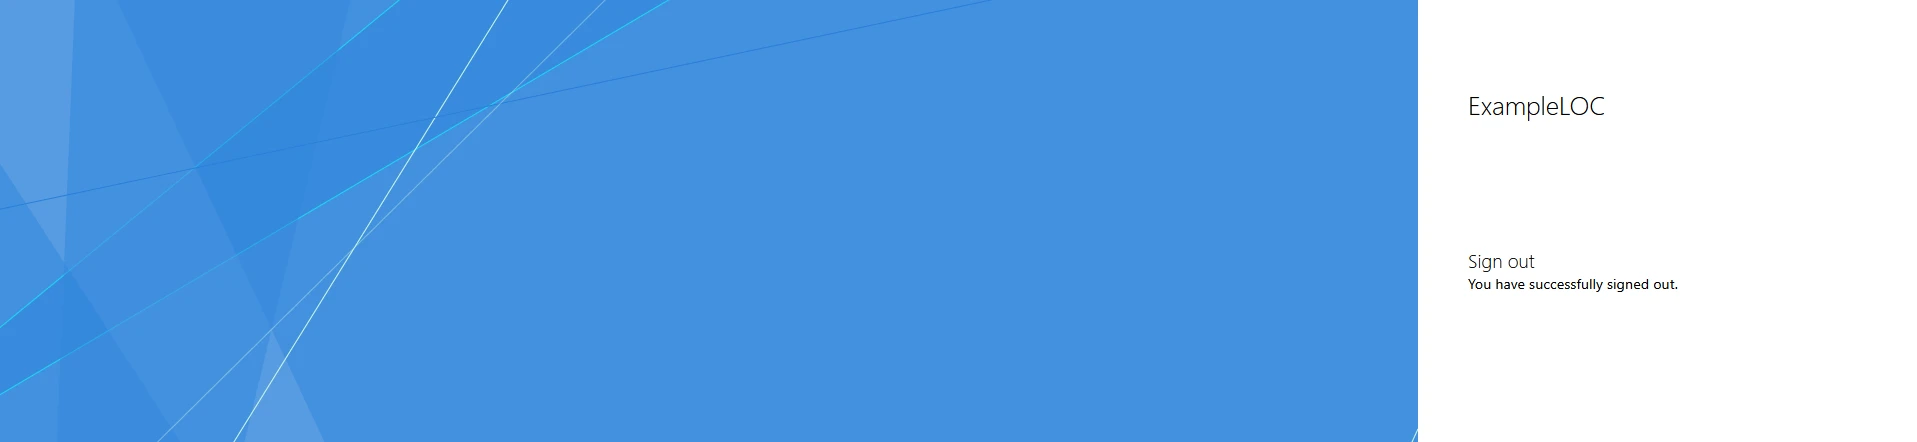
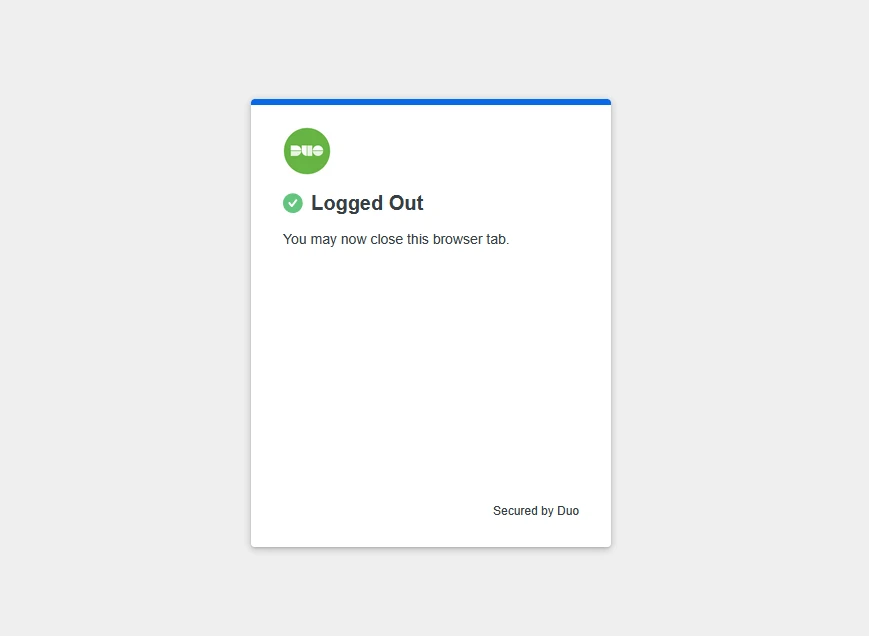
- (Optional) If SAML Single Logout (SLO) is configured, click Logout from both the application and the SSO system.
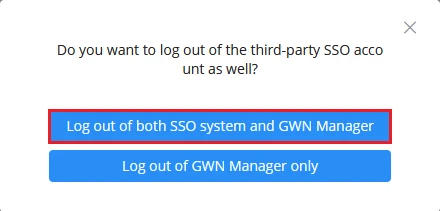
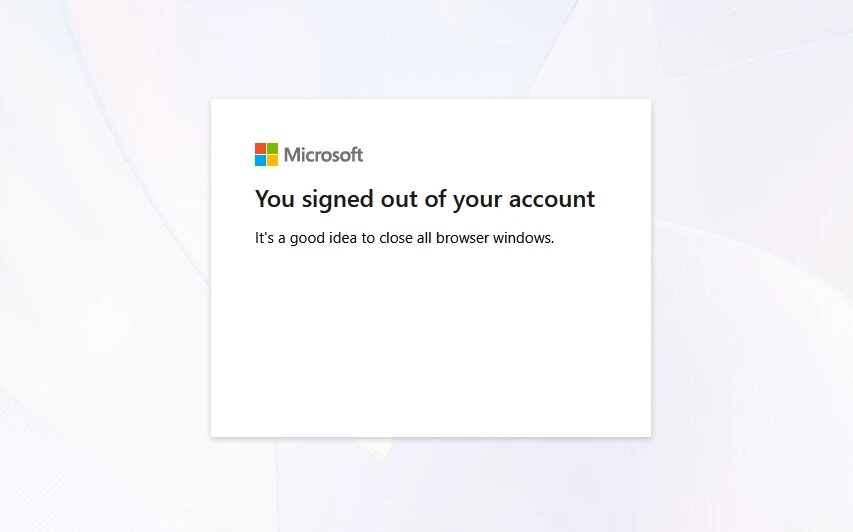
- Verify that:
- The GDMS/GWN Manager session is terminated
- The SSO system is terminated
Mobile App Login Test
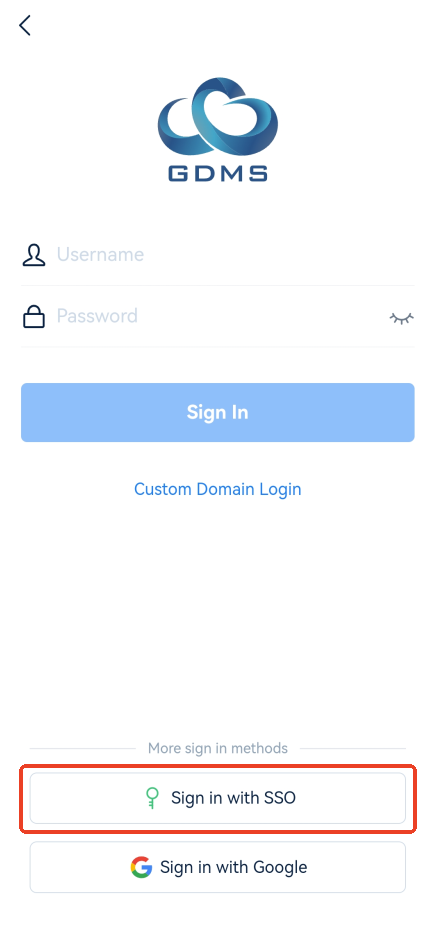
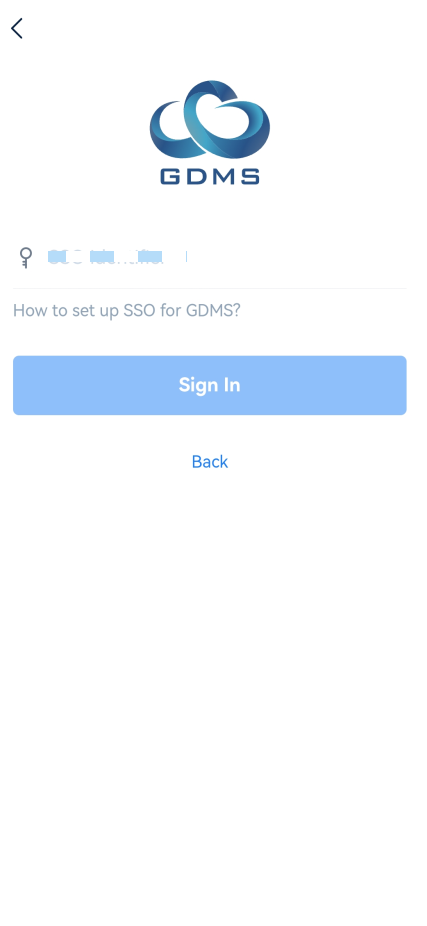
- Click Sign in with SSO at the bottom of the GDMS login page, and then enter the SSO Access Code configured by the administrator.
- Go to the configured IdP service provider authentication page, such as Microsoft Azure, ADFS, and DUO.
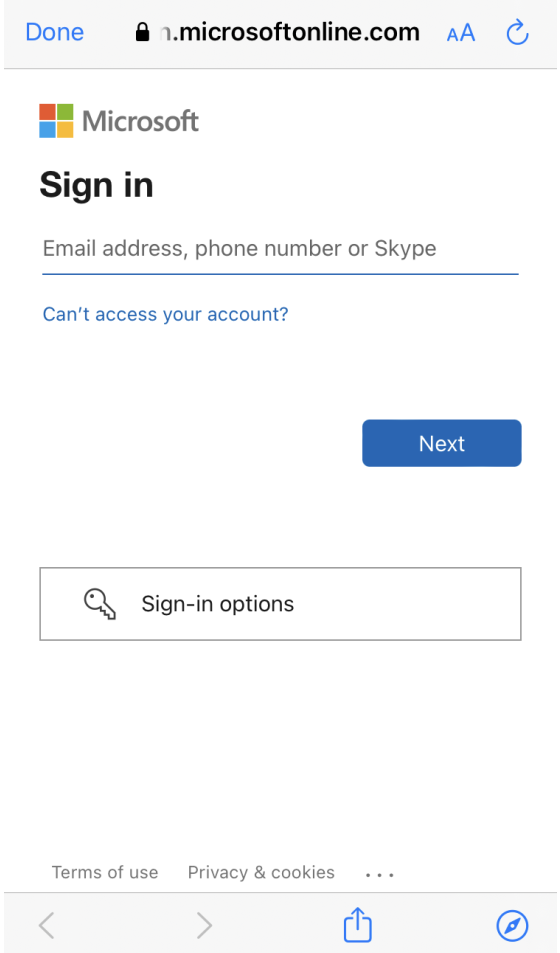
- After authentication, log in to the GDMS APP with the corresponding SAML SSO role.
IdP-Initiated Login Test
This test verifies authentication initiated directly from the Identity Provider portal.
In IdP-initiated authentication, the IdP generates the SAML assertion and redirects the user to the Service Provider without first accessing the GDMS or GWN Manager login page.
Microsoft Entra ID
SAML SSO can be validated from Microsoft Entra ID using either:
- The Application Test option
- The Microsoft MyApps portal
Access using the Application Test Option
- Log in to the Microsoft Entra Admin Center.
- Navigate to Enterprise applications and select the configured GDMS/GWN application.
- Go to Single Sign-on→SAML.
- Click Test this application.
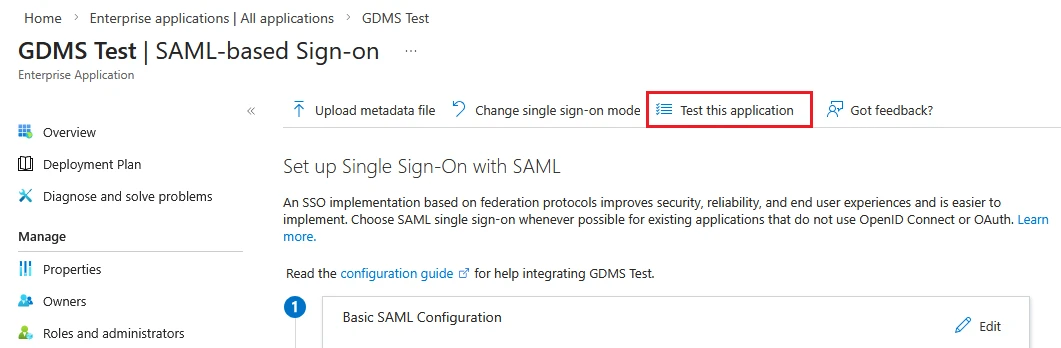
If the configuration is correct, the authentication completes successfully, and the browser redirects to GDMS or GWN Manager
Access from Microsoft MyApps Portal
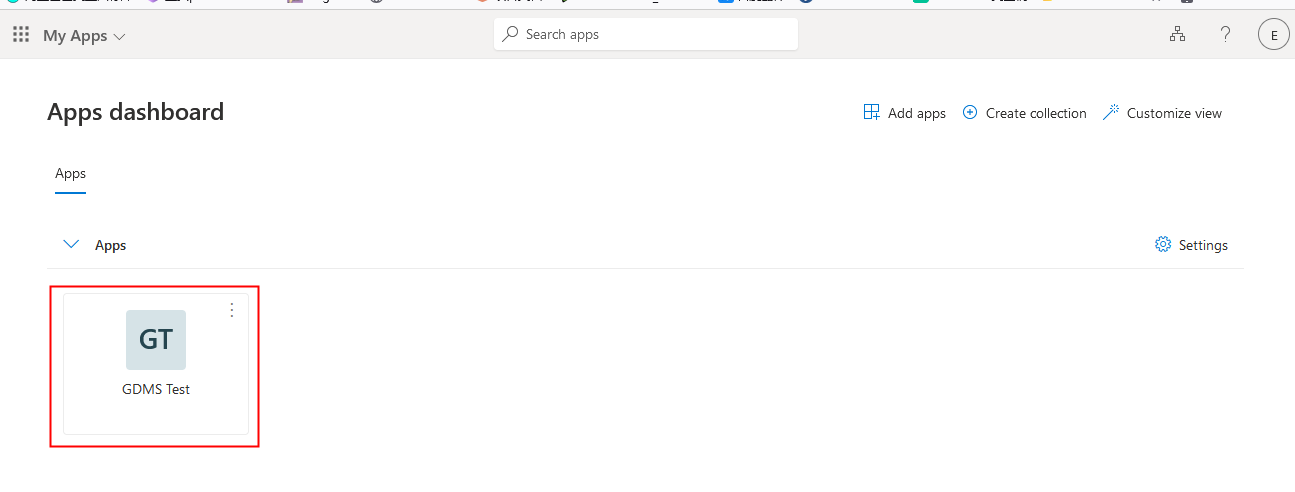
- Open Microsoft MyApps.
- Sign in using an Entra ID account with permission to access the GDMS/GWN application.
- Click the configured GDMS/GWN application tile.
- Authenticate if prompted, and verify successful redirection and correct role assignment.
AD FS
Before testing, verify that the IdP-initiated sign-on page is enabled on the AD FS server. Open PowerShell as Administrator and run:
Get-AdfsProperties | Select-Object EnableIdpInitiatedSignonPageIf the output shows “False”, enable it:
Set-AdfsProperties -EnableIdpInitiatedSignonPage $true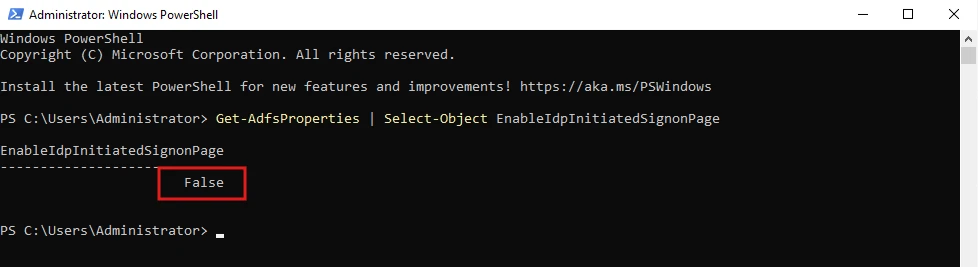
Run the check command again to confirm the value now shows “True”.
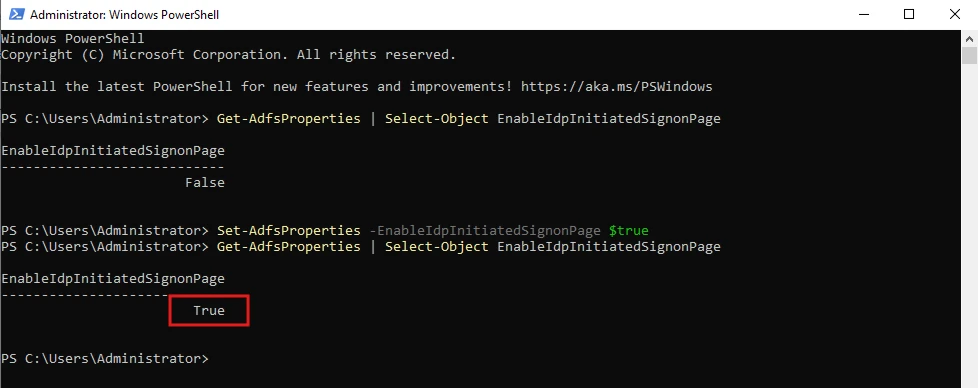
Access via AD FS IdP Sign-On Page
- Open a browser and navigate to:
https://<adfs-server>/adfs/ls/idpinitiatedsignon.aspx- From the application dropdown, select the configured application (GDMS or GWN Manager).
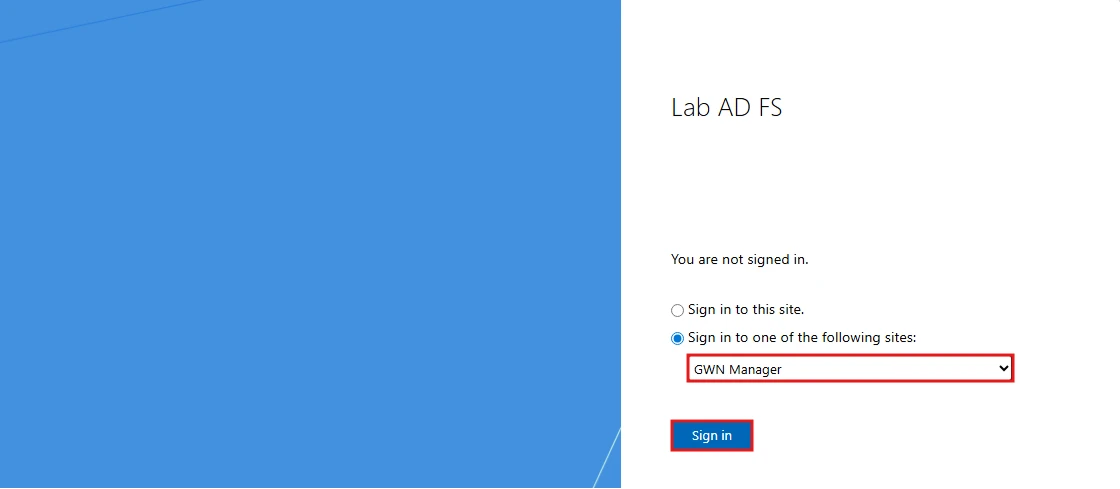
- Sign in using a domain user account that is a member of the AD group mapped to the GDMS or GWN Manager SAML SSO role.
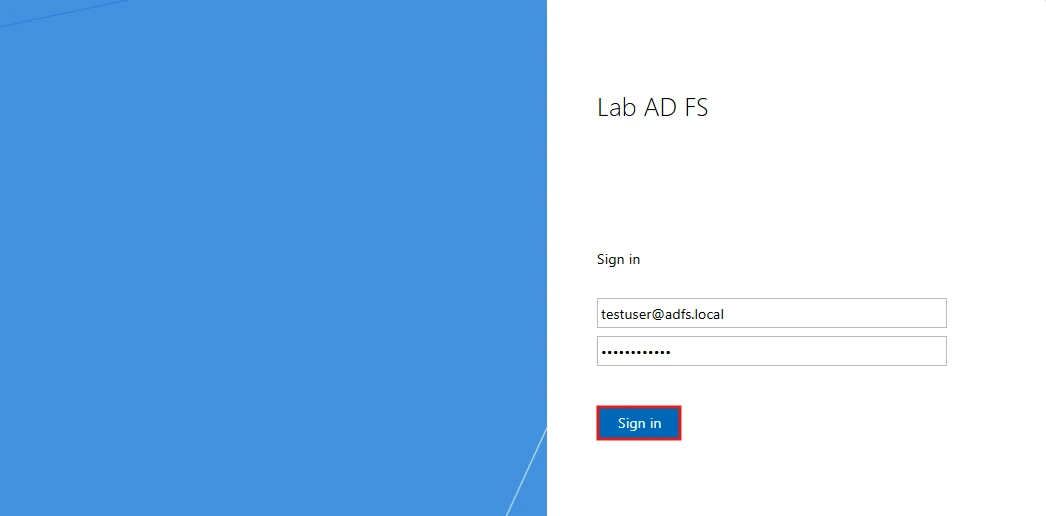
- After successful authentication, verify that:
- The browser redirects to GDMS or GWN Manager automatically
- Login completes without prompting for the SSO Access Code
- The correct SAML SSO role is applied to the session

DUO
When Duo is configured as the SAML Identity Provider, IdP-initiated login can be performed using Duo Central or through the upstream identity provider (for example, Microsoft Entra ID).
Unlike Microsoft Entra ID, Duo does not automatically create a user application tile for SAML applications. Administrators must manually add the application to Duo Central.
Access via Duo Central
- Log in to the Duo Admin Panel.
- Navigate to Applications→Duo Central.
- Ensure the Status is set to Online. If Duo Central is Offline, tiles will not be available.

- Click Add tile.
- Select Add application tile.
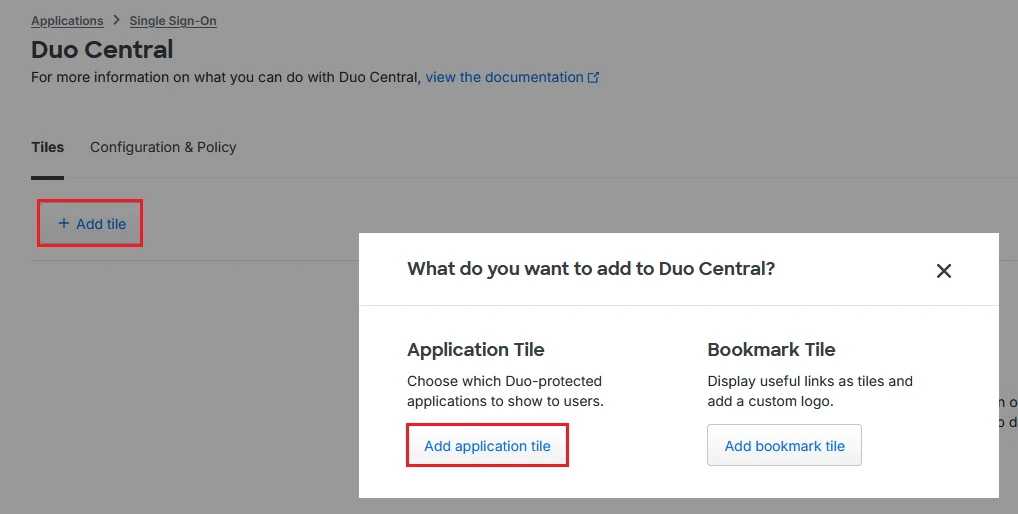
- Locate the configured SAML application (for example, GDMS or GWN Manager).
- Select the checkbox next to the application.
- Click Add Tile.
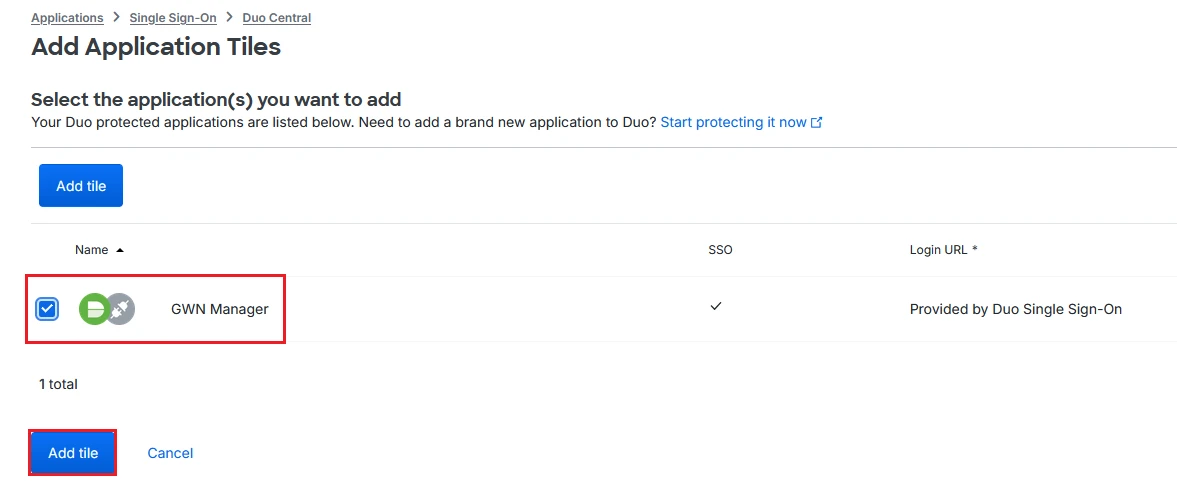
- The application will now appear in the Duo Central Tiles list. Confirm the application tile shows Enabled only for permitted groups, or Available to all users.

Once the tile has been successfully configured, users can follow these steps to log in from DUO Central:
- Open a browser and navigate to the Duo Central portal:
https://<your-subdomain>.sso.duosecurity.com- Sign in using a user account with access to the configured SAML application.
- After login, the application tile will be displayed.
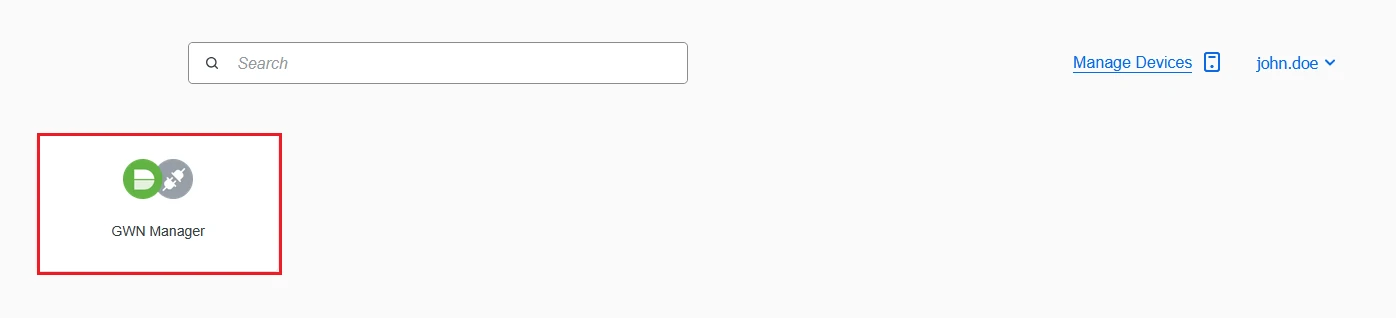
- Click the application tile to initiate IdP-initiated SAML authentication.
- Enter valid credentials and complete Duo MFA verification if required.
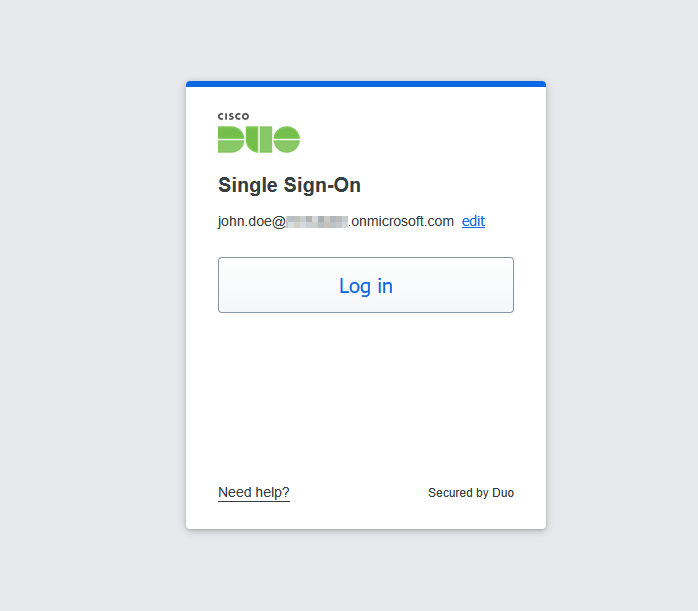
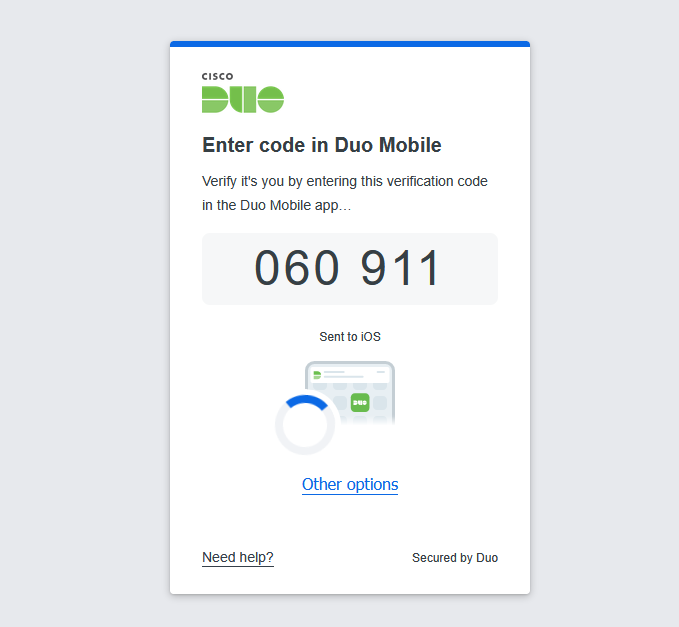
- After successful authentication, you will be redirected to the configured GDMS or GWN Manager and logged in automatically.
Access via Upstream IdP (Entra ID)
When Duo uses Microsoft Entra ID as the upstream identity provider, users may also initiate login from Microsoft MyApps.
For IdP-initiated login to work correctly in this scenario, the Sign-on URL must be configured in the Entra ID application.
- Log in to the Duo Admin Panel.
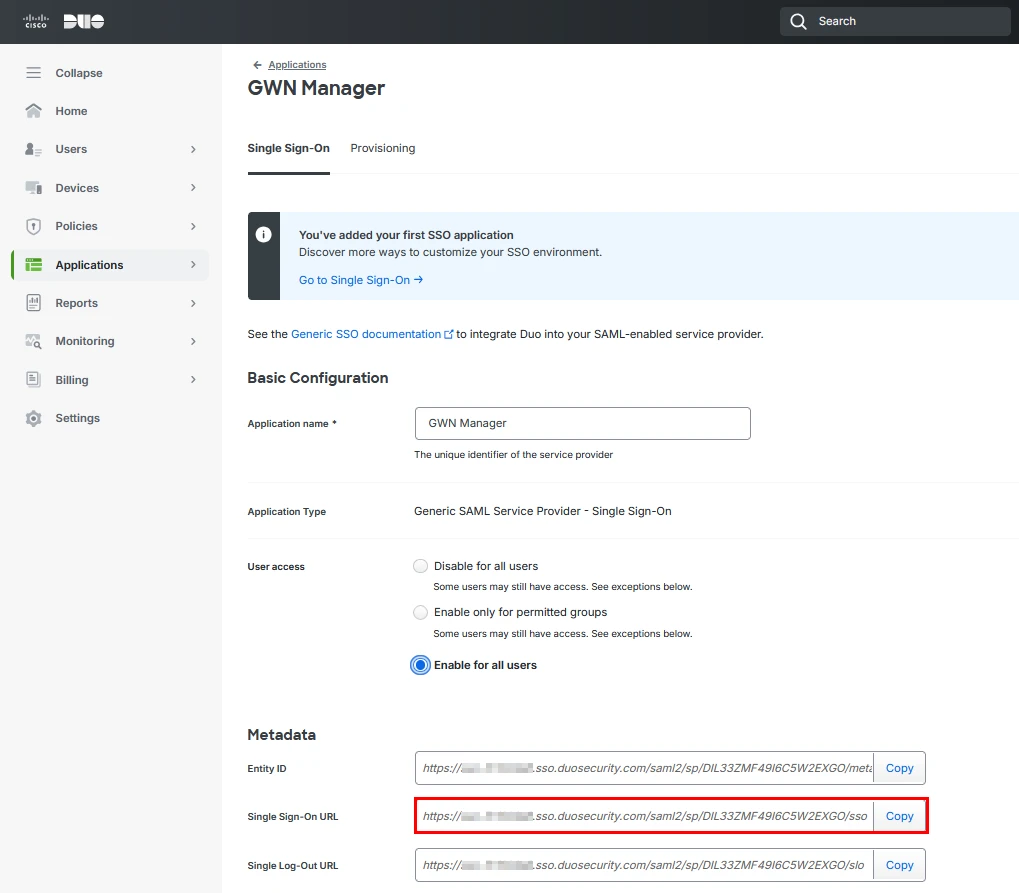
- Open the configured SAML application and copy the Single Sign-On URL from the application metadata.
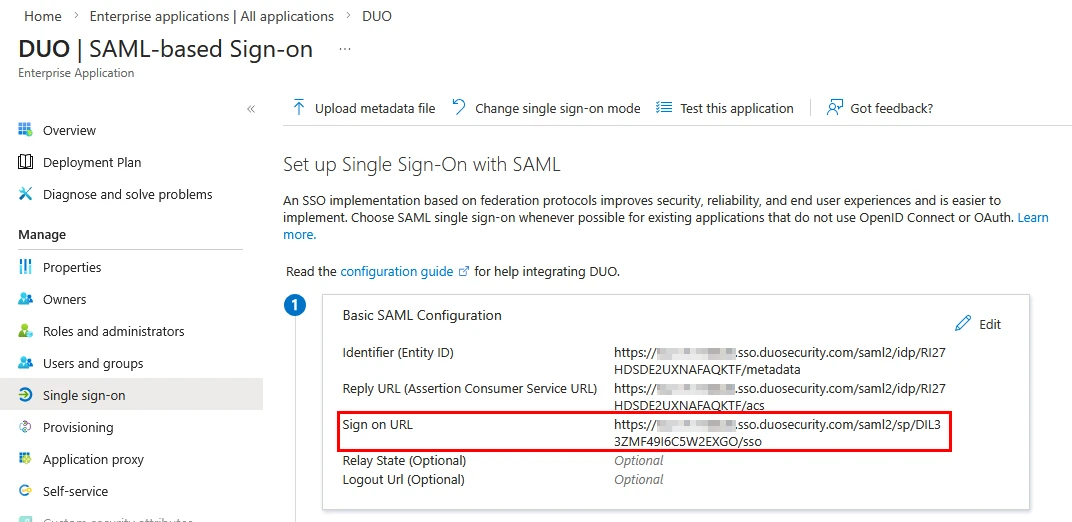
- Log in to the Microsoft Entra Admin Center.
- Navigate to the Duo application created earlier.
- Under Basic SAML Configuration, paste the copied URL into the Sign-on URL field.
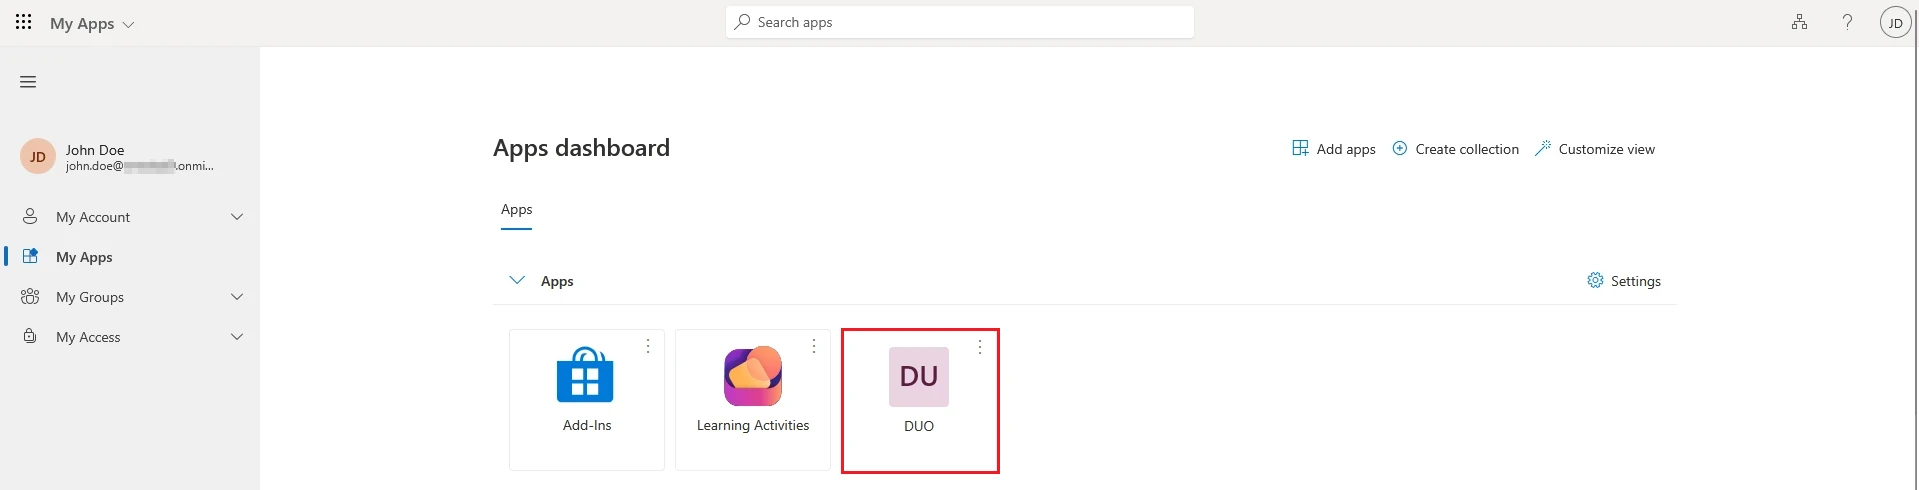
- Open Microsoft MyApps, and sign in using the Microsoft Entra ID account configured in Duo.
- Click the Duo application tile.
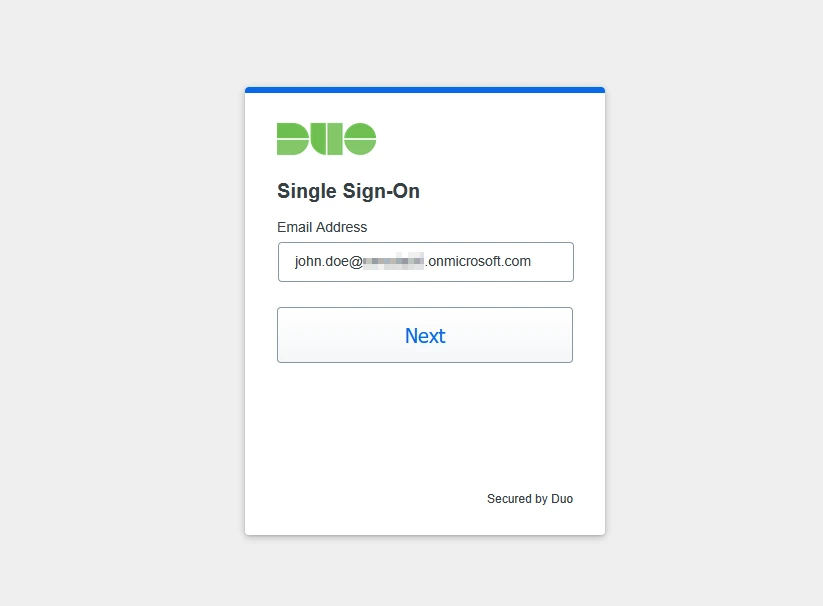
- The browser redirects to the Duo authentication page. Enter the correct credentials and complete Duo MFA verification.
If the configuration is correct, the browser redirects to GDMS or GWN Manager, and the user is automatically logged in with the appropriate role.
SAML SSO LOGS
Administrators can review authentication activity for SAML SSO users using system logs, which can be reviewed in the following systems:
- GDMS
- GWN Manager
- Microsoft Entra ID
- AD FS
- Duo
Reviewing logs from both the Service Provider and Identity Provider can help identify configuration or authentication issues.
Viewing Logs in GDMS
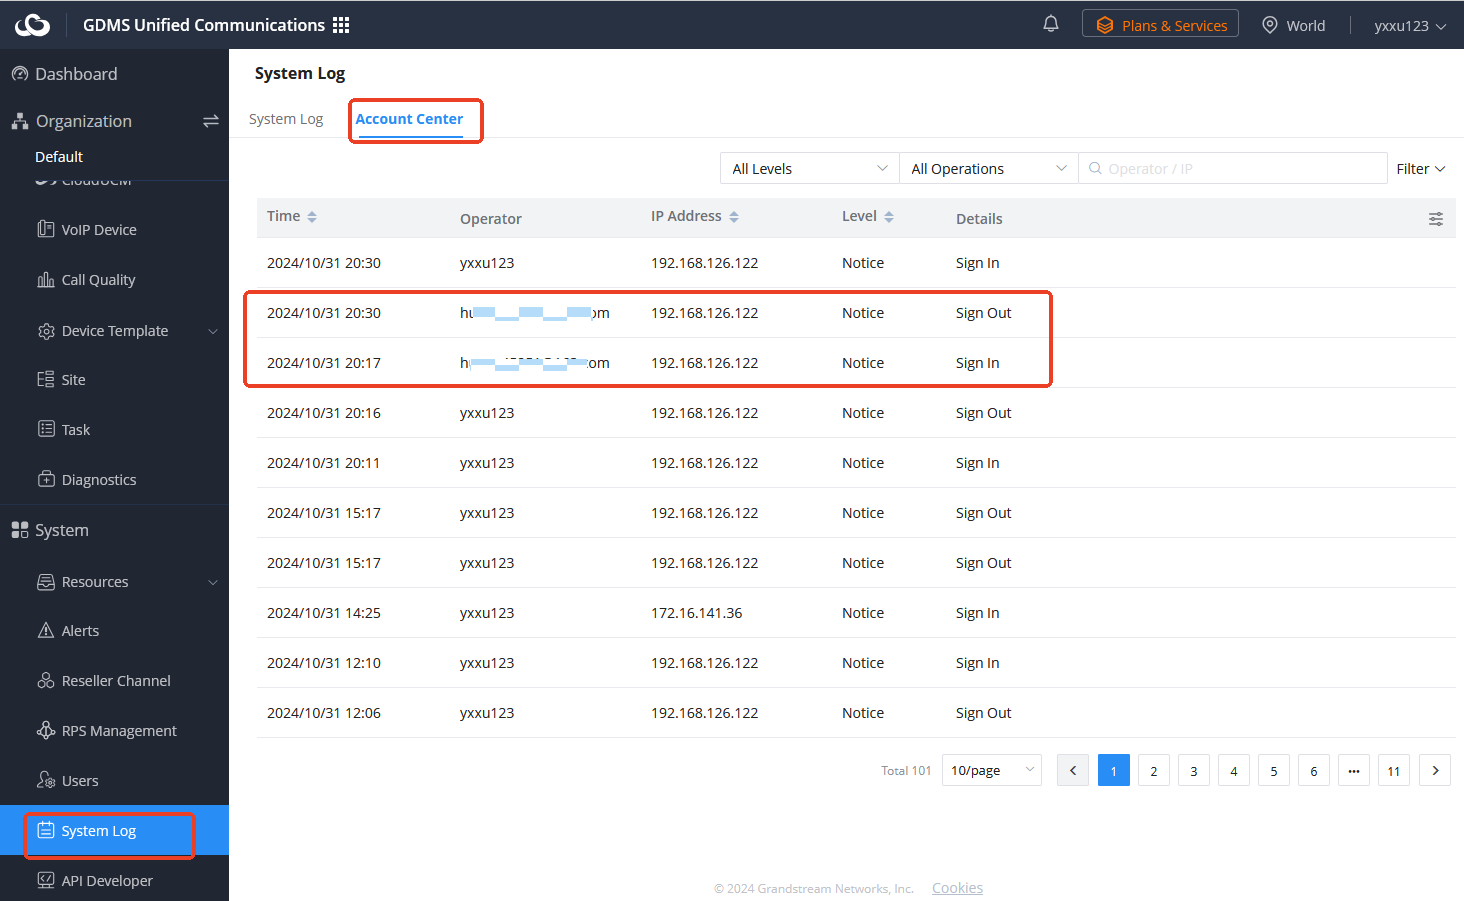
GDMS records SAML login and logout events in the System Log.
- Log in to GDMS using an administrator account.
- Access the Account Center logs using one of the following paths, depending on the module in use:
- UC Module: Navigate to System→System Log→Account Center.
- Networking Module: Navigate to Organization→Change Log→Account Center.
Viewing Logs in GWN Manager
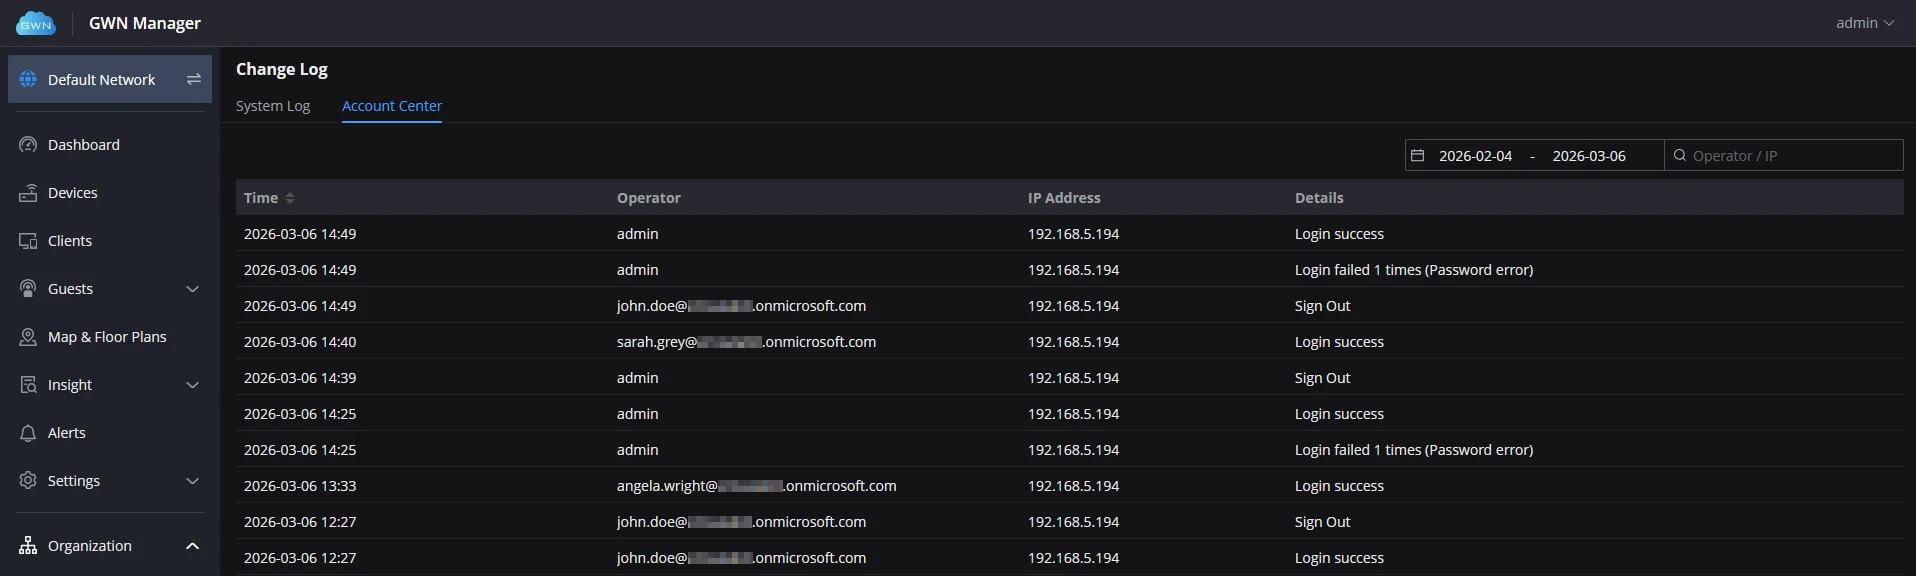
GWN Manager also records SAML authentication events in its system log.
- Log in to GWN Manager using an administrator account.
- Navigate to Organization→Change Log→Account Center.
Viewing Logs in Microsoft Entra ID
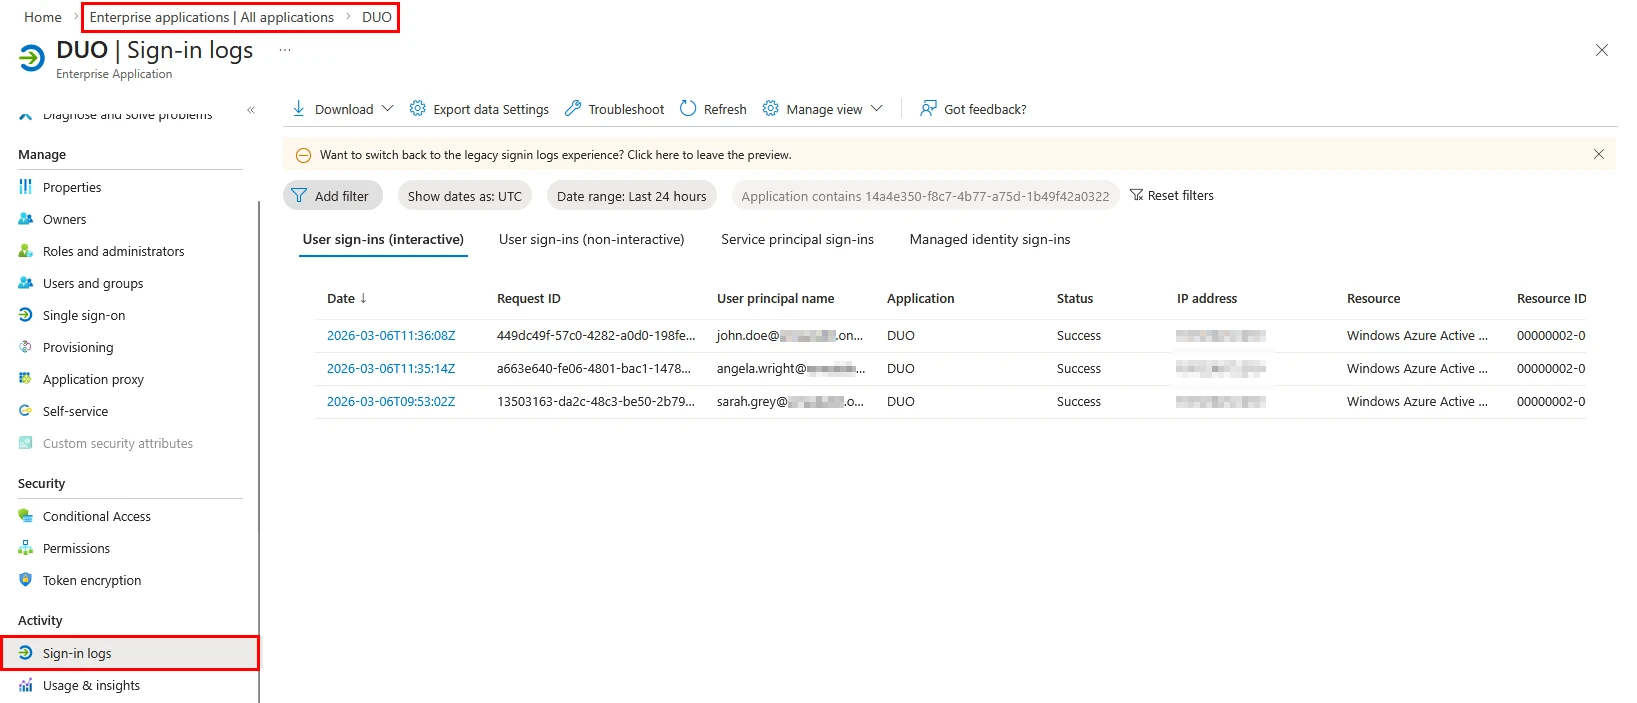
Microsoft Entra ID records SAML authentication activity in the Sign-in Logs.
- Log in to the Microsoft Entra Admin Center.
- Under Enterprise Applications, select the service provider app.
- Navigate to Identity→Monitoring→Sign-in logs.
Viewing Logs in AD FS
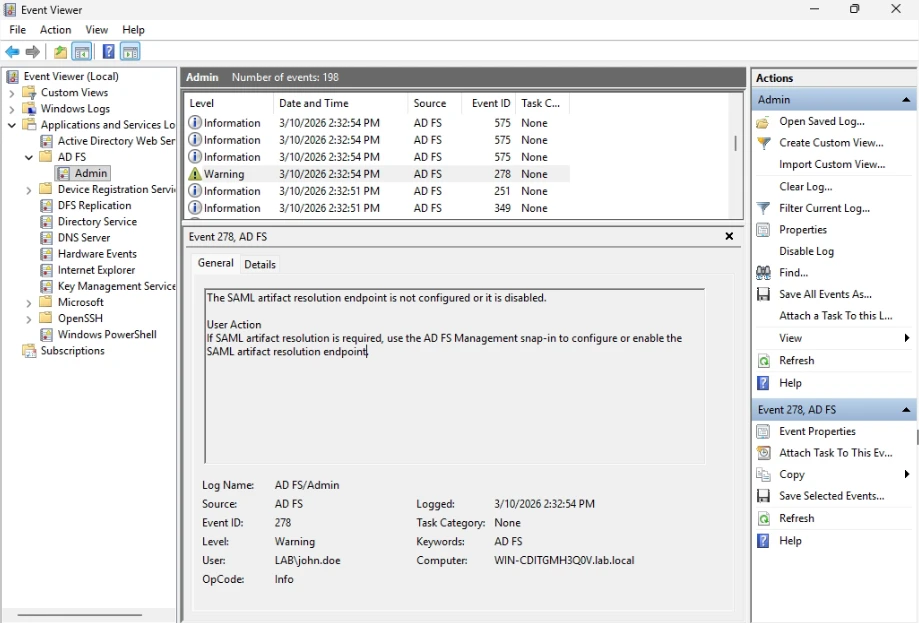
When AD FS is used as the Identity Provider, SAML authentication events are recorded in the Windows Event Viewer.
- Log in to the AD FS server, open Event Viewer by running eventvwr.msc or searching for “Event Viewer” in the Start menu.
- In the left pane, navigate to Applications and Services Logs→AD FS→Admin.
- Review the events listed.
Viewing Logs in Duo
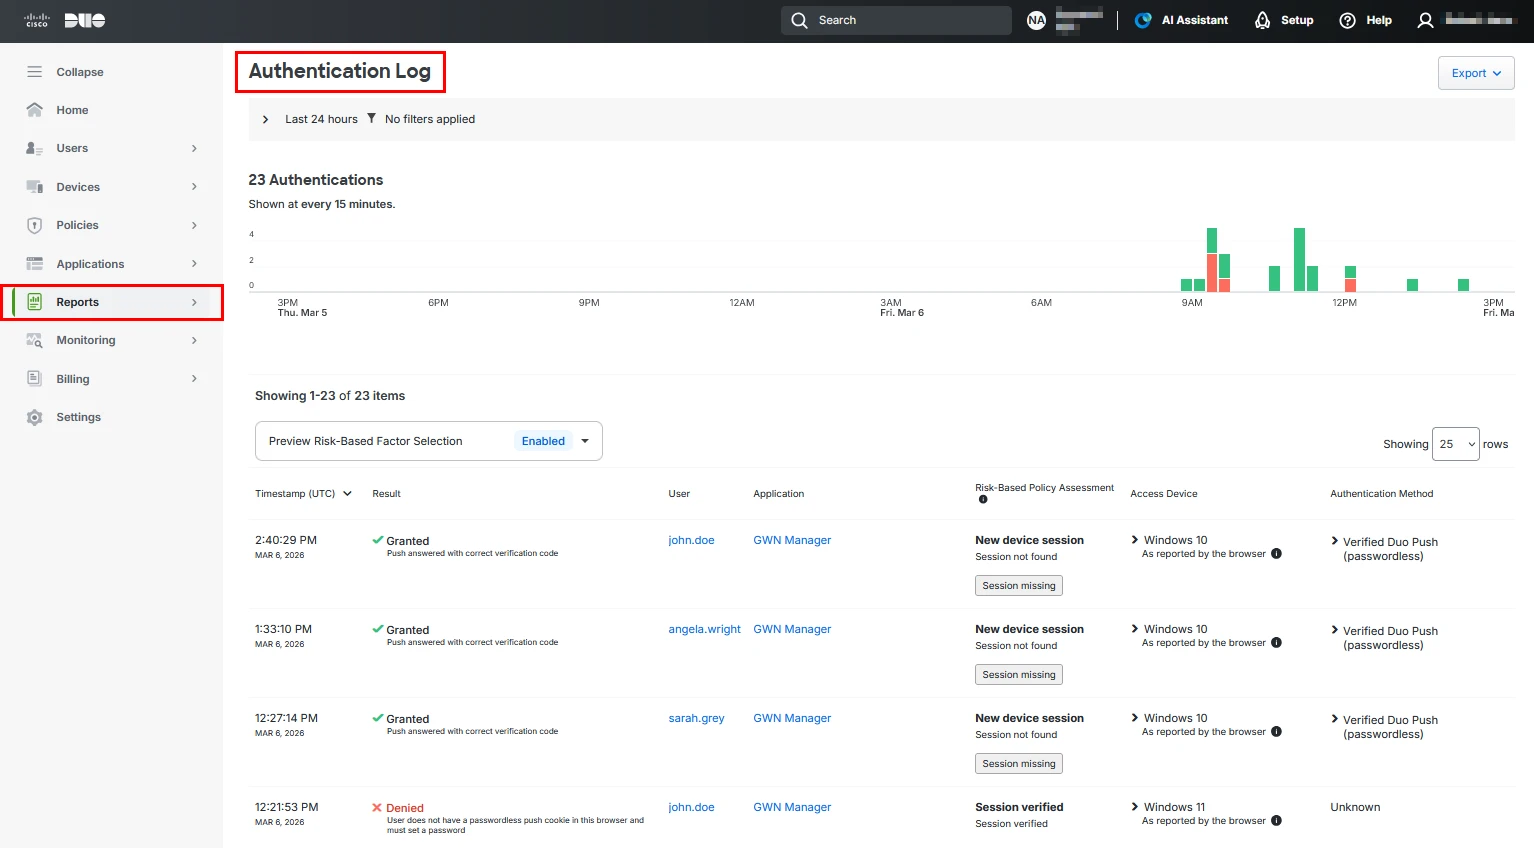
Duo records authentication activity in the Authentication Log, which includes SAML authentication events.
- Log in to the Duo Admin Panel.
- Navigate to Reports→Authentication Log.
- Use the search filters to locate events related to the configured SAML application.