
Thank you for using Grandstream Device Management System! GDMS is a cloud-based solution that provides the ability to easily manage Grandstream products before, during, and after deployment. GDMS separates subsystems independently based on different product lines: VoIP phone systems, PBX systems, network systems, and gateway systems.
PRODUCT OVERVIEW
Feature Highlights
- Intuitive deployment and management: GDMS’s easy-to-navigate web portal and batch operation support allow users to easily deploy and manage Grandstream devices located on several sites.
- All-in-one solution: GDMS offers a complete package that offers convenient management of devices and SIP server accounts on multiple sites, real-time monitoring and alerts, task scheduling and tracking, and device diagnostics.
- Supports presetting offline devices.
- One-click debugging: Easily collect system logs, network captures, and traceroutes with a click of a button.
- Supports UCM devices’ remote management and synchronizes SIP accounts to the GDMS platform in real time. All devices/SIP account one-stop management.
- Supports value-added services – UCM Remote Management Plan in GDMS platform. Supports remote external network communication for UCM clients.
- Supports value-added services – Cloud Storage Space in GDMS platform. UCM users can store more data and do not need to worry about storage space.
- Channel customer support: Allows automatic association of Grandstream ERP devices, allowing for the establishment of channel relationships and quick device allocation.
- Powerful API integration features: GDMS is compatible with ERP/CRM/OA platforms to improve workflow efficiency.
GDMS Technical Specifications
Functions |
|
Security and Authentication |
|
Enterprise Features |
|
Supported Device Models |
|
GDMS Technical Specifications
GETTING STARTED
GDMS Overview
Main Functions Overview
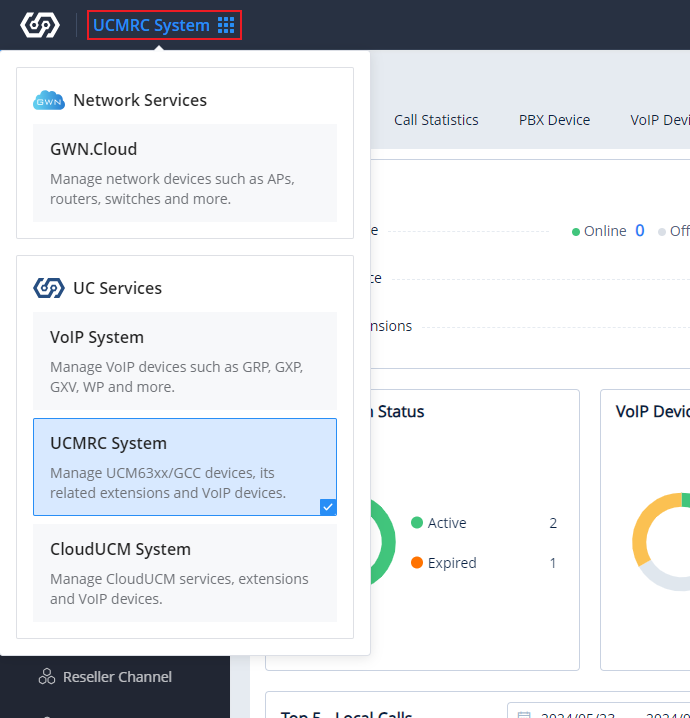
For different models, users can select to use different systems in the GDMS platform.
Users can select to access the different sub-systems depending on the different managed devices models by clicking the system selection options in the left upper corner. As the screenshot shows below:
- VoIP System: Users can remotely manage IP phones such as GRP, GXP, GXV, WP, and DP models, and the system provides unified configuration, real-time monitoring, scheduling/executing tasks functions, etc.
- UCMRC System: Users can remotely manage UCM63xx devices and corresponding extensions, and the system provides remote access, monitoring, upgrade functions, etc. The UCMRC system provides a large cloud storage space, and it allows remote calls through external networks.
- GWN.Cloud: The user can remotely manage the GWN products, this includes the GWN access points, GWN routers, and GWN switches. The user can perform a wide range of tasks fully remotely such as changing the device configuration, running diagnostic tools, rebooting the devices, upgrading the firmware, backing up and restoring the configuration, etc…
Import Devices and Management
Users need to import the devices into the GDMS platform first to view the status and configuration of the devices and monitor the devices on the GDMS platform.
Channel vendors could acquire devices directly through ERP, and the channel vendors need to submit relevant certificates to Grandstream customer support.
Import SIP Accounts and Allocate to Devices
Users could import a batch of SIP accounts with Excel files, and allocate the batch of SIP accounts to devices. Users could complete all accounts configuration for all devices by importing a batch of SIP accounts to a batch of devices.
Configure Devices
- Configure devices by model: Once the device is associated with the GDMS platform, the device will be allocated with the configuration parameters according to the device model and located site.
- Configure devices by group: Manage the devices by certain rules and groups, and the GDMS supports pushing configuration files to all devices under a group.
- Configure a single device: Modify a specific device configuration in the Device list directly.
- Configure devices by configuration file: Users could upload the configuration file of the device into the GDMS platform directly.
Firmware Upgrade
GDMS platform supports upgrading a batch of devices’ firmware by device model, site, firmware version range, and other conditions. It also supports upgrading the devices’ firmware by a batch of MAC addresses of the devices.
Schedule Tasks
Users could schedule certain tasks for a certain period of time. For example, users could schedule firmware upgrade tasks and execute the task in the early morning, so that the task will not affect the device owners.
Alarm message and diagnostic
In case of malfunction or dangerous operation of the devices, the administrator will be alerted. The GDMS platform supports to allow administrators to diagnose faults of some devices to locate and resolve problems quickly.
Prerequisites
- TR-069 feature needs to be enabled on the endpoints.
- Working Internet connection to access the GDMS platform.
- Endpoint devices are in the supported device list of the GDMS platform.
GDMS Account Registration
If using GDMS for the first time, an administrator will need to register for a GDMS account using the following steps:
- Open the GDMS platform URL on the browser: https://www.gdms.cloud
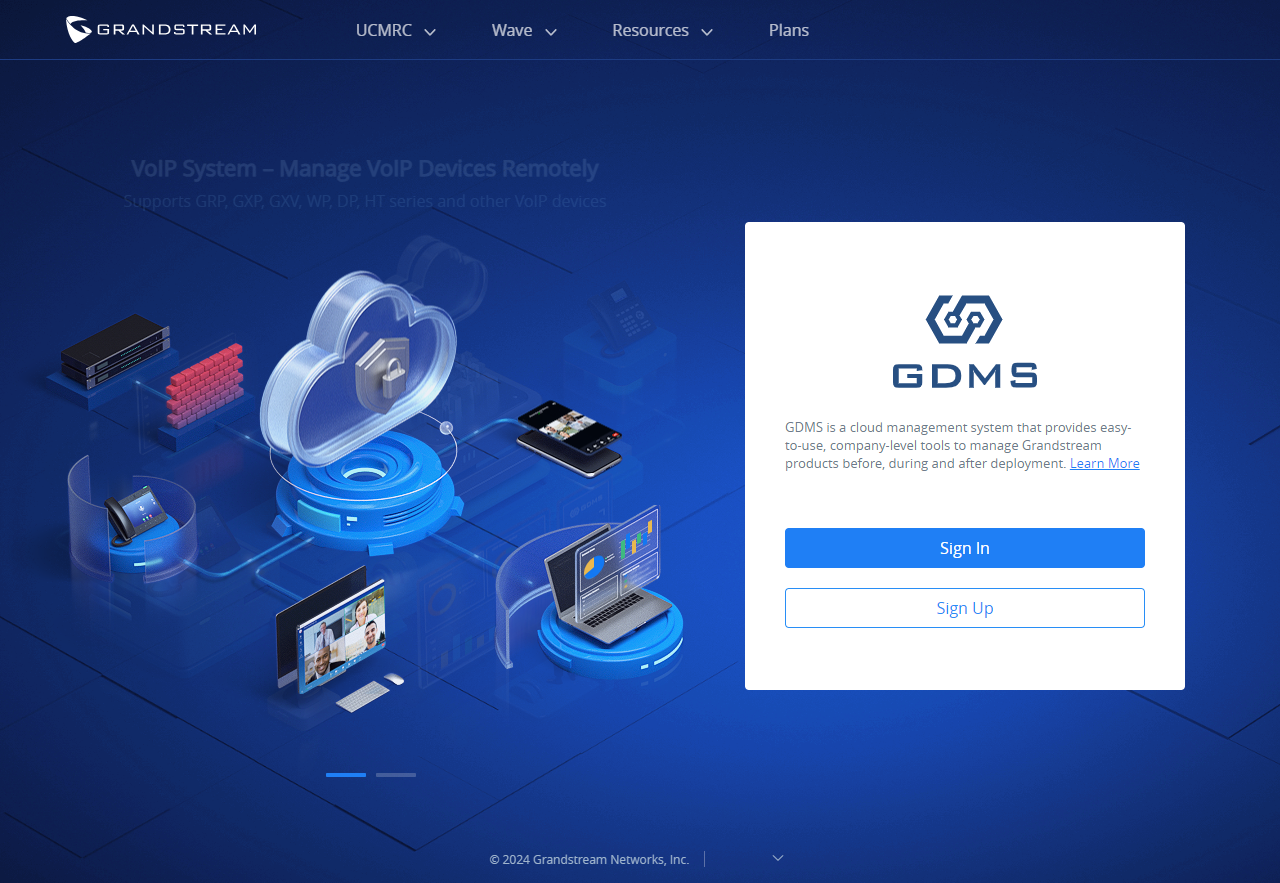
- Click on the Sign Up option to enter the registration page, and then fill in the following information:
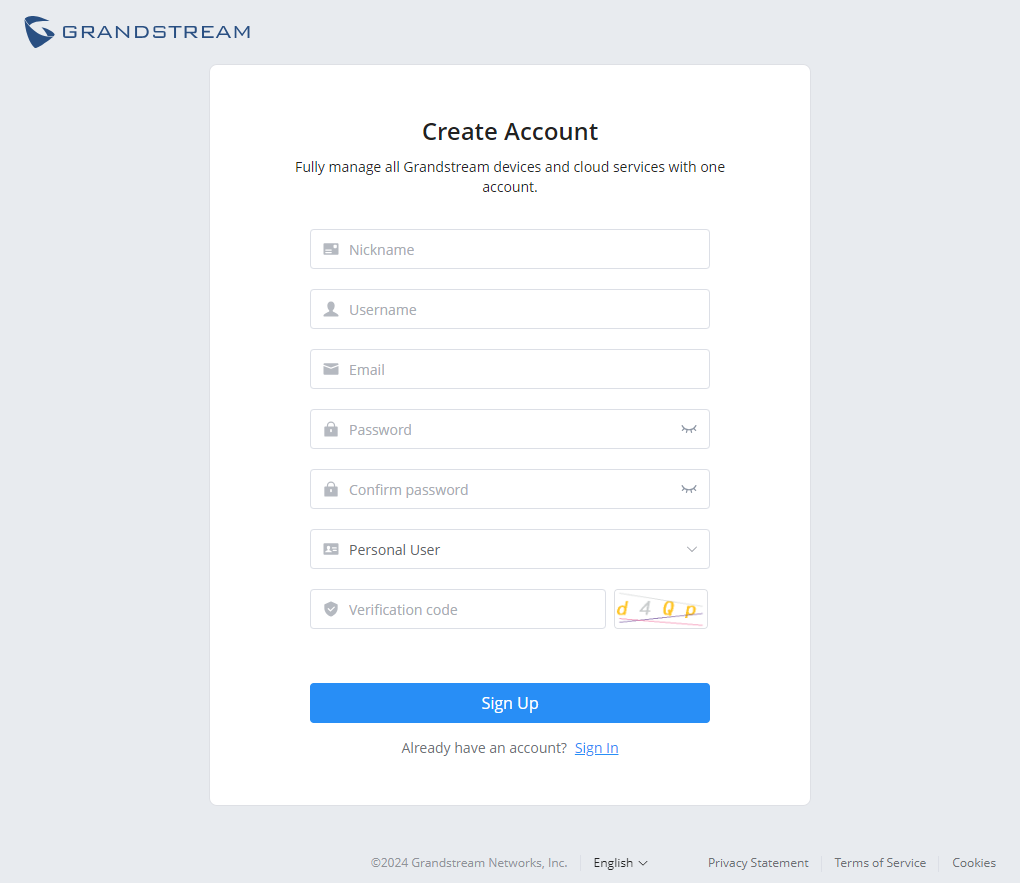
Nickname | Enter the name that will be displayed in Grandstream Cloud Platform |
Username | Enter a username. The username will be used to login. |
Enter the email. This is necessary for account activation. | |
Password | Enter the password. The password must contain at least 8 characters and up to 16 characters maximum. The password must contain letters, digits, and special characters. Only the following special characters are supported: ~`!@#$%^&*()_+=-{}|:"<>?[];',./ |
Confirm Password | Confirm the password by retyping it again. |
Company | Enter the name of your company. |
User Type | Select the user type.
|
Verification Code | Enter the Captcha verification code |
Register GDMS Account
- Once registration is complete, an account activation email will be sent to the configured email address. Follow the instructions in the email to activate the account and complete registration.
Supported Devices and Requirements
The current GDMS platform version supports the following device models.
Supported Device Models | |
Audio Device | GXP21XX |
DP7XX | |
GRP26XX | |
WP8XX | |
GHP6XX | |
GSC36XX, GSC35XX | |
Video Device | GXV33XX, GXV34XX |
Conference Device | GAC2570, GSC35XX, GVC32XX |
Facility Access Device | GDS37XX, GSC3570 |
Video Surveillance Device | GSC3610, GSC3615, GSC3620 |
ATA Device | HT80X, HT81X, HT841, HT881 |
Gateway Device | GXW45XX, GXW42XX V2 |
PBX Device | UCM63XX/A, GCC601X |
Supported Devices
Connect with GDMS
The devices must be upgraded to firmware versions that are compatible with the GDMS platform. Otherwise, the devices will not be able to connect to GDMS. When the devices connect to the Internet, and the user has added this device to the GDMS account, the device will connect to GDMS automatically.
VOIP SYSTEM
Overview
Device Statistics
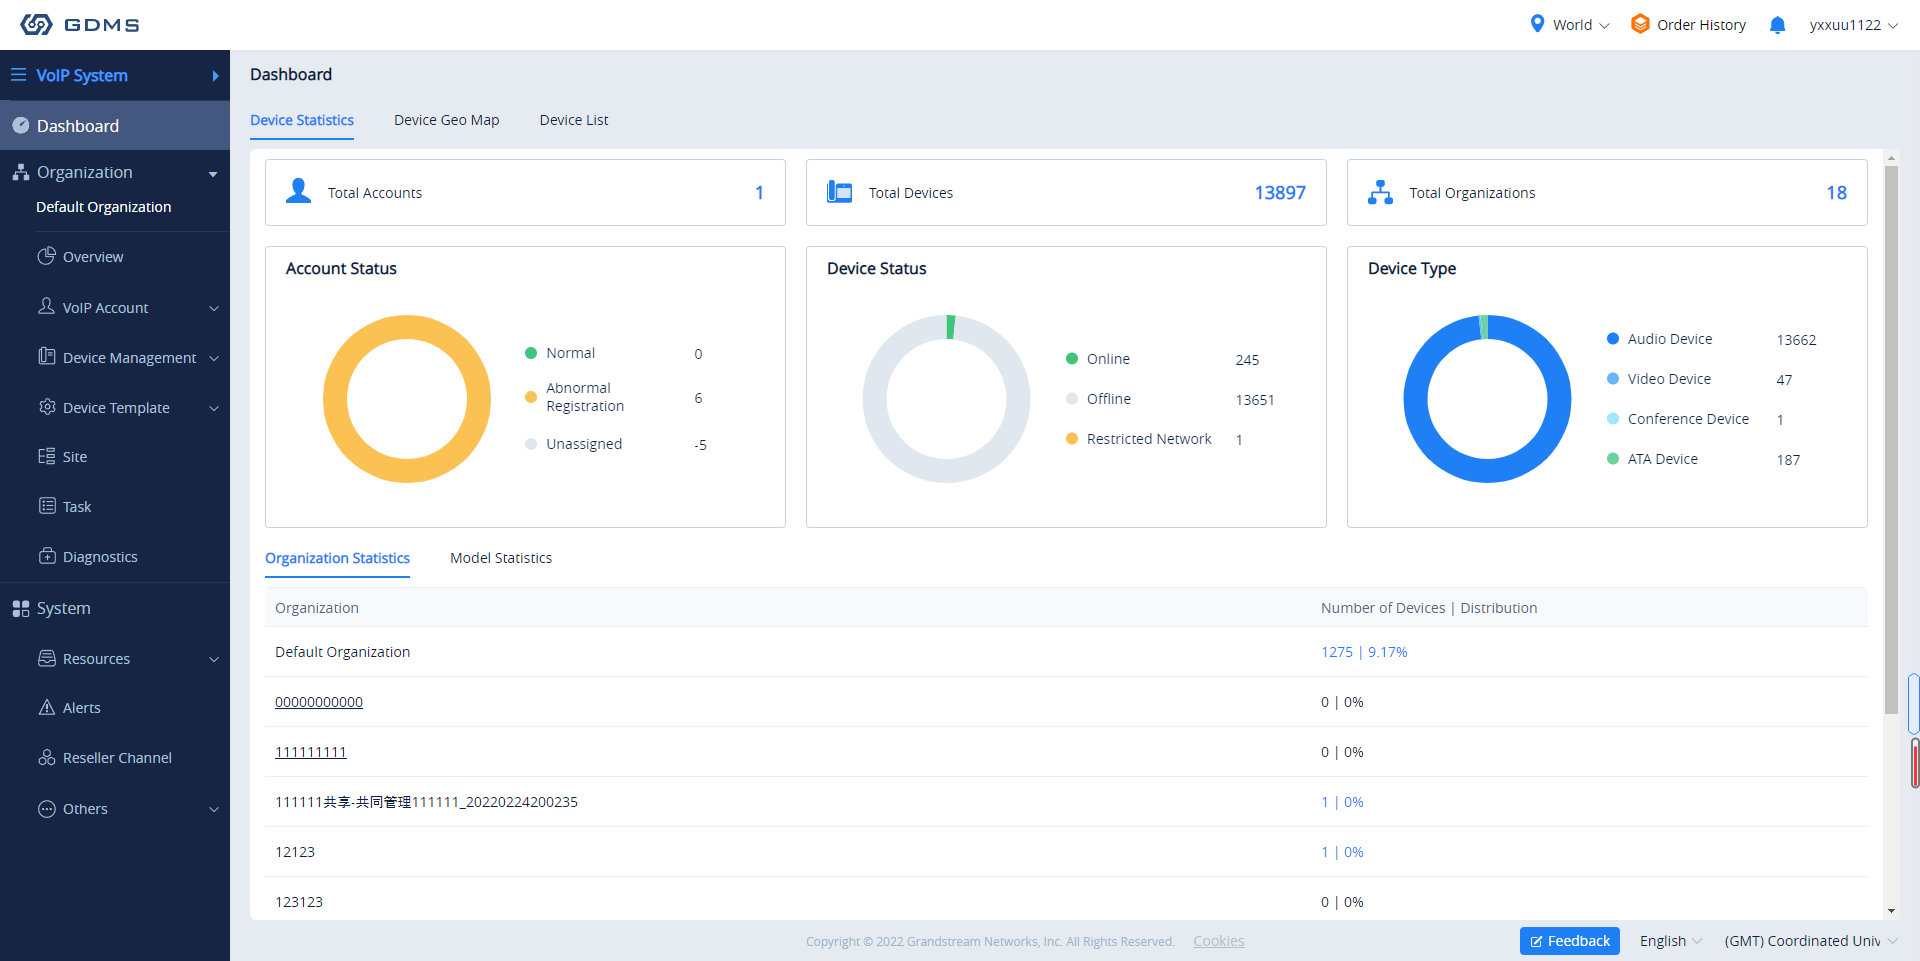
The Dashboard page provides an overview of the following information:
- Total Accounts
- Total Devices
- Total Sites
- Accounts Status
- Device status
- Device Type
- Site Statistics
- Model statistics
| Module | Description |
|---|---|
|
Total Accounts |
Displays the total number of SIP accounts configured on GDMS. |
|
Total Devices | Displays the total number of devices configured on GDMS. |
|
Total Sites | Displays the total number of sites configured on GDMS. |
|
Account Status |
Displays the total number of accounts currently registered, unregistered, and unallocated.
|
|
Devices Status |
Displays the total number of devices currently online and offline.
|
|
Device type |
Displays the total number of devices in each category: audio, video, and conferencing.
|
|
Site Statistics |
Displays the total number of devices assigned to each site and the allocation of devices per site. |
|
Model Statistics |
Displays the total number of each device model, the percentage of total devices that each model makes up, and the distribution of different firmware per model. |

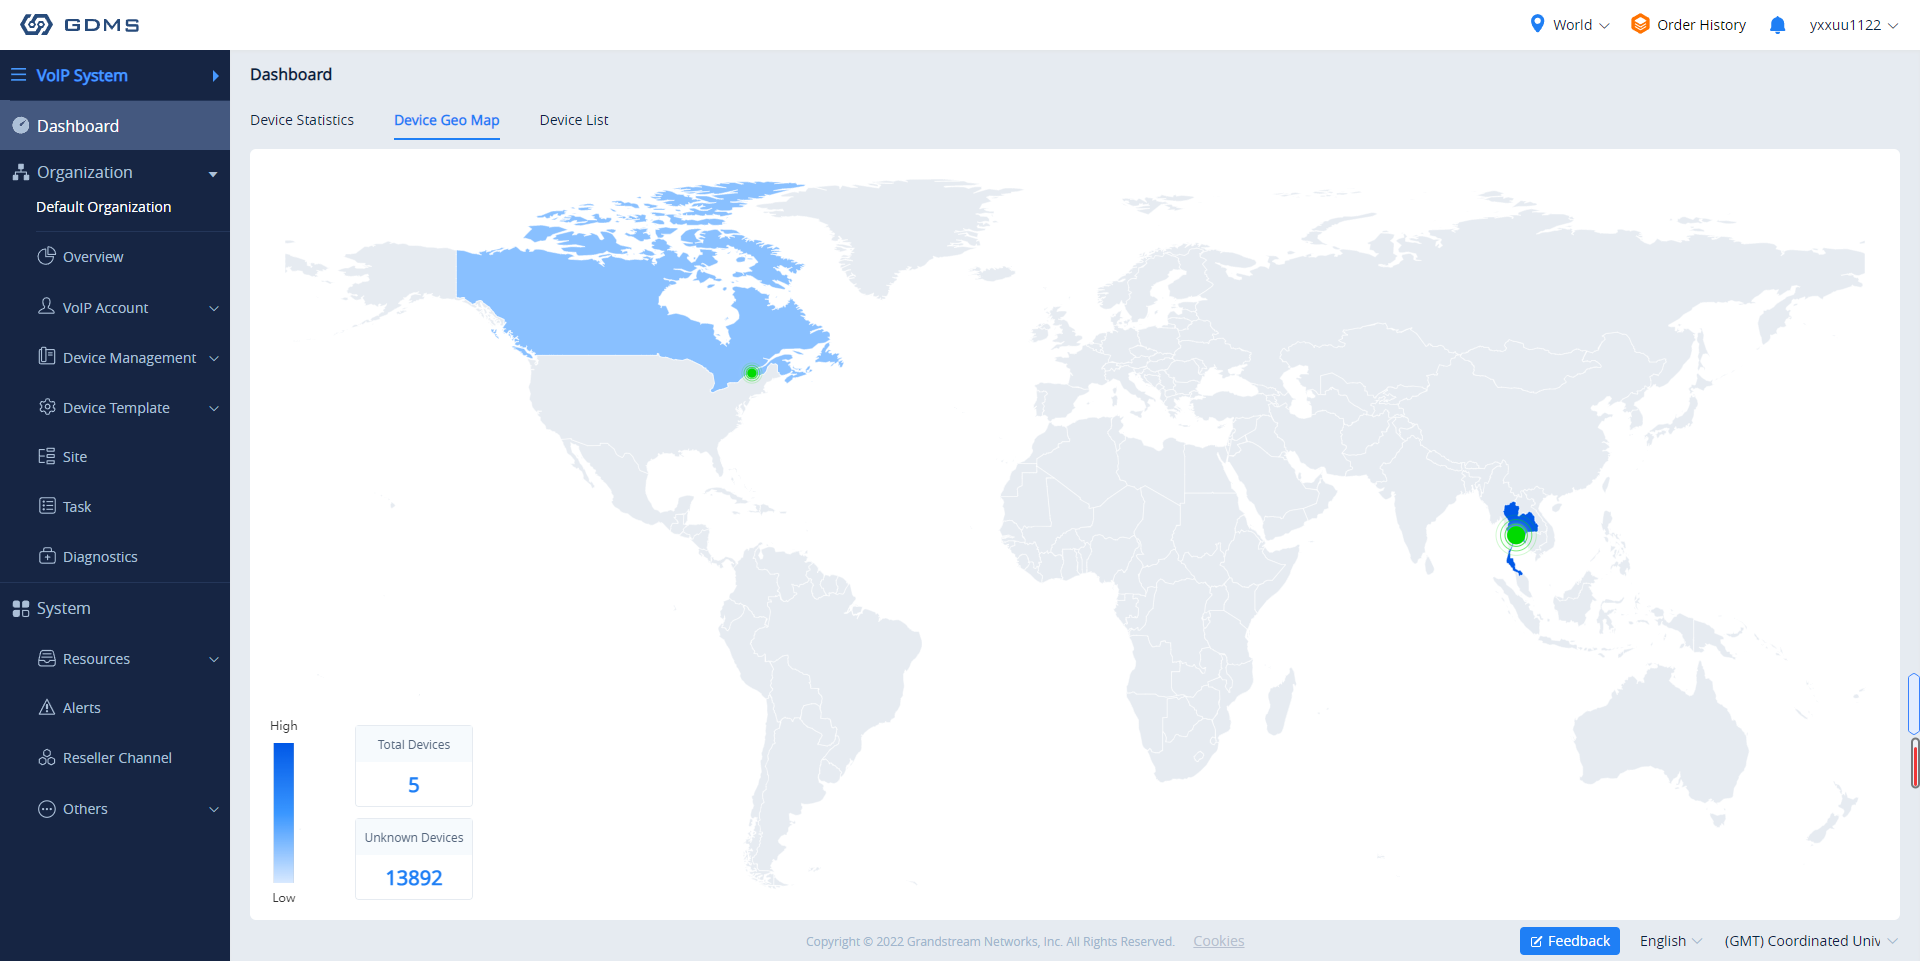
Device Distribution
This menu will show the distribution map of the devices which have been associated with the enterprise.
- The dark blue area on the map shows that area has more associated devices, and the light blue area shows the area has fewer devices.
- Users could leave the cursor on the area to check the number of devices in that area.
- If a certain city has the devices, it will be marked with a green dot
 , and users could leave the cursor on the city to check the number of devices in that city. The user can click on the dot to see the devices list in this city.
Overview
The Overview page displays all VoIP devices statistics information in the current organization.
Account Management
Overview
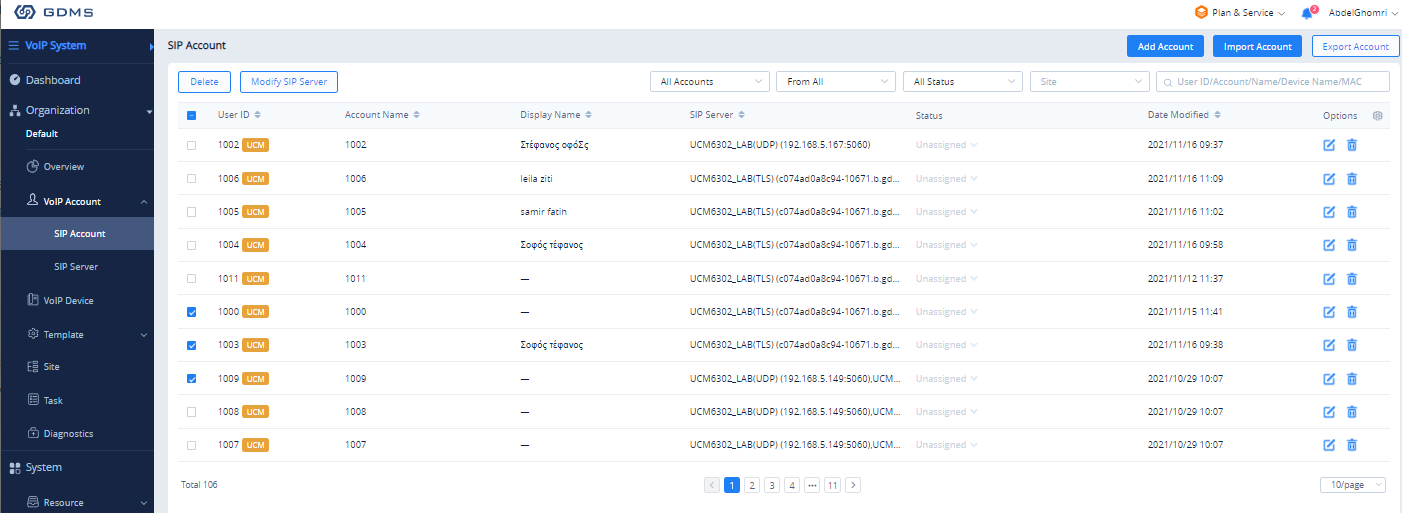
On the SIP Account page, users can manage SIP accounts across all configured SIP servers in GDMS, import a list of accounts for quick setup, and export a list of all accounts configured on GDMS.
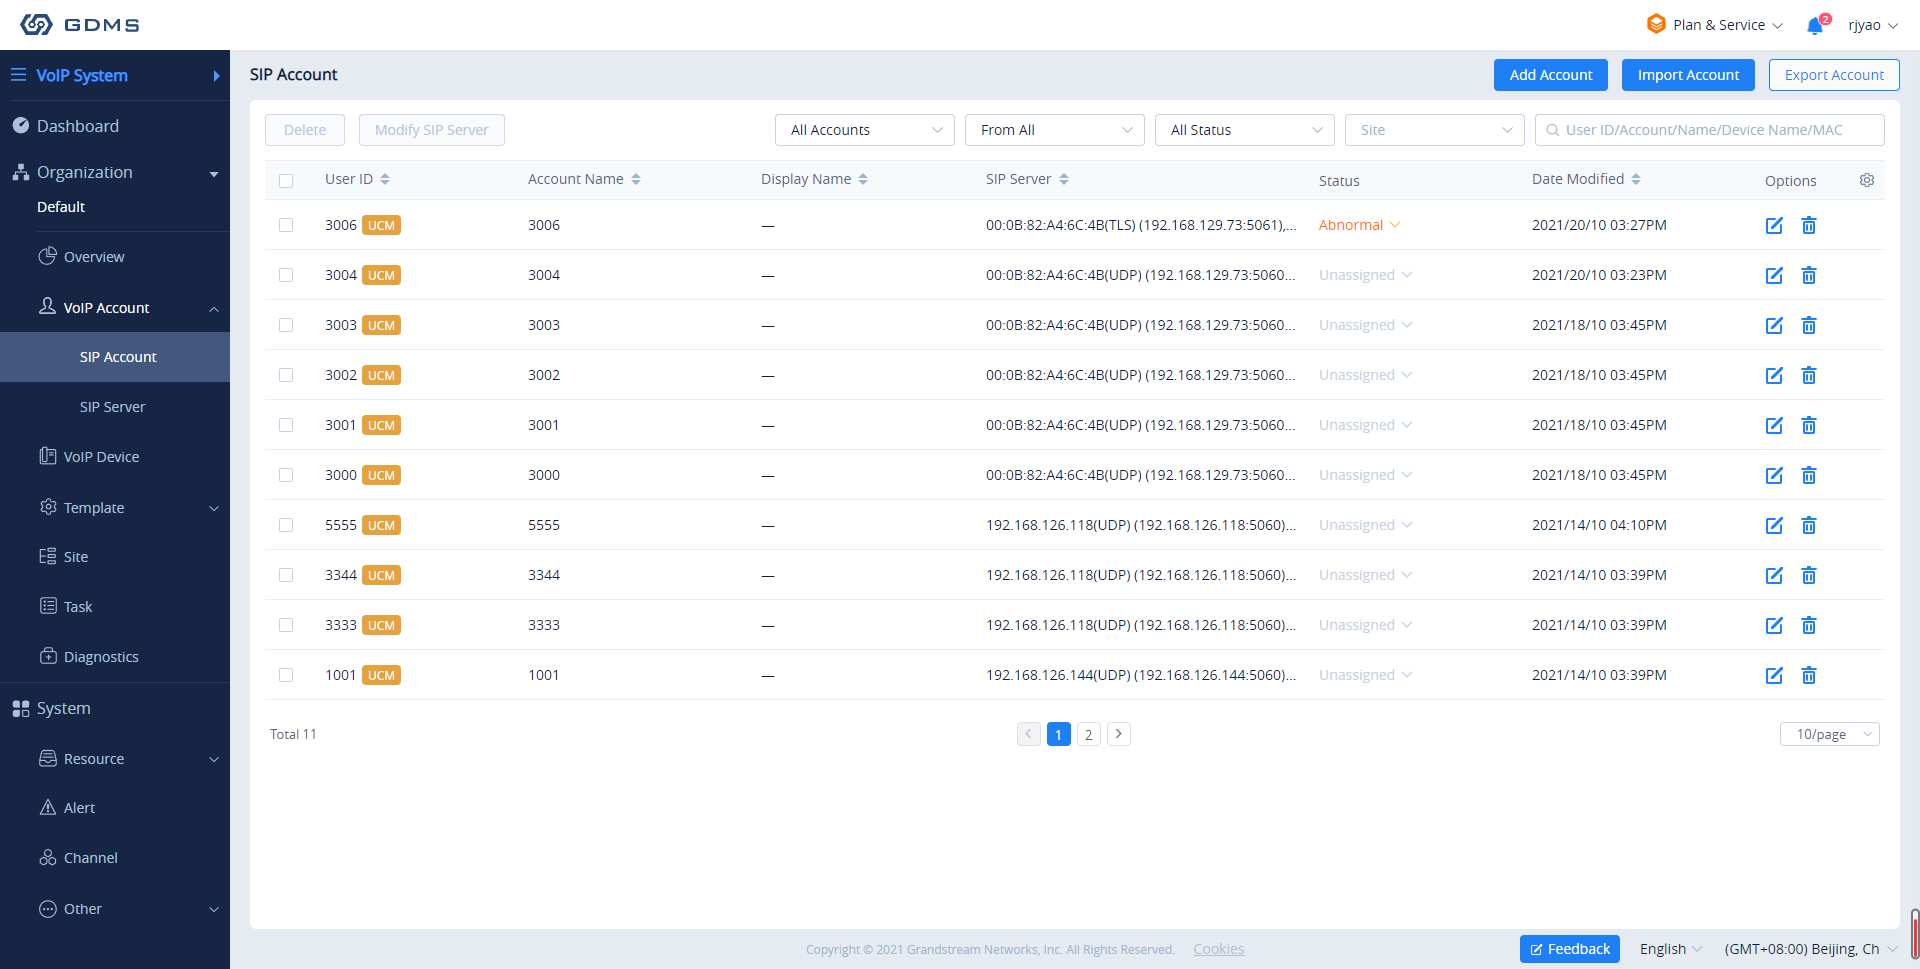
Status | Description |
Status | Normal: All devices using the account are registered, and the account is working normally. Abnormal Registration: At least one device using this account is not registered. Possible reasons include:
Unassigned: No devices are using this account. |
From PBX | This represents the SIP accounts are synchronized from the IPPBX device. If the user modifies the SIP accounts in IPPBX device, the updates will be synchronized to GDMS platform. |
From CloudUCM | This represents the SIP accounts are synchronized from the CloudUCM. If the user modifies the SIP accounts in CloudUCM , the updates will be synchronized to GDMS platform. |
Account Status Description
| Operation | Description |
|---|---|
|
Sorting |
Click on the |
|
Custom Display Option | Users could customize the displaying options on the list by clicking on option |
|
Filter and Search | Filter accounts by status, site, and search for specific accounts by entering their user IDs, account names, or display names. |
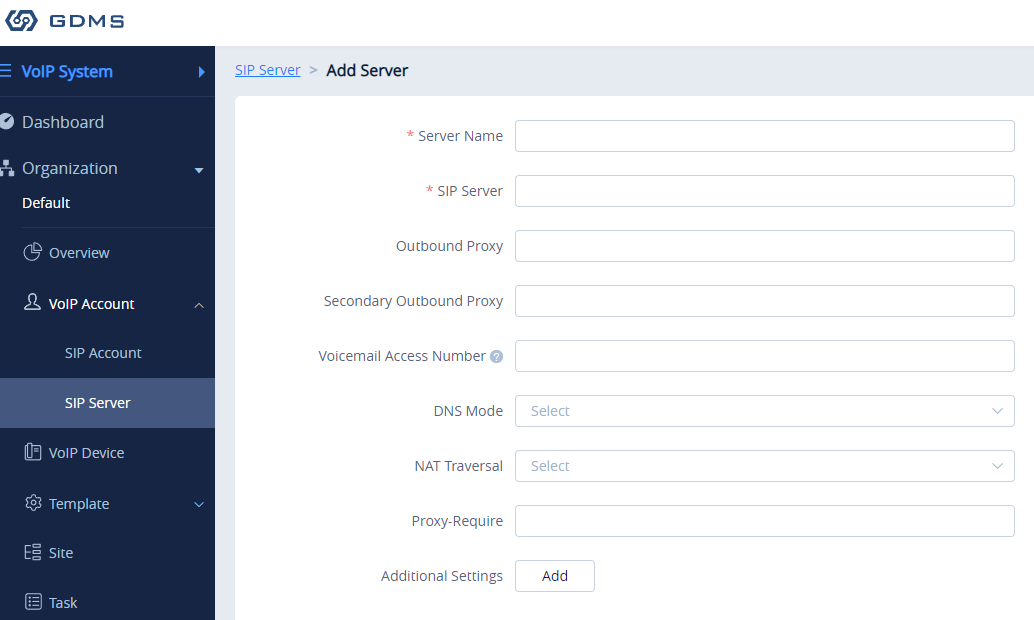
Add SIP Server
The SIP Server page shows all of the SIP servers added to GDMS.
|
Server Name |
Specifies an identity name for the SIP server. (Required) |
|
SIP Server | This is a necessary option. Specifies the URL or IP address, and port of the SIP server. This should be provided by the VoIP service provider (ITSP). |
|
Outbound Proxy | Configures the IP address or the domain name of the primary outbound proxy, media gateway, or session border controller. It is used by the phone for firewall or NAT penetration in different network environments. If a symmetric NAT is detected, STUN will not work and only an outbound proxy can provide a solution. |
|
Secondary Outbound Proxy | Sets the IP address or domain name of the secondary outbound proxy, media gateway, or session border controller. The phone system will try to connect the Secondary outbound proxy only if the primary outbound proxy fails. |
|
Voice Mail Access Number |
Sets if the phone system allows users to access the voice messages by pressing the MESSAGE key on the phone. This ID is usually the VM portal access number. For example, in UCM6xxx IPPBX, *97 could be used. |
|
DNS Mode | Defines which DNS service will be used to look up the IP address for the SIP server’s hostname. There are three modes:
To locate the server by DNS SRV set this option to “SRV” or “NATPTR/SRV”. |
|
NAT Traversal | Specifies which NAT traversal mechanism will be enabled on the phone system. It can be selected from the dropdown list:
If the outbound proxy is configured and used, it can be set to “NAT NO”. If set to “STUN” and the STUN server is configured, the phone system will periodically send a STUN message to the STUN server to get the public IP address of its NAT environment and keep the NAT port open. STUN will not work if the NAT is a symmetric type. If set to “Keep-alive”, the phone system will send the STUN packets to maintain the connection that is first established during the registration of the phone. The “Keep-alive” packets will fool the NAT device into keeping the connection open and this allows the host server to send SIP requests directly to the registered phone. If it needs to use OpenVPN to connect to the host server, it needs to set it to “VPN”. If the firewall and the SIP device behind the firewall are both able to use UPnP, it can be set to “UPnP”. Both parties will negotiate to use of which port to allow SIP through. |
|
Proxy-Require |
Adds the Proxy-Required header in the SIP message. It is used to indicate proxy-sensitive features that must be supported by the proxy. Do not configure this parameter unless this feature is supported on the SIP server. |
|
Additional Settings | Users could add the custom fields below. Some custom fields are only available for certain device models:
For detailed filling rules, please refer to the User Guide of the devices. |
Upon adding the SIP server, it will appear in the SIP Server list. Entries in the list can be edited or deleted.
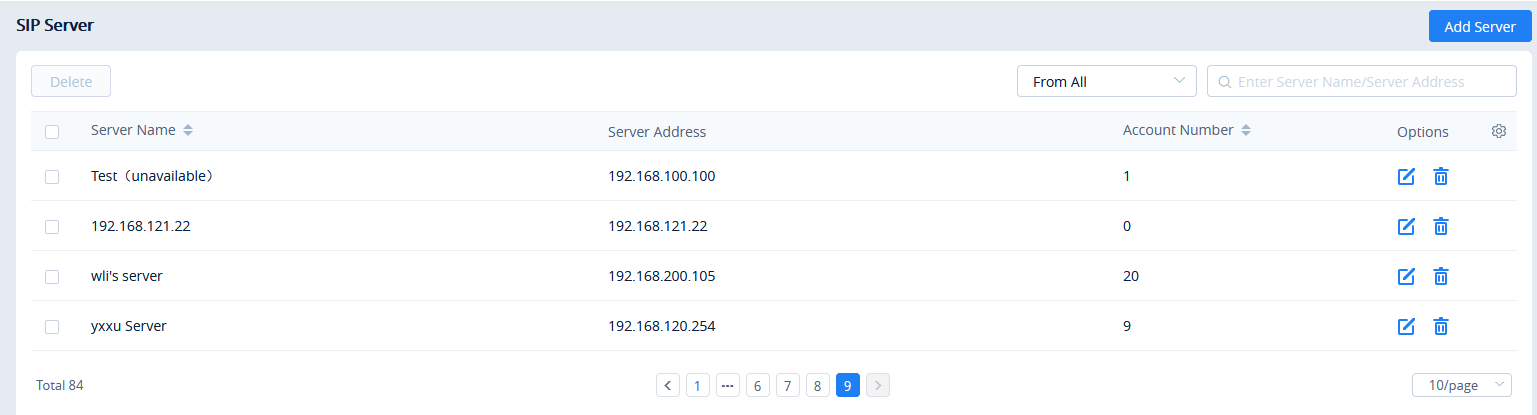
Add SIP Account
The SIP Account page shows all of the SIP accounts added to GDMS.
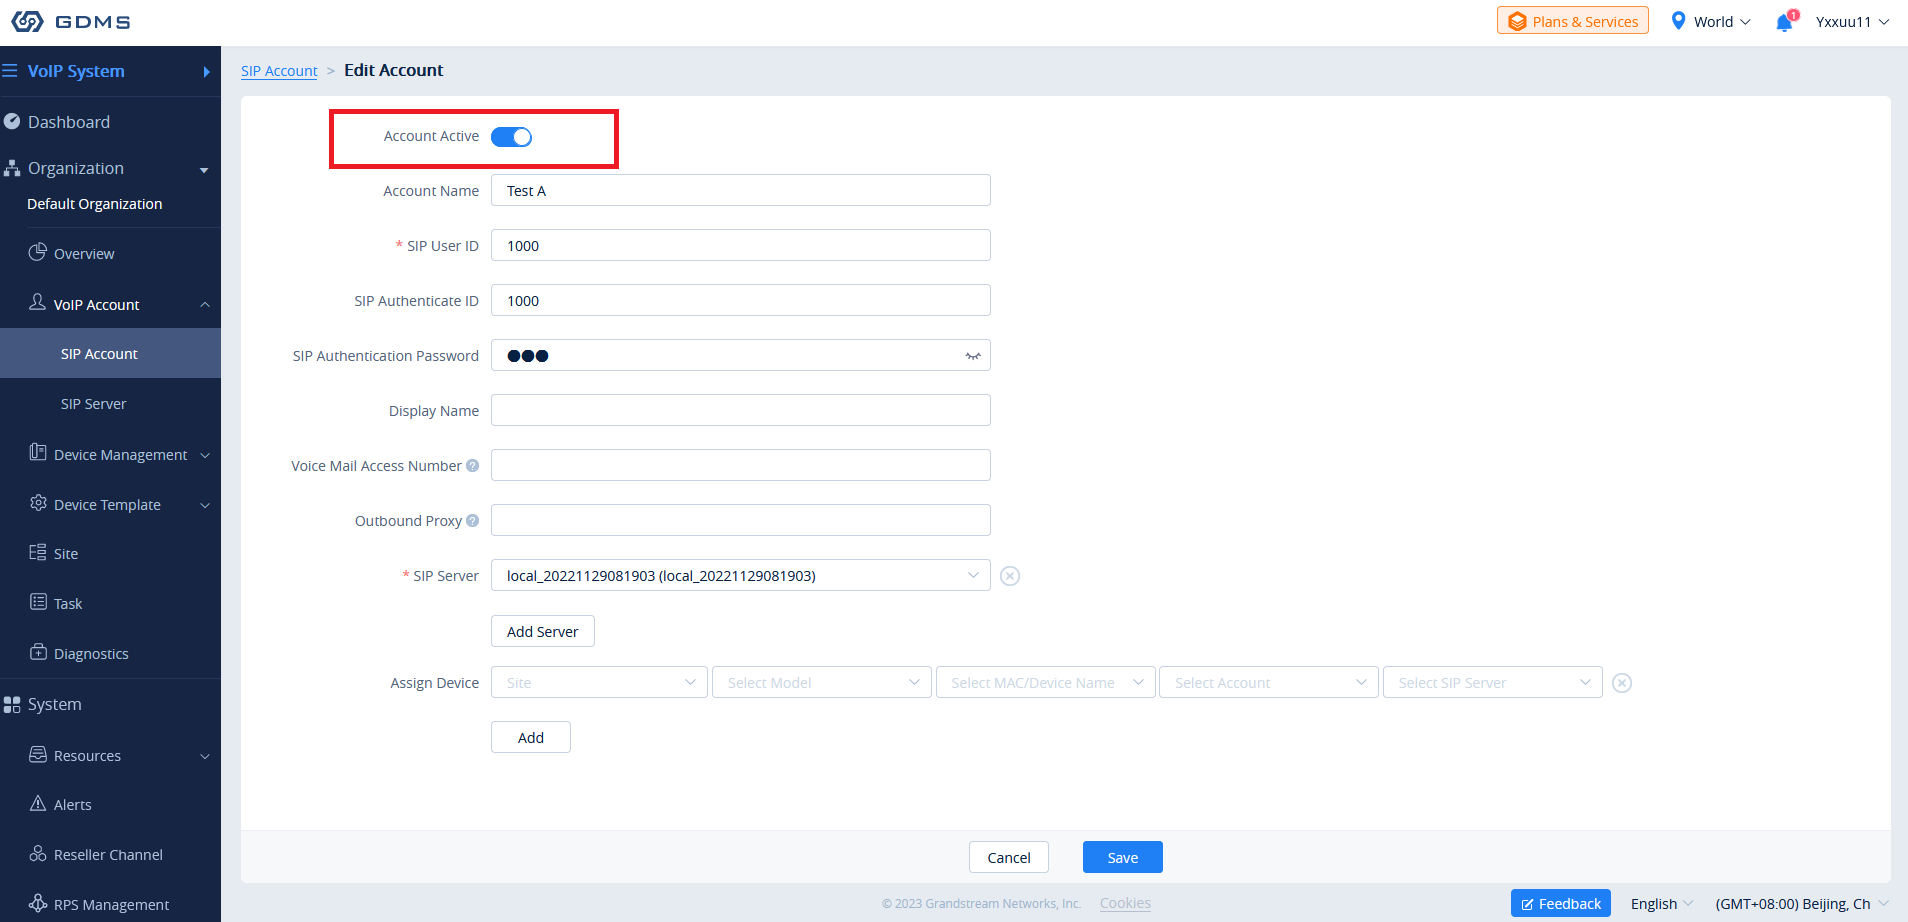
Account Active | Activates/deactivates the SIP account. |
Account Name | This is a necessary option. Specifies an identity name for the SIP account. |
SIP User ID | This is a necessary option. Configures user account information provided by your VoIP service provider (ITSP). It is usually in the form of digits similar to a phone number or actually a phone number. |
SIP Authentication ID | This is a necessary option. Configures the SIP service subscriber’s Authenticate ID used for authentication. It can be identical to or different from the SIP User ID. |
Password | This is a necessary option. Configures the account password required for the phone to authenticate with the ITSP (SIP) server before the account can be registered. After saving, it will appear as hidden for security purposes. |
Name | Configure the display name of the SIP account. This option will be used for Caller ID display. The configured content will be included in the From, Contact, and P-Preferred-Identity headers of the SIP INVITE message |
Voicemail Access Number | If the SIP Server also configures this item, this configuration will prevail. |
SIP Server | This is a necessary option. Users need to select the SIP server for the SIP account. If there is no available SIP server for the current SIP account, users could click on the “Add Server” option to add a new SIP server for the SIP account. |
Add Server | If the user needs to configure multiple SIP server addresses for a single SIP account, such as the UDP/TLS protocol server address (The UCM63xx device which purchases UCM RemoteConnect plan can synchronize multiple protocol server addresses to the GDMS platform), the user can configure it and assign to devices separately. |
Assign device | This option will allow assigning a specific device to this account. |
Allocate to Devices:
To associate devices currently in GDMS with the new SIP account, click on the Add button at the bottom of the screen and enter the following information:
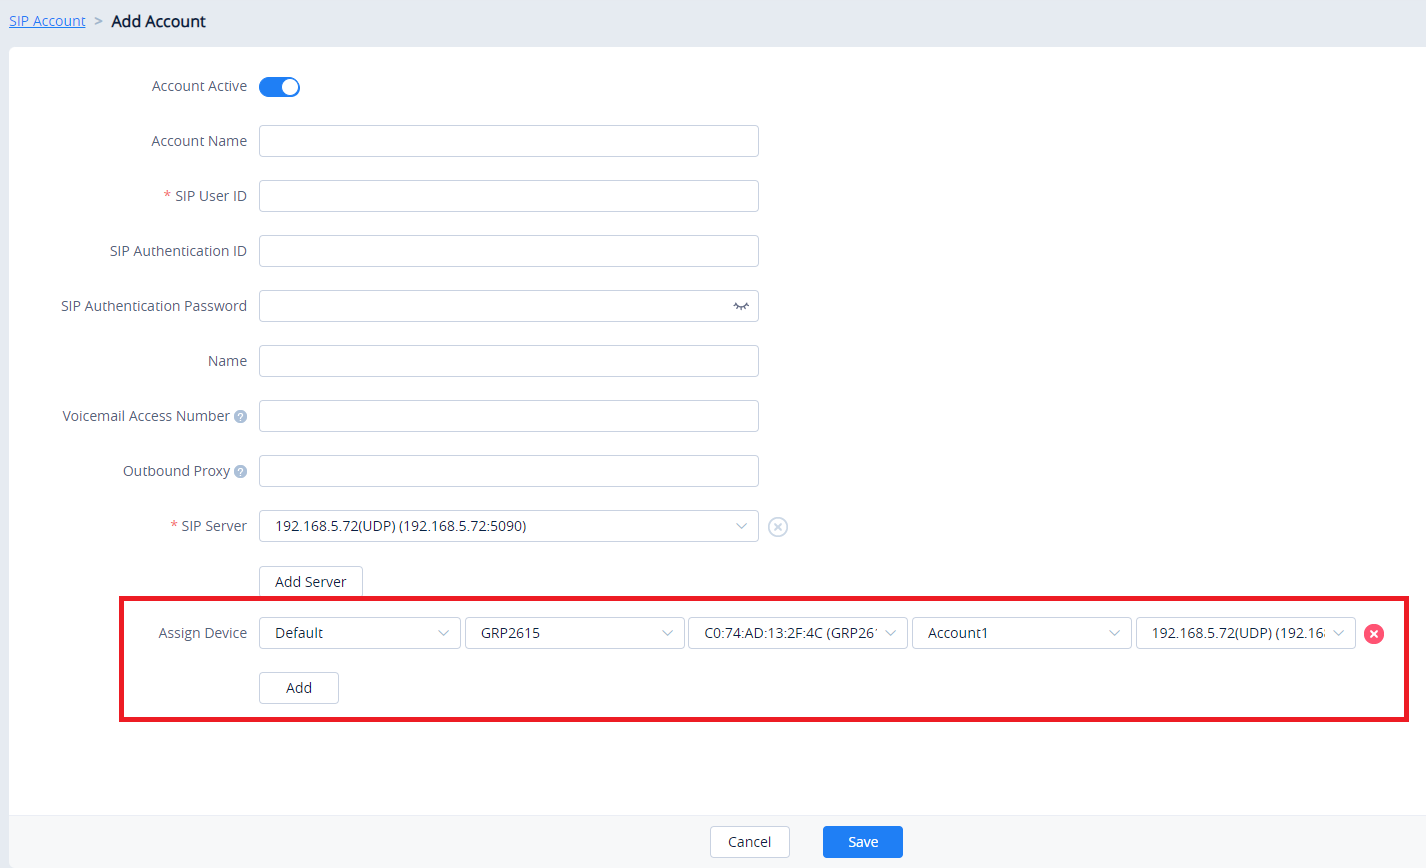
Site | This option is used to set which site this device belongs to. |
Select Device Model | This is a necessary option. Users need to select the device model to which the account will be allocated. |
Select Device MAC Address | This is a necessary option. Users need to select the device MAC address to which the account will be allocated. |
Select Account Index | This is a necessary option. Users need to select the account index to which the account will be allocated to (e.g. Account 1 – Account 16). If the account location has a configured account, the account number will be displayed. |
Select Server Address | This is a necessary option. Users can select the SIP Server address for the device, such as the UDP server address or UCM RemoteConnect server address. |
Batch Import SIP Account
GDMS platform supports to allow users to import a batch of SIP accounts and SIP servers to the system and allocates them to the devices via Excel files.
- On the SIP Account page, click on the Import Account button. The following window will appear:
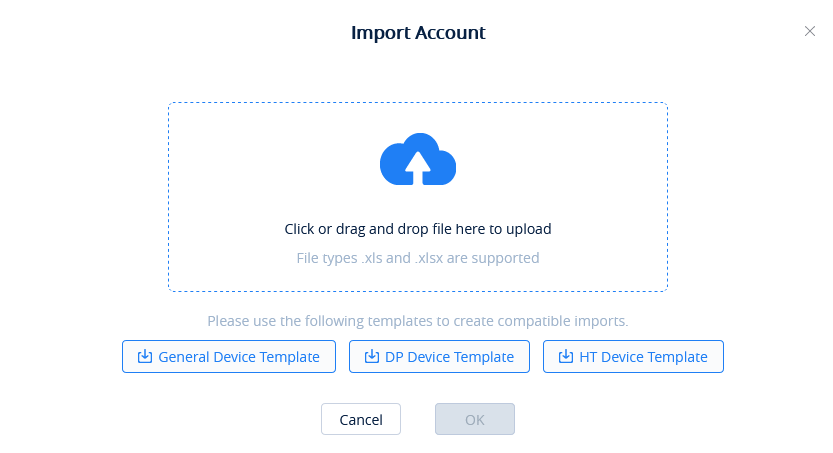
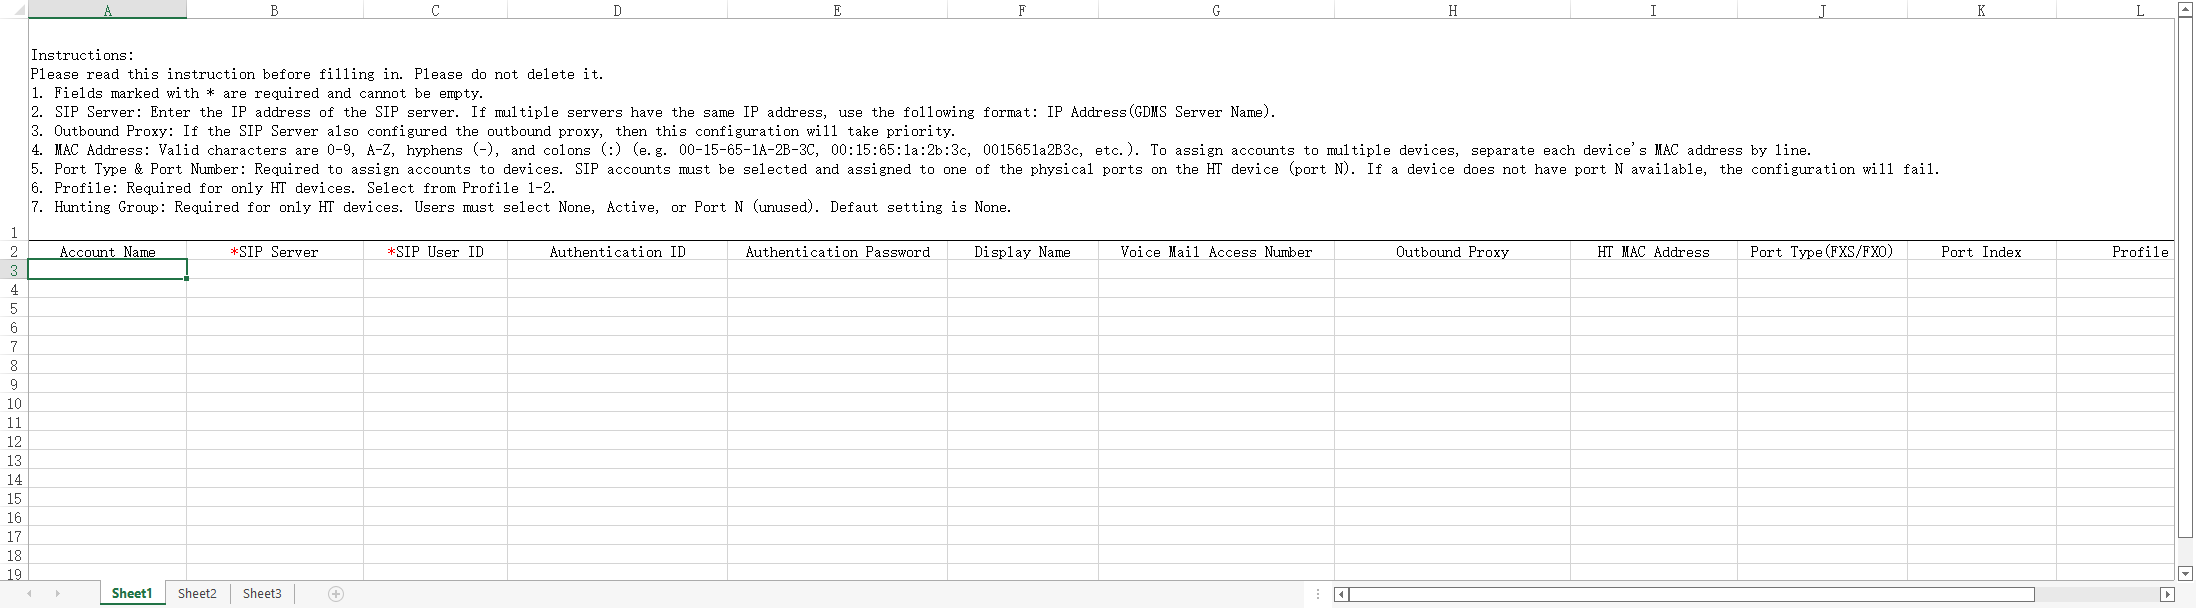
- Click on either the Download General Device Template button, Download DP Device Template, or Download HT Device Template button to get a template that will be used to import account and server information.
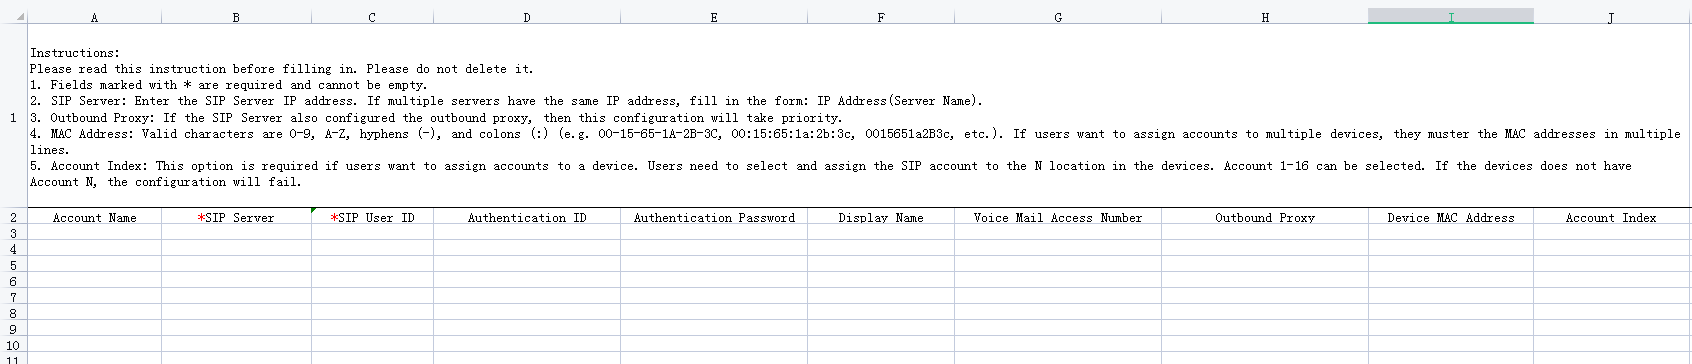
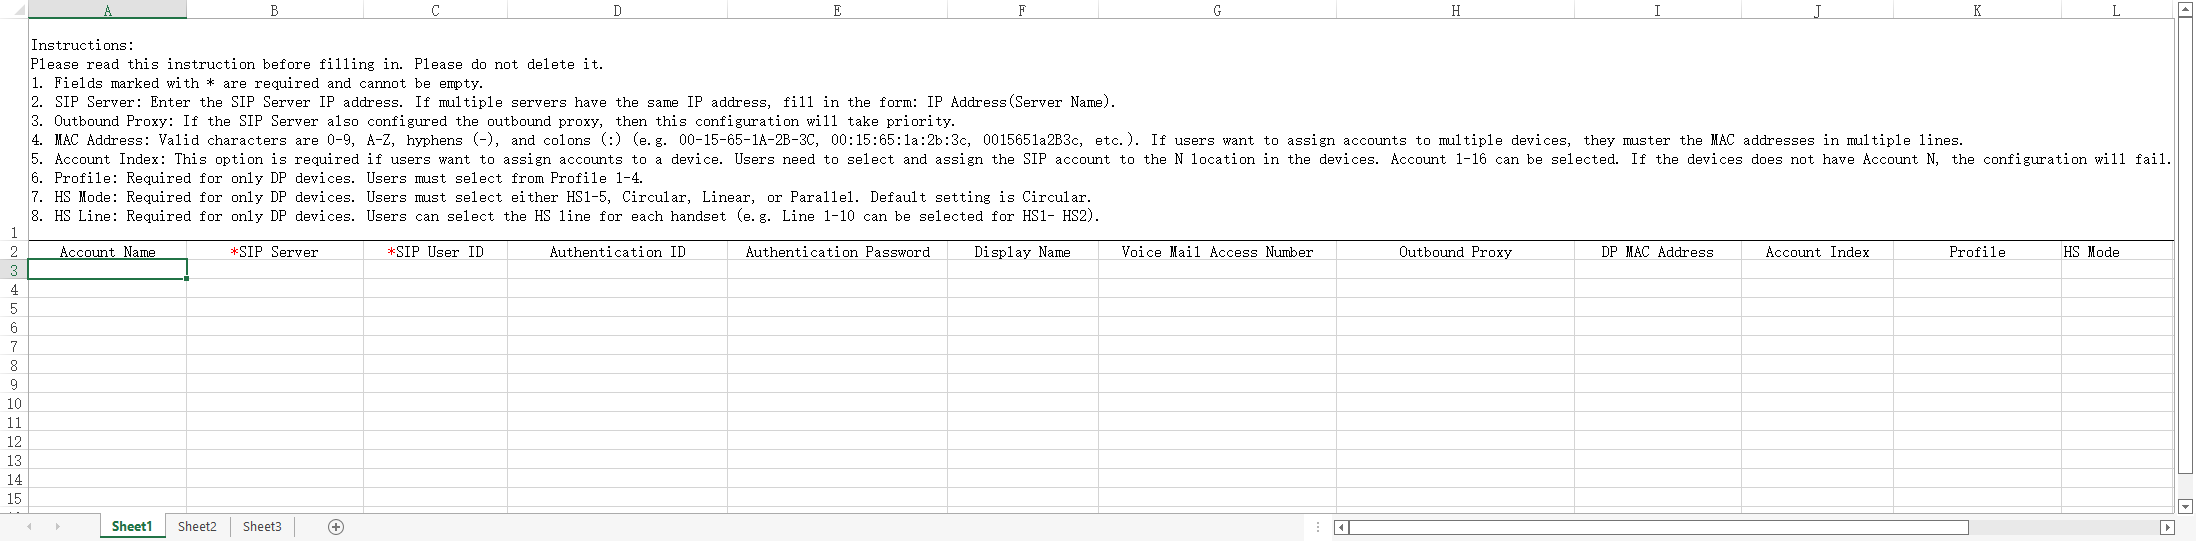
|
Account Name |
This is an optional option. Users need to set the identity name for the SIP account. |
|
SIP Server |
This is a necessary option. Users need to input the SIP server address. If the SIP server does not exist in the GDMS platform, the GDMS platform will create the SIP server in the system. |
|
SIP User ID |
This is a necessary option. Configures user account information provided by your VoIP service provider (ITSP). It is usually in the form of digits similar to a phone number or actually a phone number. |
|
SIP Authentication ID |
This is a necessary option. Configures the SIP service subscriber’s Authenticate ID used for authentication. It can be identical to or different from the SIP User ID. |
|
SIP Authentication Password | This is a necessary option. Configures the account password required for the phone to authenticate with the ITSP (SIP) server before the account can be registered. After saving, it will appear as hidden for security purposes. |
|
Display Name |
Configure the display name of the SIP account. This option will be used for Caller ID display. The configured content will be included in the From, Contact, and P-Preferred-Identity headers of the SIP INVITE message. |
|
Device MAC Address |
Input the device MAC address: e.g. 00-15-65-1A-2B-3C; 00:15:65:1a:2b:3c; 0015651a2B3c |
|
Account Index | Users need to select the account index to which the account will be allocated (e.g. Account 1 – Account 16). If the current account location has a configured account, the configured account will be replaced with the new account information. |
|
Profile |
For DP devices and HT devices only. Enter the profile that the account will use (e.g. Profile1, Profile2, etc.). If multiple different SIP servers use the same profile, the import will fail. |
|
HS Mode |
For DP devices only. Enter the HS mode for the account. Available options are “Circular”, “Linear”, “Parallel”, and “HSx”, where x can be 1 to 5. |
|
HS1-HS5 |
For DP devices only. Users could configure the Line for each handset from Line 1 to Line 10. Each SIP account can be allocated to different handsets. |
|
Port Type (FXS/FXO) |
This option is valid only for HT devices. Input the port type which will be assigned to the device. Users could select FXO port type or FXS port type. |
|
Port Serial Number |
This option is valid only for HT devices. Input the port serial number which will be assigned to the device. Users could input the port serial number from Port 1 to Port 10. |
|
Search Group | This option is valid only for HT devices. Users could select the search group between None (default), Active, and other port serial numbers beside their own. |
- Once the template is filled out, drag, and drop the file to the upload window or select the file from your PC. Click on the Import button to confirm the import.
- When the Excel file is imported into the GDMS platform successfully, the GDMS platform will prompt the execution result. If there is data that failed to be imported, the user could export the failed data and re-edit the Excel file.
Examples:
- If the user wants to allocate 1 SIP account to multiple devices, the 1st SIP account information will be the correct information to allocate to the devices. Please see the example below, the SIP account display name “Sqhuang” will be allocated to the involved devices:

- For the existing SIP account, if the user wants to allocate this SIP account to another device, here is the example: Account 100 has been allocated to Device 1, and the user wants to allocate the SIP account 100 to Device 2 (00:0b:82:cc:dd:ee).

- If the user wants to allocate multiple SIP accounts to a single device, here is an example:

- If the user wants to allocate multiple SIP accounts to a single DP device, here is an example:

Incorrect examples:
- If the user wants to allocate multiple SIP accounts to a single device, the account index cannot be the same.

- Different SIP server addresses cannot be allocated to the same Profile in the same DP device.

- If the user wants to allocate the SIP accounts to the same DP device, the different SIP accounts cannot be allocated to the same HS Line.

Allocate Device
Users could allocate the SIP accounts to the devices during adding SIP accounts, editing SIP accounts, or importing a batch of SIP accounts to the GDMS platform. Each SIP account can be allocated to multiple devices.
Edit Account
Users could edit the SIP account information and allocated devices on the Edit Account configuration page.
- Click on the
 button for the SIP account you want to modify.
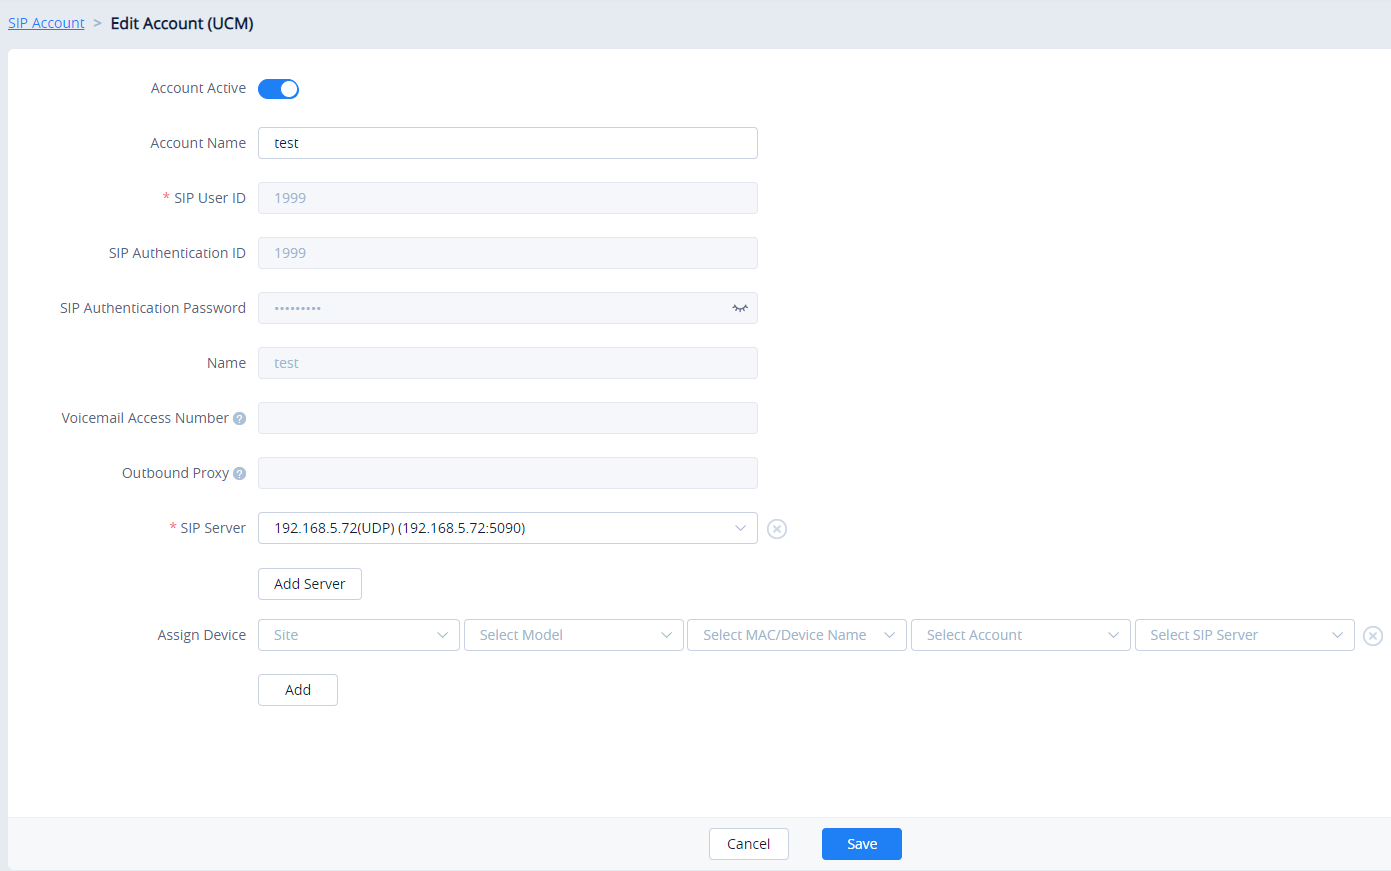
- Click on the Save button to finalize changes. All associated devices will receive the updated account information.
- Click on the
 button to unallocated devices from the account. The SIP account will be removed from unassigned devices.
Batch Modify SIP Server of SIP Accounts
Users can batch modify the SIP server of the SIP accounts, e.g. Modify the SIP protocol of the SIP server from UDP to TCP.
- On the “SIP Account” interface, select the SIP accounts that need to be modified.
- Click on the “Modify SIP Server” button at the top of the interface.
- Select the target SIP server, which can be searched by the server name.
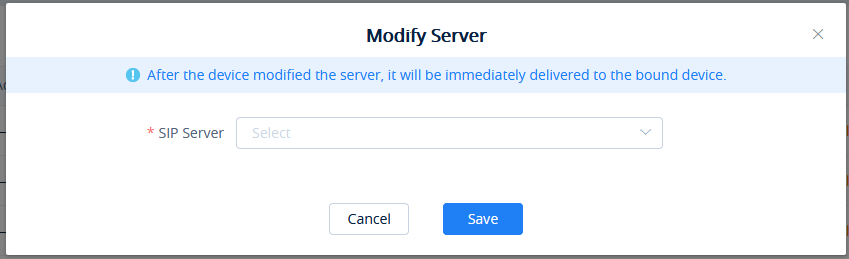
- After clicking the “OK” button, the SIP server corresponding to the SIP accounts will be modified immediately. Then, the updated account information will be assigned to the corresponding VOIP devices.
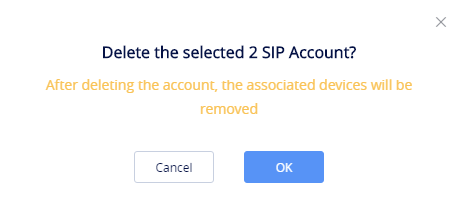
Delete Account
To delete SIP accounts on GDMS, click on the ![]() button for a single account or the Delete button in the top-left corner for multiple accounts. Associated devices will automatically remove deleted SIP account information.
button for a single account or the Delete button in the top-left corner for multiple accounts. Associated devices will automatically remove deleted SIP account information.
Users could delete 1 single SIP account or a batch of SIP accounts on the GDMS platform:
Export Account
Users can export all existing SIP accounts in GDMS to a file by clicking on the Export Account button in the top-right corner of the SIP Account page.
Edit SIP Server
Users can edit SIP server information by clicking on the ![]() button for the desired SIP server. Changes to the server will affect all associated SIP accounts.
button for the desired SIP server. Changes to the server will affect all associated SIP accounts.
Delete SIP Server
Users can delete selected SIP servers by selecting them in the SIP server list and clicking on the Delete button in the top left corner of the SIP Server page.
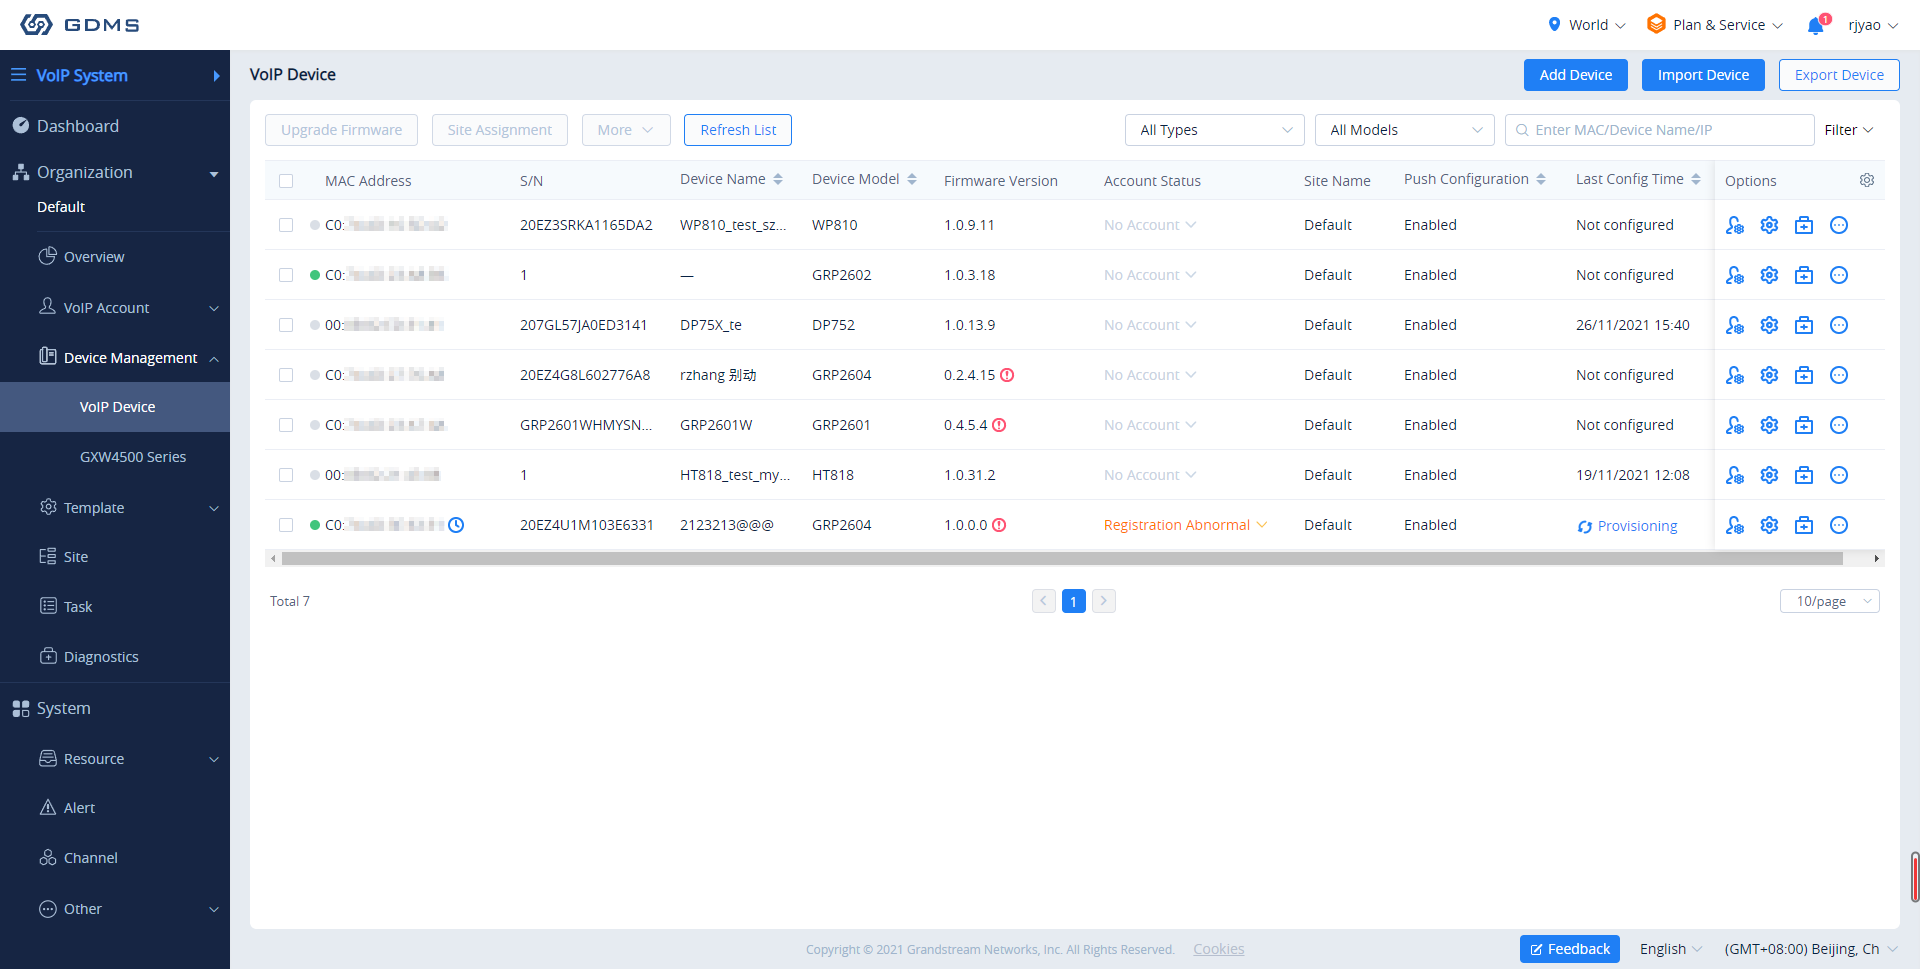
VoIP Device Management
The Device page shows all the associated VOIP devices. Users can view the information and status of the devices, the allocated account information, etc. GDMS platform supports to allow users to configure parameters, upgrade firmware, reboot/factory reset devices, view device details, device diagnostics, and other operations.
| Status | Description |
|---|---|
|
Status Indicator |
|
|
Account Status | Normal: The allocated accounts from the GDMS platform to the devices are registered successfully, and all accounts can be used normally. When an account is registered normally, the extension number will be displayed.Abnormal: Some of the device’s allocated accounts are unregistered. This may be due to the following reasons:
No Account: GDMS platform does not allocate any account to the device. |
|
Last Config Time |
Synchronizing: If the account and device parameters were modified, the changes will immediately be pushed to the device. This status will be shown while this is happening. Date/Time: The date and time of the last successful provisioning. |
|
Call Status | Idle: The SIP account is in an idle state. Busy: The SIP account is on a call. |
|
HS Status |
|
| Operation | Description |
|---|---|
|
Sorting |
Click on the sorting buttons |
|
Custom Display Option |
Click on the |
|
In addition to being able to search for devices with the search bar near the top-right corner of the page, users can further refine search results by clicking on the Filter button by specifying account status, device status, site, city, and firmware version. |

Add VoIP Device
To add a new device to GDMS, click on the Add Device button. The following window will appear:
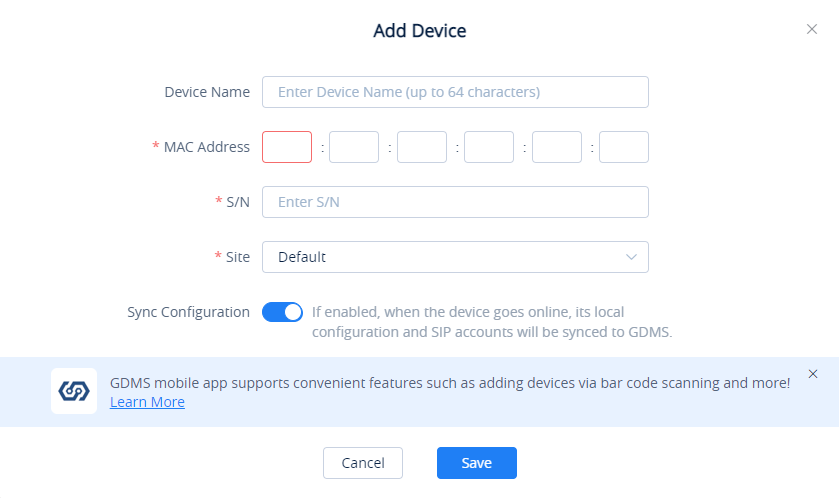
Device Name | (Optional) This option is used to set the name of the device so that the users could identify this device. The maximum number of the input characters is up to 64. |
MAC | (Required) This option is used to enter the MAC address of the device. (Locate the MAC address on the MAC tag of the unit, which is on the underside of the device, or on the package) |
Serial Number | (Required) This option is used to enter the serial number of the device. (Locate the Serial Number on the MAC tag of the unit, which is on the underside of the device, or on the package) |
Select Site | (Required) This option is used to set which site this device belongs to. The default setting is “Default” site. |
Sync Configuration | If enabled, when the device goes online, its local configuration and SIP accounts will be synced to GDMS. |
Add VoIP Device
Batch Import VoIP Devices
Users can import multiple devices by uploading a file. Click on the Import Devices button on the Device page to get started. The following window will appear:
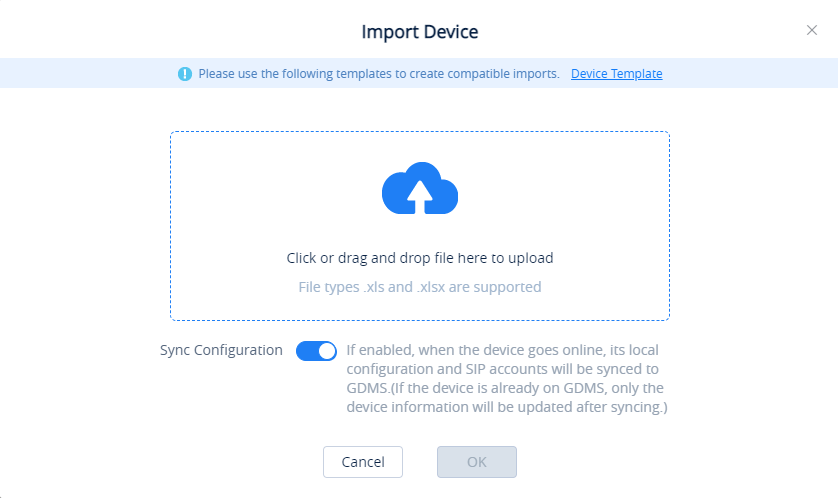
- Click on the
 button to download the template. Users must follow the instructions to enter the required information.
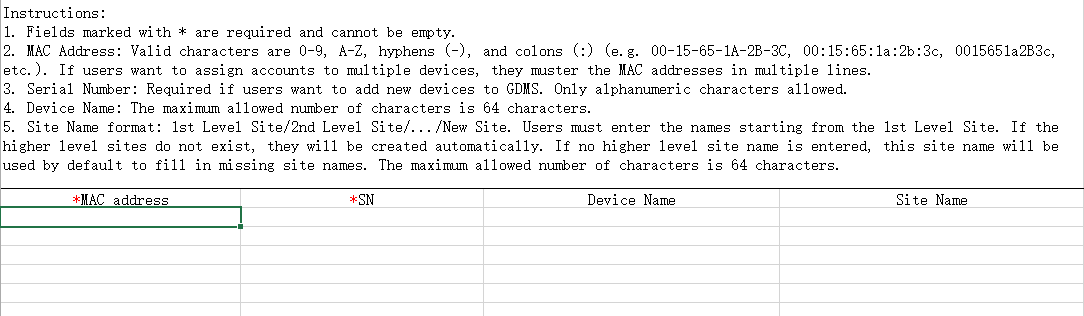
- The template will have the following fields:
MAC Address | Users need to fill in the MAC address of the device in this field (Required). For instance, 000B82E21234, and it supports to fill “:” and “-” characters in this field. |
SN | Users need to fill in the serial number of the device in this field (Required). |
Device Name | This option is used to set the name of the device so that the users could identify this device (Optional). The maximum number of the input characters is up to 64. |
Site Name | Enter the site to assign this device to (Required). If the site is under more than one level, all site levels must be included in the site name (e.g. first_level/second_level/…/new_site). If the site level does not exist, it will be automatically created. Maximum character limit is 64. |
Import VoIP Device Template
- Users can drag the file to the pop-up window, or they can click the upload button to select a file from their PC to import.
- Once the file is imported into GDMS, the result window will appear. If any data failed to import successfully, users can export the problematic data, re-edit, and attempt to import them into GDMS again.
- The user can choose to sync the devices’ configuration by enabling “Sync Configuration”. Once that is enabled, the local configuration and SIP accounts will be synchronized to the GDMS.
Configure SIP Account (Non-DP Devices)
Users can configure SIP accounts for each device from the Device page.
- In the devices list, click on the icon
 corresponding to the account to access the Account configuration page.
 - After clicking the button, users will see the Account configuration page as the figure shows below:
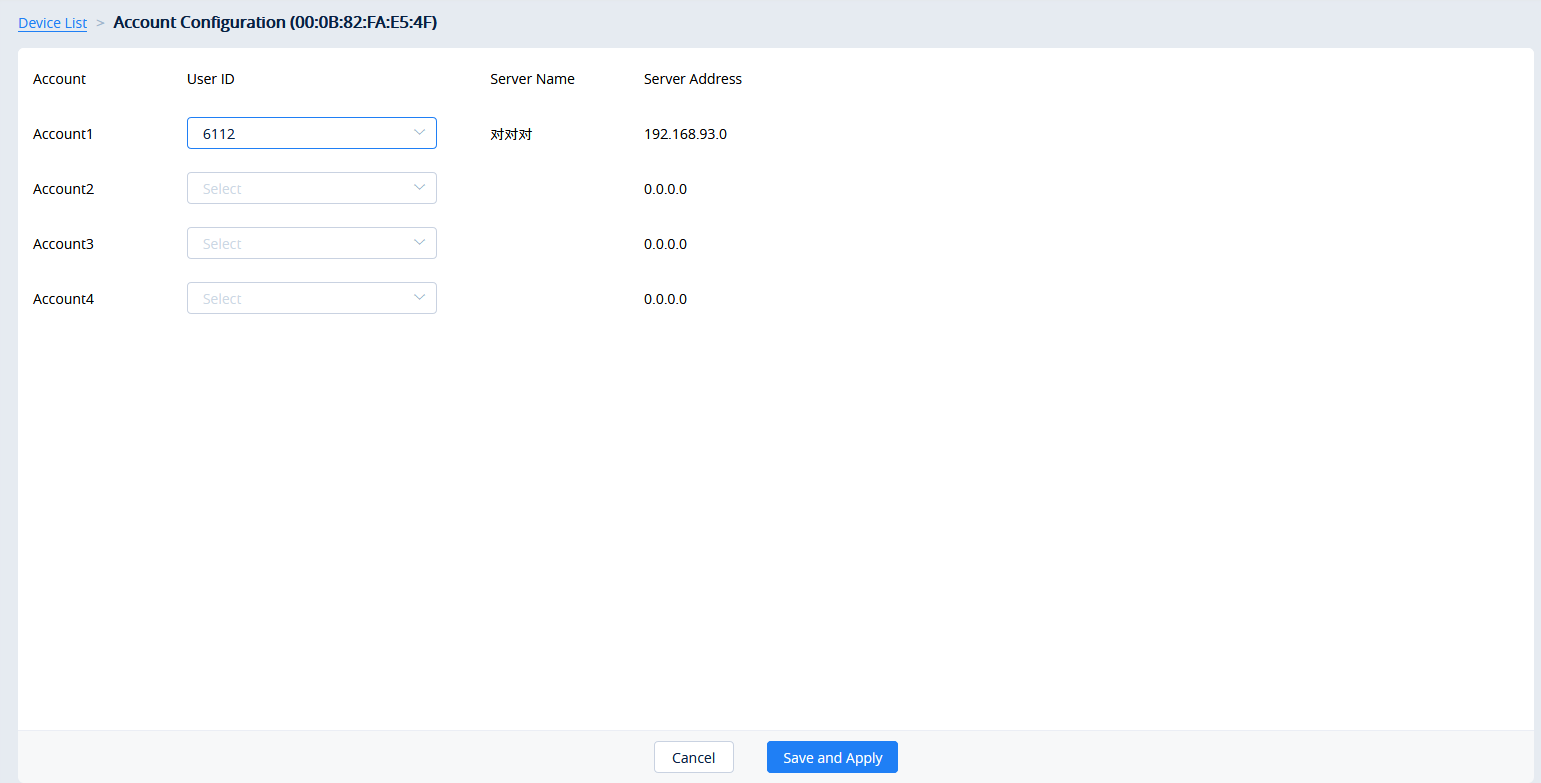
- On this Account Configuration page, users can select the SIP accounts created on the SIP Account page to assign to the device.
- Users could also select to replace the existing SIP account with a specific account or delete the existing accounts.
- Click on the Save and Apply button. The accounts will then be assigned to the device.
Configure SIP Account/Line (DP Devices)
Users could configure SIP accounts and lines for DP devices. GDMS platform supports to allow users to view the existing SIP accounts for current devices and edit/delete the accounts.
- In the devices list, click on the icon corresponding to the account to access the Account configuration page.
- After clicking the button, users will see the figure as shown below:
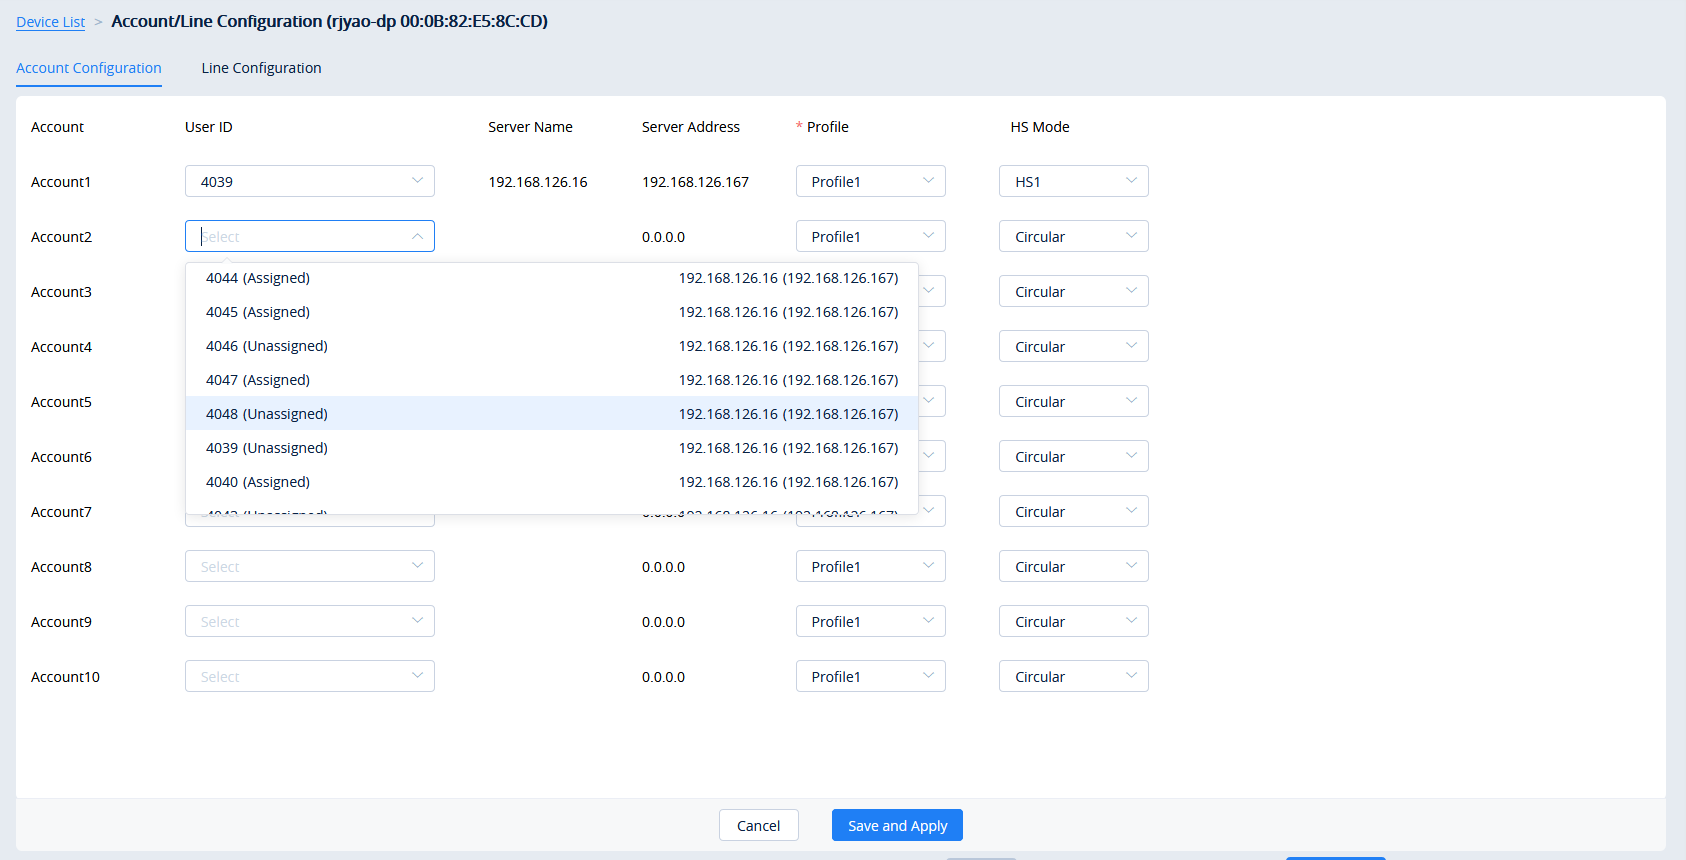
|
User ID |
Allocated: This SIP account has already been allocated to other devices; Unallocated: This SIP account has not been allocated to any device. |
|
Profile |
Different SIP servers cannot be set to the same profile. |
|
HS Mode |
If this field is not filled, the default setting is “Circular” mode. |
- To configure the lines for each HS mode, click on the Line Configuration tab.
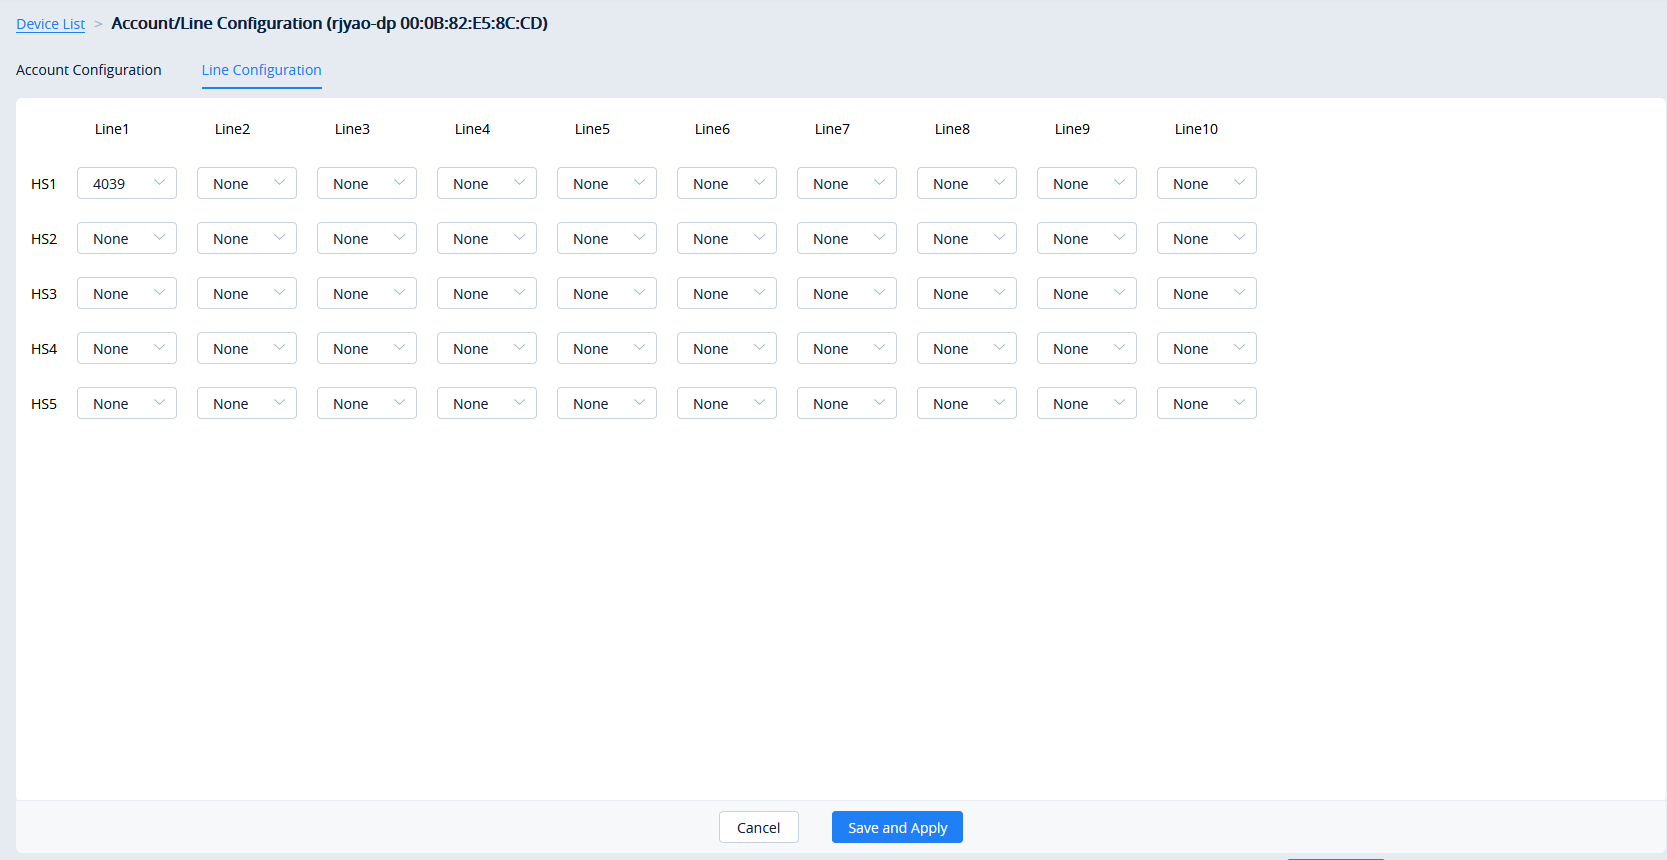
- Select the desired SIP accounts to use for each line and handset.
- Click on the button Save and Apply to allocate the SIP accounts or lines to the devices.
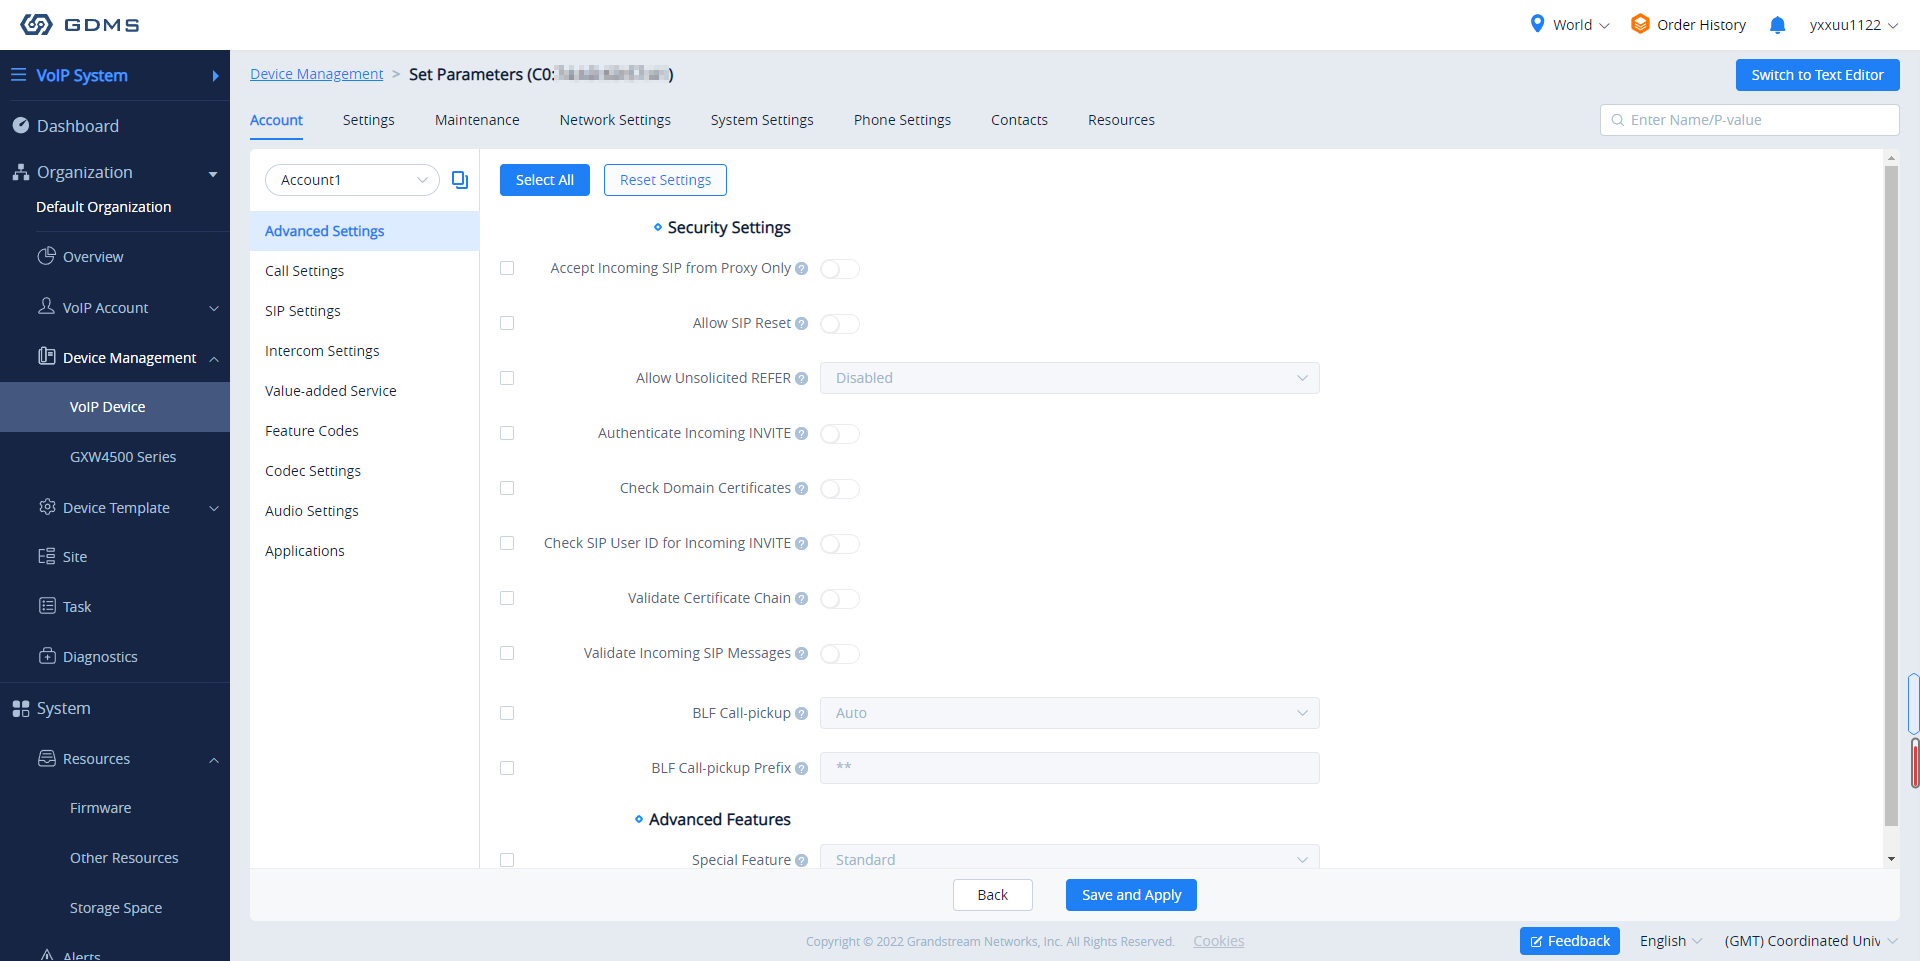
Device Parameters Configuration
Users can modify the configuration parameters for a single device.
- In the device list, click on the
 button to go to the Device Parameters Configuration page, as shown in the figure below:

- Clicking on the Select All button will select every option on the current page. Clicking on it again will deselect all the options.
- Clicking on the Reset Settings button will restore all settings on the current page to default values.
- Clicking on the button
 following the account, users can copy and paste the current account configuration to other accounts.
- When users try to configure the device wallpaper or screensaver image, users can select a picture from the resources list, or upload the local picture to GDMS and configure it to the device.

- Modify the desired settings on the page or click on the Switch to GUI Editor to configure device settings via text editing (i.e. p-values).
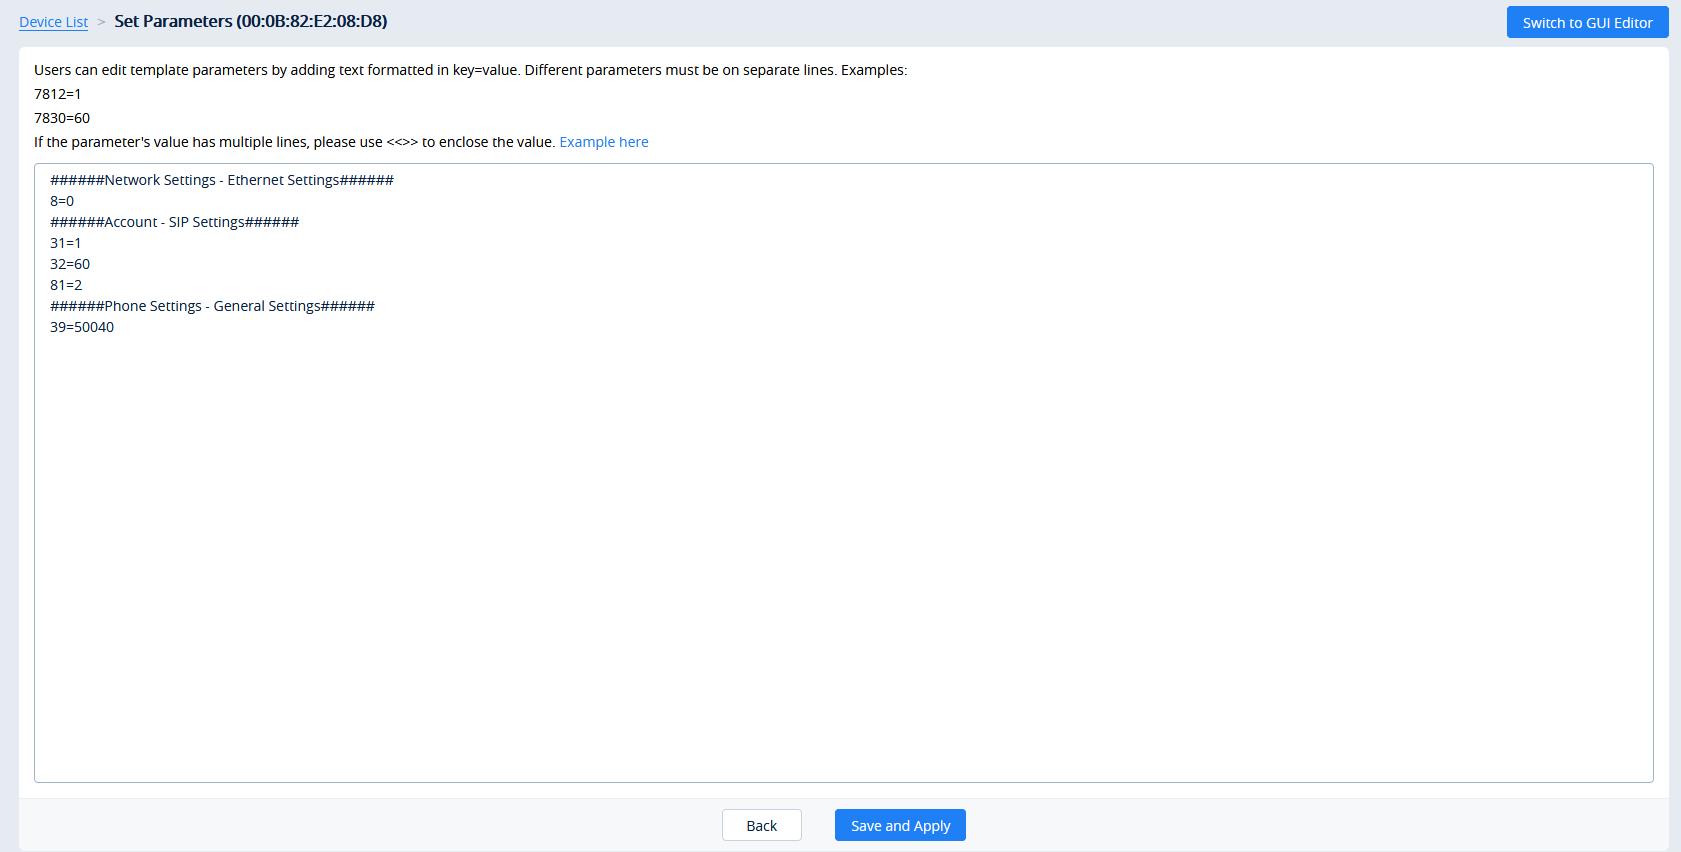
- The format requirement is key=value. The key can be either a P-value or an alias.
- Users can enter the latest parameters and values of a device in the text editor even if the GDMS configuration page does not display the configuration options.
- Click on the Save and Apply button to finalize changes. Only settings that are checked will be pushed to the device.
MPK Stickers Printing
Certian Grandstream IP phones have a MPK sticker placement (GRP2604, GRP2634, GRP2636, GXP2130, GXP2160) to label the MPKs as the user desires. GDMS offers a way to print the stickers when configuring the devices.
You can select whether to pring the background color, whether to display the border, or whether to print repeatedly on the A4 paper.
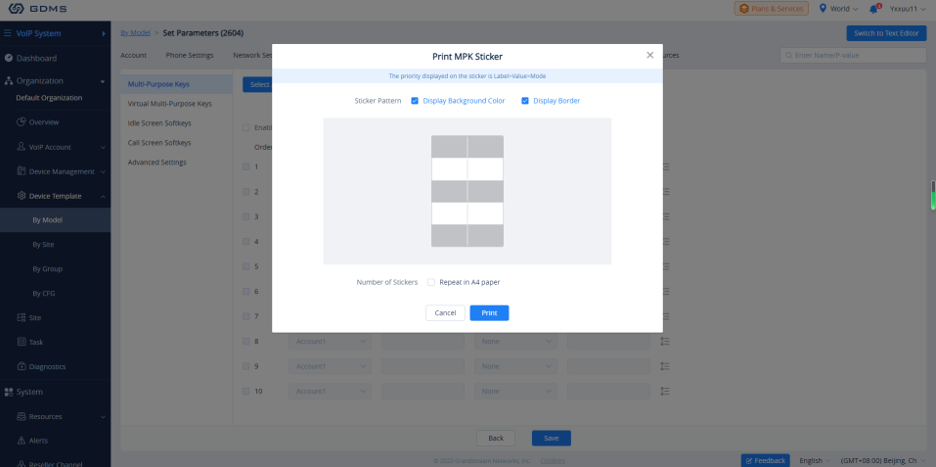
When the user prints MPK sticker repeatedly on an A4 paper, it will be displayed as following.
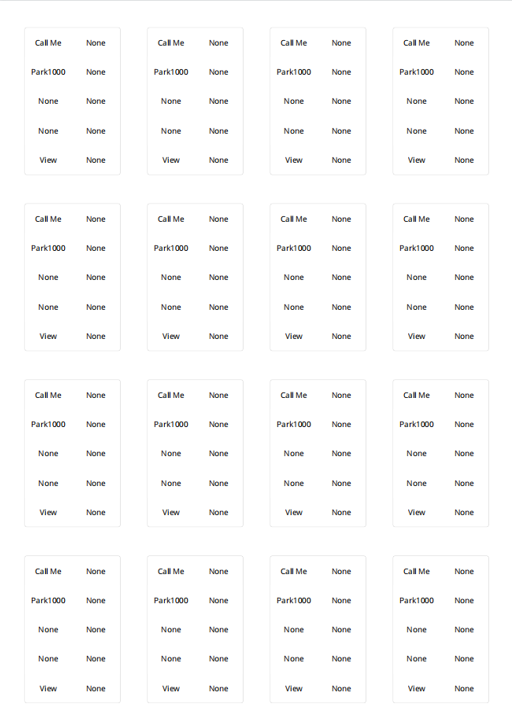
If you want to print on the native sticker provided with the IP phone unit. Please refer to the following video: https://v.youku.com/v_show/id_XNDc3MDczOTIwOA==.html
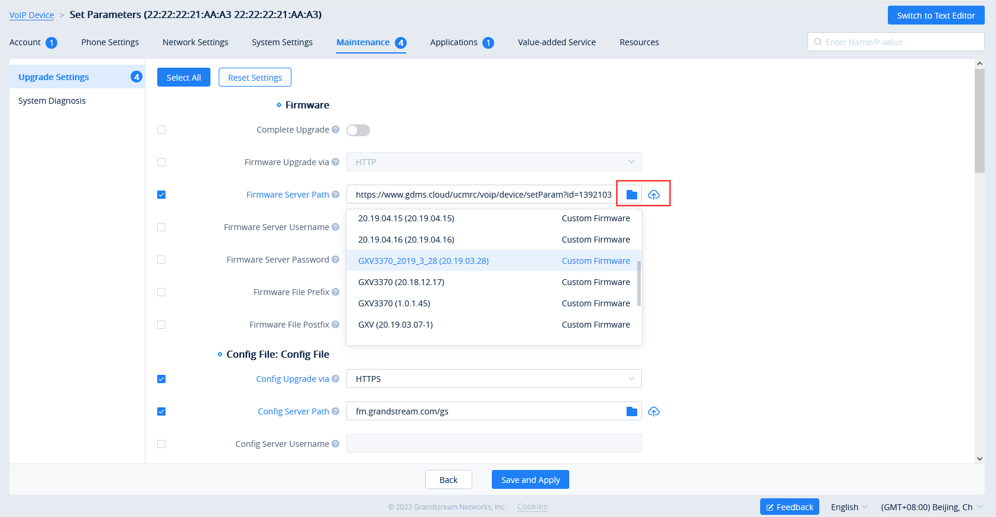
Upgrade The Firmware
You can select the firmware path from the existing firmware resource list or directly upload your firmware file by clicking the “Upload” button following the option. Please refer to the screenshot below.
Configure Resource Files
Users can configure custom ringtones and languages for devices (Supported models: GXP/DP series).
- On the Device list, click on the button to go to the Device Parameters Configuration 🡪 Resource Configuration page, as shown in the figure below:
- On the “Custom Ringtone” page, for Ringtone 1 to Ringtone N, select a ringtone file from the resources for each ringtone index.
- On the “Language Configuration” page, select a language pack from the resources for the device.
- Click on the “Save and Apply” button, the device will download the selected resources from the firmware path.
Synchronize Device Local Configuration
Before the device is configured, the user can synchronize the device’s local configuration to the GDMS server.
- Select a specific device, click icon
 and select the option “Synchronize Device Local Configuration”.
 - Click “OK” to confirm synchronization on the pop-up window. Then, the GDMS server will synchronize all the account configurations and parameters of the current device to the GDMS server.
- Enable Sync SIP Account if you wish to have your SIP accounts synchronized to the GDMS.
Disable Push Configuration
If the user does not want to push any configuration to the device through the GDMS server, please follow the steps below:
- Select a specific device, click icon and select the option “Disable Push Configuration”.
- Click “OK” to confirm the operation, the account configuration or parameters will not be pushed to the device through the GDMS server anymore, including the scheduled tasks. The configuration that has not been pushed to the device will not be pushed to the device anymore.
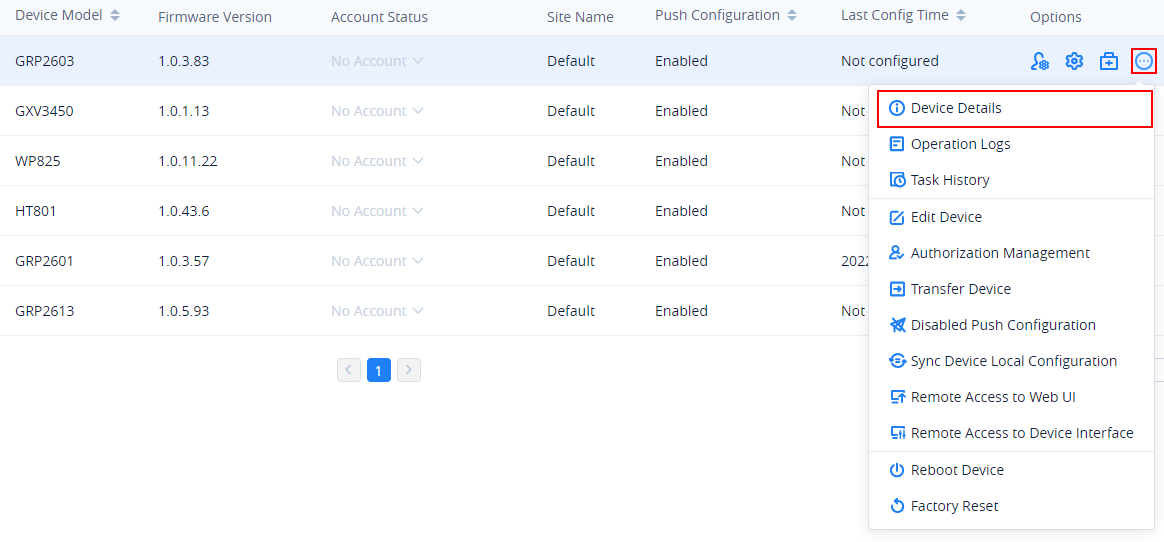
View VoIP Device Details
Click on the ![]() button to view a specific device’s system information and account status.
button to view a specific device’s system information and account status.
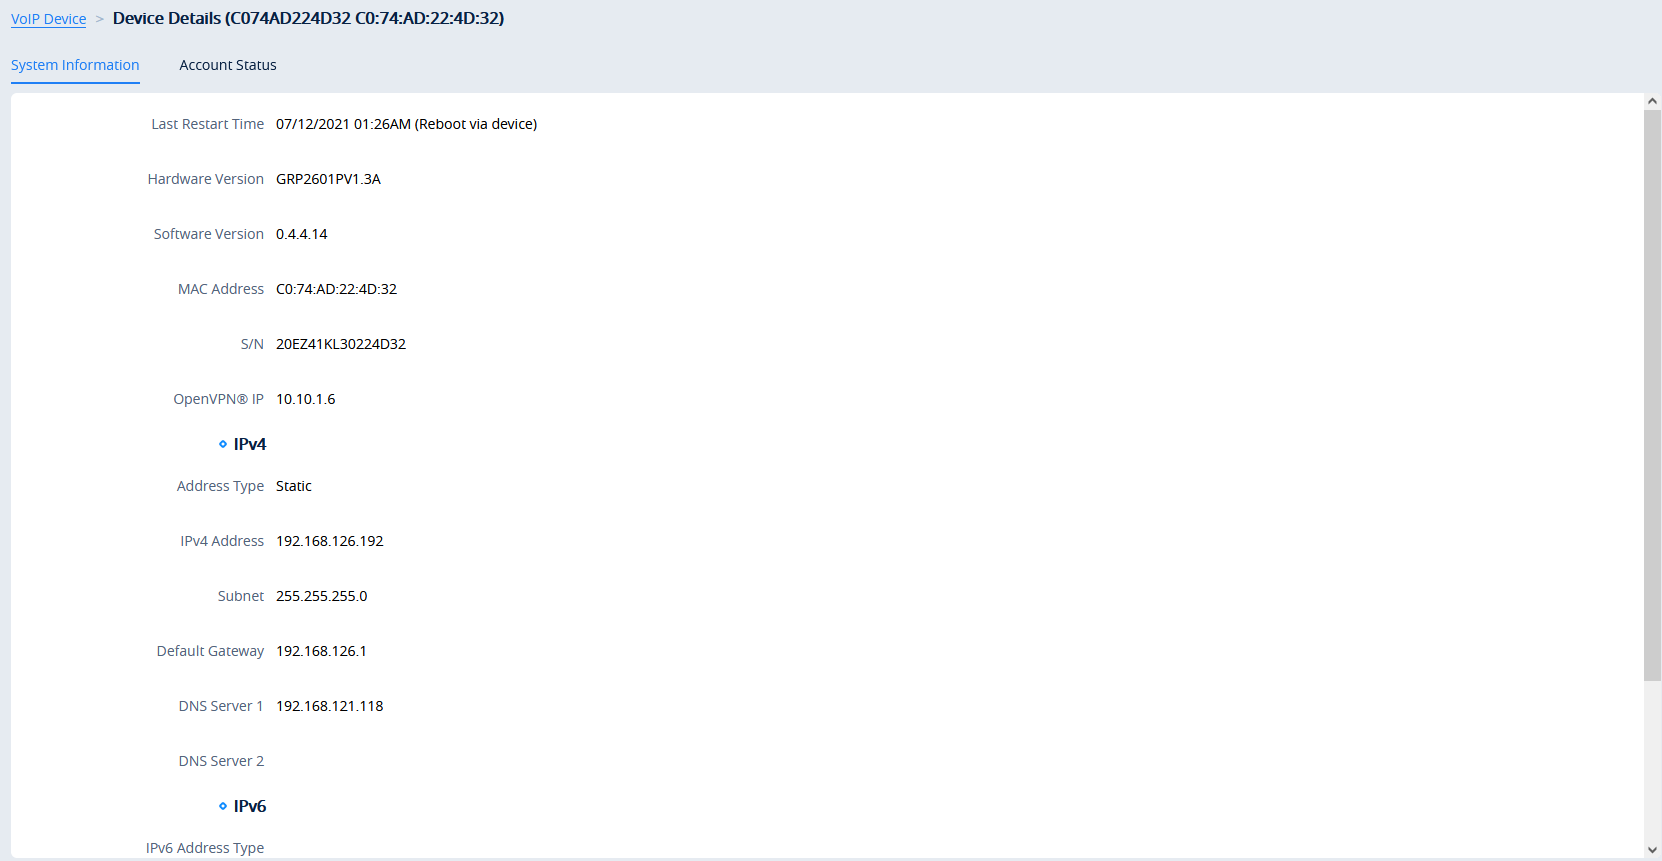
System Information
The device details include System information, Network information, Account status, etc.
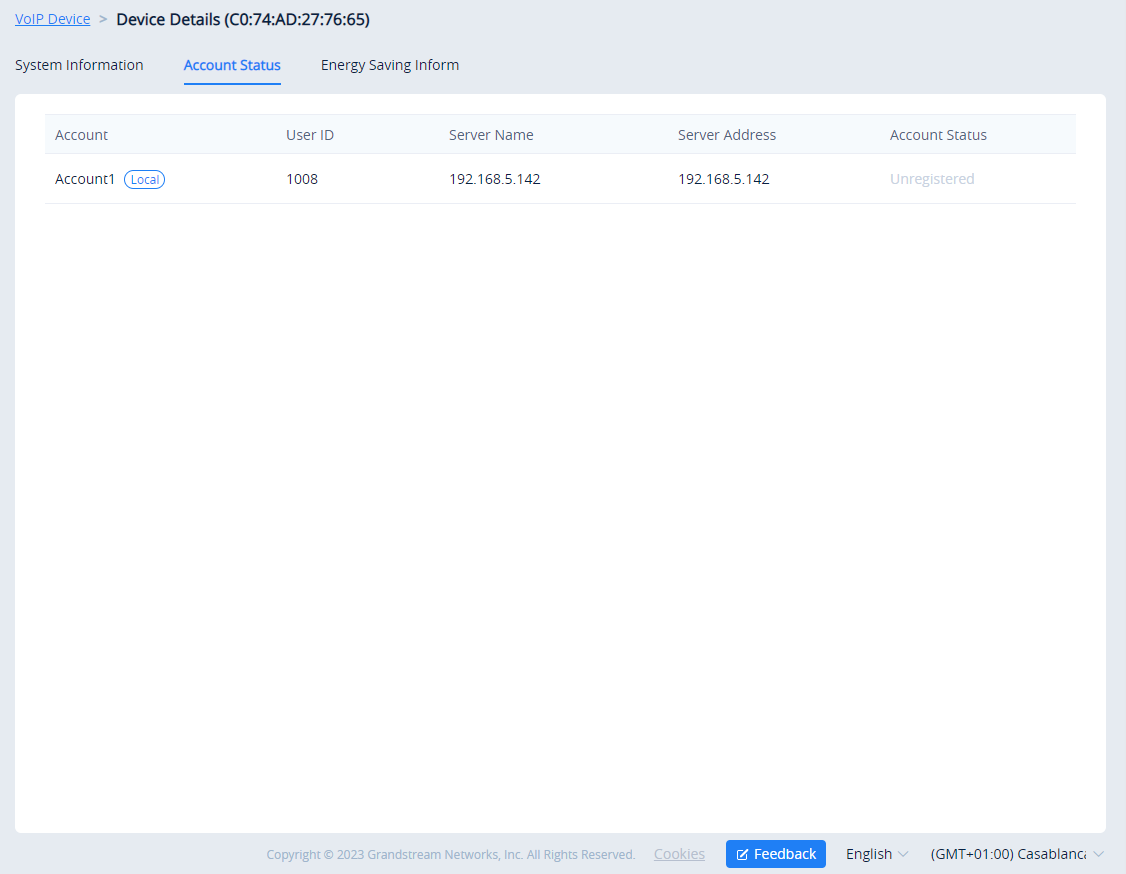
Account Status
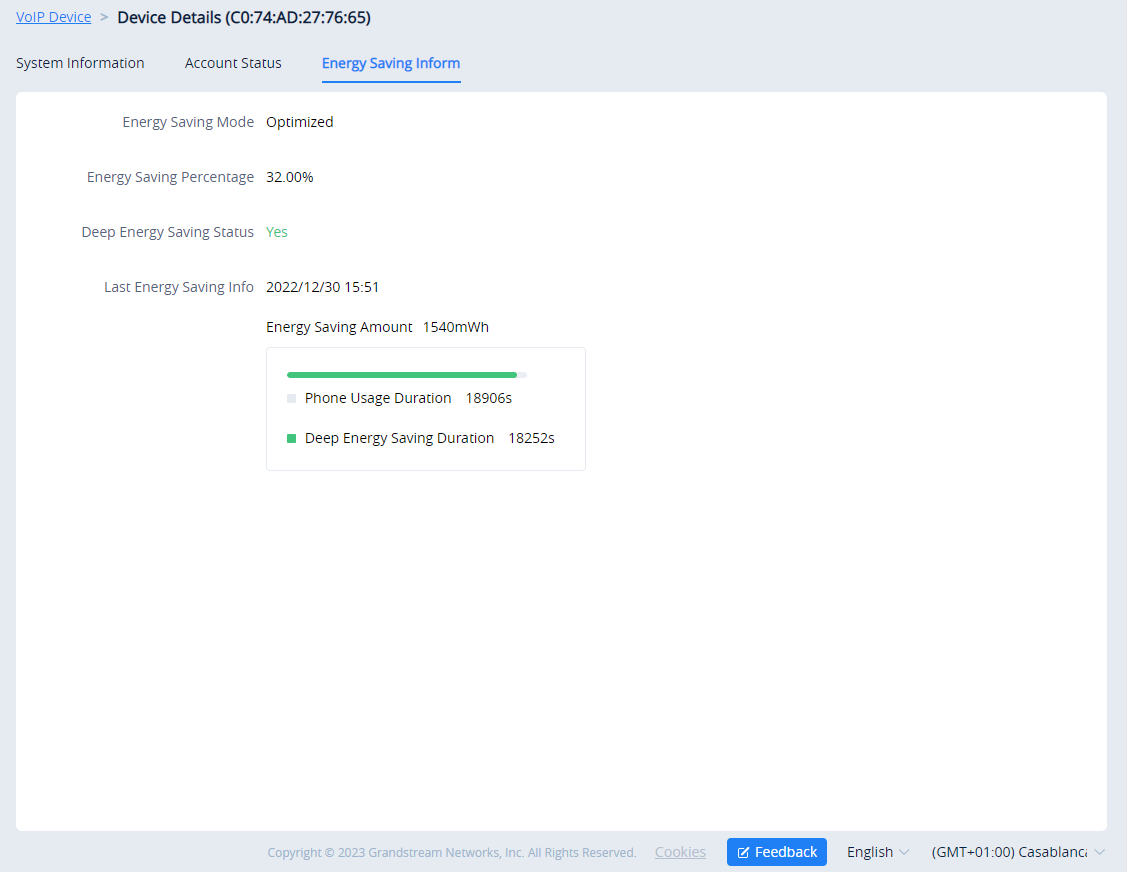
Energy Saving Inform (GRP Series Only)
If you are viewing the detail of a GRP series IP phone, an additional tab will appear Energy Saving Inform. This tab contains information about your GRP device power usage. It provides information about which Energy Saving Mode has been configured on your device, the percentage of the energy saved, whether Deep Energy Saving has been enabled, and information about when the Energy Saving has been enabled with all the related information of how much energy has been saved and how long the phone has been operational under energy saving mode.
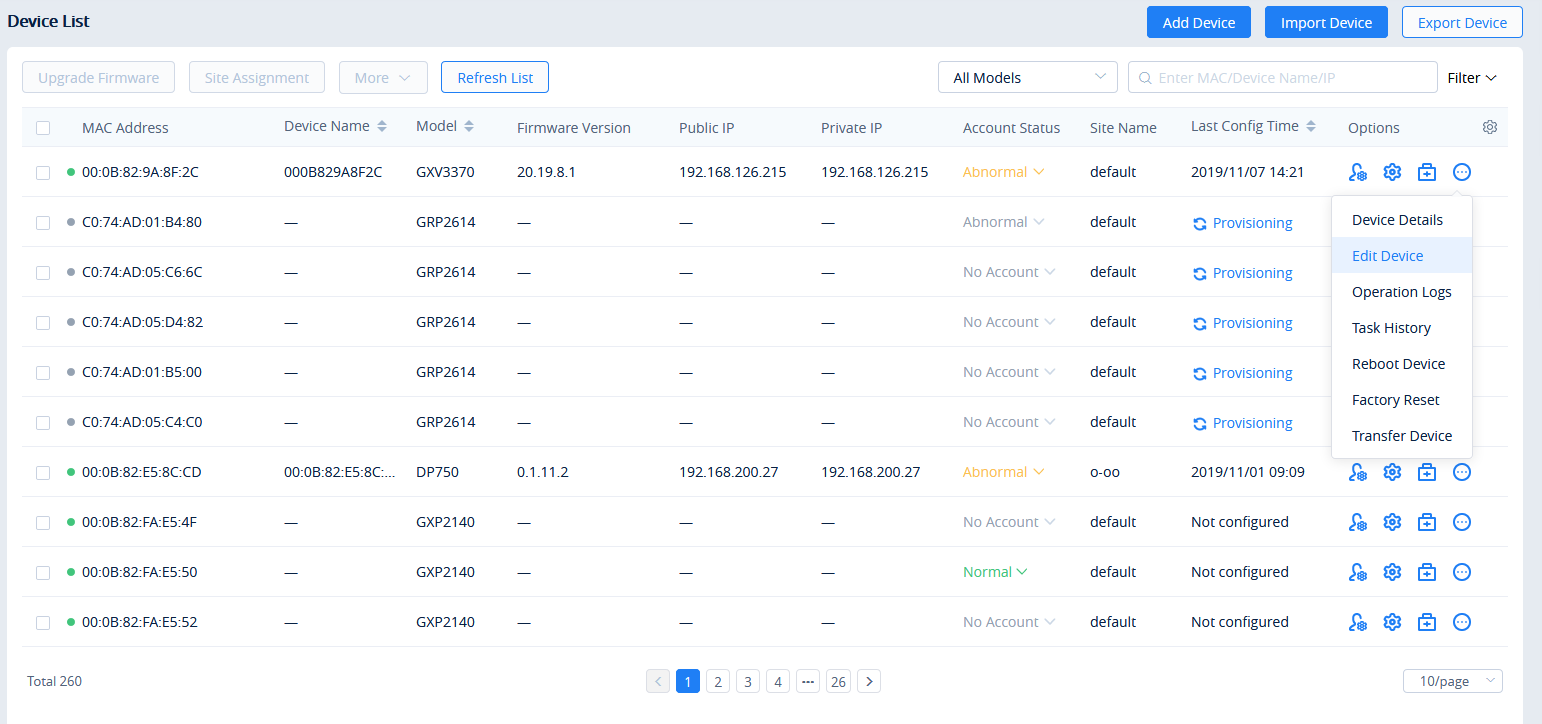
Edit VoIP Device
Users could edit the Device name and which site the device belongs to.
- In the device list, click on the button
 which is following the device, and select Edit Device to access the device editing page.
- Users will see the device editing page as the figure shows below:
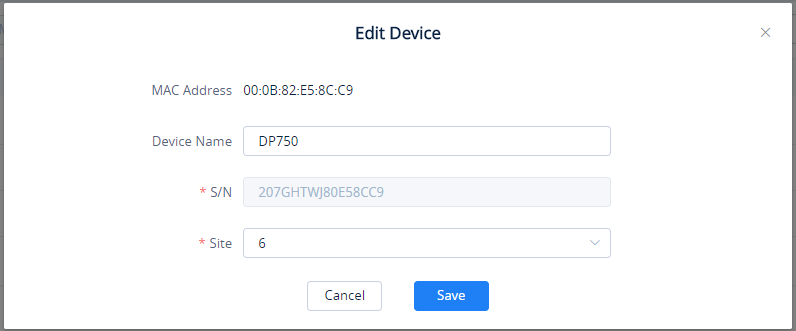
- Click on the Save button to apply the changes on the GDMS platform.
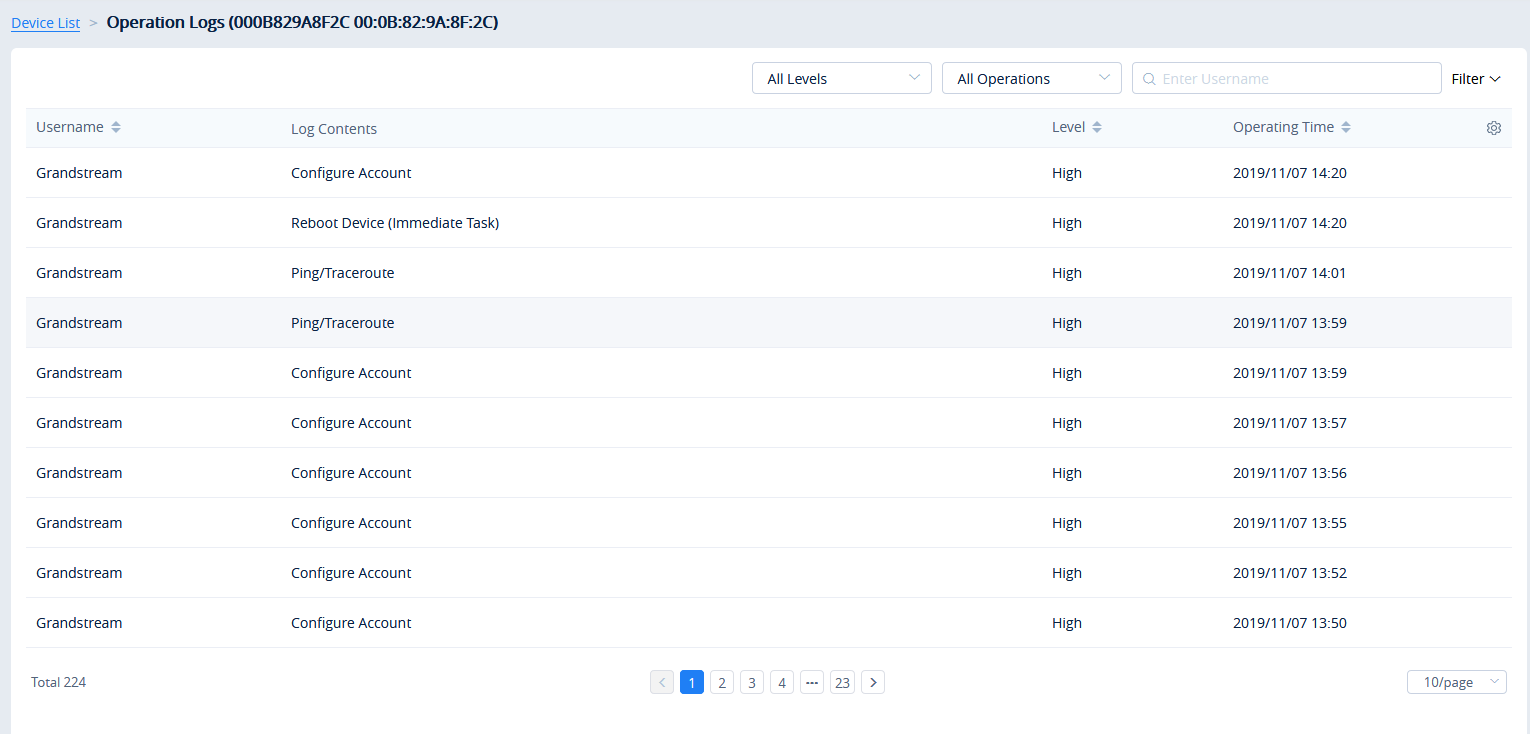
View VoIP Device Operation Logs
Users could view all operation logs for a specific device on the GDMS platform.
- On the Device List, select the menu button following the specific device, and click on the “Operation Log” button.
- Access to the Operation Log menu of the device, the menu includes the operation logs of device SIP account configuration, updating configuration parameters, device rebooting, device upgrading/downgrading, device factory reset, device diagnostics, etc.
Note:
Users could only view the device operation logs for the last 30 days.
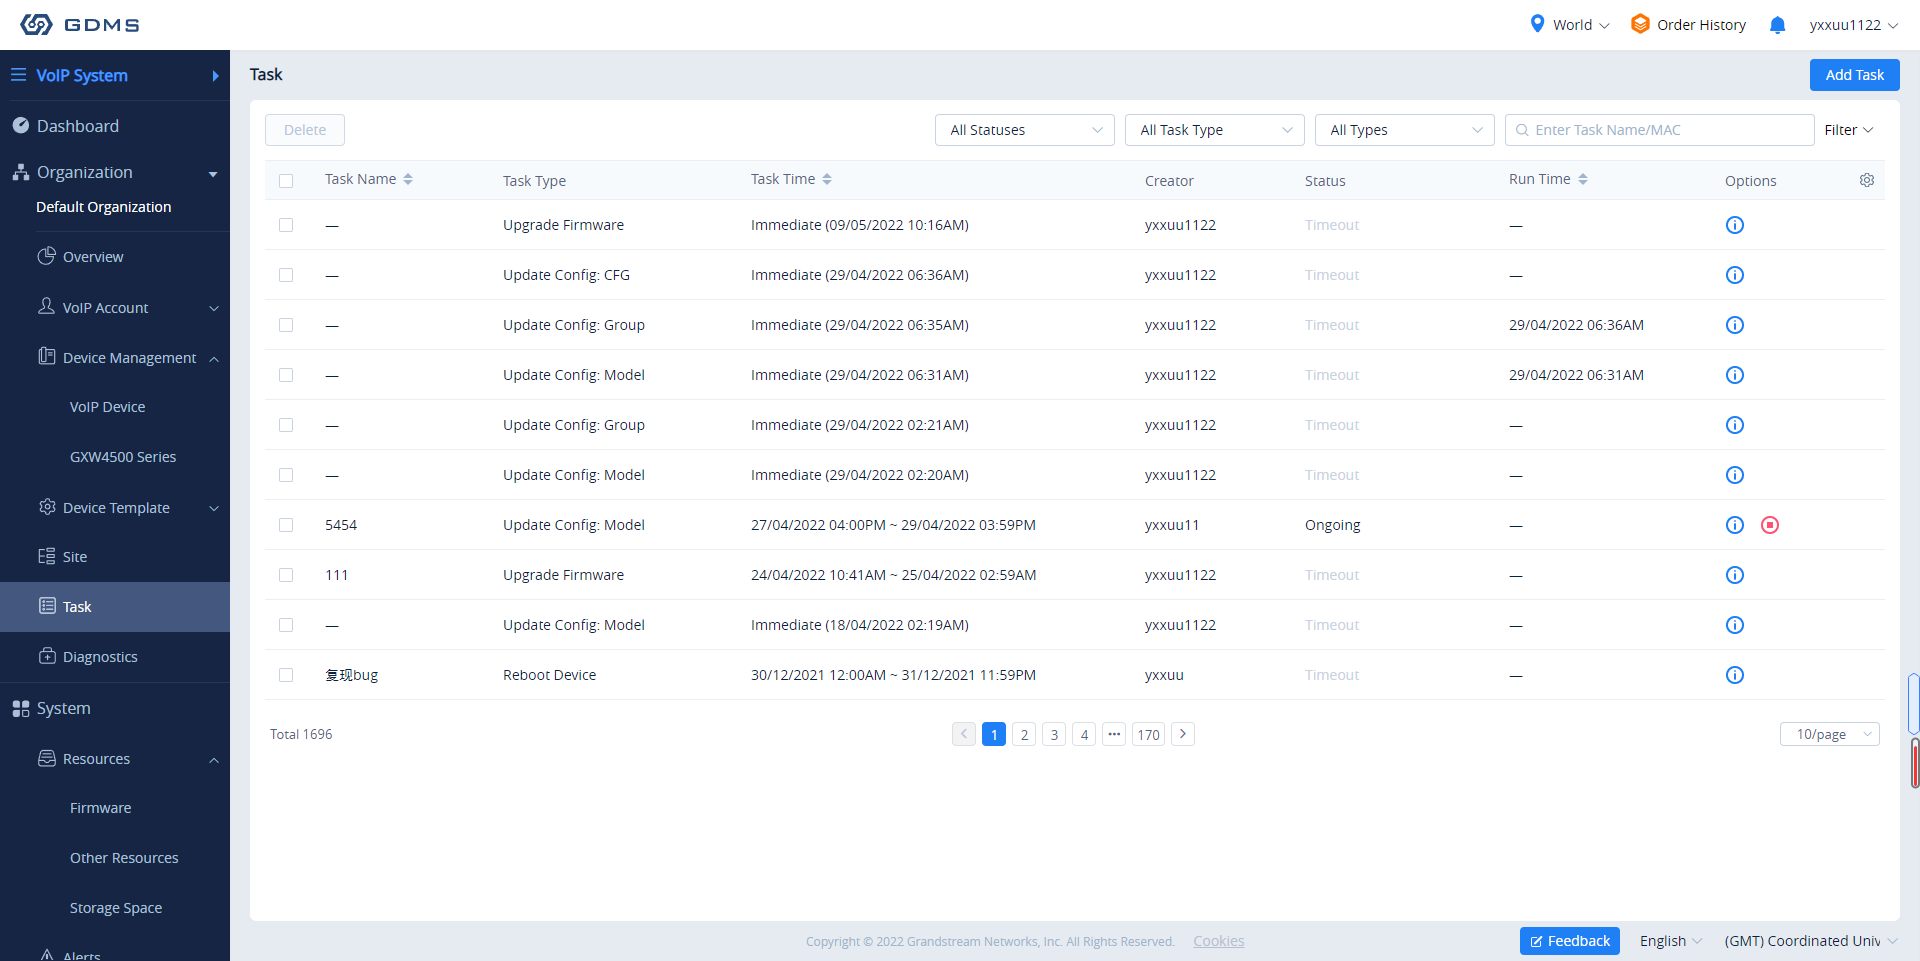
View VoIP Device Task History
Users could view all task histories in the sub-system for a specific device on the GDMS platform, including immediate tasks and timed tasks.
- On the Device List, select the menu button following the specific device, and click on the “Task History” button.
- Access the Task management page, and search for all tasks of the specific device.
Firmware Upgrade
Users could upgrade firmware for a batch of devices to a specific firmware version.
- In the device list, check multiple devices, and then click on the button Upgrade Firmware on the top of the Device page.
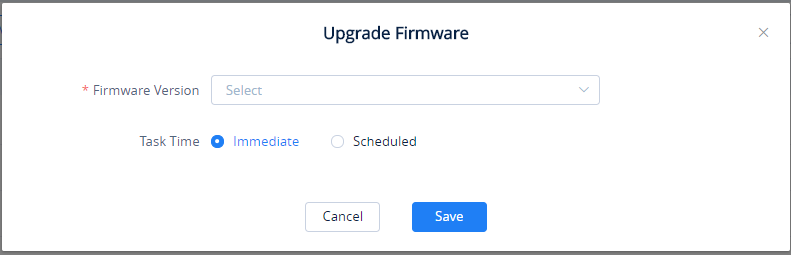
- Users need to select the firmware version to upgrade to.
- Task Time: Select when to start the firmware upgrade. Users can choose to upgrade immediately or to schedule the firmware upgrade for a specific time.
- Click on the Save button to create the task. Users can check the status of the upgrade by navigating to the Task Management page.
Site Assignment
Users could edit the site of a batch of devices on the GDMS platform. The default site is “default”.
- Select the desired devices and click on the Site Assignment button.

- Select the site to assign the selected devices.
- Click on the Save button, and all selected devices will be transferred to the selected site.
Move Device
Users can move devices to other organizations.
- Select the desired devices and click on More 🡪 Move Device.
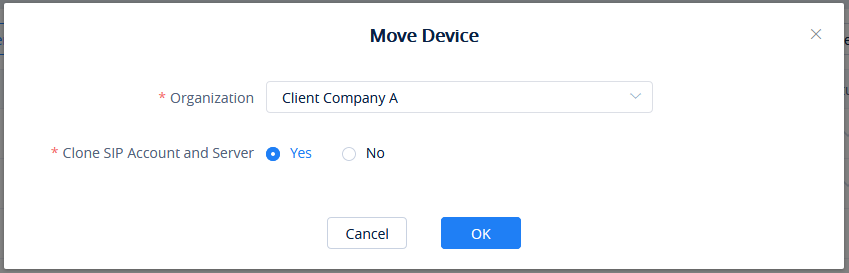
- Select the target organization where to transfer the device.
- The user needs to select whether to clone the SIP account and server which have been configured in the devices. If the user selects “No”, only the device data are transferred to the new organization, and the configured SIP accounts become empty after moving the devices.
Assign RPS
To assign an RPS to the devices, please click on ![]() and pick an RPS from the list, then select the devices to configure with the selected RPS.
and pick an RPS from the list, then select the devices to configure with the selected RPS.
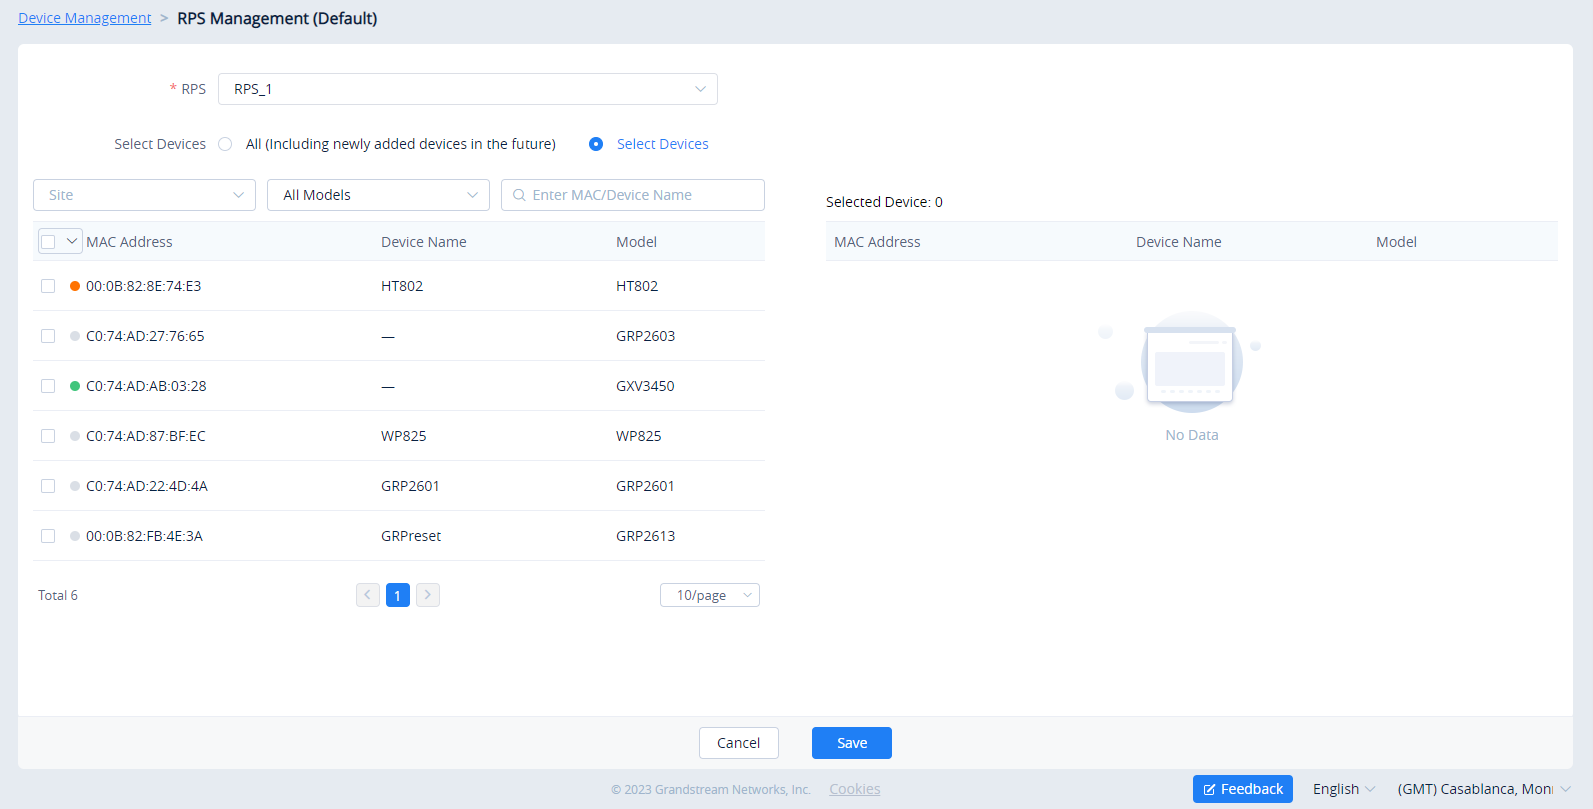
If no RPS has been created, please refer to RPS Management section.
Remote Access to Device Web UI
On the GDMS platform interface, even though the VoIP device is under the internal network, the user can remote access the VOIP device Web UI through the external network for viewing data and configuration.
- Go to the VoIP Device interface, click the “More” settings for a VoIP device 🡪 Remote access to Device Web UI, as the screenshot shows below:
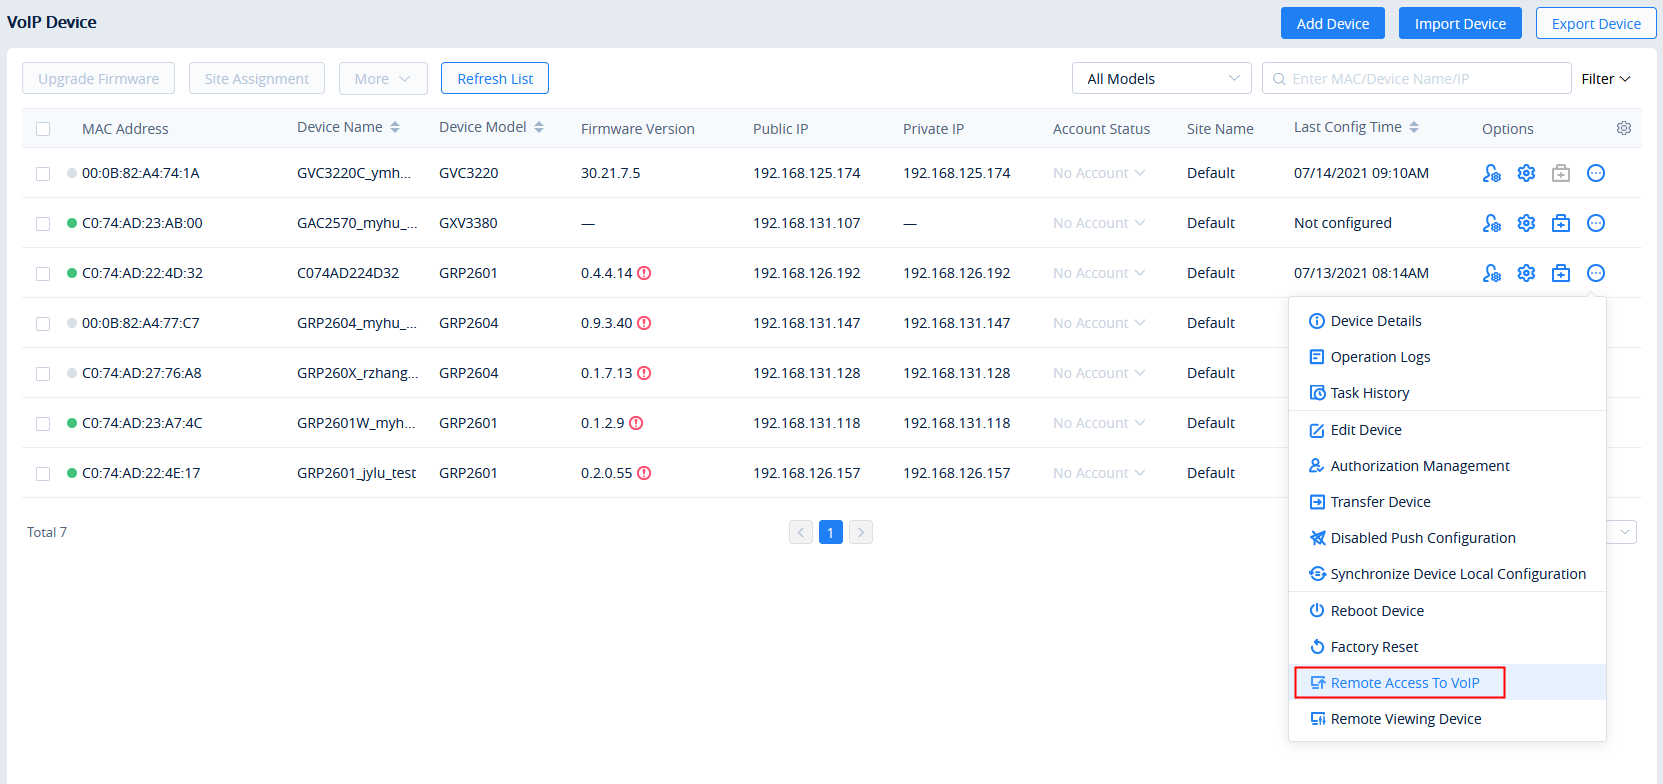
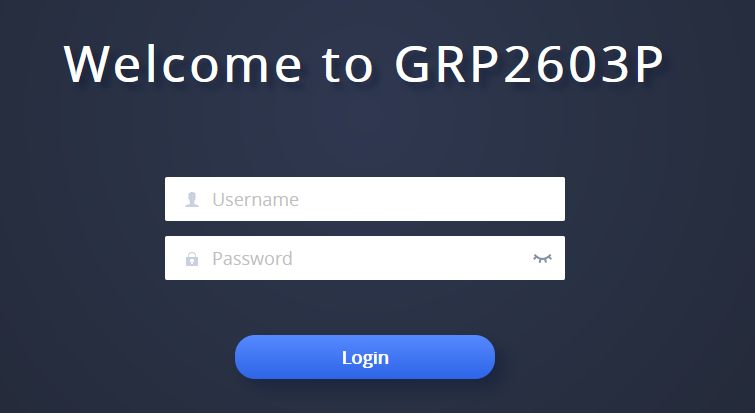
- Go to the Web UI, and log in to the VoIP device through the username and password. As the screenshot shows below:
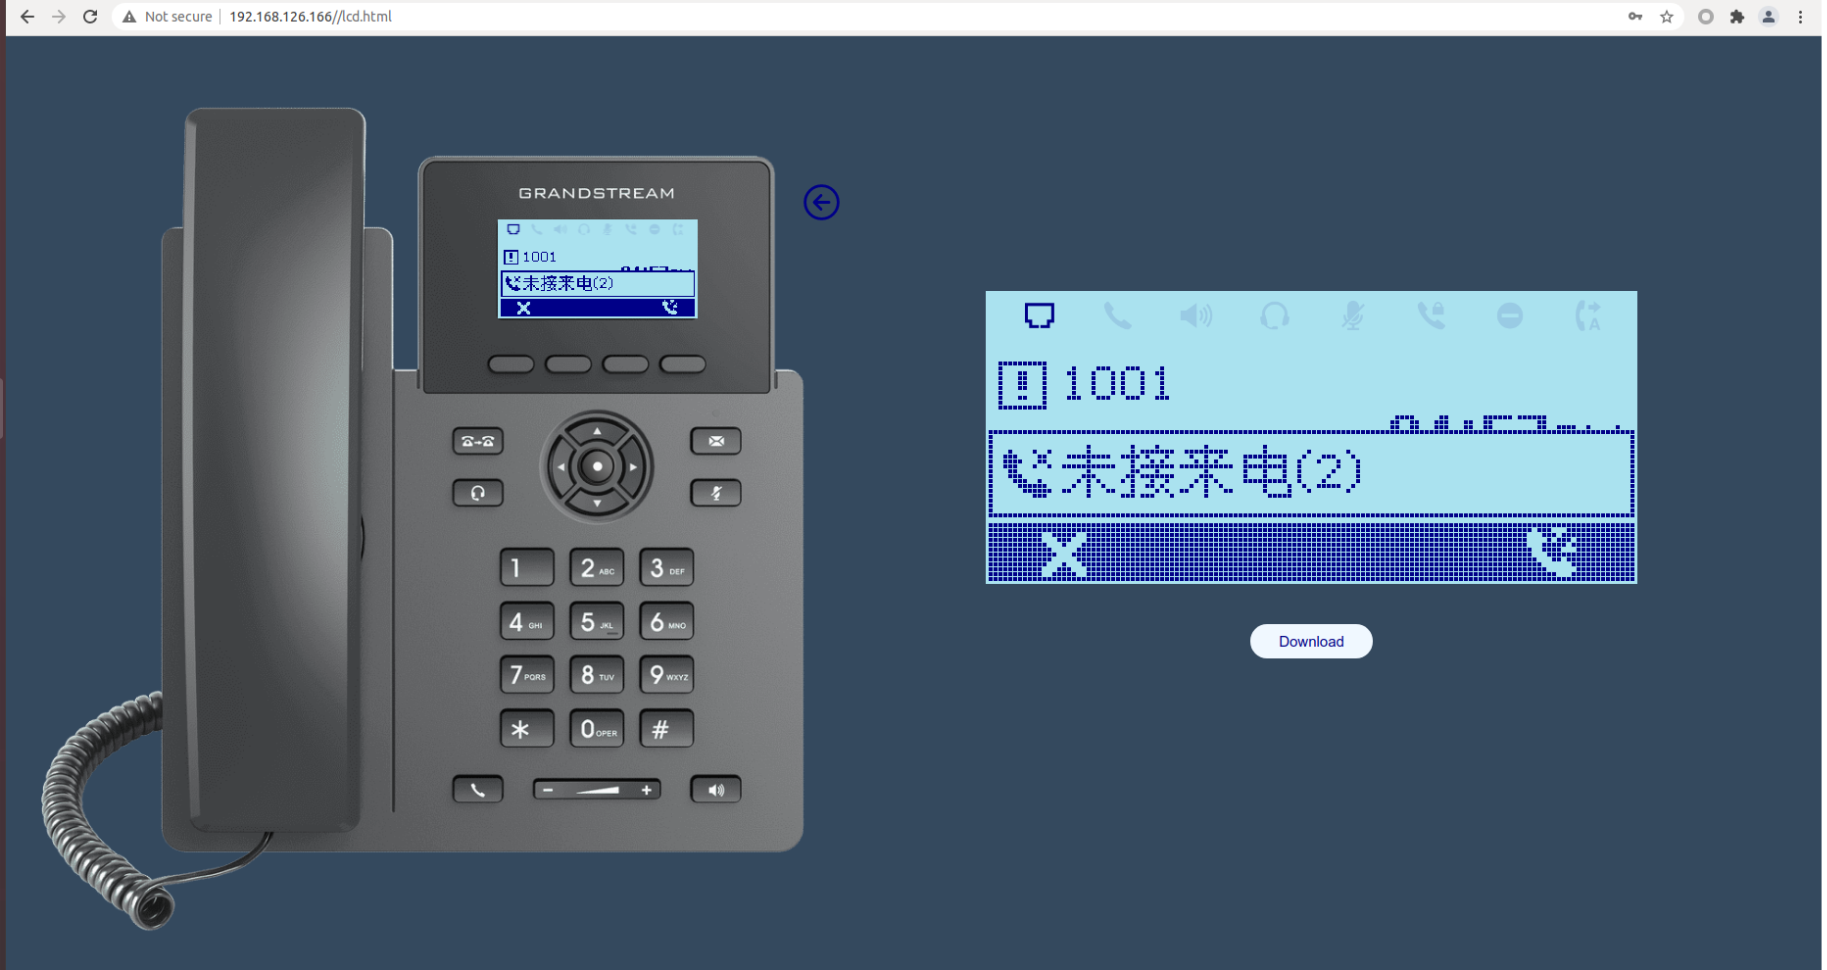
Remote Access to Device Interface
The user can remote access Grandstream devices using the GDMS. This can be performed even if the device is behind a NAT router, and the user will be able to view the screen of the device.
- Go to VoIP Device interface, click the “More” settings for a VoIP device 🡪 Remote access to Device Interface, as the screenshot shows below:
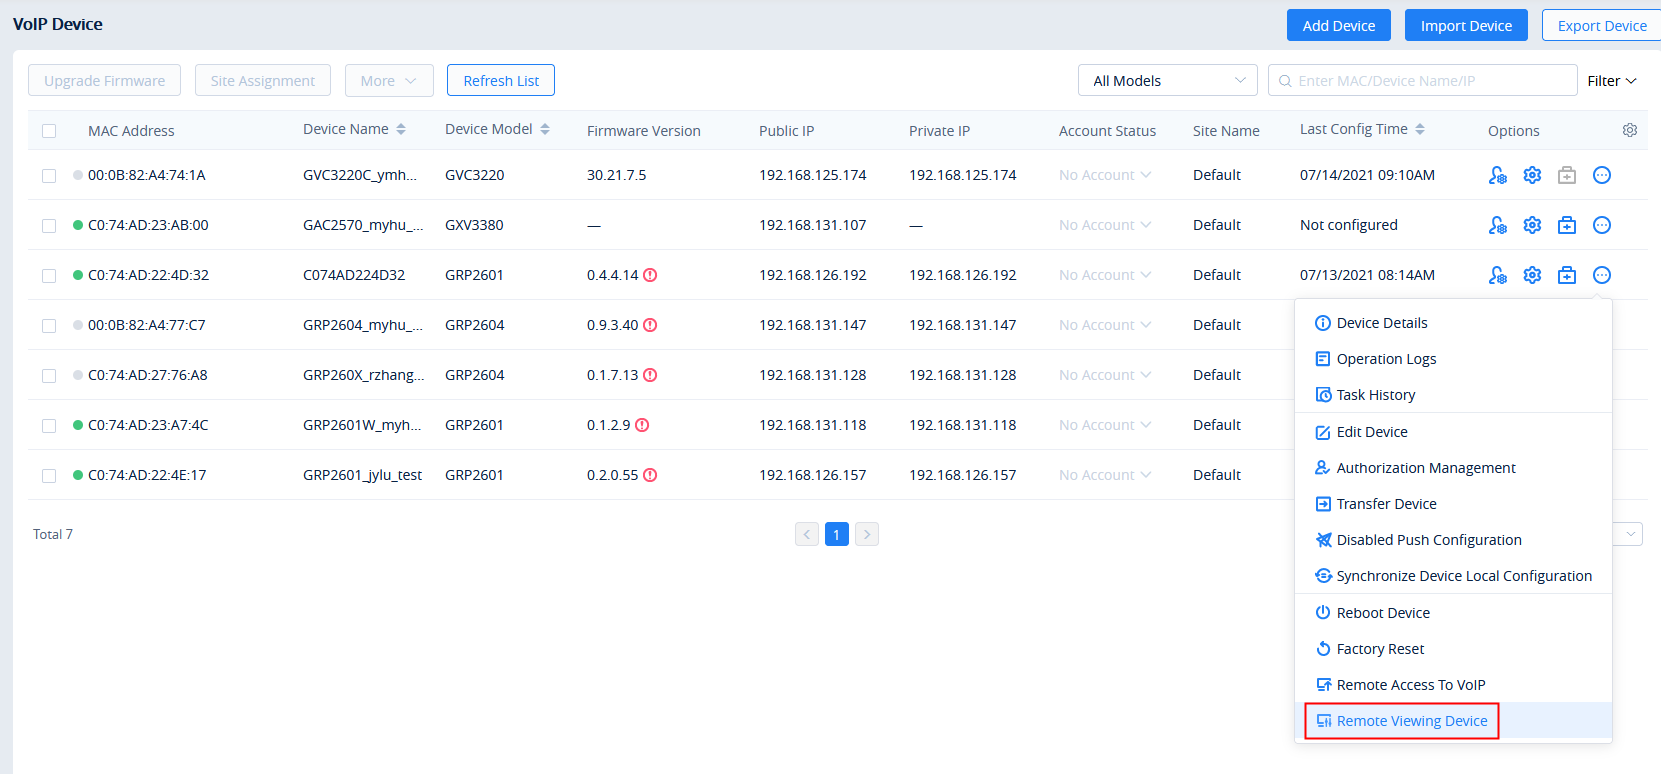
- Enter the virtual device interface, the user can control the virtual buttons on the device and the LCD screen, as the screenshot shows below:
Reboot VoIP Device
Users could reboot one device or a batch of devices on the GDMS platform.
- Select the desired devices and click on More 🡪 Reboot Device.

- Task Time: Select when to start the device reboot. Users can choose to reboot immediately or schedule the reboot for a specific time.
- Click on the Save button to create the task. Users can check the status of the reboot by navigating to the Task Management page.
Factory Reset
Users could factory reset one device or a batch of devices on the GDMS platform.
- Select the desired devices and click on More 🡪 Factory Reset.

- Task Time: Select when to factory reset the device. Users can choose to factory reset the device immediately or to schedule the factory reset for a specific time.
- Click on the Save button to create the task. Users can check the status of the reboot by navigating to the Task Management page.
Delete VoIP Device
Users could delete one device or a batch of devices on the GDMS platform.
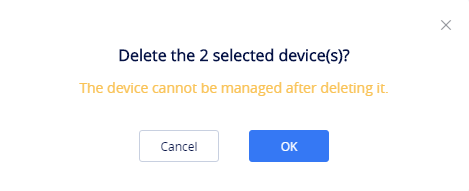
- Select the desired devices and click on More 🡪 Delete.
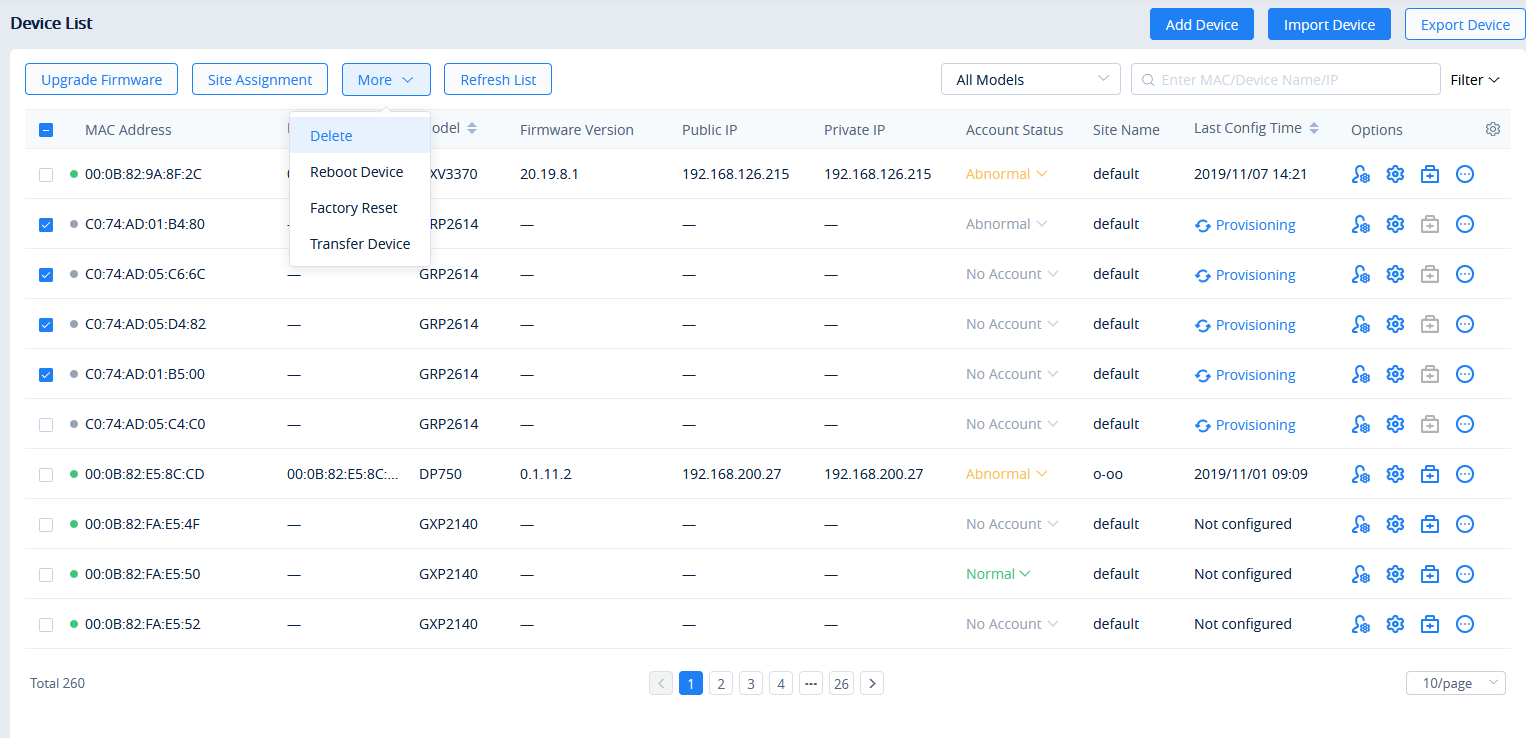
- Click on the OK button on the pop-up window to confirm deleting the devices, and the selected devices will be deleted immediately from the GDMS platform. The scheduled tasks involving the deleted devices will be canceled too.
Export VoIP Device
To export the entire device list, click on the ![]() button in the top-right corner of the device list page. The exported list includes all device and account information.
button in the top-right corner of the device list page. The exported list includes all device and account information.
Manage Device via GDMS Support
If the user’s device is abnormal and wants Grandstream Support to troubleshoot the problem, the user can enable to manage the device through GDMS Support.
After the authorization is assigned, Grandstream Support can diagnose the device and assign parameters to the device.
- On the VoIP Device list, click the “More” button
 following the device and select to access the “Authorization Management” interface, as the screenshot shows below:
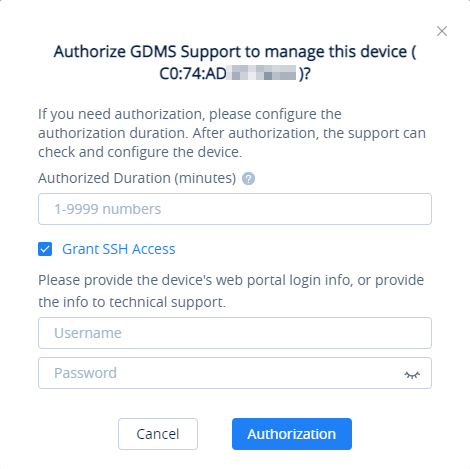
- Enter the authorization duration, which can be set between 1 to 9999 minutes, according to the time required for problem troubleshooting.
- Tick “Grant SSH Access” box to grant access using SSH, then enter the username and password of the VoIP endpoint device SSH information.
- Once the user clicks the “Authorization” button, Grandstream Support can only manage the device within the authorization period. Once the authorization period ends, Grandstream Support cannot manage the device.
Stop Authorizing Manually
- When the problem is confirmed, the user can end authorization manually. The user can click the “More” button following the device, and select to access the “Authorization Management” interface, as the screenshot shows below:
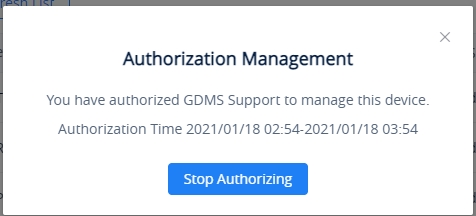
- The user can click the “Stop Authorizing” button to stop managing the device immediately, and then Grandstream Support cannot manage the device.
UCMRC SYSTEM
The UCMRC system is a management module embedded in the GDMS which allows managing the UCM and the IPPBX module of Grandstream GCC601X(W) devices. This system focuses mainly on the configuration aspects which are specific to the IPPBX such as the extensions.
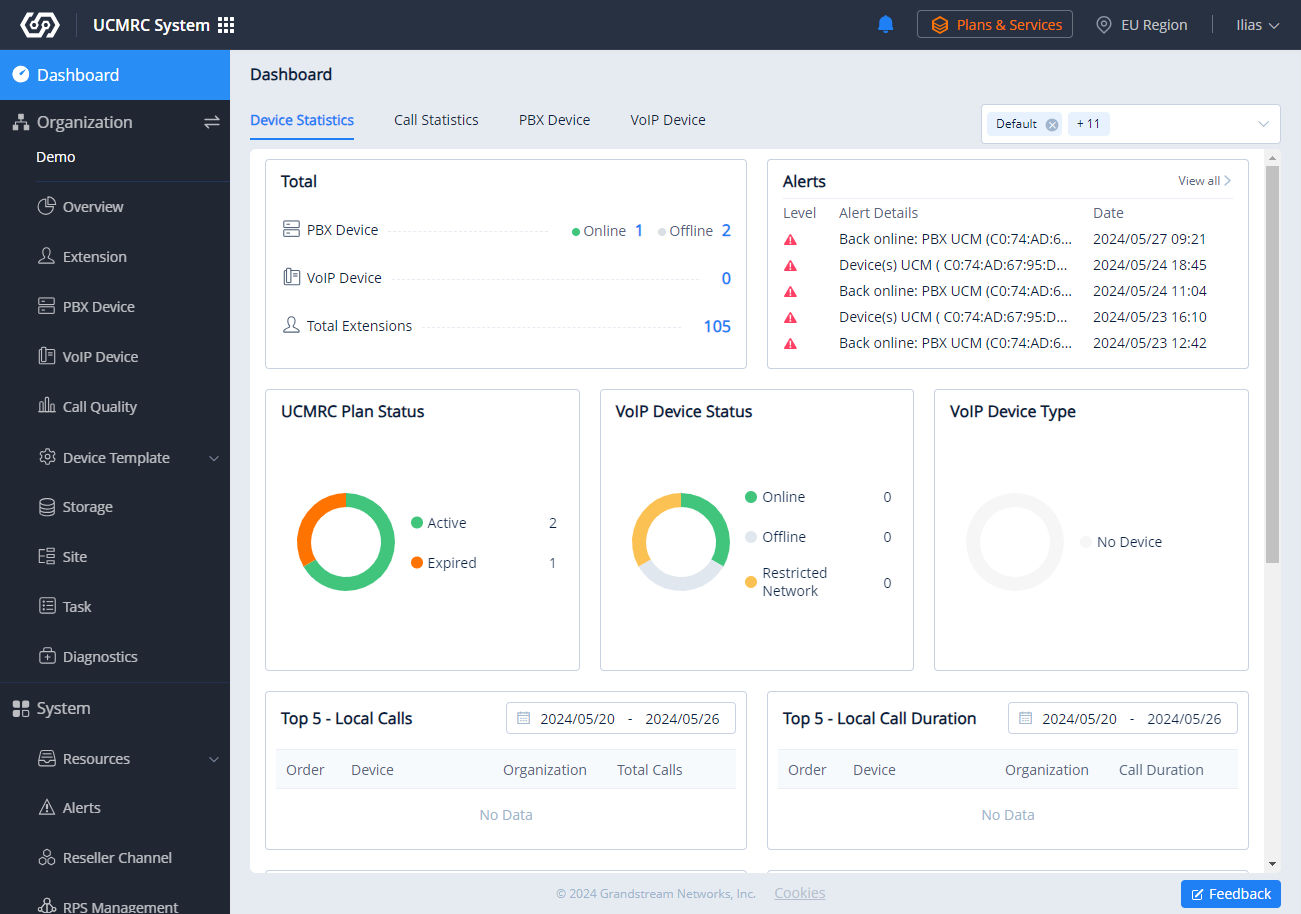
Dashboard
Device Statistics
The Device Statistics page provides an overview of the following information:
- Total Devices
- Alert Management
- VoIP Device Status
- VoIP Device Type
- UCM Real-time Status
Module | Description |
Total |
|
Alert | Display the latest 5 high and medium-level alert messages of the UCM devices in the GDMS platform. |
VoIP Device Status | Display the number of devices in each category: audio and video.
|
VoIP Device Type | Display the number of devices in each category: audio and video.
|
UCM Real-time Status | Display the real-time status of all UCM devices in the current GDMS platform.
Note: Only the UCM devices firmware version 1.0.11.X or higher version support displayinjg the real-time status. |
Top 5 - Local Calls | Displays the top devices which have made the most number of local calls. |
Top 5 - Local Call Duration | Displays the top devices which have made the longest local calls. |
Top 5 - Remote Calls | Displays the top devices which have made the most number of remote calls. |
Top 5 - Remote Call Duration | Displays the top devices which have made the longest remote calls. |
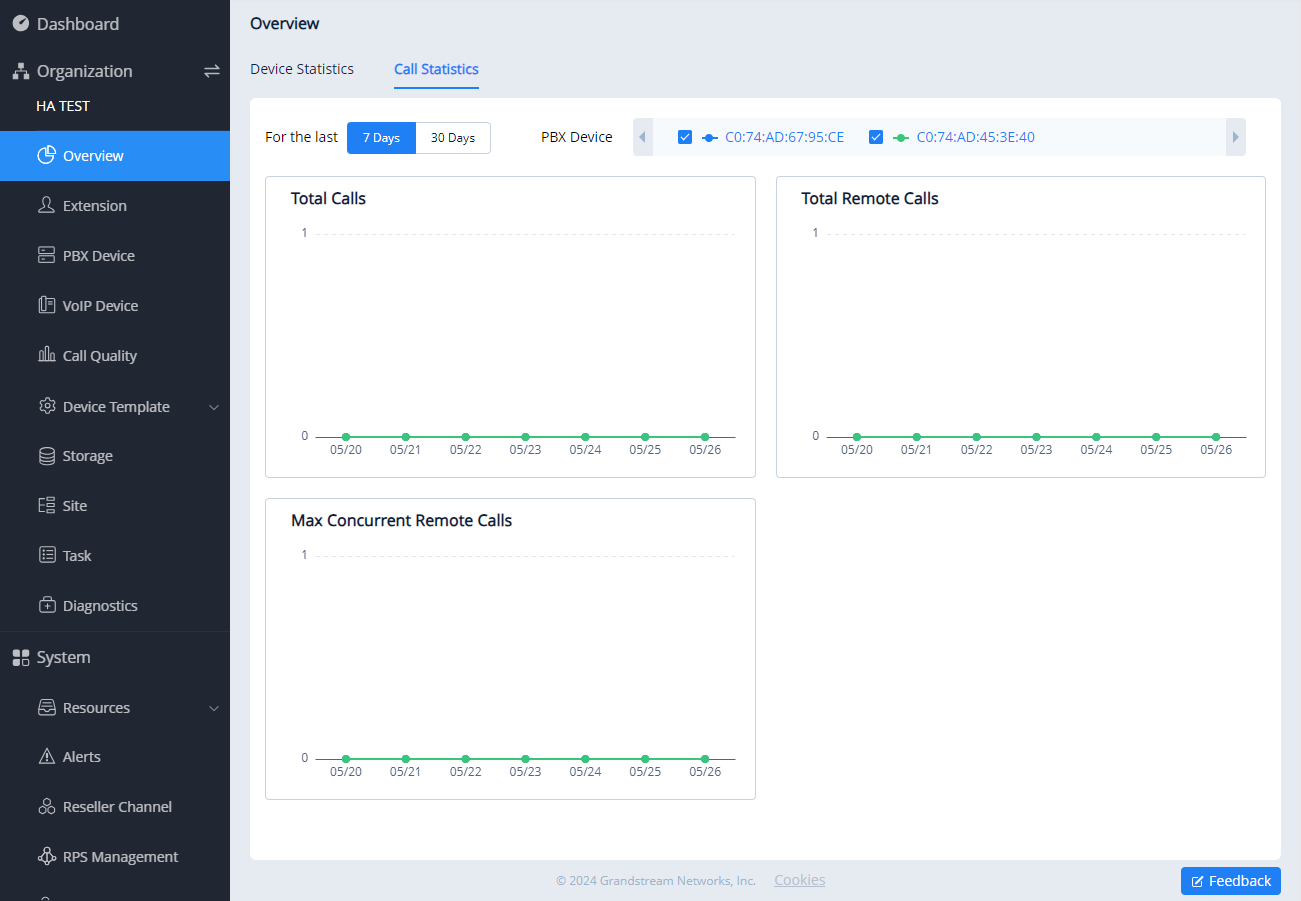
Call Statistics
The Call Statistics module displays all UCM devices’ call statistics information in the current system.
The user can select up to 3 UCM devices at one time to view the call statistics information in the latest 7/30 days.
The call statistics information contents include the number of total calls, the number of total remote calls, and the number of maximum concurrent remote calls.
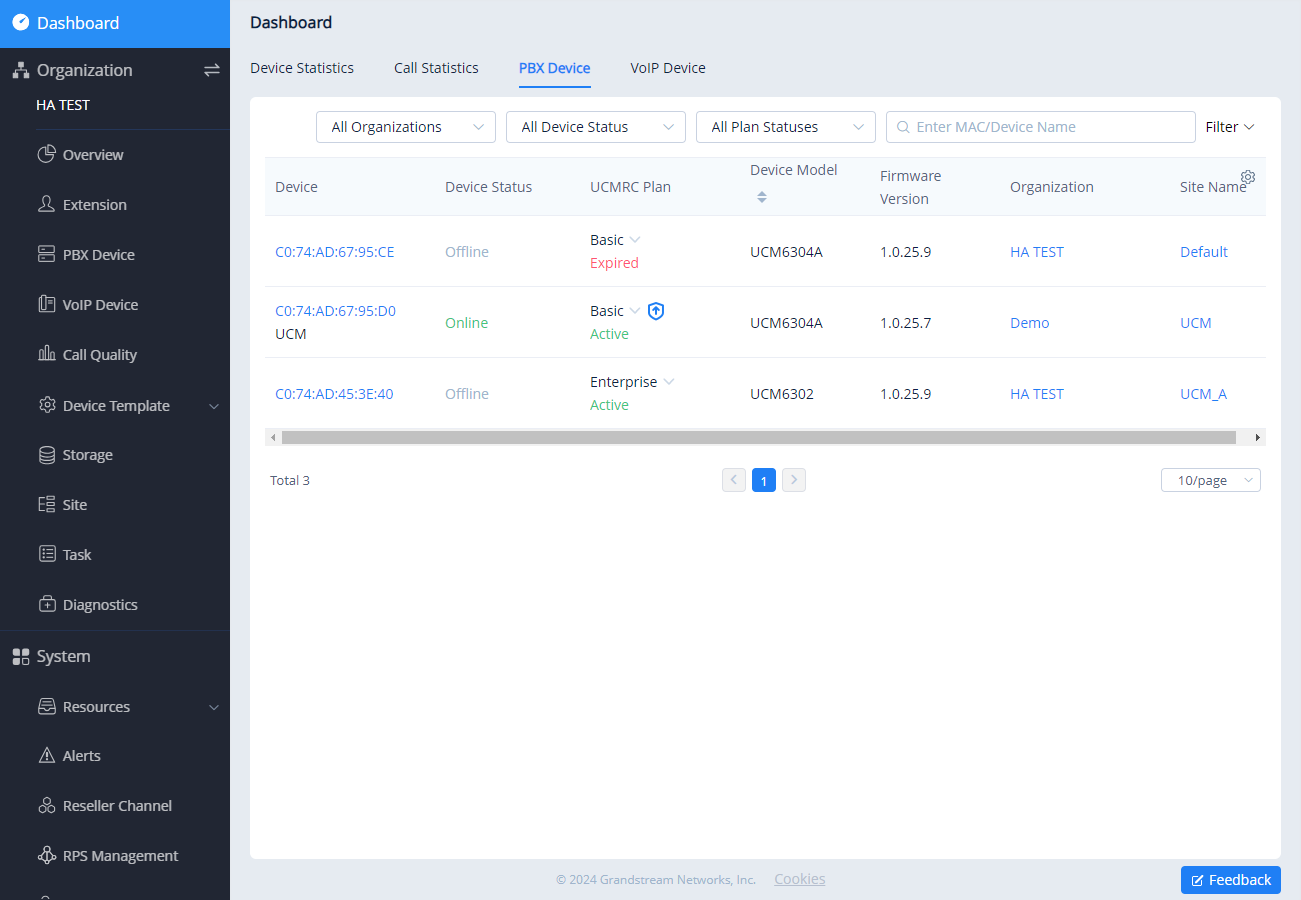
PBX Device
The PBX Device tab displays all devices listed in the UCMRC system of the current enterprise account. Users can search the devices using either the device name or the device’s MAC address.
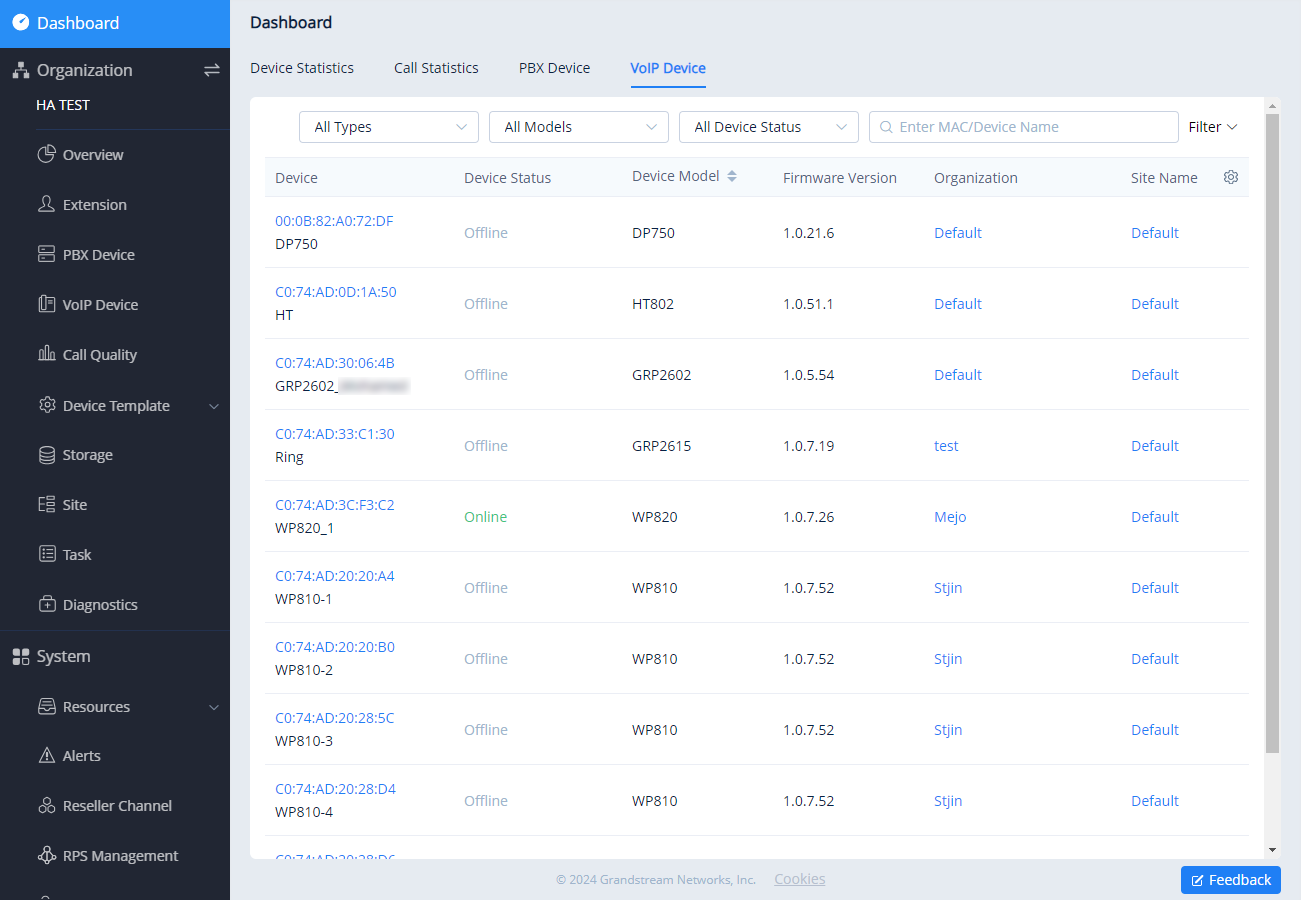
VoIP Device
In this tab, the user can see all the VoIP endpoints which are added to the selected organizations. The user can search for the device using either the name of the device or by using the address MAC.
Overview
The Overview module displays the overview information of each organization, including the Device Statistics and Call Statistics.
Device Statistics
This module displays the same information in the UCMRC system 🡪 Dashboard 🡪 Device Statistics.
Call Statistics
This module displays the same information in the UCMRC system 🡪 Dashboard 🡪 Call Statistics.
Extension
The module displays the extension information of all UCM devices in the selected organization.
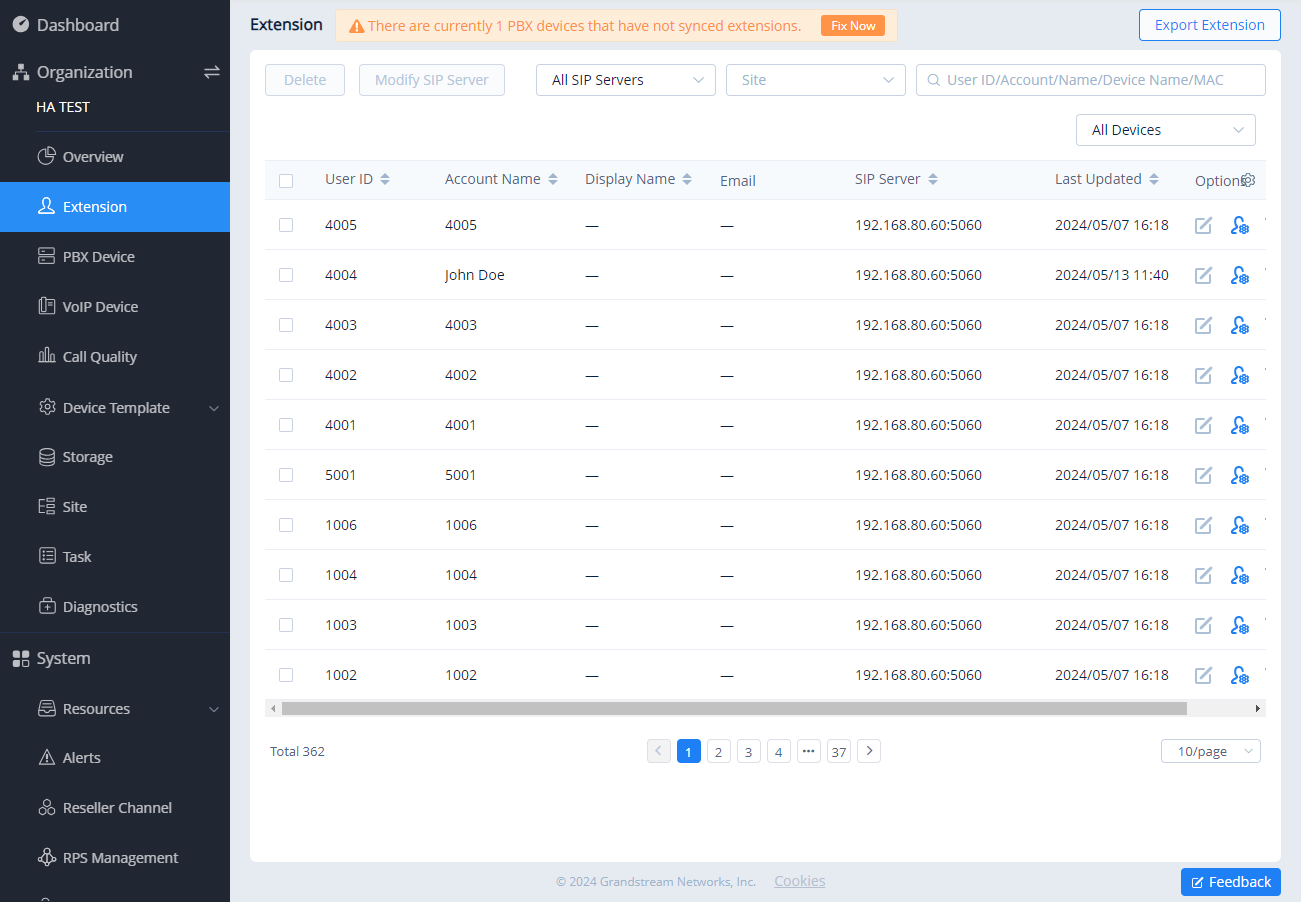
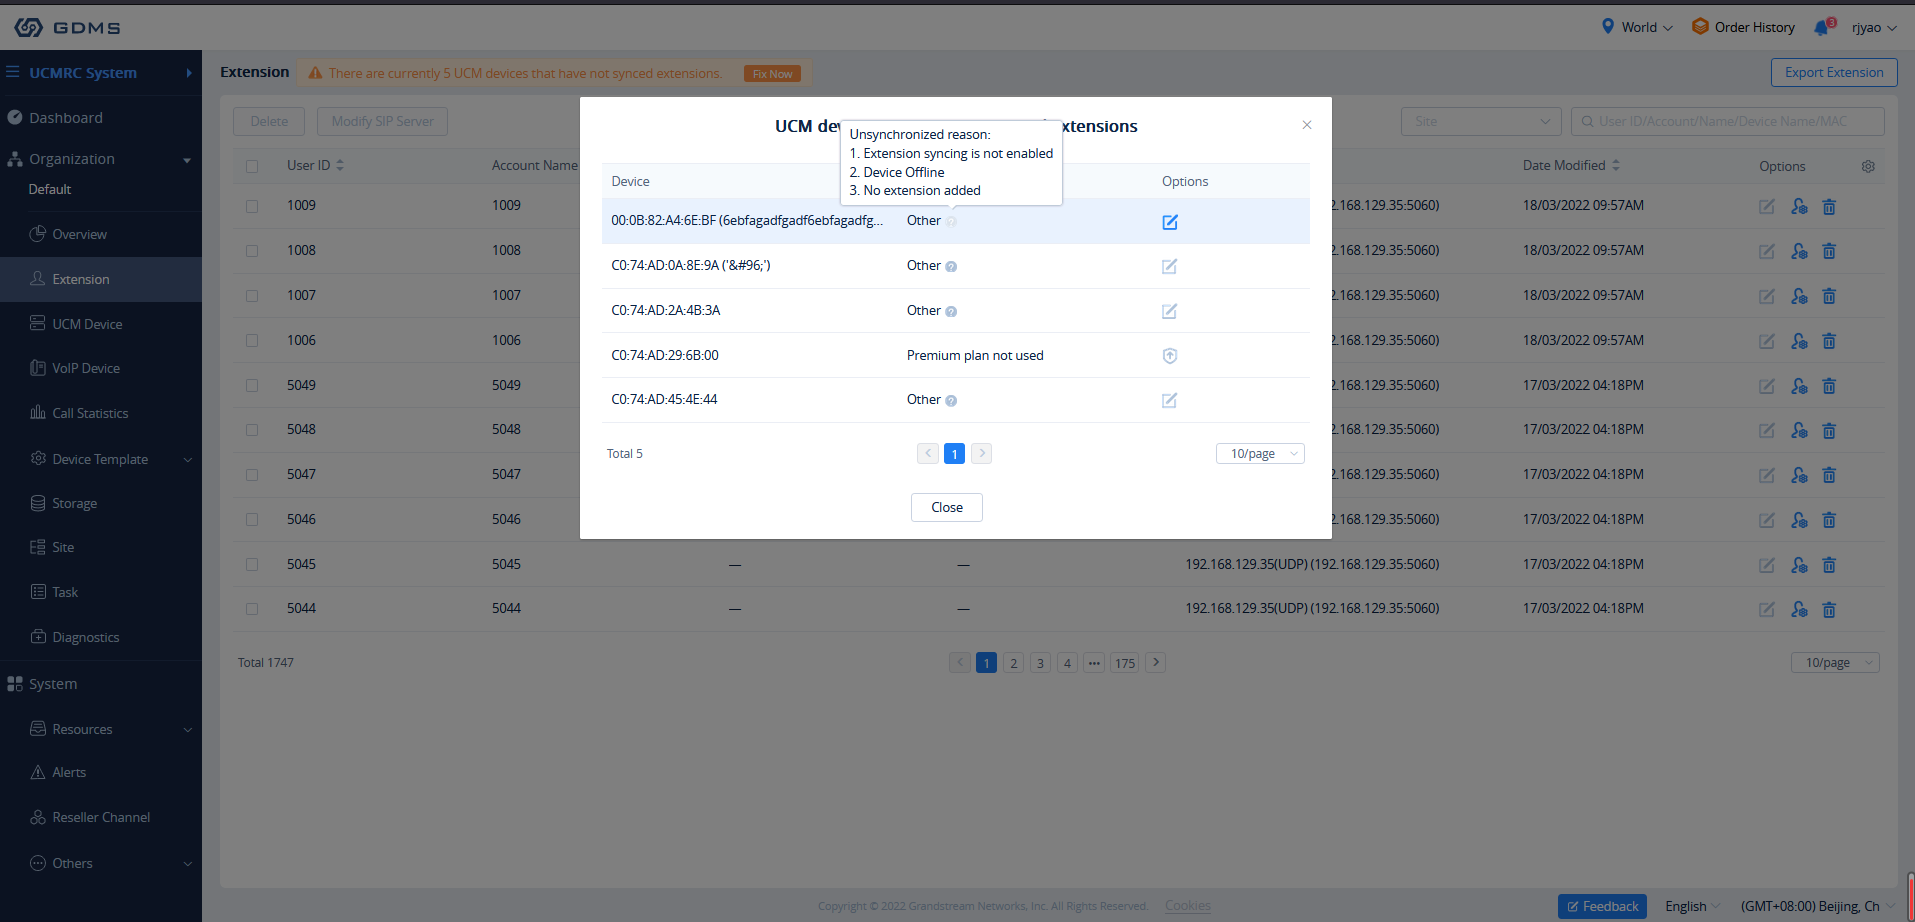
If the extensions in the UCM device have not been synchronized to the GDMS platform yet, the user can click to view the UCM devices which have not synchronized the extensions and the corresponding reasons on the GDMS platform. Please see the screenshot below:
Edit Extension in UCM Web UI
The user can click ![]() button to access the UCM device Web UI to edit the extensions. As the screenshot shows below:
button to access the UCM device Web UI to edit the extensions. As the screenshot shows below:

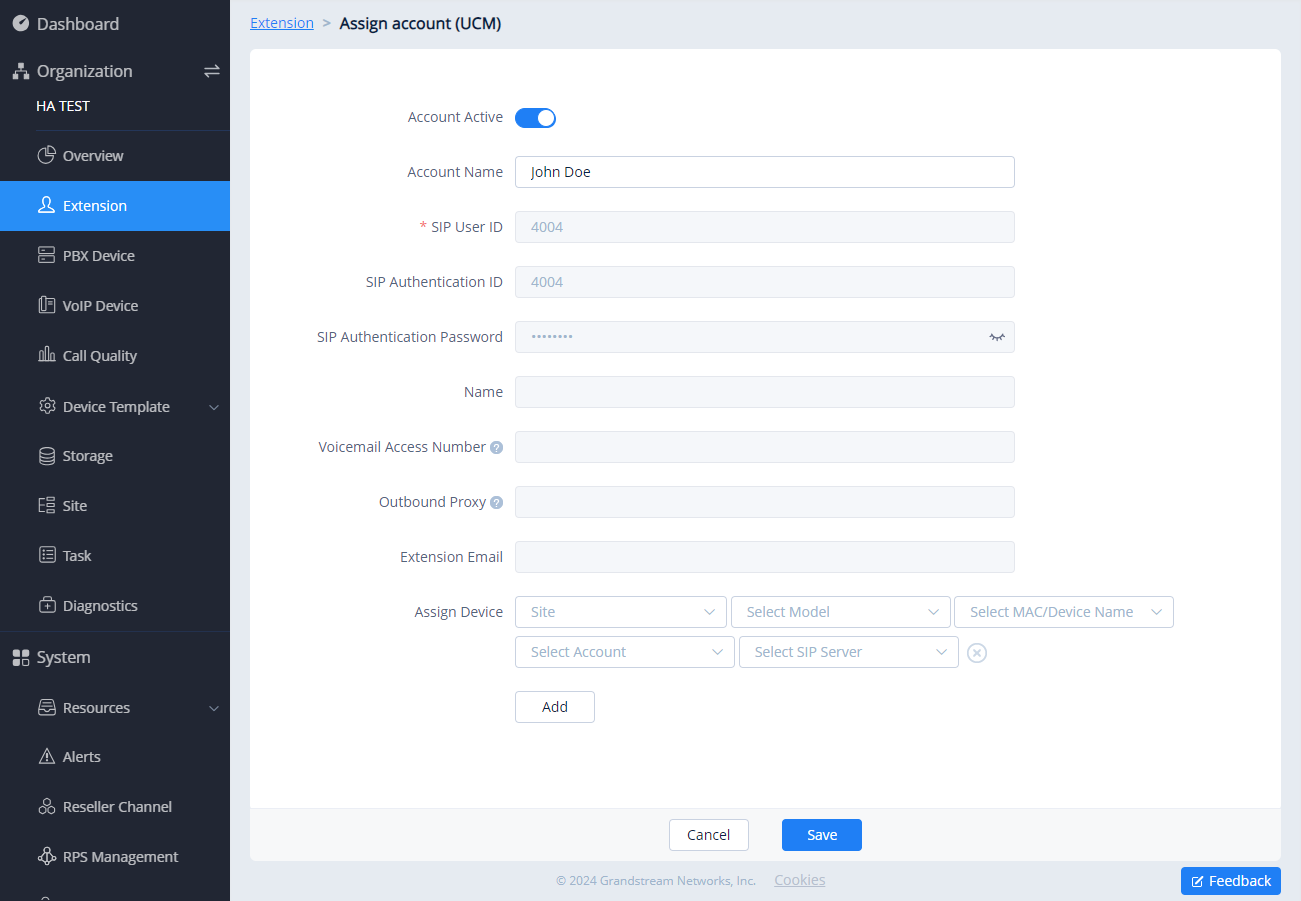
Assign Account
The user can click ![]() button to assign accounts to the VoIP devices in the current system.
button to assign accounts to the VoIP devices in the current system.
Delete Account
Users can delete one or multiple extensions in this module.
- Select an extension to delete, click button or
 button to delete the extension. The user can select to delete one extension or select multiple extensions to batch delete the extensions.
 - Click on the “OK” button, the deleted extensions will be disassociated from the corresponding UCM devices.
 button to delete the extension. The user can select to delete one extension or select multiple extensions to batch delete the extensions.
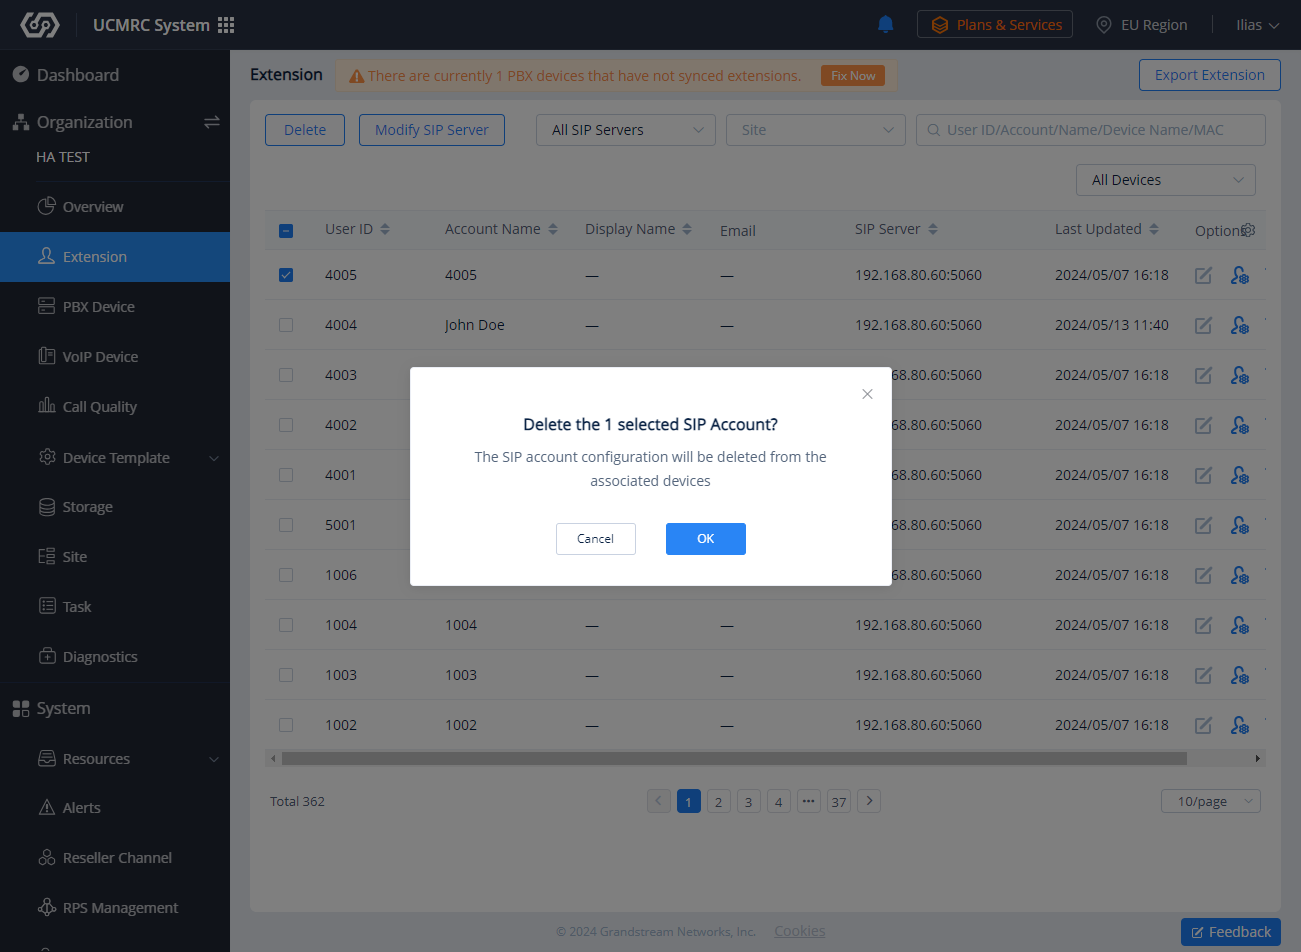
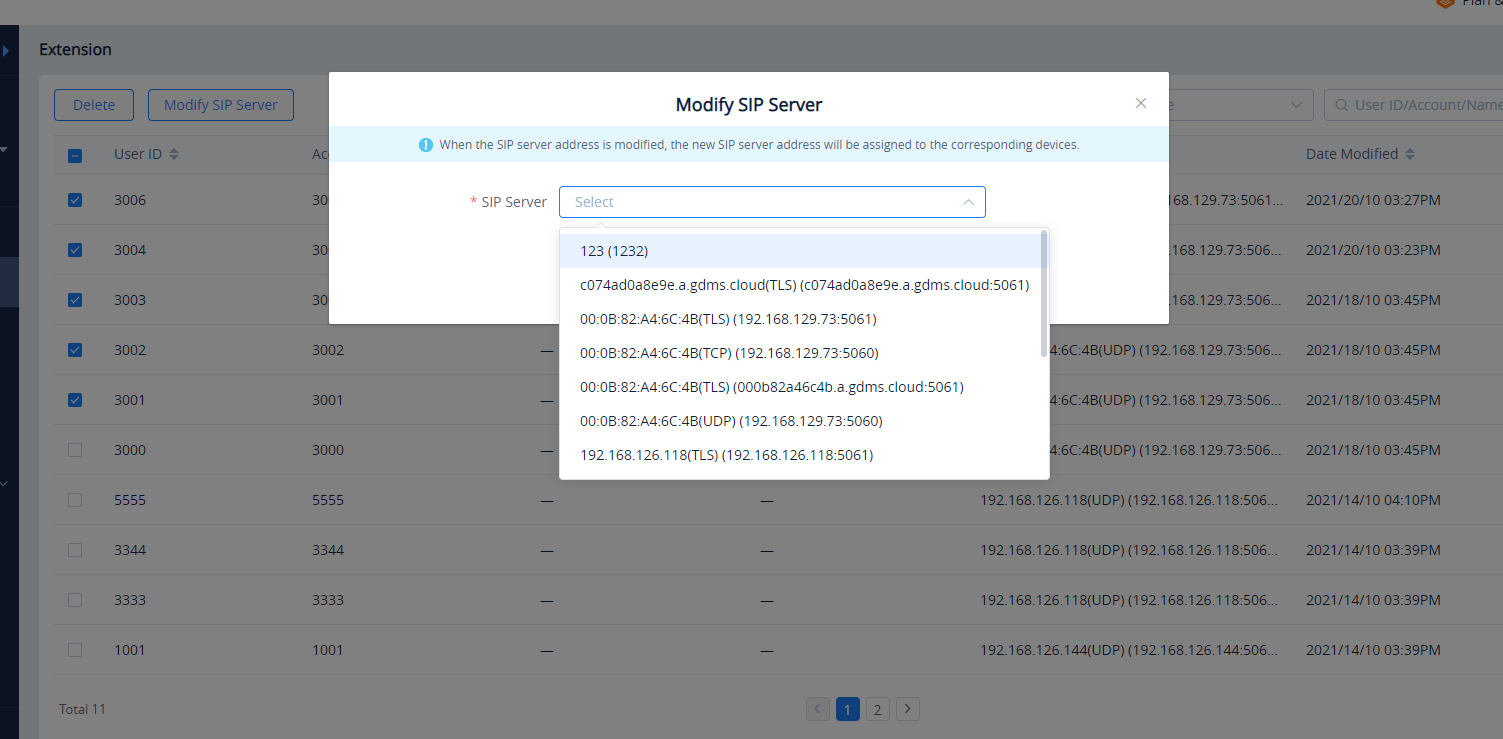
Modify SIP Server
Users can modify the SIP server of one or multiple extensions in this module.
- Select the extension that the user wants to modify the SIP server.
- Click on
 button and select the new preferred SIP server.
 - Click on the “OK” button to apply the changes. Once the SIP server is modified, the new SIP server settings will be assigned to the associated device.
Export Extension
Users can click the “Export Extension” button on the right upper corner of the Extension module to export the extensions in the current enterprise in the GDMS platform.
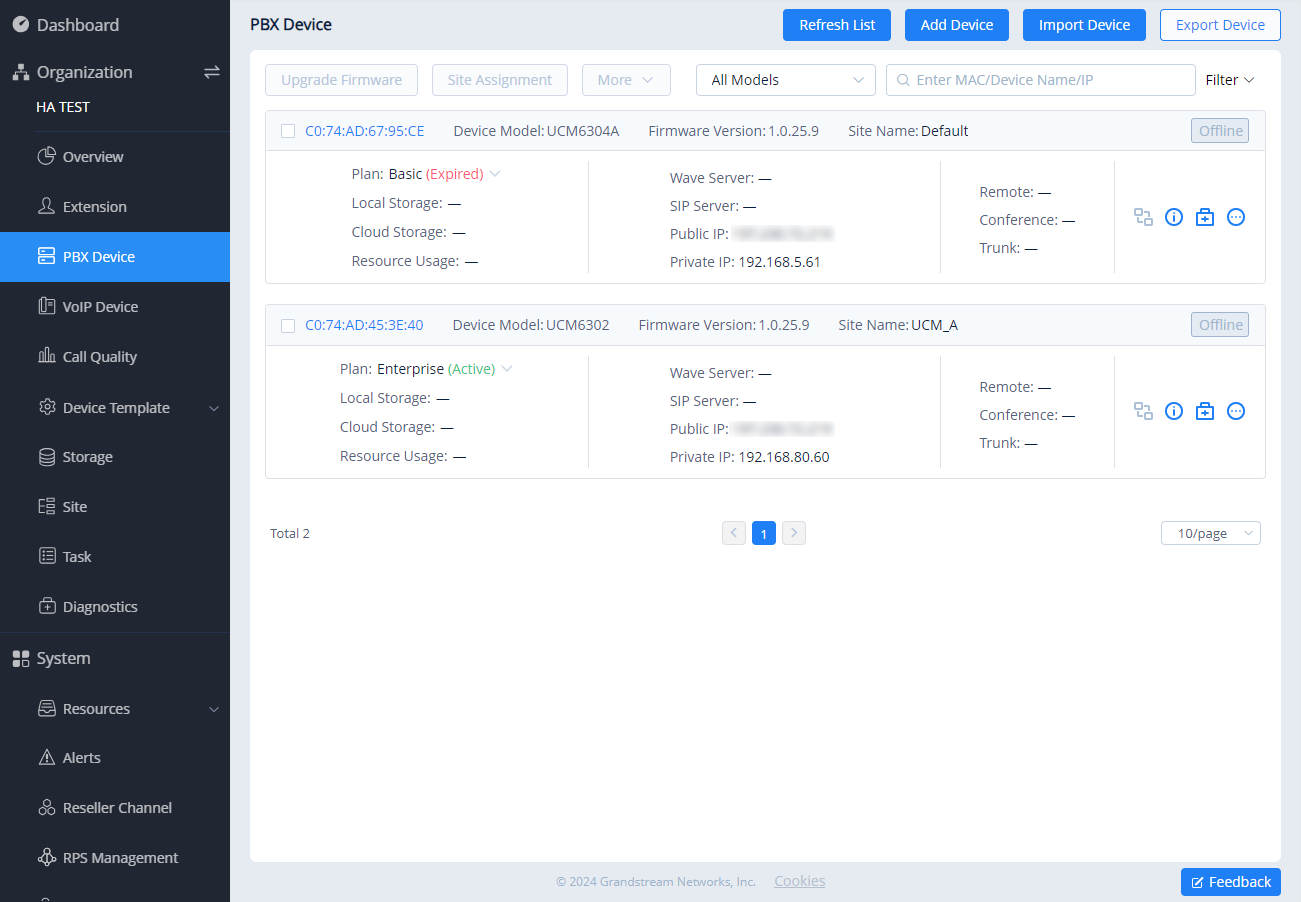
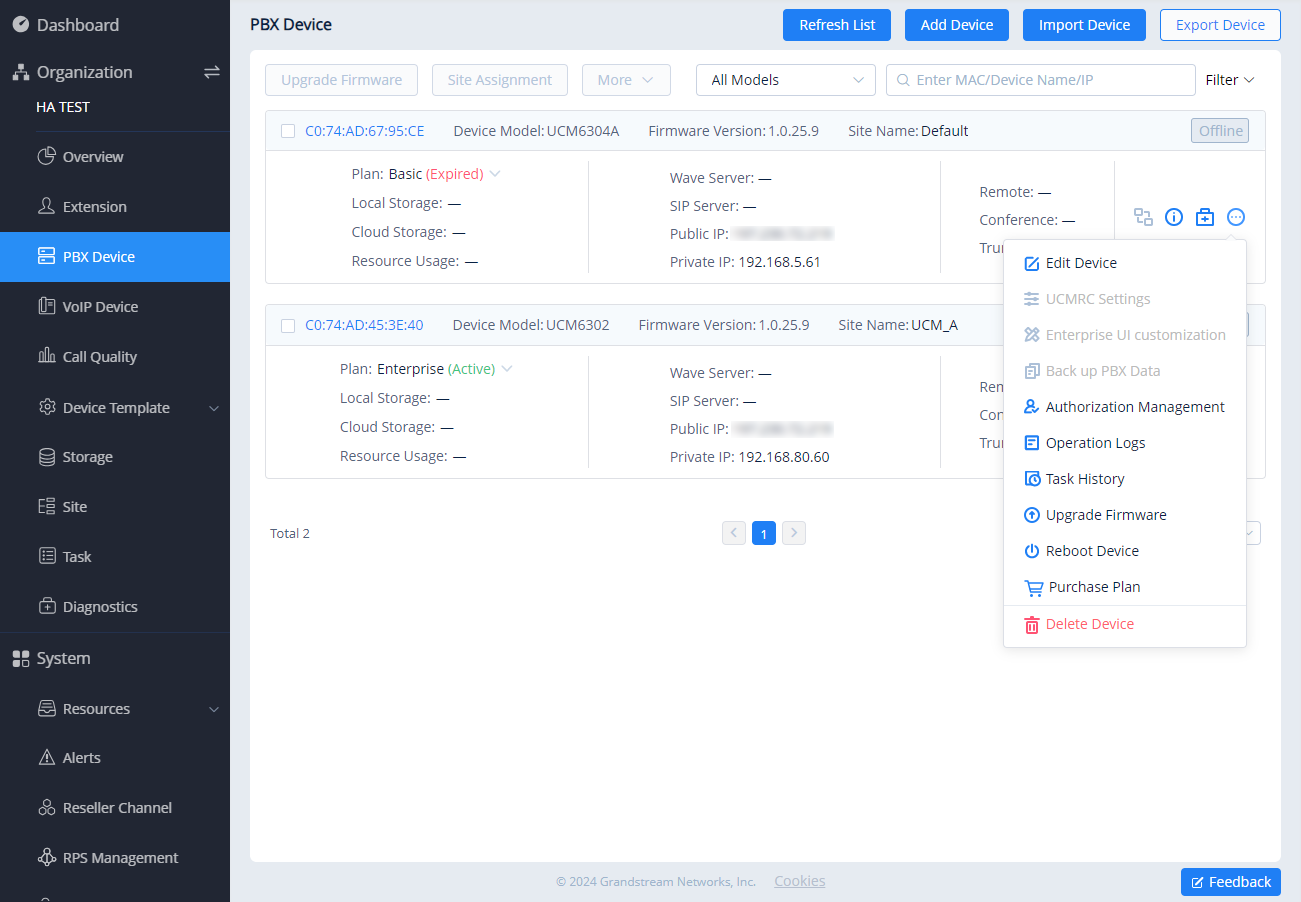
PBX Device
The PBX Device page shows all associated IPPBXs which are either UCM devices or GCC devices. Users can view the firmware version numbers, IP addresses, plans, and other information of the UCM devices. It also allows users to access the device, upgrade firmware, reboot the devices remotely, etc.
| Status | Description |
|---|---|
|
Status indicator |
|
|
Firmware version too low |
|
| Plan Status |
|
| Operation | Description |
|---|---|
|
Sorting |
Click on the sorting buttons |
|
Custom Display Option |
Click on the |
|
Search |
In addition to being able to search for devices with the search bar near the top-right corner of the page, users can further refine search results by clicking on the Filter button by specifying device status, site, city, and firmware version. |

Add IPPBX Device
To add a new IPPBX device to the GDMS platform, users can click on the Add Device button. Please see the screenshot below:
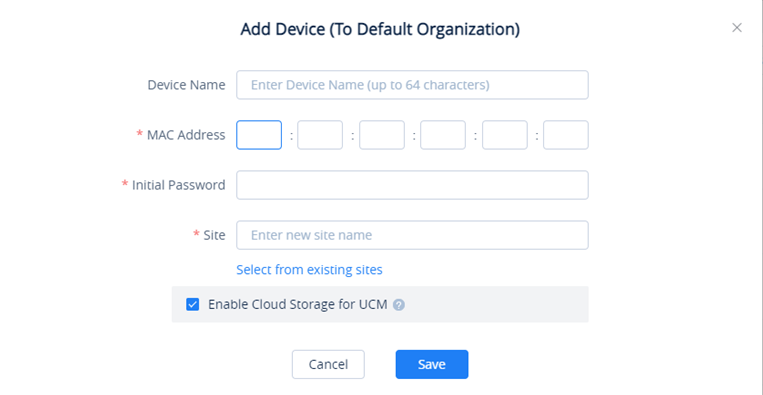
Device Name | (Optional) This option is used to set the name of the device so that the users could identify this device. The maximum number of the input characters is up to 64. |
MAC Address | (Required) This option is used to enter the MAC address of the device. (Locate the MAC address on the MAC tag of the unit, which is on the underside of the device, or on the package. Or the address can be viewed on the IPPBX Web GUI 🡪 System Status 🡪 System Information 🡪 Network interface (LAN MAC address). |
Initial Password | (Required) This option is used to enter the Initial Password of the device. The original password can be viewed on the UCM’s case or LCD. |
Select Site | (Required) This option is used to set which site this device belongs to. The newly created site name is the same as the name of the IPPBX device, as the first level site. The user can also select another site. |
Enable Cloud Storage for UCM | After enabling the option, the recording files and chats will be stored to the GDMS if the PBX device has the paid UCMRC plan. |
Add UCM Device
After clicking the “Save” button, the device will be added to the GDMS platform successfully, and the user can apply for a UCMRC advanced plan free trial for this device

Batch Import UCM Devices
Users can import multiple devices by uploading a file. Click on the Import Devices button on the Device page to get started. The following window will appear:
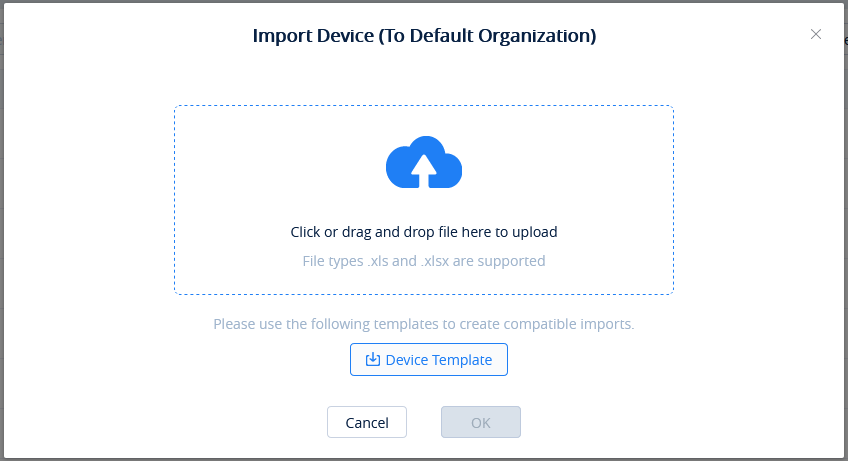
- Click on the button to download the template. Users must follow the instructions to enter the required information.
- The template will have the following fields:
MAC Address | Users need to fill in the MAC address of the device in this field (Required). For instance, |
Original Password | Users need to fill in the original password of the device in this field (Required). The original |
Device Name | This option is used to set the name of the device so that the users could identify this device |
Site Name | Enter the site to assign this device to (Required). If the site is under more than one level, all site levels must be included in the site name (e.g. first_level/second_level/…/new_site). |
Import UCM Device Template
- Users can drag the file to the pop-up window, or they can click the upload button to select a file from their PC to import.
- Once the file is imported into GDMS, the result window will appear. If any data failed to import successfully, users can export the problematic data, re-edit, and attempt to import them into GDMS again.
View IPPBX Device Details
Click on the ![]() button to view a specific device’s system information.
button to view a specific device’s system information.
In the UCMRC system, the user can quickly view all SIP server addresses in the Device List. For a certain SIP server address, the user can quickly view the advanced settings of the SIP server, including all advanced settings of the SIP server in the VoIP system.
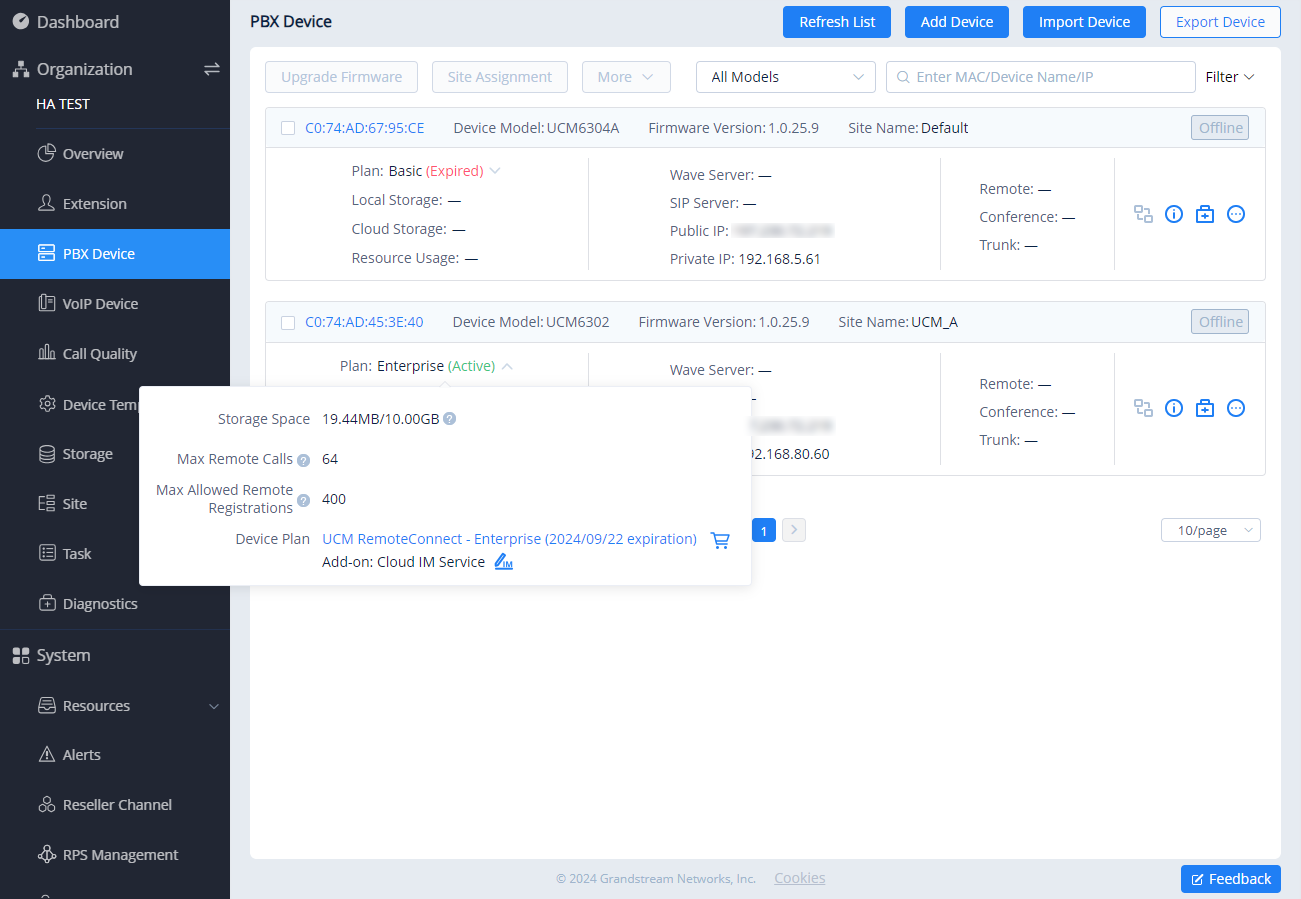
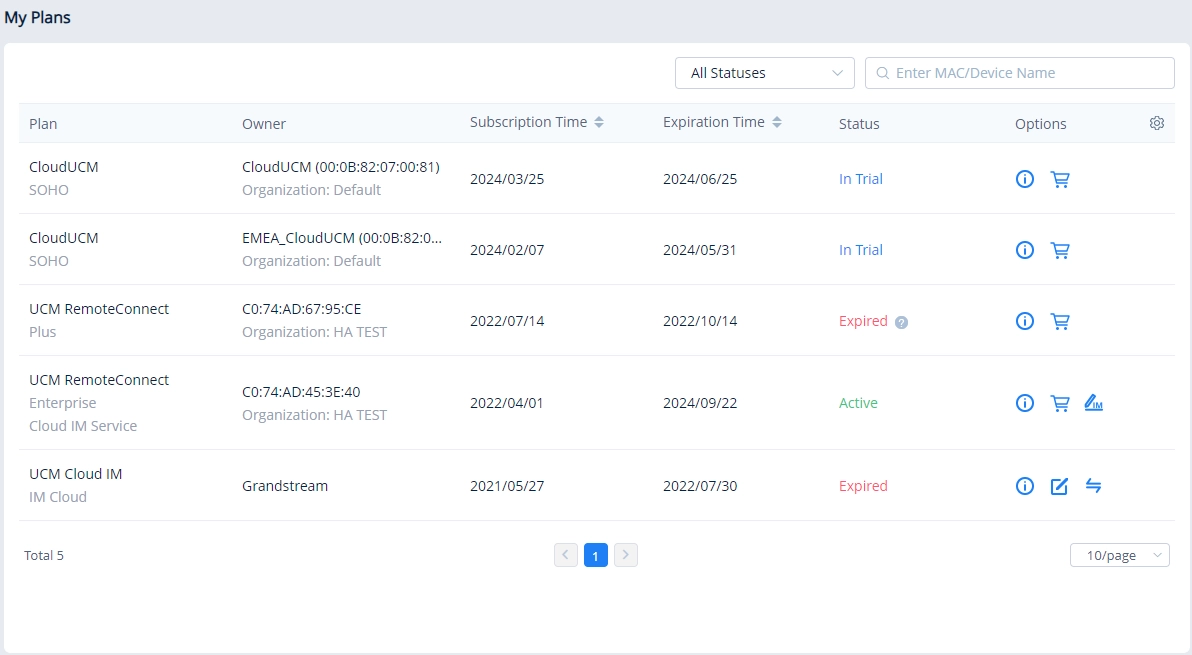
View Device Plan
Select the plan for a specific UCM device to view the plan of the device, expiration date, currently used cloud storage space, and total cloud storage space.
|
Access Server | This is used to configure Wave phones so that Wave users can connect to the UCM server and make calls at any time, anywhere on any network. If the user wants to configure the remote service address on the terminals for remote calls, the user can enable the button and obtain the remote service address. |
|
Storage Space | Refer to the current storage space used by the UCM device, and the total storage space of the UCM device. If there is not enough space, the backup files cannot be stored. The used storage space contains: – l Used storage space by cloud storage (excluding the space allocated to the Cloud IM service) – The maximum storage space allocated to the Cloud IM service |
|
Device Plan |
Refer to the current plan and add-on plan of the device. If the plan has expired, the user can only use the Basic plan as the current plan. |
After adding the device to the GDMS platform, the user can apply for a UCMRC Plus plan free trial for 3 months by clicking the button![]() .
.
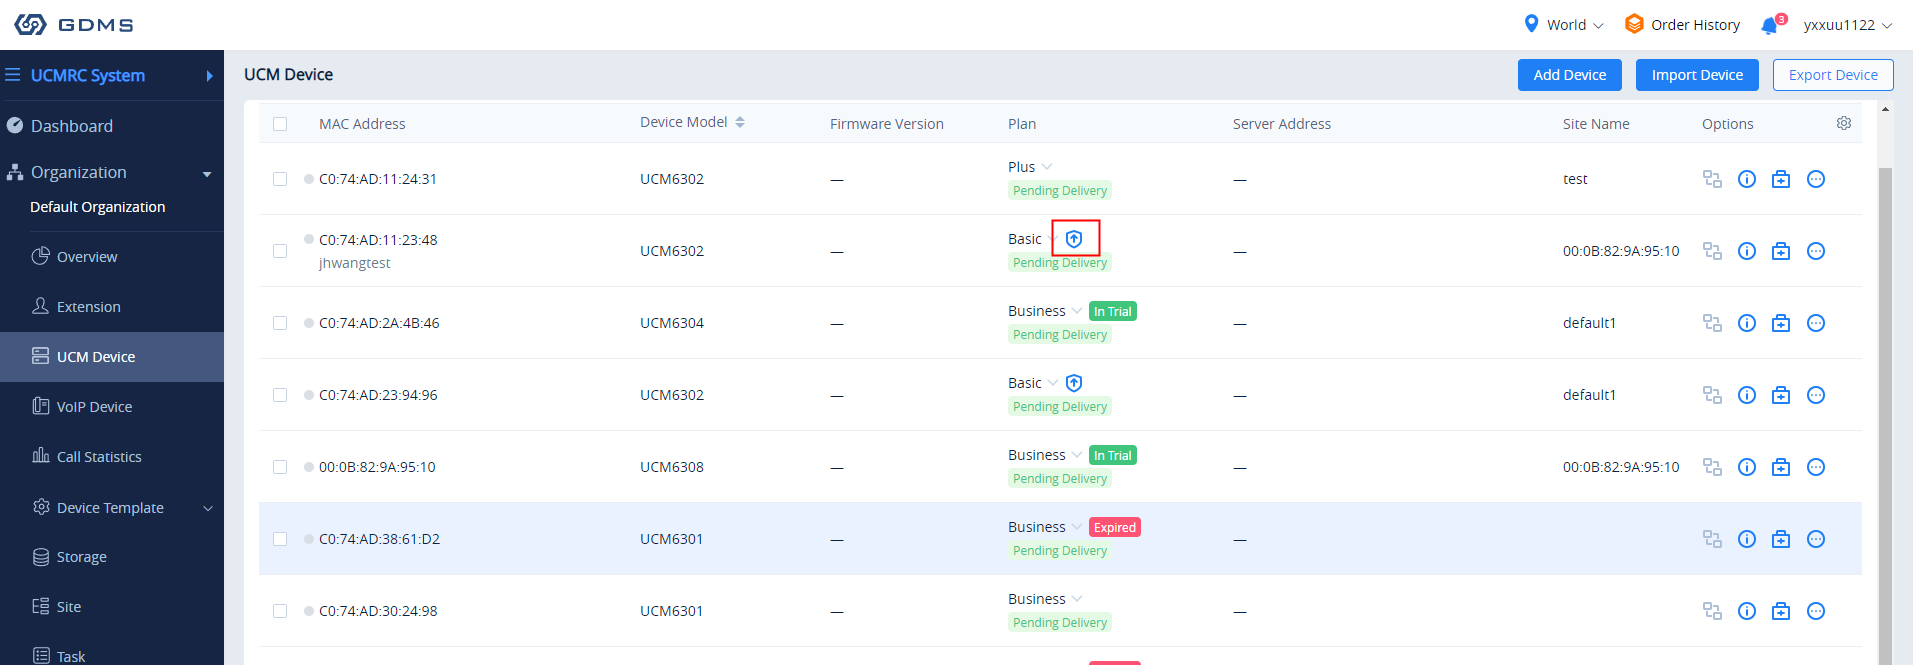
- After the paid plan expires, it will be downgraded to the “Basic” plan and the UCM630x device will permanently stay on the Basic plan until the user decides to upgrade it.
On the UCM Device -> Plan -> Expand the drop-down menu, users can view the information of “Device Original Plan” displayed on the interface. Please see the screenshot below:
2. After the paid plan expires, the user can go to the “My Plans” menu and move the cursor to the corresponding tip, the user will see the notification “After the previous plan expires, your UCM device can always use the Basic plan for free.”
We also updated the option “Order History” on the right upper corner to “My Plans”.
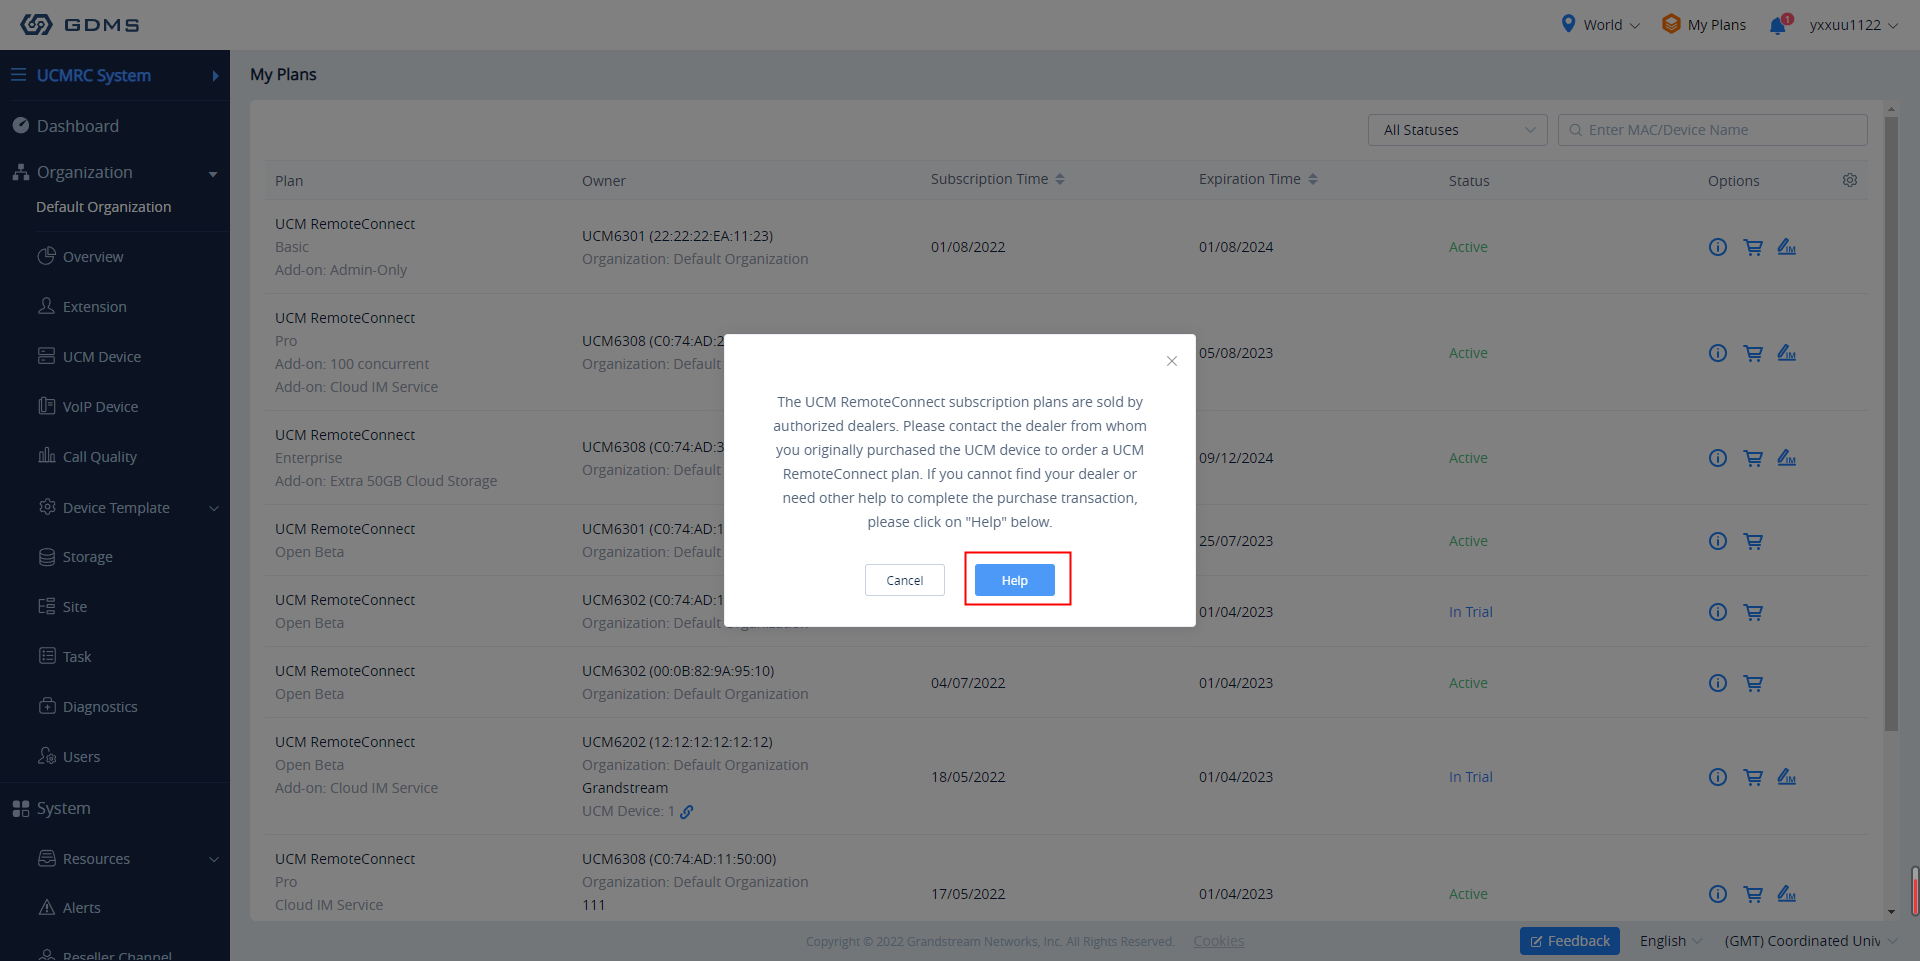
3. If the user cannot contact the dealer in the process of purchasing the plan, the user can click the “Help” button and fill in the relevant information. Then, we will send an email to the authorized distributor and the authorized distributor will contact the user as soon as possible.
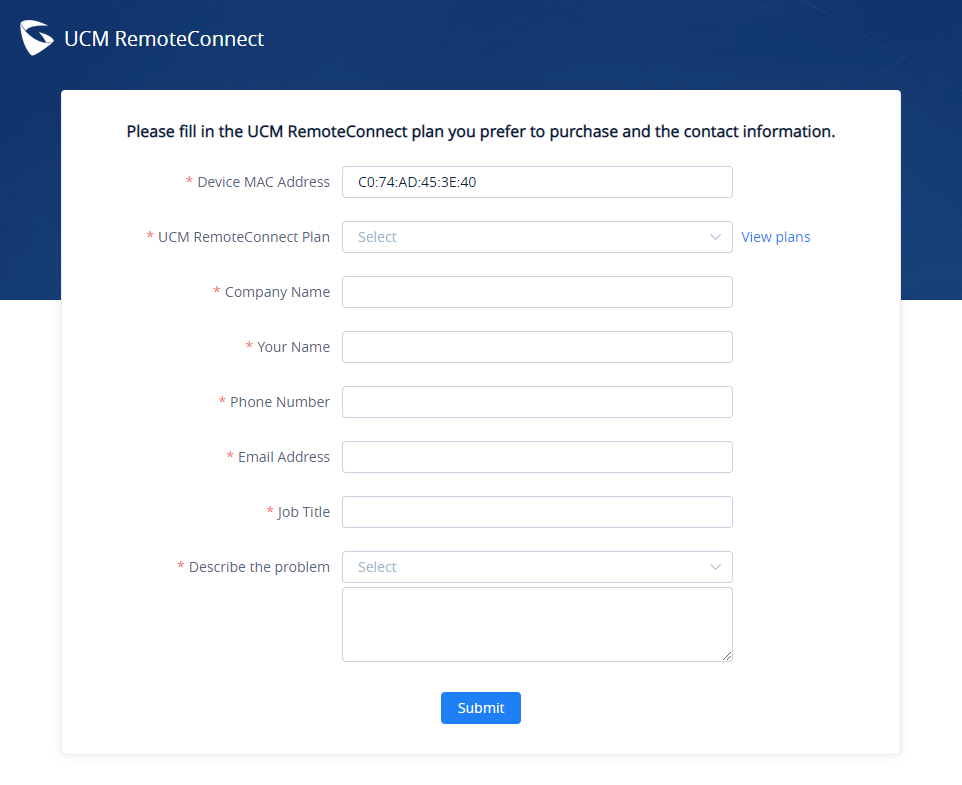
4. Then, a form will appear for the user to fill in the necessary information.
Remote Access to UCM Web UI
On the GDMS platform interface, even though the UCM is under the internal network, the user can remotely access the UCM Web UI through the external network for viewing data and configuration.
Prerequisite: The IPPBX device firmware version must be later than 1.0.15.1
- Go to Device Management 🡪 UCM/GCC Device interface, click on the button
 of the specific UCM device, as the screenshot shows below:

- Go to the UCM Web UI, and log in to the UCM device through the username and password, as the screenshot shows below:
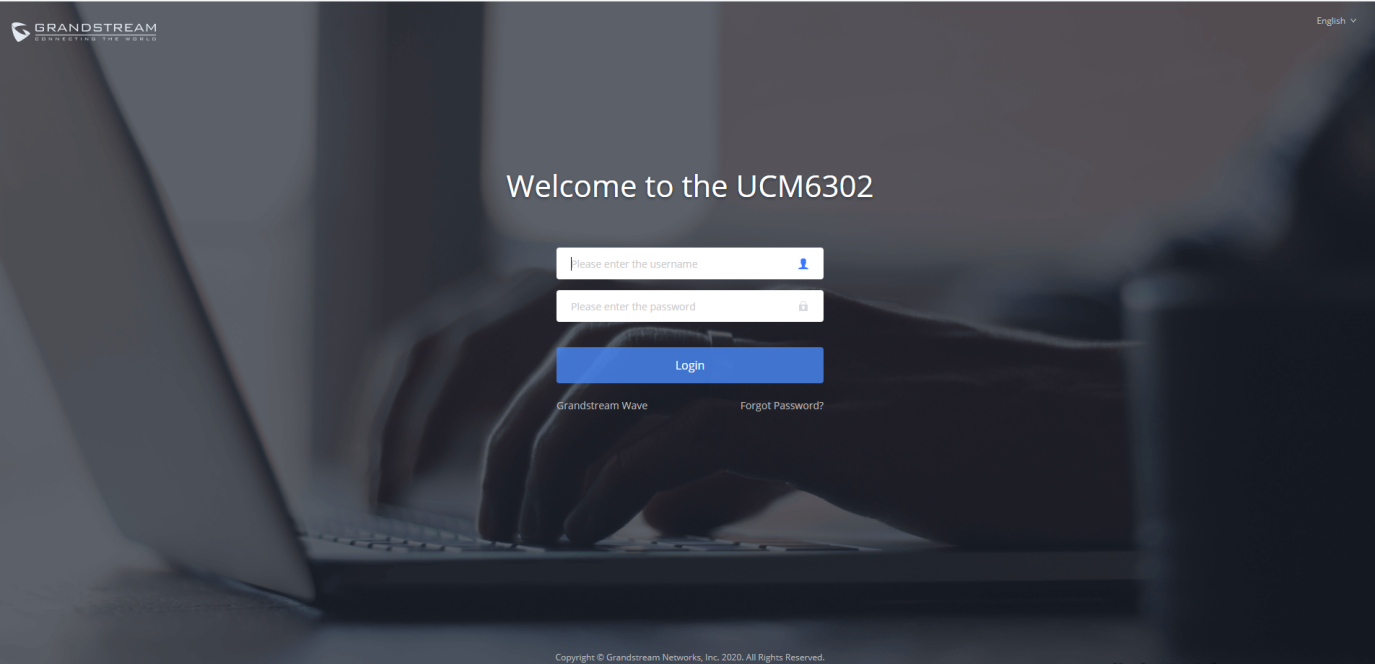
- After logging in, the user can operate this UCM remotely by accessing the UCM device under the local network, as the screenshot shows below:
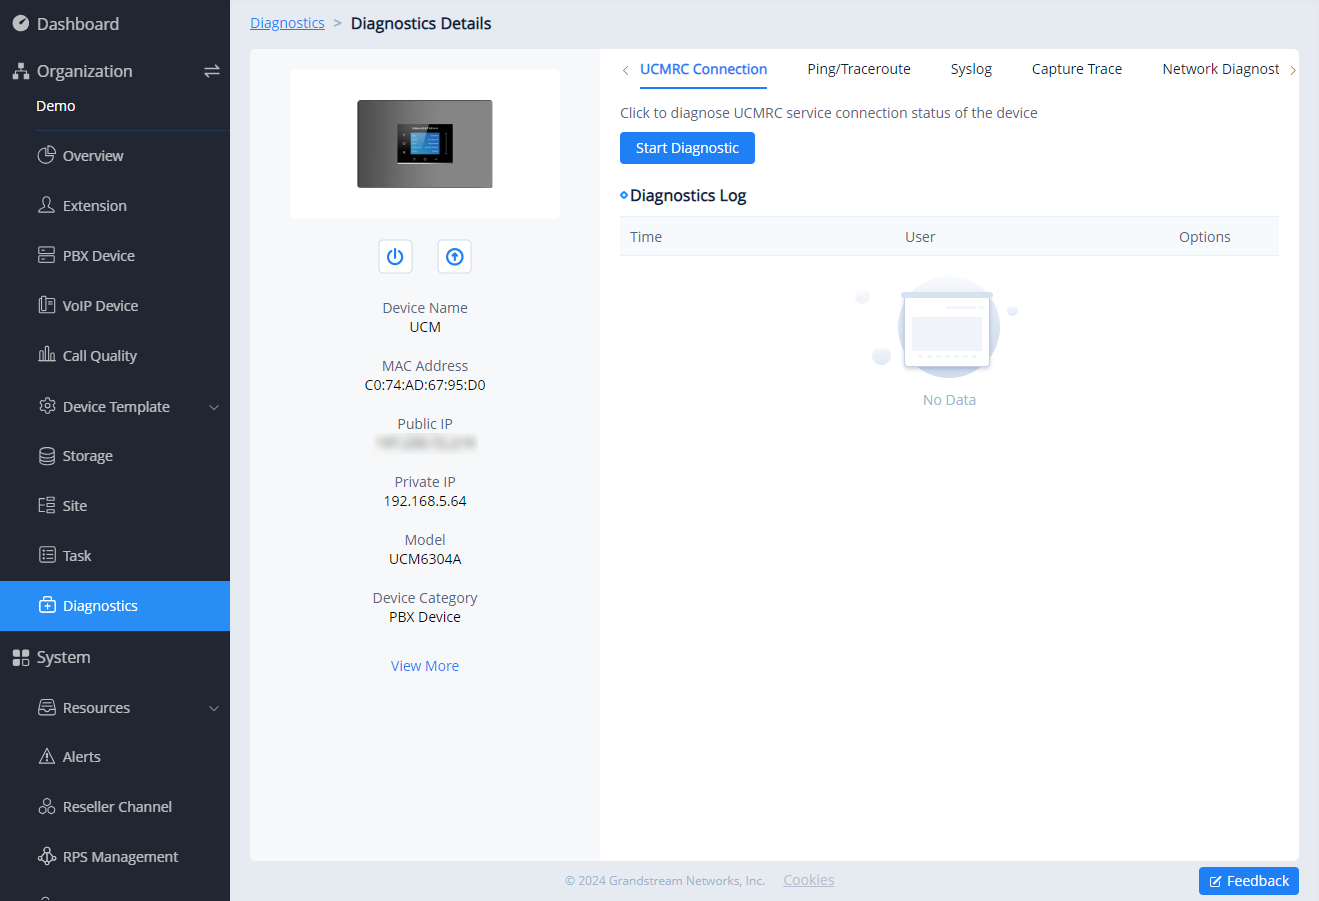
UCM Device Diagnosis
On the UCM Device list, users can click the Diagnosis button ![]() following the UCM device to diagnose the UCM device, including UCMRC Connection, Ping/Traceroute, Syslog, Capture Trace, Network Diagnostics, and System Status.
following the UCM device to diagnose the UCM device, including UCMRC Connection, Ping/Traceroute, Syslog, Capture Trace, Network Diagnostics, and System Status.

If the UCM device which is using the UCMRC services has any problems, the user can diagnose the UCM device and troubleshoot the problems remotely. The user can try to fix the problems based on the suggestions and click on the “Feedback” button to send the logs and descriptions to our technical support.
View Statistics
Daily Report
Prerequisite: The UCM plan contains permission for this function.
The UCM device collects the data report of the day and sends it to the GDMS user or the configured email box.
Please refer to the screenshot below for the daily report email:
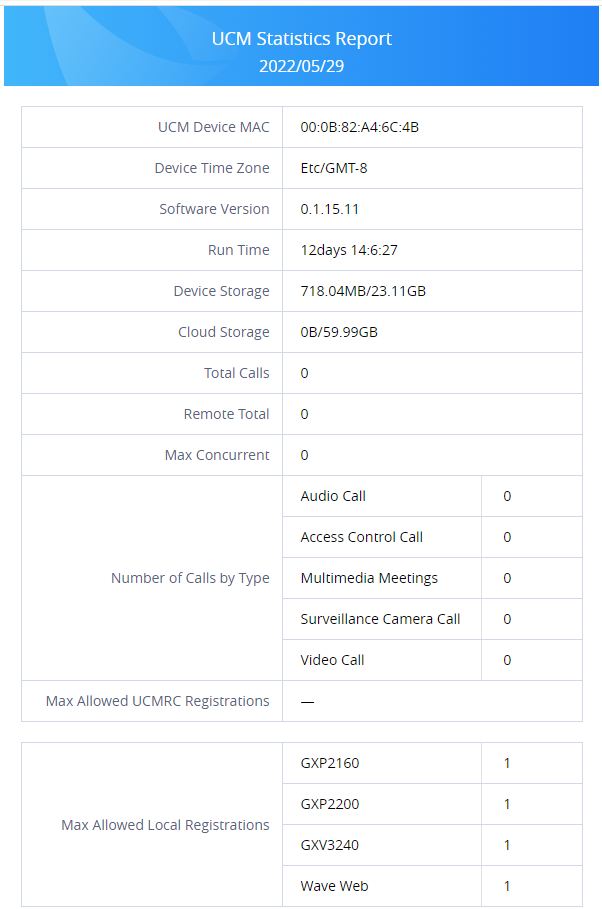
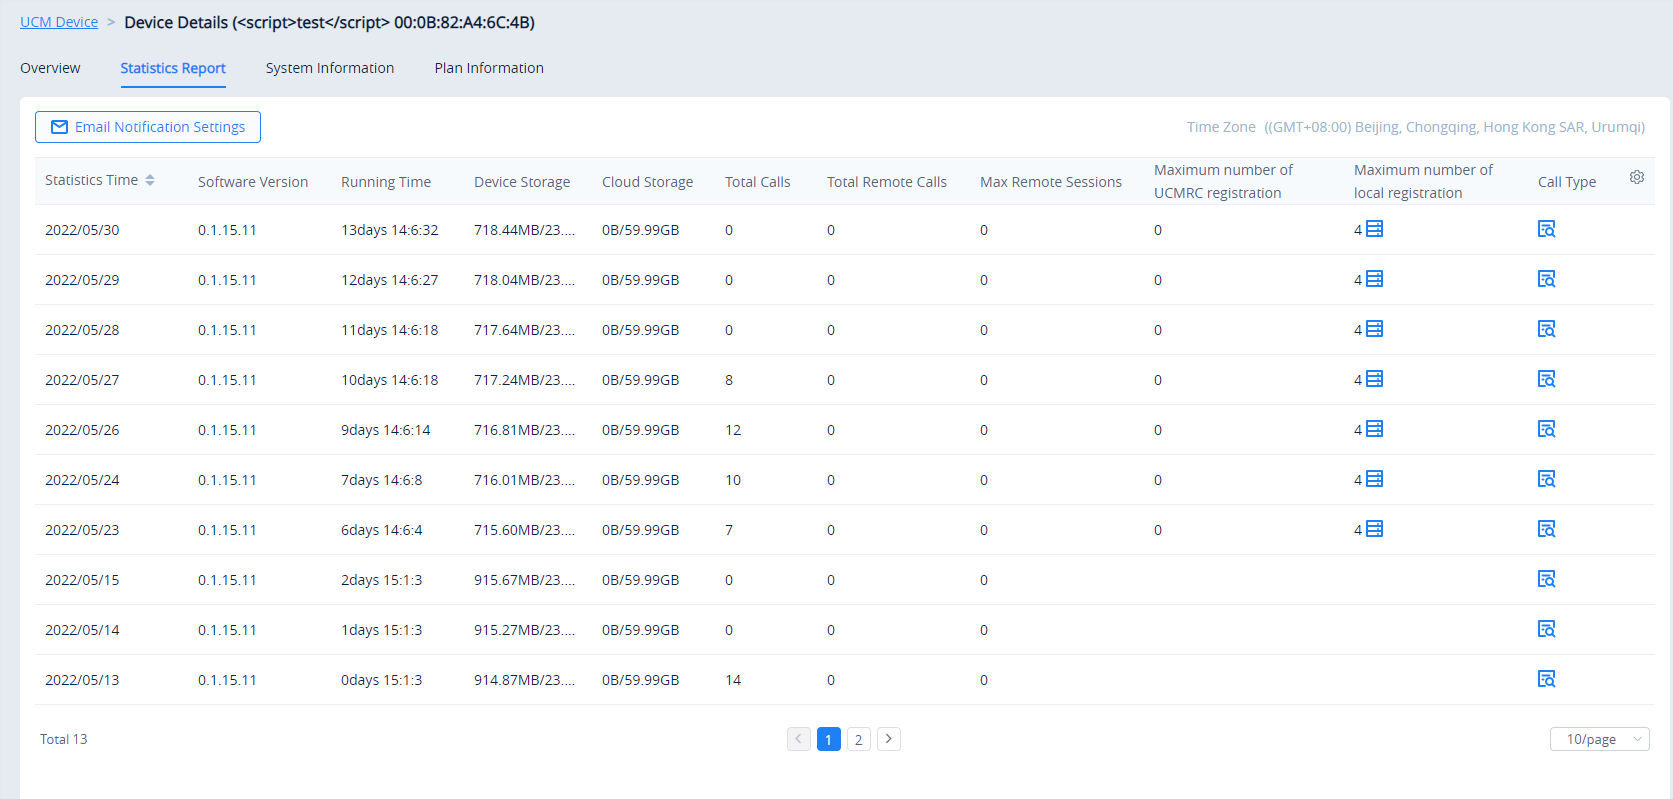
Statistics Time | The time of sending the data is displayed according to the local time zone of the IPPBX device. |
Device | The MAC address of the IPPBX device is counted. |
Time Zone | The local time zone of the IPPBX device. |
Firmware Version | The current firmware version number. |
Running Time | The running time displays the deadline for reporting the data. |
Storage Space | By the reporting data time, it displays the usage of the local storage space of the device. If the usage reaches 80%, the indicator will be marked in red. |
Cloud Storage Space | By the reporting data time, it displays the cloud storage space usage of the device. If the usage reaches 80%, the indicator will be marked in red. |
Total Calls | The total number of calls on the reported day. |
Total Remote Calls | The total number of calls made by the remote users on the reported day. |
Max Remote Sessions | The maximum number of concurrent remote calls on the reported day. |
Call Type Statistics | The distribution of all call types on the reported day. |
Max Allowed UCMRC Registrations | The maximum number of remote registered extensions on the reported day. |
Max Local UCMRC Registrations | The maximum number of local registered extensions on the reported day. |
Max Time Per Remote Call/Meeting | The maximum call duration of the single remote call on the reported day. If the maximum call duration of the single remote call reaches 90% of the plan limitation, the value will be marked in red. |
Aggregate Time for Remote Calls/Meetings | The total remote call duration on the reported day. If the total remote call duration reaches 90% of the plan limitation, the value will be marked in read. |
View Statistics Report (Last 30 days)
Prerequisite: The UCM plan contains permission for this function.
- Go to the Device Management 🡪 UCM Device interface, click on the button
 of the specific UCM device, and select the “Statistics Report” menu.
 - Users can only view the statistics report for the last 30 days. The reports will be sorted by the local time zone of the UCM devices, as the screenshot shows below:
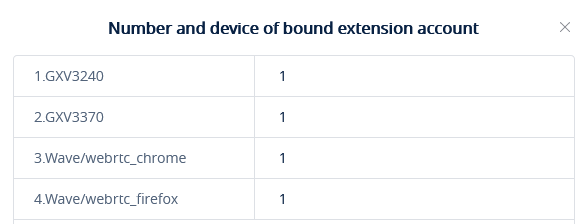
- Click on the button
 to view the type and amount of the connected device on the current day to the UCM device:
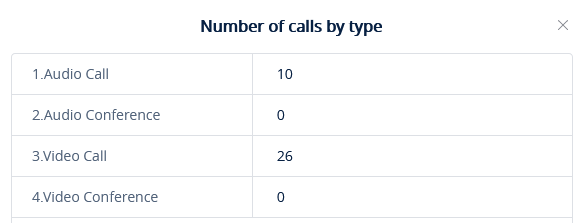
- Click on button
 to view the call type statistics of the current day:
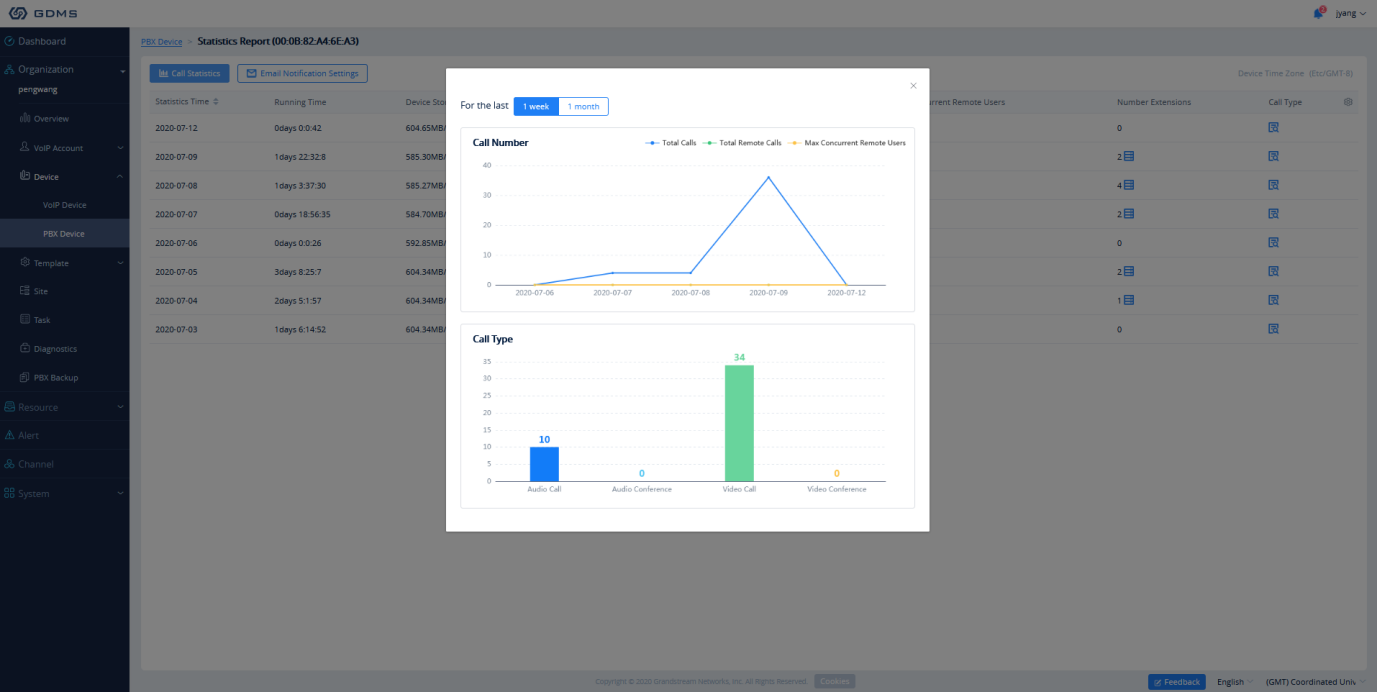
- Click on button
 to view chart statistics of the number/type of calls in the last 7 days or last 30 days, as the screenshot shows below:
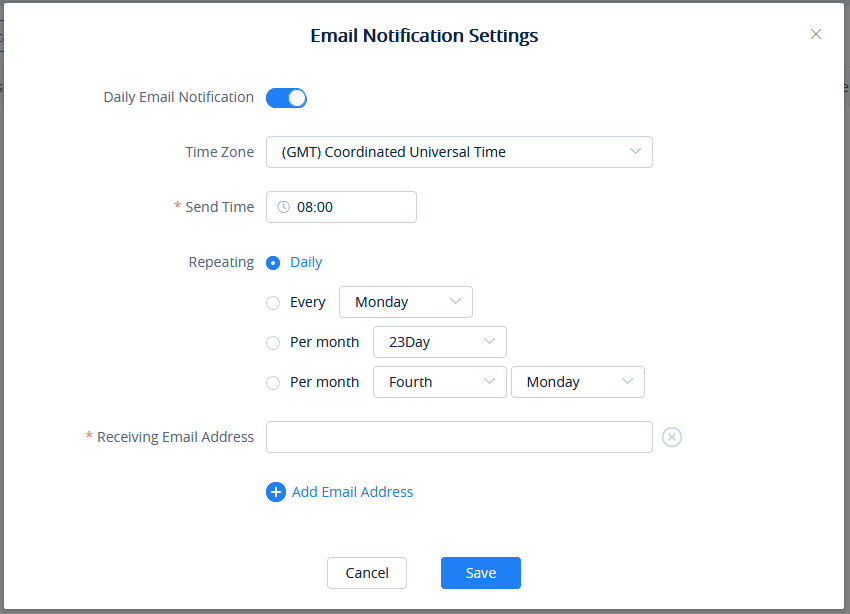
Set Daily Report Receiving Mailbox
Prerequisite: The UCM plan contains permission for this function.
GDMS platform will send a daily report email of the UCM device every day. Click on the button ![]() on the UCM Device 🡪 Statistics Report interface to configure the email-receiving mailbox, as the screenshot shows below:
on the UCM Device 🡪 Statistics Report interface to configure the email-receiving mailbox, as the screenshot shows below:
|
Daily Email Notification | This is used to configure whether the user wants to send the daily report to the mailbox every day. If not, no mail notification will be sent, and users can view the statistics report on the GDMS platform. |
|
Time Zone |
This is used to set the time zone of the daily report. |
|
Send Time |
This is used to set the sending time of the daily report. |
|
Repeating |
This is used to set the repeating sending time of the statistical report. Once this configuration is set, the statistical report will be sent to the configured email box periodically. |
|
Receiving Email Address | Supports entering any email address. Users can click “Add Email Address” to add multiple email addresses to receive the daily report. |
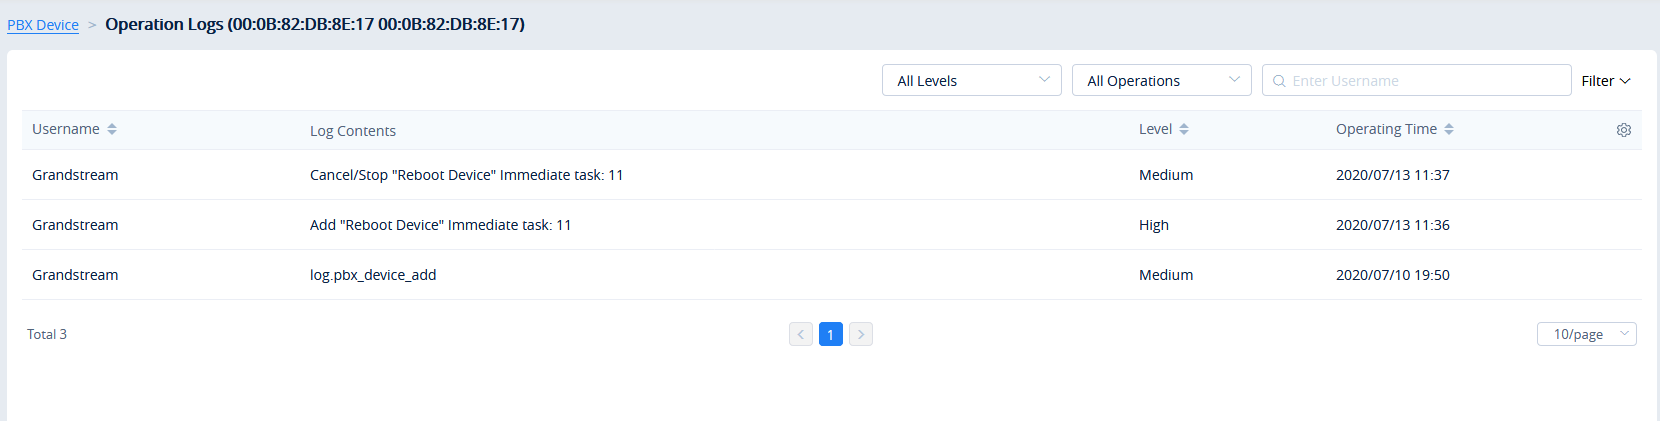
View Operation Logs
Prerequisite: The UCM plan contains permission for this function.
Users can view all operation logs on the GDMS platform for the UCM devices.
- On the UCM Device List, select the menu button following the specific device, and click on the “Operation Log” button.
- Operation logs include Remote accessing UCM Web UI logs, restarting logs, and firmware upgrading logs.
Custom Remote Access Domain Name
Remote Access Domain Name is used to configure the Wave application so that Wave application can connect to the UCM server and make calls at any time, anywhere under any network environment.
Prerequisite: The UCM plan contains permission for this function.
You can also customize your domain to access Wave Web RTC page/ UCM portal.
- Go to Device Management 🡪 UCM Device interface, click the Edit Device option for the specific UCM device, and access to the “Device Edit” menu.
- If the user wants to configure this address on the soft terminals for remote calls, the user can click the button
 and customize the remote domain address. Please see the screenshot below:
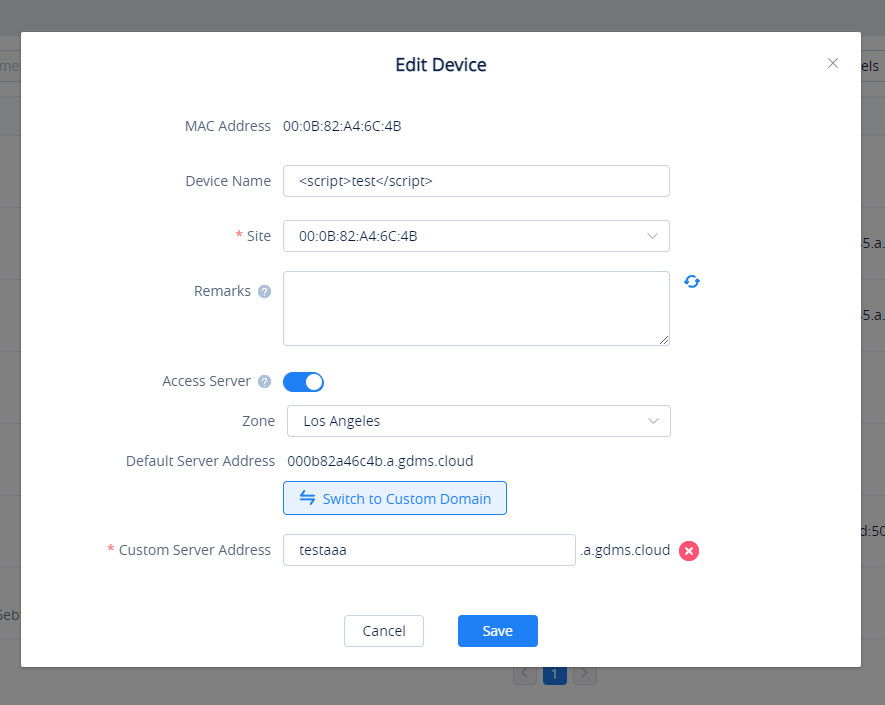
3. Click on the “Personal URL” field, and enter the preferred URL, such as {yourdomain}.zoneb.gdms.cloud

4. If the plan has a custom domain name function, the user can click on the “Custom Domain” option and enter the server address with the private domain name, and the user also needs to enter the custom certificate of the domain name.

5. If the user needs to modify the information, the user can click on the button ![]() to add a new custom server address.
to add a new custom server address.
6. Click on the “Save” button to apply the settings. Then, both the default server address and the new custom server address can be used.
Synchronize UCM Device Alert to GDMS
Only the paid UCM Remote Control plans support synchronizing UCM device alerts to the GDMS platform. For UCM Remote Control plans details, please refer to our official website.
- Users need to enable UCM alert notifications on the management platform of the UCM device. For details, please refer to the UCM User Guide on the UCM product page.
- The alerts generated in the UCM device will be synchronized to the GDMS platform.
- Users can view all UCM alert notifications in the GDMS platform, and set the alert notification methods: Email Notification, Message Notification, or SMS Notification.
Reboot Device
Users can reboot UCM devices from GDMS instantly or set up a schedule to reboot the UCM devices.
- Select a UCM device from the GDMS 🡪 Device 🡪 UCM Device page, and click on “Reboot Device”. Or select multiple UCM devices by clicking More 🡪 Reboot Device.
- The users can select to reboot the device immediately or set up a schedule to reboot the device. For a scheduled reboot, please select the start and end times of the task. Reboot will be performed during this period.
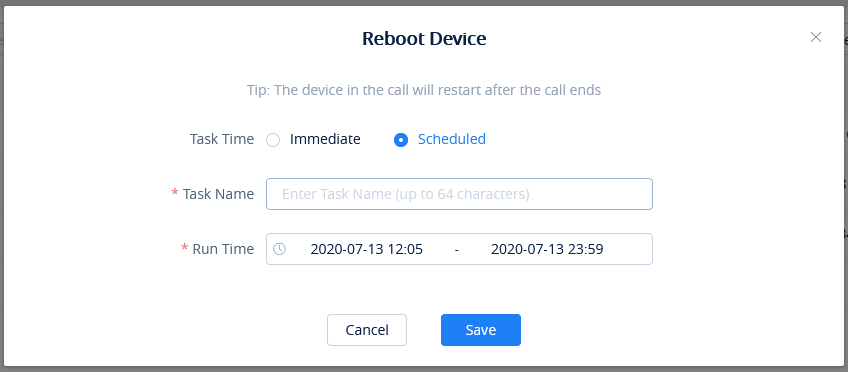
- After saving the reboot configuration, users can view the status of this task from the GDMS 🡪 Task page.
Upgrade Firmware
Prerequisite: The UCM plan contains permission for this function.
Upgrading UCM firmware via GDMS is supported. Please note there must have UCM official firmware or customized firmware available on the GDMS platform first.
- Select a UCM device from GDMS 🡪 Device 🡪 UCM Device and click on “Upgrade Firmware” as shown in the below picture. Users can also select multiple UCM devices and then click on “Upgrade Firmware” to perform a batch upgrade for all selected UCMs.
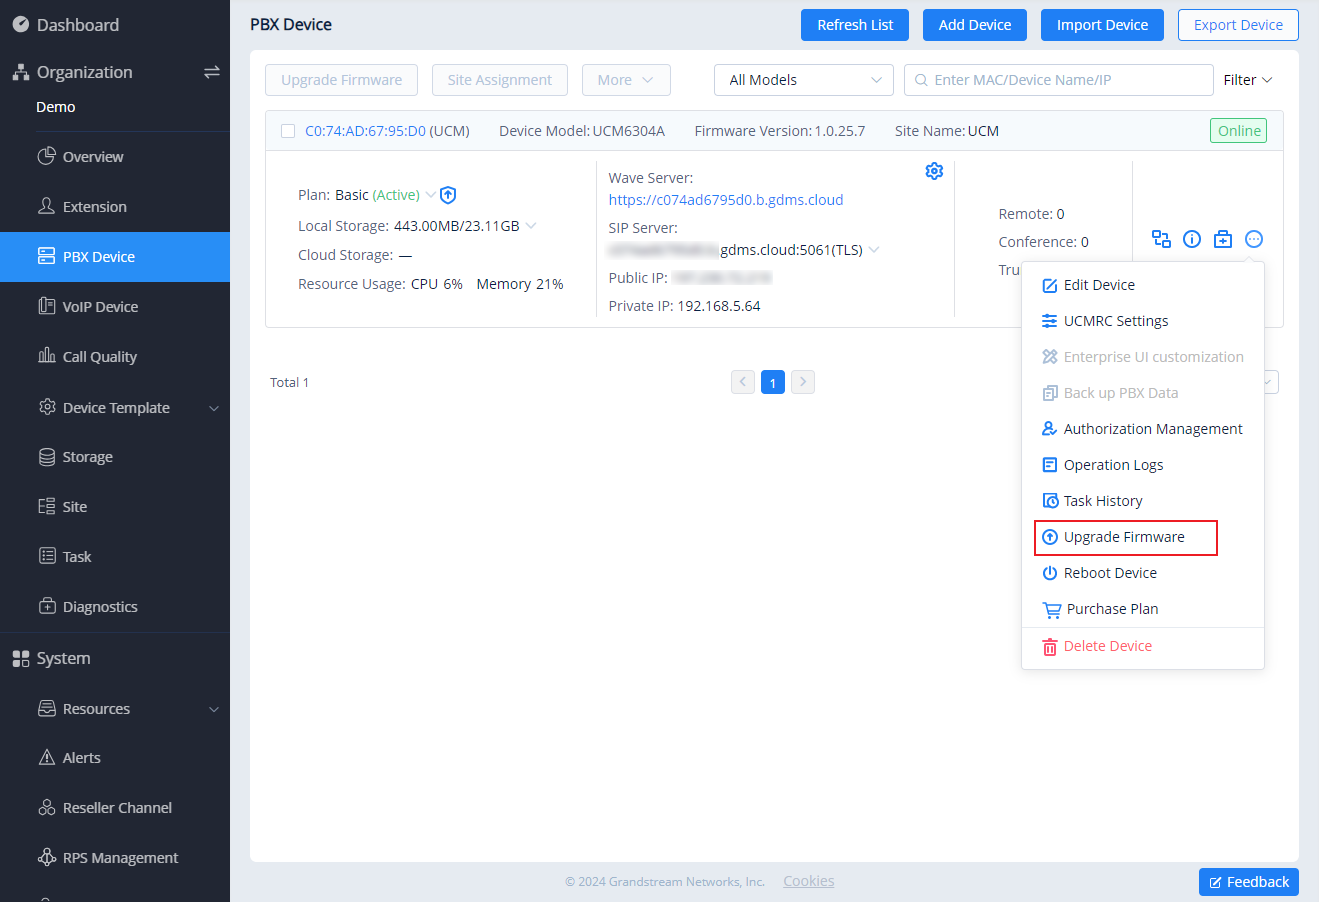
- Select upgrade immediately or set up a schedule to perform the upgrade. For scheduled upgrades, please select the start and end times of the task. Upgrade will be performed during this period.
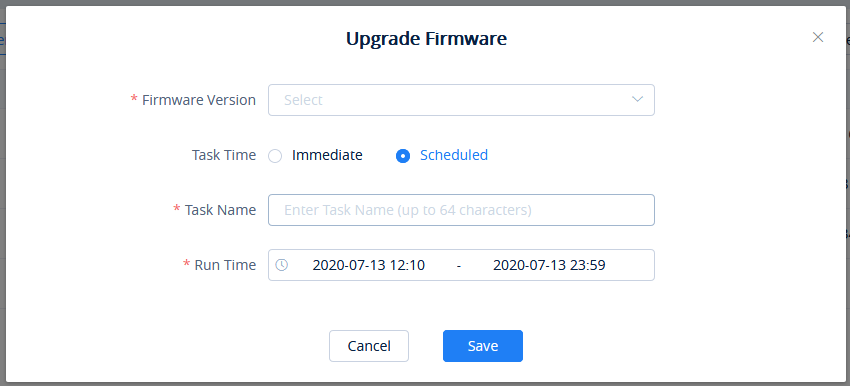
- Save the configuration. Then the users can view the task status under the GDMS Task page.
Edit Device
Users could edit the UCM Device name and which site the device belongs to.
- In the device list, click on the button
 to Edit Device to access the device editing page.
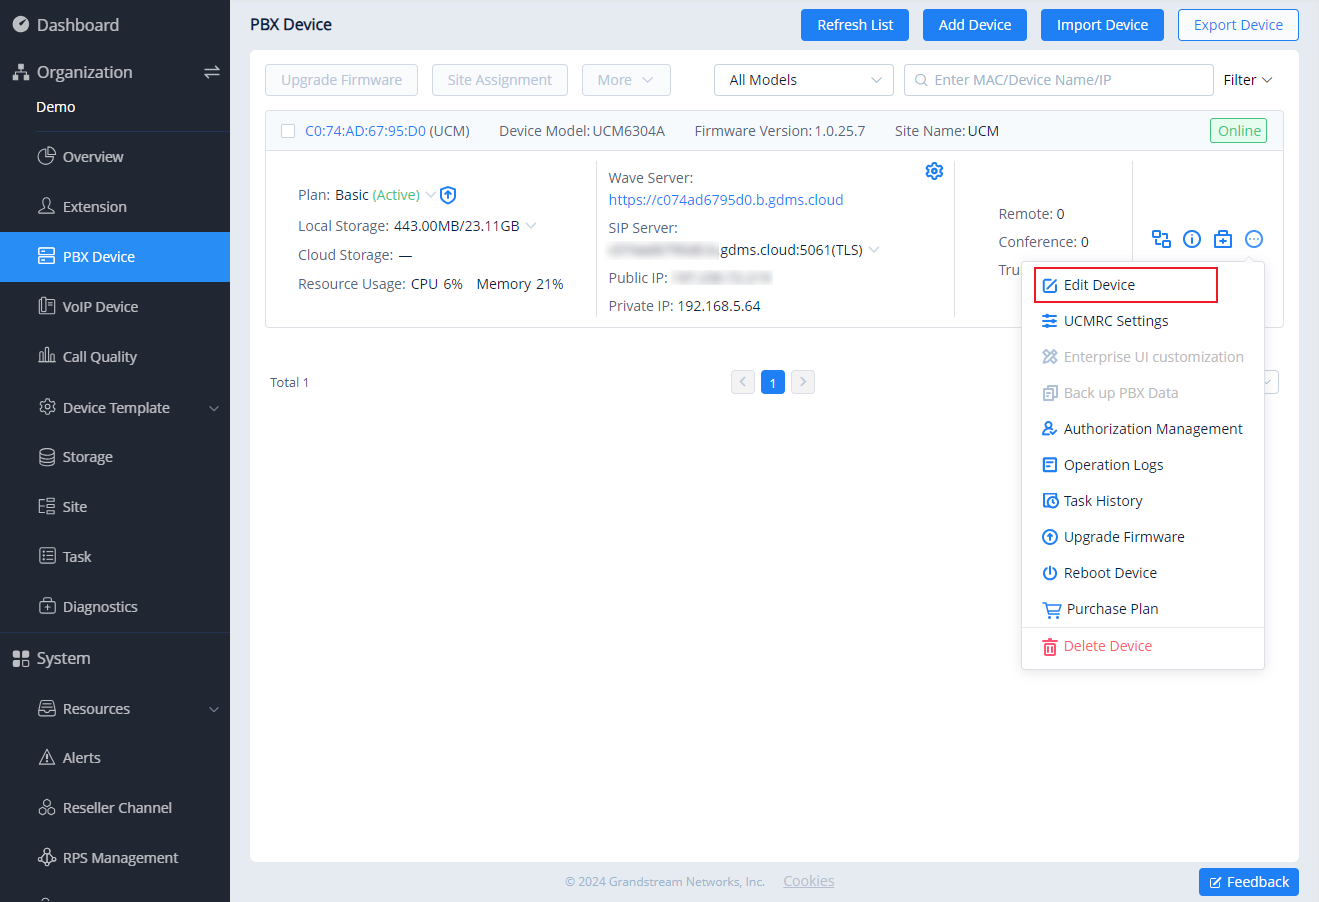
- Users will see the device editing page as the figure shows below:

- If the plan has the custom server address function, the user can click “Personal URL”; If the plan has permission to custom private domain name function, the user can click on the “Custom Domain” option to configure it.
- Click on the “Save” button to apply the changes on the GDMS platform.
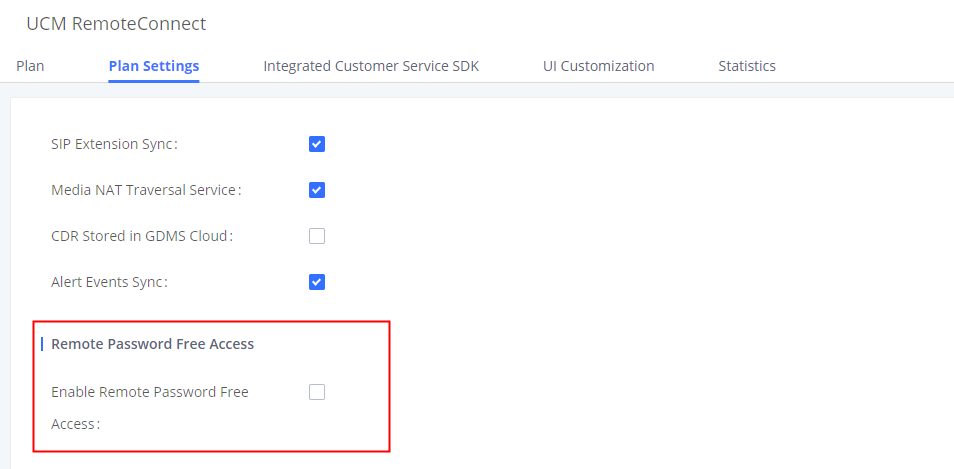
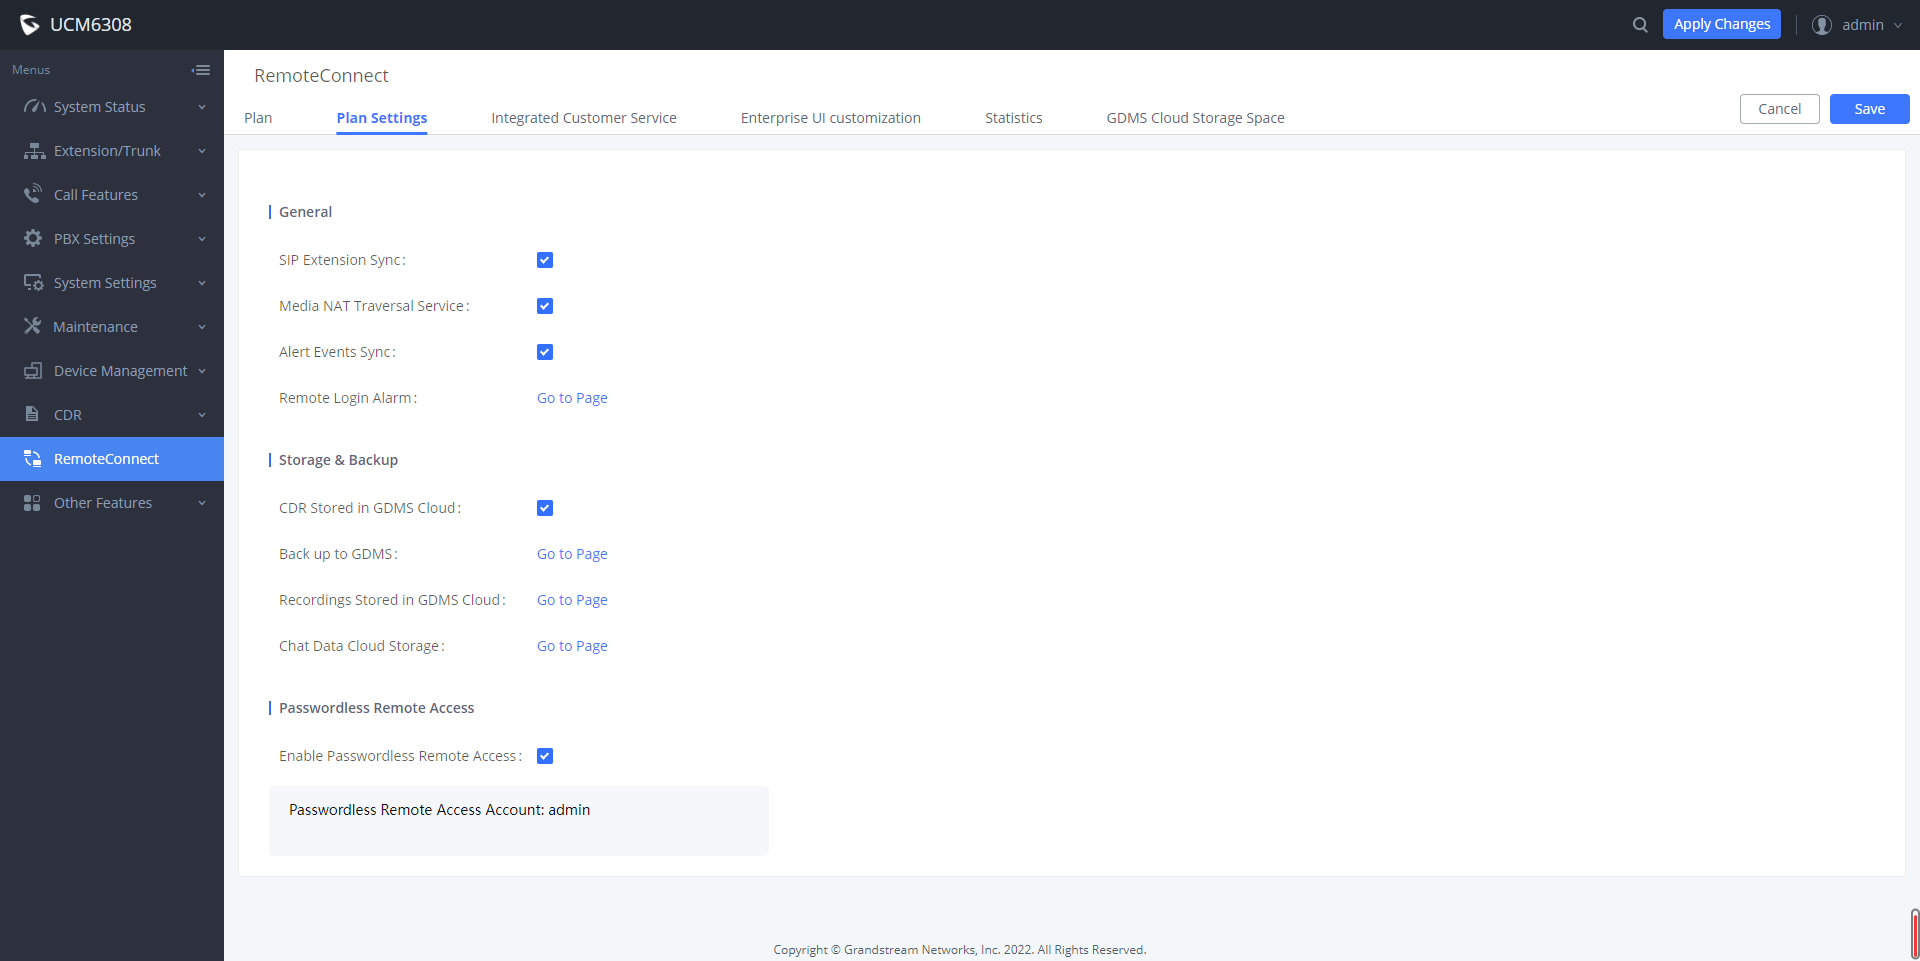
UCMRC Settings
Prerequisite: The user has the corresponding UCMRC plan including this function.
The user can remotely access the PBX device to set the plan of the UCMRC service.
- In the UCM Device list, the user can select the UCM device which the user prefers to access and click
 button to set the UCM device.
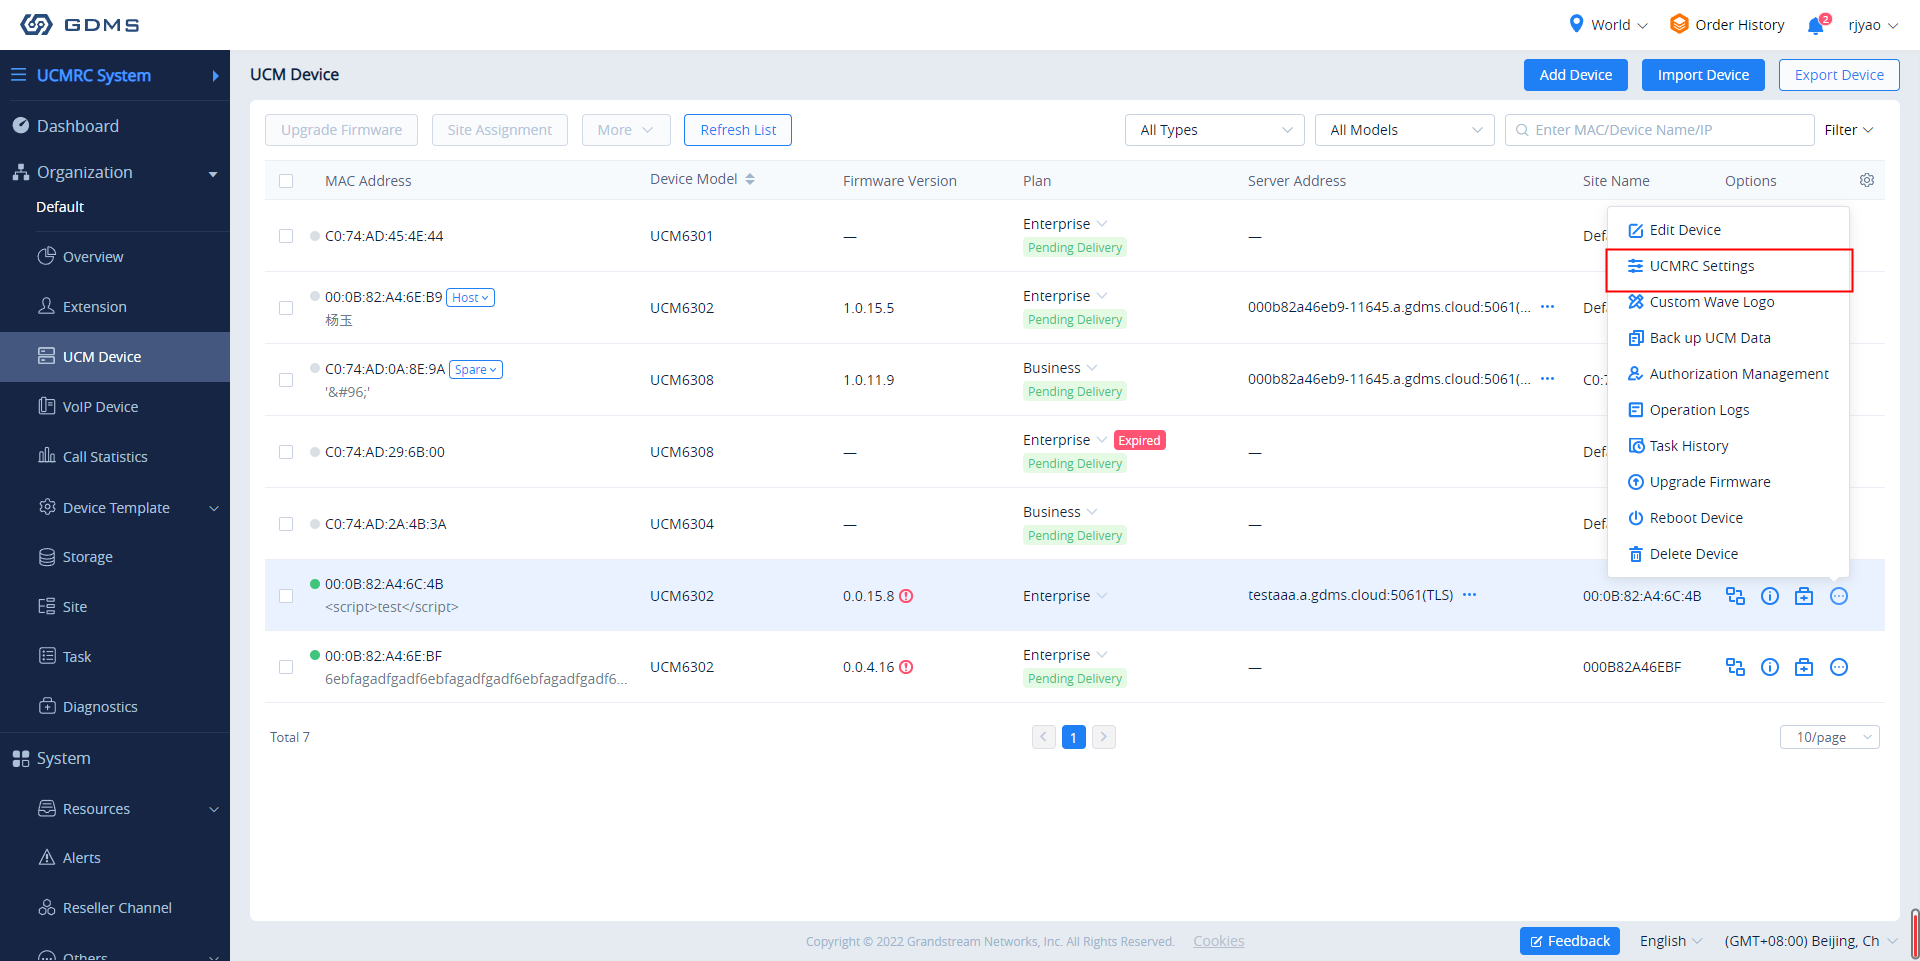
- After clicking the UCMRC Settings button, the user will be directed to the UCM Web UI remotely.
- The user will be directed to the UCM Web UI 🡪 UCM RemoteConnect 🡪 Plan Settings interface. As the screenshot shows below:
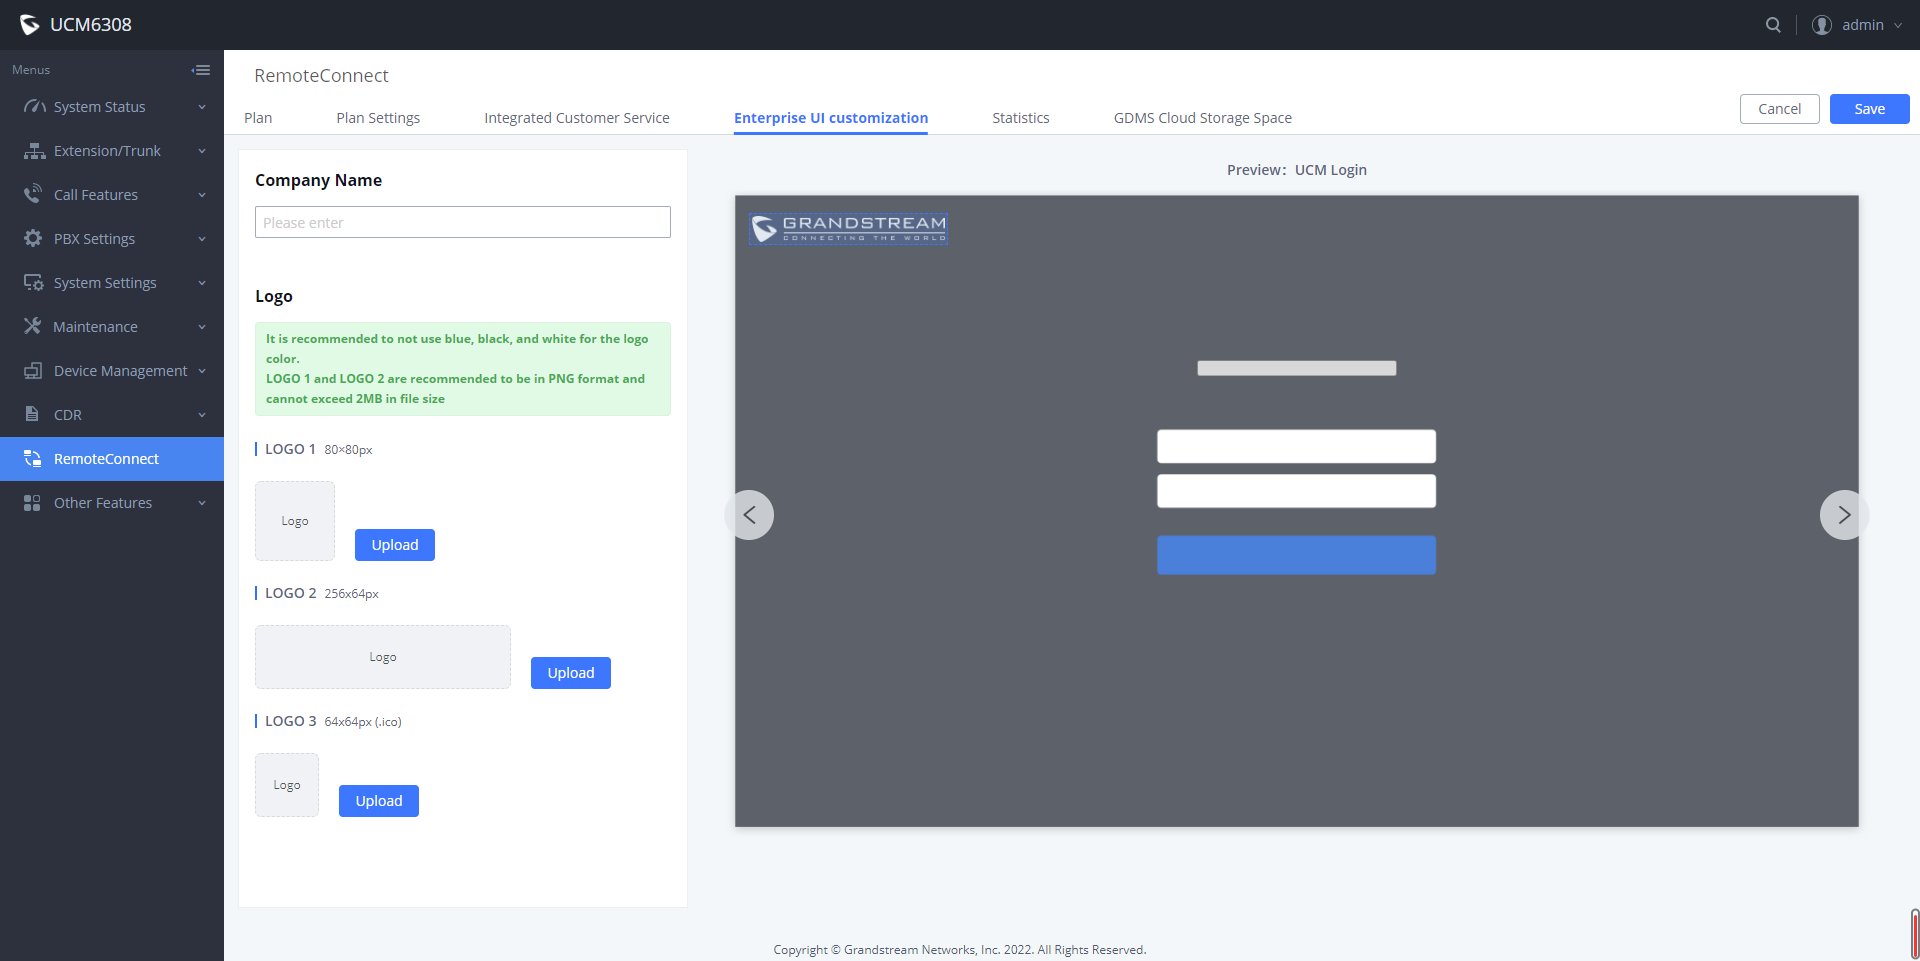
Custom Enterprise Logo
Prerequisite: The user has the corresponding UCMRC plan including this function.
The user can remotely access the UCM device Web UI to customize the enterprise logo.
- In the UCM Device list, the user can select the UCM device which the user prefers to customize the logo and click
 button to access the UCM Web UI.
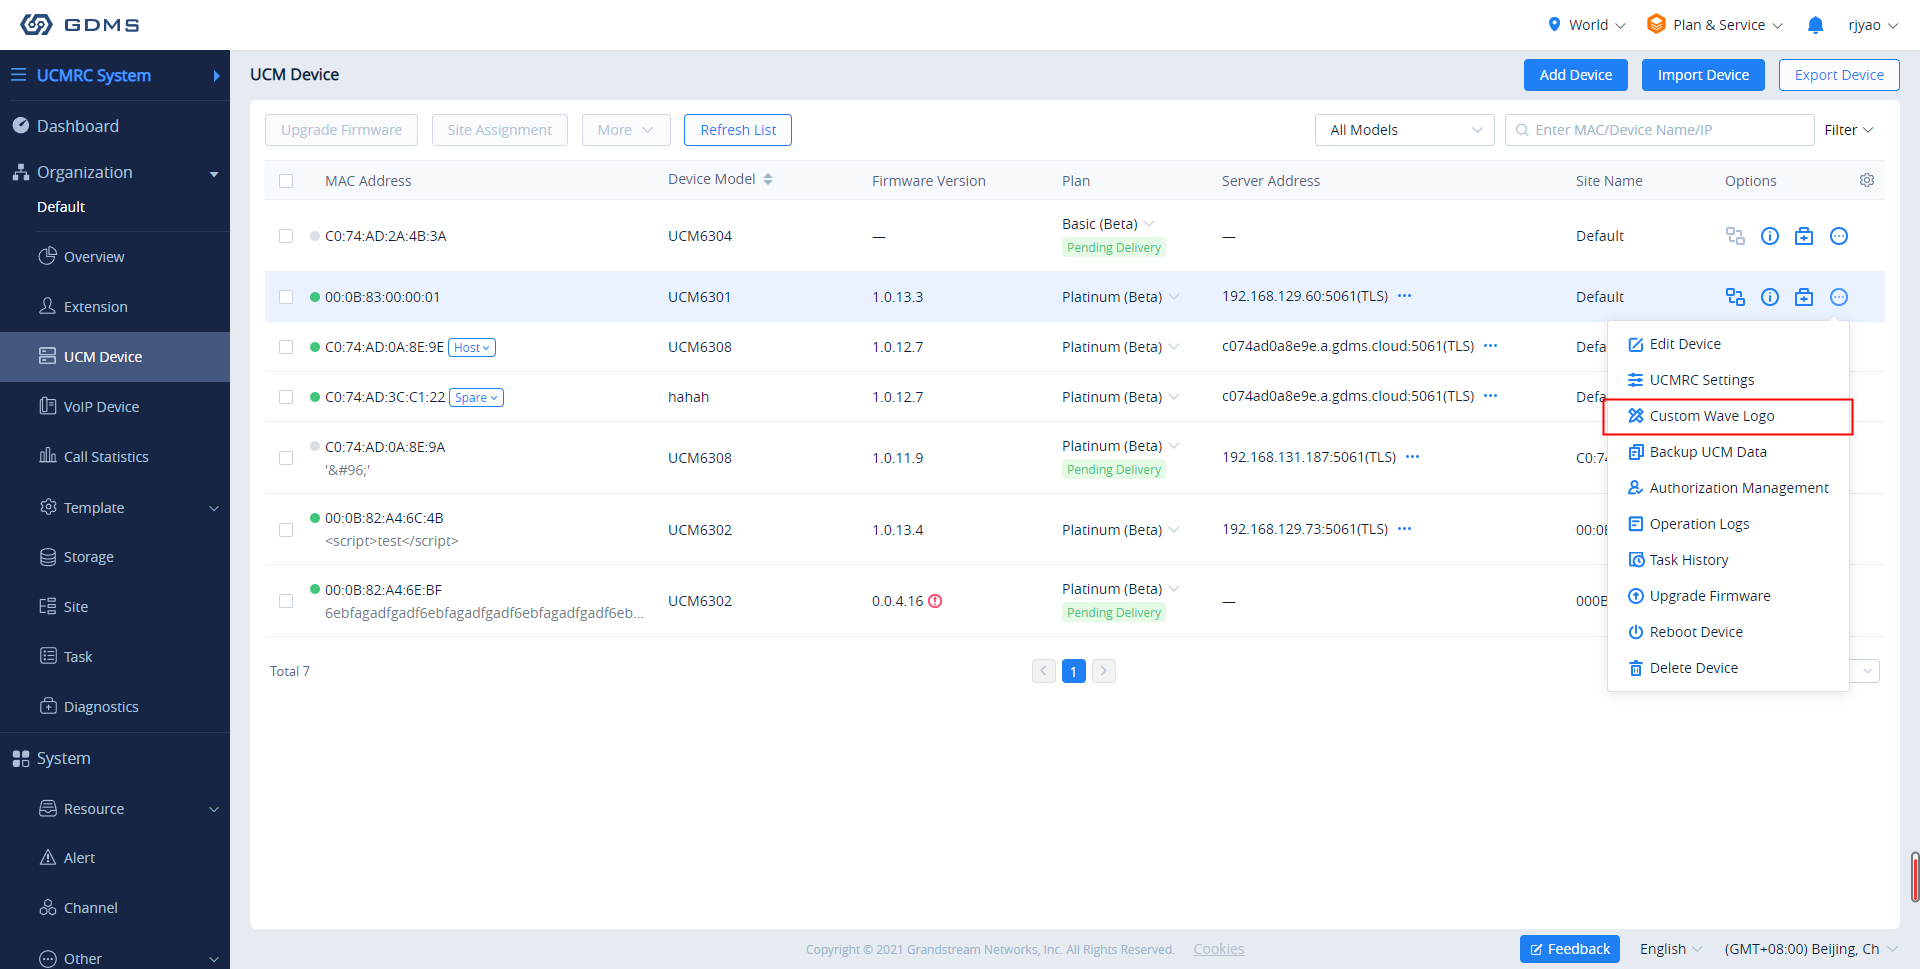
- After clicking the custom logo button, the user will be directed to the UCM device Web UI.
- The user will be directed to the UCM Web UI 🡪 UCM RemoteConnect 🡪 Custom Logo to customize the enterprise logo. As the screenshot shows below:
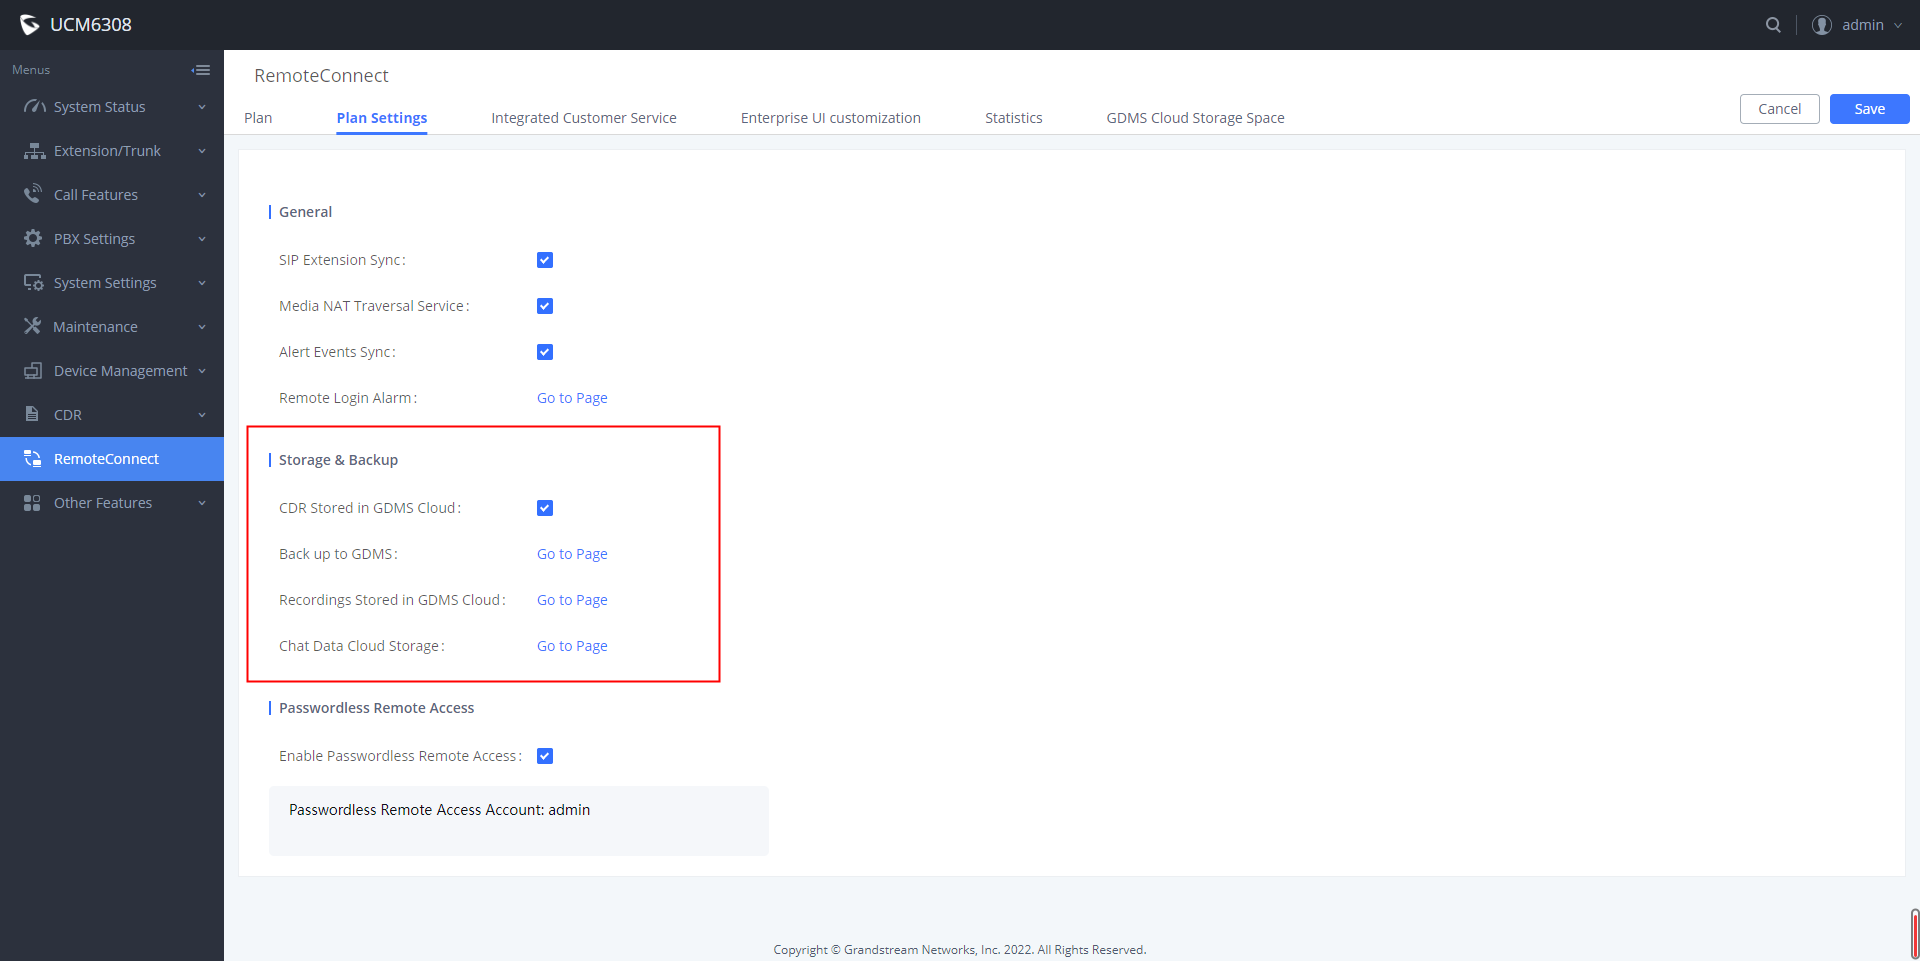
Back up UCM Data
Prerequisite: The user has the corresponding UCMRC plan including this function.
The user can remotely access the UCM device to enable the UCM data backup function.
- On the UCM Devices list, the user can select the UCM device, click the button
 to access the UCM Web UI, and set the UCM data backup function for the GDMS platform account.

2. After clicking the UCM data backup button, the user will be directed to the UCM device Web UI.
3. The user will be directed to the UCM Web UI, RemoteConnect → Plan Settings → Storage & Backup interface and set to back up the UCM data to the GDMS platform account. Please see the screenshot below:
Batch Modify Sites
Users could edit the site of a batch of UCM devices on the GDMS platform. The default site is “default”.
- Select the desired devices and click on the ”Site Assignment” button.

- Select the site to assign the selected devices.
- Click on the” Save“ button, and all selected devices will be transferred to the selected site.
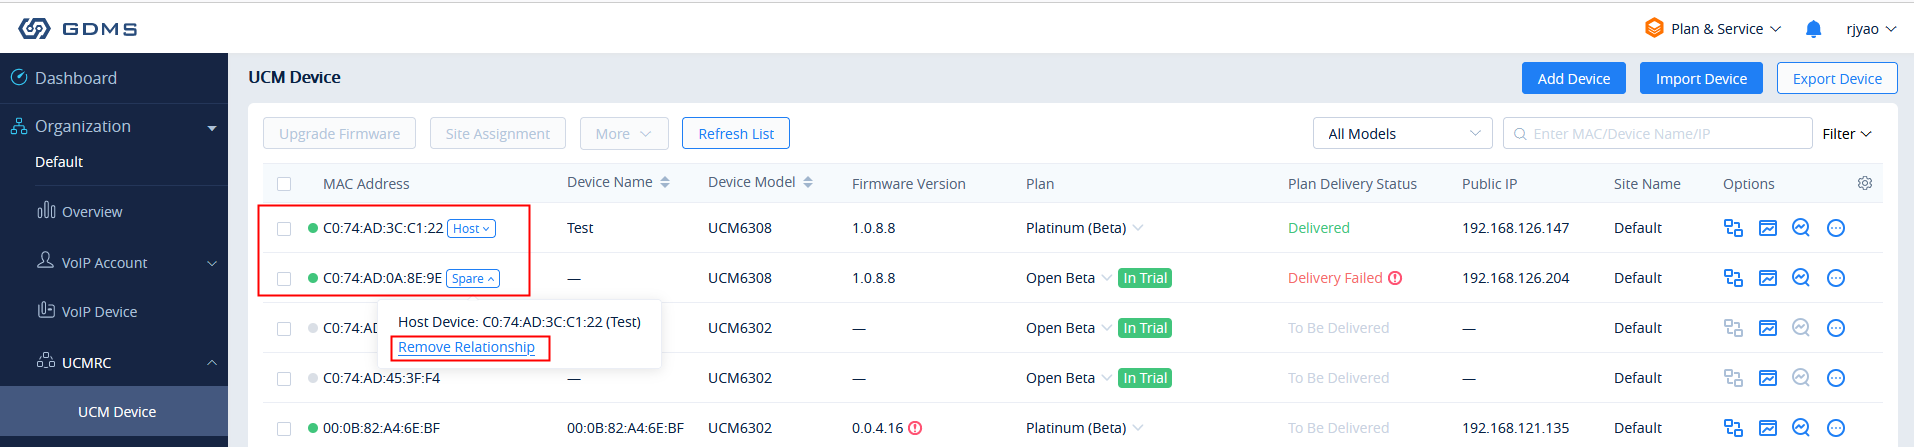
View/Disassociate Host/Spare UCM Device
Prerequisite: The user has the corresponding UCMRC plan including this function.
Users can view Host/Spare UCM devices in the UCM devices list, the Host/Spare icon will be marked following the MAC address, and users can view the corresponding MAC address of the Host/Spare devices.
When the Host/Spare association is established, and once the Host UCM server is down, the Spare UCM device can still get connected through the Host UCM device’s UCMRC domain name.
The user can click “Remove Relationship” to remove the UCMRC Host/Spare relationship. However, the local Host/Spare relationship configuration in the UCM devices is still retained. If the user also wants to remove this relationship, the user needs to go to the UCM management platform to disassociate the relationship.
Delete Device
Users could delete one UCM device or a batch of UCM devices on the GDMS platform.
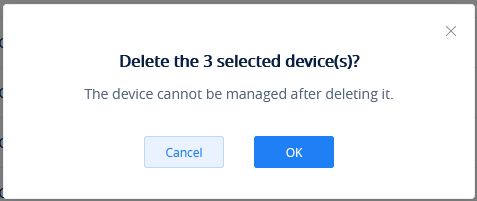
- Select the desired devices and click on More 🡪 Delete.
- Select a UCM device from GDMS 🡪 Device 🡪 UCM Device and click on “Delete Device”. Users can also select multiple UCM devices and then click on More 🡪 Delete to perform a batch delete for all selected UCMs.
- Click on the” OK“ button on the pop-up window to confirm deleting the devices, and the selected devices will be deleted immediately from the GDMS platform. The timing tasks involving the deleted devices will be canceled either.
Export Device
To export the entire device list, click on the ![]() button in the top-right corner of the device list page. The exported list includes all device information.
button in the top-right corner of the device list page. The exported list includes all device information.
Configure Parameter For Device
GDMS platform administrator can configure the parameters of UCM RemoteConnect for the device remotely. Once the device has been configured following the methods below, the device can use the UCM RemoteConnect functions.
Method 1:
- GDMS platform administrator can go to VoIP Account 🡪 SIP Account interface, select the SIP accounts which will be assigned to the device, and click on the edit button
 to access the account editing interface:
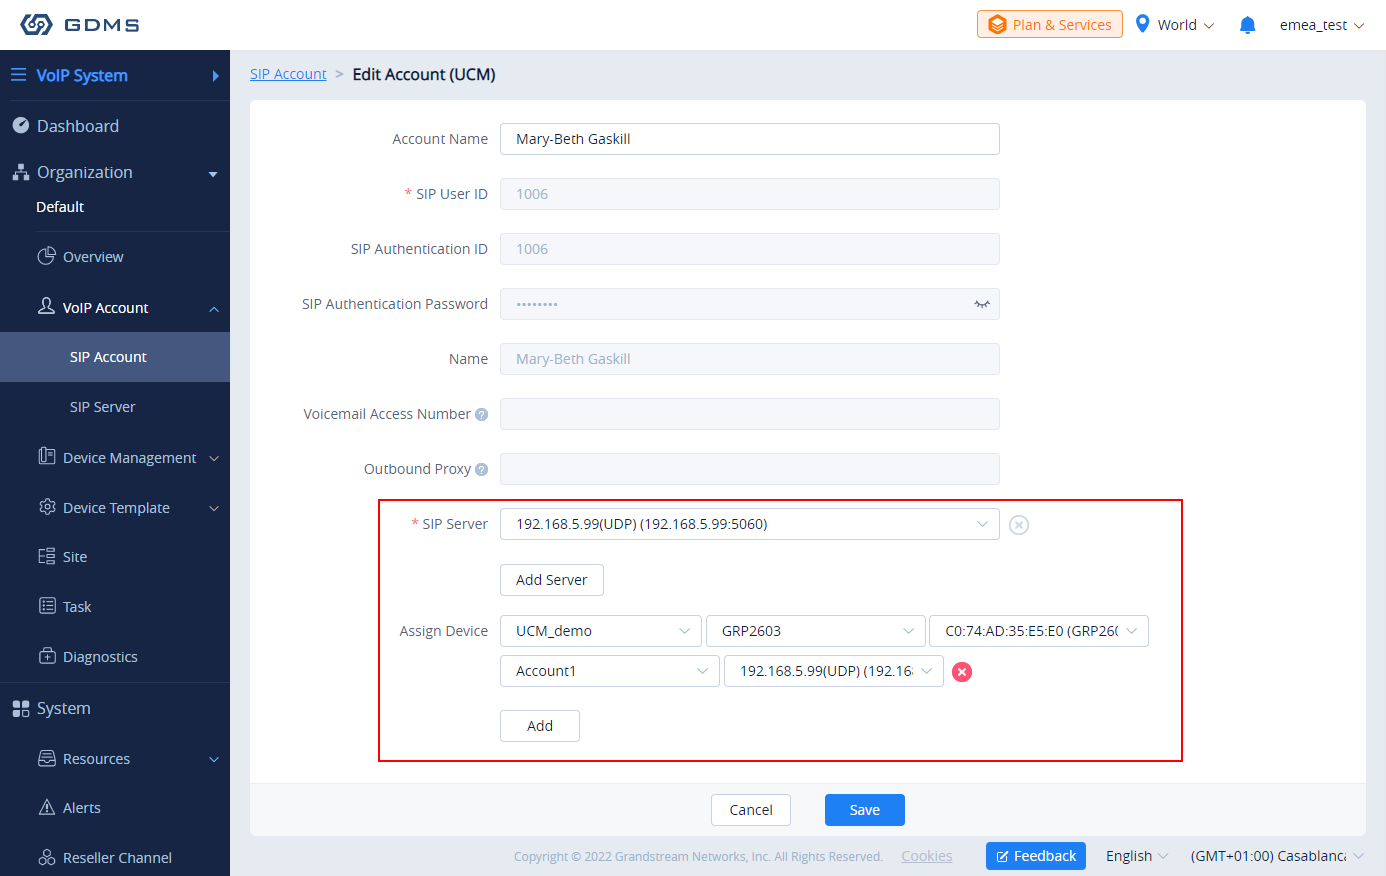
- Click Add Server option and select the external network server address reported by the UCM RemoteConnect.
- Assign the SIP server to the device and enter the device MAC address and Account index, then select the SIP server of the UCM RemoteConnect.
- Click to save and apply the changes for UCM RemoteConnect for the device.
Method 2:
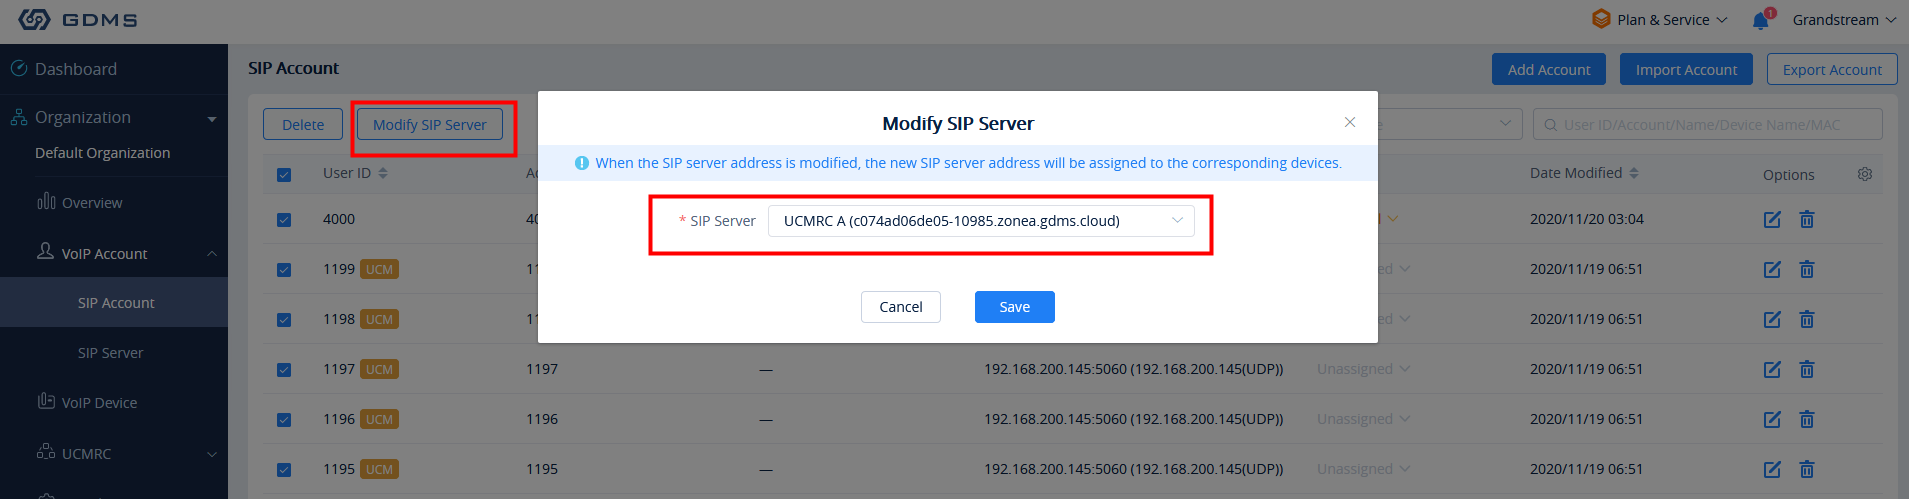
Users can select multiple SIP accounts, click the “Modify SIP Server” option on the top of the interface, and then select the server address of UCM RemoteConnect to modify the SIP server address (internal network) to the server address of UCM RemoteConnect for a batch of devices.
Storage
View Backup File
For backup files generated from UCM manually or automatically, they can be stored in GDMS cloud storage. On the GDMS platform, users can view all backup files.
- Go to the UCM Backup page, all backup files available for connected UCM devices will be displayed. The file type includes CDR files, config files, etc.
- Click the searching box at the top of the interface to search the backup files by device MAC address, backup file type, and device model.

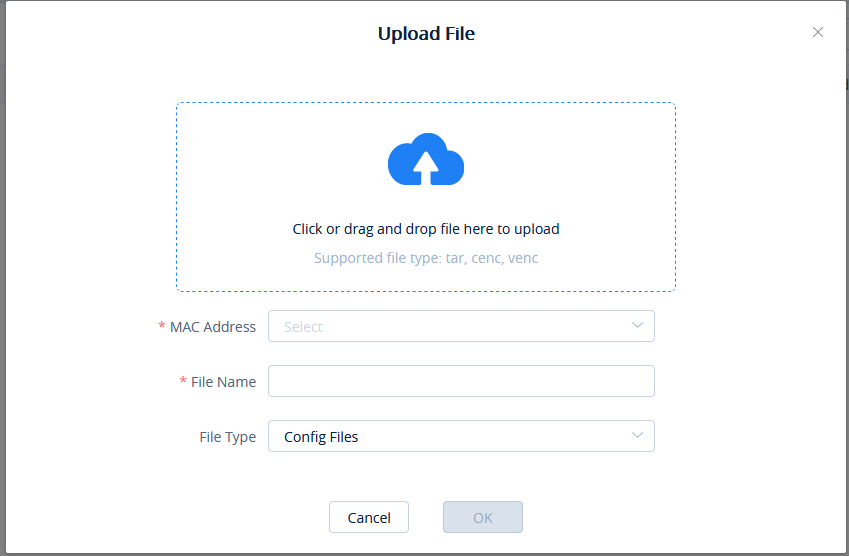
Upload Backup File
Users can upload the backup file and recover the backup file on UCM.
- Go to the UCM Backup page, and click on the “Upload File” button in the right upper corner to access the interface:
|
File |
Click to select the backup file from the local PC or drag the backup file to this field to upload the backup file. The backup file can be the configuration file of the device. |
|
MAC Address |
Enter the MAC address of the UCM device for uploading this backup file. Note: The UCM device must be in the current organization, otherwise, the backup file cannot be uploaded. |
|
File Name |
Enter the name of the backup file. |
|
File Type |
Enter the file type of the backup file so that the UCM device can obtain the backup file accordingly by the file type. |
- Click the OK button to upload the backup file.
Download Backup File
- On the ”UCM Backup“ page, click the button
 following the backup file to download the file.
 - Download the files locally.
Restore UCM Backup File Remotely
Users can restore backup files for UCM devices remotely through the GDMS platform.
- On the “UCM Backup” interface, select a UCM backup file and click the “Restore” button
 to restore the UCM device.
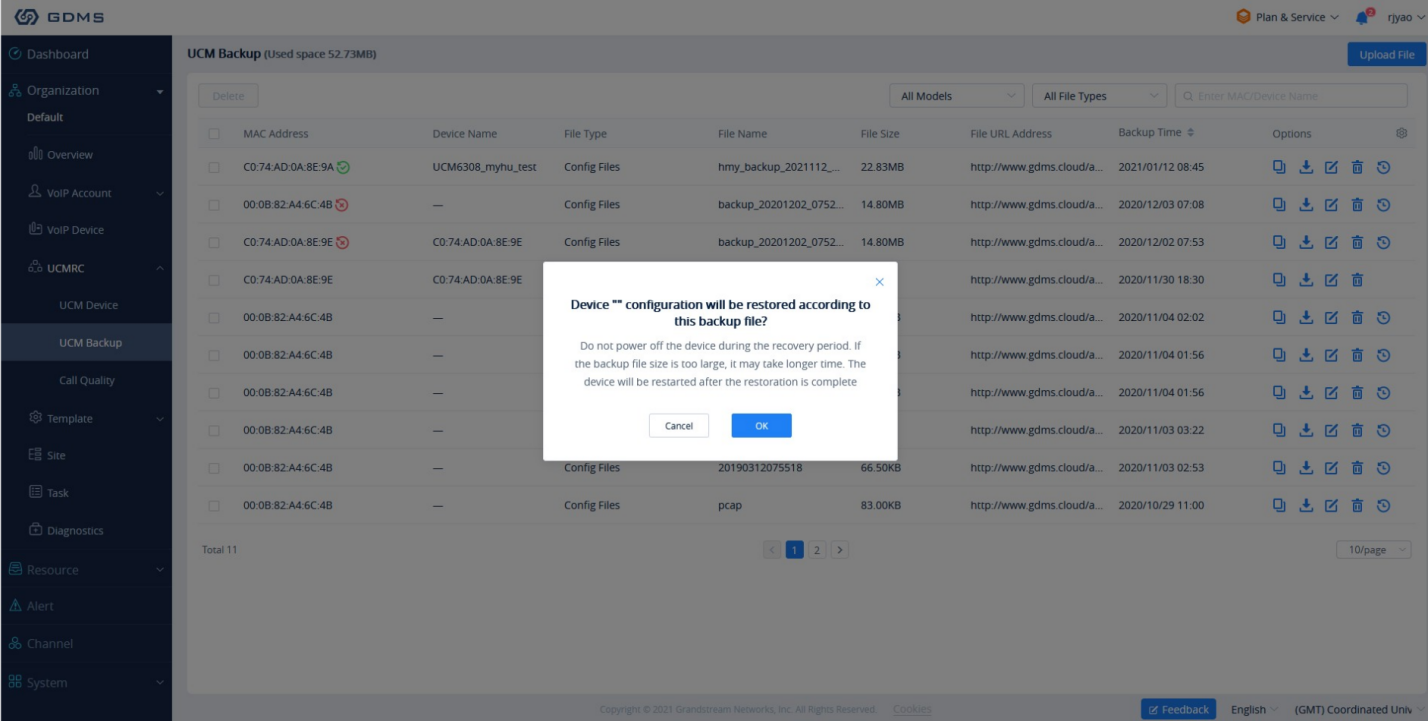
- Once the user clicks the “OK” button, the UCM backup file will be assigned to the UCM device to restore the UCM device.
- It may take several minutes to restore the backup file for the UCM device. The user can refresh the interface to view the results next to the MAC address of the UCM device on the interface. As the screenshot shows below:
![]() : Restored successfully. The user can leave the cursor on the icon to view the last restoring time.
: Restored successfully. The user can leave the cursor on the icon to view the last restoring time.
![]() : Restored failed. The user can leave the cursor on the icon to view the last restoring operation time.
: Restored failed. The user can leave the cursor on the icon to view the last restoring operation time.

Delete Backup File
If the user wants to clean up the storage space of the UCM device, the user can delete the backup files in the UCM device.
- On the” UCM Backup“ page, click the button
 following the resource file to delete the backup file. Users can also select multiple backup files and click the Delete button on the top of the page to batch delete the backup files.
 - When the user confirms to delete, the selected files will be deleted from the GDMS platform.
Convert Configuration File
If the user has upgraded the UCM device model, the user can use this function to convert the configuration file of UCM62xx/UCM65xx to the configuration file of UCM63xx.
- Go to the UCMRC System 🡪 Storage interface, the user can click the “Convert Config File” button to access the conversion interface, as the screenshot shows below:
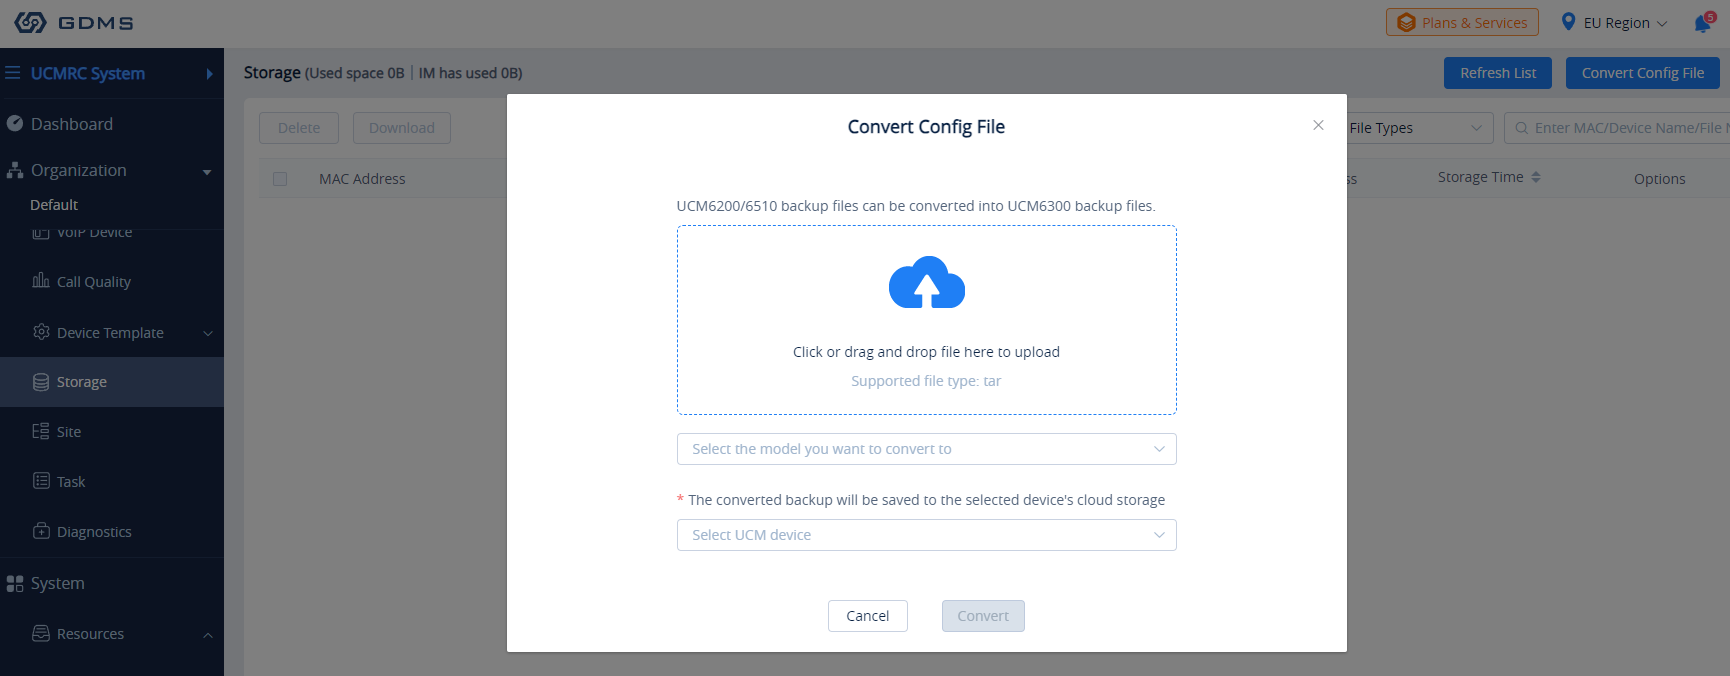
- The user can click to upload or drag the configuration file of UCM62xx/UCM65xx to the uploading area.
- Select the target model to be converted, which means the model of your new UCM device.
- Select the converted configuration file and save it to the cloud storage space of the new UCM device.
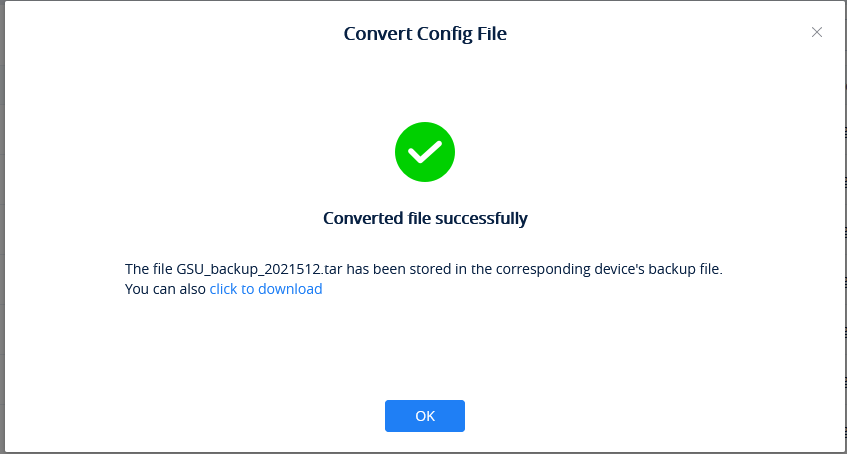
- The converting duration will last for several minutes. When the conversion is done, the user can download the converted configuration file on the UCM Backup interface. Or the user can click to download the converted configuration file directly to the local PC. The user can also restore the configuration file in the new UCM device directly.
VoIP Device
This module displays all VoIP devices in the current organization.
For more details, please refer to the VoIP System -> VoIP Device module.
Call Quality
Statistics Overview
The interface below displays the call quality reported by the device on the GDMS platform.
Prerequisites: The device must use the SIP account in the UCM server which has the UCM RemoteConnect service so that the device can report the call quality to the GDMS platform. This function is only supported for certain UCM RemoteConnect plans. To check which plans support this feature please refer to the RemoteConnect website: https://ucmrc.gdms.cloud/home
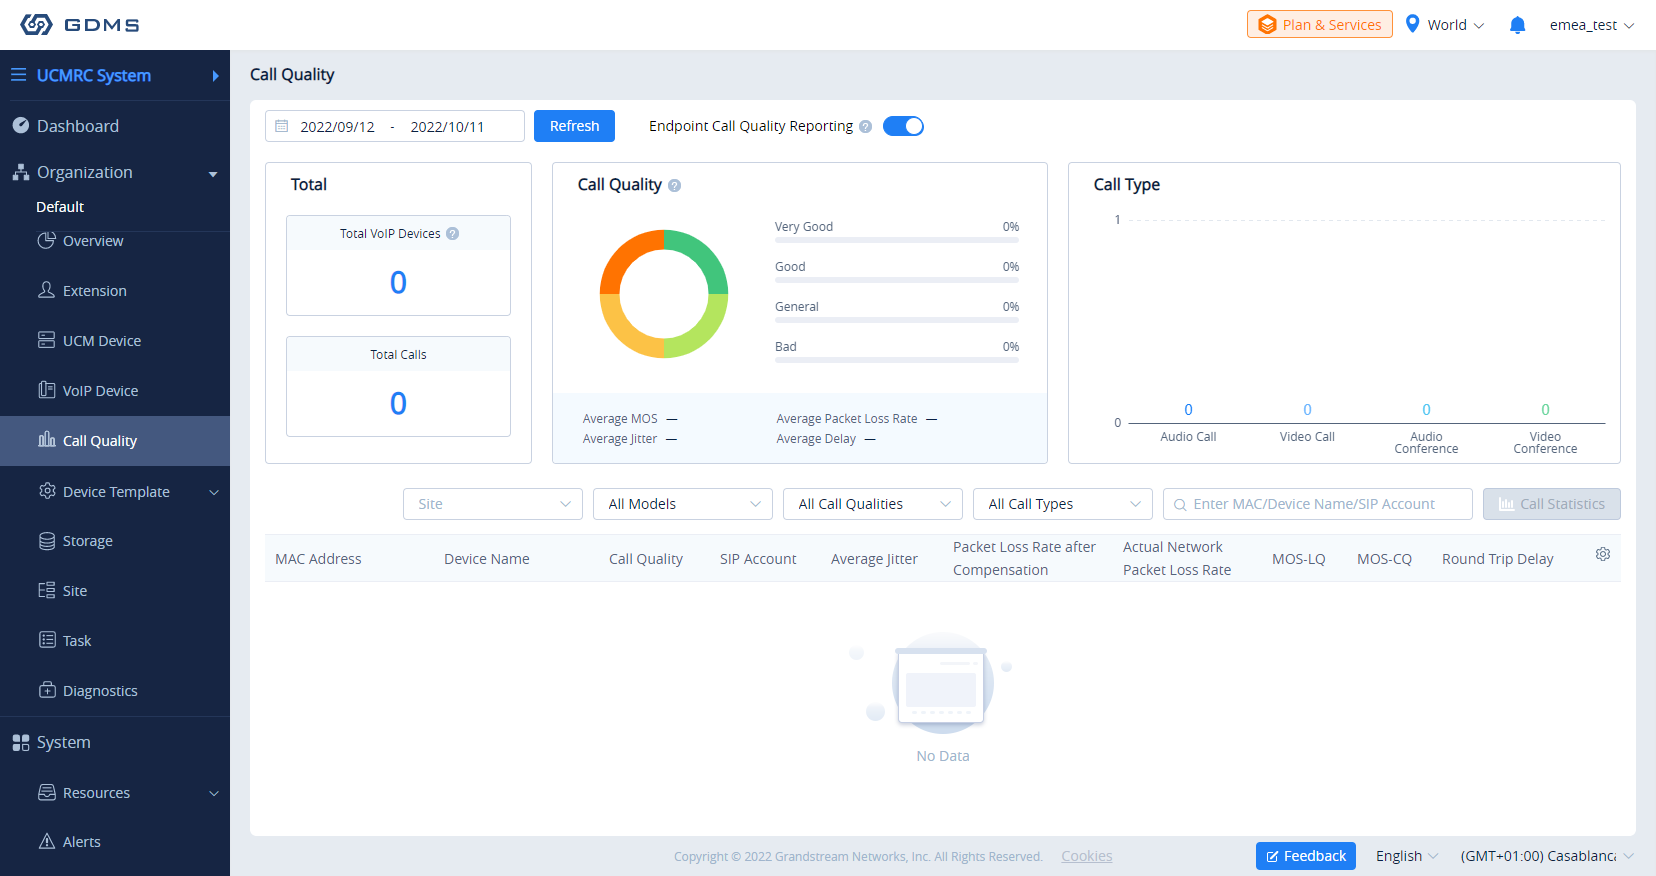
| Module | Description |
|---|---|
|
Total VoIP Devices | Display the number of VoIP devices reported by the current organization (only display the statistics report for the current filter time) |
|
Total Calls | Display the number of calls reported by the current organization (only display the statistics report for the current filter time) |
|
Call Quality | Display the call quality ratio and average values for the reported call history by the current organization (only display the statistics report for the current filter time) |
|
Call Type | Display the call types for the reported call history by the current organization (only display the statistics report for the current filter time) |
Call Quality Record
GDMS platform displays all reported call quality records on the Call Quality interface.
Please see the screenshot below:

- GDMS platform supports filtering call quality records by date.

- GDMS platform supports search call quality records by site, device model, call quality, and call type.
- GDMS platform supports to search of call quality records by device MAC address, device name, and SIP Account.
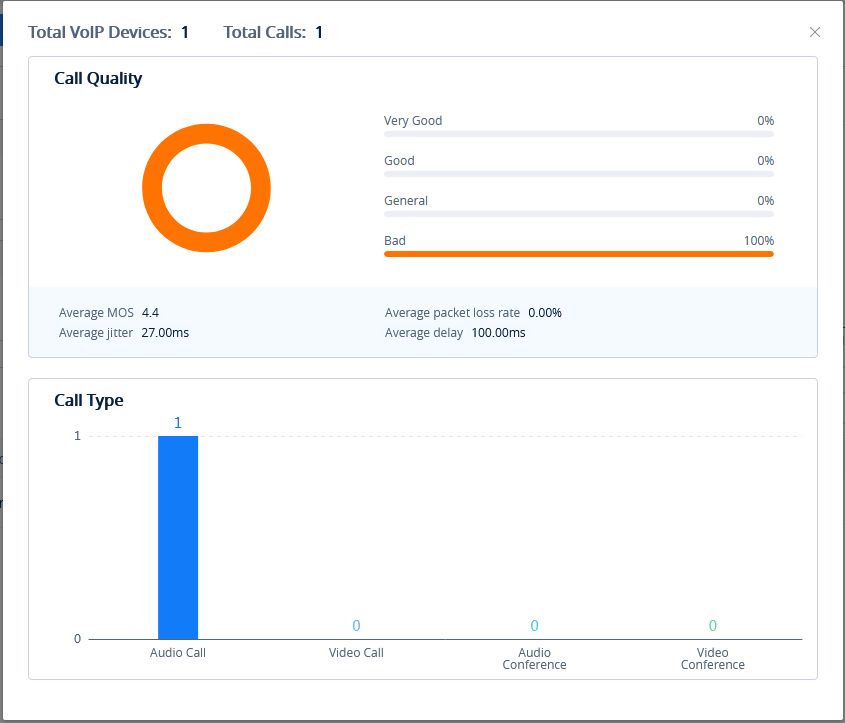
- Click the Call Statistics button
 to view the statistical report of the filtered call quality records.
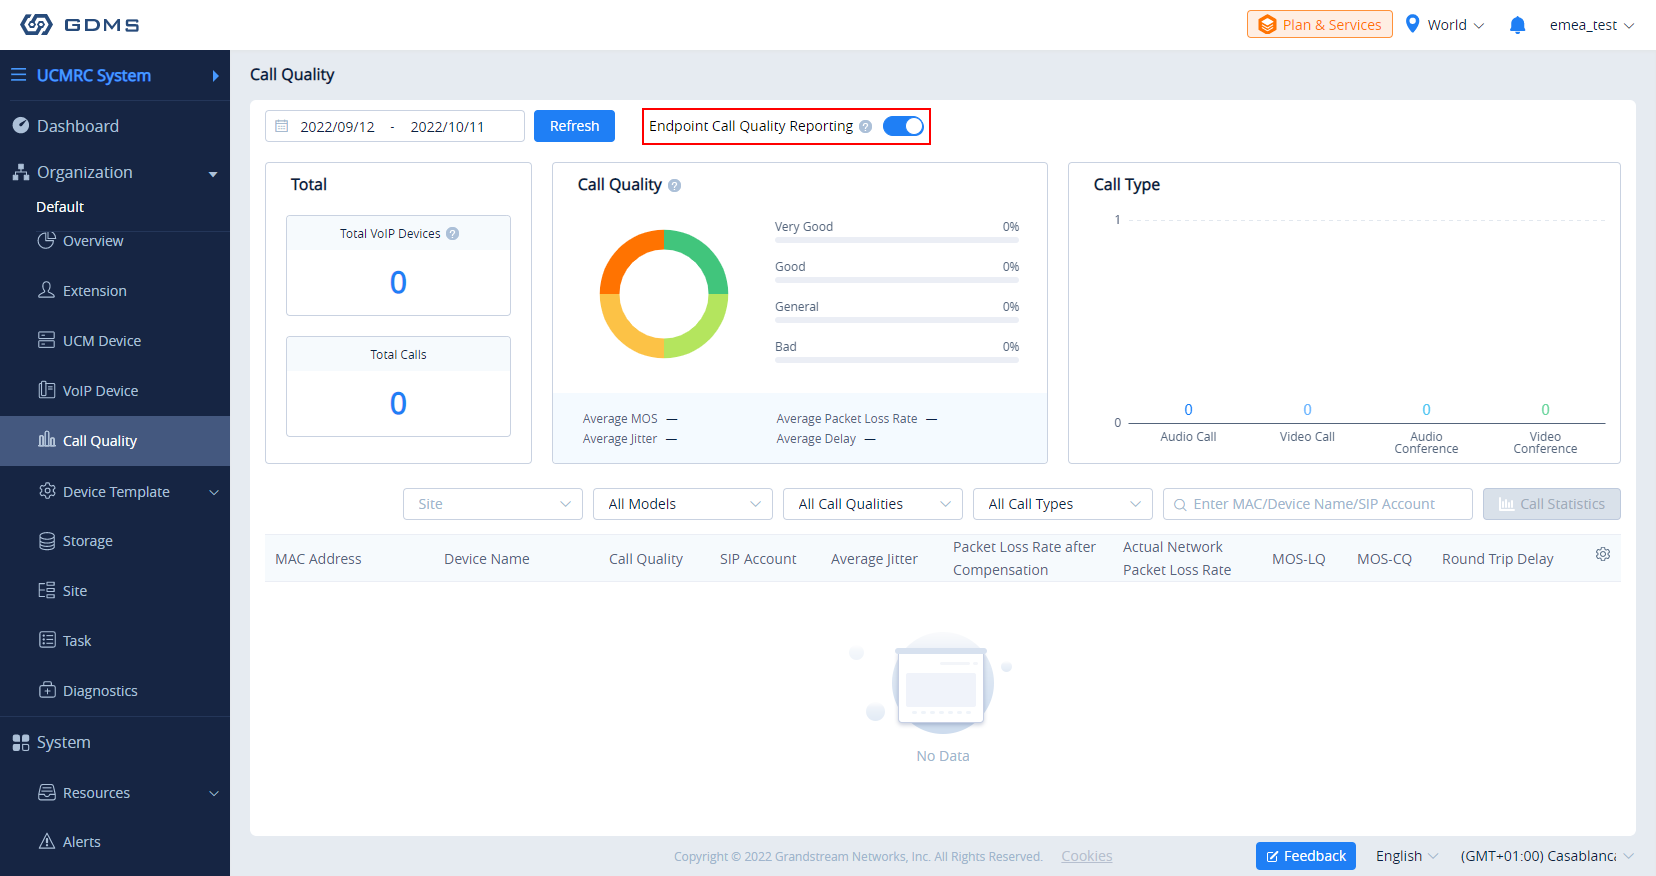
Enable/Disable Call Quality Reporting
Users can enable/disable reporting call quality on the GDMS platform. If the user does not want to view the call quality report, the user can disable this function on the GDMS platform.
On the Call Quality interface, the user can click Phone reports the call quality button ![]() to disable reporting call quality. When this function is disabled, the devices under the current organization will no longer report the call quality to the GDMS platform.
to disable reporting call quality. When this function is disabled, the devices under the current organization will no longer report the call quality to the GDMS platform.
CLOUDUCM SYSTEM
CloudUCM System integration in the GDMS allows the creation of CloudUCM devices and other features for managing the device like starting and stopping the CloudUCM, rebooting, upgrading the firmware, running diagnostic for the device, checking the task history and operation log, and resetting the device’s default password.
Switching to CloudUCM System
To switch to the GDMS system, please click on the systems menu in the top left corner of the web UI, as shown in the figure below, and then choose CloudUCM System.
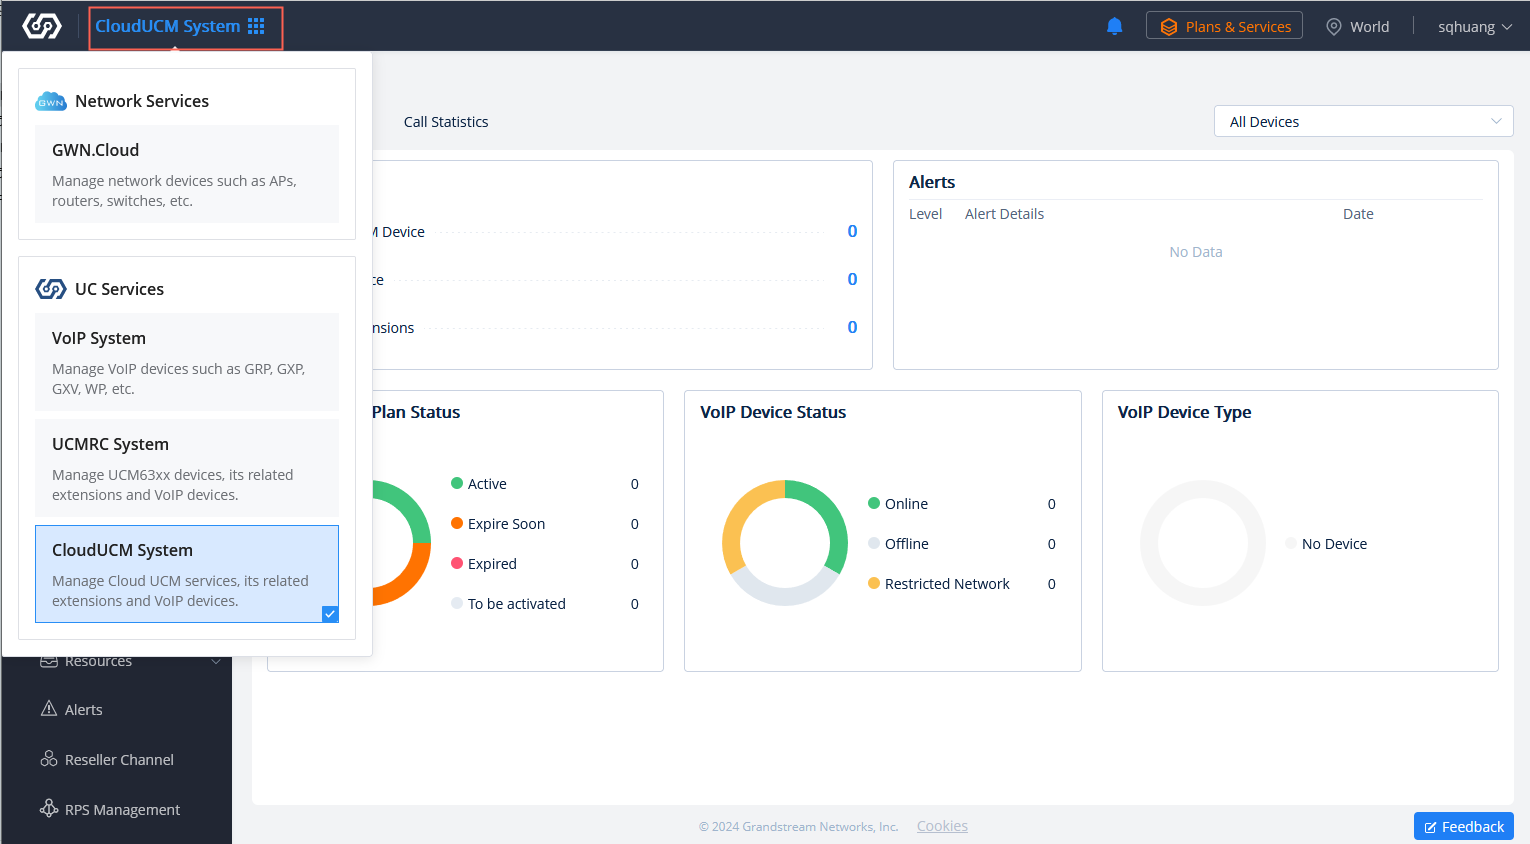
The system will be then switched to CloudUCM-related features.
Dashboard
On the Dashboard, the user can view general information about the CloudUCM devices. The dashboard is split into 4 tabs: Device Statistics, Call Statistics, CloudUCM, and VoIP Device.
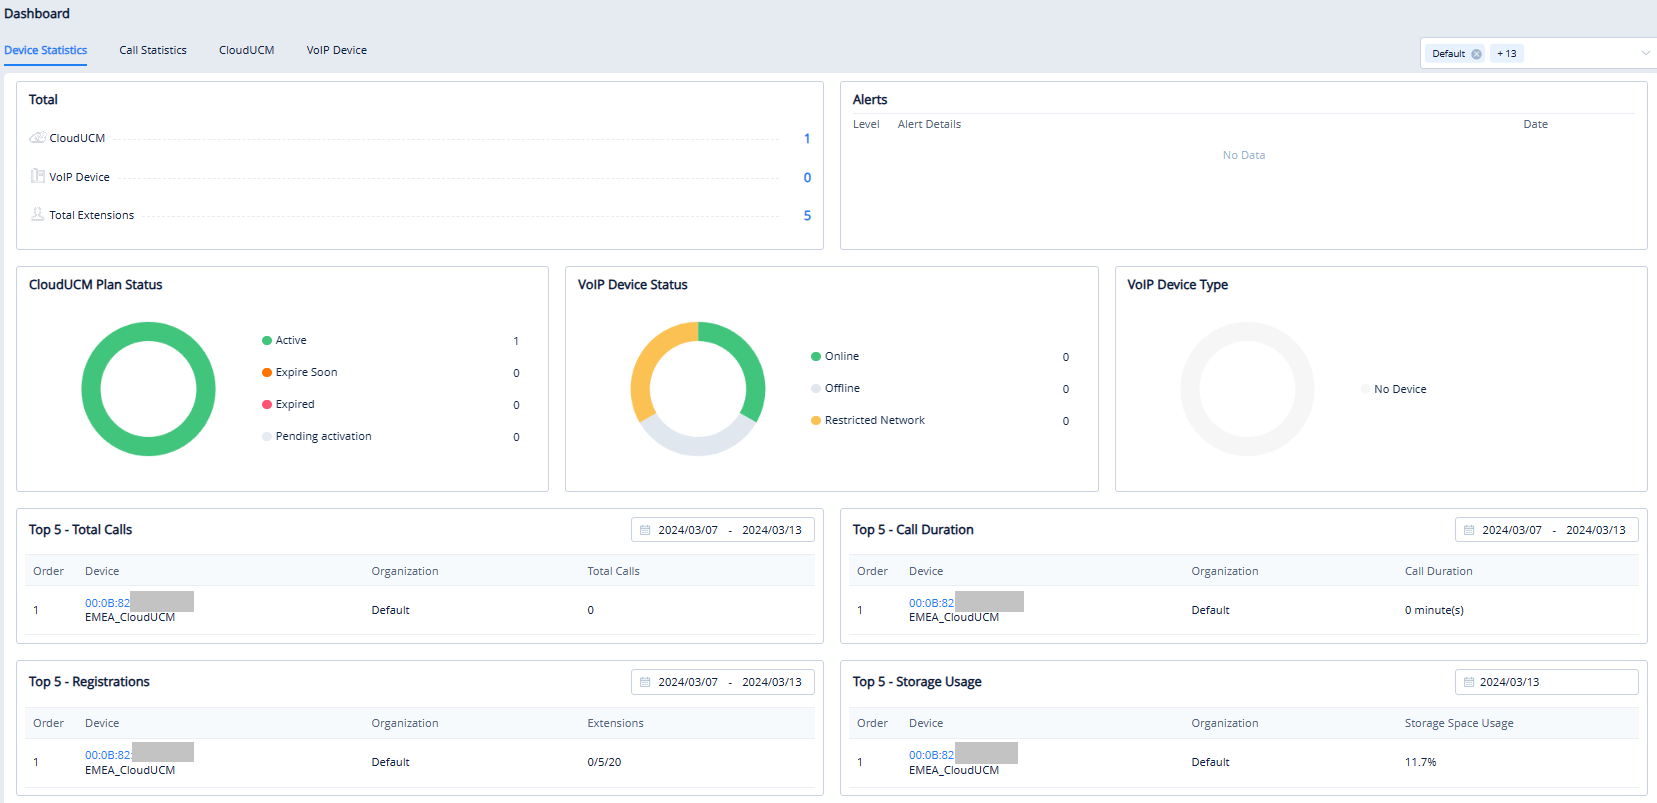
Device Statistics
The Device Statistics tab displays the following:
Total |
|
Alerts | Displays the latest 5 high and medium-level alert messages of the CloudUCM devices in the enterprise. |
CloudUCM Plan Status |
|
VoIP Device Status | Displays the number of devices that are currently online, offline, and network restricted:
|
Voice Device Type | Displays the number of devices in each category: audio and video.
|
Top 5 | Displays the top 5 usage status under the current company or organization searching results:
|
Call Statistics
You can select multiple CloudUCM devices to view the latest 7-days or 30-days call status chart.
- Total Calls: Chart of the total number of calls per day
- Max Concurrent Calls: Chart of the number of concurrent calls per day
- Number of Registered Extensions: Chart of the number of registered extensions per day

CloudUCM
Displays the real-time status of all CloudUCM devices in the current GDMS platform:
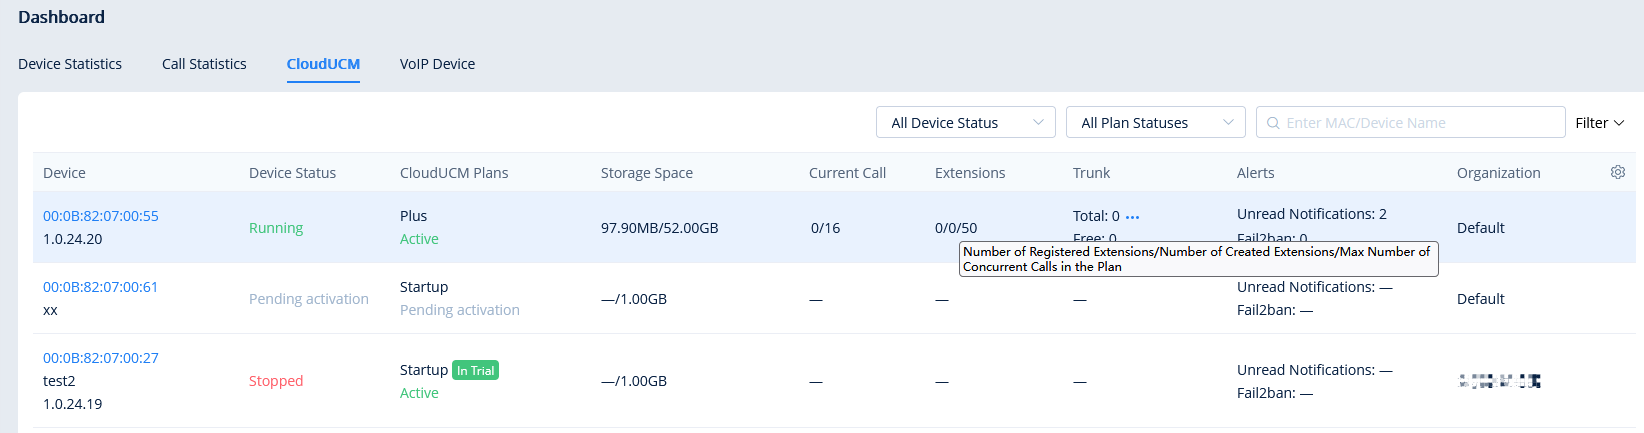
- Device: Displays the MAC address of the device.
- Device Status: Displays the status of the device. The value can be “To be Activated”, “Running”, “Stopped”, “Starting”, or “Pending activation”.
- CloudUCM Plans: Displays the current plan information and status.
- Storage Space: Displays the storage space details of UCM local and cloud space usage.
- Current Call: Displays the current number of calls/the maximum number of concurrent calls of the plan.
- Extensions: Displays the number of currently registered extensions/the number of created extensions/the maximum number of extensions of the plan.
- Trunk: Displays the number of total trunks, the number of trunks in idle/busy/abnormal state, and the number of trunks that are unmonitored.
- Alerts: Displays the number of unread notifications and IP addresses blocked by Fail2ban.
- Organization: Displays the organization where the device resides.
VoIP Device
Displays all the VoIP Devices in the current GDMS platform:
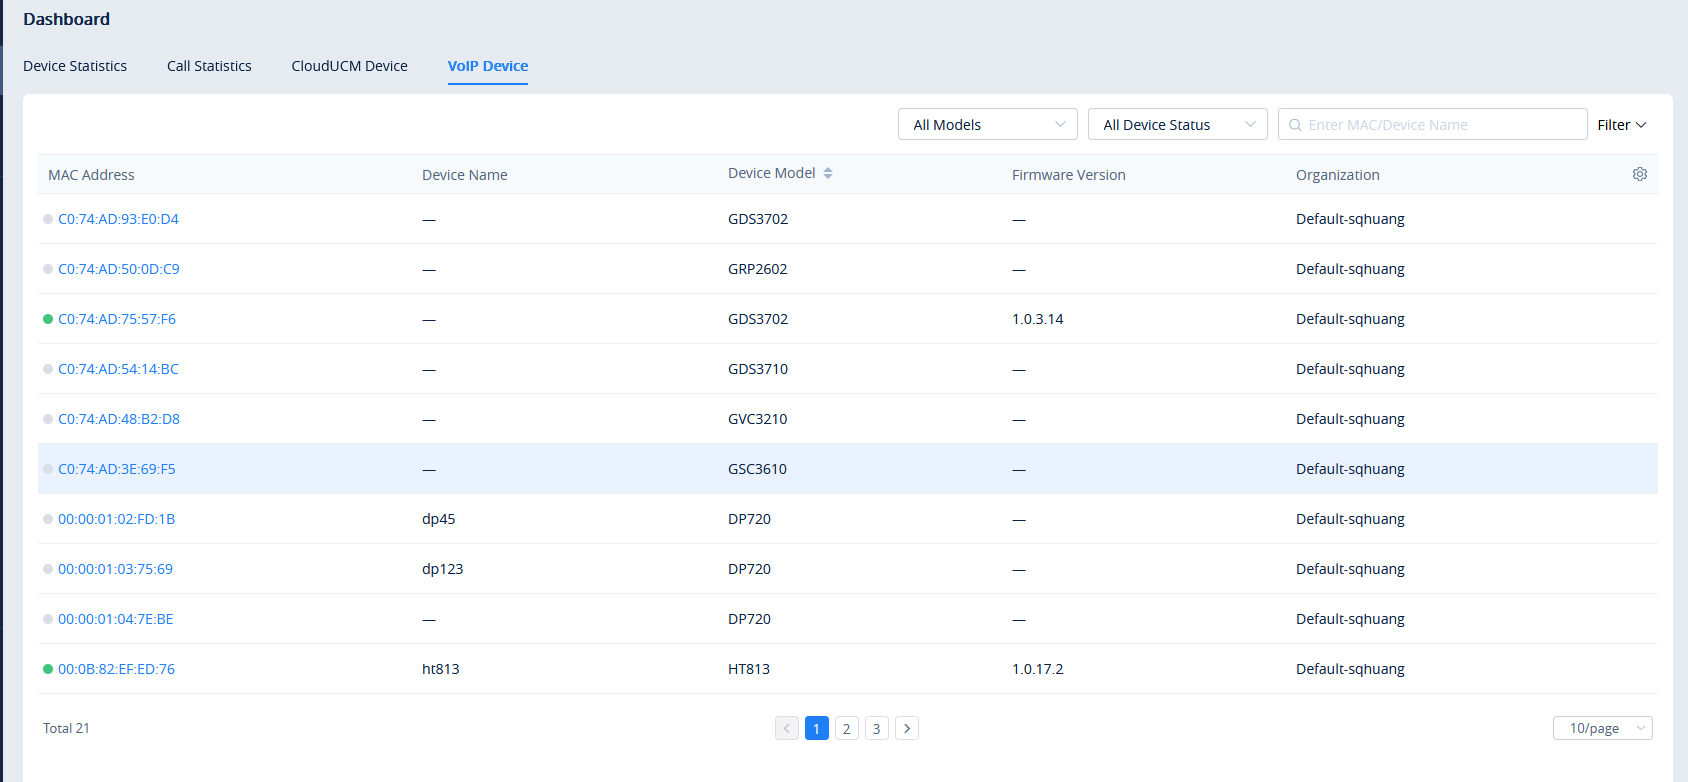
Overview
On the Overview screen, the user can view general information about the CloudUCM devices. The information displayed is related to the number of CloudUCM devices created in the organization, the number of VoIP devices that are registered to the CloudUCM device, and the total number of extensions created on the CloudUCM devices.
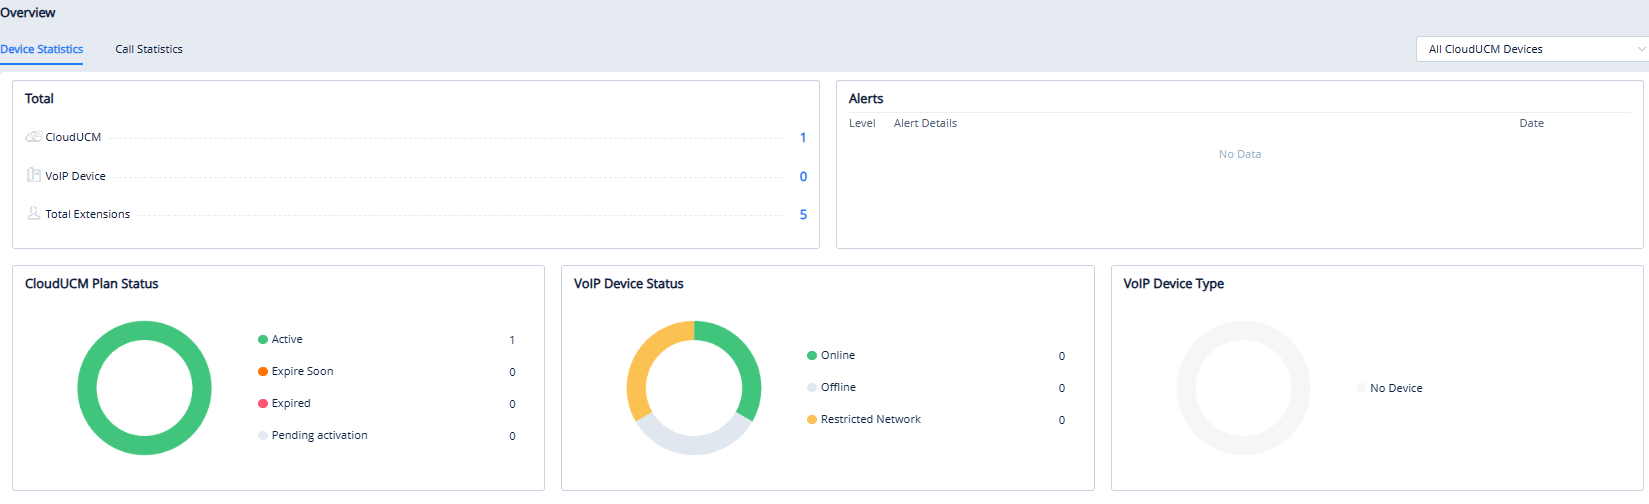
Device Statistics
The Device Statistics tab displays the following:
Total |
|
Alerts | Displays the latest 5 high and medium-level alert messages of the CloudUCM devices in the enterprise. |
CloudUCM Plan Status |
|
VoIP Device Status | Displays the number of devices that are currently online, offline, and network restricted:
|
Voice Device Type | Displays the number of devices in each category: audio and video.
|
Call Statistics
You can select multiple CloudUCM devices to view the latest 7-days or 30-days call status chart.
- Total Calls: Chart of the total number of calls per day.
- Max Concurrent Calls: Chart of the number of concurrent calls per day.
- Number of Registered Extensions: Chart of the number of registered extensions per day.
Extension
The module displays the extension information of all UCM devices in the selected organization.
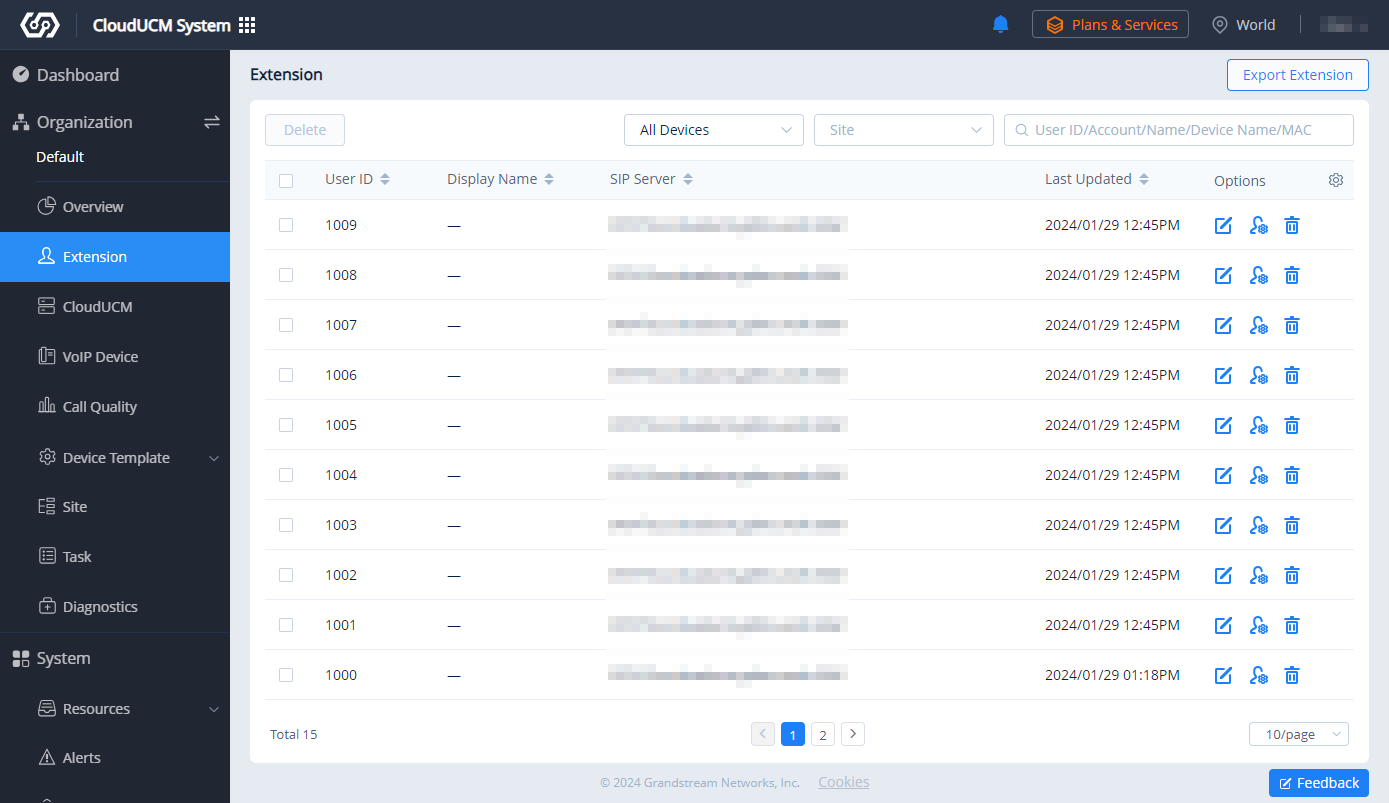
Edit Extension in UCM Web UI
The user can click
![]() button to access the UCM device Web UI to edit the extensions. As the screenshot shows below:
button to access the UCM device Web UI to edit the extensions. As the screenshot shows below:

Assign Account
The user can click ![]() button to assign accounts to the VoIP devices in the current system.
button to assign accounts to the VoIP devices in the current system.
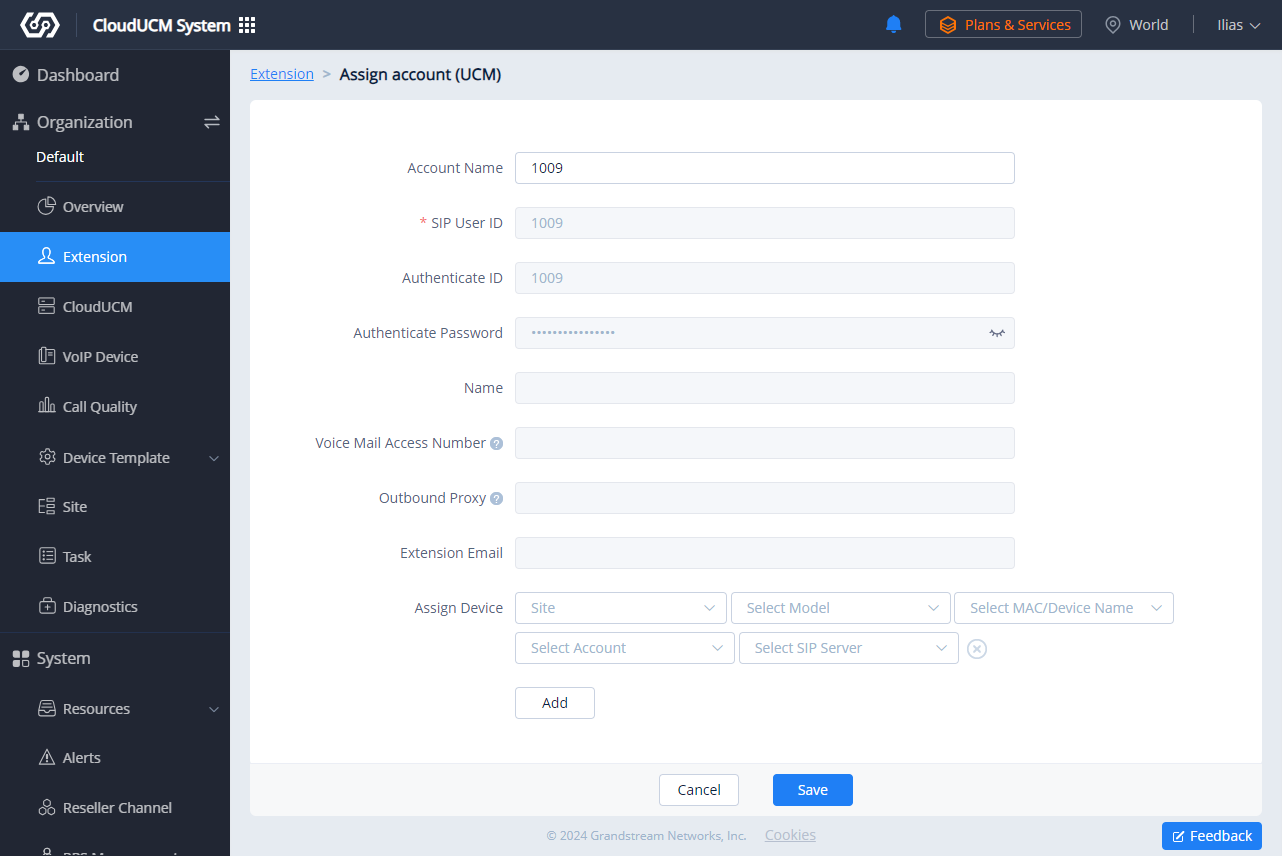
Delete Account
Users can delete one or multiple extensions in this module.
- Click on to delete individual extensions.
- When the confirmation prompt appears, click “OK”.
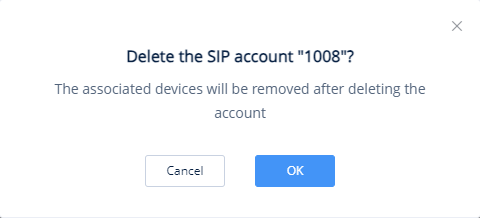
To delete multiple extensions at once, please select the extensions by ticking the box next to each extension, then click ![]() . When the confirmation message appears, click “OK”.
. When the confirmation message appears, click “OK”.
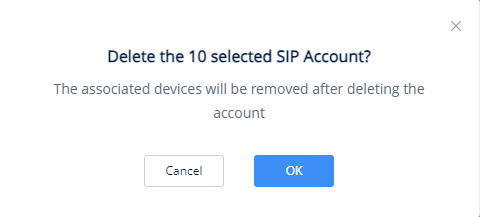
Export Extension List
Users can click the “Export Extension” button on the right upper corner of the Extension module to export the extensions in the current enterprise in the GDMS platform.
CloudUCM Device
In the CloudUCM Device List, all CloudUCM devices in the current organization are displayed, along with device status, plan information, storage space, CloudUCM server address, the number of calls in real-time, extension number (the number of currently registered extensions/the number of created extensions/the maximum number of extensions in the plan), and Trunk status.
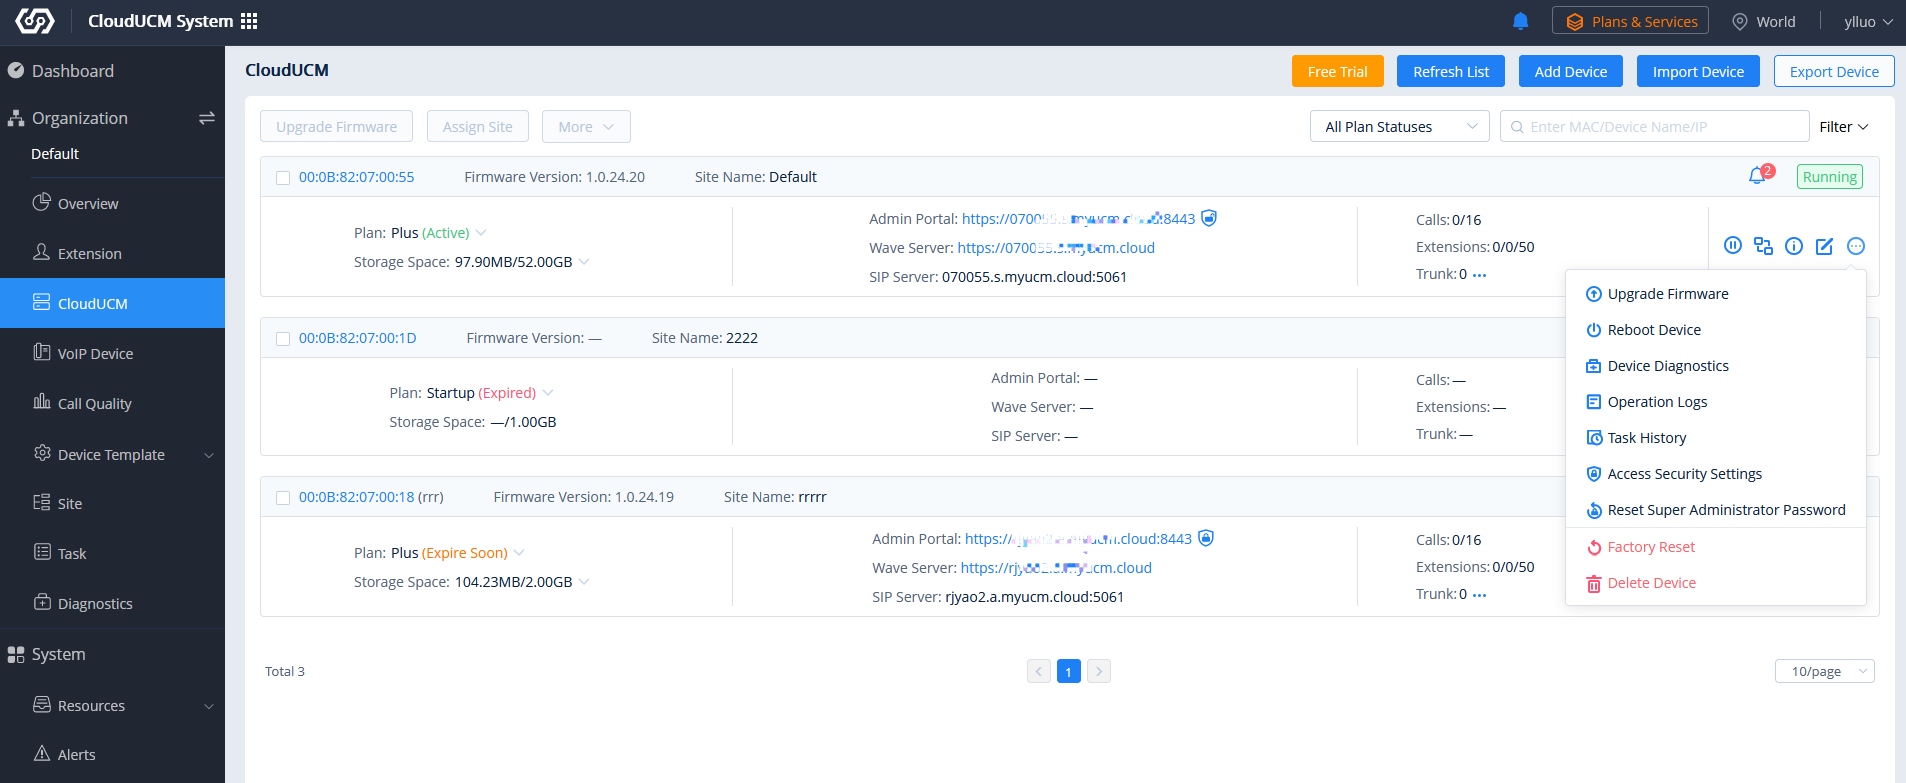
Status Descriptions:
Status | Description |
Device Status |
|
The firmware version is too low |
|
The Plan is about to expire |
|
Trunk Abnormal |
|
Unread Notification |
|
Fail2ban |
|
Server Address Descriptions:
Admin Portal: This specifies the CloudUCM device Web UI access address. The username and password of the device are required. CloudUCM User Manual
Wave Server: This specifies the server address of the Wave client. Wave User Manual
SIP Server: This specifies the SIP server address used for registering extensions. IP Phone Configuration User Manual
Filter Device:

Apply for CloudUCM Free Trial
Users can apply for the CloudUCM free trial. If you need more free trials, you can contact your superior channel or Grandstream Support for help. Learn more about CloudUCM Free Trial.
- Apply in the CloudUCM Device List:
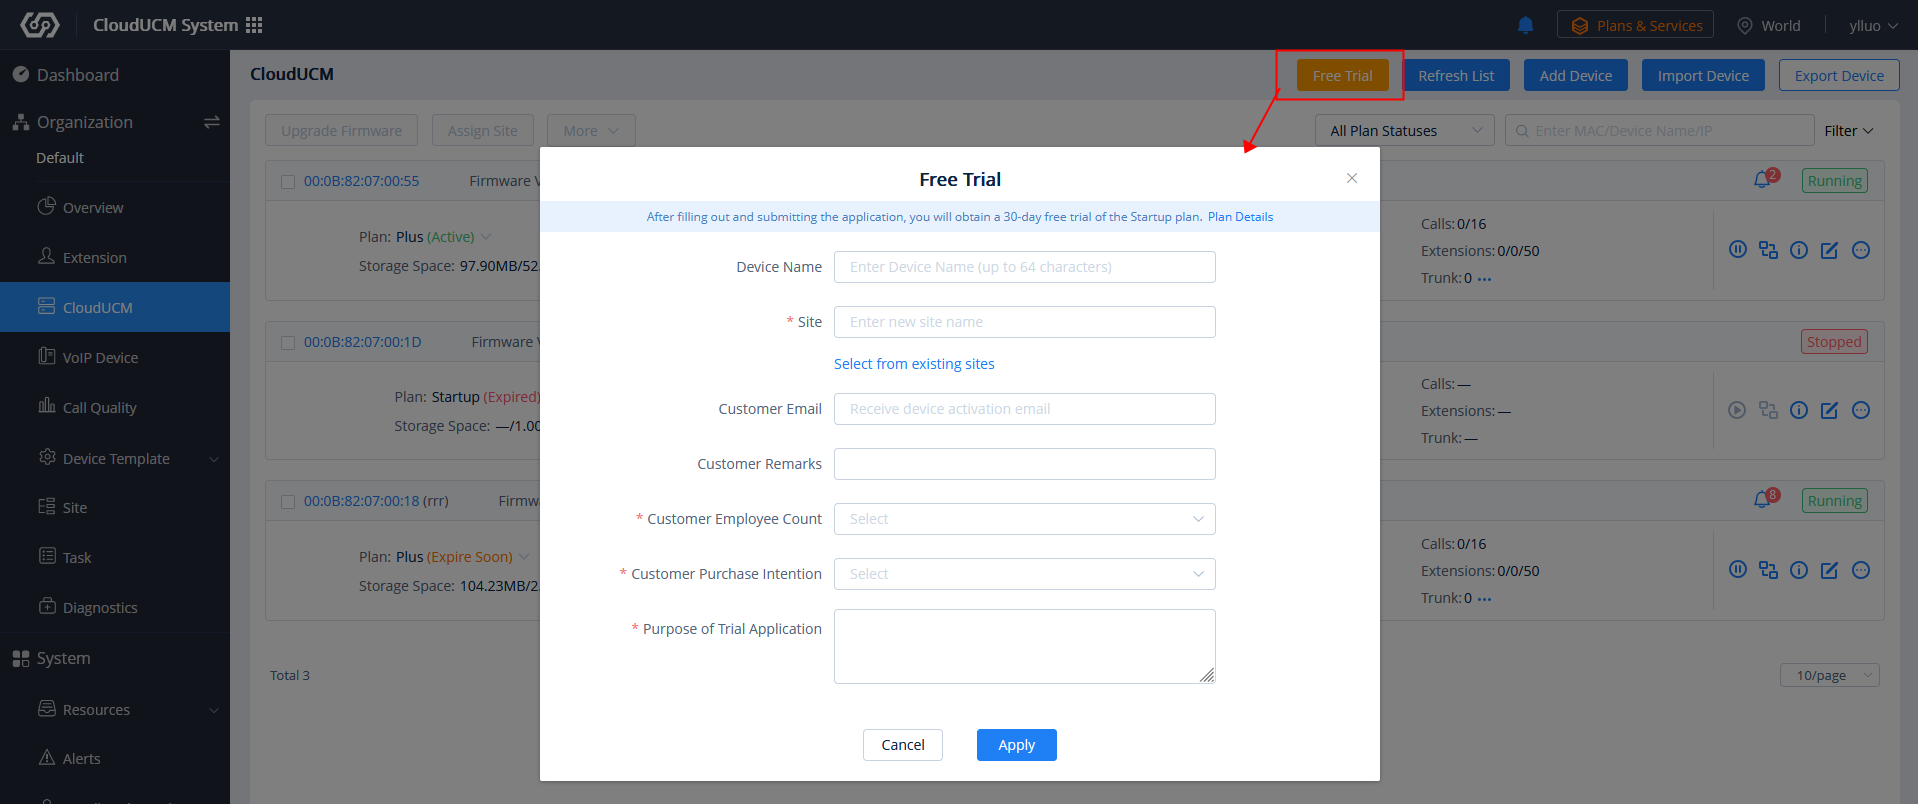
- After applying for the free trial, click the option “Activate Now” in the pop-up window or click the button
 in the CloudUCM Device List to activate the device. After activating the device, the free trial will be started.
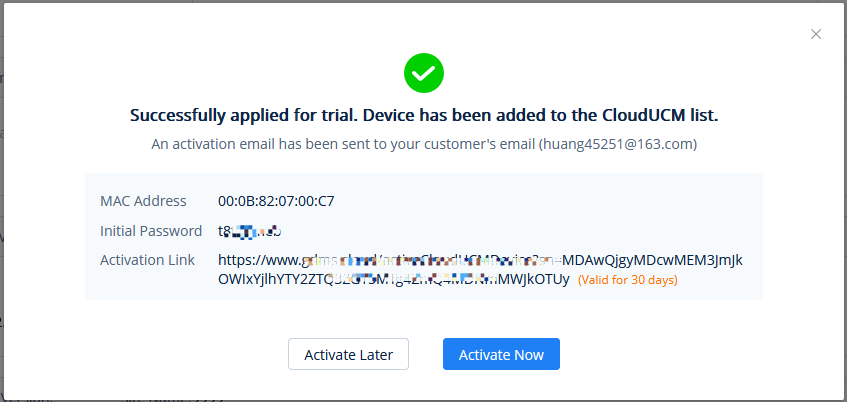
- If you have entered the customer’s email address, an activation email is automatically sent to that configured email address. (Individual and company users do not have the “Customer Email Address” option.)
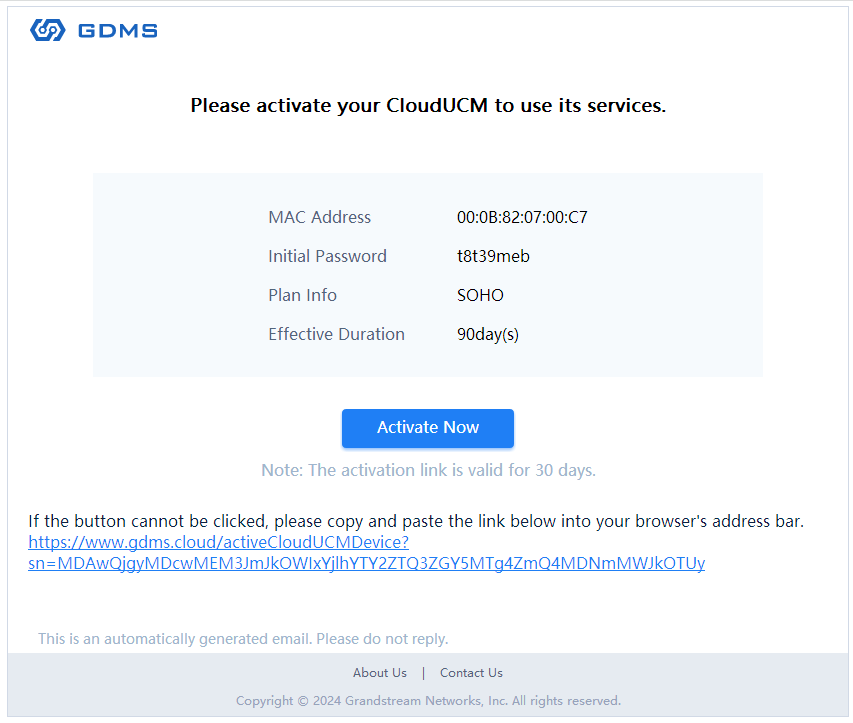
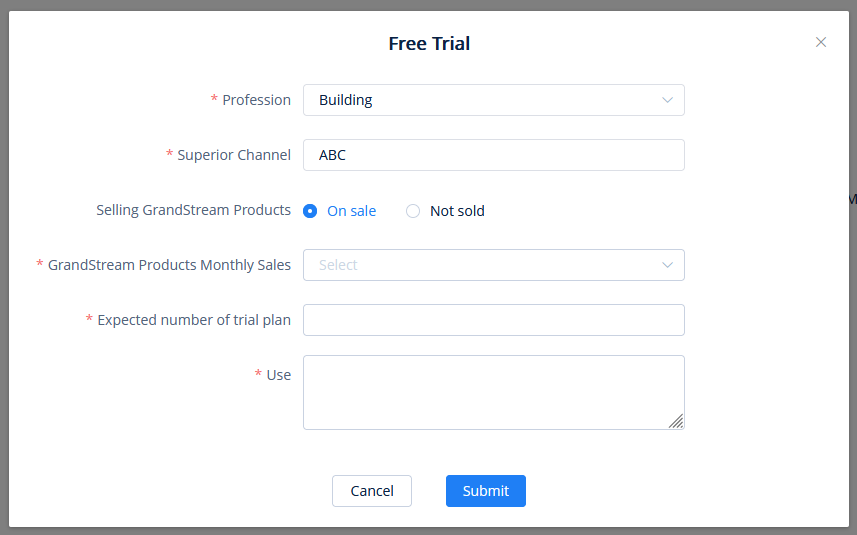
Activate CloudUCM Device
For a newly created CloudUCM device, you need to activate the device before you can start using it.
- You can activate the CloudUCM device by clicking the icon
 in the activation email or in the CloudUCM Device module of the GDMS platform.
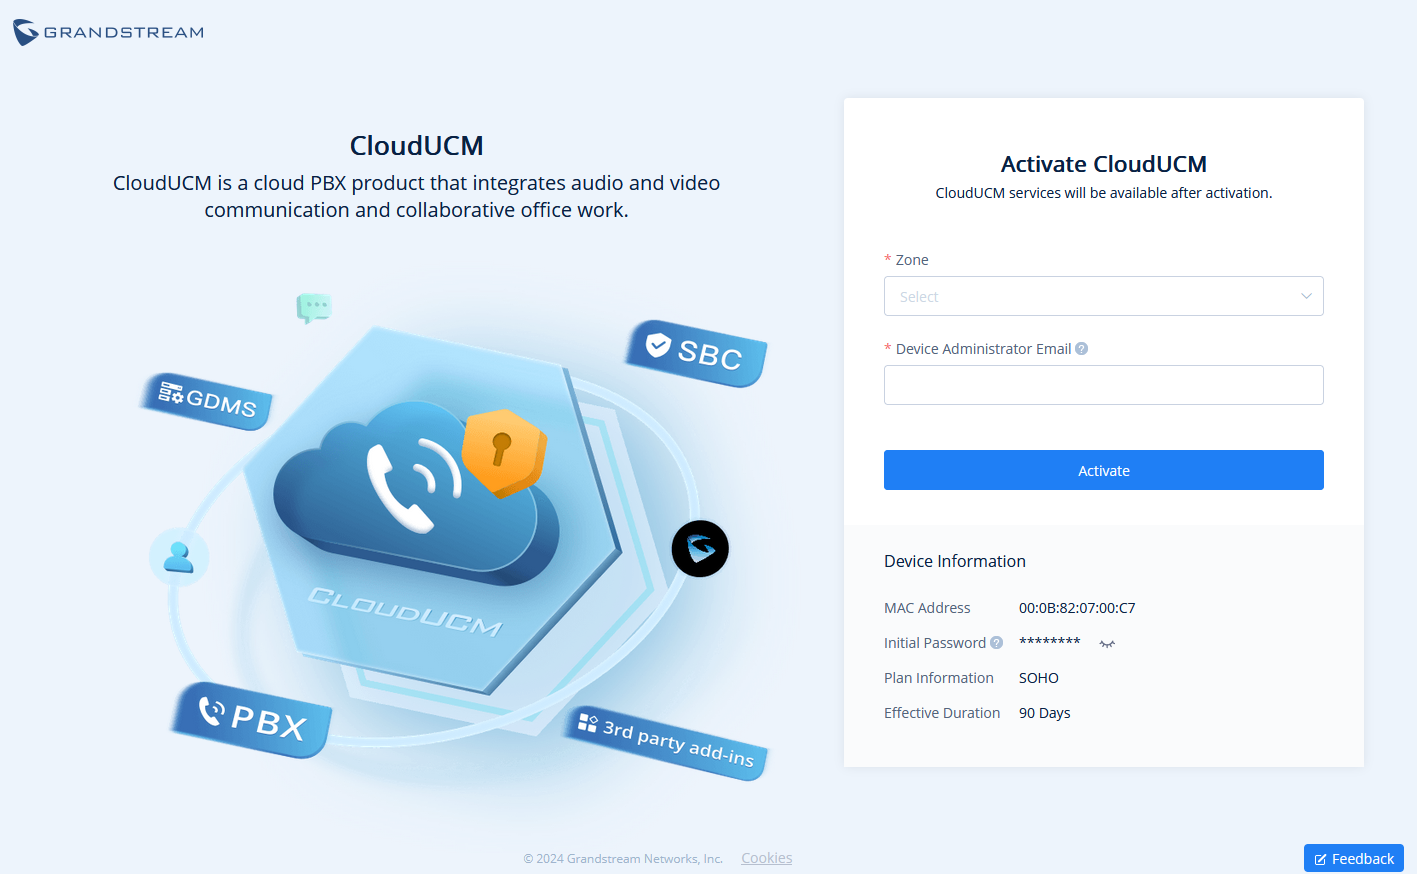
- Before activating the CloudUCM device, you need to fill in the following information:
Zone | Select the nearest data center for quick access. |
CloudUCM Server Address | Enter your custom service address for easy memorization. Note: Only the paid plans support this function. |
Device Administrator Email | Enter the administrator email of your CloudUCM device so that you can use it to retrieve the password, receive plan notifications, storage space alerts, etc. |
The device information will be displayed after filling the information:
MAC Address | It indicates the virtual MAC address of the CloudUCM device, as a unique identifier for this device. |
Initial Password | It indicates the initial password of the CloudUCM device, and it is also the initial password of the super administrator for logging in to the CloudUCM Web UI. |
Plan Information | It indicates the plan name for this CloudUCM device. |
Valid Duration | It indicates the validity period of this CloudUCM device’s plan. |
- The activation may take several minutes. After activating the CloudUCM device, you can quickly access the CloudUCM admin portal to configure the CloudUCM service or add it to the GDMS platform for management.
Please refer to the CloudUCM User Manual to learn more details.
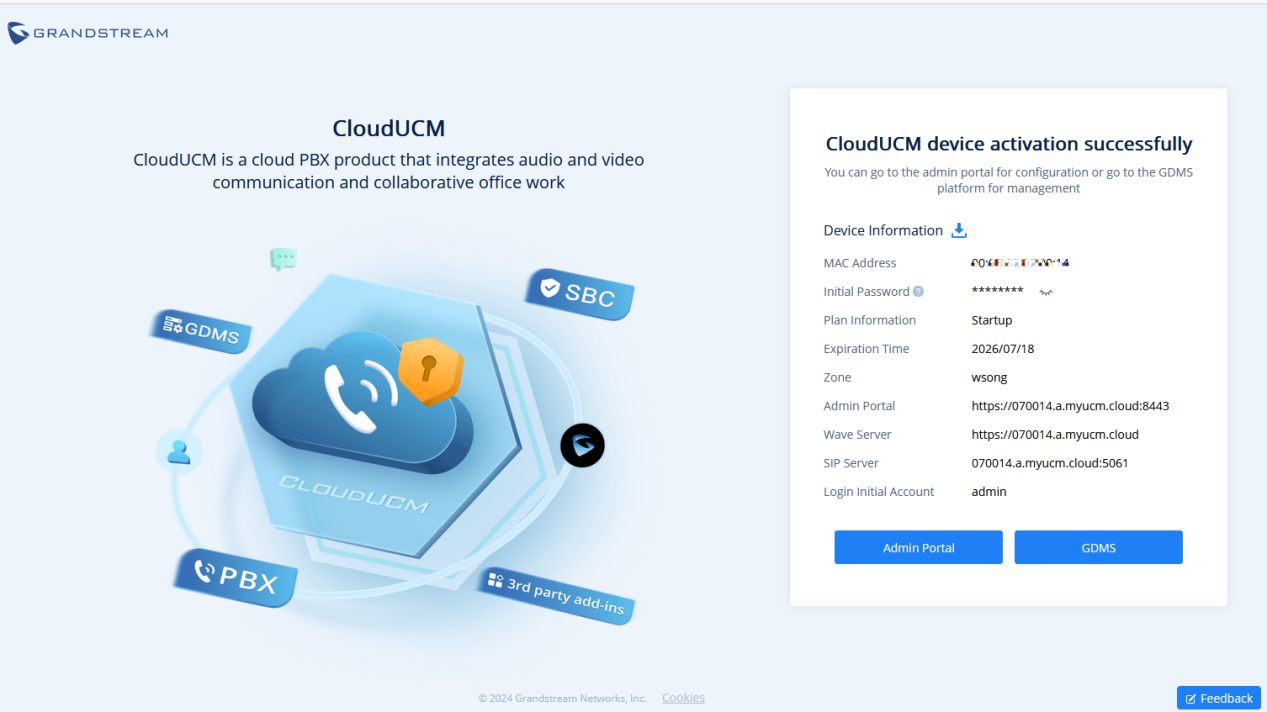
Add CloudUCM Device
You will need to enter the MAC address and initial password of your CloudUCM device to add it. The rules are the same as adding UCM devices in the UCMRC System.
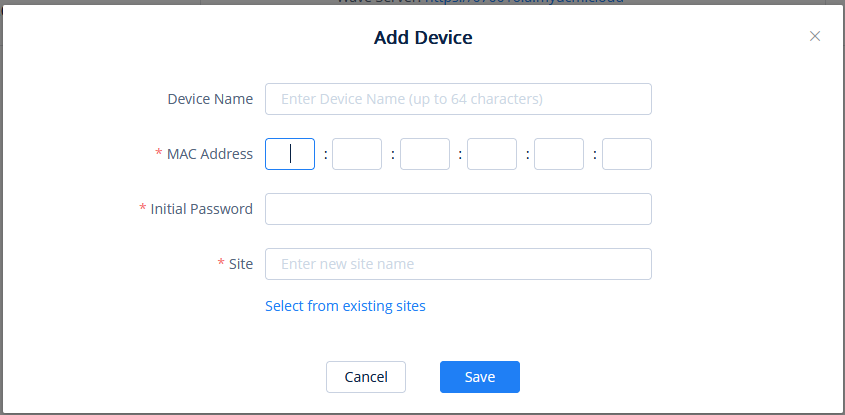
Import CloudUCM Devices in Batches
The rules are the same as importing UCM devices in batches to the UCMRC System.
Start/Stop CloudUCM Device
![]() Start Device: When the CloudUCM device stops running or needs to be activated, you can manually start the device. If the current plan has expired, it cannot be started.
Start Device: When the CloudUCM device stops running or needs to be activated, you can manually start the device. If the current plan has expired, it cannot be started.
![]() Stop Device: When the CloudUCM device is running, you can click the option
Stop Device: When the CloudUCM device is running, you can click the option ![]() to stop the device. After stopping the device, the device is no longer accessible.
to stop the device. After stopping the device, the device is no longer accessible.
Remotely Access CloudUCM Device Web UI
Click the option![]() to remotely access the Web UI of the CloudUCM device on the device list.
to remotely access the Web UI of the CloudUCM device on the device list.
- You can access the CloudUCM device Web UI without entering a password. Once the permission is assigned, the user can remotely access the UCM Web UI through the GDMS platform without entering the UCM password.

You can also set the CloudUCM device Web UI to be accessible only through the GDMS platform:

View Device Details
In the CloudUCM Device List, you can click the option ![]() to view the device details, including the current extension registration status, VoIP device status registered with the extension, storage space usage status, the number of terminals connected to the server address, alert statistics, call statistics, and extension registration statistics.
to view the device details, including the current extension registration status, VoIP device status registered with the extension, storage space usage status, the number of terminals connected to the server address, alert statistics, call statistics, and extension registration statistics.
You can view the CloudUCM device daily statistical reports, basic device information, plan information, etc.
Server Address Descriptions:
- Admin Portal: This specifies the CloudUCM device’s Web UI access address. The username and password of the device are required. CloudUCM User Manual
- Wave Server: This specifies the server address of the Wave client. Wave User Manual
- SIP Server: This specifies the SIP server address used for registering extensions. CloudUCM Endpoint Configuration Guide
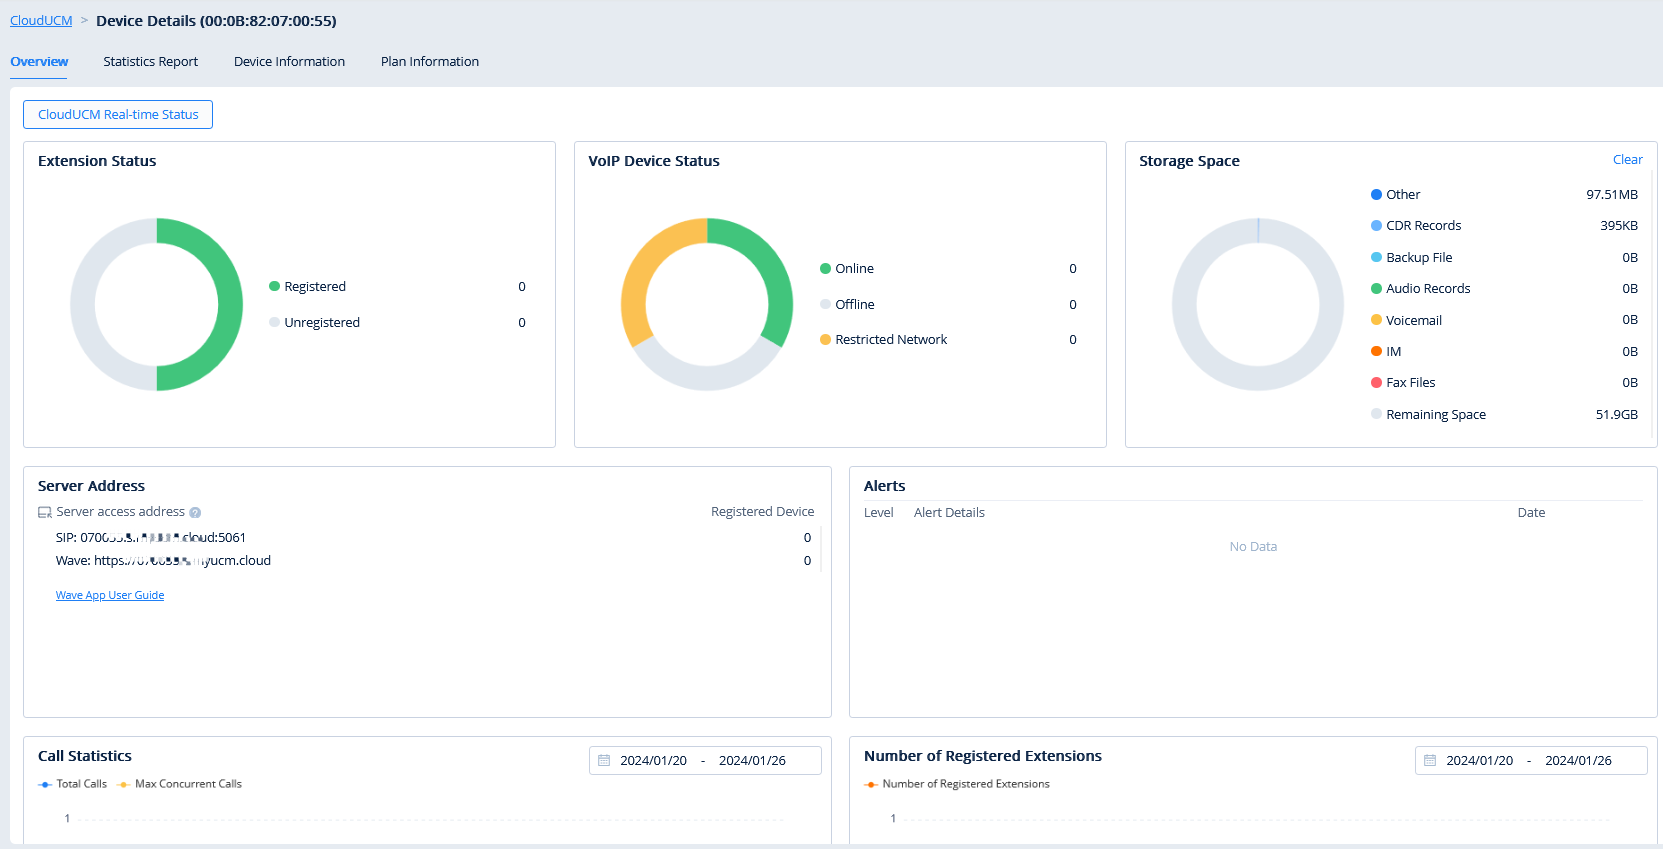
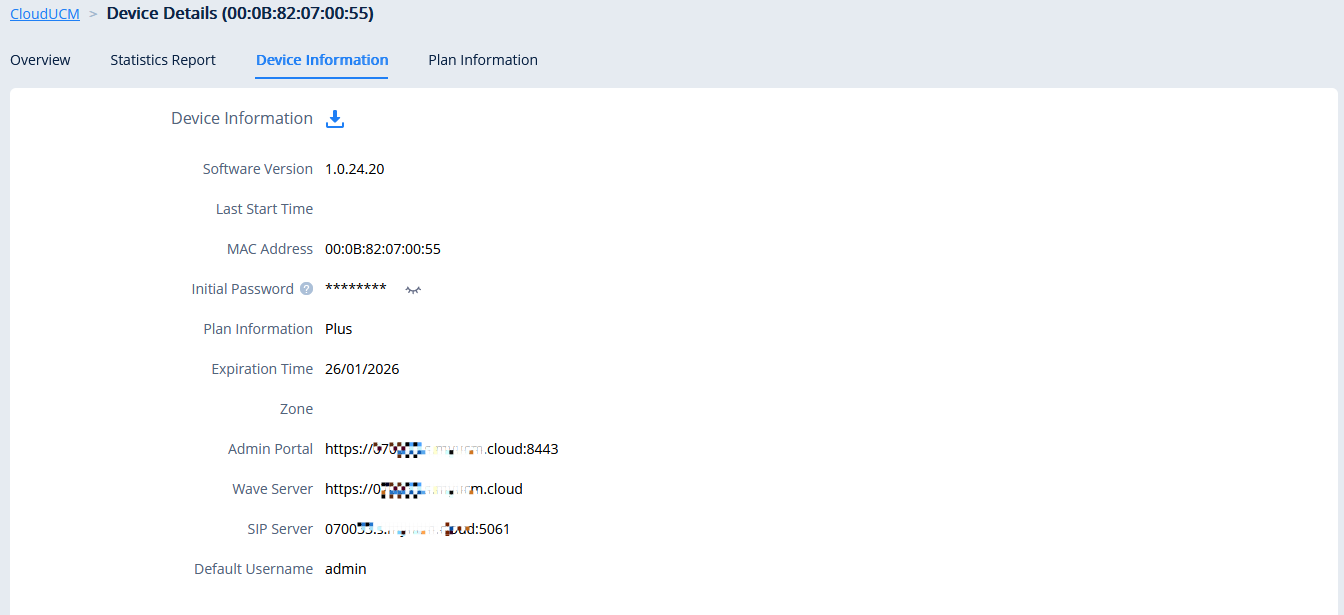
View Statistics
Daily Report
The CloudUCM device collects the data report of the day and sends it to the GDMS user or the configured email box.
Please refer to the screenshot below for the daily report email:
View Statistics Report (Last 30 days)
Except for the fields below, all other rules are the same as UCM devices in the UCMRC System.
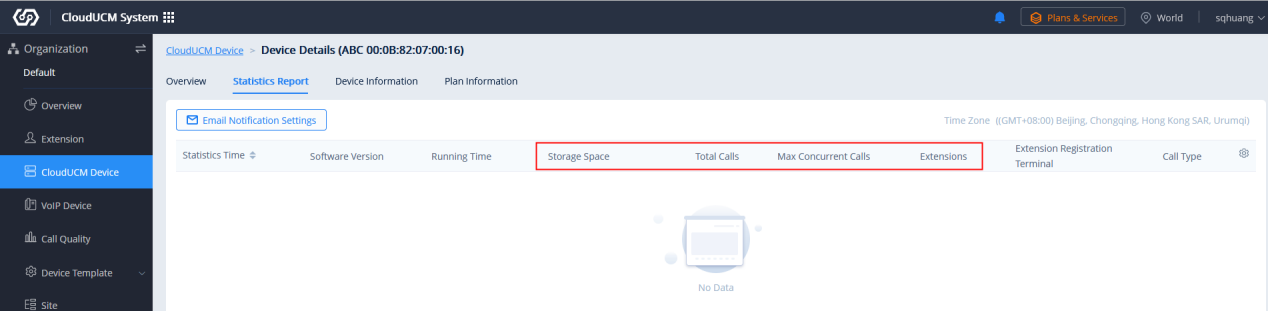
View CloudUCM Device Plan
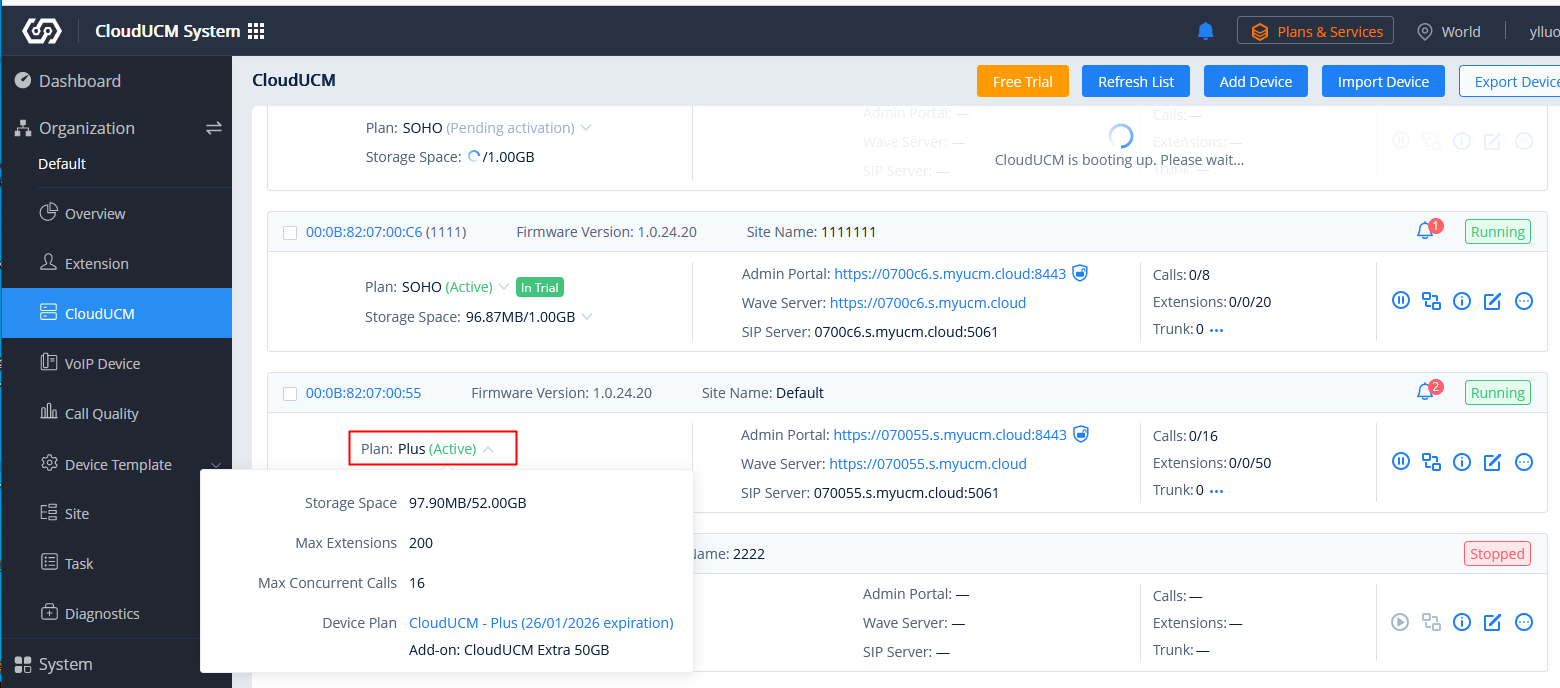
It displays the storage space (currently used) of the plan, the maximum number of extensions in the plan, the maximum number of concurrent calls, the plan name, and the expiration time.
Edit CloudUCM Device
You can click the option ![]() in the CloudUCM Device List to edit the device:
in the CloudUCM Device List to edit the device:
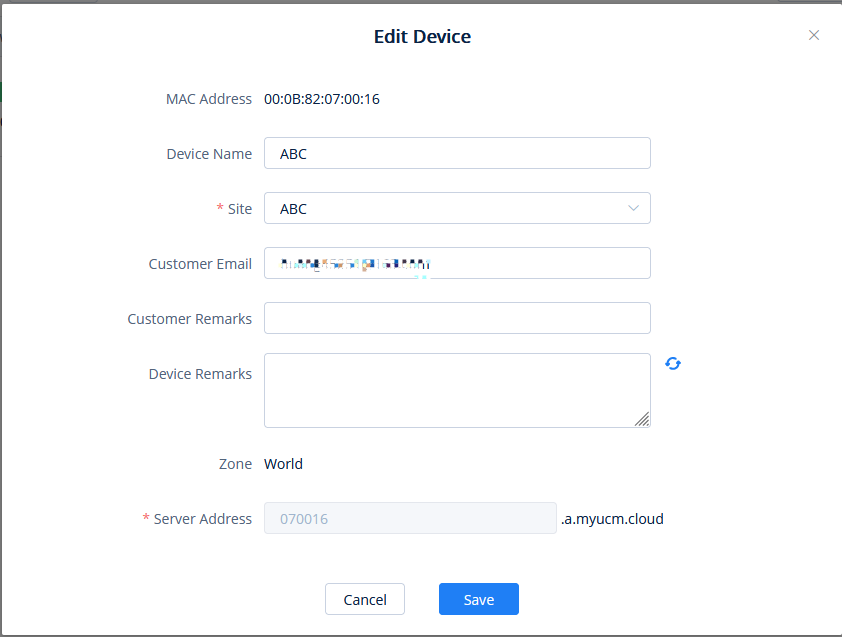
Customer Email: Enter the email address of the customer who uses this device.
Customer Remarks: Enter the remarks of the customer who uses this device.
Device Remarks: Enter the remarks of the device. The device remarks of the CloudUCM device will be synchronized to the GDMS platform.
Server Address: Enter the server address of the CloudUCM device. The Plus plan allows you to customize the domain name for this server address.
Custom Server Domain Name
Prerequisite: The CloudUCM advanced plans support custom server domain names.
- On the CloudUCM device editing page, users can customize the server domain name.
- You can enter the preferred URL, such as {yourdomain}.a.myucm.cloud.

- If the plan has a custom domain name function, the user can click on the “Custom Server Domain Name” option and enter the server address with the private domain name, and the user also needs to enter the custom certificate of the domain name.
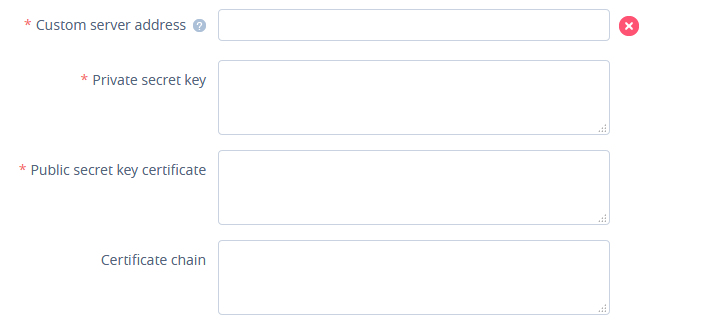
Reboot Device
After the device is restarted, its status changes to ”Starting”. After a few minutes, its status changes to “Running”. Other rules are the same as those for UCM devices in the UCMRC System.
Upgrade Firmware
It only supports upgrading to the official CloudUCM firmware version.
Downgrading the firmware version is not currently supported. Please contact Grandstream Support if needed.
Other rules are the same as those for UCM devices in the UCMRC System.
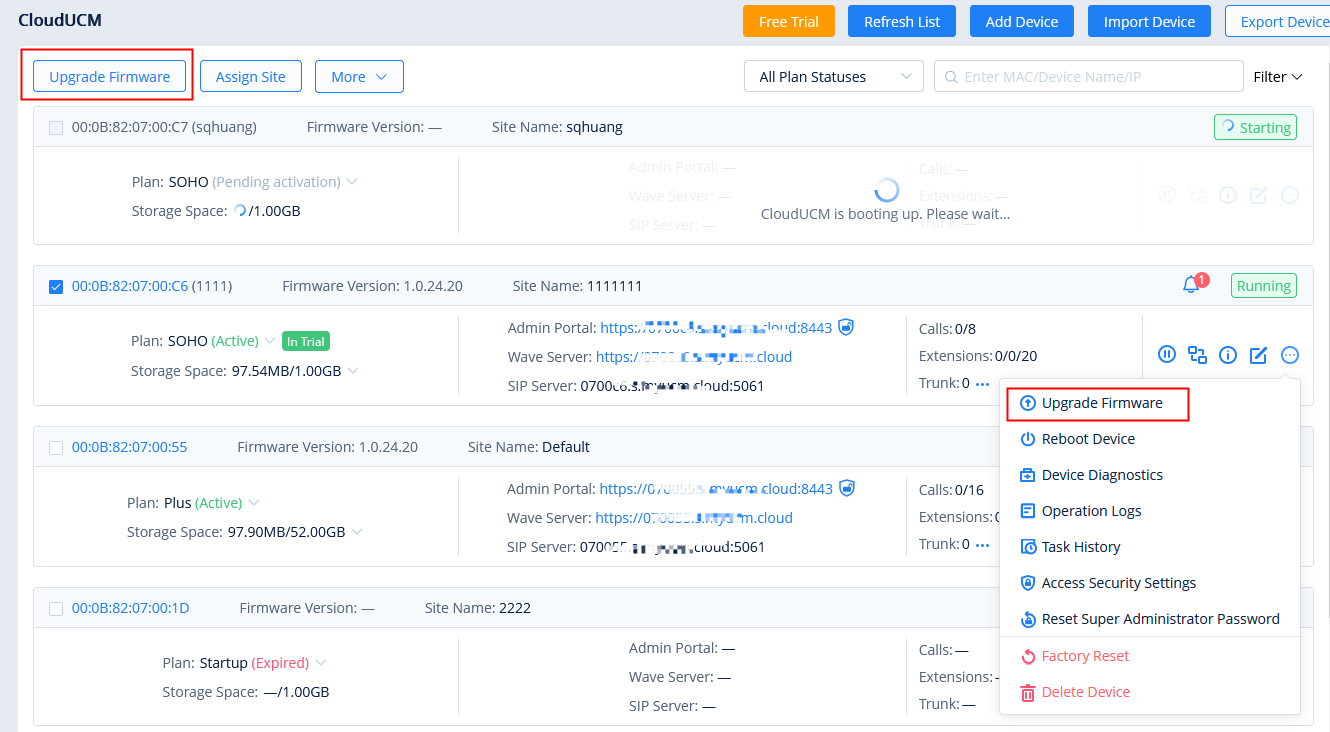
CloudUCM Device Diagnostics
CloudUCM devices only support Ping/Traceroute and Syslog, which are the same as those in the UCMRC System.
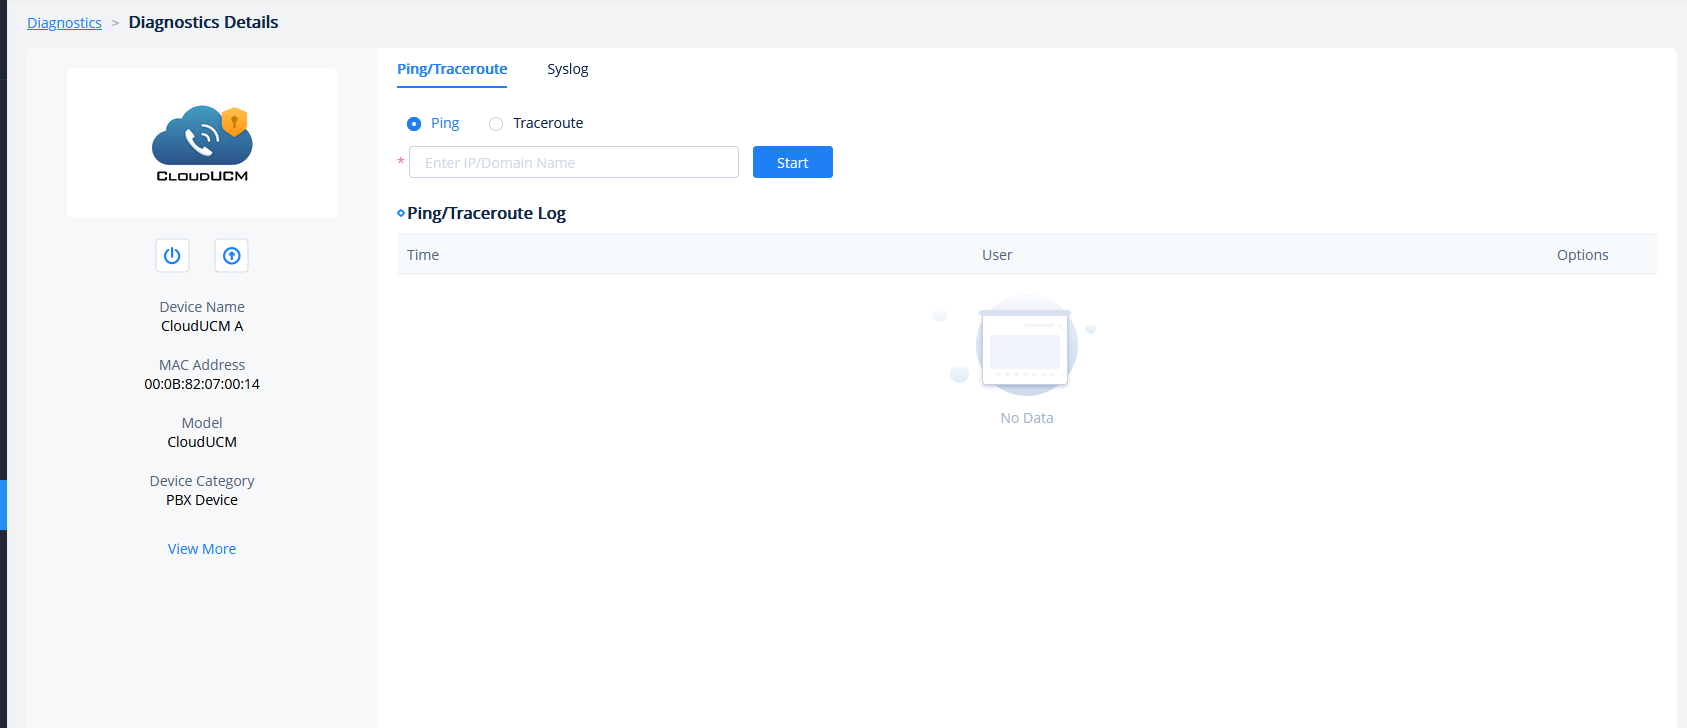
View Device Operation Logs
In the CloudUCM Device List, you can click to view the operation logs of devices. The rules are the same as those for UCM devices in the UCMRC System.
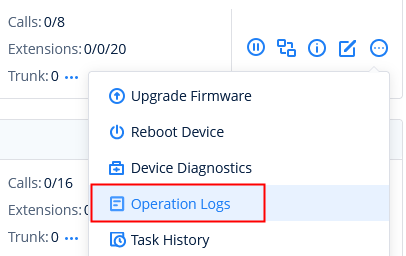
Factory Reset
You can factory reset a single CloudUCM device. After resetting the device, the firmware version is still used the same one before restoration.
Reset CloudUCM Super Administrator Password
- In the CloudUCM device list, you can click the option
 and click the option “Reset Super Administrator Password”.
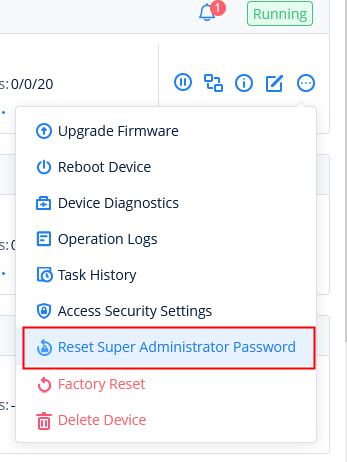
- After confirming the reset, an email will be sent to the email address of the device administrator:
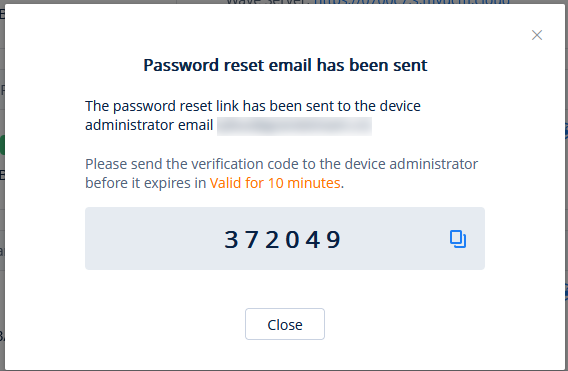
- The device administrator can click the link in the reset password email and enter the 6-digit verification code, then after the verification passes, the device administrator can enter a new password.
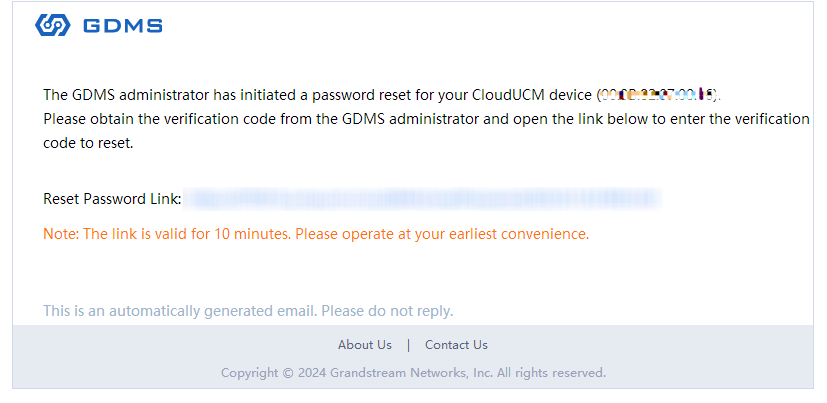
Modify Sites in Batches
Users could edit the site of a batch of CloudUCM devices on the GDMS platform. The default site is “default”.
- Select the desired devices and click on the “Site Management” button.

- Select the site to assign the selected devices.
- Click on the “Save” button, and all the selected devices will be transferred to the selected site.
Delete CloudUCM Device
To delete a CloudUCM Device, the user can go click on ![]() then click “Delete Device” as shown in the screenshot below.
then click “Delete Device” as shown in the screenshot below.
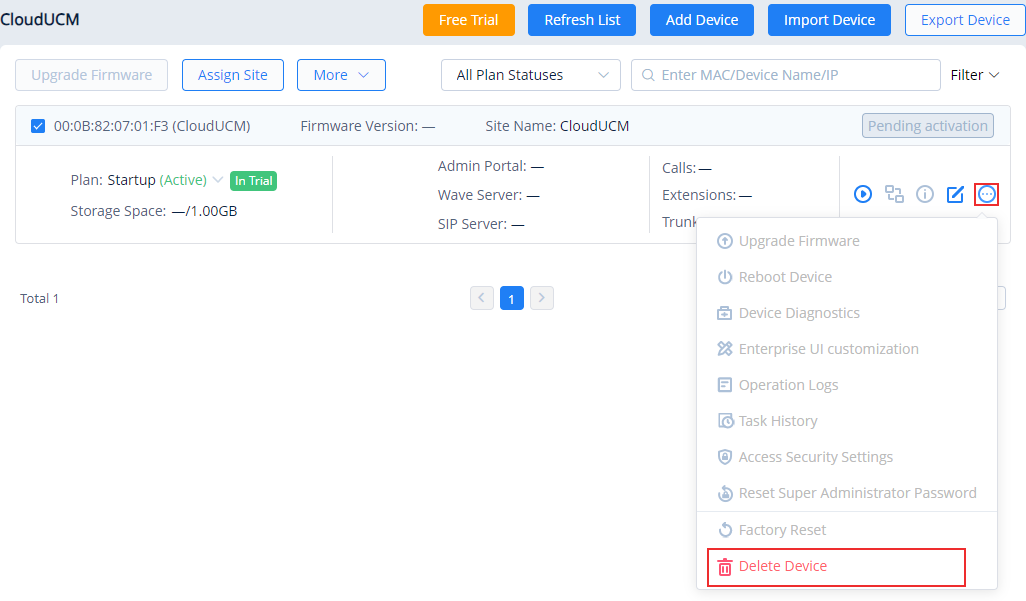
Or, to delete multiple CloudUCM devices at once, please select the device by ticking the box nex to the device’s MAC address then go to “More”, then select “Delete”.
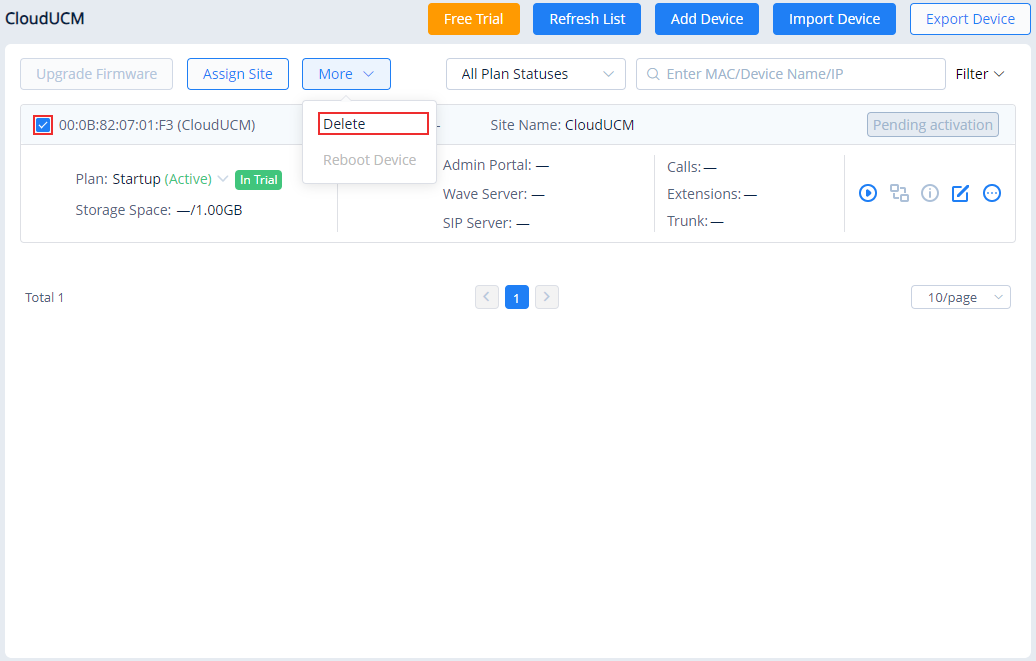
Export CloudUCM Device
To export the list of CloudUCM devices, click on ![]() button. The list created will be in .xls format, and it will include all the CloudUCM devices which are added to the organization. If the user wishes to select the devices to be exported, he/she can tick the box next to the CloudUCM MAC address, then click on “Export Device” to export only those selected devices.
button. The list created will be in .xls format, and it will include all the CloudUCM devices which are added to the organization. If the user wishes to select the devices to be exported, he/she can tick the box next to the CloudUCM MAC address, then click on “Export Device” to export only those selected devices.
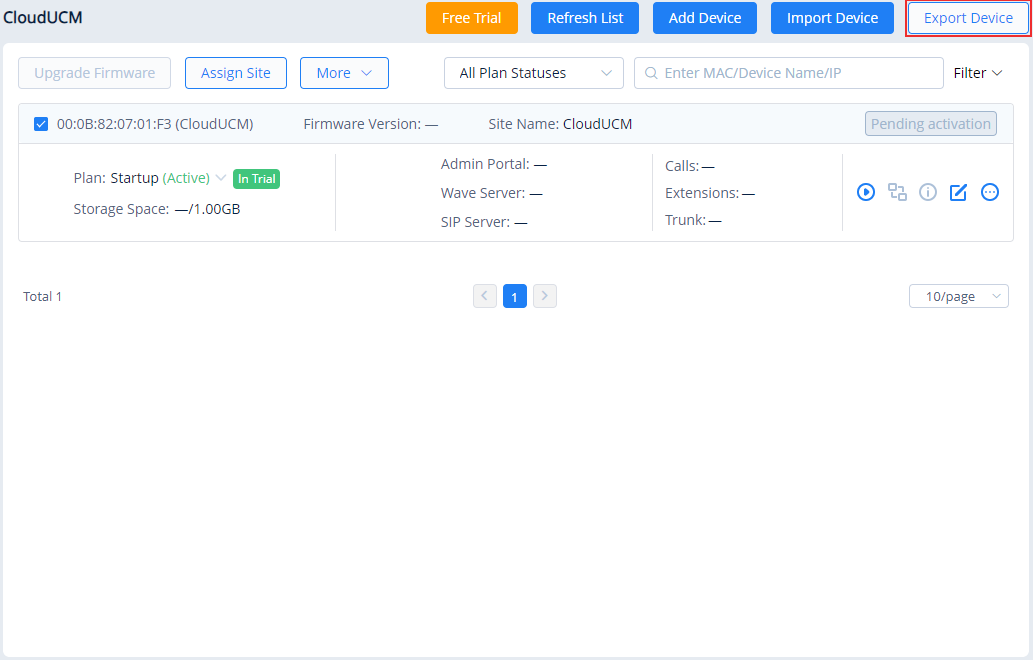
Synchronize CloudUCM Device Alerts to GDMS
- Users need to enable CloudUCM alert notifications on the management platform of the CloudUCM device. For details, please refer to the CloudUCM User Guide on the CloudUCM product page.
- The alerts generated in the CloudUCM device will be synchronized to the GDMS platform.
- Users can view all CloudUCM alert notifications in the GDMS platform and set the alert notification methods: Email Notification, Message Notification, or SMS Notification.
DEVICE TEMPLATE
The Device Template page allows users to create templates that can be used to provision devices of the same model or in the same group. Additionally, users can upload configuration files for individual devices and manage them individually.
By Model
Users could customize the configuration template and classify the templates by device model and site. Users could also configure a batch of devices on the GDMS platform, which means users could create a configuration template for all the same models of devices or create multiple templates for different sites.
Automatic Configuration Push
When a device is added to GDMS for the first time, it will automatically obtain and use the configuration template for its model.
Manual Configuration Push
To manually push the configuration to specific device models, click on the ![]() button of the desired models.
button of the desired models.
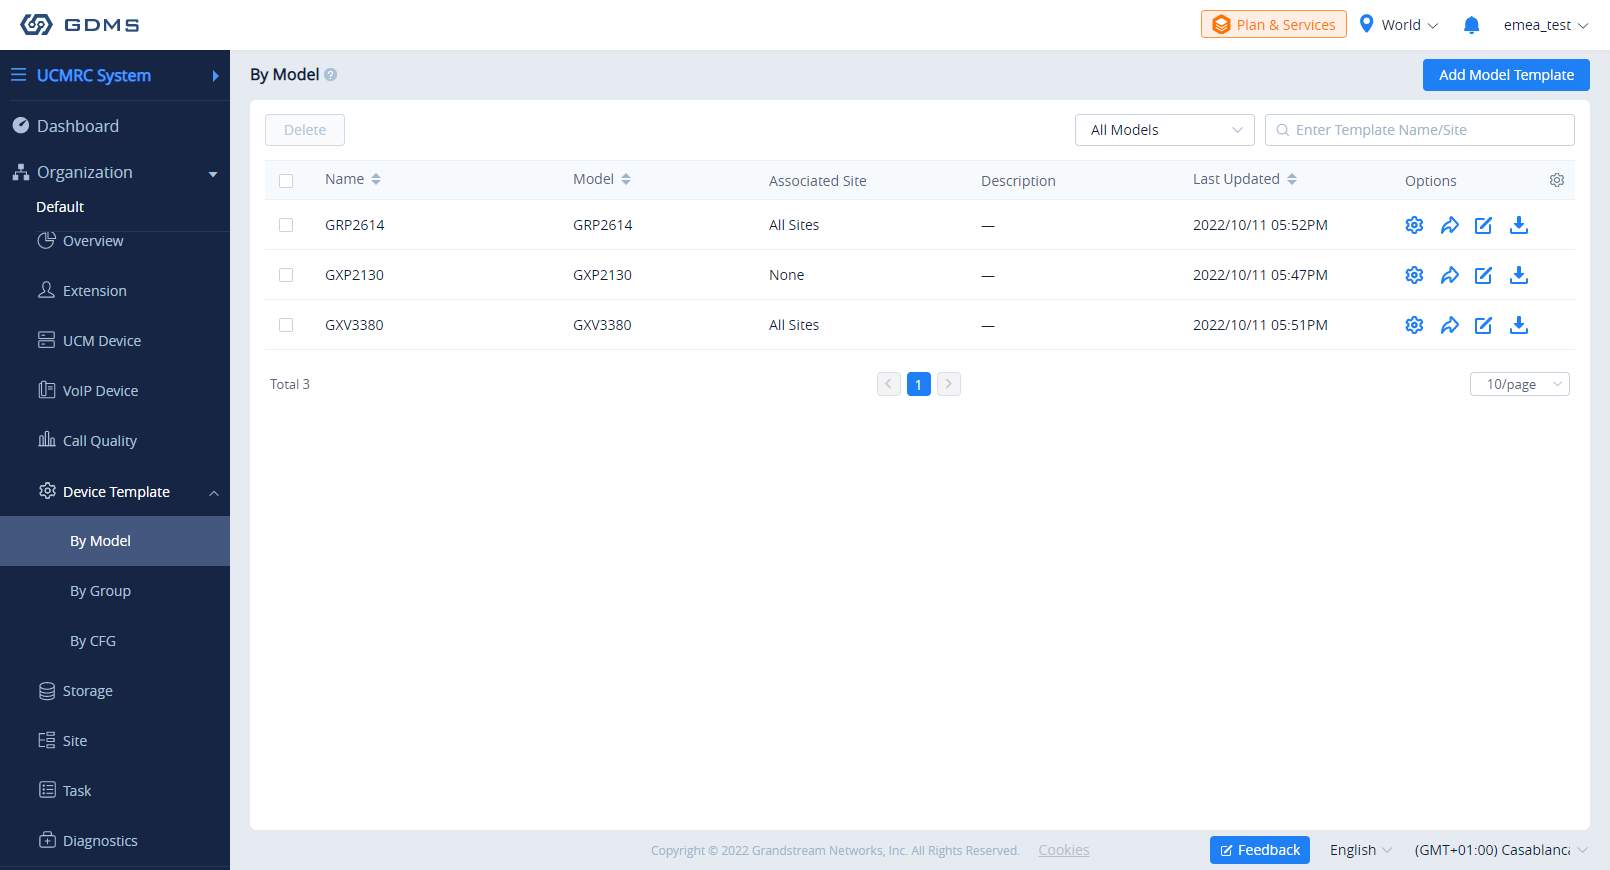
Example:
For GXV3370 devices, all sites are using the same configuration template and all the devices under site A – D will acquire the same configuration template – GXV3370 Config Template.xml.
For DP720 devices, different sites have different configuration templates. The DP720 in site A will acquire the DP720 configuration file – Config Template -1.xml; the DP720 in site B will acquire the DP720 configuration file – Config Template -2.xml.
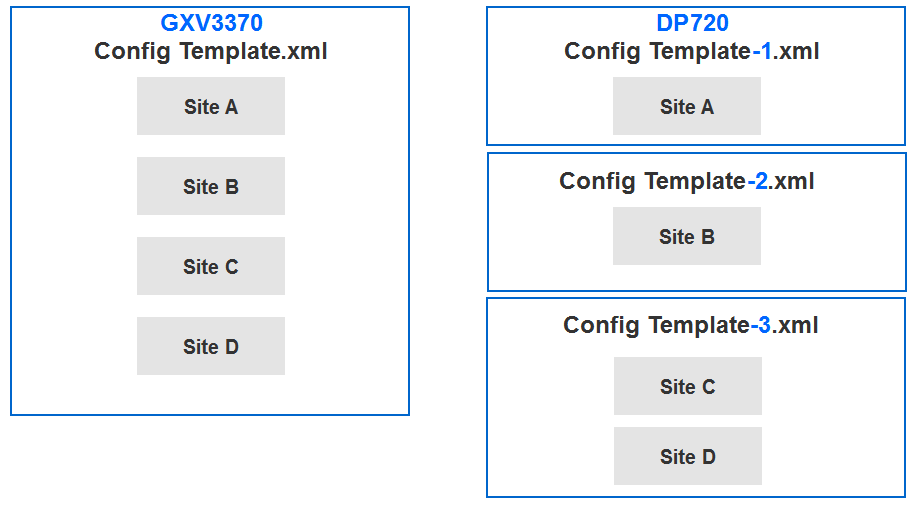
Add Template
To add a configuration template for a specific device model, click on the Add Template button on the By Model page and enter the following information:
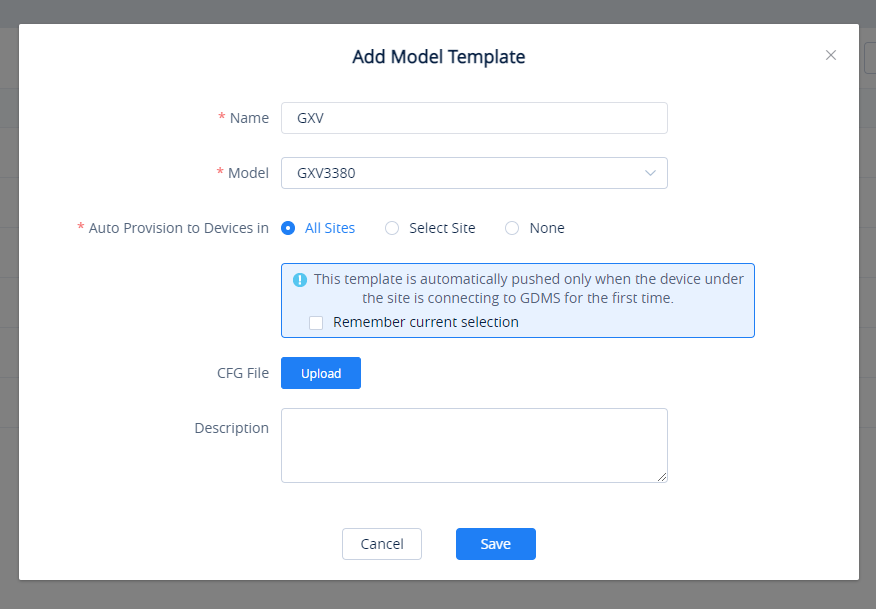
Name | Enter the name of the template. This name must be unique and has a maximum character limit of 64. |
Model | Select the device model of the template. |
Select Site | Select the site for which the template will be used.
|
Description | Users could input the descriptions of the template and the purpose. |
Add Template
Once complete, users will be redirected to the Set Parameters page to modify the device settings of the template.
Set Parameters
Users can configure model-specific settings when editing model templates.
- To configure these model-specific settings, click on the of the desired template.
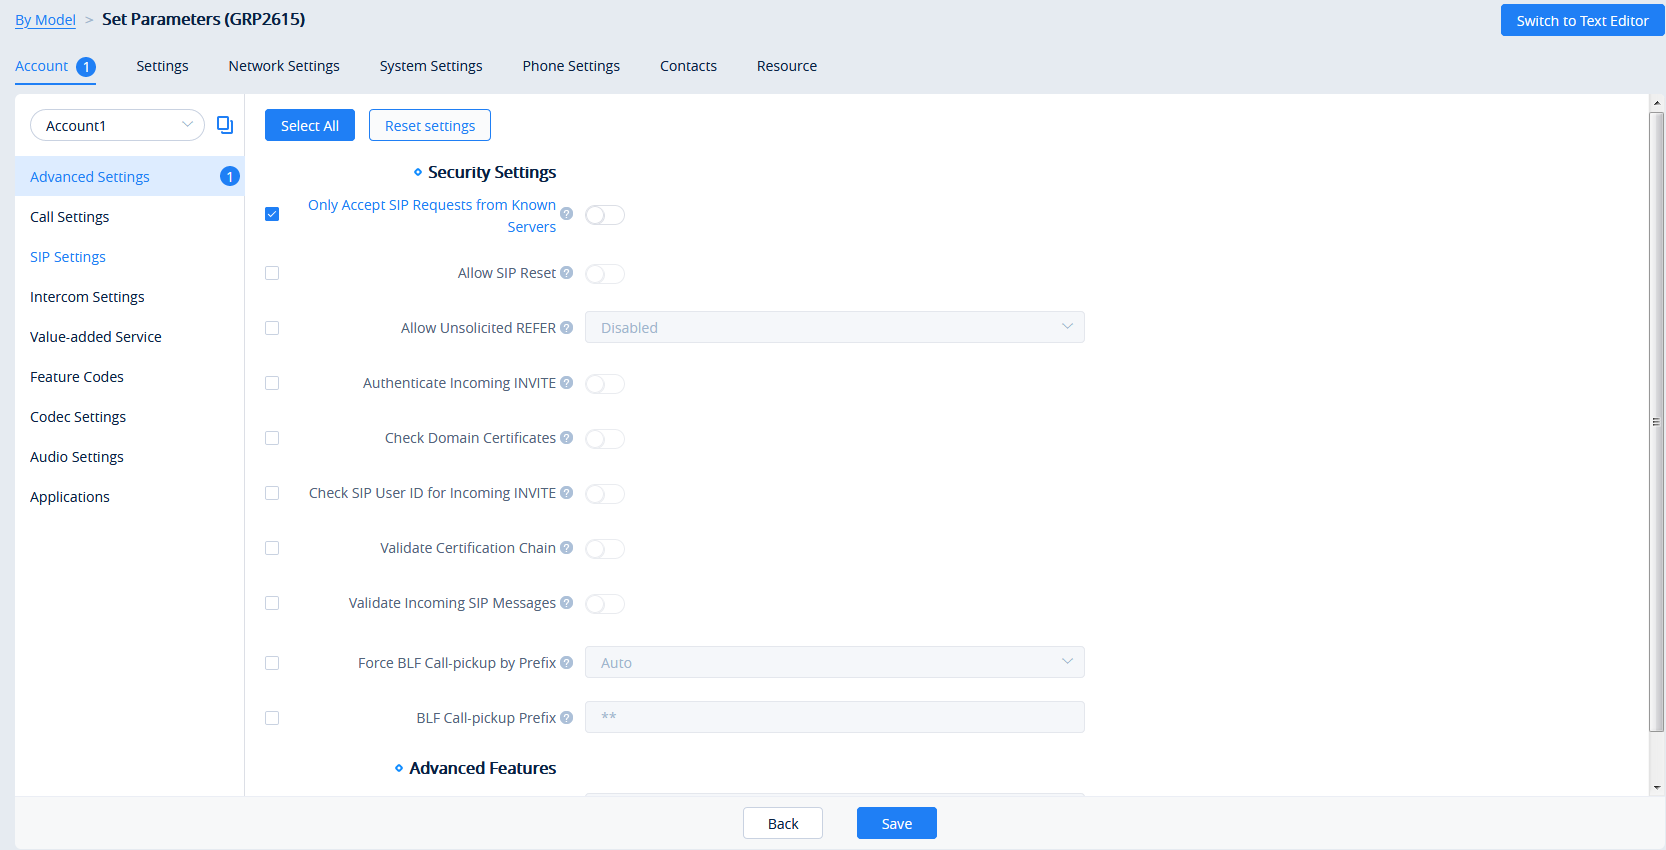
- Clicking on the Select All button will select every option on the current page. Clicking on it again will deselect all the options.
- Clicking on the Reset Settings button will restore all settings on the current page to default values.
- Clicking on the button following the account, users can copy and paste the current account configuration to other accounts.
- When users try to configure the device wallpaper or screensaver image, users can select a picture from the resources list, or upload the local picture to GDMS and configure it to the device.

- Modify the desired settings on the page or click on the Switch to Text Editor to configure device settings via text editing (e.g. p-values). The key can be either a P-value or an alias.
- After setting the parameters, the user can click the “Save” button to save the changes. The user can select to apply the template configuration to all the same model devices on the corresponding site. The user can click the option “Provision to Selected Devices” to select the devices to which the user wants to push the parameters. The user can also click the button “Apply All” to push the parameters to all devices.
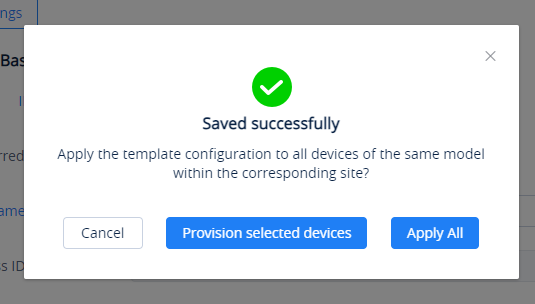
Configure Resource Files
Users can configure custom ringtones and language for devices (Supported models: GXP/DP series).
- To configure these model-specific settings, click on the button of the desired template to go to the Parameters Configuration 🡪 Resource Configuration page, as shown in the figure below:
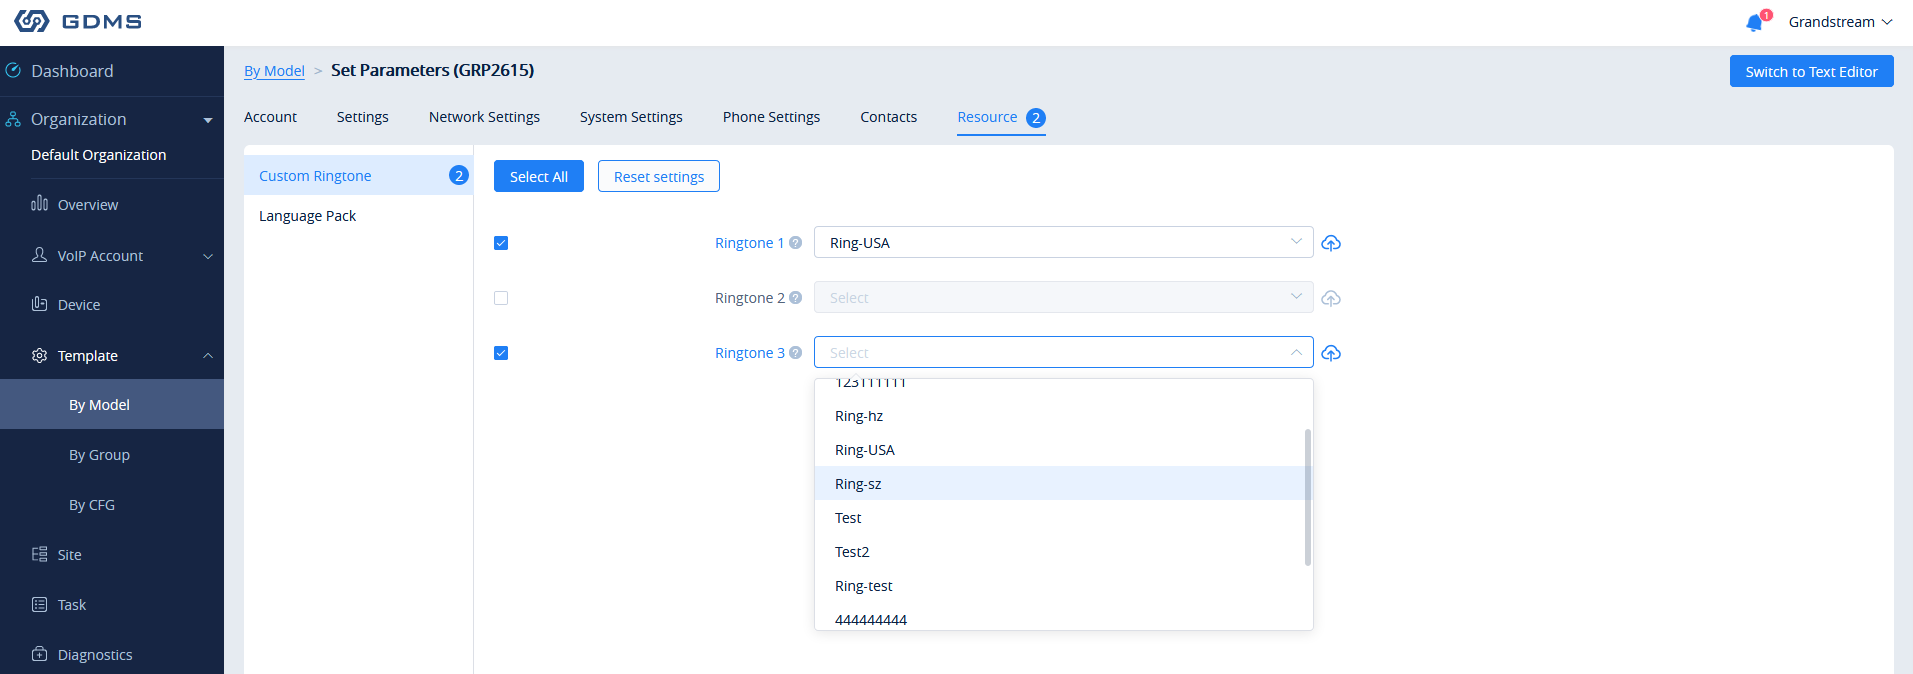
- On the “Custom Ringtone” page, for Ringtone 1 to Ringtone N, select a ringtone file from the resources for each ringtone index.
- On the “Language Configuration” page, select a language pack from the resources for the device.
- After clicking the “Save” button, the device of this model will download the resource file from the firmware path once the device is connected to the GDMS platform for the first time.
- Or, users can click the “Push” button to push the template of the model to the device. Then, the device will download the resource file from the firmware path.
Push Update
Users could push the configuration template to the device manually.
- Select a specific configuration template, and click on the button
 following the template.
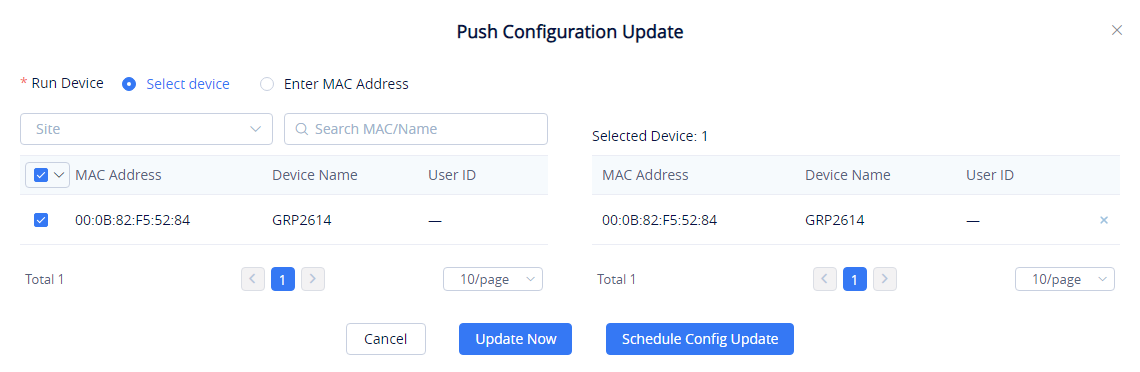
- Users could select any device in this device model to push the configuration template, and the device will be updated with the configuration template.
- Users can either push the configuration template immediately or schedule the configuration push for a specified time. If the latter is selected, users will need to enter a name and time for the scheduled push.
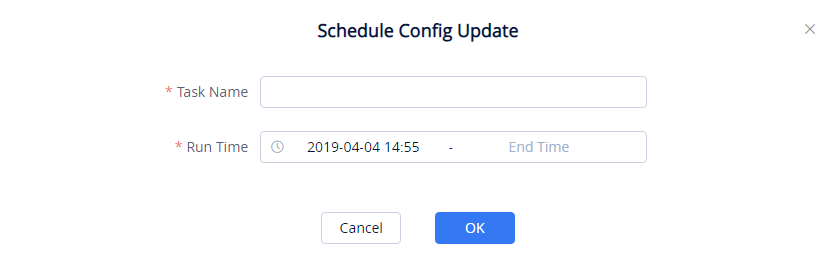
- Click on the Save button to finalize the task. Users can check the task status on the Task Management page.
Edit Template
To edit the configuration template’s name, site, and description, click on the ![]() button for the desired template.
button for the desired template.
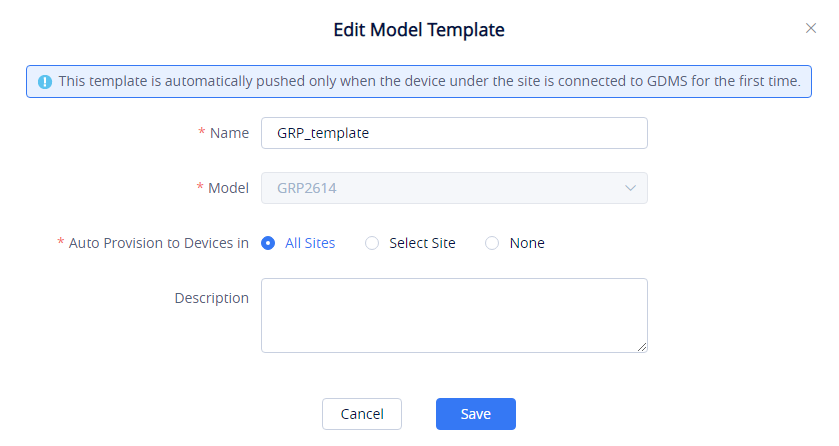
Download Model Template Configuration
To download the configuration template of a device model, click on the ![]() button for the desired template.
button for the desired template.

Copy Model Template
On the main page of the Model Template, the user can copy one or multiple templates and apply them to a different organization, this allows the user to copy the configuration easily across many organizations.
To copy a template, please tick the box on the left side of the template name, then select ![]() .
.
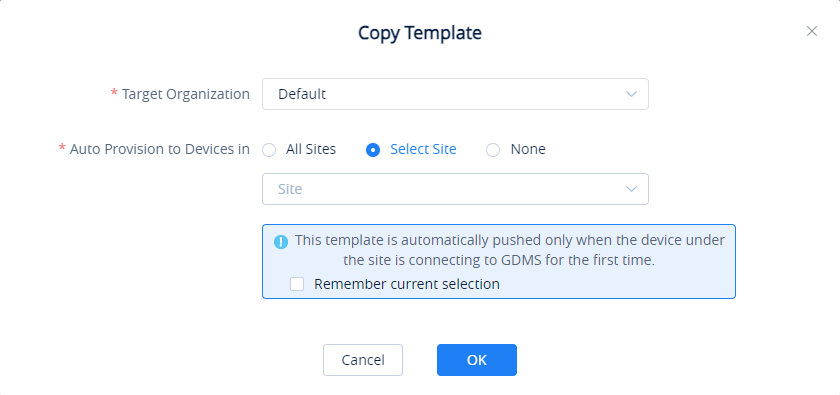
- Target Organization: Select the organization to which you want to copy the template to.
- Auto Provision to Devices in: You can select “All Sites”, “Select Sites”, or “None”. The rules are the same as those for creating model template.
After the templates have been copied successfully, the templates will be added to the “By Model” page of the selected organization, and the template’s name will be “Original Template Name_Copy”.
Delete Model Template
To delete configuration templates from GDMS, select the desired templates and click on the Delete button in the top left corner of the By Model page.
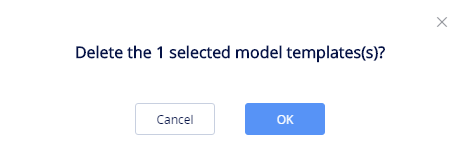
By Site
Users can customize device templates based on sites. The users will be able to configure devices based on the sites to which they have been assigned.
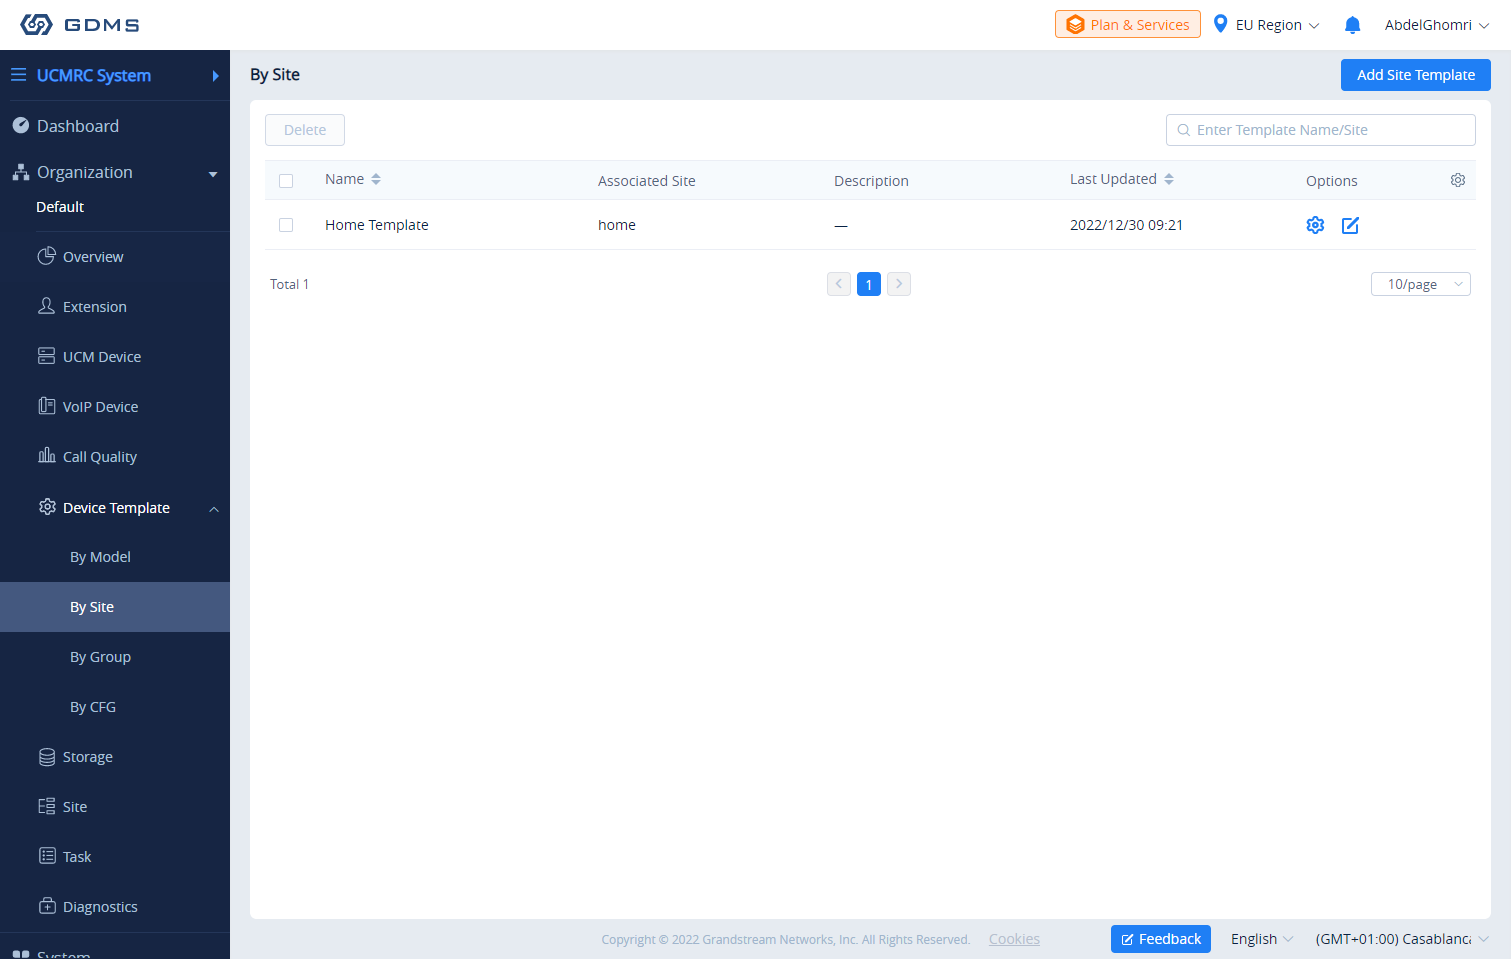
Add Site Template
To add a template, please click ![]()
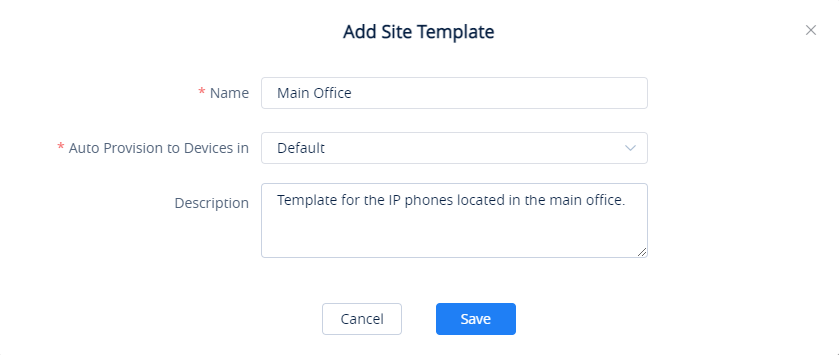
- Name: Enter the name of the template.
- Auto Provision to Devices in: Choose the site on which the template will be applied to.
- Description: Enter a description for the template.
![]() : Use this button to edit the information related to the template.
: Use this button to edit the information related to the template.![]() : Use this button to change the configuration of the template.
: Use this button to change the configuration of the template.
By Group
Users could customize the configuration template by group. Users could configure a group and update the configuration template by group. For example, users could classify a batch of devices into a group and configure/manage the devices in the group. Users could push the configuration template to the group members on the GDMS platform.
Users could view the group configuration template and the devices list in each group.
Users could modify the configuration parameters, push the configuration to the devices, edit the group and members, and download the configuration template by group.
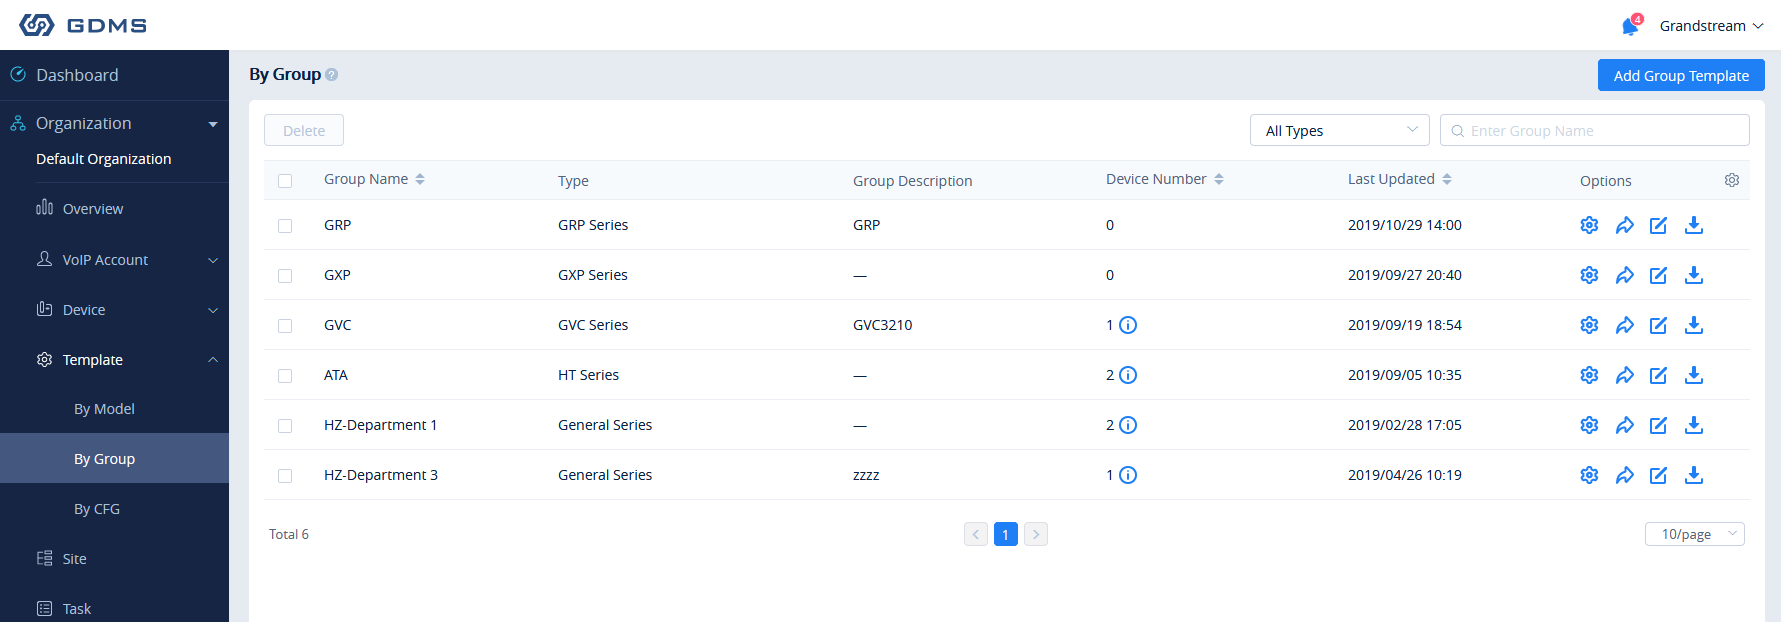
Add Group
Users can add a group at any time on the GDMS platform.
- Click on the Add Group button at the top right of the By Group page.
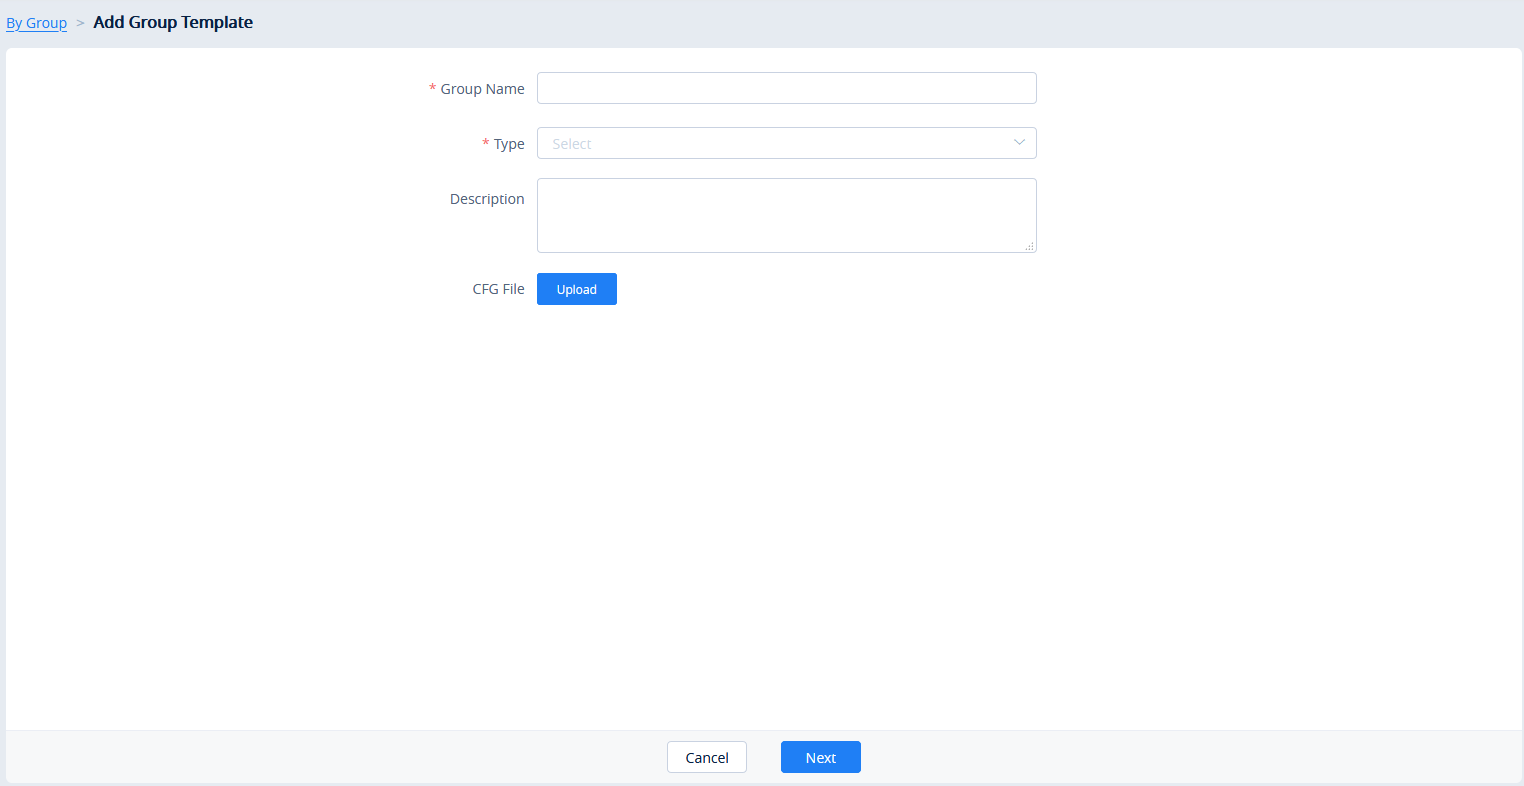
|
Group Name | Enter the name of the group to identify it easily. Names must be unique and have a maximum character limit of 64. |
|
Type |
Users need to select the type:
|
|
Description |
Enter the detailed description and purpose of the configuration template. |
- Once complete, users will be redirected to the device selection page to add devices to the group. Users can either select devices from the list or manually enter the MAC addresses of the devices. Selected devices will be moved to the Selected Device list on the right of the page.
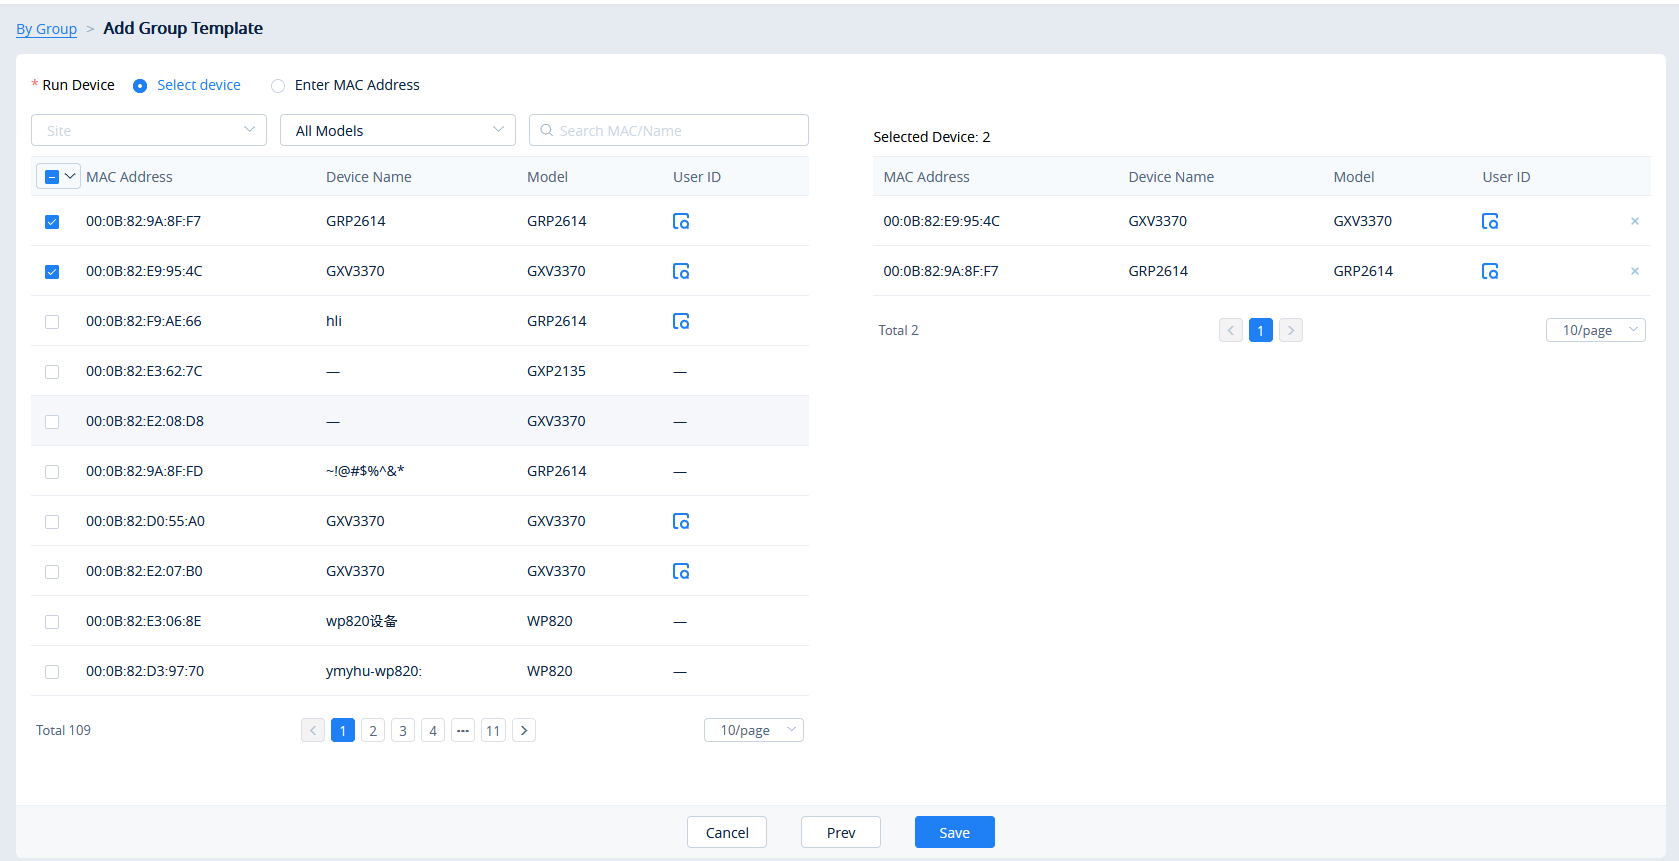
- Users could click on the “Prev” button to go back to the group configuration page to re-edit the group information.
- Click on the Save button to complete the group member selection. Users will then be redirected to the Set Parameters page.
Set Parameters
Users could set the unique parameters of the devices in the group in the configuration template to push the unique parameters to the devices in the group.
Select a specific group, and click on the button ![]() to access the group member parameters configuration page.
to access the group member parameters configuration page.
- Clicking on the Select All button will select every option on the current page. Clicking on it again will deselect all the options.
- Clicking on the Reset Settings button will restore all settings on the current page to default values.
- Clicking on the button following the account, users can copy and paste the current account configuration to other accounts.
- When users try to configure the device wallpaper or screensaver image, users can select a picture from the resources list, or upload the local picture to GDMS and configure it to the device.

- Modify the desired settings on the page or click on the Edit Configuration File to configure device settings via text editing (i.e. p-values). The key can be either a P-value or an alias.
Configure Resource Files
Users can configure custom ringtones and language for devices (Supported models: GXP/DP series).
- Select a specific group, and click on the button
 to access the group member parameters configuration page.
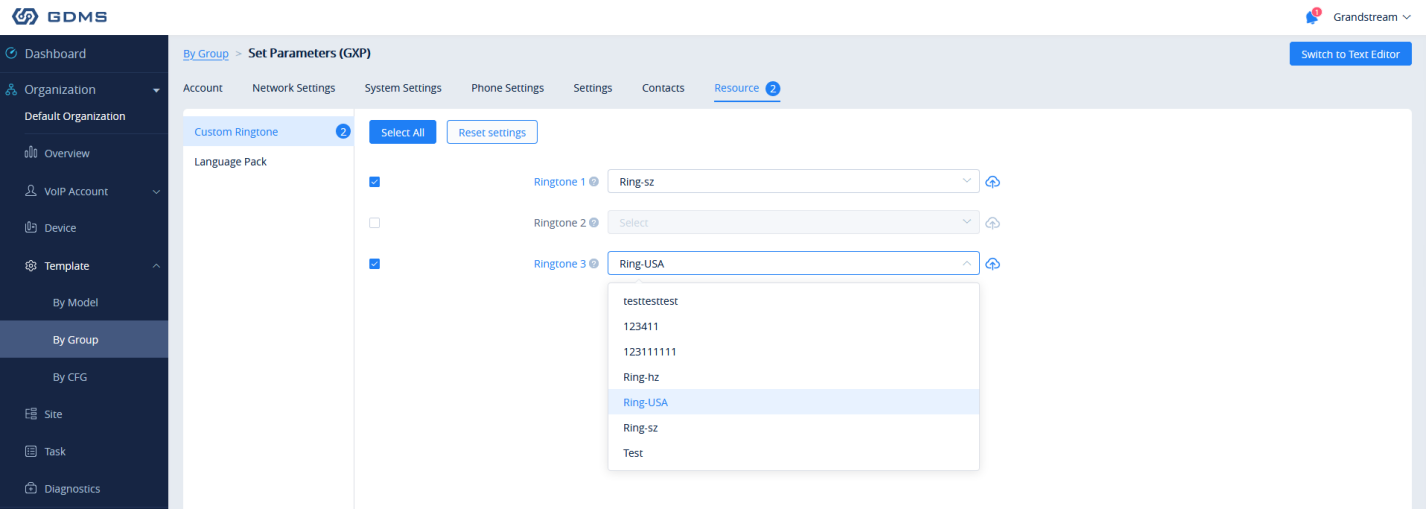
- On the “Custom Ringtone” page, for Ringtone 1 to Ringtone N, select a ringtone file from the resources for each ringtone index.
- On the “Language Configuration” page, select a language pack from the resources for the device.
- After clicking the “Save” button, the configured parameters and resources will be saved in the system. When the user clicks the “Push” button to push the template to the device, the device will download the resource file from the firmware path.
Push Update
Users could push the group configuration template to the device manually.
- Click on the button for the desired group.
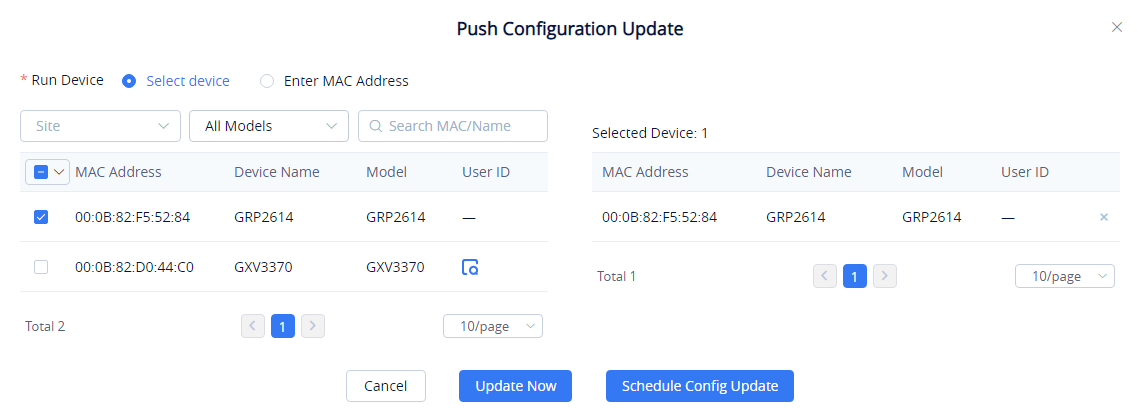
- In addition to being able to push the configuration template to all or select members of the group, users can also push it to non-members.
- Users can either push the configuration template immediately or schedule the configuration push for a specified time. If the latter is selected, users will need to enter a name and time for the scheduled push.
- Click on the Save button to finalize the task. Users can check the task status on the Task Management page.
Edit Group Template
Users could edit the group name, descriptions, and group members.
- Click on the
 button for the desired group.

- Modify the desired settings and click on the Save button to finalize changes.
Download Group Template Configuration
Users can download the group configuration template by clicking on the ![]() button for the desired group.
button for the desired group.

Copy Group Template
On the main page of the Group Template, the user can copy one or multiple templates and apply them to a different organization, this allows the user to copy the configuration easily across many organizations.
To copy a template, please tick the box on the left side of the template name, then select ![]() .
.

Select the organization to which you want to copy the template to by selecting the organization name from the “Target Organization” list.
Delete Group Template
Users can delete groups by selecting the desired groups and clicking on the Delete button in the top-left corner of the By Group page.
By CFG
Users can import configuration files for specific devices. Settings in these uploaded files will be used for their specified device.
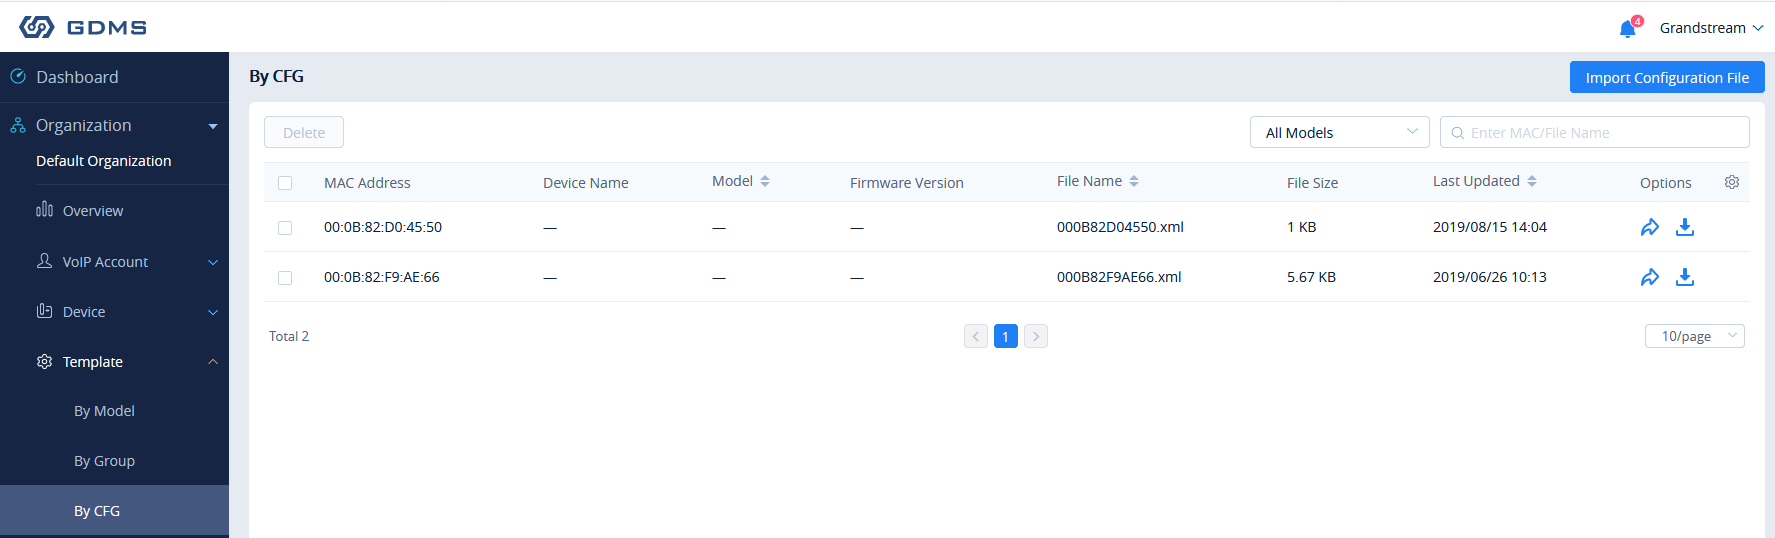
Upload CFG File
Users could upload the custom configuration file to the GDMS platform and push the custom configuration file to the device.
- Click on the Import Configuration File button at the top-right corner of the By CFG page. The following window will appear:
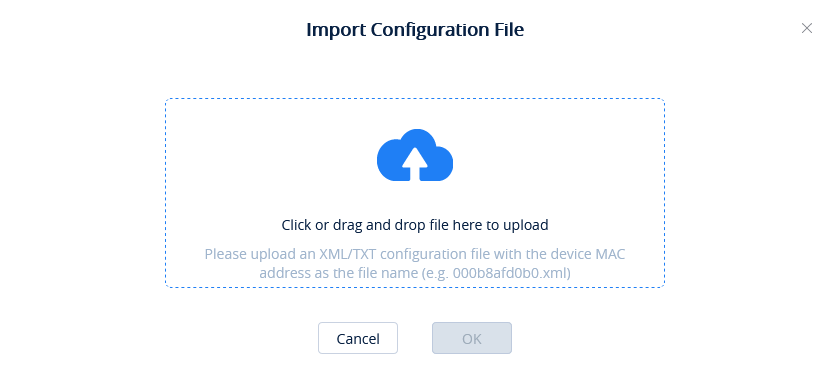
- Drag and drop the file to the window or click on the upload icon to select a file from your PC.
- Click on the OK button to finalize the import.
- The following window will appear asking the user to either push the configuration to the specified device immediately or to cancel the configuration push.
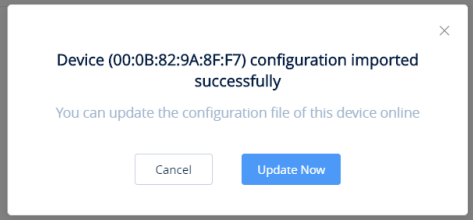
Push Update
Click on the ![]() button for the desired device to manually push the configuration to it.
button for the desired device to manually push the configuration to it.

Download Configuration File
Click on the ![]() button for the desired device to get its configuration file.
button for the desired device to get its configuration file.
Delete CFG File
To delete uploaded configuration files from GDMS, select the desired devices in the list and click on the Delete button at the top left of the By CFG page.
RPS MANAGEMENT
RPS (Redirection & Provision Server) allows creating and pushing configuration to many Grandstream devices, this reduces the time and effort spent on configuring the devices manually, which improves the deployment process greatly and lessens the frequency of mistakes that occur when configuring the device manually.
The user can create instances of RPS (Redirection and Provisioning Server).
To configure this option, the user needs to create an RPS server by providing the IP address or FQDN domain of the server, and then select the protocol used for upgrading.
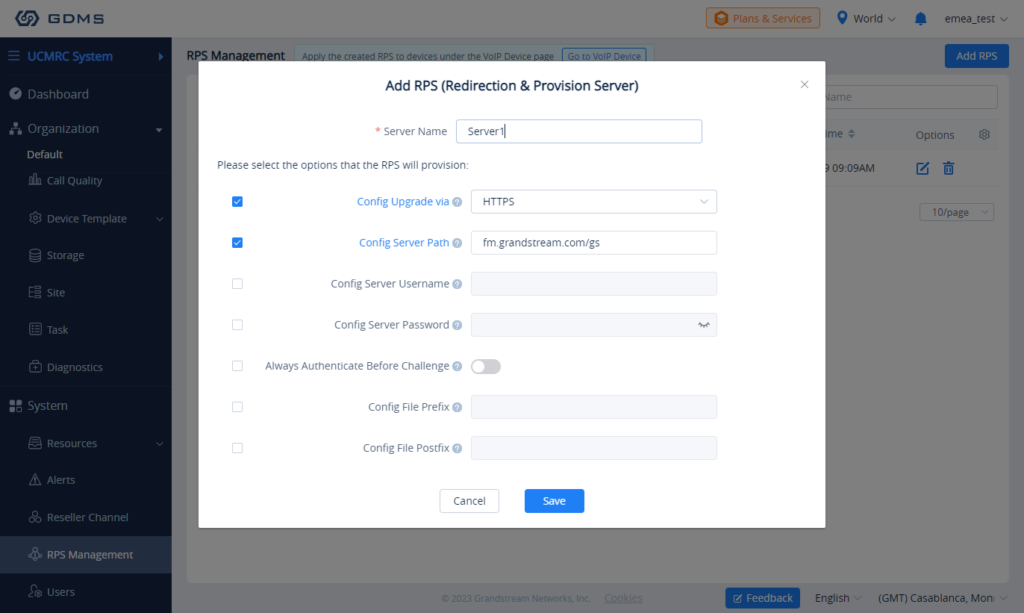
Server Name | Enter the server name. |
Config Upgrade Via | Select the protocol used for configuration upgrade.
|
Config Server Path | Enter configuration server path. |
Config Server Username | Enter the username to authenticate into the server. |
Config Server Password | Enter the password to authenticate into the server. |
Always Authenticate Before Challenge | Only applies to HTTP/HTTPS. If enabled, the phone will send credentials before being challenged by the server. |
Config File Prefix | If configured, only the configuration file with the matching encrypted prefix will be downloaded and flashed into the phone. |
Config File Postfix | If configured, only the configuration file with the matching encrypted postfix will be downloaded and flashed into the phone. |
To assign a specific RPS to an organization, click on the three dots and add an organization as indicated in the figure below.

When an RPS is edited, the new RPS will be automatically delivered to the associated devices. If an RPS has been deleted, it only deletes the association between the RPS and the device. The RPS configuration will not be deleted from the device.
SITE MANAGEMENT
Site Management allows users to organize their devices by sites and categories.
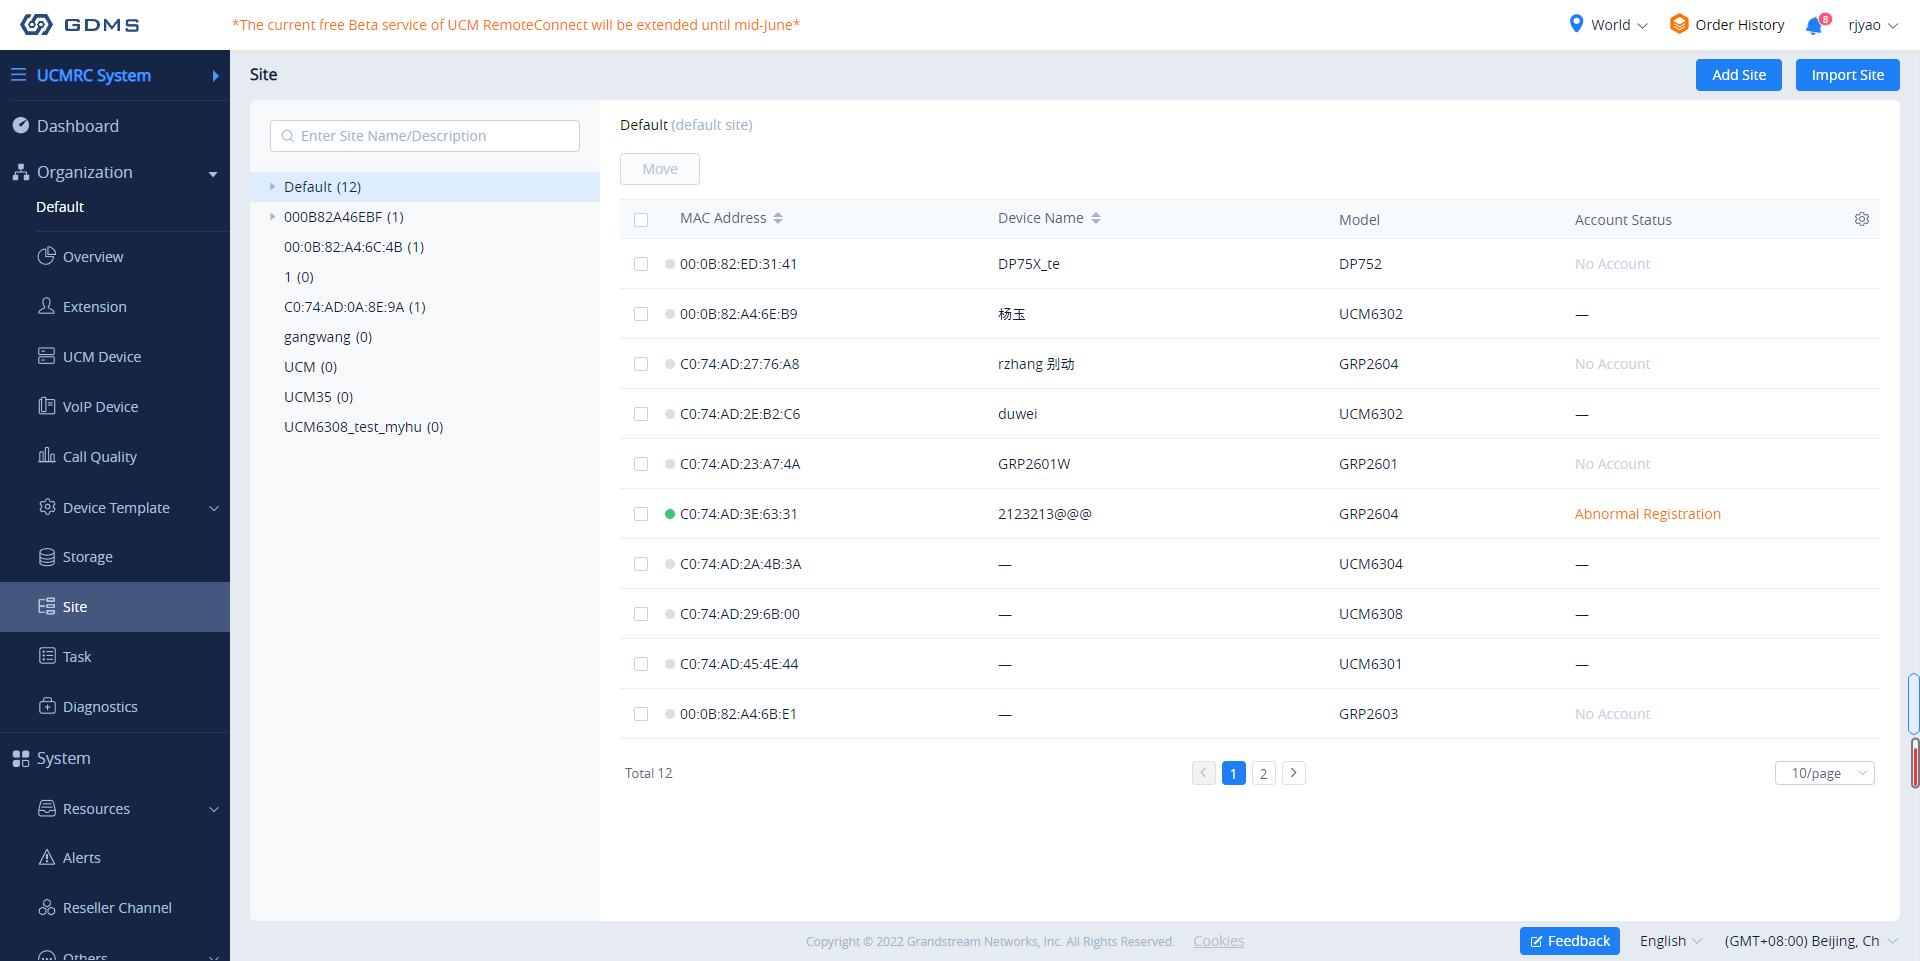
Add Site
Users can add a site at any time on the GDMS platform.
- Click on the Add Site button at the top right of the Site Management page. To quickly add a sub-site under a specific site, click on the button next to the desired site. Users can create a total of 7 different levels of sites.
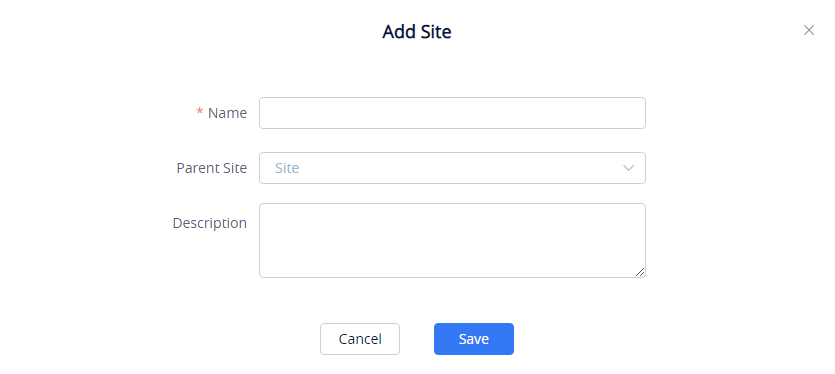
|
Site Name | Enter a name for the site to identify it easily. Sites on the same level cannot have the same name. |
|
Superior Site |
The parent level of the site. This field can be left blank if the created site is a top-level site. |
|
Site Description |
Enter the descriptions of the site. |
- Once the site is created, users can then assign devices to it.
Batch Import Sites
Users could import a batch of sites into the GDMS platform.
- Click on the Import Site button at the top right corner of the Site Management page. The following window will appear:
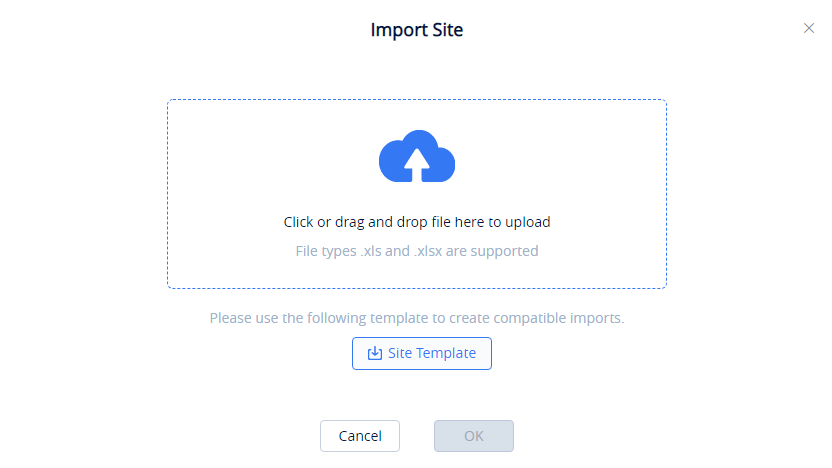
- Click on the Download button to get a template that will be used to import site information.
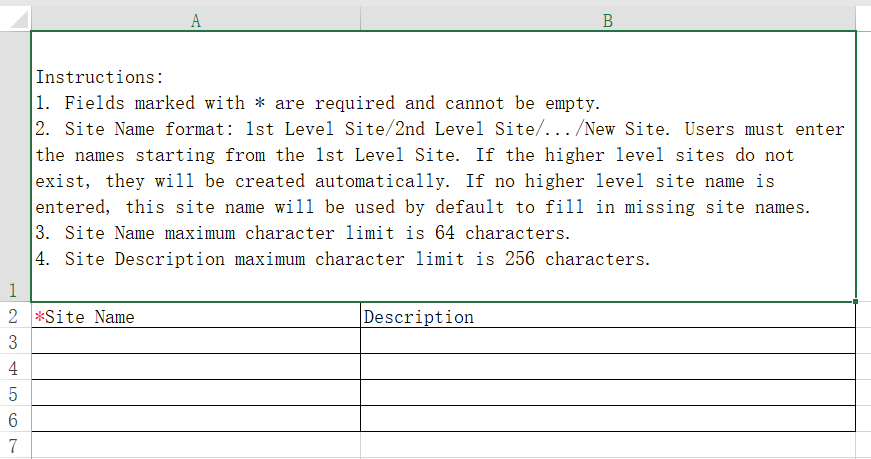
|
Site Name | Enter the name of the site. If the site is the child of another site, users must enter the entire path (e.g. top-level site/second-level site/third-level site/…new site name). |
|
Description |
Enter the descriptions of the site. |
- Once the template is filled out, drag, and drop the file to the upload window or select the file from your PC. Click on the Import button to confirm the import.
- When the Excel file is imported into the GDMS platform successfully, the GDMS platform will prompt the execution result. If there is data that failed to be imported, the user could export the failed data and re-edit the Excel file.
Edit Site
Users could edit the information of the site on the GDMS platform.
- Click on the
 button next to the desired site.

- Edit the desired fields and click on the Save button to finalize changes.

Delete Site
To remove a site from GDMS, click on the ![]() button next to the desired site.
button next to the desired site.
View Devices
To view all the devices under a specific site, click on the desired site in the Site Management list.
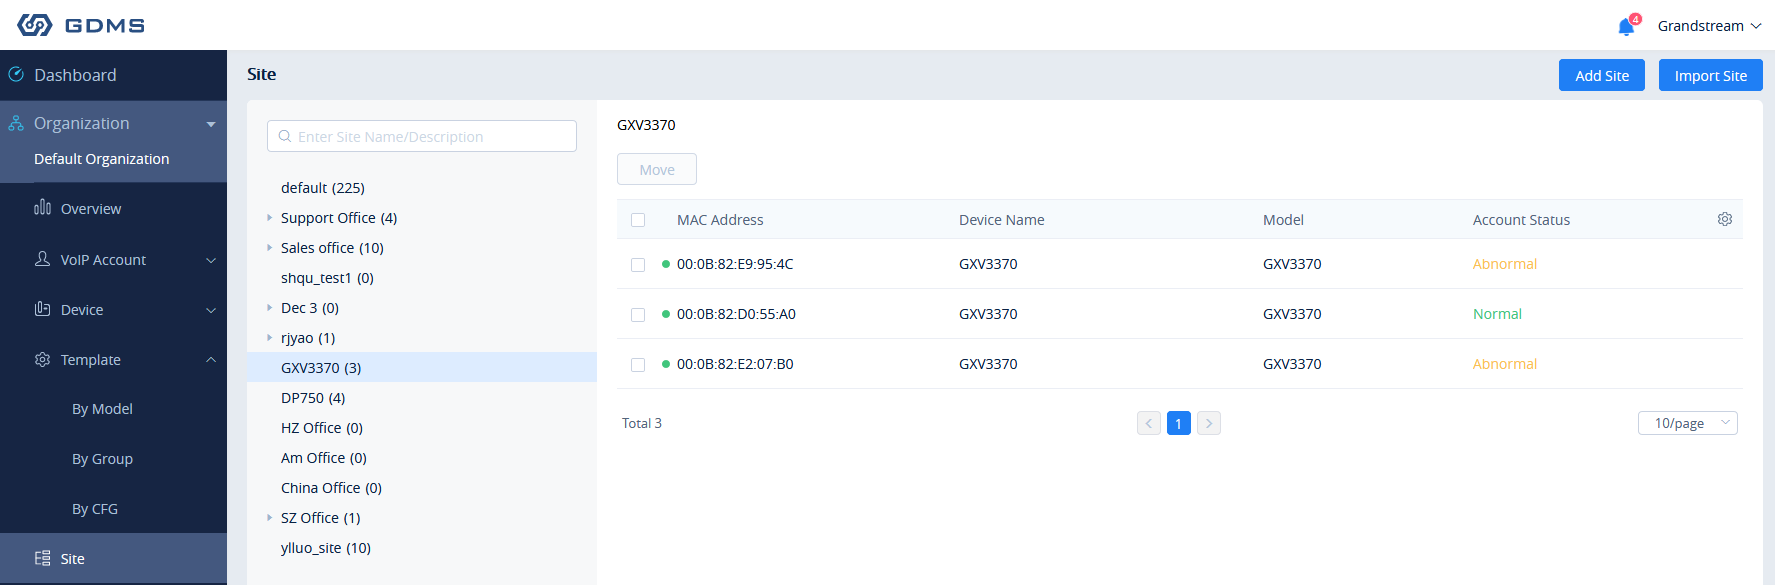
Transfer Site
Users can select devices on a site and move them to another site by clicking on the Move button.

Clicking on the Save button will finalize the move to the specified site.
TASK MANAGEMENT
The Task Management page displays all queued and completed tasks in GDMS such as configuration pushes, firmware upgrades, reboots, and factory resets. Users can add, edit, and delete tasks from this page.
Add Task
To add a task to GDMS, click on the Add Task button.
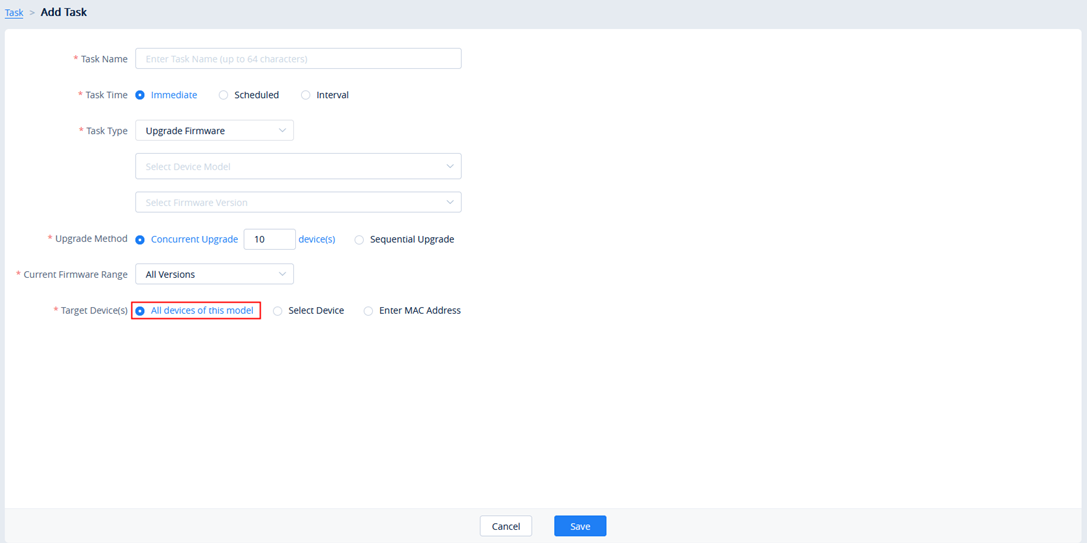
Task Name | Enter the name of the task. |
Task Time |
|
Task Type |
|
Upgrade Method | This option is available only when Upgrade Firmware is selected as the Task Type.
 |
Current Firmware Range | This option is available only when Firmware Upgrade is selected as the Task Type. Devices will be upgraded only if they meet certain requirements:
|
Target Device(s) |
|
Add Task
Click on the Save button to finalize the task creation. Users can view this task in the Task Management list.
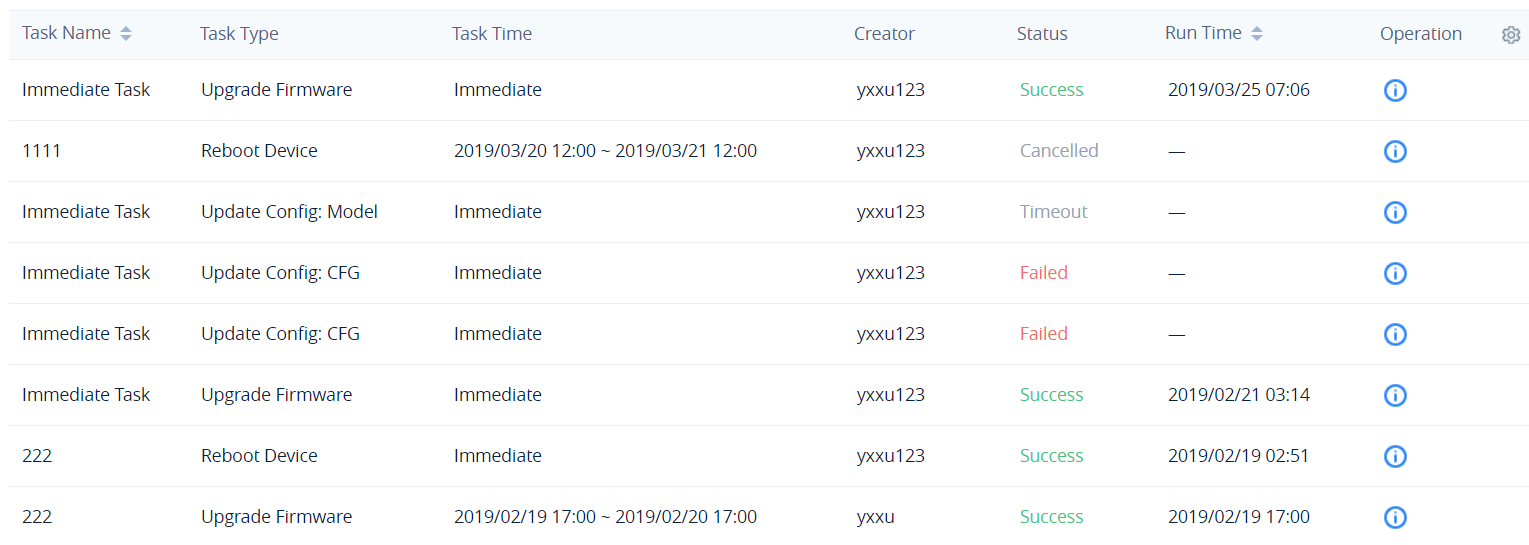
View Task Status
Users can see the status of all completed and pending tasks by looking at the Status column.
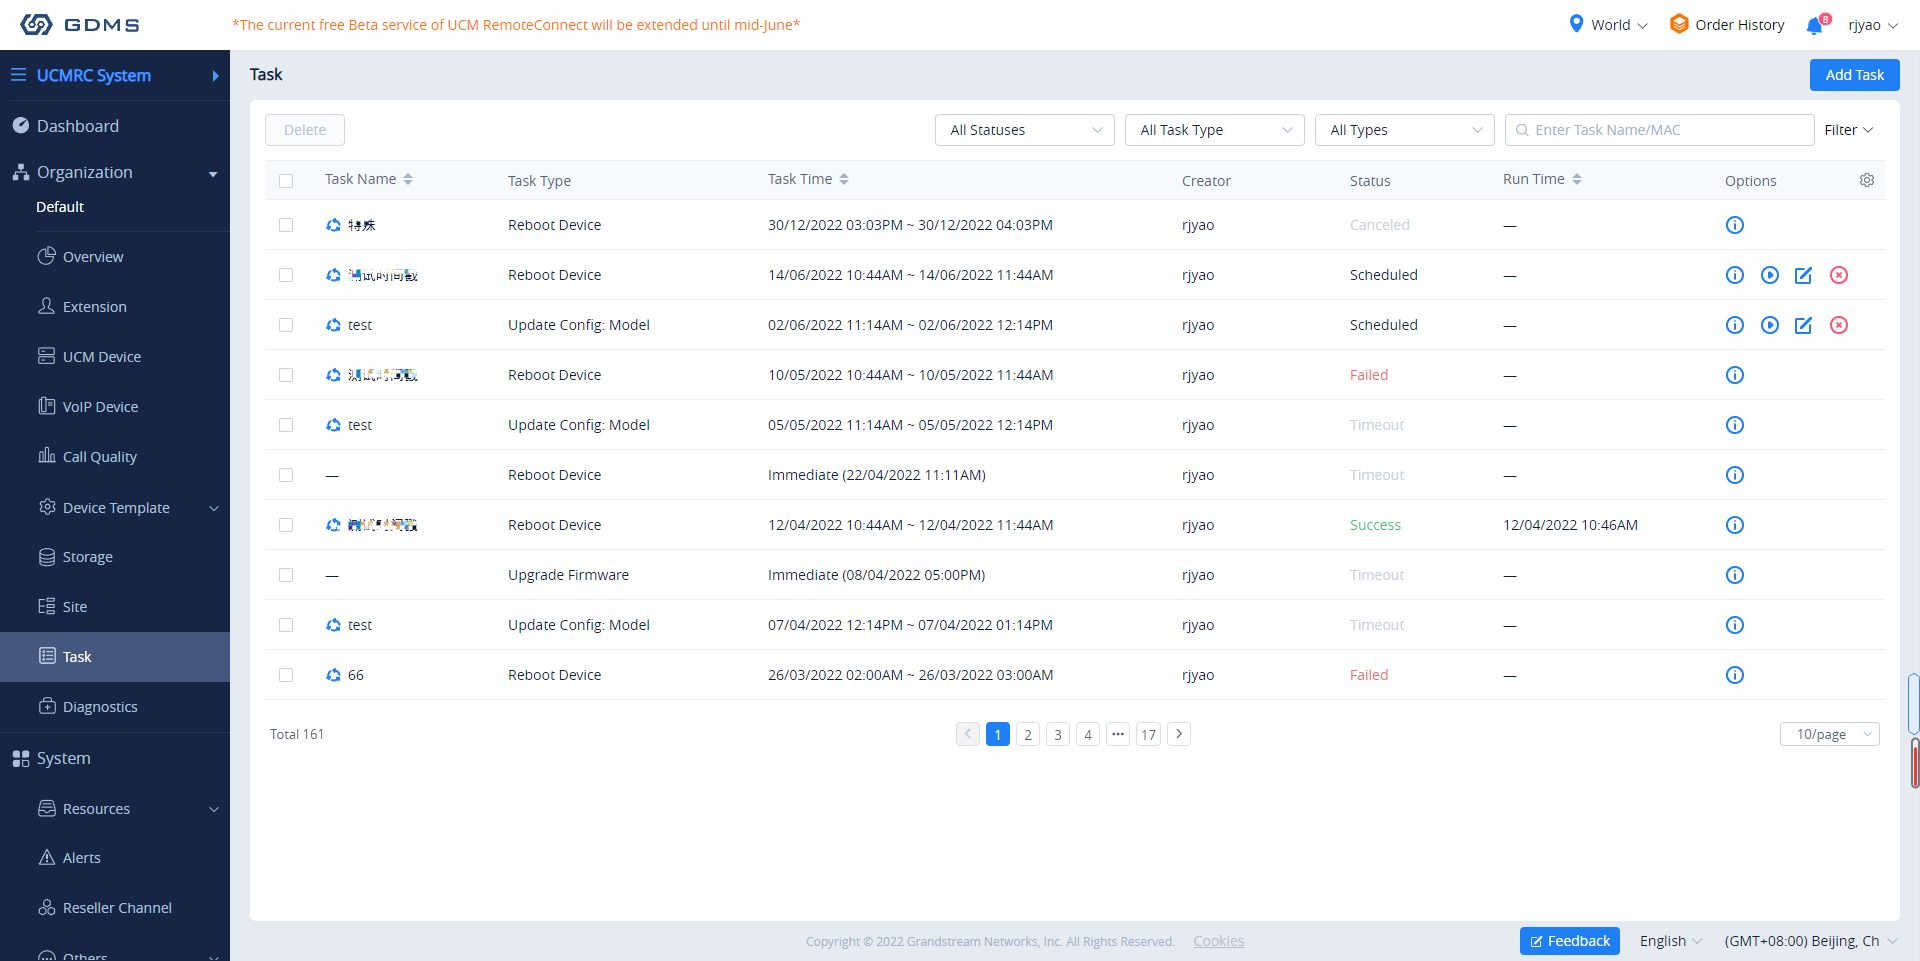
|
Pending |
The task has not been executed yet. |
|
Executing |
The task is currently in progress. |
|
Success |
The task has been completed successfully. |
|
Failed |
The task has failed. |
|
Canceled |
The task was canceled. |
|
Timeout | The task was not executed when it arrived at the ending time. |
|
Ended |
The task was ended before it could be completed. Some of the involved devices may not have run the task before it ended. |
To view more details about a task, click on the ![]() button for the desired task. Users can view the task status of each device involved.
button for the desired task. Users can view the task status of each device involved.

|
Pending Executed |
The task has not been run yet. |
|
Executing |
The task is currently ongoing. |
|
Success |
The task has been completed successfully. |
|
Failed |
The task has failed. A failure reason will be shown. |
|
Timeout |
The task has been sent to the device, but the device has not responded yet. |
|
Success (Timeout) |
The task has been completed successfully for this device, but it was completed later than the specified time. |
|
Canceled |
The task has been canceled before the starting time. |
|
Ended |
The task was ended before it could be completed. Some of the involved devices may not have run the task before it ended. |
Users could re-create tasks for the executed failed devices or all devices. If the user re-creates tasks for certain devices, all attributes of the task and all executed devices information will be logged on the “Re-create Task” page.
Start Scheduled Tasks
Users can start pending scheduled tasks immediately by clicking on the ![]() button.
button.
Cancel Pending Tasks
To cancel a pending task, click on the ![]() button for the desired task. The task status will be changed to Cancelled. To run the task again after it is completed, click on Task Details 🡪 Run Again for the desired task.
button for the desired task. The task status will be changed to Cancelled. To run the task again after it is completed, click on Task Details 🡪 Run Again for the desired task.
If the task is recurring, users could select whether to cancel the entire recurring task or just cancel the single task.
End Task
To stop a running task, click on the ![]() button to immediately end it.
button to immediately end it.
If the device has already executed the task (e.g. Reboot Device), the device will finish the task; if the device does not start to execute the task, the device will not execute the task anymore.
Search Task
Users can search for specific tasks by using the search bar and filters at the top-right of the top right corner of the Task Management page.
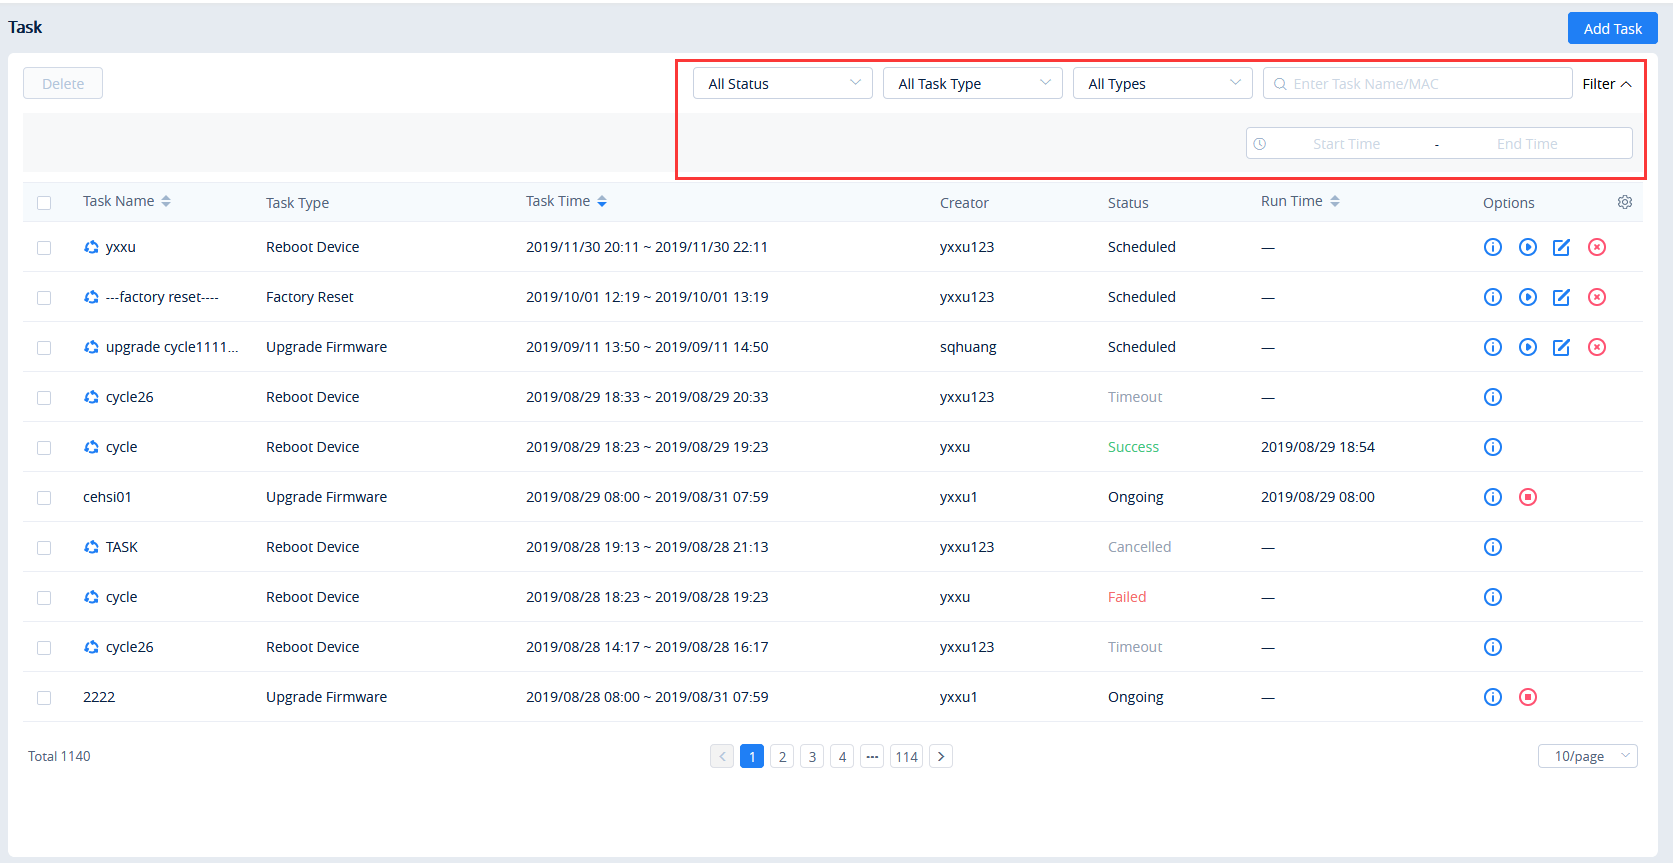
Delete Task
Users can delete tasks at any time. Select one or more tasks and click on the Delete button at the top of the page to delete them.
DEVICE DIAGNOSTICS
Device Diagnostics allows users to check devices on GDMS for issues, view device information, obtain network captures and Syslog, and conduct traceroutes.
The user can view the diagnosis status of the device in the current organization of the current system. If the user does not have the relevant permissions, the user cannot diagnose the corresponding device.
Start Diagnostics
To start diagnosing a device, users can do one of the following:
- Enter the device’s MAC address and click on the Start Diagnostics button.
- Click on the
 button for the desired device in the list to diagnose the device.
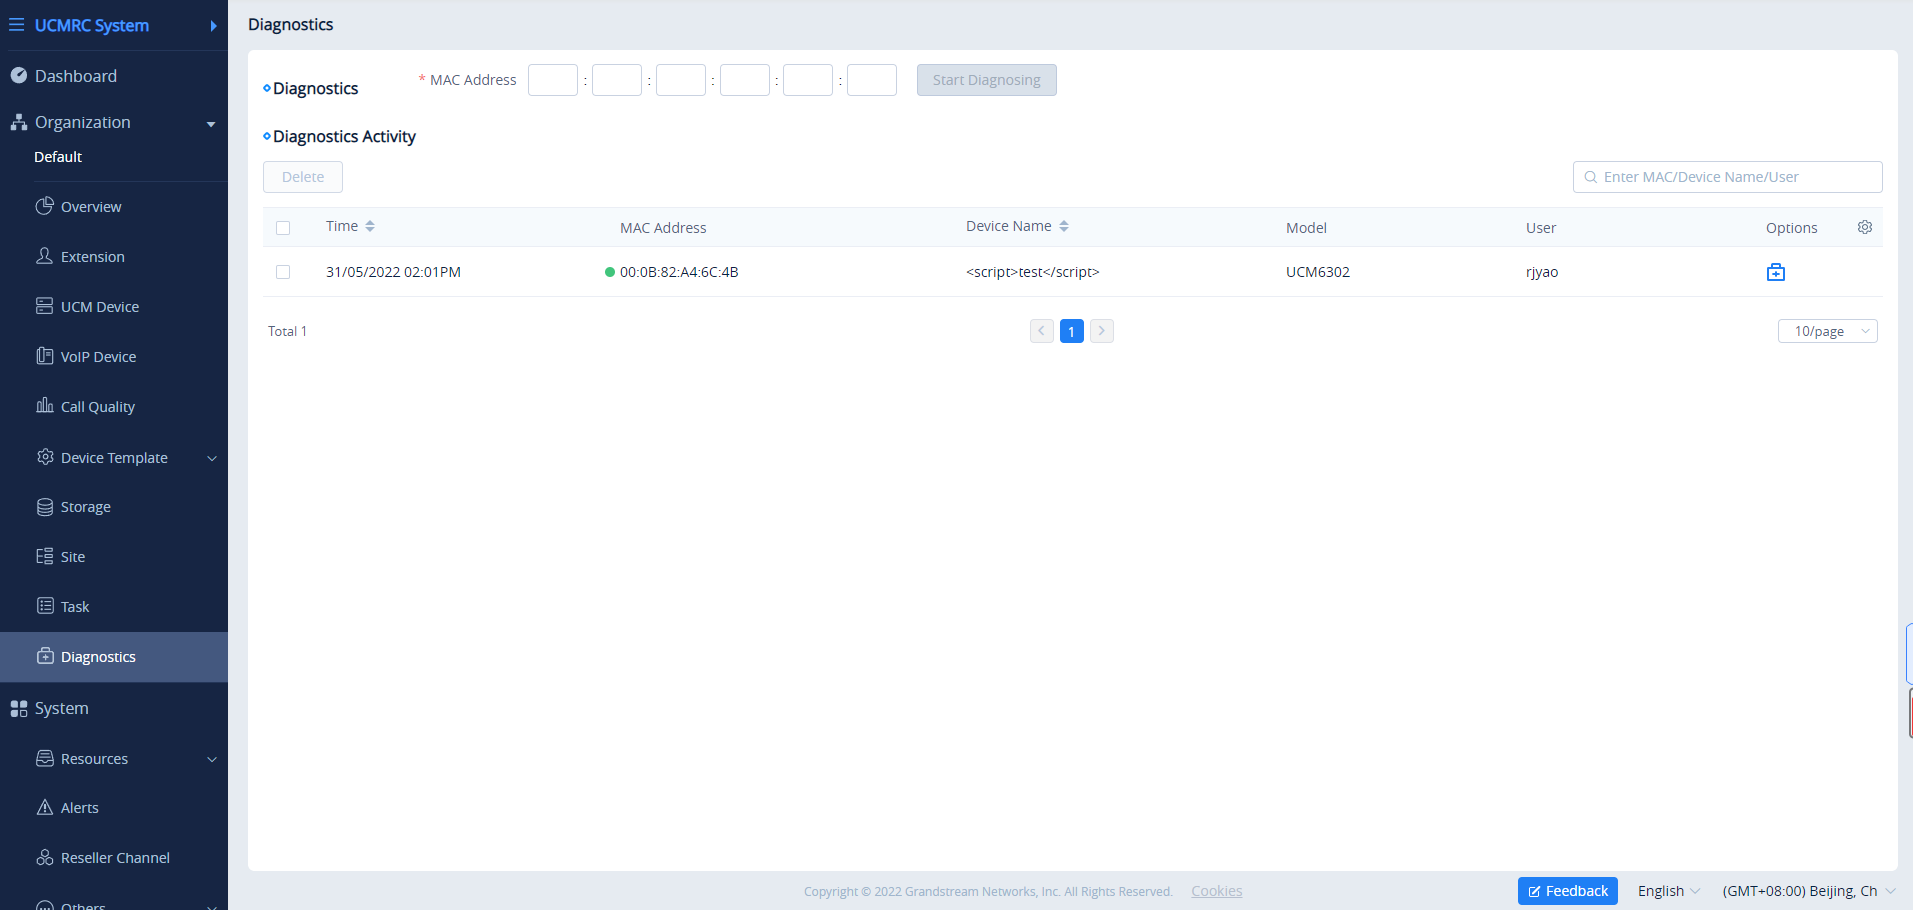
To view the diagnostic details of a device, click on the ![]() button for the desired device.
button for the desired device.
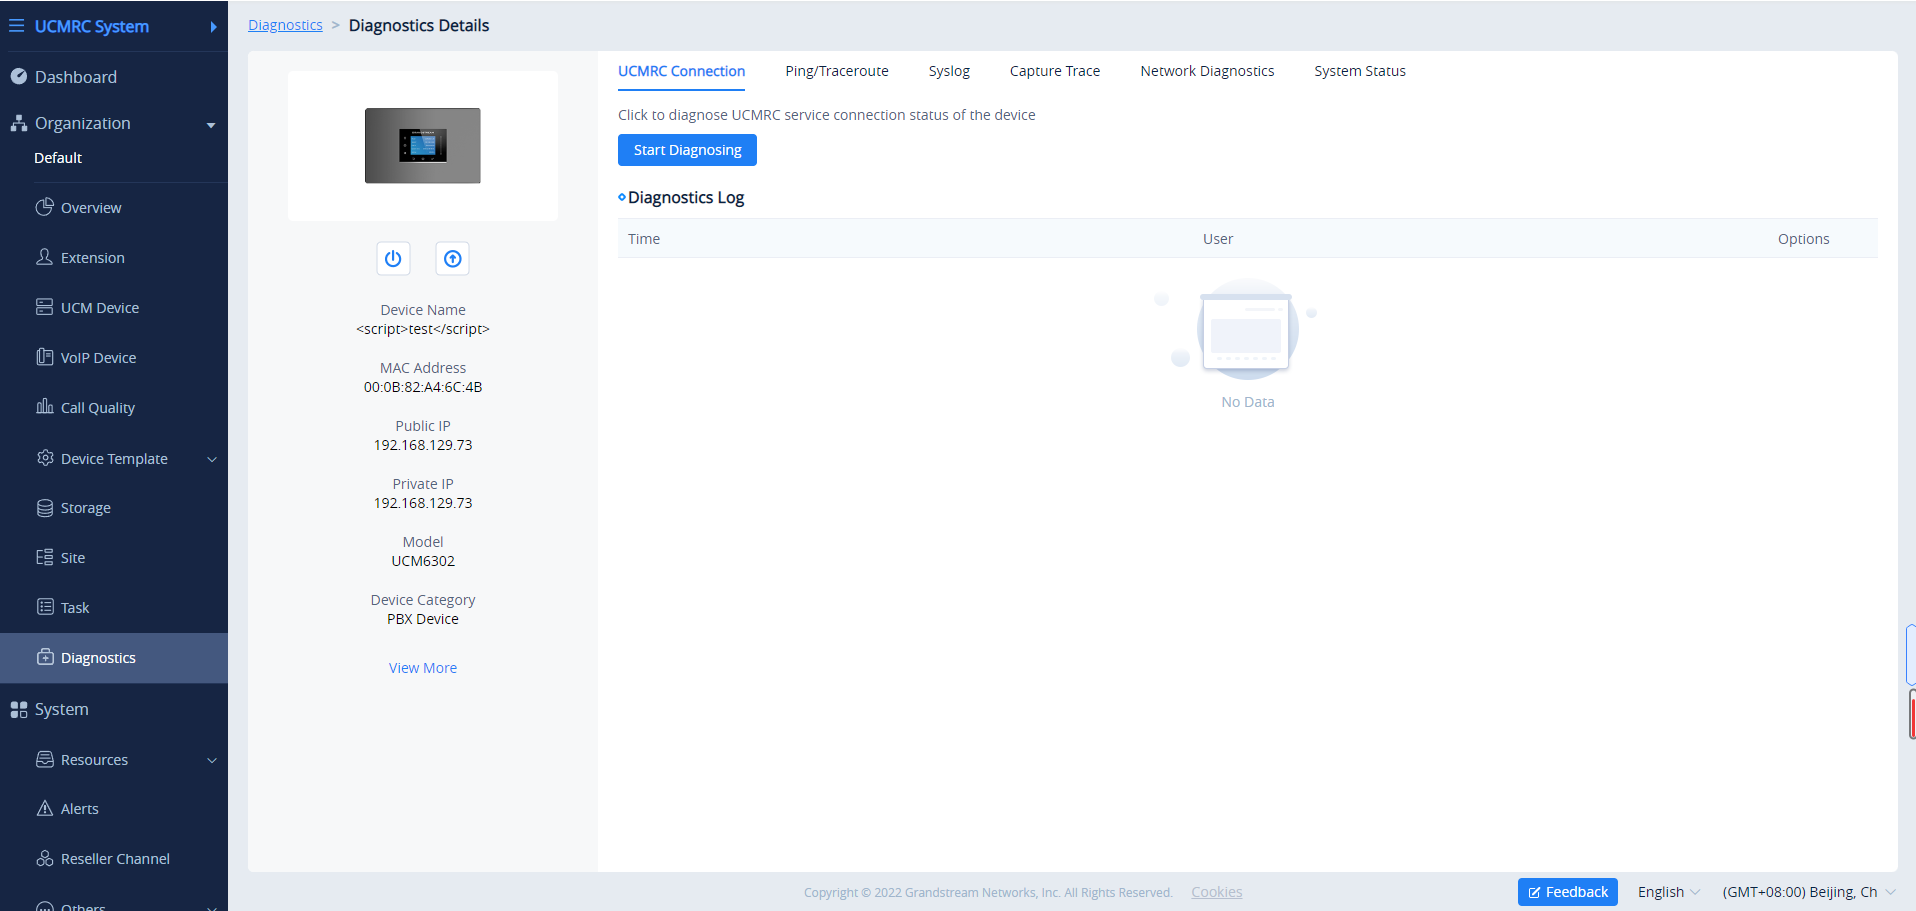
View Device Details
Click on the ![]() button on the right of the Device Diagnostics page to view information about the device.
button on the right of the Device Diagnostics page to view information about the device.
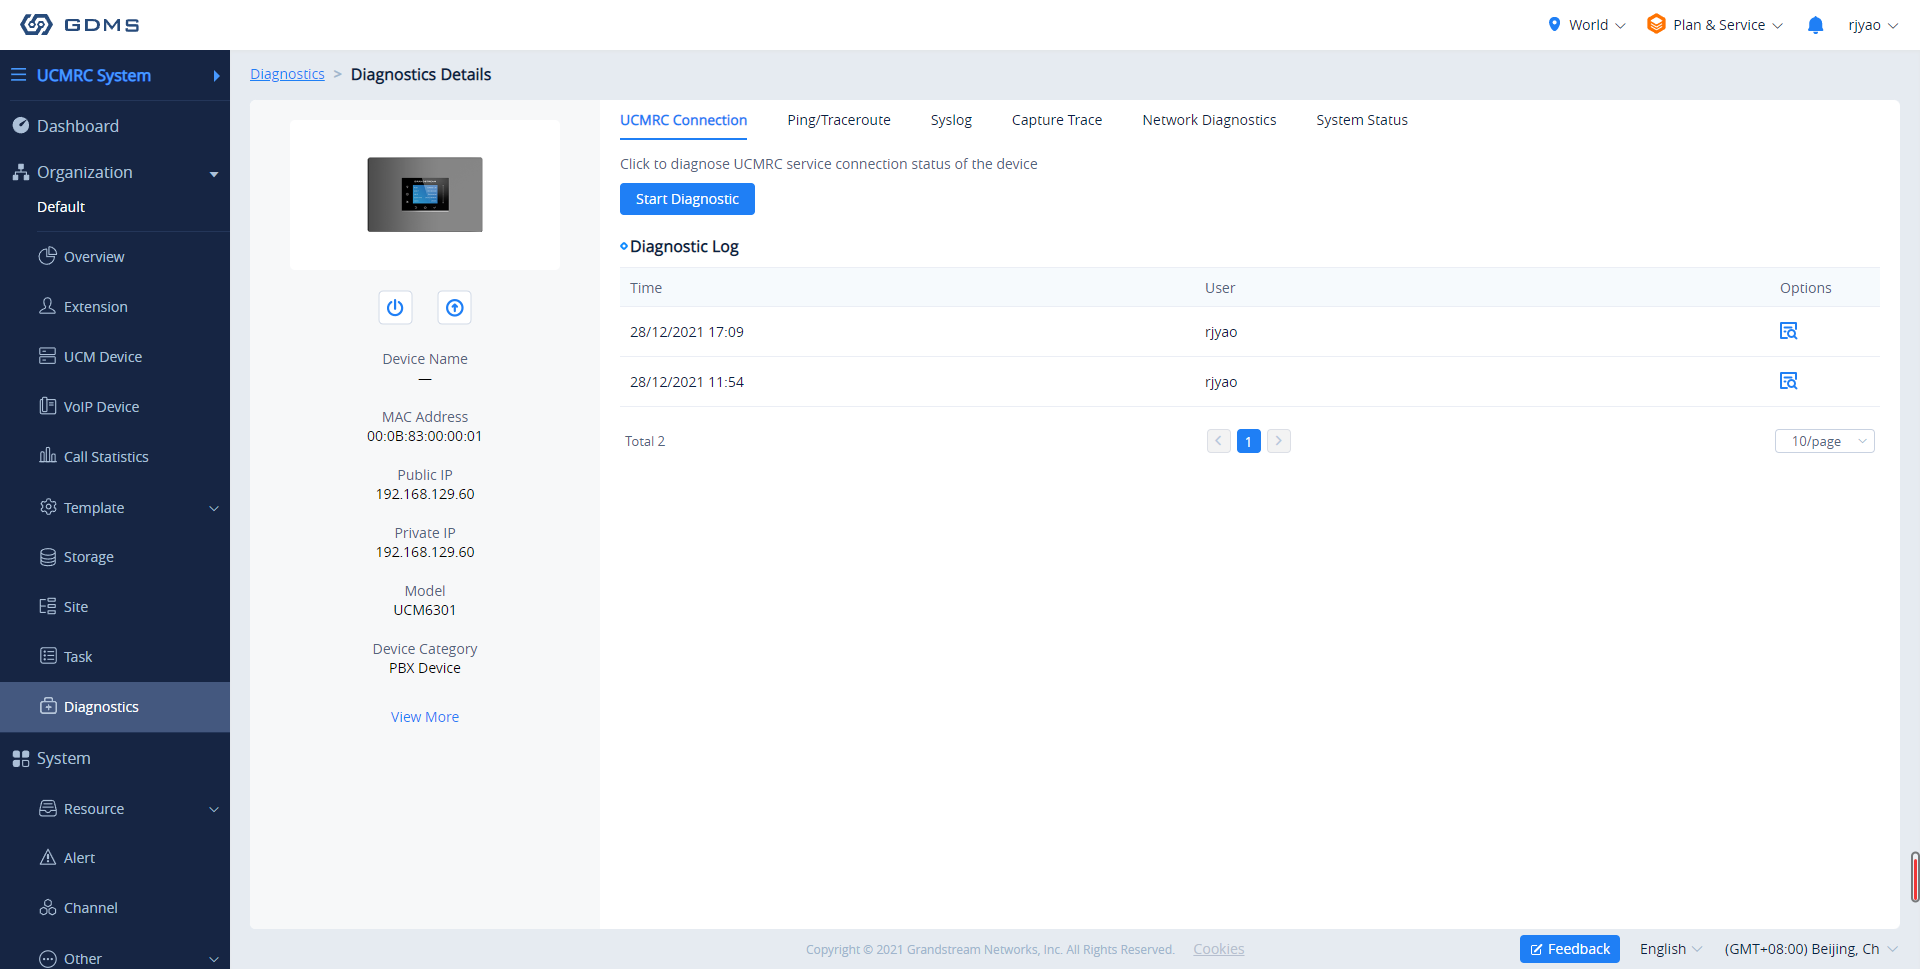
On the Diagnostics Details page, users can quickly perform operations on the devices, including restarting the devices, factory reset the devices, updating the configuration, and upgrading the devices. Users can also view the detailed information of the device, including device name, MAC address, public/private IP address, device model, and device type on this page.
Click on the button ![]() next to the diagnosis record to view the specific diagnosis result of the device.
next to the diagnosis record to view the specific diagnosis result of the device.

UCMRC Connection
Users can diagnose the current UCMRC connection status in the GDMS platform.
Click on the button “Start Diagnosis” and wait for the GDMS platform to diagnose the device. The GDMS platform will display the diagnosis result of the UCMRC connection.
If the UCM device which is using the UCMRC services has any problems, the user can diagnose the UCM device and troubleshoot the problems remotely. The user can try to fix the problems based on the suggestions and click on the “Feedback” button to send the logs and descriptions to our technical support.
Ping/Traceroute
Clicking on the Ping/Traceroute tab in the Device Diagnostics page will show the following:
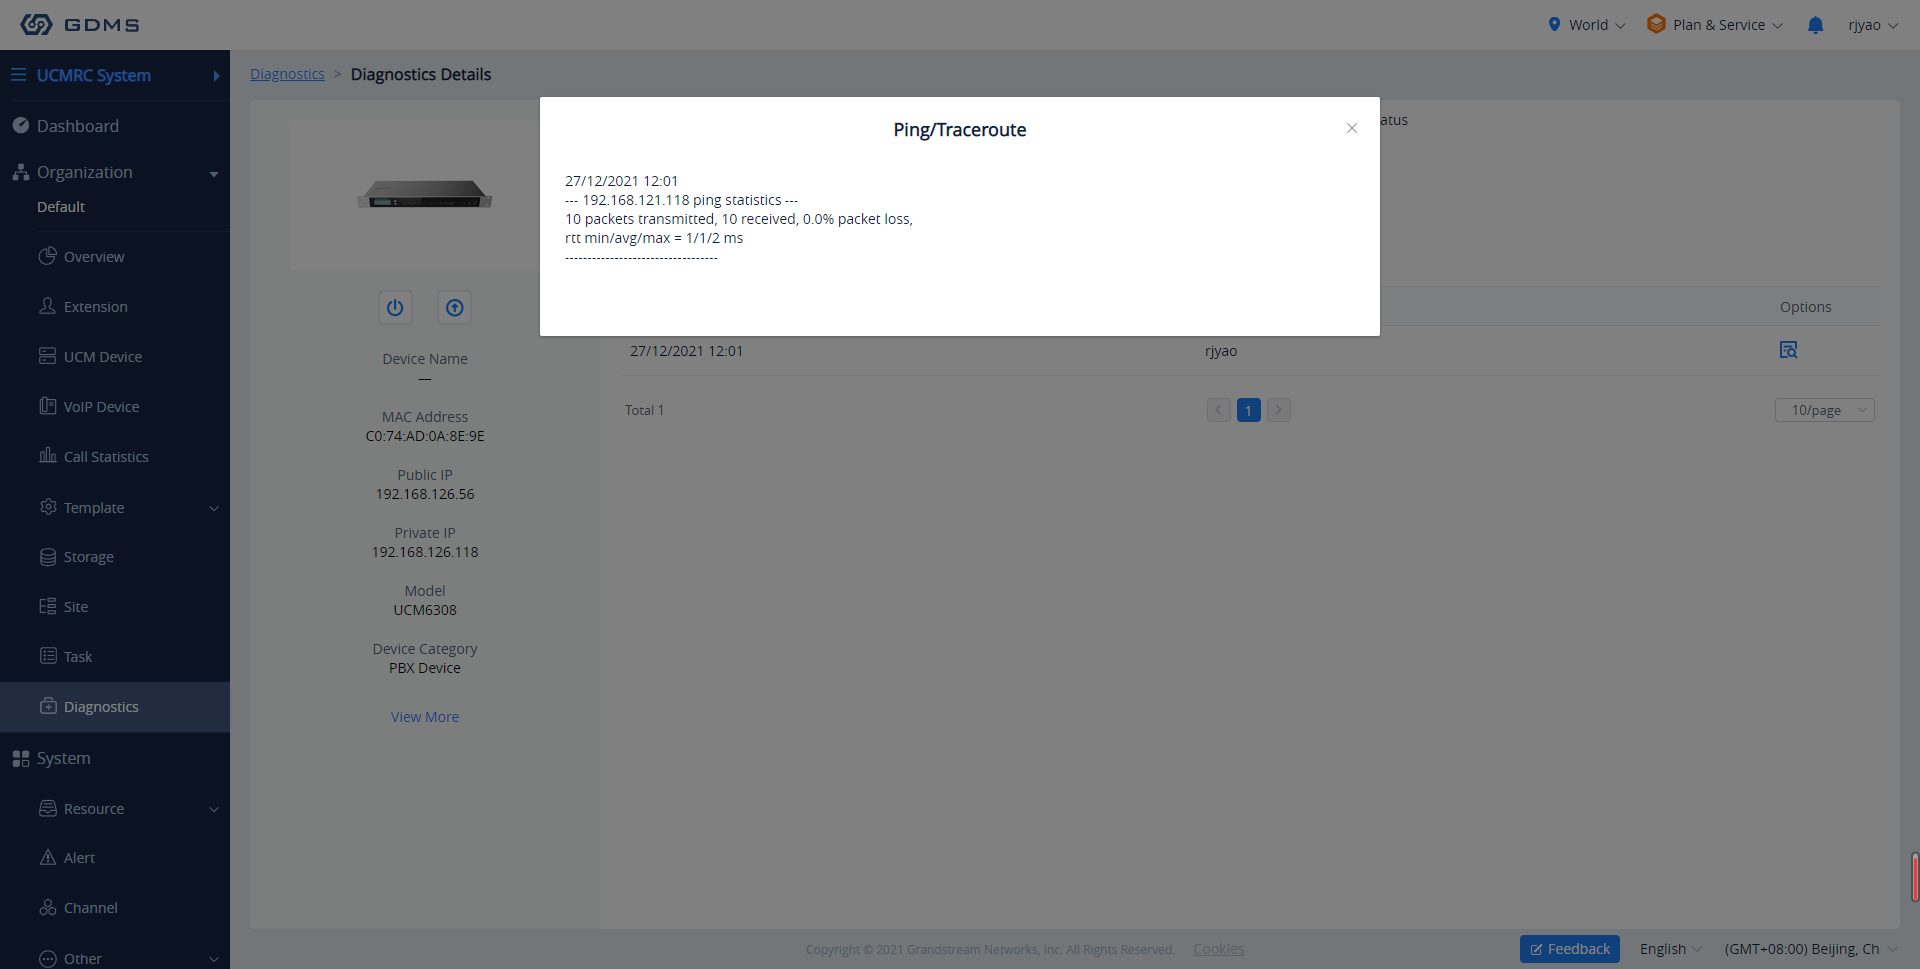
|
Operation Method |
|
|
Target Host |
Enter the IP address or hostname of the target host. |
Users could click on the “Start” button, wait for the GDMS system to diagnose the device, and the GDMS platform will print out the results of the diagnostics.
Each operation prints the diagnostics result once, and users could operate the diagnostics multiple times.
Syslog
The Syslog tool allows users to capture logs from a device.
1. To start a capture, click on the Start button on the Syslog page. At any time during the capture, users can click on the ![]() button to download the Syslog.
button to download the Syslog.
2. Clicking on the End button will stop the capture, and the Syslog will be saved to GDMS.
3. Users can access these saved logs at any time.
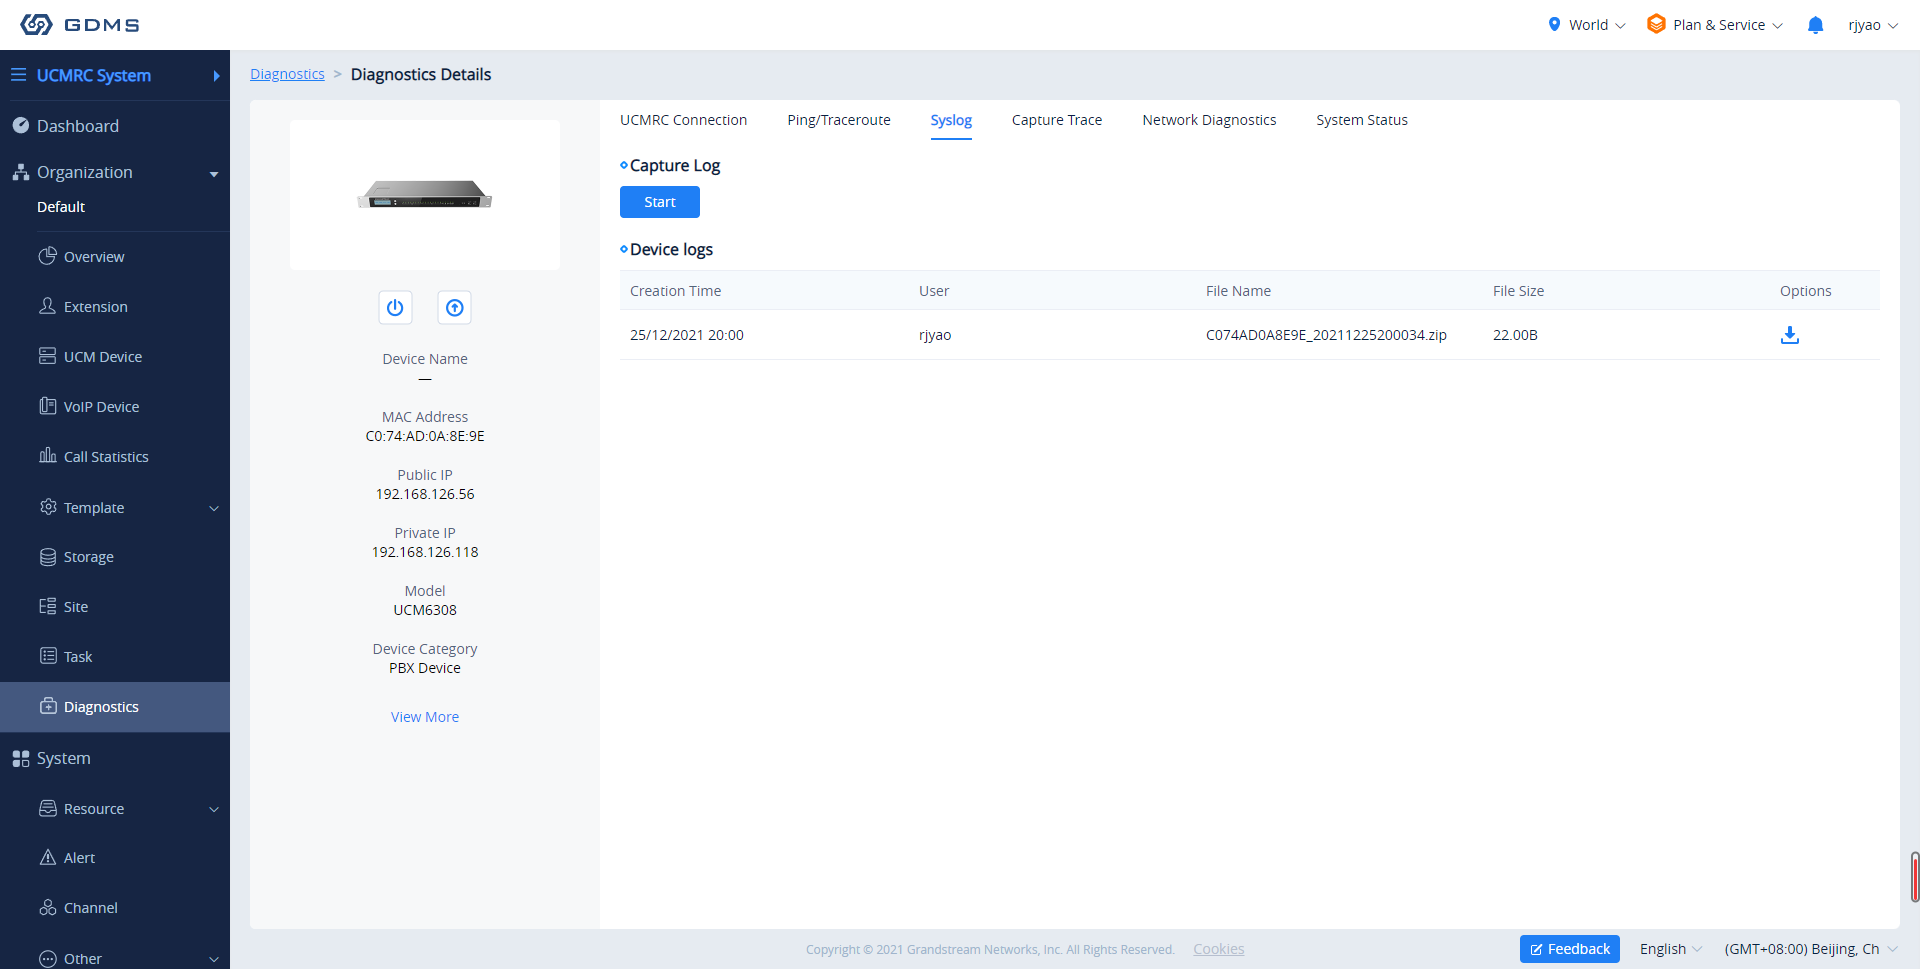
Capture Trace
The Capture Trace tool allows users to get a network packet capture of a device.
1. Click on the Start button to start the packet capture.
2. Click on the Stop button to end the packet capture.
3. Click on the ![]() button to download the capture file.
button to download the capture file.
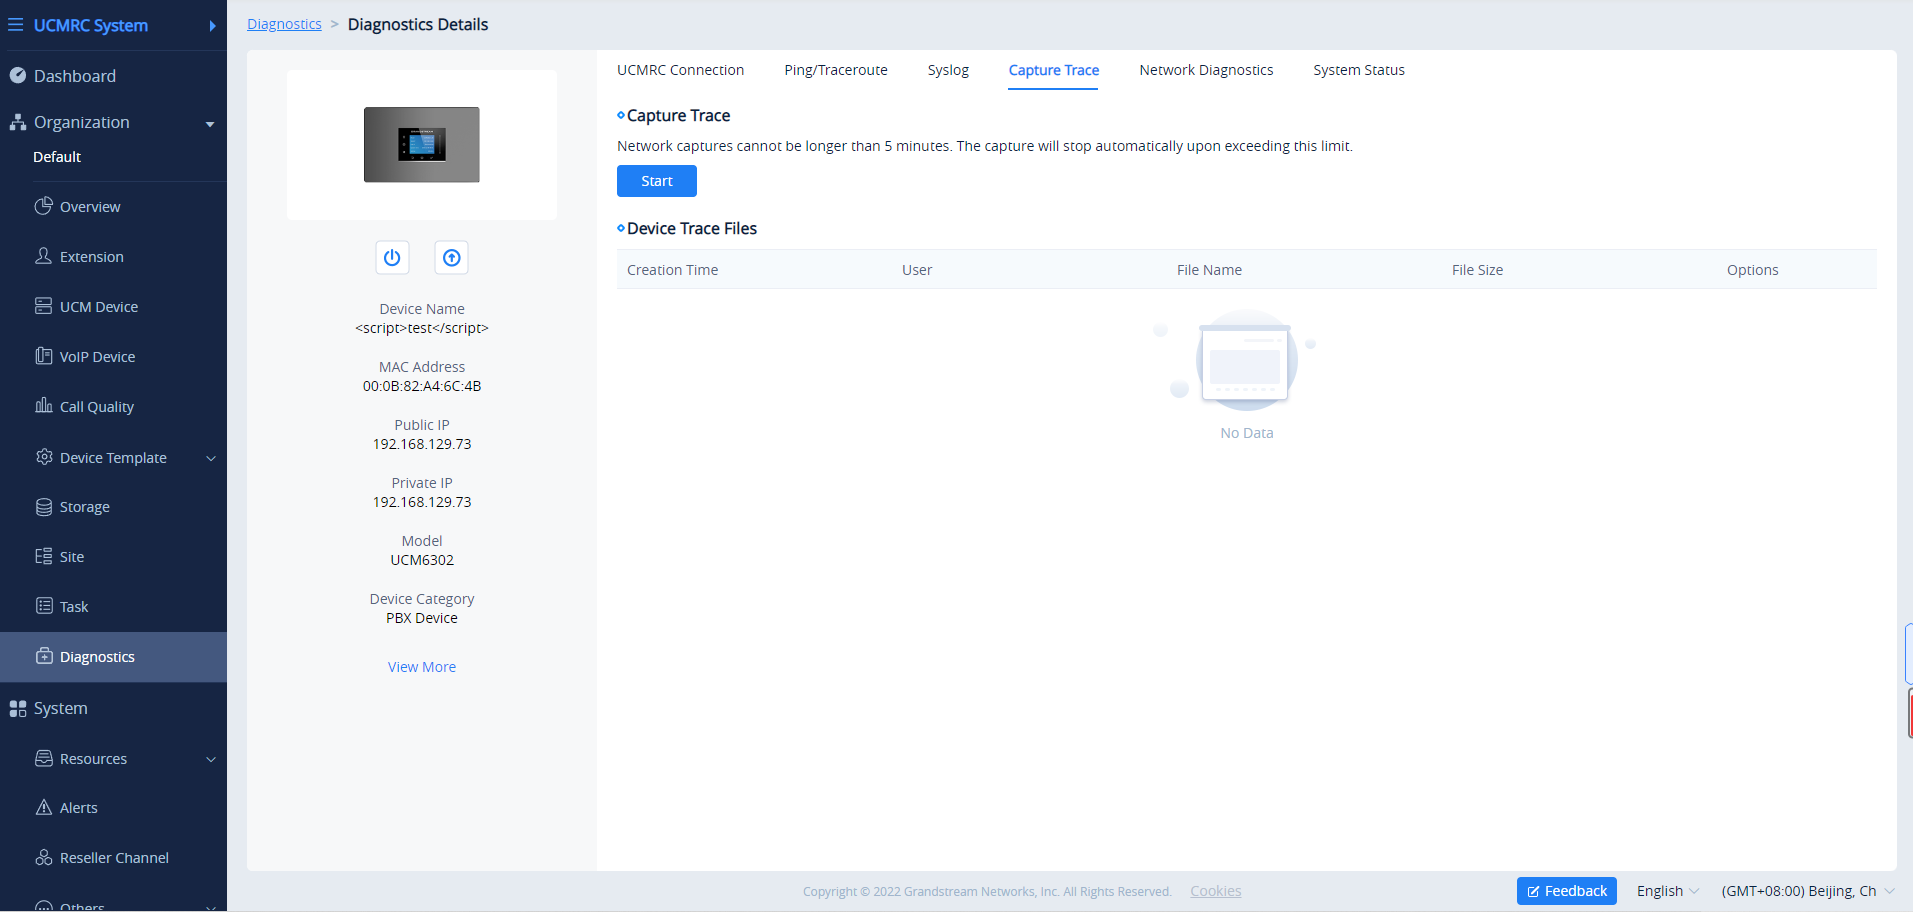
Network Diagnostics
Users can perform network diagnostics on a specific device, including local network status, network packets loss rate and latency, uplink/downlink network rates, etc.
1. Click the “Start Diagnostic” button to start network diagnosis.
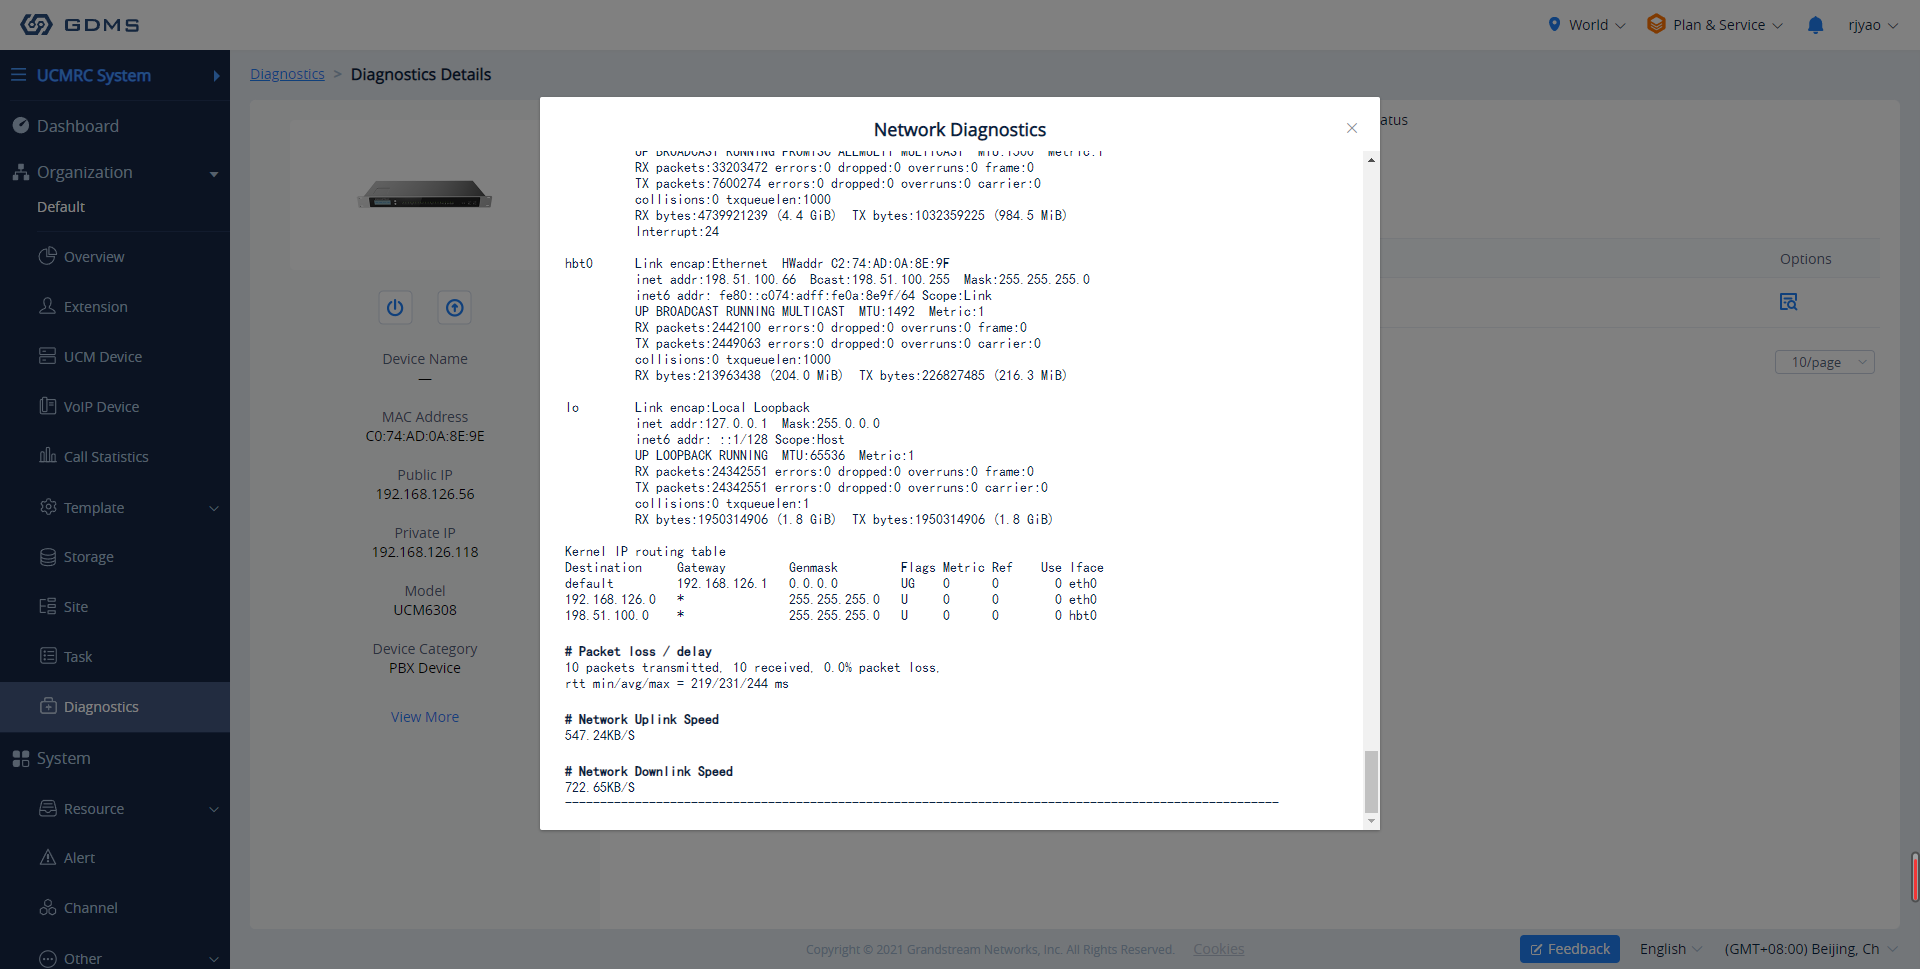
SSH Remote Capture
One of the diagnostic tools that the GDMS provides is the ability to perform a capture trace through SSH remotely.
To access the SSH Remote Capture feature please navigate to Diagnostics tab, then click ![]() on the corresponding device on which you would like to enable SSH Remote Capture. Then select “SSH Remote Access” tab.
on the corresponding device on which you would like to enable SSH Remote Capture. Then select “SSH Remote Access” tab.

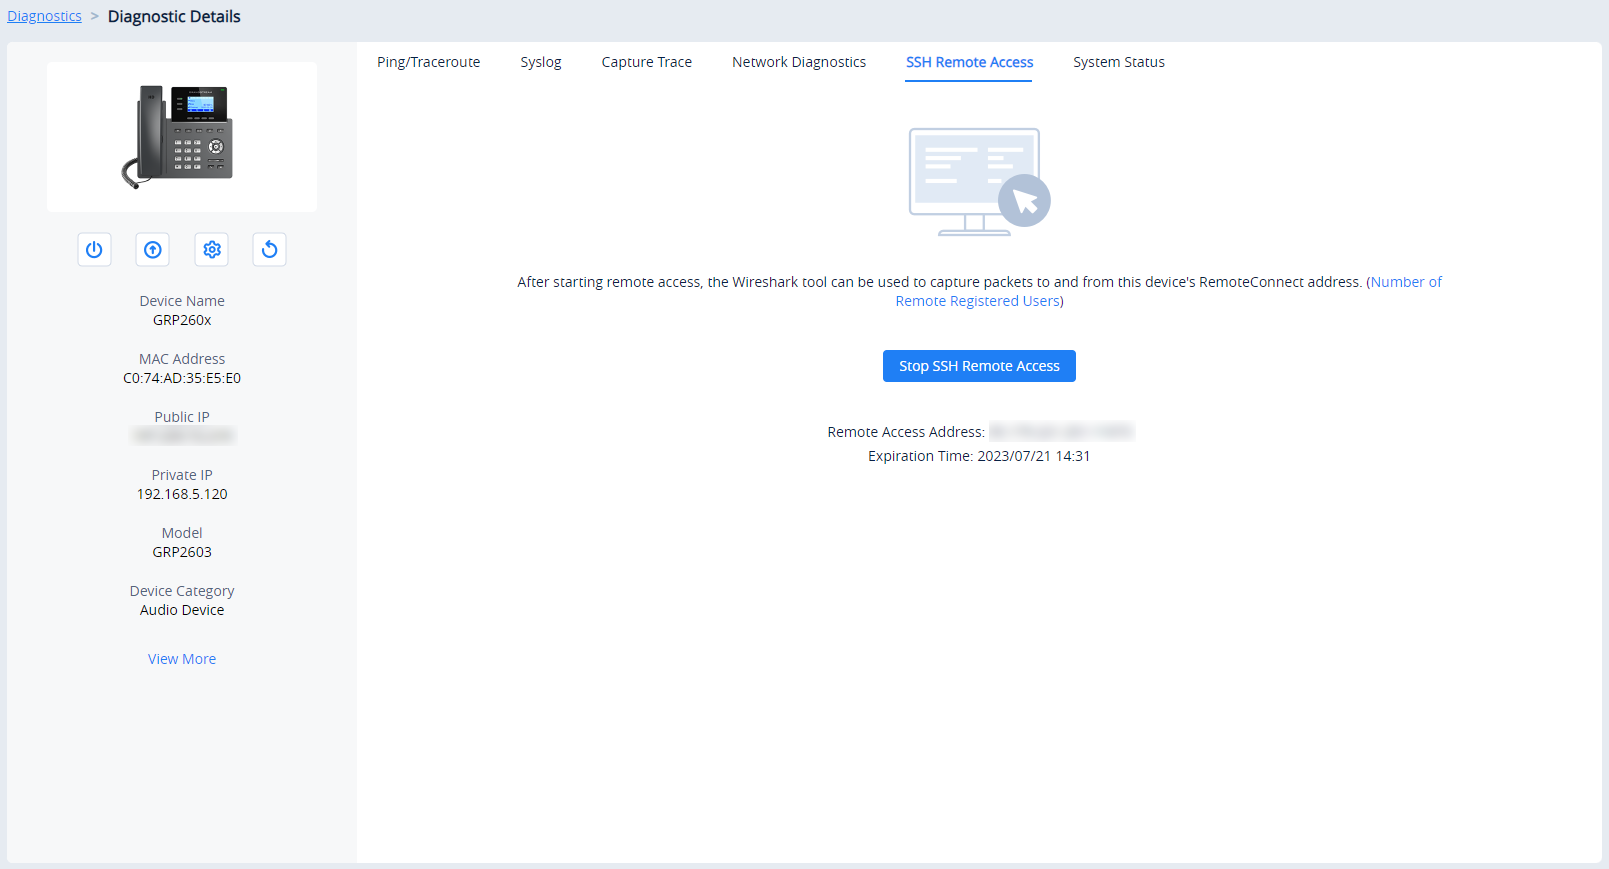
After enabling Remote SSH Capture, a Remote Access Address will be displayed, the user can use the Remote Access Address to capture the ethernet packets using a packet analyzer like Wireshark. For more information, refer to the following chapter: https://documentation.grandstream.com/knowledge-base/grp260x-series-administration-guide/#remote-ssh-capture
System Status
Users can view the system status of a specific device through the GDMS platform to diagnose the device problems, including storage space, CPU, memory information, etc.
- Click the “Start to Get” button to get the system status from the device in real-time.
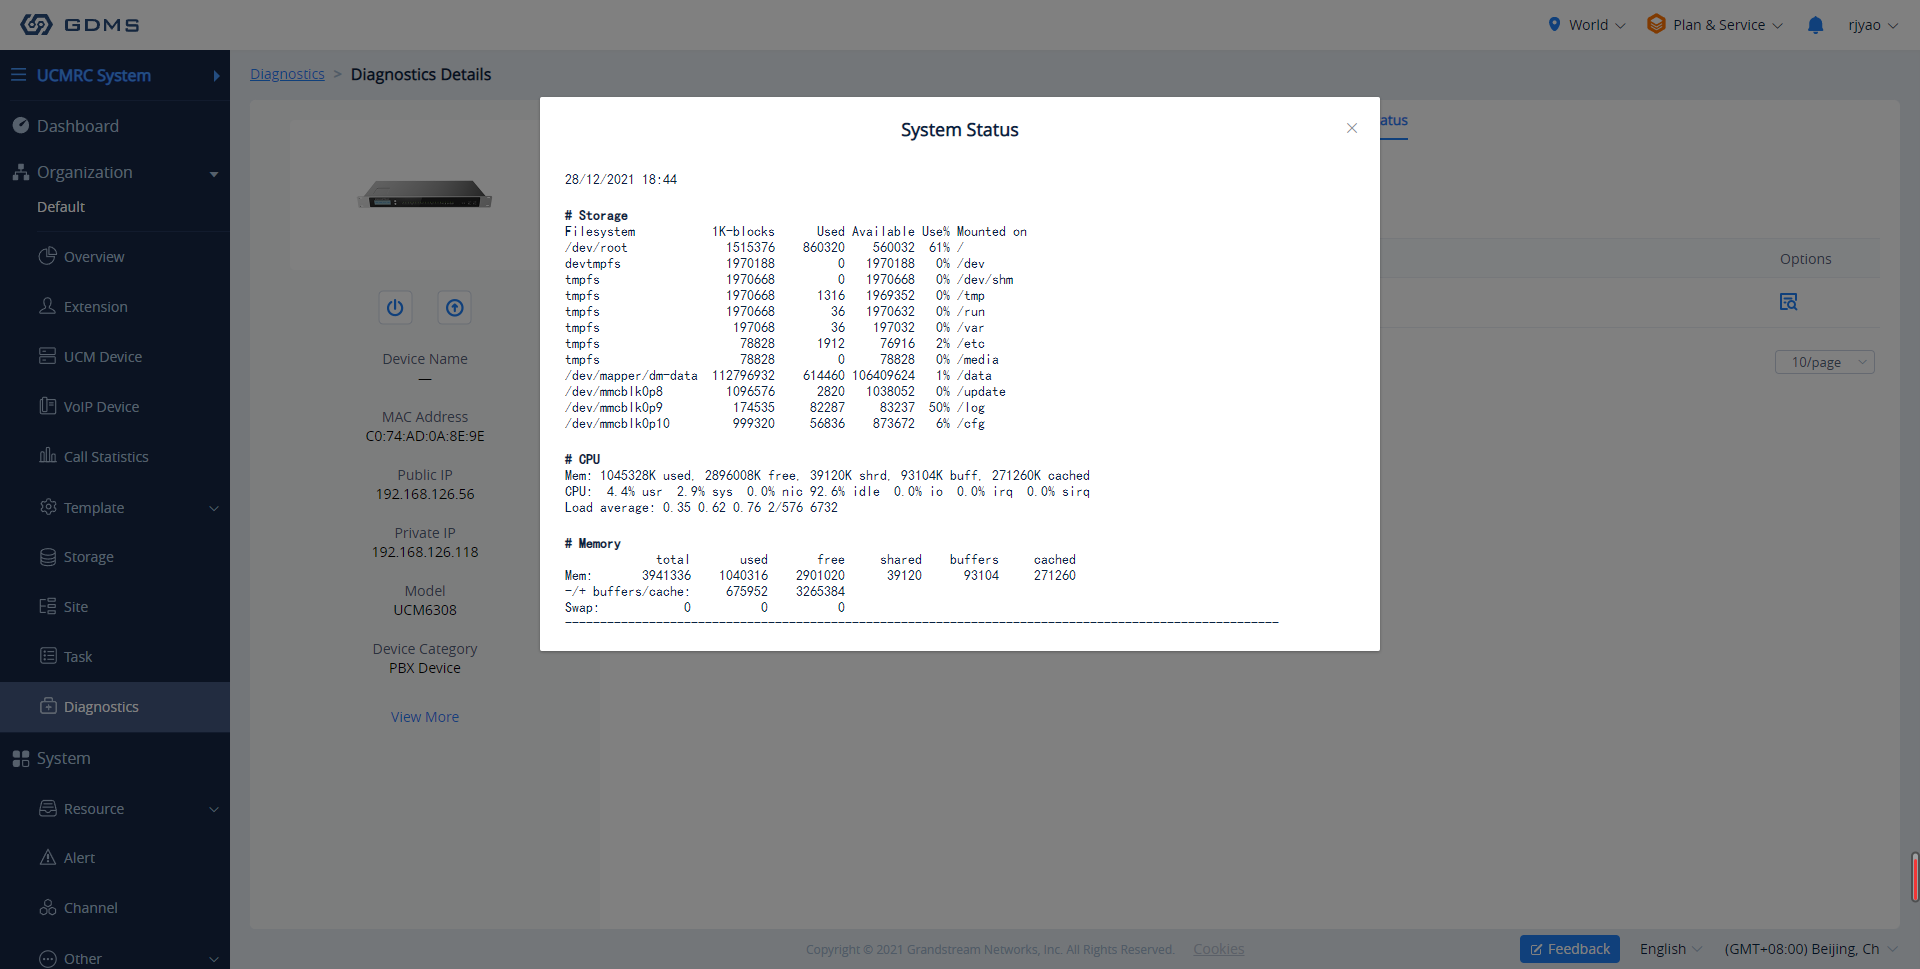
End Diagnostics
Click on the End Capture button on the Device Diagnostics page to end diagnostics for the device. All diagnostic processes will stop.
Diagnostics Records
Users can view the entire diagnostic history of all devices associated with the current account.
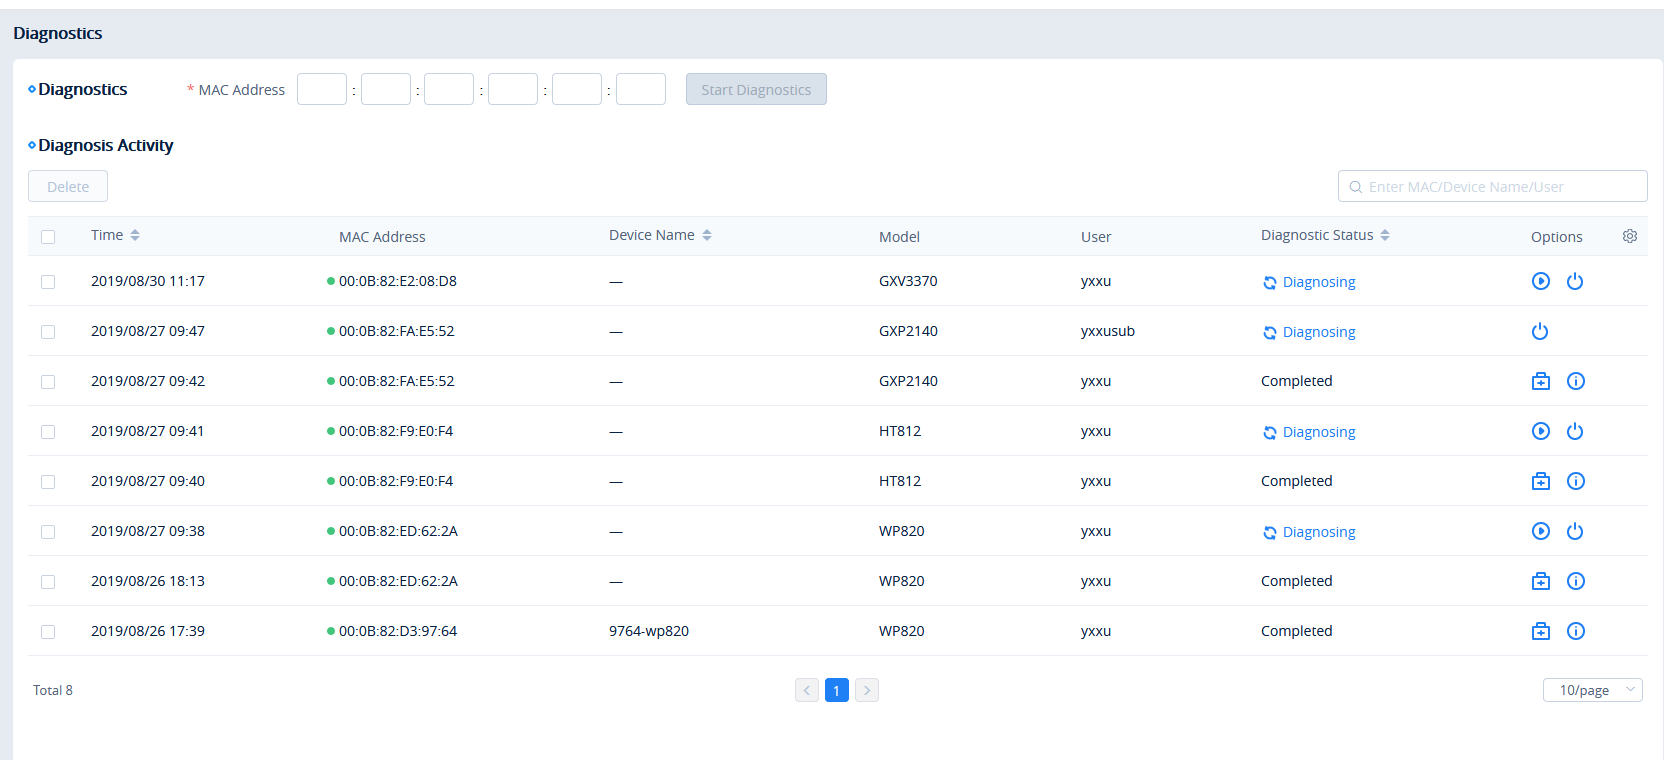
- If a device is currently being diagnosed, click on the button to continue diagnosing or the
 button to end it.
 - If a device has been diagnosed already, click on the
 button to start another round of diagnosis or the
  button to view the results.
 - View the diagnostic history of a specific device by using the search bar on the top right of the Diagnostic Records page.
- Users can delete records by selecting one or more items and clicking on the Delete button.
ALERT MANAGEMENT
GDMS has an alert system that will trigger when certain conditions are fulfilled. There are 3 alert levels: High, Medium, and Low.
Alert Notification Settings
Users can view and receive alert notifications in two ways: Message Notification and Email Notification.
Message Notification Settings
This displays the alert as a notification under the ![]() icon in the top right corner of the GDMS page.
icon in the top right corner of the GDMS page.
- To manage message alert notifications, click on the Message Notification Settings button
 on the top-right corner of the Alert Management page.

Organization | Select the organization in question. |
Subsriber | Select the users that will be alerted. Only sub-users created by the current user can be selected. The administrator can also add email addresses as subscribers instead of selecting the user account. This is a convenient feature when the email address is not linked to any GDMS user. |
Notification Time | Set the time for sending notifications. Only alerts that are generated during this time period will be sent as notifications. |
VoIP | |
Alert Details | High Level:
Medium Level:
|
PBX | |
Alert Details | Users can specify what alerts to receive. The following alert priority levels are available: High Level:
Medium Level:
Note: Only the IPPBX devices that have UCM RemoteConnect advanced plans can report the alert contents and send the alert notifications. |
CloudUCM | |
Alert Details | High Level:
Meduim Level:
|
Message Notification Settings
- When there are unread alerts, and a user subscribed to alerts logs in, the
 icon will shake. Hovering over the icon will show the unread messages. Clicking on these messages will show more details about the alerts.
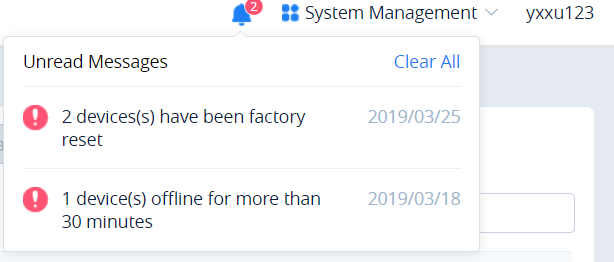
Email Notification Settings
Alerts will be sent as emails to subscribers.
- To manage email alert notifications, click on the
 button on the top-right corner of the Alert Management page.
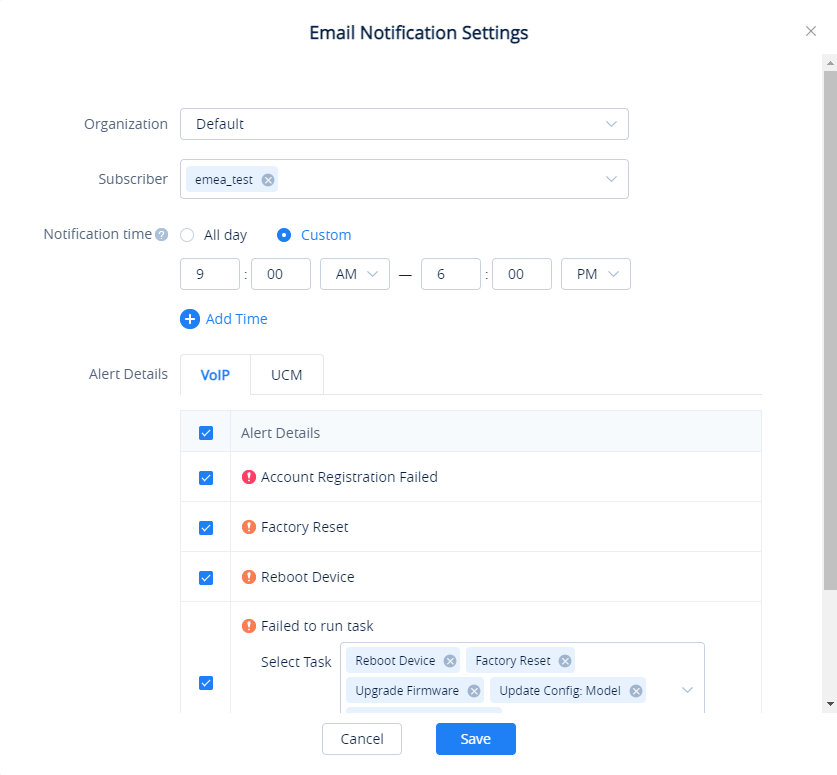
Organization | Select the organization in question. |
Subsriber | Select the users that will be alerted. Only sub-users created by the current user can be selected. The administrator can also add email addresses as subscribers instead of selecting the user account. This is a convenient feature when the email address is not linked to any GDMS user. |
Notification Time | Set the time for sending notifications. Only alerts that are generated during this time period will be sent as notifications. |
VoIP | |
Alert Details | High Level:
Medium Level:
|
PBX | |
Alert Details | Users can specify what alerts to receive. The following alert priority levels are available: High Level:
Medium Level:
Note: Only the IPPBX devices that have UCM RemoteConnect advanced plans can report the alert contents and send the alert notifications. |
CloudUCM | |
Alert Details | High Level:
Meduim Level:
|
Email Notification Settings
- When the subscriber receives the alarm notification, the GDMS platform will send an email to inform the subscriber. To avoid the alarm notification emails disturbing the subscriber, the GDMS platform only can send one alarm notification email to the subscriber’s email box per hour.

App Notification Settings
The alerts can be pushed to the subscribers through the App notifications.
- The user can click the button
 to access the App notification settings interface.

Organization | Select the organization in question. |
Subsriber | Select the users that will be alerted. Only sub-users created by the current user can be selected. The administrator can also add email addresses as subscribers instead of selecting the user account. This is a convenient feature when the email address is not linked to any GDMS user. |
Notification Time | Set the time for sending notifications. Only alerts that are generated during this time period will be sent as notifications. |
VoIP | |
Alert Details | High Level:
Medium Level:
|
PBX | |
Alert Details | Users can specify what alerts to receive. The following alert priority levels are available: High Level:
Medium Level:
Note: Only the IPPBX devices that have UCM RemoteConnect advanced plans can report the alert contents and send the alert notifications. |
CloudUCM | |
Alert Details | High Level:
Meduim Level:
|
App Notification Settings
SMS Notification Settings
UCM devices that have UCM RemoteConnect service plan can use the SMS Notification function. This function is only supported by some of the UCM RemoteConnect plans.
- To manage email alert notifications, click on the
 button on the top-right corner of the Alert Management page.
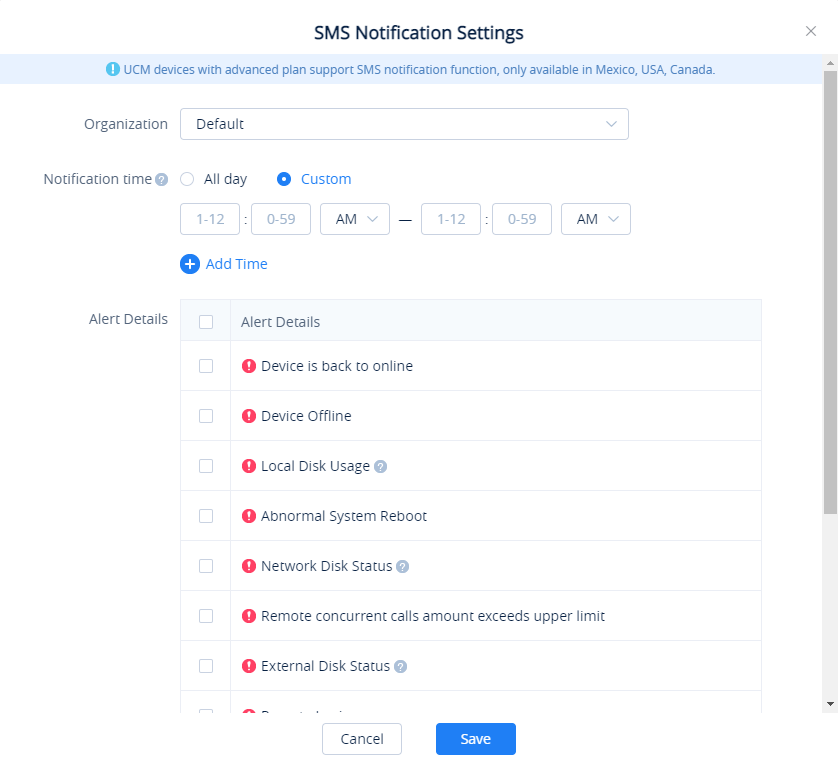
Organization | Select the organization in question. |
Subsriber | Select the users that will be alerted. Only sub-users created by the current user can be selected. The administrator can also add email addresses as subscribers instead of selecting the user account. This is a convenient feature when the email address is not linked to any GDMS user. |
Notification Time | Set the time for sending notifications. Only alerts that are generated during this time period will be sent as notifications. |
VoIP | |
Alert Details | High Level:
Medium Level:
|
PBX | |
Alert Details | Users can specify what alerts to receive. The following alert priority levels are available: High Level:
Medium Level:
Note: Only the IPPBX devices that have UCM RemoteConnect advanced plans can report the alert contents and send the alert notifications. |
CloudUCM | |
Alert Details | High Level:
Meduim Level:
|
Notification Settings
- Click the Save button to apply the changes.
View Alert Notification
The Alert Management page shows all alerts that have been generated by GDMS.
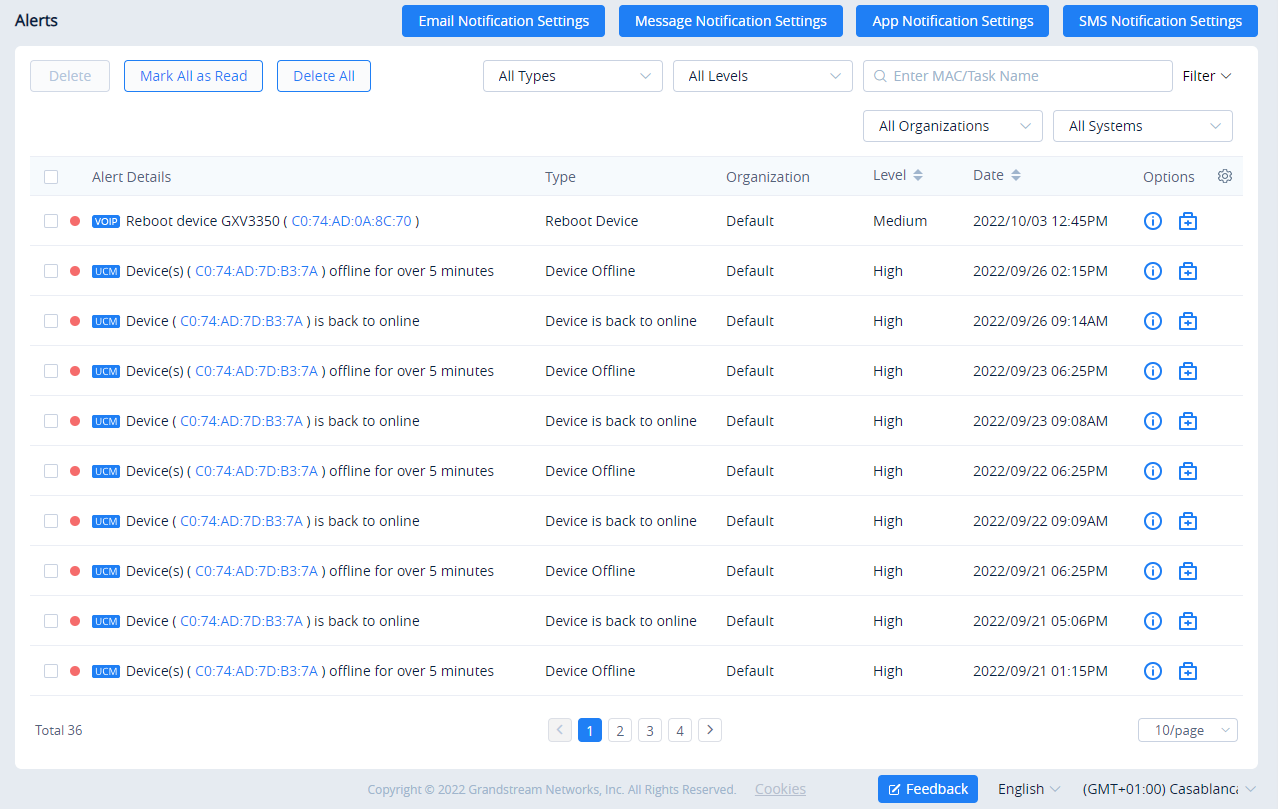
- Search: Users can find specific alerts by using the filter and search features in the top right corner of the Alert Management page.
- Latest alarm notification: If the alarm notification includes a red dot at the beginning of the item, it means the alarm notification is an unread notification. Users could click on the button
 to mark all unread notifications as “Read.”
 - View Details: Users could click on the button following the alert notification to view the alert notification details, and the red dot will disappear if the user has viewed the alert notification details.
Note: When you click on, the following information will appear.
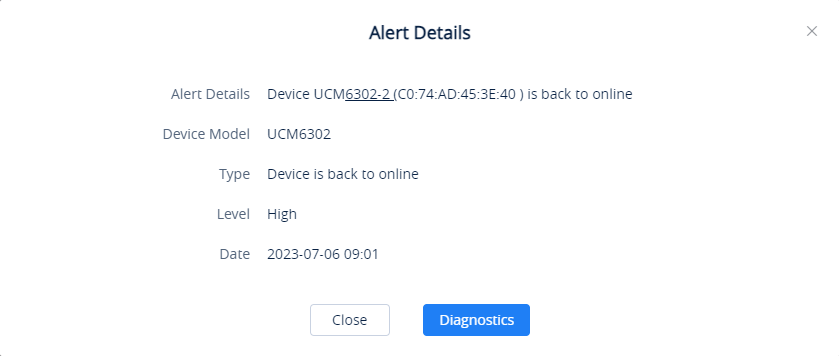
- Device Diagnostics: For the device which has a fault, the user could click on the option
 to access the Device Diagnostics page to diagnose the device.
 - Delete Alerts: Users can delete notifications by selecting one or more items and clicking on the Delete button.
- To display the device that has generated the event, the user can click on the hyperlinked MAC address to view more information about the device.
REGION MANAGEMENT
The user can switch between the available regions which are available on the GDMS platform. Currently, we support the US region and the EU region. The user can enable both regions at the same time if they wish to, to do that please access the region configuration window by clicking your region name on the upper right corner of the GDMS web UI.
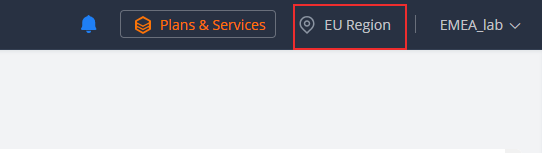
Select the region you would like to switch to. Or, to configure a new region, please click on “Region Settings”
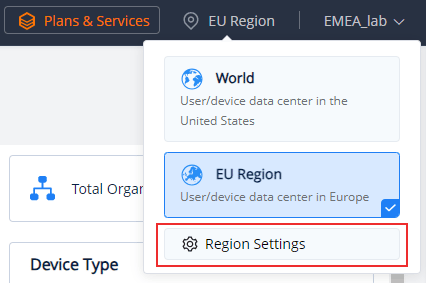
You can either delete or add a region.
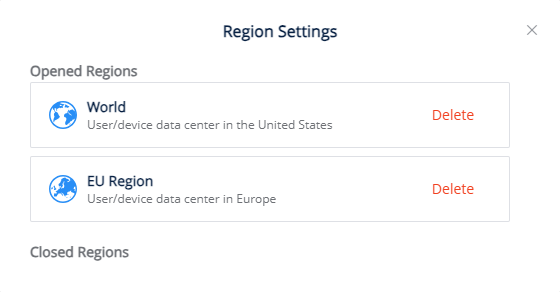
Enter the password of the administrator to be able to add or delete a region.
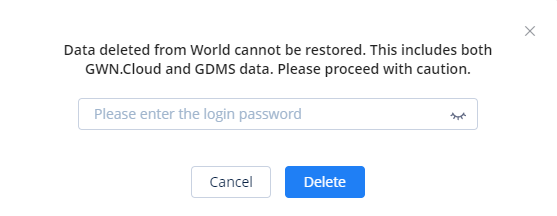
RESOURCES
Custom Firmware
Users could upload the firmware of the devices to upgrade the associated devices on the GDMS platform.
- On the Custom Firmware page, click on the Upload Firmware button.
- Either drag and drop the firmware file to the upload area or enter the firmware file path.
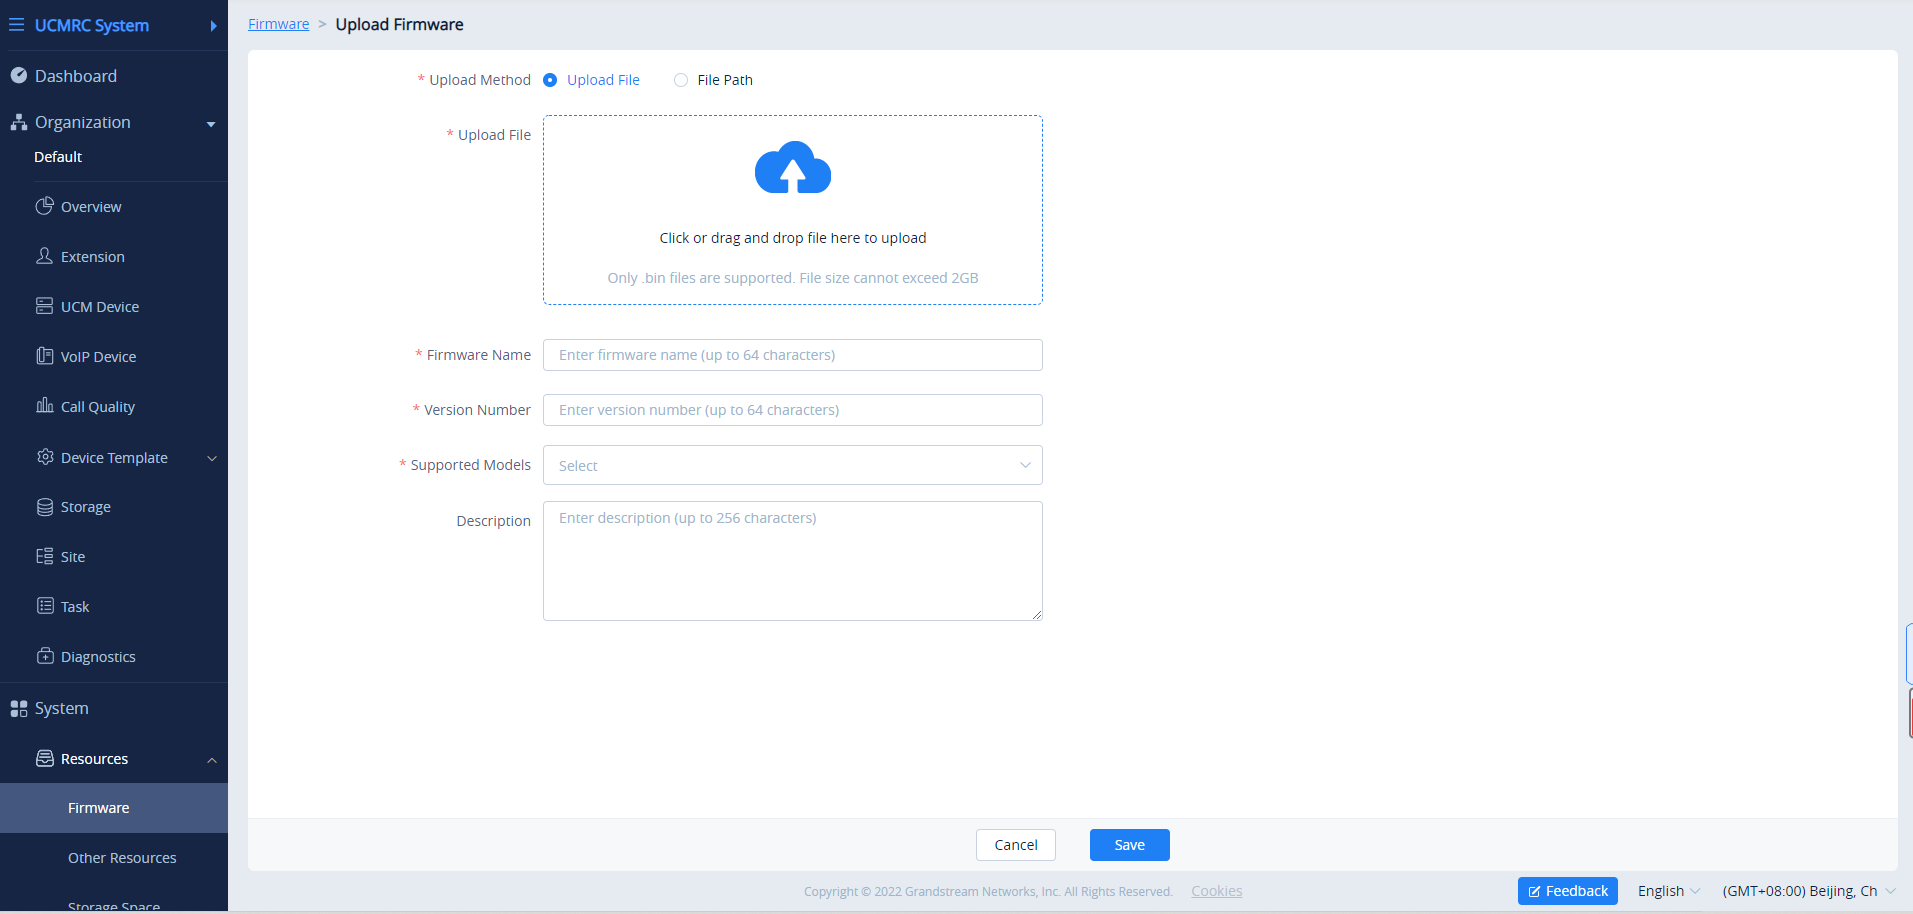
|
Upgrade Path |
|
|
Firmware Name |
This is used to identify the firmware file name. The limit is 1 – 64 characters. |
|
Version Number |
Fill in the actual version number of the uploaded firmware. |
|
Supported Model |
Select the supported device models of the firmware. |
|
Description |
Description of the firmware. The maximum character limit is 256. |
- Once the firmware is uploaded successfully, it will appear in the custom firmware list. Devices will be able to select the firmware when upgrading via GDMS.
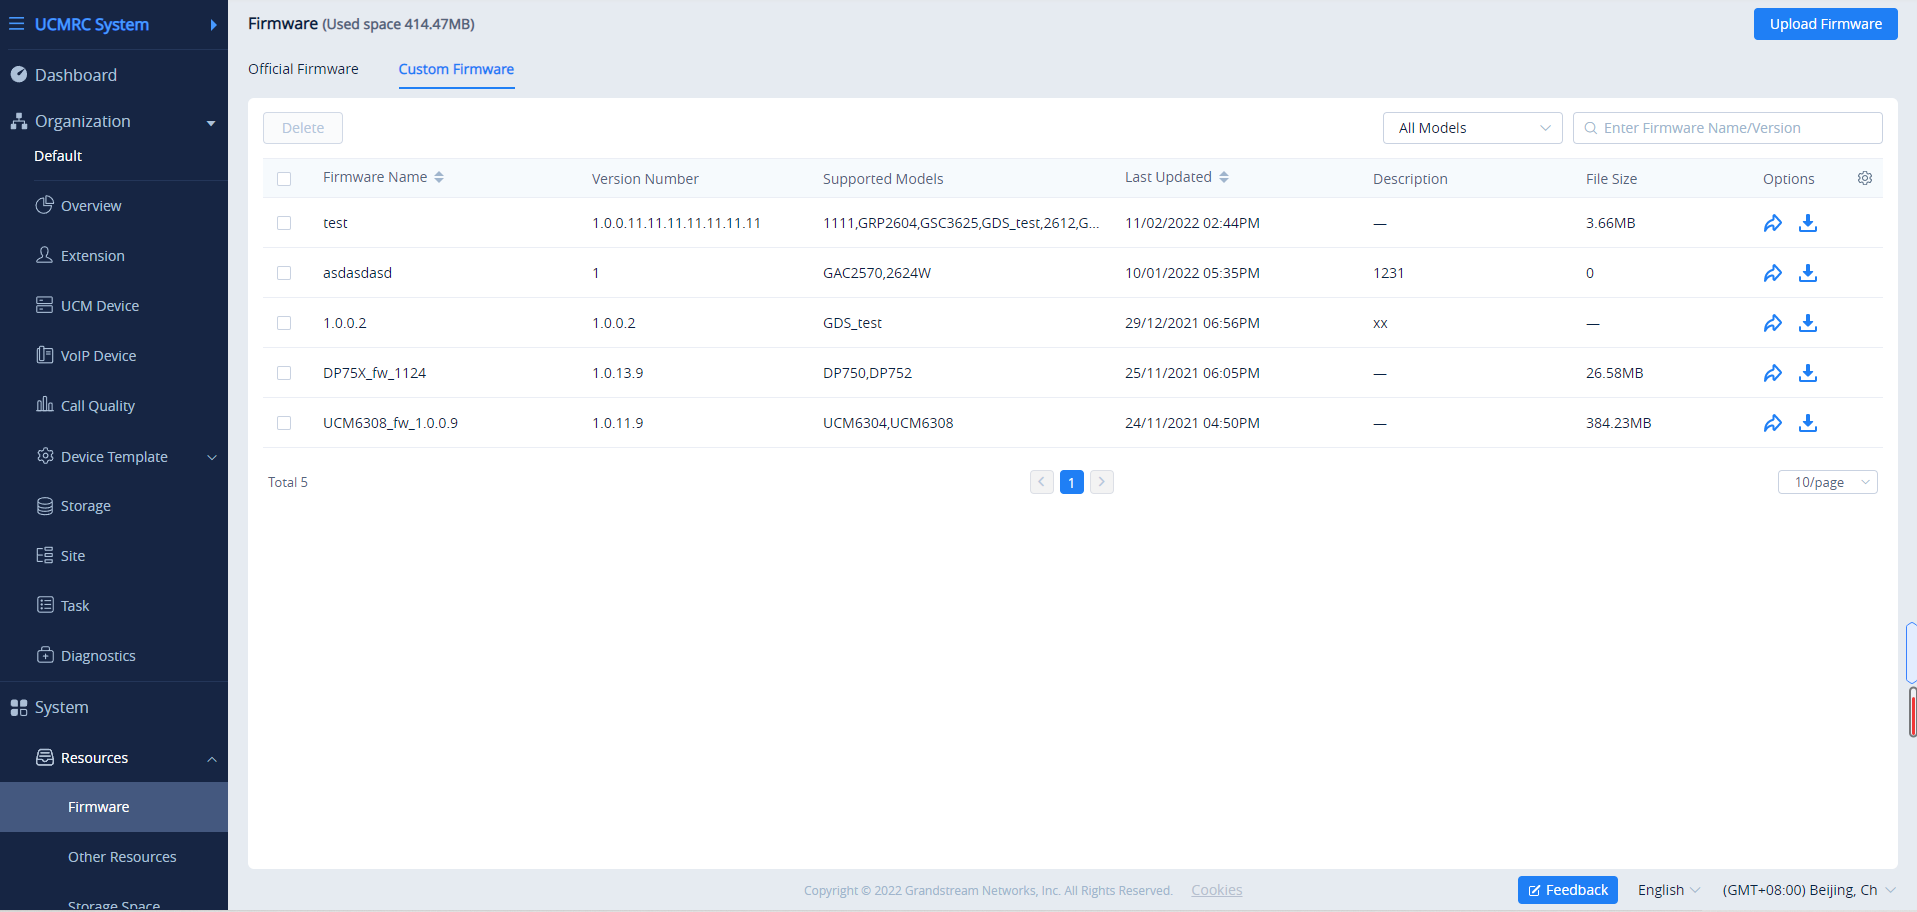
Official Firmware
The official firmware page lists the latest official firmware for every supported device. This list is maintained and updated by Grandstream.
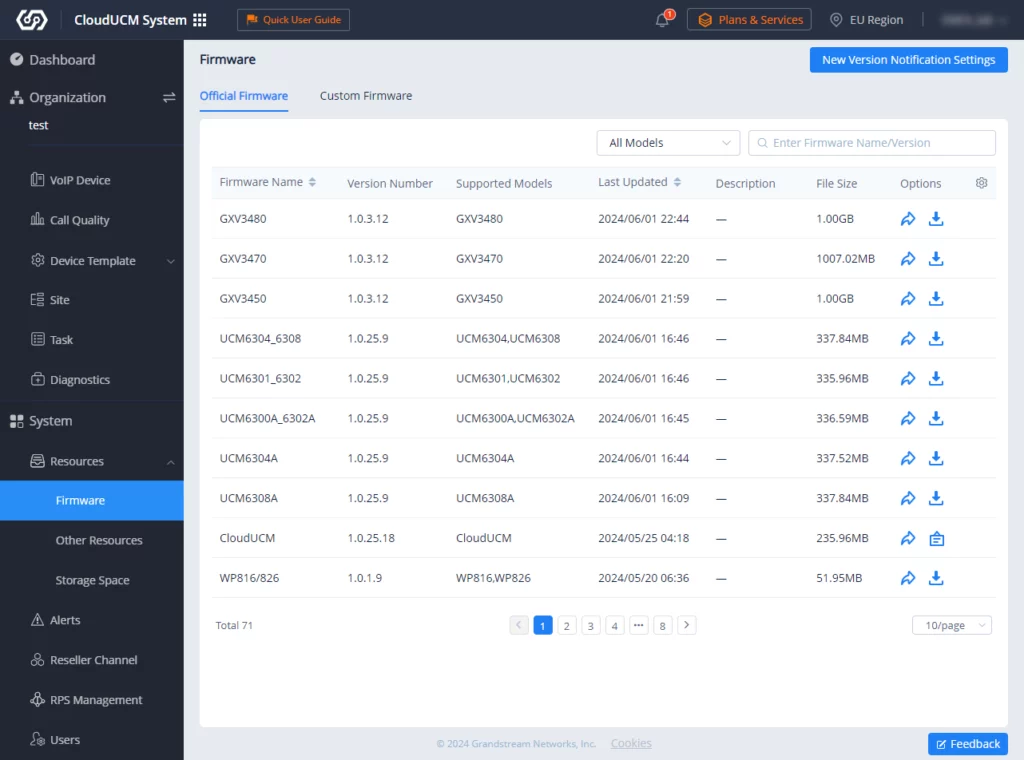
Firmware Update Notification Settings
Users can subscribe to firmware update email notifications to keep up to date with the latest firmware releases.
- Click on the New Version Notification Settings button at the top of the Firmware page.
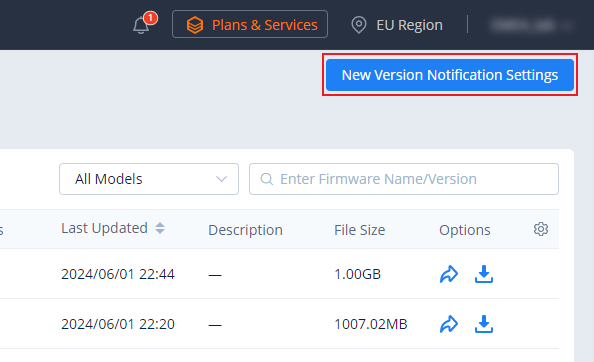
- The following page will appear, on which you can choose which products to receive notifications when a new firmware is released.
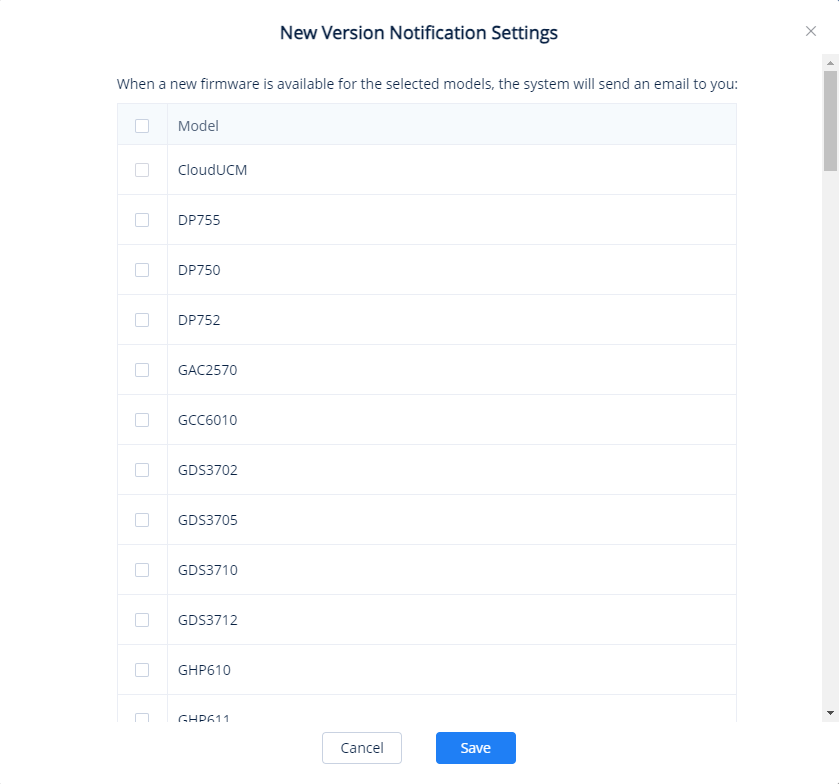
- Users can select the device models they want firmware update notifications for.
- Click on the Save button to finalize changes.
Push Firmware Update
Using this feature, the user can push firmware updates to the devices directly; this can be performed for devices with various firmware version number, or the if the user wants to upgrade devices which have a specific firmware version number, the user will be able to specify that version number or specify a range of firmware versions to be upgraded.
- Click on the
 button for the desired firmware. The following window will appear:

- Select the devices to push the firmware to. Users can search for specific devices by entering in a MAC address or name or filter devices by specific sites.
- Click on Update Now to immediately push the firmware upgrade to devices or Schedule Config Update.
- Click on the Save button to create the task. Users can check the status of the firmware upgrade on the Task Management page.
Edit Custom Firmware File Info
Users could edit the custom firmware file name, firmware version, and other information on the GDMS platform. Click on the button ![]() to access the firmware editing page.
to access the firmware editing page.
Download Firmware
Users can download firmware on GDMS by clicking on the ![]() button.
button.
Delete Custom Firmware
Users can delete custom firmware by selecting them in the firmware list and clicking on the Delete button in the top-left corner of the list.
Other Resources Management
Users can upload the resource files (such as ringtone files, wallpapers, language packs, etc.) to the GDMS platform so that users can configure or assign the resource files to devices at any time.
Upload Resource
- On Resource Management 🡪 Other Resources page, click on the resource files uploading button.
- Users can drag or click to upload ringtone files, pictures, language packs, and other files, as the figure shows below:
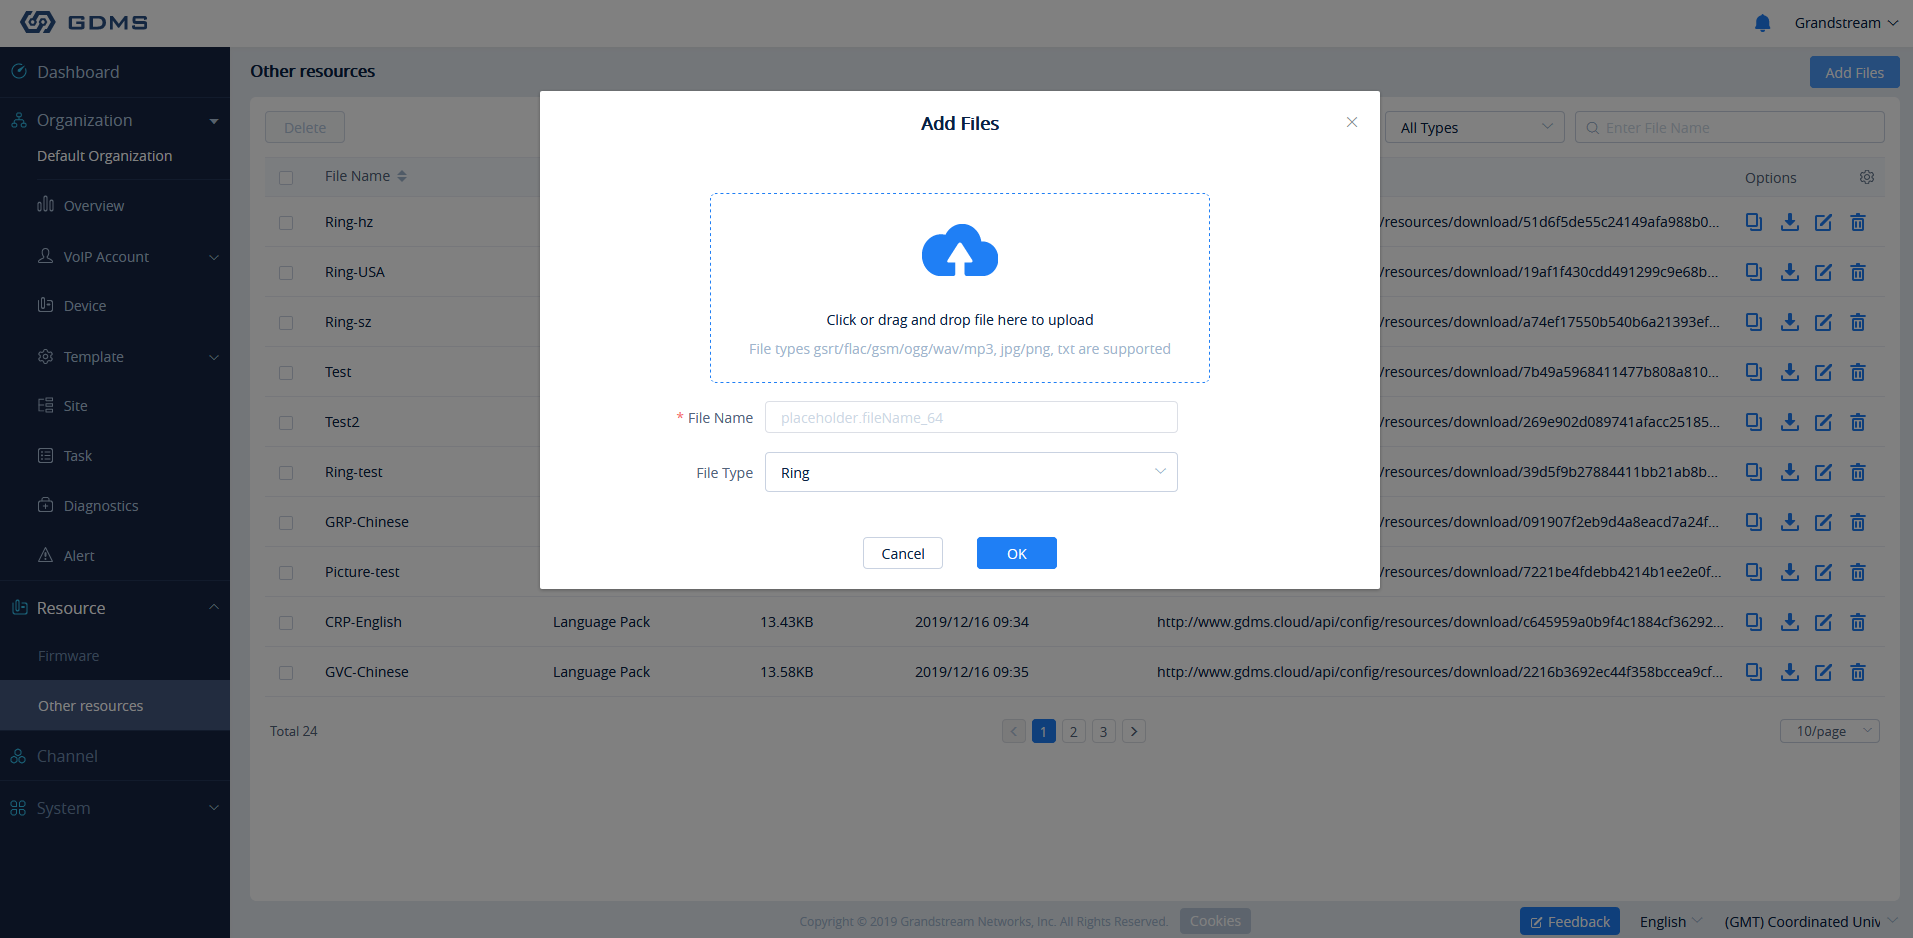
|
File |
Users could drag the file to the uploading area or click on the uploading area to select the file. Supported file format: gsrt/flac/gsm/ogg/wav/mp3/jpg/png/txt. If the user selects the file type as “Other,” the GDMS platform will not restrict the file format. File size limit: Bin file/Ringtone – 128KB; Picture/Language pack – 500KB; Other – 5MB. |
|
File Name |
This is used to identify the file name. The limit is 1 – 64 characters. |
|
File Type |
This is used to identify the file type, such as ringtone, picture, language pack, and Others. |
- Click the “OK” button to save the file to the GDMS server.
The user can also choose to edit a file, this basically allows the user to upload a file and overwriting the existing one.
View Resource List
Users can view all resources on Resource List under the enterprise, including the uploaded resources.
- Users can go to Resources 🡪 Other Resources to view the resources list.
- Users can also search the resources by resource type or file name on the resources list.
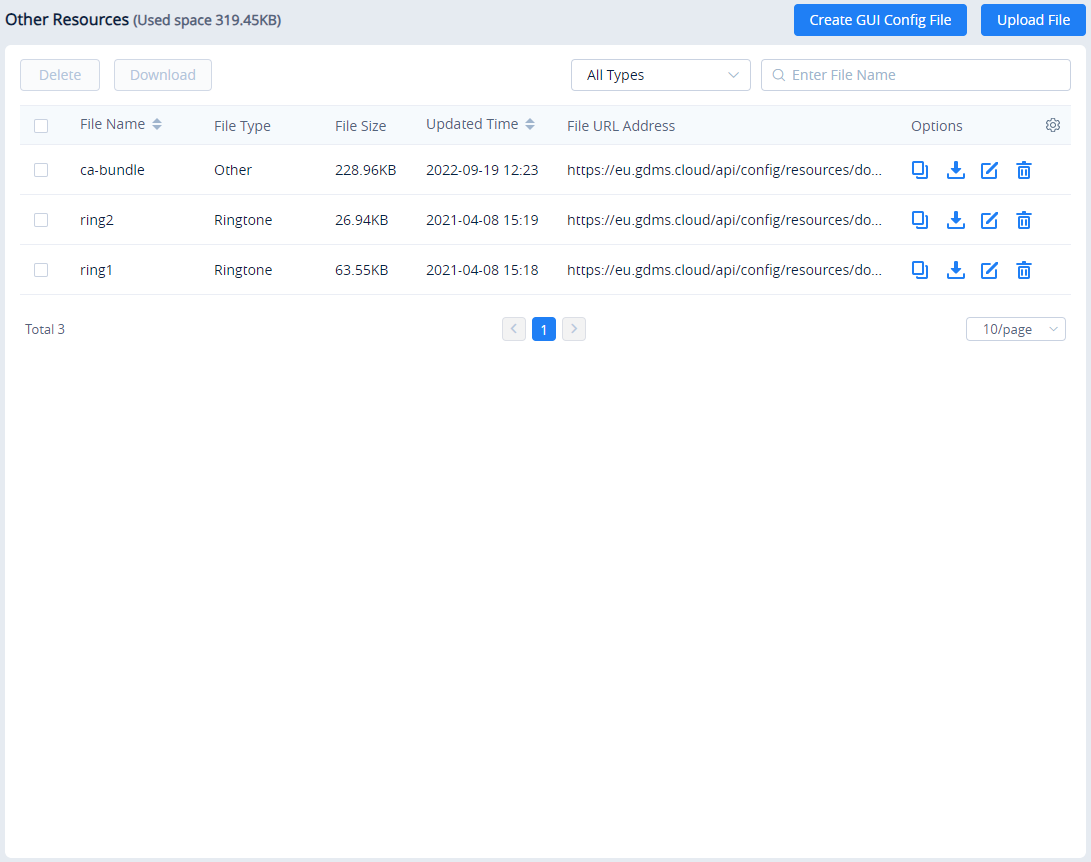
Copy File URL
- On Resource Management 🡪 Other Resources page, click the button
 following the resource file to copy the resource URL.
 - Copy the file URL and paste it to another file download path.
Download Resource
- On Resource Management 🡪 Other Resources page, click the button following the resource file to download the resource.
- Download the resource file locally.
Modify Resource
- On Resource Management 🡪 Other Resources page, click the button
 following the resource file to modify the resource.
 - Users can modify the file and file name.
Delete Resource
- On Resource Management 🡪 Other Resources page, click the button following the resource file to delete the resource. Users can also select multiple resource files and click the Delete button on the top of the page to batch delete the resource files.
- When the user confirms to delete the resource file, the selected file will be deleted from the GDMS platform.
GUI Config File
The user can use the GUI Config tool o create a configuration file for a specific model device and store the configuration file on the GDMS storage space.
- On Other Resources, please click “Create GUI Config File”
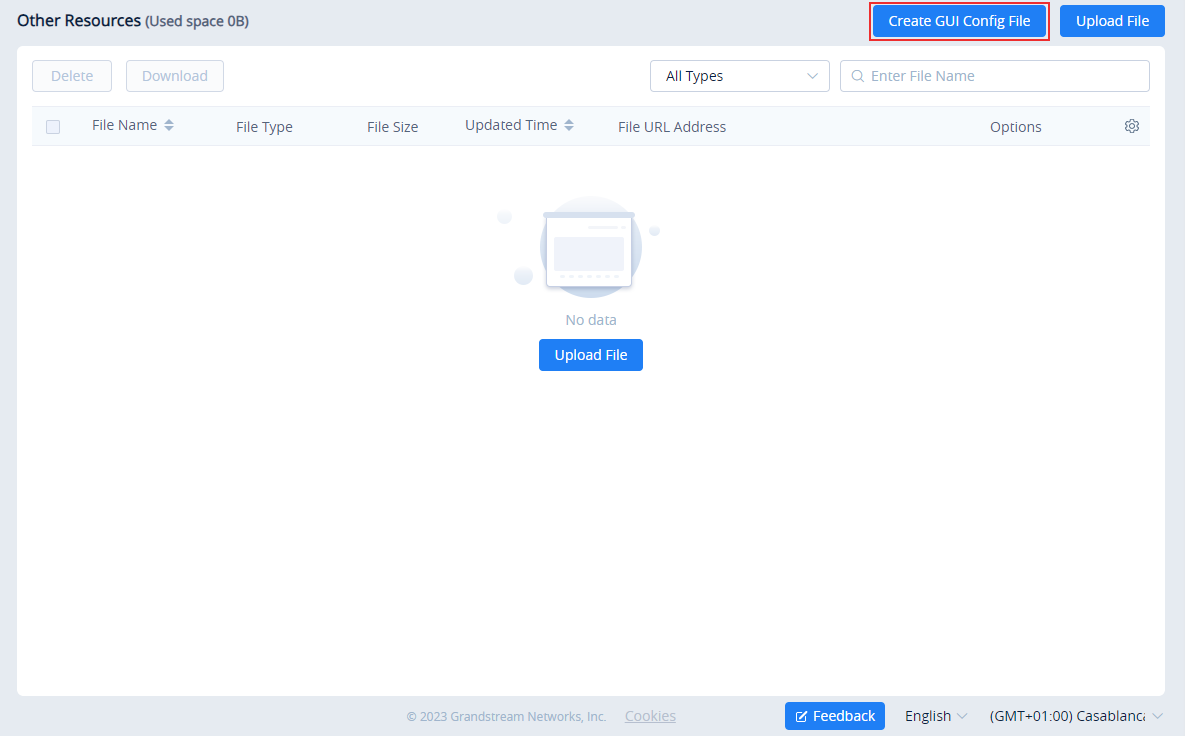
- Choose the model of which you want to create the configuration file.
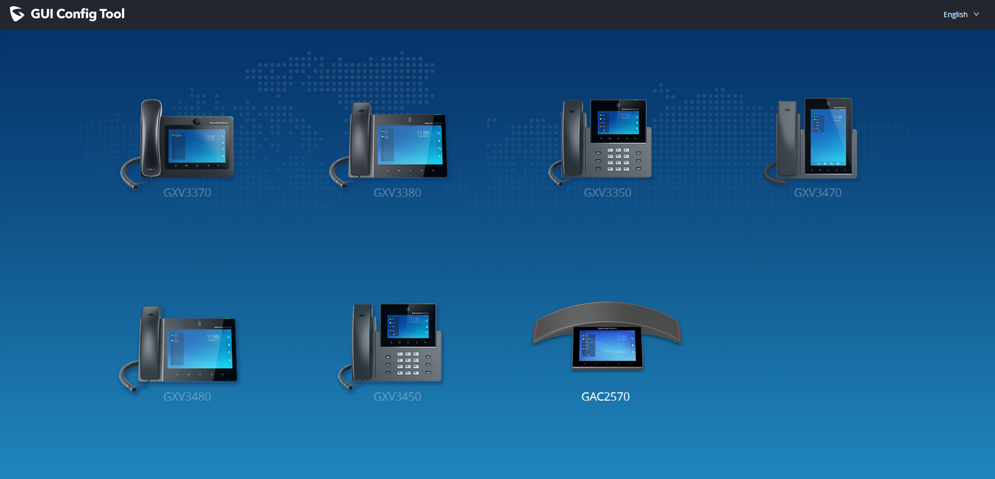
- Once the configuration has been customized, click on “Save to GDMS”.
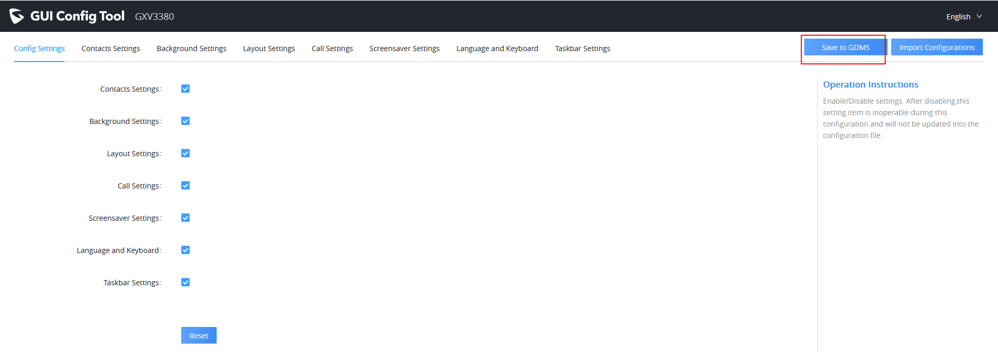
View Storage Space
All resource files are stored in the enterprise’s storage space. This interface shows the storage space occupied and the total storage space:
- On the” Resource Management“ 🡪 ”Storage Space“ interface, go to the Storage Space statistics page. This interface shows the storage space taken up by the custom firmware and the other resource files.
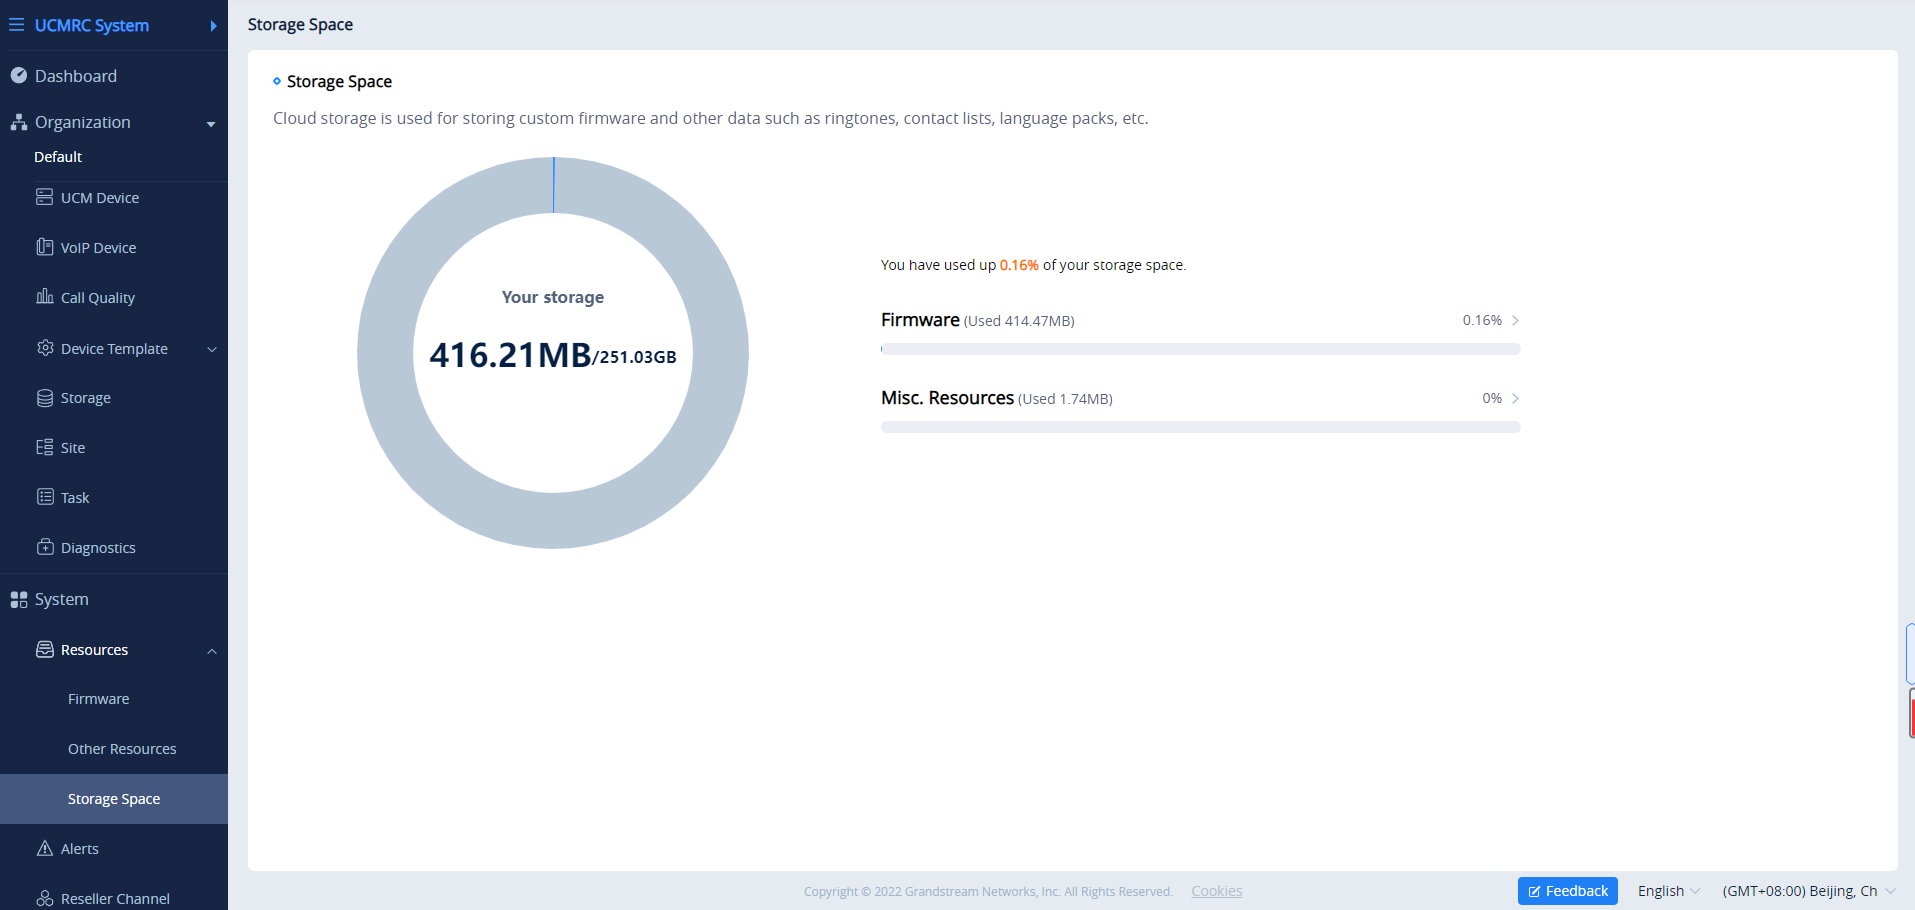
RESELLER CHANNEL
Channel customers and service providers can obtain a list of purchased devices from Grandstream ERP. This list will allow the channel customer or service provider to:
1. Quickly assign devices to sub-channel customers. These customers will then be able to log into GDMS to manage the devices.
2. Manage devices directly for customers.
Track Device
View Device
To view all devices assigned to the account, click on the Track Device tab.
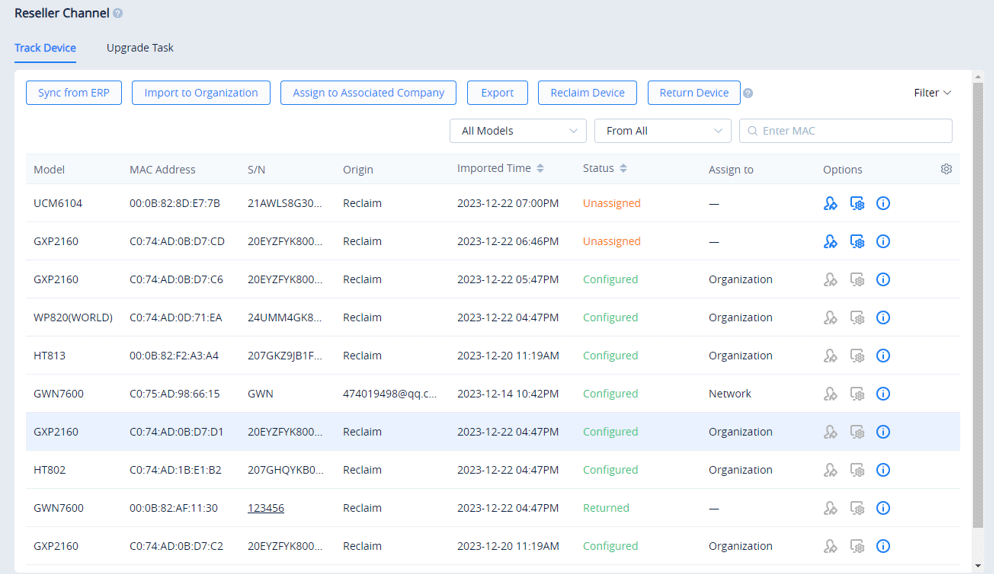
Users can search for specific devices by using the filter and search options in the top-right of the Channel Management page.
Device Assignment Notification
When devices are assigned to an account, the ![]() icon will show a notification. Clicking on the notification will show the list of assigned devices.
icon will show a notification. Clicking on the notification will show the list of assigned devices.
Device Assignment
For the devices which have been sold to the associated company customer, the user could allocate the devices to them. The associated company customer could log in to the GDMS platform to view and manage the devices.
Assign Devices:
- Click on the Device Operation button at the top-right of the Reseller Channel page.
- Click on Assign to Associate Company on the Track Device page. The user will be redirected to the batch device assignment page.

- The user will be directed to the batch devices allocating page:

| Select Associate Company | Select the associated company to add the device to. |
|
Device | Select the devices to assign to the associated company from the list or enter the MAC addresses of the devices. |

- Click the Save button to finalize changes and the assignment. The sub-channel will then be notified of the device assignment.
Assign to Organization
To assign devices to different organizations, please navigate to Reseller Channel > Track Device then click on “Assing to Organization”.
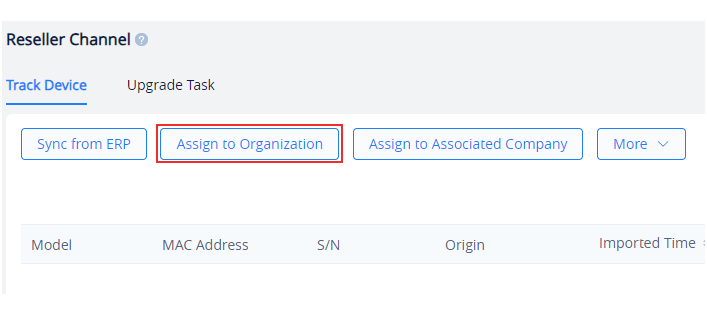
Reclaim Device
Reclaim Device allows the user to reclaim devices which are assigned to an associated company. This can be done to forcibly reclaim the device by the superior channel. Once a device has been reclaimed, it will no longer appear in the account of the user in the associated company.
To reclaim a device, please navigate to System > Reseller Channel, then click on “More”, then “Reclaim Device”.
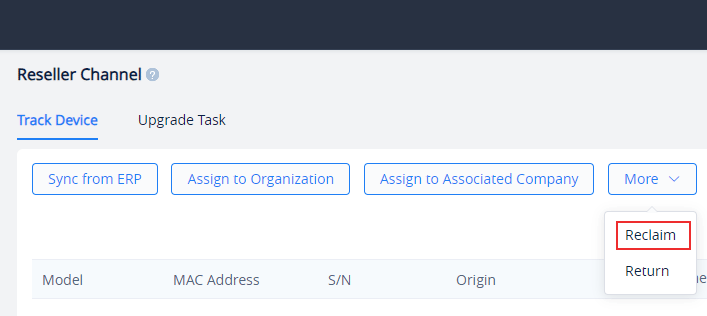
Choose the device(s) to reclaim then click “Save”.
Return Device
The user can use return a device to return it to the superior channel once it’s no longer needed. Once the device is returned, it will be deleted from the list of the devices on the user’s account.
To return a device, please navigate to System > Reseller Channel, then click on “More”, then “Return Device”.
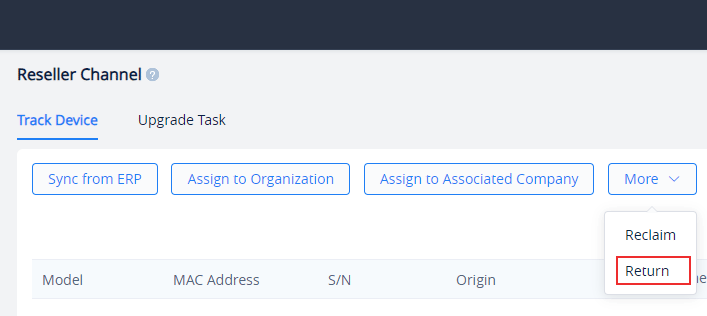
Choose the device(s) to return then click “Save”.
Upgrade Task
Users can perform an upgrade task to devices which belong to a specific channel. The upgrading can be triggered to many devices at once or it can be performed subsequently.
On the main page of scheduled tasks, please click on “Add Upgrade Task” on the top right corner of the page.
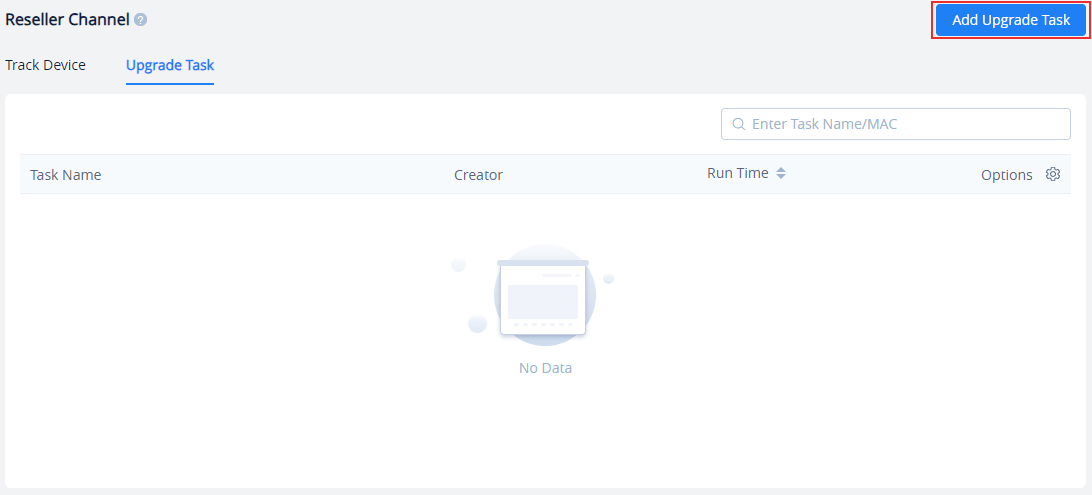
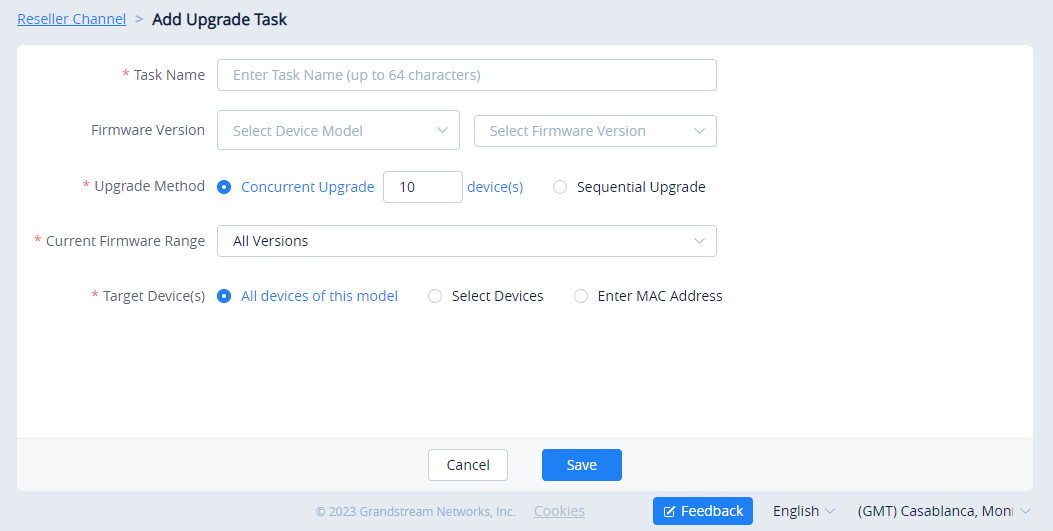
Fill in the fields according to the description in the table below.
Task Name | Enter the task name. |
Firmware Version | Select the device model and firmware version number |
Upgrade Method | Select the upgrade method
|
Current Firmware Range |
|
Target Device(s) |
|
USER MANAGEMENT
The User Management page allows users to view, add, and edit users and manage role privileges. By default, GDMS has one administrator, which has all available privileges. Roles are sets of privileges that admins can assign sub-users.
Users
- Add User
To add a sub-user to the GDMS account, click on the Add Sub-user button and enter the following information:
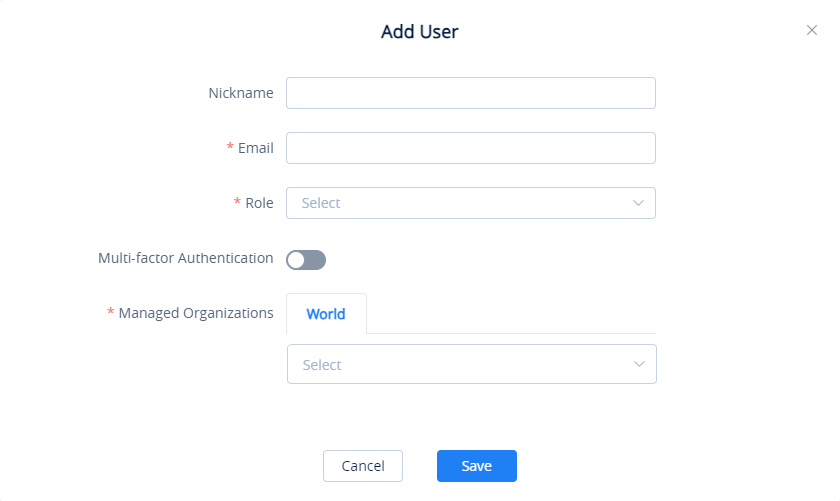
Nickname | Enter the display name of the user. |
Enter the email of the user. | |
Role | Select the role of the user. |
Multi-factor Authentication | Toggle on/off the multi-factor authentication. |
Managed Organizations | Select the organization (s) which the user can manage. |
Upon creating the sub-user, an activation email will be sent to the configured email address. The sub-user must click on the provided link to activate the account.
- Edit Subuser
To edit a verified sub-user’s role, click on the ![]() button for the desired sub-user and select the new role. The sub-user’s other information cannot be modified even by an administrator.
button for the desired sub-user and select the new role. The sub-user’s other information cannot be modified even by an administrator.
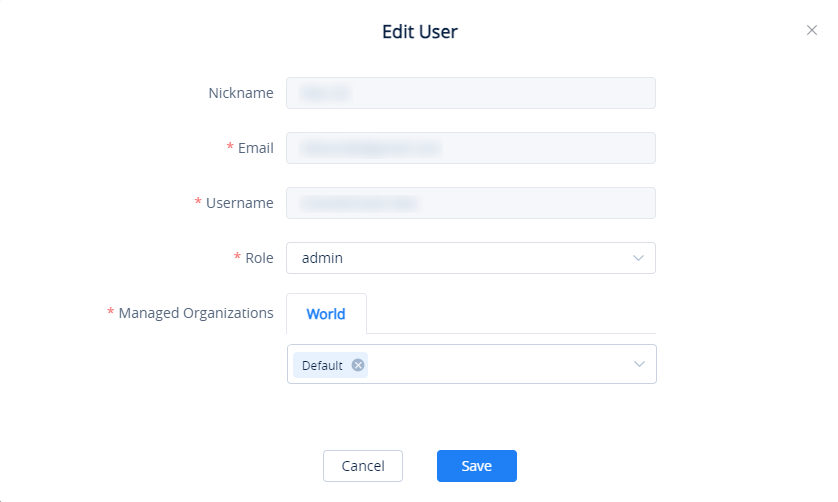
For unverified sub-users, administrators can modify the name, email address, and role. Additionally, they can send an account activation email to the configured email address.

To delete user accounts, click on the ![]() button for the desired user. Deleted users cannot log into GDMS.
button for the desired user. Deleted users cannot log into GDMS.
Role
- Add Role
To add a role with specific privileges, click on the Add Role button at the top right of the User Management 🡪 Role page and enter the following information:
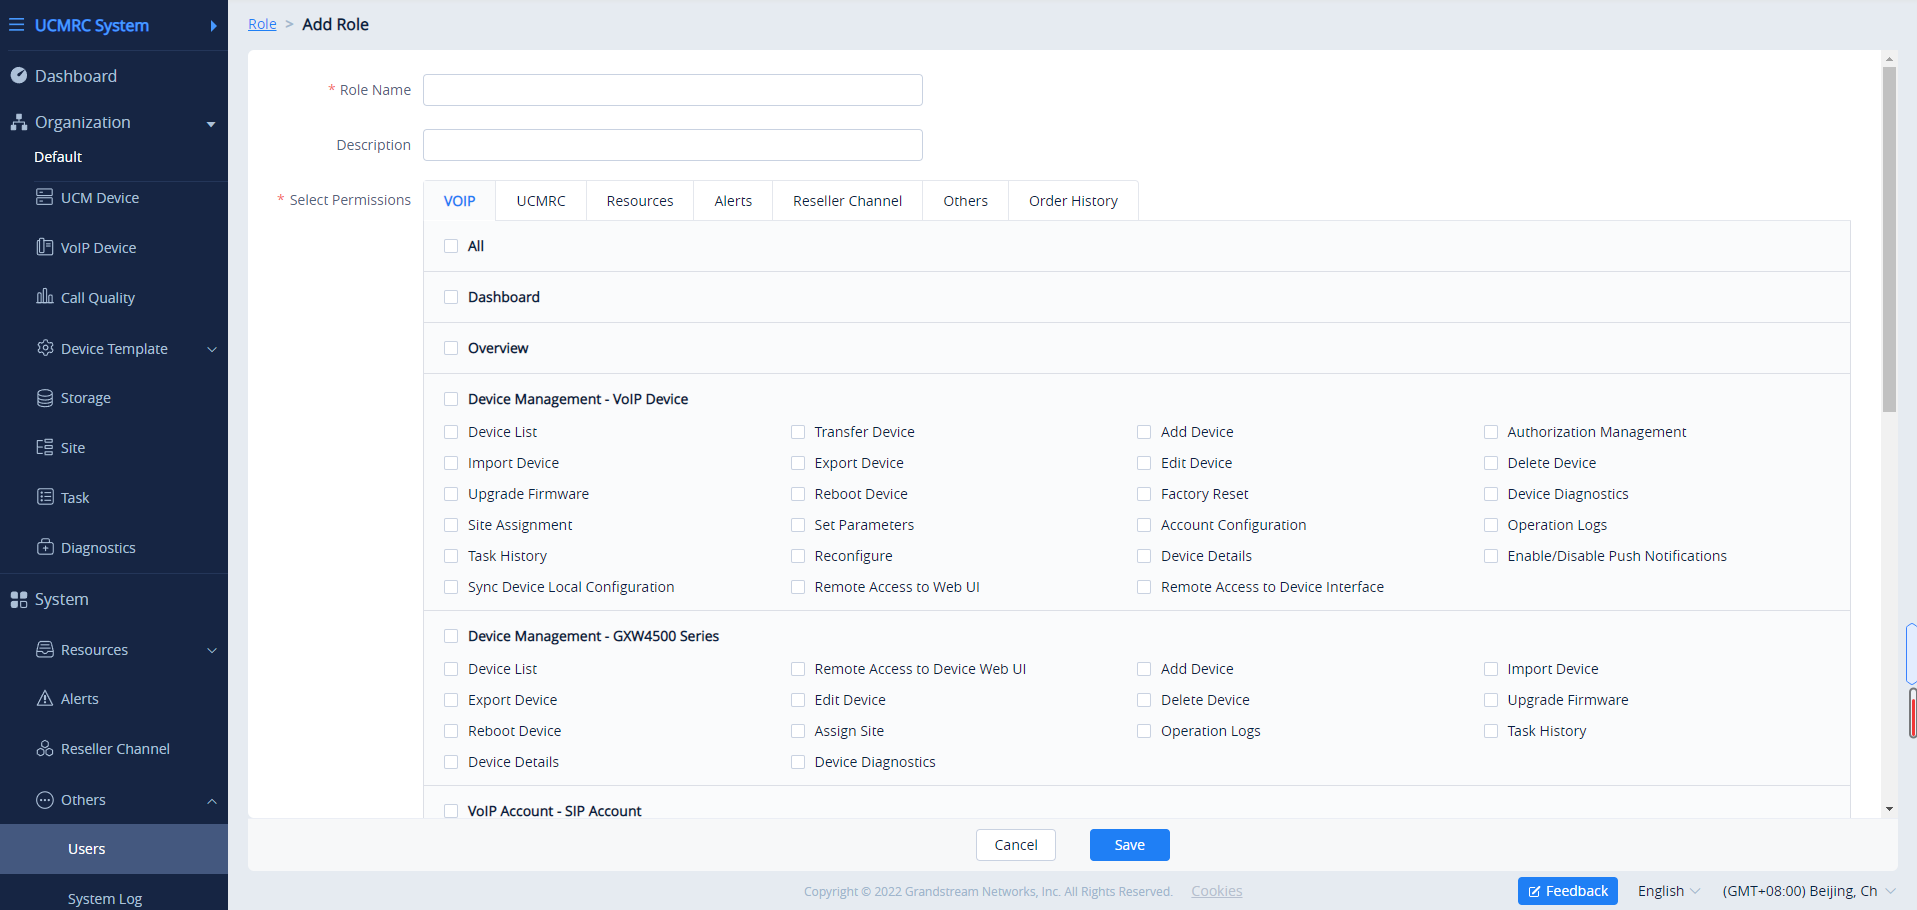
|
Role Name |
Users need to input the name of the role in this field. |
|
Description |
Users need to input the description of the role in this field. |
|
Select Permissions |
Users need to select the privileges of the role. |
To edit a role’s name, description, and privileges, click on the ![]() button for the desired role.
button for the desired role.
To delete a role, click on the ![]() button for the desired role. If the role includes some sub-users accounts, the role cannot be deleted.
button for the desired role. If the role includes some sub-users accounts, the role cannot be deleted.
User Settings
The user can customize his/her settings when logged into the account. To access the settings of the account, the user must click on the name of the account on the top right corner, then select User Settings.
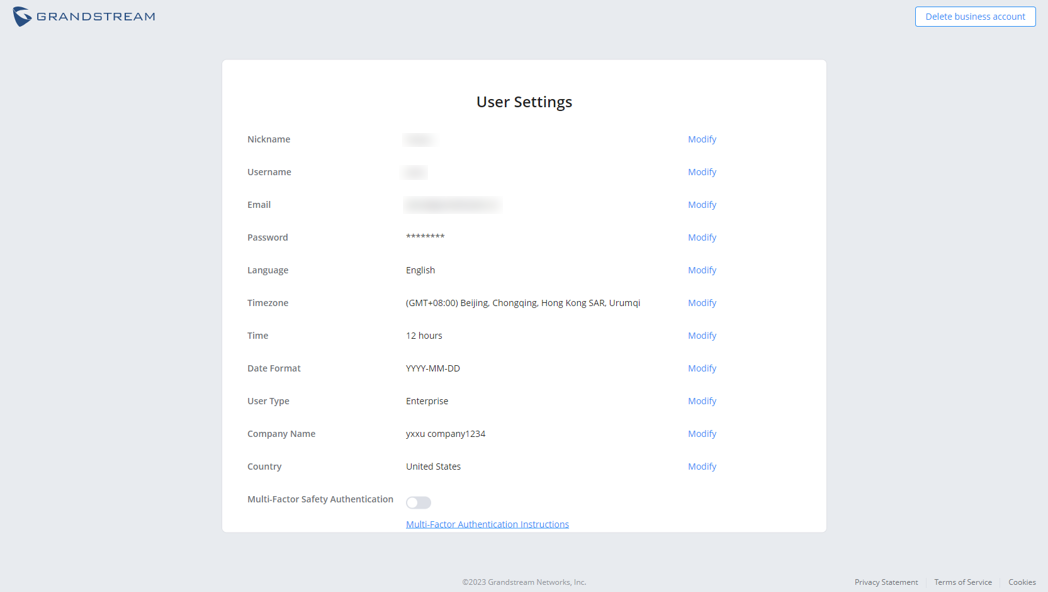
Nickname | The display name of your account. Click "Modify" to modify your nickname. |
Username | The name used to log into Grandstream Cloud Platform. Click "Modify" to modify your username. |
Email | The email bound to the account created. Click "Modify" to modify your email. |
Password | The password is hidden and cannot be viewed in clear text. This option allows modification of the password only. Click "Modify" to modify your password. |
Language | The display language of the web GUI. Click "Modify" to modify your display language. |
Timezone | The timezone selected to display your time and date. Click "Modify" to modify your timezone. |
Time | The time format selected to display your time. Click "Modify" to modify your time format. |
Date Format | The date format selected to display your date. Click "Modify" to modify your date format. |
User Type | The type of the user selected. Click "Modify" to modify the type of the user. |
Company Name | The company name which is given using this account. Click "Modify" to modify the name of the company. |
Country | The country selected for the account. Click "Modify" to modify your country. |
Multi-factor Safety Authentication | Enable or disable Multi-factor authentication. |
User Settings
Sign Out
Log out of the account by clicking on the username on the top-right corner of the GDMS portal and clicking Sign Out.
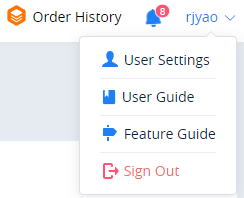
Delete GDMS Account
If the user does not want to use the GDMS platform to manage devices anymore, the user can delete the GDMS account and all sub-accounts of the enterprise.
- Click the “Personal Information” option on the name menu at the upper right corner of the main page to enter the personal information configuration page.
- Click the “Delete business account” button at the top of the page to delete the current GDMS account. If the enterprise GDMS administration account is deleted, all sub-accounts under the main GDMS account will also be deleted.
Multi-factor Authentication
The administrator can enable the multi-factor authentication for the associated user. To do that please navigate to Users section under System, then check the box next to the user for which you want to enable multi-factor authentication then click on “Enable Multi-Factor Authentication”.
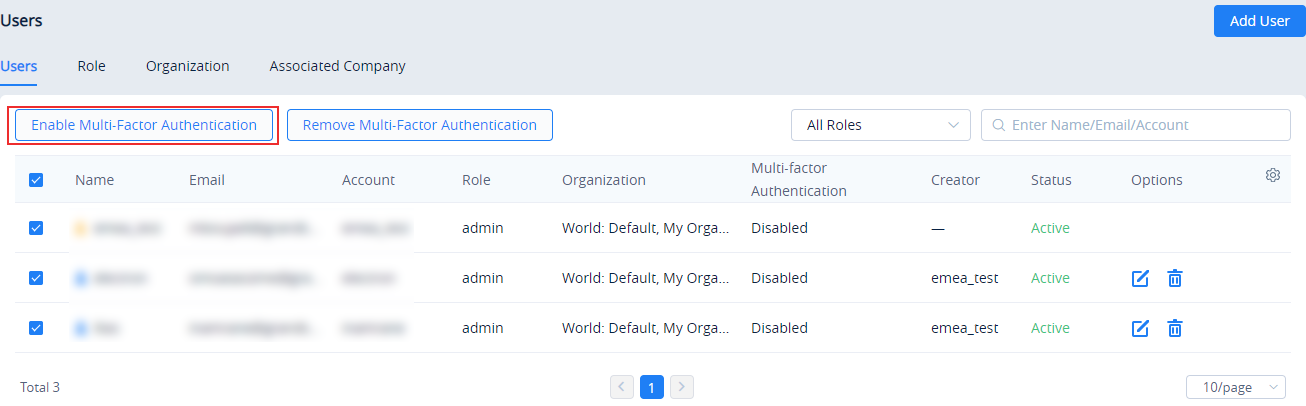
After the multi-factor authentication has been enabled, the users will receive an email to activate multi-factor authentication.
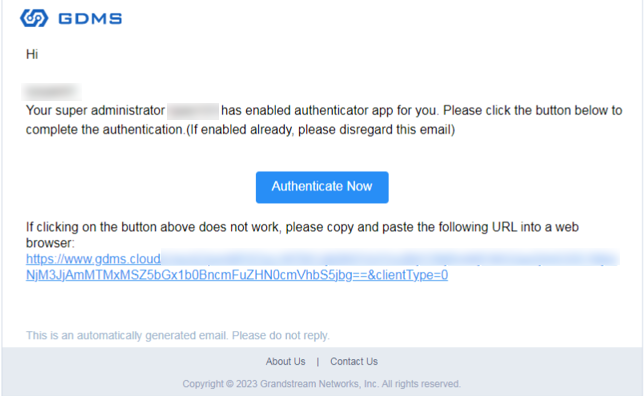
The user can click on “Authenticate Now” button to access the multi-factor authentication page. The sub-user can only log into his/her account after setting multi-factor authentication. Otherwise, the user will not be able to log in.
Account Security Settings
Under this tab, the administrator can control security settings related to the sub-user accounts. The administrator can set the security requirement for the sub-user accounts which he/she has created. This is to ensure that the sub-user accounts security is reinforced and lower the chances of getting the login credentials of the account from being compromised.
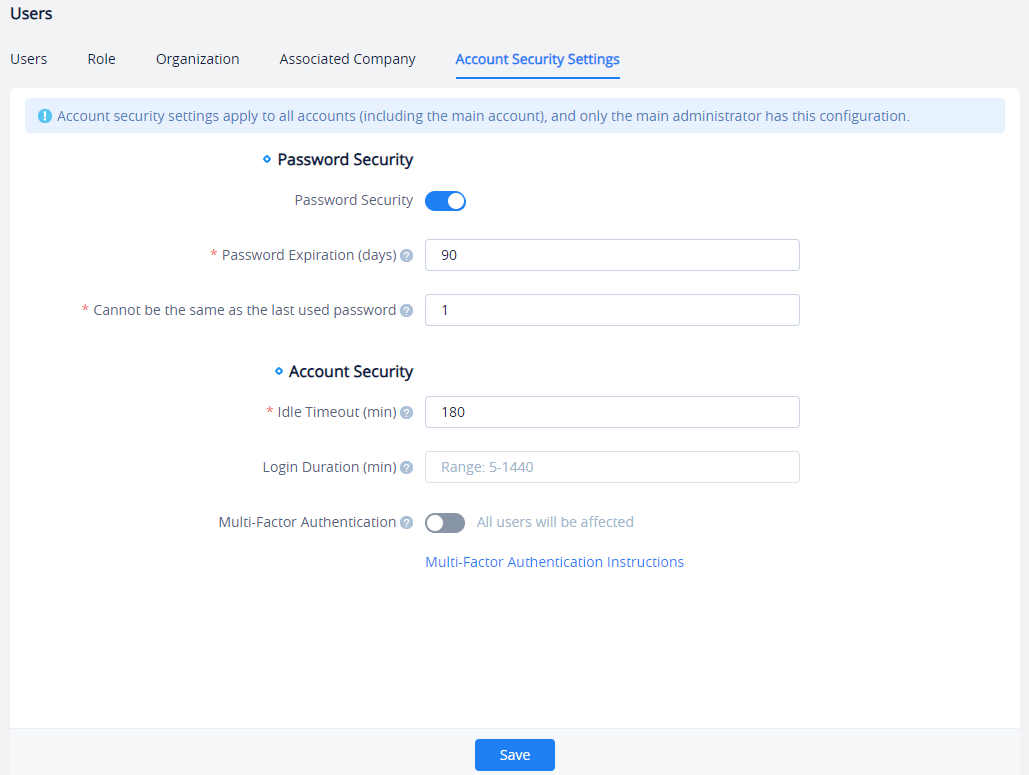
Password Security | Toggle on/off the password security. |
Password Expiration (days) | Specify the number of days of validity of a password. Once the number of days configured has elapsed, the user will be prompted to change his/her password upon login. |
No Repeating Passwords | Settings this option will prevent the user from using a password which he/she had previously used. You can set the number of previous passwords which have been used to prevent them from being used again as a new password. |
Idle Timeout (min) | This configures the number of minutes of a user being idle on the web GUI before he/she can be automatically logged out by the system. The user can enter a value from 5 to 1440 minutes. Configuring this value is required. |
Login Duration (min) | This configures the number of minutes a login session can last before the user is logged out automatically by the system. The user has to log in again to start after being logged out. Note: The user can enter a value between 5 and 1440 |
Multi-factor Authentication | If MFA is enabled, all accounts (including this account) will be required to use multi-factor authentication. This cannot be disabled by other users. If disabled, users will be able to toggle MFA for their own accounts. |
ASSOCIATED COMPANY MANAGEMENT
Users can add associated companies for management in the GDMS platform. After establishing the association relationship, users can select the associated companies and share the organizations with the associated companies for management. The associated companies are a way to centralize the management of the devices of many entities.
Add Associated Company
After adding the associated enterprise, the user can select the associated company and share the organization with the company
The user can obtain the binding address from the enterprise with which the user wants to establish the association relationship.
- The user can access Users > Associate Company page, and click the “Add Associated Company” button to add the associated company. Please see the screenshot below:
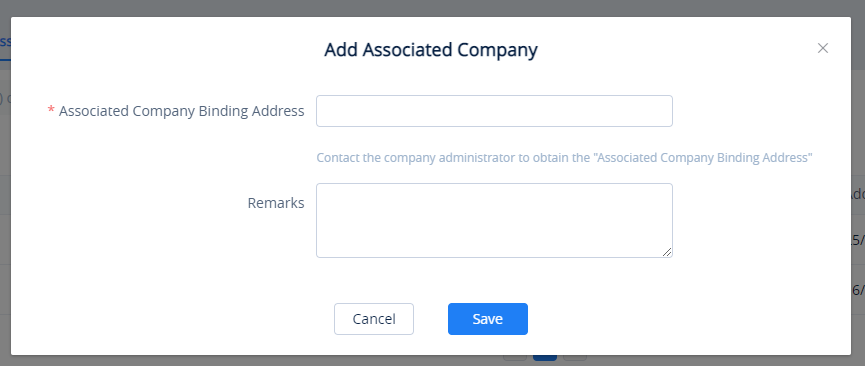
2. Enter the binding address of the associated company in the field “My Company Associating Address”.
3. Fill in the remarks of the associated company.
4. The user can click the “Save” button to add the associated company. Once done, the user can view the associated company name, remarks, and association time on the “Associated Companies” list. Please see the screenshot below:
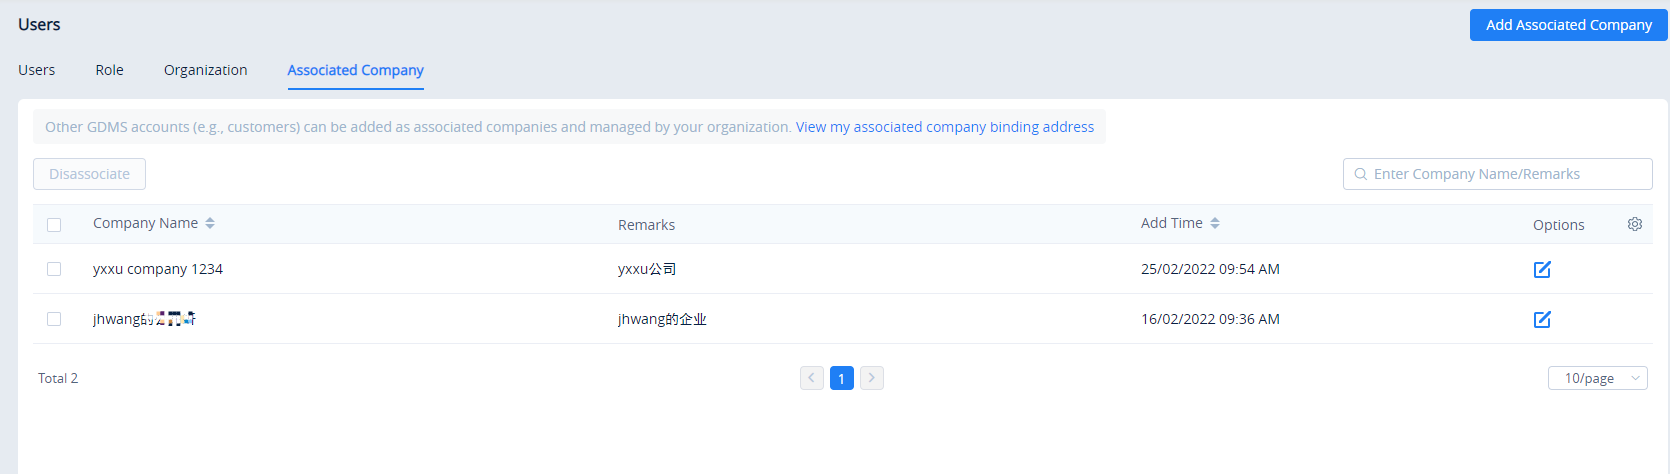
Edit Associated Company
On the “Associated Company” list, the user can click the button ![]() to access the “Edit Associated Company” interface to modify the remarks of the associated company.
to access the “Edit Associated Company” interface to modify the remarks of the associated company.
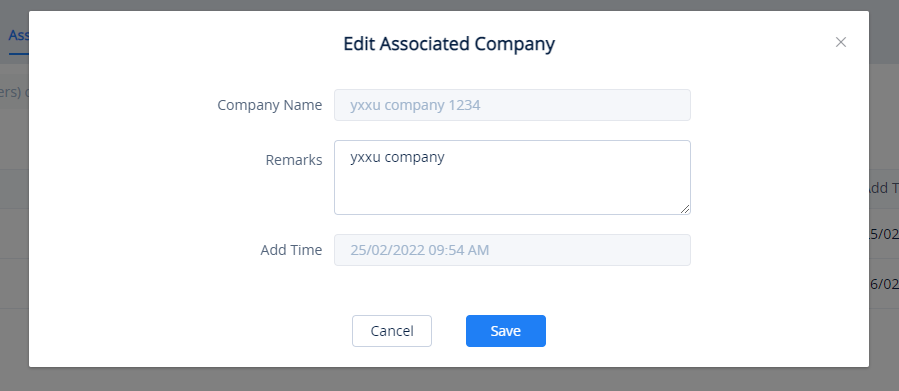
Disassociate Company
If the user wants to disassociate the relationship with the associated company, the user can select the enterprise and click the button ![]() to disassociate the association relationship.
to disassociate the association relationship.
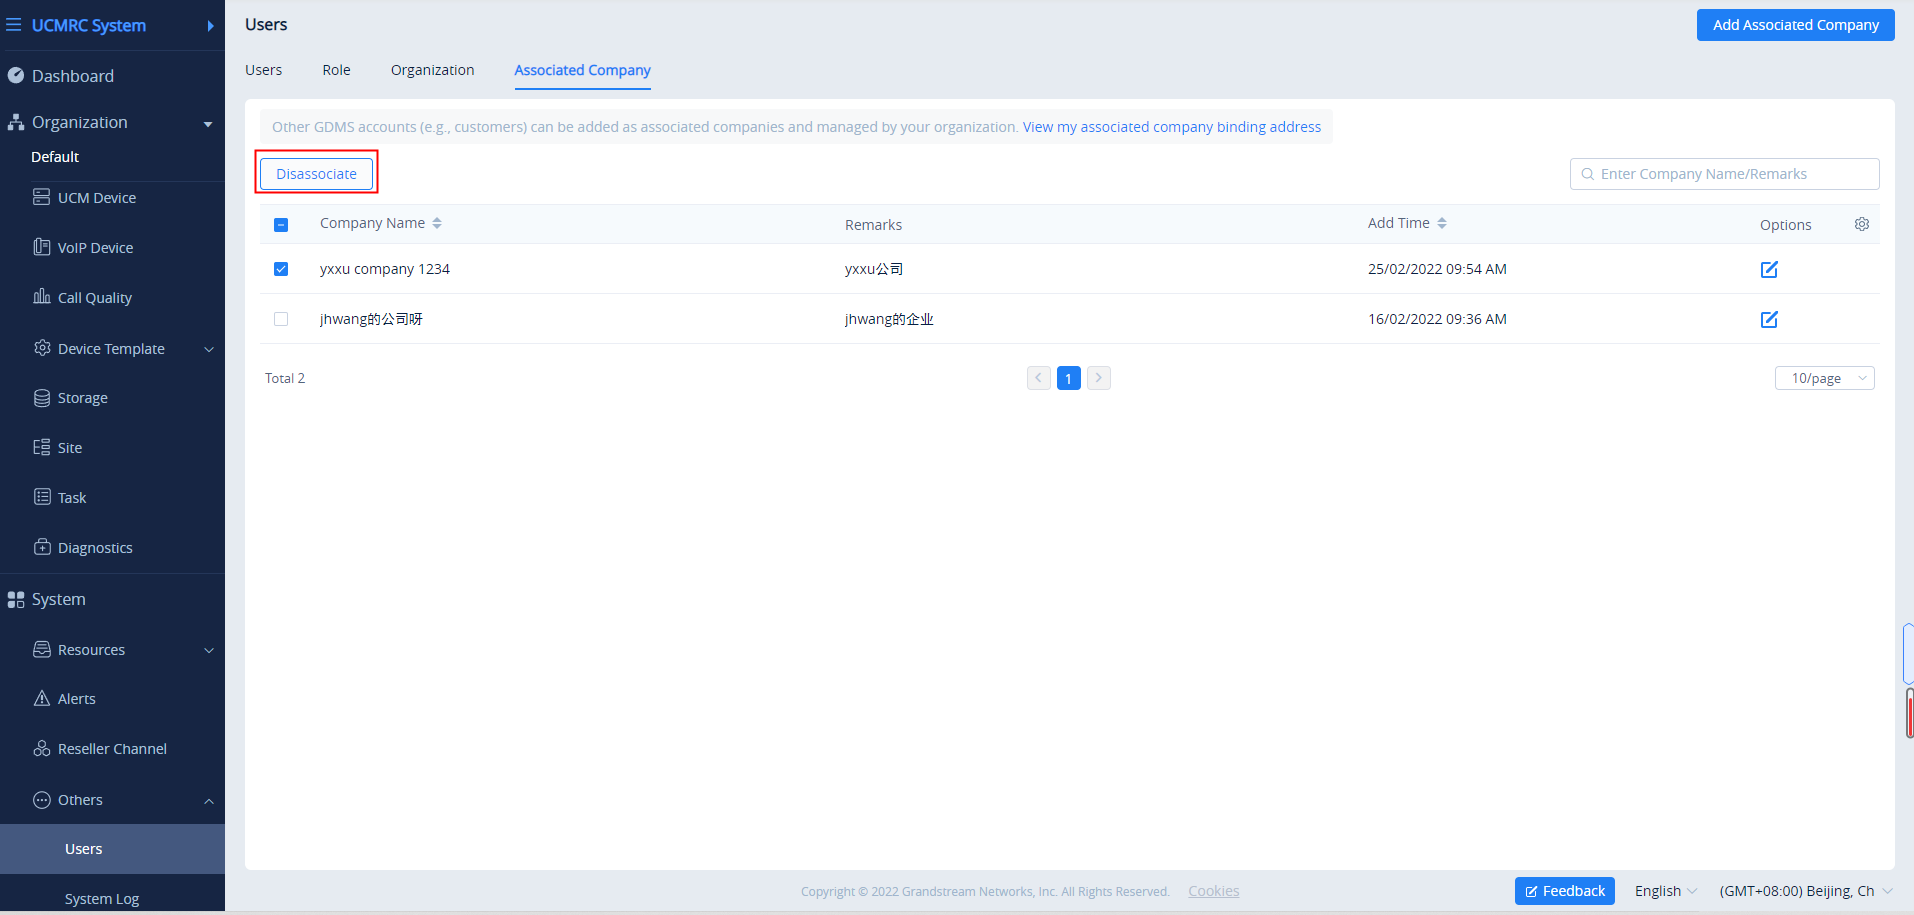
ORGANIZATION MANAGEMENT
If users want to manage devices in multiple associated companies, users could create multiple organizations (such as customer enterprises, sub-companies), and assign the devices to multiple users to manage separately. The devices, SIP accounts, and other parameters are separated between different organizations. The data in a specific organization can only be viewed and managed by the administrator who has permission.
All devices and data are in the “Default” organization by default.
Multiple organizations and administrators:
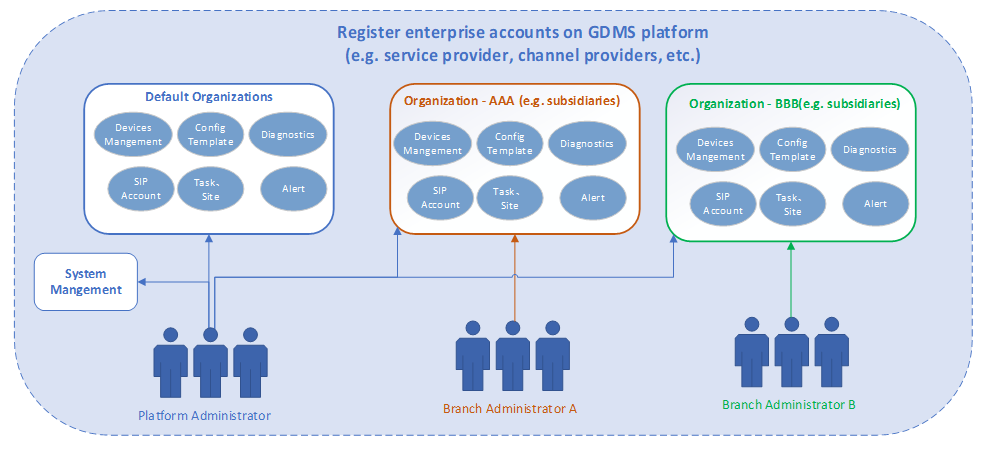
Switch Organization
If the user has permissions for multiple organizations, the user could switch to manage different organizations.
- Click the drop-down box of the Organizations menu at the upper left corner of the page to select the organization the user wants to manage.
- After switching the organization, the user only could view/edit the Device, SIP Account, Template, and other data under the organization.
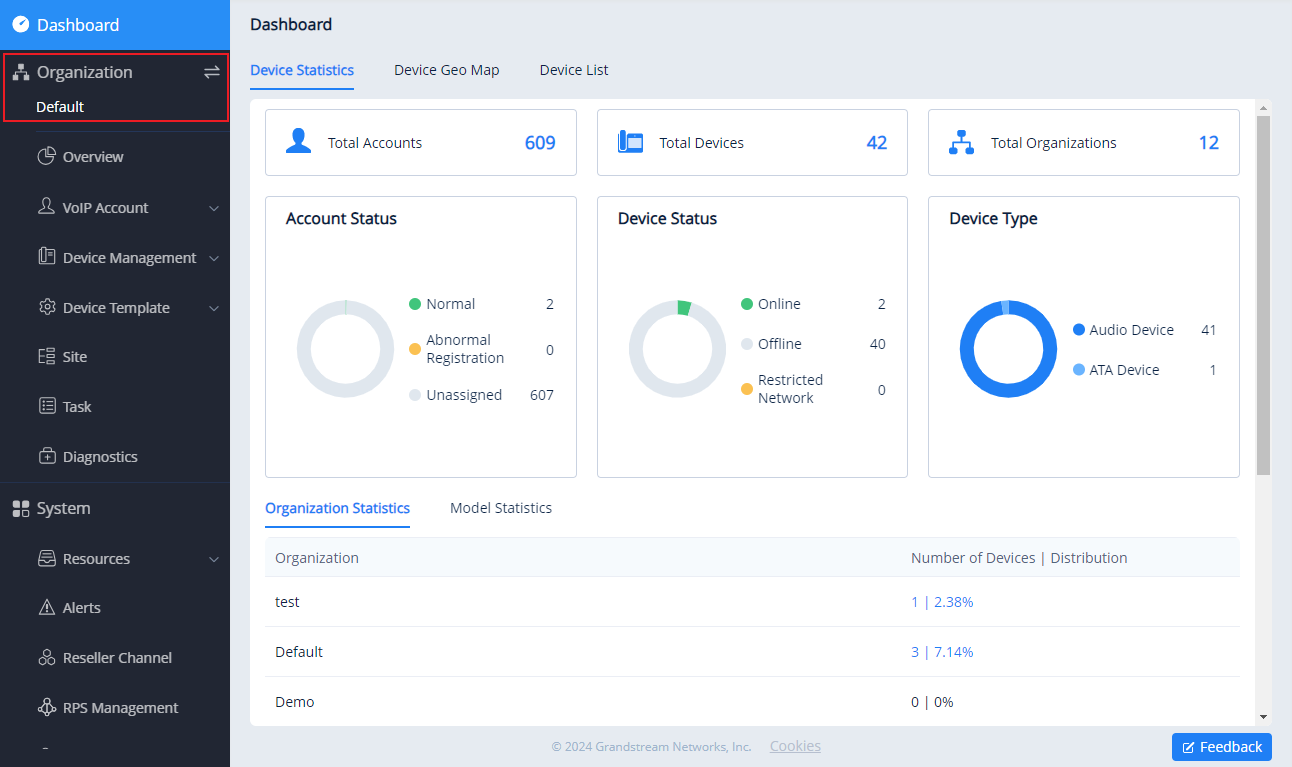
Add Organization
The user could create an organization if the user has permission.
- On the menu at the right side of the page, under System category, select the tab Users, and select the Organization tab, click the “Add Organization” button at the upper right corner.
- Fill in the information of the organization as shown in the following figure:
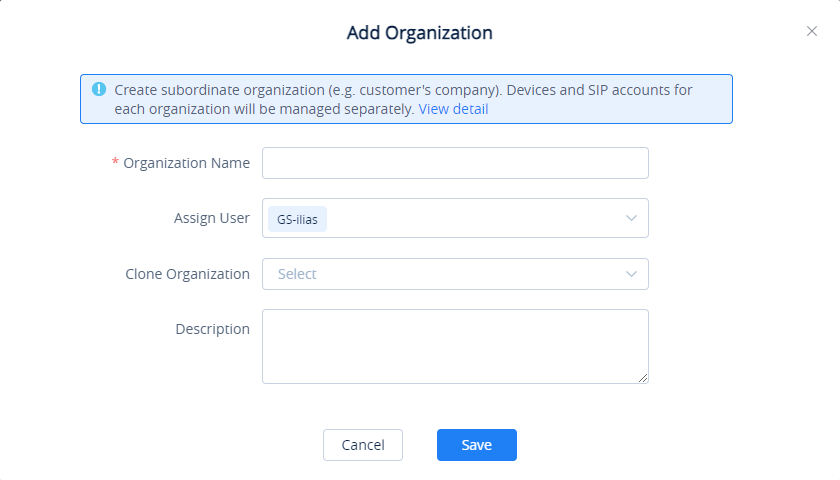
Organization Name | Input the name of the organization. |
Assign User | Select the users who will have permission to manage the organization. |
Clone Organization | This is used to select to copy data from other organizations, the data include SIP accounts, model templates, group templates, sites, etc. When the organization is created successfully, the data under the specific organization will be copied to the current organization. |
Description | Input detailed descriptions of the organization. |
Add Organization
- Click the Save button to save the organization in the GDMS platform.
- The system will switch to the newly created organization by default, and the user could add devices to the newly created organization for management.
Edit Organization
Users could edit the organization’s information at any time.
- On the menu at the right side of the page, select System management 🡪 User Management, and select the “Organization” tab to view all organizations under the account.
- Click on the button following the organization name to access the editing page. The user could edit the organization name, the administrator of the organization, and descriptions, as the figure shows below:
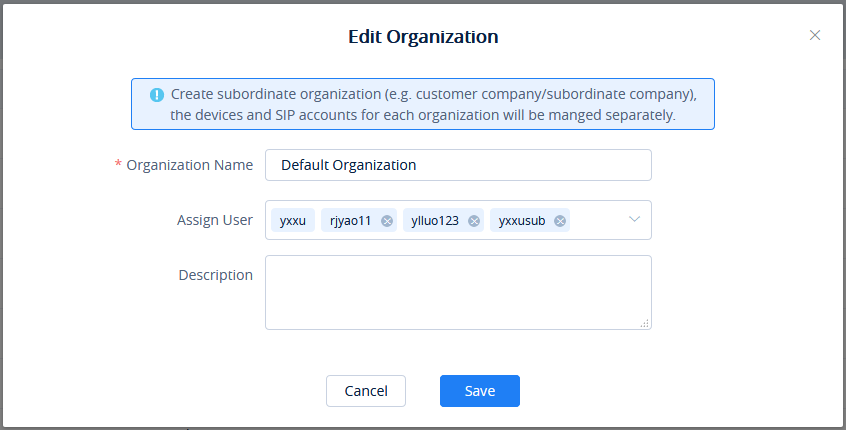
Delete Organization
- On the menu at the right side of the page, select System management 🡪 User Management, and select the “Organization” tab to view all organizations under the account.
- Click on the Delete button following the organization name, the organization will be deleted completely after confirmation, including the SIP accounts, templates, tasks, diagnostics histories, and other data under the organization.
Share Organization
The user can select to share the organizations with the associated enterprises. There are 2 methods of sharing permissions: Co-management and Authorized Management.
- On the “Organization” management interface, the user can select the organization that the user wants to share with another enterprise for management and click the button to access the “Share” organization interface. Please see the screenshot below:
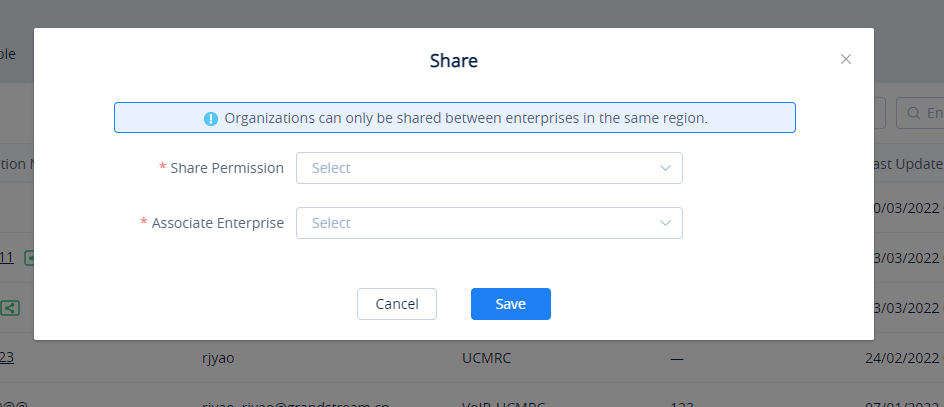
Share Permission | There are 2 methods of sharing permissions to another enterprise: Co-management and Authorized Management. Co-management: After sharing the organization, the user can manage the organization with the associated enterprise together. The associated enterprise can manage all devices in the shared organization and view the related data. Notes:
Authorized Management: After sharing the organization to the associated enterprise, the user can fully authorize the management permissions to the associated enterprise for management, and the user does not have permission to manage this organization anymore. Note:
|
Associate Enterprise | The user needs to select the associated enterprise with which the user wants to share the organization. |
Share Organization
2. The user can select the “Share Permission”: “Co-management” or “Authorized Management”.
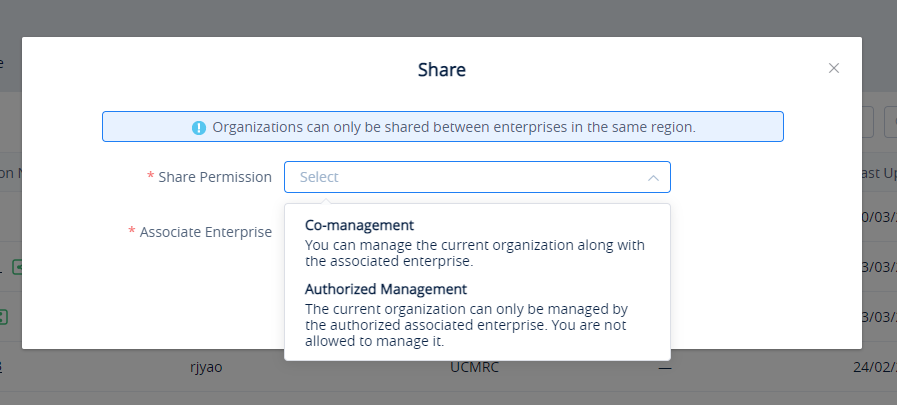
3. Select the associated enterprise to which the user wants to share the organization.
4. After clicking the “Save” button, the selected organization will be shared with the selected associated enterprise.
5. After the operation steps above, the user can view the organizations which were shared with other associated enterprises and shared with other associated enterprises on the “Organization” list. Please see the screenshot below:
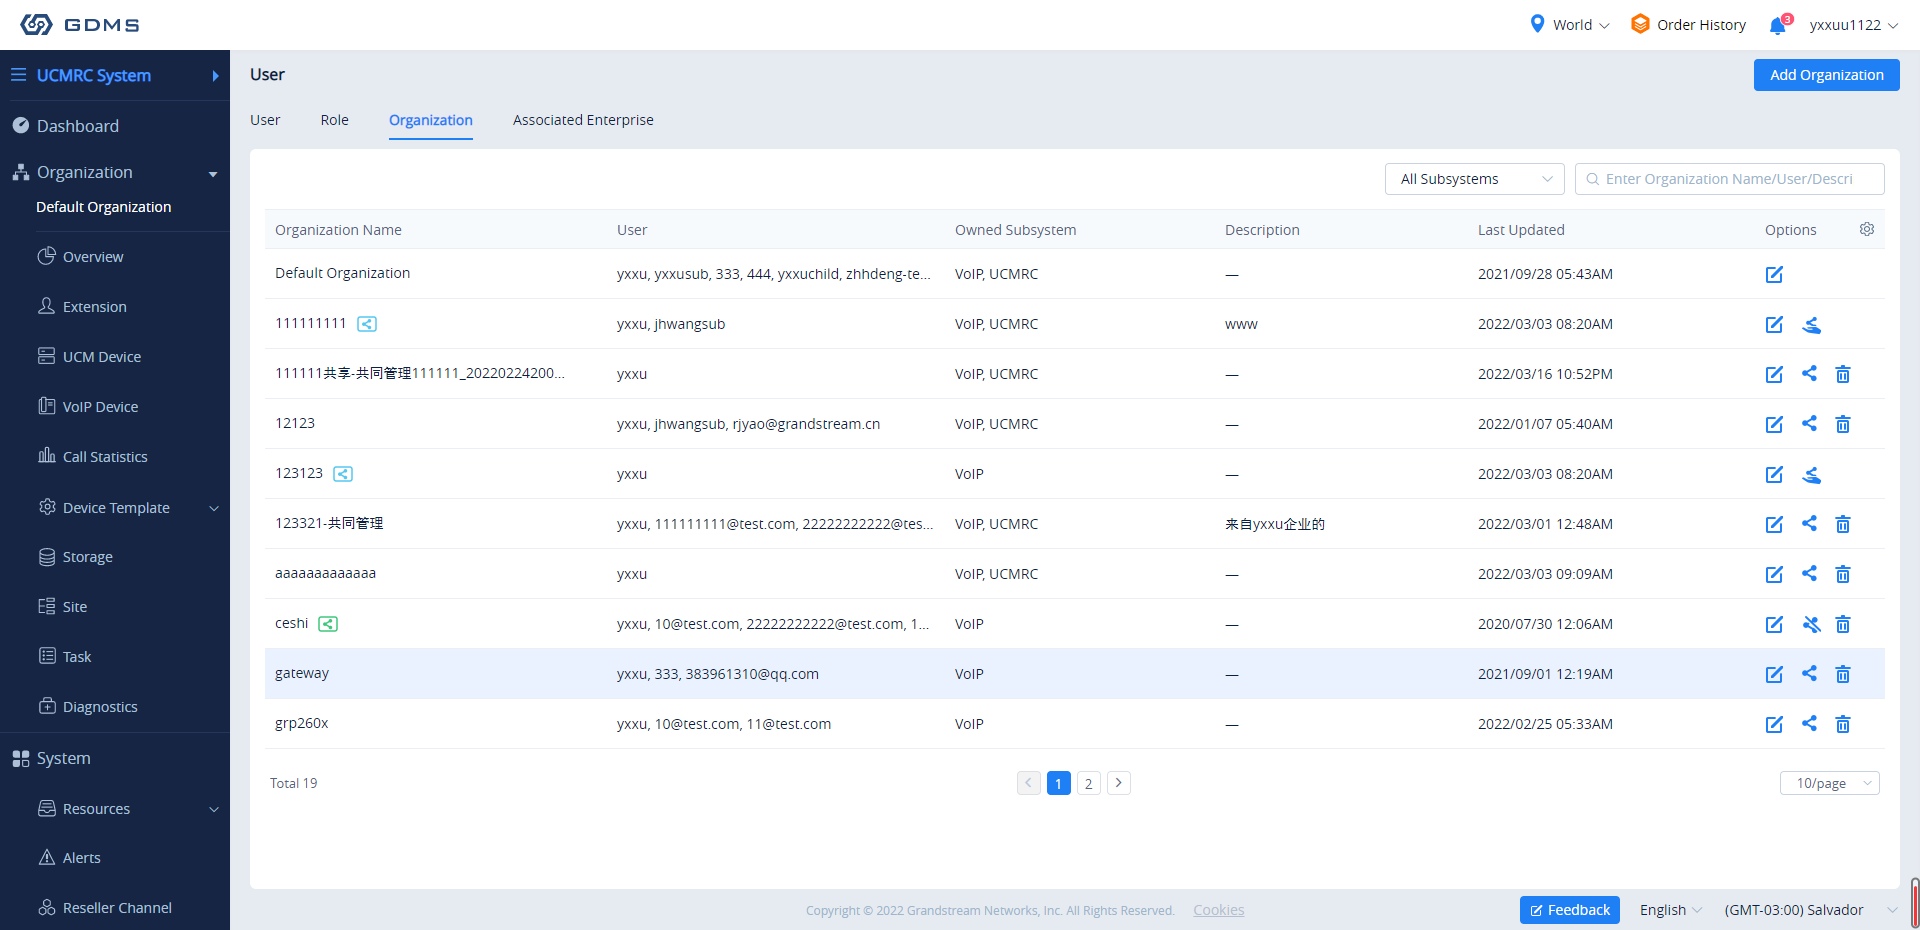
![]() : The label indicates the organization has been shared with another associated enterprise for management together.
: The label indicates the organization has been shared with another associated enterprise for management together.
![]() : The label indicates the organization is shared with another associated enterprise for management together.
: The label indicates the organization is shared with another associated enterprise for management together.
Cancel Sharing Organization
The user can cancel sharing the organization with the associated enterprise.
- On the “Organization” list, the user can select the organization with which the user wants to cancel sharing with the associated enterprise and click the button to cancel sharing with the organization. Please see the screenshot below:

2. After canceling sharing the organization, the user will get the organization management permission back, and the associated enterprise cannot manage this organization anymore.
Return Organization
After receiving the shared organization, the associated enterprise can return the management permission to the user.
On the “Organization” list, the user can view the received shared organizations and select the organization to which the user wants to return it by clicking the button ![]() as the screenshot shows below:
as the screenshot shows below:
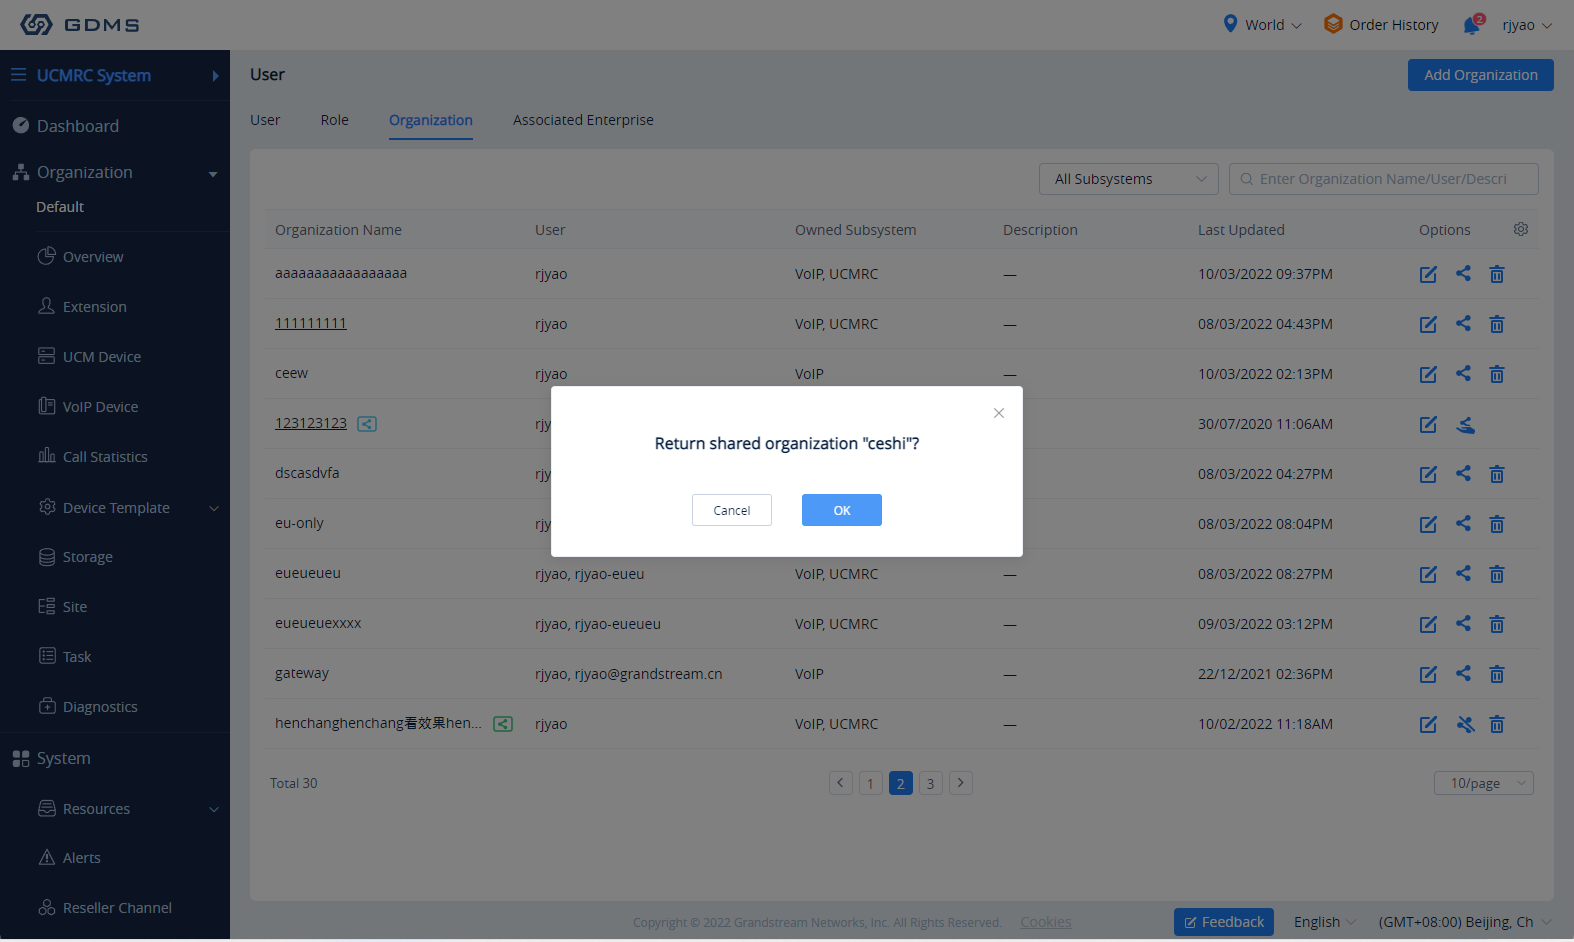
2. After returning the organization, the organization will be removed from the “Organization” list of the associated enterprise, and the associated enterprise will lose the management permission the organization.
Default Organization
The user can select one organization to be the default organization. This organization will be selected by default when logging into the GDMS platform or when adding a new device. To set a specific organization as the default organization, please navigate to Users > Organization, the click on the button “Default Organization”.
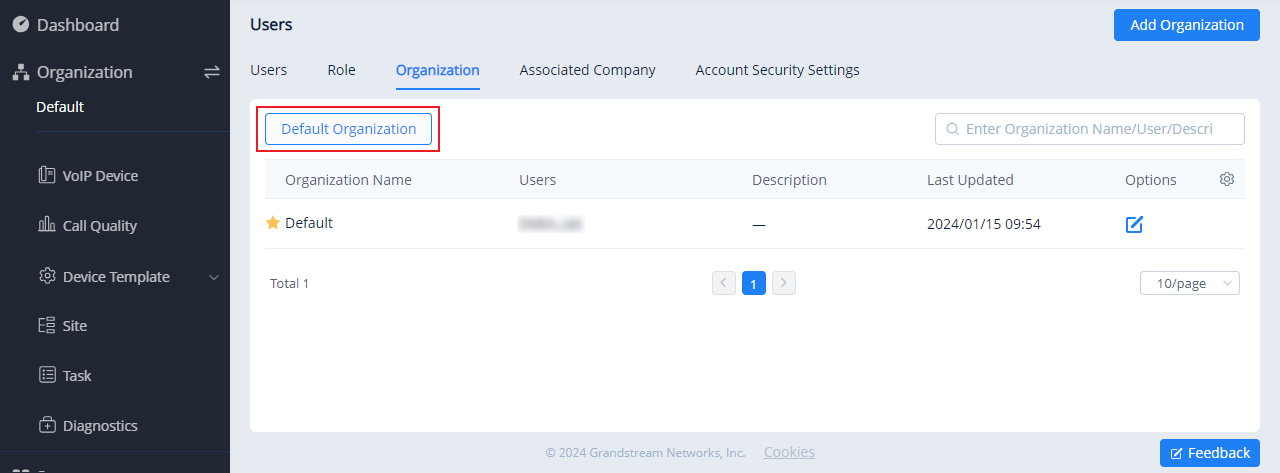
Then from the list of organizations, please choose the organization which you want to make as the default organization.
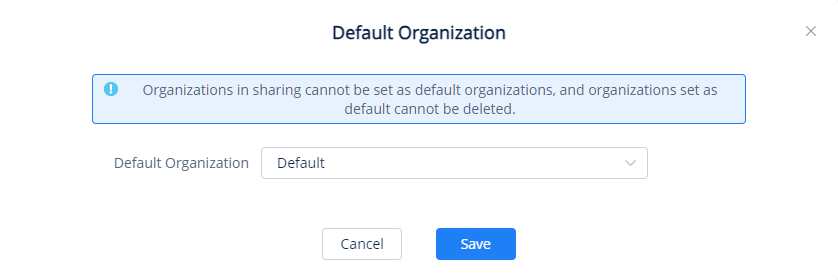
SYSTEM LOG
Users could view all operation logs of the system, including the login/logout logs of the user, adding new devices, deleting devices, adding SIP accounts, deleting SIP accounts, firmware upgrading/downgrading logs, updating configuration files for devices, devices factory reset logs, devices diagnostics logs, creating model template logs, etc.
On the menu at the right side of the page, select System management 🡪 System Log, and users could view all operation logs of the system. Users could also search the operation logs by level, operation contents, operators, and time.
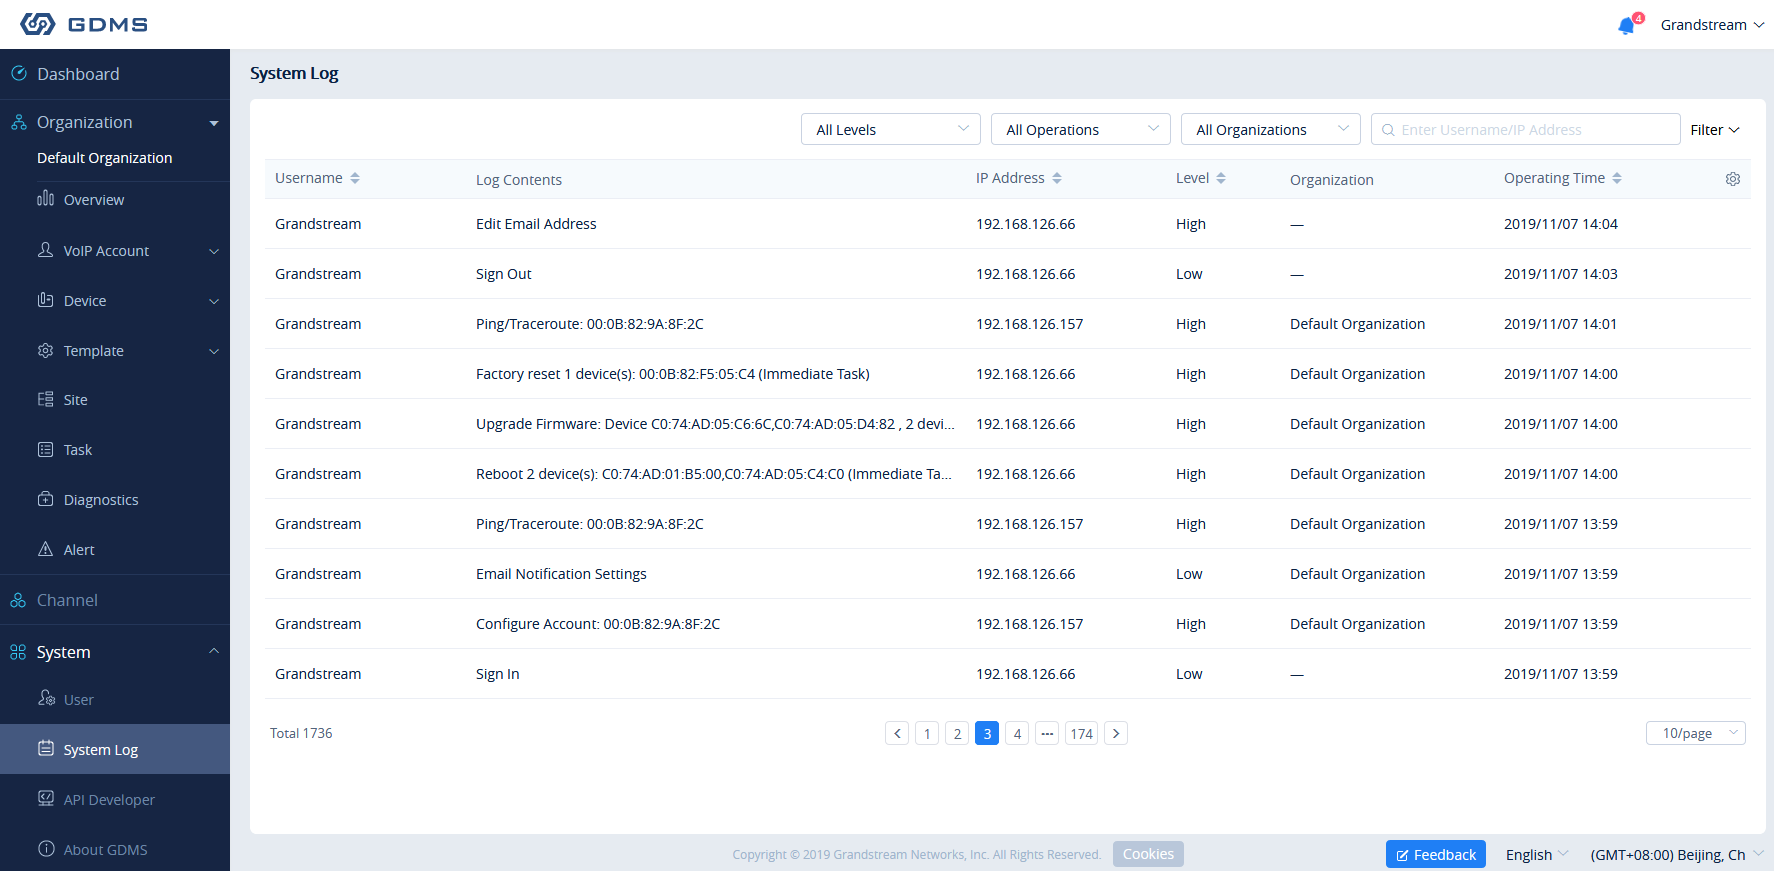
PLAN & SERVICES
Users can click on the button ![]() in the top right corner to view UCM RemoteConnect plans and the services offered with each plan. When the user clicks on
in the top right corner to view UCM RemoteConnect plans and the services offered with each plan. When the user clicks on ![]() he/she will be able to view general information about the types of purchased plans.
he/she will be able to view general information about the types of purchased plans.
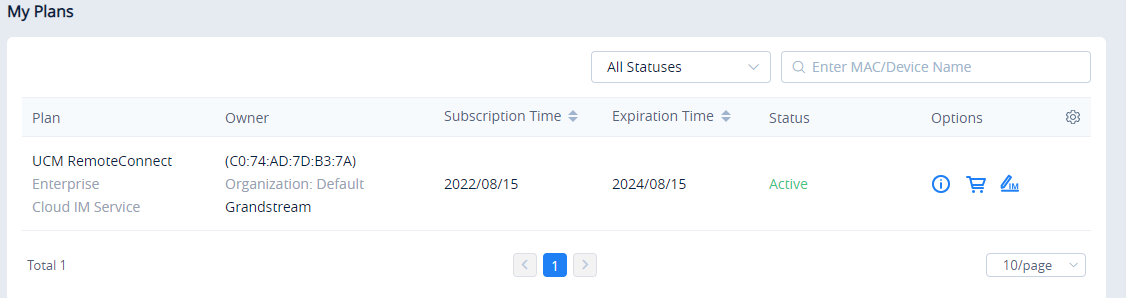
- To view the history of all purchases, the user should click on
 .
. - To ask for help to purchase a RemoteConnect plan, the user should click on .
- To edit Cloud IM settings, the user should click on
 .
.
By hovering over with the mouse pointer and clicking on ![]() you will access the UCM RemoteConnect website, on which the user can find all the details of the services provided by RemoteConnect.
you will access the UCM RemoteConnect website, on which the user can find all the details of the services provided by RemoteConnect.
UCM RemoteConnect Plan
- Supports only UCM63xx. When the user adds the UCM63xx device to the GDMS platform, the user can apply for a UCMRC advanced plan for a free trial.
- Complete NAT penetration mechanism. Users can use it directly without complicated configuration, so it can ensure the remote communication requirements through external networks (including Wave application in mobile phones/desktop clients for registration/communication through external networks).
- UCM Remote Management: There are 3 levels according to the plans, including View device information (e.g. Firmware version), SIP accounts synchronization, remote restarting UCM device, upgrading UCM, and remote access to the UCM Web UI.
- GDMS Cloud Storage service is provided with bonus cloud storage space. This is used for backup configuration files and user data for UCM.
- UCM data statistics report is provided and sent to the administrator through email.
- UCM Cloud IM Plan provides cloud IM communication services for UCM devices. After purchasing this plan, Wave users can use the cloud IM system, and the chat data will be stored in the cloud system.
UCM Cloud IM Service
UCM CloudIM Plan provides cloud IM communication services for UCM devices. After purchasing this plan, Wave users can use the cloud IM system, and the chat data will be stored in the cloud system.UCM Cloud IM service is an add-on service of the UCM RemoteConnect plan, and it provides cloud IM communication services for UCM devices. After purchasing a UCMRC plan that contains the Cloud IM service, the Wave user can use the cloud IM system, and the chat data will be stored in the cloud system.UCM CloudIM Plan provides cloud IM communication services for UCM devices. After purchasing this plan, Wave users can use the cloud IM system, and the chat data will be stored in the cloud system.
- Supports unified communication across multiple UCM devices in different regions.
- Provides cloud communication service with high performance, large storage, and multi-function.
- Starts to use UCM CloudIM service, which is not limited by the performance and storage space of UCM devices. Phone calls and messages are not affected by each other.
Enable Service
Prerequisite: The UCM plan contains the permission for this function.
- The user can click the button
 to access the “My Plans” list, select a UCM RemoteConnect plan which contains the Cloud IM service, and enable the Cloud IM service on the GDMS platform.
- The user can click the button
 to access the “Edit Cloud IM” interface. Please see the screenshot below:
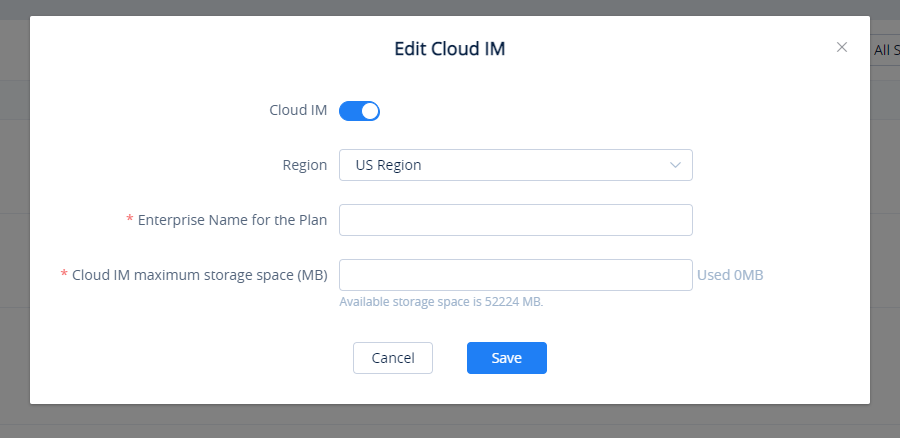
Enable Cloud IM | After purchasing a UCMRC plan that contains the Cloud IM service, the user needs to enable the Cloud IM service on the GDMS platform. Note: If the user wants to disable the Cloud IM service which is currently in use and will no longer use it, the data in the Cloud IM server will be cleared after disabling it. |
Region | US Region / EU Region Note:
|
Enterprise Name | The user can customize the name of the enterprise which will use the Cloud IM service. |
Cloud IM Maximum Storage Space | The user can edit the maximum available storage space for the Cloud IM service. Note:
|
Edit Cloud IM
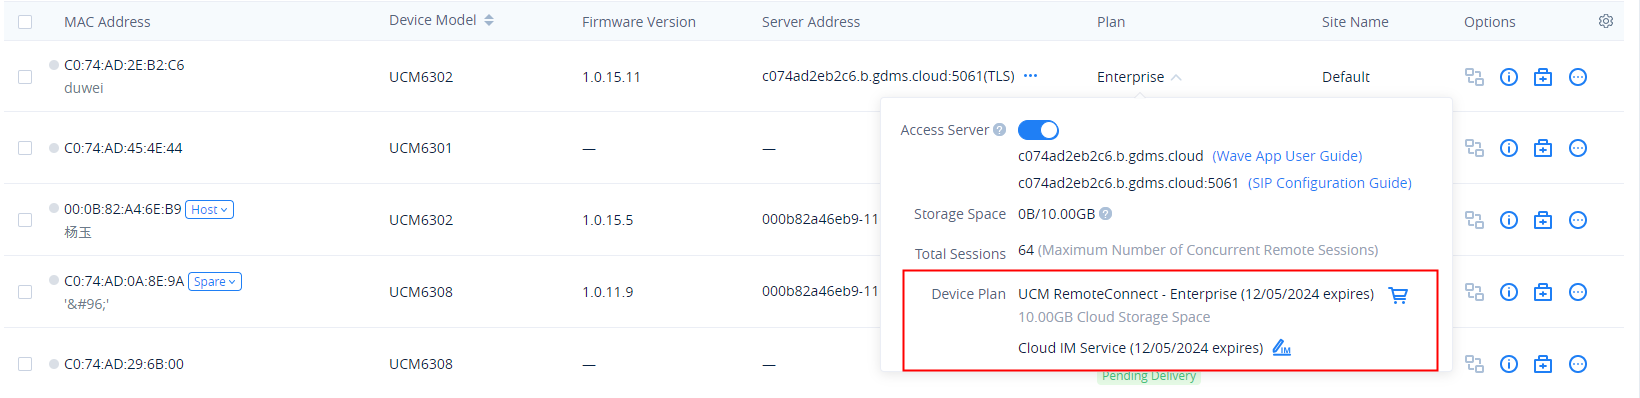
3. Click the “Save” button to get the UCM Cloud IM Service, and the user can view the Cloud IM service domain name, service ID, and Key.
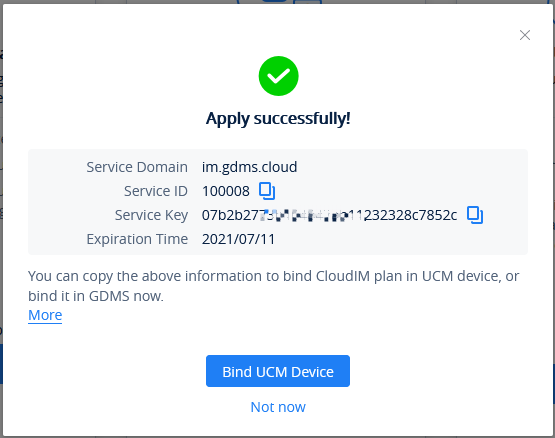
4. The user can quickly bind the UCM device for the Cloud IM service so that the UCM device can start to apply the Cloud IM service quickly.
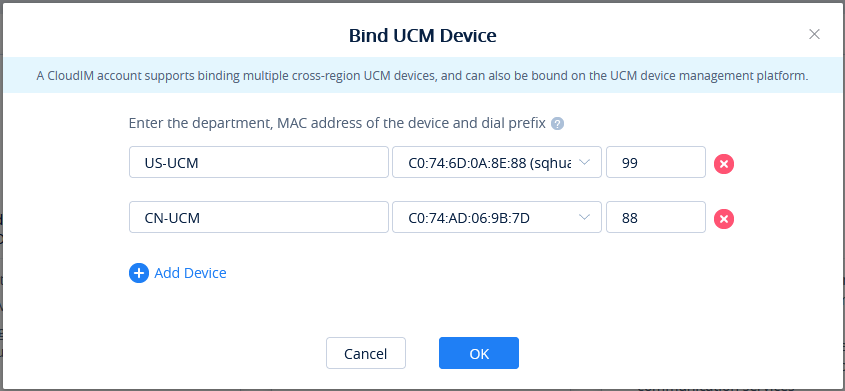
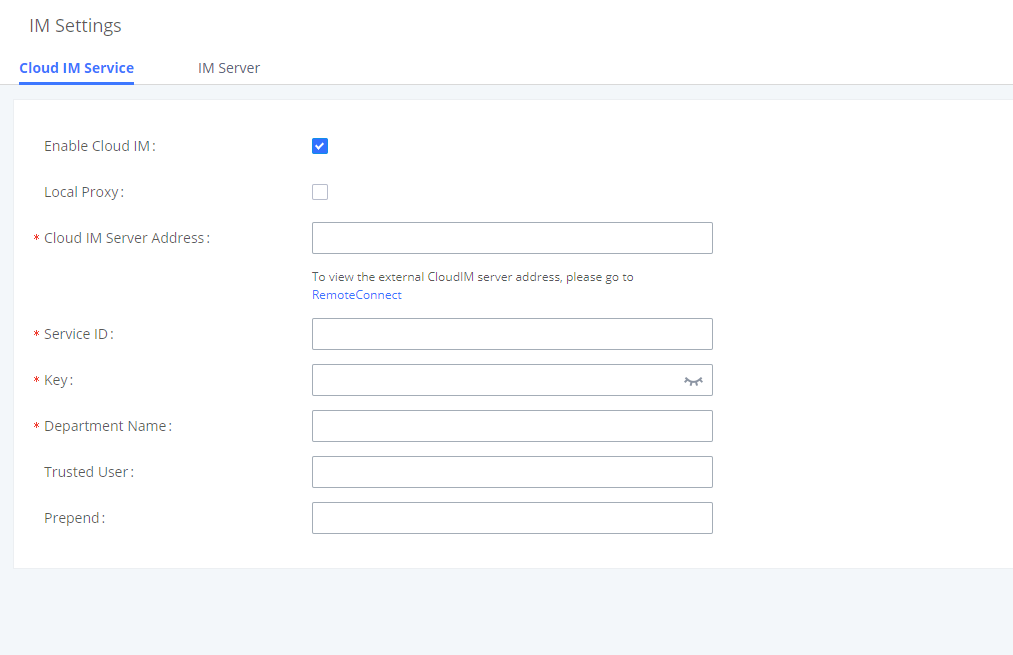
- The bound UCM device also needs the UCMRC plan which contains the Cloud IM service.
- For the Cloud IM service in the UCMRC plan free trial, when the free trial expires, the user cannot use the Cloud IM service on the GDMS platform, and if the user wants to use the UCM device data in the Cloud IM service in the UCMRC plan free trial, the user needs to transfer the data to the newly purchased Cloud IM service.
View UCM CloudIM Plan Service ID and Key
In “My Plan” interface, find the UCM CloudIM plan, click the icon ![]() to view the service domain name, service ID, and Key of this plan.
to view the service domain name, service ID, and Key of this plan.

Manage Bound UCM Device
- In My Plan interface, find the UCM CloudIM plan, click the icon
 .
.

- View the UCM devices which are bound to the UCM CloudIM plan. It allows users to add/delete devices. Please see the screenshot below:
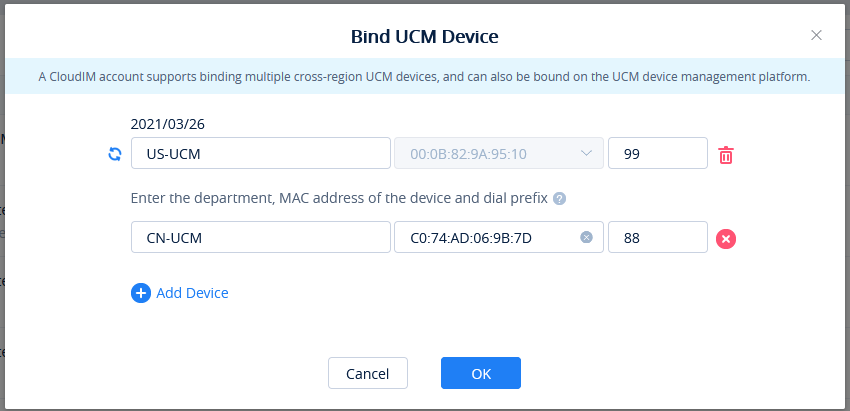
Department Name | Enter the name of the department using this IPPBX device so that the contact details in the Wave application can be viewed. |
UCM MAC Address | Enter the MAC address of the IPPBX that uses the UCM CloudIM plan. It only supports the IPPBX devices which have been associated with the GDMS platform. Note:
|
Dial Prefix | The dial prefix required to dial this IPPBX device must be the same as the trunk dial prefix configured in the IPPBX. Please refer to the UCM &GCC Administration Guides for more details. For example, there are IPPBX A, IPPBX B, and IPPBX C. If the configured prefix of IPPBX B and C to dial A is 99 (configured trunk), then when the user adds IPPBX A, the user needs to configure the dial prefix to 99. |
Edit Enterprise Name
- In My Plan interface, find the UCM CloudIM plan, click the icon
 .
.

- The user can modify the name of the enterprise, and the new name will be applied immediately.
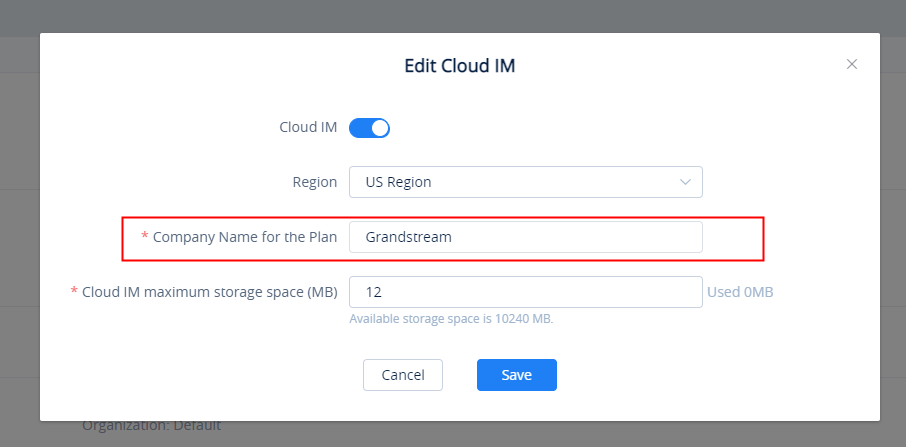
Cloud IM Maximum Storage Space
- In the “My Plans” interface, find the UCM Cloud IM Service, and click the icon .

2. The user can modify the maximum storage space of the Cloud IM service. The configured Cloud IM service usage storage space must be smaller than the currently available storage space and larger than the currently used storage space.

IM File Limit
The user can set the maximum limit size of the file that the user can send at one time. To set the limit, please refer to the screenshot below.

- Chat File Limit (MB): The single file size limit in the Wave instant chat. The size limt is between 10MB and 100MB.
It also cannot be greater than the total size of Cloud IM Maximum Storage Space.
Synchronize UCM Data in Cloud IM Service Free Trial
For the Cloud IM service in the UCMRC plan free trial, when the free trial expires, the user cannot use the Cloud IM service on the GDMS platform, and if the user wants to use the UCM device data in the Cloud IM service in the UCMRC plan free trial, the user needs to transfer the data to the newly purchased Cloud IM service.
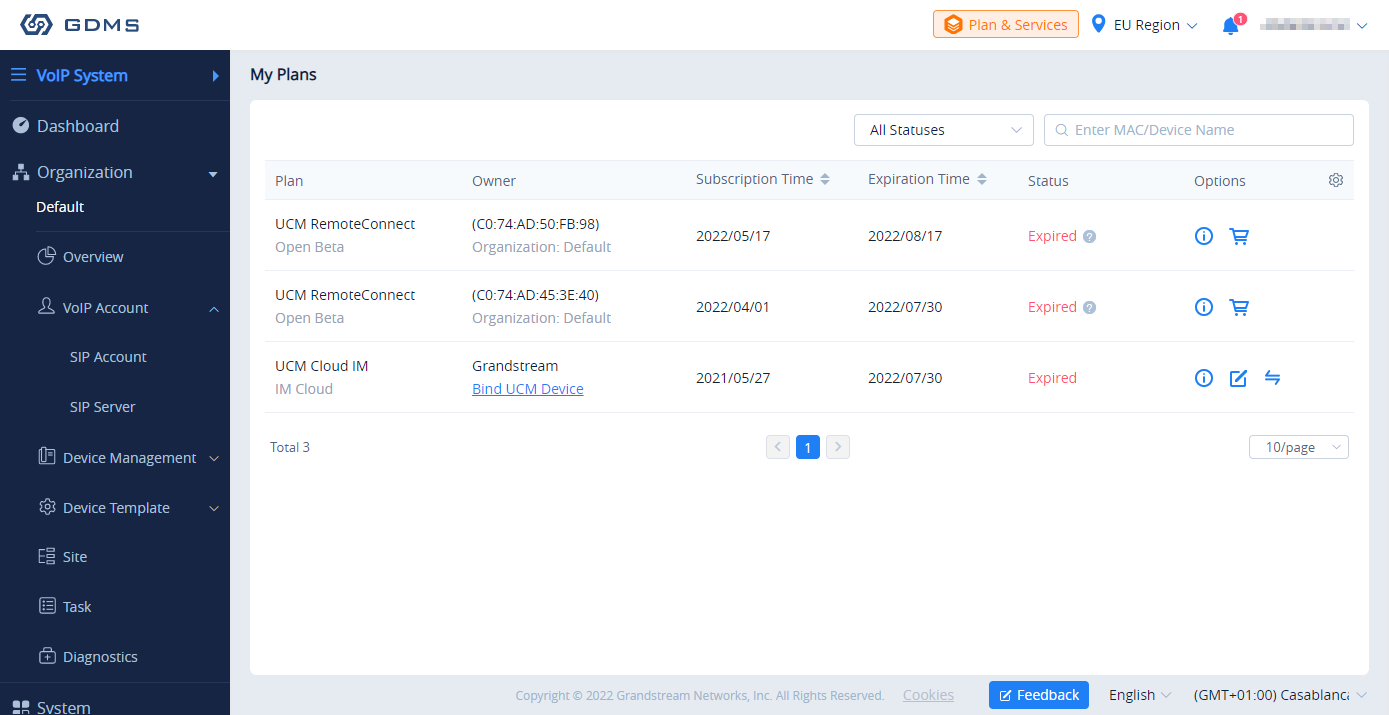
- The user can hover the mouse pointer on
 click the button
  to access the “My Plans” interface, select the previous Cloud IM service on the list of the plans, click the button
  and select the newly purchased Cloud IM service so that the UCM device data in the previous Cloud IM service will be transferred to the newly purchased Cloud IM service.
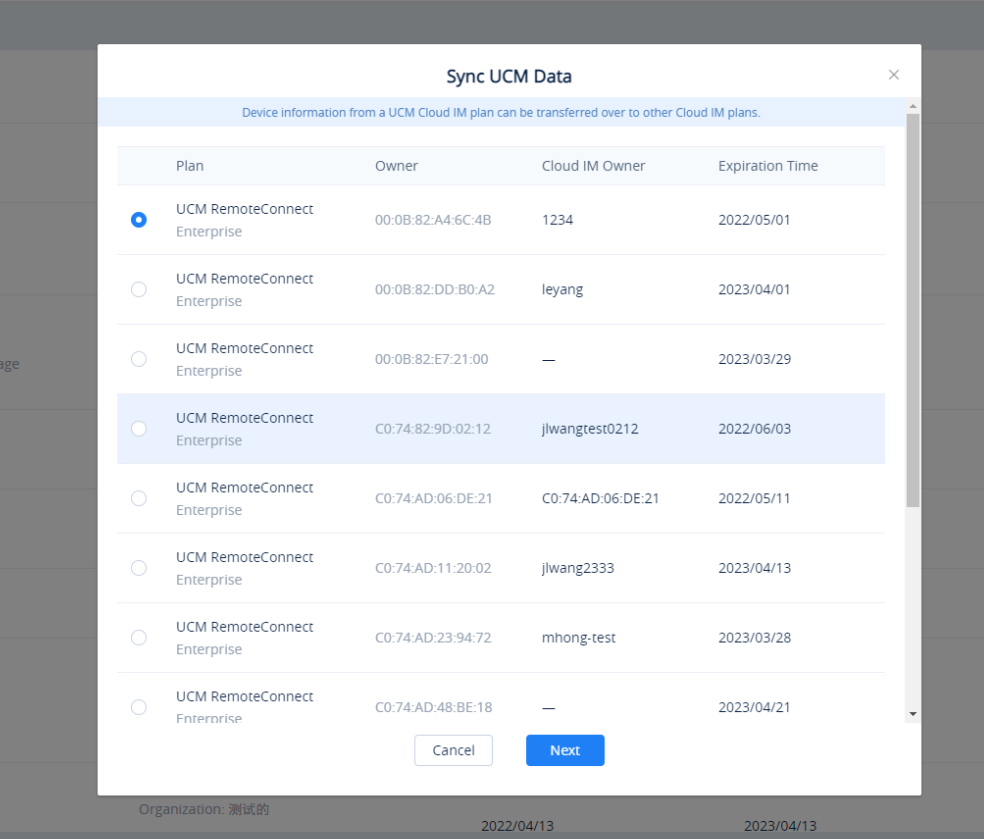
2. The user needs to select the main plan which contains the Cloud IM service, click the button ![]() to access the Cloud IM service editing interface, and the user can customize the enterprise name, and allocate the maximum storage space for the Cloud IM service.
to access the Cloud IM service editing interface, and the user can customize the enterprise name, and allocate the maximum storage space for the Cloud IM service.
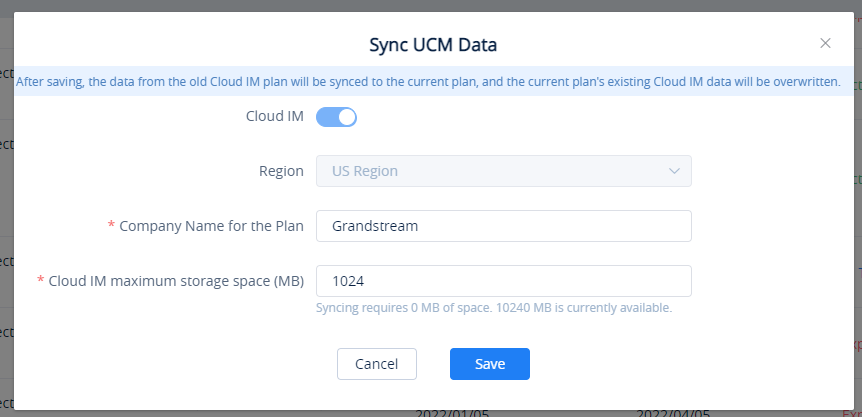
3. After clicking the “Save” button, the UCM device data in the previous Cloud IM service will be transferred to the newly purchased Cloud IM service of the UCMRC plan.
Purchase Service
Users can purchase one or more UCM RemoteConnect plans and assign them to the corresponding UCM63xx devices. If the user wants to purchase a UCM RemoteConnect plan, the user needs to contact the device distributor to learn more details about the plan and purchase the plan. The GDMS platform does not provide the purchasing service online. Users can purchase one or more UCM RemoteConnect plans and assign them to the corresponding UCM63xx devices.
Note:
If the user cannot contact the device distributor, the user can access the “UCM Devices” list -> Plans or by hovering on ![]() the clicking on
the clicking on ![]() to view the “My Plans” list and click the button
to view the “My Plans” list and click the button ![]() to access purchasing interface. Then, the user can click the “Help” button so that the GDMS platform will inform the device distributor to contact the user as soon as possible.
to access purchasing interface. Then, the user can click the “Help” button so that the GDMS platform will inform the device distributor to contact the user as soon as possible.

View My Plans
Click on the Plan and Services ![]() on the upper right corner, the click on
on the upper right corner, the click on ![]() . This page displays all purchased plans by the current enterprise.
. This page displays all purchased plans by the current enterprise.
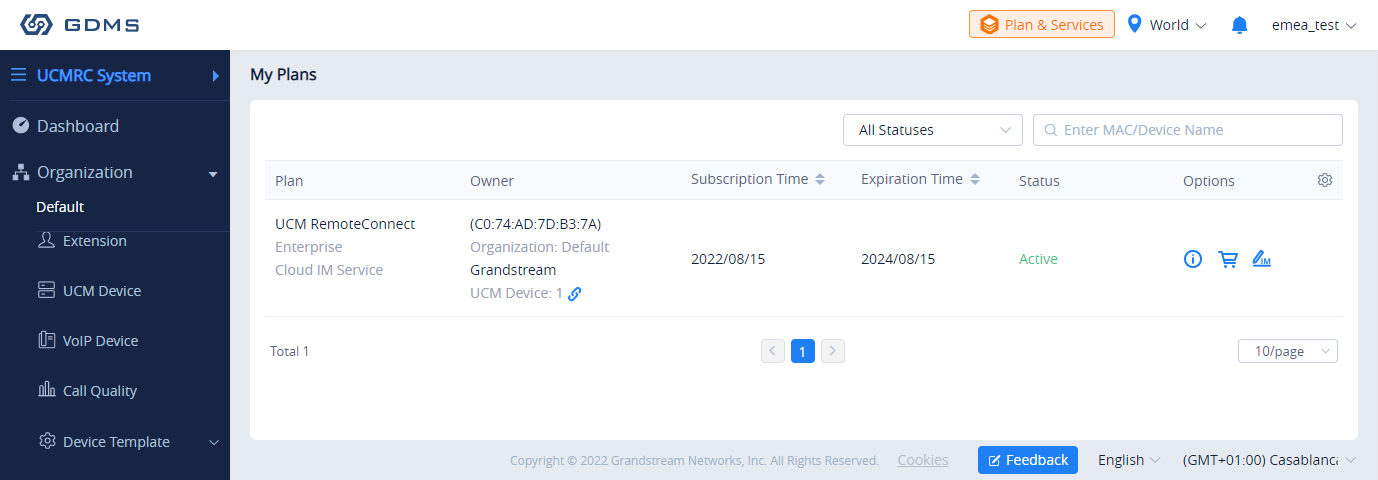
View all plans on the Plans menu:
- Active
- Expired
- About to expire (Less than 15 days from expiration date)
- Invalid (The plan has been revoked or has not been approved)
- In trial (The plan is a free trial plan)
Notes:
- If the user can see icon
 , it means the Add-on Plan will expire soon.

- If the user can see the icon
 , it indicates that the plan will expire soon. Please renew or upgrade the plan as soon as possible.
View Plan Details
On My Plans interface, select a specific plan and click on the button ![]() to view all order history of this device.
to view all order history of this device.
- Users could check the ID, Plan, Transaction, Type (upgrade/renew/purchase), Subscription Time, and Expiration Time.
- The user can view all the additional plans under the current plan, as well as the record of orders of the additional plans.
- The plan details contain the main plan and the add-on plan.
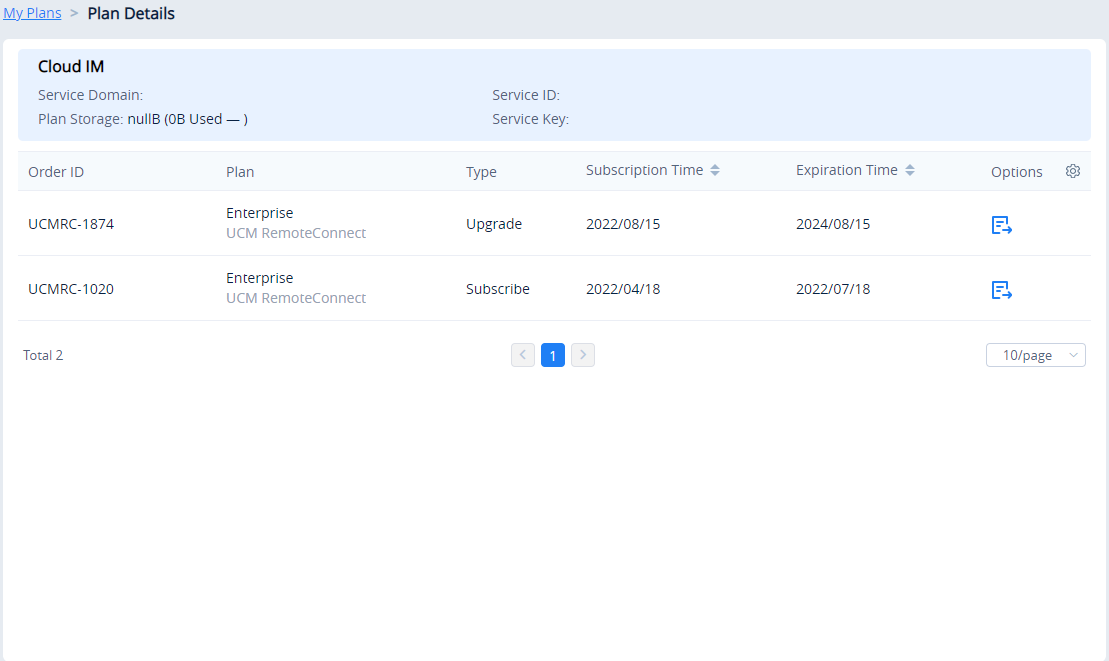
Export Receipt
The user can download the receipt for a specific plan renewal or upgrade from the plan details page.
- View all plans for My Plans menu.
- Select
 of the plan of which you want to export the receipt
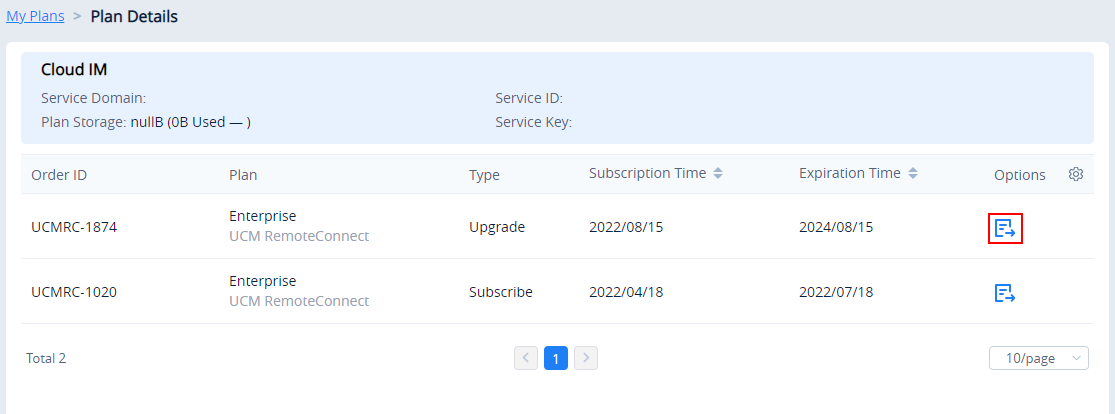
The receipt will be downloaded as a PDF file and below is an example of a receipt
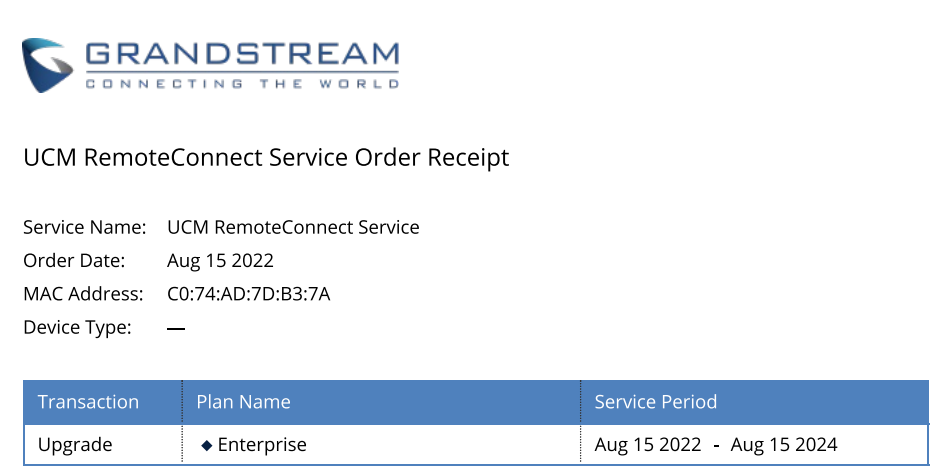
Renew/Upgrade Plan
If the user wants to renew the current UCM RemoteConnect plan or upgrade it, the user needs to contact the device distributor to learn more details about the plan and renew or upgrade the plan.
- Please click on the name of your plan, then select
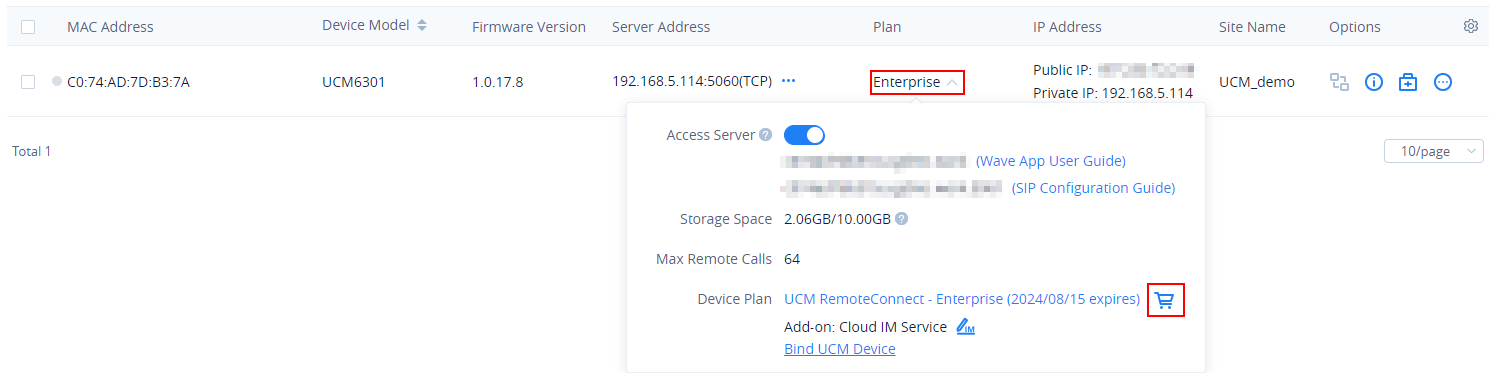
2. This window will appear, please select “I want to purchase a UCM RemoteConnect plan, but I cannot contact the dealer.
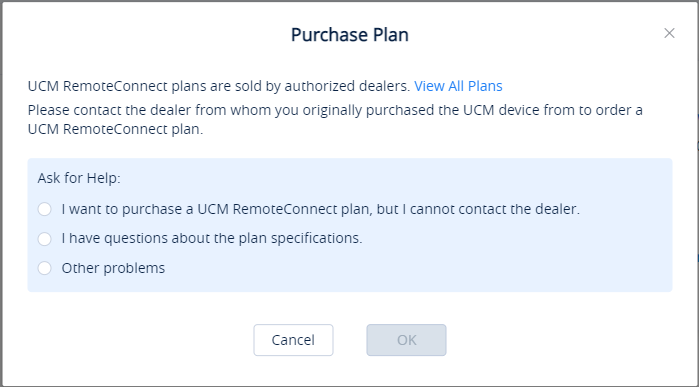
3. Fill in the form with the corresponding information:
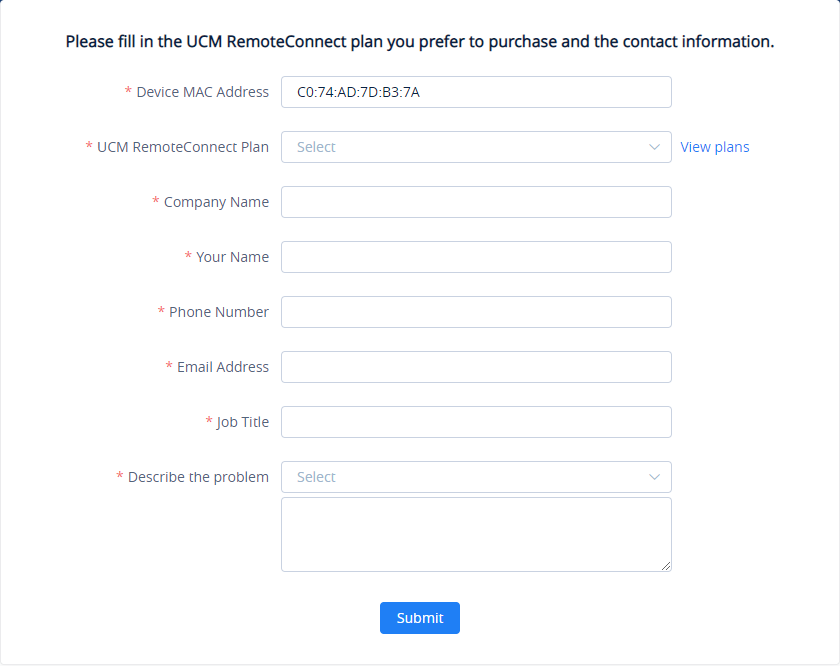
Device MAC Address | Enter the address MAC of the IPPBX device that you wish purchase/renew/upgrade the RemoteConnect plan for. |
UCM RemoteConnect Plan | Choose the RemoteConnect plan that you want to purchase/renew/upgrade to. For more information about RemoteConnect plans, please visit: https://ucmrc.gdms.cloud/plans |
Company Name | Enter the name of the company. |
Your Name | Enter your full name. |
Phone Number | Enter your phone number. |
Email Address | Enter your email address. |
Job Title | Enter your job title. |
Describe the problem | Give details of the problem you have encountered. |
Plan Expiration Notice
If the plan in the account will be expired after 15 days or already expired, the user will receive a notification through registered email.
An example of plan expired email notification:
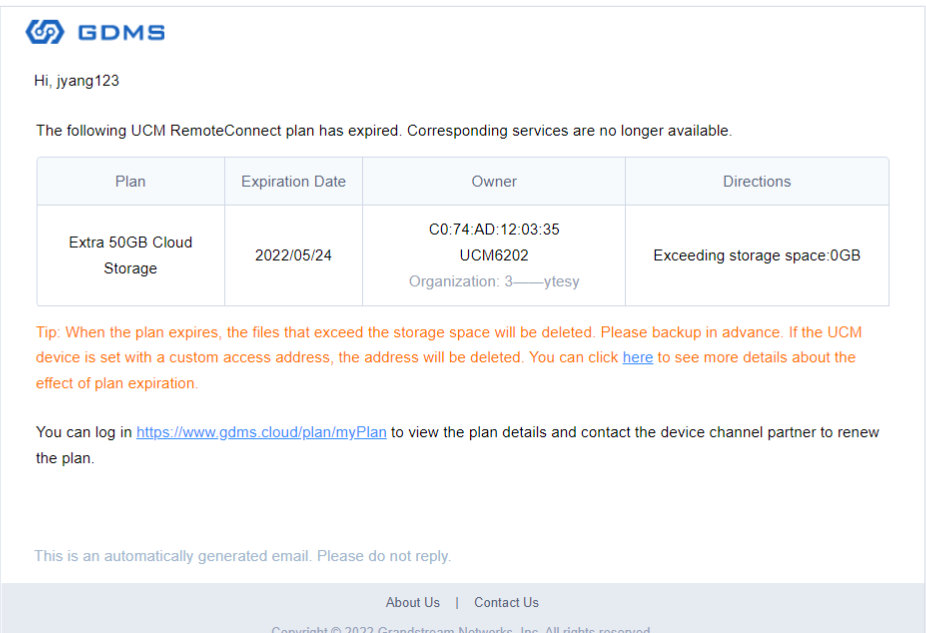
MULTI-FACTOR AUTHENTICATION
GDMS Multi-Factor Authentication (MFA) is the simple and best security practice method that adds extra protection to account username and password. When MFA is enabled, the user will be required to enter the login username and password (the first security method) and an authentication code (the second security method) from the MFA device when they log on to the GDMS platform. These multiple methods will improve the security of the settings and resources of your GDMS account.
Users can purchase supported physical devices or virtual MFA devices to enable MFA for GDMS accounts.
- Virtual MFA Device
Virtual MFA Device is an application that runs and simulates physical devices on mobile phones or other devices. Virtual MFA device will generate a six-digit code based on a one-time time-synchronized cryptographic algorithm.
When logging into the GDMS platform, the user must type in a valid code from the specific device. Each virtual MFA device assigned to the user must be unique. The user cannot type in the code with another user’s virtual MFA device code for authentication. Since the virtual MFA device may be executed on an unsafe mobile device, it may not provide the same level of security as a physical MFA device.
- Physical MFA Device
A physical MFA Device is a device that can generate a six-digit code based on a one-time time-synchronized cryptographic algorithm.
When logging into the GDMS platform, the user must type in a valid code from the specific device. Each physical MFA device assigned to the user must be unique. The user cannot type in the code with another user’s physical MFA device code for authentication.
MFA Device Standards
|
Virtual MFA Device |
Physical MFA Device | |
|
MFA Device |
Refer to table 2 |
Purchase physical MFA device |
|
Cost |
Free |
Price by supplier |
|
Physical Device Standard |
Use your smartphone/tablet/PC which can execute applications that support open TOTP standards to install virtual MFA device |
The physical device supports open TOTP standards. It is recommended to use the devices from Microcosm manufacturer. |
|
Function |
Support multiple tokens on a single device |
The financial service institutions and IT enterprises use the same model of the device. |
Download Virtual MFA Application
Install virtual MFA application for your smartphone/tablet/PC from your device’s app store. The following table lists some applications that are suitable for multiple kinds of smartphones.
|
Android | |
|
iPhone | |
|
Windows Phone |
Enable MFA Device
To enhance security, it is recommended that users can configure Multi-Factor Authentication (MFA) to help protect GDMS resources. Users can enable MFA for GDMS accounts.
Authenticator App
Prerequisite: Users need to install a virtual MFA application on the smartphone/tablet/PC before enabling a virtual MFA device.
- Log in to the GDMS platform with your account number, click on the name at the upper right corner, and access the personal information page:
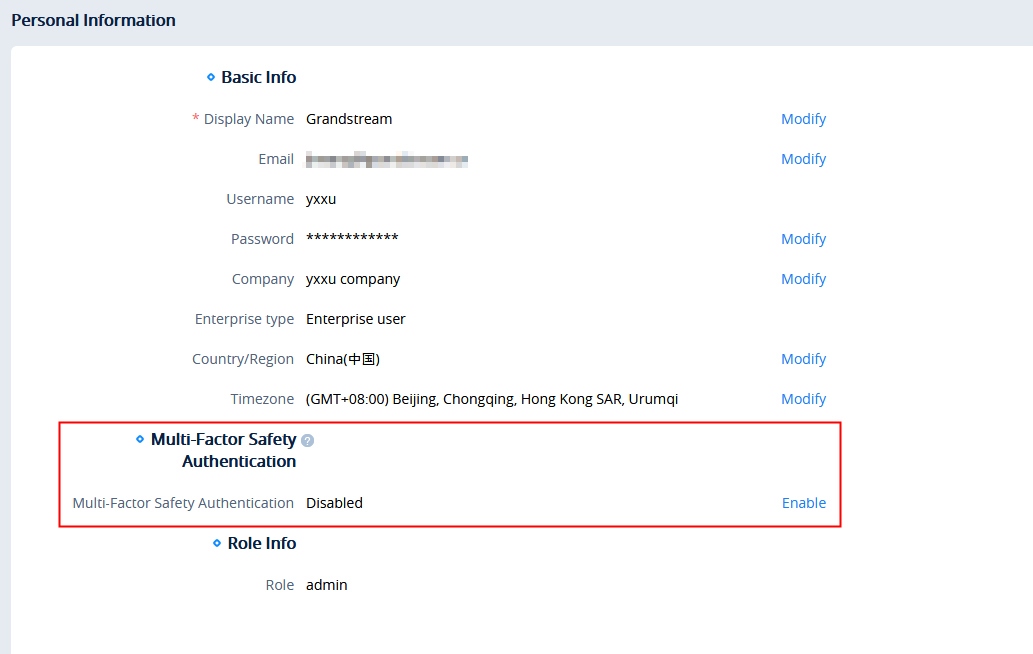
- Click to enable the “Multi-Factor Safety Authentication” option and select to use “Virtual MFA Device” on the pop-up window, then click the “Next” option to continue.
- Then, it will generate and display the configuration information of the virtual MFA device, including QR code graphics. This figure represents the configuration of the virtual MFA device as a secret key, users can scan the QR code to finish setting the virtual MFA device. Users can also input the secret key manually into the smartphone/tablet/PC to finish setting virtual MFA devices if your smartphone/tablet/PC does not support scanning QR codes.
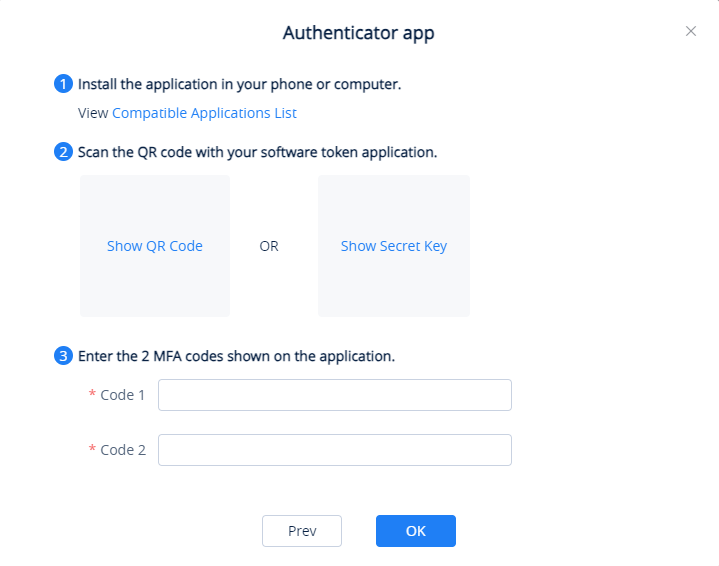
- Open virtual MFA application in your smartphone/tablet/PC, ensure that the application in your smartphone/tablet/PC supports scanning QR code, and then perform one of the following actions below:
- If the MFA application in the smartphone/tablet/PC supports scanning QR code, the user can use the application to scan QR code to finish setting virtual MFA device. For example, the user can select the camera icon or scanning QR code option to use the device’s camera to scan the QR code.
- If the smartphone/tablet/PC does not support scanning QR codes, the user can click on the “Show secret key” option and input the private secret key manually in the MFA application.
- When the operations above are completed, users can use the virtual MFA device to generate one-time passwords.
In the MFA secret code box Code 1, the user enters the one-time password which is displayed in the virtual MFA device currently. Then, wait for 30 seconds so that the virtual MFA device will generate a new one-time password, the user enters the second one-time password in the MFA secret code box Code 2.
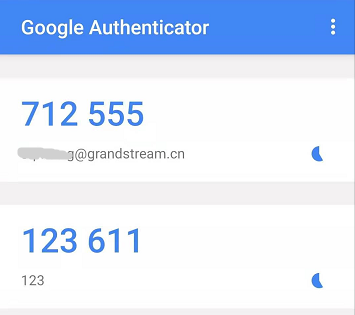
- Click on the “Start Verification” option to start to verify the password. When the verification is passed, the GDMS account and the virtual MFA device have been bound successfully. When the user tries to log in to the GDMS platform, the user must input the MFA device code.
Hardware TOTP Token
Prerequisite: The user needs to purchase the physical MFA device before using this verification function.
- Log in to the GDMS platform with your account number, click on the name at the upper right corner, and access the personal information page.
- Click to enable the “Multi-Factor Safety Authentication” option and select to use “Physical MFA Device” on the pop-up window, then click the “Next” option to continue.
- Enter the interface below to bind the physical MFA device with the GDMS account:
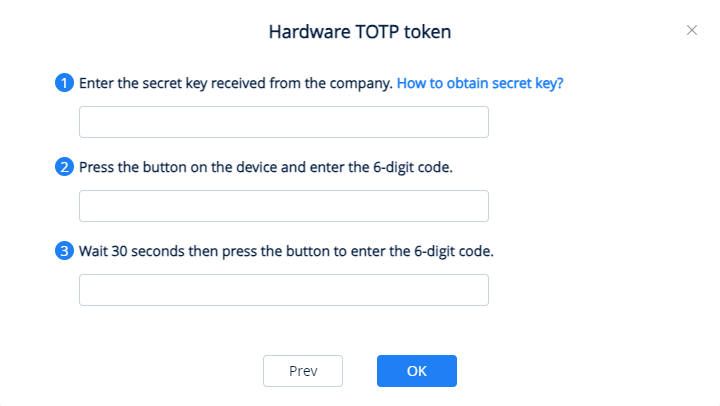
- Input the secret key of the device. Please contact the manufacturer for the secret key.
- In the MFA secret code box Code1, the user enters the six-digit one-time password which is displayed in the physical MFA device currently. The user needs to press the button on the front of the physical MFA device to display the secret code. Then, wait for 30 seconds and press the display button on the front of the physical MFA device again, so that the MFA device will generate the second six-digit one-time password. The user needs to enter the second one-time password in the MFA secret code box Code 2.
- Click on the “Start Verification” option to start to verify the password. When the verification is passed, the GDMS account and the physical MFA device have been bound successfully. When the user tries to log in to the GDMS platform, the user must input the MFA device code.
Enable FIDO Security Key
FIDO security keys are an authentication hardware which are provided by third-party companies, e.g., Yubico. These devices use complex encryption algorithms to ensure a safe authentication into your GDMS accout.
The user can select “FIDO Security Key” as a method of multi-factor authentication. When this method is selected, the user needs to connect the FIDO hardware to the computer and configure the hardware as prompted for authentication.
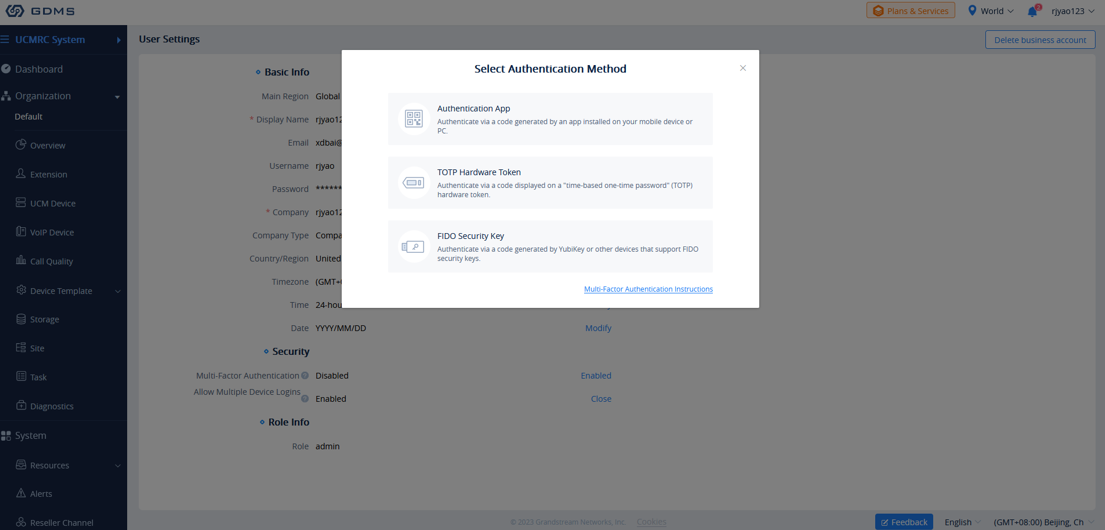
Remove MFA Device
If the user does not need to proceed with MFA verification, the user can remove the MFA device and restore the normal login authentication method.
- Log in to the GDMS platform with your account number, click on the name at the upper right corner, and access the personal information page.
- Click the “Remove” button to remove the MFA Authentication function for the current GDMS account.
Lost MFA Device/Invalid MFA Device
If your MFA device is lost or does not work properly, you can remove the MFA device first and then re-enable the new MFA device.
Method 1: If your GDMS account is a sub-account, you can contact the main GDMS account to remove your multi-factor authentication from the User management page. After removal, you can log in to the GDMS platform with the password, and then re-enable the new MFA device.
Method 2: If your GDMS account is the main GDMS account and you cannot log in to the GDMS platform, you can contact our Technical Support, provide your relevant information to our Technical Support, and they will help you remove the multi-factor authentication (Our Technical Support will send the removal email to the user and the user needs to input account password and check removal).
API DEVELOPER
GDMS platform opens API interfaces for public users. Users can apply for API Developer to use the services. Users can click to view the details about API interfaces.
API document access address: https://doc.grandstream.dev/GDMS-API/
- Click on “API Developer” on the menu on the left side and click to apply for API Developer.

- Click on “Apply for API Developer”, the GDMS platform will assign the API Client ID and secret key to the GDMS account, and the GDMS account can use the API Client ID and secret key to invoke the API interfaces.
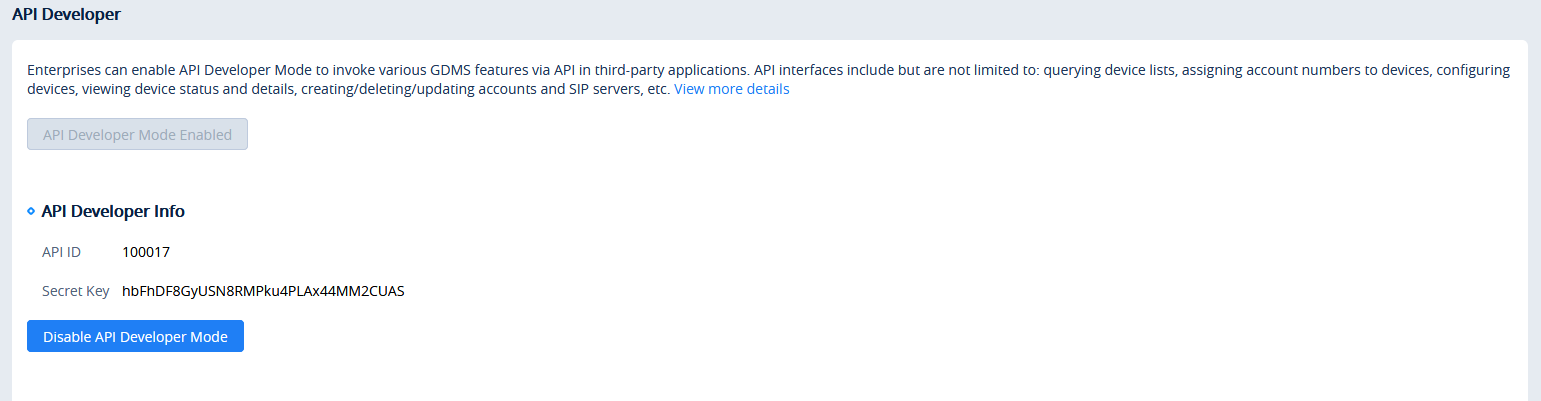
- If the user wants to disable the API Developer feature, the user can click on “Disable API Developer” to stop invoking the API interfaces.
Notes:
1. Call API Address:
The API Address is https://{gdms_domain}/oapi/xxx
- If your GDMS account is in the US region, the {gdms_domain} can be filled with www.gdms.cloud
- If your GDMS account is in the EU region, the {gdms_domain} can be filled with eu.gdms.cloud
2. When the API Developer is disabled, the previous API secret key will be invalid, the user cannot invoke the GDMS interfaces. If the user tries to re-apply for the API Developer feature, the system will assign another secret key to the GDMS account.
ABOUT GDMS
Users can view GDMS “System Version”, “Server information”, and “Supported Models and Firmware” by clicking on System 🡪 About GDMS.
- “System Version” includes:
- GDMS Version: The current version of the GDMS platform and the “Release Notes” link.
- App Version: iOS and Android application version and QR codes to scan to download the app.
- “Server Information” includes links to:
- “Supported Models and Firmware” includes the supported products and the minimum/recommended firmware version.
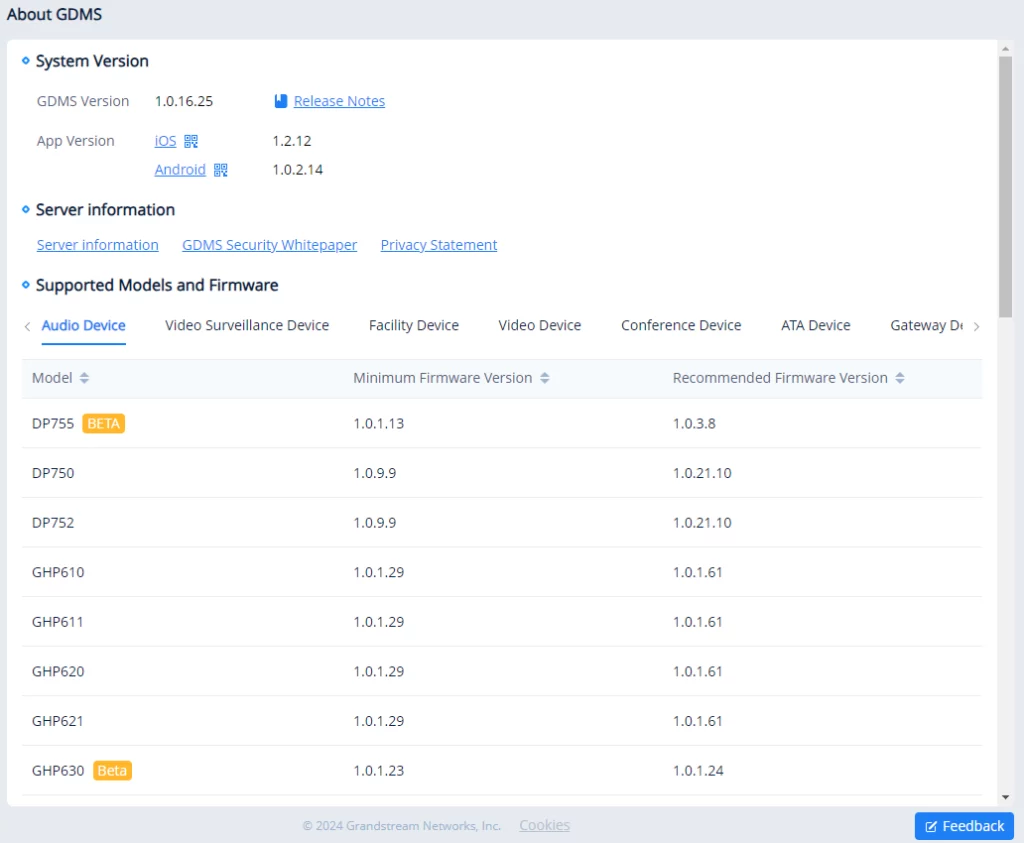
The GDMS platform supports the following languages:
- English, Chinese, Spanish (Spain), Spanish (Latin America), French, Greek, and Arabic.
CHANGELOG
Version 1.0.16.25
- Added support for GCC all-in-one products in the GDMS and supported cross-system management for GCC devices. [Supported Devices and Requirements]
- The “UCM device” module in the UCMRC System has been renamed to “PBX Device”. [PBX Device]
- Supported to view and subscribe to the latest firmware of the CloudUCM, and users can view the release notes of the CloudUCM. [Firmware Update Notification Settings]
- Supported to set a specific organization to the default organization. [Default Organization]
Version 1.0.16.9
- Added CloudUCM System. [CloudUCM System]
Version 1.0.15.15
- No major changes.
Version 1.0.14.14
- GDMS and GWN.Cloud can now be merged into one account to manage all Grandstream devices using one account. [Main Functions Overview]
- The user can now quickly switch between VoIP System, UCMRC System, and GWN.Cloud System. [Main Functions Overview]
- Added “Account Security” module which includes password security settings, login timeout, and multi-factor authentication for all the users. [Account Security Settings]
- Improved requirements for password rules. [GDMS Account Registration]
- Added “Return Device” and “Reclaim Device” features on the Reseller Channel page. [Return Device] [Reclaim Device]
- Moved the “Reseller Channel > Subchannel” module to “Users > Associated Company” for management. [Associated Company Management]
- Added the “Region Settings” module to open or close certain regions. [REGION MANAGEMENT]
- Optimized the login page, User management page, Personal Settings page and Reseller Channel, etc.
Version 1.0.13.21
- Added DP755 model on the support list of the GDMS platform. [About GDMS]
- Added “Account Active” option on the “Add Account” page and “Edit Account” page under the “SIP Account” module. [Add SIP Account] [Edit Account]
Version 1.0.13.15
- Add FIDO U2F multi-factor authentication method. (GDMS platform mobile apps do not support this feature) [Enable FIDO Security Key]
- Added ability for the administrator to forcibly enable multi-factor authentication for sub-users, and remove multi-factor authentication for sub-users in batches. [Enable Multifactor Authentication For a User]
- Integrated GUI Config Tools. Users can quickly create GUI Config files on the Resource Management page and parameters configuration page. [GUI Config File]
- Added new features for VoIP devices on the parameters configuration page: Print MPK Sticker, select firmware path or upload firmware from the firmware list, and move up and down the tables. [Device Parameters Configuration]
- Supported copying model templates and group templates to another organization. [Copy Model Template]
- Supported creating permanent firmware upgrade task and it can take effect on newly added devices [Add Task]
- Added ability to edit the custom firmware files. [Edit Custom Firmware File Info]
- Added the SSH remote diagnosis switch in Diagnostics module for devices (Currently only supported by GRP260x). [SSH Remote Capture]
- Added the following updates in the UCM device details statistics report: Device status statistics chart and remote user registration statistics chart. The alert list is also added to the PDF report file. [UCM Device Statistics]
- Added the device model info to the alert emails and alert details. [View Alert Notification]
- Added the alert for restoring the online status of the VoIP devices.
- Added ability to set chat file size limit after enabling Cloud IM service. [IM File Limit]
- Added the following APIs: View template list and push the configuration template with a specific ID to some devices. [API Developer]
Version 1.0.12.18
- Added “RPS Management” module. Users can manage multiple RPS (Redirection & Provision Server) in a unified manner and configure RPS for device organizations. [RPS Management]
- Added ability to quickly configure RPS for the current organization on the “VoIP Device” menu. [Assign RPS]
- Added SSH access authorization to the UCM device or VoIP device for remote support to troubleshoot problems. [Manage Device via GDMS Support]
- Added ability to select whether to enable/disable GDMS cloud storage space when adding UCM device or importing UCM device to the GDMS platform. This feature is only for the UCMRC paid plan users. [UCM Device Management]
- Added ability to batch download files on the UCM cloud storage space interface. [Storage]
- Added ability to select to upgrade firmware for “All devices in this model” when creating the upgrade tasks on the “Task” module. [Add Task]
- Added ability to edit the “Alert” settings for multiple organizations in batches. [Alert Notification Settings]
- Added ability to directly upgrade firmware for the devices in the “Reseller Channel” module. [Upgrade Task]
- Added “GDMS Security Whitepaper” document and “Privacy Statement” in the “About” module. [About GDMS]
Version 1.0.12.6
- Added “By Site” option under “Device Template” module. It allows users to configure the template for a specific site and provision the devices in that site. [By Site]
- Added the “Energy Saving Inform” tab under the VoIP Device Details module. Users can configure the energy saving settings through the device configuration template. [View Device Details]
Version 1.0.11.19
- Added an add-on plan for UCM RemoteConnect service: Extra 100 Concurrent Calls. If the user purchases this add-on plan, the corresponding UCM63xx device can add the capacity of 100 concurrent calls. [Plan & Service]
- Added an option to export order receipts. Users can export the order receipts after placing the orders. [Export Receipt]
- Added an option to ask the user whether to synchronize the local configurations of the device when adding/importing VoIP devices to the GDMS platform. [Add VoIP Device]
- Added an option to ask the user whether to import the local SIP account configuration of the device when synchronizing the VoIP device’s local configuration to the GDMS platform. [Batch Import SIP Account]
- Added a new alert type for the UCM63xx device “Outbound trunk call duration usage”, and combined “Network Disk Status” and “External Disk Status” alert types to “External Disk Usage”. [Alert Notification Settings]
- Added the time range settings for “Message notification settings”, “App notification settings”, and “Email notification settings”. If the user sets the time range for alerts, the user can only receive the alert notifications during that specific period. The user can select the whole day, or a specific time period, or multiple different time periods during a day. [Alert Notification Settings]
- Supported editing resource files. The user can upload the resource file again, and leave the URL unchanged. [Other Resources Management]
- Added an entrance to view UCM RemoteConnect plan specifications on the GDMS main page. [Plan & Services]
- Added “Outbound Proxy” field for SIP accounts importing the template. [Batch Import SIP Accounts]
- Supported adding OEM devices to the GDMS platform account for management. [UCM Device Management]
- Improved the user experience on the GDMS platform.
Version 1.0.10.41
- No major changes
Version 1.0.10.23
- Added to share organizations between enterprises. Organizations can be managed by the other associated enterprises. [Share Organization]
- Added UCM-related alert types and App notification setting module. [Alert Notification Settings]
- Added an option to apply the changes to all devices when editing the “By Model” template. Added an option to remember the current setting for option “Auto Provision to Devices in”, and the option will be set following the setting for the previous model template when the user creates a new one. [Add Template]
- Optimized the “UCM Devices” interface and added the feature to apply for the free trial plan. [Add SIP Server]
- Optimized the “My Plans” interface and added the feature to apply for the Cloud IM service. [Enable Service]
- Optimized interface according to the specifications of the UCM RemoteConnect plans.
Version 1.0.9.13
- Unified the account login center. Users do not need to select US regional server or EU server for login. [GDMS Account Registration]
- VoIP System is classified by supporting VoIP device and GXW45XX Device. [Supported Device Model]
- Added search function in Set Parameters module. [Set Parameters]
- Improved the function performances in Diagnostics module. [Device Diagnostics]
- Assigned permissions to separate the different sub systems in the GDMS platform.
- Added UCMRC system module and the navigation structure has been updated. Added Dashboard module and Overview module and added displaying more UCM device status information.[UCMRC SYSTEM]
- Optimized the UCM device list. Added Overview module and Plan Details information module in Device Details module. [Figure 72: UCM Device Details]
- Added new default site when adding a new UCM device to the GDMS platform.[Add SIP Server]
- Added supporting remote access to the UCMRC, UCM permissions settings, and supporting accessing the UCM Web UI without entering a password through the GDMS platform. [UCMRC SYSTEM]
- Added managing SIP server address for UCM devices, and support configuring the advanced settings of SIP servers. [Add SIP Server]
- Added to support Spanish, Latin Spanish, French, Greek, and Arabic languages in the GDMS platform. [About GDMS]
- Added to support UCMRC and VoIP sub systems in GDMS mobile application.
- Added alert messages pushing function in GDMS mobile application.
- Supported Host/Spare functionality for UCMRC services. Users can view the Host/Spare associations in the GDMS platform and disassociate the relationship. [View/Disassociate Host/Spare UCM Device]
- Supported to allow users to diagnose UCMRC services availability. [UCM Device Diagnosis]
- Supported access to the Web UI of the VoIP devices remotely. [Remote Access to Device Web UI]
- Added time and date format settings in Personal Settings. [User Settings]
- Added the ability to convert configuration files. Supported converting the configuration file of UCM62xx to the configuration file of UCM63xx. [Convert Configuration File]
- Added to display VPN IP address in VoIP Device Details interface. [View Device Details]
- Added UCM CloudIM Service. [UCM Cloud IM Service]
- Added support to modify the UCM region. [Add SIP Server]
- Added support to synchronize UCM devices’ alert notifications to the GDMS platform. [Synchronize UCM Device Alert to GDMS]
- Added support to restore UCM backup files remotely through the GDMS platform. [Restore UCM Backup File Remotely]
- Added to support to diagnose UCM devices through the GDMS platform. [UCM Device Diagnosis]
- Added to authorize Grandstream Support to manage devices. [Manage Device via GDMS Support]
- Added Call Statistics module for VoIP devices. The SIP accounts in the devices which are using the UCM RemoteConnect service plan will report the call quality and statistical report. [Call Statistics]
- Added support to upload UCM device backup file to GDMS platform. [Upload Backup File]
- Added SMS Notification function in the GDMS platform. [SMS Notification Settings]
- Added to allow users to add UCM devices to the GDMS platform with the original password. [Add SIP Server]
- Added to support to configure multiple SIP servers for a single SIP account. [Add SIP Account]
- Added to allow users to set sending time for UCM daily statistical report. [View Statistics]
- Added to support network diagnosis and system diagnosis functions in the device diagnosis module. [DEVICE DIAGNOSTICS]
- Added to support to configure the concurrent upgrading devices amount for concurrent upgrade tasks. [Supported Devices and Requirements]
- Added WP810 to supported devices. [Add Task]
- Supported adding UCM63xx to the GDMS platform. Added PBX Device module: Remote access to UCM63xx, restart UCM63xx, upgrade UCM63xx, view UCM63xx device details, data statistics report, synchronize SIP accounts in the UCM63xx to GDMS platform, etc. [UCM Device Management]
- Added Value-added services module in GDMS platform. Supported to purchase/renew/upgrade UCM RemoteConnect Plan and UCM/User Cloud Storage Space Plan and view the order history.
- Supported to view statistics report of UCM63xx device. The system can send the daily report to the configured mailbox. [UCM Device Diagnosis]
- Supported to view the enterprise/UCM cloud storage space usage. Users can receive alert messages through a configured mailbox. [View Storage Space]
- Supported to notify users when the plan will expire soon or has already expired. The alert notification can be sent to the user through a configured mailbox. [View My Plans]
- Supported creating tasks to reboot/upgrade PBX devices. [TASK MANAGEMENT]
- Added device local configuration synchronization function. Users can synchronize the SIP accounts and parameters to the GDMS platform. [Synchronize Device Local Configuration]
- Added “Disable Push Configuration” function. Users can disable pushing the configuration to the device through the GDMS platform. [Disable Push Configuration]
- Added file type “Others” in Resources Management module. There is no file type limit if the user selects the file type as “Others”. [Other Resources Management]
- Added to allow users to manage devices with GDMS mobile application. Users can use the application to scan the bar code of the device to add the device to the GDMS platform, configure SIP accounts and view alert messages, etc.
- Added GDMS account deletion function. [Delete GDMS Account]
- Added Resource Management module in GDMS platform. [RESOURCE MANAGEMENT]
- Added Custom Ringtone configuration and involved settings. [VoIP Device Management]
- Added the function to support copy configuration. [Device Parameters Configuration]
- New independent region: EU region (for GDRP rules)
- Support GRP26XX, DP7XX, GXP21XX, GXV3380/3370/3350, HT80X, HT81X, GVC3210, GRP2616. [Supported Devices and Requirements]
- Add Sub-level organization feature.
- User’s dashboard support statistic by sites. [Device Statistics]
- User’s dashboard adds devices distribution Map. [Device Statistics]
- Added operation logs for different users and record the operation logs for each device. [SYSTEM LOG]
- Support repeating tasks. [Add Task]
- ACS server support load-balance.
- Supported Multi-Factor Authentication function in GDMS platform to provide higher security protection for GDMS account. [MULTI-FACTOR AUTHENTICATION]
- Supported to copy and paste the data from other organizations when users try to create a new organization. [Add Organization]
- Supported to transfer the devices to other organizations. [Move Device]
- Supported to divide group templates into multiple series templates, which is easier for users to configure devices in different groups. [By Group]
- Supported to delete organizations. [Delete Organization]
- Supported to filter the devices in the specific city on Device Geo Map. [Device List]
- API Interfaces. [API DEVELOPER]
- This is the initial version.