


Introduction
This guide provides detailed instructions for installing the GDS372x series Door Station using the official in-wall mounting kit. It covers multiple installation methods, including solid wall, drywall, and stud wall setups, along with precise measurements and drilling templates to ensure a secure and professional fit. The document also includes guidance for optional rain cover installation and compatible RFID card types to support reliable access control deployments.
IN-Wall Mount Installation
Solid Wall Installation
Follow the steps below to install the GDS372x Door Station into a solid wall using the in-wall mounting kit.
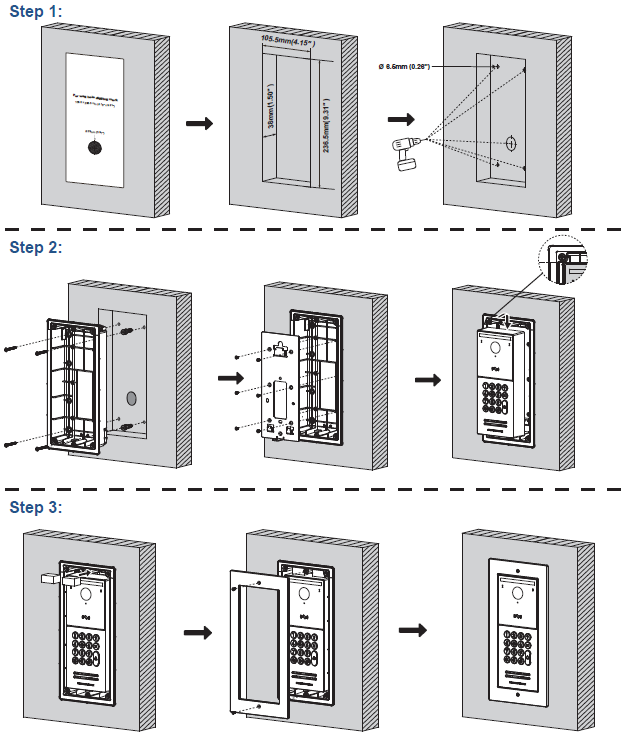
Step 1: Prepare the Wall Opening
- Mark and cut an opening in the wall measuring 105.5 × 236.5 mm (4.15″ × 9.31″).
- Drill two mounting holes of Ø 6.5 mm (0.26″) for the screw anchors.
- Ensure the depth allows the back box to fit flush within the wall surface.
Step 2: Mount the In-Wall Box and Device
- Insert the mounting box into the prepared opening and secure it to the wall using screws and anchors.
- Attach the GDS372x Door Station to the mounting bracket and tighten the screws firmly.
- Ensure cables are correctly routed and connected before final placement.
Step 3: Attach the Front Cover
- Position the front frame over the installed device and secure it in place.
- Verify that the Door Station sits flush with the wall and that the surface finish is clean and aligned.
Dry Wall Installation
Use the following steps to install the GDS372x Door Station on a drywall (hollow wall) using the in-wall mounting kit.
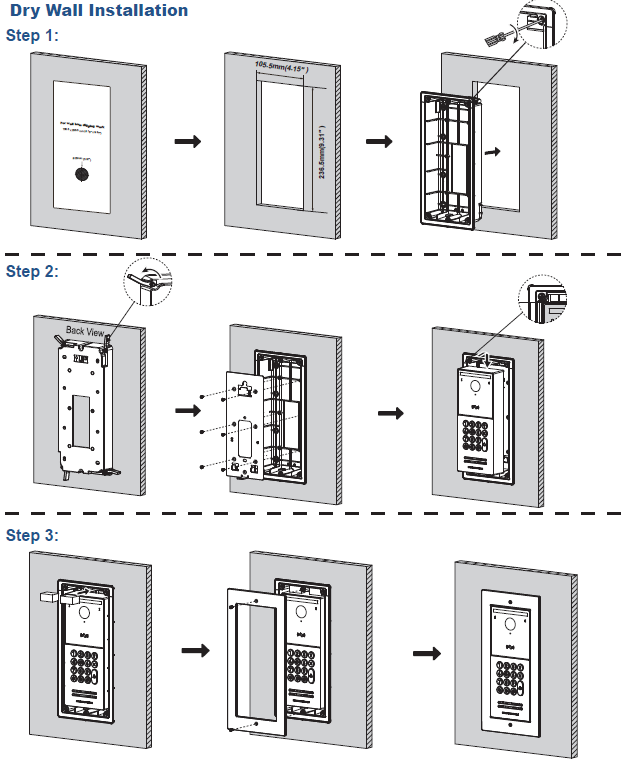
Step 1: Prepare the Wall Opening
- Mark and cut an opening in the drywall measuring 105.5 × 236.5 mm (4.15″ × 9.31″).
- Ensure the hole is clean and smooth, with enough clearance for the in-wall box.
- Insert the in-wall mounting box into the cutout and secure it by tightening the built-in clamping wings until it fits firmly against the wall.
Step 2: Mount the Device
- Connect all necessary cables through the opening before placing the GDS372x Door Station.
- Align the device with the mounting bracket and fasten it securely using screws.
- Confirm that the unit is level and that the brackets are tightly locked behind the drywall for stable support.
Step 3: Attach the Front Cover
- Fit the front faceplate over the installed unit and secure it in place.
- Make sure the surface is flush with the wall and the installation looks neat and professional.
Stud Installation
Follow the steps below to install the GDS372x Door Station into a stud wall structure using the in-wall mounting kit.
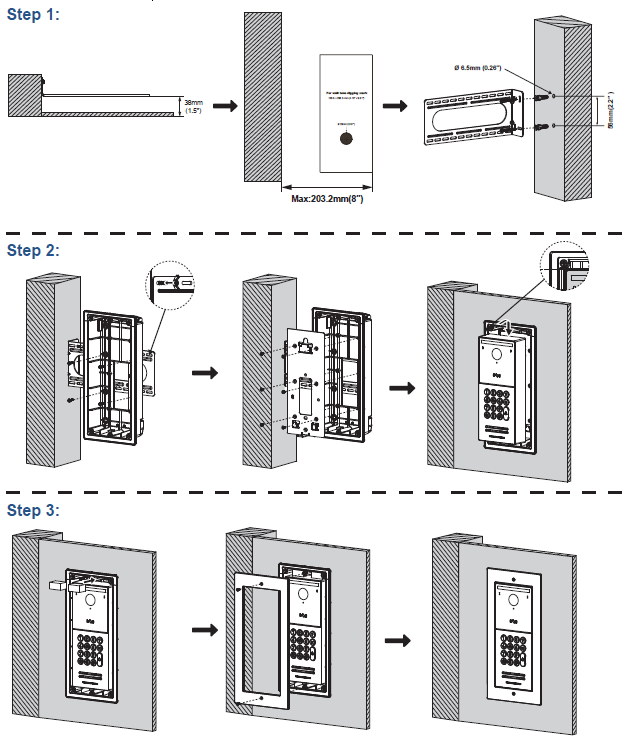
Step 1: Prepare the Mounting Location
- Choose a location between wall studs with a maximum stud spacing of 203.2 mm (8″).
- Mark and cut an opening measuring 105.5 × 236.5 mm (4.15″ × 9.31″).
- Ensure at least 38 mm (1.5″) clearance behind the wall for the in-wall box depth.
- Drill two Ø 6.5 mm (0.26″) holes for the mounting screws.
Step 2: Mount the In-Wall Box and Device
- Insert the mounting box into the prepared opening and secure it to the stud using screws and the provided brackets.
- Connect network and power cables to the GDS372x Door Station before positioning it in the box.
- Fix the device firmly to the mounting bracket and confirm proper alignment within the wall opening.
Step 3: Attach the Front Cover
- Place the front frame over the installed unit and secure it in place.
- Ensure the Door Station is flush with the wall surface for a clean, professional finish.
Rain Cover Installation
The optional rain cover provides additional protection for the GDS3726/25 Door Station when installed outdoors, preventing direct exposure to rain and debris. The cover can be installed on different wall types following the methods below.
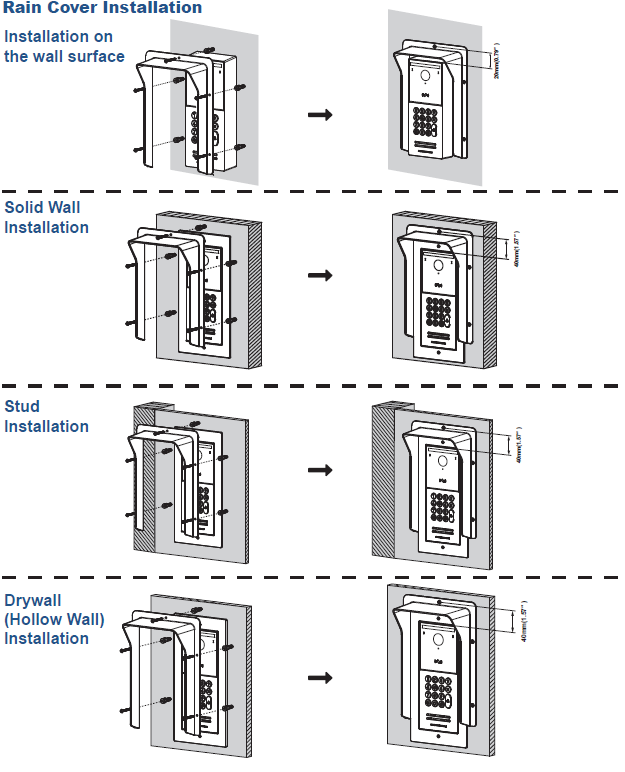
Installation on Wall Surface
- Position the rain cover directly over the surface-mounted Door Station.
- Align the cover’s mounting holes with those on the wall and secure it using screws.
- Ensure a tight fit with approximately 20 mm (0.79″) spacing from the wall surface for proper coverage.
Solid Wall Installation
- Attach the rain cover to the embedded Door Station after completing the in-wall installation.
- Secure it with the supplied screws, maintaining a clearance of 40 mm (1.57″) from the wall surface.
- Verify that the cover fully shelters the top and sides of the device.
Stud Installation
- Mount the rain cover onto the installed unit using the same screw positions as the faceplate.
- Keep a spacing of 40 mm (1.57″) between the wall and the cover for consistent alignment and protection.
Drywall (Hollow Wall) Installation
- Place the rain cover over the Door Station and fasten it using the supplied screws.
- Maintain a 40 mm (1.57″) clearance between the wall and the cover to ensure adequate protection against rain.
NFC Card
The GDS372x Door Station supports RFID-based access control using compatible MIFARE® smart cards. These cards enable secure, contactless authentication for unlocking doors and managing user access.
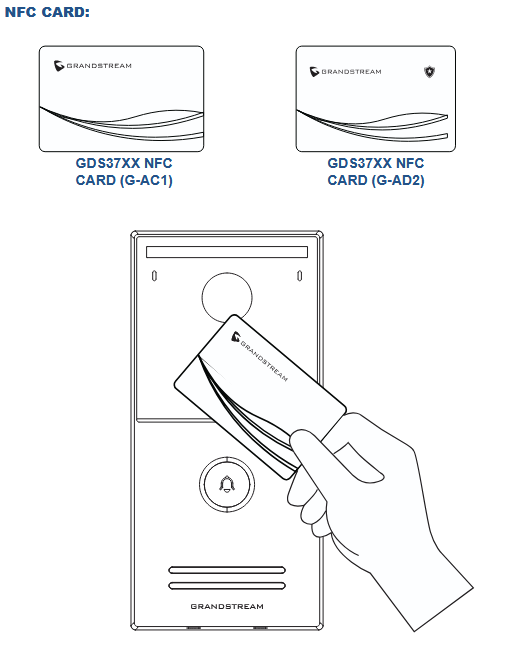
Supported Card Types
- GDS37XX NFC CARD G-AC1 – Standard RFID card providing reliable and fast proximity access.
- GDS37XX NFC CARD G-AD2 – Advanced version offering enhanced encryption and higher security for professional access control systems.
To unlock, simply hold the authorized RFID card close to the reader area on the GDS372x front panel until access is granted.
NFC FOB
The GDS37xx Door Station also supports RFID-based access control using compatible MIFARE® smart key fobs. These compact fobs provide the same secure, contactless authentication as RFID cards, while offering a more convenient form factor for everyday use—ideal for attaching to keychains and quick access management.
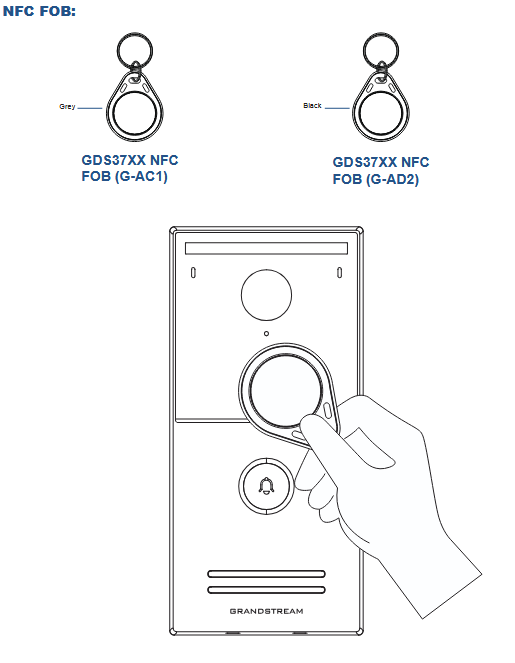
Supported Key Fob Types
- GDS37XX NFC FOB G–AC1 (Grey Key Fob) – Standard MIFARE key fob offering reliable, fast proximity detection for everyday use.
- GDS37XX NFC FOB G–AD2 (Black Key Fob) – Professional-grade key fob featuring enhanced encryption, stronger security, and improved performance for advanced access control deployments.
To unlock, simply hold the authorized RFID key fob close to the reader area on the GDS37xx front panel.
Access will be granted automatically once the device detects a valid credential.